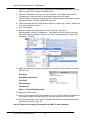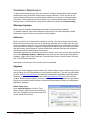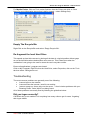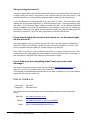
1
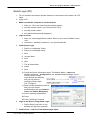
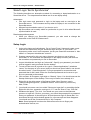
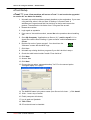
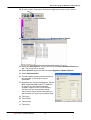
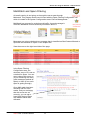
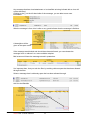
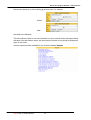
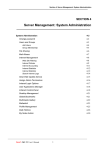
Section 2b: Using the Network - Administrators
SECTION 2B
ADMINISTRATORS
Server Set up
3
Connecting a machine to the network
4
Smart Login (PC)
5
Smart Login ‘Set to Synchronise”
6
Setup Login
Setup Synchronisation
6
7
Smart Login (MAC) v1.0.2 Mac OS-X
7
Domain Login (PC)
12
Profiles
22
eTrust Setup
14
eTrust 7.1
eTrust 8.1
Configuration of eTrust 8.1
14
16
14
Creating Users
20
Group Membership
21
File Sharing
22
Adding a Group
20
Assigning Admin Permissions
23
Assigning Intranet Permissions
24
Daily Notices
25
Creating a Category
Creating a Notice
Modifying a Notice
25
26
26
Installing Thunderbird Email on a MAC
29
Mail Aliases
32
MailWatch and Spam Filtering
33
System Reporting
36
Backup Routine
36
Backup Report
26
Web Calendar Administration
37
Managing Home Drives
39
Assigning Static IP’s by DHCP
39
Workstation Maintenance
40
Smart-Net 2.1 User’s Manual
1
Section 2b: Using the Network – Administrators
Windows Updates
Antivirus
Spyware
Empty The Recycle Bin
De-fragment the local Hard Drive
40
40
40
41
41
Troubleshooting
41
Did you logon correctly?
Can you ping the server?
If you suspect that the server is not turned on - is the power light on the server lit?
If you think you are not getting email, have you sent a test message?
How to Contact us
Smart-Net 2.1 User’s Manual
41
42
42
42
42
2
Section 2b: Using the Network - Administrators
THE ADMINISTRATORS GUIDE
Server Set up
There are four basic parts to a Smart-Net equipped school. Please familiarise yourself with
what they look like and their locations.
These are:
• The Server running the Smart-Net Software Solution
• The Network Switch and cabling
• The Internet Connection (Either Dial-Up, ADSL or Wireless link etc)
• The Workstations
Your Server is located:
Your internet connection is via:
Your ISP is:
Your main network switch is located:
Additional network switches are located:
Workstations used at this school are (OS etc):
UPS Installed?
Type:
Backup Installed?
Tape / External USB / REV Drive
The server should have been set up by a qualified Smart-Net approved technician.
The many variables will have been set specifically to your site.
Smart-Net 2.1 User’s Manual
3
Section 2b: Using the Network – Administrators
Make yourself familiar with the following information which can be
found by accessing the Server Management area and clicking on the
Server Information Icon.
Domain Name:
Server IP address:
Server Name:
Smart-Login Domain
For remote access to your server, you will need port 80 open in your router and an
external Static IP number. An ‘A Record’ (intranet.yourschoolname.school.nz) set up
pointing to your static IP will give you a web address (This is done through your Domain
Name Holder).
Connecting a machine to the network
Decide whether you will use Smart-Login (recommended method) or Domain Login.
Minimum requirement XP
Domain Login requires the machine to be joined to the Domain which will create roaming
profiles.
Smart Login is a much quicker installation and does not allow roaming profiles.
Smart-Net 2.1 User’s Manual
4
Section 2b: Using the Network - Administrators
Smart Login (PC)
1. Turn on machine and ensure that the machine is connected to the network via UTP
cable.
2. Login to XP
3. Make sure that the computer is on the network.
1. Start, run. Cmd <ok> (black window should appear)
2. ipconfig /release <enter> (you should see 0.0.0.0)
3. ipconfig /renew <enter>
4. exit (black window should disappear)
4. Login to server
1. start, run, \\saturn\applications (where Saturn is your server Netbios name)
<ok>
2. username = sysadmin, password = you should know this
5. Install Smart Login
1. D/click on “smartlogin” folder
2. D/click on “smartlogin-setup”
3. Next
4. I accept, Next
5. Next
6. Next
7. Tick all three boxes
8. Install
9. Next
10. Check the Server Information sheet. The Netbios Name - saturn and
Netbios workgroup – workgroup are our standard default settings. If your
Server name or SmartLogin Domain are different,
then you will need to
confirgure Smart Login.
Tick “Configure”.
11. Either modify the default profile or
add your own school
profile/session with your Netbios
name and Netbios Workgroup.
12. Add or update profile/session .
13. Close
14. Close “smartlogin” window.
6. Login to the Server using Smart Login
1. D/click Smart Login icon on the
desktop and log in as sysadmin.
7. Install eTrust – refer to eTrust Section page below
Smart-Net 2.1 User’s Manual
5
Section 2b: Using the Network – Administrators
Smart Login ‘Set to Synchronise”
The following describes an alternative method for connecting a laptop/workstation to a
Smart-Net server. The steps described below are for a new laptop setup.
Advantages
• One login name and password to login to the laptop and an auto-login to the
Smart-Net server. This increases security when the laptop is not connected to the
Smart-Net server.
• Microsoft synchronisation works, if you elect to use it.
• My Documents can be easily made to synchronise to your H: drive when Microsoft
synchronisation is used.
Disadvantages/Annoyances
• When you change your Smart-Net password, you also need to change the
password on the local XP/Vista account.
Setup Login
1. Login to the laptop as Administrator. Go to Control Panel, Users and create a new
user with the same name as your Smart-Net login account. IE. john.smith. It is
important to make sure it is all lowercase, just as your Smart-Net username is. Also
make it a “Computer Administrator” account.
2. Create a password for this user name, the same one that you use to login to
Smart-Net, i.e. the username and password on the laptop is exactly the same as
the username and password you use on Smart-Net.
3. Logout Administrator and login as “john.smith”. Specify your password, you should
now be logged in and you should see the desktop.
4. To test to make sure all is good so far, type in “\\saturn\applications” (substitute
“saturn” for the name of your server) and you should see some folders; one should
be called “antivir”. Close this window. If you get prompted for a username and
password then it didn’t work. Either the username/password are incorrect or you
are not connected to the network.
5. Click on Start, All Programs, right click on “Startup”, Open. You should now see the
Startup folder open on the desktop. There may be some icons already in it.
6. Right click in the white space of the Startup folder, New, Shortcut, type in
“\\saturn\netlogon\logon.bat”, (substitute “saturn” for the name of your server),
Next, Finish.
7. You should now see a new icon called “Shortcut to logon.bat” or something similar.
Right click this icon, properties, and type in “C:\” into the “Start in” box. Click OK.
8. Shutdown the laptop. Turn it on. You should see your name on the Welcome
screen or a login box. Click on your name, you should be prompted for a password.
Enter your password. It should login to XP and then auto-login to Smart-Net. You
should see the login script window appear for a few seconds and then disappear.
You should see all the connected drives in “My Computer”.
Note: Some laptops will not show the Welcome screen due to finger print
authentication devices, etc.
Smart-Net 2.1 User’s Manual
6
Section 2b: Using the Network - Administrators
Setup Synchronisation
Important note: Not everyone in the world trusts Microsoft synchronisation. If used
incorrectly, it can cause loss of data. Also synchronisation can not handle all file
types, Outlook Mail stores (.PST) and Access Databases (.MDB) are two we are
aware of.
1. Start, My Computer, Tools, Folder Options, Offline Folders. Tick “Enable Offline
Files”. Tick “Synchronise all offline files when logging on”. Tick “Synchronise all
offline files before logging off”. Click OK
2. Start, My Computer, Right Click “john.smith on Saturn (H:)” and left click “Make
Available Offline”, Next, Next, Finish, OK. It should start synchronising your H:
drive to the offline file store on the laptop. Wait until this is finished. Note: You
can share other areas of the server such as “teacherread”, “teacherwrite”, etc.
3. Close all open windows, Right click on an empty area of the Desktop, right
click, New, Shortcut, “\\saturn” (or substitute the name of your server), Next,
type in “My Offline Files”, Finish. You should now have an icon on your Desktop
called “My Offline Files”. When you are logged into the Smart-Net server, you
will see all the files and other shares you have access to. When you are offline
(at home), you will only see the offline files, IE. your H: drive
Smart Login (MAC) v1.0.2 Mac OS-X
Installation Procedure
1. As with Smart login for the PC, first check the Server Information report to find out
the Netbios name and workgroup for your school. Then make sure you are logged
on with Administrator rights.
2. Turn on the machine and ensure that the machine is connected to the network via
UTP cable
3. Make sure that the computer is on the
network.
1. In the Finder, Go, Utilities
2. Select Network Utility
3. Enter your server ip address in the ping tab. If you receive replies… then you
are connected to the network.
Smart-Net 2.1 User’s Manual
7
Section 2b: Using the Network – Administrators
4. Login to Server
5. In the Finder\ Go\ Connect to server
\eg.smb://Saturn (where Saturn is your server
Netbios name).
6. When prompted, username is sysadmin.
7. Select the Applications volume
8. Double click on the Smart Login Folder
9. Copy the smartloginosx.pkg.zip to the desktop.
10. Double click the smartloginosx.pkg.zip to explode
smartloginosx.pkg package
11. Double click the orange box to launch the installation
routine
12. Drag Applications to the trash to eject the volume
13. The installation wizard will walk you
through the installation procedure
14. Select Continue
15. Highlight HD click Continue
Smart-Net 2.1 User’s Manual
8
Section 2b: Using the Network - Administrators
16. Install screen – click Install. The
MAC may ask for local
authentication. Try admin and apple
Then click OK.
17. Install Succeeded.
18. There is no need to keep the Smart login files on the desktop
anymore so you can drag them both into the trash.
19. Configuring Easy Access to Smart Login
20. Place an alias or shortcut to Smart Login in
the Dock -Double click HD
21. Click on Applications
22. Find Smart Login and drag a copy to the
dock.
23. Control click (hold the ctrl key whilst clicking)
on the shortcut you have just made in the
Dock and choose Open at Login.
24. Configuration
Smart-Net 2.1 User’s Manual
9
Section 2b: Using the Network – Administrators
If your server is already known as “saturn” and “workgroup”, no further
configuration is required. However, if your Smart-Net Netbios name or workgroup
(refer to Server information sheet)
are different you need to modify a file on the local MAC OS-X filesystem. (Once per
machine only)
25. D/Click on the MAC hard drive icon.
26. D/Click on the Library folder
27. D/Click on the Preferences folder
28. Locate the file called “nz.co.smartcom.serverlist” and drag it to the desktop.
29. D/Click on it. Tell the MAC to open the file with TextEdit if it doesn’t open
automatically… do not use any program such as Microsoft Word for this purpose
as it may render the preferences file unsuitable. It will look like this…
Default Profile#saturn#workgroup#maclogon.v2.pl#maclogoff.v2.pl
30. Change the “saturn” to your Netbios name and change the “workgroup” to your
Netbios workgroup.
31. Save the file. Then drag it back into the Preferences Folder and replace the original
file.
32. Proxy Configuration for Safari or Firefox (Both options detailed below)
33. Select Safari then Preferences
or
select Firefox then preferences
34. On the Main tab set the home page to Intranet.your.school.nz
Smart-Net 2.1 User’s Manual
10
Section 2b: Using the Network - Administrators
35. Select the Advanced tab then under Proxies select Change Settings (Safari)
Select the Advanced tab then Network tab then select Settings (Firefox)
36. Ensure that the TCP/IP tab and the Proxies Tabs are set as per the screen shots
below. Use the IP address and port number from the Server information report.
Safari settings
Firefox settings
We recommend the use of Firefox as an Internet Browser
Smart-Net 2.1 User’s Manual
11
Section 2b: Using the Network – Administrators
Domain Login (PC)
The documentation for connecting a PC via Domain log in is available from our web
site www.smartcom.co.nz
1. Select the Support Tab, Documentation,
Workstations
2. Download How to get Windows XP to
Login to Smart-Net
3. Follow the instructions.
4. When prompted to enter the name and
password of an account with permission to join the domain,
5. The username is: root, the password is: (available on request if you don’t know
it.
Profile Management
Profile Management is used on occasions where users are logging
on to workstations with a Domain Log on. (Not Smart Logon).
A profile is created and the desktop set up with appropriate icons. ie. .A Student Profile.
When creating users, the Student profile can be assigned to that user.
In order to create a mandatory profile that we can assign users to, you must create a new
user that you can log onto a workstation with. In this example, we will create a student
profile called ‘student’.
Create a new user called
‘student.profile’. Give
them a display name and
add them to any groups
that the profile needs
access to. Also make
them a member of
‘Domain Admins’. - This
is so that you can install
software into the profile.
Now when you select the
Profile Management
icon, you should see the
‘student’ profile listed as
Unconfigured.
Smart-Net 2.1 User’s Manual
12
Section 2b: Using the Network - Administrators
In order to configure this profile,
you need to log into a workstation
as the profile user you created
Set up the desktop with all of the software, icons and shortcuts that will be required for this
type of user and log off.
This will complete the configuration of the profile.
Complete the process for other groups ie.Teachers.
Now, when creating new users, the
Profile section will give you the option
selecting from the profiles you have
just created.
Smart-Net 2.1 User’s Manual
of
13
Section 2b: Using the Network – Administrators
eTrust Setup
eTrust 7.1 (note: Vista machines will not run eTrust 7.1 and need to be upgraded
to version 8.1 see below for details)
1. Uninstall any antivirus software already installed on the workstation. If you were
a Vet antivirus school, click on Start Æ Settings Æ Control Panel Æ
add/Remove Programs and find Vet Antivirus on the list and remove the
product. Then delete the Vet folder from C:\Program files as well.
2. Restart the machine
3. Login again as sysadmin
4. If you were a Vet antivirus school, answer No to the questions about installing
Vet.
5. Go to My Computer, “Applications on Server (V:)", antivir, etrust7.1. You
should see various files including a "green monster" entitled eTrust.exe or
eTrust.
6. Double click on the "green monster". You should see the
"Welcome" screen with the MOE logo.
Etrust.exe
7. Click Next.
8. Uninstall any existing Antivirus programs if you didn't do this in step a.
9. Check the radio button beside "Install eTrust Antivirus".
10. Click Next.
11. Answer Yes
12. Click Next
13. Choose the top option “managed desktop” for PC or the second option
“managed laptop” for Laptop.
14. The NetBIOS name is the server name (from Server info sheet….) Click Install.
15. Wait… have a cup of coffee.
16. Finish (computer will reboot).
17. Log in again as Sysadmin
18. Test eTrust
19. eTrust should now be installed.
Smart-Net 2.1 User’s Manual
14
Section 2b: Using the Network - Administrators
20. Rt click on the eTrust logo in the bottom Right hand corner of your screen.
21. Select Launch eTrust Antivirus
22. Select the Scanner tab and then select Realtime Monitor Option
23. Under the Advanced tab, remove the tick from Protect Network Drives then
OK. The server will do this job.
24. Select Scanner again and this time select Signature Update Options.
25. Select Download Now.
26. This will update signatures from the server
and set them up correctly for future
downloads.
27. Remember we can be of assistance, but the
MOE Help Desk 0800 CALLICT (0800 22
55 42) line is a free service and has
excellent support for the eTrust product.
Tell them you are a Smart-Net school.
They have a copy of these instructions as
well to assist you should you need the help.
28. Test Login
29. Test Intranet
30. Test Internet
31. Test email.
Smart-Net 2.1 User’s Manual
15
Section 2b: Using the Network – Administrators
eTrust 8.1
Before installing eTrust on the local machines, ensure that you have the updated
version 8.1 on your server. If not, register from our web site www.smartcom.co.nz
eTrust ITM 8.1 Antivirus Software Installation to have the updated version loaded on to
your Smart-Net server. Once you have received an email from Smart Computers
Systems with confirmation that eTrust 8.1 has been successfully installed on your SmartNet server, then you can proceed with the instructions below.
Vista machines are only compatible with eTrust ITM 8.1
1. Login to the local machine as an Administrator on XP/Vista
2. If the machine you are installing eTrust 8.1 on is Vista, you will need to copy
and paste the etrust81 folder to the machines C:\ drive as Vista will not allow
you to install from a network path. Now open the etrust81 folder and move to
Step 4.
3. My Computer, Applications on Server (V:/antivir/etrust81). You should see a
window similar to the following one
4. Double click on the "green monster". You should see the
"Welcome" screen with the MOE logo.
Smart-Net 2.1 User’s Manual
16
Section 2b: Using the Network - Administrators
5. Uninstall any existing
Antivirus programs. Click
next.
6. Check radio button “Managed Desktop”, tick Install Antivirus and tick Install Pest
Patrol if you wish for Pest Patrol to be installed as well.
If you are unsure of your server name, check the Server Management, Server
Information report. NetBIOS name
:
Tick Reboot PC Now then click ‘Exit’.
Make sure that you delete the eTrust
from the machines C:\ drive after
installation
folder
Smart-Net 2.1 User’s Manual
17
Section 2b: Using the Network – Administrators
Configuration of eTrust ITM 8.1
1. If eTrust ITM 8.1 is not already started, go into ‘Start’ Æ ‘All
Programs’ Æ CA Æ eTrust Æ eTrust ITM Æ Realtime
Monitor. Otherwise double click on the eTrust icon in the
system tray.
2. This screen will show you all you need to know. You can see if your signatures
are up to date.
3. To update your settings, click on “Change your Update Settings here”. Setup
how often you want the update eTrust 8.1. If computers are on at times when
they are not being used, that’s a great chance to grab the updates. To do an
update now, click on ‘Download Updates Now’.
Smart-Net 2.1 User’s Manual
18
Section 2b: Using the Network - Administrators
4. Check to make your net-bios name is in the Download Source List.
7.
8. To test eTrust, right click on the eTrust logo in the system tray (bottom right hand
corner of your screen) and select Launch eTrust ITM.
9. This is what the web interface looks like for eTrust. You will not need to
configure any thing else in eTrust.
Smart-Net 2.1 User’s Manual
19
Section 2b: Using the Network – Administrators
Creating Users
Users are created and managed in the Sever management area.
All of the icons in this area are covered in more detail in the On Line Manual Section 4
Server Administration.
1.
2.
Users and Groups
Add User
Things to know before setting up users:
•
Define a protocol for user names. Some examples are: firstname.lastname,
firstinitial.lastname, firstname.last initial etc do not use capitals or apostrophes
If you have a large group of users, you may decide to enter the Display Name differently.
Eg. Teachers surnames are all in Capitals, students surnames are lowercase.
This will help to distinguish groups from a list of users (very helpful particularly in the web
calendars.)
Smart-Net 2.1 User’s Manual
20
Section 2b: Using the Network - Administrators
Group Membership
This area is where you select the parts of the network that the user will have access to.
The following description of the Network drives will help you to decide which groups users
should belong to.
H:Home
Every user has their own Home area on the server, to save
documents which are not accessible by anyone else.
This is where you save things you don’t want to share.
L:Libraryfiles
Library is where the library data is stored.
M:SMS
SMS is where the School Management System data may
be stored eg Musac or Integris.
O:Officefiles
P:Galleries
Officefiles is where office staff share information with the
principal. Users who are members of the “officefiles” group
also have the ability to save files into Teacher Read. e.g.
Financial records. GST, BOT.
Galleries is where multimedia files (e.g. videos, music) and
photos can be stored. Files stored in this area are viewable
by all users from the multimedia gallery icon in your
intranet.
R:TeacherRead
Teachers have read-only access here and can not save
files in this location e.g. “originals”, NAGs, Templates.
(Note: Only users with Officefiles access can save files
here).
T:TeacherWrite
Teacherwrite is where teachers share files.
S:StudentRead
U:StudentWrite
Students have read-only access here and can not save
files in this location. (Note: Only users with Teacher or
Officefiles rights can save files here.).
Studentwrite is where students share files.
V:Applications
X:Utils
Y:CDRoms
Applications is where Smart-Net required applications are
stored. You may add yourUtiles own applications here too.
eg. printer drivers (Note: Only users with Domain Admin
rights can save files here).
Utils is where Smart-Net required utilities are stored. You
may add your own utilities here too, eg. spyware tools
(Note: Only users with Domain Admin rights can save files
here)
CDRoms that support running from a network drive can be
copied or installed to this location.
You can create other areas if you need them (refer File Sharing below).
Smart-Net 2.1 User’s Manual
21
Section 2b: Using the Network – Administrators
File Sharing
Smart-Net comes with a pre configured set of shares that should cater to
the needs of most schools. Should you wish to add an additional share,
then first you must create a group to add users to, then add a share and specify which
areas that the share will have access to.
Adding a Group
In the Users and Groups area, Add
Group
Once completed, select Manage Groups
Click on the people icon to show
group members.
Add Multiple Users will allow you to select a number of users to be added to this group.
Back up and select the File Sharing icon.
Smart-Net 2.1 User’s Manual
22
Section 2b: Using the Network - Administrators
Add File Share
The newly created group will now appear in
the Read and Write Access lists.
You can also limit the number of users that
are able to access this area at one time.
Now that the group and rules for sharing have
been set up, please email Smart Computer
Systems Ltd at [email protected] to
have a Drive letter assigned to it.
Assigning Admin Permissions
Initially, the sysadmin user is the only one to have access to the Server Management area.
The principal and the system administrator should also have some rights here.
Log in to the Smart-Net intranet as sysadmin and select Server Management then Assign
Admin Permissions
Select the username from the dropdown list.
Under each icon there is a tick box. Tick all appropriate icons.
When finished, go back up to the top of the page and select
Save Permissions
The server Management link will only show for users that have been assigned at least one
icon in here.
Smart-Net 2.1 User’s Manual
23
Section 2b: Using the Network – Administrators
Assigning Intranet Permissions
By default, users will have all of the following icons available on the
Smart-Net Intranet.
The User Applications Manager will allow you to select which icons will be available.
From the dropdown list, select an individual user or a group of users
Tick the icons that you would like to appear
And select Save Application Settings
Note: If a group has been selected, any users added to that group later will have the
standard default settings of ALL icons available.
Smart-Net 2.1 User’s Manual
24
Section 2b: Using the Network - Administrators
Daily Notices
The Daily Notices appear underneath the Intranet icons for all users.
To add notices, a user must have been assigned rights to the Daily Notices section.
(refer to Assigning Admin Permissions above) . In this section, users with rights can add,
modify and delete any notices or categories. Notes can be created to be displayed on one
day or on one or more consecutive days.
Creating a Category
First of all, you will need to create categories for your notices to be displayed in.
Click on ‘Create Category’.
Enter the category name and select Create.
Global categories will show on everyone’s desktops.
Remove the tick from the Global box and the groups will
appear to choose from.
Create a Teachers Category with only Officefiles and
Teachers selected.
Daily Notices put in this category will only be available to
users that log on as a teacher.
All categories show in the box below.
Smart-Net 2.1 User’s Manual
25
Section 2b: Using the Network – Administrators
Modifying a Category
You can change the name of a category by clicking on modify icon.
Change the category name then click ‘Update’
Deleting a Category
When deleting a category, all the notices inside that category will also be deleted. You will
get a warning first. If you want to keep the notices, edit them and assign them to a different
category first. Once a category is deleted, there is no going back!
Creating a Notice
Click ‘Create Notice’. A new box will appear at the bottom of the ‘Daily Notices’ box. Enter
in the notice subject, content and select the category to be displayed in.
The start and end dates default to today. If you would like the entry to be displayed for
several consecutive days, change the expiry date.
Remember to
click ‘Save’.
Modifying a Notice
To modify a current notice, click the notices modify icon.
The information will popup in a box where ‘Create notice’ was. Change the required
information then click save.
Smart-Net 2.1 User’s Manual
26
Section 2b: Using the Network - Administrators
Deleting a Notice
All notices will automatically be deleted 30 days after the expiry date.
To manually delete a notice, just click on
the notice’s ‘Delete’ icon.
Confirm that you would like to delete the notice.
Notices can be deleted in bulk by checking the boxes and clicking ‘Delete Checked’.
Searching
There are three ways you can search for a notice. Firstly you can enter a few characters or
a word such as ‘giraffe’. The notice subject and content will be searched for the word.
You are also able to search by the notice start days. If you would like to see if there are
any notices that start on a particular day, select only the ‘Start Date’ for your date search.
If you would like to find notices that start between two dates then choose both the ‘Start’
and ‘End’ dates.
Smart-Net 2.1 User’s Manual
27
Section 2b: Using the Network – Administrators
Sorting
When notices are displayed,
you are able to sort them by
clicking on their column
headers. When a column is
sorted, it will show as a
darker colour than the other
headers.
You may also choose how many notes you would like to view at one time. The default is
10 notes at a time, but you do have the option to view 20 or all notices at once.
Smart-Net 2.1 User’s Manual
28
Section 2b: Using the Network - Administrators
Installing Thunderbird Email on a MAC
The following has been tested to be working on MAC OSX (including Leopard)
The following applies to Smart-Net 2 only
Step.1
Download Thunderbird for OSX by going to http://www.mozilla.com/ and follow the
links
Note: be sure it is for MAC OSX
1. Log onto the Smart-net server via Smart Login
2. Assuming you saved the download to your desktop you
should now see “Thunderbird 2.0.0.12.dmg” on your
desktop. Double click on this .dmg file to start the
unpack process. Click on Open and Accept the
agreement
3. You should now see a window with a Thunderbird icon in it. Open up another
window and go to the “Applications>Thunderbird>MACOSX” folder. Drag the
Thunderbird icon from the first window into the
“Applications>Thunderbird>MACOSX” window. You should now see a progress
bar as the files copy.
4. Now that the file has finished copying to the server close the original
Thunderbird window that opened after we double clicked the .dmg file.
Smart-Net 2.1 User’s Manual
29
Section 2b: Using the Network – Administrators
5. Drag the Thunderbird icon from “Applications>Thunderbird>MACOSX” to your
dock to make a link to open thunderbird with.
6. Click the Thunderbird icon in your dock and wait, it may take some time for
Thunderbird to open up the first time but be patient as it will open.
7. You should by now see an “Import Wizard” window asking if you want to import
settings and mail, CLICK ON CANCEL and wait
8. Once prompted with the “New Account Setup” window click “Cancel” again and
“exit” when asked to confirm.
9. Quit Thunderbird
10. Browse to Macintosh HD>Users>Current User (eg. Teacher or
Administrator)>Library>Thunderbird> Now open the file profiles.ini with text
edit (click once on profiles.ini then go to “File” menu and down to “Open with”
and select “Textedit”
11. Make the following changes to the Path line in the file: Your Profiles.ini should
look like this:
[General]
StartWithLastProfile=1
[Profile0]
Name=default
IsRelative=1
Path=../../mounts/homes/email
12. Save and close the file
13. Now you can click on the Thunderbird icon in your dock to load Thunderbird off
your server mailbox. Be patient as this can take a while for the first time.
14. You should now see your normal Thunderbird Inbox and personal folders that
you see when using it on a PC.
Setup of Smart-Net roaming Thunderbird for MAC is now complete.
Smart-Net 2.1 User’s Manual
30
Section 2b: Using the Network - Administrators
Things to remember to make Thunderbird function smoothly
•
Always make sure you are logged on to the server before starting Thunderbird
•
Do not attempt to run Thunderbird from two different locations at once, (eg.
Logged into the server in more than one place at once.)
•
Be Patient when attempting to use Thunderbird in a MAC + PC environment.
Explanation: Thunderbird will be quite slow to run after changing platforms, for
example if you run Thunderbird on a PC then run it on a MAC it will be slow to
open the first time, but should open a lot faster from then on until you run it on a
PC again. This also works in reverse, for example if you use Thunderbird on a
MAC then run it on a PC it will also be slow to open the first time.
•
If your school uses wireless, be sure to close Thunderbird and log out of the
server before moving around the school, this can help to prevent the problem of
Thunderbird being stuck open.
Smart-Net 2.1 User’s Manual
31
Mail Aliases
A mail alias, is a created email address that has end user(s) specified
for the receipt of emails.
There are 3 set up by default:
Principal, Postmaster and ITContact.
The Postmaster alias will receive all mail that is incorrectly addressed or that is sent to
users that don’t exist (spam)
The user that is the Postmaster should be assigned Server Management rights to E-mail
Aliases and Mailwatch.
When the postmaster receives legitimate mail that was intended for someone else, they
should forward the email on to the correct user.
If the reason for the mail coming to the Postmaster was an error in the spelling, and it has
happened before, the Postmaster can set up an email alias so that it will be correctly
delivered in future.
I.E. leticia is frequently miss spelled letisha
Create an alias called letisha and make the
recipient the real Leticia
Distribution lists can also be set up here.
A distribution list set up in the mail aliases will allow the list to be used by anyone from any
internet capable computer in the world.( – not just from within the school)
Add Mail Alias will bring up the screen to enter a new alias.Eg. bot. for the Board of
Trustees. (No capitals here)
Tick the boxes for the users that are members of
the Board of Trustees
All other BOT members can have their external
email addresses entered (one at a time) in the box
at the bottom.
Select add after each one.
[email protected] is now a valid email address.
Messages sent to this address will be copied and sent to every member of the distribution
list.
Smart-Net 2.1 User’s Manual
32
Section 2b: Using the Network - Administrators
MailWatch and Spam Filtering
All emails coming in and going out through the server pass through
Mailwatch. This program works hand in hand with the Spam Filtering Configuration icon
which is located in the System Configuration area of Server Management.
MailWatch is a program for analyzing mail traffic. As each message is
received, MailWatch records summary information about it.
Messages are colour coded and any message that is classified as Bad Content/infected or
Spam will be identified as “spam” in the Subject line.
View the score on the right hand side of the page
In the Spam Filtering
Configuration area, the
minimum score of 5 is set as
a default for Spam. You can
opt to change this score up
(if you are having too many
good messages marked as
spam) or down (if too much
spam is getting through).
Once Mail watch has been
checking mail for a few
weeks, and you are happy
that the scores are set
correctly, you can opt to
have High Scoring Spam
mail deleted rather than
delivered.
Smart-Net 2.1 User’s Manual
33
Any message that has a bad attachment or is classified as being infected with a virus will
not be delivered
Clicking in the [ ] on the left hand side of the message, you are able to see more
information:
Who the message is from, this is often a very good indicator that the message is fictitious.
A description will be
given of the spam score
If the message was blocked and should have been delivered, you can release the
message here or redirect it to a more suitable recipient.
Mail scanner will have the message stored in quarantine.
It is important then, that you train the filter by marking obvious spam that has been allowed
through the filter.
Select a message that is obviously spam but has been allowed through.
Add it to the Blacklist
Smart-Net 2.1 User’s Manual
34
Section 2b: Using the Network - Administrators
Remove the detail up to and including @ and all of the To: address.
before…
after…
Now add to the Blacklist.
This will enable the filter to use the information not only to block further messages being
delivered from that Domain name, but also uses the content to sort similar messages as
spam in the future.
Various reports are also available to you under the header Reports.
Smart-Net 2.1 User’s Manual
35
System Reporting
The Smart-Net server creates and emails out the following reports to ITContact:
• Raid Status – every night and if triggered or when the server is restarted.
• Virus Scan – nightly scans the Smart-net server and reports the current signatures.
• Backup Reports – Tape Backups = 2 reports.
o Amanda - This reports on last nights backup. It is quite a technical report,
but, you should look for OKs.
o Root report. This deciphers the Amanda report.
• Unibackup for External USB HDD backups= unibackup.
Backup Routine
The Smart-Net server is programmed to automatically backup all Network drives nightly
provided there is media available to backup onto.
First thing every morning, Ensure that you have removed last nights backup media. This
should be stored in a fireproof safe or taken off site. Connect the new media ready for
tonight’s backup.
If the media is not changed, the server will write over the latest backup
Backup Report
The Backup report option in will allow you to view the status of recent
backups.
Select Unibackup or Tape, then check the most appropriate report.
Smart-Net 2.1 User’s Manual
36
Section 2b: Using the Network - Administrators
Web Calendar Administration
A user that has Web Calendar rights (group membership in users and groups) will have a
few extra icons available to them in Web Calendars. This should be restricted to only one
user on the network as this will enable that user to delete entries on another user’s
calendar.
Select Admin from the menu to access these administrative tools.
System Settings will determine how the calendar will look and work for the whole
network.
Make the changes here before
you change any individual user
settings.
Non User Calendars Tab
Smart-Net 2.1 User’s Manual
37
Once these basic settings have been adjusted, you will be able to create non user
calendars. Display the list at the top or bottom, it’s your choice.
Other
Email
Colours - to suit your school
It is ideal to set up a couple of Non User Calendars – School Events and Holidays.
And have them layered on to users own calendars in another colour.
In Admin select Users then Non User Calendar Tab
Select the Add New Non User
calendar link
The Calendar ID has to be unique and
have no spaces
Each individual that wishes to have the information layered on their own calendar must
add it as a layer. Instructions for layering this calendar appear in Section 2a. Using the
Network – Users
For more information on how to use the calendars for bookings etc, contact
[email protected]
Smart-Net 2.1 User’s Manual
38
Section 2b: Using the Network - Administrators
Managing Home Drives
When a user saves information in their Home Drive, it should be considered private or
confidential to all other users. As an administrator however, you sometimes need the
ability to ‘Manage Another Users Home Drive’.
On the user edit screen, select the drop down list for Managed By:
This will allow you to make another group of users able to view/edit the home drive of that
user.
To access the home drive go to Start Æ Run Æ and enter \\Saturn\userhomes$
(where Saturn is your server Netbios name)
This area is invisible without the $ and is only then viewable by users that are in the
correct group.
For a Mac user, go connect to server smb/192.168.1.1/userhomes$....(where 192.168.1.1
is your server IP number).
Assigning Static IP’s by DHCP
This is w here a machine or printer is required to have a static IP address. This can be
achieved best by having the server automatically DHCP’ing the same number rather than
setting a static IP on the local machine.
You will need to know the MAC address for the machine.
Go to the IP address report in Server management
Find the machine by the Host name (this is the Computers name). Then copy the MAC
address
Go to DHCP Configuration
and select the DHCP Reservations.
Paste the MAC Address in to the Hardware address field and fill in the other fields.
Specify the IP address that you would like to assign to this machine.
Smart-Net 2.1 User’s Manual
39
Workstation Maintenance
To gain the best performance from your network, windows workstations require regular
maintenance to be performed to keep them running efficiently. This is not due to you
having a Smart-Net Server; the same applies whatever your server or network system
may entail. This maintenance will also improve your network performance and reduce
internet traffic. The maintenance steps below should be performed at least monthly.
Windows Updates
Ensure that all windows workstations have had all critical updates installed.
To update windows, open Internet Explorer then select Tools then Windows Update.
Follow the prompts. Ensure you install all critical updates.
Antivirus
Ensure you have up to date antivirus software running. You should check this regularly.
Most antivirus products have an icon in the system tray that you can right-click on to get
version / signature dates etc from. Check that the data files are no older than a few days.
Remember there is always a ‘window of opportunity’ between new viruses being created
and the solution being released. Treat all emails from unknown sources with suspicion.
Likewise emails with attachments from anyone.
Remember before doing a manual virus scan or using a virus removal tool under WinXP to
turn off the Windows System Æ Restore or the virus may be restored at a later date by
windows. (Right Click on My Computer, Properties then select System Restore Tab and
tick Turn Off System Restore).
Remember to remove the tick once the scan is completed.
Spyware
This is one of the biggest causes of extra call / traffic charges on your internet account as
well as using up a lot of bandwidth on your internet connection. If you are using Windows
XP then visit www.microsoft.com for their free AntiSpyWare Application called Windows
Defender. If you are running Win98 then visit www.lavasoftusa.com for their Adaware
product. Beware some products out there actually infect your workstation with spyware to
get you to purchase the paid version to clean it off! Remember to keep your antispyware
application updated!
Delete Temp Files:
Open Internet Explorer. Click on Tools,
select Internet Options then on the General
tab in the Temporary Internet files area click
on the ‘Delete Files’ button.
Smart-Net 2.1 User’s Manual
40
Section 2b: Using the Network - Administrators
For Mozilla Firefox. Click on Tools, select Options, then the Privacy tab click on Clear
Now (For more information about what is being cleared – select Settings first).
Empty The Recycle Bin
Right Click on the Recycle Bin and select ‘Empty Recycle Bin’.
De-fragment the local Hard Drive
This speeds up hard drive access by having all the data in a logical position without gaps
etc on the hard drive where deleted files once were etc. This is best done when the
workstation is not going to be used for some time as it may take a while.
Ensure all applications / programs are closed.
Click on My Computer, Right Click on the Hard Drive, select Properties, click on the Tools
tab then select ‘Defragment now’.
Troubleshooting
The most common problems are generally one of the following:
• I cannot logon to the network.
• I cannot access the internet / email is not working.
• I cannot access my Home drive on the server. – Also includes problems with your
‘Roaming Profile’ under WinXP not being found.
All of these problems are usually fixed by following the guidelines below.
Did you logon correctly?
CAPSLock key is not enabled? It is surprising how many calls we get for users ‘forgetting’
their logon details.
Smart-Net 2.1 User’s Manual
41
Can you ping the server?
A ping is a signal that is sent out via the network cabling to the server which if the server is
on and running will send a reply back to the computer that the ping was sent to. This
verifies if the server is running and the network cabling / switches are connected ok.
If your workstation is running Windows XP then click on Start / Run then enter ‘cmd’
(without the quotes) and press Enter. A DOS window will open. Type the following ‘ping
192.168.1.1 and then press Enter. Please note that 192.168.1.1 is the default Smart-Net
Server IP address, but yours may be different. If the cabling is correct etc you should see
the replies to the ping. If no replies are received then check your network cabling and that
the server is turned on. Type ‘exit’ then press Enter to exit the DOS window.
If you suspect that the server is not turned on - is the power light
on the server lit?
If the light appears to be on, another good test is to see if you can open the CDRom tray.
If there is no light or the CDRom tray doesn’t open, the server will be off. Turn it on. The
server may have been shut down by a power outage or by the UPS
If the server is on but you have no Internet connection or no email, restart the router. This
is best achieved by unplugging the power adapter and reconnecting it after 10 seconds. If
this is the issue, it will take a few minutes to come back on again.
If you think you are not getting email, have you sent a test
message?
We have an automated service. Send a test message to [email protected] and
make sure you put your school name in the subject line.
The message is automatically bounced back to you when it reaches us. If you have had no
reply within 30 minutes, contact us.
How to Contact us
Local calls:
Freephone:
982 2233
0508 982 2233
Our website and Forum addresses are in the Bookmark section on every Smart-Net
server.
Web Site:
Forums:
Email:
http://www.smartcom.co.nz
http://www.smartcom.co.nz/forums/phpBB2/
office or [email protected]
Smart-Net 2.1 User’s Manual
42