1
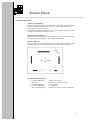
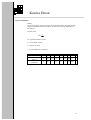
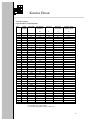
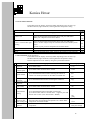
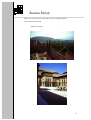
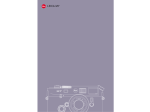
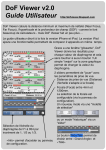
Konica Hexar
Personal additions to the user manual
Frank van de Wiel
January, 1999
Konica Hexar
Preface
I have compiled some information which I could find in the original manuals
from Konica, the internet and magazines and have put it together in this small
booklet. It took me some time to gather this information and maybe it saves you
some time.
Most information is valid for the original Konica Hexar standard model and
probably for some newer models too but there may be some small differences.
This booklet is certainly not complete and additional information is always
welcome.
I owe an upgraded Konica Hexar standard model camera myself and enjoy using
it very much.
PS. I am in no way related to Konica co-operation.
For suggestions and remarks send an e-mail to: [email protected]
Contributions by:
Peter van de Haar:
Hexar Silent Photography, Hexar S-mode (sort of, anyway...)
2
Konica Hexar
Table of Contents
Preface................................................................................... 2
Table of Contents................................................................... 3
Pictures of the camera ............................................................ 4
Did you know..?..................................................................... 5
Tips and tricks........................................................................ 6
Hexar Silent Photography....................................................... 7
Hexar S-Mode (sort of, anyway...) ......................................... 8
Flash photography.................................................................. 9
Camera software upgrade......................................................11
Viewfinder information.........................................................13
Tables
Hyperfocal distances ....................................................14
All camera settings.......................................................15
Reference cards
General camera functions (all modes) ..........................16
Camera functions (mode dependent) ............................16
Reset camera functions.................................................17
Error situations.............................................................17
Flash modes .................................................................18
HX-14 auto flash distance range...................................18
Other Information
Books ..........................................................................19
Internet sites.................................................................19
Some pictures
Andalusia (Spain, 1994)...............................................20
3
Konica Hexar
Pictures of the camera
Front view
Top view
View inside the camera
4
Konica Hexar
Did you know..?
How many different Hexar camera models there are?
There are currently five different models of the Konica Hexar camera.
• Standard (Black)
• Date (standard model with date back)
• Classic (Chrome)
the Hexar Classic has one extra function than an upgraded standard
model Hexar namely automatic bracketing!
Three exposures +- up to 2 EV in 1/3 EV steps. This may be of interest
for those who make slides. But this camera may be hard to find (special
anniversary model 120 years Konica 1993, only 2000 cameras are
made and half of it stayed in Japan).
• Rhodium (Pink)
The Rhodium has all the functions identical to an upgraded Hexar
standard model.
• Hexar Silver
the Silver has all the functions identical to an upgraded Hexar standard
model but no silent mode.
It is possible to upgrade the camera software of a standard model Hexar
If you own a Konica Hexar standard model, you can upgrade your camera with
four extra functions. Therefore, you have to return your camera to Konica
support services. They will upgrade and check your camera completely for
about $30.
The extra functions you get are:
•
multiple exposures
•
one step exposure setting in manual mode
•
guide number setting
•
infra red film setting
There is some kind of identification of your negatives
On my standard Hexar model there is a small triangular piece cut away from the
negative frame in the camera. Therefore, this is visible on all my negatives.
It is at this location where during the production process of the camera the
opening for the film frame is made.
5
Konica Hexar
Tips and tricks
How to press the buttons
This is of course personal but for me it is the best way to use the camera.
Use your middle finger to press the release button and your index finger to press
the up or down button.
This way you can look through the viewfinder while adjusting settings.
It will also reduce the possibility that one of your fingers covers the photocell on
the front side of the camera.
Filters and short focussing distance
The camera was designed to get the highest quality pictures possible and that
means no filters. Lucky for you the Konica engineers where kind enough to add
a filter screw thread (size 46mm).
If you really want to use filters, be careful. When you try to focus at a distance
of 60cm your camera may display an error message EEE on the LCD panel.*
This is caused by obstruction of the lens by the filter mounted.
This message stays there even when you have switched off your camera.
Removing the battery will clear the LCD panel error message.
You have to remove the filter before using your camera again.
If you want to use filters, focussing at a distance 60cm, return your camera to
Konica support service. They will add a very thin metal ring to your camera
which will keep the filters just out of range of the autofocusing lens and the
problem will be solved.
Adjust for exposure compensation by using the up/down button or by adjusting
the ISO speed.
* This problem may be solved on the newer models but I have no information
about this.
Using non DX films
The camera automatically sets the ISO value to that of the loaded DX-film.
There maybe situations where you may want to adjust filmspeed and you don't
like to do this with the exposure adjustment (0+-2 EV).
One way to do this is tape the filmcartridge DX-code and set manually the ISO
value you want.
- Switch your camera to A mode and press the Select button for more than 1
second.
- Adjust the ISO value with the Up or Down button.
The camera will use this ISO value for all next films until you load a DXcoded film or remove the battery.
When using a filmcartridge without a DX code you may have to press the
release button before filmloading starts.
Saving battery lifetime.
When not using the flash unit for a long time switch of the power of your flash
unit.
6
Konica Hexar
Hexar Silent Photography
With the Silent Mode, the Hexar is an extremely quiet camera. Some
circumstances may however require even less obtrusive operation (e.g.
ceremonies in church, candid photography). The following considerations will
be helpful in achieving this.
The causes and solutions to noise from the Hexar
Focussing
The noise of focussing is lessened by the Silent Mode. It can be eliminated by
manually selecting focus in advance, and sticking to that. Combined with a fixed
Aperture for a hyperfocal setting, this approach would be most effective.
Aperture
The noise of the aperture opening up or closing down is not affected by the
Silent Mode. It can be eliminated by manually selecting the aperture in A-mode
or M-mode in advance, and sticking to that. Combined with a fixed Focussing
for a hyperfocal setting, this approach would be most effective.
Film Advance
The noise of film advance is lessened by the Silent Mode. It can not be
eliminated, but the film advance can be delayed by keeping the shutter release
pressed. Release the shutter when the Hexar is hidden under a piece of cloth, or
the sound is camouflaged by other noise.
Film rewind
The noise of film rewind is lessened by the Silent Mode. One's best bet
however, is to make sure that film rewind does not need to occur.
Shutter
The noise from the shutter is not affected by the Silent Mode. It is however by
far the least obtrusive noise generated, even by Silent Mode standards. The only
solution would of course be to not press that shutter release at all :-)
Switching on/off
When switching off, the aperture opens up completely, and the lens moves back
to its base position. When switched on again, the aperture closes down to the
one selected immediately. The lens will move again when focussing takes place
either manually or automatically. This means that for candids, switching off and
on again of the Hexar should be avoided.
Taking the above at heart, your Hexar should make a whisper sound like a bang
by comparison.
7
Konica Hexar
Hexar S-Mode (sort of, anyway...)
Yep, it's true; the Hexar does not support a shutter priority mode. Programmed
aperture preference (P-Mode), Aperture priority (A-mode) and full manual (MMode), it's all there. However, there's no way to crank the selector button all the
way up to an S-Mode.
What the Hexar does have though, is a user programmable camera shake critical
speed. Combined with the P-Mode, it offers a programmed shutter preference
mode with full stop speed settings from 1/4 to 1/60th plus 1/250th.
Here's how it works:
- Select P-Mode.
- For the slower speeds (1/4, 1/8, 1/15, 1/30, and 1/60), set the camera shake
critical speed to the shutter speed required -attainable by keeping the Select
button pressed.
- Set the aperture wheel to 22.
This very small aperture will cause the Hexar to use the slowest shutter speed
available to it. This will be the selected camera shake critical speed, and when
there's still too little light -as is often the case with f22 and the slower films the
Hexar particularly favours- will automatically open up the aperture to one
appropriate to the camera shake critical speed.
- For the fastest speed (1/250), turn the aperture wheel to 2.
This large aperture will cause the Hexar to use the fastest shutter speed
available to it. This is the shutter top speed of 1/250, and when there's still too
much light -as is often the case outdoors with f2- will automatically close
down the aperture to one appropriate to the camera shake critical speed.
8
Konica Hexar
Flash photography
Using the flash unit Konica HX-14 auto
There are three main modes of taking pictures with this flash unit:
•
Full automatic, full flash output with automatic adjusted aperture
•
Automatic, fixed aperture and variable flash output depending on subject
distance
•
Manual, nothing automatic
* When mounting your flash unit to the camera be sure that both camera and
flash unit are switched off.
Full automatic
Available light, subject distance and camera-shake critical speed is taken into
account to get a correct exposure. The flash unit is set for maximal light output.
The picture is made by an exposure with the available light and then
immediately changing the aperture of the camera to a value which gives a
correct exposure with the full flash output fired just before closing the shutter.
How to:
- Mount the flash unit on camera
- Set camera to mode P
- Set flash unit to mode P-FULL
When the flash unit is completely charged a [FL] message appears in the LCD
panel and the pilot lamp on the flash unit is burning*.
- Press the release button
*If the flash unit is not fully charged a picture is made only with the available
light and the flash does not fire.
Automatic
The flash light output is changed depending on subject distance. The aperture
setting is fixed. Subject distance must be between 0.6m - 3.5m for ISO 100.
The HX-14 flash unit is now functioning like a normal electronic flash light.
How to:
- Set flash unit to mode A
- Set camera to mode A or M
- Set the aperture on camera depending on filmspeed
Film speed (ISO)
50
100
200
400
800
aperture
2.8
4
5.6
8.0
11
- Press release button
*In poor light conditions always use a tripod to support your camera.
9
Konica Hexar
M mode
Nothing automatic. Flash unit is set for maximal light output. You have to set
the aperture on your camera manually to a value calculated by the following
formula:
F = GN / m
F = aperture
GN = guide number of your flash unit (14 for HX-14 with an ISO 100 film)
m = distance to subject in meters
* Important when the distance changes to your subject you have to recalculate
the aperture value.
How to:
- Set flash unit to mode P-Full
- Set camera to mode A or M
- Calculate and set aperture on camera (e.g. Film ISO 100, GN=14, m=5 then F
is 2.8)
- Press release button
*If the flash unit is set to mode A the available light is not measured.
Using other flash units
Almost any flash unit can be used with your camera.
Only automatic and manual flash modes are available for non HX-14 flash units.
Fill-in flash
- Set camera to mode A.
- Choose a correct aperture for the available light and use the same aperture
value for your flash unit.
To get a more subtle effect set the work aperture on the flash unit one or two
stops larger than the aperture on your camera. E.g., camera aperture F8 set flash
unit to F5.6 or F4.
Depending on your flash unit, you may also reduce the flash output instead of
changing the aperture.
Try different combinations of aperture settings on your camera and flash unit to
see what is best in your situation.
This mode is very well suited for outdoor photography with fill-in flash.
10
Konica Hexar
Camera software upgrade
After a camera software upgrade of a standard or classic model, the following
functions are added to the camera.
One step exposure time setting in M(anual) mode
- Switch the camera to mode M
- Set the aperture of your choice with the aperture dial.
- To set immediately the exposure time corresponding to the selected aperture
value, you have to press the release button half way down and press the up or
down button at the same time (one step).
The light reading is made for an circular spot area of 4 degrees.
- The exposure time will be kept in memory until you explicitly set another
value or switch of the camera.
Setting the guide number
This option allows you to use other flash units with your camera. You can
choose between 36 different guide numbers.
How to:
- Switch camera to mode P while pressing and hold the Select button.
- Press the up or down button until the required guide number appears in the
LCD panel. When the guide number is set [PFL] appears in the LCD panel.
As long as the camera is switched on this setting is kept in memory. Just
switch back to mode P while pressing the select button
- Switching off the camera clears the guide number setting.
* When a guide number is not available choose the nearest lower setting, e.g.
Guide number 22 is not available set guide number to 20.
Multiple exposure
Normally only one exposure is used for a negative. With the multiple exposure
setting unlimited exposures are possible for one frame.
How to:
- Switch camera to mode P while pressing the SELF-button.
- The LCD panel displays a zero left from the framenumber: 0[12]. Which in
this case means 0 multiple exposures on frame number 12.
Everytime you press the release button the number left from the frame number
will be increased. The LCD panel can only display a maximum of nine
multiple exposures: 9[24]. You can however continue with multiple exposures.
Tip: Reduce the aperture setting as many stops as exposures you want to make
on one filmframe.
- Switching off the camera will advance the film and the multiple exposure
function will be disabled.
11
Konica Hexar
Infrared film setting
When using infrared films without compensating for the wavelength your
images will be out of focus. With the infrared compensation your camera is
ready for using Konica and Kodak infrared films.
How to:
- Load film and switch on your camera
You probably have to press the release button before the camera starts
filmloading.
- Switch camera to mode A.
- Press SELECT button until ISO value appears in the LCD-panel.
- Now within 3 seconds press theDown button until --- appears in the LCDpanel.
- Press once the MF button and [750] appears in the LCD-panel, press MF
button one times more to see [850].
These numbers corresponds to Konica [750] and Kodak [850] infrared film.
Three seconds after selecting the film [ISO 100] appears in LCD-panel.
- For the correct film exposure settings follow film instructions.
- Loading a new film will disable the infrared setting.
12
Konica Hexar
Viewfinder information
Autofocus area indicator
Four lines (cross hair) indicate the central area of the image. In P and A mode
the area of exposure metering area covers 15 ° and is square shaped just
covering the area of the cross hair.
In M mode the exposure metering area is circular shaped and covers 4 ° and is
as large as the central area of the cross hair.
Image frame area indicator
The five thick lines frames the negative image area. The top and left line will
move depending on the distance set (parallax compensation).
Distance indicator
The top thick line in the viewfinder points to a small break in the diagonal line
in the top right corner of the viewfinder, which is the distance indicator.
Viewfinder led information
• burning continuously
• flashing
- burning continuously
+ burning continuously
- and + burn alternating
distance set correctly
distance set less than 0.6 meter
under exposure
over exposure
exposure set correctly within 1/3 aperture
13
Konica Hexar
Hyperfocal distance
Briefly
If you set the focus of your camera to the hyperfocal distance the depth of field
range from half that distance to infinity. It is of course strongly depending on
the aperture.
Formula used:
H=
F2
f xc
H = hyperfocal distance (mm)
F = focal length (35mm)
f = aperture (f value)
c = circle of diffusion (0.033mm)
Aperture
2
2.8
4.0
Hyperfocal distance 18.56 13.26 9.28
Set manually
20
20
10
focus to
Sharp from x
10
10
5
till infinity
5.6
6.63
8.0
4.64
7
5
3.5
2.5
11 16 22 f
3.37 2.32 1.69 m
3.5
2.4
1.7
m
1.75 1.2 0.85 m
14
Konica Hexar
All camera settings
(upgraded Hexar standard model)
Time
Guide ISO value
Number
s
1/250
1/200
1/160
1/125
1/100
1/80
1/60
1/50
1/40
1/30
1/25
1/20
1/15
1/13
1/10
1/8
1/6
1/5
1/4
1/3.2
1/2.5
1/2
1/1.6
1/1.2
1
1.3
1.6
2
2.5
3.2
4
5
6
8
10
13
15
20
25
30
T
1.0
1.1
1.3
1.4
1.6
1.8
2.0
2.2
2.5
2.8
3.2
3.6
4.0
4.5
5.0
5.7
6.3
7.1
8
9
10
11
13
14*
16
18
20
23
25
29
32
36
40
45
51
57
64
6
8
10
12
15
19
25
32
40
50
64
80
100
125
160
200
250
320
400
500
640
800
1000
1200
1600
2000
2500
3200
4000
5000
6400
Fixed focus
distances
Aperture
Exposure
correction
Camera shake
critical speed
m
0.6
0.7
0.8
0.9
1.0
1.1
1.2
1.3
1.4
1.5
1.6
1.7
1.8
1.9
2.0
2.2
2.4
2.6
2.8
3.0
3.5
4.0
5.0
7.0
10
20
999 (infinity)
f
2.0
.
2.8
.
4.0
.
5.6
.
8.0
.
11
.
16
.
22
f
0.0
0.3
0.7
1.0
1.3
1.7
2.0
s
1/60 **
1/30
1/15
1/8
1/4
* HX14 flash unit guide number
** Advised setting when using the flash unit
15
Konica Hexar
General camera functions
In the table below the display values may differ depending on the use of the Up
and Down buttons, light conditions, focusing distance and aperture setting.
All modes P A M
Function
Displa
y
1.5
Photographer's Action
press and hold release button halfway down and press MF button.
make your composition and release shutter
Focus Lock
Focus Lock with other light
reading
press and hold release button halfway down and press MF button.
point to another subject and press and hold release button halfway down
again.
go back to your previous composition and release shutter.
Set focus at infinity
Set fixed focus distances
Silent
press MF button
press MF button for more than 1 second
press and hold MF button while switching the camera on until L appears
1/30
7.0
2.4
1/30
999
0.6
L[0]
Camera functions (mode dependent)
In the table below the display values may differ depending on the use of the Up
and Down buttons, light conditions, focusing distance and aperture setting.
Personal adjustments can be made by using the Up and Down buttons.
Function
over or under
exposure
camera shake
critical speed
P
guide number
Photographer's Action
Display
press Select button
± 0.0
press Select button for more than 1 second
1/30L
press and hold Select button while switching the camera on
switch to A mode if you don't use the Hexar X14 flash unit
...
P36
PFL
multiple
exposure
set over or under
exposure
set film speed
(ISO value)
press and hold Self button while switching the camera on
9[3]
press Select button
± 0.0
press Select button for more than 1 second
100
A
infra red film
setting
set manually
exposure time
M spot reading (4°)
set time and
aperture
press and hold Select button until ISO value appears
press Down button within 3 seconds when . . . appears press MF
button once or twice (750 = Konica 850 = Kodak)
press Select button and press Up or Down button simultaneously.
Exposure time corresponding to the aperture set is fixed. Make
composition and release shutter.
press select button to set exposure time
set aperture
100
...
750
[100]
1/250
...
1/125
Picture will be taken
with your settings
16
Konica Hexar
Reset camera functions
Reset functions
focus lock
f correction
multiple exposure
guide number
spot reading
ISO value (only if next film has DX code)
infra red film setting
reset all personal settings
Reset by
switch camera off and on
open back cover
remove battery
Error situations
Mode
PA
M
PA
M
PA
M
PA
M
LCD
Display error
no ISO value or frame number is
displayed
press select button
[0]
flashing
load film again or remove rewinded film
b.c.
flashing /
continuously displayed
replace battery (Li2cr5) / immediately
...
continuously displayed
switch to M mode and back
PA
M
EEE *
continuously displayed
PA
M
dark
continuously displayed
PA
M
slow reaction
A
1/250
flashing
A
30
flashing
M
M
2
22
flashing
flashing
M
shutter speed
flashing
Silent
mode
To solve the problem
flashing, film rewinding stops
camera lens blocked, remove battery and / or
obstruction
For instance a mounted UV filter and short focus
distance
temperature to high,
keep camera in shade
temperature to low,
keep camera warm
( -10°C +40°C )
over exposure,
set aperture to larger value
under exposure,
set aperture to smaller value
under exposure, set exposure time to larger value
over exposure, set exposure time to smaller value
exposure exceeds Exposure Display Range (EV 3-18)
This has no effects on camera functioning
low battery voltage
press rewind button
or switch camera off and on
*See Filters and short focusing distance.
17
Konica Hexar
Flash modes
Combinations of the Hexar camera and the HX-14 Konica flash unit.
Camera mode
Flash unit mode
P
P-full
A
A
M
P-full
M
A
Function
all automatic,
maximal flash output,
variable aperture
automatic correction for available light,
fixed aperture,
variable shutter time,
variable flash output
nothing automatic,
fixed aperture,
fixed shuttertime,
maximal flash output
no correction for available light,
fixed aperture,
fixed shuttertime,
variable flash output
HX-14 flash distance range (in meters)
ISO 50
100
200
400
800
2
5
7
10
14
20
2.8
3.6
5
7
10
14
4
2.5
3.6
5
7
10
Aperture
5.6
8
1.8
1.2
2.5
1.8
3.6
2.5
5
3.6
7
5
11
0.9
1.2
1.8
2.5
3.6
16
0.6
0.9
1.2
1.8
2.5
22
0.6
0.9
1.2
1.8
*HX14 flash unit guide number is 14 at ISO 100
18
Konica Hexar
Other information
Books
Language
Title
Author
Year
Type
Publisher
ISBN
German
Konica Hexar
Heiner Henninges
1992
paperback, 132p
Verlag Laterna Magica, Germany
3-87467-502-5
Internet sites
http://www.cwi.nl/~frankw/hexar
Konica Hexar
http://photo.net/photo/hexar.html
Hexar reviewed
http://swissnet.ai.mit.edu/photo/ncliffe/hexarcable.html
Hexar cable release
19
Konica Hexar
Below some pictures which I have made in 1994 in Andalusia (Spain).
Film: Kodak Gold, ISO 100
Alhambra, Granada
20