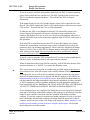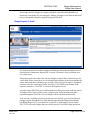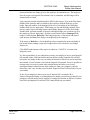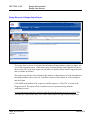
1
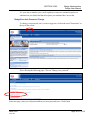
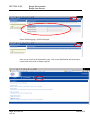
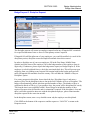
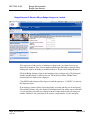
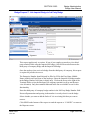
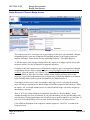
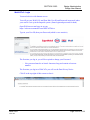
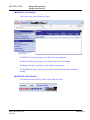
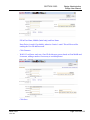
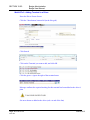
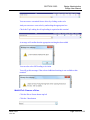
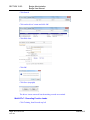
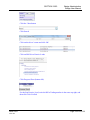
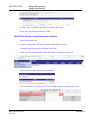
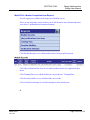
TITLE SECTION 19: SUBJECT 03: Pipelines & Distribution Manual - Volume 1-Administration Badge Administration Badge User Manual PURPOSE AND SCOPE The purpose of this subject is to document the Badge User Manual which is for managing badges issued to drivers loading or unloading at Imperial Oil terminals. This includes Hired Carriers and 3rd Party Pickup Customers. This manual also documents the procedures for managing badges issued to 3rd party personnel who require “access only” privileges. This includes 3rd party contractors who require access to a site to conduct work or inspections in the absence of Imperial Oil’s staff or access by Operations Contractors at SBFT/RBFT sites. This manual explains the use of the badge management automated tools for all users. Any time revisions are made to this manual, a copy needs to be provided to the TOU so that the Esso Hub version can be updated. REFERENCE None ASSOCIATED DOCUMENTS Badge Agreement (signed with Imperial Oil) DEFINITIONS TOU Terminal Operations Unit within Imperial Oil responsible for the support of the badge administration process and of the WebCATx system. Enterprise An Imperial Oil number Terminal location or a company that has been assigned an enterprise number by Imperial Oil associated with the badge administration process. Employee Someone hired (including the owner) by a carrier, vendor, service provider or Imperial Oil. March 2015 Pdm11903 Page 19.03-1 of 35 SECTION 19.03: Badge Administration Badge User Manual Imperial Oil Representative An Imperial Oil Pipelines and Distribution employee or TOU employee with relevant responsibilities associated with the site. Badge Custodian An Imperial Oil Representative, carrier representative, vendor representative or service provider representative. Esso Hub An Internet based tool allowing a carrier/vendor/service provider representative to send badge requests to be processed into Imperial Oil’s computer systems. The system is available 24 x 7 except for the maintenance windows displayed in the community announcements of the tool. Site Operations Contractor Contracted Imperial Oil representative who provides terminal orientation at RBFT/SBFT sites for carriers who do not have their own driver trainer. Site Representative This is the Imperial Oil Representative or the Site Operations Contractor, excluding TOU staff. Unassigned Badge A badge given to an enterprise that is not assigned to any employee of that enterprise. An unassigned badge can only be used once assigned. WebCATx ExxonMobil managed online orientation system for drivers. PROCEDURE Launch Kit When a carrier/vendor/service provider wishes to do business with an Imperial Oil terminal an enterprise must first be set-up appropriately in Imperial Oil systems by the ISC group. TOU can provide ISC’s contact information. Once the enterprise is set up, a badge agreement obtained from TOU must be signed. Page 19.03-2 of 35 Pdm11903 March 2015 SECTION 19.03: Badge Administration Badge User Manual Once the agreement has been received by TOU, a launch kit will be mailed to the carrier/vendor/service provider with instructions and a User Name. A contact phone number will be provided in order to obtain a password. A security check will be performed over the phone. This user name and password will be used to sign in to the Esso Hub and WebCATx. The launch kit will also contain a hard copy of this Badge User Manual, which has all of the training for the Hub and WebCATx and an inventory of unassigned badges for your enterprise. Once a User Name and password have been obtained, the user can log on to the Esso Hub and send badge requests. When logging on for the first time, a prompt will appear requesting a password change. This will re-occur every 90 days. CFA/TDG/Orientation Expiry List Report This report is sent automatically monthly via fax and/or e-mail to identify workers that will have CFA/TDG or WebCATx training module (orientation) expiry coming up in the next 90 days. Review the report and take any action required through WebCATx or the Esso Hub to avoid the automatic locking of the affected badges. Drivers receive badge reader warnings 90 days before CFA/TDG or WebCATx orientation expiry. Imperial Oil staff will not post any expiry reports in the driver’s room of the terminal for privacy reasons. Important: The Imperial Oil staff and TOU will not extend certification or orientation, even in emergency situations. Badges Not Used If an assigned badge is not used at any Imperial Oil terminal for a period of one year, it will be automatically locked. If an employee is not going to use their badge for approximately a year or more, please remove the badge access and give the person a new badge when required. Do not remove the access after the badge has been locked. If the badge was locked, send the driver to the proper terminals where a compliance check will be executed and the access will be restored by those terminals. March 2015 Pdm11903 Page 19.03-3 of 35 SECTION 19.03: Badge Administration Badge User Manual Logging On to the Esso Hub Using any web connected device go to www.essohub.com. In the login box, enter your User Name, enter your Password and click the “Login” button on the screen. The “Welcome” screen will appear. Click “OK”. Page 19.03-4 of 35 Pdm11903 March 2015 SECTION 19.03: The requests screen will appear. On the left, any system outage will be displayed. It is important to check for any outage each time you sign on. The Esso Hub may still open during an outage, if an auxiliary system is not operating. If a request is submitted, the request may be delayed or never processed. The phone contacts for support are also available on the left. For any technical/hub/support issue, contact TOU: March 2015 Pdm11903 Badge Administration Badge User Manual Phone: 1-866-232-9260 ext. 5889 Fax: 1-506-389-5433 or toll free 1-866-231-6994 E-mail: [email protected] In the centre, you will find the list of all Available Requests. To pick a request to fill and send, click on the arrow to the right of the Drop Down list. Scroll up and Down to view all requests. Once a request is selected, click “GO!” to proceed to the request form. Page 19.03-5 of 35 SECTION 19.03: Badge Administration Badge User Manual The Publications contain the latest version of this Badge User Manual as well as terminal contact information, addresses and orientation information. Imperial Oil may add extra communications for your benefit at any time. While completing a request, some of the items chosen on the screen may cause data entries to be displayed, hidden or set-up. If your cursor turns into an hourglass, ensure you wait for your mouse to get back to normal prior to completing the remainder of the request. Once the Send button has been clicked on a request form, the following screen will show. Click the blue word ‘Back’ to return to the Requests Screen. Once a request has been submitted, it is important to monitor your e-mail. An e-mail will be sent to you approximately 1 hour after submitting a request. The e-mail will tell you whether the request was a success or failure (and the reason of failure so you can re-submit appropriately if needed) and will include all of the information you provided in that request. If you haven’t received confirmation within 3 hours, please contact TOU for support. Please note that there is an elapsed time from receiving confirmation (which means that your request was activated in Imperial Oil systems) and the time your request is transmitted to the actual systems of all Imperial Oil terminals. This elapsed time can vary by geographic region. Page 19.03-6 of 35 Pdm11903 March 2015 SECTION 19.03: Badge Administration Badge User Manual It is your duty to monitor your e-mail regularly to ensure no unwanted request was submitted on your behalf and that all requests you submitted have succeeded. Badge Esso Hub Password Change To change your password, once you have logged on, click on the word "Personalize" at the top of the screen. This will bring the following page. Click on "Change your password". In the next page, enter your old password then your new password twice. Click Finish. March 2015 Pdm11903 Page 19.03-7 of 35 SECTION 19.03: Badge Administration Badge User Manual On the following page, click Finish again. Once you are back on the Personalize page, click on the Distribution title at the top to return to the main menu of badge requests. Page 19.03-8 of 35 Pdm11903 March 2015 SECTION 19.03: Badge Administration Badge User Manual PIN/Password Resets For any password reset, please contact TOU who will refer you to the appropriate group. When TOU is contacted for support in order to have a PIN/password reset, the caller will be asked security questions. In the case of a driver PIN reset, the caller should know either their CFA number or the place, date and time of their last badge use. In the case of an Esso Hub password reset, the caller should know one of the e-mails, one of the fax numbers or address provided with their badge agreement. Note: if your ID/password contains numbers, ensure you are using the number keys in the common area of your keyboard rather than the ones on the numeric pad, which are not always detected properly by the Badge Esso Hub. Contingency When Internet is Not Available or Service is down 1. Internet not available Internet access is strongly encouraged. However, if a carrier/vendor/service provider doesn’t have internet access, the contingency forms can be used. Imperial Oil may approach enterprises to encourage their management in getting internet access (rule of thumb will be five or more badges). To use the Badge Esso Hub, a PC with a 56K modem (dial-up) or high speed connection such as DSL or cable, a standard monitor, the browser internet explorer 6.0 or above, Adobe Acrobat reader that can be downloaded for free at www.adobe.com and a valid e-mail address are required. A virus-protected environment is recommended. 2. How to use contingency forms If a carrier/vendor/service provider doesn’t have internet access or is in a power/fax/Internet outage situation, the contingency process can be activated. Follow the steps below: March 2015 Pdm11903 Call TOU to advise you wish to activate the contingency process and which request(s) are needed. Page 19.03-9 of 35 SECTION 19.03: If TOU approves the activation of the contingency process, they will provide you with a fax number where requests can be sent (no internet access/internet outage) or will take note of your requests by phone after checking your identity (power/fax outage). If you were provided a fax number, print/copy the page of the Badge User Manual that contains the Badge Hub screen print of the request to be submitted. Your enterprise representative needs to fill in all fields (you can write to the right of the boxes; when there is a choice to select, circle it) and sign in the box labelled ‘Signature:’ Fax the completed requests to the fax number provided. Confirmations will be faxed back, whether requests succeeded or failed. As per the badge agreement terms, you are responsible to check the status of your requests just as someone who has internet access is responsible to monitor their e-mail. In the case of power/fax outages, confirmations will be faxed once the outage has ended. Page 19.03-10 of 35 Pdm11903 Badge Administration Badge User Manual March 2015 SECTION 19.03: Badge Administration Badge User Manual Badge Request 1: Add a New Badge Assignee Signature: This request is to be filled out when a new employee requires a badge or an existing employee requiring access at an Imperial Oil terminal never had an active badge. Your enterprise number should already be filled in for you and cannot be changed. Fill in the First, Middle (initials) and Last Name of the employee. The First and Last Names are mandatory fields. Choose a badge from your inventory of unassigned badges and enter the number showing on the badge in the badge number field (last six digits only). This is the badge that will be given to the employee to access an Imperial Oil terminal. If your inventory of unassigned badges is empty, go to Badge Request 9: Request More Unassigned Badges. If your enterprise is a carrier or service provider, enter the appropriate certification information in the appropriate fields: CFA or OPA Number, CFA or OPA Expiry Date and TDG or Hazmat Expiry Date. If your enterprise is not a carrier or service provider, the certification information will not show on your screen as it is not required for you. March 2015 Pdm11903 Page 19.03-11 of 35 SECTION 19.03: Badge Administration Badge User Manual If you are a carrier, and if the only products hauled are not TDG or Hazmat regulated, please click to check the box with the text “The ONLY products that I haul are nonTDG or non-Hazmat regulated products”. This will hide the TDG or Hazmat information. If the product hauled is only LPG outside Ontario, please click to check the box with the text “The ONLY product that I haul is LPG outside Ontario, which does not require CFA or OPA”. This will hide the CFA or OPA information. If either the non-TDG or non-Hazmat or the non-CFA or non-OPA options were chosen, Imperial Oil terminals will request a disclaimer form completed by the employee during their first visit. Access won’t be given to an employee who doesn’t sign the disclaimer form or who cannot show physical valid CFA/TDG certification or the equivalent. If the non-TDG or non-Hazmat or the non-CFA or non-OPA options were chosen because the corresponding certification exam was not completed, please advise the terminal so they can document appropriately. When exams are completed, the Badge Request 11: Reset CFA or OPA/TDG or Hazmat must be submitted or a disclaimer form will have to be signed. Your access to the site will be provided only when all required certifications will be completed. If you are a service provider, TDG is required but CFA is not for all personnel that do not drive trucks. A disclaimer form is not required in this situation. When all fields shown have been filled in accurately, click SEND at the bottom of the request to submit it or “CANCEL” to return to the Requests screen. This request only gives possession of a badge to the specified employee but does not give terminal access. After this request is successfully submitted, The Badge Request 10: Request Site Access will need to be completed in order to advise the appropriate Imperial Oil terminal that access is required, and that the employee will complete the required training in WebCATx and with the carrier. Imperial Oil Site Representatives can then authorise the badge through their own internet capabilities (Primary terminal) or TOU (contingency process-secondary terminals) once all appropriate training has been completed at the site. IMPERIAL OIL STAFF AND TOU WILL NOT PROVIDE ACCESS TO TERMINALS WITHOUT RECEIPT OF BADGE REQUEST 10. If your enterprise has a new employee who already has access to Imperial Oil terminals and owns a valid badge with another company, that employee is not allowed to use that badge for your enterprise’s business since the custodian of the badge is another company. If your new employee resigned from another enterprise to work for you and has a valid badge with that other company, the badge should be given back to the exemployer and you need to assign a new badge to the employee and the employee’s can transfer previous training records to the new enterprise upon request. Do not hand these badges back in to the terminal. Page 19.03-12 of 35 Pdm11903 March 2015 SECTION 19.03: Badge Administration Badge User Manual Each badge must be assigned to a unique individual. One individual should have a maximum of one badge for your enterprise. Sharing of badges is not allowed and could result in disciplinary measures applied by Imperial Oil staff. Badge Request 2: Audit The audit is the process in which a badge custodian can ensure that the badges in one’s possession are consistent to Imperial Oil’s records. The audit is to be performed once every three years. Ninety days before the audit is due, all your badges records will be e-mailed to you for verification. Please ensure there are no missing/surplus badges on the report and that all names, dates and other information are accurate. Once the received report is confirmed accurate, select the Audit option on the Esso Hub. Click SEND at the bottom of the request to submit or “CANCEL” to return to the Requests screen. An audit request MUST be received through the Esso Hub prior to the audit due date or all badges will be locked. If this occurs, complete your audit and submit an Audit request through the Esso Hub. All your badges will be unlocked automatically. If the records e-mailed to you do not match your own records, you can correct data by passing requests through the Esso Hub and then requesting the Badge Status Report (see Badge Request 4). If you cannot fix it yourself, or need support, please contact TOU. TOU will not fix badges that you can fix yourself. As per the badge agreement March 2015 Pdm11903 Page 19.03-13 of 35 SECTION 19.03: Badge Administration Badge User Manual terms, you are responsible for any badge your enterprise owns and it is your enterprise’s duty to check all the records thoroughly. For Imperial Oil terminals, reports should contain only Imperial Oil employees. If this is not the case, requests will have to be submitted through the Badge Esso Hub to fix the issue. Imperial Oil staff and TOU will not unlock badges that have been locked for audit reasons. If you do not complete your audit process when first requested, you will be reminded 60 days before and then again at 30 days. If, as a badge custodian, an Imperial Oil business unit is auditing you, keep the electronic version of the report sent to you prior to your audit. Once your audit is completed and any updates required were made, please perform Badge Request 4: Badge Status Report and keep the electronic version of the report in your files. That will allow assessors to verify accuracy of your audit. Badge Request 3: Badge Lost, Broken or Defective Signature: Badges may be lost, damaged or become defective over time. This request will allow the badge custodian to move all information from the existing badge to a new unassigned badge (e.g. orientation expiry dates, certification expiry dates and link to third party badges). Once completed, the old badge should be Page 19.03-14 of 35 Pdm11903 March 2015 SECTION 19.03: Badge Administration Badge User Manual destroyed and the new badge given to the employee for immediate use. The employee does not require any Imperial Oil terminal visit or orientation, and the badge will be automatically activated. Your enterprise number should already be filled in the request. Type in the First Name, Middle Name (initials) and Last Name for the employee with the defective or lost badge. Enter the number of the damaged, defective or lost badge in the Old Badge Number field (last six digits only). If the badge was lost and the badge number is not known, send a request for badge status report (Badge Request 4). In the New Badge Number field, input the number of the new unassigned badge you are about to give to the employee (last six digits only). Pick the reason for this request: Damaged if the badge is visibly broken, Defective if the badge looks fine, is not locked and doesn’t open the gate, and Lost if the badge was misplaced by the employee. If the reason is Defective, a check should have been completed to ensure the badge is not locked before running a request for badge broken, lost or defective (see Badge Request 6). Click SEND at the bottom of the request to submit or “CANCEL” to return to the Requests screen. It is the responsibility of your enterprise to ensure your employee arrives at an Imperial Oil terminal with a valid non-broken and non-defective badge. Imperial Oil staff will not replace any badge at their site, no matter the distance at which you are located from the terminal. If your location is far from the Imperial Oil terminal, it may be possible to arrange to have a secure location at the terminal that would allow you to store unassigned badges at that location. Only employees from your company would be allowed to carry a key for that secure location. Imperial Oil staff will not hold a key on your behalf. If one of your employees shows up at one of Imperial Oil’s terminal with a defective/broken/lost badge, even though there are badges secured on your behalf, your enterprise will still need to send a request for a badge lost, broken or defective from the Esso Hub: the Imperial Oil staff and TOU cannot do this on your behalf. March 2015 Pdm11903 Page 19.03-15 of 35 SECTION 19.03: Badge Administration Badge User Manual Badge Request 4: Badge Status Report This report allows users to view/print what information (badge numbers, employee names, site access and orientation expiry, certification expiry, third-party badge links) Imperial Oil has in their records. This is the same report sent for audits except this request doesn’t trigger the audit and is available at all times. This request may also be used to obtain badge numbers so that employees can be disciplined or lost badge numbers can be retrieved. Terminals can also use this request to verify enterprises and driver data. Click SEND at the bottom of the request to send the request or “CANCEL” to return to the Requests screen. The report will be e-mailed to you in a separate message than the confirmation e-mail. No new transactions should be submitted until the Status Report has arrived via e-mail. This will limit any confusion that may occur with a Status Report arriving with mis-information. Page 19.03-16 of 35 Pdm11903 March 2015 SECTION 19.03: Badge Administration Badge User Manual Badge Request 5: Discipline Request The discipline request will ensure an employee cannot load at any of Imperial Oil’s terminals for a specified duration of time or forever if disciplinary action is required. If Imperial Oil staff discipline one of your employees, you would be notified via e-mail of the disciplinary action, discipline reason and Imperial terminal where this occurred. In order to discipline one of your own employees, fill in the First Name, Middle Name (Initials) and Last Name of the employee. Put in the badge number of the employee (last six digits only). If unknown, please request the badge status report (see Badge Request 4). If the employee is to be disciplined forever, check the associated check box. This will prevent your employee from ever loading at any Imperial Oil terminal with his/her badge again and will notify all Imperial Oil terminals across the country. This will hide the ‘Number of Days to Discipline’ option. For a more progressive discipline, do not check the box ‘Discipline forever’ and enter a number of days for the discipline action to last in the field ‘Number of Days to Discipline’. The badge will automatically unlock after that specified number of days. The number of days is calculated in blocks of 24h (e.g. if you put three days, the person will be disciplined for exactly 72h from the time it was originally locked). Do not forget to include the number of days required for supervision, discussion, and re-orientation if required. If the discipline is over and there is still time required to intervene with the disciplined employee, please submit another discipline request for the extra time needed. In the discipline reason, enter a very detailed reason why the employee was disciplined. Click SEND at the bottom of the request to send the request or “CANCEL” to return to the Requests screen. March 2015 Pdm11903 Page 19.03-17 of 35 SECTION 19.03: Badge Administration Badge User Manual Badge Request 6: Enquire Why a Badge Assignee is Locked Signature: This request is to find out why an employee’s badge won’t give them access to an Imperial Oil terminal. If the e-mail returned indicates that the badge is unlocked after sending this request, the badge is probably defective. Please refer to Badge Request 3. Fill in the Badge Number of the locked employee (last six digits only). The Enterprise Number should already be filled in for you. Fill in the First Name, Middle Name (initials) and Last Name of the employee. Click SEND at the bottom of the request to send the request or “CANCEL” to return to the Requests screen. If an employee wants to know if/why their badge is locked and they are at an Imperial Oil terminal (Primary only), the Imperial Oil terminal staff can send a request on behalf of your enterprise provided your employee has his badge number and your enterprise number. Otherwise, the request has to be sent by a representative of your enterprise. Page 19.03-18 of 35 Pdm11903 March 2015 SECTION 19.03: Badge Administration Badge User Manual Badge Request 7: Link Imperial Badge to 3rd Party Badge Signature: This request applies only to carriers. If one of your employees needs to visit a thirdparty terminal while using the Imperial Oil badge, a link will be needed between the third-party oil company badge and the Imperial Oil badge. Once the employee has received a badge from the third-party oil company, this request is required to provide site access. The Enterprise Number should already be filled in. Fill in the First Name, Middle Name (initials) and Last Name of the employee. Enter the Imperial Oil badge number in the Badge Number field (last six digits only). Click on the arrow at the right of the Terminal field to select the third-party oil company terminal (scroll up and down to view all entries). Only the terminals indicated in the list are available to use for this functionality. Enter the third-party oil company badge number in the 3rd Party Badge Number field. Ensure all punctuation and spacing in the number is exactly what it is on the badge. Select whether you want to add the link or if it is an existing link that you want to remove. Click SEND at the bottom of the request to send the request or “CANCEL” to return to the Requests screen. March 2015 Pdm11903 Page 19.03-19 of 35 SECTION 19.03: Badge Administration Badge User Manual Badge Request 8: Remove Badge Access Signature: This request needs to be sent when one of your employees has quit, was terminated, changed assignment, doesn’t visit one of Imperial Oil terminals anymore or no longer requires an Imperial Oil badge. Please do not mix this with Badge Request 5: Discipline Request. To fill this request, first pick the terminal where the employee no longer requires access (the employee doesn’t visit one of Imperial Oil terminals anymore). If employee does not require access at all terminals (employee quit, was terminated, changed assignment or doesn’t require a badge anymore-even if the employee only has access to one terminal), select the options ‘All’ from the Terminal list. The Enterprise number should already be filled in. Enter the First Name, Middle Name (Initials) and Last Name of the employee. Type in the badge number (last six digits only). If the badge number is not known, request a badge status report to get the information (See Badge Request 4). If an employee has access to only one terminal, removing access by selecting the terminal name will remove terminal access but the badge will still be assigned to that employee. When the option ‘All’ is selected terminal access is removed and the badge will not be assigned to that employee anymore. Then, if ‘All’ was selected from the Terminal list, from the list ‘Was the Badge’, select whether the badge was Lost or Returned. If you select Returned, you may put this badge with your inventory of unassigned badges and it can be given to another employee at a later time. If you select Lost and the badge was recovered, destroy the badge as it is locked forever. Click SEND at the bottom of the request to send the request or “CANCEL” to return to the Requests screen. Page 19.03-20 of 35 Pdm11903 March 2015 SECTION 19.03: Badge Administration Badge User Manual Badge Request 9: Request More Unassigned Badges This request is to obtain more unassigned badges in order to refill the inventory of your enterprise. Imperial Oil recommends not waiting until the inventory is empty before requesting more unassigned badges. This could mean some of your employees not being able to access Imperial Oil terminals to perform their work because they don’t have a badge. When your enterprise was initially set-up on the Badge Esso Hub, unassigned badges were sent for half the number of your employees. A good rule of thumb would be to request more unassigned badges when your inventory has an amount less than a quarter of the number of employees currently having a badge. Unused badges must be stored in a secure location, such as a safe or locked cabinet. TOU will fax your enterprise a new badge agreement with the new badges numbers included. Once you have returned your new signed badge agreement, the badges requested will be mailed by TOU. Expect two business days plus mail delivery time to obtain new unassigned badges, excluding the time required by your enterprise to receive, sign and return the new badge agreement. No cost is assigned to your enterprise for those extra badges. On the screen of the request, your Enterprise Number should already be filled. Enter the Number of Unassigned Badges Requested as required. Click SEND at the bottom of the request to submit the request or “CANCEL” to return to the Requests screen. March 2015 Pdm11903 Page 19.03-21 of 35 SECTION 19.03: Badge Administration Badge User Manual Badge Request 10: Request Site Access Signature: This request will allow you to request terminal authorization at an Imperial Oil’s terminal for one of your enterprise’s employee. This always needs to be completed and sent prior to having an employee arrive at an Imperial Oil terminal. When this request is filled and sent, important pieces of information are sent to the terminal who will use this to give your employee proper access. This request is absolutely needed for Imperial Oil terminal access. Filling “Badge Request 1: Add a New Badge Assignee” by itself doesn’t provide any access. Once this request is completed and the employee has completed the appropriate WebCATx Modules contact the terminal in question to schedule when to complete a New Driver Observed Load or Grant Site Access. This request also needs to be completed when an employee completes WebCATx modules about to expire or if an employee needs access at a new Imperial Oil terminal while already having his/her badge active at one or more other terminals. Any other reasons requiring orientation at an Imperial Oil terminal mandates this request to be completed prior to requesting authorization at that terminal. Failing to send the Request Site Access will result in Imperial Oil staff denying access to the requested site(s)/denying continuation of training on site. It is the carrier/vendor/service provider’s responsibility to notify the terminal that a Request Site Access has been submitted and WebCATx modules completed or other training such as supervised loads with the Imperial Oil terminal over the phone or by email, ahead of time, to meet their schedule. Page 19.03-22 of 35 Pdm11903 March 2015 SECTION 19.03: Badge Administration Badge User Manual If your employee is locked at a terminal because the orientation has expired, the badge will get automatically unlocked once: this request has been filled and the terminal has confirmed that the orientation was completed. Imperial Oil staff and TOU will not extend orientation expiry dates. Select the terminal at which your employee requires access from the drop-down list. Click on the arrow at the right of the list to see the beginning of the terminals list and scroll up and down to view all terminals. Your enterprise number should already be filled in. Enter the First, Middle (Initials) and Last Name of the employee. Enter the badge number of the badge that was already given to the employee (last six digits only) (through Badge Request 1) in case of an employee needing a new badge or the badge number of the active badge in possession of the existing employee. Select the reason for the request. If you select ‘Other’, please specify the reason within the space that will appear to the right of the Reason for Request Field. If any comments/notes should be provided to the terminal staff where access is requested, please enter them in the Additional Comments field. In cases where drivers do not need to show up at the terminal to gain access (this is very not likely, this will mostly happen for hired carriers involved in the driver trainer program), check the box “Do Not Send Request to Terminal”. Be aware: If you check this box, the terminal will NOT receive the “Request Site Access”. If an employee of your enterprise shows up at the terminal and you have checked this box for his request, the terminal will deny access. Click SEND at the bottom of the request to send the request or “CANCEL” to return to the Requests screen. The orientation is badge specific, not employee specific. If one of your employees is working for other enterprises, you may want to have your employee complete orientation sooner and then fill this request way before expiry to allow synchronising with the other enterprises. For new drivers, depending on the terminal, requesting site access may just be the first step to obtain site access. The “Request Site Access” will be needed at the site to start the process but terminal access may only be granted once full training is completed (e.g. supervised loads, etc.). Please check the requirements with the terminal staff. Once the terminal has granted site access to your employee, you will receive a copy of the confirmation e-mail/fax that was sent to the terminal. March 2015 Pdm11903 Page 19.03-23 of 35 SECTION 19.03: Badge Administration Badge User Manual Badge Request 11: Reset CFA or OPA/TDG or Hazmat Expiry Signature: This request is available to carriers and service providers only. For service providers, the request name is “Reset TDG”. This allows an enterprise to update the certification data for an employee once it has been renewed, or to declare when it is not needed anymore. If an employee’s badge is locked because CFA, TDG or equivalent has expired, the badge will automatically be unlocked once this request is submitted. Imperial Oil staff and TOU will not extend certification expiry dates. Your Enterprise Number should already be filled in on the screen. Enter the First, Middle (Initials) and Last Name of the employee. Then type in the number of the badge that the employee has in his or her possession (last six digits only). Enter the new CFA or OPA number and Expiry Date. Enter the new TDG or Hazmat Expiry Date. You may wish to update only the CFA/OPA or the TDG/Hazmat information. The system will allow you to do that. Simply leave the Number and Date blank in the information you do not wish to update. Should a driver not require CFA or TDG due to job specification change, check the appropriate check box. If one check box is selected, the system will consider as a change and will accept the request to cancel the appropriate certification. NOTE: Your enterprise will have access privileges removed at all Imperial Oil sites should you cancel certifications for drivers/contractors that require them. Page 19.03-24 of 35 Pdm11903 March 2015 SECTION 19.03: Badge Administration Badge User Manual Click SEND at the bottom of the request to send the request or “CANCEL” to return to the Requests screen. Important Note: If someone was assigned a badge, required CFA/OPA and/or TDG/Hazmat certifications(s), but didn’t have all these certifications at the time the badge was assigned, this request needs to be completed to update the person’s profile in Imperial Oil systems. Otherwise, the terminal will request a disclaimer form completed by the person. Terminals will be able to check if this was completed by requesting the badge status report for your enterprise. Hub specifics Accounts (User Name and passwords) expire based on pre-determined frequencies. It is strongly recommended that all users log on at least once a month to keep their account active. Accounts not used over a length of time will be suspended and then deleted. Deleted accounts can take 4 business days to be re-created and the Imperial Oil terminal staff or TOU will not submit badge requests or change electronic data for carriers/vendors/service providers whose accounts are suspended or deleted. TOU should be contacted at 1-866-232-9260 for any issues regarding User Name, passwords or deleted accounts. Responsibilities TOU will be responsible for overall badge administration, with support from the Imperial Oil terminals, as requested. TOU has the proper access to Imperial Oil’s computer systems to provide appropriate support to all the Esso Hub users and will be the first point of contact on any issue. TOU will receive an electronic copy of all badge requests submitted throughout the Esso Hub and will be able to refer to them for support. TOU should be contacted at 1-866-232-9260 on any issue regarding badge requests or availability of the Esso Hub. TOU will forward calls to other contacts when necessary. Each request confirmation message, whether successful or failed, has a transaction ID number in the title. Please have that number handy when calling TOU about a particular badge request. Imperial Oil’s terminals staff will not support badge requests or the Esso Hub for any carrier, vendor or service provider. The only operations that can be done through the Esso Hub for the employee of a carrier/vendor/service provider are confirmation of orientation, enquire why the employee is locked and discipline, if the discipline request is coming from the terminal and not from the carrier/vendor/service provider. March 2015 Pdm11903 Page 19.03-25 of 35 SECTION 19.03: Badge Administration Badge User Manual The carriers/vendors/service providers are responsible for ensuring that their workers are trained to meet legislative requirements. They are also responsible for the badges cited in their badge agreement, for their own badge requests, for monitoring the status of their own badge requests through e-mail, for their own audits and their own business controls (examples: confidentiality of Esso Hub user name and password, person submitting the badge requests has authority to do so). The carriers/vendors/service providers should respond promptly on any of TOU's requests, ensure their Esso Hub IDs and passwords are functional, ensure they are capable of using the Esso Hub and follow up on any technical issue with TOU. The carriers/vendors/service providers are responsible to notify TOU of any e-mail address or fax number changes so they can receive their confirmation messages when badge requests are submitted. Imperial Oil cannot support the use of firewalls or routers on personal computers if they happen to conflict with the Badge Esso Hub. It is the carrier/vendor/service provider’s responsibility to contact their own technician to configure these devices if they happen to interfere with the Hub. TOU is not in any obligation to use the contingency process under such circumstances. Site Representative Role A site representative is responsible for or ensuring WebCATx orientation has been completed. If at an Imperial Oil’s primary/SBFT/RBFT terminal, the site representative will confirm orientation through the Esso Hub. If at a P&D operated reseller site, the site representative will notify his SNS in writing. The SNS will validate the request, initial it and send to the TOU who will confirm orientation through the Esso Hub. If the request comes from a carrier trainer, he will notify TOU in writing who will confirm orientation through the Esso Hub. Using carrier trainers is available only to hired carriers and a representative from Imperial Oil’s Transportation/Fleet department must approve this method of orientation. Each carrier trainer must be properly certified and registered with TOU for each site where they are authorised to confirm orientation. WebCATx 1: Support For generic help contact: – [email protected] – 1-800-279-8047 and ask for WebCATx support For password and login help contact: – Page 19.03-26 of 35 Pdm11903 1-800-265-0060 option 1 for English and then option 2 for portal support March 2015 SECTION 19.03: Badge Administration Badge User Manual WebCATx 2: Login You need a device with Internet access You will get your WebCATx and Esso Hub User ID and Password in an email when your carrier is set up in the Imperial system. (Same login and password for both) Open Web browser and copy in or type: https://webcatx.exxonmobil.com/WebCATDriver Type in your User ID, then your Password (which is case sensitive) The first time you log in, you will be required to change your Password – New password must be at least 8 characters long and contain at least one number The first time you log in to WebCATx you will see the Data Privacy Notice Click X at the top right of this screen to close it March 2015 Pdm11903 Page 19.03-27 of 35 SECTION 19.03: Badge Administration Badge User Manual WebCATx 3: For Carriers This is the screen you see when you log in In WebCATx you are the Supervisor of the drivers you administer The WebCATx box top left gives you a link to your own “My Training” The Reports box gives you links to some training status reports The Worklist box shows you any of your drivers who are not up to date with their training. WebCATx 4: Driver Set Up Click Driver Person (at the top of the screen), then click New Page 19.03-28 of 35 Pdm11903 March 2015 SECTION 19.03: Badge Administration Badge User Manual Fill in First Name, Middle (Initial only) and Last Name Enter Driver’s email (if available), otherwise Carrier’s email. This will be used for sending the User ID and Password. Click Generate. – WebCATx will now work out a User ID for this new person, based on First Middle and Last name, adding a number if necessary to avoid duplicates. Click Save March 2015 Pdm11903 Page 19.03-29 of 35 SECTION 19.03: Badge Administration Badge User Manual WebCATx 5: Adding Terminal to a Driver Enter the Driver Person Screen Click the 3 dots button, bottom left (in the Site grid) Click Search Click on the Terminal you want to add, and click OK Click the green + sign to the right of the terminal name Message confirms the required training for this terminal has been added to the driver’s plan Site now shown as added to the driver (red x at end of the line) Page 19.03-30 of 35 Pdm11903 March 2015 SECTION 19.03: Badge Administration Badge User Manual You can remove a terminal from a driver by clicking on the red x And you can remove extra roles by unchecking the appropriate box Check the Top Loading box if top-loading is required at this terminal A message will confirm that the appropriate training has been added You can also select Off Loading or Aviation You will get this message if the selected additional training is not available at this terminal WebCATx 6: Remove a Driver Click the Driver Person button top left Click the 3 dots button March 2015 Pdm11903 Page 19.03-31 of 35 SECTION 19.03: Badge Administration Badge User Manual Click Search Click on the driver’s name and click OK Click Hide Now Click OK Click Save (top right) The driver is now removed: but the training records are retained. WebCATx 7: Recording Practice Loads Click Training, then Records top left Page 19.03-32 of 35 Pdm11903 March 2015 SECTION 19.03: Badge Administration Badge User Manual Click the 3 dots button Click Search Click on the driver’s name and click OK Click on S80 Driver Practice Loads Click Progress Sheet (bottom left) For the first Practice Load, write the Bill of Lading number in the notes top right, and then click Task Verified March 2015 Pdm11903 Page 19.03-33 of 35 SECTION 19.03: Badge Administration Badge User Manual You have now recorded the first Practice Load for this driver. Do the same for subsequent Practice Loads WebCATx 8: Monitor Completion from the Worklist This worklist shows you: Overdue Training (Reverification Overdue and Modules Overdue) Training coming up soon (Reverification Due Soon) Failed tests (Reverification Not Passed and Other Verifications not Passed) Click a number to show which training modules Click on the name to see that person’s My Training (overdue training shown in red) Page 19.03-34 of 35 Pdm11903 March 2015 SECTION 19.03: Badge Administration Badge User Manual WebCATx 9: Monitor Completion from Reports Several reports are available on the Supervisor Worklist screen These are not frequently used, but allow you to drill down for more information about your drivers’ outstanding and completed training. Click Module Records to see which module each of your people has passed Click (Re)verifications Due Soon to see which modules need to be completed in near future Click Training Plan to see which modules are in your drivers’ Training Plans Click Overdue modules to see which modules are overdue Click Verification Attempts to see failed attempts to take module tests March 2015 Pdm11903 Page 19.03-35 of 35