1
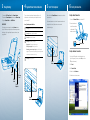
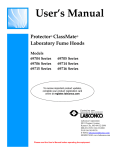
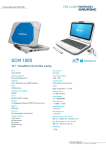
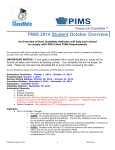
2
1
Connections
Congratulations!
Congratulations on your purchase of an
Intel-powered clamshell classmate PC.
Follow these simple instructions to get
your classmate PC up and running.
Left
1. Headphone jack
2. Microphone jack
3. USB 2.0 port #1
What’s in the box
Intel-powered clamshell classmate PC
Power adapter
1 2 3
Right
4.USB 2.0 port #2
5.SD Card Reader
6.Ethernet Port
7.Power Input
4
5
6
7
Intel-powered
clamshell classmate PC
Replace Battery
1. Unlock static latch
2.Hold spring latch and
lift battery out
3.Snap replacement battery
into slot
4.Lock static latch
Hardware Quick Start Guide
Part of the Intel® Learning Series
© 2008, Intel Corporation. All rights reserved. Intel, and the Intel logo
are trademarks of Intel Corporation in the U.S. and other countries.
* Other marks and brands may be claimed as the property of others.
1208/MG/CMD/PDF
318938-002 US
3
4
Charge Battery
System/Power Status Indicators
1. Connect the AC Power Cord to the Power Adapter.
2.Connect the Power Adapter to the computer Power Input.
3.Plug the Power Cable into a Wall Outlet.
The row of icons located above the keyboard light up with
different colors to indicate the system and power status of
your classmate PC.
IMPORTANT:
The battery must be charged for at least six hours before
first use. The battery charge indicator will become green when
the battery is fully charged. Keep the power cable away from
young children.
Icon System/power indication
Green light: Wireless local area network (WLAN) module is active.
Green light: Numeric keypad is activated.
Green light: Caps lock is activated.
Green light: The battery is charged.
Orange light: The battery is being charged.
Blinking orange light: Battery power is low.
Alternating green and orange light (when the AC adapter is
5
Start The Computer
Press and hold the Power Button for three seconds or until the
screen turns on.
If the screen does not turn on, check the power connection and
strength of the battery. Refer to the user’s manual for
troubleshooting tips.
Set Up A Connection
Set Up a Wired Connection
1.Connect an Ethernet Cable to your classmate PC.
2.Connect the other end
of the Ethernet cable to
a cable modem, DSL
modem, or network.
Ethernet Port
Set Up a Wireless Connection
plugged in): The system has stopped charging the battery because
the battery pack temperature is too high.
6
Green light: The system is on.
Power
Button
1.Verify the WLAN module is active (the wireless icon
light will be green). If it is not, press the Fn key and the
F1 key simultaneously.
2.Click Start.
3.Click Control Panel.
Power
Input
4.Double-click the Wireless icon.
AC Power
Cord
5.Follow the instructions on screen.
Power
Cable
Power
Adapter
Status
Indicators