1
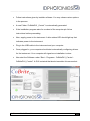
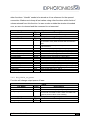
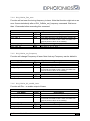
User’s Guide CoBriteDX1 Tunable Laser Instrument E-Mail: [email protected] www.id-photonics.com ID Photonics GmbH, Neubiberg, Germany V1.1 ____________________________________________________________________ Content 1 General Information ............................................................................................. 4 1.1 Warning ......................................................................................................... 4 1.1.1 Laser Safety ............................................................................................ 4 1.2 Line Voltage Selection ................................................................................... 4 1.3 Service .......................................................................................................... 5 2 Packaging List ..................................................................................................... 5 3 Instrument short description ................................................................................ 5 4 3.1.1 Front panel .............................................................................................. 6 3.1.2 Back panel .............................................................................................. 7 Getting Started .................................................................................................... 7 4.1 5 Installation of Control Software ...................................................................... 7 Description of instrument operation ..................................................................... 9 5.1 Controls ......................................................................................................... 9 5.1.1 List of 1ITLA’s ......................................................................................... 9 5.1.2 Open instrument ..................................................................................... 9 5.1.3 Stop ...................................................................................................... 10 5.1.4 Grid ....................................................................................................... 10 5.1.5 WL/Frequency select ............................................................................ 10 5.1.6 Laser frequency .................................................................................... 10 5.1.7 Fine tuning ............................................................................................ 10 5.1.8 Output Power ........................................................................................ 11 5.1.9 Laser on ................................................................................................ 11 5.1.10 ITLA temps & currents ....................................................................... 11 CoBriteDX1 User’s Manual 2 ____________________________________________________________________ 5.1.11 Write custom name ............................................................................ 11 5.1.12 Reset Graph ...................................................................................... 11 5.2 6 Indicators ..................................................................................................... 12 5.2.1 Communication status .......................................................................... 12 5.2.2 WL & Frequency ................................................................................... 12 5.2.3 Laser lock state ..................................................................................... 12 5.2.4 Graphs .................................................................................................. 12 5.2.5 Temperatures & Currents indicators ..................................................... 12 Remote Control ................................................................................................. 12 6.1 Description of DLL functions ........................................................................ 13 6.1.1 DLL_CoBrite_list_devices ..................................................................... 13 6.1.2 DLL_CoBrite_init ................................................................................... 13 6.1.3 DLL_CoBrite_set_power ....................................................................... 14 6.1.4 DLL_CoBrite_fine_tune ......................................................................... 15 6.1.5 DLL_CoBrite_set_frequency ................................................................. 15 6.1.6 DLL_CoBrite_dis_enable_Laser ........................................................... 15 6.1.7 DLL_CoBrite_read_status ..................................................................... 17 6.1.8 DLL_CoBrite_laser_locked ................................................................... 17 6.1.9 DLL_CoBrite_Temps_and_currents ...................................................... 18 6.1.10 DLL_CoBrite_laser_close .................................................................. 18 7 Uninstalling CoBriteDX1 Software ..................................................................... 18 8 User Memos ...................................................................................................... 19 CoBriteDX1 User’s Manual 3 ____________________________________________________________________ 1 General Information 1.1 Warning 1.1.1 Laser Safety The laser sources specified by this user guide are classified according to IEC 608251 (2007) Laser Notice No. 50 dated 2007-June-24. INVISIBLE LASER RADIATION DO NOT VIEW WITH OPTICAL INSTRUMENTS CLASS 1M LASER PRODUCT (IEC 60825-1/2007) Please pay attention to the following laser safety warning: Under no circumstances look into the end of an optical cable attached to the optical output when the device is operational. The laser radiation can seriously damage your eyesight. Do not enable the laser when there is no fiber attached to the optical output connector. The laser is enabled by pressing the ’Laser on’ button in the operating software delivered with the instrument. The laser is on when the red LED on the front panel of the instrument is lit. The use of optical instruments with this product will increase eye hazard. In doubt about laser safety requirements consult a trained laser safety instructor for local safety requirements of this product. 1.2 Line Voltage Selection CoBriteDX1 operates from any single-phase AC power source that supplies 100 ~ 240VAC at a frequency at 47-63 Hz. You do not need to adjust the input line voltage setting because CoBriteDX1 power supply automatically selects an input line voltage in the range specified above. CoBriteDX1 User’s Manual 4 ____________________________________________________________________ 1.3 Service Do not attempt to service or adjust this instrument unless an authorized person is present. Do not install substitute parts or perform any unauthorized modifications to this instrument. Contact ID Photonics or your local distributor to obtain service support. 2 Packaging List The instrument is shipped with following parts 1. Laser instrument 2. Power supply 3. Power cord 4. USB cord 5. Manual 6. Data medium containing installation software 3 Instrument short description This instrument contains a tunable laser module which is controlled via USB and a Windows based GUI. Note: Instrument operates autonomously once set up using the GUI. You may pull USB connection, device will still operate. Note: If USB is plugged in again, Laser will be reset in order to generate a defined starting point for operation. CoBriteDX1 User’s Manual 5 ____________________________________________________________________ 3.1.1 Front panel Two LED based indicators signal state of the instrument: A blue LED indicates if there is power supplied to the instrument. A red LED indicates if Laser emits light. An FC/APC connector, small key, is used to connect single Mode Fibers to the instrument. The laser features a polarization maintaining Fiber output which can be both used with standard single mode fibers and polarization maintaining fibers. Connector Key Stress Rods Slow Axis CoBriteDX1 User’s Manual 6 ____________________________________________________________________ 3.1.2 Back panel Back panel contains connectors for power to supplied power supplier as well as a USB connector for control of the instrument. There is no separate on/off switch. 4 Getting Started This instrument can only be operated using Software under Windows 2000, XP& Windows 7. 4.1 Installation of Control Software Before connecting the USB Port from your computer to the instrument follow the Software installation procedure. Note: If connecting the instrument before Software installation, the instrument will not be detected correctly. Insert Data medium supplied with instrument into computer Change to root Directory which now should be apparent on your computer Double Click on “setup.exe”. Your computer should return the following start screen CoBriteDX1 User’s Manual 7 ____________________________________________________________________ Follow instructions given by installer software. You may chose custom options in the process. A new Folder “CoBriteDX1_Control” is automatically generated. If the installation program asks for a reboot of the computer pls. follow instructions before proceeding. Now, supply power to the instrument. A blue status LED should light up that indicates power to the instrument Plug in the USB cable to the instrument and your computer Once plugged in, your computer should start automatically configuring drivers for the instrument. Your computer will signal once installation is done Now start the Software under “Start – Programs - CoBriteDX1_Control CoBriteDX1_Control”. A GUI is started that should resemble this screenshot: CoBriteDX1 User’s Manual 8 ____________________________________________________________________ Select from “List of 1ITLA’s” the Laser that you like to control and press “Open Instrument”. If only 1 Laser is connected to the computer it will be automatically selected All items in GUI should now be enabled and the instrument is ready to operate 5 Description of instrument operation 5.1 Controls 5.1.1 List of 1ITLA’s If multiple CoBriteDX1 instruments are connected to one host computer this drop down list contains all devices found by the program and are not used by other instances. If multiple devices are connected, each devices can be controlled by starting the according number of instances. 5.1.2 Open instrument Press this button to open the selected instrument. If a laser has been controlled previously, GUI resumes from previous setting. CoBriteDX1 User’s Manual 9 ____________________________________________________________________ 5.1.3 Stop Allows stopping GUI in a controlled way. Alternatively, standard Windows application close function in upper right part of window may be pressed. Note: Laser will continue to operate with last setting. 5.1.4 Grid Use this drop down menu to select ITU grids from 25 GHz to 400GHz in order to allow easily dial in those Frequencies using the rocker switch button control “Laser Frequency”. If “None” is selected, any arbitrary Frequency can be adjusted to the laser in 100MHz increments within available Frequency range. 5.1.5 WL/Frequency select If “None” is selected for Grid this button allows to cycle the Laser Frequency control to Wavelength mode allowing to dial in Lambda instead of Frequency. 5.1.6 Laser frequency Use this button to dial in frequency to be used by laser. Control is automatically coerces to maximum and minimum possible frequency. Note: If Laser is currently operating at a different frequency, Laser light will be shut off for tuning process. If you require continuous tuning, refer to the Fine tuning feature described below 5.1.7 Fine tuning This option allows deviating Laser frequency from initial set value. As opposed to “Laser frequency” tuning, the Laser remains switched on during tuning and keeps optical specifications stable. Furthermore, relative tuning granularity is superior over “Laser frequency” tuning. CoBriteDX1 User’s Manual 10 ____________________________________________________________________ Note: If Laser was previously set using the “Laser frequency” option, Fine tuning will be temporarily disabled for a few seconds to let the laser stabilize before fine tuning can be performed. 5.1.8 Output Power Control allows to configure output power of Laser. Control coerces to available power range. 5.1.9 Laser on Button allows switching on and off the Laser. A Pop-up will appear requiring confirmation if Laser is switched on for Laser safety reasons. 5.1.10 ITLA temps & currents Button allows enabling or disabling monitoring of TEC & Laser diode currents and Case temperature at Laser housing and Laser diode chip temperature. Values and graphs are displayed at right hand side of GUI 5.1.11 Write custom name Pressing this button will open a Pop-Up that allows writing arbitrary names into EEPROM of instrument. As limited space is available, a button is used to check remaining available space for custom name. This feature is very helpful if multiple instruments are connected to one computer where it is difficult to distinguish devices. Note: Custom name will remain in instrument even after power reset. Default custom name is serial number of device. 5.1.12 Reset Graph Will reset data currently displayed in graphs left to button. CoBriteDX1 User’s Manual 11 ____________________________________________________________________ 5.2 Indicators 5.2.1 Communication status Indicates communication status between Program and Laser. In case of failure, program will stop operating. One may restart software by right arrow apparent if Software stops operating. 5.2.2 WL & Frequency Displays currently set Wavelength and Frequency of Laser which is calculated out of Laser frequency setting and Fine tuning setting. 5.2.3 Laser lock state Indicates if the Laser is currently tuning to a new operating state if user changed a laser parameter. Indicator is update each 100ms. Note: Laser might not comply to all specifications during tuning 5.2.4 Graphs Graphs are enabled by “ITLA temps¤ts” control and traced over time. This view is not needed to operate the unit but might be helpful to trace the Laser operation. 5.2.5 Temperatures & Currents indicators Indicate current value of according parameters which are shown in graphs at same time. 6 Calibration requirements The Laser does not require any regular calibration in order to function correctly. If calibration traceability according to i.e. ISO 9001 standard is required, an approved laboratory shall calibrate the instrument for Frequency accuracy and output power. CoBriteDX1 User’s Manual 12 ____________________________________________________________________ Please find below a table with relevant accuracy parameters to be checked against for calibration of the device. Parameter Optical output power accuracy over Lifetime Frequency accuracy over Lifetime Specification +/- 1dB +/- 1.5GHz 7 Remote Control A DLL is supplied on installation medium that allows remote control of the instrument. Depending on your PC configuration, you might have to run an installer in according subdirectory before DLL can be used. A LabView example is provided on accompanied data medium to illustrate usage of the DLL. 7.1 Description of DLL functions Please note the Header File “CoBriteDX1_control.h” in the according DLL directory on the supplied data medium. It provides a description of each function available including data type description. 7.1.1 DLL_CoBrite_list_devices This function will return description of all CoBriteDX1 devices connected to the PC. Refer to section 5.1.11 for more details on user name and description. Output Var Name Type ListOfDevicesInclName Char LNge int32 Description User names of CoBriteDX1 of all lasers connected to PC. Description of each Laser is separated by carriage return. Length of char array returned 7.1.2 DLL_CoBrite_init Will initialize connection the Laser and provide its current status as well as its optical tuning capabilities. This function must always be executed before running any of the CoBriteDX1 User’s Manual 13 ____________________________________________________________________ other functions. “Handle” needs to be stored as it is a reference for the opened connection. Make sure to keep all set values using other functions within limits of values returned from this function. In case a value outside the window is handed over, an error is returned and the command is not executed. Input Var Name CoBrite_number Type int32 Description Number of laser to be opened starting from 0 Output Var Name Type Description Handle uint32 ProtocolVersion double FrequencyStepGHz FrequencyMaxGHz FrequencyMinGHz currLaserFrequencyTHz PowerStepDBm PowerMaxDBm PowerMinDBm currentOpticalPowerDBm FineTuneRangeStepGHz FineTuneRangeMaxGHz FineTuneRangeMinGHz currentFineTuneFrequencyGHz LaserOnOff Error_code_out uint16 double double double double double double double double double double double int16 int32 Reference number to the opened connection, required for execution of any other function that accesses the laser. An internal variable required for special some functions to be executed. Minimum Frequency Step supported [GHz] Maximum Frequency supported by Laser [THz] Minimum Frequency supported by Laser [THz] Current Laser Frequency [THz] Minimum Power step supported [dB] Maximum Power supported by Laser [dBm] Minimum Power supported by Laser [dBm] Current optical Power [dBm] Min. Fine Tune Frequency Step supported [GHz] Max. Fine Tune Frequency supported by Laser [GHz] Min. Fine Tune Frequency supported by Laser [GHz] Current Fine Tune Frequency [GHz] Laser On/Off state. On: 1; Off: 0 Error state; 0: ok; >0: Error 7.1.3 DLL_CoBrite_set_power Function will change output power of laser. Input Var Name Handle OutputPowerDBm Error_code_in Type uint32 double int32 Description Input handle retrieved from DLL_CoBrite_init Hand over desired Output power [dBm] If any value other than 0 is handed over; function will not execute command to laser. Hand over state from previous function call for error handling. Output Var Name Error_code_out CoBriteDX1 User’s Manual Type int32 Description Error state; 0: ok; >0: Error 14 ____________________________________________________________________ 7.1.4 DLL_CoBrite_fine_tune Function will set new fine tuning frequency to laser. Note that function might return an error if executed shortly after a DLL_CoBrite_set_frequency command. Wait more than 15 seconds before executing this command. Input Var Name Handle ProtocolVersion Error_code_in Type uint32 uint16 int32 Description Input handle retrieved from DLL_CoBrite_init Hand over value retrieved from DLL_CoBrite_init If any value other than 0 is handed over; function will not execute command to laser. Hand over state from previous function call for error handling. Output Var Name Error_code_out Type int32 Description Error state; 0: ok; >0: Error 7.1.5 DLL_CoBrite_set_frequency Function will change Frequency of laser. Note that any Frequency can be dialed in. Input Var Name Handle FrequencyTHz Error_code_in Type uint32 double int32 Description Input handle retrieved from DLL_CoBrite_init Laser Frequency [GHz] If any value other than 0 is handed over; function will not execute command to laser. Hand over state from previous function call for error handling. Output Var Name Error_code_out Type int32 Description Error state; 0: ok; >0: Error 7.1.6 DLL_CoBrite_dis_enable_Laser Function will Dis – or enable output of Laser. Input Var Name Handle Laser_on_off Error_code_in Type uint32 int32 int32 Description Input handle retrieved from DLL_CoBrite_init Set new state of Laser. 1: On; 0: Off If any value other than 0 is handed over; function will not execute command to laser. Hand over state from previous function call for error handling. Output Var Name Error_code_out CoBriteDX1 User’s Manual Type int32 Description Error state; 0: ok; >0: Error 15 ____________________________________________________________________ CoBriteDX1 User’s Manual 16 ____________________________________________________________________ 7.1.7 DLL_CoBrite_read_status Function will read current status of Laser. Note that execution time of this command can be long. Input Var Name Handle ProtocolVersion Error_code_in Type uint32 uint16 int32 Description Input handle retrieved from DLL_CoBrite_init Hand over value retrieved from DLL_CoBrite_init If any value other than 0 is handed over; function will not execute command to laser. Hand over state from previous function call for error handling. Output Var Name Type LaserFrequencyTHz FineTuneFrequencyTHz currentOpticalPowerDBm LaserOnOff LaserLockState double double double Int32 int32 Error_code_out int32 Description Current Laser Frequency [THz] Current Fine Tune Frequency [GHz] Current optical Power [dBm] Laser On/Off state. On: 1; Off: 0 Indicates whether Laser currently tunes to a new setting (value 0) or is stabilized (1) Error state; 0: ok; >0: Error 7.1.8 DLL_CoBrite_laser_locked Function will indicate whether Laser is locked and all optical parameters are within specification. Note that Laser will return state “tuning” if output is turned off. Input Var Name Handle Error_code_in Type uint32 int32 Description Input handle retrieved from DLL_CoBrite_init If any value other than 0 is handed over; function will not execute command to laser. Hand over state from previous function call for error handling. Output Var Name Type LaserLockState int32 Error_code_out int32 CoBriteDX1 User’s Manual Description Inditcates if laser is locked. 0: Laser tunes; 1: Laser locked Error state; 0: ok; >0: Error 17 ____________________________________________________________________ 7.1.9 DLL_CoBrite_Temps_and_currents Function will return relevant temperatures and currents of laser to indicate its state. Please refer to section 5.1.10 for more details. Input Var Name Handle Error_code_in Type uint32 int32 Description Input handle retrieved from DLL_CoBrite_init If any value other than 0 is handed over; function will not execute command to laser. Hand over state from previous function call for error handling. Output Var Name Type TECMA Double LaserDiodeMA CaseTempC LaserTempC Error_code_out Double Double Double int32 Description TEC current [mA] sign indicates whether TEC is in cooling or heating mode Laser diode current [mA] Case temperature at base of Laser base [°C] Laser diode temperature [°C] Error state; 0: ok; >0: Error 7.1.10 DLL_CoBrite_laser_close Use this function to close the connection to the laser. Always use this function to disconnect from Laser as no subsequent connections to the Laser are possible. Input Var Name Handle Error_code_in Type uint32 int32 Description Input handle retrieved from DLL_CoBrite_init If any value other than 0 is handed over; function will not execute command to laser. Hand over state from previous function call for error handling. Output Var Name Error_code_out Type int32 Description Error state; 0: ok; >0: Error 8 Uninstalling CoBriteDX1 Software Software may be uninstalled by either using the well-known central Windows built-in “Add/remove Programs” function or by running “setup.exe” from installation medium again. CoBriteDX1 User’s Manual 18 ____________________________________________________________________ 9 User Memos (following pages are intentionally left blank for user notes) CoBriteDX1 User’s Manual 19 ____________________________________________________________________ CoBriteDX1 User’s Manual 20