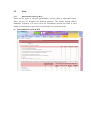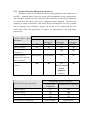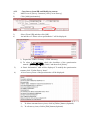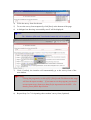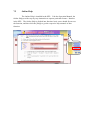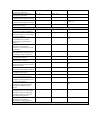
1
Self-evaluation Platform (SEP)
on
Information Technology in Education (ITEd) for Schools
User Guide
Mar 2006
[Version 3.0]
Table of Content
About this User Guide .................................................................................6
Chapter 1 Introduction to SEP .................................................................7
1.1 About SEP.....................................................................................7
1.2 Terminology..................................................................................8
1.3 Basic Concepts..............................................................................9
1.3.1
1.3.2
1.3.3
1.3.4
1.3.5
1.4
Data Accuracy ............................................................................................ 9
User-friendliness ........................................................................................ 9
Flexibility................................................................................................. 10
Extendibility............................................................................................. 10
Limitations ............................................................................................... 10
System Components of School SEP ...........................................12
1.4.1
1.4.2
User Management .................................................................................... 12
Survey Item Bank .................................................................................... 18
1.4.3
1.4.4
1.4.5
1.4.6
Survey Generator ..................................................................................... 20
Report Generator...................................................................................... 23
Data Capture ............................................................................................ 25
Do Survey ................................................................................................ 27
Chapter 2 SEP Website ............................................................................28
2.1 EMB Data Package Download ...................................................29
2.2 SEP Documents Download.........................................................30
2.3 Link to “Overall Study on Reviewing the Progress and
Evaluating the Information Technology in Education (ITEd)
Projects 1998/2003”....................................................................31
Chapter 3 SEP System..............................................................................32
3.1 Deploying SEP in schools...........................................................32
3.1.1
3.1.2
3.1.3
3.2
3.2.1
3.2.2
3.2.3
3.3
3.4
3.5
3.5.1
Platforms and Limitations........................................................................ 32
Running SEP within School Network...................................................... 32
Enabling Internet Access to SEP.............................................................. 33
Tools............................................................................................34
Questionnaire and Log Sheet ................................................................... 34
Online and Offline Modes of Operation .................................................. 36
Data Analysis and Report Generator........................................................ 38
Survey Item Types ......................................................................39
Built-in Structure and Samples in SIB........................................40
Tailoring SEP to Your Needs ......................................................43
SIB Tree Structure.................................................................................... 43
3.5.2
3.5.3
3.5.4
Attributes.................................................................................................. 43
Survey Group(s)....................................................................................... 44
Build Your Own Survey(s)....................................................................... 45
Chapter 4 Tasks for Survey Manager ......................................................47
4.1 Roles and Privilege of Survey Manager .....................................47
4.2 Considerations When Designing a Survey .................................49
4.2.1
4.2.2
4.2.3
4.2.4
4.2.5
4.3
Strategies when Designing the Survey..................................................... 49
Strategies when Designing/Implementing the PDA Questionnaire ......... 51
Decide the Required Reports for the Survey ........................................... 53
Strategies of Defining the Target Respondents Selection for the
Required Reports ..................................................................................... 54
Mode of Conducting the Survey .............................................................. 55
Examples.....................................................................................56
4.3.1
4.3.2
Flow Chart of Creating Survey in SEP .................................................... 56
Copy Survey from SIB and Modify its content ....................................... 57
4.3.3
4.3.4
Create Survey from the Scratch ............................................................... 60
Create a Survey for Cross-Timeframe Comparison................................. 61
4.4
4.4.1
4.4.2
4.5
4.5.1
4.5.2
4.6
4.6.1
4.6.2
4.6.3
Practical Tips...............................................................................63
Use a Table to design a Survey ................................................................ 63
Use a Table to Identify Target Users and Survey Groups ........................ 64
DS Questionnaire........................................................................64
Create a DS Questionnaire....................................................................... 64
Manage a DS Questionnaire .................................................................... 65
KM Questionnaire.......................................................................65
Import a KM Questionnaire Set............................................................... 65
View KM Reports .................................................................................... 65
Understand Data Collection Requirement File ........................................ 66
Chapter 5 Tasks for Survey Helper ..........................................................67
5.1 Roles and Privilege of Survey Helper ........................................67
5.2 Before You Start..........................................................................68
5.3 Data Capture ...............................................................................69
5.3.1
5.3.2
5.4
5.4.1
5.4.2
5.4.3
5.4.4
Online Data Capture for Named Survey .................................................. 69
Online Data Capture for Anonymous Survey .......................................... 72
Offline Data Capturer (ODC) .....................................................74
Download ODC of a Particular Survey ................................................... 74
Input Named Survey using ODC ............................................................. 75
Input Anonymous Survey using ODC ..................................................... 78
Import Data from Offline Data Capturer ................................................. 81
5.4.5
5.4.6
Amend Named Surveys ........................................................................... 85
Amend Surveys Using Reference Number .............................................. 85
5.5 Download Log of Offline Data Record ......................................87
5.6 Modify Named Survey................................................................88
5.7 Amend Surveys Using Reference Number.................................89
5.8 Practical Tips...............................................................................90
Chapter 6 Tasks for SIB Manager............................................................91
6.1 Roles and Privilege of SIB Manager ..........................................91
6.2 Recommended Strategies to Maintain Survey Item Bank..........92
6.3 Standardize School Folder Structure in the Item Bank ..............93
6.4 Standardize Attributes.................................................................94
6.5 Re-construction of Attributes......................................................95
6.6 Copy and paste the Pre-installed Surveys from EMB Folder to
the School Folder ........................................................................96
6.7 Maintain Survey Items Created by Resigned Staff.....................97
6.8 Import updated version of EMB Data Package to the EMB
Folder of the Item Bank ..............................................................98
6.9 Import / Export Questionnaires into / from the SIB ...................98
6.10 Practical Tips...............................................................................99
Chapter 7 Help and Support .................................................................100
7.1 Manuals.....................................................................................100
7.2 Online Help...............................................................................101
7.3 Online FAQs .............................................................................102
7.4 What’s New?.............................................................................103
Appendix 1: Terminology ........................................................................104
Appendix 2: Survey Item Types..............................................................107
A2.1 General Type .............................................................................107
A2.2 Advance Type ...........................................................................111
Appendix 3: Report Layout for Questionnaire .....................................116
A3.1 Overall Reports .........................................................................116
A3.2 Comparison Reports .................................................................117
A3.3 Results Summary ......................................................................118
A3.4 Self-Evaluation Rubric .............................................................119
A3.5 Attributed Questionnaire Item ..................................................119
Appendix 4: Report Layout for Log Sheet ............................................120
A4.1 Item-by-item Comparison Report.............................................120
A4.2 Individual User Log Sheet ........................................................120
Appendix 5 ITEd Indicators ...................................................................121
A5.1 –Matching of ITEd Overall Study (2005) Question Items with
Phase (I) Study ITEd Evaluation Framework (2006)...............127
A5.2 – Phase (I) Study ITEd Evaluation Framework .........................130
A5.3 – Title & Internal Code for Questionnaires of Phase (I) Study
by School Types and Stakeholders ...........................................140
About this User Guide
This User Guide provides an overview of the functions and features of SEP.
Detailed instructions for using the SEP are provided in the Operation Manual.
The target readers of the User Guide are the System Administrator, Survey Item
Manager, Survey Helper and Report Viewer of respective schools.
Chapter 1 Introduction to SEP
1.1
About SEP
To facilitate self-evaluation on Information Technology in Education (ITEd) in
schools, the Education and Manpower Bureau (EMB) has commissioned the Hong
Kong Institute of Education (HKIEd) to develop a user-friendly and extensible
self-evaluation platform (SEP) for all school sectors (Primary, Secondary and Special)
in Hong Kong.
Based on the survey tools developed under the Overall Study conducted by the
Hong Kong Polytechnic University (PolyU), the Project Team of the HKIEd has
designed, developed, implemented and rolled out a stable, user-friendly and extensible
platform on ITEd for schools’ self-evaluation. It is expected that the SEP will help
schools to make full use of information technology facilities and resources, develop
sound policy and planning in promoting the use of technology in education and
implement ITEd in schools.
1.2
Terminology
As a start, it is necessary to have a mutual understanding of the term ‘survey’
with the readers. A survey in this context is defined as an instrument used to collect
information for a particular purpose. There are two major types of surveys which are
provided or created in the SEP. The first type is a questionnaire and the other is a log
sheet or an observation form. A survey consists of a number of survey items which
may either be responsive (e.g. selecting a choice) or supplied type (e.g. filling in
words). A survey item is composed of two parts: the item stem and the item responses.
The item stem is a description of the question or information to be collected.
Examples are: “What do you usually use a computer for at home?” in a questionnaire
or “Location of an activity” in a log sheet. The item responses are either the choice(s)
to be selected or the information to be supplied by the respondents of a survey.
The SEP “user” refers to a person who is assigned with different operation
privileges within the system. There are at least three types of users: the “System
Administrator”, the “Survey Manager” and the “Survey Target User/Respondent”.
The System Administrator has full or partial control of all the operations in the SEP,
depending on the implementation strategy of the SEP. The Survey Manager has full
rights to revise and create a survey. The Survey Respondent is the person who is
assigned and required to provide responses to the survey items in a survey.
A detailed list of terminology is provided in Appendix 1 for quick reference.
1.3
Basic Concepts
When designing the SEP on ITEd for schools’ self-evaluation, the Project Team
has considered the following principles, which are derived from the perspectives of an
evaluator and different types of school users.
1.3.1
Data Accuracy
The SEP is designed for schools to conduct self-evaluation on ITEd by collecting
useful information from different stakeholders such as school staff, students, and
parents as related to ITEd. In order to collect valid and reliable data from these
stakeholders, at the administrative level, the SEP adopts a closed survey strategy in
which the identities of all stakeholders are known. Such measure prevents interference
from unknown users and safeguards the accuracy and the number of responses from
the stakeholders as double entry is not feasible under such strategy. Also, an accurate
response rate can be calculated as non-respondents can be easily traced in the system.
The design of the SEP has also taken the ethical issue about the anonymity of a survey
into consideration. The responses to the survey items by an individual respondent are
not saved unless a named survey is conducted (in this case, the respondents are
informed well in advance before the survey). As a result, only the aggregate
information of all the respondents in a group is displayed. In this regard, the SEP
requires a user management function which helps to create accounts for different
stakeholders. A logon procedure is also required to keep track of all survey activities
such as survey creation and data collection. All of these system operations and survey
activities are recorded in the data bank via the “System Log:” of the SEP.
1.3.2
User-friendliness
Several enhancement features have been made in SEP to facilitate its
user-friendliness. Firstly, an interactive, easy-to-follow workflow and traceable
direction path are employed in the interface design. The SEP allows users to create a
new survey by selecting survey items from the existing sample surveys (designed by
POLYU) and school-based surveys (designed by school users). To facilitate users to
compile different survey items into a new survey, the “attributes” system has been
developed in the SEP for easy search of a particular survey item. When a survey is
published for on-line data collection, the school management has to notify the target
respondents to log onto the SEP to complete the survey on-line. To facilitate such
logon procedure, the SEP can output a HTML tag (in a text file) so that the School
System Administrator can embed this tag into the existing homepage of the school. In
doing so, the target respondents are informed of the requirement(s) of doing a survey
and prompted to logon to the SEP when they enter the homepage of the school. At
the administrative level, the SEP has built in “health checking” and “system recovery”
capabilities. The Administrative User can easily make use of these bundled tools to
check the version and status of the installed components of the system. Once
discrepancies are found, the user can resolve the problems by making use of the
system recovery tools.
1.3.3
Flexibility
The SEP has provided an “Offline Data Capturer”, “Privilege Assignment”,
“Multiple Result Output” and “Multiple Data Comparison” to enhance the system
flexibility. As it is sometimes not feasible to do a survey on-line, an “Off-line Data
Capturer” mechanism is designed to facilitate data entry for paper-and-pencil surveys.
The “privilege assignment” mechanism in the SEP also allows flexibility for the
operation of the system. Different operation privileges can be assigned to different
users. Through the SEP, privileges for such operations can easily be added and deleted
later if they are no longer required. The SEP can generate different output formats of
the analyzed data to cater for different needs of the schools. The SEP has three
comparison modes built in: “Compare across Timeframe”, “Compare across Groups”
and “Compare across Survey Items” for retrieving relevant information.
1.3.4
Extendibility
For future planning and development of ITEd in schools, individual schools may
need to conduct specific surveys which are related to their particular school contexts.
In this regard, the Survey Generator of the SEP is designed for the creation of a new
survey in two different modes: “From SIB” and “From Scratch”. The newly created
survey can then be saved into the Survey Item Bank in which a specific folder (e.g.
School-based Surveys) has been created for this purpose. Users can construct a folder
structure according to a school-based convention (e.g. by subjects or by classes) under
this root folder. Within the dynamic environment provided by the system, the SEP
may also be used in other school self-evaluation activities not restricted to ITEd in
schools.
1.3.5
Limitations
The SEP Project Team has always aimed at rolling out a stable, user-friendly and
extensible platform on ITEd for schools’ self-evaluation. Given the constraints on the
resources and requirements of the project, there are; however, some limitations when
using the SEP for schools’ self-evaluation. For example, the Report Generator can
only cope with basic statistics of data analysis. High level analysis such as correlation
and inferential testing are beyond the scope of this platform as such analysis demands
users’ professional knowledge in evaluation and statistics. Moreover, the validity and
reliability of other surveys created by school users are not guaranteed as they are
dependent upon users’ professional knowledge in the design and implementation of a
survey. Similarly, although the SEP will be bundled with some templates which
demonstrate the procedures of retrieving useful information (within and across
surveys) for common scenarios concerning the establishment of an individual school’s
ITEd profile, whether such information is used meaningfully depends very much on
the professional judgment of school users. All the above point to the fact that whether
the SEP can be used professionally depends very much on the users’ competencies
both in the knowledge and skills in the design and process of an evaluation.
1.4 System Components of School SEP
There are two separate but similar systems: one is EMB SEP and the other is
School SEP. In the School SEP, there are six main component modules: User
Management (UM), Survey Item Bank (SIB), Survey Generator (SG), Data Capture
(DC), Report Generator (RG) with Data Comparison (DC) features, and Data Archive
(DA) as well as a supplementary module - Log Module. Two special features which
are Data Sharing (DS) and Knowledge Management (KM) are included in the SG
module.
1.4.1
User Management
1)
Overview
The System Administrator uses the UM functions to create user accounts, to
define groups and to assign privileges to the groups after installation of the SEP. The
user account is used for user authentication and identification during the login
procedure and user authorization in the operation of other functions in the system. In
addition, “User Account Integration (UAI) with Other System(s)” at schools provides
functions for optional individual user account authentication in addition to the
existing user account authentication method. For details, please refer to Appendix F as
described in Administrator Manual. There are two means of creating user accounts: (1)
using the web interface of the system and (2) importing a batch file from outside
(extracted from WebSAMS for creating teachers and students accounts). Before
creating the user accounts, the System Administrator has to create different user
groups and assign different privilege schemes to these groups. A user and group
search function is provided in the “User Management” to facilitate user and group
management. A “Restore deleted user” function is available for the System
Administrator to restore user accounts if accidental deletion of user accounts occurs.
A log entry is recorded for each “save and delete” action in the “User Management”
for audit purpose by the System Log.
2)
Maintain Groups
Group Management provides functions for the System Administrator to manage
groups in SEP. There are five types of groups (system group, form group, class
group, survey group, and privilege group) with different operation privileges in the
SEP. All these pre-defined group types cannot be added or deleted. These five groups
types are used to facilitate the System Administrator to group a list of users with
common properties. The properties of these five group types are:
−
“System Group” type includes pre-defined user groups which cannot be
added or deleted. They are: (1) Administrator, (2) Teacher, (3) Student, (4)
Parent, and (5) Others.
−
“Form Group” type is used to group students into forms and schools can
define Form groups according to the operating class levels.
−
“Class Group” type is used to group students into classes and schools can
define Class groups according to the operating classes.
−
“Privilege Group” type is used to assign specific access rights to a list /
group of users. The System Administrator can create user groups with
various combination of privileges assigned.
−
“Survey Group” type is used to group users with common properties (e.g.
students with computers at home, and student without computers at home)
for group comparison in a survey analysis.
With the exception of System Group type, the System Administrator can create
groups under the Form Group type, Class Group type, Privilege Group type and
Survey Group Type according to operation in schools. Group(s) can be created
through the web interface.
Additional procedures are needed for maintaining groups under the Class/Group
type. Form groups and Class groups should belong to a particular school year to form
a unique group identity (e.g. 2004-05 1A). Codes (“CLASSLVL” and
“CLASSCODE”) must be assigned to these groups for duplicate creation in the same
academic year in SEP. In spite of performing these procedures when maintaining
Form groups and Class Groups on the web interface, the mapping of school year,
assigning group code and creation of all Form groups and Class groups can be done
automatically through CSV file importation of student data. During the procedure of
importing both student and parent accounts in SEP, the system automatically creates
Class Group and Form Group for students and parents. To segregate groups for
students, the system adds a prefix “p” to the Class groups and Form groups for
parents.
3)
Maintain User Accounts
User Account Management provides functions for the System Administrator to
maintain the user accounts in the SEP. It provides functions to add user accounts (add
users and import users), update accounts, delete accounts and restore deleted users.
There are two means of creating user accounts: (1) using the web interface of the
system and (2) importing a batch file from outside (extracted from WebSAMS for
creating teachers and students accounts).
Special notes: Before creating any student/parent accounts, the System
Administrator should define the school year in the System Parameter under the
“System Tools”. Meanwhile, each student account should have a User Identity.
The System Administrator can use Students’ Registration Number as students’ user
identities. The system will capture this user identity to maintain relevant student
records across each academic year.
4)
Import User Accounts
To import batch user accounts, the System Administrator prepares a CSV file
from WebSAMS with required user information and then uploads this CSV file to the
SEP. To import teacher or student accounts, the System Administrator selects the
teacher or student group respectively. To import both student and parent accounts at
the same time, the System Administrator selects the group “Student and Parent”. For
each type of users’ import, the system requires different fields in the CSV file. The
system checks the selected group types and fields in the CSV file to prevent incorrect
data import. The system scans the CSV file to validate the content of the file, and
imports the user accounts if the content is valid. It shows all errors with descriptions
and row numbers if there is / are any error(s). As the parent accounts are generated
from the student accounts, the Login ID of successfully generated parent accounts
will be “p+student’s registration number”. If the “Integrating with Other System(s)” is
enabled, additional field(s) is/are requested in the CSV file. For teacher and other user
account import, there is a “REMOTEID” field added. For student user account import,
“REMOTEID” and “PARENTREMOTEID” fields are added. A SQL statement for
extracting student user accounts from WebSAMS into CSV file is provided in
Operation Manual (Chapter 3.3.5). The CSV file contains “REMOTEID” and
“PARENTREMOTEID” fields with the value of “LOGINID” as the default value of
“REMOTEID” and “p” plus “LOGINID” as the default value of
“PARENTREMOTEID”.
5)
Assign Privilege
Group Management provides functions for the System Administrator to assign
privileges to groups in SEP. There are eleven privileges in the system. These
privileges are “System Interface Setting”, “User Management”, “Survey Item Bank
Management”, “Survey Management”, “Data Input Management”, “Do Survey”,
“Report Management”, “Data Archive Management”, “Log Management”, “Password
Management”, and “Published Survey Management”. The System Administrator is
able to assign these privileges to different user groups (except Survey groups). A
Privilege group is used for grouping a list of users with common privileges. The
resulting privilege(s) for each account is / are the aggregate privileges of all groups
that the user belongs to.
6)
Restore Deleted Users
Restore Deleted Users provides functions for the System Administrator to restore
deleted user accounts. The restored user account can be restored with properties of
assigned group(s) before it was deleted. Restore deleted users, however, cannot be
performed if there is an active account using the same login ID and / or User Identity.
In addition, deleted student/parent accounts cannot be restored if there is an active
account with same class and same class number.
7)
User Account Integration (UAI) with Other System(s)
“User account integration (UAI) with other system(s)” at schools provides
functions for optional individual user account authentication in addition to the
existing user account authentication method. This optional method is an open source
routine to enable schools to modify it according to their needs.
Schools can configure the authentication method in SEP configuration file. The
two modes of user login authentication are “Using SEP database” and “Integrating
with other system(s)”. If “Integrating with other system(s)” is selected, “Change
Password” and “Student Password Reset” will be disabled. Password checking will
also be ignored when importing user accounts. Each user should have a corresponding
account in the master system. For mapping user accounts between SEP and the master
system, a new user property field, remote ID, will be provided. For teacher and other
user account import, there is a “REMOTEID” field added. For student user account
import, “REMOTEID” and “PARENTREMOTEID” fields are added.
(Note: A SQL statement for extracting student user accounts from WebSAMS into
CSV file is provided in Operation Manual (Chapter 3.3.5). The CSV file contains
“REMOTEID” and “PARENTREMOTEID” fields with the value of “LOGINID” as
the default value of “REMOTEID” and “p” plus “LOGINID” as the default value of
“PARENTREMOTEID”.)
The “Integrating with Other System(s)” requires Administrator to map each user
account in SEP with that in other system(s). However, this mapping is not always
possible. For example, when mapping SEP user accounts with a domain controller in
school LAN, it is found that there is not any “parent” and “others” accounts in the
school domain controller. To cope with this situation, schools may leave “remote ID”
for these SEP accounts as an empty field, then the SEP system will by-pass the user
account integration function and resume the original password authorization
procedure. This mechanism provides more flexibility for Administrator in managing
user accounts.
8)
Create DS Questionnaire(s) in DS Host
Data Sharing (DS) feature provides functions for EMB and schools respectively
to generate and disseminate questionnaire survey set(s) online to a group of schools
and gather survey results into a centralized system. Cross-group or cross-school
comparison reports can be generated from the collected responses.
9)
Manage DS Questionnaire(s) in DS Client
A DS Client can import a DS Questionnaire package and then publish the
questionnaire(s) in local site. After collecting responses from local respondents,
school can export the responses to a responses data package and then send the
package back to the DS Host. If the DS Host is EMB, schools can submit the
responses to EMB online.
10) Manage KM Questionnaire Set
A set of questionnaires can be prepared by EMB in EMB SEP and exported as a
KM questionnaire file. Schools can download the questionnaire file and import it into
School SEP for later publishing. Since the questionnaires are designed with a pre-set
framework, a set of special reports can be generated in the Report Generator.
EMB may distribute a data collection requirement file to those schools from
which survey data are to be collected. Upon importing the requirement file into the
system, schools may publish KM questionnaire(s) according to EMB requirement(s).
After administering the survey, schools may export the responses into a response file
and submit it to EMB via different means.
1.4.2
Survey Item Bank
1)
Overview
The SIB provides functions for Item Bank management that includes survey
(folder) structuring and survey maintenance as well as attributes management and
survey item maintenance. Surveys and Survey Items are stored in SIB for future use.
For the Item Bank in schools, a folder tree structure is used for organizing surveys in
the system. There are two main branches in the tree structure, an “EMB” folder and a
“School” folder. The “EMB” folder consists of pre-installed sample surveys provided
by EMB while the “School” folder includes school-based surveys that are created by
teachers of the schools. Sub-folders under the “EMB” folder are pre-defined
(according to different school sectors). A set of sample surveys is ready for schools to
use under these subfolders. Users are not allowed to update or delete either the folder
structure or the pre-installed surveys within the “EMB” folder. However, such
operations are not restricted in the management of the “School” folder. Surveys in
the SIB are constructed from survey items and an “attributes system” is used to
categorize the survey items.
2)
Item Bank
Item Bank provides functions for managing the folder structure and surveys.
Item bank is a pool for storing all surveys provided by EMB or created by schools.
A folder tree structure is pre-defined according to the types of schools (Primary,
Secondary and Special) and the categorization of sample surveys. The Item Bank
folder tree has two main branches (EMB and School folders). Under the EMB folder,
the Primary, Secondary, and Special sub-folders (school type level) are pre-defined
for placing sample surveys for different types of schools. Under the school type level,
other sub-folders (e.g. I.T.) are created for storing categorized surveys with different
objectives.
Users with either “Survey Item Management” or “Survey Management”
privilege can access the Item Bank. A school SIB user has no rights to update either
the EMB folder structure or the sample surveys under the EMB folder. User(s) who
possess(es) the privilege of “Survey Item Management” has / have the full control of
all survey items and surveys stored in the “Item Bank ”. However, the user(s) who
possess(es) the “Survey Management” privilege can add additional folder(s), update
and delete the folder(s) created by himself / herself / themselves. To prevent deletion
of folders and surveys accidentally, users are enabled to delete empty folders (folders
which do not contain sub-folders or surveys).
Questionnaire(s) maintained in Survey Item Bank can be exported as a
questionnaire file. More than one questionnaire can be exported at the same time
within Survey Item Bank. A questionnaire import function is also provided for
importing a questionnaire file into Survey Item Bank.
3)
Attributes
Attributes List provides functions for managing the attributes. An “attributes
system” is used for survey item categorization and searching. There are two types of
attributes: the first type is those pre-defined by the SEP (e.g. surveys are grouped by
themes) and the second one is those created by the school (e.g. school-based surveys
are grouped by subjects or classes). Users can add, update, and delete these attributes.
Values / sub-values can also be added under these attributes to form an attribute
hierarchy. Besides, a function is provided for re-construction of “attributes system” by
moving a branch of attributes to another branch. However, attribute(s) marked with
“*” in the Attribute List are pre-defined by EMB. These attributes cannot be edited
and deleted.
4)
Survey Item
Survey Item provides functions for managing survey items. There are ten types
of survey items (which include Single Selection, Multiple Selection, List Mode of
Single Selection, Multiple Column Selection, Grouped Single / Multiple Selection,
Standard Mode, Advanced Mode 1, Advanced Mode 2, Advanced Mode 3, and
Advanced Mode 4) that can be created in SEP. School SIB users can add, copy and
edit survey item(s) within the SIB. The users can also delete survey item(s) added by
school users within the SIB. A survey item consists at least of three parts; Item Stem,
Item Responses and Compulsory Setting. The Item Stem is either a description /
question part of a survey item. The Item Responses is the available option(s) of a
survey item. Lastly, the Compulsory Setting is used to control if it is a “must-answer
question” in a survey.
There are Compulsory Settings for both a survey item and a text field of an item
response within a survey item. These Compulsory Settings are independent even
when they are used in the same survey item. Compulsory Setting for a survey item
is to control whether it is a “must-answer-question” in a survey. The Compulsory
Setting of a text field is a refined setting for the system to check if the text field has
been input when respondent selects the item response. To suit the purpose of a
particular survey, these Compulsory Settings can be changed when creating a survey
in “Survey Generator”. However, there are two cases that the compulsory setting is
automatically disabled by the system. The first case is when the “None” is selected
in the Selection Mode of the “Single or Multiple Selection” type of a survey item, the
Compulsory Setting of the survey item is disabled. As Compulsory Setting of text
field is not available for “Standard Mode”, “Advance Mode 1” and “Advance Mode
2”, the text field is compulsory when respondents select item response that consists of
a text field.
5)
Import EMB Data Package
EMB Data Package is placed in the EMB website for school users to download.
It consists of all EMB predefined surveys, attributes and survey items for different
types of schools (i.e. Primary, Secondary and Special). The Survey Item Manager
can access Item Bank of “Survey Item Bank” to import the EMB Data Package (For
detailed operations, please refer to SEP-Operation Manual). A set of EMB
pre-defined surveys and survey items are installed together with the SEP. Download
and importation of EMB Data Package is needed when EMB announces that new
version of Data Package has been uploaded onto EMB website.
1.4.3
1)
Survey Generator
Overview
Survey Generator is used for generating surveys (questionnaires/log sheets) for
various respondents (e.g. school heads, teachers, students and parents…. etc). There
are two types of surveys: questionnaire, and log sheet or observation form. The
former mainly solicits immediate responses to a survey from the respondents whereas
the latter is used mainly to record on-the-spot events or performances in a school
activity. These surveys are designed for different purposes. New surveys can be stored
into the SIB by selecting a particular folder from the folder structure. New survey
items with assigned attributes can also be saved into the SIB. The Survey Manager
can create survey groups to organize users into user groups in order to compare
survey results across different user groups.
To facilitate the Survey Manager to design questionnaires, the users can select
existing questionnaire(s) and survey item(s) from the SIB or create new survey item(s)
from the scratch by selecting different types of survey items. After selection and
creation of survey items, the user can define the sequence of survey items and then
assign a number to each survey item with the defined numbering system ([a, b, c], [1a,
1b, 1c] or [i, ii and iii]). The numbering of survey items can at most be organized into
three levels (e.g. 1, 1a and 1ai). The numbering of survey items in the first level must
be a digit (e.g. 1, 2 and 3). After that, the user can define a logical flow within the
questionnaire in order to fit into the conceptual design of the questionnaire. A text box
for the covering page is available for the Survey Manager to provide respondents with
background information or instructions to respondents before doing the questionnaire.
The Survey Manager can also explain the terminology in the questionnaire. The above
information in the text box will appear as a covering page in a questionnaire and the
respondents can refer to it anytime while doing a questionnaire. A navigation button is
assigned for this purpose if the online survey mode is chosen. Finally, the Survey
Manager defines the basic information of the questionnaires including "Questionnaire
Title", "Start / End Time", "Compulsory Setting", "Questionnaire Method"
(Anonymous or Named), "Do Questionnaire Mode" (Online, Offline and Hybrid of
Online and Offline - i.e. both online and offline modes), and "Target Respondent(s)".
2)
Create Surveys
The Survey Manager creates a new questionnaire by selecting existing
questionnaire or specific survey items from the SIB, or creates new survey items from
the scratch. Existing questionnaires can be selected from browsing the folder tree
structure of the SIB, while specific survey items can be retrieved by searching the
attributes list. The Survey Generator provides tools and guides for the users to define
the sequencing and numbering of individual survey items, to input the description of
the survey item stem and responses, to assign survey target users and publish
information as well as to configure the survey item setting during the creation process.
In addition, Survey Manager can create questionnaire(s) for PDA. However, the
survey item types are limited to “Single or Multi selection” and “Standard Mode” only.
Questionnaire(s) can be exported from Survey Generator as a questionnaire file. More
than one questionnaire can be exported at the same time within Survey Generator. A
questionnaire import function is also provided for importing a questionnaire file into
Survey Generator for questionnaire publishing.
The users can create a new log sheet from the scratch or select a log sheet from
the SIB. Log sheets are composed of three parts including a header, an option
reference list, and a response area. The header contains the general information (e.g.
date) of the log sheet and the user can add survey item(s) from the SIB into the header.
An option reference list contains a time field (input time in HH:MM (AM/PM)
format), a minute field (input an integer), and specific survey item(s)/column(s). The
time field and the minute field are optional and only one key column is to be set in the
option reference list. The user can define the number of sections in the response area
and define a title (e.g. Morning) and a time range (optional) for each section.
3)
Assign Target Respondents
The Survey Manager can select target respondents for the questionnaire. The
target respondents can be under System groups, Form groups, Class groups, Privilege
groups, or Survey groups. Sometimes, these user groups do not contain the
combination of users that the Survey Manager needs. To facilitate the Survey
Manager to collect responses from specific target respondents, they can define Survey
groups by selecting a list of users either manually at random or according to particular
age ranges and then put these users into groups. These Survey groups are Local
Survey groups for this particular survey only and can be used for "Cross-Group
Comparison" in analyzing reports.
Special considerations are needed in assigning target respondents. As groups
and survey groups are used to aggregate statistical data when comparing data in a
survey, the Survey Manager is recommended to select users in groups and survey
groups so that Cross-Group Comparison report can be made between target group(s)
and survey group(s). Meanwhile, users of selected target groups in Anonymous
Survey should be mutually exclusive so that risk of duplicated input of anonymous
survey in Offline Data Capturer can be avoided. Therefore, assigning 1A and P1
groups in anonymous survey should be avoided because students in 1A group
overlapped with that of P1.
4)
Save Surveys in SIB
The Survey Manager can save the new / modified survey in SIB for future usage.
However, only published questionnaires can be saved into the SIB. To solely save a
new/modified survey in SIB, the Survey Manager can publish a survey without target
respondent, and then save the survey in SIB.
5)
Create Questionnaire for Cross-Timeframe Comparison
To facilitate the data comparison across time-frames in SEP, the Survey
Manager requires publishing the same questionnaire in two or more time-frames. To
do it in the “Survey Generator”, the Survey Manager can firstly create a questionnaire
either from the scratch or from SIB and publish it in a timeframe. Then he / she can
click the “Create New Survey” button of that particular survey to clone the survey and
publish it in another time-frame. By doing so, the Survey Report Viewer can use the
Cross-Timeframe Comparison Report to compare the responses of a same survey in
two different time-frames.
6)
Modify Properties of Published Questionnaire
When selected target respondents are not able to submit the assigned
questionnaire before the end date for some reasons, Survey Manager may wish to
extend the period for completion of the questionnaire. A “Modify Published
Questionnaire” function is provided for Survey Manager to reset the start / end dates,
and in addition, it allows Survey Manager to change the title of the questionnaire as
well.
7)
Export Raw Data of Questionnaire(s) to Data File
In addition to the aggregated data generated in the Report Generator module,
Survey Manager can export raw data of questionnaire(s) to data files. The data files
contain both the individual responses of each respondent and the content of each
survey item.
1.4.4
Report Generator
1)
Overview
This function is mainly designed for data analysis as well as the display and
output of the results. The display is in three formats (tables, charts and statistic
figures). Different forms of displays will be shown on the monitor according to the
types or properties of a survey item.
The RG is supplemented with the Data Comparison features. These features
allow the users to compare the results of a specific survey across timeframes,
respondents and survey items. A comparison button is available for each survey item
and a selection tool is available for these three comparison modes.
2)
Reports for Questionnaire
Report Generator provides various kinds of reports for the questionnaires. These
reports can be shown in different styles: All-in-one Mode, Click-to-view Mode and
Comparison Mode. Below are the listed reports for questionnaires, and the required
setting should be made in a survey to facilitate the generation of these reports. Please
refer to Appendix 3 for the layout of reports for questionnaire. In addition, the survey
results can be exported to an Excel file with both figures and charts. Please note that
exported report(s) can only be viewed by using Microsoft Office 2000 or above.
−
Overall Report
A report consists of the question, statistical data and chart of a survey item.
This report can be viewed in All-in-one Mode or Click-to-View Mode.
−
Cross Group Comparison
It is to compare responses between different target groups. When designing
a new survey, Survey Managers should select target users carefully if they
want to compare responses between / among groups. They should select all
target groups that they are going to compare after completion by target
responses. For details in assigning target respondent, please refer to point (3)
Assign Target Respondent in section 4.4.3 Survey Generator.
−
Cross Time Frame Comparison
A report for comparing responses of a same survey in two more different
time-frames. A feature is built in the Survey Generator to republish a
questionnaire again with different time-frames. To compare questionnaire
across time-frame, questionnaires must be created from the same published
questionnaires so that these questionnaires contain the same survey title but
different time-frames.
−
Cross-Item Comparison
This report is used to compare responses of survey items from different
questionnaires. To compare items across different questionnaires, the items
must be of the same survey type and number of responses.
3)
Reports for Log Sheet
A user can view the individual user responses or select the key item (independent
variable) and another item (dependent variable) to generate item-by-item comparison
for a particular log sheet. Please refer to Appendix 4 for the layout of reports for
questionnaire.
−
Item-by-item Comparison Report
This is a report for comparing the aggregated responses of a key item and
the other item in the log sheet.
−
Individual User Log Sheet
This is a User Log Sheet Report of a particular student of a log date.
The Individual User Log Sheet is original information input by particular
student.
4)
Personalized Report Parameters
There is a default setting for report viewing in SEP. To standardize /
personalize survey results, you can define the report setting every time you login the
SEP. The personalized report parameters will go back to default setting when you
logout the SEP. The default report parameter is shown as below.
1.4.5
Data Capture
1)
Overview
“Data Capture” is used for inputting responses from completed surveys in an
offline format. A Survey Helper assigned by the school or EMB management is given
the rights to enter the responses to the survey items of a survey which have been
collected in an off-line mode (usually in paper-and-pencil format) by a group of
respondents. There are two methods of data entry: on-line and off-line mode. For
on-line data entry mode, the helper is provided with an ODC tool so that he / she can
enter the survey responses directly through the web interface while connected to the
SEP. Response checking is based on a "compulsory setting" in the survey (the default
is compulsory if the survey is done in an off-line mode). If “compulsory setting” has
been defined and data for a respondent cannot be submitted unless all the responses to
the survey items have been entered. A reference number is generated for future
verification after data submission. For off-line data entry mode, a separate application
is provided for the Survey Helper to enter the offline survey responses and a data file
is generated after all offline survey responses have been completely entered. The
Survey Helper can import this data file into the SEP and the system shows the survey
data of individual respondents one by one for confirmation before storing them into
the system. For conduct of survey in online mode, target respondents fill in the
surveys through the web interface. The web interface is similar to that for the on-line
data entry mode. Survey results input in both online and offline means can be updated
in the web interface with verification by respective reference numbers.
2)
Online Data Capture
The Survey Helper can input offline-completed surveys (named surveys) and
offline completed surveys (anonymous surveys) through the web interface by
selecting a particular target user group. The system shows a list of errors when there is
any problem with the responses (e.g. Empty implies no response in compulsory
survey item). The Survey Helper can edit the record again by clicking the "Modify"
button or accept the problem(s) by clicking the "Accept" button. A reference number
is generated and displayed for future reference. The Survey Helper can select a
particular survey by retrieving its reference number and the responses if necessary.
3)
Offline Data Capturer
With a standalone application, the Survey Helper can input responses using an
interface similar to the online survey. The Survey Helper should firstly select the
survey to be completed offline, and generate / download the standalone application
with data such as target groups’ and respondents’ information related to the survey
from the “Data Capture”. The Survey Helper can make use of the application to input
survey responses in any workstation without network connection. A data file is
generated by the application after all offline survey results have been entered. The
Survey Helper can import this data file into the SEP. The system then shows the
survey data of individual respondents one by one for confirmation before storing them
into the system. Detailed procedures are provided in the Operation Manual.
4)
System Rules in Adding / Importing New Survey Records
There are some system-defined rules for adding / importing new records to both
named and anonymous surveys respectively. For Named Questionnaire, the new
survey record of a particular user will overwrite his / her existing one. For
Anonymous Questionnaire, the system restricts the number of submitted survey
records which should not exceed the total number of users in the selected group. The
system will reject the new record that is beyond the total number of users in the
selected group. For Named Log Sheet, the new record will replace the existing one
when records of the same log dates are found in a particular user. Moreover, new
record is rejected if the number of the submitted records of a particular user exceeds
the number of days to be logged. For Anonymous Log Sheet, new records will be
rejected if the total number of submitted records exceeds the total number of users of
a group in a log date. Moreover, new record is also rejected if the total number of
submitted records exceeds the multiple of the total number of users of a group and the
required number of log days per user.
1.4.6
Do Survey
1)
Overview
After login, the user can view the list of surveys that is assigned for him / her to
complete. Upon completion of the survey, the user can click the “submit” button to
save his / her responses in the system.
2)
Fill in Questionnaire
For named questionnaires, the user is allowed to save the responses temporarily
and re-do / continue with the questionnaires at a later time provided that the “submit”
button has not been clicked. All submitted / completed named and anonymous
questionnaires will be removed from the survey list.
3)
Fill in Log Sheet
For log sheets, the user can select a log sheet and a log date before filling in the
responses. For named log sheets, the user is allowed to update individual log sheet
records which have already been submitted provided that the log sheet is still ‘active’,
i.e. available for online completion within the specified published date range.
Chapter 2 SEP Website
SEP website provides an overview of SEP, announcements, function of
core components, EMB Data Package that consists of EMB pre-installed surveys and
survey items, manuals and frequently asked questions (FAQs). You can access the
SEP website with the URL below.
http://www.emb.gov.hk/sep/eng
2.1
EMB Data Package Download
EMB Data Package is placed in the EMB website for school users to download. It
consists of all EMB predefined surveys, attributes and survey items for different types
of schools (i.e. Primary, Secondary and Special). As the set of EMB pre-defined
surveys and survey items are installed together with the SEP, download and
importation of EMB Data Package is necessary when EMB announces the release of
new version of Data Package at EMB website. You can access the SEP website with
the URL below.
http://www.emb.gov.hk/sep/eng
2.2
SEP Documents Download
SEP Documents (including Administrator Manual, Operation Manual,
User Manual and User Guide) are available for download at SEP website. The
manuals are located in the [Menu] section. The URL of the SEP is
http://www.emb.gov.hk/sep/eng
2.3
Link to “Overall Study on Reviewing the Progress and
Evaluating the Information Technology in Education (ITEd)
Projects 1998/2003”
The PolyU Technology and Consultancy Company Limited of the Hong
Kong Polytechnic University (PolyU) was commissioned by the then Education
Department, now Education and Manpower Bureau (EMB) to conduct the “Overall
Study on Reviewing the Progress and Evaluating the Information Technology in
Education (ITEd) Projects 1998/2003” (the Overall Study) from September 2002 to
November 2004. The Overall Study aims to review the progress and achievements
made under the “Information Technology for Learning in a New Era: Five-year
Strategy – 1998/99 to 2002/03 (the ‘Five-year Strategy’) announced by the
Government in 1998. It was also meant to provide pointers to fine-tune the
implementation measures of the second ITEd strategy as detailed in the policy
document “Empowering Learning and Teaching with Information Technology” issued
by the Education and Manpower Bureau (EMB) in July 2004. The
report
is
available at the below URL.
http://www.emb.gov.hk/index.aspx?langno=1&nodeID=2497
Chapter 3 SEP System
3.1
Deploying SEP in schools
3.1.1
Platforms and Limitations
1)
Platforms
The SEP can be installed on Windows NT workstation and server, Windows
2000 workstation and server, Windows 2003 server, Windows XP and RedHat Linux
9.0. The System Administrator should follow the installation procedures as stated in
the Administrator Manual.
2)
Limitations
The school can use existing hardware available in school for running the SEP.
The minimum hardware requirements are available in the Administrator Manuals. If
the hardware configuration cannot meet the minimum hardware requirements,
performance problems will occur.
Some features of the SEP can only work under Internet Explorer 5.5 or above.
The end-user will need to install or upgrade the browser to Internet Explorer 5.5 or
above. Unexpected behaviors will happen for the browser with versions below
Internet Explorer 5.5.
The school needs to address security issues for the server running the SEP
system and ensure that all operating system patches are up-to-date, anti-virus software
installed and the virus definitions updated. In this respect, the number of maximum
connection(s) from clients to the SEP server is limited by the licensing terms of the
Operating System. The school should comply strictly with respective licensing terms.
3.1.2
Running SEP within School Network
A fixed IP should be assigned to the server running the SEP. Internet Explorer
5.5 or above and Hong Kong Supplementary Character Set (HKSCS) for proper
display of Chinese characters should be installed into the computers of the end-users.
The end-users should have basic knowledge of web browsing in order to use the SEP.
3.1.3
Enabling Internet Access to SEP
A Routable IP address should be used if the school allows the users to access the
SEP outside the school. Schools should protect their servers from unauthorized
Internet access by using Firewalls. The school needs to address security issues for the
server running the SEP system and ensure that all operating system patches are
up-to-date, anti-virus software installed and the virus definitions updated.
3.2
Tools
3.2.1
Questionnaire and Log Sheet
There are two types of surveys: questionnaire, and log sheet or observation form.
These surveys are designed for different purposes. The former mainly solicits
immediate responses to a survey from the respondents whereas the latter is used
mainly to record on-the-spot events or performances in a school activity.
1)
Questionnaire Layout in SEP
2)
Log Sheet Layout in SEP
3.2.2
Online and Offline Modes of Operation
To conduct survey in SEP, there are two modes (Online Mode and Offline Mode)
to facilitate the operation of individual schools. “Online mode” means that the
respondents can respond to the survey and submit the responses to the SEP through
the web interface directly. “Offline mode” means that the survey responses are input
into the SEP by a Survey Helper. By selecting the “Hybrid of Online and Offline”
mode in a survey, the school can assign a particular group of respondents to response
to the survey via offline mode while the rest of the respondents response to the survey
via online mode. To facilitate the Online and Offline Modes of Operation,
recommended workflows are respectively provided as below:1)
Online Mode of Operation
The recommended workflow for Online Mode of Operation is:
i) The Survey Manager firstly creates a survey either from the SIB or from the
scratch in the Survey Generator. In the survey information setting, the
Survey Manager should define the “Do Survey Mode” as “Online”, select
target respondents and define “Start / End Date” of the survey.
ii) Publish the survey and notify target respondents to response to the survey in
the SEP.
iii) The respondent can use the web interface to do the survey online (either
within the School Local Area Network or Internet).
iv) After the close of the survey according to its defined “End Date”, the results
of the survey will be available in the “Report Generator”.
2)
Offline Mode of Operation
The recommended workflow for Offline Mode of Operation is:
i) The Survey Manager creates a survey either from the SIB or from the
scratch in the Survey Generator. In the survey information setting, the
Survey Manager should define the “Do Survey Mode” as “Offline”, select
target respondents and define “Start / End Date” of the survey.
ii) Publish the survey.
iii) Download the survey by clicking “Export to RTF”. The Survey Manager
can format the exported survey (e.g. add school letter head).
iv) Print and distribute hardcopies of the survey to target respondents.
v) Collect the completed surveys from respondents by group and classes.
vi) Before inputting the survey using the Offline Data Capturer (ODC) or web
interface, the Survey Helpers are recommended to further sort the survey
according to students’ class and class numbers for Named Survey.
vii) Download the ODC and use it to input survey responses for users.
OR
Input the survey via the web interface of “Data Capture”.
viii) Print out the post-importation summary (i.e. the list of imported surveys’
reference number) and pack it with hardcopies of the survey for future
verification.
ix) Use reference number to retrieve the survey for modification if necessary.
x) The results of the survey will be available in “Report Generator”.
3)
Hybrid of Online and Offline Mode of Operation
The recommended workflow for Hybrid of Online and Offline Mode is:
i) The Survey Manager creates a survey either from the SIB or from the
scratch in the Survey Generator. In the survey information setting, the
Survey Manager should define the “Do Survey Mode” as “Hybrid of Online
and Offline”, select target respondents as “Online Users” and “Offline
Users” respectively. The users under the “Offline User” mode require the
Survey Helper to input the survey for them in offline means. The other users
can response the survey via the web interface. Then the survey manager can
define “Start / End Date” of the survey.
ii) Publish the survey and notify respective users to response to the survey in
the SEP.
iii) Download the survey by clicking “Export to RTF”. The Survey Manager
can format the exported survey (e.g. add school letter head).
iv) Print and distribute hardcopies of the survey to target respondents under the
“Offline User” list.
v) Collect the completed surveys from respondents by groups and classes.
vi) Before inputting the survey using the Offline Data Capturer (ODC) or web
interface, Survey Helpers are recommended to further sort the survey
according to students’ classes and class numbers for Named Survey.
vii) Download the ODC and use it to input survey responses for users.
OR
Input the survey via the web interface of “Data Capture”.
viii) Print out the post-importation summary (i.e. the list of imported surveys’
reference number) and pack it with hardcopies of the survey for future
verification.
ix) Use reference number to retrieve the survey for modification if necessary.
x) After the close of the survey according to its defined “End Date”, the results
of the survey will be available in the “Report Generator”.
3.2.3
Data Analysis and Report Generator
The “Report Generator” (RG) is responsible for analyzing the collected
data and outputting the results in selected formats according to the user’s choice.
Three different modes can be chosen: display mode, printing mode, and saving mode.
The “Report Generator” also allows multiple data comparison methods when
displaying the results. Three comparison modes have been built in the SEP: “Compare
across Timeframe”, “Compare across Groups” and “Compare across Survey Items”.
For the display of results from a log sheet, a user can view the individual users’
responses or select a key item (independent variable) and other item (dependent
variable) can be viewed to generate item-by-item comparison of a particular log sheet.
3.3
Survey Item Types
There are nine types of survey items according to the sample surveys
provided by POLYU and each type is designed for different purposes. These nine
types of survey items are categorized as general and advanced ones for different uses
by the Survey Manager. Additionally the unique icons of the survey item types are
applied in the SEP for reference and identification when creating the survey items
(Figure 3.3). Meanwhile, an online example of the respective survey item type can
be retrieved by clicking on these survey item type icon. The layouts of the survey item
types are located in the Appendix 2.
General
Single / Multiple
Selection
List Mode of
Single or Multiple
Selection
Multiple Column
Selection
Standard Mode
Advance
Grouped Single or
Multiple Selection
Advanced Mode 1
Advanced Mode 3
Figure 3.3 Icons of Survey Items Types
Advanced Mode 2
Advanced Mode 4
3.4
Built-in Structure and Samples in SIB
1)
SIB Folder Structure
A folder tree structure is pre-defined according to the types of schools (Primary,
Secondary and Special) and the categorization of sample surveys. The Item Bank
folder tree has two main branches (EMB and School folders). Under the EMB folder,
the Primary, Secondary, and Special sub-folders (school type level) are pre-defined for
placing sample surveys for different types of schools. Under the school type level,
other sub-folders (e.g. ITED) are created for storing categorized surveys with different
objectives.
2)
Built-in Surveys
A set of predefined questionnaires and log sheets for each school type (e.g.
Primary, Secondary and Special) are pre-installed in the SEP. The pre-installed
questionnaires and log sheets of respective school type are listed as below:
i) Pre-installed Surveys for Primary Schools are:
1) Primary - Initial Survey Form.doc
2) Primary - IT Activity Daily Log.doc
3) Primary - Questionnaire Heads.doc
4) Primary - Questionnaire IT Team.doc
5) Primary - Questionnaire Parents.doc
6) Primary - Questionnaire Students.doc
7) Primary - Questionnaire Teachers.doc
ii) Pre-installed Surveys for Secondary Schools are:
1) Secondary - Initial Survey Form.doc
2) Secondary - IT Activity Daily Log.doc
3) Secondary - Questionnaire IT Team.doc
4) Secondary - Questionnaire Parents.doc
5) Secondary - Questionnaire School Heads.doc
6) Secondary - Questionnaire Students.doc
7) Secondary - Questionnaire Teachers.doc
iii) Pre-installed Surveys for Special Schools are
1) Special - Initial Survey Form.doc
2) Special - IT Activity Daily Log.doc
3) Special - Questionnaire IT Team.doc
4) Special - Questionnaire School Heads .doc
5) Special - Questionnaire Specialist .doc
6) Special - Questionnaire Students .doc
7) Special - Questionnaire Teacher .doc
3)
Attribute List
In the SEP, there are two types of pre-installed attribute lists. The Attribute lists
are used to categorize survey items in the SIB and aimed at facilitating SEP users to
have a quick search of survey items.
i)
PolyU ITEd surveys attribute list
The attribute list consists of three levels. From top to bottom, they are school
type (Secondary, Primary and Special), target respondents (Teachers, Students, School
heads, Parents and others) and language (Chinese and English). Each survey item of
the PolyU ITEd surveys will be linked to at least one value in each level (e.g. Primary
School Æ IT Team Æ Chinese).
ii)
ITinEd indicators
According to the new IT in Education strategy published by EMB in July 2004,
the Project team proposed another attribute list to facilitate school users make use of
the SEP pre-installed survey items to generate school-based IT in Education survey.
For details, please refer to Appendix 6.
3.5
Tailoring SEP to Your Needs
3.5.1
SIB Tree Structure
Under the new three-year IT in Education strategy, EMB will grant funding for
enhancement of schools’ IT facilities / services. Schools may consider using the SEP
to evaluate the usage and effectiveness of the new IT facilities. In this respect, it is
suggested to build a new folder called “New IT facilities evaluation”. This folder
should include the subfolders with “Teacher” and “Student”. All the surveys will be
placed in the sub-folders according to different types of survey respondents.
For detailed procedures, please refer to Operation Manual.
3.5.2
Attributes
Schools are suggested to create a two-level attribute system. The name of the
attribute is called “New IT facilities”. The first level consists of the following values:
z
z
z
z
Wireless LAN
Intranet System
Tablet PC
Interactive Whiteboard
For the each of the first level attribute value, it consists of the following second
level values:
z
z
z
z
Administration and Management
Teaching and learning enhancement
Frequency of use
Curriculum Innovation
The survey item(s) may link to at least one of the first level and second level
attribute value. The survey creator (e.g. teacher) can make use of the attribute system
to search for the relevant survey items to build a survey.
For detailed procedures, please refer to Operation Manual.
3.5.3
Survey Group(s)
Schools are suggested to create survey group (e.g. 1A - Intranet System)
and include relevant survey respondents (e.g. 1A Student). This can facilitate
cross-group (e.g. 1A – Intranet System and 1B – Intranet system) and time (e.g. 1A –
Intranet system(20050106) and 1A – Intranet System(20050606)) comparison for
survey analysis.
3.5.4
Build Your Own Survey(s)
Under the new three-year IT in Education strategy; for example, EMB will grant
a funding for schools to deploy an intranet system. Schools may consider using the
following survey to evaluate the effectiveness in teaching and learning with the use of
such intranet system.
各位老師:
辛苦了,請您花一些時間,就使用該 ABC Intranet System 的一些教學問題,
回答下列問卷。
非常 同意 反對 非常
同意
反對
1.
1.
ABC Intranet System 能提高學生對本科的學習興趣。
2.
ABC Intranet System 中所選用的電腦學習教材及資源有助 本科的學習。
ABC Intranet System 中提供的小組電腦學習教材及資源很 切合個別學生的學習需要。
ABC Intranet System 中的討論工具有助本科的學習。
2.
3.
4.
5.
6.
學生有疑問時,會利用學習平台中的討論工具主動請教老 師或同學。
ABC Intranet System 能提高學生對本科的學習自信。
6.
7.
利用 ABC Intranet System 學後,批改功課的時間減少了。 7.
8.
經過使用 ABC Intranet System 後,我對個別學生的了解加
深了。
9. 經過使用 ABC Intranet System 後,我對個別學生的接觸多
了。
10. 利用 ABC Intranet System 後,上課期間我有更多的時間輔
導個別的學生。
11. 我覺得 ABC Intranet System 操作簡單易用。
8.
9.
10.
11.
12. 我會繼續使 ABC Intranet System 教學。
12.
3.
4.
5.
School users can use “Standard Mode” of the SEP (Figure 3.5.4) to build the survey
items and then create the survey for teachers. For detailed procedures, please refer
to the Operation Manual.
Figure 3.5.4
Chapter 4 Tasks for Survey Manager
4.1
Roles and Privilege of Survey Manager
Survey Manager is the general term used to describe the users who can create
survey in the SEP. The Survey Managers are probably the teachers or subject panels
who can assign survey to students, parents and other stakeholders.
The roles of the Survey Managers are as follows z Browse / copy surveys in EMB and School folders in the “Survey Item
Bank”.
z Design the content and format of the survey.
z Decide target respondents of the survey.
z Decide the mode of conducting the survey (i.e. online, offline or hybrid
of online and offline).
z Browse and select the pre-installed surveys and surveys from the EMB
and School folder of Survey Item Bank respectively.
z Create / modify / delete the surveys that are created by themselves in
the “Survey Generator”.
z Clone a copy of the pre-installed surveys from SIB, and then modify
the cloned surveys and publish it to target respondents.
z Search and select survey items from Item Bank to create surveys.
z Define attributes of new survey item(s) and save them into Item Bank.
z Create DS Questionnaires in DS Host.
z Manage DS Questionnaires in DS Client.
z Manage KM Questionnaire Sets.
The Survey Managers should have “Survey Item Bank Management” privilege to
access the following menu buttons in the SEP (Figure 4.1) z Survey Item Bank
z Survey Generator
z Report Generator
z DS Survey (Host) Management
z DS Survey (Client) Management
z KM Survey Management
z Survey
Figure 4.1: Menu buttons for the Survey Managers.
4.2
Considerations When Designing a Survey
Special considerations should be made before creating the survey from the SEP.
The Survey Managers are recommended to collect / prepare information for the four
main areas before using the SEP to create a survey. With the required information,
the Survey Managers can easily identify the efficient ways to create the survey in the
SEP.
z
z
z
z
Design the Survey.
Decide Required Reports for the Survey.
Define the Strategy of Target Respondents Selection for Required
Reports.
Mode of Conducting the Survey.
4.2.1
Strategies when Designing the Survey
To create a survey efficiently in the SEP, what we need to do first is to identify
what is available in the SEP and then decide on the method used to create the survey
in the SEP.
The Survey Managers should find out the available surveys and individual
survey items that can be used in the “to-be-created” survey in the following areas of
the SEP z Pre-installed surveys and surveys in the EMB folder and School folder
of the Item Bank.
z Individual survey items stored in the Survey Item Bank.
Then the Survey Managers can decide how to create the survey.
ways to create a survey in the SEP as shown below.
There are three
z
Create the survey from the scratch: this method should only be used
when none of the available surveys matched with the “to-be-created”
survey.
z
Create the survey from SIB: this method is recommended when there
is a similar survey found in EMB folder or school folder of Item Bank.
z
Create the survey from a published survey: this method should only
be used when the Survey Managers want to compare the responses of
the same survey across different time-frames.
The constraints of each method are summarized in Table 4.2.1.
Properties/Method
Insert additional survey
Create the survey
Create the survey Create the survey from
from the scratch
from SIB
published survey
5
5
7
5
5
7
7
5
7
5
5
7
5
5
5
5
5
5
5
5
5
7
7
5
items from SIB
Insert Additional survey
items form the scratch
Copy survey items from an
existing survey in SIB
Define new logic /
sequence / numbering /
terminology / covering for
the survey
Assign to new set of target
respondents / survey groups
Support Cross-Item
Comparison with published
survey(s)
Support Cross-Group
Comparison with published
survey(s)
Support Cross-Timeframe
Comparison with published
survey(s)
Table 4.2.1: Constraints of respective Survey Creation Methods in the SEP.
4.2.2
Strategies when Designing/Implementing the PDA Questionnaire
Since there is limited space in a PDA screen and normally the number of pixels
of width is less than that of height, we should therefore reduce the ‘length’ of the
questionnaire and that of the survey item(s), if possible. The following tips can help
you to design a good-looking PDA questionnaire.
-
In “Single Selection” or “Multi-selection”, set the number of column(s) of
“Item Responses” (i.e. options) to one.
For open-ended survey items, please set the length of the text field to 10 or
less.
For “Standard Mode”, use short forms in “Item Response” and provide the
full description in the item stem.
Users should note that Pocket PC version 2003 is recommended for
administering PDA questionnaire. You may experience slow processing speed if
Pocket PC 2002 is used. Please upgrade your Pocket PC to version 2003, if possible.
To login SEP with PDA, users should access the PDA login page (The URL is
http://domain_name/sep/pocketpc/).
PDA questionnaire with existing survey
items
PDA questionnaire with customized
survey items
4.2.3 Decide the Required Reports for the Survey
Standard reports are provided for survey result generation and comparison in
the SEP. Although these reports are preset and standardized for the Questionnaire
and Log Sheet respectively, the system provides flexibility for the Survey Managers
to control how the survey data can be aggregated and compared. However, the
grouping of target respondents is the major factors affecting how the survey results
can be displayed and compared. Figure 4.2.2a and 4.2.2b summarized the core
factors that affect the generation of reports for Questionnaire and Log Sheet
respectively.
Available Reports for Questionnaire
Factors affect report
Overall Report Cross-Group
Cross-Timeframe Cross-Item
generation
Comparison
Comparison
Comparison
5
5
5
5
Not Available
5
5
5
5
5
5
Cross Surveys
Comparison
Not Available
Identical Survey
Item(s) in the surveys
to be compared
Not Available
Not Available
5
5
7
7
5
7
Target Group(s)
Survey Group(s)
Method of survey
creation
Must be created
from a
published
survey”
Table 4.2.2a: Factors affecting the report generation for Questionnaire in SEP.
Available Reports for Log Sheet
Factors affect report generation
Item-by-item
Comparison
Individual User Log Sheet
Method of survey creation
5
5
5
7
7
7
5
7
Cross Surveys Comparison
Not Available
Not Available
Target Group(s)
Survey Group(s)
Key Item (independent variable)
Table 4.2.2a: Factors affecting the report generation for Log Sheet in SEP.
4.2.4 Strategies of Defining the Target Respondents Selection for the Required
Reports
Grouping of target respondents is the major factors affecting how the survey
results can be displayed and compared. Target respondents can be grouped by the
following methods in the SEP –
z
Group Types / Groups defined in “User Management”: these
groups are Teacher Group, Class Groups, Form Groups, Parent Groups
and Other groups. These groups are either generated when importing
users or created by the System Administrator.
z
Global Survey Groups defined in “User Management”: these are
global and common groups created by the System Administrator
facilitating the selection of target respondents and generation of survey
results.
z
Local Survey Groups defined within individual survey: these
groups can be created by the Survey Managers to aggregate the results
of a particular survey. The creation of local survey can be created
either by picking respondents manually, randomly via the system or by
age.
A rule of thumb is to always select target respondents in groups so that the
survey results are aggregated. The following suggestions can help the Survey
Managers to identify the groups of target respondents and whether a Local Survey
Groups creation is required.
z
Always using the “User Groups” as the target respondents and try
to select the smallest user group(s) instead a big user group. For
example, select class group(s) (i.e.1A, 1B and 1C) instead of selecting
the form group (i.e. P1).
z
Use Local Survey Groups to refine / consolidate the survey results.
For example, create Local Survey Groups for students aged over 14
and P1.
z
Check if the user group(s) / unit of users are coherent in the
surveys used for cross-survey result comparison. For example,
P1(in 2004) versus P1(in 2005) or P1 aged 14 students (in 2004)
versus P1 aged 14 students(in 2005).
4.2.5
Mode of Conducting the Survey
The Survey Managers can assign the defined Groups of Target
Respondents / Local Survey Group(s) to reply to the survey in the SEP or in
hardcopies. There are three modes of conducting the survey in the SEP z “Online” means all respondents reply the survey in the SEP.
z “Offline” means all respondents reply the survey in hardcopies and the
survey helper inputs the survey using Data Capture function provided
by the SEP.
z “Hybrid of Online and Offline” means selected group(s) of
respondents reply to the survey via offline mode while other groups of
respondents reply the survey in the SEP.
4.3
Examples
4.3.1
Flow Chart of Creating Survey in SEP
Logins the “Survey Generator”
Method of Survey
Creation
From SIB
From a
published
survey
From the
scratch
Select Survey Item(s)
from SIB
Copy existing
survey in SIB
Modify survey
content?
Yes
No
Search and
clone the
published
survey in SG
Create new Survey
Item(s) from scratch
Sequence the survey
item(s)
Save the
Survey item in
SIB?
Yes
Define numbering
format of the survey
item(s)
SIB
Define Logic
Cover Page Setting
Define Terminology
Define Setting and
target respondent
Temporarily save the
survey
Publish Survey
The Survey will be
stored in “Survey
Generator”
No
Yes
Save a copy of Survey
in SIB?
Indicates
optional steps
4.3.2
1)
2)
Copy Survey from SIB and Modify its content
Mouse over to [Survey Generator] click [Create Survey].
Click [Add Questionnaire].
3)
Select [From SIB] and then click [OK].
4)
An interface of “Please select questionnaire” will be displayed-
i) Expand the “EMB > Primary > ITEd” directory
ii) To select a questionnaire, check the checkbox of the questionnaire
named “小學學生問卷調查 (2004)” and then click [Select].
5)
6)
A “Basic Information” table will be displayed. To modify the questionnaire
content, click “Update Survey Items”.
A list of survey items of the questionnaire will be displayed-
i)
ii)
To delete unwanted survey item, click its [Delete] button (Optional).
To edit survey item, click its [Edit] button (Optional).
iii) To add additional survey item(s), click [Add] on the right bottom
corner (Optional).
iv) To search survey item(s) existed in Survey Item Bank, select “Primary
/ Student” in the attributes called “ITEd Survey” and then click
[Search].
v) Select the checkbox of the survey item(s) and then click [Select]
vi) When finished adding survey items, click [OK].
7)
The interface returns to “Basic Information” table.
i)
ii)
iii)
iv)
v)
vi)
vii)
Edit the Questionnaire “Title” (optional);
Select “Questionnaire Method”;
Define “Start / End Date”;
Select “Mandatory Setting”;
Select “Do Questionnaire Mode”;
Click [Select User] to select “Target User”;
Click [Select User] to select “Survey Group” (Optional);
viii)
ix)
x)
xi)
xii)
Click [Preview] to preview the questionnaire (Optional);
Click [Save Temporarily] to save the information setting;
To publish the questionnaire to selected target users, click [Publish];
To print the questionnaire, click [Export to RTF File]; and
Target users can response the survey within the period of defined
“Start / End Date”.
Tips:
Click [Show Temporarily Saved Surveys] to retrieve the survey information saved
temporary as in step ix) listed above.
4.3.3
1)
2)
Create Survey from the Scratch
Mouse over to [Survey Generator] and then click [Create Survey].
Click [Add Questionnaire].
3)
4)
5)
Select [Scratch] and then click [OK].
In the “Survey Item” table, click [Add].
An interface of “Survey Item Search” will be displayed-
i)
To search survey item, click [Search].
Notes:
To narrow down the search results, select attribute(s) and then click
[Search].
ii)
6)
In the bottom of “Survey Item” interface, select survey item(s) and then
click [Select].
The system returns to the “Survey Items” interface.
i) To select more survey item(s), please repeat Steps 4 and 5 (Optional).
ii) To remove a selected survey item, click [Delete].
iii) To complete the selection of survey item, please click [OK] in the
bottom-right corner.
7) At the “Sequence Setting”, click [OK] to save the survey items ordering
sequence.
8) At the “Numbering Setting”, click [OK] to save.
9) At the “Logic Setting”, click [OK] to save the logic setting.
10) At the “Cover Letter”, type in information and then click [OK].
11) At the “Terminology Setting”, click [OK] to save terminology defined.
12) A “Basic Information” table will be displayed with the following functions-
i)
ii)
iii)
iv)
v)
vi)
vii)
viii)
ix)
x)
xi)
xii)
Input “Title”;
Select “Questionnaire Method”;
Define “Start / End Date”;
Select “Mandatory Setting”;
Select “Do Questionnaire Mode”;
Click [Select User] to select “Target User”;
Click [Select User] to select “Survey Group” (Optional);
Click [Preview] to preview the questionnaire (Optional);
Click [Save Temporarily] to save the information setting;
To publish the questionnaire to selected target users, click [Publish];
To print the questionnaire, click [Export to RTF File]; and
To save the questionnaire to SIB, click [Save into SIB].
Reference: Please note that the Chinese version is missing. To narrow down the
search results, define the “Start / End Date” and “Survey Type” and click
[Search] to find the survey.
4.3.4
1)
2)
3)
Create a Survey for Cross-Timeframe Comparison
Mouse over to [Survey Generator] and then click [Survey Generator].
In the “Survey Search” table, click [Search] to find the questionnaire.
To create questionnaire, click [Create New Survey] of the survey.
4)
A dialogue box will pop up confirming if you want to create a new survey of this
survey, click [Confirm].
5)
An interface of “Basic Information” will be displayed -
i)
ii)
iii)
iv)
v)
vi)
vii)
viii)
ix)
x)
xi)
Select “Questionnaire Method”;
Define “Start / End Date”;
Select “Mandatory Setting”;
Select “Do Questionnaire Mode”;
Click [Select User] to select “Target User”;
Click [Select User] to select “Survey Group” (Optional);
Click [Preview] to preview the questionnaire (Optional);
Click [Save Temporarily] to save the information setting;
To publish the questionnaire to selected target users, click [Publish];
To print the questionnaire, click [Export to RTF File]; and
Target users can response the survey within the period of defined “Start
/ End Date”.
4.4
4.4.1
Practical Tips
Use a Table to design a Survey
It is recommended that the Survey Managers draft a table (Table 4.1.4)
listing where to retrieve the survey items in the SEP, the sequencing, number, logic
and terminology for the survey before creating it in the SEP.
Survey Name
IT in Education Survey to Students
(A)
(B)
Survey question
Where is the Survey Item Sequencing Numbering Logic
question
(C)
(D)
(E)
(F)
Type
請問你家裡有沒有電腦? From “小學家 Single
and
1
Level 1
|
沒有電腦(跳至題 2) 長 問 卷 調 查 Multi
(Jump to
|
有1部
Selection
question
|
有2部
Mode
2)
(2004)”
你 家 裡 的 電 腦 可 以 上 網 From “小學家 Single
and
1a
Level 2
2
Level 1
長 問 卷 調 查 Multi
嗎?
|
可以上網
|
不可以上網
|
不大清楚
(2004)”
Selection
Mode
在過去一個月內,你平均 New questions Single
and
每天在學校花多少時間去
Multi
使用電腦?
Selection
|
0 小時
Mode
|
1 小時以內
Table 4.1.4 Design Survey Table
(G)
Terminology
4.4.2
Use a Table to Identify Target Users and Survey Groups
The Survey Managers can use a Group Strategy Table (Table 4.2.1) to identify
the Target Users, Survey Groups and Mode of Conducting the Survey quickly.
z
z
z
z
List out the expected groups to be used for Cross-Group Comparison
in column (A)
From the groups listed in column (A), all the class group(s) should be
marked as target users in column (B).
From the groups listed in column (A), all groups (except the class
groups) should be marked as Survey Group in column (C). The
groups listed in column (C) should be selected in the “Survey Group”
field of the survey in the SEP
Define “Mode of Conducting the Survey” for each group and identify
if there is any conflict. For example, 1A students reply the survey
offline while P1 students reply the survey online.
(A)
(B)
Expected Groups Target
for
Cross-Group Users
Comparison
(C)
Survey Group
(D)
Mode of Conducting the Survey
Online
P1
P1
P2
P2
Offline
1A
1A
1A
1B
1B
1B
2A
2A
2A
2B
2B
2B
Focus Group P1
Focus Group P1
Focus Group P2
Focus Group P2
Table 4.2.1 Group Strategy Table.
4.5
4.5.1
DS Questionnaire
Create a DS Questionnaire
Before a Survey Manager creates a DS questionnaire for a list of target schools,
they should consider the following items - Questionnaire Title
- Start / End Date
- Mandatory Setting
- Target Group
- Password for the DS Questionnaire
- Target School List
For the “Start / End Date”, a Survey Manager should define the target date range
that he / she expects the DS Client(s) to publish / administer the questionnaire. For the
“Target Group”, appropriate target group(s) should be selected so that cross-group
comparison reports can be generated based on the selected target group(s) after
collecting responses from the DS Client(s). To protect the DS questionnaire, a
password should be set. DS Client(s) must input the correct password when they
import the DS questionnaire.
4.5.2
Manage a DS Questionnaire
To import a DS Questionnaire file, the Survey Managers can browse a DS
Questionnaire file and enter the “Password” as appropriate. The Survey Managers are
free to publish the questionnaire to the suggested target group(s). They can administer
the questionnaire to different target groups in different timeslots.
When the Survey Managers export the responses to a response data file, they
should select the appropriate published questionnaire(s). The Survey Managers should
examine the selected target group(s) and response rates before exporting the
questionnaire responses.
4.6
KM Questionnaire
4.6.1
Import a KM Questionnaire Set
The Survey Managers can import a KM Questionnaire set as released by EMB.
The KM Questionnaire set contains a set of related questionnaires. The Survey
Managers are free to publish these questionnaires to relevant user groups.
4.6.2
View KM Reports
There will be four types of reports, namely ‘Results Summary’, ‘Self-Evaluation
Rubric’, Stakeholders’ Questionnaire(s)’ and ‘Attributed Questionnaire Item(s)’,
which can be selected by the user. The Survey Managers can generate these reports if
they have already published the questionnaires in the KM Questionnaire set. In
addition, cross-timeframe comparison reports are available for ‘Results Summary’ and
‘Self-Evaluation Rubric’ reports. If schools publish all questionnaires within a KM
Questionnaire Set every year, they can view the trend / development of various areas
of their schools by using the cross-timeframe comparison reports.
4.6.3
Understand Data Collection Requirement File
EMB will collect responses from appropriate schools based on the KM
Questionnaire set(s). A Data Collection Requirement file which includes selected
questionnaires, instructions, target groups and expected response rate per
questionnaire will be prepared by EMB and schools should import the requirement
file into the School SEP so that they can extract responses from relevant published
questionnaire(s) subsequently. Schools should follow the instructions provided by
EMB to publish relevant questionnaires to selected respondents as appropriate. After
completing all questionnaires stated in the requirement file, schools can export the
responses to a response data file and send the data file to EMB. For detailed
procedures, please refer to Operation Manual (Section 5.35).
Chapter 5 Tasks for Survey Helper
5.1
Roles and Privilege of Survey Helper
Survey Helper is the general term used to describe the users who help to input
results of the surveys that are conducted in Offline Mode. The Survey Helpers are
probably the clerk or admin staff.
The roles of the Survey Helpers are as follows z Perform Data Capturing using the online data capture tool in the SEP;
z Perform Offline Data Capturing using the ODC tool downloaded from
the SEP; and
z Amend input / imported surveys which are conducted in Offline Mode.
The Survey Helpers should have the privilege “Data Input Management”
to access the following menu buttons in the SEP (Figure 5.1) z Data Capture
z Survey
Figure 5.1: Menu buttons for the Survey Helpers.
5.2
Before You Start
There are two methods (i.e. Online / Offline) to import offline-conducted
surveys into the SEP. “Online” means you login the SEP to input the surveys in the
“Data Capture”. “Offline” means you extract an Offline Data Capturer from the
“Data Capture” and then use the Offline Data Capturer to input the surveys without
logging in to the SEP. Some common perquisite for data capturing are:
z Before inputting survey to the SEP, you should have created / published
the Named Survey / Anonymous in the “Survey Generator”. The
students have been assigned to complete the survey via offline means
in the survey setting.
z For inputting the named survey forms, you are recommended to sort
out hardcopies of the survey forms according to the class(es) and class
number(s) before inputting them to the SEP.
z For inputting the Anonymous Surveys, you are recommended to sort
out hardcopies of the survey forms sequentially before inputting them
to the SEP so that the input sequence is the same as the filing sequence
of the survey forms.
5.3
Data Capture
5.3.1
Online Data Capture for Named Survey
1) Mouse over to [Data Capture] and then click [Online].
2) In the “Survey Search” table, click [Search] to search the survey.
Notes:
To narrow down the search results, define the “Start / End Date” and
“Survey Type” and click [Search] to find the survey.
3)
In the survey list, click [View] of the named survey.
4)
To select respective users’ survey forms, select the group(s) / class(es), and then
select his / her name(s).
5)
Click [OK].
6)
The survey form of the user with the user name shown at the right top corner of
the survey form will be displayed.
i)
Fill in the survey.
ii)
To save the survey, click [Save] at the bottom of the page.
iii)
If there is any empty response in the compulsory survey item(s), a
dialogue box will pop up a list of survey items with problem(s) for
your quick reference.
iv)
To ignore the error, click [Accept] or click [Reject] and return to the
survey form for checking and revision.
Notes:
If you ignore the error at this moment, you can use the reference number
to retrieve the survey and make amendment(s) later on. For details,
please refer to the Section on “Amend Input / Imported Surveys”.
v)
The System will generate a reference number of the input survey.
vi)
Mark the reference number to the hardcopy of survey form for
cross-reference or further amendment(s) later on (Optional).
Notes:
You can also use respondent’s name to search and amend the record in
the SEP later on.
vii)
Click [Confirm] to continue the input of other users’ records of the
survey.
5.3.2
1)
2)
Online Data Capture for Anonymous Survey
Mouse over to [Data Capture] and then click [Online].
In the “Survey Search” table, click [Search] to search the survey.
Notes:
To narrow down the search results, define the “Start / End Date” and
“Survey Type” and click [Search] to find the survey.
3)
4)
5)
6)
In the survey list, click [View] of the anonymous survey.
To select the group user’s survey form, select the group / class, and then select
his / her name.
Click [OK].
The survey form of the user with the user group name shown at the right top
corner of the survey form will be displayed.
i) Fill in the survey.
ii) To save the survey, click [Save] at the bottom of the page.
iii) If there is any empty response in the compulsory survey item(s), a dialogue
box will pop up a list of survey items with problem(s) for your quick
reference.
iv) To ignore the error, click [Accept] or click [Reject] and return to the survey
form for checking and revision.
Notes:
If you ignore the error at this moment, you can use the reference number to
retrieve the survey and make amendment(s) later on. For details, please refer
to the Section of Amend Input/ Imported Surveys.
v) The System will generate a reference number of the input survey. You are
recommended to mark the reference number to the hardcopy of the survey
form for cross-reference amendment(s) later on.
vi) Click [Confirm] to continue the inputting of other records of the survey.
5.4
Offline Data Capturer (ODC)
5.4.1
Download ODC of a Particular Survey
1) Mouse over to [Data Capture] and then click [Offline].
2) In the “Survey Search” table, click [Search] to search the survey.
Notes:
To narrow down the search results, define the “Start / End Date” and
“Survey Type” and click [Search] to find the survey.
3)
4)
On the survey list, click [View] of the anonymous survey.
Click [Download Offline Data Capturer] to download ODC for this
survey.
5)
A download dialogue box will be displayed asking if you want to open / save the
file, click [Save] to save the zip file in your workstation.
6)
Unzip the “sepdoc.zip” file.
Notes:
Since each survey will have its unique ODC, you are recommended to
rename the folder name of “sepdoc” to the name of the survey for easy
identification.
5.4.2
Input Named Survey using ODC
Prerequisite:
To perform the steps below, you should have downloaded the ODC of a
particular survey. For details, please refer to Section on “Download
ODC of a Particular Survey”.
1)
To open the ODC, double click the file named “sepdoc.hta”.
2)
The survey template will be displayed.
3)
At the right top corner, select the group and respondent name.
4)
5)
6)
Fill in the survey form for the user.
To save the survey form temporarily, click [Save] at the bottom of the page.
A dialogue box showing “successfully saved” will be displayed.
Notes:
The “Number of Records” listed at the bottom left will be updated.
7)
Click [Confirm], the interface will automatically go to the survey form of the
next student.
Warning:
Closing the program by a click of [X] / [Exit] in the File Menu at this stage
will lose the input record(s). If you want to exit the program, you should
extract input survey forms as a data file for importation to the SEP. For
details, please follow Step 9 below.
8)
Repeat Steps 3 to 7 for inputting other students’ survey form (Optional).
9)
To extract data for importation to the SEP, click [File] at the left top corner.
i)
ii)
Select [Save As..] under the File Menu
When a “Save HTML” window is displayed, save the file.
Notes:
For easy data file identification, it is recommended to rename the file
name accordingly.
5.4.3
Input Anonymous Survey using ODC
Prerequisite:
To perform the steps below, you should have downloaded the ODC
of a particular survey. For details, please refer to Section on
Download ODC of Particular Survey.
1)
To open the ODC, double click the file named “sepdoc.hta”.
2)
The survey template will be displayed.
3)
At the right top corner, select the group and record number.
4)
5)
6)
Fill in the survey form.
To save the survey form temporarily, click [Save] at the bottom of the page.
A dialogue box showing “successfully saved“ will be displayed.
Note:
The “Number of Records” listed at the bottom left will be updated. Copy this
record number to the hardcopy of the anonymous survey forms if reference is
needed.
7)
Click [Confirm], the interface will then automatically go to the next survey form.
Notes:
Closing the program by a click [X] / [Exit] in the File Menu at this stage
will lose the input record(s). If you want to exit the program, you should
extract input survey forms as a data file for importation to the SEP. For
details, please follow the instruction of step 9.
8)
9)
Repeat steps 3 to 7 for inputting other students’ survey forms (Optional).
To extract the data for importation to SEP, click [File] at the left top corner.
iii)
iv)
Select [Save As..] under the File Menu.
A “Save HTML” window is displayed, save the file.
Notes:
For easy data file identification, it is recommended to rename the file
name accordingly.
5.4.4
Import Data from Offline Data Capturer
Prerequisite:
To perform the steps below, you should have a data file extracted
from the ODC of a particular survey. For details, please refer to
Sections on “Input Named Survey Using ODC” and “Input
Anonymous Survey Using ODC”.
1)
2)
Mouse over to [Data Capture] and then click [Offline].
In the “Survey Search” table, click [Search] to search the survey.
Notes:
To narrow down the search results, define the “Start / End Date” and
“Survey Type” and click [Search] to find the survey.
3)
On the survey list, click [View] of survey.
4)
In the “Upload Offline Data File” section located at the middle of the page, click
[Browse] to select the data file and then click [OK].
Notes: The data file is in *.dat format.
Tips:
To by-pass the logical check by system, click [OK (Auto)] to upload all
survey results without confirming each survey result manually. For steps
after uploading the file, jump to step 12.
5)
The system will scan the data file(s) and display the survey form(s) one by one.
Current Survey Form / Total survey forms detected in the data file
Respondent Name
6)
7)
Verify each survey form if necessary.
At the bottom of the survey form, click [Save] to import the survey form.
Notes: You can click [Skip] to skip importing this survey form to the system.
8)
If there is any empty response in the compulsory survey item(s), a dialogue box
will pop up a list of survey items with problem(s) for your quick reference.
9)
To ignore the error, click [Accept] or click [Reject] and return to the survey form
for checking and revision.
Notes:
If you ignore the error at this moment, you can use the reference number to
retrieve the survey and make amendment(s) later on. For details, please
refer to Section on “Amend Surveys Using Reference Number”.
10) The System will generate a reference number of the input survey, you are
recommended to mark the reference number to the hardcopy of the survey form
for cross-reference / amendment(s) later on.
11) Click [Confirm] to continue the importation for the rest of the survey form.
12) When finished the importation of the last survey form in the data file, a
post-importation summary will be displayed.
Notes:
There are three types of status in the post-importation summary−
“Error But Accepted” indicates that the survey helper ignores
the system-reported problem(s) and imports the responses to
the survey.
−
“OK” indicates that there is no system-checked problem in the
imported responses.
−
“Skipped” indicates that the survey helper acknowledges the
system-reported problem(s) and skips the importation
procedure(s) for the relevant Log Sheet / Questionnaire.
13) Click [Export] to export the summary report (optional).
14) Click [Open] to open the summary report in Excel (Optional).
Notes:
If survey hardcopies are needed for cross-reference, you can attach the
summary reports to the respective hardcopies of survey forms.
5.4.5
1)
2)
Amend Named Surveys
Mouse over to [Data Capture] and then click [Online].
In the “Survey Search” table, click [Search] to search the survey.
Notes:
To narrow down the search results, define the “Start / End Date” and
“Survey Type” and click [Search] to find the survey.
3)
4)
On the survey list, click [View] of the named survey.
To select the respective users’ survey form, select the group(s) / class(es), and
then select his / her name(s).
5)
Amend the survey and click [Save] to save the changes.
5.4.6
1)
2)
Amend Surveys Using Reference Number
Mouse over to [Data Capture] and then click [Online].
In the “Survey Search” table, click [Search] to search the survey.
Notes:
To narrow down the search results, define the “Start / End Date” and “Survey
Type” and click [Search] to find the survey.
3)
On the survey list, click [View] of the survey.
4)
In the “Search Record by Reference Number” section, input the reference
number and then click [OK].
5)
Amend the survey and click [Save] to save the changes.
5.5
Download Log of Offline Data Record
1) Mouse over to [Data Capture] and then click [Online] / [Offline].
2) In the “Survey Search” table, click [Search] to search the survey.
Notes:
To narrow down the search results, define the “Start / End Date” and “Survey
Type” and click [Search] to find the survey.
3) On the survey list, click [View] of the survey.
4) To download log record, click [Download Log].
5) The following dialog box requests you to Save / Open a file. Click [Save] to save
the file to your workstation.
6) Open the file to view the log record.
5.6
Modify Named Survey
1) Mouse over to [Data Capture] and then click [Online] / [Offline].
2) In the “Survey Search” table, click [Search] to search the survey.
Notes:
To narrow down the search results, define the “Start / End Date” and “Survey
Type” and click [Search] to find the survey.
3) On the survey list, click [View] to view the named survey.
4) To select individual user survey, first select the group / class and then the
name of the target user.
5) Modify the survey and click [Save] to save the amendments.
5.7
Amend Surveys Using Reference Number
1) Mouse over to [Data Capture] and then click [Online] / [Offline].
2) In the “Survey Search” table, click [Search] to search the survey.
Notes:
To narrow down the search results, define the “Start / End Date” and “Survey
Type” and click [Search] to find the survey.
3) On the survey list, click [View] to view the survey.
4) In the “Search Record by Reference Number” interface, input a reference number
and click [OK].
5) Modify the survey and click [Save] to save the amendments.
5.8
Practical Tips
To import the offline surveys efficiently, below are some tips –
z Use the “auto” button to by-pass all system-logical checking when
importing the offline data. Print out the post summary report is
recommended so that you can use the reference number for necessary
amendments.
z Print out the post-import summary report and attach it to the
correspondents survey hardcopies for future reference and amendment.
Chapter 6 Tasks for SIB Manager
6.1
Roles and Privilege of SIB Manager
SIB Manager is the general term used to describe the users who can
manage the “Survey Item Bank” in the SEP. The SIB Managers are probably the
teachers who have authority to delete ALL surveys and survey items in the Survey
Item Bank. SEP System Administrators are recommended to assign one person as
the SIB Manager; this person can be either the System Administrator himself / herself
or a teacher.
The roles of the SIB Managers are as follows z Maintain the Item Bank in SIB
z Define the Attributes according to the operation of the school
z Maintain Survey Item Bank in SIB
z Import updated version of EMB Data Package to the EMB folder of
the Item Bank.
z Import / Export questionnaire(s) into / from the SIB
The SIB Managers should have the privilege “Survey Item Bank
Management” to access the following menu buttons in the SEP (Figure 4.1) z Survey Item Bank
z Survey
Figure 6.1: Menu buttons for the Survey Item Bank Managers.
6.2
Recommended Strategies to Maintain Survey Item Bank
As the Survey Item Bank is a common area for Survey Manager to store
and retrieve surveys and survey items, a set of strategies is recommended for school
to manage the Survey Item Bank efficiently –
z
Assign one person to manage the Survey Item Bank so as to keep
the consistency of folder structure / attribute. This person can be
either the system administrator or a teacher. Only he / she has the full
right to create / delete / edit folder and attributes in Survey Item Bank.
He / she can standardize the structure for the Survey Mangers by
saving the materials in Survey Item Bank. Therefore, the possibilities
of surveys and survey item scattered into highly refined folders and
attributes can be prevented.
z
Standardize the SIB folder structure and attributes into narrow
folders and terms so as to shorten time used to find resources in SIB.
Develop a scheme for folder and attribute creation so that all
Survey Managers understand when to request a new folders and
attributes in SIB.
z
z
Develop a guideline of saving materials in SIB showing the Survey
Managers how to save surveys and survey item in appropriate folders
and attributes respectively.
z
Copy and paste the pre-installed surveys from EMB Folder to the
School defined folder structure so as to facilitate the operation of
individual schools.
6.3
Standardize School Folder Structure in the Item Bank
The SIB Managers have the full rights to create folder(s) under the School
Folder in Item Bank. The aim of designing the folder structure is to facilitate the
Survey Managers to locate the required survey quickly and efficiently.
Tips to standardize school folder structure –
z
z
z
Create folder into several board categories instead of refined categories
so that the surveys are not scattered into a lot of refined folders and
difficult to find.
Standardize the folder structures with the Survey Managers before
creating it in the Item Bank.
Create subject folder(s) (i.e. English and Chinese) for storing surveys
of other academic subjects
The following are some suggested categories used to customize the school
folder structure:z
z
z
School Academic Year so that school can identify the surveys
published in respective years.
Type of Target Respondents (i.e. students, parents, staff)
Subject Area
6.4
Standardize Attributes
A set of pre-installed attributes is preset as the default Attributes to
categorize the pre-installed survey items in the Survey Item Bank. These
pre-installed attributes cannot be edited / deleted. And they are marked with “*”
sign in the Attributes List so that the SIB Managers can identify them easily.
Strategies to standardize school attributes structure –
z Discuss and identify the required attributes with the Survey Managers
z Check if the required attributes can be inserted as value(s) /
sub-value(s) of the pre-installed attributes (i.e. ITEd Survey and ITEd
Survey Indicator). If new / required attributes cannot fit into
pre-installed attributes, add it as new attributes.
z Try to group the new attributes into several broad terms. To facilitate
the search, define broad terms as attributes and refine terms as value(s)
and sub-value(s) in the SEP..
z Create new set of attributes for storing other non ITEd survey items
To maintain a neat bank for storing Survey Items, he / she should –
z Develop a guide advising the Survey Managers to use appropriate
attributes to categorize the survey items.
z Define a scheme to show how the Survey Managers can request for
new Attributes.
6.5
Re-construction of Attributes
At the beginning, the SIB Managers may build a simple “Attributes
System” structure in. After some time, when the number of survey items increases, the
structure of the “Attributes System” may not fit the nature of the survey items added.
Under such circumstances, the SIB Managers should review the survey items and
“Attributes System”, and re-construct the “Attributes System” accordingly.
6.6
Copy and paste the Pre-installed Surveys from EMB Folder
to the School Folder
Import the updated version of EMB Data Package will replace all the
pre-installed surveys in EMB Folder. The SIB Managers are recommended to make
a copy of the pre-installed surveys from EMB Folder to School Folder. The benefits
of relocating the pre-installed surveys are –
z
z
The Survey Managers can still use the old versions of the pre-installed
survey if necessary.
The School Folder structure can help the Survey Managers to locate
the required surveys efficiently.
6.7
Maintain Survey Items Created by Resigned Staff
The Survey Managers can only modify the survey items created by them.
When a staff resigned, only the SIB Managers have the rights to modify the survey
item created by the resigned staff. To minimize the workload of maintaining all
survey items created by the resigned staff, the Survey Manager can first select the
survey item to a survey, edit the survey item and then save it to the Survey Item Bank.
6.8
Import updated version of EMB Data Package to the EMB
Folder of the Item Bank
The SIB Managers can import the EMB Data Package to the EMB Folder
of Item Bank. Download and importation of EMB Data Package is needed when
EMB announces that new version of Data Package has been uploaded onto EMB
website. The SIB Managers are recommended to keep backup copies. Usually the
format of Data Package is as below Version 2: EMB-SEP-DATA-v2(month/year of release)
Version 3: EMB-SEP-DATA-v3(month/year of release)
6.9
Import / Export Questionnaires into / from the SIB
The SIB Manager(s) can export questionnaire(s) from the SIB. Multiple
questionnaires can be exported at the same time if they are located in the same folder.
He / She can also choose to import questionnaire(s) into a specific folder of the SIB.
6.10
Practical Tips
Below are some tips to assist the SIB Managers to manage the Survey Item
Bank efficiently –
z Develop a guide advising the Survey Managers to use appropriate
attributes / folders to categorize the survey items / surveys.
z Define a scheme to show how the Survey Managers can request for
new Attributes and folders.
z Create a “Temporary” attribute for the Survey Managers to save the
survey items so that they can access the Survey Item Bank to define
the attributes later on.
Chapter 7 Help and Support
7.1
Manuals
There are four manuals provided for installing and using the SEP. Each
manual has its purposes and recommended target readers as summarized in Table 7.1.
New version of manuals can be download from the “Manual” section in the SEP
website. You can download the manuals by accessing the URL
http://www.emb.gov.hk/sep/eng.
Manuals
Purposes
Administrator Manual Provide instruction on
z Installation of SEP
z System Administration
Target Readers
System Administrator
Operation Manual
Provide step-by-step instructions z System
on all operations in the SEP.
Administrator
z SIB Managers
z Survey Managers
z Survey Helpers
User Manual
Provide
instructions
for z
respondents to reply surveys in the z
SEP.
z
z
User Guide
Provide conceptual instruction / z System
information in operating the SEP. Administrator
z SIB Managers
z Survey Managers
z Survey Helpers
Table 7.1 Purposes and target readers of the SEP manuals.
Parents
Students
Teachers
Stakeholders
7.2
Online Help
The Online Help is installed in the SEP. Like the Operation Manual, the
Online Help provides step-by-step instruction to operate particular feature / function
in the SEP. The Online Help is divided into function–basis, users should first access
the function, and then click the [Help] to get the respective help manuals of that
function.
7.3
Online FAQs
A list of frequently asked questions is provided in the SEP website for
online enquiry. The frequently asked questions are located in the “FAQs” section in
the SEP website. You can access the Online FAQs by accessing the below URL.
http://www.emb.gov.hk/sep/eng
Figure 7.3: FAQs in SEP website.
7.4
What’s New?
News / announcements of SEP are published in the “What’s New” section
of the SEP website. Meantime, announcements will be posted onto the “What’s
New” section prior to the release of new version of data packages and manuals. You
can download the manuals by accessing the below URL.
http://www.emb.gov.hk/sep/eng
Figure 7.3: Announcement in SEP website.
Appendix 1: Terminology
Terms
Definition
SEP
Self-evaluation Platform.
Surveys
A generic term describing both questionnaires and log sheets in the SEP.
Questionnaire It mainly solicits immediate responses to a survey from the respondents.
Log Sheet
It is used mainly to record on-the-spot events or performances in a school
activity / at home.
Group Type
There are five types of groups: 1) System Group, 2) Form Group 3) Class
Group, 4) Privilege Group, and 5) Survey Group. All these pre-defined group
types cannot be added or deleted. These five group types are used to facilitate
the System Administrator to group a list of users with common properties.
A group type includes pre-defined user groups which cannot be added or
System Group deleted. They are: 1) Administrator, 2) Teacher, 3) Student, 4) Parent and 5)
Others.
Form Group
A group type is used to group students into forms. Schools can define form
groups according to the operating form levels.
Class Group
A group type is used to group students into classes. Schools can define class
groups according to the operating class levels.
A group type is used to group users with common properties (e.g. students
Survey Group with computers at home, and students without computers at home) for group
comparison in a survey analysis.
Privilege
Group
A group type is used to assign specific access rights to a list/group of users.
The System Administrator can create user groups with various combination of
privileges assigned. The resulting privilege(s) for each account is/are the
aggregate privilege(s) of all groups that the users belong to.
Class Level
The operating class levels.
Class Code
The operating classes.
User Identity
A unique key to maintain relevant student records in the SEP across different
academic year.
EMB Folder
A folder located in the Item Bank. It consists of pre-defined sample surveys
provided by EMB.
A folder located in the Item Bank. It is used for maintaining school-based
School Folder surveys that are created by responsible personnel such as teachers/head(s) at
schools.
Terms
Definition
An attribute system is used for survey item categorization and searching.
There are two types of attributes: the first type includes those pre-defined by
Attribute List the SEP (e.g. clustered or enhanced surveys are grouped by themes) and the
second type includes those created by individual schools (e.g. school-based
surveys may be attributed by subjects or classes).
Attribute
A quality or characteristic used to categorize survey items in the SEP.
Value
A refined characteristic under the defined attribute.
survey items in the SEP.
It is used to categorize
Sub Value
A refined characteristic under the defined values.
survey items in the SEP.
It is used to categorize
Item Bank
It is used for organizing surveys in the SEP.
Survey Item
An individual survey question.
Item Stem
It can be used as a description / question part of a survey item.
to the Operation Manual for details.
Please refer
Item Response The option for a survey question.
Selection
Mode
A setting to define if the survey item is a "single-choice" or "multiple-choice"
question.
Create Survey
Using the pre-defined surveys in the SIB to create / issue a new survey.
from SIB
Create Survey
Create a brand new survey without retrieving the pre-defined survey as draft.
from Scratch
Survey
Creator
Manager
/ The user who creates / owns the survey in SEP.
SIB
Survey Item Bank
SG
Survey Generator
ODC
Offline Data Capturer
DC
Data Capture
UM
User Management
SD
Standard Deviation
EMB
Data It contains all surveys and survey items provided by EMB.
Package
the EMB website for school users to download.
It is placed in
Terms
Offline
File
Definition
Data The data file contains the records which is extracted from the Offline Data
Capturer (ODC).
Reference
Number
A system-generated number for data verification after submission of offline
surveys in the SEP
A staff/user, who is assigned by the school, is given the rights to enter the
Survey Helper responses from a survey which is done in an off-line mode (usually in
paper-and-pencil format) by a group of respondents.
A user who possesses the “Survey Item Bank Management"privilege. He /
Survey Item
She has the full control of all survey items and surveys stored in the SIB. The
Manager
Survey Manager can browse and copy item(s) in the SIB.
Survey
Manager
A user who possesses a “Survey Management” privilege. He / She can
create questionnaire/log sheet either by composing it from the scratch or
extracting an existing survey from the SIB.
All-in-one
The overall report is shown on the same page view.
Click-to-view
The overall report of a specific survey item is shown when a user clicks the
“View Overall Report"button for each survey item.
CrossTimeframe
It is data comparison between / among two or more questionnaires of the
same published questionnaire across different time-frames.
Individual
Report
A report that shows all the “log sheets” activity records of an individual
student.
Item-by-item A comparison report is for the comparison of the key item (independent
Comparison variable) and another item (dependent variable) of a log sheet.
Cross-Group It is the data comparison between / among different groups for the same
Comparison questionnaire.
Cross-Item
Comparison
It is the data comparison between / among survey items across different
questionnaires. The survey items to be compared in Cross-Item Comparison
must be of the same type and with the same number of responses
Overall
Report
A report consists of the question(s), statistical data and chart(s) of survey
item(s).
Appendix 2: Survey Item Types
A2.1
1)
General Type
Single or Multi Selection
Figure A2a Icon for Single or Multi Selection
Figure A2b Sample for Single Selection
Figure A2c Sample for Multi Selection
2)
List Mode of Single Selection
Figure A2d Icon for List Mode of Single Selection
Figure A2e Sample for List Mode of Single Selection
3)
Multiple Column Selection
Figure A2f: Icon for Multiple Column Selection
Figure A2g: Sample for Multiple Column Selection
4)
Standard Mode
Figure A2h: Icon for Standard Mode
Figure A2i: Sample for Standard Mode
A2.2
1)
Advance Type
Grouped Single or Multiple Selection
Figure A2j: Icon for Group Single or Multiple Selection
Figure A2k: Sample for Group Single or Multiple Selection
2)
Advanced Mode 1
Figure A2l: Icon for Advanced Mode 1
Figure A2m: Sample for Advanced Mode 1
3)
Advanced Mode 2
Figure A2n: Icon for Advanced Mode 2
Figure A2o: Sample for Advanced Mode 2
4)
Advanced Mode 3
Figure A2p: Icon for Advanced Mode 4
Figure A2q: Sample for Advanced Mode 4
5)
Advanced Mode 4
Figure A2r: Icon for Advanced Mode 5
Figure A2s: Sample for Advanced Mode 5
Appendix 3: Report Layout for Questionnaire
A3.1
Overall Reports
1)
All-in-one Mode
ALL survey items, table of statistical results and chart are displayed in the
same interface.
2)
Click-to-view Mode
ALL survey items are displayed in the same interface. Users have to click
[Overall Report] to see the table of statistical results and chart of particular survey
item.
A3.2
Comparison Reports
1)
Cross-Group Comparison Report
The report compares the responses of respondents from 1A, 1B and “Focus
Group-P1”.
2)
Cross-Item Comparison Reports
This report compares the responses on an identical survey item between
two surveys.
3)
Cross-Timeframe Comparison Report
This report compares two identical surveys which are held in two different
time-frames.
A3.3
Results Summary
A3.4
Self-Evaluation Rubric
A3.5
Attributed Questionnaire Item
Appendix 4: Report Layout for Log Sheet
A4.1
Item-by-item Comparison Report
The report below compares the Key Item (Major Activity) to a dependent
variable (Duration).
Mean of each major activity and the corresponding chart are
displayed.
A4.2
Individual User Log Sheet
The report below is the log sheet input by a student on 26 January 2005.
Appendix 5 ITEd Indicators
According to the information in the new IT in Education strategy, the HKIEd
project team proposed a eight-dimension framework, which makes use of the PolyU
ITEd survey items for schools to evaluate the IT in Education performance/progress.
All the following survey items in this framework are from the ITEd surveys
designed by the PolyU:
z
z
z
z
School Information Technology Survey (SITS)
z
z
z
z
IT Team Members’ Questionnaire (ITTMQ)
School Heads’ Questionnaire (SHQ)
Students’ Questionnaire (SQ)
Teachers’ Questionnaire (TQ)
Parents’ Questionnaire (PQ)
IT Literacy Assessment – Students’ self-rating (ITLA)
IT Activity Daily Log (ITADL)
Research &
Development
School-based
ITEd
Development
Domain
knowledge in IT
Empowering
Learners with IT
Learning
Outcomes
Community
Wide Support
Information
Literacy
IT Curriculum
Teacher
Empowerment
Competent
Teacher
School
Curriculum
Learning &
Teaching with IT
IT Application
& Integration
Digital
Resources
Infrastructure
& Resources
Infrastructure &
Innovative
Technologies
Administration &
Management
School
Leadership
School General
Information
Figure A5.1 The Conceptual Framework
Note:
z
z
z
z
z
z
z
z
School Information Technology Survey (SITS)
School Heads’ Questionnaire (SHQ)
Students’ Questionnaire (SQ)
Teachers’ Questionnaire (TQ)
IT Team Members’ Questionnaire (ITTMQ)
Parents’ Questionnaire (PQ)
IT Literacy Assessment – Students’ self-rating (ITLA)
IT Activity Daily Log (ITADL)
Relevant Key
Survey-item
Related
Survey-item
Reference#
Number of classes
Number of students
Number of teachers
Number of technical support staff
Number of IT team members
Teachers’ IT background
SITS - Q1b
SITS - Q1c
SITS - Q1d
SITS - Q1f
SHQ - Q14a
SITS - Q3
SITS - Q.2b
NA
NA
NA
NA
TQ - Q13, Q21
Total budget in ITEd
Technical support staff-to-student
ratio
Technical support staff-to-teacher
ratio
IT team member-to-teacher ratio
SHQ - Q13
SITS - Q1f
NA
SITS - Q1c
Table 6.4, 7.4, 9.4
NA
NA
NA
Section 6.4.3
Table 6.9, 7.9 , 9.9, 11.15,
11.17
Table 6.6, 7.6, 9.6
NA
SITS - Q1f
SITS - Q1d
NA
NA
NA
NA
ITLA - Section 1
NA
Table 6.36, 7.36, 9.44, 11.33
ITLA - Section 2
SQ – Q20
SQ - Q28
SHQ - Q9c,
TQ - Q14e,
SQ - Q13b, 27
Section 11.1.5, Table 6.35,
6.37, 7.35, 7.37, 9.43
Table 6.39-41, 7.39-41,
9.49-51, 11.34
SQ - Q.2
ITADL
Section 11.1.1
ITADL
ITADL
Table 6.32, 7.32, 9.40, 11.9
Time spent with IT at home by
students
IT facilities used by students
SQ - Q.1b
ITADL
SITS - Q.2a
SQ – Q21
Section 11.1.1, Table 11.12,
11.13, 11.14
Table 6.34, 7.34, 9.42
Educational software used by
students
IT Activities at school by students
SITS - Q.4d
SQ – Q20
Table 6.35, 7.35, 9.43
SQ - Q.4
SQ - Q13c, 14b, 23,
Table 6.24, 6.30-1, 7.24,
Dimensions & Indicators
School General Information
Empowering Learners with IT1
Learning Outcomes
Information Literacy-discipline
knowledge and technical skills
Student perceived confidence in
software skills
Information Literacy-problem
solving
Learning with IT
Time spent with IT at school by
students
Students’ use of IT during lessons
1
Goal 1: Empowering Learners with IT - Students will acquire the necessary skills, knowledge and attitudes for lifelong
learning and creative problem solving in the information age. They will use IT as an information retrieval, knowledge enquiry,
communication, collaboration, analytical and personal development tool.
ITADL
ITADL
ITADL
7.30-1, 9.3f, 9.39
Table 11.9, 11.32
SQ - Q.17, 23
ITADL
Table 6.8, 7.8, 9.8, 11.27, 11.32
IT as KLA (IT curriculum)
SITS - Q5a
Section 9.3.2, Table 6.18-19,
6.40, 7.18-19, 7.40, 9.50
Adoption of IT across KLA (IT
integration)
SHQ - Q6
SHQ - Q6
TQ - Q14a-e (Select
computer subject)
SQ - Q6,13
(Select computer
subject)
ITADL
TQ-Q.8-12, 14b,c
SQ-Q.13c
ITTMQ-Q.5a
ITADL
SQ – Q7
Time spent on various IT activities
by students
IT Activities outside school hours
by students
School Curriculum
Section 11.1.1
Table 6.18-9, 6.26-7, 7.18-9,
7.26-7, 8.1-2
Teacher Empowerment2
Teaching with IT
Time spent with IT at school by
teachers
Time spent with IT at home by
teachers
Types & frequency of IT facilities
used by teachers
Software types & frequency used
by teachers
Activities with IT at home by
teachers
Pedagogical uses of IT by teachers
TQ - Q1e
TQ - Q2a
SITS - Q.2a(iv),
Section 6.1.3, 7.1.3, 9.1.3,
Table 11.11
Section 6.1.3, 7.1.3, 9.1.3,
Table 11.11
Table 6.25, 7.25, 9.32-3
TQ - Q12
NA
Table 6.21, 7.21, 9.26
TQ - Q1d
NA
Section 6.1.3, 7.1.3, 9.1.3
TQ - Q8,10
SQ - Q13 d,14b
TQ - Q19
SHQ – Q9b
Table 6.22, 7.22, 8.1-2, 11.9,
11.25&27
Table 6.15, 7.15, 9.19, 9.20,
11.26
Teachers’ perceived satisfied
activities using IT
TQ - Q1c
Teacher Competency & Perception in Teaching with IT
Teachers’ IT competence level
Teachers’ self-efficacy with IT
TQ - Q21
TQ - Q1g
SITS - Q3b
SHQ - Q4
Teachers’ competency in software
applications
Professional development types &
effectiveness in ITEd by teachers
Teachers’ perception of impact of
ITEd
Teachers’ belief of using IT in
teaching
Teachers’ perceived role of using
IT
Perceived roles of IT team
members
TQ - Q13
NA
TQ - Q4
SHQ - Q3
TQ - Q19
SHQ - Q9b
TQ - Q11, Q20
NA
TQ - Q14d
NA
ITTMQ - Q3
Table 6.9, 7.9, 9.9, 11.15
Section 6.2.1, 7.2.1,
Table 6.10, 7.10, 9.10,
11.16-17
Section 6.2.1, 7.2.1, 9.2.1
Table 11.17
Table 6.11, 7.11, 9.12
Table 6.14-5, 7.14-5, 9.18-19,
11.21
Section 6.3.1, 7.3.1, 9.3.1
Table 11.23, 11.35
Table 6.17, 7.17, 9.23, 11.24
Section 6.4.3 , 7.4.3, 9.4.3
2
Goal 2: Empowering Teachers with IT - Teachers will be provided with professional development opportunities and support
to undertake the challenge of using IT for curriculum and pedagogical innovations, and to facilitate, guide, administer and assess
learning in ways that align with the goal of the Curriculum Reform. Support structures and mechanisms will be developed to
foster the development of online and off-line communities of practice for teachers to exchange experience and good practices,
collaborate in curriculum and pedagogical innovations, as well as undertake action-oriented research.
School Leadership3
Time spent with IT at school by
school head
Time spent with IT at home by
school head
IT facilities used by school head
Activities with IT at school by
school head
Activities at home by school head
with IT
SHQ - Q1e
NA
Section 6.1.3, 7.1.3, 9.1.3
Table 11.10
Section 6.1.2, 7.1.2, 9.1.2
Table 11.10
NA
Section 6.1.3, 7.1.3, 9.1.3
SHQ - Q1c
NA
NA
SHQ - Q2
NA
NA
SHQ - Q1d
NA
Section 6.1.3, 7.1.3, 9.1.3,
11.1.1
School head’s IT competence level
School head’s self-efficacy with IT
Professional development types &
effectiveness in ITEd vy school
head
School head’s perception of
impact of ITEd
School head’s perception of an
ITEd plan
School ITEd promotion activities
NA
SHQ - Q4
SHQ - Q3
NA
TQ - Q1g
TQ - Q.4
SITS - Q1h,3c
NA
Section 6.2.1, 7.2.1, 9.2.1
Section 6.2.2, 7.2.2, 9.2.2
SHQ - Q9b, 9d, 9e
TQ - Q19
SHQ - Q5
NA
Table 6.14-5, 7.14-5, 9.18-20,
11.28
Table 6.28, 7.28, 9.37
SITS - Q4b
SHQ - Q10
NA
NA
Teachers’ participation in ITEd
promotion
School ITEd project
TQ - Q18
NA
Section 11.1.4
Section 11.1.4,
Table 6.29, 7.29, 9.38
NA
NA
NA
NA
TQ-Q.12
Table 6.21,7.21,9.26
IT Infrastructure and Resources
Digital Resources4
Types & usage of educational
software
SITS - Q4d
Infrastructure and Innovative Technologies5
Types & quantity of hardware
SITS - Q2a
TQ - Q2a
Types & usage of application
software
Types of service (website, email,
intranet etc.)
Number of computers in school
(Desktop+Notebook)
Number of computers for students
(Desktop+Notebook)
Student-to-computer ratio
Number of computers in general
classrooms (Desktop+Notebook)
Number of computers for teachers
(Desktop+Notebook)
Teacher-to-computer ratio
Types & speed of Internet access
SITS - Q4d
TQ - Q12
Table 6.1, 6.25, 7.1, 7.25, 9.1,
9.32-33
NA
SITS - Q4a
TQ - Q2a
Table 6.5, 7.5, 9.5, 11.5
SITS - Q2a(i)
NA
SITS - Q2b(i-iv)
NA
Table 6.25, 7.25, 9.1, 9.32-33,
11.1
Table 6.3-4, 7.3-4, 9.3-4
SITS - Q2b (i-iv)
SITS - Q2b (i)
SITS - Q1c
NA
Table 6.3, 7.3, 9.3, 11.2
Table 6.4, 7.4, 9.4, 11.3
SITS - Q2b(vii)
NA
Table 6.4, 7.4, 9.4
SITS - Q2b(vii)
SITS - Q2c
SITS - Q1d
NA
NA
Section 6.1.1, 7.1.1, 9.1.1
3
Goal 3: Enhancing School Leadership for the Knowledge Age - School heads and their associates will be guided and
supported to establish visions and goal as well as build teams appropriate for their school contexts, in order to enable them to
effectively lead change in integrating IT into school planning, curricula, learning and teaching processes, communication and
collaboration. They will be given more flexibility in making decisions that tailor to the IT needs of their schools.
4
Goal 4: Enriching Digital Resources for Learning - Digital resources will be continually enriched to meet school needs.
Research on knowledge management strategies will be conducted to enable digital resources and curriculum experiences
generated from various sources, local and international, to become more easily shared, updated, retrieved, customized and
utilized.
5
Goal 5: Improving IT Infrastructure and Pioneering Pedagogy Using IT - We will help schools to upgrade and replace
obsolete hardware and migrate where appropriate to wireless systems. We will encourage innovation and trials of new
information technologies to enhance learning and teaching.
Home ownership of computer
-Percentage of teachers
Home ownership of computer
-Percentage of students
Home Internet
connection-Percentage of teachers
Home Internet
connection-Percentage of students
Teachers’ perceived level of
support from school
TQ - Q1a
SITS - Q1d
Table 11.8
SQ - Q1
SITS - Q1c
Table 11.8
TQ - Q1b
SITS - Q1d
Table 11.8
SQ - Q1a
SITS - Q1c
Table 11.8
TQ - Q2b
NA
Section 6.3.6, 7.3.6, 9.3.6
NA
Table 11.7
Administration and Management
Expenditure on consumables as a
percentage of total expenditure*
Expenditure on computer assisted
learning packages as a percentage
of total expenditure*
Average expenditure on
consumables and computer
assisted learning packages per
student *
Expenditure on facilities
(hardware and application
software) as a percentage of total
expenditure
Expenditure on facilities
management & maintenance as a
percentage of total expenditure
Average expenditure on TSS
personnel per student*
Average expenditure on TSS
personnel per computer*
Total number of hours (including
dedicated and part-time positions)
assigned to TSS*
Total number of
workstation-related TSS incidents*
Average expenditure on Internet
connection per student*
Amount of bandwidth for Internet
access in the school premises*
Total number of opening hours of
computer rooms/facilities beyond
normal school hours*
Total number of students using the
equipment (computer facilities)
during the extended opening
hours*
Average expenditure on extension
of opening hours per total number
of students using the equipment
(computer facilities) during the
extended opening hours*
Expenditure on staff professional
development in ITEd as a
percentage of total expenditure
SHQ – Q13
SHQ – Q13
Table 6.6, 7.6, 9.6, 11.7
NA
NA
NA
SHQ - Q13
NA
Table 6.6, 7.6, 9.6, 11.7
SHQ - Q13
NA
Table 6.6, 7.6, 9.6, 11.7
NA
NA
NA
NA
NA
NA
NA
NA
NA
NA
NA
NA
NA
NA
NA
SITS - Q2c(iii)
NA
NA
NA
NA
NA
NA
NA
NA
NA
NA
NA
SHQ - Q13
NA
Table 11.7
School-based ITEd Development
Research and Development6
Action research
NA
NA
NA
Evaluation study
NA
NA
NA
SHQ - Q11
NA
Section 6.4.5, 7.4.5, 9.4.5
NA
SHQ - Q11
PQ - Q6-7
ITTMQ - Q1f
NA
NA
NA
NA
NA
Section 6.4.5, 7.4.5, 9.4.5
Section 6.4.6, 7.4.6, 9.4.5,
11.1.4
Section 6.4.5, 7.4.5, 9.4.5
7
Community-wide Support
Use of outside school facilities &
resources
Digital divide measure
Partnership
Parents involvement
Dissemination & sharing
NA
Table A5.1 The ITEd survey indicators and the survey items in PolyU ITEd survey
#
Comparable findings can be located in the respective sections and tables in the Final report “Overall Study on the Reviewing
the Progress and Evaluating The ITEd Projects 1998/2003”
* Indicators of ITEd commitment on Composite Information Technology Grant (CITG) (Source: CITG, EMB Internal Circular
No. 2/2004)
Seven strategic goals in ITEd (Source: Empowering Learning and Teaching with Information
Technology 2004)
6
Goal 6: Providing Continuous Research and Development - We will conduct research on the effectiveness of the IT in
education strategy and the impact of IT on students' learning outcomes. We will explore the possibility of setting up a Hong Kong
based research centre to pioneer leading edge IT applications in support of proven educational precepts and to come up with
creative means of applying IT in pedagogy, learning and teaching and other education purposes.
7
Goal 7: Promoting Community-wide Support and Community Building - We will enhance partnership with the IT industry
on teacher training, digital resources and other related fields. We will involve the community, in particular parents, and encourage
them to motivate children towards the appropriate use of IT and drive home messages on cyber ethics. Communication between
schools and parents will be enhanced through the use of IT and measures to address the digital divide will continue.
A5.1 –Matching of ITEd Overall Study (2005)1 Question Items with
Phase (I) Study2 ITEd Evaluation Framework (2006)
Note:
z
z
z
z
z
z
z
School Information Technology Survey (SITS)
School Heads’ Questionnaire (SHQ)
Students’ Questionnaire (SQ)
Teachers’ Questionnaire (TQ)
IT Team Members’ Questionnaire (ITTMQ)
Parents’ Questionnaire (PQ)
IT Literacy Assessment Questionnaire (LA)
Phase (I) Study ITEd
Evaluation Framework
(2006)
Evaluative Areas
ITEd Overall Study (2005)
ITEd Indicators (2005)
ITEd Overall Study (2005)
Question Items
Empowering Learners with IT
(1) Students’ Perception of
Learning with IT
- Learning outcomes
- Students’ perceived level(s) of
SQ – Q20, LA – Section 2
confidence in software skills
Teacher Empowerment
- Teachers’ Competency &
Perception of Teaching with IT
- Teachers’ IT competency level
TQ – Q21, SITS – Q3b
- Teachers’ self-efficacy with IT
TQ – Q1g, SHQ – Q4
- Teachers’ competency in
TQ – Q13
software applications
(2) Teachers’ IT Competency
as well as Teachers’ &
School Heads’ Perception
of ITEd
- Teachers’ perception of ITEd
TQ – Q19, SHQ – Q9b
impact
- Teachers’ belief of using IT in
TQ – Q11, Q20
teaching
- Teachers’ perceived role(s) of
TQ – Q14d
using IT
- Perceived role(s) of IT Team
ITTMQ – Q3
members
School Leadership
1.
Overall Study on Reviewing the Progress and Evaluating The Information Technology in Education (ITEd)
Projects 1998/2003
2.
Phase (I) Study on Evaluating the Effectiveness of the ‘Empowering Learning and Teaching with
Information Technology’ Strategy (2004/2007)
- School heads’ perception of
SHQ – Q9b, 9d, 9e
ITEd impact
- School heads’ perception of
SHQ – Q5
ITEd plan
School–based ITEd development
- Community-wide support
(3) Community-wide
Support & Parents’
Involvement
- Use of outside school facilities
SHQ – Q11
& resources
- Partnership
SHQ – Q11
- Parents’ involvement
PQ – Q6-7, ITTMQ – Q1f
School Curriculum
SITS – Q5a, SHQ – Q6,
TQ – Q14 a-e (Select
computer subject)
SQ – Q6, 13 (Select
(4) School ITEd Curriculum
computer subject)
SHQ – Q6, TQ- Q8-12,
14b,c, SQ – Q13c,
ITTMQ – Q5a, ITADL
Teacher Empowerment
- Teachers’ Competency &
Perception of Teaching with IT
- Types of professional
TQ – Q4, SHQ – Q3
development & effectiveness in
(5) School Professional
ITEd by teachers
Development in ITEd
(Training Opportunities)
School Leadership
- Types of professional
development & effectiveness in
SHQ – Q3,
SITS – Q1h, 3c
ITEd by school heads
School Leadership
9e, 10, 18
(6) School Leadership
TQ – Q1g, 4, 19
IT Infrastructure and Resources
(7) Digital Resources &
Infrastructure
SHQ – Q1c-e, 2-5,9b, 9d,
SITS – Q1c-d, 2a, 2b(i-iv),
2c, 4a, 4d,
TQ – Q1a-b, 2a, 12
SQ – Q1, SHQ13
School Leadership
(8) School Technology using Culture and School
ITEd Development
- School ITEd promotion
SITS – Q4b, SHQ – Q10
activities
- Teachers’ participation in ITEd
TQ – Q18
promotion
Empowering Learners with IT
(9) Students’ Learning
Activities with IT
- Learning outcomes
- Information Literacy-Problem
solving
SQ – Q28, SHQ – Q9c,
TQ – Q14e, SQ – Q13b, 27
Teacher Empowerment
(10) Teachers’ Pedagogical
Practices with IT
- Teaching with IT
- Pedagogical uses of IT by
teachers
(11) Students’ Learning
Outcomes in different
Key Learning Areas and
the Development of
Generic Skills
NA
TQ – Q8,10
SQ – Q13d, 14b
NA
A5.2 – Phase (I) Study ITEd Evaluation Framework
Drawing on the notion of resource-based learning and the view of systemic change of
the impact of the use of technology in an educational system, a conceptual framework
underpinning the evaluation design of the Phase (I) Study on Evaluating the
Effectiveness of the “Empowering Learning and Teaching with Information
Technology” Strategy (2004-2007) [Phase (I) Study] is presented in Figure 1.
Based on the conceptual framework, the following questionnaires have been
developed and administered in the Primary, Secondary and Special Schools
Sectors:
1. School Head’s Information Technology in Education Questionnaire (Part 1)
(HSQ)
2. School Head’s Information Technology in Education Questionnaire (Part 2) (HQ)
3. School Information Technology in Education Survey (ITEdinfo)
4. Information Technology in Education Team Teachers’ Questionnaire (ITQ)
5. Teachers’ Information Technology in Education Questionnaire (TQ)
6. Students’ Information Technology in Education Questionnaire (SQ)
7. Parents’ Information Technology in Education Questionnaire (PQ)
8. Therapists’ Information Technology in Education Questionnaire (for Special
Schools only) (THQ)
For the details of questionnaire code and naming conventions, please refer to
Appendix 5.3.
Figure 1: Phase (I) Study ITEd Evaluation Framework
#(IV) School
ITEd Curriculum
#(V)
School Professional
Development in ITEd
#(VIII) School
ITEd Development
*5b. Pioneering Pedagogy Using IT
School
ITEd Plan
*4. Enriching Digital Resources
*3. Enhancing School Leadership
#(VI)
School
Leadership
#(VIII)
School
Technologyusing Culture
#(VII)
Digital Resources
& Infrastructure
*5a. Improving IT Infrastructure
#(II)
*7. Promoting Community-wide Support
& Community Building
School Head’s
Perception of ITEd
#(III)
Communitywide Support &
Parents’ Involvement
ITEd Vision &
Strategic Goals
(*1-7)
ITEd
Implementation
Measures
ITEd Projects/
Initiatives
Resources
Context
Dimension
Context/ Learning
Environment
#(XI)
Input
Dimension
Outcome
Dimension
KLAs
#(XI)
Information
Literacy
#(XI)
Generic
Skills
#(I)
Evaluation Study
Student’s
Perception of
learning with IT
Process
Dimension
#(II)
Teacher’s IT
Competency &
Perception of ITEd
*6. Providing Continuous Research & Development
#(X)
Teachers’ Pedagogical
Practices with IT
*2. Empowering Teachers with IT
* Strategic goals in ‘Empowering Learning and Teaching with Information Technology’ Strategy (2004/2007)
# Evaluative areas in this study
Scaffolds
& Tools
#(IX)
Students’
Learning activities
*1.Empowering Learners with IT
Detailed relationship between the conceptual framework and indicators (survey items)
Dimension
is shown in the following table:
Evaluative
Area
Main Point
(1) Students’ Students’ ITEd
Perception of perception –
Learning with attitude
IT
(2) Teachers’ Teachers’ IT
IT
competency
Competency
as well as
Teachers’ &
(1) Input Dimension
School Heads’
Perception of
ITEd
Teachers’ ITEd
perception – roles
Indicators (Survey Items)*
(1) [P6/S6/E6-2/E6-3]SQ3a,b; 11e, 22;
[E6-1]SQ3a,b, 10e, 21;[E6-4/E6-5/E6-5]SQ3a,b,
13e, 24
(2) SQ3bii,c
(3) HSQ1b
(1) [P5/S5]TQ1,7h; [E5]TQ1, 7j;[E8]THQ1,6j
(2) ITEdInfoQ1e
(3) HSQ2a
(4) [P5/S5/E5]TQ32; [E8]THQ28
(5) [P5/S5/E5]TQ31; [E8]THQ27
(6) [P5/S5/E5]TQ10f; [E8]THQ9f
(1) [P5/S5/E5]TQ16a-f; [E8]THQ15a-f
(2) HSQ2b
of IT
Teachers’ ITEd
perception – roles
(1) [P5/S5/E5]TQ12; [E8]THQ11
(2) HSQ2c
of teachers
Teachers’ ITEd
perception –
attitude
(3)
Home-school
Communitycollaboration
wide Support
& Parents’
Involvement
(1)
(2)
(3)
(4)
(1)
(2)
(3)
(4)
(5)
(6)
(7)
(8)
(9)
[P5/S5/E5]TQ20; [E8]THQ18
[P5/S5/E5]TQ16; [E8]THQ15
HSQ5-6,HQ6
HSQ2d
HSQ7a-d, HQ13
[P7/S7]PQ18; [E7-1/E7-2]PQ19
[P7/S7]PQ20; [E7-1/E7-2]PQ21
[P7/S7]PQ17, 19; [E7-1/E7-2]PQ18, 20
[P7/S7]PQ21; [E7-1/E7-2]PQ22
PQ10a
PQ10b-d
[P7/S7]PQ22; [E7-1/E7-2]PQ23
HSQ7a
(3)
Communitywide Support
& Parents’
Involvement
Parents as
supporters and
motivators for
(1)
(2)
(3)
(4)
students' learning
with IT
(5)
(6)
(7)
(1) Input Dimension
(8)
[P2/S2]HQ12a-f; [E2-1/E2-2]HQ12a-g
PQ8
PQ6
PQ1,3, 9d, 11, [P7/S7]PQ13,15;
[E7-1/E7-2]PQ14,16
PQ7
[P6/S6/E6-2]SQ8a-d; [E6-3]SQ8a-f;
[E6-4/6-5/E6-6]SQ9a-f;
[P7/S7]PQ13;[E7-1/E7-2]PQ14
[P6/S6/E6-2/E6-3]SQ8c,d;
[E6-4/6-5/E6-6]SQ9c,d; PQ12
[P6/S6/E6-2/E6-3]SQ9bii ,15b,cii;
[E6-1]SQ8bii, 14b,cii; [E6-4/6-5/E6-6]SQ10bii,
16b,cii
HQ13a
PQ9a
PQ9b
PQ9e
[P5/S5/E5]TQ11e,f; [E8]THQ10e,f
Option 3 of ITEdInfo Q 6b,c
HQ13d
[P7/S7]Option 5 of PQ18; [E7-1/E7-2]Option 5
of PQ19
(3) [P7/S7]PQ14; [E7-1/E7-2]PQ15
Parents' Use of IT (1)
(2)
as a
(3)
communication (4)
(5)
tool
(6)
Role(s) of parents (1)
(2)
to ensure
students'
understanding of
ethical, legal and
health issues
involved in using
IT
Help offered to
the poor/needy
students
Community
resources
(1) HQ15
(2) HQ10
(3) [P6/S6/E6-2]SQ7a-e, 8a-d; [E6-1]SQ7a-g;
[E6-3]SQ7a-g, 8a-f;
[E6-4/6-5/E6-6]SQ8a-g,9a-f
(4) [P6/S6/E6-2]Option of SQ8e,9b; [E6-1]8b;
[E6-3]Option of SQ8g,9b;
[E6-4/6-5/E6-6]Option of SQ9g,10b
(5) HSQ7b
(6) PQ11 & [P7/S7]PQ25; [E7-1/E7-2]PQ26
(7) PQ12a,b & [P7/S7]PQ25; [E7-1/E7-2]PQ26
(1) HQ14a
(2) HSQ7c
(3) HQ14b
(4) ITQ7a
(5) HQ15a
(6) HQ15b
(2) Context Dimension
Community &
home-school
collaboration
(1) [P7/S7]Option 6 of PQ15; [E7-1/E7-2]Option 6
of PQ16
(2) [P6/S6/E6-2]Option 3, 4 of SQ8e, 18e;
[E6-1]SQ17g;[E6-3]Option 3, 4 of SQ8g, 18e;
[E6-4/6-5/E6-6]Option 3, 4 of SQ9g, 20e
(3) [P6/S6/E6-2/E6-3]SQ9biii ,15b,ciii;
[E6-4/6-5/E6-6]SQ10biii, 16b,ciii
(4) HSQ7d
(5) [P7/S7/E7-1]PQ5a-f; [E7-2]PQ5a-h
(6) HSQ7e
(7) [P7/S7]PQ16; [E7-1/E7-2]PQ17
(8) HSQ7f
(9) [P7/S7]PQ15; [E7-1/E7-2]PQ16
(1) SQ1;[P6/S6/E6-2]7g;[E6-1/E6-3]7i;
(1) School
IT Learning
ITEd
Targets
[E6-4/6-5/E6-6]SQ8i
curriculum
(2) [P6/S6/E6-2/E6-3]SQ18a-e; [E6-1]SQ17a-g;
[E6-4/6-5/E6-6]SQ20a-e
(3) ITEdInfoQ7, 8, [P4/S4/E4-1]ITQ3l;
[E4-2]ITQ3m
(4) HSQ3a
(5) HSQ3b
(6) [P4/S4/E4-1]ITQ3m; [E4-2]ITQ3n
(7) HQ11
(8) SQ3a,bi
(9) SQ2a
(10) [P5/S5/E5]TQ14a; [E8]THQ13a
(11) [P5/S5]TQ15a-i; [E5]TQ15a-k; [E8]THQ14a-k
(1) SQ2b
The use of IT
across KLAs /
(2) SQ2b
generic skills
(3) [P5/S5/E5]TQ14a; [E8]THQ13a
(4) HSQ3c
(1) [P5/S5/E5]TQ30a-h
Teachers’
understanding of (2) HSQ3d
school ITEd
(3) ITQ1
curriculum
(4) [P5/S5/E5]TQ30a-h
(1) [P5/S5/E5]TQ22i, j; [E8]THQ20d
Types &
(2) School
Professional effectiveness of (2) [P5/S5/E5]TQ22h; [E8]THQ20c
Development ITEd professional (3) [P5/S5/E5]TQ22f,g
development
in ITEd
(4) [P5/S5/E5]TQ23
(Training
(5) [P1/S1/E1-1]HSQ4a; [E1-2]HSQ4a
Opportunities
(6) [P5/S5/E5]TQ22a-e; [E8]THQ20a,b
)
(7) [P4/S4/E4-1]ITQ3g; [E4-2]ITQ3g,h
(8) HQ18a
(9) HQ18b
(10) HQ18c, d
(11) HSQ4b
(3) School
Leadership
ITEd plan learning
ITEd plan –
resources and
support
ITEd plan –
teachers’
understanding
(2) Context Dimension
Feeling of
support
Types, quantity
(4) Digital
Resources & and quality of
Infrastructure resources and
support
(1)
(2)
(3)
(4)
(5)
(1)
(2)
(3)
(4)
(5)
(1)
(2)
(3)
(4)
(1)
(2)
(3)
HSQ5a,e; [P2/S2/E2-1]HQ1a-l [E2-2]1a-n; HQ4
HQ2
HSQ5
[P2/S2]HQ3a-l; [E2-1]HQ3a-m; [E2-2]HQa-n
ITQ4
[P4/S4/E4-1]ITQ2a-d; [E4-2]ITQ2a-e
ITQ3b
ITQ3c
ITQ4
HSQ5c
[P5/S5/E5]TQ28; [E8]THQ25
[P5/S5/E5]TQ24,25; [E8]THQ21, 22
[P5/S5/E5]TQ21; [E8]THQ19
HSQ5g
[P5/S5/E5]TQ26; [E8]THQ23
[P5/S5/E5]TQ9b; [E8]THQ8b
HSQ5d
(1) [P6/S6/E6-2/E6-3]SQ12a,b; [E6-1]SQ11a,b;
[E6-4/6-5/E6-6]SQ14a,b
(2) [P6/S6/E6-2/E6-3]SQ12e; [E6-1]SQ11e;
[E6-4/6-5/E6-6]SQ14e
(3) [P6/S6/E6-2/E6-3]SQ12d; [E6-1]SQ11d;
[E6-4/6-5/E6-6]SQ14d
(4) [P6/S6/E6-2/E6-3]SQ12f; [E6-1]SQ11f;
[E6-4/6-5/E6-6]SQ14f
(5) [P5/S5/E5]TQ11a,b; [E8]THQ10a,b
(6) [P5/S5/E5]TQ11d; [E8]THQ10d
(7) HSQ6a,b
(8) PQ9c,d
(9) [P6/S6/E6-2/E6-3]SQ10c,d; [E6-1]SQ9c,d;
[E6-4/E6-5/E6-5]SQ11c,d, 12c,d
(10) [P5/S5/E5]TQ10d,e; [E8]THQ9d,e
(11) HQ9
(12) ITEdInfoQ6
(13) [P5/S5/E5]TQ10a; [E8]THQ9a
(14) [P5/S5/E5]TQ11c; [E8]THQ10c
(15) [P6/S6/E6-2/E6-3]SQ12c; [E6-1]SQ11c;
(16) [P6/S6/E6-2/E6-3]SQ13a,b; [E6-1]SQ12a,b;
[E6-4/6-5/E6-6]SQ14a,b
(17) [P6/S6/E6-2/E6-3]SQ13c; [E6-1]SQ12c;
[E6-4/6-5/E6-6]SQ14c
(2) Context Dimension
(4) Digital
Types, quantity
Resources & and quality of
Infrastructure resources and
support
Types of ITEd
resources and
ways of use
(18) [P6/S6/E6-2/E6-3]SQ13e; [E6-1]SQ12e;
[E6-4/6-5/E6-6]SQ14e
(19) [P6/S6/E6-2/E6-3]SQ13f; [E6-1]SQ12f;
[E6-4/6-5/E6-6]SQ14f
(20) [P6/S6/E6-2/E6-3]SQ13d; [E6-1]SQ12d;
[E6-4/6-5/E6-6]SQ14d
(21) [P5/S5/E5]TQ13a,b; [E8]THQ12a,b
(22) [P5/S5/E5]TQ13c,d; ; [E8]THQ12c,d
(23) HSQ6b
(24) HSQ6c
(25) [P6/S6/E6-2]SQ7f; [E6-1/E6-3]SQ7h;
[E6-4/6-5/E6-6]SQ8h
(26) [P5/S5]TQ7g; [E5]TQ7i; [E8]THQ6g
(27) ITQ5
(28) [P6/S6/E6-2]SQ7a,b; [E6-1/E6-3]SQ7a,b,f,g;
[E6-4/6-5/E6-6]SQ8a,b,f,g
(29) [P6/S6/E6-1/E6-2/E6-3]SQ7c;
[E6-4/6-5/E6-6]SQ8c
(30) [P5/S5/E5]TQ7a-c; [E8]THQ6a-c
(31) [P5/S5/E5]TQ7e; [E8]THQ6e
(32) HSQ6d
(33) ITEdInfoQ3-5
(34) [P6/S6/E6-2/E6-3]SQ9a,bi; [E6-1]SQ8a,bi;
[E6-4/6-5/E6-6]SQ10a,bi
(35) [P5/S5/E5]TQ7b, 9b; [E8]THQ6b, 8b
(36) HSQ6e
(37) [P5/S5/E5]TQ9a; [E8]THQ8a
(38) [P6/S6/E6-1/ E6-2/E6-3]SQ7d;
[E6-4/6-5/E6-6]SQ8d
(39) [P5/S5/E5]TQ7f; [E8]THQ6f
(40) HSQ6f
(41) HSQ6g, HQ10
(42) [P6/S6/E6-1/E6-2/E6-3]SQ7e;
[E6-4/6-5/E6-6]SQ8b
(43) [P6/S6/E6-1/E6-2/E6-3]SQ7b;
[E6-4/6-5/E6-6]SQ8b
(44) [P5/S5/E5]TQ7c; [E8]THQ6c
(45) HSQ6h, HQ7
(46) [P5/S5/E5]TQ7d; [E8]THQ6d
(47) HSQ6i,HQ8
(1) HSQ6j, HQ5, ITQ6
(2) ITQ7d
(3) ITQ7b
(4) ITEdInfoQ2
(5) HSQ8c
(6) [P5/S5/E5]TQ19e
(7) ITQ4k
(8) ITQ7c
(3) Process Dimension
Types, ways and (1) [P6/S6/E6-2/E6-3]9b; [E6-1]SQ8b;
frequency of use
[E6-4/6-5/E6-6]SQ10b
(2) [P6/S6/E6-2/E6-3]9a,bi; [E6-1]8a,bi;
[E6-4/6-5/E6-6]SQ10a,bi
(3) HSQ6k
(4) [P5/S5/E5]TQ8a-c; [E8]THQ7a-c
(5) [P5/S5]TQ7h,8d; [E5]TQ7j,8d; [E8]THQ6j,7d
(6) [P6/S6/E6-2]SQ7g, 8f; [E6-1]SQ7i; [E6-3]SQ7i,
8h; [E6-4/6-5/E6-6]SQ8i,9h;
[P7/S7/E7-1/E7-2]PQ2
(7) [P6/S6/E6-2]SQ8e; [E6-3]SQ8g;
[E6-4/6-5/E6-6]SQ9g
(5) School
School ITEd
(1) HSQ8a, HQ16
(2) [P4/S4/E4-1]ITQ3i; [E4-2]ITQ3j
Technology - innovation
(3) HQ8
using Culture
and School
ITEd
School ITEd
(1) HSQ8b, HQ17
Development innovation,
(2) HQ16
(3) [P4/S4/E4-1]ITQ3a-m; [E4-2]ITQ3a-n
sharing and
(4) [P4/S4/E4-1]ITQ3j; [E4-2]ITQ3k
collaboration
among schools (5) [P5/S5/E5]TQ29; [E8]THQ26
(6) [P5/S5/E5]TQ19d
(1) [P5/S5/E5]TQ18; [E8]THQ17
School ITEd
innovation,
(2) HSQ8d
sharing and
(3) [P4/S4/E4-1]ITQ3i; [E4-2]ITQ3j, HSQ6d
collaboration
(4) [S5/E5]TQ18b; [E8]THQ17b
among teachers
The use of IT in (1) [P6/S6/E6-2/E6-3]SQ19; [E6-1]SQ18;
[E6-4/E6-5/E6-5]SQ21
daily practices of
(2) [P5/S5/E5]TQ27; [E8]THQ24
a school
(3) HSQ8e
(1) [P6/S6/E6-2/E6-3]SQ10a,b; [E6-1]SQ9a,b;
(1) Students’ Information
Learning
processing skills
[E6-4/E6-5]SQ11a,b, 12a,b
Activities
with IT
(2) [P5/S5/E5]TQ4a,b; [E8]THQ3a,b
with IT
(3) [P5/S5/E5]TQ14ai-iii, 10g; [E8]THQ13ai-iii, 9g
(4) SQ4
(5) [P6/S6/E6-2/E6-3]SQ14ai-iii; [E6-1]SQ13ai-iii;
[E6-4/E6-5]SQ16ai-iii
(6) PQ4a-c
(7) HSQ1c
(8) [P6/S6/E6-2/E6-3]SQ14b,c; [E6-1]SQ13b,c;
[E6-4/E6-5]SQ16b,c
Learning subject (1) [P6/S6/E6-2/E6-3]SQ11a,b; [E6-1]SQ10a,b;
matter/knowledge
[E6-4/E6-5]SQ13a,b
with IT
(2) [P6/S6/E6-2/E6-3]SQ11c,d; [E6-1]SQ10c,d;
[E6-4/E6-5]SQ13c,d
(3) [P5/S5/E5]TQ10b,c; [E8]THQ9b,c
(4) HSQ1d
(5) HSQ2j
(6) [P5/S5/E5]TQ4a; [E8]THQ3a
(3) Process Dimension
Higher-order
(1)
thinking
(2)
capability with IT
(3)
(4)
(5)
(6)
(2) Teachers’ Management of (1)
Pedagogical learning with IT (2)
Practices with
(3)
IT
(4)
(5)
(6)
Teacher-centred (1)
teaching mode
(2)
with IT
(3)
(4)
Assessment of
(1)
learning with IT (2)
(3)
(4)
(5)
(6)
(7)
(8)
(9)
Student-centred (1)
learning
(2)
environment with (3)
IT
(4)
(5)
(6)
(7)
(8)
(9)
(10)
(11)
(12)
SQ4
[P6/S6/E6-2/E6-3]SQ14a; [E6-1]SQ13a;
[E6-4/E6-5]SQ16a
[P5/S5/E5]TQ4b; [E8]THQ3b
HSQ1f
[P5/S5/E5]TQ14a; [E8]THQ13a
PQ4
[P5/S5/E5]TQ1; [E8]THQ1
[P5/S5/E5]TQ16g-j; [E8]THQ15g-j
[P5/S5/E5]TQ3; [E8]THQ2
SQ3a,b
HSQ2e
[P5/S5/E5]TQ2
[P5/S5/E5]TQ4; [E8]THQ3
[P5/S5]TQ15a-i; [E5]TQ15a-k; [E8]THQ14a-k
HSQ2f
[P5/S5/E5]TQ30a
SQ5
SQ5, [P5/S5/E5]TQ5; [E8]THQ4
[P6/S6/E6-1/E6-2/E6-3/E6-4/E6-5/E6-6]SQ6;
[E6-4/E6-5/E6-6]SQ7
[P6/S6/E6-1/E6-2/E6-3/E6-4/E6-5/E6-6]SQ6;
[E6-4/E6-5/E6-6]SQ7
[P5/S5/E5]TQ6; [E8]THQ5
HSQ2h
[P5/S5/E5]TQ30c
[P5/S5/E5]TQ6g, 30d; [E8]THQ5g
HSQ2i
[P5/S5/E5]TQ19a
[P5/S5/E5]TQ4c; [E8]THQ3c
[P5/S5/E5]TQ4b; [E8]THQ3b
[P6/S6/E6-2/E6-3]SQ15b,ci; [E6-1]SQ14b,ci;
[E6-4/E6-5]SQ16b,ci
[P5/S5/E5]TQ14b; [E8]THQ13b
[P5/S5/E5]TQ17a; [E8]THQ16a
[P5/S5/E5]TQ10g,17b; [E8]THQ9g,16b
[P5/S5/E5]TQ17c; [E8]THQ16c
[P5/S5/E5]TQ19b
HSQ2j
HSQ2g, k
[P5/S5/E5]TQ30b,h
(4) Outcome dimension
(1) Students’ Learning about
Learning
IT – IT Learning
Outcomes in Targets
different Key
Learning
Areas and the
Development
of Generic
Skills
(1) [P6/S6/E6-2/E6-3]SQ16;
[E6-1]SQ15;[E6-4/E6-5]SQ18
(2) [P6/S6/E6-2/E6-3]SQ17;
[E6-1]SQ16;[E6-4/E6-5]SQ19
(3) HSQ1a
(4) [P6/S6/E6-2/E6-3]SQ20; [E6-1]SQ19;
[E6-4/E6-5]SQ22
(5) HSQ1g
(6) [P6/S6/E6-2/E6-3]SQ14a, 19;[E6-1]SQ13a,
18; [E6-4/E6-5]SQ16a,21
(7) [P5/S5/E5]TQ19c
(8) HSQ1c,e
(9) [P6/S6/E6-2]SQ14a, 15ai-ix, 19; [E6-1]SQ13a,
14ai-ix, 18; [E6-3] SQ14a, 15ai-x, 19;
[E6-4/E6-6]SQ16a, 17ai-xiv, 21; [E6-5]SQ16a,
17ai-xv, 21
(10) [P6/S6/E6-2/E6-3]SQ3a; 11e, 22; [E6-1]SQ3a,
10e, 21; [E6-4/E6-5]SQ3a,13e, 24
(11) [P6/S6/E6-2/E6-3]SQ21;[E6-1]SQ20;
[E6-4/E6-5]SQ23
(12) [P6/S6/E6-2/E6-3]SQ21; [E6-1]SQ20;
[E6-4/E6-5]SQ23
* Codes for Indicators (Survey Items):
P = Primary School Sector
S = Secondary School Sector
E = Special School Sector
If there is no identification for P, S or E, it means that the question applies to all sectors.
A5.3 – Title & Internal Code for Questionnaires of Phase (I) Study by School Types and Stakeholders
<善用資訊新科技 開拓教學新世紀> 資訊科技教育策略(2004/2007) 第一階段研究 問卷名稱及代碼 (按學校界別及持分者)
Special Schools 特殊學校
Without Therapists 沒有治療師
With Therapists 有治療師
School Types 學校界別
Questionnaires
Types
by (Stakeholders)
Primary
School
小學
Secondary
School
中學
P1
S1
E1-1
E1-2
4
School Head (Part2):
校長資訊科技教育問卷調查 (第二部份)
School Head’s Information Technology in Education Questionnaire (Part 2)
P2
S2
E2-1
E2-2
4
School ITEd Survey:
學校資訊科技教育調查
School Information Technology in Education Survey
P3
S3
ITEd Team Teachers:
資訊科技教育組教師問卷調查
Information Technology in Education Team Teachers’ Questionnaire
P4
S4
Teachers / ITEd Team Teachers:
教師資訊科技教育問卷調查
Teachers’ Information Technology in Education Questionnaire
P5
S5
Students:
學生資訊科技教育問卷調查
Students’ Information Technology in Education Questionnaire
P6
S6
E6-1
Parents:
家長資訊科技教育問卷調查
Parents’ Information Technology in Education Questionnaire
P7
S7
N.A
N.A.
N.A.
問卷類別
(按持分者)
School Head (Part 1-self-evaluation):
校長資訊科技教育問卷調查 (第一部份)
School Head’s Information Technology in Education Questionnaire (Part 1)
Therapists:
治療師資訊科技教育問卷調查 (特殊學校)
Therapists’ Information Technology in Education Questionnaire (Special)
Hospital
醫院
(H)
Social
Development
群育
(SD)
Visual
ImpairMent
視障
(VI)
Hearing
Impairment
聽障
(HI)
Mental
Handicap
智障
(MH)
Physical
Disability
肢體傷殘
(PD)
3
E3
E4-1
E4-2
4
E5
E6-2
E6-3
E7-1
N.A.
Total
總數
3
E6-4
E6-5
E6-6
8
E7-2
4
E8
1