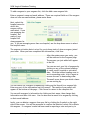
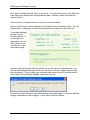
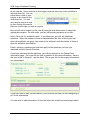
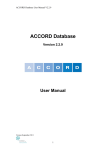
1
SIGN Surgical Database Training Manual
In addition to using the Online Surgical Database for single case entry, you
can also use the Offline Data Entry Tool (ODET) to enter each case offline
and then upload a batch of cases to the online database. Your choices are:
With Internet Access
If you have an internet
connection at your
computer, you can upload
individual case data
directly from your
computer into the online
database, or use the ODET
for batch uploads of
multiple cases.
SIGN Database Training Manual ver. 20100719
OR
Without Internet Access
If you DO NOT have an
internet connection at your
computer, you can use the
ODET to prepare your data for
offsite upload. You can then
log into the Online Database
and batch upload all case data
files into the database.
Instructions for use of the
ODET are included in a
separate document and are
available on the Surgical
Database website.
7/19/10
SIGN Surgical Database Training
Introduction
Welcome to the SIGN Surgical Database training. This document was designed to
equip you with the knowledge needed to setup your hospital and begin reporting your
SIGN surgical cases in the SIGN Surgical Database.
Both the database and the data collection sheets have been designed to work
together to create a more comprehensive report of each surgical case. While the
data collection sheets serve as your hardcopy, the database serves an electronic copy
of that data and is designed to follow the flow of information as you have recorded it
on your data collection sheets. Keep your data collection sheets nearby so you can
follow along with the training.
Each section of your data collection sheets has a corresponding screen in the
database. For example, here is the first section of the data collection sheets and
here is the database screen for entering this data. Each field you have completed on
your data collection sheet will appear in the database to record this same data item.
Note: Weight is only required for pediatric patients and will be entered on the
Fracture page as a trigger for other questions and data entry options.
SIGN Database Training Manual ver. 20100719
Page 2 of 20
SIGN Surgical Database Training
Logging Into The Database
The database is accessible by using most current web browsers. The address of the
database is www.sign-surgery.org. At this web site, you will see the following login
screen.
Use your existing User Name and
Password to log into the
database. Your Program
Manager will provide you with
your User Name and Password.
After entering your Username
and Password, Click the Login
button.
Note: Only approved SIGN Program Managers are
issued a username and password. This login is
specific to one hospital, not to one person. All
cases entered with this login will be recorded to
the hospital for which this login information is
assigned.
Login Information:
Program:
UserName:
Password:
Setting Up Your Hospital
When you have logged into the database, you will first see the Surgical Cases page
shown below. From this page you can edit any existing case by clicking on the
patient’s name, add a new case or search for a case. To improve the speed at which
this page loads, you will not see any x-ray images until you actually view a specific
case but rather the number of X-rays will be shown. It is critical that a pre-op and at
least one post-op X-ray be included with each fracture entered.
SIGN Database Training Manual ver. 20100719
Page 3 of 20
SIGN Surgical Database Training
Surgeons Tab: This feature is designed to allow you to manage a list of surgeons
specific to your hospital. You must create your list of surgeons before entering any
case data. Details of how to do this are found on the next page.
Surgical Codes Tab: This feature is designed to allow you to create a customized list
of codes or flags that can be applied to your cases for categorizing them in ways that
are meaningful to you. This feature has for the most part been replaced by the very
customizable search capacity found on the Research tab.
Offline Data Entry Tab: This feature is where you will find all resources for
installation and use of the Offline Data Entry Tool (ODET).
Research Tab: This feature provides you with a comprehensive search tool design to
help you retrieve a list of surgical cases that meet a specific set(s) of criteria which
you define. This tab will be discussed at the end of the training.
Creating Your List of Surgeons (Required)
Because you are required to enter the name of the surgeon in every case you report,
you must create your list of surgeons before reporting any cases but you can modify
your list at any time. The list of surgeons you create will only appear for your
hospital.
To create your list of surgeons,
click the Surgeons tab.
The purpose of this page, is to
give you a place to add or delete
names of surgeons that you would
like to make available to use when
reporting surgical cases.
The surgeons you add to your list
will appear in a dropdown menu
on the Surgery page when you are
reporting a case. This is a valuable tool because you as the program manager, now
have complete control over how long your list of surgeons will be.
SIGN Database Training Manual ver. 20100719
Page 4 of 20
SIGN Surgical Database Training
To add a surgeon to your surgeons list, click the Add a new surgeon link.
Enter a surgeon’s name and email address. These are required fields so if the surgeon
does not have an email address, please enter None.
Next, select the
hospital name for
which this
surgeon will be
associated. If you
are managing one
hospital, the
name of your
hospital will
always appear for
you. If you are managing more than one hospital, use the drop down menu to select
the hospital name.
The surgeon activation date is a tool for you to keep track of when a surgeon joined
your team. When you have completed this information, click Save.
After the system saves your entry, you
will be returned to the Surgeons page.
The surgeon you just added will appear
in the list.
You can now sort your list of surgeons by
clicking on any of the column headings
of name, email, hospital or activation
date. Click the column heading once to
sort in ascending order, click it again to
reverse the sort to descending order.
The small arrow shows you which column
you are sorting by.
You can Search for a surgeon to update by clicking on the Search for a surgeon link.
Enter any part of the information and click search. The results of your search will
appear at the bottom of the page. Click Cancel to return to the complete list.
You can edit a surgeon’s information by clicking on their name, then change their
information and then click save. You can also send an email to a surgeon by clicking
on their email address.
Lastly, you can delete a surgeon from your list by clicking the X symbol on the right
side of the screen. You will be prompted to confirm the deletion, select Ok to delete
this surgeon. If a surgeon’s name has been used in reporting a case and you try to
SIGN Database Training Manual ver. 20100719
Page 5 of 20
SIGN Surgical Database Training
delete this surgeon, you will see a warning instructing you to go edit the cases by
assigning a different surgeon’s name. In other words, you cannot delete a surgeon if
you have already used that surgeon’s name in reporting a case.
Creating Your List of Surgical Codes (Optional)
Note: the function of these codes has for the most part been replaced by the
Research Tab which allows you to create complex searches based on any data field in
the database.
Think of surgical codes as a way of marking your cases so that you can group them
together into like groups. For instance, if you wanted to see a list of all your cases
that involved a broken ankle, you could create a code called BA and then every time
you enter a case where the patient had a broken ankle, you could mark that case with
a BA code.
Unlike setting up surgeons, setting up surgical codes is not a requirement for entering
cases and you can modify your list of codes at any time. Codes are simply a tool to
help you retrieve cases in a meaningful way. If you do not wish to use codes, just
ignore the Surgical Codes tab.
SIGN Database Training Manual ver. 20100719
Page 6 of 20
SIGN Surgical Database Training
Reporting Surgical Cases
Click the Surgical Cases tab.
The case list will always appear sorted by Input Date so that the most recent cases
are at the top. You can however, resort your case list by clicking any of the column
headings. At any time that you wish to return to the original sort order, just click the
refresh button on your browser.
The database includes a method for project managers to review each case entered
into the database. Once a case is flagged as reviewed it does not show up on this list
but is still available by using the Search link. If you never mark a case as reviewed, it
will always remain on this list. If you mark cases as reviewed, then this list will
remain manageable and you will always know that these are your new surgery cases.
Case review is optional.
Add A New Case
Click the Add a
new case link.
Please note that
unless marked as
optional, all data
fields are
required. If you
forget to fill in a
field and click the
Save & Continue
button, you will
see a message
alerting you that
you must fill in
that field.
The information
you enter here is taken from the first page of your Data Collection Sheets.
Select the name of your hospital or leave it as is if it is correct. Enter a case number
if you use case numbers. Enter the patient’s name, their age and their gender.
SIGN Database Training Manual ver. 20100719
Page 7 of 20
SIGN Surgical Database Training
Next enter the date that the injury occurred on. If you do not know for sure what the
exact date was, please enter an approximate date. Address, phone and email are
optional fields.
Click the Save & Continue button to save this case information.
Now you will see your case information in the Patient Case Information area. You can
always return to this page to edit this information by clicking the view/edit link.
If you make changes,
use the Save &
Continue button, if
no changes have
been made, you can
click Cancel or use
the Return to case
information page.
Any time you leave a page like this and do not use the Save & Continue button, you
will see this message alerting you that you are about to leave a page without saving
the information. If you change your mind and want use the Save & Continue button,
click Cancel in the warning message, otherwise click Ok.
Now that we have returned to the Patient Case Information page, it is time to add the
surgery information found on page 2 of your Data Collection Sheets.
SIGN Database Training Manual ver. 20100719
Page 8 of 20
SIGN Surgical Database Training
Add A Surgery
Click the Add a surgery link.
You will notice that the patient name, case number and date of injury all appear on
the surgery page. Enter the date of the surgery. If you enter a surgery date that is
before the date of injury, you will see an alert message when you try to save this
record. Any time you make an error in data entry, you will see a message similar to
this one. Just return to the page you were working on and look for the text box
pointing to the error. Once you correct it, you can save and continue.
Next let’s assign a code to this surgery from the list of codes we created earlier.
Click the link called Optional: select a code for this surgery. A new field will appear
with a drop down menu, select the code you wish to use. If you need to add codes to
your list, you will need to return the Surgical Codes tab and add them there. I will
exit adding this surgery and then add a new surgical code. The new code will then
appear in the drop down list when you return to add a surgery. This is why it is
important to setup your codes before entering case information.
SIGN Database Training Manual ver. 20100719
Page 9 of 20
SIGN Surgical Database Training
As you can see, I have returned to this surgery and now have two codes available in
my drop down list. You can
add as many codes to your
surgery as are found in the
drop down list. It is also
very easy to remove a code
by just clicking the remove
link next to the code you wish to remove.
Now we will add a Surgeon to this case by using the drop down menu to select the
appropriate surgeon. As with codes, you can add as many surgeons as you like.
Select Yes or No for Antibiotics used. If you select yes, you will see additional
questions. Enter the number of hours or days between the time of the injury and
when the antibiotic was given, the name of the antibiotic and the number of hours or
days the antibiotic was used for.
Finally, add any comments you wish that apply to the questions you have just
answered and click Save & Continue.
If you have answered all the questions, you will be returned to the Patient Case
Information page. On it you will see that in addition to the case information, there is
also now a link to Surgery 1: and the date. This is your link to the surgery information
you just entered.
If you ever need to edit this information, just click this link and you can change any or
all of the information.
It is time now to add information to this case about the actual fracture being treated.
SIGN Database Training Manual ver. 20100719
Page 10 of 20
SIGN Surgical Database Training
Reporting Surgical Cases - Add A Fracture
So, turn to page 3 of your Data Collection Sheet and click the Add a Fracture link just
below the surgery link you just created.
If you like, you can start by adding a code to this fracture. Click the link to do so and
select the appropriate code. The value of these codes will be very easy to understand
later when we look at the Search tool.
Now, complete the rest of the information on the fracture page. For questions where
you see the phrase “Check all that apply” you can check multiple answers as
appropriate.
In some instances, when you
check a certain box it will cause
additional questions to appear.
Typically, if you select Other as an
SIGN Database Training Manual ver. 20100719
Page 11 of 20
SIGN Surgical Database Training
answer, you will be asked to type in some additional information.
Ok, time to turn to page 4 of your Data Collection Sheets and enter information about
nails, screws and x-rays.
Select the type of nail used, its length and its diameter.
You can edit any of these fields at any time or come back to them another day to
make changes.
Next enter the screw information. By selecting Yes, you will cause the screw size
table to appear. Please enter the quantity of screws used as appropriate. Note here
that you can only enter a quantity of up to 2 screws for Proximal and 2 screws for
Distal. If you enter higher numbers, an alert will appear when you attempt to save
the record.
The last step in entering fracture information is to upload you PreOp and PostOp xray
images. You may do this at any time now or later. To do this, simply click the “add
an X-ray Image to this fracture” link. Select bowse and then double cick on your x-ray
file in the File Upload window. Use the dropdown menu to identify this x-ray as
either pre or post op. Then enter the date it was taken. Add a second x-ray by
repeating this procedure. Please upload only x-rays needed to clearly describe this
fracture. Do not add follow-up x-rays here. You will learn how and where to do that
later.
When you have uploaded all your x-rays, click Save & Continue. If you receive an
error message, return to the fracture page and correct the error in your data.
SIGN Database Training Manual ver. 20100719
Page 12 of 20
SIGN Surgical Database Training
If you have answered all the questions, you will be returned to the Patient Case
Information page. On it you will see that in addition to the case information and the
surgery information, there is also now a link to Fracture 1, an icon indicating that
there are x-rays with this record and a description of the fracture. This is your link to
the fracture information you just entered. As you saw with surgery information, this
is how you return to edit fracture information or add more x-rays.
In the upper right corner, you will now see a green button called “Review: Flag as
Complete”. This button is what you will push if you wish to have this record hidden
from the list on your Surgical Cases page.
Let me demonstrate. We will return to the Surgical Cases page and verify that the
case we just entered, appears in our list of cases. Notice that because this is the
most recently added case and because it has x-rays with it, it now appears at the top
of the list.
Also note that to the left of the X-ray column is the flag column. Because you have
not yet clicked the Flag as Complete button for this case, it indicates Not yet
Reviewed and stays in the new cases list seen here.
SIGN Database Training Manual ver. 20100719
Page 13 of 20
SIGN Surgical Database Training
Reporting Surgical Cases - Review A Case
Now lets return to this case and review it by clicking on the patient’s name.
The patient information looks good, but I see that the date of the surgery is incorrect
so I will edit that date by clicking on Surgery 1.
Notice that next to the Surgery Date there is now text indicating the time span
between injury and surgery. This is provided for your convenience so that at a glance
you can see the time difference when reviewing cases. When you review the followup page you will see this again only it will show the time between surgery and followup.
Click the date field to be changed and then scroll down and click Save & Continue.
We return to the Patient Case Information page and can also review or edit the
Fracture and Follow up information. You could even add another surgery, another
fracture or another follow-up to this case.
When your review is complete, click the Flag as Complete button. After updating your
record, the button now changes to Remove Flag. As you might guess, this allows you
to manually change this case from reviewed back to un-reviewed if for some reason
you need to do so.
Click Return to Surgical Cases. You will notice that this case no longer appears on
your new case list. It is still present in the database though and the next thing I will
show you is how to locate it.
SIGN Database Training Manual ver. 20100719
Page 14 of 20
SIGN Surgical Database Training
Reporting Surgical Cases - Search For A Case
On the Surgical Cases page, click Search for a case to expand the search window.
You can search by any of the fields you see here. For example, if you want to simply
see a complete list of all your cases, click the Both option for Reviewed? Then click
Search.
Now scroll the window
down and take a look at
your complete list of
cases. You will notice
that all the cases from
the surgical cases page
are here and flagged as
not yet reviewed.
You will also notice that
the case you just
flagged as reviewed is
also shown here with
the yellow reviewed
flag. As you might have
guessed, the red flag
that indicates a case has changed since last review is not attached to any cases
because we have not changed any cases since we reviewed them.
Now lets do a search using more than one search criteria. Enter the letter T in the
Patient Name field and 123 in the Case Number field. Click Search. The results list
includes all cases where the letter T appears in the name and the numbers 123 appear
in the case number. Click reset to all cases or the cancel button to return to the
surgical cases page with only un-reviewed cases showing.
So far we have covered how to add a new case and how to search for cases. Now we
will look at how to return to a case to add an x-ray or a follow-up.
SIGN Database Training Manual ver. 20100719
Page 15 of 20
SIGN Surgical Database Training
Reporting Surgical Cases - Add A Follow-Up To A Case
First, turn to page 5 of your data collection sheets and then click the Search for a
case link.
Now enter the name of the patient for whom a follow-up visit is to be reported and
click Search.
Now click on the patient’s name to open their case and click the Add a follow-up
under the fracture that is being followed up on.
Hopefully, these screens are starting to look pretty familiar. Please note that in the
header area the date of surgery is now visible along with the other case information.
Enter the date this follow-up occurred on and again this date must be after the date
of injury and the date of surgery.
If you created a code in your Surgical Codes list and made it a Follow up code, then it
will appear in your code list here. If you do not have any codes in your list that are
designated for use with follow-ups, then the option to code the follow-up will not be
visible until you return to the Surgical Cases tab and add Follow up codes.
If there is deformity then please indicate the severity. If there was a repeat surgery,
please indicate the reason for it and if it was for a non-union, then also include
information shown here.
SIGN Database Training Manual ver. 20100719
Page 16 of 20
SIGN Surgical Database Training
You can now add any comments pertaining to this follow-up and upload any x-rays. In
the event that you upload the wrong x-ray, you can always return to this screen and
delete it by using the X next to the x-ray.
When you have uploaded all your x-rays, click Save & Continue. If you receive an
error message, return to the follow-up page and correct the error in your data.
If you have answered all the questions, you will be returned to the Patient Case
Information page. On it you will see that in addition to the case information, surgery
information and fracture information, there is also now a link to Follow-up 1, an icon
indicating that there are x-rays with this record and a the date of the follow-up. As
always, this is your link to the follow-up information you just entered.
There is also a NEW icon that will appear next to the item that has changed since the
last review of this record. The purpose of this icon is to point out to the program
manager what it was that changed.
SIGN Database Training Manual ver. 20100719
Page 17 of 20
SIGN Surgical Database Training
Now let’s return to the case list page by clicking Return to surgical cases. Notice now
that our case has reappeared in the list but now has a red flag to indicate that
something has changed on this record. The purpose of this flag is to help the program
manager know which cases have changed recently so that they can be reviewed and
then flagged as complete.
To review this case, click on the patient’s name. Then click on the data link to
information marked as new, in this case, the follow-up we just entered. Review the
follow-up page and when complete, click Save & Continue. When you have return to
the Patient Case Information page, click the Review Flag to mark this record as having
been reviewed and then return to the surgical cases page.
Notice now that our case has once again been removed from our list of cases needing
to be reviewed.
In the final part of our training, I will show you how to use the Research Tab.
Researching Surgical Cases
The research tab was designed to provide SIGN surgeons with access to their SIGN
surgeries for the purpose of writing research papers. The research tool was built to
retrieve a list of surgical cases that match a simple or complex set of search criteria
that you design.
To use the research tool, click on the
Research tab.
The search category field is designed
to allow you to focus your research on
any or all of the pages of your data
collection sheets. Use the drop down
menu to see your choices. Notice
that the list of options matches the
pages in the Data Collection Sheets
and the screens in the database.
SIGN Database Training Manual ver. 20100719
Page 18 of 20
SIGN Surgical Database Training
For this example, we will limit our search to case information only. Remember, this
is the information found on page one of your data collection sheets.
By changing the category to case, the list of search parameters that are available
matches the data fields on page 1 of the data collection sheets. For example, if we
wanted to see a list of all male patients in the database, we would select Gender as
our search parameter and Male as our second level criteria. Then click search.
Notice how the search results look different from the surgical cases page search
results. Case are now given a generic number and only the country of origin is shown.
To show you what our test case would look like in the research tool, I will set the
search category to Case and the search parameter to Hospital. As you can see, you
will only be able to do this kind of search on your own records.
Click search and you will
see the generic list of
the same cases you have
been seeing throughout
the training. Click the
one with the highest
number to see the case
most recently entered.
Now lets review the
fracture information by
clicking on Fracture No.
1.
As you can see, all of
the fracture information
is available for review
but none of the patient
information. Click the
close button to return to
the case information
page and then click the
Return to search cases
to continue.
Now let me illustrate
the real power of this
tool. Lets say that you
would like to review all
cases in the SIGN database where a 33 year old male patient with a closed fracture
was treated without antibiotics.
SIGN Database Training Manual ver. 20100719
Page 19 of 20
SIGN Surgical Database Training
Search Criteria #1: Create your first set of search criteria by setting the search
category to Case
Set the first search parameter to Age, the second search parameter to Equals and the
third search parameter to 33.
Search Criteria #2: Now, create your second set of search criteria by clicking “add a
search parameter”. Set the search category to Case. Set the first search parameter
to Gender and the second search parameter to Male.
Search Criteria #3: Finally, create your third set of search criteria by clicking “add a
search parameter” again. This time we will set the search category to Surgery. Set
the first search parameter to Antibiotics Used and for the second search parameter,
check the N for no.
Now scroll down
and click the
search button.
The results are
shown at the
bottom of the
screen. Each of
these four cases
met the criteria
of our search.
You can see
that by
combining any
combination of
fields and field
data from the
data collection
sheet questions,
you can create
very customized
searches.
Use the Cancel button or the reset to all cases link to clear your search and start
over, or if you just want to remove one of your search criteria, use the remove link
found next to that criteria.
Please contact SIGN staff for any additional help.
SIGN Database Training Manual ver. 20100719
Page 20 of 20