1
Colorado
Provider POS Device User Manual
Where to call for POS device troubleshooting:
1-877-779-1932
Version: 2.0
Provider POS Device User Manual
Table of
Contents
Provider POS Device User Manual
Section
1.0
2.0
Page
General Information
4
Getting Assistance
6
2.1
Child Care Assistance
Program for Providers
6
2.2
Xerox Provider Helpdesk
Assistance
6
2.2.1
2.3
3.0
6.0
7
8
9
10
13
15
Daily Check In
16
5.2
Daily Check Out
18
5.3
Previous Check In and Previous
Check Out
20
5.3.1
Previous Check In
22
5.3.2
Previous Check Out
24
Correcting Attendance Errors
26
Void Transaction
Capturing Attendance Without
Phone Line Connectivity
Store and Forward (SAF)
Transactions
Receipts and Reports
8.1
Daily Attendance Receipt
8.1.1
Reprinting Attendance
Receipts
8.1.1.1
Version 2.0
7
5.1
7.1
8.0
POS Device Communication Test
Using the POS Device to Record
Attendance
6.1
7.0
Swiping CCAP Cards
POS Device Installation
4.1
5.0
Client CCAP Card Assistance –
Only Performed by Client
Features of the POS Device
3.1
4.0
Updating Your Address on the
Daily Attendance Receipt
Reprinting an Entire Daily
Attendance Receipt
27
29
30
32
33
34
34
Page 1
Provider POS Device User Manual
Table of
Contents
9.0
11.0
37
8.1.1.3
Reprinting the Last
Report
40
Attendance Report
41
8.3
Exceptions Report
45
Denial/Error Messages
47
9.1
General Denial/Error Messages
48
9.2
Sample Denial/Error Receipts
53
9.2.1
Check In First Denial
Receipt
53
9.2.2
Check Out First Denial
Receipt
54
9.2.3
No Auth for Person
Denial Receipt
55
9.2.4
Void Denial Receipt
55
POS Device Technical/System
Error Messages
POS Device Replacement and
Returning a POS Device
56
58
10.1
POS Device Replacements
59
10.2
Returning a POS Device to Xerox
59
Paper Supplies
11.1
Page 2
Reprinting a Range
of Attendance Transactions
8.2
9.3
10.0
8.1.1.2
Replacing the Paper Roll
60
61
12.0
Troubleshooting Tips
63
13.0
Quick Reference Guides for
Clients and Providers
64
14.0
Frequently Asked Questions
65
APPENDIX A – POS Device Installation
Diagram
68
APPENDIX B – Quick Reference Guide for
Clients
69
APPENDIX C – Quick Reference Guide for
Providers
70
Version: 2.0
Provider POS Device User Manual
Acronyms
Used in This
Manual
Terms Used in
This Manual
Version: 2.0
Colorado Department of Human Services
CDHS
Child Care Assistance Program
CCAP
Date of Birth
DOB
Personal Identification Number
PIN
Point-of-Service
POS
Quick Reference Guide
QRG
Store and Forward
SAF
Adult
Caretaker
A person in the home who is financially
contributing to the welfare of the child and
is the parent, adoptive parent, step-parent,
legal guardian, teen parent, or person who
is acting in loco parentis.
Client
The adult caretaker, parent or any
authorized individual in possession of
a CCAP card.
Facility
A private home or a child care center.
Missed
Swipe
Period
The missed swipe period is a 10-day
period including the date of care plus the
nine (9) following calendar days.
Orphan
Transaction
A Check In without an associated Check
Out transaction. Approved attendance must
have both an In and Out to complete the
pair. Providers may not be paid for orphan
transactions. Clients may be responsible
for the cost of care.
Provider
The child care provider.
Page 3
Provider POS Device User Manual
1.0 General Information
Overview
The Colorado Department of Human Services (CDHS) and Xerox
State & Local Solutions, Inc. (Xerox) are proud to be able to make
Point-of-Service (POS) devices available to child care providers and
clients who are participating in the Colorado Child Care Assistance
Program (CCCAP).
This is the automated system CDHS uses to record the time and
attendance for children who are receiving State subsidy funds for child
care. The equipment is referred to as a Point-of-Service device or by the
POS device throughout this manual.
Clients who bring children to a CCCAP authorized child care facility
must use the POS device, and their Child Care Assistance Program
(CCAP) Card, to enter time and attendance information. This system
records time and attendance so the appropriate provider payment
is calculated. Child care providers must enforce this automated
collection of attendance and ensure clients use the POS device
every time child care services are provided. The only way child care
provider payments are calculated is by using the attendance data
collected through the POS device.
Providers may never possess a client’s CCAP Card. No CCAP
Cards may be left onsite at a provider’s location. Providers found
with CCAP Cards will no longer be able to provide CCCAP child
care.
The client is required to check his/her child(ren) in and out of care every
day using the POS device issued to the child care facility. Clients may
also record time and attendance for a previous day by using the Previous
Check In and Previous Check Out feature. Instructions on how to use
the Previous Check In and Previous Check Out function are displayed
in Section 5.3.1 and 5.3.2. Providers have the ability to void an incorrect
transaction. Instructions on how to perform a void are found in Section 6.1.
The POS device generates a Daily Attendance Receipt of the times
children have checked in and out. Instructions on how to reprint the
receipt are found in Section 8.1.1. Effective September 2012, providers
will have the ability to print an Attendance Report that shows all approved
transactions for a given date, a date range, or a specific case.
Page 4
Version: 2.0
Provider POS Device User Manual
Overview, continued
The POS device is made available to providers at no cost but must
be used properly and be protected from damage. Replacement and
repair of the POS device is the responsibility of Xerox unless the need
for replacement or repair is due to loss, theft, destruction, or negligent
handling. In these instances, the provider is financially responsible for
the cost of the repair or replacement of the POS device. The POS device
is issued with two rolls of thermal paper. The provider is responsible for
purchasing replacement paper. Refer to Section 11 for more information
on paper supplies.
Version: 2.0
Page 5
Provider POS Device User Manual
2.0 Getting Assistance
Overview
This section documents the various types of assistance available, such as:
Child Care Assistance Program for Providers
Xerox Provider Helpdesk Assistance
Client CCAP Card Assistance
2.1 Child Care Assistance Program for Providers
Program Assistance for Providers
Please contact the County Department of Social/Human Services for
policies and procedures regarding the Child Care Assistance Program
(CCAP). Please refer to your fiscal agreement for specific program
requirements.
2.2 Xerox Provider Helpdesk Assistance
Xerox Provider Helpdesk
Xerox is responsible for answering questions about the POS device or
replacing the POS device if it is not working.
The Xerox Provider Helpdesk is answered by an automated response unit
24 hours a day, 7 days a week. Customer Service agents are available
from 7:00 a.m. to 7:00 p.m. Mountain Time to assist with problems with the
POS device. The Customer Service agents will perform troubleshooting
with you over the telephone. In some cases, the problem is resolved
through this troubleshooting. In other instances, the POS device may need
to be replaced. If a provider receives a replacement device, the provider
must notify the county to avoid potential billing issues.
Please call the Xerox Provider Helpdesk when setting up your POS device
if your phone line requires you to dial a prefix for an outgoing call (e.g., dial
an 8 or 9) or if your phone has call waiting. The Customer Service agent
will help you set the POS device so it will automatically dial the prefix.
Please call the Xerox Provider Helpdesk for all POS device related
problems. The Customer Service agent will request a replacement POS
device be mailed to you if the POS device needs to be replaced. Refer
to Section 10 for information on POS device replacements.
Page 6
Xerox Provider Helpdesk:
1-877-779-1932
Version: 2.0
Provider POS Device User Manual
2.2.1 Updating Your Address on the Daily Attendance
Receipt
Xerox Provider Helpdesk Assistance with Updating the
Address on the Receipt
Licensed providers must contact the Colorado Department of Human
Services to change your address. Qualified family child care home
providers must contact the County Department of Social/Human Services
to change your address. The address update cannot be made until the
change has been reported to CDHS or the County Department of Social/
Human Services. After the change has been reported to CDHS or the
County Department of Social/Human Services, contact the Xerox Provider
Helpdesk to have the address corrected on the POS device receipt.
To request assistance with correcting the address at the top of the Daily
Attendance Receipt, call the Xerox Provider Helpdesk at 1-877-779-1932.
The Customer Service agent will create a ticket to have a technician call
you to perform the update. The update will take only a few minutes to
complete.
You must sign a new fiscal agreement with the County Department
of Social/Human Services before you change locations.
2.3 Client CCAP Card Assistance – Only Performed
by Client
Client CCAP Card Assistance – Only Performed by Client
Clients shall call the Personal Identification Number (PIN) Helpline to
select a PIN to use with the CCAP Card. The PIN Helpline is available 24
hours a day, 7 days a week, by calling 1-877-779-1933. More information
on how to select a PIN was sent by the County Department of Social/
Human Services when the case was approved.
The client must contact the local County Department of Social/Human
Services to request a replacement CCAP card if the card is lost or
damaged. The County Department of Social/Human Services will order
a replacement card and the new card will be sent in the mail. It takes
approximately five (5) business days to receive a new CCAP Card. The
client shall notify the County Department of Social/Human Services if the
card is not received within seven (7) calendar days. The client does not
need to PIN the replacement CCAP Card as the same PIN will be used
on the replacement card. The PIN will carry forward to the new card.
Version: 2.0
Page 7
Provider POS Device User Manual
3.0 Features of the POS Device
Overview
INTERNAL THERMAL
PRINTER
PRINTER COVER RELEASE
GREEN INDICATOR LED
SERRATED METAL
STRIP
MAGNETIC CARD READER
TERMINAL DISPLAY
ATM-STYLE FUNCTION KEYS
ALPHA KEY
PROGRAMMABLE FUNCTION
KEYS
TELEPHONE-STYLE
KEYPAD
ENTER KEY
(RED) CANCEL KEY
(GREEN)
BACKSPACE/CLEAR KEY
(YELLOW)
SMART CARD READER
Figure 1
Vx5xx/Vx610
Terminal Features (Front Panel)
The front panel includes the following features:
•
A terminal display, backlit LCD screen.
•
Five types of keys:
a A 12-key, telephone-style keypad.
b Four ATM-style function keys, labeled F1 to F4, to the right of the LCD
screen.
c Four unlabeled, programmable function keys above the keypad.
d Three color-coded function keys below the
keypad (icons at right; from left to right: CANCEL,
BACKSPACE/CLEAR, ENTER).
e An ALPHA key centered at the top of the keypad.
•
A magnetic card reader, built into the right side. The icon at right
shows the proper swipe direction, with the stripe down and facing
inward, toward the keypad.
•
A green indicator LED indicates power is ON.
•
An internal thermal printer.
Page 8
Version: 2.0
Provider POS Device User Manual
3.1 Swiping CCAP Cards
Swiping CCAP Cards
To swipe CCAP Cards through the POS device, the client will slide the
card through the card reader located on the right-hand side of the POS
device. The magnetic stripe on the card should be down and facing the
POS device.
The client will receive two CCAP Cards which must be used
to check his/her children into and out of child care. The client
determines who receives the second card. Either card may be
used to perform POS device transactions. The client must PIN
both cards prior to use.
The client may select the same PIN for both cards.
A video demonstration on how to use the CCAP Card is available
for providers and clients by contacting the County Department
of Social/Human Services.
Version: 2.0
Page 9
Provider POS Device User Manual
4.0 POS Device Installation
Overview
Setting up the POS device is fast, easy, and will take about five minutes to
complete. You will perform a communication test after the POS device is
set up, connected to the telephone line, and plugged into a three-pronged
electrical outlet. Instructions for the communication test are displayed in
Section 4.1. The communication test ensures the POS device is ready
for use.
If you encounter any problems with setting up your POS device, you
may call the Xerox Provider Helpdesk at 1-877-779-1932. Agents are
available from 7:00 a.m. to 7:00 p.m. Mountain Time (MT) to assist with
POS device related questions or problems.
Providers, who use a PBX (private branch exchange) telephone system,
will most likely need a prefix to access an outside line. The POS device
may not work with a PBX system. The POS device works best with a
dedicated line or could be shared with a fax line.
The diagrams below show you how to plug the silver cord into the
telephone jack and how to plug the black power pack into the electrical
outlet.
POS Device Installation Diagram
The silver cord must be
plugged into a telephone
jack or splitter if sharing
the telephone line.
The splitter can be inserted
into a wall jack to allow two
devices to share the same
phone line.
Step 1. Plug silver telephone cord into telephone jack.
Step 2. Plug black power cord into POS device.
Step 3. Plug black power cord into electrical outlet.
Step 4. Perform communication test:
• Press “F4” from main menu
• Type provider password (123456)
• Press green ENTER key
• Press “5” for Terminal Setup
• Press “3” for Communications Test
• Check receipt for results
Page 10
The black cord must be
plugged into a 3 pronged
electrical outlet.
Version: 2.0
Provider POS Device User Manual
POS Device Shipment
The following items are included in your POS device shipment box:
POS device hardware with telephone cord and power cord
Dual telephone jack splitter
Two rolls of thermal paper (one roll is in the POS device and a spare
roll)
Installation and training materials
o POS Device Installation Diagram
o Provider POS Device User Manual
o Quick Reference Guide (QRG) for Clients
Version: 2.0
Page 11
Provider POS Device User Manual
Step
Task
1.
Remove the POS device and find a convenient set-up location that
is accessible to power and the telephone jack. The location should
be easily accessible for clients. You may need to use an extension
cord or a longer telephone cord if you are placing the POS device
a distance away from the power and telephone source.
2.
Remove the POS Device Installation Diagram from the box (it is
also displayed on page 10). A copy of the POS Device Installation
Diagram may also be found in Appendix A of this manual.
3.
Connect the two parts of the black power pack together. Insert the
power pack (black cord) into the POS device and a three-pronged
electrical outlet.
4.
Insert the silver telephone cord into a telephone jack. If the
telephone line is shared with a telephone or other device such
as a FAX machine, use the dual jack splitter. Insert the dual jack
splitter into the wall jack and then plug the cord for the telephone
or other device into one side and plug the cord to the POS device
into the other side. This allows both the other device and the POS
device to use the same telephone line.
5.
Perform the POS device communication test using the instructions
provided in Section 4.1. If the communication test fails, check to be
sure the POS device has power and is plugged into the telephone
jack. A common reason the communication test fails is that the
POS device needs to dial a prefix such as an 8 or 9.
6.
Dialing a prefix for an outgoing call:
If you must dial a prefix for an outgoing call (e.g., dial an 8 or 9),
please call the Xerox Provider Helpdesk at 1-877-779-1932. The
Customer Service agent will help you configure the POS device
so it will automatically dial the prefix.
Call Waiting:
Please call the Xerox Provider Helpdesk at 1-877-779-1932 if your
phone has call waiting. The agent will program the POS device so it
disables call waiting when the POS device is sending transactions.
Page 12
Version: 2.0
Provider POS Device User Manual
4.1 POS Device Communication Test
POS Device Communication Test
Perform this short communication test immediately after the POS device is
installed. The test will inform you if the POS device is connected correctly.
The screens you will see as you perform the communication test are
displayed below:
POS Device Screen
Sat 06/16/12
Action
12:44pm
SWIPE CARD to Begin.
Press F4 to access the Provider Options menu.
Provider Options F4
Provider Options
Key in the 6-digit provider password, which is
123456. Press the green enter key.
User Pwd: ______
Back
Main
Provider Options
1-Reports
2-Void Trans Number
3-Serd SAF s
4-Reprint
5-Terminal Setup
Back Main
Terminal Setup
1-Install/Activate
2-Print/Config
3-Communication Test
4-Download Updates
5-Date/Time
Press 5 for Terminal Setup.
Press 3 for Communication Test.
Main
Communication Test
APPROVED
Ke ep Provider Recei pt
for records.
<< Press Any Key >>
Version: 2.0
The POS device displays Dialing Primary, Waiting
for Answer, Connecting, Connected, Sending,
Receiving followed by an approved or denied
message.
Wait a few seconds for the POS device to dial. If the
test is successful, the POS device will print a receipt
that reads “Communication Test Successful.” If the
test was not successful, the POS device prints a
receipt the reads “Communication Test Failed.”
Page 13
Provider POS Device User Manual
If the communication test is successful, your device is ready for use. Check
the connections and try again if the test is not successful. Please contact
the Xerox Provider Helpdesk if you need further assistance.
Training Provider
123 Any Stre et
Anywhere, CO 89999
Ph: 999-999-9999
06/16/12
Term#:12234501
1:06:31pm
Prov#:12345
----------------------------Communication test successful
Result: Approved
Trace#: 000018-000000063064283
----------------------------V1.00 020 018 000 000 000 000 000 000
POS Device Screen
Terminal Setup
1-Install/Activate
2-Print/Config
3-Communication Test
4-Download Updates
5-Date/Time
Action
Press the purple button under the word Main to
return to the main menu.
Main
Page 14
Version: 2.0
Provider POS Device User Manual
5.0 Using the POS Device to Record Attendance
Overview
The client must use the POS device to record the time the child is dropped
off (Check In) and the time the child is picked up (Check Out) every time
a CCAP child is dropped off or picked up from child care.
The attendance shall be recorded the next time the client is at your facility if
he/she forgets his/her CCAP Card. This is referred to as the missed swipe
period. The missed swipe period is a 10-day period, the date of care, plus
the nine (9) following calendar days. It is the provider’s responsibility to
ensure a Check In and Check Out is recorded each day for the child care
services provided. Failure to do so will affect your child care payment.
When multiple children are being Checked In or Checked Out, each child
will receive an approval, denial or pending message. You and the client
must verify the response code for each child’s recorded attendance. The
client must perform a transaction again for any children who are denied.
EXAMPLE: If the client is Checking In two children in the same transaction
and one child is approved and one child is denied, the client must perform
the transaction again for the denied child if that child is authorized for
care at the provider facility.
Version: 2.0
Page 15
Provider POS Device User Manual
5.1 Daily Check In
Daily Check In
The client must swipe his/her CCAP card through the POS device when
the child arrives at the childcare facility. This will record that the child is
now in the provider’s care if the transaction is approved. A list of denial
codes and messages, along with some sample receipts, are in Section 9.
Only approved transactions captured by the POS device will result
in payments from the County Department of Social/Human Services.
Payments will not be made unless an action is taken to correct a pending
or denied transaction.
The screens the client will see as the daily Check In transaction is performed
are displayed below.
POS Device Screen
Sat 06/16/12
Action
12:44pm
SWIPE CARD to Begin.
Client swipes his/her CCAP card.
Provider Options F4
PIN Number Required
Please ENTER PIN...
****
Client enters 4-digit PIN and presses the green
enter key.
[X] - Exit
Attendance Type?
1-Check In
2-Check Out
3-Prev Check In
4-Prev Check Out
Client presses 1 for Check In.
Main
Client enters in the child number and presses
the green enter key.
Check In
Enter Child #
__
Main
Page 16
Note: If entering more than one child, enter the
next child number and press the green enter
key. When finished press enter again.
Version: 2.0
Provider POS Device User Manual
Daily Check In (cont’d)
POS Device Screen
Action
Wait for authorization. The POS device displays
Dialing Primary, Waiting for Answer, Connecting,
Connected, Sending, Receiving followed by an
approved or denied message.
Check In
APPROVED
Printing Complete.
<< Press Any Key >>
The eligibility status of the child is displayed when a response is received
and a receipt is printed. The status may be approved, denied, or pending.
A sample daily Check In receipt is below:
Training Provider
123 Any Stre et
Anywhere, CO 89999
Ph: 999-999-9999
06/16/12
Term#:12234501
1:06:31pm
Prov#:12345
----------------------------Daily Attendance Recei pt
For: 06/16/12
Item #: 1
----------------------------06/16/12 01:44:39pm
CHECK IN
Firstname L.
Child#: 1
1234567890
DOB: 08/01/2001
PT: $15.00
APPROVED
Tran#: 123456789012
=================================
The receipt is the provider’s verification of the child’s attendance and must not be taken by the client.
Version: 2.0
Page 17
Provider POS Device User Manual
5.2 Daily Check Out
Daily Check Out
The client must swipe his/her CCAP Card through the POS device to
record when a child leaves your child care facility. This will record the
date and time of the child’s departure from child care.
If the client does not swipe in and out for every day of care, the provider
will not be paid for that day.
The screens the client will see as the daily Check Out transaction is
performed are shown below.
POS Device Screen
Sat 06/16/12
Action
12:44pm
SWIPE CARD to Begin.
Client swipes his/her CCAP card.
Provider Options F4
PIN Number Required
Please ENTER PIN...
****
Client enters 4-digit PIN and presses the green
enter key.
[X] - Exit
Attendance Type?
1-Check In
2-Check Out
3-Prev Check In
4-Prev Check Out
Client presses 2 for Check Out.
Main
Client enters in child number and presses the
green enter key.
Check Out
Enter Child #
__
Main
Check Out
APPROVED
Printing Complete.
<< Press Any Key >>
Page 18
Note: If entering more than one child, enter the
next child number and press the green enter
key. When finished press enter again.
Wait for authorization. The POS device displays
Dialing Primary, Waiting for Answer, Connecting,
Connected, Sending, Receiving followed by an
approved or denied message.
Version: 2.0
Provider POS Device User Manual
A sample Daily Check Out receipt is below:
Training Provider
123 Any Stre et
Anywhere, CO 89999
Ph: 999-999-9999
Item #: 2
----------------------------06/16/2012 01:45:39pm
CHECK OUT
Firstname L.
Child#: 1
1234567890
DOB: 08/01/2001
PT: $15.00
APPROVED
Tran#: 123451234511
=================================
Version: 2.0
Page 19
Provider POS Device User Manual
5.3 Previous Check In and Previous Check Out
Overview
The child’s attendance must be entered during the missed swipe period
if attendance was not recorded when the child arrived at the child care
facility. The missed swipe period is a 10-day period including the date of
care plus the nine (9) following calendar days.
Two transactions are required for each day to record previous attendance:
a Previous Check In and a Previous Check Out. If a Check In was captured
but a Check Out was not performed, then only a Previous Check Out is
needed. A Previous Check In and Previous Check Out require entering
both the date and time care was provided.
Examples of when a Previous Check In and/or a Previous Check Out are
used is below:
Scenario #1:
• The child arrives at child care directly from school. Later that day, when
the client picks up the child, the client will perform both a Previous
Check In and a Check Out to record that day’s attendance.
Scenario #2:
• The child is dropped off by a person who does not have a CCAP Card
and cannot perform a Check In transaction. The client must perform
a Previous Check In when picking up the child. After the Previous
Check In is performed, the client performs a Check Out to indicate
the child is leaving care for the day.
Scenario #3:
• The child is picked up by an adult who does not have the CCAP Card;
therefore, a Check Out cannot be performed. The next day, when
dropping off the child, the client must perform a Previous Check Out
to record the date and time the child left the facility on the previous
day of care. The client must perform the Previous Check Out before
a Check In may be performed for the current day.
Page 20
Version: 2.0
Provider POS Device User Manual
Overview, continued
Scenario #4:
• The POS device is broken and attendance cannot be recorded. The
client must record the attendance for the days not captured on the
POS device by using the Previous Check In and Previous Check
Out functionality when the replacement POS device is received by
the provider. A paper attendance sheet must be used to capture the
attendance so that accurate information will be recorded in the POS
device.
The client must use the Previous Check In or Previous Check Out
transaction the next time he/she is at your child care facility or when the
POS device is available in each of the above examples. Previous Check
In and Previous Check Out transaction must be completed within ten (10)
days of the date the child care was provided. The 10-day allowance is
the day of care and the nine (9) following calendar days.
Version: 2.0
Page 21
Provider POS Device User Manual
5.3.1 Previous Check In
Previous Check In
The screens the client will see as the Previous Check In transaction is
performed are displayed below.
POS Device Screen
Sat 06/16/12
Action
12:44pm
SWIPE CARD to Begin.
Client swipes his/her CCAP card.
Provider Options F4
PIN Number Required
Please ENTER PIN...
****
Client enters 4-digit PIN and presses the green
enter key.
[X] - Exit
Attendance Type?
1-Check In
2-Check Out
3-Prev Check In
4-Prev Check Out
Client presses 3 for Prev Check In.
Main
Client enters in the date for the Previous
Check In (MM/DD, Example 06/14) and presses
the green enter key.
Prev Check In
Date: MM/DD
Main
Prev Check In
Date: 06/14
Time: HH:MM
Main
Client enters in the time the child arrived (HH:MM,
Example 08:30) and presses the green
enter key.
Prev Check In
Client selects 1 for AM or 2 for PM.
Date: 06/14
Time: 08:30
1-AM / 2-PM ?
Main
Page 22
Version: 2.0
Provider POS Device User Manual
Previous Check In (cont’d)
POS Device Screen
Action
Client enters in the child number and presses the
green enter key.
Prev Check In
06/14/2012 08:30am
Enter Child #:
__
Note: If entering more than one child, enter the
next child number and press the green enter key.
When finished press enter again.
Main
Wait for authorization. The POS device displays
Dialing Primary, Waiting for Answer, Connecting,
Connected, Sending, Receiving followed by an
approved or denied message.
Prev Check In
APPROVED
Printing Complete.
<< Press Any Key >>
A sample Previous Check In receipt is below:
Training Provider
123 Any Stre et
Anywhere, CO 89999
Ph: 999-999-9999
Item #: 3
----------------------------06/16/2012 01:44:39pm
PREV CHECK IN
For: 06/14/2012 08:30am
Firstname L.
Child#: 1
1234567890
DOB: 08/01/2001
PT: $15.00
APPROVED
Tran#: 123412341234
=================================
Version: 2.0
Page 23
Provider POS Device User Manual
5.3.2 Previous Check Out
Previous Check Out
The screens the client will see as the Previous Check Out transaction is
performed are displayed below.
POS Device Screen
Sat 06/16/12
Action
12:44pm
Client swipes his/her CCAP card.
SWIPE CARD to Begin.
Provider Options F4
PIN Number Required
Client enters in the 4-digit PIN and the presses
the green enter key.
Please ENTER PIN...
****
[X] - Exit
Attendance Type?
1-Check In
2-Check Out
3-Prev Check In
4-Prev Check Out
Client presses 4 for Prev Check Out.
Main
Prev Check Out
Date: MM/DD
Main
Prev Check Out
Date: 06/14
Time: HH:MM
Main
Prev Check Out
Date: 06/14
Time: 05:30
Client enters in the date of the Previous
Check-Out in MM/DD format (Example, 06/14)
and presses the green enter key.
Client enters in the time the child departed
(HH:MM, Example 05:30) and presses the green
enter key.
Client selects 1 for AM and 2 for PM.
1-AM / 2-PM ?
Main
Page 24
Version: 2.0
Provider POS Device User Manual
Previous Check Out (cont’d)
POS Device Screen
Action
Client enters in child number and presses the
green enter key.
Prev Check Out
06/14/2012 05:30pm
Enter Child #:
__
Main
Note: If entering more than one child, enter the
next child number and press the green enter key.
When finished press enter again.
Wait for authorization. The POS device displays
Dialing Primary, Waiting for Answer, Connecting,
Connected, Sending, Receiving followed by an
approved or denied message.
Prev Check Out
APPROVED
Printing Complete.
<< Press Any Key >>
A sample Previous Check Out receipt is below:
Training Provider
123 Any Stre et
Anywhere, CO 89999
Ph: 999-999-9999
Item #: 4
----------------------------06/16/2012 02:22:03pm
PREV CHECK OUT
For: 06/14/2012 05:30pm
Firstname L.
Child#: 1
1234567890
DOB: 08/01/2001
PT: $15.00
APPROVED
Tran#: 245634563456
=================================
Version: 2.0
Page 25
Provider POS Device User Manual
6.0 Correcting Attendance Errors
Overview
The void transaction option is used to cancel transactions entered in error
by the client. Only providers may void transactions.
You must have the transaction number, which appears on the Daily
Attendance Receipt, and your password to void a transaction. Your
password is “123456”. The transaction number is found under the DOB
line as displayed below.
Training Provider
123 Any Stre et
Anywhere, CO 89999
Ph: 999-999-9999
06/16/12
Term#:12234501
1:06:31pm
Prov#:12345
----------------------------Daily Attendance Recei pt
For: 06/16/12
Item #: 1
----------------------------06/16/12 01:44:39pm
CHECK IN
Firstname L.
Child#: 1
1234567890
DOB: 08/01/2001
PT: $15.00
APPROVED
Tran#: 123456789012
=================================
The client must enter the correct attendance information after the
transaction is voided. The correct information may be entered using the
appropriate daily Check In or daily Check Out transaction if the transaction
is voided at the time attendance is recorded. The correct information
may be entered by the client using Previous Check In and/or Previous
Check Out if the error is discovered during the missed swipe period.
Page 26
Version: 2.0
Provider POS Device User Manual
6.1 Void Transaction
Void Transaction
The Void transaction option is used to cancel transactions that were
entered in error by the client. Only approved transactions may be voided.
If a transaction is denied, it cannot be voided because it does not exist in
the system.
The screens you will see as you perform a Void transaction are displayed
below.
POS Device Screen
Sat 06/06/12
Action
12:44pm
Press F4 to access the Provider Options menu.
SWIPE CARD to Begin.
Provider Options F4
Provider Options
Key in the 6-digit provider password, which is
123456. Press the green enter key.
User Pwd: ------
Back
Main
Provider Options
1-Reports
2-Void Tran Number
3-Send SAFs
4-Reprint
5-Terminal Setup
Back Main
Void Tran Number
Enter Tran #
Key in the transaction number and
press the green enter key.
____________
Back
Main
Void Tran Number
VOID APPROVED
Printing Complete.
<< Press Any Key >>
Version: 2.0
Press 2 for Void Tran Number.
Wait for authorization. The POS device displays
Dialing Primary, Waiting for Answer, Connecting,
Connected, Sending, Receiving followed by an
approved or denied message.
Page 27
Provider POS Device User Manual
A sample Void receipt is below:
Training Provider
123 Any Stre et
Anywhere, CO 89999
Ph: 999-999-9999
Item #: 7
----------------------------06/16/2012 03:22:03pm
VOID TRAN NUMBER: 123456789012
IN: 06/16/2012 01:44:39pm
Firstname L.
Child#: 1
1234567890
DOB: 08/01/2001
VOID APPROVED
=================================
Page 28
Version: 2.0
Provider POS Device User Manual
7.0
Capturing Attendance Without Phone Line
Connectivity
Overview
The POS device must be used to check children in and out of your care
if your telephone service is unavailable but you do have electricity. The
POS device stores the information until it is transmitted over the telephone
line. These stored transactions are called Store and Forward (SAF)
transactions. The POS device will detect the dial tone and automatically
transmit any stored attendance transactions in memory when telephone
service is restored. You may also manually trigger the sending of these
stored transactions.
It is important to note that SAF functionality does not work if you
do not have electrical service.
The POS device will store transactions for up to ten (10) days (current day
plus the previous nine (9) days). The provider must transmit any stored
transactions within this time period to ensure that attendance is reported
timely and that you are paid for the child care services provided.
Version: 2.0
Page 29
Provider POS Device User Manual
7.1 Store and Forward (SAF) Transactions
Overview
Your Daily Attendance Receipt will display SAF STORED when information
was stored. This indicates that these transactions were recorded but not
transmitted, therefore, the transaction has not been approved or denied.
It is important to check the Daily Attendance Receipt after the stored
transactions are transmitted to ensure they are approved. It is possible
that attendance transactions may be pending or denied.
You may initiate the transmission of stored transactions instead of waiting
for the POS device to do this automatically by following the instructions
provided below. Once the stored transactions are transmitted, the Daily
Attendance Receipt shows SAF COMPLETE.
Some common reasons why SAF transactions are denied are:
1) an incorrect PIN was entered;
2) an incorrect child number was entered;
3) the Check In is missing; or
4) the Check Out is missing.
The Daily Attendance Receipt will display the transaction as denied with
the corresponding denial message after the stored transactions are
transmitted if these errors occur when in SAF mode.
----------------------------*SAF COMPLETE*
Seq: 000374
At: 06/16/2012 06:51:24pm
----------------------------06/14/2012 06:50:47pm
CHECK IN
NAME UNAVAILABLE
Child#: 5
333333333
DOB: --/--/---DENIED
- DA
Reason: Ivd Person Nbr
Trace#: 000004491001
Voice mail messages must be cleared in order for your POS device to send
SAF transactions if your child care facility uses any form of voice mail.
This means if you have unchecked voice mails, the POS device will not
send SAF transactions immediately but instead will store the transactions.
The POS device must have a clear dial tone to send transactions.
Page 30
Version: 2.0
Provider POS Device User Manual
Overview, continued
The POS device must have power to operate. If you encounter a
power outage, a paper attendance sheet must be used, so that
clients are able to record the date and time when children are in
care at your facility. The attendance sheet will assist the clients
in entering the correct attendance data using Previous Check In
and Previous Check Out transactions when electrical service is
restored. You may refer to the manual sign-in log used to meet
Division of Early Care and Learning Licensing or other program
attendance requirements for this purpose.
Transactions must be recorded and transmitted within the 10-day
missed swipe period to receive payment from the County Department
of Social/Human Services.
The screens you will see as you transmit SAF transactions are displayed
below.
POS Device Screen
Sat 06/16/12
Action
12:44pm
Press F4 to access the Provider Options menu.
SWIPE CARD to Begin.
Provider Options F4
Provider Options
Key in the 6-digit provider password, which is
123456. Press the green enter key.
User Pwd: ______
Back
Main
Provider Options
1-Reports
2-Void Tran Number
3-Send SAF’s
4-Reprint
5-Terminal Setup
Back Main
Send SAF’s
Successful
Printing Complete.
<< Press Any Key >>
Version: 2.0
Press 3 for Send SAF’s.
Wait for authorization. The POS device displays
Dialing Primary, Waiting for Answer, Connecting,
Connected, Sending, Receiving followed by an
approved or denied message.
Page 31
Provider POS Device User Manual
A sample SAF approval receipt is below:
----------------------------* SAF COMPLETE *
Seq: 000370
At: 06/16/2012 06:45:44pm
----------------------------06/14/2012 06:39:40pm
CHECK OUT
Firstname L.
Child#: 1
333333333
DOB: 01/01/1998
PT: $10.00
APPROVED
Tran#: 456745674567
=================================
8.0 Receipts and Reports
Overview
This section describes the three reports that are available via the POS
device:
Page 32
Daily Attendance Receipt (Section 8.1)
Attendance Report (Section 8.2)
Exceptions Report (Section 8.3)
Version: 2.0
Provider POS Device User Manual
8.1 Daily Attendance Receipt
Daily Attendance Receipt
Every time a transaction is performed on the POS device a receipt is
generated.
Check In, Check Out, Previous Check In, and Previous Check Out
transactions are printed on the Daily Attendance Receipt. The transaction
receipt is the record that documents a child’s attendance in your facility.
The Daily Attendance Receipt displays only transactions for the current
date. It is very important to retain a copy of the transaction receipt every
day for use in ensuring the payment you receive is accurate.
A sample Daily Attendance Receipt is below:
Training Provider
123 Any Stre et
Anywhere, CO 89999
Ph: 999-999-9999
Term #: 12234501
Prov #: 12345
06/16/12
12:55:23pm
----------------------------Daily Attendance Recei pt
For: 06/16/2012
Item #: 7
----------------------------06/16/2012 12:55:21pm
CHECK IN
Firstname L.
Child#: 1
123456789
DOB: 08/01/2001
PT: $15.00
APPROVED
Tran#: 11001
Firstname L.
Child#: 2
123456789
DOB: 08/01/2001
PT: $15.00
APPROVED
Tran#: 11002
=================================
Item #: 8
----------------------------06/16/2012 12:58:21pm
CHECK OUT
Firstname L.
Child#: 1
1234567890
DOB: 08/01/2001
PT: $15.00
APPROVED
Tran#: 12001
=================================
Version: 2.0
Page 33
Provider POS Device User Manual
8.1.1 Reprinting Attendance Receipts
Reprinting an Attendance Receipt
You may reprint the Daily Attendance Receipt by using the Reprint
function found in the Provider Options menu. You may print a range
of transactions or you may print the entire attendance receipt from the
beginning of the current day.
For example, if you want to reprint transactions #5 through #10, you may
enter that range when prompted. If you want to reprint all transactions,
you may leave the range blank and a complete receipt for the day is
printed.
You may only reprint the Daily Attendance Receipt for the current date.
8.1.1.1 Reprinting an Entire Daily Attendance Receipt
Reprinting an Entire Daily Attendance Receipt
You may print the entire Daily Attendance Receipt by leaving the
transaction range (Start # and End #) blank. You may only reprint the
Daily Attendance Receipt for the current date.
The screens you will see as you reprint an entire Daily Attendance Receipt
are displayed below.
Page 34
Version: 2.0
Provider POS Device User Manual
Reprinting Attendance Receipts
POS Device Screen
Sat 06/16/12
Action
12:44pm
Press F4 to access the Provider Options menu.
SWIPE CARD to Begin.
Provider Options F4
Provider Options
Key in the 6-digit provider password, which is
123456. Press the green enter key.
User Pwd: ------
Back
Main
Provider Options
1-Reports
2-Void Tran Number
3-Send SAF s
4-Reprint
5-Terminal Setup
Back
Press 4 for Reprint.
Main
Reprint
1-Attendance Recei pt
2-Last Report
Back
Main
Attendance Recei pt
06/16/12: 17 Items
Leave Start Item # blank, press the green enter
key.
Start Item #: _____
(Blank = First)
Back
Main
Attendance Recei pt
06/16/12: 17 Items
Leave End Item # blank, press the green enter
key.
Start Item #: _____
End Item #: _____
(Blank = Last)
Back
Main
Reprint
1-Attendance Recei pt
2-Last Report
Back
Version: 2.0
Press 1 for Attendance Receipt.
Press the purple button under the word Main to
return to the main menu.
Main
Page 35
Provider POS Device User Manual
A sample reprinted Daily Attendance Receipt is below. The reprinted receipt
will indicate where the reprint starts and where the reprint ends.
Training Provider
123 Any Stre et
Anywhere, CO 89999
Ph: 999-999-9999
Term#: 12234501
Prov#: 12345
06/16/12
4:23:00pm
Daily Attendance Recei pt
For: 06/16/2012
==========REPRINT START==========
Item #: 1
----------------------------06/16/2012 01:44:39pm
CHECK IN
Firstname L.
Child#: 1
123456789
DOB: 08/01/2001
PT: $15.00
APPROVED
Tran#: 23001
=================================
Item #: 2
----------------------------06/16/2012 01:44:39pm
CHECK OUT
Firstname L.
Child#: 2
123456789
DOB: 08/01/2001
PT: $15.00
APPROVED
Tran#: 11002
=================================
Item #: 3
----------------------------06/16/2012 04:20:43pm
VOID TRAN NUMBER: 896521896521
OUT: 06/15/2012 03:20pm
Firstname L.
Child#: 1
234567890
DOB: 08/01/2001
VOID APPROVED
=================================
===========REPRINT END============
Page 36
Version: 2.0
Provider POS Device User Manual
8.1.1.2 Reprinting a Range of Attendance Transactions
Reprinting a Range of Transactions
You may print a specified range of transactions from the Daily Attendance
Receipt by keying in the starting item number and keying in the last item
number to print.
For example, if you want to reprint Items #8 through #10, you would enter
the starting range as 8 and the ending range as 10. The reprint will then
only show transactions #8, #9 and #10.
You may use this feature to print a specified range of transactions if the
printer runs out of paper or if the paper gets jammed.
Example: The printer runs out of paper or the paper gets jammed on
transaction #12. You fix this by entering the “Start Item #” as #12 and
would not enter anything for the “End Item #”. This will reprint transactions
#12 and continue to print all other recorded transactions after #12
You may only reprint the Daily Attendance Receipt for the current date.
The screens you will see as you reprint a range of attendance transactions
are displayed below.
Version: 2.0
Page 37
Provider POS Device User Manual
Reprinting a Range of Transactions
POS Device Screen
Sat 06/16/12
Action
12:44pm
SWIPE CARD to Begin.
Press F4 to access the Provider Options menu.
Provider Options F4
Provider Options
Key in the 6-digit provider password, which is
123456. Press the green enter key.
User Pwd:______
Back
Main
Provider Options
1-Reports
2-Void Tran Number
3-Send SAF s
4-Reprint
5-Terminal Setup
Back
Press 4 for Reprint.
Main
Reprint
1-Attendance Recei pt
2-Last Report
Back
Attendance Recei pt
06/16/12: 17 Items
Key in the Start Item # and press the green enter
key.
Start Item #: _____
(Blank = First)
Back
Main
Attendance Recei pt
06/16/12: 17 Items
Start Item #: _____
End Item #: _____
(Blank = Last)
Back Main
Reprint
1-Attendance Recei pt
2-Last Report
Back
Page 38
Press 1 for Attendance Receipt.
Main
Key in the End Item # and press the green enter
key.
Press the purple button under the word Main to
return to the main menu.
Main
Version: 2.0
Provider POS Device User Manual
A sample reprinted attendance receipt for a range of transactions is below.
The sample receipt only displays items #8, #9, and #10 because this is
the range requested. The reprinted receipt will indicate where the reprint
started and where it ended.
Training Provider
123 Any Stre et
Anywhere, CO 89999
Ph: 999-999-9999
Term#: 12234501
Prov#: 12345
06/16/12
4:23:00pm
----------------------------Daily Attendance Recei pt
For: 06/16/2012
==========REPRINT START==========
Item #: 8
----------------------------06/12/2012 02:20:39pm
PREV CHECK OUT
For: 06/15/2012 05:30pm
Firstname L.
Child#: 1
123456789
DOB: 08/01/2001
PT: $15.00
APPROVED
Tran#: 27001
=================================
Item #: 9
----------------------------06/16/2012 01:44:39pm
CHECK OUT
Firstname L.
Child#: 2
1234567890
DOB: 08/01/2001
PT: $15.00
APPROVED
Tran#: 31002
Firstname L.
123456789
PT: $15.00
APPROVED
Child#: 3
DOB: 08/01/2001
Tran#: 31003
=================================
Item #: 10
----------------------------06/16/12 03:20:43pm
CHECK IN
Firstname L.
Child#: 1
423456789
DOB: 08/01/2001
PT: $15.00
APPROVED
Tran#: 44444
=================================
===========REPRINT END===========
Version: 2.0
Page 39
Provider POS Device User Manual
8.1.1.3 Reprinting the Last Report
Reprinting the Last Report
You may reprint either the last Attendance Report or the last Exceptions
Report by using this feature. Reprinting the last report is helpful if the
printer runs out of paper or if the paper gets jammed while you are
printing. If you receive an error message when printing the Attendance
or Exceptions Report, the reprint will give you that error message. If this
occurs, request the report again.
The screens you will see as you reprint the last report are displayed below.
When the last report is reprinted, it will say DUPLICATE.
POS Device Screen
Sat 06/16/12
Action
12:44pm
SWIPE CARD to Begin.
Press F4 to access the Provider Options menu.
Provider Options F4
Provider Options
Key in the 6-digit provider password, which is
123456. Press the green enter key.
User Pwd:______
Back
Main
Provider Options
1-Reports
2-Void Tran Number
3-Send SAF s
4-Reprint
5-Terminal Setup
Back
Press 4 for Reprint.
Main
Reprint
1-Attendance Recei pt
2-Last Report
Back
Reprint
1-Attendance Recei pt
2-Last Report
Back
Page 40
Press 2 for Last Report.
Main
Press the purple button under the word Main to
return to the main menu.
Main
Version: 2.0
Provider POS Device User Manual
8.2 Attendance Report
Attendance Report
The Attendance Report will show all approved swipes for a specific care
date or range of care dates regardless of when the swipes occurred.
The Attendance Report will also highlight children who were checked in
but were not checked out and children where there is not a Check Out
recorded for every Check In.
You may review the Attendance Report to verify all children were checked
in and checked out. To correct missing attendance you must inform the
client and the client should perform a Previous Check In and/or Previous
Check Out. The attendance will be reported as zero (0) hours and no
payment will be made for that care if a Check Out is not recorded for
every Check In.
It is critical that you print and review the Attendance Report
regularly because the accuracy of attendance reporting will
affect your payment.
Examples of discrepancies you may see on the Attendance Report include:
Example #1: You generated an Attendance Report for yesterday and
child Jane D. has a Check In transaction but no Check Out transaction for
yesterday. You will ask the adult caretaker to perform a Previous Check
Out transaction for yesterday to correct this discrepancy.
Example #2: You generated an Attendance Report for yesterday and child
Jane D. has a Check In at 8 am, a Check In at 3:30 pm and Check out at
6 pm. Perform one of the following to correct this discrepancy:
• Void the inaccurate Check In, or
• Ask the adult caretaker to record a Previous Check Out transaction
for a time after the 8 am Check In and before the 3:30 pm Check In
Example #3: A child does not appear on the report but was present
for child care. Verify against the Daily Attendance Receipt to see
if the transaction has been denied or is pending. If the transaction
shows as Denied, refer to Section 9 to locate the appropriate denial
code and description. If a transaction was not recorded, request the
adult caretaker to enter a Previous Check In and Previous Check
Out for the missing attendance.
Example #4: A child who appears on the report but was not present on that
day indicates that an error occurred when the adult caretaker recorded
attendance. You must void both the Check In and Check Out transactions
that were captured in error.
Version: 2.0
Page 41
Provider POS Device User Manual
Attendance Report, continued
All corrections to attendance must be done within ten (10) calendar days
of the date the child was in care (day of care plus the following nine (9)
calendar days). Corrections must be entered as quickly as possible so
you are paid correctly.
Attendance Report Printing Options
A. Report for all cases for today’s date
Press the first purple key from the left to print the report for today’s
date for all cases. The word Print appears above the purple key.
No data entry is required.
B. Report for all cases for a single day
Key in the From: date and press the green enter key which will
add MM/DD in the To: field. Press the green enter key or press
the first purple key from the left. The word Print appears above
the purple key.
C. Report for a date range for all cases
Key in the desired date range (e.g., up to any 14 day period for
the past 365 days) in an MM/DD format. Press the green enter
key to move to the next field. Leave the Case number field blank
and press the first purple key from the left. The word Print appears
above the purple key.
D. Report for a specific case for today’s date
Press the green enter key twice to move to the case number field.
Key in the case number and press the green enter key or the first
purple key from the left. The word Print appears above the purple
key.
E. Report for a date range for a specific case
Key in the desired date range (e.g., up to any 14 day period for
the past 365 days) in an MM/DD format. Press the green enter key
to move to the next field. Key in the case number and press the
green enter key.
Example: To request an Attendance Report for the date range
June 10 to June 16, you will key in 0610 in the From: field and
press the green enter key and key in 0616 in the To: field and
press the green enter key. Key in the case number and press
the green enter key.
Page 42
Version: 2.0
Provider POS Device User Manual
POS Device Screen
Sat 06/16/12
Action
12:44pm
SWIPE CARD to Begin.
Press F4 to access the Provider Options menu.
Provider Options F4
Provider Options
User Pwd:____________
Back Main
Provider Options
1-Reports
2-Void Tran Number
3-Send SAFs
4-Reprint
5-Terminal Setup
Back Main
Key in the 6-digit provider password, which is
123456. Press the green enter key.
Press 1 for Reports.
Reports
1-Attendance
2-Exceptions
Press 1 for Attendance.
Back Main
Attendance Report
today is: 06/16
From: MM/ DD To: ___/ ___
Case:___________________
Print
Back Main
The Attendance Report can be generated for:
• Any date range up to 14 days for the past
365 days. (e.g., 2 days, 5 days, 8 days, 14 days)
• All cases or a single case
TIP: Press the
green enter
Printing options are listed
key to go to
on the previous page.
the next field.
Wait for report to generate and print.
Attendance Report
APPROVED
Ke ep provider recei pt for
records.
<< Press Any Key >>
The POS device displays Dialing Primary, Waiting
for Answer, Connecting, Connected, Sending,
Receiving followed by an approved or denied
message. Screen also displays <<Press Any Key
to Abort>> while printing. Press any key to abort
printing if you wish to abort the transaction.
Reports
Press the purple button under the word Main to
return to the main menu.
1-Attendance
2-Exceptions
Version: 2.0
Back Main
Page 43
Provider POS Device User Manual
A sample Attendance Report is below.
Training Provider
123 Any Stre et
Anywhere, CO 89999
Ph: 999-999-9999
Term#:12234501
Prov#:12345
06/19/12
11:37:25am
--------------------------------
3
1
Attendance Report
as of: 06/19/2012
2
From: 06/17/2012
To: 06/19/2012
Attende es: 3
-------------------------------Firstname L.
Child#: 1
234567878
DOB: 11/05/2002
--6/18/2012
IN: 06:12am
Tr#307833676001
OUT: 04:34pm
Tr#307833678001
--6/19/2012
IN: 08:19:12am Tr#307833674001
OUT: 11:20:10am Tr#307833675001
4a
4b
Firstname L.
432143211
--6/17/2012
IN: 07:14am
--06/18/2012
IN: 09:12:34am
OUT: 08:07pm
--06/19/2012
IN: 04:10am
OUT: 08:00am
IN: 11:05:41am
OUT: 04:07:11pm
Child#: 1
DOB: 03/11/2005
Tr#387833673001
Tr#307933666901
Tr#307833666001
5
Tr#307833662001
Tr#307833664001
Tr#307833660001
Tr#307833661001
Firstname L.
Child#: 2
432143211
DOB: 08/15/2007
--06/17/2012
IN: 06:00am
Tr#307833639001
OUT: 11:00pm
Tr#307833648001
--06/18/2012
IN: 02:15pm
Tr#307833652001
IN: 02:25:21pm Tr#307933633001
OUT: 04:26:11pm Tr#307833634001
DENIED - A8
Result: Approved
Trace#: 000071-000000307833689
5
Explanations
Only approved transactions will be shown. Denied and voided transactions will not appear.
1.
2.
3.
4a.
4b.
5.
Date the report is printed.
Care date(s) for which the report was requested.
Receipt is printed in case number order.
Aendance swiped will display in HH:MM:SS format.
Aendance recorded as a Previous Check In/Out will display in HH:MM format.
Aendance highlighted in reverse print must be researched and corrections must
be done within ten (10) calendar days of the date the child was in care (day of care
plus the following nine (9) calendar days).
Page 44
Version: 2.0
Provider POS Device User Manual
8.3 Exceptions Report
Exceptions Report
The Exceptions Report will show all children who have been checked in
but not checked out. The Exceptions Report may be requested for any
day during the ten (10) calendar day missed swipe period. The missed
swipe period is today and the previous nine (9) days.
You may review the Exceptions Report to identify children who attended
and were checked in but were not checked out. If a child was checked in,
but was not checked out, you must inform the client and the client should
perform a Previous Check Out to correct the discrepancy. If a Check Out
is not recorded for every Check In, attendance will be reported as zero
(0) hours and no payment will be made for that care.
All corrections to attendance must be done within ten (10) calendar days
of the date the child was in care (day of care plus the following nine (9)
calendar days). The best practice is to have corrections entered as quickly
as possible to ensure all attendance is recorded correctly and you are
paid for the care you provide.
Version: 2.0
Page 45
Provider POS Device User Manual
Exceptions Report
POS Device Screen
Sat 06/16/12
Action
12:44pm
SWIPE CARD to Begin.
Press F4 to access the Provider Options menu.
Provider Options F4
Provider Options
Key in the 6-digit provider password, which is
123456. Press the green enter key.
User Pwd:______
Back
Main
Provider Options
1-Reports
2-Void Tran Number
3-Send SAF’s
4-Reprint
5-Terminal Setup
Back Main
Press 1 for Reports.
Reports
1-Attendance
2-Exceptions
Press 2 for Exceptions.
Back
Main
Exceptions Report
Date: MM/DD
Back
Main
Exceptions Report
APPROVED
Ke ep Provider recei pt
for records.
<< Press Any Key>>
Key in the date (MM/DD), that you would like to
run the exceptions report for, and press the green
enter key.
Wait for authorization. The POS device displays
Dialing Primary, Waiting for Answer, Connecting,
Connected, Sending, Receiving followed by an
approved or denied message.
Reports
Press the purple button under the word Main to
return to the main menu.
1-Attendance
2-Exceptions
Back
Page 46
Main
Version: 2.0
Provider POS Device User Manual
A sample Exceptions Report is below.
Training Provider
123 Any Stre et
Anywhere, CO 89999
Ph: 999-999-9999
Term#: 12234501
Prov#: 12345
06/16/12
4:23:00pm
----------------------------Exceptions Report
For: 06/12/12
Firstname L.
123456789
PT: $5.00
IN: 03:00pm
Child#: 1
DOB: 02/01/2001
Firstname L.
234567891
PT: $5.00
IN: 04:00pm
Child#: 2
DOB: 12/22/2003
Firstname L.
345678911
PT: $5.00
IN: 05:00pm
Child#: 3
DOB: 08/15/2005
Tran#: 14125
Tran#: 14125
Tran#: 14125
Total Exceptions: 3
The Exceptions Report lists the daily Check Ins without a matching
Check Out. The client must record a Previous Check Out for the
day of care to correct the error.
9.0 Denial/Error Messages
Overview
The POS device has the ability to communicate various types of messages.
You may see messages indicating:
• the POS device cannot dial out;
• errors related to entering incorrect data, or
• errors related to the child care authorization.
The next two sub-sections (General Denial/Error Messages and POS
Device Denial/Error Messages) define the various denial/error messages
you may encounter.
Version: 2.0
Page 47
Provider POS Device User Manual
9.1 General Denial/Error Messages
General Denial/Error Messages
If an error occurs, the chart below lists the error messages displayed on
the Daily Attendance Receipt. You should take the actions listed in the
“ACTION TO TAKE” column to correct the denial/error. The actions in the
Action to Take column must be taken by the client or provider as listed in
the Action Taken By column.
Response
Code
Error
Description Description
Action
Taken by
B2
IVD
PROVIDER
PWD
Provider password
is invalid.
B4
PENDING
DIFF
PROVIDER
Provider is not au- Client
thorized to care for
the child through
CCAP.
Attendance cannot
be recorded until the
provider is
authorized for
the child.
B5
TRAN NOT
VOIDABLE
The transaction is Provider
not voidable. The
error may have already been settled
or an incorrect
transaction number
was entered.
Verify transaction
number and retry.
[Note: only approved
transactions may be
voided. It is possible
the transaction was
denied and cannot
be voided.]
BE
IVD VOID
DATE
Cannot void a
transaction that is
before the missed
swipe period.
Provider
Verify the void date
and retry. If the date
is prior to the missed
swipe period, it cannot be voided.
BF
IVD DATE
Not a valid calendar date.
Client or
Provider
Verify the calendar
date and retry.
D0
PROVIDER The provider
Provider
NOT FOUND making the request
is not identifiable.
Page 48
Provider
Action to Take
Enter the correct
provider password
which is 123456.
Attendance cannot
be recorded because the provider
record does not
exist. Contact the
County Department
of Social/Human
Services.
Version: 2.0
Provider POS Device User Manual
Response Error
Code
Description
Description
D1
TERM NOT
FOUND
Provider
Attendance cannot be recorded.
Contact the Xerox
Provider Helpline.
D2
TRANSACTION The transaction
Provider
NOT FOUND
number cannot be
identified or does not
exist. You may have
entered an incorrect
transaction number.
Try the transaction
again using the
correct transaction
number.
D6
INVALID CARD The card used is not Client
a valid CCAP Card.
Attendance cannot
be recorded with
the card used. Use
a valid CCAP Card.
DA
INVALID
PERSON
NUMBER
The child number
entered does not
exist on the case.
Client
Verify the child
number and retry.
DB
NO AUTH FOR
PERSON
No Authorization is
found for the child.
Client
Attendance cannot
be recorded. Retry
the transaction,
if you receive the
error again contact
the County Department of Social/Human Services.
DC
UNAUTHORIZED
PROVIDER
The provider is not Client
authorized to accept
attendance.
Attendance cannot be recorded.
Contact the County
Department of
Social/Human
Services.
DD
CHECK IN
FIRST
Caused by a Check
Out without a
matching Check In.
Client must Check
In the child first.
Use Previous
Check In feature.
E1
ALREADY
VOIDED
The transaction
Provider
being voided has already been voided.
Version: 2.0
The POS device
sending the request
is not identifiable.
Action
Taken by Action to Take
Client
Verify transaction
item and retry.
Page 49
Provider POS Device User Manual
Response Error
Code
Description
E3
TERM NOT
LOGGED ON
E4
Description
Provider
The POS device
has been deactivated and cannot be
used. Contact the
County Department
of Social/Human
Services for deactivation reason.
AUTH
Authorization is
PENDING FOR pending for the
PROV
provider.
Client
Attendance is not
approved and
may not be paid.
Contact the County
Department of
Social/Human
Services.
E5
AUTH
PENDING NO
PROV
Authorization is
pending and the
provider is not
active.
Client
Attendance cannot
be recorded. Contact the County Department of Social/
Human Services.
E6
CASE NOT
FOUND
Cannot find a case Client
based on the card
number entered.
The case associated
with the CCAP Card
cannot be found.
Attendance cannot be recorded.
Contact the County
Department of
Social/Human
Services.
E7
TOO MANY
CASES
Found multiple
cases for the card
number. Only one
case should be
found.
Client
Attendance cannot
be recorded. Contact the County Department of Social/
Human Services.
E8
AUTH NOT
FOUND
An authorization
schedule or authorized hours do not
exist.
Client
The authorization
cannot be found or
there are no scheduled hours for the
day of care. Contact
the County Department of Social/Human Services.
Page 50
POS device not
signed on.
Action
Taken by Action to Take
Version: 2.0
Provider POS Device User Manual
Response Error
Code
Description
Description
Action
Taken by Action to Take
EA
AUTH
PENDING
PROV DIFF
Authorization is
pending – Provider
Differs.
Client
Attendance cannot
be recorded. Contact the County Department of Social/
Human Services.
A1
ALL DAYS
USED
Attendance is not
allowed.
Client or
Provider
Contact the County
Department of
Social/Human
Services.
A4
CARD NOT
ACTIVE
CCAP card is not
active.
Client
Attendance cannot
be recorded until
the CCAP Card is
activated. PIN the
card or contact the
County Department
of Social/Human
Services.
A6
CASE NOT
ACTIVE
The case
associated with the
CCAP card is not
eligible to receive
child care.
Client
Attendance cannot
be recorded. Contact the County Department of Social/
Human Services.
00
SUCCESS/
APPROVAL
The swipe was
successful.
Client
No action needed
as attendance was
recorded
successfully.
01
APPROVED
The swipe was
successful, but
one or more errors
occurred with the
child(ren)’s
attendance.
Client
Determine error
and re-enter
attendance for the
child/children with a
denial message.
05
DENY-RETRY
The swipe was
Client
denied due to technical or communication issues.
Retry the
transaction.
14
IVD CARD
NUMBER
The CCAP Card is
not valid.
Use an active, valid
CCAP Card.
Version: 2.0
Client
Page 51
Provider POS Device User Manual
Response Error
Code
Description
Description
Action
Taken by Action to Take
19
RE-ENTER
TRAN
Transaction is not
recognized.
Provider
Retry the
transaction. If not
resolved, call the
Xerox Provider
Helpline at
1-877-779-1932.
43
CARD NOT
ACTIVE
Lost/Stolen/
Damaged CCAP
card.
Client
Use an active
CCAP Card. To
obtain a new card,
contact the County
Department of
Social/Human
Services.
55
IVD
PIN-RETRY
Incorrect PIN.
Client
Use correct PIN
and retry. To select
a new PIN, call the
PIN Helpline at
1-877-779-1933.
56
CARD NOT
FOUND
CCAP Card number Client
not found in the
system.
Use an active CCAP
Card. To obtain a
new card, contact
the County Department of Social/Human Services.
75
PIN TRIES
EXCEEDED
The incorrect PIN
has been entered
3 times.
Client
To select a new
PIN, call the PIN
Helpline at
1-877-779-1932.
76
KEY SYNCH
ERRORRETRY
PIN encryption
key needs to be
updated.
Provider
Call the Xerox
Provider Helpline at
1-877-779-1932.
95
HOST DB
ERRORRETRY
Transaction was not Client or
processed due to a Provider
technical issue.
Page 52
Retry the
transaction. If still
unsuccessful, call
the Xerox Provider
Helpline at
1-877-779-1932.
Version: 2.0
Provider POS Device User Manual
Response Error
Code
Description
96
SYSTEM
ERRORRETRY
Description
Action
Taken by Action to Take
Transaction was not Client or
processed due to a Provider
technical issue.
Retry the
transaction. If still
unsuccessful, call
the Xerox Provider
Helpline at
1-877-779-1932.
9.2 Sample Denial/Error Receipts
Common Sample Denial/Error Receipts
Below are sample receipts for the most common denial/error messages.
9.2.1 Check In First Denial Receipt
Check In First Denial Receipt
A Check In First denial receipt is produced when an approved Check Out
was recorded for a child but an approved Check In was not recorded for
the child for the day of care. The adult caretaker shall perform a Previous
Check In for the child for the day of care to correct this denial. You may
use the Attendance Report to determine the recorded attendance for the
child and the day of care.
Item #: 24
----------------------------06/19/2012 08:01:18am
PREV CHECK OUT:
For: 06/17/2012 05:00am
Firstname L.
Child#: 1
234567890
DOB: 08/19/2007
DENIED - DD
Reason: Check In First-06/19
Trace #307833682011
=================================
Version: 2.0
Page 53
Provider POS Device User Manual
9.2.2 Check Out First Denial Receipt
Check Out First Denial Receipt
A Check Out First denial receipt is produced when an approved Check In
was recorded for a child but an approved Check Out was not recorded for
the child for the day of care. The adult caretaker shall perform a Previous
Check Out for the child for the day of care to correct this denial. You may
use the Attendance Report to determine the recorded attendance for the
child and the day of care.
Item #: 25
----------------------------06/19/2012 08:09:24am
PREV CHECK IN:
For: 06/18/2012 08:00am
Firstname L.
Child#: 1
345678901
DOB: 03/11/2005
DENIED - A8
Reason: Check Out First-06/19
Trace #307833663001
=================================
Page 54
Version: 2.0
Provider POS Device User Manual
9.2.3 No Auth for Person Denial Receipt
No Auth for Person Denial Receipt
A No Auth for Person denial receipt is produced when the system cannot
find an active authorization for the child for the day of care. The adult
caretaker should check his/her authorization for child care to ensure care
is authorized for the day of care to correct this denial. If care is authorized
for the day of care, the adult caretaker should call the local County
Department of Social/Human Services to report this problem.
Item #: 26
----------------------------06/19/2012 08:12:24am
CHECK IN
Firstname L.
Child#: 1
456789012
DOB: 05/17/2005
DENIED - OB
Reason: No Auth For Person
Trace #309774004001
=================================
9.2.4 Void Denial Receipt
Void Denial Receipt
A void transaction may be denied for two primary reasons: 1) the
transaction number entered is incorrect, or 2) the original transaction was
denied and cannot be voided. You may only void approved attendance
transactions. You may use the Attendance Report to determine the
approved attendance.
Item #: 27
----------------------------06/19/2012 08:16:24am
VOID TRAN NUMBER: 307833668005
DENIED - 58
Reason: Ivd Transaction
Trace #000051-000000307833670
=================================
Version: 2.0
Page 55
Provider POS Device User Manual
9.3 POS Device Technical/System Error Messages
POS Device Technical/System Error Messages
The chart below lists the error messages that may display on the POS
device screen if the POS device encounters a technical or system-level
error. You must follow the advice listed in the “ACTION TO TAKE” column.
Non-ISO
Error #
Error
Description
POS Device
Display
Action to Take (All
Actions are preformed
by the Provider)
C1
Lost connection (tele- Connection
phone carrier dropped) Lost
after successfully
connecting.
Retry the transaction. Call
the telephone company if
unresolved.
C2
No ENQ character (i.e. No ENQ From
‘start transmit’ signal
Host
character after
connection).
Retry the transaction.
Call the Xerox Provider
Helpdesk at 1-877-779-1932
if unresolved.
C3
No response; data
transmitted but no
response received.
No Host
Response
Retry the transaction.
Call the Xerox Provider
Helpdesk at 1-877-779-1932
if unresolved.
C4
Packet transmission
Packet TX
error (LRC or framing Error
error), maximum NAK
receive count reached.
Retry the transaction.
Call the Xerox Provider
Helpdesk at 1-877-779-1932
if unresolved.
C5
Packet Receive Error Packet RX
(LRC or framing error), Error
maximum NAK send
count reached.
Retry the transaction.
Call the Xerox Provider
Helpdesk at 1-877-779-1932
if unresolved.
C6
Host sent ‘graceful’
disconnect character
(EOT) and terminated
the call, but the POS
wasn’t expecting it
(unexpected EOT).
Unexpected
Host EOT
Retry the transaction.
Call the Xerox Provider
Helpdesk at 1-877-779-1932
if unresolved.
C7
Send I/O failure
(internal COMM port
buffer error).
Send I/O
Failure
Retry the transaction.
Call the Xerox Provider
Helpdesk at 1-877-779-1932
if unresolved.
Page 56
Version: 2.0
Provider POS Device User Manual
Non-ISO
Error #
Error
Description
POS Device
Display
Action to Take (All
Actions are preformed
by the Provider)
C8
No response from
modem; modem not
responding to ‘AT’
command sequences.
No Modem
Response
Retry the transaction.
Call the Xerox Provider
Helpdesk at 1-877-779-1932
if unresolved.
C9
No phone line or dial
tone detected during
line detection phase
(before attempting dial
command).
No Phone Line
Check the phone jack for dial
tone and that silver cord is
inserted securely and retry
the transaction. Call the
telephone company if no dial
tone.
CA
No Phone Number
programmed into the
POS device.
No Phone
Number
Call the Xerox Provider
Helpdesk at 1-877-779-1932.
CB
No Answer From
Dial; phone number
dialed but no modem
answered the call.
No Answer
From Dial
Retry the transaction.
Call the Xerox Provider
Helpdesk at 1-877-779-1932
if unresolved.
CC
No dial tone detected
after dial command
initiated.
No Dialtone
Check the phone jack for dial
tone and that silver cord is
inserted securely and retry
the transaction. Call the
telephone company if no dial
tone.
CE
POS device application stopped (or
power loss) during
send/receive to host
(only applies to transactions that are saved
as SAF).
Tran
Interrupted
Retry the transaction.
Call the Xerox Provider
Helpdesk at 1-877-779-1932
if unresolved.
CF
Unexpected internal
communication error
(where xxx on the
displayed/printed
message is the
unexpected error
code number).
Unknown Error
(xxx)
Retry the transaction.
Call the Xerox Provider
Helpdesk at 1-877-779-1932
if unresolved.
Version: 2.0
Page 57
Provider POS Device User Manual
Non-ISO
Error #
Error
Description
POS Device
Display
Action to Take (All
Actions are preformed
by the Provider)
F3
Host response
message is not an
8583 message
(message too short
or no bitmap found).
Bad Response- Retry the transaction.
Retry
Call the Xerox Provider
Helpdesk at 1-877-779-1932
if unresolved.
F4
Variable length field
exceeds specification.
Bad Response- Retry the transaction.
Retry
Call the Xerox Provider
Helpdesk at 1-877-779-1932
if unresolved.
F5
Data missing from
packet based on bits
returned.
Bad Response- Retry the transaction.
Retry
Call the Xerox Provider
Helpdesk at 1-877-779-1932
if unresolved.
F6
Response from host
does not match
request sent.
Bad Response- Retry the transaction.
Retry
Call the Xerox Provider
Helpdesk at 1-877-779-1932
if unresolved.
10.0 POS Device Replacement and Returning a POS Device
Overview
Contact the Xerox Provider Helpdesk at 1-877-779-1932 to request that
a new POS device be ordered for you if your POS device needs to be
repaired or replaced. The POS device will be shipped to you via Federal
Express (FedEx), and should arrive within 6 - 8 days.
You must return the non-functioning POS device to Xerox for repairs using
the pre-paid, pre-addressed label enclosed with the new POS device upon
receipt of your replacement POS device or you will be required to pay
for the POS device. There is no cost to you to return the damaged POS
device. It is important to return the damaged POS device immediately.
Instructions on how to return a POS device to Xerox are documented in
Section 10.2.
Page 58
Version: 2.0
Provider POS Device User Manual
10.1 POS Device Replacements
POS Device Replacements
If the Xerox Customer Service agent requests a replacement POS device
for you, it will arrive in 6 to 8 days. During this time, attendance should
be recorded manually using a paper attendance log.
Follow the Installation instructions in Section 4.0 to install the POS device
when the replacement POS device arrives.
Ask all clients to record the attendance captured on the paper attendance
log into the replacement POS device using Previous Check In and
Previous Check Out. The transactions must be entered promptly so
attendance data can be used to calculate your payment.
10.2 Returning a POS Device to Xerox
Returning a POS Device
A pre-addressed, pre-paid return label is included in the box with the
replacement POS device for you to ship the non-functioning POS device
back to Xerox. Instructions on how to call FedEx and schedule a pickup
from your location are attached to the Federal Express return label. You
should include all cords (silver telephone cord and power cord) with the
return shipment.
There is NO cost to you for returning the non-functioning POS device.
Please schedule the pickup for the non-functioning POS device within
two business days.
The non-functioning POS device will be returned to the address preprinted on the return label.
Version: 2.0
Page 59
Provider POS Device User Manual
11.0 Paper Supplies
Overview
The only supply you need to purchase for your POS device is thermal
paper for the printer.
Thermal paper may be purchased online from a wide range of sources
or may be purchased at any local office supply store. Be sure to check
several websites as prices may vary if ordering online. One paper roll will
average 250 transactions.
It is important to remember the paper used by the POS device is thermal
paper and no other paper type will work with the POS device. The POS
device prints on the paper without using an ink ribbon so paper should
be stored in a cool dry location prior to use and after use for recordkeeping purposes.
Paper specifications are as follows:
• Paper for a Verifone Vx510LE
• Thermal, single ply, 2.25 inches x 85 feet
• Typically comes in quantities of 12, 25 or 50 rolls
Page 60
Version: 2.0
Provider POS Device User Manual
11.1 Replacing the Paper Roll
Replacing the Paper Roll
Replacing the paper is quick and easy. It is important to remember your
POS device will not work if it runs out of paper.
Version: 2.0
Page 61
Provider POS Device User Manual
Replacing the Paper Roll:
Step
Task
1.
Press the release button located on the right-side of the POS device
near where the paper comes out. This will unlock the paper cover.
You will see a white paper roll symbol. Press the release down as
displayed in the diagram above.
2.
Push the paper cover back so it stands upright.
3.
Remove the empty paper roll core from the printer and discard.
4.
Insert a new roll of paper with the tail of the paper facing you and
the paper coming out from underneath the roll.
5.
Extend the end of the paper so it will stick out beyond the serrated
metal edge that is the paper cutter.
6.
Close the paper cover so it snaps shut.
7.
Tear off any excess paper.
Page 62
Version: 2.0
Provider POS Device User Manual
12.0 Troubleshooting Tips
Overview
You may use the tips below to help determine why the POS device is not
working properly.
• Ensure the POS device has power and the window displays
information.
• Unplug the POS device and plug it back in allowing the POS device
to reset.
• Check that the silver telephone cord is connected from the POS
device to the telephone jack. Replace the silver telephone cable if
needed.
• Does the telephone jack have a dial tone? This can be tested by
plugging a phone into the telephone jack and checking for a dial
tone. Contact the telephone company if the telephone jack does not
have a dial tone.
• Check the printer to ensure there is paper on the paper roll. Replace
the roll if the paper is low.
• Check that the printer cover is properly latched. Release the cover
and close it again.
• Check the paper roll to ensure that the paper is not jammed. Remove
the paper roll and reinsert the roll if the paper is jammed.
Please call the Xerox Provider Helpdesk at 1-877-779-1932 for assistance
if the tips above do not correct the problem. The Xerox Provider Helpdesk
is staffed with Customer Service agents from 7:00 a.m. to 7:00 p.m.
Mountain Time, 7 days a week. You may use an automated attendant
to access Troubleshooting tips during hours outside of those when a
Customer Service agent is available.
Version: 2.0
Page 63
Provider POS Device User Manual
13.0 Quick Reference Guides for Clients and Providers
Overview
CLIENTS:
A Quick Reference Guide (QRG) for Clients is included with your training
materials. The guide is a handy size (8 ½ inches by 5 ½ inches) and may
be placed next to the POS device as a quick reference for clients. One
side of the QRG is in English and the other side is in Spanish.
The QRG includes the steps clients will take to perform the most common
transactions. The a QRG provides instructions on how to perform a:
•
•
•
•
Check In
Check Out
Previous Check In
Previous Check Out
A copy of the Quick Reference Guide for Clients is also contained in
Appendix B. This is included so you always have the option to make
copies of the QRG for Clients.
PROVIDERS:
There is also a Quick Reference Guide for Providers. Your QRG contains
the steps on how to:
•
•
•
•
Print an Attendance Report
Print an Exceptions Report
Submit store and forward transactions
Void a transaction
A copy of the Quick Reference Guide for Providers is contained in
Appendix C. This is included so you have the option to make copies of
your QRG, if needed. You should keep your QRG in a secure location
because these transactions should only be performed by you or your
authorized staff. Clients may never perform the transactions displayed
on the QRG for Providers.
Page 64
Version: 2.0
Provider POS Device User Manual
14.0 Frequently Asked Questions
Overview
What happens if the client is not authorized to receive child care
benefits?
• When the transaction is complete, the POS device will print the receipt for
the child with the word DENIED. If the client disagrees with this message,
the client may try the transaction again then contact his/her local County
Department of Social/Human Services.
What if the client’s card is lost or stolen?
• The client must contact his/her local County Department of Social/Human
Services for a replacement card if either CCAP Card is lost, stolen, or
malfunctioning. Replacement cards are mailed and may not be picked up at
a County Department of Social/Human Services. It will take approximately
four (4) to six (6) business days to receive a replacement card. A replacement card will be mailed to the client’s home address. The client does not
need to PIN the replacement card.
Can the child be checked in or out on the POS device if the client does
not have his/her card with him/her?
• No, the client must wait until he/she brings his/her card and uses the
PREVIOUS CHECK IN or PREVIOUS CHECK OUT function. Instructions for
each process appear in the previous sections of this Manual.
What happens if a client forgets to check a child out?
• The client must perform a Previous Check Out within ten (10) days (day of
care plus nine (9) previous days) from the date child care was provided if a
child is not checked out.
If the client has his/her card with him/her but it is damaged and the POS
device cannot read the magnetic stripe on the back, can the child still be
checked in or out?
• No, the card must be swiped in order to record attendance. If the client’s
card is damaged he/she must contact the local County Department of Social/
Human Services to have a replacement card issued. A replacement card will
be mailed to the client’s home address.
How does the POS device work?
• The POS device contains a modem and it sends and receives information
over a land-based telephone line. Once the telephone connection is made,
the process takes approximately five (5) seconds to complete.
• Please call the Xerox Provider Helpdesk when setting up your POS
device if your phone line requires you to dial a prefix for an outgoing call
(e.g., dial an 8 or 9) or if your phone has call waiting.
Version: 2.0
Page 65
Provider POS Device User Manual
What happens if my telephone line is out of service but I have electricity?
• Clients shall still check children in and out because the information will be
stored in the POS device and will be transmitted when the POS device detects
a dial tone after periodically polling for a dial tone. You may also send any
stored transactions by using the steps described in Section 7.
What happens if I do not have electricity?
• The POS device will not work if you do not have electricity. You must keep
written sign-in/out records of the time and attendance of the children during
this period. The clients will use the Previous Check In and Previous Check Out
function to record the attendance when electricity is restored. All attendance
must be recorded in the POS device within the ten (10) day missed-swipe
period for you to receive payment.
• All information stored in the POS device will remain for a maximum of ten
(10) days until the electrical service is restored. The attendance transactions
should be transmitted to ensure timely payment when electricity is restored.
What happens if I unplug the POS device? Will attendance data be lost?
• No, information will not be lost if the POS device is unplugged. You must ensure
transactions are transmitted within ten (10) days if you have stored information
in the POS device.
What happens if my POS device does not work?
• Call the Xerox Provider Helpdesk immediately at 1-877-779-1932 for assistance. Do not attempt to repair the POS device. If you need a new POS
device, the Xerox Provider Helpdesk Customer Service agent will make
arrangements to have a replacement POS device mailed to you.
How can I get more thermal paper for my POS device?
• You may purchase the replacement paper online or from a local office supply
store. The specific type and size of paper to order is shown in Section 11.
What if I have a question about my payment?
• Contact your local County Department of Social/Human Services for all payment questions.
How do I get paid if a client doesn’t Check In or Check Out for a couple
of days and then doesn’t return to my child care facility?
• Report this problem to your local County Department of Social/Human Services.
You may submit a manual claim for adjustment, based on the manual attendance
sheet you use in your facility to show the child was in your care. County payment policies dictate if providers will be paid for manual claims. Only the county
has the ability to adjust payments. Remember it is the provider’s responsibility to
ensure that clients record attendance on a daily basis, and you may not receive
payment for care not recorded through the POS device. It is best practice to not
go beyond one day of care provided before all Previous Check Ins and Previous
Check Outs are performed by the client.
Page 66
Version: 2.0
Provider POS Device User Manual
Can I keep the client’s CCAP card so they don’t forget it?
• NO. Possession or use of a client’s CCAP Card is strictly prohibited. It will
result in the termination of the provider’s Fiscal Agreement(s), and you will
not be able to provide care for any CCAP clients in the future. Call the County
Department of Social/Human Services to report if a client accidentally leaves
a card on your premises and destroy the CCAP Card.
What should I do if I receive Store and Forward (SAF) messages on the
POS device?
• This means that the POS device is not detecting a dial tone. Check the POS
device to ensure it is securely plugged into the telephone jack and that there is
a dial tone at the jack. If you hear a dial tone but the POS device displays it is in
Store and Forward mode, call the Xerox Provider Helpdesk for assistance.
What should I do with the POS device if I decide not to participate in the
child care program?
• Contact your local County Department of Social/Human Services first to
advise the CCAP program worker you no longer wish to provide child care
assistance services. The county will process the necessary transaction to
alert Xerox to make arrangements for you to return the POS device.
How should I return the POS device if it is not functioning and needs to
be replaced?
• Refer to Section 10 for full instructions on how to get a non-functioning POS
device replaced. Xerox will enclose a pre-addressed, pre-paid return label
with the new POS device so you can mail the damaged POS device back
to Xerox at no cost to you. The instructions and label are included with the
replacement POS device. Place the damaged POS device in the box that
contained the replacement POS device, seal the box, and call FedEx to pick
up the box. The FedEx number to call is included on the instruction sheet.
I only received payment for X days but should have received payment for
Y days for a specific child.
• Contact your local County Department of Social/Human Services. All adjustments to payments are made through a manual claim process and are based
on the County Department of Social/Human Services payment policies. You
may not receive payment for care not recorded through the POS device.
I did not receive payment for child care services provided.
• Contact your local County Department of Social/Human Services. All
adjustments to payments are made through a manual claim process. You
may not receive payment for care not recorded through the POS device.
Child X checked in and out but no payment was received for child X.
• Contact your local County Department of Social/Human Services. All
adjustments to payments are made through a manual claim process.
Version: 2.0
Page 67
Provider POS Device User Manual
APPENDIX APOS DEVICE INSTALLATION DIAGRAM
This diagram is provided to assist you with installing your POS device. The
POS device must be plugged into a telephone jack and into a 3-pronged
electrical outlet. Please call the Xerox Provider Helpdesk (1-877-779-1932)
for assistance if your phone line requires you to dial a prefix for an outgoing
call (e.g., dial an 8 or 9) or if your phone has call waiting.
The silver cord must be
plugged into a telephone
jack or splitter if sharing
the telephone line.
The splitter can be inserted
into a wall jack to allow two
devices to share the same
phone line.
The black cord must be
plugged into a 3 pronged
electrical outlet.
POS Device Installation Diagram
Step 1. Plug silver telephone cord into telephone jack.
Step 2. Plug black power cord into POS device.
Step 3. Plug black power cord into electrical outlet.
Step 4. Perform communication test:
• Press “F4” from main menu
• Type provider password (123456)
• Press green ENTER key
• Press “5” for Terminal Setup
• Press “3” for Communications Test
• Check receipt for results
Version: 2.0
Page 68
Version: 2.0
Enter your four-digit PIN and press
the green Enter key.
Press “1” for Check In.
Enter the child number assigned to
the child that needs to be checked in
and press the green Enter key.
Repeat the previous step until all
children have been added. When
finished, press Enter again.
Please ENTER PIN
Attendance Type?
Enter Child #
Enter your four-digit PIN and press
the green Enter key.
Press “2” for Check Out.
Enter the child number assigned to
the child that needs to be checked
out and press the green Enter key.
Please ENTER PIN
Attendance Type?
Enter Child #
Approval, Denial or
Pending message
Swipe your CCAP Card.
SWIPE CARD to Begin
Wait for Authorization and check
receipt that the transaction has been
approved or pending for all children.
Repeat the previous step until all
children have been added. When
finished, press Enter again.
Action
POS Device Display
CHECK OUT
Wait for Authorization and check the
receipt that the transaction has been
approved or pending for all children.
Swipe your CCAP Card.
SWIPE CARD to Begin
Approval, Denial or
Pending message
Action
POS Device Display
CHECK IN
Enter the hour and minute that the
check out occurred and press the
green Enter key.
Press “1” for AM or “2” for PM.
Enter the child number assigned to
the child that needs to be checked
out and press the green Enter key.
Time: HH:MM
1-AM / 2-PM
Enter Child #
Enter the hour and minute that the
check in occurred and press the
green Enter key.
Press “1” for AM or “2” for PM.
Enter the child number assigned to
the child that needs to be checked in
and press the green Enter key.
Time: HH:MM
1-AM / 2-PM
Enter Child #
Approval, Denial or
Pending message
Wait for Authorization and check the
receipt that the transaction has been
approved or pending for all children.
Repeat the previous step until all
children have been added. When
finished, press Enter again.
Wait for Authorization and check the
receipt that the transaction has been
approved or pending for all children.
PIN Helpline for Clients:
1-877-779-1933
Approval, Denial or
Pending message
Enter the month and date when the
check out occurred and press the
green Enter key.
Date: MM/DD
Enter the month and date when
the check in occurred and press the
green Enter key.
Repeat the previous step until all
children have been added. When
finished, press Enter again.
Press “4” for Previous Check Out.
Attendance Type?
Press “3” for Previous Check In.
Date: MM/DD
Enter your four-digit PIN and press
the green Enter key.
Attendance Type?
Swipe your CCAP Card.
Enter your four-digit PIN and press
the green Enter key.
Please ENTER PIN
Please ENTER PIN
Swipe your CCAP Card.
SWIPE CARD to Begin
Action
PREVIOUS CHECK OUT
SWIPE CARD to Begin
Action
POS Device Display
POS Device Display
PREVIOUS CHECK IN
Client Functions
This guide outlines the most common functions clients will perform.
For additional assistance, ask the child care provider.
POS DEVICE QUICK REFERENCE GUIDE
for the CCCAP Attendance Reporting System
Provider POS Device User Manual
APPENDIX BQUICK REFERENCE GUIDE FOR CLIENTS
You may copy this page and place it near the POS device to give clients
some quick tips on how to perform attendance transactions. Make as many
copies as needed.
Page 69
Page 70
Provider Functions
Press“1”forAttendance.
Waitforthereporttoprintorpress
<anykey>toabortprinting.
TheAttendanceReportmaybe
generatedfor:
>anydaterangeupto14days
forthepast365days
>Allcasesorasinglecase
Reports
NOTE:Usethegreen
enterkeytomovetothe
nextfield.
AttendanceReport
todayis:MM/DD
PressF4toaccesstheProvider
Optionsmenu.
Keyinthesix-digitproviderpassword
whichis123456.Pressthegreen
Enterkey.
Press “3” forSendSAF’s.
SWIPECARDtoBegin
UserPwd:
ProviderOptions
Thestoredtransactionswilltransmitandclearthememory.Checkthe
attendancereceipttoensurealltransactionshavebeenapproved.Ifadenied
messagedisplays,theclientmustre-entertheattendancetransaction.
Action
POS Device Display
STORE AND FORWARD
Reviewwhatattendanceisshownin
reverseprintandalertclientsofthe
transactionsthatmustbecorrected.
SeePrintOptionsforAttendance
Report.
Press“1”forReports.
ProviderOptions
From:MM/DDTo:___/___
Case:________________
UserPwd:
Keyinthesix-digitprovider
passwordwhichis123456.Press
thegreenEnterkey.
UserPwd:
Note:Youmayvoidtransactionsforthedayofcareandthefollowing9calendardays.
Reviewthereceipttoensurethe
Voidwasapproved.
WaitforAuthorization.
Keyinthetransactionnumberfrom
thereceiptandpressthegreen
Enterkey.
Press“2”forVoidTranNumber.
ProviderOptions
VoidTranNumber
EnterTran#
Keyinthesix-digitproviderpasswordwhichis 123456.Pressthe
green Enterkey.
PressF4toaccesstheProvider
Optionsmenu.
Action
VOID
Reviewwhatcasesarelisted--these
caseshaveacheck-inbutare
missingacheck-out.
Waitforthereporttoprint.
KeyinthedesireddateinMM/DD
formatandpressthegreenEnter
key.
Press“2” forExceptions.
Press"1"forReports.
Keyinthesix-digitproviderpassword
whichis123456.Pressthegreen
Enterkey.
PressF4toaccesstheProvider
Optionsmenu.
Action
UserPwd:
SWIPECARDtoBegin
POS Device Display
ExceptionsReport
Date:MM/DD
Reports
ProviderOptions
SWIPECARDtoBegin
Press F4 toaccesstheProvider
Optionsmenu.
SWIPECARDtoBegin
POS Device Display
Action
EXCEPTIONS REPORT
POS Device Display
ATTENDANCE REPORT
You may copy this page for your use on how to perform the Provider
Management functions.
The Stored Transactions will Transmit and Clear the Memory.
Check the attendance receipt to ensure all transactions have been
approved. If a denied message displays, the client must re-enter the
attendance transaction.
Xerox Provider Helpdesk:
1-877-779-1932
E. Reportforadaterangeforaspecificcase:Keyinthedesired
daterange(e.g.,uptoany14dayperiodforthepast365days)
inanMM/DDformat.Pressthegreenenterkeytomovetothe
nextfield.Keyinthecasenumberandpressthegreenenter
key.Example:TorequestanAttendanceReportforthedate
rangeJune10toJune16,youwillkeyin0610intheFrom:field
andpressthegreenenterkeyandkeyin0616intheTo:field
andpressthegreenenterkey.Keyinthecasenumberand
pressthegreenenterkey.
D.Reportforaspecificcasefortoday’sdate:Pressthegreenenter
keytwicetomovetothecasenumberfield.Keyinthecase
numberandpressthegreenenterkeyorthefirstpurplekey
fromtheleft.ThewordPrintappearsabovethepurplekey.
C.Reportforadaterangeforallcases:Keyinthedesireddate
range(e.g.,uptoany14dayperiodforthepast365days)in
anMM/DDformat.Pressthegreenenterkeytomovetothe
nextfield.LeavetheCasenumberfieldblankandpressthe
firstpurplekeyfromtheleft.ThewordPrintappearsabovethe
purplekey.
A.Reportforallcasesfortoday’sdate:Pressthefirstpurplekey
fromthelefttoprintthereportfortoday’sdateforallcases.The
wordPrintappearsabovethepurplekey.Nodataentryisrequired.
B.Reportforallcasesforasingleday:KeyintheFrom:dateand
pressthegreenenterkeywhichwilladdMM/DDintheTo:field.
Pressthegreenenterkeyorpressthefirstpurplekeyfromthe
left.ThewordPrintappearsabovethepurplekey.
PRINT OPTIONS FOR
ATTENDANCE REPORT
This guide outlines the most common functions child care providers will perform. The Provider POS Device
User Manual contains more detailed information and shows all the POS device screens that will be displayed.
POS DEVICE QUICK REFERENCE GUIDE
for the CCCAP Attendance Reporting System
Provider POS Device User Manual
APPENDIX CQUICK REFERENCE GUIDE FOR PROVIDERS
Version: 2.0


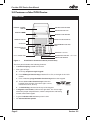
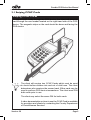
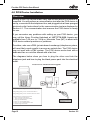
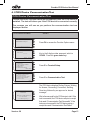
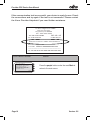

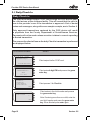

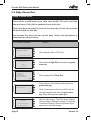


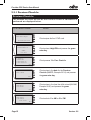

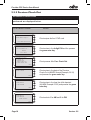


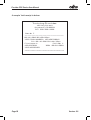


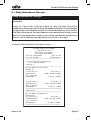


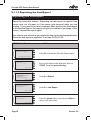
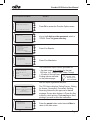
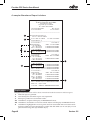
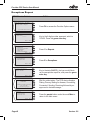

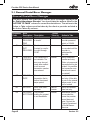
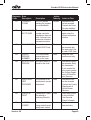
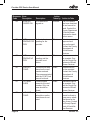

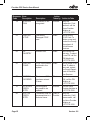
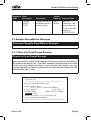


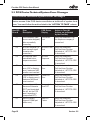
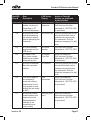


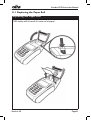


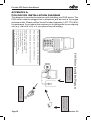


![Forms [packet] specific to Licensed Child Care](http://vs1.manualzilla.com/store/data/005750447_1-ace0dbf587046d14d311f9d21e5da3df-150x150.png)