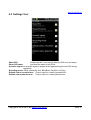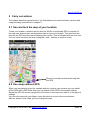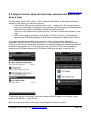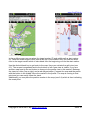
1
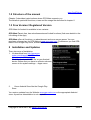
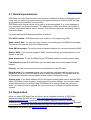
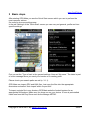
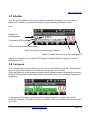
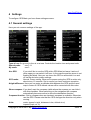
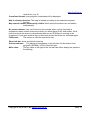
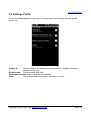
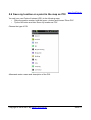
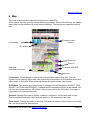
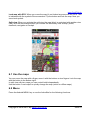
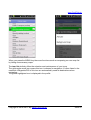
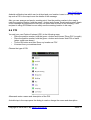
User's Manual
GPS-Mate
for
Android
V3.1.5
10/20/2012
www.gps-mate.com
1 Introduction......................................................................................................................... 1
1.1 Function overview........................................................................................................ 1
1.2 Structure of the manual................................................................................................ 3
1.3 Free Version / Registered Version............................................................................... 3
2 Installation and Updates..................................................................................................... 3
2.1 Android permissions..................................................................................................... 4
2.2 Registration.................................................................................................................. 4
3 Basic steps.......................................................................................................................... 5
3.1 Quick Start screen........................................................................................................ 6
3.1.1 Search paths..........................................................................................................6
3.1.2 Actions Map → Enter coordinates........................................................................ 7
3.1.3 Actions Tour........................................................................................................... 8
3.1.3.1 Import tour....................................................................................................... 8
3.1.3.2 Record tour..................................................................................................... 9
3.2 Outdoor Navigation.................................................................................................... 10
3.3 Info-Bar....................................................................................................................... 11
3.4 Compass..................................................................................................................... 11
4 Settings............................................................................................................................. 12
4.1 General settings......................................................................................................... 12
4.2 Settings Profile........................................................................................................... 14
4.3 Settings Tour...............................................................................................................15
5 Carry out actions............................................................................................................... 16
5.1 Use and lock the map at your location....................................................................... 16
5.2 Use maps without GPS.............................................................................................. 16
5.2.1 Measuring coordinates, altitude and slope.......................................................... 17
5.3 Save map for offline usage........................................................................................ 17
5.4 Import a track, show it in the map, measure the profile and save a map .................. 18
5.5 Send my location or a meeting point as text message.............................................. 20
5.6 Save my location or a point in the map as POI.......................................................... 21
6 Map................................................................................................................................... 22
6.1 Use the maps............................................................................................................. 23
6.2 Menu...........................................................................................................................23
6.2.1 Map, Tour, POI..................................................................................................... 24
6.2.2 Save map............................................................................................................. 26
6.2.3 Find a location..................................................................................................... 27
6.2.4 Quick Start........................................................................................................... 28
6.3 Split view.................................................................................................................... 28
6.4 Place and use the position marker............................................................................. 29
6.4.1 Tour planning ...................................................................................................... 30
6.4.2 Navigate to a point in the map............................................................................. 30
6.5 Send your location or a meeting point as text message............................................ 30
6.6 POI............................................................................................................................. 31
6.6.1 Voice notes.......................................................................................................... 32
Index................................................................................................................................... 33
Important hint
Disclaimer:
Installing this software is done at your own risk. The author is not liable for loss of data,
etc. This software is not designed to be used in life-maintaining and life-saving (e.g.
mountain rescue) environments.
www.ConfiTek.de
1 Introduction
GPS-Mate supports you with your outdoor activities such as hiking, biking,
skiing/skitouring, sailing and flying. It has many functions regarding showing, saving and
working with maps, tours and Point-Of-Interests (POIs) as well as a outdoor navigation.
GPS-Mate is optimized for tablets and very useful on smartphones. Using the split view is
particularly good on the bigger screens of tablets.
1.1 Function overview
GPS-Mate integrates a number of online maps loaded through an internet connection.
Most of these can be saved for later offline usage without internet connection. The
following table shows the currently available online maps. If you miss a particular map
please send us an email at [email protected].
Public Transport
Bing Maps (Hybrid)
OpenStreetMap
Bing Maps (Aerial)
OpenCycleMap
GoogleMaps (Road)
4UMaps
GoogleMaps (Terrain)
Outdoor Germany
GoogleMaps (Satellite)
Outdoor Austria
Finland Topo
Outdoor South Tyrol
Norway Topo2
Hike & Bike
Norway Toporaster2
Nop's Reit- & Wanderkarte Sweden Topo
Refuges Hike & MTB
UK Ordnance Survey NPE
Nokia OVI Map (Road)
TopOSM USA
Nokia OVI Map (Terrain)
New Zealand Topo
Nokia OVI Map (Satellite)
OpenSeaMap (Overlay)
Bing Maps (Road)
GoogleMaps (Marking)
Copyright © 2006-2012 by www.ConfiTek.de
Seite 1
www.ConfiTek.de
The following table gives you a first impression of the functions of GPS-Mate:
Usage at sea, in the air and at the ground
√
Position and altitude measurement via GPS
√
Compass function by compass or GPS
√
Record of own tours
√
Planning of own tours
√
Import of GPX, KML, LOC files
√
Export of GPX, KML, LOC files
√
Display of scanned maps, building and site plans,
historic maps
√
Display of third-party maps such as bsmap or
nv.digital (sea charts)
√
Display of online maps
√
Saving online maps
√
Display of offline maps
√
Send your location and meeting point via text
message
√
Find a location
√
Maintain your maps, tours and POIs
√
Altitude-/Speed-Profile (distance and time)
√
Your location within the profile
√
Outdoor navigation
√
Recording of voice notes
√
Display bearing
√
GeoCaching
√
Cockpit with day trips
√
Split-View display
√
Usage of own POI icons
√
Compatibility to ther GPS-Mate variants (PC etc.)
√
Language English
√
Language German
√
Copyright © 2006-2012 by www.ConfiTek.de
Seite 2
www.ConfiTek.de
1.2 Structure of the manual
Chapter 5 describes typical actions where GPS-Mate supports you.
The details to particular functions, views and the usage are described in chapter 6.
1.3 Free Version / Registered Version
GPS-Mate for Android is available in two variants:
GPS-Mate Free is free, has advertisements and limited functions (find more details in the
info dialog of the App).
GPS-Mate offers all functions, no advertisement and more screen space. You can
purchase a license key for GPS-Mate at www.gps-mate.com. Furthermore you find GPSMate in the Google Play Store, at AndroidPIT and other stores.
2 Installation and Updates
There two ways of installation:
1. Via download from http://www.gpsmate.com/de/produkte/GPSMate/downloadPDA.php.
Click the downloaded APK file on your Android
device. Before that you have to activate unknown
source in the system settings → Apps menu:
2.
Via an Android Store like the Google Play
Store.
You receive updates from the Website www.gps-mate.com or the appropriate Android
store. A previous deinstallation is not required.
Copyright © 2006-2012 by www.ConfiTek.de
Seite 3
www.ConfiTek.de
2.1 Android permissions
GPS-Mate has many functions and uses services of Android. Android is designed in such
a way that you have to give permission to all required services in order to install the app;
giving selective permissions is not possible.
GPS-Mate never uses a service on its own or in the background. E.g. a text message is
only send when you press the button. The adress book is only read when you choose a
contact. No personal data is sent to a server. The internet connection is primarily used to
load online maps.
For what requires GPS-Mate permissions in Android:
Fine GPS location: GPS-Mate shows your location in the maps using GPS.
Read contact data: You can send your location or a meeting point as SMS text message.
You choose the recipient from your address book.
Send SMS messages: To use the function explained above you can send a position SMS.
Receive SMS: If you receive a position SMS, it is automatically processed and the info is
shown in the map.
Read phone state: To use the SMS function GPS-Mate needs to know the phone state.
Full internet access: With GPS-Mate you can watch and store online maps from the
internet.
Storage: You can record your own tours and save them to the SD card.
Record audio: For navigating outdoor you can prepare individual spoken hints for your
waypoints. While on tour GPS-Mate is playing these automatically. The spoken hints are
an important orientation and navigation feature without looking at the map.
System tools: If you have disabled GPS in the system settings and want to activate GPS
within GPS-Mate it asks whether it should open the system settings. You can then easily
access and control your settings. Also GPS-Mate has a setting to keep the screen on
when it is running in the foreground. So you do not have to change the system settings
yourself.
2.2 Registration
Have you used GPS-Mate Free and like to use all complete functions of GPS-Mate,
please download the APK file from http://www.gps-mate.com/en/products/GPSMate/downloadPDA.php, install and run GPS-Mate. Now you require a license key
available from http://www.gps-mate.com/en/products/GPS-Mate/registration.php. By email
you receive the licese key and instructions to copy it to your Android device.
Copyright © 2006-2012 by www.ConfiTek.de
Seite 4
www.ConfiTek.de
3 Basic steps
After starting GPS-Mate you see the Quick Start screen which you use to perform the
most common actions.
It's useful to do some settings now.
In the tab 'Settings' of the 'Quick Start' screen you can carry out general, profile and tour
specific settings.
First you set the 'Type of use' in the general settings. Also set 'My name'. The latter is part
of a text message when you send your location or a meeting point.
Please check your search paths as well (s. 3.1.1).
GPS-Mate can import GPX and KML files. Just copy the files into the appropriate
directories and select 'Auto import' within 'Import tour'.
To import a single file in any directory GPS-Mate asks the Android system for an
appropriate file explorer. Make sure you have one on your device. If none is preinstalled
install one from the Play Store such as the Metago ASTRO.
Copyright © 2006-2012 by www.ConfiTek.de
Seite 5
www.ConfiTek.de
3.1 Quick Start screen
The Quick Start screens offers an overview of the most important actions and can be open
from any other screen (see chapter 6).
At the top you find the buttons to recommend GPS-Mate your friends, open this help and
send Feedback about GPS-Mate to ConfiTek.
Via the hardware key MENU or the Info (i) symbol you can read the license agreement and
the version number.
3.1.1 Search paths
GPS-Mate uses upto 9 search paths in which you store your maps, tours and POIs (s.
General settings). By default some of these search paths point to the SD card of most
devices. Possibly you may have to change these.
GPS-Mate scans these search paths when starting or when you click 'Rescan search
paths'. It finds all maps, tours and POIs in the directories and their sub directories.
You can also use the search paths to structure and maintain your files. The following
screenshot for example shows the default paths plus one Canada and Mexico. The
checkbox in front of the search path indicates that the paths is actually scanned. In this
example only additional maps and tour under Mexico are scanned and added to the lists.
Therefore the lists are more readable.
Copyright © 2006-2012 by www.ConfiTek.de
Seite 6
www.ConfiTek.de
When you copy files from the PC make sure that the target directory is part of the search
path in order to find them during the next scan.
Tip the folder icon on the right border to open a window for chosing a directory.
Tip on a directory to navigate deeper into the sub directories. Tip on the button on the top
right to navigate one level up. Clicking 'Apply' sets the chosen directory as new search
path.
3.1.2 Actions Map → Enter coordinates
Use this dialog to enter geografic, UTM or Gauß-Krüger coordinates. Entering one set of
coordinates changes the other two.
The button 'Show' centers the map at the entered coordinates.
The button 'Navigate to' makes the entered point the new navigation destination. This is
useful for geo caching.
Copyright © 2006-2012 by www.ConfiTek.de
Seite 7
www.ConfiTek.de
3.1.3 Actions Tour
3.1.3.1 Import tour
Tip on 'Import tour' in order to import GPX, KML or LOC files.
Copyright © 2006-2012 by www.ConfiTek.de
Seite 8
www.ConfiTek.de
You have two options:
1. The comfortable 'Auto import' function: Just copy your GPX files into the directory
'/sdcard/GPS-Mate/GPX' and KML files into '/sdcard/GPS-Mate/KML'. Then tip the
button 'Auto import'. All new, not yet imported tours will be imported.
If you delete imported tours later in the tourlist and the GPX or KML files are still in
the directories they will be imported again at the next Auto import.
Go to the map and open the tourlist to find all the tours.
2. Import a single file in any directory: Tip 'Open file' and the Android system suggests
some apps to open files/media content. If there's no appropriate file explorer please
install such an explorer app.
After choosing the file in the file explorer it's imported and the first point is shown in
the map.
3.1.3.2 Record tour
Tip on 'Record tour' in order to record your own tour. A filename for the tour is suggested
containing the date and time. You may change this.
The button 'New tour' starts the recording. The distance of the recorded tour so far is
shown red in the info bar. In the tour list the tour is marked with a red record icon.
The recording can be paused with 'Pause tour' and continued.
'Finish recording' stops the recording.
Copyright © 2006-2012 by www.ConfiTek.de
Seite 9
www.ConfiTek.de
3.2 Outdoor Navigation
GPS-Mate offers a navigation to locations by direction, distance and height difference.
This is useful outdoors beyond paved roads and works at any location on earth.
GPS-Mate does not calculate the fastest route or best cycle path in a civilised
environment. It rather supports you in different ways:
• Navigate you to single locations in the maps or from a POI list.
• Navigate along a tour. Automatically the next POI of the tour is determined for
navigation.
The direction to the destination is shown in the compass (visible in any screen) and in the
navigation/geo caching screen.
The distance to the destination as well as the coordinates or name of it are shown in the
info bar (visible in any screen).
The height difference is shown in the navigation/geo caching screen.
The roadbook shows all destination POI of the selected tour. You find the POI icon to the
left, the name in the middle and on the right the distance from your current location. The
current destination is highlighted in green and the list is scrolled automatically.
The navigation is switched on when selecting a target in the map or when selecting a tour.
In the map screen you can switch it off and on using the Go! button (see 6).
Copyright © 2006-2012 by www.ConfiTek.de
Seite 10
www.ConfiTek.de
3.3 Info-Bar
The info bar is available in any screen and can be shown on the top. For more screen
space you can hide it (via general settings) or when activating fullscreen mode.
Info:
Number of
used satellites
(Corrected) GPS height
GPS or position marker coordinates
Measured (black) or recorded (red) distance
Speed ('?' when unknown) or course over ground
Values in red mean that no reliable GPS signal is available and the values are the last
determined ones.
3.4 Compass
The compass can be shown above the main screen und below the info bar. The compass
points to your viewing direction with the two orange lines in the middle.
When navigation is on the compass shows a green flashing needle indicating the direction
to the next destination. Is the needle right in the middle you're moving directly towards the
destination.
In the general settings you can choose the 'compass function' to either use a built-in
electronic compass or the GPS. Please note that the GPS only updates the direction when
you move.
Copyright © 2006-2012 by www.ConfiTek.de
Seite 11
www.ConfiTek.de
4 Settings
To configure GPS-Mate you have three settings screens.
4.1 General settings
Here you set common settings of the app.
Type of use: On ground, in the air or at sea. Controls the location icon and preset units.
Search paths:
see 3.1.1
My name:
see 3
Use GPS:
If you don't like to use the GPS wihtin GPS-Mate but leave it active of
other apps you can switch it off here. In the map the position arrow is not
flashing but black. Also you can leave the GPS on and switch it on and
off via the device's system settings.
GPS mode:
Normal, Power saving. When set to power saving the GPS is active only
about every 15 seconds. Set to normal you have continous reception.
Height difference: Here you can enter an altitude delta between the GPS and the used
map in meter. All GPS altitude values will be corrected with this value.
Show compass: If you don't want the compass visible above the screens you can hide it
with this checkbox. When switching on the navigation the compass
automatically becomes active to show the destination direction.
Compass function: Set to compass when an electronic compass is available. Otherwise
use the GPS. Please note that the GPS changes the direction only when
moving.
Units:
metric (speed in kp/h, distances in km, altitude in m)
imperial (mph, mi, ft)
Copyright © 2006-2012 by www.ConfiTek.de
Seite 12
www.ConfiTek.de
nautical (kn, nm, ft)
Coordinate format: how geografic coordinates will be displayed.
Map in viewing direction: The map is rotated according to the selected compass
function.
Map control buttons permanently visible: When active the buttons are not hidden
automatically.
No screen timeout: very useful function for example when cycling. Normally a
smartphone has a screen timeout set which you would have to dis- and enable. If this
funtion is active the timeout is deactivated as soon as GPS-Mate is running in the
foreground. If you open another app or the home screen the timeout is activated again.
Fullscreen:
The screen is used the maximum way.
Show info bar: show and hide the info bar.
Grid coordinatec: The display of coordinates in the info bar can be chosen from
geografic (WGS84), UTM to Gauß-Krüger.
Main value:
The big value to the right in the info bar can either display the speed or
the bearing.
Copyright © 2006-2012 by www.ConfiTek.de
Seite 13
www.ConfiTek.de
4.2 Settings Profile
These are settings specific to the profile. You can open these settings from the profile
screen too.
Scaling X:
Choose whether the altitude and speed profile is displayed along the
distance or the time.
Relative time: The time starts with 0:00.
Show speed profile: Show or hide the speed profile
Units:
The units the app uses: metric, imperial or nautical.
Copyright © 2006-2012 by www.ConfiTek.de
Seite 14
www.ConfiTek.de
4.3 Settings Tour
Show POI:
Deactivate this if you want to hide the POI icon and name.
Show POI name:
Just hide the name of the POIs.
Acoustic signal: an acoustic signal is played when approaching the next POI during
navigation.
Recoding mode: Either choose By foot, Bike/Boat, Car/train or Flying.
Default colour recorded tour: Colour used for a newly recorded tour.
Default colour planned tour: Colour used for a newly planned tour.
Copyright © 2006-2012 by www.ConfiTek.de
Seite 15
www.ConfiTek.de
5 Carry out actions
The chapter describes typical actions. You find details to the used functions, screens and
usage including screenshots in chapter 6.
5.1 Use and lock the map at your location
To see your location a location service such as WLAN or perferrably GPS is required. In
the map view tip the button on the bottom right to show your location. This also locks the
map the the GPS and the map is following your motion. This is indicated with the lock icon.
You can scroll and zoom the map (using the + and – buttons or pinch to zoom).
Show your location and lock the map with
the GPS
5.2 Use maps without GPS
When you are planning a tour for example and don't require your location you can switch
off the GPS within GPS-Mate. Also you can switch off the GPS in the system settings.
Switch the GPS off and on using the the Go! button in the map view (see 6) or the general
settings.
You move the map with your finger, zoom with pinch-to-zoom or the zoom buttons.
With the button 'Local maps' you can change the map.
Copyright © 2006-2012 by www.ConfiTek.de
Seite 16
www.ConfiTek.de
5.2.1 Measuring coordinates, altitude and slope
Within the map you can place and move the position marker (see 6.4). The coordinates
and altitude of the point in the middle of the marker are shown in the info bar.
If you then tip another point in the map the marker draws a line between the two points. If
you place the two points on contour lines you can measure the slope in between. You
enter the height difference of the contour lines in meter by long pressing the green +
button and choose 'enter height difference'. Above the position marker three values are
shown: to the left is the bearing from previous to the last point, the distance (in the chosen
units) between them in the middle and to the right the slope angle in degrees and percent.
5.3 Save map for offline usage
With an internet connection you choose an online map via MENU → map or the button
'Local maps' (see 6). Check whether it's possible to save this map by clicking MENU →
Save map. The button must not be greyed out.
Now move and zoom the map to the appropriate area. When zooming you find the zoom
level value in the scale bar on the bottom. It's the number between 0 and 20. A higher
number means more detail.
Click on MENU → Save map, enter a name and the zoom levels. If the screen covers a
big map area and you choose high zoom levels saving the map may take a while.
Copyright © 2006-2012 by www.ConfiTek.de
Seite 17
www.ConfiTek.de
5.4 Import a track, show it in the map, measure the profile and
save a map
You can easily import GPX, KML or LOC tracks into GPS-Mate. Is the track file already
stored on your device you have two options:
1. In the 'Quick Start' screen choose Actions tour → Import tour. The Android system
offers you some apps to choose a file or content. If no file explorer is offered please
install one such as the free Metago ASTRO or ES file explorer.
Then tip on the explorer and choose the file. The track is imported and show in the
map.
2. Wihin a file explorer just tip the GPX, KML or LOC file. The file is automatically
opened with GPS-Mate respective GPS-Mate is offered as an app to open the file.
If you are looking for an outdoor tour you can search via a tour portal. Some are
accessible from GPS-Mate. Tip on Actions tour → Tour provider in 'Quick Start' screen.
Find the tour in the tour portal and download it. Once the download is finished the Android
notification bar informs you. Pull it down and click on the file. The file is automatically
opened with GPS-Mate respective GPS-Mate is offered as an app to open the file.
To discover the tour in the map, zoom and choose different maps via the button 'Local
maps' or the MENU → map (see 6).
Now tip on the blue button to the right and change the screen to 'profile'.
Copyright © 2006-2012 by www.ConfiTek.de
Seite 18
www.ConfiTek.de
In the profile screen you can place the target marker (Z) and additionally a start marker
(S). Read the exact height of this point at the top of the marker. Also you find tour data
next to the target marker which is calculated from the beginning or from the start marker.
Use the Android back key to get back to the map. Here you activate the split view (see
6.3). The screen is separated and to the bottom or left a new view is visible. If you see
another map here tip the red button to change to the profile view in this section. Between
the views is a blue (top or right) and a red magnet stripe. Connect the map and the profile
with the button in the middle. Move the marker in the profile. The map is moving to that
point and you can easily follow the track.
Additionally you can place the position marker in the map (see 6.4) which is then indicating
the exact point.
Copyright © 2006-2012 by www.ConfiTek.de
Seite 19
www.ConfiTek.de
Hint:
Choose the fullscreen mode for more screen real estate. For this tip the Go! button in the
map and choose 'fullscreen ON'.
You can now analyse the tour and prepare it. Choose different maps to find the most
appropriate for you activity. To save battery on tour and avoid missing or bad cellular
reception save the map in advance (see 6.2.2).
5.5 Send my location or a meeting point as text message
You can easily send your location to your friends but also to emergency services by text
message. Tip the Go! button in the map and choose 'Send my location'. Then choose a
recipient form your address book.
The text message is composed with your name (see general settings), the coordinates,
the altitude, date and time and a short text. You can enter the text or choose from a few
fixed messages. Is the recipient also using GPS-Mate, he receives a notification in the
Android notification bar which can be clicked and your location is shown in the map.
Double tap such a POI in the map to see the details of the message.
Also you can arrange and send a meeting point. Use the position marker in the map to
mark the meeting location, hold the green + button and choose 'Send meeting point'. Again
a text message is composed but now you can enter date and time of the meeting. If the
recipient is using GPS-Mate he can easily see the meeting location in his map.
Copyright © 2006-2012 by www.ConfiTek.de
Seite 20
www.ConfiTek.de
5.6 Save my location or a point in the map as POI
You add your own Points-of-Interest (POI) in the following ways:
• Place the position marker, hold the green + button and choose 'Place POI'
• Tip the Go! button and then 'Save my location as POI'.
Choose the type of POI:
Afterwards enter a name and description of the POI.
Copyright © 2006-2012 by www.ConfiTek.de
Seite 21
www.ConfiTek.de
6 Map
The map view shows the map and on top the tours and POIs.
When you tip the map view the control buttons are shown. After 4 seconds they are hidden
again (this can be switched off in the general settings). The buttons are used the follwing
way:
Change to next
screen
Local maps
Go! button
Zoom out
Zoom in
Scale bar
units and zoom level
Lock map with GPS
split view
Local maps: Tip this button to open a list of all available maps in this area. The first
number is the currently active amp, the second the total number of all available online and
offline maps in this area. When zooming and scrolling this number can change.
Go! button: This button gives you access to settings such as 'Navigation ON/OFF', 'GPS
ON/OFF' and 'Fullscreen EIN/AUS'. Furthermore the important actions can be started. You
can lock the touchscreen for GPS-Mate. Is the screen locked the Go! button is orange. A
long press on it unlocks the screen.
Screens: Change from map to profile, roadbook, navigation, cockpit and back to map.
This is possible in the main view (blue) as well as in the secondary view (red).
Zoom in/out: Change the scale of the map. The scale is shown on the bottom in the scale
bar. Use two fingers for zooming too.
Copyright © 2006-2012 by www.ConfiTek.de
Seite 22
www.ConfiTek.de
Lock map with GPS: When you move the map it's not locked anymore with the GPS. This
is indicated with the symbol of the screenshot. Tip the button and lock the map. Now you
see a lock symbol.
Split view: When you activate the split view the map (blue) is combined with another view
(red). With the red change button you choose the secondary view as map, profile,
roadbook, navigation or cockpit.
6.1 Use the maps
You can move the map with a finger, zoom it with the buttons or two fingers. Lock the map
with the button to the bottom right.
In split view with two maps you can control both independently.
Use the button 'Local maps' to quickly change the map (online or offline maps).
6.2 Menu
Press the Android MENU key or use the ActionBar for the following functions.
Copyright © 2006-2012 by www.ConfiTek.de
Seite 23
www.ConfiTek.de
6.2.1 Map, Tour, POI
These three menus open the appropriate list. The lists are structured in a two-level
hierarchy: The top level corresponds to the search path where the maps, tour or POIS of
the second level were found.
In the map list the active map is highlighted in green and has an eye icon indicating it's
visible. The checkbox behind the map name indicates whether this map is used for a
number of map functions. E.g. when scrolling offline maps a neighbouring map is
automatically loaded if the checkbox is ticked. Otherwise it's ignored.
The icons below the eye means that this is a backgorund map and the outline of other
maps are show on top of it. This is particular useful for overview maps.
A short tip on the map name activates the map and displays it in the map view.
A long tip opens a context menu with more options.
Copyright © 2006-2012 by www.ConfiTek.de
Seite 24
www.ConfiTek.de
When you press the MENU key there are functions such as composing our own map list
by hiding unneccessary maps.
The tour list similarly offers the selection and maintenance of your tours.
The right-angle arrow icon means this tour is chosen for navigation. It's then listed in the
roadbook. Waypoints/POI of this tour are automatically used as destinations when
navigating.
The green highlighted tour is displayed in the profile.
Copyright © 2006-2012 by www.ConfiTek.de
Seite 25
www.ConfiTek.de
A short tip on the tour name shows a list of al POIs when available.
A long press and selection of 'Show in map' shows the beginning of the tour in the map.
You can delete or rename a tour. You can export it as GPX, KML and LOC file. Also you
can change the track color.
When you press MENU or 'Open' you can import a new GPX, KML or LOC file.
The POI list is very similar to the tour list. You have the option to import a contact from
your adress book as POI.
6.2.2 Save map
Tipping 'Save map' saves the currently visible region of the active map for the zoom levels
you enter. Some online maps and the already saved offline can not be saved. The button
is then greyed out.
Copyright © 2006-2012 by www.ConfiTek.de
Seite 26
www.ConfiTek.de
Enter a name and the zoom levels for the map.
6.2.3 Find a location
This functions supports you to find a location in the map.
Copyright © 2006-2012 by www.ConfiTek.de
Seite 27
www.ConfiTek.de
6.2.4 Quick Start
'Quick Start' opens the Quick Start screen where you can change settings for example.
6.3 Split view
A simple tip on the button 'Split view' activates or deactivates the split view. In split view
the blue main view is combined with a second red view. This view can also be changed
with the red button. This way you can combine a map with a second map, the profile, the
roadbook, the navigation or the cockpit.
Between the two views is a blue and red magnet stripe and a button.
The strips indicate the behaviour of the two views:
• If the stripes don't touch each other both views are independent.
• If the stripes touch a bit a location is shown in both views. E.g. with two maps the
center is always the same location. In profile the maps shows the position of the
profile marker.
• (only for two maps) If the stripes touch more closely the two maps also have the
same zoom level.
One of the two views is active indicated by a orange frame. For the active view the title is
shown at the top and its menu is active.
Copyright © 2006-2012 by www.ConfiTek.de
Seite 28
www.ConfiTek.de
6.4 Place and use the position marker
The position marker is an important tool in the map view. With it you can determine
coordinates and altitude, measure distances along an arbitrary path and plan your own
tours.
Back/Delete
Close
Functions
Move
Activate the position marker by a normal, not too short tip in the map. With the blue button
on the bottom right you can move the marker.
Hint:
You do not have to hit the buttons exactly. Just tip within the right quarter of the complete
position marker.
The coordinates shown in the info bar or the tour points always refer to the little cross right
in the center of the marker. A short tip adds new tour points (also in the area covered by
the marker). You can move tour points afterwards. Therefore grab a point with the magnet
function and move it.
The + buttons also adds new tour point between existing ones. The green back button
either deletes the selected tour point or the last one.
Copyright © 2006-2012 by www.ConfiTek.de
Seite 29
www.ConfiTek.de
The info bar shows the total length of the path in the black field in the selected units. At the
position marker you find the bearing, distance and slope from the previous point (see
above).
6.4.1 Tour planning
Draw a path as described above. Hold the green + button long and add a POI or save the
path as a tour.
Press the close button to delete the path with or without saving it.
6.4.2 Navigate to a point in the map
Mark a point in the map with the position marker, hold the green + button long and choose
'Navigate to' (see above). The point is marked with the destination flag.
6.5 Send your location or a meeting point as text message
You can easily send your location to your friends but also to emergency services by text
message. Tip the Go! button in the map and choose 'Send my location'. Then choose a
recipient from your address book.
The text message is composed with your name (see general settings), the coordinates,
the altitude, date and time and a short text. You can enter the text or choose from a few
fixed messages. Is the recipient also using GPS-Mate, he receives a notification in the
Copyright © 2006-2012 by www.ConfiTek.de
Seite 30
www.ConfiTek.de
Android notification bar which can be clicked and your location is swn in the map. Double
tap such a POI in the map to see the details of the message.
Also you can arrange and send a meeting point. Use the position marker in the map to
mark the meeting location, hold the green + button and choose 'Send meeting point'. Again
a text message is composed but now you can enter date and time of the meeting. If the
recipient is using GPS-Mate he can easily see the meeting location in his map.
6.6 POI
You add your own Points-of-Interest (POI) in the following ways:
• Place the position marker, hold the green + button and choose 'Place POI' (no path)
• Place the position marker, hold the green + button and choose 'Add POI on track'
(when a path was drawn)
• Tip the Go! button and then 'Save my location as POI'.
• A contact from your address book
Choose the type of POI:
Afterwards enter a name and description of the POI.
A double tap in the map opens the dialog to read or change the name and description.
Copyright © 2006-2012 by www.ConfiTek.de
Seite 31
www.ConfiTek.de
6.6.1 Voice notes
Apart from the name and description you can also record a voice note. Tip the red record
button to start and stop recording. The button to the right deletes the recording.
If this POI is part of the current navigation list the voice note is played when approaching
the POI.
Copyright © 2006-2012 by www.ConfiTek.de
Seite 32
www.ConfiTek.de
Index
Bing Maps.............................................................................................................................. 1
Compass.............................................................................................................................. 11
Export..................................................................................................................................... 2
GeoCaching........................................................................................................................... 2
GoogleMaps...........................................................................................................................1
GPX............................................................................................................... 2, 5, 8, 9, 18, 26
GPX files into the directory ................................................................................................... 9
Import................................................................................................................... 2, 5, 8, 9, 18
Import tour..............................................................................................................................8
KML................................................................................................................2, 5, 8, 9, 18, 26
KML files into..........................................................................................................................9
LOC........................................................................................................................2, 8, 18, 26
Local maps...................................................................................................16, 17, 18, 22, 23
Lock map with...................................................................................................................... 23
Map.............................................................................................................. 1, 2, 7, 13, 22, 24
Map, Tour, POI..................................................................................................................... 24
Navigation.................................................................................................................. 2, 10, 22
nv.digital................................................................................................................................. 2
OpenCycleMap...................................................................................................................... 1
OpenSeaMap......................................................................................................................... 1
OpenStreetMap......................................................................................................................1
Planning................................................................................................................................. 2
POI............................................................................ 2, 10, 15, 20, 21, 24, 25, 26, 30, 31, 32
Profile............................................................................................................................... 2, 14
Record tour............................................................................................................................ 9
Scale bar.............................................................................................................................. 22
Show POI............................................................................................................................. 15
Split view.................................................................................................................... 2, 23, 28
Tour............................................................................................................ 2, 8, 15, 18, 24, 30
Units............................................................................................................................... 12, 14
Zoom.................................................................................................................................... 22
Copyright © 2006-2012 by www.ConfiTek.de
Seite 33