1
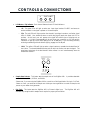
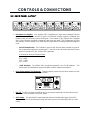
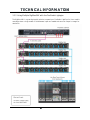
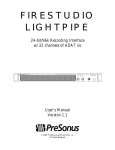
DIGIMAX 96K 8 Channel Preamplifier with Dual Domain Limiters and Digital Outputs User’s Manual Version 2.0 © 2007, PreSonus Audio Electronics, Inc. All Rights Reserved. PRESONUS LIMITED WARRANTY PreSonus Audio Electronics Inc. warrants this product to be free of defects in material and workmanship for a period of one year from the date of original retail purchase. This warranty is enforceable only by the original retail purchaser. To be protected by this warranty, the purchaser must complete and return the enclosed warranty card within 14 days of purchase. During the warranty period PreSonus shall, at its sole and absolute option, either repair or replace, free of charge, any product that proves to be defective on inspection by PreSonus or its authorized service representative. To obtain warranty service, the purchaser must first call or write PreSonus at the address and telephone number printed below to obtain a Return Authorization Number and instructions of where to return the unit for service. All inquiries must be accompanied by a description of the problem. All authorized returns must be sent to the PreSonus repair facility postage prepaid, insured and properly packaged. PreSonus reserves the right to update any unit returned for repair. PreSonus reserves the right to change or improve the design of the product at any time without prior notice. This warranty does not cover claims for damage due to abuse, neglect, alteration or attempted repair by unauthorized personnel, and is limited to failures arising during normal use that are due to defects in material or workmanship in the product. Any implied warranties, including implied warranties of merchantability and fitness for a particular purpose, are limited in duration to the length of this limited warranty. Some states do not allow limitations on how long an implied warranty lasts, so the above limitation may not apply to you. In no event will PreSonus be liable for incidental, consequential or other damages resulting from the breach of any express or implied warranty, including, among other things, damage to property, damage based on inconvenience or on loss of use of the product, and, to the extent permitted by law, damages for personal injury. Some states do not allow the exclusion of limitation of incidental or consequential damages, so the above limitation or exclusion may not apply to you. This warranty gives you specific legal rights, and you may also have other rights, which vary from state to state. This warranty only applies to products sold and used in the United States of America. For warranty information in all other countries please refer to your local distributor. PreSonus Audio Electronics, Inc. 7257 Florida Blvd. Baton Rouge, LA 70806 www.PreSonus.com © 2007, PreSonus Audio Electronics, Inc. All Rights Reserved. TABLE OF CONTENTS 1 OVERVIEW 1.1 Introduction ........................................................................................................................................... 3 1.2 Features ................................................................................................................................................ 4 1.3 What is in the Box ................................................................................................................................. 5 2 CONTROLS & CONNECTIONS 2.1 Front Panel Layout ................................................................................................................................ 6 2.2 Back Panel Layout ................................................................................................................................. 8 3 OPERATION 3.1 Microphones ........................................................................................................................................ 10 3.1.1 Condenser .................................................................................................................................... 10 3.1.2 Dynamic ...................................................................................................................................... 10 3.2 Digital Connections and Synchronization .............................................................................................. 11 3.2.1 ADAT Optical Lightpipe ............................................................................................................... 11 3.2.2 BNC Sync .................................................................................................................................... 11 3.2.3 Master/Slave and Multiple Digital Devices .................................................................................... 11 3.2.4 Setting up your DAW Software .................................................................................................... 12 3.3 A Brief Tutorial on Dynamics Processing ................................................................................................ 13 3.3.1 Common Questions Regarding Dynamics ......................................................................................... 13 3.3.2 Types of Dynamics Processing ........................................................................................................ 14 3.3.3 Vocabulary of Dynamics Processors................................................................................................ 16 3.3 Sample Hook up Diagrams ................................................................................................................... 18 3.3.1 Using the DigiMax 96K with ProTools ......................................................................................... 18 3.3.2 Using multiple DigiMax 96K with the FireStudio LightPipe .......................................................... 19 4 TECHNICAL INFORMATION 4.1 Specifications ....................................................................................................................................... 20 OVERVIEW 1.1 INTRODUCTION Thank you for purchasing the PreSonus DigiMax 96K. PreSonus Audio Electronics has designed the DigiMax 96K utilizing high-grade components to ensure optimum performance that will last a lifetime. The DigiMax 96K is an eight-channel microphone preamplifier, with 24 bit ADAT lightpipe output, (4) stereo RCA SPDIF Digital Outputs (Unit ships in AES/EBU mode, breakout cable not included), and BNC word clock I/O for digital sync. Loaded with 8 direct outputs, individual channel input metering and -20 dB pads on every channel, the DigiMax 96K is the perfect hardware expansion for your FireStudio LightPipe, FireStudio 26x26, or any digital recording system with optical Lightpipe expansion capability including Digidesign’s HD and 003 systems, RME, Yamaha, Alesis, Mackie and many others. We encourage you to contact us at 225-216-7887 or at [email protected] with any questions or comments you may have regarding your PreSonus DigiMax 96K. PreSonus Audio Electronics is committed to constant product improvement, and we value your suggestions highly. We believe the best way to achieve our goal of constant product improvement is by listening to the real experts, our valued customers. We appreciate the support you have shown us through the purchase of this product. We suggest you use this manual to familiarize yourself with the features, applications and correct connection procedure for your DigiMax 96K before trying to connect it to your recording system. This will hopefully alleviate any unforeseen issues that you may encounter during installation and set up. Please pay close attention when connecting your DigiMax 96K to your system. Bad cables and improper grounding are the most common causes of problems encountered in recording and live P. A. environments. We recommend checking your cables, connections and grounding if you experience any noise or sonic performance problems. Thank you, once again, for buying our product, and we hope you enjoy your DigiMax 96K! 3 | PreSonus 2007 OVERVIEW 1.2 FEATURES The DigiMax 96K is high quality eight-channel preamplifier with analog to digital conversion, perfect for expanding an audio interface or digital mixer with ADAT input or upgrading the preamps on an analog console. Hand built in Baton Rouge, Louisiana, the DigiMax 96K comes complete with eight high-quality PreSonus microphone preamps, ADAT output, BNC word clock input, as well as input metering, direct analog output and -20 dB pads on every channel. Each preamp is a Class A Discrete Input Buffer followed by a dual-servo gain stage giving you 60db of preamp gain with 52db of headroom. The DigiMax 96k is electronically balanced and features phase reverse on the first two channels, as well as a 20dB pad and selectable 48v phantom power on each channel. A unique feature is EQ Enhance™ which contours the EQ curve -4dB centered at 1k from 250Hz to 5kHz. This is especially helpful on drum overheads and other sources to bring out definition and notch out problem frequencies. Summary of features 44.1, 48, 88.2 and 96kHz Sample Rates Ultra-Wide Dynamic Range Low-Noise Operating Levels Dual-Domain Limiter on Every Channel EQ Enhance on Every Channel -20dB Pad on Every Channel 48V Phantom Power on Every Channel Instrument Input on Channels One and Two Phase Reverse on Channels One and Two Eight 24-bit ADC Converters ADAT Lightpipe Output S/PDIF Outputs AES/EBU Outputs 1/4” TRS Balanced Analog Outputs BNC Word Clock I/O for Sync 4 | PreSonus 2007 OVERVIEW 1.3 WHAT IS IN THE BOX Your DigiMax 96K package contains the following: DigiMax 96K Eight-channel microphone preamplifier Custom built external power supply PreSonus Warranty Card 5 | PreSonus 2007 CONTROLS & CONNECTIONS 2.1 FRONT PANEL LAYOUT Instrument Inputs (Channels 1 and 2). The ¼” TS connector on channels 1 and 2 are for use with an instrument (guitar, bass, etc.). When an instrument is plugged into the instrument input, the microphone preamp is bypassed, and the DigiMax 96K becomes an active instrument preamplifier. NOTE: Active instruments are those that have an internal preamp or a line level output. Active instruments should be plugged into a line input rather than into an instrument input. Plugging a line level source into the instrument inputs on the front of the DigiMax 96K not only risks damage to these inputs but also results in a very loud and often distorted audio signal. (In other words, don’t plug a line level source into the front panel jacks of channel 1 or 2.) Phase Reverse Switch (Channels 1 and 2). Push this button to invert the phase of the selected Channel’s signal by 180°. The button will illuminate indicating that the phase inversion is in operation. The Phase Inversion button can be used to correct audio signals that are out of phase and cancelling each other out. Phase inversion is only available on channels 1&2. -20 dB Pad. These buttons attenuate the input signal on each channel by 20 dB. The pad can be used to keep a hot signal from overdriving the microphone preamp. Enhance. This button engages the EQ Enhancement feature which attenuates the input signal by 3dB between 250 Hz and 5 kHz. This has a smoothing effect on mid-range heavy signals providing a flatter frequency response characteristic. Dual Concentric Control. These knobs adjust each channel’s gain (inner control) and select the threshold for the limiter (Outer)` o Gain. The inner concentric controls provide 60dB of gain to the processed signal. The amplifier has an inherent gain of 12dB delivering a total gain of 72dB. o Limiter Threshold. The outer concentric control sets the Threshold of the Dual Domain Limiter ranging from 0 to +24dB. 6 | PreSonus 2007 CONTROLS & CONNECTIONS -20 CLIP LIMIT LED Meters / Clip Indicator. Each channel features three LED level indicators. o -20. The green LEDs will light up when your input signal reaches -20 dBFS and serves to monitor whether or not signal is present on a channel output. o Clip. The red LEDs will light up when the channel’s input signal reaches a pre-limiter signal level of +24dB. Care should be taken to avoid using signal levels that cause this LED to activate. At this level, your mic preamp trim signal will exhibit signs of clipping such as distortion. It is highly recommended you do not allow your converters to clip (the red clip indicators to light up) as the sound quality will not be desirable. If you are having difficulty achieving a useable signal level without clipping, engage the -20 dB pad. o Limit. The yellow LEDs will light up when a signal reaches or exceeds the threshold level of the Limiter. The threshold determines the point at which the limiter acts upon the signal. The proprietary technology of the dual domain limiter allows it to act instantaneously when the threshold is reached. SAMPLE EX T. RATE CLOCK 44.1k 48k x2 88.2k 96k Sample Rate Selector. This button sets the sample rate of the DigiMax 96k. It provides selectable rates of 44.1kHz, 48kHz, 88.2kHz, and 96kHz. Please note: If you are using the DigiMax 96K to record into a DAW application like Logic, ProTools, Cubase or Sonar, you must set the sample rate inside your host application to match the sample rate you set on your master clock generator. Ext Clock. This button sets the DigiMax 96K to External digital sync. The DigiMax 96k will automatically recognize which sample rate is require for proper synchronization. 7 | PreSonus 2007 CONTROLS & CONNECTIONS 2.2 BACK PANEL LAYOUT CHANNEL 7 CHANNEL 8 OUTPUT MIC. IN +48V CHANNEL 6 OUTPUT MIC. IN +48V CHANNEL 5 OUTPUT MIC. IN +48V OUTPUT OUTPUT MIC. IN CHANNEL 3 CHANNEL 4 +48V MIC. IN +48V CHANNEL 2 OUTPUT MIC. IN +48V CHANNEL 1 OUTPUT MIC. IN +48V OUTPUT MIC. IN +48V Microphone Pre-Amplifier. Your DigiMax 96K is equipped with eight custom designed PreSonus microphone preamplifiers for use with all types of microphones including Dynamics, Condensers and Ribbons as well as instruments and line level signals. Each channel of your DigiMax 96k is equipped with a Class A discrete input buffer followed by a dual servo gain stage. This provides ultra low noise and wide gain control allowing you to boost desirable signal without increasing unwanted background noise. o 48 Volt Phantom Power. The FireStudio Project has 48V Phantom power available in groups of two via push button switches on the back panel. From right to left, each button activates Phantom power for channels 1&2, 3&4, 5&6 and 7&8 respectively. XLR connector wiring for Phantom Power Pin 1 = GND Pin 2 = +48V Pin 3 = +48V o +52dB Headroom. The DigiMax 96K microphone preamplifier has +52 dB headroom. This feature gives you wide dynamic range and excellent transient response characteristics. Direct Analog Outputs (TRS Balanced). These are general purpose line-level direct outputs for each input channel. They are post gain and pre-converter. DIGIMAX WORD OUT CLOCK adat IN Digital Out S/PDIF - AES/EBU POWER BNC I/O. The BNC I/O allows the DigiMax 96K to be connected and slaved to an external word clock generator or act as the master clock of your system. ADAT Output. This optical ADAT output sends eight channels of digital audio output (24 bit 44.1 / 48kHz). Word clock is also being sent through this output so you can use the DigiMax 96K as a clock master. 8 | PreSonus 2007 CONTROLS & CONNECTIONS Digital Output Connector. The DB9 connector on the rear panel of the DigiMax 96k provides 24 bit digital output at up to 96kHz. This connector comes configured from PreSonus for AES/EBU output (4 pair stereo) when used with the optional DMAX007 cable. An optional S/PDIF cable (DMAX006) is also available. The use of the S/PDIF breakout cable requires reconfiguring the jumpers on the output card of the DigiMax 96k. While this is a very simple procedure, care must always be taken when opening the chassis of your DigiMax 96k. A diagram and complete instructions for this procedure are included with the DMAX006 cable. Both the DMAX007 and DMAX006 cables can be purchased either from an authorized PreSonus dealer or from the PreSonus webstore: http://webstore.presonus.com/ Power Adaptor Input. This is where you plug the provided external power supply into the DigiMax 96K. 9 | PreSonus 2007 TECHNICAL INFORMATION 3.1 MICROPHONES The DigiMax 96K works with all standard microphones including dynamic, ribbon and condenser microphones. 3.1.1 Condenser Condenser microphones tend to generate a high-quality audio signal and are one of the most popular mic choices for today’s studio recording applications. Because of their design technology, condenser microphones require a power source, which can be provided from a small battery, external power supply or from microphone inputs as phantom power. The DigiMax 96K sends phantom power over XLR inputs only. 3.1.2 Dynamic Dynamic microphones are possibly the most widely used microphone type – especially in live shows and when recording loud source signals such as guitar amplifiers and kick drums. They are usually less expensive than condenser and ribbon microphones, resistant to physical damage and typically handle high sound pressure levels (SPL) very well. Unlike condenser microphones, dynamic microphones do not require a power source. In the vast majority of cases, phantom power will have no effect on a dynamic microphone’s audio quality or sensitivity and will not damage the microphone. You should consult your microphone’s documentation to confirm. Dynamic microphones, especially ribbon microphones, tend to generate low output voltages, so they typically need more preamp gain than a condenser microphone. Ribbon Ribbon microphones are a special type of dynamic microphone and get their name from the thin metal ribbon used in their design. Ribbon microphones have very high quality sound reproduction qualities – especially higher frequencies sounds. However, they are very fragile and typically cannot handle high SPL’s. The most important thing to note about Ribbon microphones is that nearly all Ribbon Microphones do not require phantom power. PLEASE NOTE: unless a Ribbon microphone calls specifically for phantom power, sending phantom power to a ribbon microphone will severely damage it – usually beyond repair. Regardless of the microphone type you are using, we recommend reading your microphone’s user’s manual thoroughly before engaging phantom power or if any other usage questions may arise. 10 | PreSonus 2007 TECHNICAL INFORMATION 3.2 DIGITAL CONNECTIONS AND SYNCRONIZATION 3.2.1 ADAT Optical Lightpipe ADAT is an industry standard abbreviation for the ADAT Lightpipe protocol, which transfers eight tracks in a single fiber optic cable. Supported sample rates are 44.1 kHz and 48 kHz. When you are utilizing the eight DigiMax 96K preamplifiers and converting to the digital optical output, connect one ADAT optical cable from the ADAT output on the back of the DigiMax 96K to the ADAT optical input on your digital audio interface, workstation or digital mixer. To synchronize your system to the DigiMax 96K’s internal clock, set your other device to receive external word clock via its ADAT optical input. You may need to consult your device’s user manual for instructions on how to do so. 3.2.2 BNC Sync and Word Clock When using multiple devices connected through digital audio formats like S/PDIF, AES/EBU, ADAT or TDIF, it is necessary to synchronize them to a single word clock generator. Word clock is used to keep a perfectly timed and constant bit rate between all synced devices to avoid data errors. A word clock generator creates digital pulses that contain no other data (i.e. audio). These pulses clock the internal oscillators of each device and are essential to avoid frequency drift. A word clock signal is bundled with the audio data in the ADAT Lightpipe protocol; however, many engineers prefer to keep word clock sync and audio separate from each other. This is where BNC word clock connections come into play and the DigiMax 96K has a BNC word clock input for just this purpose. You will find BNC cables used to deliver dedicated word clock in many quality studios and broadcast facilities worldwide. BNC cables are rugged, lock into position, and can carry clock signals much farther than the standard optical cable. A BNC word clock cable is a 75 Ω, shielded coaxial cable with standard ‘twist-lock’ BNC-type connections on each end. Please note: BNC cables are made in several impedances. The DigiMax 96K requires an impedance of 75 Ω to achieve consistent sync. To synchronize the DigiMax 96K via BNC word clock, you will need to run a BNC word clock cable from the BNC word clock output of your external device to the BNC word clock input of your DigiMax 96K. From the front panel of your DigiMax 96K, select external sync using the clock button. 3.2.3 Master/Slave and Multiple Digital Devices Whether you are using the ADAT output of the DigiMax 96K to generate word clock or you are using the BNC word clock output of another device as your word clock generator, it is necessary to denote one device as the “master” word clock device to which all other digital devices are synced or “slaved”. The DigiMax 96K should perform equally well as a master or a slave in most cases, although syncing it to a lesser quality clock source may affect performance. Not all word clock generators are created equal. The general approach is to determine which device has the best clock from which to reference and to designate that device as the word clock master. This is done with careful listening and A/B testing. Once you’ve determined which device is to be your Master clock, you will need to sync the remaining digital devices either through series or parallel distribution or some combination thereof. Of course, if your digital device chain only consists of one master and one slave, syncing the two is as simple as connecting a 75 Ω 11 | PreSonus 2007 TECHNICAL INFORMATION BNC word clock cable from the output of your master device to the input of the device you are slaving. When working with multiple slaved devices, the job gets a bit more complicated. Series distribution requires that your digital devices have both a BNC word clock input and a BNC word clock output. Parallel distribution uses a BNC “T-connector” attached to the BNC word clock input of each slaved device. This allows the word clock signal to be sent to that device and then sent on to another. A BNC word clock output on the slaved devices is not used or required for parallel word clock distribution. If the last device in the chain does not have a word clock terminate switch, it will require a BNC terminator plug to be attached to the other side of the “T-connector”. This helps to stabilize the word clock sync as well as to keep the word clock signal clean. Both word clock terminator plugs and BNC T-connectors can be purchased at most recording supply retailers. A third option for syncing your digital devices is to purchase a high quality dedicated word clock generator; and many engineers believe that using dedicated word clock generators, rather than utilizing series or parallel word clock distribution, enhances the performance of their digital audio devices. A dedicated word clock generator and distribution amplifier exists for one purpose and one purpose only: to be a Master clock. Word clock generators usually have one BNC word clock input and multiple BNC word clock outputs (sometimes TDIF, S/PDIF or ADAT outputs as well to make them compatible with as many types of digital devices as possible). Without a dedicated word clock generator, it is necessary to split the word clock signal generated by the Master device by daisy chaining the slaved devices as described above. Because of this, many engineers feel that the resulting digital audio signals will be of a higher quality when a dedicated word clock generator is used; because all the digital devices are receiving the same digital pulse from the same source at exactly the same time. Whichever approach one uses, it is always advisable to use good quality BNC cables that are not excessively longer than necessary for the job at hand and, as with any audio cabling, it is always good to keep word clock cables separate from AC cable lines or other possible sources of interference. 3.2.4 Setting Up Your DAW Software If you are planning on using your DigiMax 96K as the master clock for your digital device system, you will need to refer to the instructions on external synchronization provided by the manufacturer of both your audio interface and your DAW recording application. Setting external sync usually must be done in both the audio interface’s control panel software application (if it has one) and your recording application. As a general rule of thumb, this will be necessary when you are using any device other than your audio interface as the master clock for your system. 12 | PreSonus 2007 TECHNICAL INFORMATION 3.3 A BRIEF TUTORIAL ON DYANAMICS PROCESSING The DigiMax 96k features a dual domain limiter with a variable threshold on each of its eight channels. This section is an excerpt from brief tutorial on dynamics processing written by PreSonus President and Chief Technical Officer, Jim Odom. It is included to help you get the most out of your DigiMax 96k. This tutorial will take you through the basics of dynamics processing as well as explain the various types of dynamics processors, including limiters. 3.3.1 Common Questions Regarding Dynamics What is dynamic range? Dynamic range can be defined as the distance between the loudest possible level to the lowest possible level. For example, if a processor states that the maximum input level before distortion is +24dBu and the output noise floor is -92dBu, then the processor has a total dynamic range of 24 + 92 = 116dB. The average dynamic range of an orchestral performance can range from -50dBu to +10dBu on average. This equates to a 60dB dynamic range. 60dB may not appear to be a large dynamic range but do the math and you’ll discover that +10dBu is 1000 times louder than -50dBu! Rock music on the other hand has a much smaller dynamic range, typically -10dBu to +10dBu, or 20dB. This makes mixing the various signals of a rock performance together a much more tedious task. Why do we need compression? Consider the previous discussion: You are mixing a rock performance with an average dynamic range of 20dB. You wish to add an un-compressed vocal to the mix. The average dynamic range of an uncompressed vocal is around 40dB. In other words a vocal performance can go from -30dBu to +10dBu. The passages that are +10dBu and higher will be heard over the mix, no problem. However, the passages that are at -30dBu and below will never be heard over the roar of the rest of the mix. A compressor can be used in this situation to reduce (compress) the dynamic range of the vocal to around 10dB. The vocal can now be placed at around +5dBu. At this level, the dynamic range of the vocal is from 0dBu to +10dBu. The lower level phrases will now be well above the lower level of the mix and louder phrases will not overpower the mix, allowing the vocal to ‘sit in the track’. The same discussion can be made about any instrument in the mix. Each instrument has its place and a good compressor can assist the engineer in the overall blend of each instrument. Does every instrument need compression? This question may lead many folks to say ‘absolutely not, overcompression is horrible’. That statement can be qualified by defining ‘overcompression’. The term itself, ‘overcompression’ must have been derived from the fact that you can hear the compressor working. A well designed and properly adjusted compressor should not be audible! Therefore, the overcompressed sound is likely to be an improper adjustment on a particular instrument. Why do the best consoles in the world put compressors on every channel? The answer is simply that most instruments need some form of compression, oftentimes very subtle, to be properly heard in a mix. 13 | PreSonus 2007 TECHNICAL INFORMATION Why do you need noise gates? Consider the compressed vocal example above and you now have a 20dB dynamic range for the vocal channel. Problems arise when there is noise or instruments in the background of the vocal mic that became more audible after the lower end of the dynamic range was raised (air conditioner, loud drummer, etc.) You might attempt to mute the vocal between phrases in an attempt to remove the unwanted signals; however this would probably end disastrous. A better method is to use a noise gate. The noise gate threshold could be set at the bottom of the dynamic range of the vocal, say -10dBu, such that the gate would ‘close’ out the unwanted signals between the phrases. If you have ever mixed live you know well the problem cymbals can add to your job by bleeding through your tom mics. As soon as you add some highs to get some snap out of the tom the cymbals come crashing through, placing the horn drivers into a small orbit. Gating those toms so that the cymbals no longer ring through the tom mics will give you an enormous boost in cleaning up the overall mix. 3.3.2 Types of Dynamics Processing Dynamics processing is the process of altering the dynamic range or levels of a signal thereby enhancing the ability of a live sound system or recording device to handle the signal without distortion or noise, and aiding in placing the signal in the overall mix. Compression / Limiting Punch, apparent loudness, presence…just three of many terms used to describe the effects of compression/limiting. Compression and limiting are forms of dynamic range (volume) control. Audio signals have very wide peak to average signal level ratios (sometimes referred to as dynamic range which is the difference between the loudest level and the softest level). The peak signal can cause overload in the audio recording or reproduction chain resulting in signal distortion. A compressor/limiter is a type of amplifier in which gain is dependent on the signal level passing through it. You can set the maximum level a compressor/limiter allows to pass through, thereby causing automatic gain reduction above some predetermined signal level or threshold. Compression refers, basically, to the ability to reduce the output level of an audio signal by a fixed ratio relative to the input. It is useful for lowering the dynamic range of an instrument or vocal, making it easier to record without distorting the recorder. It also assists in the mixing process by reducing the amount of level changes needed for a particular instrument. Take, for example, a vocalist who moves around in front of the microphone while performing, making the output level vary up and down unnaturally. A compressor can be applied to the signal to help correct this recording problem by reducing the ‘louder’ passages enough to be compatible with the overall performance. How severely the compressor reduces the signal is determined by the compression ratio and compression threshold. A ratio of 2:1 or less is considered mild compression, reducing the output by two for signals greater than the compression threshold. Ratios above 10:1 are considered hard limiting. Limiting refers to the point at which the signal is restrained from going any louder at the output. The level of input signal at which the output is reduced is determined by the compression threshold. As the compression threshold is lowered, more and more of the input signal is compressed (assuming a nominal input signal level). Care must be taken not to ‘over compress’ a signal. Too much compression destroys the acoustic dynamic response of a performance. (‘Over compression’, however, is used by some engineers as an effect, and with killer results!) 14 | PreSonus 2007 TECHNICAL INFORMATION Compressor / Limiters are commonly used for many audio applications. For example: A kick drum can get lost in a wall of electric guitars. No matter how much level is increased, the kick drum stays ‘lost in the mud’. Add a touch of compression and tighten up that kick drum sound allowing it to ‘punch’ through without having to crank the level way up. A vocal performance usually has a wide dynamic range. Transients (the very loudest portion of the signal) can be far outside the average level of the vocal signal. It is extremely difficult to ride the level with a console fader. A compressor/limiter automatically controls gain without altering the subtleties of the performance. A solo guitar can seem to be masked by the rhythm guitars. Compression can make your ‘lead’ soar above the track without shoving the fader through the roof. Bass guitar can be difficult to record. A consistent level with good attack can be achieved with proper compression. Your bass doesn’t have to be washed out in the low end of the mix. Let the compressor/limiter give your bass the punch it needs to drive the bottom of the mix. Expansion There are two basic types of expansion: dynamic and downward. Expansion increases the dynamic range or level of a signal after the signal crosses the expansion threshold. Dynamic expansion is basically the opposite of compression. In fact, broadcasters use dynamic expansion to ‘undue’ compression before transmitting the audio signal. This is commonly referred to as ‘companding’ or COMPression followed by expANDING. By far the most common use of expansion is downward expansion. In contrast to compression, which decreases the level of a signal after rising above the compression threshold, expansion decreases the level of a signal after the signal goes below the expansion threshold. The amount of level reduction is determined by the expansion ratio. For example, a 2:1 expansion ratio reduces the level of a signal by a factor of two. (e.g. if a level drops 5dB below the expansion threshold, the expander will reduce it to 10dB below the threshold.) Commonly used as noise reduction, expansion is very effective as a simple noise gate. The major difference between expansion and noise gating is the fact that expansion is dependent on the signal level after crossing the threshold, whereas a noise gate works independent of a signal’s level after crossing the threshold. Noise Gating Noise gating is the process of removing unwanted sounds from a signal by attenuating all signals below a set threshold. As described above, the ‘gate’ works independent of the audio signal after being ‘triggered’ by the signal crossing the gate threshold. The gate will remain open as long as the signal is above the threshold. How fast the gate opens to let the ‘good’ signal through is determined by the attack time. How long the gate stays open after the signal has gone below the threshold is determined by the hold time. How fast the gate closes is determined by the release. How much the gate attenuates the unwanted signal while closed is determined by the range. 15 | PreSonus 2007 TECHNICAL INFORMATION 3.3.3 Vocabulary of Dynamics Processors In scientific research, it is widely accepted that if one needs to master a subject quickly, learn the associated vocabulary and industry terms. The same is true with audio recording and production. Most manuals and text books assume a prior level of knowledge. We hope this section will help you to get the most benefit from your independent study in the world of music production. Compressors Threshold. The Compressor threshold sets the level at which compression begins. When the signal is above the threshold setting, it becomes ‘eligible’ for compression. Basically, as you turn the threshold knob counterclockwise, more of the input signal becomes compressed. (If you have a ratio setting of greater than 1:1.) Ratio. Ratio sets the compression slope. This is defined as the output level versus the input level. For example, if you have the ratio set to 2:1, any signal levels above the threshold setting will be compressed at a compression ratio of 2:1. This simply means that for every 1dB of level increase into the compressor, the output will only increase 1/2dB, thus producing a compression gain reduction of 0.5dB/dB. As you increase the ratio, the compressor gradually becomes a limiter. A limiter is defined as a processor that limits the level of a signal to the setting of the threshold. For example, if you have the threshold knob set at 0dB, and the ratio turned fully clockwise, the compressor becomes a limiter at 0dB. This means that the signal will be limited to an output of 0dB regardless of the level of the input signal. Attack. Attack sets the speed at which the compressor ‘acts’ on the input signal. A slow attack time (fully clockwise) allows the beginning envelope of a signal (commonly referred to as the initial transient) to pass through the compressor uncompressed, whereas a fast attack time (fully counterclockwise) immediately subjects the signal to the ratio and threshold settings of the compressor. Release. Release sets the length of time the compressor takes to return the gain reduction back to zero (no gain reduction) after crossing below the compression threshold. Very short release times can produce a very choppy or ‘jittery’ sound, especially in low frequency instruments such as a bass guitar. Very long release times can result in an over compressed sound, sometimes referred to as ‘squashing’ the sound. All ranges of release can be useful at different times however and you should experiment to become familiar with the different sound possibilities. Hard/Soft Knee. With hard knee compression, the gain reduction applied to the signal occurs as soon as the signal exceeds the level set by the threshold. With soft knee compression, the onset of gain reduction occurs gradually after the signal has exceeded the threshold, producing a more musical response (to some folks). Auto. Places a compressor in automatic attack and release mode. The attack and release knobs become inoperative and a pre-programmed attack and release curve is used. Gain Makeup. When compressing a signal, gain reduction usually results in an overall reduction of level. The gain control allows you to restore the loss in level due to compression. (Like readjusting the volume.) 16 | PreSonus 2007 TECHNICAL INFORMATION Compressor Sidechain. The sidechain jack interrupts the signal that the compressor is using to determine the amount of gain reduction to apply. When no connector is inserted into this jack, the input signal goes directly to the compressor’s control circuitry. When a connector is inserted into this jack, the signal path is broken. This signal can then be processed by an equalizer for example to reduce sibilance (de-essing) in a vocal track. The signal is then returned to the unit via the connector. The signal returned to the sidechain could be that of a narrator or vocalist. In this application, the audio that is passing through the compressor will automatically ‘duck’ when the narrator speaks or vocalist sings. Expanders Downward Expansion. Downward expansion is the most common expansion used in pro audio and recording. This type of expansion applies noise reduction to all signals below a set threshold level. Ratio. The expansion ratio sets the amount of noise reduction applied to a signal once the signal has dropped below the expansion threshold. For example, a 2:1 expansion ratio attenuates a signal 2dB for every 1dB it drops below the threshold. Ratio’s 4:1 and higher act much like a noise gate without the ability to tailor the attack, hold and release times. Noise Gates Threshold. The gate threshold sets the level at which the gate opens. Essentially, all signals above the threshold setting are passed through unaffected, whereas signals below the threshold setting are reduced in level by the amount set by the range control. If the threshold is set fully counterclockwise, the gate is turned off (always open), allowing all signals to pass through unaffected. Attack. The gate attack time sets the rate at which the gate opens. A fast attack rate is crucial for percussive instruments, whereas signals such as vocals and bass guitar require a slower attack. Too fast of an attack can, on these slow rising signals, cause an artifact in the signal producing an audible ‘click’. All gates have the ability to ‘click’ when opening, however a properly set gate will never click. Below is an example of a gate opening very fast on a pure sine wave. Notice the almost vertical edge of the waveform when the gate opens. This is what produces the high frequency artifact known as ‘click’. Hold. Hold time is used to keep the gate open for a fixed period of time following the signal going below the gate threshold. This can be really useful for effects such as ‘gated snare’ where the gate remains open after the snare hit for the duration of the hold time then abruptly closes. Release. The gate release time determines the rate at which the gate closes. Release times should typically be set so that the natural decay of the instrument or vocal being gated is not affected. Shorter release times help to clean up the noise in a signal but my cause ‘chattering’ in percussive instruments. Longer release times usually eliminate ‘chattering’ and should be set by listening carefully for the most natural release of the signal. Range. The gate range is the amount of gain reduction that the gate closes down to. Therefore, if the range is set at 0dB, there will be no change in the signal as it crosses the threshold. If the range is set to -60dB, the signal will be gated (reduced) by 60dB, etc. 17 | PreSonus 2007 TECHNICAL INFORMATION 3.4 SAMPLE HOOK UP DIAGRAMS 3.4.1 Using the DigiMax 96K with ProTools The DigiMax 96K is the perfect solutions to expand your ADAT compatible Digidesign interface. For example: To set up a Digi 003 with ProTools LE software: 1. Plug in an ADAT cable from the optical output of the DigiMax 96K to the optical input of the Digi 003. 2. Plug in a BNC word clock cable from the Digi 003 BNC word clock output to the BNC input of the DigiMax 96K. 3. Push the ‘clock’ button on the DigiMax 96K three times, until the yellow “external” LED is lit. Please note: When using Digidesign interfaces that do not have word clock output, you will need to set the DigiMax 96K as the master clock of the system. Push the ‘clock’ button to the internal setting you prefer (48 kHz or 44.1 kHz). In ProTools, go to Setups>Hardware setup. Select “RCA = S/PDIF, Optical = ADAT” and set the clock to “ADAT”. Digi003, ProTools, and Digidesign are trademarks of Avid™ 18 | PreSonus 2007 TECHNICAL INFORMATION 3.3.2 Using Multiple DigiMax 96K with the FireStudio Lightpipe The DigiMax 96K is a great high quality solution to expand your FireStudio LightPipe for live or mobile recordings where a large number of simultaneous inputs are needed and two track output is enough for monitoring. 19 | PreSonus 2007 TECHNICAL INFORMATION 4.1 SPECIFICATIONS Channels ........................................................................................................................................................................................... Eight Microphone Preamp Type ....................................................................................................................................................................... XLR Female Balanced Input Impedance (Balanced) ........................................................................................................................................................... 1.3 kΩ THD+N (unwtd, 1 kHz @ +4 dBu Output, Unity Gain) ................................................................................................................. < 0.09% Noise Floor ....................................................................................................................................................................................-94 dBu S/N Ratio (Unity Gain, unwtd, Ref. = +4 dBu, 20Hz to 22 kHz) ................................................................................................... > 98 dB Analog Dynamic Range ................................................................................................................................................................ > 120 dB Power Supply Rejection ................................................................................................................................................................. > 98 dB Amplifier Type ........................................................................................................................................................................... Dual Servo Phantom Power (±2 VDC) .......................................................................................................................................................... +48 VDC Instrument Input (channels 1 & 2 only) Type ................................................................................................................................................................ ¼” TS Female Unbalanced Input Impedance .............................................................................................................................................................................. 1 MΩ Line Outputs Type ............................................................................................................................................................................. ¼” TRS Balanced Output Impedance .............................................................................................................................................................................. 51 Ω Panel Controls Gain ................................................................................................................................................................................... 0 dB to +40 dB Limiter ...................................................................................................................................................................................... 0 dB to Off Phase Reverse (Channels 1&2 only) ............................................................................................................................................... 0°, 180° Pad ................................................................................................................................................................................................. -20 dB Meters Signal Present ................................................................................................................................................................................-20 dBu Clip ...............................................................................................................................................................................................+22 dBu Limit ................................................................................................................................................................................................ Active Digital Audio Type ..................................................................................................................... ADAT, AES/EBU (4 pair stereo), S/PDIF (4 pair stereo) Bit Depth .............................................................................................................................................................................................. 24 Internal Sample Frequency Selections (kHz) ................................................................................................................. 44.1, 48, 88.2, 96 Dither Type ........................................................................................................................................................................ Psycho-acoustic Power Supply Type ................................................................................................................................................................................ Linear, External Input Voltage Range ............................................................................................................. 100/120/220/240 VAC (Factory Configured) Power Requirements (Continuous) ..................................................................................................................................................... 80W Physical Size ...............................................................................................................................................................................................1U Rack Dimensions ........................................................................................................................................................................ 19”x 1.75”x 7” Weight ..............................................................................................................................................................................................15 lbs Chassis ............................................................................................................................................................................................... Steel Panel ......................................................................................................................................................................................... Aluminum As a commitment to constant improvement, PreSonus Audio Electronics, Inc. reserves the right to change any specification stated herein at any time without notification. 20 | PreSonus 2007