1
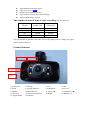
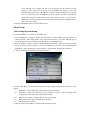
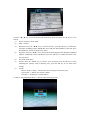
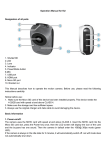
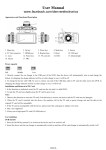
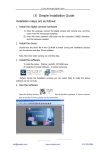
User manual RIDER F120 FHD www.iget.eu SUPPORT: http://www.iget.eu/helpdesk Dear Users: Thank you for buying this high-resolution car DVR. This product is characterized by advanced technology, unique appearance, strong . This manual provides the detailed instructions regarding how to use this device and other detailed information, including use, operation, technical specifications, etc.. Before use, please read this manual carefully and be sure to understand it completely. Please keep this manual properly. We hope that this product can meet your demand and we would like to serve you for long time! Install and remove memory card 1. As per the direction indicated, insert the memory card into the card slot until it is fixed firmly in the slot. 2. When taking the memory card, slightly press the memory card; after it is ejected out, you may take it out. 3. If no card is inserted, the screen will display the information “No card!” as shown in the following picture: Note: 1. Please make sure the direction in which you insert the card is right. Otherwise, the device and the memory card may be damaged. 2. After the memory card is inserted into the device, the device will set the memory card. 3. The documents and data occurring in the use of this device should be backed up. Should any loss, we will not assume any legal responsibilities arising therefrom. Product Characteristics Super small portable mini car DVR facilitates the easy photo and video taking, audio recording and free high-definition image capture in various situations. HDMI high-definition video output; 2.7″ LTPS TFT LCD; High-definition wide angle camera; Video specs: H.264 (MOV) Inbuilt with microphone (speaker); Supports the function of video while charging; Supports high-capacity TF card; The number of shots & time of video recording (only for reference) TF Card (1080P) 30F (720P) 60F 16G 8G 4G 2G 120 min 60 min 30 min 15 min 160 min 80 min 40 min 20 min Note: The number of shots that can be taken will vary depending on device settings, the subject and the memory card used. Product Structure 2. Fill lamp 3. Lens 1. Speaker hole 4. MIC 1. Speaker hole 5. Screen 9. OK/REC 13. Shoot key 17. Support holder 2. Fill lamp 6. Charging indicator 10. Menu/Back key 14. Out-built GPS antenna 18. USB port 3. Lens 7. POWER key 11. UP key (▲) 15. HDMI 4. MIC 8. TF card 12. DOWN key (▼) 16. RESET key 5. Screen 6. Charging indicator 10. MENU key OUTkey 7. POWER 11. UP key 8. TF card 12. DOWN key 9. REC/OK 13. Shoot key Use Guide: 1. Press the POWER key shortly to switch on the device. 2. After the device is switched on, the system will have the video mode in default. In such case, press the OK key to start video recording and again to pause with the video file saved automatically. 3. In video pause mode, press the MENU key to enter Switch Mode: (1) Press the MENU key shortly to enter Setup; when the cursor is on the top of the screen (i.e. ), press the OK key to switch between “Video Setup Menu” and “System Setup Menu”; when the cursor is not on the top of the screen, press the “▼”"▲" key to choose the desired menu, press the OK key to enter the sub-options of such menu, press “▼”"▲" key again to choose the desired option, press the OK key to set the option and then back to the main menu. On the main menu, press the Menu key to back to the video mode. (2) Press the Menu key to enter the playback mode, press “▼”"▲" key to choose the type of the file to be opened. Press the OK key again to enter the Browse Files screen, press “▼”"▲" key to browse the file to be browsed, press the OK key to start playing; on the Browse Files screen, press the MENU key shortly to enter the playback mode menu, press “▼”"▲" key to choose the desired option, press the OK key to set the menu, press the MENU key shortly again to exit from the playback mode menu and back to the Browse Files screen. After the play is over, press the MENU key to back the playback mode main menu and then press the MENU key to back to the video mode. 4. Press the POWER key long to switch off the device. Menu Setup Video Setup/System Setup Press the POWER key to switch on. In standby state: 1. Press the MENU key shortly to display the main menu of “Video Menu”, press the OK key to switch between “Video Setup Menu” and “System Setup Menu”; press the “▼”"▲" key to choose the option to be set and then press the OK key to confirm the setup. 2. Press the Menu key long to enter the “Playback Mode Main Menu” and press the OK key again to browse the file. After the play is over, press the MENU key to back to the “Playback Mode Main Menu”, press the Menu key again to back to “Video Mode” with details as follows: 1) Choose “Video Menu” as shown in the follow picture: Press the “▼”"▲" key to choose the desired menu setup option and press the OK key to set as follows: (1) Resolution: 1920*1080(30 fps) and 1280*720(60 fps) available. (2) Continuous: Choose the duration for every segment of circular video recording witch such options as Off, 2min, 5min and 10min available. (3) Date: Choose whether video has date or not: ON and OFF. (4) Delayed switch-off: Off, 5min and 10min available. (5) Moving detection: On/Off 2) Choose “System Setup Menu” as shown in the following picture: Press the “▼”"▲" key to choose the desired menu setup option and press the OK key to set as follows: (1) Power frequency: 50Hz, 60Hz. (2) LED:On/Off. (3) Date/Time: Press the “▲/▼” key to increase/decrease, press the OK key to confirm the automatic switching of date (Month-Day-Year) and time (Hour-Minute); after that, press the MENU key to back to the previous menu. (4) Language: Press the “▲/▼” key to choose the desired language from English, Simplified Chinese, Traditional Chinese and Russia; press the OK key to confirm and back to the previous menu. (5) TV mode: NTSC/PAL (6) Format: Press the “▲/▼” key to choose “Yes” and then press the OK key to start formatting the memory card; if choosing “No”, press the OK key to exit from menu settings. (7) System: Restore factory settings =>Restore the current settings to the factory ones. System info => Display the software edition. Card info => Display the card information. 3) Choose “Playback Mode Menu” as shown in the following picture: Press the OK key to enter and press the “▼”"▲" key to choose the desired option and set as follows: (1) Enter the playback mode, press “▼”"▲" key to choose the type of the archive to be opened, press the OK key again to enter the archive, press “▼”"▲" key to browse the file to be browsed, press the OK key to start playing. On the Browse Files screen, press the MENU key shortly to enter the “Playback Mode Menu”, press the “▼”"▲" key to choose Delete or Lock and press the OK key to set. After the play is over, press the MENU key long to back to the “Playback Mode Main Menu” and press the MENU key again to exit. 4) Shooting function. In normal standard state, press the SHOOT key to have static shooting; in video recording, press the SHOOT key to have dynamic shooting. The system has 2M pixels in default. Files are saved in the JPEG folder. Functional Operation Switch on and Have Circular Video 1. After the CAR DVR completes the switch-on program, press the OK key, then the right upper corner of the screen will display a flickering “.REC” red video icon. In such case, the system is in the video recording state. In the video recording process, press the “▲” key, then the left upper corner of the screen will display a lock icon, indicating that the file being recorded is locked and saved into the EVENT folder. 2. If no manual control, the car DVR will automatically save one video file every 5min into the video folder. After the card is full, the device will automatically delete the first file in the folder so as to get more space and achieve circular video recording. 3. Emergency video: In video recording process, in case of violent collision, the device will save one video file every 5min into the video folder and then continue circular video recording. Cyclic Video while Charging After the card DVR is connected with the charger and powers on automatically, it will enter the video record mode and automatically start videoing and have one video file every 5 minutes. When the card is full of video files, the first video file will be deleted automatically and the device will continue working, achieving the function of cyclic video record. To stop, press the OK key. Note: 1. If this device is connected to PC and charger but it cannot have the function of video record while charging, please power it off and reconnect with the charger. 2. Whether with car charger or common charger, you may have the function of videoing while charging. 3. If you charge the device with car charger, after the car is powered on, the device will be charged and start to take video automatically; after the car stops, it will save files and power off after 5s automatically. 4. Before the car is started, activate the delay switch-off of the device; after the car is started, the device will automatically switch on and start to record videos. After the car stops, the device can continue recording, depending on the set time. PC Camera Mode In on/off state, connect this USB cable to connect this device and a PC, then the screen will display one mode as MSDC, i.e. U-disc mode, one as PC-CAM, as network camera mode and the other as video mode. Press the “▲/▼” key to choose PC-CAM and then press the OK key to switch the device to the PC-CAM mode, click the AMCAP icon to use the PC as a camera. Note: 1. In PC connection, press the OK key to enter the U-disc mode and press the MSDC key to switch the network camera. 2. In PC connection, when U-disc and PC-CAM appear, press the MSDC key to switch to the video mode. HDMI TV out Insert the small end of the HDMI TV output cable into the HDMI OUT port of this device and the other large end to the HDMI port of the TV, set the TV to be HDMI mode to realize HDMI output. Choose the desired file, press the OK key to start the output, then you may share the wonderful program together with friends. Product Specs Sensing element Lens Focus range Screen TV OUT Video format Video Memory Connector Battery USB Dimensions/Weight Working temperature/humidity COMS wafer Wide angle, 140º 12cm~infinite 2.7” LTPS TFT LCD NTSC/PAL MOV(H.264) 1920*1080(30 fames/s);1280*720(60 fames/s) External: TF card (max. 32G ) USB 2.0/HDMI 300mAh USB2.0 high-speed transmission 87*32*70 MM 0~40ºC / 10%~80% Troubleshooting Unable to switch on? Maybe the battery is out of power. Please charge it in time. Unable to take videos and record audios? Please replace the memory card with one with sufficient space and check if it is inserted properly. No video on the HD screen? Please check if the TV OUT cable plug is inserted completely. Use always the attached AV cable. Unclear images/videos? Mop the lens subject to light with soft cloth before use. Tips for operation: This device is similar to PC. If it does not operate, please directly press the RESET key to restart the device.