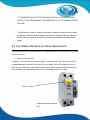
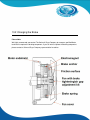
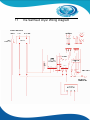
1
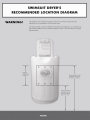
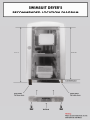
User Guide
For “THE SWIMSUIT DRYER”.
THE SWIMSUIT DRYER
Copyright 2012
Page of 24
1
Table of Contents
1
LOCATION DIAGRAM ............................................................................................................................4
2
PURPOSE ....................................................................................................................................................6
3
4
5
2.1
PROPER USAGE AND LIABILITY ...............................................................................................................6
2.2
IDENTIFICATION & CERTIFICATION ........................................................................................................6
THE SWIMSUIT DRYER INFORMATION ...........................................................................................7
3.1
FEATURES AND BENEFITS ......................................................................................................................7
3.2
WHERE WOULD YOU EXPECT TO FIND THE SWIMSUIT DRYER .............................................................7
3.3
ITEMS SUPPLIED WITH THE SWIMSUIT DRYER........................................................................................8
3.4
ENVIRONMENT AND LOCATION OF INSTALLATION.................................................................................8
INSTALLING THE SWIMSUIT DRYER................................................................................................9
4.1
INSTALLATION TOOLS REQUIRED ..........................................................................................................9
4.2
SECURING MOUNTING BRACKET ...........................................................................................................9
4.3
INSTALLING THE SWIMSUIT DRYER .....................................................................................................10
4.4
CONNECTING POWER TO THE SWIMSUIT DRYER ..................................................................................10
4.5
CONNECTING THE SWIMSUIT DRYER TO A WASTE OUTLET ..................................................................11
INSTRUCTIONS FOR USING THE SWIMSUIT DRYER..................................................................12
5.1
6
7
2
INSTRUCTIONS .....................................................................................................................................12
MAINTENANCE & SERVICING...........................................................................................................13
6.1
WEEKLY CLEANING REQUIREMENTS ...................................................................................................13
6.2
WEEKLY MAINTENANCE/ SAFETY REQUIREMENTS .............................................................................13
6.3
FOUR WEEKLY MAINTENANCE/ SAFETY REQUIREMENTS ....................................................................14
6.4
YEARLY SAFETY REQUIREMENTS ........................................................................................................15
MALFUNCTIONS/ TROUBLESHOOTING GUIDE ...........................................................................16
7.1
MALFUNCTIONS/ TROUBLESHOOT .......................................................................................................16
7.2
BRAKING PROBLEMS............................................................................................................................16
7.3
LEAKING ..............................................................................................................................................16
7.4
RUNNING PROBLEMS ............................................................................................................................17
8
9
SERVICE, REPAIR AND TESTING......................................................................................................18
8.1
SERVICING INFORMATION & BENEFITS ................................................................................................18
8.2
SERVICE PARTS & SUPPLY PARTS ........................................................................................................18
8.3
OPTIONAL NEW CASE ..........................................................................................................................18
WARRANTIES – TERMS AND CONDITIONS ...................................................................................19
9.1
RETURNING THE SWIMSUIT DRYER .....................................................................................................19
9.2
WARRANTY TERMS AND CONDITIONS .................................................................................................19
10
THE SWIMSUIT DRYER BRAKE MAINTENANCE .....................................................................20
10.1
BRAKE MOTOR MAINTENANCE ( BRAKES ) .........................................................................................20
10.2
CHANGING THE BRAKE ........................................................................................................................21
11
THE SWIMSUIT DRYER WIRING DIAGRAM..............................................................................22
12
TECHNICAL.........................................................................................................................................23
13
SWIMSUIT DRYER MAINTENANCE LOG....................................................................................24
THE SWIMSUIT DRYER
Copyright 2012
Page of 24
3
1 Location Diagram
4
roduction
THE SWIMSUIT DRYER
Copyright 2012
Page of 24
5
2 Purpose
The purpose of the Swimsuit Dryer is to give the user the facility to remove water from their
Swimsuits quickly, thus increasing their satisfaction with the pool experience, encouraging the
user to continue to use the pool, sauna, steam room and other wet facilities offered. The
Swimsuit Dryer has been designed, not only to increase the user’s satisfaction, but to also offer
a low cost maintenance solution for the purchaser.
2.1 Proper usage and liability
The Swimsuit Dryer is intended to dry Swimsuits ONLY, neither The Swimsuit Dryer Company,
the purchaser, or the facility where the Swimsuit Dryer is installed will not be liable, or take
responsibility for any damages to swimming costumes where the user has not properly followed
the instructions given.
2.2 Identification & Certification
Please see the label located on the bottom right hand side of The Swimsuit Dryer for the
following Information:
6
•
Identification number: This is the unique Serial Number for your Swimsuit Dryer.
•
Certification: Confirms The Swimsuit Dryer conforms to CE and any other certification.
•
Contact Details: Contact details should you need to contact us.
•
Version number: Your current version
3 The Swimsuit Dryer Information
3.1 Features and Benefits
The Swimsuit Dryer’s key features are:
•
Easy to use
● Built in Brake Motor
•
Simple instructions
● Manual Self Start-Stop
•
10 – 12 Seconds Drying time
● Uses no Heat
•
Increases Satisfaction for pool users
● Low maintenance required
•
Changeable outer case
● Easy Installation
3.2 Where Would You Expect To Find the Swimsuit Dryer
The Facilities that a user could expect to find The Swimsuit Dryer installed in are:
•
Health Clubs • Gyms • Public Swimming Pools • Hotels with Leisure Facilities • Spas •
Holiday Resorts • Universities • Wellness Centers • Recreation Centers • Cruise Liners •
Any Commercial Property with a pool or wet area.
Although The Swimsuit Dryer have been designed and manufactured for commercial use
they are available and suitable for private use.
THE SWIMSUIT DRYER
Copyright 2012
Page of 24
7
3.3 Items Supplied with the Swimsuit Dryer
The Swimsuit Dryer will be supplied with the following items. The items listed below must be
kept should the unit experience a fault in or out of warranty, and in order to carry out any
necessary maintenance.
•
Shipping Box and Packaging.
• Securing Bracket
•
User Manual
• Stainless steel Bolts
•
Security Screw Driver
• Mounting Bracket
•
Swimsuit Dryer Cleaning Brush • Wall Instructions
3.4 Environment and Location of Installation.
The Swimsuit dryer’s recommended installation location is one of the following areas listed
below:
•
In a changing room, outside a changing room, in a corridor, or in an area where facility
users have access, a dry or semi wet area, and a location where the waste water can be
removed.
Note: The Swimsuit Dryer Company highly recommends where ever the Swimsuit Dryer is
installed, it should be installed to the correct local electrical and waste water
regulations .
•
The Swimsuit Dryer must be mounted to the wall with the mounting bracket supplied.
The mounting bracket must be secured to a wall stud, a concrete block, and a wall
structure capable of holding up to 30kg of weight plus the added weight of a user leaning
on the unit.
The Swimsuit Dryer Must NOT be installed by anyone in any of the following locations:
•
Around a Pool, inside a shower area, outside, or in any wet area where the Swimsuit
Dryer may be exposed to direct water.
8
4 Installing the Swimsuit Dryer
4.1 Installation Tools Required
To install the Swimsuit Dryer you will require the following items not supplied with the Swimsuit
Dryer:
•
A suitable Masonry drill.
• Spirit level.
•
A marker pen.
• 7 x Wall Bolts
•
Tape Measure.
• 7 x Raw Plugs
The Swimsuit Dryer Company recommends the installer of the Swimsuit Dryer is a qualified
tradesman. Should the facility where the Swimsuit Dryer is installed wish to have the Swimsuit
Dryer plumbed in please consult a professional plumber.
Note: Unfortunately The Swimsuit Dryer Company will try to offer advice on location installation, but unfortunately the advice may be limited as each facility varies.
4.2 Securing Mounting Bracket
•
Once a suitable and appropriate location has been found to install the Swimsuit Dryer
you will need to secure the mounting bracket to the wall. Place the mounting bracket on
the wall, check with a spirit level to ensure the Mounting bracket is level. Mark your
locating holes and proceed to drill the holes, insert wall fixings, then use the screws ( not
provided ) to secure the bracket to the wall.
•
The Swimsuit Dryer’s recommended height from the floor to the top of the lid is
approximately 110cm. Please remember the lid will need approximately 30cm clearance
from the top to allow the lid to open.
THE SWIMSUIT DRYER
Copyright 2012
Page of 24
9
Warning:
After securing the mounting bracket to the wall ensure it is level and fastened to the wall
securely!
Please refer to Utilities Drawing for more information on page 4.
•
4.3 Installing the Swimsuit Dryer
Once the mounting plate has been securely fastened to the wall, remove the Swimsuit Dryer
from its packaging.
Warning:
REMOVE ALL PACKAGING FROM THE SWIMSUITDRYER BEFORE SECURING IT
TO THE WALL.
•
Place the Swimsuit Dryer on the mounting bracket.
•
Remove the two screws located underneath The Swimsuit Dryer.
•
Use the removed screws to then secure the securing bracket to the bottom of the
Swimsuit Dryer.
•
Where the hole is located on the bracket drill a further hole into the wall, insert one more
wall fixing and secure with the final remaining screw. Please refer to picture for more
information located on the next page 5.
4.4 Connecting power to The Swimsuit Dryer
As safety is our number one priority we highly recommend a qualified electrician connects The
Swimsuit Dryer to the fuse spur, or a circuit breaker of the correct supply voltage. The Swimsuit
Dryer MUST be installed in conformance with the current local electrical regulations.
10
4.5 Connecting The Swimsuit Dryer to a waste outlet
We strongly recommend The Swimsuit Dryer is plumbed in to the waste water works. The
Swimsuit Dryer Company feels this is the most professional approach. Please ensure your
plumbing is carried out by a qualified plumber and that he is in conformance with all the local
plumbing and waste water regulations. Unfortunately The Swimsuit Dryer Company can not offer
any services or advice with regards to plumbing types as this depends on the centers type of
water pipes and the plumber’s discretion. For more information please view the Utilities
Diagram, and consult your local Plumbing company.
THE SWIMSUIT DRYER
Copyright 2012
Page of 24
11
5 Instructions for Using the Swimsuit Dryer
5.1 Instructions
To use The Swimsuit Dryer safely and properly please follow these Step by Step instructions .If the lid is closed open lid.
Children under the age of 16 must have adult supervision
Warning:
•
LOOK!! IS THE BASKET STILL SPINNING?! DO NOT PLACE YOUR HAND IN THE
BASKET UNLESS IT IS STATIONARY!
If there are any other items in The Swimsuit Dryer remove these items and place ONE
costume in. The Swimsuit Dryer is designed to dry ONE item at anyone time.
•
Push your costume to the bottom of the basket, the material must be at least 4 cm below
the top of the basket.
•
Close the lid and hold down firmly for between 8 – 12 seconds.
•
Release the lid and wait for a further 2-3 seconds.
Warning:
•
LOOK!! MAKE SURE THE BASKET HAS COMPLETELY STOPPED BEFORE
ATTEMPTING TO REMOVE YOUR COSTUME. IF THE BASKET HAS NOT STOPPED
WITHIN THE 2-3 SECONDS PLEASE CONTACT A MEMBER OF STAFF
IMMEDIATELY!!
Remove your costume.
Note: The Owner of The Swimsuit Dryer and the Swimsuit Dryer Company is not responsible for any items or injuries caused by the improper usage or not following the instructions specified above.
12
6 Maintenance & Servicing
The Swimsuit Dryer has been manufactured to be a low maintenance low cost item, however all
electrical and mechanical equipment requires maintenance. The Maintenance required is
minimal depending on usage, but important to keep The Swimsuit Dryer clean and pleasant for
all the users and to insure the safety of the user is not compromised. Please read on for
weekly, and yearly requirements.
6.1 Weekly Cleaning Requirements
Every week the Swimsuit Dryer should be checked, please follow the instructions below:
•
Use the Security Screw Driver, to remove the three stainless steel screws from the Top
Ring. Remove the Top Ring, but make sure you hold the plungers to prevent them from
falling into the inner liner. Clean the inner liner with a brush and disinfectant. Replace
the plunger, Top Ring and the Stainless steel screws.
•
Optional, Spray the inner liner with a Fragrance supplied by the Swimsuit Dryer Company or an equivalent product to give the Swimsuit Dryer a nice fragrance.
6.2 Weekly Maintenance/ Safety Requirements
•
Check the braking speed of The Swimsuit Dryer EVERY week.
•
Wet a piece of material with similar properties (weight and size) of a swimsuit. Place the
swimsuit in the Swimsuit Dryer drum. Push the material all the way to the bottom leaving
a minimum gap of 4 cm from the top. Close the lid and hold down firmly for 10 seconds.
Release the lid, wait for a further 1 - 2 seconds before opening the lid to remove the
fabric.
THE SWIMSUIT DRYER
Copyright 2012
Page of 24
13
•
IF THE BASKET DOES NOT STOP SPINNING WITHING 2-3 SECONDS PLEASE
CONTACT YOUR MAINTENANCE TEAM IMMEDIATELY, OR THE SWIMSUIT DRYER
HELPLINE.
•
The Maintenance Team will need to either adjust the braking components on the motor,
or contact the Swimsuit Dryer Company to arrange for a qualified engineer to adjust the
braking. Please see page 21 for further instructions and the diagram on adjusting the
Brakes.
6.3 Four Weekly Maintenance/ Safety Requirements
Once a month your RCD should be tested as a standard practice on all electrical items including
the Swimsuit Dryer.
•
Manually test your RCD.
To perform a manual RCD ensure power supply is connected to the RCD. Open your RCD lid
located underneath the Swimsuit Dryer, press the test button. If the RCD switch clicks off, the
RCD has passed the test. In the event the switch fails to click off, please contact The Swimsuit
Dryer Company, or a qualified electrician as this could indicate your RCD is faulty.
RCD test switch.
Image for illustration purposes
only.
14
6.4 Yearly Safety Requirements
•
The Swimsuit Dryer Company recommends The Swimsuit Dryer be PAT and RCD tested
every 12 months as with all electrical equipment.
Please either contact The Swimsuit Dryer Company to arrange a service, or contact your local
PAT testing company to test your equipment.
THE SWIMSUIT DRYER
Copyright 2012
Page of 24
15
7 Malfunctions/ Troubleshooting Guide
7.1 Malfunctions/ Troubleshoot
If The Swimsuit Dryer you have installed develops a fault please follow the troubleshoot guide
below. Depending on the fault, a qualified maintenance technician may be able to resolve to
problem, or should the problem persist then please contact a Swimsuit Dryer Company
Representative.
7.2 Braking Problems
The Swimsuit Dryer’s braking may need adjusting periodically depending on the usage The
Swimsuit Dryer receives. Should this occur please either contact The Swimsuit Dryer Company
to arrange a standard service and re-testing, or refer to the motor braking page.
Warning:
Incorrect adjustment of the air gap on the brakes could damage the motor and
void any warranties and liabilities given by The Swimsuit Dryer Company to the
Purchaser, or the facility where The Swimsuit Dryer is installed.
7.3 Leaking
In the event The Swimsuit Dryer develops a leak from the bottom of the unit please resolve this
immediately to prevent any damage to the motor. Please follow the steps below:
•
Use the Security Screw Driver to remove the three stainless steel screws from the Top
Ring. Remove the Top Ring. Clean the inner liner with a brush and disinfectant. Should
there be any foreign Items causing an internal blockage and causing the Swimsuit Dryer
to leak please remove these immediately.
16
7.4 Running problems
If The Swimsuit Dryer experiences a fault and appears to not run at all please check the
following step by step instructions:
1. Is the oval light at the front of The Swimsuit Dryer on?
Yes – Please proceed to question 2.
No – Please proceed to question 4.
2. Has the Braking air gap been adjusted by a Non-qualified Swimsuit Dryer Company
engineer?
Yes – Please proceed to question 3
No – Please proceed to questions 5
3. Please check your air gap again, if the air gap is set incorrectly it could cause running
problems and may even burn the motor out. If the problem persists please contact The
Swimsuit Dryer Company for further advice, or to arrange a service, and to prevent any
motor damage. .
4.
There is a power supply issue. Please check the main supply ( ie The centers circuit
breaker). If that does not resolve the issue check the RCD located underneath The
Swimsuit Dryer, the RCD should be in the “on” position. If neither of these options
resolve the fault then please proceed to question 5.
5. Close the lid and hold down firmly, does the oval light shine brighter?
Yes – Unfortunately the motor could be seized or damaged. Please contact The
Swimsuit Dryer Company for a repair.
No - The fault could be a faulty electrical component, located in the control panel. Please
refer to the wiring diagram. If the faulty part is identified The Swimsuit Dryer Company
can supply the relevant part.
THE SWIMSUIT DRYER
Copyright 2012
Page of 24
17
8 Service, Repair and Testing
8.1 Servicing Information & Benefits
The Swimsuit Dryer Company offers a competitive service and repair package. After every
Service or repair, depending on the new items replaced The Swimsuit Dryer Company will
warranty the labour cost for 12 months. All Swimsuit Dryers serviced or repaired will receive a
full PAT test and RCD test valid for 12 months.
8.2 Service Parts & Supply Parts
All new parts the Swimsuit Dryer Company replaces on a service will receive a full 12 month
warranty. Unfortunately any parts supplied to a customer or a third party, unless stated cannot
be supplied with a warranty or guarantee.
8.3 Optional New Case
The Swimsuit Dryer Company offers a range of colours and various editions for the Swimsuit
Dryer outer cases, these can be either purchased, or depending on the service/ repair level
chosen, we can offer a new case at a reduced price.
18
9 Warranties – Terms and Conditions
9.1 Returning The Swimsuit Dryer
The Swimsuit Dryer is warranted for 12 months return to base. Should a fault occur during or
after your warranty period has expired please refer back to 8 Malfunctions/ Troubleshooting
Guide to determine if the fault can be rectified. If the faulty cannot be rectified you will need to
box the Swimsuit Dryer in the original packaging and contact The Swimsuit Dryer Company for
details on sending the Swimsuit Dryer for a repair.
Warning:
The faulty Swimsuit Dryer MUST be boxed up in the original box and all the original
packaging must be used to prevent any transit damage. Failure to package The Swimsuit Dryer correctly may void the warranty.
9.2 Warranty Terms and Conditions
The Swimsuit Dryer Company’s 12 month warranty on New Swimsuit Dryer’s, and where
applicable services and repairs will become void if any of the following terms are broken:
•
If the Motor brakes are incorrectly adjusted for any reason.
•
If any component is removed and replaced other than the Top Ring.
•
Any Unauthorized work is carried out by a non-Swimsuit Dryer leisure technician.
•
Any Modified, Incorrect or foreign parts are installed.
•
The Swimsuit Dryer is not returned in the correct packaging.
THE SWIMSUIT DRYER
Copyright 2012
Page of 24
19
10
The Swimsuit Dryer Brake Maintenance
10.1 Brake Motor Maintenance ( Brakes )
** Brake motor reliability & lifetime is dependant upon good periodic maintenance. All
Maintenance work on brake motors should be carried out by qualified personnel, always with the
machine out of operation, disconnected and secured against starting. The Swimsuit Dryer brake
motors have a fixed braking torque, with an electromagnetic brake in case of supply failiure. It is
not possible to adjust the stopping times of these motors.
If the Swimsuit Dryer brake motor is running excessively hot it is likely to be casued by the brake
not releasing. This is probably a result of one of the following factors:
•
Brake air-gap setting incorrect
• Poor rectifier supply connection
•
Blown or damaged rectifier
• Worn or damaged parts
Before adjustment disconnect mains power
Air-gap adjustment
1. Tighten down the hexagon head bolt in the centre of the fan cover completely (without
forcing) then unscrew by one third of a turn. For more accurate setting remove the fan
cover and tighten down the hexagon head bolt, again without forcing, then unscrew until
the air-gap is between 0.3mm and 0.5mm.
2. After several air-gap adjustments you will need to verify that the thickness of the friction
surface is no less than 1mm, if it is then the Brake component will need to be replaced
as no more adjustment can be achieved.
Warning:
Too small air-gap values could produce a noisy operation and even cause the
brake not to be released; excessive air-gap values can cause the brake not to
work correctly.
20
10.2 Changing the Brake
Please Note.
We highly recommend you contact The Swimsuit Dryer Company to arrange a qualified Motor
technician to replace the braking component. If you still wish to replace the braking component
please contact a Swimsuit Dryer Company representative for advice.
THE SWIMSUIT DRYER
Copyright 2012
Page of 24
21
11
22
The Swimsuit Dryer Wiring Diagram
12
Technical
Swimsuit Dryer Dimensions:
Height 59cm x Width 37.5cm x Depth 36.5cm
Weight:
Approximately 22kg
Power Consumption:
Standing: approximately 3 watts
Running: approximately 350 watts
Safety Details:
Smooth plastic body
PAT tested
RCD breaker installed
RCD tested
low voltage LEDs
IP56 rated control box
IP55 rated motor
IP54 rated brake motor
IP66 rated conduit & glands
IP65 rated RCD enclsure
Recommended running time:
8-12 seconds
Power Installation Requirements:
230 Volts 50 Hz 13 amp fused spur/ Circuit Breaker
115 Volt 60 Hz local supply.
Waste Plumbing Requirements (optional):
32 – 40 cm waste pipe connection
Recommended Brake adjustment:
Approximately 50,000 – 150,000 uses/ once every 1 year – 2
years depending on usage
Features:
Interchangeable colour cases.
Removable top ring to allow easy access inside the liner.
THE SWIMSUIT DRYER
Copyright 2012
Page of 24
23
24
13
Swimsuit Dryer Maintenance Log