1
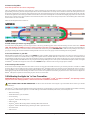
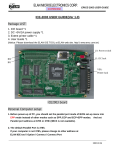
Thank you for purchasing the most technologically advanced brushless electronic speed controller in the world for RC boats, complete with datalogging
capability. Please take the time to read over these instructions to ensure you get the most from your Hydra Ice™ speed control, and enjoy years of
trouble-free operation.
SAFETY FIRST!
Castle Creations is not responsible for your use of this product, or any damage or injuries you may cause or sustain as a result of its usage.
For use by adults only.
Understand that an electric motor that is connected to a battery and speed control may start unexpectedly and cause serious injuries.
Always treat them with necessary respect.
Keep the propeller away from your body and others at all times.
We suggest that you remove the propeller when you are working on the boat with the battery connected.
Please observe all local laws regarding the use of remote control boats.
NEVER attempt to drive two motors using a single speed controller.
1.0 Features of the Hydra Ice 240™ and Hydra Ice2 HV 200™:
• Extremely Low Resistance
• Up to 200 or 240 Amps continuous current
• Water cooled heat sinks (see section 2.1 below)
• Massive 8 gauge wire on Hydra Ice 240 and Hydra Ice2 HV200.
• 8s LiPo max with BEC on the Hydra Ice 240; Hydra Ice2 HV200 does not have a BEC so a separate battery pack is required for receiver/servo
power.
• BEC (5A) provides power to receiver and servo - eliminates separate receiver battery ( Hydra Ice 240 ONLY! )
User Programmable Features:
• Reverse Type
• Reverse Throttle Amount
• Cutoff Voltage
• Auto-LiPo Volts/cell
• Motor Direction
• Motor Timing
• Throttle Dead Band
Safe “power on” arming program helps prevent motor from accidentally turning on. Always use extreme care with high power systems.
Auto shut down when signal is lost or radio interference becomes severe.
2.0 Making Connections on your Hydra Ice™:
Tools required: Parts required:
• Soldering iron (80W)
• Wire cutters (optional)
• Wire stripper (optional) • Rosin core electrical solder
• Battery connector
Hydra Ice™ User Guide
© 2012 Castle Creations, Inc. All rights reserved.
Page 1
2.1 Water Cooling Tubes
Users must provide their own water cooling tubing.
There are 4 aluminum cooling tubes on the Hydra Ice™ speed controllers. You must make three crossover sections of plastic or silicon tubing that are
approximately 3.75-4” long. Connect the input/output tubes to the two aluminum tubes on the top of the controller closest to the battery wires. Connect
the bottom controller tubes on the motor side together with a 3.75” inch length of tubing. Connect the top left tube on the battery side of the controller
to the bottom right tube on the battery side with a 3.75” tube. Now connect the remaining tubes on that side with a slightly longer tube. The water should
flow into the controller on the top board, flow to the bottom board, then to the other side of the top board, down to the remaining side of the bottom
board and then out of the controller.
Please see the diagram below for reference.
2.2 Add a Battery Connector to your Hydra Ice™:
You must attach a quality battery connector of your choice to the red (+) and black (-) power wires. Solder the battery connector to the wires. ENSURE
THAT THE POLARITY IS CORRECT (red wire to battery red wire, black wire to battery black wire). Follow the instructions provided with the
battery connector. After the connector is soldered and insulated with shrink tubing check it ONE MORE TIME to make sure the polarity is correct before
you plug in a battery. We recommend 6.5mm or 8mm gold bullet connectors due to the gauge of motor and battery wires being utilized.
2.3 Connect the Motor to your ESC:
With a brushless system, there is no polarity on the MOTOR side of the controller. Simply solder the three leads to your motor or solder your choice of
connectors to the motor and controller leads, and plug them together. After the throttle calibration routine below – if the motor runs backwards with
forward throttle, simply swap any two of the motor/controller connections and it will reverse the rotation of the motor. You can also reverse the motor
rotation using the Castle Link™ USB software or by using the manual programming function of the speed controller. Both the Hydra Ice 240™ and Hydra
Ice2 HV200™ controllers are designed to control one motor. NEVER attempt to drive two motors using a single speed controller.
2.4 Connecting to the receiver:
Connect the receiver lead (the three color wires with a connector on the end) to the throttle channel on your receiver (channel 2 or throttle on 2.4GHz
receivers). Do not connect a battery to the receiver, as the Hydra Ice 240™ will supply power to the receiver and servo through the receiver connector.
If you would like to use a separate receiver battery with the Hydra Ice 240™ simply remove the red wire from the receiver lead, and use some heat
shrink tubing to keep the wire from shorting out while not in use. Then use a separate receiver battery to power the servos and receiver. The Hydra Ice2
HV200™ will require a separate receiver battery to power the servos and receiver.
3.0 Calibrating the Hydra Ice™ to Your Transmitter:
IMPORTANT NOTE: Calibration is required for the very first use of the HYDRA™ Ice 240™ and Hydra Ice2 HV200™, after updating software
using the Castle Link™ USB programmer, or whenever used with a new/different transmitter.
NOTE TO USERS WITH A FUTABA TRANSMITTER: You must reverse the throttle channel signal on your transmitter. Please refer to your Futaba
instructions.
The Hydra Ice™ contains a throttle calibration feature that you’ll want to use the first time you power it up with a new/different transmitter. Performing
the sequence below will teach the Hydra Ice™ controller what your transmitter’s full throttle, full reverse, and neutral points are.
• Disconnect battery
• Hold full throttle on your transmitter
• Connect battery
• Hydra Ice™ flashes LED and rings once
• Wait 2 seconds
• Hydra Ice™ flashes LED and rings 4 times indicating full throttle measured
• Hydra Ice™ flashes LED while beeping, indicating it’s time to push full reverse
• Push full reverse
• Wait 1 second
Hydra Ice™ User Guide
© 2012 Castle Creations, Inc. All rights reserved.
Page 2
• Hydra Ice™ flashes LED and rings 4 times indicating full reverse measured
• Hydra Ice™ flashes LED while beeping indicating it’s time for neutral
• Relax trigger to neutral (center)
• Wait 1 second
• Hydra Ice™ flashes LED and rings 4 times indicating neutral measured
• Wait for 1 second
• Hydra Ice™ will flash LED and ring twice indicating that it is armed
3.1 Programming the Hydra Ice™
This is as simple as answering a few questions. The Hydra Ice™ asks questions by flashing a setting number, followed by the possible setting values.
There are 7 settings that can be programmed into the Hydra Ice™:
1.
Reverse Type
2.
Reverse Throttle Amount
3.
Cutoff Voltage
4.
Auto-LiPo Volts/cell
5.
Motor Direction
6.
Motor Timing
7.
Throttle Dead Band
You must answer “yes” or “no” to the setting values as they are presented by the Hydra Ice™. When you enter programming mode the controller will emit
a sequence of beeps and LED flashes that tell you which programming step you are in. There are two parts to the beep sequence. The first set of beeps
indicates the “Setting” Number (e.g., Cutoff voltage type), and the second set of beeps indicates a Setting Value (e.g Auto-LiPo). Answering “no” to a
Setting Value will cause the Hydra Ice™ to ask for the next Value. Answering “yes” to a Setting Value will store that setting in the Hydra Ice’s™ permanent
memory. After a setting is stored, the Hydra Ice™ will automatically continue to the next setting until all settings have been stored. NOTE: If you answer
“no” to all Setting Values for a particular Setting Number, the Hydra Ice™ will keep whatever value had been previously programmed. Only
by answering “yes” to a Setting Value will the Hydra Ice™ store/change that value. When answering a question, you will need to move the trigger
to the yes (full throttle) position or the no (full reverse) position and keep it there for about 5 seconds. When the Hydra Ice™ has accepted your answer it
will confirm your reply by flashing the LED and emitting a beeping tone. Release the trigger allowing it to go to neutral to confirm that you are ready for
the Hydra Ice™ to ask the next question. You are not required to continue through all seven programming options. For example, if you wish only to change
the Reverse Type (option 1) then after programming that setting you can disconnect power from the Hydra Ice™ and you’re ready to run. Disconnecting
the controller in the middle of programming simply retains the values for the remaining programming options that were previously set up.
3.2.1 Programming Example
The following is a simplified example demonstrating how to “skip” through a program section, how to set a program option, and how to terminate
programming early. In this example we will: 1) skip (e.g. do not change) Reverse Type setting, 2) change Reverse Throttle Amount to 12.5%, and 3)
terminate programming after this option.
3.2.2 Entering Programming Mode
• Disconnect battery
• Hold full throttle on your transmitter
• Connect battery
• Hydra Ice™ flashes LED and rings once
• Wait 2 seconds
• Hydra Ice™ flashes LED and rings 4 times indicating that it is ready for CALIBRATION mode
• Continue to hold full throttle
• Hydra Ice™ flashes LED while beeping
• Wait 8 seconds
• Hydra Ice™ flashes LED and rings 4 times
• Hydra Ice™ flashes LED while beeping indicating that you are in PROGRAMMING mode
• Let trigger go neutral (center)
At this point the Hydra Ice™ will be flashing/beeping the following sequence:
Beep – Pause – Beep… and then Repeats
This indicates that you are at Question 1 and it is asking to accept/reject Value 1.
3.2.3 Skipping Programming Sections – No change required
Looking at previous section you can see that Question 1 is “What reverse type do you want?” and that Value 1 is “No Reverse”. We don’t want to change
Hydra Ice™ User Guide
© 2012 Castle Creations, Inc. All rights reserved.
Page 3
the current value of this option, so we will say no to each value thereby skipping the programming option.
• Apply full reverse for 1 second (NO)
• Hydra Ice™ flashes RED LED and rings 4 times, indicating that it has accepted your answer
• Hydra Ice™ flashes/beeps: “Beep – Pause – Beep – Beep” (Question 1, Value 2)
• Apply full reverse for 1 second (NO)
• Hydra Ice™ flashes LED and rings 4 times, indicating that it has accepted your answer. At this point you will have answered no to both of the
questions in Section 1, so the Hydra Ice™ will move on to Section 2 without modifying the currently stored value.
3.2.4 Changing a Program Option
• Hydra Ice™ flashes/beeps: “Beep – Beep – Pause – Beep” (Question 2, Value 1). From the Table on the last page, Question 2 is “Reverse Throttle
Amount” and Value 1 is “12.5%”. This is the value we want to accept.
• Apply full throttle for 1 second (YES)
• Hydra Ice™ flashes LED and rings 4 times, indicating that it has accepted your answer.
• At this point the Hydra Ice™ will move on to Setting Number 3.
3.2.5 Terminating Programming Early
In this example, we do not need to change any of the remaining programming options, therefore we can terminate the programming routine by
disconnecting the battery from the Hydra Ice™. This leaves the remaining programming options at their previously stored values.
3.2.6 A Word About Cutoff Voltages
The factory cutoff voltage is Auto-LiPo and 3.2 Volts/cell. If you would like to change this cutoff you may do so using manual programming with your
transmitter or via Castle Link™. If you are running NiCad or NiMH cells, the default cutoff voltage of the Hydra Ice 240™ and Hydra Ice2 HV200™ will need
to be changed via manual programming or using Castle Link™ in order for your ESC to function properly.
4.0 Mounting the Hydra Ice™ ESC:
Your Hydra Ice™ ESC has an aluminum heatsink complete with mounting brackets to make installation much easier. It is highly recommended that you
use these for mounting your ESC. If you are unable to use the brackets you may try using Velcro™ or double-sided tape, but ensure that the ESC is secure
prior to using it. NOTE: warranty does not cover damage due to improper mounting.
5.0 Troubleshooting:
Problem: Everything is hooked up correctly, the BEC (receiver and servo) works, but the throttle does not work.
Solution: The controller is not seeing the four seconds of neutral throttle and is not arming. Try moving your throttle trigger slightly in each direction to
arm the controller or follow the calibrating function Section 3.1 above. You may also check to make sure that your endpoint adjustments on your radio (if
it has them) are set all the way open (both top and bottom are furthest from zero).
Problem: Every time I throttle all the way up, the controller “cuts off” after a few seconds, even with fresh charged batteries.
Solution: The controller will automatically shut down the motor if the battery voltage falls below the programmed voltage cutoff. If the cutoff is kicking
in with fresh charged batteries, it means that the voltage is dropping very quickly. This is usually an indication of a motor that is drawing too much current
for the batteries to handle. Try using a smaller prop on the motor, or using batteries with a higher capacity or C rating. Check your current limiting setting.
If set too sensitive it will trigger a premature cutoff. Also, check your cutoff voltage to make sure it is set properly.
Problem: Nothing seems to work, receiver and servos are dead, and the throttle is dead.
Solution: Check all connections to ensure that they are correct, and that the polarity (+/-) of the battery connections are correct. If everything is correctly
connected, and the receiver and servos still do not work, contact the dealer where you purchased your Hydra Ice™ or contact Castle Creations directly.
6.0 Standard Features Employed by the Hydra Ice™ Series
LED
The LED’s primary function is programming the features on the Hydra Ice™ ESC via your transmitter.
However, they have several other functions due to the error codes built into the controller, and the data
logging capability. Please see Section 7.0 for more details on all of the LED functions.
Loss of Signal
The Hydra Ice™ ESCs will stop the motor as a safety feature when the throttle signal is lost or corrupt. Moving
the throttle to the neutral position for two seconds may be required to re-arm the motor. Once armed, the
LED also provides an indication that the controller has reached full throttle by lighting continuously.
Low Voltage Cutoff
ESC stops the motor power when the input battery voltage drops to the programmed cutoff voltage.
Current Limiting
ESC optionally detects an over-current and shuts down to protect its circuitry.
Continued on the next page.
Hydra Ice™ User Guide
© 2012 Castle Creations, Inc. All rights reserved.
Page 4
Electronic Timing
Advance
A setting that may improve the efficiency of the system for some motors. The standard Hydra Ice™ setting is
to automatically detect and adjust for the motor it is driving.
Throttle Dead Band
Adjusts the amount of dead space around your neutral point on your transmitter. A lower setting will cause
the motor to turn with less throttle input.
7.0 LED Indications
If you are not calibrating and have no throttle input then:
• Flashing Red and Yellow = over-temp.
• Flashing Green and Yellow = low voltage cut-off (battery).
• Flashing Green OR Red = speed control has not been calibrated and is not armed; or throttle sub-trim is not at 0.
• Solid Green OR Red = should not happen when at neutral, indicates full throttle/reverse.
• Yellow LED flashing = ESC is logging data.
• Yellow LED is solid = datalogger is full. Use the Castle Link™ to clear the datalogger, and download your logged data.
• Flashing Green and Red = speed control is not receiving a valid signal from the receiver, usually indicates the receiver wire is plugged in backwards
into the receiver; possible problem with controller or with throttle channel on receiver.
If you are applying throttle or reverse when NOT calibrating:
• Flashing Red and Yellow = over-temp.
• Flashing Green and Yellow = low voltage cut-off (battery).
• Flashing Green OR Red = indicates partial throttle (green) or reverse (red).
• Solid Green OR Red = indicates full throttle (green) or reverse (red).
• Yellow LED flashing = ESC is logging data.
• Yellow LED is solid = Datalogger is full. Use the Castle Link™ to clear the datalogger, and download your logged data.
• Flashing Green and Red = speed control is not receiving a valid signal from the receiver, usually indicates the receiver wire is plugged in backwards
into the receiver; possible problem with controller or with throttle channel on receiver.
If you are applying throttle or reverse WHEN calibrating:
• Flashing Red and Yellow = should not happen when calibrating.
• Flashing Green and Yellow = should not happen when calibrating.
• Flashing Green OR Red while beeping = indicates speed control is looking for full throttle (green) or full reverse (red). If it continues for more than
~ 8 seconds, indicates speed control is seeing partial throttle (green) or reverse (red), increase endpoints on transmitter so speed control sees
full throttle/reverse.
• Solid Green OR Red = indicates full throttle (green) or reverse (red) has been read.
• Flashing Yellow = speed control is not seeing a valid neutral signal, check your transmitters throttle sub-trim is at zero, exponential is set to 0 or
linear, and mixing is disabled.
• Solid Yellow = indicates neutral has calibrated and is armed.
• Flashing Green and Red = speed control is not receiving a valid signal from the receiver. Usually indicates the receiver wire is plugged in backwards
into the receiver; also happens when speed control has accepted a calibration setting (throttle, reverse or neutral) and flashes/chimes 4 times
before moving to next calibration point; or problem with throttle channel on receiver.
• Yellow LED flashing = ESC is logging data.
• Yellow LED is solid = Datalogger is full. Use the Castle Link™ to clear the datalogger, and download your logged data.
8.0 Battery Eliminator Circuit (BEC)
The Hydra Ice 240™ uses a switching battery eliminator circuit (BEC) that will provide up to 5A of max input. This is only in the Hydra Ice 240™ ESCs.
Hydra Ice2 HV200™ ESCs do not have an integrated BEC. You must use an external battery or BEC to power your servos and receiver.
NOTE 1: If you™choose to use a separate rx battery or any form of external BEC, you MUST disable the RED WIRE on the throttle cable from the
Hydra Ice 240 ESC.
NOTE 2: Most servo connectors are rated to conduct up to 5 amps of current continuously. If your application draws more than this amount on
a continuous basis, you should consider alternate means of connecting this power to the RX and or servos.
Hydra Ice™ User Guide
© 2012 Castle Creations, Inc. All rights reserved.
Page 5
NOTE 3: You should NEVER disconnect the red receiver wire on the Hydra Ice2 HV200™ ESC. It does not have an integrated BEC so all wires
must be in place for proper controller operation. Disconnecting the red wire will render the controller inoperable.
NOTE 4: Always power your radio transmitter before powering up the receiver and/or the ESC. Some receivers with failsafe features or
Spektrum receiver units that are not bound on receiver power up are entirely capable of causing the arming sequence to occur and command
the ESC to drive the motor. Always keep the boat on a stand and clear of body parts when the ESC is powered.
NOTE 5: Always perform a range check at full, half, and zero throttle before operating your model with any new speed controller!
NOTE: When setting LiPo cutoff voltage follow your battery manufacturer’s recommendations!
Castle Creations is not responsible for damage to batteries due to improper cutoff voltage.
9.0 PROGRAMMABLE FEATURES
NOTE: Factory Defaults are indicated by asterisk (*)
Hydra Ice 240™
1. Reverse Type
2. Reverse Throttle Amount
3. Cutoff Voltage
4. Auto-LiPo Volts/cell
5. Motor Rotation Direction
6. Motor Timing
7) Throttle Dead Band
1. Forward Only*
No reverse function
2. Forward to Reverse
Forward and reverse function
1. 12.5%
Maximum reverse speed equal to 12.5% of full power
2. 25%
Maximum reverse speed equal to 25% of full power
3. 50%*
Maximum reverse speed equal to 50% of full power
4. 100%
Maximum reverse speed equal to 100% of full power
1. None
NiCad/NiMH cells ONLY!
2. Auto-LiPo*
Automatically sets cutoff voltage to 3.2v/cell
3. 6v
2s (2 cell) LiPo
4. 9v
3s (3 cell) LiPo
5. 12v
4s (4 cell) LiPo
6. 18v
6s (6 cell) LiPo
1. 3.0v
Cuts off LiPo pack(s) at 3v/cell
2. 3.1v
Cuts off LiPo pack(s) at 3.1v/cell
3. 3.2v*
Cuts off LiPo pack(s) at 3.2v/cell
4. 3.3v
Cuts off LiPo pack(s) at 3.3v/cell
5. 3.4v
Cuts off LiPo pack(s) at 3.4v/cell
6. 3.5v
Cuts off LiPo pack(s) at 3.5v/cell
1. Forward*
Rotates motor forward
2. Reverse
Rotates motor in reverse
1. Low
Maximum efficiency/runtime
2. Normal*
Balance of power/runtime
3. Race
More power/less runtime/more motor heat! No warranty!
1. 0.15ms
Very wide
2. 0.10ms*
Average
3. 0.075
Small
4. 0.050
Smaller
5. 0.025
Very small
1. Forward only*
No reverse function
2. Forward to Reverse
Forward and reverse function
Hydra Ice2 HV200™
1. Reverse Type
Continued on the next page.
Hydra Ice™ User Guide
© 2012 Castle Creations, Inc. All rights reserved.
Page 6
2. Reverse Throttle Amount
3. Cutoff Voltage
4. Auto-LiPo Volts/cell
5. Motor Rotation Direction
6. Motor Timing
7. Throttle Dead Band
1. 12.5%
Maximum reverse speed equal to 12.5% of full power
2. 25%
Maximum reverse speed equal to 25% of full power
3. 50%*
Maximum reverse speed equal to 50% of full power
4. 100%
Maximum reverse speed equal to 100% of full power
1. Auto-LiPo*
Automatically sets cutoff voltage to 3.2v/cell
2. 9v
3s (3 cell) LiPo
3. 12v
4s (4 cell) LiPo
4. 18v
6s (6 cell) LiPo
5. 24v
8s (8 cell) LiPo
6. 30v
10s (10 cell) LiPo
1. 3.0v/cell
Cuts off LiPo pack(s) at 3.0v/cell
2. 3.1v/cell
Cuts off LiPo pack(s) at 3.1v/cell
3. 3.2v/cell*
Cuts off LiPo pack(s) at 3.2v/cell
4. 3.3v/cell
Cuts off LiPo pack(s) at 3.3v/cell
5. 3.4v/cell
Cuts off LiPo pack(s) at 3.4v/cell
6. 3.5v/cell
Cuts off LiPo pack(s) at 3.5v/cell
1. Forward*
Rotates motor forward
2. Reverse
Rotates motor in reverse
1. Low
Maximum efficiency/runtime
2. Normal*
Balance of power/runtime
3. Race
More power/less runtime/more motor heat! No warranty!
1. 0.15ms
Very wide
2. 0.10ms*
Average
3. 0.075ms
Small
4. 0.050ms
Smaller
5. 0.025ms
Very small
10.0 Connecting your Hydra Ice™ series ESC to Castle Link™:
The Hydra Ice 240™ ESC has an onboard BEC. It will draw power through the Castle Link from the USB port. It does not require an external power source.
If you have removed the red wire from the receiver connector on your Hydra Ice 240™ your USB port will not power your ESC, and you will need to
provide external power to connect to Castle Link™. Plug the Hydra Ice 240™ ESC into the Castle Link™ and then plug a battery into the ESC (the one you
normally use to operate the model). The Hydra Ice 240™ will not link if connected out of order. The Hydra Ice2 HV200™ does NOT have an onboard BEC.
You must power the Hydra Ice2 HV200™ using a battery pack on the battery leads in order to power the onboard processor for Castle Link™ operation.
This is necessary because the throttle lead/Castle Link™ serial wire is optically isolated from the controller and cannot provide power from the USB port
to the controller. Any pack of 4s or larger will be sufficient for this purpose. You must plug the Hydra Ice2 HV200™ controller into the Castle Link™ before
you plug in your battery pack. The ESC will not link if connected out of order.
11.0 Settings via Castle Link™:
• Cutoff Voltage - Cuts off power to the motor to prevent damage to the battery pack
• Auto-LiPo Volts/cell - Adjustable between 3.0 and 3.5v/cell, set per manufacturer’s specifications
• Reverse Type - Add/Remove reverse with this setting
• Motor Direction - Reverses motor rotation direction
• Motor Type - Hydra Ice™ will run BOTH brushed and brushless motors
• Power On Warning Beep - A beep approximately every 20s to let you know your batteries are plugged in
• Max Forward Power - Limits forward speed, useful for handing over the controls to the less experienced
• Max Reverse Power - Control your reverse speed, or disable it altogether
• Punch Control - Limits power output of motor from a dead stop
• Sensorless Motor Timing - May improve the efficiency of the system for some motors. If you increase this setting check for increased motor
temperature.
• Arming Time - The amount of time from when the ESC is powered on until it arms
• Throttle Dead Band - Adjusts the amount of dead space around your neutral point on your transmitter
Hydra Ice™ User Guide
© 2012 Castle Creations, Inc. All rights reserved.
Page 7
• Start Power - How much power the controller is allowed to send the motor to start the boat from a dead stop
• Current Limiting - ESC optionally detects an over-current and shuts down to protect its circuitry
• BEC Voltage - Hydra Ice 240™ only, adjusts the output voltage to your servos and receiver
• Throttle Curve - Allows you to fine tune how your motor reacts to throttle inputs from your transmitter
• Brake Curve - Allows you to fine tune how your motor reacts to brake inputs from your transmitter
12.0 Datalogging features of the Hydra Ice™ series:
Both the Hydra Ice 240™ and Hydra Ice2 HV200™ have the ability to datalog and provide you with very useful data. Among these are:
• Voltage - The voltage of your battery pack from plug-in to the end of the run.
• Ripple - The change in voltage measured each time the motor is pulsed. If the maximum number starts to increase over time you should consider
purchasing new packs.
• Current - The amperage your setup is drawing.
• Amp Hours - The approximate amount of battery capacity you used during your session.
• Watts - The amount of watts your setup is drawing.
• Temperature - The temperature of your Hydra Ice™ ESC. The maximum recommended temperature is 200°F/93°C.
• RPM - The RPM of your motor. Be sure to go to the “Edit” tab and change your motor pole count, Kv, and gearing to get an accurate reading.
• Throttle In - The millisecond pulse width that you were sending to the ESC at a given moment. 1ms is full reverse, 1.5ms is neutral, and 2.0ms is
full throttle.
• Power Out - The percentage of throttle your setup was capable of putting out.
13.0 Intended Use
The Hydra Ice™ is intended for exclusive use with boats only. Use in any other vehicles or aircraft is not covered by warranty and will not be supported
by Castle Creations, Inc.
14.0 Contact & Warranty Info
Your Hydra Ice™ ESC is warranted for one (1) year from date of purchase to be free from manufacturing and component defects. This warranty does
not cover damage caused to your controller from abuse. Abuse includes, but is not limited to, the following: incorrect wiring, over voltage, overloading,
improper motor selection, incorrect controller settings, insufficient batteries, insufficient connectors, or water damage. If you have any questions,
comments, or wish to return your Hydra Ice™ ESC for warranty or non-warranty repair or replacement, please contact Castle Creations, Inc. at:
Castle Creations Inc.
540 North Rogers Road
Olathe, Kansas 66062
phone: (913) 390-6939
fax: (913) 390-6164
e-mail: [email protected]
website: www.castlecreations.com
15.0 Non-Warranty Repairs
Never throw away a damaged Hydra Ice™! You may send it to Castle and take advantage of our flat price replacement offer. Please check our website
for specific pricing.
Hydra Ice™ User Guide
© 2012 Castle Creations, Inc. All rights reserved.
Page 8