1
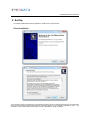
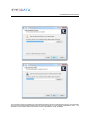
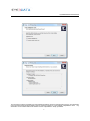
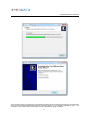
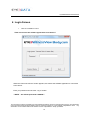
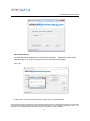
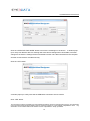
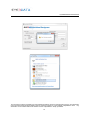
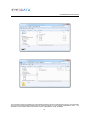
Eye3WitnessView Body Camera Software Manual Copyright 2012-2013, MAI Media Group, LLC d.b.a. Eye3Data All Rights Reserved Eye3WitnessView User Manual Contact Information Eye3Data 9624 Cincinnati Columbus Rd., Cincinnati, OH 45241 USA Web site: www.eye3data.com Local Phone: 513-779-0604; Local Fax: 513.898.0206 North American Sales: 877.777.9059 Email: [email protected] Technical Support Email: technical [email protected] Customer Support Email: customer [email protected] LEGAL NOTICE Copyright ©2013 Eye3Data. All rights reserved. Eye3Data, Eye3WitnessView, VTracker, WitnessPro, WitnessPro-HR, Eye3Connect, Eye3Dispatch, Eye3VMS are registered trademarks of MAI Media Group LLC. Acrobat is a registered trademark of Adobe Systems Incorporated. Microsoft and Microsoft Windows registered trademarks of Microsoft Corporation. The information contained in this guide is subject to change without notice. This manual was last modified on September 1, 2014. For your Records Complete the following product purchase information. The factory requests this information when contacted for technical support. It is also valuable in case of loss or theft. Purchase Date: _______________________________________ Serial Number: ________________________________________ Thank you for using Eye3Data products. This document contains proprietary and copyrighted information subject to change without notice. The information in this document shall not be duplicated, used, or disclosed in whole or in part outside of Eye3Data © 2014. Any distribution of this material without the written consent of Eye3Data is strictly prohibited. 2 Eye3WitnessView User Manual Table of Contents 1. Overview ............................................................. 4 Features Minimum Requirements 2. Set Up.................................................................. 5 Client Installation Client Un-Installation 3. Connect……………….......................................... 9 4. Login………………………………….................... 10 Retrieving Video Files for Playback Allow user to activate via USB Allow user to login Sync your computer clock Modify login, password, and user id Allow user to define serial id or badge number This document contains proprietary and copyrighted information subject to change without notice. The information in this document shall not be duplicated, used, or disclosed in whole or in part outside of Eye3Data © 2014. Any distribution of this material without the written consent of Eye3Data is strictly prohibited. 3 Eye3WitnessView User Manual 1 Overview This manual is intended to provide the user with the information required for proper installation, initial setup and explanation of the individual programming options. Features • Allow user activate via USB • Allow user to login • Sync your computer clock • Modify login password and user id • Allow user to define serial id or badge number Minimum Requirements • Windows XP (Service Pack 3) • Windows 7 (32 and 64 bit) • Additional or external hard drive storage (recommended for archiving video) Compatible Devices Eye3WitnessView Body Camera This document contains proprietary and copyrighted information subject to change without notice. The information in this document shall not be duplicated, used, or disclosed in whole or in part outside of Eye3Data © 2014. Any distribution of this material without the written consent of Eye3Data is strictly prohibited. 4 Eye3WitnessView User Manual 2 Set Up To install Eye3WitnessView Client application, double click on setup.exe file. Client Installation This document contains proprietary and copyrighted information subject to change without notice. The information in this document shall not be duplicated, used, or disclosed in whole or in part outside of Eye3Data © 2014. Any distribution of this material without the written consent of Eye3Data is strictly prohibited. 5 Eye3WitnessView User Manual This document contains proprietary and copyrighted information subject to change without notice. The information in this document shall not be duplicated, used, or disclosed in whole or in part outside of Eye3Data © 2014. Any distribution of this material without the written consent of Eye3Data is strictly prohibited. 6 Eye3WitnessView User Manual This document contains proprietary and copyrighted information subject to change without notice. The information in this document shall not be duplicated, used, or disclosed in whole or in part outside of Eye3Data © 2014. Any distribution of this material without the written consent of Eye3Data is strictly prohibited. 7 Eye3WitnessView User Manual This document contains proprietary and copyrighted information subject to change without notice. The information in this document shall not be duplicated, used, or disclosed in whole or in part outside of Eye3Data © 2014. Any distribution of this material without the written consent of Eye3Data is strictly prohibited. 8 Eye3WitnessView User Manual After software is installed, the WitnessView icon will appear on your desktop. Double click on the WitnessView icon to start the software. If you use WIN7, run as Administrator to make sure all functions work properly. Client Un-installation Go to START—ALL PROGRAMS—Eye3WitnessView: select Uninstall to delete WitnessView Client 3 Connect To retrieve video from the WitnessView BodyCam to your computer device, connect both ends of the provided USB cable to the camera and the computer. Turn the camera “ON” by pressing the power button on the camera. When the camera is successfully connected to the computer device a picture of a monitor will appear on the LED screen of the camera. Next, start the WitnessView Client application. the desktop. Double click on the “WitnessView” icon located on Alternatively, the program can also be started by clicking “Start”, selecting “All Programs”, selecting “Eye3WitnessView” and clicking on “WitnessView.” **NOTE: The camera must be connected to the computer and in the “ON” position to have videos downloaded. You must connect the USB cable to the camera and on the computer. The “LOGIN SCREEN” for the WitnessView Client application will appear on your desktop: This document contains proprietary and copyrighted information subject to change without notice. The information in this document shall not be duplicated, used, or disclosed in whole or in part outside of Eye3Data © 2014. Any distribution of this material without the written consent of Eye3Data is strictly prohibited. 9 Eye3WitnessView User Manual 4 Login Screen • Click the “CONNECT” button **This will connect the software application to the device** When the “Disconnect Device” button appears, this means the software application is connected to the device. Enter your password and click the “Log In” button. **NOTE: the default password is 000000** This document contains proprietary and copyrighted information subject to change without notice. The information in this document shall not be duplicated, used, or disclosed in whole or in part outside of Eye3Data © 2014. Any distribution of this material without the written consent of Eye3Data is strictly prohibited. 10 Eye3WitnessView User Manual Device Setup Screen The “DEVICE SETUP SCREEN” for the WitnessView will open. Additionally, another small window will pop up to notify user that the time has synchronized successfully. Click “OK” On this screen, users are able to set up the Device Time, ID, and Password. This document contains proprietary and copyrighted information subject to change without notice. The information in this document shall not be duplicated, used, or disclosed in whole or in part outside of Eye3Data © 2014. Any distribution of this material without the written consent of Eye3Data is strictly prohibited. 11 Eye3WitnessView User Manual Click the “OPEN FILE EXPLORER” button to access the recordings on the device. A window pops up to notify user that the device is entering disk mode and recordings will be accessible, but further changes to the device’s settings will be inaccessible until the unit is disconnected from the computer and then reconnected to re-enable security. Click the “YES” button. A window pops up to notify user that the USB Mode connection was successful. Click “YES” button. This document contains proprietary and copyrighted information subject to change without notice. The information in this document shall not be duplicated, used, or disclosed in whole or in part outside of Eye3Data © 2014. Any distribution of this material without the written consent of Eye3Data is strictly prohibited. 12 Eye3WitnessView User Manual This document contains proprietary and copyrighted information subject to change without notice. The information in this document shall not be duplicated, used, or disclosed in whole or in part outside of Eye3Data © 2014. Any distribution of this material without the written consent of Eye3Data is strictly prohibited. 13 Eye3WitnessView User Manual This document contains proprietary and copyrighted information subject to change without notice. The information in this document shall not be duplicated, used, or disclosed in whole or in part outside of Eye3Data © 2014. Any distribution of this material without the written consent of Eye3Data is strictly prohibited. 14 Eye3WitnessView User Manual CORPORATE HEADQUARTERS 9624 Cincinnati Columbus Road Cincinnati, Ohio 45241 Main: 513.779.0604 Toll Free: 888.777.9059 Fax: 513.898.0206 www.eye3mobile.com This document contains proprietary and copyrighted information subject to change without notice. The information in this document shall not be duplicated, used, or disclosed in whole or in part outside of Eye3Data © 2014. Any distribution of this material without the written consent of Eye3Data is strictly prohibited. 15