1
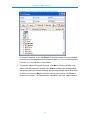
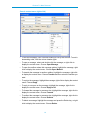
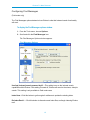
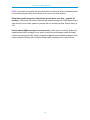
Eudora® Email 7.0
New Features Manual
for Windows
This manual was written for use with the Eudora® for Windows software version 7.0. This manual and the Eudora
software described in it are copyrighted, with all rights reserved. This manual and the Eudora software may not be
copied, except as otherwise provided in your software license or as expressly permitted in writing by QUALCOMM
Incorporated.
Copyright © 2005 by QUALCOMM Incorporated. All rights reserved.
QUALCOMM, Eudora, Eudora Pro, Eudora Light, and QChat are registered trademarks of QUALCOMM
Incorporated.
PureVoice, SmartRate, MoodWatch, WorldMail, Eudora Internet Mail Server, and the Eudora logo are trademarks
of QUALCOMM Incorporated.
Microsoft, Outlook, Outlook Express, and Windows are either registered trademarks or trademarks of Microsoft
Incorporated in the United States and/or other countries.
Adobe, Acrobat, and Acrobat Exchange are registered trademarks of Adobe Systems Incorporated.
Apple and the Apple logo are registered trademarks, and QuickTime is a trademark of Apple Computer, Inc.
Netscape, Netscape Communicator, and Netscape Messenger are registered trademarks of the Netscape
Communications Corporation in the United States and other countries. Netscape's logos and Netscape product and
service names are also trademarks of Netscape Communications Corporation, which may be registered in other
countries.
All other trademarks and service marks are the property of their respective owners.
Use of the Eudora software and other software and fonts accompanying your license (the "Software") and its
documentation are governed by the terms set forth in your license. Such use is at your sole risk. The Software and
its documentation (including this manual), and QUALCOMM's software maintenance and extended maintenance, if
applicable, are provided "AS IS" and without warranty of any kind and QUALCOMM AND ITS LICENSORS
(HEREINAFTER COLLECTIVELY REFERRED TO AS "QUALCOMM") EXPRESSLY DISCLAIM ALL
WARRANTIES, EXPRESS OR IMPLIED, INCLUDING, BUT NOT LIMITED TO THE IMPLIED WARRANTIES OF
MERCHANTABILITY AND FITNESS FOR A PARTICULAR PURPOSE AND AGAINST INFRINGEMENT.
QUALCOMM DOES NOT WARRANT THAT THE FUNCTIONS CONTAINED IN THE SOFTWARE WILL MEET
YOUR REQUIREMENTS, OR THAT THE OPERATION OF THE SOFTWARE WILL BE UNINTERRUPTED OR
ERROR-FREE, OR THAT DEFECTS IN THE SOFTWARE WILL BE CORRECTED. FURTHERMORE,
QUALCOMM DOES NOT WARRANT OR MAKE ANY REPRESENTATIONS REGARDING THE USE OR THE
RESULTS OF THE USE OF THE SOFTWARE OR ITS DOCUMENTATION IN TERMS OF THEIR
CORRECTNESS, ACCURACY, RELIABILITY, OR OTHERWISE. NO ORAL OR WRITTEN INFORMATION OR
ADVICE GIVEN BY QUALCOMM OR A QUALCOMM AUTHORIZED REPRESENTATIVE SHALL CREATE A
WARRANTY OR IN ANY WAY INCREASE THE SCOPE OF THIS WARRANTY. SOME JURISDICTIONS DO NOT
ALLOW THE EXCLUSION OF IMPLIED WARRANTIES, SO THE ABOVE EXCLUSION MAY NOT APPLY.
UNDER NO CIRCUMSTANCES INCLUDING NEGLIGENCE, SHALL QUALCOMM, ITS LICENSORS OR THEIR
DIRECTORS, OFFICERS, EMPLOYEES OR AGENTS BE LIABLE FOR ANY INCIDENTAL, SPECIAL OR
CONSEQUENTIAL DAMAGES (INCLUDING DAMAGES FOR LOSS OF BUSINESS, LOSS OF PROFITS,
BUSINESS INTERRUPTION, LOSS OF BUSINESS INFORMATION AND THE LIKE) ARISING OUT OF THE USE
OR INABILITY TO USE THE SOFTWARE OR ITS DOCUMENTATION, EVEN IF QUALCOMM OR A QUALCOMM
AUTHORIZED REPRESENTATIVE HAS BEEN ADVISED OF THE POSSIBILITY OF SUCH DAMAGES. SOME
JURISDICTIONS DO NOT ALLOW THE LIMITATION OR EXCLUSION OF LIABILITY FOR INCIDENTAL OR
CONSEQUENTIAL DAMAGES SO THE ABOVE LIMITATION OR EXCLUSION MAY NOT APPLY.
In no event shall QUALCOMM's total liability to you for all damages, losses, and causes of action (whether in
contract, tort, including negligence, or otherwise) exceed the amount paid for the Software and its documentation.
Acknowledgments
The Eudora software for version 7.0 was designed and developed by Shrinivas Bairi, Jeff Beckley, John D. Boyd,
Rob Chandhok, Sagar Chitnis, Marshall Clow, Steve Dorner (original author of Eudora), Sangita Mohan, Apul
Nahata, Martin Naskovski, Ben Ogdon, Eitan Pilipski, Raj Pitchaimani, Bill Rhodes, Jim Riley, Keerthi Sundarmurthy,
Geoff Wenger, and Dale Wiggins. The software was quality assured by Colleen Archer, Kevin Askew, Kevin
Crosthwaite, Matt Dudziak, and Steve Han. Other contributors to this version of Eudora are Anton de Anda, Anthony
Arellano, Ellen Boemer, Dianna DiCintio, Helen Elson, Beth Flanagan, Vera Fuentes, Bill Ganon, Stevan Gonzales,
Cary Gordon, Jen Isaac, J. Michael Lanaghan, Judi Meade, Armand Rouleau, James Santos, Carolyn Schultz, Joe
Toth, and Jim Ybarra. This manual was written by Danny Atwood. Thanks to all the users and testers of Eudora,
whose suggestions have made it a much better program than it otherwise would have been.
The SpamHeaders plug-in was made easy thanks to the Boost Regular Expression Library, one of a group of free,
peer reviewed, portable C++ libraries maintained at <http://www.boost.org>.
The SpamWatch plug-in was heavily influenced by work done by Paul Graham, and publicized in his article "A Plan
for Spam" <http://www.paulgraham.com/spam.html>, and additional suggestions made by Gary Robinson in his
Linux Journal article "Spam Detection" <http://radio.weblogs.com/0101454/stories/2002/09/16/
spamDetection.html>.
About the Name
Why the name Eudora?
When looking for a name for this new Post Office Protocol mail program, we thought immediately of the title of the
short story “Why I Live at the P.O.,” and named the program after the author of the story, Eudora Welty. For more
information, see http://www.eudora.com/presskit/backgrounder.html
“Why I Live at the P.O.” can be found in a collection entitled A Curtain of Green and other stories (Harcourt Brace &
Co.). Ms. Welty’s stories are funny, sad, and fascinating; she’s surely one of the great American writers.
November 2005
80-48377-5 Rev A
Contents
Eudora 7.0 New Features
4
Ultra Fast Search 4
Using Find Messages 4
Configuring Find Messages 15
BossWatch 17
Using BossWatch for Outgoing Messages 17
Using BossWatch with the Address Book 18
Using BossWatch with Make Address Book Entry 18
Configuring BossWatch 19
IMAP 21
S/MIME 22
Installing the S/MIME plugin 22
Signing outgoing messages with S/MIME 22
Verifying the digital signature on an incoming message
Encrypting a message 23
Decrypting an encrypted message 24
iv
23
Eudora 7.0 New Features
Welcome to Eudora® 7.0! This document describes the new features and functions in Eudora
7.0 for Windows.
• Ultra Fast Search - Find messages quickly with indexed searching powered by X1
(Paid mode only)
• BossWatch - Avoid accidentally sending messages to unintended recipients (Paid
mode only)
• IMAP - Enhanced IMAP support in Eudora improves IMAP functionality while offline
• S/MIME - Digitally sign messages, verify the digital signatures of incoming mail,
send encrypted messages, and decrypted messages sent to you
Ultra Fast Search
(Paid mode only)
Eudora 7.0’s Find Messages feature is now indexed and powered by X1 for fast searches for
Paid mode users. Even with decades of archives containing hundreds of thousands of
messages, Eudora 7 finds results in seconds.
Using Find Messages
NOTE: If you are using Eudora in Sponsored or Light mode, you have access to fewer features
when using Eudora’s Search functionality.
You can perform complex searches through messages in all or a selected number of
mailboxes or folders. Once your search is complete, you can sort, delete, and view the
resulting messages. You can search for a specific piece of information in all your mail or just
search for a particular item that matches the criteria you set. Set up the criteria for your search
by selecting options from the drop-down lists and by entering text.
4
Eudora 7.0 New Features
To set up criteria for a message search
1. From the Edit menu, choose Find or press Ctrl+F.
The Find submenu appears.
2. From the Find submenu, choose Find Messages.
The Find Messages dialog box appears.
Find Messages dialog box
In the Find Messages dialog box, your mailboxes appear along with check boxes.
If the boxes are checked, Eudora will perform a search in these mailboxes
according to the criteria you are about to set up. To omit a mailbox from the search,
just un-check the box. If you had a mailbox selected when opening the Find
Messages dialog, Eudora will default to only that mailbox being checked.
Otherwise, all mailboxes are checked by default.
If you right-click in the Find Messages window, a context menu appears allowing
you to clear all the check marks so you can select the mailboxes to search. Choose
Clear All to clear the check marks or choose Check All to check all the mailboxes.
5
Eudora 7.0 New Features
Find Messages context menu (right-click)
The top part of the dialog box is where you select and enter criteria for your search.
Each search can use up to five “terms” and “verbs” as its criteria, connecting them
as appropriate. Eudora remembers the previous criteria if you close and reopen the
Find Messages dialog box. The drop-down and verb lists displaying the criteria you
can select are shown below:
Find Messages drop-down and verb options lists
3. In the drop-down criteria list (Anywhere is the default), choose where in the
message you want Eudora to search for text. Following is a description of each
option.
Anywhere—Choose this option to search everywhere in the message including all
header fields and message body. This includes headers that are normally exposed
only with the Blah Blah Blah icon button turned on.
Headers—Choose this option to search only in the header fields of the message.
This includes headers that are normally exposed only with the Blah Blah Blah icon
button turned on.
6
Eudora 7.0 New Features
Body—Choose this option to search only in the body of the message.
Attachment Name(s)—Choose this option to search only attachment names in
the message.
Summary—Choose this option to search text entered in only the header From: and
Subject: fields of the message.
Status—Choose this option to search for messages by status. A status drop-down
options list displays (the default is Unread). You can choose from Unread, Read,
Replied, Forwarded, Redirected, Sent, Sendable, Unsent, Queued, Time-Queued,
Unsandable, or Recovered. The verb field defaults to is.
Priority—Choose this option to search for messages by priority. A priority dropdown options list displays (the default is Highest). You can choose from Highest,
High, Normal, Low, or Lowest. The verb field defaults to is.
Attachment Count—Choose this option to search the number of attachments
joined to each message. A counter appears for you to select the desired number,
or you can type the number in the text box. The verb field defaults to is.
Label—Choose this option to search for messages by label. Choose Label, and
the labels drop-down options list displays (the default is None). You can choose
from the labels you previously set up. The verb field defaults to is.
Date—Choose this option to search for messages by date. Once selected, today’s
date appears. Click the down arrow to display the current month’s calendar. Using
the arrows on the calendar, you can display the preceding or succeeding months
and years. Choose the date to or from where you want the search to begin.
Size—Choose this option to search for messages by their file size (in kilobytes). A
counter appears for you to select the desired number of kilobytes, or you can type
the number in the text box. The verb field defaults to is.
Age—Choose this option to search for messages by age (in days). A counter
appears for you to select the desired number of days, or you can type the number
in the text box. The verb field defaults to is.
Personality—Choose this option to search for messages by account. A drop-down
list displaying your previously set up personalities appears. Select the desired
personality.
Mailbox Name—Choose this option to search for messages in a specific mailbox.
Enter the name of the mailbox in the text box. This works well if you selected
several mailboxes but only wanted certain mailboxes that matched the criteria you
selected.
7
Eudora 7.0 New Features
To—Choose this option to search text entered in only the To: header field of the
message.
From—Choose this option to search text entered in only the From: header field of
the message.
Subject—Choose this option to search text entered in only the Subject: header
field of the message.
CC—Choose this option to search text entered in only the Cc: header field of the
message.
BCC—Choose this option to search text entered in only the Bcc: header field of the
message.
Any recipient—Choose this option to search text entered in only the To:, Cc:, and
Bcc: header fields of the message.
In the example below, Headers was selected from the drop-down options list as the
first criteria.
4. After you select the option from the drop-down list, select a verb to link the first
option with the text you you want to find. The verb drop-down lists are shown below:
Verb drop-down lists
Anywhere
Headers
Body
Attachment Name (s)
Summary
Mailbox Name
To
From
Subject
CC
BCC
Any Recipient
Date
Age
Size
Priority
Attachment Count
Status
Label
Personality
Following is a description of each verb option in the drop-drop list.
contains—If the specific item contains the text string, search and display those
messages. This allows for other text to the right of the text string.
contains whole word—If the specific item contains the exact word, search and
display those messages. This does not allow for other surrounding text.
8
Eudora 7.0 New Features
does not contain—If the specific item does not contain the text string, search and
display those messages.
matches x1 query—If the specific items matches the x1 formatted query string,
search and display those messages. This allows for complex queries to be
performed within a single search criterion. For details on x1 query syntax, please
see X1 Search Queries on page 433 of the Eudora 7.0 User Manual.
NOTE: The following options are available only when Indexed Search is turned off:
Verb drop-down lists
Anywhere
Headers
Body
Attachment Name (s)
Summary
Mailbox Name
To
From
Subject
CC
BCC
Any Recipient
Date
Age
Size
Priority
Attachment Count
Status
Label
Personality
is—If the specific item is an exact match, search and display those messages.
is not—If the specific item is not an exact match, search and display those
messages.
starts with—If the specific item starts with the text string, search and display those
messages.
ends with—If the specific item ends with the text string, search and display those
messages.
matches regexp (case insensitive)—If the specific item matches the regular
expressions characters with case insensitivity, search and display those
messages.
9
Eudora 7.0 New Features
Regular Expression is a search string that uses special characters to match text
characters. For example, if you are searching for messages sent to you by two
people, choose From in the first drop-down options list, then choose matches
regexp, then type their usernames between brackets separated by a vertical pipe
symbol, for example (bobclark)|(janedoe) in the text box. Eudora searches
and displays all messages from these two people. For more information
concerning regular expressions, refer to the readme.txt file in the Eudora folder, or
go to the following URL: http://www.regular-expressions.info/
NOTE: Regular Expressions is an advanced and complex method of searching for
text.
matches regexp—If the specific item matches the regular expression string of
characters, search and display those messages. is after/is before (Date only)—If
the date is after or before the date displayed, search and display those messages.
is greater than/is less than (Age, Size, Priority, Attachment Count only)—If the
specific item is greater than or less than the number indicated, search and display
those messages.
5. Once you have chosen the verb, enter the text string that you are searching for, or
choose a value from the drop down list if one appears. In the text box, you can enter
as much text as you want. In the following example, a username was entered.
10
Eudora 7.0 New Features
Example of search criteria for a one-level search
In the above example, if you click Search, Eudora will search through all of your
mailboxes for every message that contain the text Ron anywhere in the header
portion of the message.
6. To continue adding a second level of criteria (you can add up to five levels), click
More. Choose and enter more criteria to further streamline the search as in the
following example. You can also select Match All or Match Any to include or
differentiate the criteria from one level to the other. “Match All” will find messages
that match all of the criteria you entered; “Match Any” will find messages that match
any of the criteria you entered.
11
Eudora 7.0 New Features
Example of search criteria for a two-level search
In the above example, if you click Search, Eudora will search for every message
through every selected mailbox that contains the word speaker anywhere but only
if the text Ron is somewhere in the header.
7. To continue adding a third level of criteria, click More. Choose and enter more
criteria to further reduce the search. Click Search to display the messages that
contain the criteria you entered. Although the following example shows three levels
of criteria, you can click More to continue entering more criteria; click Fewer to
return one level back. The Search button is disabled if you have a blank text box.
12
Eudora 7.0 New Features
Example of search criteria for a three-level search with results
In the above example, if you click Search, Eudora will search for every message
through every mailbox that contains the word message in the message body, the
text Ron somewhere in the headers, and the word speaker anywhere in either
the message headers or the body.
To select all the messages in the Results window, choose Select All from the Edit
menu or press Ctrl + A.
The messages that fulfill the search criteria appear in the Results window.
The Search feature will not work if you have any text boxes blank. You can click
Fewer to reach a level where all text boxes are filled to conduct your search.
13
Eudora 7.0 New Features
Search context menu (right-click)
• To sort the messages, click a column heading to sort by that column. To sort in
descending order, click the column header again.
• To open a message, select and double-click the message, or right-click to
display the context menu. Choose Open Message.
• To open the mailbox where this message resides, highlight the message, rightclick to display the context menu. Choose Open Mailbox.
• To transfer the message to another mailbox, highlight the message, right-click
to display the context menu. Choose Transfer and then select the mailbox you
want.
• To reply to the message, highlight the message, right-click to display the context
menu. Choose Reply.
• To reply to everyone on the message, highlight the message, right-click to
display the context menu. Choose Reply to All.
• To forward the message to someone else, highlight the message, right-click to
display the context menu. Choose Forward.
• To redirect the message to someone else, highlight the message, right-click to
display the context menu. Choose Redirect.
• To delete a message, highlight the message and press the Delete key, or rightclick to display the context menu. Choose Delete.
14
Eudora 7.0 New Features
Configuring Find Messages
(Paid mode only)
The Find Messages options determine how Eudora’s ultra-fast indexed search functionality
will work.
To display the Find Messages options window
1. From the Tools menu, choose Options.
2. Scroll and click the Find Messages icon.
The Find Messages Options window appears.
Find Messages Options
Use fast (indexed) search powered by X1—This setting turns on the indexed search
capabilities within Eudora. If this setting is turned off, Eudora will revert to the slower, old-style
search. This setting is only available to Paid mode users
Index Now—Click this button to go through all mailboxes to update the existing index.
Re-Index Email...—Click this button to discard current index files, and begin indexing Eudora
mail.
15
Eudora 7.0 New Features
NOTE: You should only need to use Index Now and Re-Index Email buttons if indexed search
is not working properly. Most users should never need to use these buttons.
Show index update progress in Task Status window when more than _ updates are
pending—If this option is checked, Eudora will will show a message in the Task Status window
when there are more index updates to process than the number specified. Default setting is
100.
Include deleted IMAP messages in search results—If this option is checked, Eudora will
display deleted IMAP messages in the search results if those messages match the search
criteria, even though the IMAP mailbox might be configured to hide deleted messages. If this
option is disabled, Eudora will not display deleted IMAP messages in the search results.
16
Eudora 7.0 New Features
BossWatch
(Paid mode only)
Have you ever used Reply-All and wished you hadn’t? The new BossWatch feature will alert
you to the presence of email addresses that you have designated, giving you an extra chance
to think twice before you click Send.
Using BossWatch for Outgoing Messages
When you compose a new message, or reply to a message you received, BossWatch will alert
you if any of the recipients match the criteria specified by your BossWatch settings.
New message composition window with BossWatch alerts
Eudora can alert you when you are about to send a message to email addresses on your
BossWatch list by underlining the addresses, outlining the Send/Queue button with a custom
color, displaying a dialog, speaking the address or any combination of these options.
17
Eudora 7.0 New Features
Using BossWatch with the Address Book
You can add addresses to your BossWatch list using the Eudora Address Book. From the
Tools menu, choose Address Book, or press Ctrl+L, or click the Address Book icon
on the toolbar.
1. Select an existing Address Book entry, or create a new one.
2. If you want the nickname on your BossWatch list, check the BossWatch list box,
or right-click on the nickname and select Add to BossWatch list.
Once the person is on the BossWatch list, the icon
mark in the address book list.
displays a red exclamation
Using BossWatch with Make Address Book Entry
The Make Address Book Entry command is used to create entries in your Address Book and
is especially helpful for making group entries.You can use this command from anywhere in
Eudora, including open messages, open mailbox windows, the Address Book, and the
Directory Services window.
To use the Make Address Book Entry command, do one of the following:
18
Eudora 7.0 New Features
• In an open window, go to step 1.
• In an open mailbox window, first select the message summary or summaries you
want in the address book, then go to step 1.
1. From the Special menu, choose Make Address Book Entry.
The Make Address Book Entry dialog box appears.
Make Address Book Entry dialog with Bosswatch
2. If you want to put the nickname on your BossWatch List, check the Put it on the
BossWatch list box.
3. When finished, click OK.
Configuring BossWatch
(Paid mode only)
The BossWatch options determine how BossWatch will alert you to messages being sent to
addresses that match your designated criteria.
To display the BossWatch Options window
1. From the Tools menu, choose Options.
2. Scroll and click the BossWatch icon.
The BossWatch Options window appears.
19
Eudora 7.0 New Features
BossWatch Options window
Warn me additionally with a dialog—If you select this option, Eudora will display a warning
dialog when you click the Send or Queue button on messages that match your BossWatch
criteria.
When sending to more than _ recipients—If you select this option, Eudora will warn you with
a dialog if you are sending to more recipients than the number entered in this setting, as well
as to addresses on your BossWatch list.
NOTE: You must have enabled Warn me additionally with a dialog for this setting to have any
effect.
When I do a Reply All—If you select this option, Eudora will warn you with a dialog when you
queue a message where Reply to All was used to generate the reply, as well as to addresses
on your BossWatch list.
NOTE: You must have enabled Warn me additionally with a dialog for this setting to have any
effect.
Speak Addresses—If you select this option, Eudora uses the Microsoft Text-to-Speech
engine to read the addresses that match your BossWatch criteria.
20
Eudora 7.0 New Features
When sending to more than _ recipients—If you select this option, Eudora will warn you by
speaking the names of your recipients if you are sending to more recipients than the number
entered in this setting, as well as to addresses on your BossWatch list.
NOTE: You must have enabled Speak Addresses for this setting to have any effect.
When I do a Reply All—If you select this option, Eudora will warn you by speaking the email
addresses of your recipients when you queue a message where Reply to All was used to
generate the reply, as well as to addresses on your BossWatch list.
NOTE: You must have enabled Speak Addresses for this setting to have any effect.
Domain Warnings—
Outside domain—If you enter a domain in this setting, Eudora will warn you when
you are sending to a recipient whose address is not within the domain specified.
Multiple domains may be entered separated by commas.
Inside domain—If you enter a domain in this setting, Eudora will warn you when
you are sending to a recipient whose address is within the domain specified.
Multiple domains may be entered separated by commas.
Color code BossWatch addresses using this color:
—If you select this option,
Eudora will underline addresses from your BossWatch list in your composition window, as well
as outline the Send or Queue button, with the selected color. You can click on the color to
customize it.
IMAP
Eudora 7.0 incorporates changes to IMAP functionaly to greatly improve performance over
previous versions. Eudora now provides the option to hide deleted messages in your local
cache of IMAP mailboxes.
To show Deleted IMAP messages within an IMAP mailbox
1. From the Tools menu, choose Mailboxes, or click the Mailboxes window’s tab if it
is the inactive window in a tabbed group.
The Mailboxes window appears.
2. Right click an IMAP mailbox
21
Eudora 7.0 New Features
A drop-down menu appears.
3. From the drop-down list, choose Show Deleted Messages.
A check mark appears next to the Show Deleted Messages option. Deleted
messages are displayed within that mailbox.
4. To hide the deleted messages, right click again on the IMAP mailbox and remove
the check mark.
S/MIME
Using Eudora 7.0 with the S/MIME plugin allows users to enjoy more secure email
transactions. This feature lets you digitally sign messages, verify signatures on incoming
messages, decrypt encrypted messages that are sent to you, or send messages with S/MIME
encryption.
Installing the S/MIME plugin
The S/MIME plugin is available as a separate download from the Eudora website. It is not
installed with the Eudora application.
Before you can use Eudora’s S/MIME capabilities, you must first install the S/MIME plugin by
copying the SMIME.dll file into the plugins subfolder of your Eudora application directory.
Eudora will recognize the plugin the next time it is launched.
Signing outgoing messages with S/MIME
To sign an outgoing message
1. From the Message menu, choose New Message or click the New Message icon
on the main toolbar:
22
Eudora 7.0 New Features
The composition window appears.
S/MIME Signer
If this button is on, Eudora will use your S/MIME certificate to digitally sign your
outgoing message.
NOTE: You must have an S/MIME certificate installed on your machine to use
this feature.
2. Click the Send or Queue button
Verifying the digital signature on an incoming message
When you receive a digitally signed message, the S/MIME icon
message body.
will appear in the
To verify a digital signature
1. Click on the S/MIME icon
in the body of the message
The contents of the message appear. If the signature does not verify, a dialog
appears to alert you why the signature could not be verified.
Encrypting a message
To encrypt an outgoing message
1. From the Message menu, choose New Message or click the New Message icon
on the main toolbar:
The composition window appears.
S/MIME Encrypter
If this button is on, Eudora will use the public S/MIME certificate(s) of your recipient(s)
to digitally encrypt your outgoing message.
NOTE: You must have the S/MIME public certificates for your recipients
installed on your machine to use this feature.
2. Click the Send or Queue button
23
Eudora 7.0 New Features
Decrypting an encrypted message
When you receive an S/MIME encrypted message, the S/MIME icon
message body.
To decrypt an encrypted message
1. Click on the S/MIME icon
in the body of the message
The contents of the message appear.
24
will appear in the