1
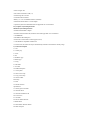
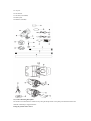
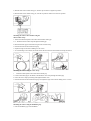
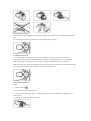
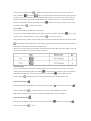
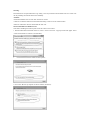
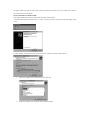
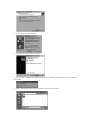
WATERPROOF HANDS FREE SPORTS CAMERA
USER
MANUAL
SUPPORTING 4G SD CARD
I) Quick Start
Turning the Camera On
Press and hold the On/Off Button for 2 seconds (two beeping sounds). The LCD screen will show the remaining
time.
Taking Video Footage
1. Aim at what you want to record.
2. Press and hold the 'Movie shutter button' for 2 seconds to start recording (one beeping sound). The time elapsed
will be shown on the LCD screen.
3. Press and hold the 'Movie shutter button' again for 2 seconds to stop recording (two beeping sounds). The length
of the video footage will show on the LCD screen for 2 seconds, after which the remaining time will be shown (the
remaining time is an estimate only).
II) Camera Precautions
Notice the following guidelines when using your camera
• The CAM is shock resistant, not shock proof.
• For your safety, do not press the buttons on the camera during sports activities.
• Do not place the camera in areas prone to dust or damp for extended periods of time. This may cause a fire or an
electrical shock.
• Do not leave the camera in places exposed to extremely high temperatures, such as under direct sunlight, for
extended periods of time. This may affect the camera housing and internal components.
• Clean the lens with a soft cloth to remove fingerprints or dust.
• We recommend using Alkaline batteries in temperatures between 32°F to 104°F (0°C to 40°C).
• The working temperature range of a normal Alkaline AA battery is 32°F to 104°F (0°C to 40°C). Above or below
this temperature may cause the batteries to malfunction, therefore for use in low temperature, we recommend
changing to Lithium batteries.
• Turn the camera off before removing the batteries or memory card. The card and the data may be damaged if the
memory card is inserted or removed while the camera is still on.
• Remove the batteries and memory card before storing the camera for long periods of time. Keep it in a
well-ventilated place to prevent mould.
• Under the following circumstances, have the camera repaired by qualified personnel:
a) The plug is damaged or worn.
b) The device has been dropped and/or the housing has been damaged.
c) Liquid has entered the camera.
Notes on copyright: Users are asked to note that the transfer of memory containing photos or data protected under
copyright laws is only permissible within the restrictions imposed. Users assume all responsibility in the event that
copyrights are violated by the use of this camera.
Waterproof Feature
The CAM camera is waterproof up to 3m (10ft). We will not assume any responsibility for camera malfunction
caused by liquid entering the camera as a result of misuse by the user.
Precaution:
Follow the steps below to keep the camera waterproof.
Step 1: Apply silicon grease (included).
Step 2: Ensure both o-rings are attached.
Step 3: Replace the cover.
Liquid may get inside the camera if the battery cover is not firmly
closed
• If the camera gets wet, wipe the liquid off as soon as possible with a dry cloth.
• Other camera accessories may not be waterproof.
• Ensure the o-rings are clean and have silicon grease applied before use underwater
or in wet conditions.
Using the camera in cold weather
• We recommend using Energizer e2 lithium batteries in cold weather.
Don't use the camera in extreme temperatures as this may cause the camera to malfunction.
Attention:
• Non-rechargeable batteries are not to be recharged;
• Rechargeable batteries are to be removed from the camera before being charged;
• Rechargeable batteries are only to be charged under adult supervision;
• The supply terminals are not to be short-circuited;
• Exhausted batteries are to be removed from the camera.
III) Technical Specifications
• Sensor resolution 640x480 VGA CMOS sensor
• Built-in memory 32MB
• SD memory card drive supports cards of up to 4GB (not included)
• Movie storage:
640 x 480 pixels (30* frames per second)
320 x 240 pixels (30* frames per second)
• Status LCD 2-digit B/W
• Focusing range 3m~infinity
• Movie images AVI
• File format of Interface USB (1.1)
• Delete image All / last one
• Auto Shut-Off 30 minutes
• Battery 2 x 1.5V AA alkaline batteries (included)
• Dimensions 40mm diam. x 110mm length
• Operation system Win 2000/XP/Vista and Apple Mac X 10.4 and below
IV) Computer System Requirements
Minimum System Requirements
• Pentium III 800 MHz or higher
• Windows 2000, Windows XP, Windows Vista and Apple Mac X 10.4 and below
• 128 MB RAM
• 800 MB Free hard disk space
• SVGA 800 x 600 resolution video support (32 bit)
• 16 bit Windows compatible sound device
* In some cases, the frame rate may be automatically reduced to maximize the memory usage.
V) Camera Description
1. Lens
2. Camera grip
3. Screw
4. Nut
5. Handlebar grip
6. Helmet grip
7. O-ring
8. USB cable
9. AV cable
10. Rubberized patch
11. Velcro patch
12. Short velcro strap
13. Long velcro strap
14. Silicon rubber
head strap
15. Bolt
16. Mount lock and
tripod mount
17. Silicon grease container
18. Webcam stand
19. Webcam installation CD
20. LCD screen
21. ON/OFF
22. Movie shutter button &
Confirm button
23. Menu button & Select button
24. Mini-USB port
25. AV port
26. SD card slot
27. SD card (not included)
28. Battery door
29. Batteries (included)
VI) Camera Mounting Description
The camera can be mounted in a number of ways using the straps and the velcro patch provided. Please follow the
methods of mounting as suggested below:
Fixing the position of the camera
a) With the base of the camera facing you, turn the clip clockwise to tighten its position.
b) With the base of the camera facing you, turn the clip counter clockwise to loosen its position.
Mounting the camera onto a helmet using the
silicon rubber strap:
1. Attach the rubberized patch to the bottom of the helmet mount grip.
2.+3. Thread the silicon rubber strap through the helmet grip.
4. Mount the helmet grip to the helmet using the silicon rubber strap.
5. Slide the camera into the helmet mount grip.
6. Adjust the angle of the camera making sure it's secure.
7. To avoid damage to the camera, the mount lock at the base must be loosened before twisting the camera.
Mounting the camera using the velcro strap:
1.
Attach the rubber patch to the bottom of the helmet grip.
2+3. Place the helmet grip on the helmet, and thread the velcro strap through the helmet grip.
4. Secure the velcro strap by fastening it through the helmet vents.
5. Slide the camera into the helmet mount grip, and adjust the angle of the camera making sure it is secure.
Mounting the camera using the handlebar grip:
1. Place the handlebar grip on the handlebar.
2. Add the screw and nut to hold the handlebar grip securely.
3. Slide the camera into the handlebar grip and make sure the handlebar grip is locked with the camera.
4. Adjust the angle of the camera.
Mounting the camera on a tripod or
camera mount:
1. Attach the tripod mount to the bottom of the camera.
2. With the tripod mount on the camera, screw it onto the webcam stand.
3. Adjust the angle of the camera.
VII) Camera Usage
Battery Installation
Use Caution, the edge of the base clip may be sharp.
When unscrewing the cover make sure the clip is in the same direction as the lens. Observe the following
precautions when unscrewing the cover of the camera:
1. Unscrew the cover at the end of the unit.
2. Place your finger on the 'lip', which is on the bottom half of the rear of the unit, and pull in an upward direction
to open the battery slot door.
3. Insert 2 x AA alkaline batteries into the battery slot with the polarity in the direction as shown.
4. Close the battery slot door and screw on the end of unit cover.
Note: When the battery is low, the low battery icon will appear on the LCD screen.
Always upload video footage to your PC prior to replacing batteries to avoid memory loss。
Note:
a) Do not mix old and new batteries together. Replace both batteries at the same time.
b) Remove the batteries if the camera is not going to be used for extended periods of time.
c) Do not mix alkaline, standard (carbon-zinc) or rechargeable (nickel-cadmium) batteries. Only batteries of the
same or equivalent type as recommended are to be used together.
Turning the Camera On
Press and hold the On/Off Button for 2 seconds (two beeping sounds). The LCD screen will show the remaining
time.
For your safety, do not press any buttons on the camera during sports activities.
Turning the Camera Off
1. Press and hold the On/Off Button for 2 seconds (two beeping sounds). The LCD screen will turn off.
2. The camera will be turned off automatically after 30 minutes of not being used unless it is in USB mode.
Note: If the camera is connected to your PC, you have to unplug the USB cable to turn the camera off.
Note: Ensure that the CAM is turned off during the insertion or the removal of the SD card. The card and the data
may be damaged if the SD card is inserted or removed while the camera is on.
SD card insertion/removal
Insert:
1. Turn the CAM off
.
2. Unscrew the cover at the end of the unit.
3. Turn the SD card upside down (connect terminals facing up) then insert it carefully and completely until it
clicks in place.
4. Screw the cover back onto the end of the unit.
Remove:
1. Turn the CAM off
.
2. Unscrew the cover at the end of the unit.
3. Push the card until it clicks, then pull the card out.
4. Screw the cover back onto the end of the unit.
Note:
a. Ensure the card is inserted correctly.
b. Do not touch the connect terminals on the back of the SD card.
c. The connect terminals should be facing the same way as the LCD screen.
d. The card may be damaged if it is not fully inserted.
e. The card and the data may be damaged if the SD card is inserted or removed while the camera is on.
Taking Video Footage
1. Aim at what you want to record.
2. Press and hold the 'Movie shutter button'
for 2 seconds to start recording (one beeping sound). The time
elapsed will be shown on the LCD screen.
3. Press and hold the 'Movie shutter button'
again for 2 seconds to stop recording (two beeping sounds). The
length of the video footage will show on the LCD screen for 2 seconds, after which the remaining time will be
shown (the remaining time is an estimate only).
4. Press the Menu button
to select the desired resolution (640 x 480, 320 x240). Press the Menu button
again to shift through the icons representing these resolutions (at the top of the LCD screen). The icons will flash
until you press Confirm
to verify your selection.
Note:
1. Default resolution is 640 x 480 (VGA).
2. When the time is shown, you will see 'H' for hour, 'M' for minute, and 'S' for second.
3. If the recording time is long, the video file may be separated into two files automatically. The user does not need
to monitor this process, the camera will resume filming once the file is saved (after a couple of seconds). Please
note that the time duration needed to save video files may vary depending upon the length of the file. Please be
patient during this process.
VIII) Menu Settings
1.
Press and hold the Menu button
for 2 seconds (one beeping sound) to start selecting options.
2. You can shift through different shooting modes by pressing the Menu button
show each mode as you press the Menu button
3. Press the 'Confirm' button
repeatedly. The LCD will
.
to confirm the selection (one beeping sound).
4. When you want to exit the Menu Selection mode, shift through the icons by pressing the Menu button
repeatedly until the selected icon stops flashing. Alternatively you can hold Menu
will exit menu mode.
down for 2 seconds. This
5. The different mode icons are shown in the table below.
Icon
Title
Description
High
resolution
(640*480
pixels)
Medium resolution (320*240
pixels))
Low
resolution
(160*120
pixels)
Large video format/ less storage capability
Medium video format
Smallest video format/ more storage capability
Sound
Sound recording
Delete the last video footage
Erases the last video footage taken
Delete all video footage
Erases all video footage stored
Date and time
Sets the date and time
30 frames per second
15 frames per second
The frame rate of video footage is 30 frames per second
(smooth and less storage capability)
The frame rate of video footage is 15 frames per second
(less smooth and more storage capability)
Low battery
Battery is low
SD card
SD card is inserted in the camera
640 x 480, 320 x 240 pixels resolution
To change the resolution, press the Menu button
until the desired resolution icon is displayed on the LCD
screen. Press the 'Confirm' button
to confirm your selection. This camera allows you to choose from two
640 x 480 and
video resolutions:
320 x 240. High resolution video footage has better quality because it
has more pixels. Lower resolution has fewer pixels but enables the user to record for a longer period of time. The
duration of video footage your camera can take depends on the resolution you choose. To switch between high
resolution and medium resolution, press the Menu button
the 'Confirm' button
until the LCD screen shows the correct icon. Press
to confirm your selection.
Privacy Mode
This mode allows the user to disable the sound features.
The privacy icon will be flashing and the current mode it is in will not be shown. Press ‘Menu’
next menu mode – Sound Recording. Or, press ‘Confirm’
to go onto the
to enter the privacy mode.
Once inside the Privacy Mode P , the icon P will continue to flash and ON will be displayed. If you select Confirm
this will disable the sound but still record the audio. If you select OFF, this will turn the Privacy Mode P OFF
and enable the sound features while still recording the audio.
When in privacy mode option, pressing ‘Menu’ will change between ON and OFF. This will be looping. You must
confirm one of the choices to move onto the next menu mode.
Sound Recording
Once you have entered this mode the icon will keep flashing and “LO” will be shown on screen. “LO” means
sound is being recorded during filming. Press Menu
(one beeping sound) to switch to “OFF”, which means no
sound will be recorded. After “OFF”, it will loop back to “HI” when 'Menu'
'Confirm' button
is pressed again. Press the
(one beeping sound) to confirm the setting and to go to the next function icon.
Deleting video footage
To delete the last video footage that was recorded, press the Menu button
Press the Confirm button
until the LCD screen shows
.
to confirm. Repeat these two steps to individually delete your files.
Note: After file deletion, the LCD screen will adjust the remaining number of files accordingly.
Delete All Video Footage
To delete all video footage stored in your camera, press the Menu button
Press the Confirm button
to verify.
until the LCD screen shows
.
Note: It may take a few minutes to delete multiple files at one time.
Setting Date/Time (Clock Set)
Shift to the Date icon in the Menu mode by pressing the Menu button
flashing, press the 'Confirm' button
repeatedly. When the Date icon is
to change the date and time.
Setting the Year
1. Press the 'Menu button'
to adjust the last digit of the year (2000-2009). Press the 'Confirm' button
to
verify the last digit.
2. Press the 'Menu button'
to adjust the 3rd digit of the year (200X-209X). Pressing 'Confirm'
move the cursor to allow you to adjust the 3rd digit of the year. Press the 'Menu' button
and the 'Confirm' button
will then
to select the number
to verify, after which you will be able to adjust the month.
Setting the Month
When adjusting the month, the “M” will be shown. Press the 'Menu button'
'Confirm' button
to adjust the month. Press the
to verify, after which you would be able to adjust the day and proceed to setting the day.
Setting the Day
When adjusting the day, the “D” will be shown. Press the 'Menu button'
button
to adjust the day. Press the 'Confirm'
to verify, after which you would be able to adjust the and proceed to setting the time.
Setting the Time
When adjusting the hour, the “H” will be shown. Press the 'Menu button'
button
to adjust the hour. Press the 'Confirm'
to verify the hour, after which you would be able to adjust the and proceed to setting the
minute.
.
When adjusting the minute, the “M” will be shown. Press the 'Menu button'
'Confirm' button
to adjust the minute. Press the
to verify the time and exit this mode.
SD Memory Card
In this unit, you can use SD Memory Cards of up to 4GB. To use an SD memory card, turn off the CAM and insert
the SD memory card. When the camera is turned on again the SD card icon will be displayed on the LCD screen.
The remaining time on the SD card will also be displayed on the LCD screen. All of the video footage will now be
saved onto the SD card.
Note:
1. If there is an error on the SD memory card, the SD card icon and the letters 'Err' will be displayed on the LCD
screen. In this case, turn off the camera and remove the SD card.
2. The SD card is equipped with a Write-Protect switch that can prevent writing and formatting to the card. The
letters 'Err' will be displayed if the SD card is locked with Write-Protect switch.
3. We recommend using SanDisk regular or AData SD cards.
4. With use on Windows 2000 users must format to FAT otherwise the SD card and camera may malfunction
Available Recording Time
The available recording time is an approximation (these vary depending on the recording conditions and the type
of card).
IX) Connecting to a computer
You can upload your recorded video footage to a PC by connecting the CAM to your PC using the USB cable.
1. Turn the CAM on.
2. Connect the CAM to a PC via the USB cable.
3. There are 2 modes available, File (F) and Cam (C). File allows you to check the files in the camera or SD card.
Cam is the webcam function.
4. “F” appears on the CAM LCD screen, which means CAM is connected to your PC and files are available for
review.
5. To choose to review Files in the Camera/SD card the user should press 'Confirm'
.Once selected the CAM
drive appears in the [My Computer] folder.
*If you are connecting the camera to a PC for the first time, the required driver is installed automatically so that
the camera can be recognized by Windows Plug and Play. The 100CAM drive then appears on the [My Computer]
folder.
6. Open the '100CAM' folder in the [DCIM] folder to start selecting your desired video files. Copy the desired
video to your PC.
X) Webcam installation
Warning:
This hardware has not passed Windows Logo testing. Users may install the webcam feature but do so at their own
risk. By installing the webcam feature users indemnify
Attention:
*Webcam Installation does not work with Vista 64 bit versions.
* With use on Windows 2000 users must install Netmeeting in order to use the webcam feature.
*With use on Windows XP users must install the AMC tool.
Webcam Installation on Windows Vista
Note: Before installing the software please ensure the CD is in the CD drive.
1. With the USB cable inserted and camera on, select C on the LCD screen. A pop-up window will appear. Select
“Locate and install driver software (recommended)”.
1.
Click “I don't have the disc. Show me other options”.
3. Next select “Browse my computer for driver software (advanced)”.
4. After following step 3 you should select browse, CD drive then click next.
5. When the Windows Security pop up window appears click "Install this software anyway" to continue installing.
6. Congratulations, you can now use the webcam function on your CAM.
Webcam Installation Guide on Windows XP
Note: Before installing the software please ensure the CD is in the CD drive.
1. With the USB cable inserted and camera on, select C on the LCD screen. A pop-upnwindow will appear. Select
“No, not this time” then click next.
2.
Select “Install from a list or specific location (Advanced)” then click next.
3. On the next window select the drop down bar then click on your CD drive letter
name before clicking next.
4. The next pop-up window will inform you that our camera has not passed Windows Logo Testing to verify its
compatibility with Windows XP. Click “Continue Anyway”.
5. A new window will appear, click finish. Your installation of the OS Digital Camera is now complete. Repeat
these steps again to install the OS Video Camera and to complete the webcam installation.
6. Once you have installed the webcam, enter “My Computer” and double click on the
OS Video Camera icon, this will open a new window and show the real time view of your CAM. Your camera is
now ready to be used as a webcam.
Webcam Installation on Windows 2000
Note: Before installing the software please ensure the CD is in the CD drive.
1. With the USB cable inserted and camera on, select C on the LCD screen. A pop-up window will appear. Select
“next”.
2. Select “Display a list of the known drivers for this device so that I can choose a specific driver”.
3.
On the next window select “Other devices” then click next.
4.
On the next window click “have disk” then select the CD drive.
5. Select Win2000 from the CD drive then select the icon named “OSUsb” before clicking Open.
6.
Ensure the path name is correct then click OK.
7.
Select "OS Digital Camera" then click next.
8.
When the next window appears click Next.
9.
At this window click the Yes button.
10. Your hardware is now installed. Click finish.
11. Once you click finish the Video Capture Device will begin installing. Repeat the above steps until that has
been installed.
12. When in the Win2000 folder in the CD remember to select OSVid, not OSUsb.
13. Click Next after selecting the OS Video Camera.
14. Once you have finished installation your camera will be ready to use as a webcam.
XI) Webcam USB mode
1. To use the Webcam function, whilst the mode is in F, press 'Menu'
'Confirm
. This will change the mode to C. Press
' to select. Once selected the computer will recognize the camera as a webcam.
2. While in either mode, to change to the other, users must disconnect from their PC and reconnect going through
the entire selection procedure again.
3. The camera will use power from the computer.
Note:
1. Videos will be saved in AVI format.
2. When the CAM is connected to the PC with an SD card inserted in the camera, the '100CAM' folder will show
the files on the SD card.
3. Webcam mode is not available with Apple Mac. You can upload your recorded video footage to a MAC by
connecting the CAM to your MAC using the USB cable.
1. Turn the CAM on.
2. Connect the CAM to a MAC via the USB cable.
3. There are 2 modes available, File (F) and Cam (C). File allows you to check the files in the camera or SD card.
Cam is
the webcam function.
4. “F” appears on the CAM LCD screen, which means CAM is connected to your MAC and files are available for
review.
5. To choose to review Files in the Camera/SD card the user should press 'Confirm'
. Once selected the CAM
drive appears in the [My Computer] folder.
*If you are connecting the camera to a MAC for the first time, the required driver is installed automatically
6. Open the '100CAM' folder in the [DCIM] folder to start selecting your desired video files. Copy the desired
video to your MAC.
7. While in either mode, to change to the other, users must disconnect from their MAC and reconnect going
through the entire selection procedure again.
8. The camera will use power from the computer.
Note:
The webcam comes with a webcam stand. Please use this when using your CAM as a webcam.
XII) Playing back video footage on a TV
1. Turn the CAM and TV off.
2. Connect your CAM to your TV using the AV cable.
3. Turn the TV and CAM on.
4. There are 2 modes available, Playback (PB) and Viewfinder (VF).
5. "PB" appears on the LCD screen as default. To change to VF press the 'Menu' button then 'Confirm'
. Once
this mode is selected, a real time image will appear on your TV screen (or PMP). When in VF mode all record
functions are disabled. TV mode is automatically activated when the AV cable is connected to the CAM and TV.
6. If PB mode is selected the function keys will be shown on the TV screen. The function keys include Pause
Stop
, Scan Back
, Play
7. Press the Menu button
,Scan Forward
and Delete One
.
to move the highlight cursor along the function keys.
8. Press the Confirm button
when the desired function key is highlighted.
9. To delete one file, select the Delete-One icon and confirm by pressing the Confirm button
.
10. Whilst in either mode, to change to the other, the AV cable must be disconnected and step 1 through to step 4
should be followed.
XIII) Troubleshooting
There's no display
-Are the batteries properly installed?
-Do the batteries need replacing?
After the CAM is connected to my PC, it cannot find the new drive in the, 'My Computer' folder
-Ensure each end of the CAM USB cable is properly and firmly connected.
-Ensure your USB port is working properly. Try connecting another USB device into the port. If the other device
does not work, the USB port may have a malfunction. In this case, contact your system manufacturer or the
manufacturer of your USB card.
I can't capture video footage
-Ensure there is enough space on the internal memory of CAM or the
SD card; the display will tell you how much time there is left for video
recording.
-Ensure the SD card is not locked. The letters “Err” will be displayed if
the SD card is locked.
The remaining time is not accurate
-The remaining time is an estimate.
-The remaining time depends not only on the time recorded, but on the color density of the video footage. Under
conditions with high contrast, such as outdoors, the actual time available will be less than under low-contrast
conditions, such as indoors.
,
I can't play the video footage on my television
-Ensure each end of the AV cable is properly and firmly connected to CAM and to your television.
-Ensure the CAM and television are both turned on. -Ensure you have selected PB to view files.
Some captured video footage cannot be found when SD card is inserted
-The video footage may be stored on the internal memory. Connect the CAM to your PC without an SD card, and
it will show the files in the internal memory.
The sound is very low or there is no sound
- Ensure the audio is on by following the instructions in the Sound Recording section.
- The CAM is specifically designed for extreme sports and is waterproof, it is for this reason that we have made
the microphone less sensitive.