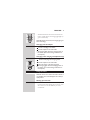
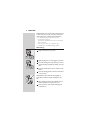
1
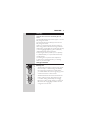
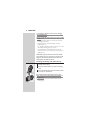
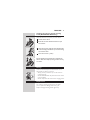
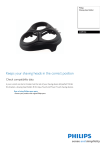
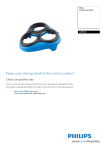
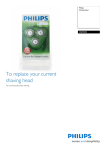
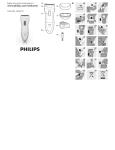
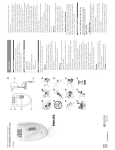
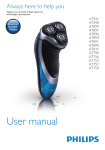
(QUHJLVWUH]YRWUHSURGXLWHWEpQpÀFLH]G·XQHDVVLVWDQFHjO·DGUHVVHVXLYDQWH
ZZZSKLOLSVFRPZHOFRPH
AT940, AT893, AT890, AT753, AT752, AT750
1
I
AT940, AT893, AT890, AT753, AT752, AT750
ENGLISH 6
FRANÇAIS (CANADA) 23
6
ENGLISH
Introduction
Congratulations on your purchase and welcome to
3KLOLSV7RIXOO\EHQHÀWIURPWKHVXSSRUWWKDW3KLOLSV
offers, register your product at
www.philips.com/welcome.
Please read this user manual, as it contains
information about the wonderful features of this
shaver as well as some tips to make shaving easier
and more enjoyable.
General description (Fig. 1)
Protection cap
Shaving unit
Shaving unit release button
Shaver on/off button (AT893/AT890/AT753/
AT752/AT750)
E Charging light (AT893/AT890/AT753/AT752/
AT750)
F Charging stand (AT940 only)
G Trimmer (AT940/AT893/AT890 only)
H Trimmer release slide (AT940/AT893/AT890
only)
I Shaver on/off button (AT940 only)
J Battery symbol and plug symbol (AT940 only)
K Adapter
L Cleaning brush
Not shown: Storage pouch (AT940/AT893/AT890
only)
A
B
C
D
1RWH<RXFDQÀQGWKHW\SHQXPEHURQWKHEDFNRIWKH
VKDYHU
ENGLISH
7
Important
Read this user manual carefully before you use the
appliance and the charging stand (AT940 only). Save
it for future reference.
Danger
- Make sure the adapter does not get wet.
Warning
- The adapter contains a transformer. Do not cut
off the adapter to replace it with another plug, as
this causes a hazardous situation.
- This appliance is not intended for use by persons
(including children) with reduced physical, sensory
or mental capabilities, or lack of experience
and knowledge, unless they have been given
supervision or instruction concerning use of the
appliance by a person responsible for their safety.
- Children should be supervised to ensure that they
do not play with the appliance.
- Always unplug the shaver before you clean it
under the tap.
Caution
- Never use water hotter than 80°C to rinse the
shaver.
- Be careful with hot water. Always check if the
water is not too hot, to prevent your hands from
getting burnt.
- Do not immerse the charging stand (AT940 only)
in water or any other liquid, nor rinse it under the
tap.
- The shaver and the charging stand (AT940 only)
are not dishwasher-proof.
- Water may leak from the socket at the bottom
of the shaver when you rinse it. This is normal
8
ENGLISH
-
-
and not dangerous because all electronics are
enclosed in a sealed power unit inside the shaver.
Do not use the shaver, adapter or charging
stand (AT940 only) if it is damaged, as this
may cause injury. Always replace a damaged
adapter or charging stand with one of the original
type.
Charge and store the appliance at a temperature
between 10°C and 35°C.
Always place and use the shaver and the charging
VWDQG$7RQO\RQDVXUIDFHWKDWLVÁXLG
resistant.
Only use the adapter and the charging
stand (AT940 only) supplied.
Always put the protection cap on the shaver
to protect the shaving heads when you are
travelling.
If the shaver is subjected to a major change
in temperature, pressure or humidity, let
it acclimatise for 30 minutes before you use it.
Compliance with standards
- This shaver complies with the internationally
approved safety regulations and can be safely used
in the bath or shower and cleaned under the tap.
- This Philips appliance complies with all standards
UHJDUGLQJHOHFWURPDJQHWLFÀHOGV(0),IKDQGOHG
properly and according to the instructions in this
user manual, the appliances are safe to use based
RQVFLHQWLÀFHYLGHQFHDYDLODEOHWRGD\
General
- The appliance is equipped with an automatic
voltage selector and is suitable for mains voltages
ranging from 100 to 240 volts.
- The adapter transforms 100-240 volts to a safe
low voltage of less than 24 volts.
ENGLISH
9
Charging
1RWH7KHVKDYHUFDQQRWEHXVHGGLUHFWO\IURPWKH
PDLQV
AT940/AT893/AT890 only: It takes approx. 1 hour to
fully charge the shaver.
AT753/AT752/AT750: It takes approx. 8 hours to
fully charge the shaver.
:KHQ\RXFKDUJHWKHVKDYHUIRUWKHÀUVWWLPHRU
after a long period of disuse, let it charge until the
white battery symbol lights up continuously (AT940)
or the charging light lights up green continuously
(AT893/AT890/AT753/AT752/AT750.
A fully charged shaver provides up to 21 (AT940),
17 (AT893/AT890) or 14 (AT753/AT752/AT750)
cordless shaves.
The shaving time may be less than expected as
a result of your shaving behaviour, your cleaning
habits or your beard type.
Charge indications
Battery low
- AT940: When the battery is almost empty (when
there are only 5 or fewer shaving minutes left),
WKHRUDQJHSOXJV\PEROVWDUWVWRÁDVK:KHQ
you switch off the shaver, the orange plug symbol
FRQWLQXHVWRÁDVKIRUDIHZVHFRQGV
- AT893/AT890/AT753/AT752/AT750: When the
battery is almost empty (when there are only
5 or fewer shaving minutes left), the charging
OLJKWVWDUWVWRÁDVKRUDQJH:KHQ\RXVZLWFKRII
WKHVKDYHUWKHFKDUJLQJOLJKWFRQWLQXHVWRÁDVK
orange for a few seconds.
10
ENGLISH
Quick charging (AT940/AT893/AT890 only)
- AT940: When you start charging the empty
battery, both the white battery symbol and the
SOXJV\PEROÁDVK$IWHUDSSUR[PLQXWHVWKH
orange plug symbol goes out, while the battery
V\PEROFRQWLQXHVWRÁDVK7KHVKDYHUQRZ
contains enough energy for a 5-minute shave.
- AT893/AT890: When you start charging the
HPSW\EDWWHU\WKHFKDUJLQJOLJKWDOWHUQDWHO\ÁDVKHV
orange and green. After approx. 3 minutes the
FKDUJLQJOLJKWFRQWLQXHVWRÁDVKJUHHQ7KHVKDYHU
now contains enough energy for a 5-minute shave.
Charging
- AT940: When the shaver is charging, the white
EDWWHU\V\PEROÁDVKHV
- AT893/AT890/AT753/AT752/AT750: When the
VKDYHULVFKDUJLQJWKHFKDUJLQJOLJKWÁDVKHVJUHHQ
Battery fully charged
- AT940: When the battery is fully charged, the
white battery symbol lights up continuously.
1RWH$IWHUDSSUR[PLQXWHVWKHEDWWHU\V\PERO
JRHVRXWWRVDYHHQHUJ\
ENGLISH 11
- AT893/AT890/AT753/AT752/AT750: When the
battery is fully charged, the charging light lights up
green continuously.
1RWH$IWHUDSSUR[PLQXWHVWKHFKDUJLQJOLJKWJRHV
RXWWRVDYHHQHUJ\
Charging with the adapter
1 3XWWKHVPDOOSOXJLQWKHVKDYHU
2 3XWWKHDGDSWHULQWKHZDOOVRFNHW
7KHFKDUJLQJOLJKWVKRZVWKHFKDUJLQJVWDWXVRI
WKHVKDYHUVHHVHFWLRQ¶&KDUJHLQGLFDWLRQV·LQ
WKLVFKDSWHU
Charging in the charging stand (AT940 only)
1 3XWWKHVPDOOSOXJLQWKHFKDUJLQJVWDQG
2 3XWWKHDGDSWHULQWKHZDOOVRFNHW
3 3ODFHWKHVKDYHULQWKHFKDUJLQJVWDQG
7KHFKDUJLQJOLJKWVKRZVWKHFKDUJLQJVWDWXVRI
WKHVKDYHUVHHVHFWLRQ¶&KDUJHLQGLFDWLRQV·LQ
WKLVFKDSWHU
Using the shaver
1RWH7KLVVKDYHUFDQEHXVHGLQWKHEDWKRUVKRZHU,W
FDQWKHUHIRUHQRWEHXVHGGLUHFWO\IURPWKHPDLQVIRU
VDIHW\UHDVRQV
Shaving tips and tricks
- This shaver is suitable for both wet and dry use.
Use the shaver with shaving gel or foam for extra
skin comfort, or use the shaver dry for extra
convenience.
12
ENGLISH
1RWH:HDGYLVH\RXWRXVHWKHVKDYHUZLWKVKDYLQJJHO
RUIRDPZKHQ\RXXVHLWIRUDZHWVKDYH'RQRWXVH
WKLFNVKDYLQJFUHDPRUVKDYLQJRLOZLWKWKLVVKDYHU
- )RURSWLPDOVKDYLQJUHVXOWVPDNHFLUFXODU
movements during use.
- The shaver is waterproof and can be used in the
bath or shower.
- Your skin may need 2 or 3 weeks to get
accustomed to the Philips shaving system.
Wet shaving
1 $SSO\VRPHZDWHUWR\RXUVNLQ
2 $SSO\VKDYLQJIRDPRUVKDYLQJJHOWR\RXUVNLQ
3 5LQVHWKHVKDYLQJXQLWXQGHUWKHWDSWRHQVXUH
WKDWWKHVKDYLQJXQLWJOLGHVVPRRWKO\RYHU\RXU
VNLQ
4 3UHVVWKHRQRIIEXWWRQRQFHWRVZLWFKRQWKH
VKDYHU
5 0RYHWKHVKDYLQJKHDGVLQFLUFXODUPRYHPHQWV
RYHU\RXUVNLQ
1RWH5LQVHWKHVKDYHUXQGHUWKHWDSUHJXODUO\WR
HQVXUHWKDWLWFRQWLQXHVWRJOLGHVPRRWKO\RYHU\RXU
VNLQ
6 $IWHUVKDYLQJSUHVVWKHRQRIIEXWWRQRQFHWR
VZLWFKRIIWKHVKDYHUDQGGU\\RXUIDFH
7 &OHDQWKHVKDYHUVHHFKDSWHU¶&OHDQLQJDQG
PDLQWHQDQFH·
ENGLISH 13
1RWH0DNHVXUH\RXULQVHDOOIRDPRUVKDYLQJJHORII
WKHVKDYHU
Dry shaving
1 3UHVVWKHRQRIIEXWWRQRQFHWRVZLWFKRQWKH
VKDYHU
2 0RYHWKHVKDYLQJKHDGVLQFLUFXODUPRYHPHQWV
RYHU\RXUVNLQ
3 $IWHUVKDYLQJSUHVVWKHRQRIIEXWWRQRQFHWR
VZLWFKRIIWKHVKDYHU
4 &OHDQWKHVKDYHUVHHFKDSWHU¶&OHDQLQJDQG
PDLQWHQDQFH·
Trimming (AT940/AT893/AT890 only)
You can use the trimmer to groom your sideburns
and moustache.
1 3XVKWKHWULPPHUVOLGHGRZQZDUGVWRRSHQ
WKHWULPPHU
2 3UHVVWKHRQRIIEXWWRQRQFHWRVZLWFKRQWKH
VKDYHU
<RXFDQQRZVWDUWWULPPLQJ
3 $IWHUWULPPLQJSUHVVWKHRQRIIEXWWRQRQFHWR
VZLWFKRIIWKHVKDYHU
4 &OHDQWKHWULPPHUVHHFKDSWHU¶&OHDQLQJDQG
PDLQWHQDQFH·
5 &ORVHWKHWULPPHU¶FOLFN·
Cleaning and maintenance
1HYHUXVHFRPSUHVVHGDLUVFRXULQJSDGVDEUDVLYH
FOHDQLQJDJHQWVRUDJJUHVVLYHOLTXLGVVXFKDVSHWURO
14
ENGLISH
RUDFHWRQHWRFOHDQWKHVKDYHUDQGWKHFKDUJLQJ
VWDQG$7RQO\
$OZD\VXQSOXJWKHVKDYHUEHIRUH\RXFOHDQLWXQGHU
WKHWDS
- Clean the shaver after every shave for optimal
shaving performance.
- Regular cleaning guarantees better shaving
performance.
- )RUWKHEHVWFOHDQLQJUHVXOWVZHDGYLVH\RXWRXVH
the Philips Cleaning spray (HQ110).
- Be careful with hot water. Always check if the
water is not too hot, to prevent your hands from
getting burnt.
1RWH:DWHUPD\OHDNIURPWKHVRFNHWDWWKHERWWRP
RIWKHVKDYHUZKHQ\RXULQVHLW7KLVLVQRUPDODQGQRW
GDQJHURXVEHFDXVHDOOHOHFWURQLFVDUHHQFORVHGLQD
VHDOHGSRZHUXQLWLQVLGHWKHVKDYHU
Cleaning the shaving unit under the tap
1 6ZLWFKRIIWKHVKDYHU
2 3UHVVWKHUHOHDVHEXWWRQWRRSHQWKHVKDYLQJ
unit.
3 5LQVHWKHVKDYLQJXQLWDQGKDLUFKDPEHUXQGHU
DKRWWDSIRUVHFRQGV
%HFDUHIXOZLWKKRWZDWHU$OZD\VFKHFNLIWKH
ZDWHULVQRWWRRKRWWRSUHYHQW\RXUKDQGVIURP
getting burnt.
- Rinse the hair chamber and the inside of the
shaving unit.
ENGLISH 15
- Rinse the outside of the shaving unit.
4 &ORVHWKHVKDYLQJXQLWDQGVKDNHRIIH[FHVV
ZDWHU
%HFDUHIXOQRWWRKLWWKHVKDYLQJXQLWDJDLQVW
DQ\WKLQJZKLOHVKDNLQJRIIH[FHVVZDWHU
1HYHUGU\WKHVKDYLQJXQLWDQGWKHKDLUFKDPEHU
ZLWKDWRZHORUWLVVXHDVWKLVPD\GDPDJHWKH
VKDYLQJXQLW
5 2SHQWKHVKDYLQJXQLWDJDLQDQGOHDYHLWRSHQ
WROHWWKHVKDYHUGU\FRPSOHWHO\
Cleaning the shaving unit with the cleaning
brush
1 6ZLWFKRIIWKHVKDYHU
2 3UHVVWKHUHOHDVHEXWWRQWRRSHQWKHVKDYLQJ
unit.
3 3XOOWKHVKDYLQJXQLWRIIWKHVKDYHU
4 7XUQWKHORFNDQWLFORFNZLVHDQGUHPRYHWKH
UHWDLQLQJIUDPH
16
ENGLISH
5 5HPRYHDQGFOHDQRQHVKDYLQJKHDGDWDWLPH
(DFKVKDYLQJKHDGFRQVLVWVRIDFXWWHUDQGD
JXDUG
1RWH'RQRWFOHDQPRUHWKDQRQHFXWWHUDQGJXDUG
DWDWLPHVLQFHWKH\DUHDOOPDWFKLQJVHWV,I\RX
DFFLGHQWDOO\PL[XSWKHFXWWHUVDQGJXDUGVLWPD\WDNH
VHYHUDOZHHNVEHIRUHRSWLPDOVKDYLQJSHUIRUPDQFHLV
UHVWRUHG
- Remove the cutter from the shaving guard and
clean it with the brush.
- Clean the inside and outside of the shaving guard
with the brush.
6 3XWWKHVKDYLQJKHDGVEDFNLQWRWKHVKDYLQJ
unit.
0DNHVXUHWKDWWKHSURMHFWLRQVRIWKHVKDYLQJ
KHDGVÀWH[DFWO\LQWRWKHUHFHVVHV
7 3XWWKHUHWDLQLQJIUDPHEDFNLQWRWKHVKDYLQJ
XQLWDQGWXUQWKHORFNFORFNZLVH
8 ,QVHUWWKHOXJRIWKHVKDYLQJXQLWLQWRWKHVORW
LQWKHWRSRIWKHVKDYHU7KHQFORVHWKH
VKDYLQJXQLW
1RWH,IWKHVKDYLQJXQLWGRHVQRWFORVHVPRRWKO\FKHFN
LI\RXKDYHLQVHUWHGWKHVKDYLQJKHDGVSURSHUO\DQGLI
WKHUHWDLQLQJIUDPHLVORFNHG
ENGLISH 17
Cleaning the trimmer with the cleaning
brush (AT940/AT893/AT890 only)
Clean the trimmer every time you have used it.
1 6ZLWFKRIIWKHVKDYHU
2 3XVKWKHWULPPHUVOLGHGRZQZDUGVWRRSHQ
WKHWULPPHU
3 &OHDQWKHWULPPHUZLWKWKHVKRUWEULVWOHGVLGH
RIWKHFOHDQLQJEUXVK%UXVKXSDQGGRZQDORQJ
WKHWULPPHUWHHWK
4 &ORVHWKHWULPPHU¶FOLFN·
7LS)RURSWLPDOWULPPLQJSHUIRUPDQFHOXEULFDWHWKH
WULPPHUWHHWKZLWKDGURSRIVHZLQJPDFKLQHRLOHYHU\
VL[PRQWKV
Storage
There are several ways to store the shaver or to
take it with you when you travel:
- Always put the protection cap on the shaver to
prevent damage.
- AT940/AT893/AT890 only: Store the shaver in the
pouch supplied.
- AT940 only: Store the shaver in the charging stand.
Replacement
)RUPD[LPXPVKDYLQJSHUIRUPDQFHZHDGYLVH
you to replace the shaving heads every year.
Replace damaged shaving heads right away.
18
ENGLISH
Only replace the shaving heads with original HQ9
Philips Shaving Heads (for AT940) or HQ8 Philips
Shaving Heads (for AT893/AT890/AT753/AT752/
AT750).
1 6ZLWFKRIIWKHVKDYHU'LVFRQQHFWWKHVKDYHU
IURPWKHPDLQVRUUHPRYHLWIURPWKHFKDUJLQJ
VWDQG$7RQO\
2 3UHVVWKHUHOHDVHEXWWRQWRRSHQWKHVKDYLQJ
unit.
3 3XOOWKHVKDYLQJXQLWRIIWKHVKDYHU
4 7XUQWKHORFNDQWLFORFNZLVHDQGUHPRYHWKH
UHWDLQLQJIUDPH
5 5HPRYHWKHVKDYLQJKHDGVDQGSODFHQHZRQHV
LQWKHVKDYLQJXQLW
0DNHVXUHWKDWWKHSURMHFWLRQVRIWKHVKDYLQJ
KHDGVÀWH[DFWO\LQWRWKHUHFHVVHV
6 3XWWKHUHWDLQLQJIUDPHEDFNLQWRWKHVKDYLQJ
XQLWDQGWXUQWKHORFNFORFNZLVH
7 ,QVHUWWKHOXJRIWKHVKDYLQJXQLWLQWRWKHVORW
LQWKHWRSRIWKHVKDYHU7KHQFORVHWKH
VKDYLQJXQLW
1RWH,IWKHVKDYLQJXQLWGRHVQRWFORVHVPRRWKO\FKHFN
LI\RXKDYHLQVHUWHGWKHVKDYLQJKHDGVSURSHUO\DQGLI
WKHUHWDLQLQJIUDPHLVORFNHG
Accessories
To retain the top performance of your shaver, make
sure you clean it regularly and replace its shaving
heads at the recommended time.
ENGLISH 19
Shaving heads
- We advise you to replace your shaving heads
every year. Always replace with HQ9 Philips
Shaving Heads (for AT940) or HQ8 Philips
Shaving Heads (for AT893/AT890/AT753/AT752/
AT750).
Cleaning
- Use Cleaning spray (HQ110) to clean the shaving
heads thoroughly.
Environment
- Do not throw away the appliance with the normal
household waste at the end of their life, but
KDQGWKHPLQDWDQRIÀFLDOFROOHFWLRQSRLQWIRU
recycling. By doing this, you help to preserve the
environment.
- The built-in rechargeable shaver battery contains
substances that may pollute the environment.
Always remove the battery before you discard or
KDQGLQWKHVKDYHUDWDQRIÀFLDOFROOHFWLRQSRLQW
'LVSRVHRIWKHEDWWHU\DWDQRIÀFLDOFROOHFWLRQ
point for batteries. If you have trouble removing
the battery, you can also take the appliance to a
Philips service centre. The staff of this centre will
remove the battery for you and will dispose of it
in an environmentally safe way.
Removing the rechargeable shaver battery
2QO\UHPRYHWKHUHFKDUJHDEOHEDWWHU\ZKHQ\RX
GLVFDUGWKHVKDYHU0DNHVXUHWKHUHFKDUJHDEOH
EDWWHU\LVFRPSOHWHO\HPSW\ZKHQ\RXUHPRYHLW
20
ENGLISH
1 'LVFRQQHFWWKHVKDYHUIURPWKHPDLQVRU
UHPRYHLWIURPWKHFKDUJLQJVWDQG$7
RQO\
2 /HWWKHVKDYHUUXQXQWLOLWVWRSV
3 8QGRWKHVFUHZVLQWKHEDFNRIWKHVKDYHUDQG
LQWKHKDLUFKDPEHU
4 5HPRYHWKHIURQWSDQHODQGWKHEDFNSDQHO
5 %HQGWKHKRRNVDVLGHDQGWDNHRXWWKH
power unit.
%HFDUHIXOWKHKRRNVDUHVKDUS
6 5HPRYHWKHEDWWHU\
%HFDUHIXOWKHEDWWHU\VWULSVDUHVKDUS
'RQRWFRQQHFWWKHVKDYHUWRWKHPDLQVDJDLQ
RUSXWLWEDFNLQWRWKHSOXJJHGLQFKDUJLQJ
VWDQG$7RQO\DIWHU\RXKDYHUHPRYHGWKH
UHFKDUJHDEOHEDWWHU\
Guarantee and service
If you need service or information or if you have a
problem, please visit the Philips website at
www.philips.com or contact the Philips Consumer
Care Centre toll free at 1-866-800-9311.
Guarantee restrictions
The shaving heads (cutters and guards) are not
covered by the terms of the international guarantee
because they are subject to wear.
ENGLISH 21
Troubleshooting
This chapter summarises the most common
problems you could encounter with the appliance. If
you are unable to solve the problem with the
information below, contact the Consumer Care
Centre in your country.
3UREOHP
3RVVLEOHFDXVH
6ROXWLRQ
The shaver does
not shave as well
as it used to.
The shaving
heads are
damaged or
worn.
Replace the shaving heads (see
chapter ‘Replacement’).
)RDPRUJHO
residues clog
up the shaving
heads.
Rinse the shaving unit under a
hot tap (see section ‘Cleaning
the shaving unit under the
tap’ in chapter ‘Cleaning and
maintenance’).
Long hairs
obstruct the
shaving heads.
Clean the shaving heads one by
one (see section ‘Cleaning the
shaving unit with the cleaning
brush’ in chapter ‘Cleaning and
maintenance’).
You have not
inserted the
shaving heads
properly.
Make sure that the projections
RIWKHVKDYLQJKHDGVÀWH[DFWO\
into the recesses (see section
‘Cleaning the shaving unit with
the cleaning brush’).
The
rechargeable
battery is
empty.
Recharge the battery (see
chapter ‘Charging’).
The shaver does
not work when I
press the on/off
button.
22
ENGLISH
3UREOHP
The shaver
does not work,
although it is
connected to the
mains.
3RVVLEOHFDXVH
6ROXWLRQ
The
temperature
of the shaver is
too high. In this
case, the shaver
does not work.
As soon as the temperature
of the shaver has dropped
VXIÀFLHQWO\\RXFDQVZLWFKRQWKH
shaver again.
If the shaver
does not
work when
you press the
on/off button,
the battery is
empty.
This shaver is not designed to be
used directly from the mains, so
you should recharge the battery
(see chapter ‘Charging’).