1
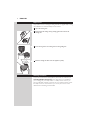
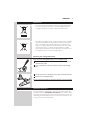
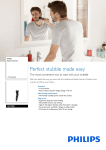
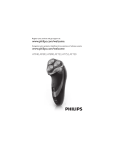
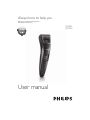
Always here to help you
Register your product and get support at
www.philips.com/welcome
QT4005
QT4000
User manual
1
QT4005, QT4000
ENGLISH 4
DANSK 10
DEUTSCH 16
ƁƇƇƃƉƅƆž 23
ESPAÑOL 30
SUOMI 36
FRANÇAIS 42
ITALIANO 49
NEDERLANDS 56
NORSK 63
PORTUGUÊS 69
SVENSKA 76
TÜRKÇE 82
4
ENGLISH
Introduction
Congratulations on your purchase and welcome to Philips!
7RIXOO\EHQHÀWIURPWKHVXSSRUWWKDW3KLOLSVRIIHUVUHJLVWHU\RXUSURGXFW
at www.philips.com/welcome.
General description (Fig. 1)
1
2
3
4
5
6
7
8
Trimming comb
Cutting unit
Precision Zoom Lock™ adjustment ring
On/off slide
Socket for appliance plug
Brush
Appliance plug
Adapter with charging light
Important
Read this user manual carefully before you use the appliance and save it for
future reference.
Danger
- Make sure the adapter does not get wet.
Warning
- The adapter contains a transformer. Do not cut off the adapter to
UHSODFHLWZLWKDQRWKHUSOXJDVWKLVFDXVHVDKD]DUGRXVVLWXDWLRQ
- This appliance is not intended for use by persons (including children)
ZLWKUHGXFHGSK\VLFDOVHQVRU\RUPHQWDOFDSDELOLWLHVRUODFNRI
H[SHULHQFHDQGNQRZOHGJHXQOHVVWKH\KDYHEHHQJLYHQVXSHUYLVLRQRU
instruction concerning use of the appliance by a person responsible for
their safety.
- Children should be supervised to ensure that they do not play with
the appliance.
Caution
- Never immerse the appliance in water or rinse it under the tap.
Only the cutting unit can be rinsed under the tap.
- 8VHFKDUJHDQGVWRUHWKHDSSOLDQFHDWDWHPSHUDWXUHEHWZHHQ
5°C and 35°C.
- Only use the adapter supplied.
- ,IWKHDGDSWHULVGDPDJHGDOZD\VKDYHLWUHSODFHGZLWKRQHRIWKH
RULJLQDOW\SHLQRUGHUWRDYRLGDKD]DUG
- This appliance is only intended for trimming the human beard.
Do not use it for any other purpose.
- Do not use the appliance if the cutting unit or the trimming comb is
GDPDJHGRUEURNHQDVWKLVPD\FDXVHLQMXU\
(OHFWURPDJQHWLFÀHOGV
This Philips appliance complies with all standards regarding electromagnetic
ÀHOGV(0),IKDQGOHGSURSHUO\DQGDFFRUGLQJWRWKHLQVWUXFWLRQVLQWKLV
XVHUPDQXDOWKHDSSOLDQFHLVVDIHWRXVHEDVHGRQVFLHQWLÀFHYLGHQFH
available today.
ENGLISH
5
General
- The appliance is equipped with an automatic voltage selector and is
suitable for mains voltages from 100 to 240 volts.
- The adapter transforms 100-240 volts to a safe low voltage of less than
24 volts.
Charging
&KDUJHWKHDSSOLDQFHIXOO\EHIRUH\RXXVHLWIRUWKHÀUVWWLPHRUDIWHUDORQJ
period of disuse.
It takes approximately 10 hours to fully charge the appliance.
:KHQLWLVIXOO\FKDUJHGWKHDSSOLDQFHKDVDFRUGOHVVRSHUDWLQJWLPHRIXS
to 35 minutes.
Note: For safety reasons, the epilator can only be used cordlessly. Make sure
the appliance is charged before use.
1 Make sure the appliance is switched off.
2 Insert the appliance plug into the appliance.
3 Put the adapter in the wall socket.
The charging light on the adapter lights up green continuously to
indicate that the appliance is charging.
Note:The charging light on the adapter does not change colour and does not
go out when the appliance is fully charged.
4 After charging, remove the adapter from the wall socket and pull the
appliance plug out of the appliance.
Optimising the lifetime of the rechargeable battery
:KHQ\RXKDYHFKDUJHGWKHDSSOLDQFHIRUWKHÀUVWWLPHZHDGYLVH\RXWR
use it until the battery is completely empty. Continue to use the appliance
until the motor almost stops running during a session. Then recharge the
EDWWHU\)ROORZWKLVSURFHGXUHDWOHDVWWZLFHD\HDU
Using the appliance
$OZD\VFRPEWKHEHDUGDQGRUPRXVWDFKHZLWKDÀQHFRPEEHIRUH\RX
start trimming.
:KHQ\RXWULPIRUWKHÀUVWWLPHEHFDUHIXO'RQRWPRYHWKHWULPPHU
too fast. Make smooth and gentle movements.
Trimming with comb
1 Turn the Precision Zoom Lock™ adjustment ring to the
desired setting. The selected setting is the setting in the centre of the
adjustment ring.
See the table below for an overview of the settings and the resulting hair
lengths.
ENGLISH
6
Setting
Resulting hair length
1
1mm
2
2mm
3
3mm
4
4mm
5
5mm
6
6mm
7
7mm
8
8mm
9
9mm
10
10mm
1RWH:KHQ\RXWULPIRUWKHÀUVWWLPHVWDUWDWWKHKLJKHVWVHWWLQJWR
familiarise yourself with the appliance.
2 Switch on the appliance.
3 To trim most effectively, move the trimmer against the hair growth
GLUHFWLRQ0DNHVXUHWKHVXUIDFHRIWKHFRPEDOZD\VVWD\VLQFRQWDFW
with the skin.
4 ,IDORWRIKDLUKDVDFFXPXODWHGLQWKHEHDUGWULPPLQJFRPE
UHPRYHWKHFRPEDQGEORZDQGRUVKDNHWKHKDLURXWRILW
The selected setting does not change when you do this.
Trimming at the unique ‘stubble look’ setting
1 7RFUHDWHD¶VWXEEOHORRN·WULPZLWKWKHEHDUGWULPPLQJFRPEVHW
to setting 1.
ENGLISH
7
Trimming without comb
Use the trimmer without beard trimming comb to trim full beards and
single hairs.
%HFDUHIXOZKHQ\RXWULPZLWKRXWFRPEEHFDXVHWKHFXWWLQJ
element removes every hair it touches.
1 3XOOWKHEHDUGWULPPLQJFRPERIIWKHDSSOLDQFHDVVKRZQLQÀJXUH
2 Switch on the appliance.
3 Make well-controlled movements. Touch the hair lightly with the
trimmer.
Cleaning
1HYHUXVHVFRXULQJSDGVDEUDVLYHFOHDQLQJDJHQWVRUDJJUHVVLYHOLTXLGV
such as alcohol, petrol or acetone to clean the appliance.
1 Make sure the appliance is switched off and disconnected from the
mains.
2 Wipe the housing of the appliance with a dry cloth.
Never immerse the appliance in water or rinse it under the tap.
3 5HPRYHWKHWULPPLQJFRPEDQGFOHDQLWZLWKWKHEUXVK
4 5HPRYHWKHFXWWLQJXQLWE\SXVKLQJDJDLQVWWKHWHHWKRIWKHFXWWLQJ
XQLWDQGFOHDQLWZLWKWKHEUXVKRUULQVHLWXQGHUWKHWDS
5 6KDNHRIIH[FHVVZDWHUDQGSODFHWKHFXWWLQJXQLWEDFNE\LQVHUWLQJ
the lug of the cutting unit into the guiding slot.
6 3XVKWKHFXWWLQJXQLWEDFNRQWRWKHDSSOLDQFH¶FOLFN·
8
ENGLISH
Replacement
Only replace a worn or damaged cutting unit with an original Philips cutting
XQLWDYDLODEOHIURPDXWKRULVHG3KLOLSVVHUYLFHFHQWUHV
1 Open the cutting unit.
2 5HPRYHWKHROGFXWWLQJXQLWE\SXVKLQJDJDLQVWWKHWHHWKRIWKH
cutting unit.
3 Insert the lug of the new cutting unit into the guiding slot.
4 3XVKWKHFXWWLQJXQLWEDFNRQWRWKHDSSOLDQFH¶FOLFN·
Ordering accessories
7RSXUFKDVHDFFHVVRULHVIRUWKLVDSSOLDQFHSOHDVHYLVLWRXURQOLQHVKRSDW
www.shop.philips.com/service. If the online shop is not available in
\RXUFRXQWU\JRWR\RXU3KLOLSVGHDOHURUD3KLOLSVVHUYLFHFHQWUH,I\RX
KDYHDQ\GLIÀFXOWLHVREWDLQLQJDFFHVVRULHVIRU\RXUDSSOLDQFHSOHDVHFRQWDFW
WKH3KLOLSV&RQVXPHU&DUH&HQWUHLQ\RXUFRXQWU\<RXÀQGLWVFRQWDFW
GHWDLOVLQWKHZRUOGZLGHJXDUDQWHHOHDÁHW
ENGLISH
9
Environment
-
Do not throw away the appliance with the normal household waste
DWWKHHQGRILWVOLIHEXWKDQGLWLQDWDQRIÀFLDOFROOHFWLRQSRLQWIRU
UHF\FOLQJ%\GRLQJWKLV\RXKHOSWRSUHVHUYHWKHHQYLURQPHQW
-
The built-in rechargeable battery contains substances that may pollute
the environment. Always remove the battery before you discard and
KDQGLQWKHDSSOLDQFHDWDQRIÀFLDOFROOHFWLRQSRLQW'LVSRVHRIWKH
EDWWHU\DWDQRIÀFLDOFROOHFWLRQSRLQWIRUEDWWHULHV,I\RXKDYHWURXEOH
UHPRYLQJWKHEDWWHU\\RXFDQDOVRWDNHWKHDSSOLDQFHWRD3KLOLSV
service centre. The staff of this centre will remove the battery for you
and will dispose of it in an environmentally safe way.
Removing the rechargeable battery
2QO\UHPRYHWKHUHFKDUJHDEOHEDWWHU\LILWLVFRPSOHWHO\HPSW\
1 'LVFRQQHFWWKHDSSOLDQFHIURPWKHPDLQVDQGOHWWKHDSSOLDQFHUXQ
until the motor stops.
2 ,QVHUWDVFUHZGULYHULQWKHKDLUFKDPEHUWRVHSDUDWHWKHKRXVLQJ
part.
3 &XWWKHZLUHVFORVHWRWKHEDWWHU\ZLWKDSDLURIKRXVHKROGVFLVVRUV
4 5HPRYHWKHUHFKDUJHDEOHEDWWHU\
'RQRWFRQQHFWWKHDSSOLDQFHWRWKHPDLQVDJDLQDIWHU\RXKDYHRSHQHGLW
Guarantee and service
,I\RXQHHGVHUYLFHRULQIRUPDWLRQRULI\RXKDYHDSUREOHPSOHDVHYLVLW
the Philips website at www.philips.com/support or contact the Philips
&RQVXPHU&DUH&HQWUHLQ\RXUFRXQWU\<RXÀQGLWVSKRQHQXPEHULQWKH
ZRUOGZLGHJXDUDQWHHOHDÁHW,IWKHUHLVQR&RQVXPHU&DUH&HQWUHLQ\RXU
FRXQWU\JRWR\RXUORFDO3KLOLSVGHDOHU