1
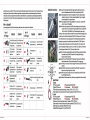
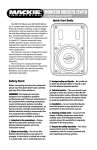
600 Watts Motorcycle/ATV/Snowmobile Mount Amplifier w/Dual
handle-bar Mount Aluminum Diacast Weatherproof speakers
w/MP3/Ipod Input and USB Charger
400 Watts Motorcycle/ATV/Snowmobile Mount Amplifier w/Dual
handle-bar Mount Weatherproof speakers w/MP3/Ipod Input
Congratulations on your purchase of this Pyle Cycle Series premier amplified speaker system. Like all Pyle products, this motorcycle system has been
th~roughly tested to .ensure consistent, reliable performance under some rigorous conditions. Our systems were designed to with stand water,
mOisture, hea~, and direct sun exposure. We pride ourselves in customer satisfaction. If you should have any questions regarding the installation
and/or operation of your Pyle Cycle Series motorcycle speaker system, which is not covered in this manual, please contact your Pyle Dealer or Pyle
Technical Support.
Installation Instructions:
What is Included?
Upon un-packing your new Pyle Cycle Series audio system, please check to ensure you have all the included parts.
Part #
with Image
PLMCA60
PLMCA30
(1) Pair of 300 Watt Stereo (1) Pair of 200 Watt Stereo
Chrome Speaker Enclosures Chrome Speaker Enclosures
with Speaker Wires
with Speaker Wires
#1
(1) Pair of Handlebar
Speaker Enclosure "p.
(1) Pair of Handlebar
Speaker Enclosure "p.
Shape Clamp
Shape Clamp
(1) Pair of Handlebar MUSic
Source Mount"Z· Shape
Clamp
(1) Pair of Handlebar MUSic
Source Mount"Z· Shape
Clamp
#4
(l)Micro Stereo 2CH
Amplifier(300 Watts x 2
Max Output Power)
(l)Micro Stereo 2CH
Amplifier(200 Watts x 2
Max Output Power)
#5
(l)Universal chrome Handlebar
Mp3/Audio Mounf with
(2) Black Industrial Velcro
#2
#3
#6
#7
BRAND SPEAKERS
,
Part #
with Image
PLMCA60
#9
(1) 12 Volt Direct Plug, for
Compatible Motorcycles
#10
(1) USB Charger/ Power
Source
#11 ~
- ",,-- -
(1) Adjustable Rotary
Volume Control 3.5 mm
Interface
PLMCA30
(1) 12 Volt Direct Plug, for
Compatible Motorcycles
NA
(1) Adjustable Rotary
Volume Control 3.5 mm
Interface
L+
#12
(1) Black Industrial Velcro
Adhesive Strips
#13
(6) Black Wire Tie Lockable (6) Black Wire Tie Lockable
Straps
Straps
NA
D-l-l:::::::!l"'-l ~+--+ 12V
R-~~~-R+
NA
-
(1) Amplifier 12 Volt (-)
(1) Amplifier 12 Volt (-)
Ground Blue Spade Terminal Ground Blue Spade Terminal
#14
(2) Screws for Speaker
(2) Screws for Speaker
(1) Amplifier 12 Volt (+)
Blue Male Terminal
Connector
(1) Amplifier 12 Volt (+)
Blue Male Terminal
Connector
#15
(1) Screw, Washer and Nut
for Amplifier
(1) Screw, Washer and Nut
(1) Universal 12 Volt Wire
Harness Connection
(1) Universal 12 Volt Wire
Harness Connection
for Amplifier
Step #1: Install 'P" shaped clamp (Item #2)/"Z" shaped clamp (Item #3) threaded on to the
bottom of each speaker enclosure (Item #1). Use the provided bolts (item #14).
Step #2: Bolt each speaker with its mount to the handlebar of the vehicle. Hardware included
will allow for mounting on to 1" diameter and smaller handlebars. Project each speaker
at desired listening level, for best performance.
Step #3: Secure speaker wires either through handlebars for a custom look, or use (Item #13)
wire ties to secure to the handlebars.
Step #4: Bolt the rotary volume control (Item #11) to the handlebars using the vehicle provided
hardware. Then run 3.5 mm connection down to desired amplifier location. Use (Item #13)
wire ties to secure to the handlebars. Have 3.5 mm male connection close to mount.
The Connector that comes pre-installed on the amplifier wire harness (Item #8) was designed to allow
for direct plug-in for most American Motorcycles (Item #9). If mounting on a metric or universal
vehicle, this harness will not be used, and replaced with the terminals/connectors provided in the
enclosed parts bag according to the installation instructions (Items #6, #7, & #8). Follow wire
instructions as shown in Diagram A Be sure to match the proper polarity for all connections. The
polarity for the speaker terminals solid color wire (+), wire with stripe (-). Blue wire 12 Volt Positive
(+) terminal trigger wire. Black wire 12 Volt (-) Ground to chassis of vehicle.
Step #5: Bolt the Universal Handlebar MP3/ Audio Mount (Item #5) using provided black industrial
velcro adhesive strips (Item #12). Remove bolt from existing switch housing on
motorcycle and secure to bracket.
Step #6: (Only for use with PLMCA60): Bolt the USB Charger/ Power Source (Item #10) using
vehicle provided hardware. This wire should be connected 12 Volt power source.
Step #7: Run wires up to neck area of motorcycle and plug into harness. Use (Item #13) wire ties to
the frame.
Step #8: Bolt amplifier on Motorcycle with provided Bolt (item #15). Best if mounted directly to
frame out of reach from direct heat or crash bar.
Step #9: Attach Velcro strips (Item #12) one side to our Universal Bracket (Item #5) the other
to your MP3 player/ audio source.
Step #10: Connect 3.5mm male connection into Audio device, and opposite side into Micro Amplifier
Specifications:
PLMCA30
. 2" motorcycle speaker
• Frequency Response: 280Hz-20KHZ
. 20mm KAPTON voice coil
. 4 ohm Impedance
. SPL: 83 dB (1W/1M)
• Plastic with shinny chromed Speaker housing, Dimensions: 2.5"(W) x 2.5"(H) x 3.75"( L)
• Micro amplifier with harness & universal mount included, Amp dimension: 3.2 5"(W)x 1.2 5"( H) X 2"( L)
PLMCA60
. 2" motorcycle speaker
• Frequency Response: 260Hz-21KHZ
• 25mm KAPTON voice coil
. 4 ohm Impedance
. SPL: 85 dB (1W/1M)
• Aluminum with shinny chromed Speaker housing, Dimensions: 2.5"(W)x 2.5"(H)x3( L)
• Micro amplifier with harness & universal mount included, Amp dimension: 3.25"(W)x 1.25"( H) x 2"(L)
. USB charge included, Dimensions:2.5"(W)x1.75"(H)x 1.5"(L)
• Radio/MP3 Mount Dimensions: 3.5"( L)x 0.625"(W)x 3.125"(H)
SPEAKER SYSTEM