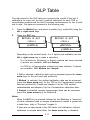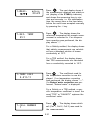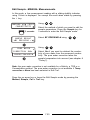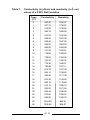
1
CDM230
Conductivity Meter
Operating Instructions
D21M009
Introduction
The CDM230 Conductivity Meter is a top-of-the-line instrument in
MeterLabTM, RADIOMETER ANALYTICAL's complete range of measuring
equipment for accurate and reliable pH, ion and conductivity measurements.
The CDM230 offers high-precision measurements: conductivity measurements in the range 0.001 µS/cm to 2.000 S/cm, resistivity measurements
in the range 0.2 Ω•cm to 500 MΩ•cm, salinity measurements, TDS measurements and concentration measurements.
Three measurement methods for conductivity, resistivity, salinity, TDS or
concentration can be individually edited to fit your specific tasks.
Calibration data for 3 different cells can be stored.
Using the AUTOREAD function, the result is locked on the display as soon
as the user-defined stability criterion and/or the accept time are reached
thus ensuring excellent reproducibility. Sample measurements can also be
measured continuously and printed out at specific time intervals.
Conductivity is displayed at the sample temperature or can be corrected to
a reference temperature between 0 and 99°C using a temperature
coefficient. If your sample is natural water, the conductivity can also be
corrected to a temperature of 25°C using a standardized conversion
algorithm. The conversion factor is calculated from a conductivity versus
temperature table stored in the memory.
Sample temperature can be measured automatically or entered manually.
The conductivity of pure water at the current temperature can be subtracted automatically from the displayed conductivity.
Conductivity cells with 2, 3 or 4 poles can be used. The 4-pole conductivity cell provides reliable conductivity measurements to be performed over
a wide conductivity range.
The CDM230 is equipped with a RS232C input/output serial port allowing
for measurements to be either printed out or processed using a PC
equipped with MeterMaster, the MeterLab Automation Program.
For optimal user convenience, connect the SAM7 Sample Stand.
D21M009
Printed by Radiometer Analytical SAS •France • 2004-07I
Contents
Setting up .............................................................................. 1.1
The CDM230 Conductivity Meter ................................................ 1.1
Connecting the Conductivity Cell/Temperature Sensor ................ 1.2
Choosing the Language ............................................................... 1.3
Setting the Date, Time and Keyboard Beep ................................ 1.3
Selecting the Parameters of the CDM230/Printer Serial Port ....... 1.4
Entering the Instrument ID .......................................................... 1.5
Description of Keys ..................................................................... 1.6
Routine Use ........................................................................... 2.1
Selecting the Method .................................................................. 2.2
Cell Calibration ............................................................................ 2.4
Sample Measurements ............................................................... 2.11
GLP Table .................................................................................. 2.17
Conductivity Measurements ................................................ 3.1
Selecting the Conductance Range .............................................. 3.1
Relative Conductivity Measurements .......................................... 3.3
Salinity Measurements ......................................................... 4.1
TDS Measurements ............................................................... 5.1
Selecting a TDS Method ............................................................. 5.1
Editing the Method parameters ................................................... 5.2
Editing the Calibration (Cell) parameters ..................................... 5.3
Editing the Calibration (Method) parameters ................................ 5.4
Editing the Sample parameters ................................................... 5.6
Performing a cell Calibration ....................................................... 5.7
Performing a Method Calibration ................................................. 5.8
Performing TDS Sample measurements ..................................... 5.9
GLP Table (Method Calibration) .................................................. 5.12
Concentration Measurements ............................................ 6.1
Selecting a Concentration Method ............................................... 6.1
Editing the Method parameters ................................................... 6.2
Editing the Calibration (Cell) parameters ..................................... 6.3
Editing the Calibration (Method) parameters ................................ 6.4
Editing the Sample parameters ................................................... 6.7
Performing a cell Calibration ....................................................... 6.8
Performing a Method Calibration ................................................. 6.9
Performing Concentration Sample measurements ....................... 6.13
GLP Table (Method Calibration) .................................................. 6.15
The Edit Mode ........................................................................ 7.1
Editing a Method ......................................................................... 7.1
Methods and Conductivity Cells .................................................. 7.2
Edit Method ................................................................................ 7.3
Edit Calibration (Cell Calibration) ................................................. 7.6
Edit Calibration (TDS Method) ..................................................... 7.10
Edit Calibration (Concentration Method) ...................................... 7.13
Edit Sample - AUTOREAD Measurements ................................. 7.16
Edit Sample - AT INTERVALS Measurements ............................ 7.18
Edit Sample - MANUAL Measurements ...................................... 7.20
Edit Tref - Temperature Correction .............................................. 7.21
Edit GLP ..................................................................................... 7.23
Edit PRINT ................................................................................. 7.24
Locking the Edit Mode ................................................................ 7.25
Theory ...................................................................................... 8.1
Conductivity and Resistivity Measurements ................................ 8.2
Salinity Measurements ............................................................... 8.7
TDS Measurements .................................................................... 8.9
Concentration Measurements ...................................................... 8.11
Printouts .................................................................................. 9.1
Troubleshooting and Maintenance ........................................ 10.1
Error Messages ............................................................................ 10.1
Maintenance (Changing the Battery and Adjusting the Contrast) ... 10.5
Appendix 1
Table 1. Conductivity values for Demal solutions ............................... A1.1
Table 2. Resistivity values for Demal solutions .................................. A1.3
Table 3. Conductivity values for Molar solutions ................................ A1.5
Table 4. Resistivity values for Molar solutions ................................... A1.7
Table 5. Temperature coefficients for conductivity measurements ..... A1.9
Table 6. Temperature coefficients for resistivity measurements ......... A1.9
Table 7. Conductivity and resistivity values of a 0.05% NaCl solution A1.10
Appendix 2
Connection of Peripherals .................................................................. A2.1
Appendix 3
Default Values ................................................................................... A3.1
Appendix 4
Remote Control using a PC ................................................................ A4.1
Appendix 5
Accessories ....................................................................................... A5.1
Appendix 6
Specifications .................................................................................... A6.1
Appendix 7
Examples of Applications .................................................................. A7.1
Appendix 8
Keyword Index ................................................................................... A8.1
Setting up
The CDM230 Conductivity Meter
1.
Place the CDM230 on a laboratory bench close to an appropriate
power outlet.
2.
Raise the conductivity meter by means of the blue tilt-up levers, if
desired.
3.
Connect the CDM230 to the mains supply via the POWER IN
(12 V 0.8 A) socket using the AC/DC adapter supplied. For safety
reasons, make sure that the power adapter is placed at a distance of at
least 1 meter from a water supply.
CELL
TEMP
RECORDER
LI-BATTERY 3.6V
PRINTER/PC
12 V 0.3 A
SIZE AA/R6
MADE IN FRANCE
POWER OUT
POWER IN
POWER
12 V 0.8 A
ON
OFF
RADIOMETER ANALYTICAL S.A.
Fig.1: Rear panel of the CDM230
4.
The CDM230 can be switched ON/OFF using the POWER ON/OFF
switch situated on the rear panel (see fig.1).
5.
A printer or a PC can be connected to the CDM230 via the RS232C
PRINTER/PC interface.
For printer connection, use the RADIOMETER ANALYTICAL cable,
9-25 pins, part no. A95P201. For PC connection, please refer to
appendix 2.
6.
To connect a recorder use the CDM230 analogue RECORDER output
and the MAB-8M/3 banana RADIOMETER ANALYTICAL cable, part
no.: A95R102. For pin connections of the RECORDER socket, please
see appendix 2.
7.
If the SAM7 Sample Stand is to be connected, use the CDM230
POWER OUT output and the RADIOMETER ANALYTICAL cable
part no.A95A110.
1.1
The
socket: This non-insulated socket is connected to the
electrical zero of the CDM230. When the CDM230 is
used with other measurement units, connect the
electrical zeros of the instruments to the same
ground.
Connecting the Conductivity
Cell and Temperature Sensor
Secure the conductivity cell firmly in the cell holder of the sample stand.
CONDUCTIVITY CELL INPUT
Use the socket marked CELL for connection of the conductivity cell. The
CDC641T has a built-in temperature sensor.
Note: The conductivity cell used must have a consistent cell constant
over the conductivity range studied. It is recommended to determine the
cell constant regularly (once a week). To obtain the most accurate high
conductance measurements (> 20 mS) with a 2-pole conductivity cell,
the resistance of the cell cable should be known and entered in the Edit
Calibration mode. If you are measuring low conductance (< 4µS) with a
4-pole conductivity cell, the cable capacitance should be known and
entered in the Edit Calibration mode.
TEMPERATURE SENSOR INPUT
A separate temperature sensor (for example the RADIOMETER
ANALYTICAL temperature sensor T201) may be connected to the TEMP
socket.
1.2
Choosing the Language
A choice of English, French, German, Spanish and Italian is available as
the language used on the CDM230 displays and printouts.
1.
Switch on the CDM230 with the on/off switch. The instrument will
perform its Autotest.
2.
Select the language you require during the setup state (first 3 seconds
after switching on the instrument) using the left and right arrow keys.
3.
If no keys are pressed for a few seconds, the CDM230 automatically
switches to the method selection display.
Refer to the display overview given on page 2.3.
Setting the Date, Time and Keyboard Beep
The CDM230 is fitted with an internal clock. The actual date and time are
adjusted in the Edit GLP mode. The time and date are displayed when the
CDM230 is switched on and appear in printouts.
1.
Switch on the CDM230 with the on/off switch and wait for the Method
selection display.
2.
Hold the GLP key down for 3 seconds. The Current Time Hour display
appears.
3.
The hour and minute can be adjusted in the two displays using the left or
right arrow key. Use the down arrow key to change the display.
CURRENT TIME
MINUTES 20
CURRENT TIME
HOURS 10
4.
Adjust the year, month and day in the following three displays using the
left or right arrow key.
CURRENT DATE
MONTH APR
CURRENT DATE
YEAR
95
CURRENT DATE
DAY
26
1.3
5.
If you press the down arrow key, the Keyboard Beep display
appears.
Using the left or right arrow key, select whether you want a beep to
sound at each keystroke.
KEYBOARD BEEP
NO
YES
Leave the Edit mode by pressing the Method, Cal, Sample or Tref key.
Selecting the Parameters of the
CDM230 / Printer Serial Port
A printer can be used with the CDM230. The printer must be connected to
the PRINTER/PC output on the rear panel of the CDM230 and the serial
parameters must be selected as follows:
1.
Hold the Print key down for 3 seconds: the Printer output display
appears.
2.
Using the left or right arrow key, select between:
.
9600, n, 8, 1: 9600 baud, no parity, 8 data bits and 1 stop bit
.
2400, e, 7, 1: 2400 baud, even parity, 7 data bits and 1 stop bit
The parameters must be selected in accordance with those defined on
the printer (see the User's Manual of the printer).
Note: If you press the down arrow key from the Printer output display, the
Instrument ID display appears as explained below.
1.4
Entering the Instrument ID
The instrument identification entered by the user in the Edit Print mode
display will appear at the top of all printouts.
1.
Hold the Print key down for 3 seconds: the Printer output display
appears. Move to the Instrument ID display by pressing the down
arrow key.
2.
Using the left or right arrow key, adjust the instrument identification
"R xxx".
Note: If you adjust the instrument identification to "R---", the CDM230
displays "R---N000" and no ID will appear on the printouts.
3.
Press the down arrow key and, using the left or right arrow key,
adjust the Instrument identification "Nxxx". The instrument ID is marked
on the rear panel of the CDM230. Leave the Edit mode by pressing the
Method, Cal, Sample or Tref key.
1.5
Description of Keys
Method
Tref
Press the Method key to select one of 3 available
methods (A, B or C). By holding the key down for 3
seconds you can edit the method selected: selection of
the conductivity cell, selection of the type of method
(conductivity, resistivity, salinity, TDS or concentration),
measurement ranges, units, etc.
When the Tref key is pressed, the display shows if a
temperature correction has been selected for the method
and shows the reference temperature and temperature
coefficient. By holding the key down for 3 seconds, you can
select another temperature correction and enter the reference temperature and temperature coefficient.
Cal
The Cal key is pressed to initiate a cell or a method calibration. By holding the key down for 3 seconds, you can edit a
cell or a method calibration procedure.
Sample
The Sample key is pressed to initiate sample measurements. By holding the key down for 3 seconds, you can edit
a sample measurement procedure.
The ✓ (or Check Mark) key is used to validate a display
and thus continue to the next step. In the MANUAL mode,
results are accepted by pressing this key.
The left and right arrow keys are used to change a number
or to select an option which appears within arrows on the
display. In order to change parameter data quickly, hold the
left or right arrow key down continuously.
The up and down arrow keys are primarily used to move
up and down in the Edit mode displays.
1.6
Print
The Print key can be pressed during a calibration measurement procedure. Results of sample measurements and
calibrations are printed automatically when a printer is
connected.
Edit mode data and GLP result tables can also be printed out
by pressing the Print key from the Edit mode or by pressing
the Print key followed by the GLP key.
By holding the key down for 3 seconds, you can select the
parameters of the PC/Printer port and identify your CDM230
(entry of the ID number).
GLP
The GLP key gives access to the results of the last 5 cell
calibrations (if Cell is selected), the last 5 method calibrations
(if Method is selected) or the last 50 sample measurements (if
Sample is selected).
By holding the GLP key down for 3 seconds, you can enter
the current time and date and request a keyboard beep.
1.7
Routine Use
This chapter describes how to perform measurements with the CDM230 in
routine mode (i.e. without entering the EDIT mode).
To perform measurements with the CDM230, the following steps must be
performed in this order:
.
Selection of the method (method name, method mode).
.
Cell Calibration (operations performed after pressing Cal for all
methods).
.
Method Calibration (operations performed after pressing Cal
for a TDS or a Concentration method).
.
Sample measurements (operations performed after pressing
Sample).
The 3 steps apart from method calibration are described here. The method
calibration, which is only required for TDS or Concentration methods, is
described in individual chapters. These are:
.
Chapter 5 for a TDS method,
.
Chapter 6 for a Concentration method.
This chapter also includes a description of how to display the GLP data (cell
calibration and sample data). To, display the GLP method calibration data,
please refer to chapter 5 (TDS method) or 6 (Concentration method). To
print the GLP data, please refer to chapter 9.
If you are about to use the CDM230 for the first time, please read chapter 1
"Setting up" before reading this chapter. For first-time users, it is recommended to follow the instructions of this chapter in the order in which they
are given.
In this chapter, you will find parameters printed in bold and italics (example: Cell Constant = Enter below): these parameters are defined in the
EDIT Mode as described in chapter 7.
2.1
Selecting the Method
Refer to the display overview given on the next page.
1.
Switch on the CDM230 with the on/off switch. The first display you
see will remain for a few seconds and shows the name of the meter,
the software reference and that the CDM230 is performing an
Autotest.
2.
The language selection display appears for a few seconds. Then the
CDM230 automatically switches to the method selection display.
METHOD A CELL1
CONDUCTIVITY
3.
Select a method (A, B or C) using the left and right arrow keys. The
Conductivity cell (Cell 1, Cell 2 or Cell 3) used with the method is
displayed. The second line of the display indicates whether it is a
conductivity, resistivity, salinity, TDS or concentration measurement method.
Select the method having the right mode (conductivity, resistivity,
Salinity, TDS or Concentration) and right cell (Cell 1, Cell 2 or
Cell 3).
Notes:
.
If there is no method programmed with the desired mode and desired
cell, enter the Edit Method mode and define the method mode and
method cell as described in chapter 7, page 7.3.
.
The current date and time can be displayed by pressing the up
arrow key from the method display (press the down arrow key to
return to the method display).
.
If a Conductivity method is selected, one more display is available
by pressing the down arrow key: the conductance range display.
Description on chapter 3, page 3.1.
2.2
Starting up
Display Overview
Power on
CDM230 --------AUTOTEST
ENGLISH
2 seconds
Language selected
(3 seconds)
FRANCAIS
DEUTSCH
ESPANOL
ITALIANO
28NOV95 14:15:33
28NOV95 14:16:05
METHOD A
METHOD A CELL1
CONDUCTIVITY
METHOD B CELL2
RESISTIVITY
METHOD C CELL3
TDS
2.3
Select the method
(A, B, C)
Other modes are
available: Salinity
and Concentration
Cell Calibration
The CDM230 measures conductance and displays conductivity (or other
measurement based on a conductivity:resistivity, salinity, TDS or concentration). The conductivity is equal to the conductance multiplied by the
cell constant: see chapter 8. The cell constant is a characteristic of the
conductivity cell used and must be known. The aim of a cell calibration is
to enter or determine this value.
4 types of cell calibrations can be performed with the CDM230 depending
on the option entered in the EDIT Calibration mode (Cell constant =
Enter below, Entered, Adjusted or Calibrate using ...).
Important: Do not enter the cell constant indicated on the conductivity
cell and perform a cell calibration using one of the two following
options:Cell constant Adjusted or Calibrate using ...
At the end of a cell calibration, the CDM230 will take into account the cell
constant for sample measurements using the conductivity cell selected
(Cell 1, Cell 2 or Cell 3).
Before starting a calibration
Press the Method key and select a method (A, B or C) with the cell you
want to calibrate.
Operating instructions
See also the display overview, page 2.10.
Press the Cal key. Depending on the option entered in the Edit Calibration
mode, one of the 4 following screens is displayed.
Note: If a TDS or Concentration method is used, you first have to select
between a cell or a method calibration as shown on the display overviews
on pages 5.4 and 6.6.
This display appears if Cell
constant = Enter below has been
selected in the Edit Calibration
mode. The cell constant is displayed and cannot be changed
CELL 1 CONSTANT
1.0000 cm-1
2.4
here. Check the constant value and
start sample measurements by
pressing the Sample key.
CELL 1 CONSTANT
1.0000 cm-1
This display appears if Cell constant = Entered has been selected
in the Edit Calibration mode. Enter
the cell constant value using the left and right arrow keys then start the
sample measurements by pressing the Sample key.
Available range: 0.05 cm-1 to 15 cm-1 adjustable by steps of 0.0001 cm-1
(below 10 cm-1) or 0.001 cm-1
(between 10 and 15 cm-1).
DIP CELL 1 IN
STANDARD
✓
DIP CELL 1 IN
1 KCl
If Cell constant = Adjusted has
been selected in the Edit Calibration
mode. Press the ✓ key to continue.
✓
If Calibrate using 1 KCl has been
selected in the Edit Calibration
mode. You can also have 0.1 KCl,
0.01 KCl, 0.05% NaCl or Seawater Std. Press the ✓ key to continue.
If the CDM230 displays Dip cell in Standard, the standard to be used is a
standard of your choice. You must know the conductivity (or resistivity) of
this standard at a given temperature.
If the CDM230 displays Dip cell in 1 KCl, 0.1 KCl, 0.01 KCl, 0.05% NaCl
or Seawater Std, it means that the standard to be used is one of the 5
listed below. The conductivities (and resistivities) of these standards are
stored against temperature in the CDM230 memory within a specified
temperature range. These 5 standards are:
- KCl 1 Demal (temperature range: 0.0 to 27.0°C).
- KCl 0.1 Demal (temperature range: 0.0 to 50.0°C).
- KCl 0.01 Demal (temperature range: 0.0 to 50.0°C).
- NaCl 0.05% weight/weight (temperature range: 0.0 to 99.9°C).
- Standard seawater (temperature range: -2.0 to 35.0°C).
2.5
Definition: The Demal concentrations have been established by G. Jones
and B.C. Bradshaw . They are close to the number of moles per kg of total
solution.
a.
Take or prepare carefully your standard solution.
Preparation of the standard solutions
KCl Demal solutions:
- For the 1 Demal KCl standard: dissolve 71.1352 g of KCl in
demineralised water to get 1000 g of solution.
For the 0.1 Demal KCl standard dissolve 7.41913 g of KCl in
demineralised water to get 1000 g of solution.
For the 0.01 Demal KCl standard dissolve 0.745263 g of KCl in
demineralised water to get 1000 g of solution.
The conductivity of the demineralised water used must not exceed 2 µS/cm.
Correction for air buoyancy must be applied to the weighing.
Reference for the preparation of the standards: "Organisation
Internationale de Métrologie Légale, Recommendation no. 56", June 1980.
The CDM230 uses a 4-degree polynomial equation giving the conductivity as
a function of temperature. This equation fits the results of the National Institute of Standards and Technology (NIST). The results are published for the
0.1 and 0.01 KCl solutions in the Journal of Solution Chemistry, Vol. 20,
no. 4, 1991.
Other standard solutions:
- For the 0.05 % NaCl standard: dissolve 500 mg of NaCl in
demineralised water to get 1000 g of solution. With this standard, the
measurements obtained with the CDM230 fit the tables published
in October 1960 by G.F. Hewitt, Atomic Energy Research Establishment, Harwell, U.K.
- For the standard seawater: a seawater solution (salinity: 35) of a
conductivity of 42.896 mS/cm at 15°C must be used. With this
standard, the measurements obtained with the CDM230 fit the tables
given by Standard Methods, 2520D "Algorithm of practical salinity"
and UNESCO 1981-83.
2.6
If you are running a Salinity method, we recommend you use the
seawater standard solution (salinity: 35) with a conductivity of
42.896 mS/cm at 15°C.
This standard can be ordered from: Ocean Scientific International,
Brook Road, Wormley, Surrey, GU8 5UB - United Kingdom.
If you are running a TDS method, we recommend you to use the 0.05%
NaCl solution as the CDM230 calculates the TDS from a conductivity
corrected to 18°C using the temperature correction table of a 0.05%
NaCl solution: see also chapter 8 "Theory".
b.
Pour the standard solution into the beaker.
c.
Dip the conductivity cell (and temperature sensor if desired) in the
standard solution. Start stirring. Check that the conductivity cell is
properly immersed in the solution and that proper stirring is applied. The
SAM7 Sample Stand, which is a combined electrode holder and magnetic stirrer, is ideal for setups with the CDM230.
Press the ✓ key to continue with step d or e.
d.
If the previous CDM230 display was: Dip cell in standard, the next
screen is:
After stabilisation (the 4 segments
of the STAB indicator are continuously displayed), read the conductivity value shown on the display.
STAB 3.081µS/cm
1.8921 24.3oC✓
When "STAB" is displayed, it means that the measurement variations
are less than 1%/min.
If a temperature probe is connected, the measured temperature is also
displayed.
Adjust the cell constant value displayed within arrows until the measured value shown on the first line matches the conductivity (or resistivity) value of your standard at current temperature. Table 1, page A1.1,
gives the conductivity values against temperature for some standards.
Press the ✓ key to accept the cell constant value.
The cell constant is displayed and stored in the GLP memory with the
conductivity cell used (Cell 1 in our example).
CELL 1 CONSTANT
1.8921 cm-1
2.7
The calibration is completed. You can, for example, start a sample
measurement by pressing the Sample key.
Important: For high-precision measurements, it is necessary to
determine the cell constant by performing a calibration measurement
on a standard thermostatted at the desired temperature.
No temperature correction is made during a cell calibration procedure.
e.
If the previous CDM230 display was: Dip cell in 1 KCl, 0.1 KCl,
0.01 KCl, 0.05% NaCl or Seawater std and if no temperature sensor
is connected, the next display is:
The temperature must be
adjusted manually using the
left or right arrow keys.
Press ✓ key to continue.
TEMP OF STANDARD
25.0
˚C ✓
If a temperature sensor is connected, the temperature will be measured directly and the Temp of standard display will not appear.
The measurement can be followed on the display by means of the
conductance reading and the visual STABility indicator.
ST
44s
111.7mS
23.0oC
ST
44s
If the temperature is measured.
111.7mS
23.0oC
If no temperature sensor is connected and 23.0°C has been
entered.
After a set time, the measurement will be accepted whether it is
stable or not. The display shows this countdown in seconds.
Note: The maximum duration of a measurement is defined in the Edit
Calibration mode (Accept time parameter). If the method has been
edited with no Accept time, the CDM230 displays the time since the
measurement started.
The measurement variations are compared to a stability criterion.
When the 4 segments of the STAB indicator are continuously displayed, it means that the measurement variations are less than the
stability criterion: the stabilisation is reached.
2.8
Note: The Stability criterion is defined in Edit Calibration mode.
After stabilisation or at end of the maximum duration, the CDM230
calculates the standard conductivity at the measured (or entered)
temperature then calculates and displays the Cell constant. The cell
constant is stored in the GLP memory with the cell selected.
CELL 1 CONSTANT
1.008cm-1
Note: If the method has been edited with no stability criterion and no
Accept time , you must press the ✓ key to manually determine when the
measurement is to be used for calibration.
The calibration is completed. You can, for example, start a sample measurement by pressing the Sample key.
2.9
Calibration
Display Overview
Cal
If Cell constant Adjusted
If Cell constant Enter below
CELL 1 CONSTANT
1.000 cm-1
DIP CELL 1 IN
STANDARD ✓
If Cell constant Entered
CELL 1 CONSTANT
1.000 cm-1
If temperature sensor
STAB 12.39mS/cm
0.9452 23.0oC ✓
If no temperature sensor
STAB
Adjust using
Adjust using
and
CELL 1 CONSTANT
0.9452 cm-1
If Calibrate using...
DIP CELL 1 IN
1 KCl
✓
If no temperature sensor
TEMP OF STANDARD
17.0
¡C ✓
Adjust using
and
If temperature sensor
STAB
51s
95.88mS
17.7oC
STAB
51s
95.88mS
17.0oC
When stable or at end of Accept time
CELL 1 CONSTANT
0.9452 cm-1
2.10
12.39mS/cm
0.9452
✓
Sample Measurements
Sample measurements can be performed in three ways depending on the
option selected in the EDIT Sample mode:
. Using the
MANUAL (by pressing ✓) validation function with a live
reading on the display. When you consider the measurement to be
stable, press the ✓ key.
. Using
the AUTOREAD function which locks the result on the display
as soon as the signal is stable or at end of an Accept time. Stability
is defined by the Stability criterion and Accept time set in the Edit
Sample mode.
. Using
the AT INTERVALS function for which the sample is measured
continuously and printed out at specific time intervals set in the Edit
Sample. The measurements will stop at end of Stop print after set in
the Edit sample mode.
The conductivity or resistivity of the sample is measured at the sample
temperature then corrected to a reference temperature using a temperature
coefficient if selected in the Edit Tref mode. Another temperature correction,
the Natural water correction, can also be performed if selected in the Edit
Tref mode.
To determine the TDS of the sample, the CDM230 first measures the conductivity of the sample at the sample temperature then corrects the value to
18°C using the temperature correction of the 0.05% NaCl solution.
To determine the Concentration of the sample, the CDM230 first measures
the conductivity of the sample at the sample temperature then corrects the
value to a reference temperature using a temperature coefficient if selected
in the Edit Tref mode. Another temperature correction, the Natural water
correction, can also be performed if selected in the Edit Tref mode.
To determine the Salinity of the sample, the CDM230 first measures the
conductivity at the sample temperature and applies a conversion factor
calculated from a conductivity versus temperature table for a standard
solution of salinity 35.
If a conductivity method is used, a conductivity value can be subtracted
from the conductivity measured. Relative conductivity measurements are
explained in chapter 3 page 3.3.
2.11
Before starting the measurements
Press the Method key and select a method (A, B or C).
Pressing the Sample key will normally start the measurement. However, the
following message may be displayed:
NEW CELL CAL
REQUIRED
This message reminds you that you have to calibrate the conductivity cell
regularly (e.g. weekly). Press the Cal key and start a cell calibration.
If a TDS or a Concentration method is used, another message may be displayed:
NEW METHOD CAL
REQUIRED
This message reminds you that you may have to recalibrate the method
regularly (e.g. every 100 days). Press the Cal key and start a TDS calibration
(see chapter 5) or a Concentration calibration (see chapter 6).
Important: A reliable sample measurement requires the exact cell constant.
If TDS or Concentration measurements are to be performed, the exact TDS
factor or Concentration coefficient values are also required.
The maximum time interval between 2 cell or 2 method calibrations is a user
defined parameter set in the Edit Calibration mode.
Operating instructions
See also the display overview, page 2.16.
1.
Pour the sample solution into a beaker.
2.
Dip the conductivity cell (and temperature sensor if desired) in the
sample solution. Start stirring. Check that the conductivity cell is properly immersed in the solution and that proper stirring is applied.
3.
Press the Sample key. The sample ID number is displayed for 3
seconds. This number is incremented each time a sample measurement
procedure is initiated.
2.12
NEXT SAMPLE No.
1
You can enter a new sample number
(1 to 9999) using the left or right
arrow keys.
If no key is pressed, the CDM230 switches automatically to the next
display.
4.
If no temperature sensor is connected and, for a Conductivity, a
Resistivity or a Concentration method, if a temperature correction has
been selected in Edit Tref mode:
SAMPLE TEMP
25.2
˚C ✓
The temperature must be adjusted
manually using the left or right arrow
keys. Press ✓ key to continue.
Note: If a temperature sensor is connected, the temperature will be
measured directly and the SAMPLE TEMP display will not appear.
5.
The measurement starts and can be followed on the display by means
of the conductivity (or resistivity) reading and the visual STABility
indicator.
STAB 11.67mS/cm
25s
23.3oC
STAB 11.67mS/cm
58s
22.2oC
If a temperature sensor is connected. If no temperature sensor is connected and 23.2°C was entered in
step 4.
When the visual STABility indicator shows "STAB", the measured
stability is better than 1 %/min for MANUAL measurements or better
than the Stability criterion entered in the Edit Sample mode for
AUTOREAD or AT INTERVALS measurements. The letters "", "S",
"ST", "STA" appear as stabilisation progresses.
For MANUAL measurements, the CDM230 displays the time elapsed
since measurements started.
For AUTOREAD measurements, the Accept time (i.e. maximum time
of a measurement) entered in the Edit Sample mode is counted down.
The CDM230 displays the time elapsed since measurement started if
no Accept time has been entered.
2.13
For AT INTERVALS measurements, the Stop Print after entered in
the Edit Sample mode is counted down. The CDM230 displays the
time remaining until the next result printing if no Stop Print after has
been entered.
6.
End of measurements
For MANUAL measurements, when the stability is acceptable (i.e.
when the stability indicator displays "STAB" continuously), press the
✓ key: the measurement value is locked on the display. The result is
automatically printed out and is stored in the GLP memory. The
measurement can be accepted with the ✓ key whether it is stable or
not.
Tr25 means that the conductivity has
been corrected to a reference temperature of 25°C.
Tr25 11.65mS/cm
RESULT
23.3oC
For AUTOREAD measurements,when the stability is reached or at the
end of the Accept time, the measurement value is locked on the
display, the result is printed out and stored in the GLP memory. At the
end of the Accept time, if the stability criterion has not been reached,
the measurement is locked on the display with the UNSTABLE
warning message. The result display is like the one obtained for the
MANUAL measurements (see above).
For AT INTERVALS measurements, the Print Interval entered in Edit
Sample mode sets the time delay desired between each measurement
and result printout. Each measurement is stored in the GLP memory if
Store in GLP = All results has been selected in the Edit Sample
mode. The "UNSTABLE" message is displayed with the result if the
Stability criterion has not been reached before the end of Print
Interval.
The measurement will automatically stop at the end of the Stop print
after delay entered in EDIT Sample mode
7.
Starting a new measurement
From the result display, press the ✓ key to start a new MANUAL or
AUTOREAD measurement. The measurement procedure starts from
step 4 and the sample number is automatically incremented.
2.14
Press the Sample key if you want to start a new AT INTERVALS
measurement or if you want to adjust the sample ID number before
starting a measurement.
8.
Stopping a measurement in progress
You can stop a measurement in progress by pressing the Method,
Tref, Cal, GLP or Sample key.
2.15
Sample measurements
Display Overview for a conductivity method
Sample
Entry of the sample ID number
NEXT SAMPLE No.
1
During 3 seconds
SAMPLE TEMP
25.0 oC ✓
If no temperature sensor connected
and temperature correction selected.
Adjust to the sample temperature
During stabilisation
If temperature sensor
and temperature correction
STA
12.39mS/cm
20s
23.0oC
If no temperature sensor
and temperature correction
If no temperature sensor
and no temperature correction
STA
12.39mS/cm
20s
23.0oC
STA
12.39mS/cm
20s
When stable (*)
Reference temperature if 20¡C
Reference temperature if 20¡C
Tr20 12.41mS/cm
RESULT
23.1oC
Tr20 12.41mS/cm
RESULT
23.1oC
12.41mS/cm
RESULT
(*) or after having pressed the ✓ key for MANUAL measurements.
Printout
If unstable
Tr20 12.41mS/cm
UNSTABLE 23.1oC
Tr20 12.41mS/cm
UNSTABLE 23.1oC
Press ✓ or Sample to start a new measurement.
2.16
12.41mS/cm
UNSTABLE
Printout
GLP Table
The data stored in the GLP table can comprise the results of the last 5
calibrations for each cell, the last 5 method calibration for each TDS or
concentration method and the last 50 sample measurements for the 3 methods in total. The data are accessed in the following way:
1.
Press the Method key and select a method (e.g. method B) using the
left or right arrow keys.
2.
Press the GLP key.
METHOD B GLP
CELL
METHOD B GLP
SAMPLE
or
METHOD B GLP
CELL
METHOD B GLP
METHOD
METHOD B GLP
SAMPLE
Depending on the method mode, 2 or 3 options are available (use the
left or right arrow key to make a selection):
.
If a Conductivity, Resistivity or Salinity method has been selected,
2 options are available: Cell and Sample.
.
If a TDS or a Concentration method has been selected, 3 options
are available: Cell, Method and Sample.
If Cell is selected, calibration data can be accessed (press the down
arrow key) for the cell used with method B.
If Method is selected, the method calibration data can be accessed
(press the down arrow key) for the TDS or the Concentration method
selected (method B). Please see chapter 5 for the TDS method
calibrationdata and chapter 6 for the Concentration calibration data.
If Sample is selected, sample measurement data can be accessed
(press the down arrow key) for Method B.
Notes:
.
When the GLP key is pressed followed by the Print key a "summary"
of either calibration data or sample measurement results is printed out
in table form; refer to "Printouts" chapter 9.
.
If there are no data stored in the GLP table (cell calibration, method
calibration or sample data table), the down arrow key is disabled.
2.17
Cell Calibration Data
When Cell is selected, the following calibration data can be accessed:
1.CELL 1 CONST. *
1.2248cm-1
Press
to see the most recent
calibration data, i.e. entry no. 1. The first
display will show the cell constant found in
the last calibration. If a "*" is displayed, it
shows that you have changed one of the
following parameters after having performed the calibration: calibration mode
(Calibrate using, Cell constant adjusted,
entered or Enter below), Accept time
and Stability criterion.
1.STANDARD
1 KCl
Press
. The type of standard used
for the calibration is displayed (1 Demal
KCl solution for example).
1.CONDUCTANCE
90.9mS
Press
. The conductance measured
and used for calibration is displayed. If the
calibration mode selected was Cell constant Adjusted, the display shows a
conductivity.
1.CONDUCTANCE
UNSTABLE
Press
. If the measurement was
unstable at the end of the Accept time.
1.TEMPERATURE
25.0˚C
Press
. The temperature (measured
or entered) of the standard used for calibration is displayed.
1.DATE
29NOV95
TIME
10:02
Press
shown.
2.18
. The date and time are
1.CABLE RESIST.
0.261Ω
1.CABLE CAPACIT.
0pF
Press
. The cable resistance
used for cable correction is displayed.
Press
one last time. The cable
capacitance used for cable correction
is displayed.
If you wish to see previous calibration results, press the down arrow key
and then use the left arrow key to move along the text line.
The most recent calibration result is always shown first and is stored as
entry no. 1. When the down arrow key is pressed, the next result, entry
no. 2, will appear.
2.19
Sample Data
When Sample is selected the following sample measurement results can
be accessed:
1.CONDUCTIVITY
4.000 mS RANGE
Press
to see the most recent
sample result, i.e. entry no. 1. The first
display will show the conductance range
used for measurements. The first line of
the display indicates whether it is a Conductivity, a Resistivity, a Salinity, a TDS
or a Concentration method.
1.SAMPLE NUMBER
4
Press
displayed.
1.OFFSET
0.040mS/cm
Press
. If a Conductivity method is
selected. The offset value is the conductivity measured just before selection of
the Reset reading option: see page 3.3.
The offset value is replaced by "----------" if
the measurement was performed without
the Reset reading option.
1.RESULT
0.974mS/cm
1.TEMPERATURE
25.0˚C
*
. The sample number is
Press
.The next display shows the
sample result (conductivity result for
example) obtained. If a "*" is displayed, it
shows that you have changed one of the
following parameters after you have obtained the result: Cell number, measurement mode (Autoread, At Intervals or
Manual), Accept time and Stability
criterion).
Press
. The next display shows the
temperature (entered or measured) of the
sample.
2.20
1.MEAS.
STAB
min:s
00:23
1.REF. TEMP
25˚C
Press
. The next display shows if
the measurement obtained was stable or
not (display of the STABility indicator)
and shows the measuring time in minutes and seconds, i.e. the stabilisation
time, the accept time or the time taken
before the result was accepted manually
by pressing the ✓ key.
Press
. The display shows the
reference temperature the sample measurement is corrected to. If no temperature correction was performed, the display shows "--".
For a Salinity method, the display shows
that salinity measurements are calculated from a standard solution of known
conductivity at 15°C.
For a TDS method, the display shows
that TDS measurements are calculated
from a conductivity corrected to 18°C.
1.TEMP COEF
2.21%/˚C
Press
. The coefficient used for
the temperature correction is now displayed. If no temperature correction
was performed, the display shows "----".
If a Natural water correction was performed, "Natural water" is displayed.
For a Salinity or a TDS method, a specific temperature coefficient is used: the
word "TDS" or "SALINITY" replaces the
coefficient value.
1.CELL NUMBER
1
Press
. The display shows which
cell (Cell 1, Cell 2, Cell 3) was used for
the measurements.
2.21
1.DATE
29NOV95
TIME
10:07
Press
one last time. The date and
time at which the sample measurement
was performed are now shown.
If you wish to see further sample measurement results, press the down
arrow key and then use the left arrow key to move along the text line.
Important:
The CDM230 can store up to a maximum of 50 results for all methods. If
you have 50 sample results stored in the GLP table and if you perform
another measurement with method B (for example), the oldest of the 50
results present in the GLP table will be replaced by the new one irrespective
of the method (A, B or C). See below.
Method A: 47 results obtained on the 21st of December 1995
Method C: 1 result obtained on the 28th of November 1995
You are performing on the 22nd of December 1995 AT INTERVALS sample
measurements with method B with the option Store in GLP = All results,
then:
.
the first 2 results of method B are stored in the GLP table with no
change for the 48 other stored results,
.
result no. 3 will replace the result obtained with method C,
.
the following results will replace those obtained with method A from the
oldest to the most recent.
Reset of the GLP table:
The only way to reset a GLP table is to switch off the CDM230, remove the
battery (see page 10.5) and the PC or printer cable (if connected) and switch
the CDM230 on again.
Warning: You will lose all the data stored in the GLP table for the 3 methods
and you will reset to default values all the parameters of the 3 methods.
2.22
Conductivity Measurements
To perform conductivity measurements with the CDM230, select a Conductivity method and follow the instructions given in chapter 2 "Routine Use".
This chapter contains additional information which is specific to conductivity
measurements, i.e.:
.
manual selection of the conductance range,
.
relative conductivity measurements.
Selecting the Conductance Range
1.
Perform steps 1 and 2 on page 2.2.
2.
Select a Conductivity method (A, B or C) using the left and right arrow
keys.
3.
Press the down arrow key: the next display shows whether the
CDM230 automatically changes the range according to the sample
reading, whether a specific range has been selected or whether you may
specify a range. The option depends on what is entered in the Edit
Method displays (Autorange, Manual range or Fixed range).
METHOD A CELL1
CONDUCTIVITY
CONDUCTIVITY
AUTORANGE
or
CONDUCTIVITY
4.000mS RANGE
Select a Conductivity
method (A, B, C)
or
SIGNAL <1% OF
4.000mS RANGE
Select a conductance
range
3.1
If a range can be selected, dip the conductivity cell into the sample and,
using the left or right arrow keys, adjust the conductance range in order
to have a displayed "Signal" between 10 and 100% (the best reading is
obtained in this way).
Example:
SIGNAL
<1% OF
2.000S SIGNAL
RANGE
<1% OF
400.0mS SIGNAL
RANGE
2.66% OF
40.00mS RANGE
SIGNAL
26.6% OF
4.000mS RANGE
SIGNAL
>100% OF
400.0µS SIGNAL
RANGE
>100% OF
40.00µS SIGNAL
RANGE
>100% OF
4.000µS RANGE
Here, the best resolution is obtained on the 4.000 mS range
3.2
Relative Conductivity Measurements
Relative conductivity measurements can be performed if you want to follow
the change in conductivity with time for a given sample.
To perform relative conductivity measurements with the CDM230, you must
select a Fixed or a Manual range in the Edit Method mode (see page 7.3).
You must also select the Reset reading = Yes option in the Edit Method
mode (see page 7.4).
Operating Instructions:
1.
Selection of the conductance range:
Before starting relative measurements, you must find the conductance
range: measure the intial and final conductance of your sample (conductivity divided by the cell constant value).
Example: If the conductivity measured varies between 15 µS/cm and
135 µS/cm and if a cell used has a constant value of 3 cm-1, it means that
the conductance measured varies between 5 µS (15/3) and 45 µS (135/3)
and that the 400 µS/cm range must be selected as the conductance range.
2.
Edit a conductivity method using the Manual or Fixed range function
and the Reset reading = Yes option (see pages 7.3 and 7.4).
Select the conductance range found in step 1:
3.
-
in the Edit Method mode as explained on page 7.3 if a Fixed
range has been selected.
-
from the method selection display as explained on page 3.1 if a
Manual range has been selected.
Press the Sample key. After the Next sample No. and Sample temp
displays, the CDM230 displays:
STAB
1.167mS/cm
NO RESET ✓
STAB 1.167mS/cm
RESET READING ✓
3.3
4.
Select Reset Reading.and press the ✓ key. The CDM230 now
displays 0.000 for the conductivity. The conductivity displayed will
now be the difference between the conductivity of the sample and the
conductivity value measured when ✓ key was pressed. You can
follow the change in conductivity with time
5.
If you press the ✓ key, a new relative conductivity measurement is
initiated. The CDM230 uses the offset value that was measured when
the Reset reading option was accepted by pressing the ✓ key. Each
time the ✓ key is pressed, a new relative measurement is initiated.
If you press any other key, the offset value stored is reset to 0. For
example, if you press the Sample key and select No reset in step 3,
the absolute conductivity measurement will be displayed.
3.4
Salinity Measurements
To perform Salinity measurements with the CDM230, follow the instructions
of chapter 2 "Routine Use": select a Salinity method, perform a cell calibration then start sample measurements.Please observe the following recommendation:
.
Use the CDC865 4-pole conductivity cell (model with platinised platinum rings).
.
Calibrate the cell with a seawater standard solution (salinity: 35) with a
conductivity of 42.896 mS/cm at 15°C.
You can order this standard from:
Ocean Scientific International, Brook Road, Wormley, Surrey,
GU8 5UB - United Kingdom.
4.1
TDS Measurements
To perform TDS measurements with the CDM230:
A. Select a TDS method.
B. Edit the TDS
B1. Edit
B2. Edit
B3. Edit
B4. Edit
method, i.e.
the Method parameters
the Calibration (cell) parameters
the Calibration (method) parameters
the Sample parameters
C. Calibrate the cell, i.e. determine the cell constant of the
conductivity cell.
D. Calibrate the method, i.e. determine the TDS factor of the method.
E. Perform TDS measurements on your samples.
A- Selecting a TDS method
1.
Switch on the CDM230 with the on/off switch then select the language
(if necessary). See page 2.2 for more information.
2.
The CDM230 automatically switches to the method selection display.
METHOD A CELL1
CONDUCTIVITY
Select a TDS method (A, B or C) having the right cell (Cell 1, Cell 2 or
Cell 3). Use the left and right arrow keys.
Example: Method B with Cell 2.
METHOD
B CELL2
TDS
Important:
If there is no TDS method programmed, you have to edit the method
parameters following the paragraph B1 (see next page).
5.1
B1 - Editing the Method parameters
METHOD B
CELL1
CONDUCTIVITY
Method
Select a method (A, B or C) with
and
hold the Method key down for 3 seconds to enter
the Edit Method mode.
For example: method B
3 seconds
USE CELL
1 2 3
METHOD B
TDS
PRINTOUT FORMAT
RESULT
PRINTOUT
FORMAT
ALL
WARNING BEEP
NO
YES
Select the conductivity cell (Cell 1, Cell 2 or
Cell 3) used for TDS measurements with
For example: Cell 2.
Using:
, select TDS.
Using:
Select the printout format you require for sample
measurements:
If you choose All, the cell constant and TDS
factor will be included in the printout:
see also chapter 9.
Using:
Select Yes, if you want a Warning Beep (three
short tones) to accompany any warning message.
RESULT BEEP
NO
YES
Using:
Select Yes, if you want a Result Beep (one long
tone) to sound when a result has been obtained.
5.2
B2 - Editing the Calibration (cell) parameters
METHOD
Cal
B CELL2
TDS
3 seconds
Using:
Select the TDS method (B for example) you
want to calibrate the cell (Cell 2 for example).
If the method is not TDS or the method does
not use the correct cell, hold the Method key
down for 3 seconds and select a TDS
method and/or the correct cell. See also page
5.2 "Editing the Method parameters".
Press the Cal key for 3 seconds to enter the
Edit Calibration mode.
Using:
EDIT
CELL 2 CAL
CELL 2 CONSTANT
ENTER
BELOW
CELL
1 CONSTANT
ENTERED
CELL
1 CONSTANT
ADJUSTED
CALIBRATE USING
1 KCl USING
CALIBRATE
Select "Edit Cell 2 Cal" then press the down
arrow key.
We recommend you to use the 0.05%
NaCl solution (select "Calibrate using
= 0.05% NaCl") as the standard for the
cell calibration (conductivity at 18°C =
873.36 µS/cm).
0.1 KCl
CALIBRATE
USING
0.01
KCl
CALIBRATE USING
0.05% NaCl
CALIBRATE
USING
SEAWATER STD
See pages 7.6 to 7.9
CELL 2 CONSTANT
or
STABILITY CRIT.
ACCEPT TIME
CALIBRATE EVERY
CABLE RESISTANCE
CABLE CAPACITANCE
5.3
B3 - Editing the Calibration (Method) parameters
METHOD
Cal
B
TDS
CELL2
3 seconds
EDIT
METHOD CAL
Using:
Select the TDS method (B for example) you
want to calibrate.
If the method is not TDS or the method does
not use the correct conductivity cell (Cell 2 for
example), hold the Method key down for 3
seconds and select a TDS method and/or the
correct cell. See also page 5.2 "Editing the
Method parameters".
Press the Cal key for 3 seconds to enter the
Edit Calibration mode.
Using:
Select "Edit Method Cal" then press the down
arrow key.
LOCK CURRENT CAL
NO
YES
Or
If you want the method calibration results (TDS
Factor) to be locked, select Lock current Cal
= Yes using
. In this case, the TDS
Factor is entered in the Edit mode on the next
display. Select Lock current Cal = Yes, then
press the down arrow key if you know the
TDS factor and do not want to perform a
method calibration.
To determine the TDS Factor by performing a
method calibration, select Lock current Cal =
No then press the down arrow key.
TDS FACTOR
0.574
If Lock current Cal = Yes, adjust the TDS
Factor using
.
Range available: 0.010 and 9.999.
TDS OF STANDARD
501.1 mg/l
If Lock current Cal = No, adjust the TDS of
the standard used for method calibration using
Range available: 0.000 to 9999 mg/l.
Note: 501.1 mg/L is the default value: it is the
TDS of a 0.05% NaCl solution. We recommend
you to use this solution to calibrate the
method).
5.4
STABILITY CRIT.
1.0 %/min
The stability criterion set in this display will
determine when the electrode signal is
accepted as being stable. In our example,
when the "drift" is less than 1.0% of the
measured value per minute, the TDS Factor
will be calculated and displayed.
If the Stability criterion is set to "- - - -"
using the left or right arrow keys, the TDS
Factor will be calculated at the end of the
Accept time set on the next display.
Range available: 0.1 to 99.9%/min and
"- - - -" (no criterion).
ACCEPT TIME
60 s
Adjust the Accept time using
In the example shown, the TDS Factor will be
calculated after 60 seconds irrespective of
the measurement stability. If you only want
the TDS Factor to be calculated when the
measurement is stable, set the Accept time
to "- - - -" with the left or right arrow keys.
Range available: 1 to 9999 seconds and "- - -"
Note: At the end of the calibration the TDS
Factor is calculated and displayed as soon as
either the Stability criterion or the Accept
time is reached. If the Stability criterion and
Accept time are both set to "- - - -", the
measurement must be accepted manually by
pressing the ✓ key.
CALIBRATE EVERY
7 DAY(S)
Using:
Adjust the maximum time interval between
two method calibrations.
The CDM230 prompts you to perform a new
method calibration if the current calibration is
older than, for example, 7 days.
Range available: 1 to 999 days.
5.5
B4 - Editing the Sample parameters
METHOD
B
TDS
Sample
CELL2
3 seconds
SAMPLE RESULT
AUTOREAD
SAMPLE RESULT
AT INTERVALS
Using:
Select the TDS method (B for example) you
want to edit the Sample parameters.
If there is no TDS method or if the TDS method
does not use the correct conductivity cell (Cell 2
for example), hold the Method key down for 3
seconds and select a TDS method and/or the
correct cell. See also page 5.2 "Editing the
Method parameters".
Press the Sample key for 3 seconds to enter
the Edit Sample mode.
Using:
Select the measurement mode between:
Autoread
At intervals
By pressing ✓
SAMPLE RESULT
BY PRESSING ✓
The AUTOREAD function locks the result on the display as soon as the
signal is stable. Stability is defined by the Stability criterion and Accept
time set in the Edit Sample mode.
With the AT INTERVALS function, the sample is measured continuously
and printed out at specific time intervals set in Edit Sample. The measurements will stop at the end of Stop print after set in the Edit sample mode.
Using the By pressing ✓ function, a live reading is displayed. When you
consider the measurement to be stable, press the ✓ key. There is no other
Sample parameters to edit in this case.
If Autoread or At Intervals is selected, press the down arrow key then edit
the following parameters:
. Stability Crit. and Accept Time (if Autoread, see page 7.17 for
more information)
. Stability Crit., Print Interval, Stop Print After and
Store in GLP (if At Intervals, see pages 7.18 and 7.19 for
more information).
5.6
C- Performing a Cell calibration
(see also the display overview page 5.11)
METHOD
B CELL2
TDS
Cal
Using:
Select the TDS method with the correct cell
(method B with Cell 2 for example) and
press the Cal key. If there is no TDS method
or if the TDS method does not use the
correct conductivity cell (Cell 2 for example),
hold the Method key down for 3 seconds and
select a TDS method and/or the correct cell.
See also page 5.2 "Editing the Method
parameters".
The next screen depends on the selection
you made in Edit Calibration (see page 5.3).
CELL 2 CONST.
1.000cm-1
or
CELL 2 CONST.
1.000 cm-1
or
CELL 2 CONST.
CALIBRATION ✓
If you have entered "Cell 2 Constant = Enter
below", the cell constant is displayed and
cannot be changed here. There is no cell
calibration to perform.
If you have entered "Cell 2 Constant =
Entered", enter the Cell constant value using
the left and right arrow keys. The cell
calibration is over.
If "Cell 2 Const
= Calibration
DIP CELL 2 IN
✓
0.05% NaCl
Or Dip Cell 2 in
Standard
1 KCl
0.1 KCl
0.01 KCl
Seawater Std
If you have entered one of the five "Calibrate
using ..." option, start the cell calibration by
dipping the cell into the specified standard
solution then follow the operating instructions
of pages 2.5 to 2.9.
Note: We recommend you to use the 0.05%
NaCl solution to calibrate the method). The
correct solution must have been selected in
the Edit Cell Calibration, parameter "Calibrate
using = 0.05% NaCl", see page 5.3).
5.7
D- Performing a Method calibration
(see also the display overview page 5.11)
METHOD
B CELL2
TDS
Cal
CELL 2 CONST.
1.000cm-1
or
or
Using:
Select the TDS method with the correct cell
(method B with Cell 2 for example) and
press the Cal key. If there is no TDS method
or if the TDS method does not use the
correct conductivity cell (Cell 2 for example),
hold the Method key down for 3 seconds and
select a TDS method and/or the correct cell.
See also page 5.2 "Editing the Method
parameters".
The next screen depending on the selection
you made in Edit Cell Calibration (see page
5.3).
CELL 2 CONST.
1.000 cm-1
CELL 2 CONST.
CALIBRATION ✓
TDS FACTOR
METHOD B ✓
Press the left or right arrow keys.
If you press the ✓ key by mistake, press the
up arrow key. The next screen must be "TDS
FACTOR - METHOD B".
Press the ✓ key.
TDS FACTOR
0.576
or
The next display depends on the options
selected in the Edit Method Calibration mode
(see page 5.4):
DIP CELL IN STD
501.1 mg/l ✓
If Lock current Cal = Yes has been selected in Edit Calibration mode.
The TDS factor entered in the Edit Calibration mode is displayed. You
can start sample measurements using the current method.
If Lock current Cal = No has been selected in Edit Calibration mode.
The TDS factor is to be determined by a calibration using a standard of
known TDS (501.1 mg/L in our example).
5.8
DIP CELL IN STD
501.1 mg/l ✓
If Lock current Cal = No has been selected in
Edit Calibration mode. Take or prepare carefully
your standard solution (solution of known TDS).
As for the cell calibration, we recommend you
use the 0.05% NaCl solution as the standard
(TDS = 501.1 mg/l, conductivity at 18°C =
873.36 µS/cm and TDS factor = 501.1/873.36 =
0.574).
Pour the standard solution into the beaker.
Dip the conductivity cell (and temperature
sensor if desired) in the standard solution. Start
stirring. Check that the conductivity cell is
properly immersed in the solution and that
proper stirring is applied. The SAM7 Sample
Stand, which is a combined electrode holder
and magnetic stirrer is ideal for setups with the
CDM230.
Press the ✓ key to continue.
TEMP OF STANDARD
25.0
˚C ✓
If no temperature sensor is connected, the
temperature must be adjusted manually using
the left or right arrow keys.
Press the ✓ key to continue.
Note: If a temperature sensor is connected, the
temperature will be measured directly and the
TEMP OF STANDARD display will not appear.
The measurement can be followed on the
display by means of the conductivity reading
and the visual STABility indicator.
TDS FACTOR
0.589
After stabilisation (the 4 segments of the STAB
indicator are continuously displayed), the
CDM230 calculates and displays the TDS
factor. The TDS factor is stored in the GLP
memory for the current method.
The calibration is completed. You can start a sample measurement by
pressing the Sample key.
5.9
E- Performing TDS sample Measurements
METHOD
Sample
B CELL2
TDS
Using:
Select the TDS method with the correct cell
(method B with Cell 2 for example) and
press the Sample key. If there is no TDS
method or if the TDS method does not use
the correct conductivity cell (Cell 2 for
example), hold the Method key down for 3
seconds and select a TDS method and/or the
correct cell. See also page 5.2 "Editing the
Method parameters".
Pressing the Sample key will normally start the measurement. However,
the following message may be displayed:
NEW CELL CAL
REQUIRED
This message reminds you that you have to calibrate the conductivity
cell regularly (e.g. weekly). Press the Cal key and start a cell calibration
(see page 5.7).
Another message may be displayed:
NEW METHOD CAL
REQUIRED
This message reminds you that you may have to recalibrate the method
regularly (e.g. every 100 days). Press the Cal key and start a new
method calibration (see pages 5.8).
Important: A reliable sample measurement requires the exact cell
constant and TDS factor.
The maximum time interval between 2 cell or 2 method calibrations is a
user defined parameter set in the Edit Calibration mode.
After having pressed the Sample key, the Sample ID number is displayed
for 3 seconds. This number is incremented each time a sample measurement procedure is initiated.
The sample measurement is then carried out in the same way as for a
conductivity measurement (see pages 2.13 to 2.15).
5.10
TDS method - cell and method Calibrations
Display Overview
METHOD
B
TDS
Cal
CELL2
3 seconds
EDIT
METHOD CAL
LOCK
CURRENT CAL
NO
YES
TDS FACTOR
0.574
Or
TDS
OF STANDARD
501.1
mg/l
5.11
GLP Table
If the GLP key is pressed after having selected a TDS method, the 3
following options are available:
METHOD B GLP
CELL
METHOD B GLP
METHOD
METHOD B GLP
SAMPLE
If Cell is selected, cell calibration data can be accessed as explained on
pages 2.18 and 2.19.
If Sample is selected, sample measurement data can be accessed as
explained on pages 2.20 to 2.22.
If Method is selected, the TDS method calibration data can be
accessed as explained below.
Method Calibration Data
For a TDS method, when Method is selected, the following method
calibration data can be accessed:
1.TDS FACTOR
0.576
1.STANDARD
501.1mg/l
*
Press
to see the most recent
method calibration data i.e. entry no.
1. The first display shows the TDS
Factor calculated in the last calibration. If a "*" is displayed, it shows
that you have changed one of the
Accept time and Stability criterion
parameters after you have obtained
the result.
Press
. The TDS of the standard used for calibration is now displayed in mg/L.
5.12
1.STANDARD
0.870mS/cm
Press
. If the measurement was
unstable at the end of the Accept time.
1.STANDARD
UNSTABLE
Press
.The next display shows
the temperature (entered or measured) of
the standard.
1.STANDARD
25.0˚C
1.DATE
29NOV95
Press
.The next display shows the
conductivity measured and corrected to
18°C for the standard. This value is used
for the TDS Factor calculation.
TIME
10:02
Press
one last time. The date
and time at which the method calibration
was performed are now shown.
If you wish to see previous method calibration results, press the down
arrow key and then use the left or rght arrow keys to move along the text
line.
The most recent calibration result is always shown first and is stored as
entry no.1. When the down arrow key is pressed, the next result, entry
no. 2, will appear.
5.13
Concentration Measurements
To perform Concentration measurements with the CDM230:
A. Select a Concentration method.
B. Edit the Concentration method, i.e.
B1. Edit the Method parameters
B2. Edit the Calibration (cell) parameters
B3. Edit the Calibration (method) parameters
B4. Edit the Sample parameters
C. Calibrate the cell, i.e. determine the cell constant of the
conductivity cell.
D. Calibrate the method, i.e. determine the 1 to 3 concentration
coefficients of the equation that gives the concentration as a function
of the measured conductivity.
E. Perform Concentration measurements on your samples.
A- Selecting a Concentration method
1.
Switch on the CDM230 with the on/off switch then select the language
(if necessary). See page 2.2 for more information.
2.
The CDM230 automatically switches to the method selection display.
METHOD A CELL1
CONDUCTIVITY
Select a Concentration method (A, B or C) having the right cell (Cell 1,
Cell 2 or Cell 3). Use the left and right arrow keys.
Example: Method B with Cell 2.
METHOD B CELL2
CONCENTRATION
Important:
If there is no Concentration method programmed, you have to edit the
method parameters following the paragraph B1 (see next page).
6.1
B1 - Editing the Method parameters
METHOD B
CELL1
CONDUCTIVITY
Method
Select a method (A, B or C) with
and hold
the Method key down for 3 seconds to enter the
Edit Method mode.
For example: method B
3 seconds
USE CELL
1 2 3
METHOD B
CONCENTRATION
UNIT SELECTION
mg/l
Select the conductivity cell (Cell 1, Cell 2 or
Cell 3) used for Concentration measurements
with
. For example: Cell 2.
Using:
, select Concentration.
Using:
Select the measurement unit.
Concentration can be measured in mg/l, µg/l,
g/kg, mg/kg, µg/kg, %, ppm, ppb, mol/l, mmol/l,
µmol/l, mol/kg, mmol/kg, µmol/kg or g/l.
Important: to obtain the best reading resolution,
select a concentration unit in order to have at least
"1.000" displayed for all standard concentrations.
Example: for a standard concentration of
10 µmol/l, select µmol/l for the unit and not
mmol/l or mol/l.
PRINTOUT FORMAT
RESULT
PRINTOUT
FORMAT
ALL
Using
, select the printout format you
require for sample measurements: If you choose
All, the cell constant and Concentration
coefficient(s) will be included in the printout: see
also chapter 9.
WARNING BEEP
NO
YES
Using
, select Yes, if you want a Warning
Beep (three short tones) to accompany any warning message.
RESULT BEEP
NO
YES
Using
, select Yes, if you want a Result
Beep (one long tone) to sound when a result has
been obtained.
6.2
B2 - Editing the Calibration (cell) parameters
METHOD B CELL2
CONCENTRATION
Cal
3 seconds
EDIT
CELL 2 CAL
Using:
Select the Concentration method (B for
example) you want to calibrate the cell (Cell
2 for example).
If the method is not Concentration or the
method does not use the correct cell, hold
the Method key down for 3 seconds and
select a Concentration method and/or the
correct cell. See also page 6.2 "Editing the
Method parameters".
Press the Cal key for 3 seconds to enter the
Edit Calibration mode.
Using:
Select "Edit Cell 2 Cal" then press the down
arrow key.
CELL 2 CONSTANT
ENTER
BELOW
CELL
1 CONSTANT
ENTERED
CELL
1 CONSTANT
ADJUSTED
CALIBRATE USING
1 KCl USING
CALIBRATE
0.1 KCl
CALIBRATE
USING
0.01
KCl
CALIBRATE USING
0.05% NaCl
CALIBRATE
USING
SEAWATER STD
See pages 7.6 to 7.9
CELL 2 CONSTANT
or
STABILITY CRIT.
ACCEPT TIME
CALIBRATE EVERY
CABLE RESISTANCE
CABLE CAPACITANCE
6.3
B3 - Editing the Calibration (Method) parameters
METHOD B CELL2
CONCENTRATION
Cal
3 seconds
EDIT
METHOD CAL
Using:
Select the Concentration method (B for example) you want to calibrate.
If the method is not Concentration or the
method does not use the correct conductivity
cell (Cell 2 for example), hold the Method key
down for 3 seconds and select a Concentration
method and/or the correct cell. See also page
6.2 "Editing the Method parameters".
Press the Cal key for 3 seconds to enter the
Edit Calibration mode.
Using:
Select "Edit Method Cal" then press the down
arrow key.
LOCK CURRENT CAL
NO
YES
If you want the method calibration results
(Concentration coefficients) to be locked,
select Lock current Cal = Yes using
.
In this case, the concentration coefficients,
which are stored in the CDM230 memory, are
used for sample measurements. In routine
mode, if you press the Cal key then select the
Conc. Coeff. option, the concentration coefficients will be displayed.
To determine the Concentration coefficients by
performing a method calibration, select Lock
current Cal = No then press the down arrow
key.
If Lock current Cal = Yes is entered, you can
press the up arrow key or leave the Edit
Calibration mode by pressing the Method,
Sample, Cal or Tref key.
6.4
If Lock current Cal = No
CALIBRATE USING
1
POINT(S)
Using:
Select whether you want to perform a one,
two or three-point calibration.
If Lock current Cal = No
CONC. STD 1
1.000 mg/l
Using:
Adjust the concentration of the first standard.
Range available: 0.000 to 9999.
The unit displayed is the one selected in the
Edit Method mode (see page 6.2).
If you have selected 2 or 3 standards,
continue to enter the concentration values in
the same way.
STABILITY CRIT.
1.0 %/min
The stability criterion set in this display will
determine when the electrode signal is
accepted as being stable. In our example,
when the "drift" is less than 1.0% of the
measured value per minute, the result will be
used for calculation of the concentration
coefficients.
If the Stability criterion is set to "- - - -"
using the left or right arrow keys, the
conductivity will be used for the calculation of
the concentration coefficients at end of the
Accept time set on the next display.
Range available: 0.1 to 99.9%/min and
"- - - -" (no criterion).
6.5
ACCEPT TIME
60 s
Adjust the Accept time using
In the example shown, the conductivity value will
be used for the calculation of the concentration
coefficients after 60 seconds irrespective of the
measurement stability. If you only want the concentration coefficients to be calculated when the
measurement is stable, set the Accept time to "- - -" with the left or right arrow keys.
Range available: 1 to 9999 seconds and "- - - -".
Note: If the Stability criterion and Accept time
are both set to "- - - -", the measurement must be
accepted manually by pressing the ✓ key.
CALIBRATE EVERY
7 DAY(S)
Using:
Adjust the maximum time interval between two
method calibrations.
The CDM230 prompts you to perform a new
method calibration if the current calibration is older
than, for example, 7 days.
Range available: 1 to 999 days.
6.6
B4 - Editing the Sample parameters
METHOD B CELL2
CONCENTRATION
Sample
3 seconds
SAMPLE RESULT
AUTOREAD
SAMPLE RESULT
AT INTERVALS
Using:
Select the Concentration method (B for example)
you want to edit the Sample parameters.
If there is no Concentration method or if the Concentration method does not use the correct conductivity cell (Cell 2 for example), hold the Method
key down for 3 seconds and select a Concentration
method and/or the correct cell. See also page 6.2
"Editing the Method parameters".
Press the Sample key for 3 seconds to enter the
Edit Sample mode.
Using:
Select the measurement mode between:
Autoread
At intervals
By pressing ✓
SAMPLE RESULT
BY PRESSING ✓
The AUTOREAD function locks the result on the display as soon as the signal
is stable. Stability is defined by the Stability criterion and Accept time set in
the Edit Sample mode.
With the AT INTERVALS function, the sample is measured continuously and
printed out at specific time intervals set in Edit Sample. The measurements will
stop at the end of Stop print after set in the Edit sample mode.
Using the By pressing ✓ function, a live reading is displayed. When you consider the measurement to be stable, press the ✓ key. There is no other Sample
parameters to edit in this case.
If Autoread or At Intervals is selected, press the down arrow key then edit
the following parameters:
. Stability Crit. and Accept Time (if Autoread, see page 7.17 for
more information)
. Stability Crit., Print Interval, Stop Print After and
Store in GLP (if At Intervals, see pages 7.18 and 7.19 for
more information).
6.7
C- Performing a Cell calibration
(see also the display overview page 6.14)
METHOD B CELL2
CONCENTRATION
Cal
Using:
Select the Concentration method with the correct
cell (method B with Cell 2 for example) and
press the Cal key. If there is no Concentration
method or if the Concentration method does not
use the correct conductivity cell (Cell 2 for
example), hold the Method key down for 3
seconds and select a Concentration method and/
or the correct cell. See also page 6.2 "Editing the
Method parameters".
The next screen depends on the selection you
made in Edit Calibration (see page 6.3).
CELL 2 CONST.
1.000cm-1
or
CELL 2 CONST.
1.000 cm-1
or
CELL 2 CONST.
CALIBRATION ✓
If you have entered "Cell 2 Constant = Enter
below", the cell constant is displayed and cannot
be changed here. There is no cell calibration to
perform.
If you have entered "Cell 2 Constant = Entered",
Enter the Cell constant value using the left and
right arrow keys. The cell calibration is over.
If "Cell 2 Const
= Calibration
DIP CELL 2 IN
✓
0.05% NaCl
Or Dip Cell 2 in
Standard
1 KCl
0.1 KCl
0.01 KCl
Seawater Std
If you have entered one of the five "Calibrate
using ..." option, start the cell calibration by
dipping the cell into the specified standard
solution then follow the operating instructions of
pages 2.5 to 2.9.
6.8
D- Performing a Method calibration
(see also the display overview page 6.14)
Before performing a concentration measurement, the method must be
calibrated against standards to define the equation which gives the concentration as a function of the measured conductivity. A calibration of a concentration method consists of determining 1 to 3 coefficients of the equation. To calculate one coefficient, the CDM230 measures the conductivity of
a standard (solution of known concentration) at the standard temperature
then corrects the conductivity to a reference temperature if selected in the
Edit Tref mode. See chapter 8 "Theory", page 8.11.
At the end of a method calibration, the CDM230 will save the 1 to 3
coefficient(s) found for the method selected (A, B or C).
Remarks
.
Calibration standard solutions with low concentrations should be
prepared just before a calibration is to be performed.
.
Always carry out measurements in the standard having the lowest
concentration first in order to avoid the carry-over of species from one
standard to another.
.
Make sure that calibration standards and samples have the same
temperature.
.
Read the paragraph "Limitations of the concentration method" on page
8.12.
Operating Instructions:
METHOD B CELL2
CONCENTRATION
Cal
Using:
Select the Concentration method with the
correct cell (method B with Cell 2 for example)
and press the Cal key. If there is no Concentration method or if the Concentration method does
not use the correct conductivity cell (Cell 2 for
example), hold the Method key down for 3
seconds and select a Concentration method
and/or the correct cell. See also page 6.2
"Editing the Method parameters".
6.9
CELL 2 CONST.
1.000cm-1
CELL 2 CONST.
1.000 cm-1
or
or
The next screen depending on the selection
you made in Edit Cell Calibration (see page
6.3).
CELL 2 CONST.
CALIBRATION ✓
CONC. COEFF.
METHOD B ✓
Press the left or right arrow keys.
If you press the ✓ key by mistake, press the
up arrow key. The next screen must be
"CONC. COEFF. - METHOD B".
Press the ✓ key.
CONC. COEFF.
B1
1.196E-01
or
DIP CELL IN STD1
1.000mg/l ✓
The next display depends on the options
selected in the Edit Method Calibration mode
(see page 6.4):
If Lock current Cal = Yes has been selected
in Edit Calibration mode. The 1 to 3 coefficients entered in the Edit Calibration mode
are displayed. Use the left or right arrow
keys to display the other coefficients (if
saved in the method). Coefficient "Bi" means
that the coefficient of index i (0 to 2) is
related to method B. You can start sample
measurements using the current method.
If Lock current Cal = No has been selected.
The coefficient(s) is (are) going to be determined by a calibration using 1 to 3
standard(s) of known concentration.
Pour standard 1 into the beaker. Dip the
conductivity cell (and temperature sensor if
desired) in standard 1 (for example: 1.000
mg/l) . Start stirring.
Check that the conductivity cell is properly
immersed in the solution and that proper
stirring is applied. The SAM7 Sample Stand,
which is a combined electrode holder and
magnetic stirrer is ideal for setups with the
CDM230.
6.10
DIP CELL IN STD1
1.000mg/l ✓
Press the ✓ key to continue.
TEMP OF STANDARD
25.0
˚C ✓
If no temperature sensor is connected, the
temperature must be adjusted manually using
the left or right arrow keys.
Press the ✓ key to continue.
Note: If a temperature sensor is connected,
the temperature will be measured directly and
the TEMP OF STANDARD display will not
appear.
The measurement can be followed on the
display by means of the conductivity reading
and the visual STABility indicator.
If 1-point calibration
CONC. COEFF.
B0
1.196E-01
If 2 or 3-point calibration
DIP CELL IN STD2
10.00mg/l ✓
After stabilisation (the 4 segments of the
STAB indicator are continuously displayed),
and if method B has been edited as a 1-point
calibration, the CDM230 calculates and
displays the B0 concentration coefficient. B0
is stored in the GLP memory for the current
method. The calibration is completed. You
can start a sample measurement by pressing
the Sample key.
After stabilisation (the 4 segments of the
STAB indicator are continuously displayed),
and if method B has been edited as a 2 or a
3-point calibration, rinse the cell thoroughly
with deionised water and dab dry with a soft
tissue. Dip the cell in standard 2 and press ✓
to continue.
6.11
If 2-point calibration
CONC. COEFF.
B0
3.395E-04
If 3-point calibration
DIP CELL IN STD3
100.0mg/l ✓
CONC. COEFF.
B2
1.326E-06
After stabilisation (the 4 segments of the
STAB indicator are continuously displayed),
and if method B has been edited as a 2-point
calibration, the CDM230 calculates the two
concentration coefficients (B0 and B1).
The CDM230 displays the first coefficient
(B0). You can also display the other coefficient (B1) by using the left or right arrow
keys. The 2 coefficients are stored in the
GLP memory for the current method.
After stabilisation (the 4 segments of the
STAB indicator are continuously displayed),
and if method B has been edited as a 3-point
calibration, rinse the cell thoroughly with
deionised water and dab dry with a soft
tissue. Dip the cell in standard 3 and press ✓
to continue.
After stabilisation, the CDM230 calculates
the three concentration coefficients (B0, B1
and B2). The CDM230 displays B2. You can
also display the other two coefficients (B0
and B1) by using the left or right arrow
keys. The 3 coefficients are stored in the
GLP memory for the current method. The
calibration is completed. You can, for example, start a sample measurement by pressing
the Sample key.
6.12
E- Performing Concentration sample Measurements
METHOD B CELL2
CONCENTRATION
Sample
Using:
Select the Concentration method with the correct
cell (method B with Cell 2 for example) and
press the Sample key. If there is no Concentration method or if the Concentration method does
not use the correct conductivity cell (Cell 2 for
example), hold the Method key down for 3
seconds and select a Concentration method
and/or the correct cell. See also page 6.2
"Editing the Method parameters".
Pressing the Sample key will normally start the measurement. However, the
following message may be displayed:
NEW CELL CAL
REQUIRED
This message reminds you that you have to calibrate the conductivity cell
regularly (e.g. weekly). Press the Cal key and start a cell calibration (see
page 6.8).
Another message may be displayed:
NEW METHOD CAL
REQUIRED
This message reminds you that you may have to recalibrate the method
regularly (e.g. every 100 days). Press the Cal key and start a new method
calibration (see pages 6.9).
Important: A reliable sample measurement requires the exact cell constant
and concentration coefficients.
The maximum time interval between 2 cell or 2 method calibrations is a user
defined parameter set in the Edit Calibration mode.
After having pressed the Sample key, the Sample ID number is displayed for
3 seconds. This number is incremented each time a sample measurement
procedure is initiated.
The sample measurement is then carried out in the same way as for a
conductivity measurement (see pages 2.13 to 2.15).
6.13
Concentration method - cell and method calibrations
Display Overview
Cal
CELL 1 CONST.
1.000 cm-1
CONC. COEFF.
METHOD B
✓
or
CELL 1 CONST.
CALIBRATION ✓
If Method Cal locked
If Method Cal not locked
CONC. COEFF.
B1
1.012E-03
Cell calibration
(see chapter 2)
DIP CELL IN STD1
1.000mg/l ✓
Display the other
coefficients if calculated
using
If no temperature sensor connected
TEMP OF STANDARD
17.0
¡C ✓
Adjust using
and
If temperature sensor connected
STAB 0.850mS/cm
51s
17.0oC
STAB 0.850mS/cm
51s
17.7oC
When stable or at end of Accept time
DIP CELL IN STD2
5.000mg/l ✓
If calibration using 2 points
DIP CELL IN STD3
10.00mg/l ✓
If calibration using 3 points
Display the other
coefficients if calculated
using
6.14
CONC. COEFF.
B1
1.012E-03
GLP Table
If the GLP key is pressed after having selected a Concentration method, the
3 following options are available:
METHOD B GLP
CELL
METHOD B GLP
METHOD
METHOD B GLP
SAMPLE
If Cell is selected, calibration data can be accessed as explained on pages
2.18 and 2.19.
If Sample is selected, sample measurement data can be accessed as
explained on pages 2.20 to 2.22.
If Method is selected, the Concentration method calibration data can be
accessed as explained below.
Method Calibration Data
For a Concentration method, when Method is selected, the following method
calibration data can be accessed:
1.COEFFICIENT
B0: 1.041E+00
*
Press
to see the most recent method calibration data i.e. entry no. 1. The first
display shows the first concentration coefficient found (B0 for method B). If a 1-point
calibration has been performed, the display
shows "-----" indicating that this coefficient
has not been calculated. If a "*" is displayed, it shows that you have changed
one of the following parameters after you
have obtained the result: Accept time and
Stability criterion.
6.15
1.COEFFICIENT
B1: 1.196E-01
*
1.COEFFICIENT *
B2: ----------
Press
. The next display shows
the second concentration coefficient
found (B1 for method B). A "*" can also
be displayed for the same reasons as for
the previous display.
Press
. The next display shows
the last concentration coefficient found
(B2 for method B). If a 1 or 2-point calibration has been performed, the display
shows "-----" indicating that this coefficient has not been calculated. A "*" can
also be displayed for the same reasons
as for the first coefficient display.
1.STANDARD 1
1.000mg/l
Press
. The display shows the
concentration of the first standard and
the unit the concentration is expressed
in.
1.STANDARD 1
1.099mS/cm
Press
.The next display shows the
conductivity measured for the first standard.
1.STANDARD 1
UNSTABLE
1.STANDARD 1
25.0˚C
1.STANDARD 2
10.00mg/l
Press
. If the measurement was
unstable at the end of the Accept time.
Press
.The next display shows the
temperature (entered or measured) of the
first standard.
Press
. The display shows the
concentration of the second standard
and the unit the concentration is expressed in. If a 1-point calibration was
performed, the displayed value is
"-----".
6.16
1.STANDARD 2
10.40mS/cm
Press
.The next display shows the
conductivity measured for the second
standard if a 2-point calibration was
performed (if not, the value displayed is
"----------").
1.STANDARD 2
UNSTABLE
Press
. If the measurement was
unstable at the end of the Accept time.
1.STANDARD 2
25.0˚C
Press
.The next display shows the
temperature (entered or measured) of the
second standard if a 2-point calibration
was performed (if not, the value displayed is "----").
1.STANDARD 3
-----mg/l
1.STANDARD 3
----------
1.STANDARD 3
----˚C
1.DATE
29NOV95
TIME
10:07
Press
. The display shows the
concentration of the third standard and
the unit the concentration is expressed
in. If a 1 or 2-point calibration was performed, the displayed value is "-----".
Press
.The next display shows the
conductivity measured for the third
standard if a 3-point calibration was
performed (if not, the value displayed is
"----------").
Press
.The next display shows the
temperature (entered or measured) of the
third standard if a 3-point calibration was
performed (if not, the value displayed is
"----").
Press
one last time. The date and
time at which the method calibration was
performed are now shown.
6.17
If you wish to see previous method calibration results, press the down
arrow key and then use the left arrow key to move along the text line.
The most recent calibration result is always shown first and is stored as
entry no.1. When the down arrow key is pressed, the next result, entry
no. 2, will appear.
6.18
The Edit Mode
The Edit mode of the CDM230 comprises 6 parameter categories which
allow you to:
•
configurate your CDM230 with parameters that are common to all
methods. These are the 2 Edit mode options PRINT and GLP.
•
edit a method in order to fit your specific tasks. These are the 4 Edit
mode options: METHOD, CALIBRATION, SAMPLE and Tref.
Editing a Method
Editing a method is performed as follows:
1.
Select one of the 3 available methods (A, B or C).
2.
Select one of the 3 available conductivity cells (Cell 1, Cell 2 or Cell 3)
and edit the parameters that are common to calibration and sample
measurement procedures: hold the Method key down for 3 seconds
and follow the instructions on pages 7.3 to 7.5.
3.
Define the calibration to be performed with the conductivity cell selected. Edit the calibration data: hold the Cal key down for 3 seconds
and follow the instructions on pages 7.6 to 7.9.
4.
If a TDS or a concentration method is edited, define the calibration to
be performed with the method. Edit the calibration data: hold the Cal
key down for 3 seconds and follow the instructions on pages 7.10 to
7.15.
5.
Define the sample measurement to be performed with the method and
conductivity cell selected. Edit the sample data: hold the Sample key
down for 3 seconds and follow the instructions on pages 7.16 to 7.20.
6.
Define a temperature correction for the sample measurement. Edit the
Tref data: hold the Tref key down for 3 seconds and follow the instructions on pages 7.21 and 7.22.
7.1
Methods and Conductivity Cells
Three methods (A, B, C) can be edited independently using one to three conductivity cells (Cell 1, Cell 2 or Cell 3).
As a general rule, edit a new method when you need to use another conductivity cell, for example:
.
method A with Cell 1,
.
method B with Cell 2,
.
method C with Cell 3.
With the CDM230, it is also possible to run different methods (for example:
methods A and B) with the same conductivity cell (for example: Cell 1).
Example: you want to get a conductivity or a resistivity result for a sample
using the same cell (Cell 1)
Follow the instructions below:
1.
Press the Method key and select Method A.
2.
Hold the Method key for 3 seconds and select the conductivity cell
Cell 1.
3.
Press the Cal key to calibrate the cell (result: cell constant for Cell 1: k1).
4.
Press the Sample key and perform sample measurements with Cell 1.
5.
Press the Method key and select Method B.
6.
Hold the Method key down for 3 seconds and select Cell 1.
7.
Press the Sample key and perform sample measurements with Cell 1:
the cell constant found in step 3 is used.
7.2
Edit Method
METHOD A CELL1
C CONDUCTIVITY
Method
Select a method (A, B or C) with
and hold the Method key down for 3 seconds
to enter the Edit Method mode.
3 seconds
USE CELL
1 2 3
METHOD A
CONDUCTIVITY
METHOD A
RESISTIVITY
METHOD A
SALINITY
METHOD A
TDS
METHOD
A
CONCENTRATION
Select the conductivity cell (Cell 1, Cell 2 or
Cell 3) for measurements with
.
Using:
, select whether you want to
perform conductivity, resistivity, salinity, TDS
or concentration measurements.
If Resistivity or Concentration is selected,
the next display is: "Unit selection" (see page
7.4).
If TDS or Salinity is selected, the next
display is: "Printout format" (see page 7.5).
CONDUCTIVITY
AUTORANGE
METHOD A
MANUAL
RANGE
METHOD
A
FIXED RANGE
Using:
If Conductivity has been selected, select one
of the following options for the conductance
range of the sample measurements:
- Autorange: the optimum range is set
automatically by the CDM230 while performing measurements.
- Manual range: the range is set by the user
just after having selected the method. Use the
Manual range option if you frequently want to
select another conductance range of the
method without entering the Edit Method
mode.
- Fixed range: the range is set in the next
display of the Edit Method mode (see below).
The range cannot be changed without entering
the Edit mode. Use the Fixed range option if
you always want a specific conductance
measurement range.
7.3
SIGNAL
<1% OF
2.000S SIGNAL
RANGE
<1% OF
400.0mS SIGNAL
RANGE
2.66% OF
40.00mS RANGE
SIGNAL
26.6% OF
4.000mS RANGE
SIGNAL
>100% OF
400.0µS SIGNAL
RANGE
>100% OF
Using:
If Fixed range has
been chosen, select
the conductance
range for measurements. The best
resolution is obtained
when the
40.00µS SIGNAL
RANGE
>100% OF
signal is
4.000µS RANGE
10 to 100%
of the
range.
RESET READING
NO
YES
UNIT SELECTION
S/m
S/cm
If Fixed or Manual range has been selected,
only select Yes using
if you want to
display a relative conductivity measurement.
During the sample measurement, you will be
prompted to confirm the reset reading. See also
chapter 3, paragraph "Relative conductivity
measurements".
Using:
Select the measurement unit.
or
UNIT SELECTION
Ω.m
Ω.cm
Conductivity can be measured in either S/m or
S/cm and resistivity in Ω.cm or Ω.m.
or
UNIT SELECTION
mg/l
Concentration can be measured in mg/L, µg/L,
g/kg, mg/kg, µg/kg, %, ppm, ppb, mol/L, mmol/
L, µmol/L, mol/kg, mmol/kg, µmol/kg or g/L.
Important: to obtain the best reading resolution,
select a concentration unit in order to have at
least "1.000" displayed for all standard concentrations.
Example: for a standard concentration of
10 µmol/L, select µmol/L for the unit and not
mmol/L or mol/L.
7.4
PRINTOUT FORMAT
RESULT
PRINTOUT
FORMAT
ALL
Using:
Select the printout format you require for
sample measurements:
If you choose All, the cell constant and either
TDS factor or the concentration coefficients
will be included in the printout: see also chapter
9.
WARNING BEEP
YES
NO
RESULT BEEP
YES
NO
RESET METHOD
NO
YES
Using:
Select Yes, if you want a Warning Beep (three
short tones) to accompany any warning message.
Using:
Select Yes, if you want a Result Beep (one
long tone) to sound when a result has been
obtained.
Using:
Select Yes, if you want to reset the method to
default values. When No is selected: press the
up arrow key or leave the Edit Method mode
by pressing the Method, Sample, Cal or Tref
key.
If Yes
CONFIRM RESET
YES
NO
If Reset method = Yes, the CDM230 asks you
to confirm the method reset. If No is selected
no method reset will be performed.
A Reset method operation will replace all the parameters in Edit Method,
Sample and Tref modes with the default values. The parameters of the
Edit Calibration, Print and GLP are not affected by a reset method operation. The default values of the parameters are listed in appendix 3.
7.5
Edit Calibration (Cell Calibration)
The following settings are common and accessible for conductivity, resistivity and salinity methods. For a TDS method, go to page 7.10 and for a
Concentration method, go to page 7.13.
METHOD
A
CELL1
CONDUCTIVITY
Cal
3 seconds
CELL 1 CONSTANT
ENTER
BELOW
CELL
1 CONSTANT
ENTERED
CELL
1 CONSTANT
ADJUSTED
CALIBRATE USING
1
KCl USING
CALIBRATE
0.1
KCl
CALIBRATE
USING
0.01
KCl
CALIBRATE
USING
Using:
Select the method (A, B or C) using the cell
(Cell 1, Cell 2 or Cell 3) you want to calibrate.
Press the Cal key for 3 seconds to enter the
Edit Calibration mode.
Using:
Select a calibration mode for the cell selected
(Cell 1, Cell 2 or Cell 3):
- Cell constant = Enter below: select this
option when you know the cell constant value
and only want to change it in the Edit mode. The
cell constant value is entered on the next
display.
- Cell constant = Entered: select this option
when you want to enter the cell constant value
0.05% NaCl
CALIBRATE
USING and not to determine it. During routine operation,
SEAWATER STD
simply press the Cal key: the cell constant is
displayed and a new value can be entered.
- Cell constant = Adjusted: In routine mode,
while the cell is dipped in your standard, the cell
constant can be adjusted. You must know the
conductivity of your standard at the temperature
used.
- Calibration using KCl, NaCl, Seawater Std:
the cell constant is determined by the CDM230
using a standard the conductivity value of which
is stored at different temperatures. These
standards are (see pages 2.5 and 2.6 for
details):
.
.
.
.
.
1 D KCl (range: 0.0 to 27.0°C).
0.1 D KCl (range: 0.0 to 50.0°C).
0.01 D KCl (range: 0.0 to 50.0°C).
0.05% NaCl (range: 0.0 to 99.9°C).
Seawater standard (range: -2.0 to 35.0°C).
7.6
CELL 1 CONSTANT
1.0000 cm-1
If Cell constant = Enter below, adjust the cell
constant value using:
. The next display
is Cable resistance (see page 7.8).
Range available: 0.0500 to 15.000 cm-1 by steps of
0.0001 below 10 cm-1 and of 0.001 above.
STABILITY CRIT.
1.0 %/min
If you choose one of the five Calibrate using
options, adjust the Stability criterion
using
The stability criterion set in this display will determine when the electrode signal is accepted as
being stable. In our example, when the "drift" is
less than 1.0% of the measured value per minute,
the cell constant will be calculated and displayed.
If the Stability criterion is set to "- - - -" using the
left or right arrow keys, the cell constant will
be calculated at the end of the Accept time set on
the next display.
Range available: 0.1 to 99.9%/min and
"- - - -" (no criterion).
ACCEPT TIME
60 s
If you choose one of the five Calibrate using
options, adjust the Accept time using
In the example shown, the cell constant will be
calculated after 60 seconds irrespective of the
measurement stability. If you only want the cell
constant to be calculated when the measurement is
stable, set the Accept time to "- - - -" with the left
or right arrow keys.
Range available: 1 to 9999 seconds and "- - - -".
Note: at the end of the calibration, the cell constant is calculated and displayed
as soon as either the Stability criterion or the Accept time is reached. If the
Stability criterion and Accept time are both set to "- - - -", the measurement
must be accepted manually by pressing the ✓ key.
7.7
Using:
CALIBRATE EVERY
7
DAYS
If you choose one of the five Calibrate using
options or Cell constant = Adjusted, adjust the
maximum time interval between two calibrations.
The CDM230 prompts you to perform a new
calibration if the current calibration is older than,
for example, 7 days.
Range available: 1 to 999 days.
CABLE RESISTANCE
0.000
Ω
To obtain the most accurate conductance
measurements in the 2 S or 400 mS range
(measurements of sample resistances of less
than 50 Ω), adjust the resistance of the cell
cable using
.
Range available: 0 to 1.999 Ω.
The cable resistance values of some conductivity cells are listed below:
Conductivity CDC641T CDC741T
cell or cable
Resistance
(in Ω)
0.260
0.610
CAB. CAPACITANCE
0 pF
CDC749
CDC565
CDC865
CL136
CL336
0.180
0
0
0.145
0.350
Press the down arrow key and enter in the
same way the Cable Capacitance.
Range available: 0 to 1999 pF.
Note: Correction for the cable capacitance is only performed in the
4.000 µS range because the cable capacitance has nearly no influence on
low conductivity measurements.
Any value below 350 pF will not disturb the measurements (enter
0 pF for the cable capacitance).
7.8
The cable capacitance values of some conductivity cells are listed below:
Conductivity CDC641T CDC741T
cell or cable
Capacitance
(in pF)
500
320
CDC749
CDC565
CDC865
CL136
170
440
440
70
CL336
See also chapter 8 "Theory".
After having entered the Cable Capacitance, press the up arrow key or
leave the Edit Calibration mode by pressing the Method, Sample, Cal or
Tref key.
7.9
200
Edit Calibration (TDS Method)
The calibration of a TDS method is edited as follows:
METHOD
Cal
A CELL1
TDS
3 seconds
EDIT
CELL
CAL
CELL 1 1CONSTANT
METHOD CAL
Using:
Select the TDS method (A, B or C) you want to
calibrate.
If the method is not TDS or the method does
not use the correct cell, hold the Method key
down for 3 seconds and select a TDS method
and/or the correct cell. See also page 7.3.
Press the Cal key for 3 seconds to enter the
Edit Calibration mode.
Using:
Select whether you want to edit a calibration
procedure for the cell selected (Cell 1 in our
example) or to edit a method calibration.
Select "Edit Cell 1 Cal" then press the down
arrow key if you want to edit the calibration
procedure. A cell calibration of a TDS method
is carried out in the same way as for a Conductivity method (see pages 7.6 to 7.9).
To edit a method calibration, select "Edit
Method Cal" then press the down arrow key.
LOCK CURRENT CAL
NO
YES
If you choose Edit Method Cal before.
If you want the method calibration results (TDS
Factor) to be locked, select Lock current Cal
= Yes using
. In this case, the TDS
Factor is entered in the Edit mode on the next
display. In routine mode, if you press the Cal
key then select the TDS Factor option, the
TDS Factor entered will be displayed.
To determine the TDS Factor by performing a
method calibration, select Lock current Cal =
No .
7.10
TDS FACTOR
0.574
If Lock current Cal = Yes, adjust the TDS
Factor using
.
Range available: 0.010 and 9.999.
After having entered the TDS Factor, press the
up arrow key or leave the Edit Calibration mode
by pressing the Method, Sample, Cal or Tref
key.
TDS OF STANDARD
501.1 mg/l
If Lock current Cal = No, adjust the TDS of the
standard used for method calibration using
Range available: 0.000 to 9999 mg/L.
Note: 501.1 mg/L is the default value: it is the
TDS of a 0.05% NaCl solution.
STABILITY CRIT.
1.0 %/min
The stability criterion set in this display will
determine when the electrode signal is accepted
as being stable. In our example, when the "drift"
is less than 1.0% of the measured value per
minute, the TDS Factor will be calculated and
displayed.
If the Stability criterion is set to "- - - -" using
the left or right arrow keys, the TDS Factor will
be calculated at the end of the Accept time set
on the next display.
Range available: 0.1 to 99.9%/min and
"- - - -" (no criterion).
ACCEPT TIME
60 s
Adjust the Accept time using
In the example shown, the TDS Factor will be
calculated after 60 seconds irrespective of the
measurement stability. If you only want the TDS
Factor to be calculated when the measurement is
stable, set the Accept time to "- - - -" with the
left or right arrow keys.
Range available: 1 to 9999 seconds and "- - - -"
7.11
Note: At the end of the calibration the TDS Factor is calculated and
displayed as soon as either the Stability criterion or the Accept time is
reached. If the Stability criterion and Accept time are both set to "- - - ", the measurement must be accepted manually by pressing the ✓ key.
CALIBRATE EVERY
7 DAY(S)
Using:
Adjust the maximum time interval between
two method calibrations.
The CDM230 prompts you to perform a new
method calibration if the current calibration is
older than, for example, 7 days.
Range available: 1 to 999 days.
After having entered this number of days, press the up arrow key or
leave the Edit Calibration mode by pressing the Method, Sample, Cal or
Tref key.
7.12
Edit Calibration (Concentration Method)
A calibration of a Concentration method is edited as follows:
METHOD A CELL1
CONCENTRATION
Cal
3 seconds
EDIT
CELL
CAL
CELL 1 1CONSTANT
METHOD CAL
Using:
Select the Concentration method (A, B or C)
you want to calibrate.
If the method is not Concentration or the
method does not use the correct cell, hold the
Method key down for 3 seconds and select a
Concentration method and/or the cell. See also
page 7.3.
Press the Cal key for 3 seconds to enter the
Edit Calibration mode.
Using:
Select whether you want to edit a calibration
procedure for the cell selected (Cell 1 in our
example) or to edit a method calibration.
Select "Edit Cell 1 Cal" then press the down
arrow key if you want to edit the calibration
procedure. A cell calibration of a Concentration
method is carried out in the same way as for a
Conductivity method (see pages 7.6 to 7.9).
To edit a method calibration, select "Edit
Method Cal" then press the down arrow key.
LOCK CURRENT CAL
NO
YES
If you choose Edit Method Cal before.
If you want the method calibration results
(Concentration coefficients) to be locked,
select Lock current Cal = Yes using
In this case, the concentration coefficients,
which are stored in the CDM230 memory, are
used for sample measurements. In routine
mode, if you press the Cal key then select the
Conc. Coeff. option, the concentration coefficients will be displayed.
7.13
LOCK CURRENT CAL
NO
YES
To determine the Concentration coefficients
by performing a method calibration, select
Lock current Cal = No .
If Lock current Cal = Yes is entered, you
can press the up arrow key or leave the Edit
Calibration mode by pressing the Method,
Sample, Cal or Tref key.
If Lock current Cal = No
CALIBRATE USING
1
POINT(S)
Using:
Select whether you want to perform a one,
two or three-point calibration.
If Lock current Cal = No
CONC. STD 1
1.000 mg/l
Using:
Adjust the concentration of the first standard.
Range available: 0.000 to 9999.
The unit displayed is the one selected in the
Edit Method mode (see page 7.4).
If you have selected 2 or 3 standards,
continue to enter the concentration values in
the same way.
STABILITY CRIT.
1.0 %/min
The stability criterion set in this display will
determine when the electrode signal is
accepted as being stable. In our example,
when the "drift" is less than 1.0% of the
measured value per minute, the result will be
used for calculation of the concentration
coefficients.
If the Stability criterion is set to "- - - -"
using the left or right arrow keys, the
conductivity will be used for the calculation of
the concentration coefficients at end of the
Accept time set on the next display.
Range available: 0.1 to 99.9%/min and
"- - - -" (no criterion).
7.14
ACCEPT TIME
60 s
Adjust the Accept time using
In the example shown, the conductivity value will
be used for the calculation of the concentration
coefficients after 60 seconds irrespective of the
measurement stability. If you only want the concentration coefficients to be calculated when the
measurement is stable, set the Accept time to "- - -" with the left or right arrow keys.
Range available: 1 to 9999 seconds and "- - - -".
Note: If the Stability criterion and Accept time are both set to "- - - -", the
measurement must be accepted manually by pressing the ✓ key.
CALIBRATE EVERY
7 DAY(S)
Using:
Adjust the maximum time interval between two
method calibrations.
The CDM230 prompts you to perform a new
method calibration if the current calibration is older
than, for example, 7 days.
Range available: 1 to 999 days.
After having entered this number of days, press the up arrow key or leave the
Edit Calibration mode by pressing the Method, Sample, Cal or Tref key.
7.15
Edit Sample
Sample measurements can be performed in three ways depending on the
option selected in the EDIT Sample mode:
. Using the MANUAL function with a live reading on the display. When
you consider the measurement to be stable, press the ✓ key.
. Using
the AUTOREAD function which locks the result on the display
as soon as the signal is stable. Stability is defined by the Stability
criterion and Accept time set in the Edit Sample mode.
. Using
the AT INTERVALS function in which the sample is measured
continuously and printed out at specific time intervals set in Edit
Sample. The measurements will stop at the end of Stop print after
set in the Edit sample mode.
Edit Sample - AUTOREAD Measurements
In this mode, the result is locked on the display as soon as the measurements satisfy user defined criteria.
METHOD A CELL1
CONDUCTIVITY
Sample
3 seconds
SAMPLE RESULT
AUTOREAD
Using:
.
Select the method (A, B or C) for which you
want to edit the sample parameters.
Press the Sample key for 3 seconds to enter
the Edit Sample mode.
Select AUTOREAD using:
7.16
.
STABILITY CRIT.
1.0
%/min
The Stability criterion set in this display will
determine when the electrode signal is accepted as being stable, e.g. when the "drift" is
less than 1.0% of the measured value per
minute, the result will be locked on the display.
If "- - - - " is selected using the left or right
arrow keys, the sliding stability indicator uses
1%/min and the measurement will only be
accepted at end of the Accept time set on the
next display.
Range available: 0.1 to 99.9 %/min and
"- - - -" (no Stability criterion).
ACCEPT TIME
60
s
In the example shown, the signal will be
accepted and locked on the display after 60
seconds irrespective of the measurement
stability.
If you only want the electrode signal to be
accepted when it is stable, adjust to "- - - -"
with the left or right arrow keys .
Range available: 1 to 9999 seconds and
"- - - -" (no Accept time).
Note: The result will be locked on the display as soon as either the Stability criterion or the Accept time is reached. If the Stability criterion and
Accept time are both set to "- - - -", the measurement must be accepted
manually by pressing the ✓ key.
Using:
PURE WATER
CORRECTION
NO
PURE WATER
CORRECTION YES
.
Select Yes if you want to subtract the conductivity of pure water from the measured conductivity. The pure water correction takes the
sample temperature into account (see
chapter 8 "Theory").
Note: the pure water correction is not available for a Salinity, a TDS or a
Concentration method. The pure water correction is not available if Temp
correction = None has been selected in Edit Tref.
Press the up arrow key or leave the Edit Sample mode by pressing the
Method, Sample, Cal or Tref key.
7.17
Edit Sample - AT INTERVALS Measurements
In this mode, the sample is measured continuously and the measurement
printed out at specific time intervals whether the signal is stable or not.
METHOD A CELL1
CONDUCTIVITY
Sample
3 seconds
SAMPLE RESULT
AT INTERVALS
STABILITY CRIT.
1.0 %/min
PRINT INTERVAL
60
s
Using:
.
Select the method (A, B or C) for which you
want to edit the sample parameters. Press the
Sample key for 3 seconds to enter the Edit
Sample mode.
Select AT INTERVALS using:
.
The Stability criterion set in this display will
determine when the electrode signal is judged
as being stable, e.g. when the "drift" is less
than 1.0% of the measured value per minute,
the result will be considered as stable. If "- - - " is selected using the left or right arrow
keys, the sliding stability indicator uses 1%/
min.
Range available: 0.1 to 99.9 %/min and
"- - - -".
In the example shown, the measurement will
be printed at intervals of 60 seconds. If the
Stability criterion is not fulfilled at the end of
the Print interval, a warning message UNSTABLE will be displayed.
Note: A printout is made on starting the
measurements if a Print interval greater than
10 seconds is selected.
Range available: 4 to 9999 seconds.
7.18
STOP PRINT AFTER
1
min
STORE IN GLP
ALL
RESULTS
STORE
IN GLP
NO RESULTS
STORE
IN GLP
LAST RESULT
In the example shown, the printing of
measurement data will automatically stop after
10 minutes. The printing will continue indefinitely
if "- - - -" is adjusted using the left or right arrow
keys.
To stop the measurement, press the Sample,
Cal, Tref or Method key.
Range available: 1 to 5999 minutes or "- - - -".
Using:
Select which results you want to store in the
GLP table.
If you choose ALL RESULTS: the result at the
end of each interval will be stored in the GLP
table.
If you choose NO RESULTS: there will be no
results stored in the GLP table.
If you choose LAST RESULT: the very last
result will be stored in the GLP table.
Note: Only the last 50 results can be stored in
the GLP table.
PURE WATER
CORRECTION
NO
PURE WATER
CORRECTION YES
Using:
Select Yes if you want to subtract the conductivity of pure water from the measured conductivity. The pure water correction takes the sample
temperature into account (see chapter 8
"Theory").
Note: the pure water correction is not available for a Salinity, a TDS or a
Concentration method. The pure water correction is not available if Temp
correction = None has been selected in Edit Tref.
Press the up arrow key or leave the Edit Sample mode by pressing the
Method, Sample, Cal or Tref key.
7.19
Edit Sample - MANUAL Measurements
In this mode, a live measurement reading with a sliding stability indicator
using 1%/min is displayed. You accept the result when stable by pressing
the ✓ key.
METHOD A CELL1
CONDUCTIVITY
Sample
3 seconds
SAMPLE RESULT
BY PRESSING ✓
PURE WATER
CORRECTION
NO
PURE WATER
CORRECTION YES
Using:
Select the method of which you want to edit the
sample parameters. Press the Sample key for
3 seconds to enter the Edit Sample mode.
Select BY PRESSING ✓ using
.
Using:
Select Yes if you want to subtract the conductivity of pure water from the measured conductivity. The pure water correction takes the
sample temperature into account (see chapter 8
"Theory").
Note: the pure water correction is not available for a Salinity, a TDS or a
Concentration method. The pure water correction is not available if Temp
correction = None has been selected in Edit Tref.
Press the up arrow key or leave the Edit Sample mode by pressing the
Method, Sample, Cal or Tref key.
7.20
Edit Tref - Temperature Correction
Sample measurements of a Conductivity, Resistivity or Concentration method
may be corrected to a reference temperature using:
-
a linear equation (select Temp correction = Enter below). Use this
option if you want to correct the sample measurements to a reference
temperature of your choice (between 0 and 99°C). See chapter 8 "Theory".
-
a non-linear equation (select Temp correction = Natural water). Use this
option only if you measure on natural water samples (lake and river waters
for example). The CDM230 displays the measurement at 25°C from the
value measured at the sample temperature and using a conversion factor
from an equation stored in the CDM230 memory. This equation fits the
conductivity variations against temperature for natural water given by the
standard ISO/DIS 7888 - Table 3 (1984/06/22). See chapter 8 "Theory".
If you select Temp correction = None, measurement is displayed
at the sample temperature.
METHOD A CELL1
CONDUCTIVITY
Tref
3 seconds
TEMP CORRECTION
NONE
TEMP CORRECTION
ENTER
BELOW
TEMP
CORRECTION
NATURAL WATER
Using:
Select the method (A, B or C) for which you want to
edit the temperature data and press the Tref
key for 3 seconds. Note that there is no Edit Tref
mode for Salinity and TDS methods.
Using:
Select Temp correction = None or select
one of the two types of temperature
correction.
REFERENCE TEMP
25 ˚C
If Temp correction = Enter below, adjust the
Reference temperature the measured
conductivity will be corrected to.
Available range: 0 to 99°C.
TEMPERATURE COEF
2.20 %/˚C
Now adjust the Temperature coefficient.
Determination of the coefficient is explained on
the next page.
Available range: 0.00 to 9.99%/°C.
Press the up arrow key or leave the Edit Tref mode by pressing the Method,
Sample, Cal or Tref key.
7.21
Determination of the Temperature Coefficient
The temperature coefficient of a sample can be determined by measuring the
conductivity/resistivity of the sample at two different temperatures following
the procedure described below.
Note: For a temperature coefficient and a Concentration method, follow the
same operating instructions.
1.
Select a Conductivity method (A, B or C).
2.
Press Tref for 3 seconds and, using the left or right arrow keys, set the
CDM230 to Temp correction None.
3.
Immerse the conductivity cell in a typical sample thermostatted to the
desired reference temperature Tref (Tref between 0°C and 99°C).
4.
Press the SAMPLE key.
5.
When stable, write down the conductivity value measured at Tref.
6.
Heat or cool the sample to the desired measuring temperature T2.
7.
Press the SAMPLE key and read the conductivity of the sample at the
measured temperature.
8.
Enter the conductivity measurements (κ ) at Tref and T2 into the
following equation and calculate the temperature coefficient (θ)
measured at the reference temperature Tref .
9.
Press Tref for 3 seconds and, using the left or right arrow keys, set the
CDM230 to Temp correction = Enter below.
10. Press the down arrow key and, using the left or right arrow keys,
adjust the reference temperature Tref: available values: 0 to 99°C.
11. Press the down arrow key and, using the left or right arrow keys,
adjust the calculated temperature coefficient (θ): available values: 0.00
to 9.99 %/°C.
See also the chapter 8 "Theory".
7.22
Edit GLP
The following settings are common to all methods. The current time and date
and the activation or desactivation of a keyboard beep are set here.
GLP
3 seconds
CURRENT TIME
HOURS
14
CURRENT TIME
MINUTES
Hold the GLP key down for 3 seconds to enter
the Edit GLP mode.
Using
adjust the hour and minute.
Using
adjust the year, month and day.
34
CURRENT DATE
YEAR
95
CURRENT DATE
MONTH
APR
CURRENT DATE
DAY
23
KEYBOARD BEEP
NO
YES
Using
adjust whether you want a
Keyboard Beep to sound at each keystroke or
not.
To leave the Edit GLP mode: press the Method,
Sample, Cal or Tref key.
7.23
Edit PRINT
The following settings are common to all methods. The configuration
parameters of the PC/PRINTER serial link and the instrument ID number
are set here.
Print
3 seconds
PRINTER OUTPUT
9600,n,8,1
PRINTER
OUTPUT
2400,e,7,1
INSTRUMENT ID
654R 001 N---
INSTRUMENT ID
654R001N ---
Hold the Print key down for 3 seconds to
enter the Edit Print mode.
Using
select between the PC/
PRINTER output format. The parameters
must be selected in accordance with those
defined on the PC or the printer.
Using
adjust the instrument ID
"Rxxx", xxx being a number between 001 and
999. If "- - -" is selected with the left or right
arrow keys, the instrument ID is set to
"654R---N000" and the instrument ID will be
not printed in the tables.
Adjust the instrument ID in the same way.
"Nxxx" is a number between 000 and 999.
To leave the Edit Print mode: press the
Method, Sample, Cal or Tref key.
7.24
Locking the Edit Mode
The parameters entered in all Edit Modes of all methods can be locked
(or unlocked) from the method selection display as described below.
Method
METHOD A CELL1
CONDUCTIVITY
Press the up arrow key
11DEC95 14:48:12
METHOD A
Sample
Press the up arrow
key twice then Sample
DATA LOCKED
if CDM230 Edit Mode unlocked
DATA UNLOCKED
or
If CDM230 Edit Mode locked
METHOD A CELL1
CONDUCTIVITY
7.25
After 2 seconds
Theory
Before a reading appears on the CDM230 display, the following operations
are performed in the following order:
1.
Conductance measurement Gm
2.
Cable correction (cable resistance and cable capacity correction):
corrected conductance value G
3.
The cell constant is used to calculate the conductivity κ (for all
methods except the resistivity) or the resistivity ρ at the sample
temperature measured or entered T
4.
For a conductivity method only, pure water correction: new conductivity at T
5.
For a conductivity, Resistivity and Concentration methods,
temperature correction: conductivity at the reference temperature Tref
6.
For a conductivity method, offset (optional operation): relative
conductivity at Tref
7.
For a salinity method, determination of the salinity of a seawater
sample
8.
For a TDS method, applying the TDS Factor found by a 1-point
calibration to display the TDS of the sample in mg/L
9.
For a concentration method, applying the concentration coefficients found by a 1, 2 or 3-point calibration to display the concentration of the sample
Steps 2 to 6 are described below (paragraph "Conductivity and resistivity
measurements"), step 7 on page 8.7 (paragraph "Salinity measurements"), step 8 on page 8.9 (paragraph "TDS measurements") and step 9
on page 8.11 (paragraph "Concentration measurements").
8.1
Conductivity and Resistivity Measurements
Steps 1 to 6 (see page 8.1) are performed for a Conductivity method and
steps 1 to 5 for a Resistivity method. Steps 2 to 6 are described below.
1.
Cable correction
The cable correction takes into account the cable resistance and the
cable capacitance.
Cable resistance correction:
The influence of the cable resistance on the measured conductance Gm
is as follows:
Gs
Gm =
(S)
1 + (Rc . Gs)
Gs
R
= solution conductance (S)
= cable resistance (Ω)
Cable capacitance correction:
The cable capacitance influences the measurements of very low conductance. Therefore, the CDM230 makes a correction for the 4.000 µS
conductance range. The empirical equation used by the CDM230 enables
an accurate measurement correction to be obtained for cable
capacitances up to 1000 pF.
2.
Cell constant correction
The conductance G of a solution is a result of the sum of contributions
from the movement of every ion present.
The resistance between the electrodes is proportional to the ratio of the
distance (l) between the electrodes and the surface area (s) of the
electrodes. This ratio is known as the cell constant:
K = l (cm-1)
s
8.2
The CDM230 calculates and displays the conductivity or the resistivity of
a solution on the basis of the conductance G compensated for the cable
resistance and capacitance and the cell constant of the conductivity cell
used. The conductivity κ and resistivity ρ are calculated as follows:
κ = G • K (S/cm)
ρ = 1/κ (Ω • cm)
3.
Pure Water Correction
The conductivity of pure water can be subtracted from the conductivity
measured if asked for in the Edit Sample mode (select Pure Water
correction = Yes, see chapter 7).
Principle:
The CDM230 calculates the conductivity of pure water Cwater at the
sample temperature T using a 4-degree polynomial equation. The equation
used fits the table stated in reference 1 (see page 8.14).
Conductivity of pure water is calculated for a temperature range of
0 to 100°C.
The CDM230 subtracts the Cwater from the conductivity measured in the
sample and displays the difference.
The Pure Water Correction can be used each time you want to suctract
the conductivity value of a pure water (i.e. 0.055 µS/cm at 25 °C).
This correction is interesting on very low conductivity samples when
using the 4 µS conductance range.
4.
Temperature correction
The conductivity of a solution changes with temperature. In order to
compare measurements taken at different temperatures, the conductivities are corrected using a temperature coefficient. Two correction methods are available in the CDM230:
. Linear correction.
. Natural water correction (non linear correction).
8.3
The Linear Correction
The linear correction mode is selected in Edit Tref mode with the Temp
correction = Entered option: see chapter 7.
Principle:
The conductivities are corrected to a reference temperature using a
temperature coefficient and the following equation:
Equation (1)
100
κΤref =
Tref
100 + θ . (T - Tref)
= reference temperature in °C
T
= sample temperature in °C
. κT
κTref = conductivity at Tref
κT
= conductivity at T
θ
= temperature coefficient of the sample in %/ °C
On the CDM230, the reference temperature is adjustable between 0 and
99°C by steps of 1°C and the temperature coefficient between 0.00 and
9.99%/°C by steps of 0.01%/°C.
Since the temperature correction factor should not be allowed to approach
zero, the limits for the sample temperature with respect to the reference
temperature (and vice versa) depend upon the temperature coefficient and
are as follows:
Temperature correction condition:
1/3 ≤
100
100 + θ . (T - Tref)
≤3
If this condition is not fulfilled, the error message TEMP CORRECTION
NOT POSSIBLE will be displayed and no result will be obtained.
8.4
Determination of the Temperature Coefficient:
By measuring the conductivity of a typical sample at a temperature T1
close to Tref and another temperature T2, you can calculate the temperature coefficient by using the following equation:
θ=
(κT1 - κ T2). 100
(T2 - T1) . κT1
(Unité : %/˚C)
T2 should be selected as a typical sample temperature and should differ
by more than 10°C from T1.
With temperature compensation, the conductivity at the reference temperature is displayed. Note that the compensation is accurate only within
a limited temperature range around T1 and T2. On the figure below:
T1 = 26°C, T2 = 14°C and Tref = 25°C
Real sample conductivity
Conductivity S/cm
0.015
κT1
T1
κT2
0.010
T2
0.005
5
15
25
Temperature ˚C
8.5
35
The Natural Water Correction
The natural water correction is selected in the Edit Tref mode with the
Temp correction = Natural water option: see chapter 7.
Principle:
The conductivity κT measured at the sample temperature T is corrected
to 25°C to give κ25 using the following equation:
κ25 = f25 (T) • κT
f25 (T) is the temperature correction factor used for the conversion of
conductivity values of natural water from T to 25°C.
The CDM230 calculates f25 (T) from a 4-degree polynomial equation. This
equation fits the conductivity variations against temperature for natural
water stated in reference 2 (see page 8.14).
The natural Water Correction can be selected for the following samples:
lake, rivers, underground waters.
For more information, see "Natural Water temperature correction (ISO/
DIN 7888)" - Table 3.
The available range for T is 0 to 35.9°C and the factor f25 (T) varies from
0.808 to 1.918.
If the CDM230 measures a sample temperature T outside the range
specified, the message TEMP CORRECTION NOT POSSIBLE will be
displayed and no result will be obtained.
5.
Relative conductivity
A conductivity value of your choice can be subtracted from sample
measurements if Reset reading = yes is selected in the Edit Method
mode: see pages 3.3 and 7.4. The CDM230 then displays a relative
conductivity.
Note:
A conductivity method and a fixed or manual conductivity range must be
selected.
8.6
Salinity Measurements
Salinity is a measurement without unit corresponding to the weight of
dissolved salts in seawater.
The CDM230 calculates the salinity from an empirical relationship between
the conductivity and the salinity of a seawater sample.
The Salinity mode of the CDM230 follows Oceanographic Tables and
Standards endorsed by UNESCO/SCOR/ICES/IAPSO.
Determination of the sample salinity
To determine the salinity of the sample, the CDM230 performs steps 1, 2,
3 and 7 given on page 8.1. Step 7 is described in detail below.
Note:
There is no Edit Tref mode for a salinity method.
At the sample temperature T, the conductivity of standard seawater
κT (STD) is calculated:
κT (STD) = f (T) • κ15 (STD)
With:
κ15 (STD) = 42.896 mS/cm at 15°C. This value is stored in the CDM230 and
cannot be modified. It is the conductivity at 15°C of standard seawater of
salinity 35.
The conversion factor f (T) is calculated from a 4-degree polynomial
formula. The formula is stated in reference 3 (see page 8.14) and UNESCO
1981-1983.
The sample temperature T is measured or entered within the interval -2 to
+35°C.
8.7
At the sample temperature T, the sample conductivity measured is
κT (SMP).
Based on the ratio:
R = κT (SMP) / κT (STD)
and the sample temperature T, the formula stated in reference 4 (see
page 8.14) is applied.
The CDM230 displays the salinity S (range: 2.00 to 42.00) of the sample.
8.8
TDS Measurements
What is TDS and how it is measured?
The TDS (Total Dissolved Solids) corresponds to the total weight of
cations, anions and all other undissociated dissolved species in one liter
of water sample. A filtration/evaporation/weighing procedure is used as
the standard method as described in reference 5 (see page 8.14). The
precision of the standard method is depending on the nature of the
dissolved species.
The conductivity measured in the water sample is supposed to be
proportional to the filtrable residue of the sample as mentioned in
reference 6 (see page 8.14).
The TDS method of the CDM230, based on conductivity measurements,
offers a quicker and easier way of determining TDS than the Standard
method (filtration/evaporation/weighing procedure).
The TDS Factor calculated by the CDM230 also provides information
about the qualitative ionic composition of the water sample. If the TDS
Factor is out of the 0.55 to 0.7 range, the TDS calibration should be
considered as suspect and must be repeated. If a TDS Factor below 0.55
is confirmed, the sample probably contains a significant concentration of
a constituent that cannot be measured (e.g. ammonia or nitrite). A TDS
Factor above 0.8 may indicate the presence of a large amount of poorly
dissociated calcium and sulfate ions.
To determine the TDS of the sample, the CDM230 performs steps 1, 2, 3
and 8 given on page 8.1. Step 8 is described in detail below.
Note:
There is no Edit Tref mode for a TDS method.
8.9
Determination of the TDS Factor (Method calibration)
A calibration using one standard of known TDS, TDS(STD), is performed
and the CDM230 calculates the TDS Factor as follows:
TDS factor = TDS (STD) / κ18 (STD)
TDS (STD) is expressed in mg/l.
κ18 (STD) is the conductivity of the standard corrected to 18°C (in µS/cm).
The conductivity of the standard measured is corrected to 18°C by using
the temperature correction table of a 0.05% NaCl solution. The correction
table originates from reference 7 (see page 8.14).
For "normal" water, the TDS factor calculated should be within 0.55 to
0.70.
Calculating the sample TDS
The sample conductivity is measured at the sample temperature (0 to
99°C) and corrected to 18°C (temperature correction as for the 0.05%
NaCl). The sample TDS, TDS (SMP) is calculated from the sample conductivity corrected at 18°C, κ18 (SMP):
TDS (SMP) (in mg/l) = TDS factor • κ18 (SMP).
TDS values between 4 and 20000 mg/l can be displayed.
Note:
To obtain the most accurate measurements, it is recommended to perform
the standard and sample measurements at the same temperature.
8.10
Concentration Measurements
The concentration mode of the CDM230 can be used to determine the
concentration of ionic species.
The concentration mode is not a selective method : you can determinee a
species in presence of other ionic or dissociated species provided that the
concentration of the other species are negligeable or stay constant. If the
other species concentration remains constant, it is necessary to add
these species to each standard solution that will be used for the calibration.
Please also read the limitation of the concentration method on the next
page.
To calculate a sample concentration, the CDM230 must be calibrated
against 1 to 3 standards of known concentration. At the end of the method
calibration, a formula expressing the concentration as a function of the
conductivity measured is determined. The sample concentration is
calculated from the sample conductivity measured and the coefficients
obtained during calibration.
To determine the concentration of the sample, the CDM230 performs
steps 1, 2, 3, 5 and 9 given on page 8.1. Step 9 is described in detail
below. Steps 1, 2, 3 are described on pages 8.1 and 8.2 and step 5 on
pages 8.3 to 8.5.
Determination of the concentration coefficients (Method
calibration)
A calibration using 1 to 3 standards of known concentration is performed.
For each standard:
.
the conductivity of the standard is measured at the standard's
temperature.
.
the conductivity of the standard is corrected to a reference temperature Tref (linear correction or natural water correction as for a conductivity measurement).
At end of the method calibration (for method A, for example), the CDM230
calculates and displays the A0, A1 and A2 coefficients of the following
equation:
C = A0 + A1 • κTref + A2 • (κTref )2
8.11
With: C = concentration with the unit selected in the Edit Method mode.
κTref = conductivity measured at the Tref reference temperature.
If a 1-standard calibration is performed, A0 and A2 are equal to 0.
If a 2-point calibration is performed,A2 = 0.
Note:
All the measurements of the standards must be performed at the same
temperature. To obtain the most accurate measurements, it is recommended to thermostat the standards and the samples at the reference
temperature Tref (selected in the Edit Tref mode).
Determination of the sample concentration
The conductivity of the sample is measured at the sample's temperature
then corrected to a reference temperature Tref to give κTref (linear correction or
"Natural water" correction as for a conductivity measurement).
The sample concentration CSMP is then calculated with the unit selected in
Edit Method as follows:
CSMP = A0 + A1 • κTref + A2 • (κTref )2
A0 , A1 and A2 are the coefficients determined during method calibration.
Limitations of the concentration method
For some samples with high concentrations, the conductance = f (concentration) curve may show a maximum for the conductance. This can lead to
major measurement errors as shown below for the example of HCl.
For HCl, a maximum around 860 mS is obtained for a concentration of
about 19% (see the curve on the next page). Two calibrations have been
performed using 3 standards each. The two calibration curves obtained are
represented in dashed lines on the conductance = f (concentration) curve
(see next page).
When performing measurements on a 32 % HCl sample using calibration
no. 1, the CDM230 measures a conductance of 720 mS and finds a concentration of 10% instead of 32%. The correct result (32%) is obtained if
sample measurements are performed using calibration no. 2.
8.12
Concentration in % by weight
40
32
30
Calibration
no. 2
20
Cmax
Calibration
no. 1
10
0
120
240
360
480
600
720
840
960
Conductance at 25˚C in mS
Concentration versus conductance for a HCl solution
Recommendations:
To obtain accurate measurements in concentrated samples, some precautions must be taken:
1)
For the sample analysed, you must know if the conductance =
f (concentration) curve shows a maximum for the conductance. If it is
the case, the concentration value Cmax must be known.
2)
A calibration on 3 standards must be performed with the following
recommendation: the 3 standard concentrations must be greater or
less than the Cmax value.
8.13
List of references:
(1)
Pure Water correction (ASTM D1125-91).
(2)
Natural Water temperature correction (ISO/DIN 7888)
Bibliography: WAGNER, R. Temperaturkorrekturfaktoren für die
elektrische Leitfähigkeit von Wässern. Z. Wasser - Abwasserforsch.
(2) 1980.
(3)
Standard methods for the examination of water and wastewaters,
18th Edition 1992 (Editors: Arnold E. Greenberg, Lenore S. Clesceri,
Andrew D. Eaton), 2520D "Algorithm of practical salinity".
(4)
Standard methods for the examination of water and wastewaters,
18th Edition 1992 (Editors: Arnold E. Greenberg, Lenore S. Clesceri,
Andrew D. Eaton), part 2520B.
(5)
Standard methods for the examination of water and wastewaters,
18th Edition 1992 (Editors: Arnold E. Greenberg, Lenore S. Clesceri,
Andrew D. Eaton), part 2540C, page 2-55.
(6)
Standard methods for the examination of water and wastewaters,
18th Edition 1992 (Editors: Arnold E. Greenberg, Lenore S. Clesceri,
Andrew D. Eaton), part 1030F, page 1-12.
(7)
International Electrochemical Commission Draft January 1980,
Sub-Committee 66 /WG2.
and:
G. F. Hewit
Chemical Engineering Division
U.K.A.E.A. Resezarch Group
Atomic Energy Research Establishment
Harwell
October 1960.
8.14
Printouts
This chapter gives an explanation of the printouts available when a printer
is connected to the CDM230. Printout layout is described and illustrated
and information is provided about the type of data printed and when it is
printed. Specific information can be found on the following pages, and in
the order shown concerning:
•
Calibration results
•
Sample results
•
Method table
•
Edit data
•
GLP data
How to obtain printouts:
Calibration and sample measurement results are printed automatically when
a printer is connected.
Printouts are obtained by pressing the Print key during a calibration, a
sample measurement or when the method selection screen is displayed.
Printouts can also be obtained by pressing the Print key in all Edit modes.
9.1
Cell Calibration Results
The Print key can be pressed during a calibration. The live display will be
printed out, for example:
STAB
56s
117.2mS
22.4˚C
The following information is automatically printed out at the end of a cell
calibration: the instrument ID entered in Edit Print, the date and time, the
cell number, the type of calibration performed and:
.
the conductivity measured, the sample temperature or the cell constant value if Cell constant = Adjusted has been selected in Edit
Calibration.
.
the conductance measured, the sample temperature, the measurement time and the cell constant calculated if Calibrate using KCl
(NaCl or Seawater standard) has been selected in Edit Calibration.
Examples:
*** CDM230 Conductivity Meter 654R01N001
15 NOV 1995 09:48 ***
CELL CALIBRATION
Cell No.:
1
Cell Constant adjusted to calibration standard
Conductivity:
111.7 mS/cm
Cell Constant value:
1.008 cm-1
**************************************************************************
*** CDM230 Conductivity Meter 654R01N001
16 NOV 1995 11:18 ***
CELL CALIBRATION
Cell No.:
1
Cell Constant calibrated using 1 KCl
Conductance:
111.7 mS
Temperature:
22.4
C
Measurement Time:
23 s
Cell Constant value:
1.008 cm-1
**************************************************************************
Note: If the cell constant calculated is out of the range 0.050 to 15 cm-1, the
Out of range error message will appear. If the measurement signal has not
stabilised at end of the Accept time entered in Edit Calibration, the Unstable error message will be printed with the cell constant value.
9.2
Method Calibration Results
1.
TDS method
The following information is automatically printed at the end of a TDS
method calibration: the instrument ID entered in Edit Print, the date and
time, the method name (A, B or C), the cell number, the cell constant, the
TDS of the standard, the conductivity measured and corrected to 18°C for
the standard, the standard temperature, the measurement time and TDS
Factor calculated.
Example:
*** CDM230 Conductivity Meter 654R01N001
15 NOV 1995 09:48 ***
TDS CALIBRATION
Method:
Cell No.:
Cell Constant:
TDS of standard:
Conductivity:
Temperat
Measurement Time:
TDS Factor:
A
1
0.5288 cm-1
501.1 mg/l
0.911 mS/cm
25.0
ure:
C
23 s
0.55 mg/l
**************************************************************************
Note: If the TDS Factor calculated is out of the range 0.010 / 9.999, the
TDS Factor value will be replaced by the Out of range error message. If
the measurement signal has not stabilised at the end of the Accept time
entered in Edit Calibration, the Unstable error message will be printed with
the TDS Factor value.
9.3
2.
Concentration method
The following information is automatically printed out at the end of a Concentration method calibration: the instrument ID entered during Edit Print,
the date and time, the method name (A, B or C), the cell number.
A table is also printed out with the standard number (1, 2 or 3), the concentration of the standard in the unit selected in Edit Method, the standard
temperature, the conductivity measured in the standard and the measurement time.
The calibration results (concentration coefficients calculated) are printed
out below the table.
Example:
*** CDM230 Conductivity Meter 654R01N001
16 NOV 1995 15:18 ***
CONCENTRATION CALIBRATION
Method:
Cell No.:
Cell Constant:
Standard
No.
1
2
3
A
1
0.5288 cm-1
Concentration
mg/l
1.011
1.022
1.033
Coefficient A0:
Coefficient A1:
Coefficient A2:
Temp Conductivity
˚C
Meas.
min:s
25.0
25.0
25.0
00:21
00:22
00:20
1.059 mS/cm
0.881 mS/cm
0.757 mS/cm
1.157E+00
-2.286E-04
8.584E-08
**************************************************************************
9.4
Sample Results
1.
For AUTOREAD measurements: the following information is automatically printed out at the end the measurement: the instrument ID
entered in Edit Print, the method name (A, B or C), the cell number,
the date and time of the last cell calibration performed, the date and
time of the last method calibration performed (for a TDS or a Concentration method), the last cell calibration result (cell constant value)
and the last method calibration results (for a TDS or a Concentration
method). A table is also printed out with the sample number, the
result, the reference temperature used for temperature correction, the
sample temperature, the type of measurement error (if relevant), the
measurement duration and time.
Example: for a Conductivity method:
*** CDM230 Conductivity Meter 654R01N001
4 DEC 1995
09:48 ***
SAMPLE
Method:
Cell No.:
Mode:
Last Cell calibration:
Cell Constant value:
Sample
No.
6
Result
B
1
Conductivity
28NOV95 - 08:42
1.008 cm-1
Error
102.2 mS/cm
Temp
˚C
Meas.
mm:ss
23.1 00:23
Time
hh:mm:ss
09:49:02
**************************************************************************
Notes :
.
If Printout Format = Result has been entered in Edit Method, the two lines
Last Cell Calibration and Cell constant value will not be printed. For a
TDS or a concentration method, the two lines Last Method Calibration and
TDS Factor (or the lines Last Method Calibration and the 1 to 3 Coefficient lines) will also not be printed
.
The Out of range message will be printed out in the Error column if the measurement is above or below the CDM230 specifications or if the measurement is
above the conductance range selected.
The Unstable message will be printed out in the Error column if the measurement signal has not stabilised at end of the Accept time entered in
Edit Sample.
9.5
2.
For AT INTERVALS measurements: the following information is
automatically printed out at the end the measurement: the instrument ID entered in Edit Print, the method name (A, B or C), the cell
number, the date and time of the last cell calibration performed (if
Printout Format = All), the last cell calibration result (if Printout
Format = All), the date and time of the last method calibration performed (for a TDS or a Concentration method and if Printout Format
= All), the last cell calibration result (if Printout Format = All) and
the last method calibration results (for a TDS or a Concentration
method and if Printout Format = All) and the sample number.
The CDM230 prints a result line at specific time intervals (Print Interval entered
during Edit Sample). This line comprises the result, the sample temperature, the
time of the measurement and the "STAB" stability indicator showing if the
measurement is stable when printed.
Example of printout for a Conductivity method and if
Printout Format = All:
*** CDM230 Conductivity Meter 654R01N001
4 DEC 1995
09:48 ***
SAMPLE
Method:
Cell No.:
Mode:
Last Cell calibration:
Cell Constant value:
B
1
Conductivity
28NOV95 - 08:42
1.008 cm-1
Sample No.:
6
104.7 mS/cm
22.4 C
09:48:24
ST..
The measurements are printed at specific time intervals (e.g. every 10 s):
104.7 mS/cm
104.7 mS/cm
22.4 C
22.4 C
09:48:34
09:48:44
STA.
STAB
**************************************************************************
3.
For MANUAL measurement: the printout equivalent to an
AUTOREAD measurement is obtained after a pressing ✓. If the ✓
key is pressed a second time, a new measurement starts and you
can print a second line in the result table by pressing the ✓ key again
and so on.
9.6
Method Table
If you press the Method key followed by Print, the CDM230 will print a
table summarizing the three methods.
The table describes each method with method name, measurement mode,
cell number, cell constant value, date of the last cell calibration performed,
date of the last method calibration performed, type of sample measurements (AUTOREAD, AT INTERVALS or BY PRESSING ✓), reference
temperature if a temperature compensation is programmed.
*** CDM230 Conductivity Meter 654R01N001
Method
A
B
C
Mode
Conductivity
Resistivity
Concentration
Cell Cell K Cell
No.
cm-1
cal
1
1
2
1.020
0.887
1.020
30NOV95
Meth
cal
Sample
Result
09:42 ***
Ref.
Temp
17NOV95
Manual 25˚ C
10NOV95
Autoread 25˚ C
28NOV95 28NOV95 Interval 25˚ C
**************************************************************************
Edit Data
To print the Edit Data:
.
enter in Edit Method, Calibration, Sample, Tref or Print by holding
down the appropriate key (Method, Cal, Sample, Tref or Print) for 3
seconds.
.
press the Print key.
Example of printouts obtained for a Conductivity method:
Edit Method:
*** CDM230 Conductivity Meter 654R01N001
4 DEC 1995 09:51 ***
METHOD
Method:
Cell No.:
Mode:
Unit:
Range selection:
Printout Format:
Warning Beep:
Result Beep:
A
1
Conductivity
S/cm
Autorange
All
No
No
**************************************************************************
9.7
Edit Calibration:
*** CDM230 Conductivity Meter 654R01N001
4 DEC 1995 09:54 ***
CELL CALIBRATION
Cell No:
1
Cell Constant value:
1.0008 cm-1
Cell Constant adjusted to calibration standard
Calibrate Every:
7 day(s)
Cable resistance:
0 Ω
Cable capacitance:
0 pF
**************************************************************************
Edit Sample:
*** CDM230 Conductivity Meter 654R01N001
4 DEC 1995 09:57 ***
SAMPLE
Method:
Cell No.:
Mode:
Sample result:
Stability Criterion:
Accept Time:
Pure Water Correction:
B
1
Resistivity
Autoread
1.0%/min
60 s
No
**************************************************************************
Edit Tref :
*** CDM230 Conductivity Meter 654R01N001
4 DEC 1995 09:59 ***
TEMPERATURE CORRECTION
Method:
Cell No.:
Mode:
Temperature Correction:
Reference Temperature:
Temperature Coefficient:
B
1
Resistivity
Enter below
25˚C
2.20%/¡C
**************************************************************************
Edit Print
*** CDM230 Conductivity Meter 654R01N001
4 DEC 1995 10:02 ***
PRINTER
Printer Output:
9600,n,8,1
**************************************************************************
Note: The Edit GLP parameters cannot be printed.
9.8
GLP Data
Cell calibration data:
1.
Press the GLP key.
2.
Select CELL with the left or right arrow keys.
3.
Press the Print key.
A table is printed out with the last 5 calibration results for the cell selected.
Example of printout obtained for a Conductivity method:
*** CDM230 Conductivity Meter 654R01N001
4 DEC 95
09:42 ***
GLP, CELL CALIBRATION
Cell No:
GLP Constant
No.
cm-1
1
Calibration
mode
Value
measured
Temp Time Date
˚ C h:min
Cable Cable
pF
1
1.1629
1 KCl
95.7mS
25.0 09:37 04DEC95 0.000
0
2
1.1631
1 KCl
95.5mS
25.0 10:02 31NOV95 0.000
0
3
1.1688
1 KCl
95.2mS
25.0 11:31 24NOV95 0.000
0
4
0.5288
Seawater Std 100.3mS
25.0 09:57 24NOV95 0.000
0
5
0.4220
1.408mS/cm 25.0 09:01 24NOV95 0.000
0
Adjusted
**************************************************************************
9.9
TDS calibration data:
1.
Select a TDS method then press the GLP key.
2.
Select METHOD with the left or right arrow keys.
3.
Press the Print key.
A table is printed out with the last 5 calibration results for the TDS
method selected.
Note : In the "Value measured" column, the conductivity measured and
corrected to 18°C is printed.
*** CDM230 Conductivity Meter 654R01N001
4 DEC 95
10:12 ***
GLP, TDS CALIBRATION
Method:
GLP
No.
TDS
factor
A
Cell Standard
No.
mg/l
Value
measured
Temp Time Date
˚ C h:min
1
0.576
1
501.1
0.870mS/cm 25.0 09:37 04DEC95
2
0.574
1
501.1
0.872mS/cm 25.0 10:02 31NOV95
3
0.574
1
501.1
0.872mS/cm 25.0 11:31 24NOV95
**************************************************************************
Concentration method calibration data:
1.
Select a Concentration method then press the GLP key.
2.
Select METHOD with the left or right arrow keys.
3.
Press the Print key.
A table is printed out with the last 5 calibration results for the concentration method selected.
*** CDM230 Conductivity Meter 654R01N001
4 DEC 95
10:12 ***
GLP, CONCENTRATION CALIBRATION
Method:
GLP
No.
Coefficient
A
Cell
No.
Standard
Time
Date
No. Concentration Conductivity Temp h:min
˚C
1
A1 2.294E-04
1
1
1.011mg/l
4.41mS/cm
25.0 09:37 04DEC95
2
A0 1.300E+00
A1 -1.015E-04
A2 8.149E-09
1
1
2
3
1.011mg/l
1.022mg/l
1.033mg/l
4.41mS/cm
4.07mS/cm
3.78mS/cm
25.0 09:04 04DEC95
25.0
25.0
3
A0 1.157E+00
A1 -2.286E-04
A2 8.584E-08
1
1
2
3
1.011mg/l
1.022mg/l
1.033mg/l
1.059mS/cm
0.882mS/cm
0.757mS/cm
25.0 08:15 04DEC95
25.0
25.0
9.10
**************************************************************************
GLP Sample data:
1.
Press the GLP key.
2.
Select Sample with the left or right arrow keys.
3.
Press the Print key.
The GLP table is printed. The table can contain up to 50 sample results for
all methods. The last result obtained is printed on the first line (GLP n°1)
and the oldest result is printed on the last line of the table.
If an error occurred during the measurement, an error number will be shown
in the table and the corresponding message will be printed below.
Note: PWC means Pure Water Correction
*** CDM230 Conductivity Meter 654R01N001
4 DEC 95
10:12 ***
GLP, SAMPLE
Method:
Mode:
A
Conductivity
GLP Range Smp. Cell Offset
No.
No. No.
Result
1
40mS
17
1
11.12
mS/cm
2
4mS
16
1
-0.023
mS/cm
3
40mS
15
4
40mS
5
6
Error
Meas. Temp Tref PWC Time
min:s ˚ C
˚C
h:min
Date
00:24 25.0
25
No 03:38 04DEC95
2
00:12 25.0
25
No 03:32 04DEC95
1
1
00:40 25.0
25
No 03:29 04DEC95
14
1
1
00:20 25.0
25
No 03:26 04DEC95
40mS
13
1
12.51
mS/cm
00:21 25.0
25
No 03:23 04DEC95
40mS
12
1
10.01
mS/cm
00:22 25.0
25
No 03:20 04DEC95
2
Error 1: Out of range
Error 2: Unstable
**************************************************************************
9.11
Troubleshooting and Maintenance
A number of tests are automatically performed when the CDM230 is switched
on, during calibration and during measurement. If a problem is detected, an
error or warning message will appear on the display. The messages are listed
below.
By pressing the ✓ key, the CDM230 will normally return to the operational
state in which the error was detected. This makes it possible to correct the
error and immediately resume operation.
Error and Warning Messages
Message
Problem / Action
BATTERY LOW !
The battery is run down and must be
replaced as described on page 10.5.
Replace the battery and press the ✓ key.
MEMORY ERROR !
DATA MEMORY
or
MEMORY ERROR !
GLP MEMORY
This message is displayed at power on if
the instrument detects an error in the data
stored in the non volatile memory. This
message is generally displayed after a
battery failure.
Press the ✓ key.
The default values are then used instead of
the erroneous data. If this error remains displayed after a battery change, please
contact your local RADIOMETER
representative.
NEW CELL CAL
REQUIRED
The last cell calibration performed is older
than the Calibrate every parameter entered
during Edit Calibration mode.
Press the Cal key to start a calibration.
NEW METHOD CAL
REQUIRED
The last TDS or CONCENTRATION method
calibration performed is older than the
Calibrate every parameter entered during
Edit Calibration mode.
Press the Cal key to start a calibration.
10.1
PRINTER ERROR
If a printer is connected and data transmission cannot be performed properly, this
message will appear.
Check that the printer is on line and that the
paper is in place.
SAME STANDARD
CHANGE STANDARD
During calibration of a concentration
method, the conductivity measured in a
standard and the next one differ by less
than 0.5%.
Calibration using the correct second
standard can be initiated after pressing ✓.
TEMP. CHANGED
REPEAT MEAS.
During calibration of a concentration
method, the temperature difference
between two standards is more than 1°C.
The standards used for calibration must be
at the same temperature (use a thermostatted bath).
If the temperature is entered manually,
make sure you enter the same temperature
for your standards while performing the
method calibration.
TEMP. CORRECTION
NOT POSSIBLE
During cell calibration, if one of the five
Calibrate using options is used and the
calibration temperature measured or entered is above or below the CDM230
specifications for the standard selected (see
page 7.6).
Modify the calibration temperature and
press the ✓ or Cal key to start a calibration.
TEMP. CORRECTION
NOT POSSIBLE
During measurements, this message is
displayed if a temperature correction is
selected and the sample temperature is out
on the [-2 / +35°C] range for a Natural water
correction or does not satisfy the condition
of page 9.4 for linear temperature correction. After correcting the fault, press the ✓
key or Tref to continue.
10.2
UNSTABLE
During AUTOREAD measurements, if the
Stability criterion is not satisfied at the
end of the Accept time entered in Edit
Sample mode.
During AT INTERVALS measurements, if
the Stability criterion is not satisfied at
the end of the Print interval or Stop print
after entered in Edit Sample mode.
Check cell connections, cell and stirring
conditions. You may also edit the Sample
parameters (increase the Stability criterion, or Accept time ).
After correcting the fault, press the ✓ or
the Sample key to continue.
OUT OF RANGE
(during measurements)
This message appears if the
measurements are above or below the
CDM230 specifications (see appendix 6).
If the conductivity range is selected
manually, this message appears when the
conductance measurements are above the
range selected.
Check the condition of the cell and connection (cell input). Select a higher conductance range in the Edit Method mode
(see pages 7.3 and 7.4) or from the
method selection display (see page 2.2).
OUT OF RANGE
(after a Cell Calibration)
This message appears if the cell constant
calculated is outside the 0.05 to 15 cm-1
range.
Check the condition of the cell and connection (cell input).
Check the concentration of the standard.
10.3
OUT OF RANGE
(during TDS Calibration)
This message appears if the TDS factor
calculated is outside the 0.010 to 9.999
range.
Check the condition of the cell and connection (cell input).
Check the TDS of the standard.
$$$$
During sample measurements, figures will
be replaced by $ signs if the number of
figures obtained exceeds the number
which can be shown on the CDM230
display.
Check the condition of the cell and connection (cell input).
Start a new sample measurement, if the
$$$$ remains displayed, start a cell
calibration and a method calibration (if
using a TDS or Concentration method).
Immunity interference
When using the Conductivity meter CDM230 in heavy industry: a high
level electromagnetic field (>10 V/m) may impair the operation of the
conductivity meter. The situation is temporary, operation will return to
normal within a few seconds.
10.4
Conductivity/Resistivity Tables
Table 1.
Conductivity (in mS/cm) of varying Demal concentrations of 1 D, 0.1 D and 0.01 D KCl solutions
Temp
(°C)
KCl (**)
1D
KCl (*)
0.1 D
0
65.14
7.13
0.773
1
66.85
7.34
0.796
2
68.58
7.56
0.820
3
70.32
7.77
0.843
4
72.07
7.98
0.867
5
73.84
8.20
0.891
6
75.62
8.42
0.915
7
77.41
8.64
0.940
8
79.21
8.86
0.965
9
81.03
9.08
0.989
10
82.85
9.31
1.014
11
84.68
9.54
1.039
12
86.54
9.76
1.065
13
88.39
9.99
1.090
14
90.26
10.22
1.116
15
92.13
10.46
1.142
16
94.02
10.69
1.168
17
95.91
10.93
1.194
18
97.81
11.16
1.220
19
99.72
11.40
1.247
20
101.63
11.64
1.273
21
103.56
11.88
1.300
22
105.49
12.12
1.327
A1.1
KCl (*)
0.01 D
Table 1......Continued
Temp
(°C)
23
KCl (**)
1D
107.42
KCl (*)
0.1 D
12.36
KCl (*)
0.01 D
1.354
24
109.36
12.61
1.381
25
111.31
12.85
1.409
26
113.27
13.10
1.436
27
115.22
13.35
1.464
28
13.59
1.491
29
13.84
1.519
30
14.09
1.547
31
14.34
1.575
32
14.59
1.603
33
14.85
1.632
34
15.10
1.660
35
15.35
1.688
36
15.61
1.717
37
15.86
1.745
38
16.12
1.774
39
16.37
1.803
40
16.63
1.832
41
16.89
1.861
42
17.15
1.890
43
17.40
1.919
44
17.66
1.948
45
17.92
1.977
46
18.18
2.007
47
18.44
2.036
48
18.70
2.065
49
18.96
2.095
50
19.22
2.124
A1.2
Table 2.
Resistivity (in Ω•cm) of varying Demal concentrations of 1 D, 0.1 D and 0.01 D KCl solutions
Temp
(°C)
KCl (**)
1D
KCl (*)
0.1 D
KCl (*)
0.01 D
0
15.35
140.16
1293.51
1
14.96
136.17
1255.81
2
14.58
132.36
1219.94
3
14.22
128.73
1185.76
4
13.87
125.26
1153.18
5
13.54
121.95
1122.09
6
13.22
118.79
1092.39
7
12.98
115.76
1064.01
8
12.62
112.86
1036.86
9
12.34
110.08
1010.87
10
12.07
107.43
985.97
11
11.81
104.87
962.10
12
11.56
102.42
939.21
13
11.31
100.07
917.23
14
11.08
97.81
896.13
15
10.85
95.63
875.84
16
10.64
93.54
856.33
17
10.43
91.53
837.57
18
10.22
89.59
819.50
19
10.03
87.72
802.10
20
9.84
85.92
785.33
21
9.96
84.18
769.16
22
9.48
82.50
753.56
23
9.31
80.88
738.50
24
9.14
79.32
723.97
25
8.98
77.81
709.93
26
8.83
76.35
696.36
A1.3
Table 2......Continued
Temp
(°C)
27
KCl (**)
1D
8.68
KCl (*)
0.1 D
74.94
KCl (*)
0.01 D
683.24
28
73.57
670.56
29
72.25
658.28
30
70.97
646.40
31
69.73
634.90
32
68.52
623.75
33
67.36
612.95
34
66.23
602.48
35
65.14
592.33
36
64.08
582.49
37
63.04
572.93
38
62.04
563.66
39
61.07
564.65
40
60.13
545.91
41
59.21
537.42
42
58.32
529.16
43
57.46
521.14
44
56.62
513.33
45
55.80
505.75
46
55.00
498.37
47
54.23
491.18
48
53.47
484.19
49
52.74
477.39
50
52.02
470.76
(*) Reference: "Organisation Internationale de Métrologie Légale (OIML)",
Recommendation n°56 and "The National Institute of Standards and
Technology (NIST)", Journal of Solution Chemistry, Vol. 20, no. 4, 1991.
(**) For the 1 Demal KCl solution: Extrapolation of the NIST results from
OIML conductivity values at 0°C, 18°C and 25°C
A1.4
Table 3.
Conductivity (in mS/cm) of varying molar concentrations of KCl solutions
Temp
(°C)
KCl
KCl
1M
-1
10 M
KCl
KCl
-2
2 x 10 M
10-2M
0
65.41
7.15
1.521
0.776
1
67.13
7.36
1.566
0.800
2
68.86
7.57
1.612
0.824
3
70.61
7.79
1.659
0.848
4
72.37
8.00
1.705
0.872
5
74.14
8.22
1.752
0.896
6
75.93
8.44
1.800
0.921
7
77.73
8.66
1.848
0.945
8
79.54
8.88
1.896
0.970
9
81.36
9.11
1.945
0.995
10
83.19
9.33
1.994
1.020
11
85.04
9.56
2.043
1.045
12
86.89
9.79
2.093
1.070
13
88.76
10.02
2.142
1.095
14
90.63
10.25
2.193
1.121
15
92.52
10.48
2.243
1.147
16
94.41
10.72
2.294
1.173
17
96.31
10.95
2.345
1.199
A1.5
Table 3......Continued
Temp
KCl
KCl
(°C)
1M
-1
10 M
2 x 10 M
18
98.22
11.19
2.397
1.225
19
100.14
11.43
2.449
1.251
20
102.07
11.67
2.501
1.278
21
104.00
11.97
2.553
1.305
22
105.94
12.15
2.606
1.332
23
107.89
12.39
2.659
1.359
24
109.84
12.64
2.712
1.386
25
111.80
12.88
2.765
1.413
26
113.77
13.13
2.819
1.441
27
115.74
13.37
2.873
1.468
28
13.62
2.927
1.496
29
13.87
2.981
1.524
30
14.12
3.036
1.552
31
14.37
3.091
1.581
32
14.62
3.146
1.609
33
14.88
3.201
1.638
34
15.13
3.256
1.667
35
15.39
3.312
36
15.64
3.368
A1.6
KCl
KCl
-2
10-2M
Table 4.
Resistivity (in Ω•cm) of varying molar concentrations of KCl solutions
Temp
KCl
KCl
(°C)
1M
-1
10 M
2 x 10 M
0
15.29
139.86
657.46
1288.66
1
14.90
135.87
638.57
1250.00
2
14.52
132.10
620.35
1213.59
3
14.16
128.37
602.77
1179.25
4
13.82
125.00
586.51
1146.79
5
13.49
121.66
570.78
1116.07
6
13.17
118.48
555.56
1085.78
7
12.87
115.47
541.13
1058.20
8
12.57
112.61
527.43
1030.93
9
12.29
109.77
514.14
1005.03
10
12.02
107.18
501.50
980.39
11
11.76
104.60
489.48
956.94
12
11.51
102.15
477.78
934.58
13
11.27
99.80
466.85
913.24
14
11.03
97.56
456.00
892.06
15
10.81
95.42
445.83
871.84
16
10.59
93.28
435.92
852.51
17
10.38
91.32
426.44
834.03
18
10.18
89.37
417.19
816.33
19
9.99
87.49
408.33
799.36
A1.7
KCl
KCl
-2
10-2M
Table 4......Continued
Temp
KCl
KCl
(°C)
1M
-1
10 M
2 x 10 M
10-2M
20
9.80
85.69
399.84
782.47
21
9.62
83.96
391.70
766.28
22
9.44
82.31
383.73
750.75
23
9.27
80.71
376.08
735.84
24
9.10
79.11
368.73
721.50
25
8.94
77.64
361.66
707.71
26
8.79
76.16
354.74
693.96
27
8.64
74.79
348.07
681.20
28
73.42
341.65
668.45
29
72.10
335.46
656.17
30
70.82
329.38
644.33
31
69.59
323.52
632.51
32
68.40
317.86
621.50
33
67.20
312.40
610.50
34
66.09
307.13
599.88
35
64.98
301.93
36
63.94
296.91
A1.8
KCl
-2
KCl
Table 5.
Average temperature coefficients of standard electrolyte solutions expressed as %/°C of the conduc
tivity value at 25°C
Temperature
KCl
KCl
KCl
Saturated
Range °C
1M
0.1 M
0.01 M
NaCl
1.735
1.863
1.882
15 - 25 - 35
1.730
*(15 - 27)
1.906
1.937
2.041
*(15 - 34)
25 - 35
1.730
*(25 - 27)
1.978
1.997
2.101
*(25 - 34)
15 - 25
1.981
* Temperature range °C
Table 6.
Average temperature coefficients of standard electrolyte solutions expressed as %/°C of the resistivity
value at 25°C
Temperature
KCl
KCl
KCl
Range °C
1M
0.1 M
0.01 M
15 - 25
- 2.09
- 2.30
-2.33
15 - 25 - 35
- 2.02
*(15 - 27)
-1.92
-1.98
*(15 - 34)
25 - 35
-1.63
* Temperature range °C
A1.9
-1.69
*(25 - 34)
Table 7.
Conductivity (in µS/cm) and resistivity (in Ω•cm)
values of a 0.05% NaCl solution
Temp
(°C)
0
Conductivity
Resistivity
540.40
1850.47
1
557.73
1792.97
2
575.20
1738.54
3
592.79
1686.93
4
610.53
1637.93
5
628.40
1591.35
6
646.40
1547.02
7
664.55
1504.78
8
682.83
1464.48
9
701.26
1426.01
10
719.82
1389.23
11
738.53
1354.05
12
757.37
1320.36
13
776.36
1288.07
14
795.48
1257.11
15
814.74
1227.38
16
834.14
1198.83
17
853.68
1171.39
18
873.36
1145.00
19
893.18
1119.60
20
913.13
1095.13
21
933.22
1071.56
22
953.44
1048.83
23
973.80
1026.91
24
994.28
1005.75
25
1014.90
985.31
26
1035.65
965.57
A1.10
Table 7......Continued
Temp
(°C)
27
Conductivity
Resistivity
1056.53
946.49
28
1077.54
928.04
29
1098.67
910.19
30
1119.92
892.92
31
1141.30
876.19
32
1162.80
859.99
33
1184.41
844.30
34
1206.15
829.09
35
1228.00
814.34
36
1249.96
800.03
37
1272.03
786.15
38
1294.21
772.67
39
1316.49
759.59
40
1338.89
746.89
41
1361.38
734.55
42
1383.97
722.56
43
1406.66
710.90
44
1429.44
699.57
45
1452.32
688.55
46
1475.29
677.83
47
1498.34
667.40
48
1521.48
657.25
49
1544.71
647.37
50
1568.01
637.75
51
1591.39
628.38
52
1614.84
619.25
53
1638.37
610.36
54
1661.97
601.70
55
1685.63
593.25
A1.11
Table 7......Continued
Temp
(°C)
56
Conductivity
Resistivity
1709.36
585.02
57
1733.15
576.99
58
1756.99
569.15
59
1780.90
561.51
60
1804.85
554.06
61
1828.86
546.79
62
1852.92
539.69
63
1877.02
532.76
64
1901.16
525.99
65
1925.34
519.39
66
1949.56
512.94
67
1973.82
506.63
68
1998.10
500.47
69
2022.42
494.46
70
2046.76
488.58
71
2071.13
482.83
72
2095.52
477.21
73
2119.93
471.71
74
2144.35
466.34
75
2168.79
461.09
76
2193.24
455.95
77
2217.71
450.92
78
2242.17
446.00
79
2266.65
441.18
80
2291.12
436.47
81
2315.60
431.85
82
2340.08
427.34
83
2364.55
422.91
84
2389.02
418.58
A1.12
Table 7......Continued
Temp
(°C)
85
Conductivity
Resistivity
2413.47
414.34
86
2437.92
410.19
87
2462.36
406.11
88
2486.79
402.13
89
2511.20
398.22
90
2535.59
394.38
91
2559.97
390.63
92
2584.33
386.95
93
2608.66
383.34
94
2632.98
379.80
95
2657.27
376.33
96
2681.54
372.92
97
2705.78
369.58
98
2729.99
366.30
99
2754.18
363.08
100
2778.34
359.93
Reference: G.F. Hewitt, Chemical Engineering Division, U.K.A.E.A
Research Group Atomic Energy Research Establishment, HARWELL,
U.K., Oct 1960
A1.13
Connection of Peripherals
The CDM230 Conductivity Meter is equipped with sockets for connection
of a Printer/Personal computer and a recorder. In this chapter, you will find
a description of the pin layout of these sockets. The pin layout of the other
CDM230 sockets are also described here. The sockets on the rear panel are
illustrated on page 1.1.
Printer / PC
9-pin, sub D-connector (see also page 1.4).
Cable for printer connection: A95P201 (for an Epson LX800) or A95P203 (for
the RADIOMETER ANALYTICAL PRS15 printer).
Cable for Personal computer connection: A95X501 (9-9 pin) or A95X502 (925 pin)
Pin connections:
1
6
5
9
1. No connection
2. Receiving Data (input):
RxD
3. Transmitted Data (output):
TxD
4. Data Terminal Ready (output):
DTR
5. Ground:
GND
6. No connection:
DSR
7. Request to Send (output):
RTS
8. Clear to Send (input):
CTS
9. No connection
POWER IN input: 6-pin DIN input DC power supply for the CDM230.
3
Pin connections:
3. 0 V (ground)
6. -12 V.
CDM230 power requirements:
12 V, 800 mA
6
A2.1
POWER OUT output: 6-pin DIN socket for connection of the SAM7
Sample Stand (cable part no.: A95A110).
3
Pin connections:
3. Electrical zero
6. -12 V, 300 mA max
6
RECORDER output: 8-pin DIN socket for connection of a recorder
(cable part no.: A95R102). The CDM230 has 2 types of analogue output
signals.
Pin connections:
1
1. Direct analogue output proportional to the
conductance measured by the CDM230.
2000 mV corresponds to the nominal
2
value of the conductance range.
5
On the 2 S range, 1000 mV corresponds
to 2 S.
2. Calibrated analogue output proportional to
the conductivity displayed on the
CDM230. 2 digits on the displays (i.e. the
difference between the 2 displays "0000"
and "0002") correspond to 0.25 mV.
Maximum potential output: 1 V.
For resistivity measurements, this pin
outputs 0 V irrespective of the resistivity
displayed.
5. 0 V
Calibrated analogue output: examples of potential output (E) between
pins 2 and 5 when working on the 4 mS conducance range:
Displayed conductivity = 2.000 mS/cm: E = 250 mV.
Displayed conductivity = 1.500 mS/cm: E = 187.5 mV.
Displayed conductivity = 4.000 mS/cm: E = 500 mV.
Displayed conductivity = 6.000 mS/cm: E = 750 mV.
Displayed conductivity = 7.998 mS/cm: E = 999.75 mV.
Displayed conductivity = 8.000 mS/cm: E = 1 V.
Displayed conductivity = 9.447 mS/cm: E = 1 V.
Displayed conductivity = 12.78 mS/cm: E = 1 V.
A2.2
CELL input: 6-pin DIN socket for connection of the conductivity cell with 2
or 4 poles and a temperature sensor.
3
2
4
6
1
5
Pin connections:
1. Pole no. 1
2. Pole no. 2
3. Pole no. 3
4. Pole no. 4, also connected to pin no. 5
5. 0 V (ground)
6. Temperature sensor
Potential imposed between poles 2 and 3: ±200 mV constant for all ranges
except the 2 S range: ±40 mV constant
The current passing through poles 1 and 4 is measured. The potential
between poles 1 and 4 cannot exceed 3 V in absolute value.
Temperature sensor input:1 CINCH socket
Connecting the VIT90 Video Titrator to the CDM230
Conductivity Meter
Connect the cable between the CDM230 PRINTER/PC terminal and the
BURETTE I/O terminal no. 3 on the VIT90 (see pin layout of connecting cable
part no. A95A220 below).
2 - Rx
1
3 - Tx
3
9-pin female
4 - DTR
connector
to the CDM230 5 - 0V
2
4
6 - DSR
5-pin male
connector
to the VIT90
5
NOTE:
The CDM230 must be set to 2400 baud (press the Print key for 3 seconds
and select with the left or right arrow key).
The AUTORANGE mode should be selected for conductivity measurements.
A2.3
Default Values
The default values are those which are used when the error message
MEMORY ERROR - DATA MEMORY is displayed for example after a
battery failure. The default data are displayed below :
Edit mode options
Parameter
Value
Method
Cell number
Method type
Range mode
Unit selection
Printout format
Warning beep
Result beep
Reset method
Cell 1
Conductivity
Autorange
S/cm
Result
No
No
No
Calibration
Calibration mode
Cell constant value
Cable resistance
Cable capacitance
Cell const. = Entered
1 cm-1
0.000 Ω
0 pF
Sample
Sample result
Stability criterion
Accept time
Pure water correction
Autoread
1.0 %/min
60 s
No
Tref
Temperature correction
Reference temperature
Temperature coefficient
Enter below
25°C
2.20%/°C
GLP
Keyboard beep
No
Print
Printer output
Instrument ID
9600, n, 8, 1
654R---N000
Other parameters
Current method : A, language: English, next sample no.: 1, Sample
temperature: 25°C
A3.1
Remote Control using a PC
Connect the CDM230 printer output to a serial port on the PC using the
RADIOMETER ANALYTICAL cable, part no. A95X501 or A95X502
(A95X501 for PC with a 9-pin serial port and A95X502 for PC with a 25-pin
serial port).
Data transmission:
Two options are available. The option is set in the Edit Print mode
(see chapter 6):
.
8 data bits, 1 stop bit, no parity. Baud rate: 9600
.
7 data bits, 1 stop bit, even parity. Baud rate: 2400
Note: All the commands given in the table below must be followed by a
Carriage Return.
Keyboard emulation:
Switch on the CDM230 and send the >CE command first (answer: <CE): the
remote control is now active.
Command
Answer
Comments
>M
<M
Method key (routine mode)
>T
<T
Tref key (routine mode)
>C
<C
Cal key (routine mode)
>S
<S
Sample key (routine mode)
>G
<G
GLP key (routine mode)
>P
<P
Print key (routine mode)
>K
<K
✓ key
>L
<L
Left arrow key
>R
<R
Right arrow key
>U
<U
Up arrow key
>D
<D
Down arrow key
>m
<m
Method key (edit mode)
>t
<t
Tref key (edit mode)
>c
<c
Cal key (edit mode)
>s
<s
Sample key (edit mode)
A4.1
Command
Answer
Comments
>g
<g
GLP key (edit mode)
>p
<p
Print key (edit mode)
The >KD command (answer: <KD) disables the instrument keyboard.
After this command is received, the keyboard is inactive. Sending the
>KE (answer: <KE) will enable the CDM230 keyboard again.
A4.2
Accessories
Accessories Supplied
The CDM230 comes in different versions depending on the power adapter
to be used.
CDM230 Conductivity Meter, 115 V version (R21M041) including:
Adapter 115 V 60 Hz / Unregulated 12 V, 1 A
A66B002
CDM230 Conductivity Meter, 230 V version (R21M040) including:
Adapter 230 V 50 Hz / Unregulated 12 V, 1 A
A66B001
Accessories Available
The following accessories are available to make a complete MeterLab setup:
SAM7
Sample Stand
391-543
Power supply cable from CDM230 to SAM7
A95A110
CDC641T
Conductivity Cell with built-in temperature
sensor ; platinised
B15B001
CDC741T
Conductivity Cell, 2 poles ; platinised,
built-in temperature sensor, 3 m cable
MAB6 plug
CDC745-9
E61M012
Conductivity Cell, 2 poles ; platinised ;
epoxy body ; screw cap
E61M013
CDC565
Conductivity Cell, 4 poles
E61M003
CDC865
Conductivity Cell, 4 poles ; platinised
E61M004
T201
Temperature Sensor
E51M001
CL136
Electrode cable FX / coax 1m / MAB6
A94L136
CL336
Electrode cable FX / coax 3m / MAB6
A94L336
A5.1
Plug Adapter UHF-F/MAB6-M
A94P001
Printer cable, 9-25 pin
A95P201
PC cable, 9-25 pin
A95X502
PC cable, 9-9 pin
A95X501
Recorder cable
A95R102
Cable for VIT90 to CDM230
A95A220
Conductivity standard, 500 ml, 1 Demal KCl
S51M001
Conductivity standard, 500 ml, 0.1 Demal KCl
S51M002
Conductivity standard, 500 ml, 0.01 Demal KCl
S51M003
Conductivity standard, 500 ml, 0.05% NaCl
S51M004
KS910
0.1 M KCl solution, 500 ml
C20C250
KS920
0.1 M KCl solution, 500 ml
C20C270
KS930
0.1 M KCl solution, 500 ml
C20C280
A5.2
Specifications
Measuring range, conductivity
0.001 µS/cm to 2.000 S/cm with a cell constant of 1 cm-1.
Automatic or manual range selection.
Seven conductance ranges: 4.000 µS, 40.00 µS, 400.0 µS, 4.000 mS,
40.00 mS, 400.0 mS and 2.000 S
Measuring range, resistivity
0.5 Ω•cm to 500 MΩ•cm with a cell constant of 1 cm-1.
Automatic range selection.
Measuring range, salinity
2.00 to 42.00 with a cell constant of 1 cm-1.
Automatic range selection.
Measuring range, TDS
0 to 9999 mg/L with a cell constant of 1 cm-1.
Automatic range selection.
Temperature measuring range
-9.9 °C to 99.9°C
Resolution, conductance
1/4000 full-scale
Resolution, temperature
0.1°C
Accuracy, conductivity
± 0.5% of reading ± 3 of least significant digit for the 4 µS range.
± 1% of reading ± 3 of least significant digit for the 2 S range.
± 0.2% of reading ± 3 of least significant digit for all other ranges.
Accuracy, resistivity
Typically ±1% of reading ± 3 of least significant digit.
Accuracy, temperature
± 0.3°C between 0 and 70°C and ± 0.5°C between 70 and 100°C.
A6.1
Measuring frequencies
94 Hz in 4.000 µS and 40.00 µS ranges
375 Hz in 400.0 µS range
2.93 kHz in 4.000 mS range
23.4 kHz in 40.00 mS range
46.9 kHz in 400.0 mS and 2.000 S ranges
Methods
3 programmable methods (A, B, C)
5 modes . Each method can be edited for conductivity, resistivity, Salinity, TDS or Concentration
Measurement procedures
Conductivity, resistivity, salinity, TDS or concentration reading with
sliding stability indicator
AUTOREAD mode: the result is locked on the display when the
user-selected stability criterion and/or accept time are reached.
AT INTERVALS mode: measurement reading and printing at set intervals.
BY PRESSING ✓ mode: the result is obtained manually by pressing the
✓ key.
The conductivity of pure water can be subtracted from the measurement.
Result units
Conductivity: S/cm or S/m
Resistivity: Ω•cm or Ω• m
Salinity: no unit
TDS in mg/L
Concentration:g/L, mg/L, µg/L, g/kg, mg/kg, µg/kg, %, ppm, ppb, mol/L,
mmol/L, µmol/L, mol/kg, mmol/kg, µmol/kg.
Stability criterion, AUTOREAD measurements and cell calibration
Adjustable, range: 0 to 99.9 % of measuring value per minute
Max. accept time, AUTOREAD measurements and cell calibration
Adjustable, available range: 0 to 9999 s
A6.2
Cell Calibration
3 cell constants can be entered or determined independently.
Range: 0.050 and 15.000 cm-1.
Adjustment of the cell constant against standard of your choice.
Automatic determination of the cell constant using standards of which
conductivity values against temperature are stored:
1 D KCl (temperature range: 0 to 27°C)
0.1 D KCl (temperature range: 0 to 50°C)
0.01 D KCl (temperature range: 0 to 50°C)
0.05% NaCl (temperature range: 0 to 99°C)
Seawater standard (temperature range: -2 to 35°C)
Method Calibration
TDS method calibration: The TDS Factor can be entered (range:
0.010 to 9.999) or determined using a standard of known TDS.
Concentration method calibration: Automatic determination of the
concentration coefficients by performing a calibration using 1 to 3
standards of known concentration.
Temperature correction
Linear correction by entering a reference temperature (0 to 99°C) and
a temperature coefficient (0.00 to 9.99 %/°C). Available for conductivity, resistivity and concentration methods.
Natural water correction: automatic temperature correction of the
conductivity from the sample temperature to 25°C. Available for conductivity, resistivity and concentration methods.
Cable corrections
Cable resistance: 0 to 1.999 Ω.
Cable capacitance: 0 to 1999 pF.
Data storage
3 methods each with parameters for sample measurements and calibration procedures.
GLP Functions
Complete printout with date, time, instrument ID and, if selected, calibration data.
Access to the last 5 calibrations for each cell, the last 5 calibrations
for each method and the last 50 sample measurements.
A6.3
Finish
Splashproof cabinet with 2 x 16-character, alphanumeric LCD display.
Languages
English, French, German, Spanish or Italian.
Outputs/inputs
RS232C I/O for connection of Printer/ PC and VIT90 Video Titrator.
9-pin, D-connector. 2400 or 9600 baud.
Direct analogue recorder output, 2000 mV full-scale for all conductance
ranges except for the 2 S range (1000 mV full scale).
Calibrated analogue recorder output for conductivity measurements only,
0.25 mV correspond to 2 digits of the CDM230 display. Maximum potential output: 1000 mV.
Input for conductivity cell and temperature sensor.
Power supply for SAM7 Sample Stand or SAM90 Sample Station.
Ambient Temperature
5 to 40°C.
Relative Humidity
20 to 80 %.
Power requirements
12 V mains adapter.
Weight
1.0 kg.
Dimensions (H x W x D)
9.5 x 28 x 21.5 cm.
Specifications subject to change without notice.
A6.4
EMC Standards
The CDM230 complies for run 3 (Instrument ID = 654R003N001 and
above) with the following regulations:
Emission:
Immunity:
Generic standard
EN50081-1 (1992)
Basic standard
EN55022 (1987) Class B
Generic standard
prEN50082-2 (1992)
Basic standard
IEC 801-2 (1991) level 3
IEC 801-3 (1984) level 3
IEC 801-4 (1988) level 3
A6.5
A6.6
Examples of Applications
Conductivity
Conductivity measurements of a NaCl solution using the CDC565
conductivity cell.
Programmation
Edit METHOD
Method:
Cell No.:
Mode:
Unit:
Range selection:
Printout Format:
Warning Beep:
Result Beep:
A
1
Conductivity
S/cm
Autorange
All
Yes
Yes
Edit CALIBRATION
Cell 1 Constant:
Stability Criterion:
Accept Time:
Calibrate every:
Cable resistance:
Cable Capacitance:
Calibrate using 0.05% NaCl
1.0 %/min
60 s
7 days
0.000 Ω
400 pF
Edit SAMPLE
Sample result:
Stability Criterion:
Accept Time:
Pure water correction:
Autoread
1.0 %/min
60 s
No
Edit Tref
Temp. correction:
Reference temp:
Temperature coef.:
Enter below
25°C
2.20 %/°C
A7.1
Results
Cell calibration
*** CDM230 Conductivity Meter 654R01N001
27 MAR 1998 08:42 ***
CELL CALIBRATION
Cell No.:
1
Cell Constant calibrated using 0.05% NaCl
Conductance:
39.2 mS
Temperature:
25.0
C
Measurement Time:
14 s
Cell Constant value:
1.2468 cm-1
**************************************************************************
Sample measurements
*** CDM230 Conductivity Meter 654R01N001
3 APR 1998
09:48 ***
SAMPLE
Method:
Cell No.:
Mode:
Last Cell calibration:
Cell Constant value:
Sample
No.
6
Result
A
1
Conductivity
27MAR98 - 08:42
1.2468 cm-1
Error
12.16 mS/cm
Temp
˚C
Meas.
mm:ss
23.1 00:14
Time
hh:mm:ss
09:49:02
**************************************************************************
A7.2
Resistivity
Resistivity measurements of a NaCl solution using the CDC565 conductivity cell.
Programmation
Edit METHOD
Method:
Cell No.:
Mode:
Unit:
Printout Format:
Warning Beep:
Result Beep:
B
1
Resistivity
Ω.cm
All
Yes
Yes
Edit CALIBRATION
Cell 1 Constant:
Stability Criterion:
Accept Time:
Calibrate every:
Cable resistance:
Cable Capacitance:
Calibrate using 0.05% NaCl
1.0 %/min
60 s
7 days
0.000 Ω
400 pF
Edit SAMPLE
Sample result:
Stability Criterion:
Accept Time:
Pure water correction:
Autoread
1.0 %/min
60 s
No
Edit Tref
Temp. correction:
Reference temp:
Temperature coef.:
Enter below
25°C
2.20 %/°C
A7.3
Results
Cell calibration
*** CDM230 Conductivity Meter 654R01N001
27 MAR 1998 08:42 ***
CELL CALIBRATION
Cell No.:
1
Cell Constant calibrated using 0.05% NaCl
Conductance:
39.2 mS
Temperature:
25.0
C
Measurement Time:
14 s
Cell Constant value:
1.2468 cm-1
**************************************************************************
Sample measurements
*** CDM230 Conductivity Meter 654R01N001
3 APR 1998
10:10 ***
SAMPLE
Method:
Cell No.:
Mode:
Last Cell calibration:
Cell Constant value:
Sample
No.
7
Result
B
1
Resistivity
27MAR98 - 08:42
1.2468 cm-1
Error
81.9 Ω.cm
Temp
˚C
Meas.
mm:ss
23.3 00:14
Time
hh:mm:ss
10:12:02
**************************************************************************
A7.4
Salinity
Salinity measurements on a seawater sample using the CDC565
conductivity cell.
Programmation
Edit METHOD
Method:
Cell No.:
Mode:
Printout Format:
Warning Beep:
Result Beep:
C
2
Salinity
All
Yes
Yes
Edit CALIBRATION
Cell 2 Constant:
Stability Criterion:
Accept Time:
Calibrate every:
Cable resistance:
Cable Capacitance:
Calibrate using Seawater Standard
1.0 %/min
60 s
7 days
0.000 Ω
400 pF
Edit SAMPLE
Sample result:
Stability Criterion:
Accept Time:
Autoread
1.0 %/min
60 s
A7.5
Results
Cell calibration
*** CDM230 Conductivity Meter 654R01N001
3 APR 1998 09:09 ***
CELL CALIBRATION
Cell No.:
2
Cell Constant calibrated using Seawater Standard
Conductance:
39.2 mS
Temperature:
25.0
C
Measurement Time:
14 s
Cell Constant value:
1.2482 cm-1
**************************************************************************
Sample measurements
*** CDM230 Conductivity Meter 654R01N001
3 APR 1998
10:21 ***
SAMPLE
Method:
Cell No.:
Mode:
Last Cell calibration:
Cell Constant value:
Sample
No.
12
Result
C
2
Salinity
3APR98 - 09:09
1.2482 cm-1
Error
35.07
Temp
˚C
Meas.
mm:ss
Time
hh:mm:ss
21.0
00:14
10:22:55
**************************************************************************
A7.6
TDS
TDS measurements of a NaCl solution using the CDC565 conductivity
cell.
Programmation
Edit METHOD
Method:
Cell No.:
Mode:
Printout Format:
Warning Beep:
Result Beep:
B
2
TDS
Result
Yes
Yes
Edit CALIBRATION (Cell)
Cell 1 Constant:
Stability Criterion:
Accept Time:
Calibrate every:
Cable resistance:
Cable Capacitance:
Calibrate using 0.05% NaCl
1.0 %/min
60 s
7 days
0.000 Ω
400 pF
Edit CALIBRATION (Method)
Lock current Cal:
TDS of standard:
Stability Criterion:
Accept Time:
Calibrate every:
No
500.0 mg/l
1.0 %/min
60 s
7 days
Edit SAMPLE
Sample result:
Stability Criterion:
Accept Time:
Autoread
1.0 %/min
60 s
A7.7
Results
Method calibration
Sample measurements
A7.8
Concentration
Concentration measurements of a NaCl solution using the CDC565
conductivity cell.
Programmation
Edit METHOD
Method:
Cell No.:
Mode:
Unit delection:
Printout Format:
Warning Beep:
Result Beep:
B
2
Concentration
mg/l
All
Yes
Yes
Edit CALIBRATION (Cell)
Cell 1 Constant:
Stability Criterion:
Accept Time:
Calibrate every:
Cable resistance:
Cable Capacitance:
Calibrate using 0.05% NaCl
1.0 %/min
60 s
7 days
0.000 Ω
400 pF
Edit CALIBRATION (Method)
Lock current Cal:
Calibrate using:
Conc. STD1:
Conc. STD2:
Conc STD3:
Stability Criterion:
Accept Time:
Calibrate every:
No
3 points
20.01 mg/l
250.2 mg/l
500.3 mg/l
1.0 %/min
60 s
7 days
Edit SAMPLE
Sample result:
Stability Criterion:
Accept Time:
Autoread
1.0 %/min
60 s
A7.9
Results
Method calibration
*** CDM230 Conductivity Meter 654R01N001
5 APR 1998 15:18 ***
CONCENTRATION CALIBRATION
Method:
Cell No.:
Cell Constant:
Standard
No.
1
2
3
B
2
1.2482 cm-1
Concentration
mg/l
20.01
250.2
500.3
Coefficient B0:
Coefficient B1:
Coefficient B2:
Temp Conductivity
˚C
Meas.
min:s
51.8 µS/cm
0.593 mS/cm
1.043 mS/cm
00:33
00:18
00:15
22.0
22.0
22.0
2.057E+00
3.395E-01
1.326E-04
**************************************************************************
Sample measurements
*** CDM230 Conductivity Meter 654R01N001
5 APR 1998
15:55 ***
SAMPLE
Method:
Cell No.:
Mode:
Last Cell Calibration:
Cell Constant:
Last Method Calibration:
Coefficient B0:
Coefficient B1:
Coefficient B2:
Sample
No.
Result
22
80.7mg/l
B
2
Concentration
3APR98 - 09:09
1.2482 cm-1
5APR98 15:18
2.057E+00
3.395E-01
1.326E-04
Error
Temp
˚C
Meas.
mm:ss
Time
hh:mm:ss
22.0
00:15
15:56:49
**************************************************************************
A7.10
Keyword Index
-AAccept Time ................................................................ 7.7, 7.11, 7.15, 7.17
AUTOREAD measurements ......................................... 7.16
AT INTERVALS measurements ................................... 7.18
-CCable capacitance ....................................................... 7.9
Cable resistance .......................................................... 7.8
Calibrate every ............................................................. 7.8, 7.12, 7.15
Cell constant
Definition ......................................................... 8.2
Determination (cell calibration) ........................ 2.4
Cell calibration
Definition ......................................................... 8.2
Editing a cell calibration .................................. 7.6
Performing a cell calibration ............................ 2.4
Concentration
Theory ............................................................. 8.11
Concentration method - editing ........................ 6.2
Concentration method - running ....................... 6.8 to 6.14
Concentration coefficients (CC)
Definition ......................................................... 8.11
Determination of the CC .................................. 6.9
Conductance range
Selecting a conductance range ....................... 3.1
Conductivity, conductance
Theory ............................................................. 8.2
Conductivity method - editing .......................... 7.3
Conductivity method - running ......................... 3.1
Current date ................................................................. 1.3
Current time ................................................................. 1.3
A8.1
-DDate
Setting the date .................................................... 1.3
-EEdit
Calibration (or Cell calibration) .............................. 7.6
GLP ..................................................................... 7.23
Method ................................................................. 7.3
Method calibration (Concentration) ....................... 6.4, 7.13
Method calibration (TDS) ...................................... 5.4, 7.10
Print ..................................................................... 7.24
Sample ................................................................ 7.16
Tref ...................................................................... 7.21
-GGLP tables
Cell Calibration data .............................................
Method calibration data (TDS) ..............................
Method calibration data (Concentration) ...............
Sample data .........................................................
2.18
5.12
6.15
2.20
-IInstrument ID .................................................................... 7.24
-KKCl Demal solutions
Definition ..............................................................
Preparation ...........................................................
Conductivity values of KCl Demal solutions .........
Resistivity values of KCl Demal solutions ............
2.6
2.6
A1.1
A1.3
Keyboard beep .................................................................. 7.23
-LLanguage selection ........................................................... 2.2
Lock current calibration ..................................................... 5.4, 6.4, 7.10, 7.13
Locking the CDM230 Edit mode ........................................ 7.25
A8.2
-MManual measurements (by pressing ✓) ............................. 7.20
Method
Selecting a method .............................................. 2.2
Editing a method .................................................. 7.1
Method calibration (Concentration method)
Definition .............................................................. 8.11
Editing a method calibration ................................. 6.4, 7.13
Performing a method calibration ........................... 6.9
Method calibration (TDS method)
Definition .............................................................. 8.8, 8.9
Editing a method calibration ................................. 5.4, 7.10
Performing a method calibration ........................... 5.8
Method table
Printing a method table ........................................ 9.7
-NNatural water correction (NWC)
Definition .............................................................. 8.6
How to program a NWC? ...................................... 7.21
-PPrint interval ...................................................................... 7.18
Printer output .................................................................... 7.24
Printout format .................................................................. 7.5
Printouts
Calibration results ................................................ 9.2
Edit data .............................................................. 9.7
How to obtain printouts? ....................................... 9.1
GLP data .............................................................. 9.9
Method table ........................................................ 9.7
Sample results ..................................................... 9.5
Pure Water correction (PWC)
Definition .............................................................. 8.3
How to program a PWC? ...................................... 7.17
A8.3
-RReference temperature ...................................................... 7.21
Reset reading .................................................................... 3.3
Resistivity, resistance
Theory .................................................................. 8.3
Resistivity method - editing .................................. 7.3
Resistivity method - running ................................. 2.11
Result beep ....................................................................... 7.5
Relative measurements (Conductivity method only)
Performing relative measurements ....................... 3.3
-SSalinity
Theory .................................................................. 8.7
Salinity method - editing ....................................... 2.2
Salinity method - running ...................................... 4.1
Stability Criterion ............................................................... 7.7, 7.11, 7.14, 7.17
Standard solutions
Preparing .............................................................. 2.6
Stop print after .................................................................. 7.19
Store in GLP ..................................................................... 7.19
-TTDS
Theory .................................................................. 8.9
TDS method - editing ........................................... 5.2
TDS method - running .......................................... 5.7 to 5.11
TDS Factor
Definition .............................................................. 8.9
Determination of a TDS factor .............................. 5.8, 5.9, 8.10
Temperature
Temperature correction (linear correction) ............. 8.3 to 8.5
A8.4
Temperature coefficient (TC)
Determination of a TC .......................................... 8.5
Entry of a TC ....................................................... 7.21
Time
Setting the time .................................................... 2.2
-UUnit selection .................................................................... 7.4
-WWarning beep .................................................................... 7.5
A8.5
A8.6