1
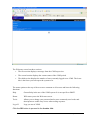
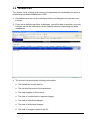
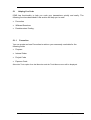
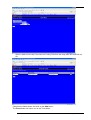
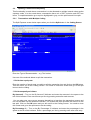
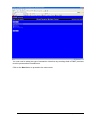
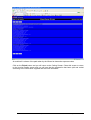
RMIT Corporate Card ICMS User Manual Version 3.1.3.04 February 2006 – Edition 1 Page 1 Table of Contents HOW TO USE THE iCMS CORPORATE CARD SYSTEM.....................................3 1.0 TRANSACATION DOWNLOAD AND PROCESSING TIMETABLE OVERVIEW ................................................................................................3 2.0 ACCESSING THE iCMS CORPORATE CARD SYSTEM...........................3 3.0 INVOICE LIST .............................................................................................6 4.0 INVOICE DETAILS ......................................................................................7 5.0 CODING SCREEN – HOW TO CODE YOUR EXPENDITURE ..................9 5.1 Helping You Code ................................................................................12 5.1.1 Favourites .................................................................................12 5.1.2 Wildcards ..................................................................................14 5.1.3 Predetermined Coding ..............................................................14 5.2 Splitting a Transaction........................................................................15 5.2.1 Transactions with Multiple Internal Orders/Expense Codes .....15 5.2.2 Transactions with GST inclusive & GST free items ..................16 5.3 FBT Wizard ........................................................................................16 6.0 SUBMISSION............................................................................................22 7.0 LINE MANAGER AUTHORISATION .........................................................23 APPENDIX A: GLOSSARY ....................................................................................24 APPENDIX B: GST CODES ...................................................................................25 Version 3.1.3.04 February 2006 – Edition 1 Page 2 How to Use the iCMS Corporate Card System This section details, in a step by step process, how to use the iCMS system to code your monthly expenditure, and how a line manager will use the system to authorise the expenditure submitted. 1.0 Transaction Download and Processing Timetable Overview ♦ Transactional data is downloaded daily from the bank to the RMIT network server, and imported into iCMS throughout a billing period, once the previous monthly processing period has been rolled-over. ♦ Each transaction will be available for coding, submitting and authorising as it appears. ♦ At the end of the billing period a period of two weeks will be available for transactions to be authorised. Note: cardholders can continue to code and submit during this period. ♦ At the expiration of this period, the monthly processing period will be closed, and the system will be rolled-over to the next billing period. 2.0 Accessing the iCMS Corporate Card System You can access iCMS in the following ways: 1. Typing the following address in the address box of your web browser: http://credit.its.rmit.edu.au or http://131.170.6.48 2. Saving the internet address as a bookmark, and selecting this when you want to open the system 3. Save the address as a shortcut on your desktop. When the following Login box appears, type in Licensee : RMIT ,your username, which is your full employee number, and password. Please note: when logging in for the first time, enter the username and the temporary password(usually 123456) supplied by the Finance Officer, Credit Cards. You will then be prompted to enter your own password which you will use from then on. Version 3.1.3.04 February 2006 – Edition 1 Page 3 Card Management System Login • Click the OK button to proceed to the Welcome Screen Version 3.1.3.04 February 2006 – Edition 1 Page 4 The Welcome screen has three sections. • The first section displays a message from the iCMS supervisor. • The second section displays the current status of the iCMS period. • The third section displays the number of users currently logged on to iCMS. The lower this is the faster you can expect the system to be. The menu options at the top of the screen are common to all screens and have the following functions. Help General help in the use of the iCMS system. It is not specific to RMIT. Home: Will return you to the Welcome screen. Tools: Allows you to change your password and to store commonly used codes and descriptions to enable easy access when coding expenses. Log off: Logs you out of iCMS. Click the OK button to proceed to the Invoice List. Version 3.1.3.04 February 2006 – Edition 1 Page 5 3.0 Invoice List The Invoice List is a listing of all invoices (or statements) for cardholders for which a relationship has been established in iCMS. • Cardholders who are not an authorising officer or a delegate only see their own invoices. • If you are an authorising officer or delegate, you will be able to see both your own invoices, as well as invoices for all the cards for which a relationship has been established. • The Invoice List provides the following information: • The Period the invoice was for. • The first and last name of the cardholder. • The total charges on the invoice. • The total of unsubmitted or rejected charges. • The total of submitted charges. • The total of authorised charges. • The total of charges loaded to the GL. Version 3.1.3.04 February 2006 – Edition 1 Page 6 • Actions that can be performed – e.g. Print, View or Code. To view the transactions that make up the invoice, select the View option in the drop down box in the Action column. Click on the Go button. 4.0 Invoice Details • This screen lists all the transactions that have been incurred by the cardholder during the billing period. • The Invoice Details screen provides the following information: • The coding status of the transaction (?) – refer to following table. • The date of the transaction. • The amount of the transaction. • The GST amount of the transaction. • The name of the merchant, or description of the transaction. • The purpose of the transaction. • The internal order number and general ledger code that has been allocated to the transaction. • Action that can be performed on the transaction. Version 3.1.3.04 February 2006 – Edition 1 Page 7 The table below explains the coding status codes (?) for the Invoice Details screen Status Codes Code Background Colour U Red C Yellow Coded S Orange Coded and Submitted A Green Authorised R Black Rejected E Blue Uploaded to the General Ledger Version 3.1.3.04 Explanation Unsubmitted February 2006 – Edition 1 Page 8 5.0 Coding Screen – How to Code Your Expenditure You can access your transactions for coding in two ways. 1. From the Invoice List screen, select View or Coding Screen in the drop down box in the Action Column and click on the Go button. All the transactions are then displayed together with the required fields for coding. 2. From the Invoice List screen, select Coding Screen in the drop down box in the Action Column and click on the Go button. You must enter data in all the fields as follows: Field Action Expense Type Allows you to select the following expenditure types: Version 3.1.3.04 • General Expense • Project (Property Services Group use only - requires a WBS number) • Personal (Used when a personal item is inadvertently charged to the card – the expense code is pre-coded) • Disputed (Used when a transaction is unknown to the cardholder - the Expense Code is pre-coded). February 2006 – Edition 1 Page 9 Tax Status Select either Inclusive (where the expense incudes GST) or Free (where there is no GST). Documentation Click the appropriate button. Tax Invoice: You select this button if the invoice complies with the details regarding GST Compliant Invoices in Section 1.4 of this document. Receipt: You select this button if the purchase is supported by a receipt only, or if the transaction relates to an overseas expense. None: You select this option if you did not receive a Tax Invoice or Receipt, or the documentation has been lost. Note: All expenditure you incur for RMIT on your Corporate Card needs to be supported by a Tax Invoice or Receipt. Purpose Enter a meaningful description for the transaction. You can enter up to 200 characters in this field. A meaningful purpose should include a description of the item purchased and why the item was purchased. Internal Order Enter the relevant internal order number for the expense in the following manner: • Enter a code directly • Use a preset favourite, or • Use a search. Expense Code • Enter the relevant general ledger expense code for the expense in the following manner: • Enter a code directly • Use a preset favourite, or • Use a search. Version 3.1.3.04 February 2006 – Edition 1 Page 10 The action buttons across the top of the Coding Screen are for the following functions: Name Save Wizard Function Saves any data you have entered – you can partially code a transaction and complete it at another time. Starts the FBT wizard to help you code transactions that might include FBT. On previous coded transactions, you also use this button to’ Undo’ an FBT Split. Split Allows you to split a transaction into separate amounts for separate coding. & Unsplit Where the transaction has been split, the option to Unsplit will be available Submit Submits the transaction to your line manager for authorisation. Reset Coding Removes any data you have entered. Audit Displays the logic by which the Wizard function arrives at the expense code. Close Returns you to the previous screen. First Takes you to the first transaction on the Invoice Details list. Prev Takes you to the previous transaction on the Invoice Details list. Next Takes you to the next transaction on the Invoice Details list. Last Takes you to the last transaction on the Invoice Details list. Status Enables you to navigate through the transactions according to their status. (Drop down box) Version 3.1.3.04 February 2006 – Edition 1 Page 11 5.1 Helping You Code iCMS has functionality to help you code your transactions quickly and easily. The following functions described in this section will help you to code: • Favourites • Wildcard Searches • Predetermined Coding. 5.1.1 Favourites You can create and use Favourites to retrieve your commonly used data for the following fields: • Purpose • Internal Order • Project Code • Expense Code Select the Tools option from the Menu bar and the Tools Menu screen will be displayed. Version 3.1.3.04 February 2006 – Edition 1 Page 12 Select a field from the My Favourites for Coding Field from the drop down box and click on Go. Complete the fields shown and click on the Add button. The Close button will return you to the Tools Menu. Version 3.1.3.04 February 2006 – Edition 1 Page 13 Select My Favourites from the “Whose favourites to use?” drop down box and click on the Apply button. The Close button will take you back to the screen that you entered the Tools Menu from. 5.1.2 Wildcards You use the Wildcard search for Internal Orders, WBS Codes and G/L Expense Codes. When in the Coding Screen you can Use the wildcard character % to search on any of the above fields – e,g. Entering %travel% as the description in the Expense description field and hitting enter will result in all account codes with the word travel in the description being listed in the Search Results. You can then select the one you want and click on the < button to transfer to the Expense Fields. 5.1.3 Predetermined Coding Bank charges such as annual fees and international transaction charges are recognised as such by iCMS and are automatically coded to the cardholders default internal order and appropriate expense code. They are also submitted automatically. If you wish to change the internal order you can select the Unsubmit option in the Action column in the Invoice Details screen and click on the Go button. You can then change the internal order and submit the transaction again. Version 3.1.3.04 February 2006 – Edition 1 Page 14 5.2 Splitting Transactions/Unsplitting This functionality is used where a transaction is to be allocated to multiple internal orders and/or expense codes. It is also used where a transaction has a mix of GST inclusive and GST free items. To unsplit transaction go to top line highlighted in grey, not the split line and hit unsplit. 5.2.1 Transactions with Multiple Coding The Split Expense screen below opens when you click the Split button in the Coding Screen. Enter the Type of Documentation – e.g. Tax Invoice. Use one of the methods below to split the transaction. 1. Divide into equal parts. Enter the number of equal parts you wish to split the transaction into and click on the OK button. This will return you to the Coding Screen. You need to close this screen and go to the split items to do the coding. 2. Divide unequally as follows: By Amount $ – Turn on the By Amount $ indicator and enter the amounts in the space to the left of this indicator. Enter one amount per line by pressing enter after each amount, You can also enter one or more amounts that add up to less than the transaction amount and turn on the Make up the difference indicator. The system will then calculate the amount for the last split. Click on the OK button and you will return to the Coding Screen. You need to close this screen and go to the split items to do the coding. By Percentage % – Turn on the By Percentage % indicator and enter the percentages in the space to the left of this indicator. Enter a percentage per line by pressing enter after each entry. Version 3.1.3.04 February 2006 – Edition 1 Page 15 You can also enter one or more percentages that add up to less than 100% of the transaction amount and turn on the Make up the difference indicator. The system will then calculate the amount for the last split. Click on the OK button and you will return to the Coding Screen. You need to close this screen and go to the split items to do the coding. By Ratio or Foreign Currency Amount - Turn on the By Ratio or Foreign Currency Amount indicator and enter the ratios/amounts in the space to the left of this indicator. Enter a ratio/amount per line by pressing enter after each entry. You can also enter one or more ratios/amounts that add up to less than the transaction amount and turn on the Make up the difference indicator. The system will then calculate the amount for the last split. Click on the OK button and you will return to the Coding Screen. You need to close this screen and go to the split items to do the coding. 5.2.2 Transactions with GST inclusive and GST free items. If you have a transaction that includes a mix of GST inclusive and GST free items, iCMS will help you split the transactions to allocate the amounts correctly. To do this, select the Split button on the Coding Screen. This will bring up the Split Expense screen. Choose option 3 and complete as follows. 3. Create 2 transactions (one taxed, one untaxed) based on a tax rate of 10% where the tax amount is $ Enter the amount of GST shown on the Tax Invoice in the field following “tax amount is $” and click on the OK button next to this field and you will return to the Coding Screen. The system will have split the transaction into a GST inclusive item and a GST exclusive item. You need to close this screen and go to the split items to do the coding. 5.3 Coding transactions using the FBT Wizard. The FBT Wizard provides a facility to assist with the coding of transactions that might be subject to Fringe Benefits Tax. A suggestion box will automatically appear when an expense of an entertainment nature is submitted. The cardholder may invoke the FBT wizard, or may choose to code the transaction directly. This feature can also be used at any time by selecting the Wizard button on the Coding Screen. It should be noted that all entertainment expenses require an acquittal in the form of a listing of participants. As such, the FBT wizard would normally be used for most entertainment expense transactions. Using the FBT Wizard does not mean that all transactions are subject to FBT. The FBT Wizard simply seeks a series of responses to determine the appropriate Expense Codes to allocate to the expense. To use the Wizard, enter the Tax Status, Documentation, Purpose and Internal Order on the Coding Screen and click on the Wizard button. The following screen will be displayed. Version 3.1.3.04 February 2006 – Edition 1 Page 16 You now need to select the type of transaction. Note that any meetings held off RMIT premises must be processed as Entertainment. Click on the Next button to proceed to the next screen. Version 3.1.3.04 February 2006 – Edition 1 Page 17 Select one of the activities and click on the Next button to proceed to the next screen. Version 3.1.3.04 February 2006 – Edition 1 Page 18 Enter the names of all participants involved in the transaction. Enter each participant on a new line by pressing enter after typing in the name. If you want to evenly divide the expenditure between the participants, select the “Split the total evenly between these participants” box. (If you do not select this option the Manual Split screen will come up next and you will need to enter the amounts against each of the participants.) Click on the Next button. Version 3.1.3.04 February 2006 – Edition 1 Page 19 You now must enter the type of participant for the first participant listed. Clicking on the Next button will take you to the next participant on the list entered by you. Complete the details for all participants and click on the Next button. Version 3.1.3.04 February 2006 – Edition 1 Page 20 An audit trail is shown of the path taken by the Wizard to determine expense codes. Click on the Finish button and you will return to the Coding Screen. Close this screen to return to the Invoice Details screen and you will see that the transaction has been split and coded according to the information supplied and has been submitted. Version 3.1.3.04 February 2006 – Edition 1 Page 21 6.0 Submission Transactions can be submitted and authorised at any time. However, no statements should be printed and forwarded to Financial Services until all transactions for the month have been submitted and authorised. Partially acquitted statements will not be accepted. When all your transactions for the period have been submitted: 1. Print a hardcopy of your statement. (In the Invoice List screen select Print from the Action column) 2. Attach all receipts to the statement. 3. Sign and date your printed statement. Note: if a delegate has completed the details and submitted the statement, the signature must be that of the cardholder. 4. Send your signed statement and receipts to your line manager for authorisation. Your line manager must sign the statement as the authorising officer. 5. All original statements and all of the supporting documentation to be kept in their schools/dept. Version 3.1.3.04 February 2006 – Edition 1 Page 22 Note: if transactions are not authorised prior to the rollover of the period, they will be allocated to a default account 552320 within your cost centre. Once authorised, the default account will be credited and the identified expenses lines will be debited during the next rollover process. 7.0 Line Manager Authorisation As a Line Manager, you are required to approve all your Cardholder’s statements during the monthly statement reconciliation period. (Refer to Corporate CardRollover Timetable) http://www.rmit.edu.au/browse;ID=5dmfxgcbq5v4z To authorise a cardholder's statement, follow the below instructions: • Login to the iCMS system • View the cardholder’s statement that you wish to review (refer to Section 3 – Invoice List & Section 4 – Invoice Details) • Review the cardholder's expenditure by viewing each line. • Query any transactions that require further explanation • You can authorise all submitted transactions by clicking on the Authorise All button at the top of the screen or you can authorise each transaction separately by selecting Authorise from the drop down box in the Action column and clicking on the Go button. • Sign the hard copy of the statement. Version 3.1.3.04 February 2006 – Edition 1 Page 23 Appendix A: Glossary Term Explanation Authorising Officer Able to view and authorise statements submitted by cardholders within the Cost Centre. This is a mandatory relationship within iCMS. RMIT Corporate Card The Business Card used by RMIT for purchasing and travelling purposes. Delegate Able to view, code and submit a statement on behalf of the cardholder. This is an optional relationship within iCMS. Delegates can also be set up with no authority to submit. Deputy Act on behalf of the authorising officer to view and authorise statements submitted by cardholders within the Cost Centre. This access should be given when the authorising officer is absent for a period of time. GST Exclusive The quoted amount does not include GST. GST Inclusive The quoted amount includes GST. ICMS System Intranet Creditor Management System. Referred to as iCMS in this manual. Merchant Code A classification assigned to suppliers by Mastercard. SAP RMIT’s financial system Save Saves the details entered on the Coding Screen without submitting for authorisation. Submit Forwarding a transaction to your line manager for authorisation. WBS Work Breakdown Structure Version 3.1.3.04 February 2006 – Edition 1 Page 24 Appendix B: GST Tax Codes The following is a detailed listing of the GST Tax Codes that are used in RMIT: Code Use this code for… Acquisitions with no GST and not subject to GST assessment (or includes GST but no Tax Invoice held, although ABN is known) Use this code for: P0 acquisitions from suppliers who are not GST registered and not required to be GST registered. GST is not included in the price as the supplier cannot charge GST. acquisitions of GST free supplies, eg. Basic food, most education expenses, essential medical services acquisitions that do not attract GST, eg. Certain specified taxes, levies, municipal rates, drivers licence fees, registration fees acquisitions of goods & services from an overseas supplier transactions related to overseas travel and expenses • acquisitions with GST in the price but the vendor did not provide either: a Tax Invoice where the GST exclusive value is greater than $50, or some other commercial document where the GST exclusive value is $50 or less. GST Inclusive acquisitions Use this code for acquisitions for which RMIT can claim an Input Tax Credit. This code is the most commonly applied to acquisitions within RMIT. P1 The acquisition: • • • • • • Must be a taxable supply to RMIT Cannot be a foreign purchase (use P0) Cannot be GST free, eg. Basic food (use P0) Cannot be one of those specified expenses of a non-deductible nature, eg. Fines (use P5) Cannot be an Input Taxed supply, eg. Bank fees (use P3) Must have a compliant tax invoice or one will be provided, where the GST inclusive value is greater than $55 or $82.50 from 1 July 2007. Input Taxed Expense P3 Version 3.1.3.04 Use this code for expenses for which RMIT cannot claim an Input Tax Credit because they relate to Input Taxed supplies. Eg bank charges, and conversion fees. February 2006 – Edition 1 Page 25 Non-deductible expenditure P5 Use this code for certain expenses incurred through acquisitions that are non-deductible for income tax purposes. The acquisition may include GST, however RMIT cannot claim back the GST from the ATO as the acquisition is for a good or service that is not allowable as an income tax deduction. • client entertainment (Non FBT) – GL A/C 556350 Internal expense transactions or pre-GST transactions being processed post-GST introduction – no GST or BAS impact Use this code for: P9 • • Version 3.1.3.04 pre-GST acquisitions where the invoice is being processed on or after 1 July 2000. The acquisition price does not include GST and the value will not appear on the BAS. internal expense transactions, accruals and adjustments. February 2006 – Edition 1 Page 26