1
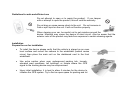
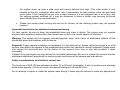
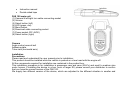
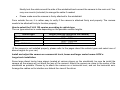
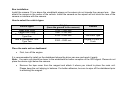
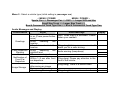
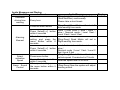
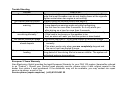
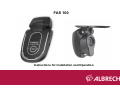
FAS 100
Instructions for Installation and Operation
Introduction
•
FAS 100 is an innovative and intelligent driving support device for automobile and truck drivers.The
device notifies the driver of any lane departure and can provide video storage in the case of an
accident.
•
After the FAS 100 system is activated, the GPS signal has to be received for at least 5 minutes
before use.
Please note the device may not operate properly in underground areas, tunnels, elevated road conditions,
near tall buildings, or in dense forests because it is using GPS Satellite signals
•
•
to measure Your actual speed for activating / deactivating the audible warnings
to record and store time and location in case of a car accident.
•
This product is intended to be only a support system for safer driving. Alan Electronics is
not responsible or liable in the event of an accident or citation. Please follow all
applicable road, vehicle and traffic regulations carefully.
Restrictions: This hardware, software, and intellectual property belong to the manufacturer. Copying,
processing, or distributing the product without written permission will be punished to the fullest extent of the
intellectual property rights law, and of course, will be claimed for damages.
The specification in manual may be modified for quality improvement without any notice.
Guidelines for safe and efficient use
Do not attempt to open or to repair the product. If you tamper
with or attempt to open the product, this will void the warranty.
Do not drop or cause severe shock to the unit. Do not immerse in
fluid or spill liquid on the unit. It will not function properly.
When cleaning your car, be careful not to get moisture around the
device. Moisture may cause the device to short circuit. Also be aware that the
exterior color of the product may fade from exposure to certain cleaning agents.
Installation
Prepare the car for installation
•
To install the device please verify that the vehicle is placed on an even
level surface and mount the camera to the windshield (behind review
mirror) then place the main unit on the dashboard next to the front
windshield.
•
Use extra caution when near underground parking lots, tunnels,
elevated road conditions, tall buildings, or forests where the GPS
signal to the tracking device may be compromised.
•
Upon initial installation, it is best to allow 5 minutes for the device to
initialize the GPS system. Try to find an open space for parking and let
the system warm up near a wide road with clearly defined lane lines. This initial action is only
needed for the first installation after sales, later it remembers the last position of the car and starts
much faster. If You transport the car over a larger distance in a car transport train or on a ferry, with
the warning system switched off, it may be necessary to allow a similar long warming up period
when starting from the new destination.
•
Please use caution when driving into and out of tunnels, as the warning system may not operate
properly.
Important instructions for optimized camera positioning
For best results, be sure to keep the windshield clean and clear of debris. The system may not operate
properly when objects or debris block the camera lens or there is a certain degree of reflection.
Warning: The system will not operate normally/regularly when other items on dashboard reflects off the
windshield glass and interferes with the device.
Essential: Proper camera installation is mandatory! For the initial set-up, please verify the vehicle is on a flat
surface, then attach the camera to the windshield and confirm the camera is correctly adjusted. Please check
and inspect the horizontal axis (at the bottom of the camera) from time to time and re-adjust it when
necessary.
Vibration from prolonged use may disturb the horizontal attachment. Be sure to inspect the camera and the
dashboard attachment periodically to confirm proper positioning of the camera and main device.
Safety considerations and limits for correct use
The functions of FAS 100 are activated at either 75 or 90 km/h (selectable). It will not produce any warnings
below those speeds. (The truck version has speed settings for 60 and 80 km/h)
Do not attempt to adjust or install the system while driving. Please stop the vehicle to make any adjustments
to FAS 100.
The Lane Departure Warning may not operate normally under certain conditions. Sometimes the device may
not be able to recognize the vehicle lane. There are several possible reasons: the lane markings are
damaged, the road is not paved, a dark shadow is over the lane, light is directly focused on the camera lens,
bad weather (heavy snowfall and or rainfall), puddles, when the lane abruptly changes from light to dark or
vise versa (entering into or coming out of tunnels), and the headlights are not able to illuminate the roadway.
The video storage at the time of an accident may not be stored when a certain level of acceleration shock is
not present, or when the power is not maintained for a minimum of 20 seconds after impact. (Please refer
to the Video storage at accident function)
This product is intended to be a supplementary device for safe driving. It in no way is intended to replace
alert driving, and good judgement. Never continue driving when You are too tired- do not rely on the system
that it wakes you up early enough before a crash can happen.
Product components
These components are normally supplied with the system (subject to variations depending on special offers)
Please check the contents of the box, before you install the product and contact your distributor, if parts
should be missing:
•
•
•
•
•
•
•
FAS 100 main unit
Camera (with cable)
Cigarette lighter plug adapter cable (2.5m)
Magnetic dash board holder for main unit
Cable assembly to connect left & right turn indicators (option)
Cable ties & clamps (5 each)
Hexagonal wrench for camera adjustment
•
•
Instruction manual
Double sided tape
FAS 100 main unit
(1) Camera & left/right turn cable connecting socket
(2) Volume
(3) Select button (left)
(4) LED (green, red)
(5) Menu button
(6) Download cable connecting socket
(7) Power socket (DC JACK)
(8) Select button (right)
Camera
Angle control wrench bolt
Adhesive plate
Tube vials (horizontal axis)
Installation
Precautions:
Please read and understand the user manual prior to installation:
This product should be installed while the vehicle is parked on a level road with the engine off.
All the components required for installation are contained in the product box.
This installation procedure is for installation in passenger cars and vans (SUV’s) and small to medium size
motor homes. If installing the device in a bus, truck or larger RV, please consult your distributor to confirm
that you have the correct version of the FAS 100.
We supply two different version of the device, which are adjusted to the different situation in smaller and
larger vehicles below and above 1.7 m camera height. The passenger car version is also designed for
different speeds compared to the truck version.
Regarding truck installation, please refer to instruction chapter for truck installation. Important is also the
position of the wipers in relation to the camera when they are not in motion.
When the camera is set up properly, the device announces “Camera has been installed” within 10 seconds
after driving over the initial selected speed on a level & straight road.
When the setting is not correct, the device announces, “Camera setting error “. Please reinstall the Road
Matrix camera in reference to camera installation manual” If this happens, please check the camera setting
status and reset or adjust the camera.
Select camera location for passenger cars, SUV’s or vans)
•
•
•
Please check and select where to install the camera first. It is recommended that the camera is
installed on the windshield behind the rearview mirror within the upper area with anti-sun protection
(if equipped). Please confirm that the camera installation is not blocking nor interfering with the
driver’s view of the windshield.
The car’s wiper (when not in motion) shall not touch the camera viewing angle, please check!
Prior to installation, clean the windshield where the camera is to be installed. Areas with dirt or debris
will prohibit proper attachment of the double sided tape. Peel off one side of the tape and attach it to
the anti-glare or shaded area on the windshield.
Install & adjust the camera
•
Adjust the camera so the horizontal level in the middle. Use the hexagonal wrench provided to firmly
tighten the camera in place.
•
Press the camera cable into the grove between the windshield and the upholstery of the vehicle.
Neatly tuck the cable around the side of the windshield and connect the camera to the main unit. You
may use mounts (included) to arrange the cable if needed.
•
Please make sure the camera is firmly attached to the windshield.
From outside the car, it is rather easy to verify if the camera is attached firmly and properly. The camera
needs to be attached firmly to function properly.
How to select the F-A-S 100 version according to vehicle type
The car type selection is made depending on the possible camera heights.
Vehicle type
Sports car
Passenger car
SUV
Large SUV & Vans
Height (from the ground to the camera)
900 ~ 1100 mm
1100 ~ 1300 mm
1300 ~ 1500 mm
1500 ~ 1700 mm
(If the camera is not installed properly, please refer to the pages about the vehicle types and select one of
above heights for your car.)
Install and adjust the camera on commercial truck, buses and larger motor homes & RV’s:
Large truck installation:
Some large diesel trucks have wipers located at various places on the windshield, be sure to install the
camera so the wipers will not block the lens of the camera. Attach the camera as close to the center of the
windshield as possible. Please try to attach the camera on a horizontal level, and set the horizontal axis.
Arrange the cables not to interfere nor disturb the view of the driver.
Bus installation:
Install the camera 10 cm above the windshield wipers so the wipers do not impede the camera lens. Also
attach the camera in the center of the vehicle. Install the camera so the wipers will not block the lens of the
camera or interfere with the camera.
How to select the vehicle types
Vehicle types
Small Size Truck
Larger Size Truck
Bus & Commercial Truck
Type One
Bus & Commercial Tuck
Type Two
Height
(from the ground to the camera)
1700 ~ 1900 mm
1900 ~ 2100 mm
Remark
2100 ~ 2300 mm
Flat Front Type
2300 ~ 2500 mm
Engine in Front of
Truck
Place the main unit on dashboard
•
First, turn off the engine.
It is recommended to install on the dashboard where the driver can see and reach it easily.
Note: the main unit should be closer to the windshield for better reception of the GPS signal. Please do not
place the device right below the camera.
•
Remove the tape cover from the magnet and attach it where you intend to place the main unit.
Please keep the unit staying in balance. For better adhesion, be sure to wipe off the dashboard prior
to attaching the magnet.
Main Unit wiring and first POWER ON
•
Insert the DC jack from the cigarette lighter into the main unit’s socket (7).
•
Insert the cable from the camera into the main unit’s socket (1).
•
Direction indicator cable (if installed): Insert the camera not directly, use the LEFT / RIGHT turn
cable assembly and plug the camera into the free USB Mini socket at the Y side, and the other end
of the cable into the camera socket of the main unit. The 2 free wires at the cable set are for
connection to L and R indicator lamp wiring behind dashboard or at the front indicator lamp wires
directly. For this option, You should ask an authorized car service station to install the wires of the
optional cable assembly to the left and right turn indicator lamp wiring of the car. Please follow the
instructions supplied with the cable set
•
Note: a connection to a vehicle CAN bus system is not possible. In case if Your car is equipped
with computerized bus-systems the service people can only connect the sensor cables directly to
the left and right indicator lamps wires.
If the LEFT & RIGHT TURN option sensor cables are installed, the system will not alert You when You use
the TURN indicators of Your car before passing the lanes.
•
Now, connect the cigarette cable into the cigarette socket and arrange the remaining cable so the
driver’s view remains undisturbed.
•
Once the power is attached, press the Menu/Power Button once. The unit will say, “Hello. F-A-S
100 system is activated. Please fasten your seat belt.” If it does not, please check the cables
and re-adjust the volume.
Please make all adjustments to the device before you drive the vehicle. For any help with these adjustments,
please refer to the section for “settings functions”.
•
The unit has no extra on-off switch, because most European cars have the cigarette lighter socket
connected to ignition switch. So it will switch off automatically when You turn off the engine. If You
need it turned off, please pull the DC connector or use the “warning-off” procedure described in this
manual.
Functions
Lane Departure Warning
The system helps you drive safer by obtaining the images of the road ahead with the camera, then analyzing
the image in real time, and providing warnings on possible lane departure situations. F-A-S 100 helps ensure
a safer driving experience.
It alerts the driver to the situation and informs them of the lane departure.
(This system helps the driver pay attention and deal with the road conditions.)
Continuous audio warning;
The device will provide an audio warning when the driver does not respond to the initial warning and
continues departing from the lane.
Warning for departing one side of the lane
Audio warnings will alert the driver of possible road conditions.
There are 5 different audio warning sounds, the volume is adjustable and the sensitivity to each side of the
lane may be adjusted for the driver.
The Lane Departure Warning System is a quality product that has been developed and tested for reliability
world-wide in many countries.
Video storage of an accident (Black Box function)
The system will internally store all film sequences delivered by the camera and overwrite them after some
seconds, if nothing happens. So the system is able to keep a memory recording of the last 12 seconds
before and 6 seconds after an impact such as a car crash or a sudden stop with an acceleration of greater
than 1.5 G (~ 15 m/sec2) should happen. If such a recording has been made, the device will announce an
audio message of "Video has been stored." Using the GPS data, the system stores time, location, speed,
and acceleration information during the accident together with the camera’s video film.
•
If you would like to have saved a recorded image (e.g. in case of an accident) on CD, remove the
main unit device and contact ALAN or the distributor where you purchased the product. Authorized
distributors will be able to analyze the image and transfer it to a CD. If You should send the main unit
to the Albrecht / Alan Service, we will send you the device back along with a CD copy of the accident
or image.
•
If you do not want to save a video, you can leave it in the memory, because the unit is able to record
up to 3 video sequences. After 3 sequences have been recorded, the next event will automatically
overwrite the first one. So You will have always the last 3 videos available in your memory.
System restrictions and limits for crash recordings: The device records 12 seconds prior to the 1.5G
shock and 6 seconds after it.
It will also record the accident time, location, speed/acceleration information. These information are obtained
from the GPS data, so please consider that the black box functions are not available in absence of GPS
signals (for example in tunnels). After a 1.5G shock, power must be maintained for at least 20 seconds to
record the image correctly. If the car’s power supply should be interrupted during a heavy crash, the unit may
not save properly.
It is possible to set off the 1.5G sensor without an accident. (Road condition or sudden stops may set off the
1.5G sensor). In the event that the F-A-S 100 system records a video when there was not an accident,
please press the button that will erase the video.
Voice notification of front car departure
When your car is stopped; such as traffic jams, waiting for the traffic light, or entering the expressway, the
system notifies you within 1-2 seconds after the car ahead of you moves forward.
Road Matrix is always watching the road ahead for you. When the car ahead of you starts to move forward, it
perceives the situation right away and provides you with an audio alarm. This feature allows you a few
moments to take care of other things in the vehicle without worrying about the driver behind you honking the
horn.
This alarm feature is a supplementary function for your driving. The driver of the vehicle is at any time
responsible for the safety of the passengers.
This function is very useful in heavy traffic or when you are waiting at a traffic light.
Once an audio alarm is provided, there will be no more alarms when the speed is below 25mph / 38 km/h.
Message for Safe Driving
The system counts the time as long as it is powered and informs you after you are driving for an extended
period of time without making a break.
Extended driving time warning
•
•
Notifies the driver of how long they have been driving.
Hourly Messages: 1 hour, 2 hours, 3 hours, 4 hours …etc.
Power On/Off
•
Press MENU/POWER button once.
The power will automatically be switched off when the engine (ignition) is switched off .
If necessary, you may also switch off the unit by pulling the cigarette lighter plug. But do not forget to insert
the plug again for the next tour!
Menu button: Lane departure warning on/off
The lane departure warning function is automatically on when the power is on. You may turn it off.
• When the deviation warning is on and you press the menu button for 3 seconds, the device will
power off with an audio message.
• If you press the menu button for 3 seconds again, the device powers on.
Video storage and voice notification functions
These functions are automatically always on and cannot be switched off separately
Volume (VOL)
• If you turn the volume up, it becomes louder, if you turn down the volume, the audio warning
becomes quieter.
Menu settings
How to control the menu and select button
There are 5 menus; you can go one by one on the menu, or in case you already know each menu, you can
reach each menu by pressing it.
Examples:
•
•
•
Menu 1: press the menu button once
Menu 3: press 3 times
Menu 5; press 5 times)
All the menus are saved and go back to the waiting mode automatically if you once select and do not do
anything after 6 seconds.
Menu 1 : Set a Left side Warning Time Mode (Initial Setting : Nominal mode)
> MENU/POWER
MENU/POWER <
Level 3 Slow <-> Level 2 Slow <-> Level 1 Slow <-> Nominal mode <->
Level 1 Fast <-> Level 2 Fast <-> Level 3 Fast
Menu 2 : Set a Right side Warning Time Mode (Initial Setting : Nominal Mode)
> MENU/POWER
MENU/POWER <
Level 3 Slow <-> Level 2 Slow <-> Level 1 Slow <-> Nominal mode <->
Level 1 Fast <-> Level 2 Fast <-> Level 3 Fast
Menu 3 : Select an Vehicle Speed (Initial Setting : 75 km/h)
< MENU/POWER
Car type:
Truck type
75 km/h
60 km/h
MENU/POWER>
<==>
<==>
90 km/h
80 km/h
Menu 4 : Warning sound (Initial Setting : Sound 1)
< MENU/POWER
MENU/POWER>
Sound 1 <-> Sound 2 <-> Sound 3 <-> Sound 4 <-> Sound 5
Menu 5 : Select a vehicle type (initial setting is passenger car)
< MENU / POWER
MENU / POWER >
Sports Car <-> Passenger Car <-> SUV <-> Larger SUV and Van
Small Size Truck <-> Larger Size Truck <->
Bus & Commercial Truck Type One <-> Bus & Commercial Truck Type Two
Audio Messages and Display
Classification
Event
2 seconds after the power
is on (Press power button
once)
Greetings
While
checking
the
location
After it has checked the
location
Lane Departure When
departing
the
Warning
right/left lane
Voice
When car is stopped
Notification of
Within 1~2 sec after front
Front Car
car departure
Departure
When the power is on
after saving an image
Image Storage
During saving the image
After saving the image
Audio Message
Hello. Road Matrix is activated. Please
fasten your seatbelt.
(Ding-dong!) Voice announcement will
assist you for a safer driving.
Audio warning (beep-beep)
(Ding-dong) Please pay attention to the
front of the vehicle.
(Ding-dong) There is a stored video
(Ding-dong) Video has been stored.
Display
Audio Messages and Display
Classification
Event
Extended
driving time
warning
Every hour
Press the menu button
Press Select[>,<] button
within 6 seconds
Alarming
Moment
After left alarming moment
setting and press the
menu Button within 6
seconds.
Press Select[>.<] button
within 6 seconds.
Select
activation
Speed
Alarm Sound
Control
Press menu button
Press Select(>,<) button
within 5 seconds
After speed setting press
the menu button within 5
seconds
Audio Message
(Ding-dong) You are driving for 1 hour
(2hrs/3hrs/4hrs) continuously.
Please take a short break.
[Ding-Dong] Road Matrix will set a left
side warning time mode
Level 3 slow Level 2 slow / Level 1
slow / Nominal mode / Level 1fast /
Level 2 fast / Level 3 fast
[Ding-Dong] Road Matrix will set a
Right warning time mode.
Level 3 slow / Level 2 slow / Level 1
slow /
Nominal mode / Level 1 fast / Level 2
fast / Level 3 fast
(Ding-Dong) Road Matrix will select a
vehicle speed. Preselected is 75 km/h.
Selected speed level is 90 km/h
(Ding-Dong) Now the system will adjust
warning sound.
Display
Audio Messages and Display
Classification
Event
Alarm Sound
Control
Press Select(>,<)
within 5 seconds
Model setting
After setting the alarm
moment and pressing the
menu Button within 6
seconds
Press the select(>,<) button
within 6 seconds
Lane departure
warning setting
MENU
Camera
calibrating
button
Press the menu Button on
over 3 seconds
Camera setting completed
Camera setting error
Audio Message
[>Button basis] Sound 1
(Sound2/Sound3/Sound4/Sound5)
[<Button goes the opposite direction]
(Ding-Dong)
F-A-S 100 will select an automobile type
[< Button basis] selected for passenger
car (sports car, SUV, van)
Lane departure warning system is
deactivated
Lane departure warning system is
activated
Camera has been installed properly
Camera setting error! Please reinstall the
camera and follow all manual steps!
Trouble Shooting
Problem
Does not power on
You cannot hear any audio
There is no lane departure
warning
There is alarming even if you
are driving normally
You cannot record an image
There is no alarm when the car
ahead departs
The product seems to be overheating
What to do?
Please check the cigarette cable is properly connected. Please
note that most European cars do not supply power at the cigarette
lighter socket when car engine is not running.
Please check the volume control and adjust it.
- Check that the horizontal axis is correctly aligned.
- Lane departure warning works only after recognizing
the first lane for more than 2 seconds. So it only alerts you
after driving on a lane for more than 2 seconds.
- Verify the horizontal axis under the camera is situated correctly.
- If the road is too bumpy or the weather is too
bad, an alarm will warn you that the system is deactivated.
The device requires a 1.5g or great impact to record an image.
- Please check the horizontal axis under the camera is situated
correctly.
- This alarm works only when you are completely stopped and
the car in front has started to move.
It may seem to overheat by the direct sunlight or when used for
long period of time during the hot summer months. The system will
withstand extreme temperatures.
European 2-Years Warranty
Alan Electronics GmbH provides the legal European Warranty for your FAS 100 system (hereinafter referred
to as “Product”). Should your Product need warranty service, please return it with original receipt to the
dealer from whom it was purchased. If the distributor may not be available, you may contact our repair
service via phone, e-mail or fax.
Service phone (repair enquiries) (+49) 6103 9481 22
Fax
e-mail:
(+49) 6103 9481 60
[email protected]
Our Warranty: Alan warrants this product to be free of defects in design, material and workmanship at the
time of its original purchase by the end user, for a period of 2 years.
Warranty Guidelines: If, during the warranty period, this product fails to operate under normal use and
service, due to defects in design, materials and or workmanship, ALAN or our authorized representative, in
the country where you purchased the product, will at their discretion, either repair or replace the product in
accordance with the terms and conditions of the warranty, stated hereafter.
Our distributors or service agents reserve the right to charge a handling fee if a returned product is found not
to be under warranty according to the terms and conditions below:
Conditions:
• The warranty is only valid if the original proof of purchase issued to the original purchaser by an
authorized dealer for this product, specifying the date of purchase and Product purchased, is
presented with the product to be repaired or replaced. ALAN reserves the right to refuse any
warranty service is this information has been removed or changed after the original purchase of the
product from the authorized dealer.
• If a product is replaced or repaired, the repaired or replaced product shall be warranted for the
remaining time of the original warranty period. During the repair or replacement we have the option
to use functionally equivalent reconditioned units. Replaced parts or components will become the
property of ALAN.
• This warranty does not cover any failure of the Product due to normal ware and tear, or due to
misuse, including but not limited to use in other than the normal and customary manner, in
accordance with our instructions for the use and maintenance of the product. Nor does this warranty
cover any failure of the product due to accident, software or hardware modifications or adjustments,
higher force or damage resulting from liquid or cleaning chemicals.
•
•
•
•
This warranty does not cover product failures caused by improper installations, modifications, or
repair or opening of the product by non authorized personnel.
The warranty does not cover product failures which have been caused by use of accessories or
other peripheral devices which are not approved Albrecht or Alan product accessories for use with
the product.
Tampering with any of the seals on the product or trying to open the product will void the warranty.
There are no express warranties, whether written or oral, other than this printed limited warranty. All
implied warranties of merchantability or fitness for a particular purpose, are limited to the duration of
this limited warranty. In any event Albrecht, Alan or it’s agents or licensors shall not be liable for
incidental or consequential damages of any nature whatsoever, including but not limited to lost
profits or commercial loss, to the extent those damages can be disclaimed by law.
There are some countries and or states that do not allow the exclusion or limitation of incidental or
consequential damages, or limitation of the duration of implied warranties, therefore the preceding
limitations or exclusions may not be applicable to your situation.
The warranty provided above does not affect the consumer’s statutory rights under applicable legislation
in force, nor the consumers’ right against the dealer or agent arising from their sales or purchase
contract.
Recycling of defective or no more used electronic items
New European regulations request that such no more used electronic items are not allowed
to be put into the household trash. Please recycle not used electronic items only via local
collecting stations or via car recycling companies. The recycling of electronic goods is free of
charge for end consumers. Your contribution to environmental improvements is appreciated!
Conformity to European standards:
This device is in conformity with European Standards and regulations. It does only receive free
accessible GPS signals and does not contain any Radar Warning Receiver or related parts. It
carries the “E11” marking for after market car accessory products. The device can be used free of
charges and license in all European countries. The original Declaration of Conformity can be
downloaded any time from our Download server http://service.alan-germany.de.
© Alan Electronics 2007
Service:
Technical Information Hotline
Repair inquiries:
Fax:
e-mail:
Download-Server
0900 1234-222 (69 cents/minute, only via german fixed phone network,
1.49 Euro/min from mobile phones)
(+49) (0)6103 9481 22
(+49) (0)6103 9481 60
[email protected]
http://service.alan-germany.de
Contact address in case of crash recording’s analysis:
Alan Electronics GmbH – Daimlerstr. 1 k – 63303 Dreieich / Germany
Phone
(+49) (0)6103 9481 22