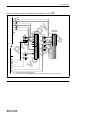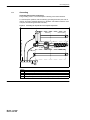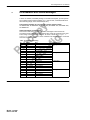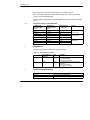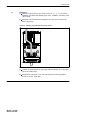
1
Modicon TSX Compact and TIO
for Rail(way) Applications with CAN
User Manual
802 USE 011 00
33001458.00
09/99
Breite: 178 mm
Höhe: 216 mm
Data, Illustrations, Alterations
Data and illustrations are not binding. We reserve the right to alter products in line
with our policy of continuous product development. If you have any suggestions
for improvements or amendments or have found errors in this publication, please
notify us using the form on one of the last pages of this publication.
Training
Schneider Automation offers suitable further training on the system.
Hotline
See addresses for the Technical Support Centers at the end of this publication.
Trademarks
All terms used in this publication to denote Schneider Automation products are
trademarks of Schneider Automation.
All other terms used in this publication to denote products may be registered
trademarks and/or trademarks of the corresponding Corporations.
Microsoft and MS-DOS are registered trademarks of Microsoft Corporation,
Windows is a brandname of Microsoft Corporation in the USA and other countries.
IBM is a registered trademark of International Business Machines Corporation.
Intel is a registered trademark of the Intel Corporation.
Copyright
All rights are reserved. No part of this document may be reproduced or transmitted
in any form or by any means, electronic or mechanical, including copying,
processing or by online file transfer, without permission in writing by Schneider
Automation. You are not authorized to translate this document into any other
language.
© 1999 Schneider Automation GmbH. All rights reserved.
Contents
Contents
Information . . . . . . . . . . . . . . . . . . . . . . . . . . . . . . . . . . . . . . . . . . . . . . 1
Symbols Used . . . . . . . . . . . . . . . . . . . . . . . . . . . . . . . . . . . . . . . . . . . . . . . . . . . . . . . . . 2
Terms and Abbreviations Used . . . . . . . . . . . . . . . . . . . . . . . . . . . . . . . . . . . . . . . . . . . 3
Scope of Application . . . . . . . . . . . . . . . . . . . . . . . . . . . . . . . . . . . . . . . . . . . . . . . . . . . . 4
Chapter 1
General Information Concerning the Compact PLC . . . . . . . . 5
1.1
1.2
1.3
1.3.1
1.3.2
1.3.3
1.4
1.4.1
1.4.2
1.4.3
1.4.4
Design . . . . . . . . . . . . . . . . . . . . . . . . . . . . . . . . . . . . . . . . . . . . . . . . . . . . . . . . . . . . . . . . 6
Configuration Limits . . . . . . . . . . . . . . . . . . . . . . . . . . . . . . . . . . . . . . . . . . . . . . . . . . . . 8
Programming . . . . . . . . . . . . . . . . . . . . . . . . . . . . . . . . . . . . . . . . . . . . . . . . . . . . . . . . . 10
Expert Programming Languages . . . . . . . . . . . . . . . . . . . . . . . . . . . . . . . . . . . . . . . . 10
Creating Programs . . . . . . . . . . . . . . . . . . . . . . . . . . . . . . . . . . . . . . . . . . . . . . . . . . . . 10
Programming Units . . . . . . . . . . . . . . . . . . . . . . . . . . . . . . . . . . . . . . . . . . . . . . . . . . . . 11
Overview of the Components . . . . . . . . . . . . . . . . . . . . . . . . . . . . . . . . . . . . . . . . . . . 12
Software . . . . . . . . . . . . . . . . . . . . . . . . . . . . . . . . . . . . . . . . . . . . . . . . . . . . . . . . . . . . . 12
Hardware (Rail--qualified Components) . . . . . . . . . . . . . . . . . . . . . . . . . . . . . . . . . . . 12
Indicator Elements . . . . . . . . . . . . . . . . . . . . . . . . . . . . . . . . . . . . . . . . . . . . . . . . . . . . 15
Control Elements . . . . . . . . . . . . . . . . . . . . . . . . . . . . . . . . . . . . . . . . . . . . . . . . . . . . . . 15
Chapter 2
Controller Area Network (CAN) . . . . . . . . . . . . . . . . . . . . . . . . . . 17
2.1
2.2
2.2.1
2.2.2
2.2.3
2.2.4
2.2.5
2.2.6
2.3
2.3.1
2.3.2
2.3.3
2.3.4
2.3.5
20
Breite: 178 mm
Höhe: 216 mm
Hardware and Bus Topology . . . . . . . . . . . . . . . . . . . . . . . . . . . . . . . . . . . . . . . . . . . .
Message Types . . . . . . . . . . . . . . . . . . . . . . . . . . . . . . . . . . . . . . . . . . . . . . . . . . . . . . .
Data Frame -- Standard and Extended Format . . . . . . . . . . . . . . . . . . . . . . . . . . . .
Data Frame -- Standard Format . . . . . . . . . . . . . . . . . . . . . . . . . . . . . . . . . . . . . . . . .
Data Frame -- Extended Format . . . . . . . . . . . . . . . . . . . . . . . . . . . . . . . . . . . . . . . . .
Remote Frame . . . . . . . . . . . . . . . . . . . . . . . . . . . . . . . . . . . . . . . . . . . . . . . . . . . . . . . .
Error Frame . . . . . . . . . . . . . . . . . . . . . . . . . . . . . . . . . . . . . . . . . . . . . . . . . . . . . . . . . .
Remark on Identifiers . . . . . . . . . . . . . . . . . . . . . . . . . . . . . . . . . . . . . . . . . . . . . . . . . .
The ISO/OSI Reference Model . . . . . . . . . . . . . . . . . . . . . . . . . . . . . . . . . . . . . . . . . .
CANopen as the Application Layer (Layer 7) . . . . . . . . . . . . . . . . . . . . . . . . . . . . .
Communications mode . . . . . . . . . . . . . . . . . . . . . . . . . . . . . . . . . . . . . . . . . . . . . . . . .
The Object Dictionary . . . . . . . . . . . . . . . . . . . . . . . . . . . . . . . . . . . . . . . . . . . . . . . . . .
Service Data Objects (SDO) . . . . . . . . . . . . . . . . . . . . . . . . . . . . . . . . . . . . . . . . . . . .
Process Data Objects (PDO) . . . . . . . . . . . . . . . . . . . . . . . . . . . . . . . . . . . . . . . . . . .
19
20
20
21
23
24
25
25
26
26
27
27
28
28
III
Contents
Chapter 3
3.1
3.1.1
3.1.2
3.2
3.2.1
3.2.2
3.2.3
3.3
3.3.1
3.3.2
3.3.3
3.3.4
3.3.5
3.3.6
3.3.7
Hardware Configuration . . . . . . . . . . . . . . . . . . . . . . . . . . . . . . . . . . . . . . . . . . . . . . . .
Mapping and Specifying I/O Slots . . . . . . . . . . . . . . . . . . . . . . . . . . . . . . . . . . . . . . .
Total Current . . . . . . . . . . . . . . . . . . . . . . . . . . . . . . . . . . . . . . . . . . . . . . . . . . . . . . . . . .
Configuring the Power Supply . . . . . . . . . . . . . . . . . . . . . . . . . . . . . . . . . . . . . . . . . .
Planning and Distribution of Circuits . . . . . . . . . . . . . . . . . . . . . . . . . . . . . . . . . . . . .
Connection Scheme for Power Supply UB
(24 VDC for Modules and Sensors) . . . . . . . . . . . . . . . . . . . . . . . . . . . . . . . . . . . . . .
Connection Scheme of the Working Voltage Supply (US = 24 VDC) . . . . . . . . .
Installation . . . . . . . . . . . . . . . . . . . . . . . . . . . . . . . . . . . . . . . . . . . . . . . . . . . . . . . . . . . .
Top hat rail . . . . . . . . . . . . . . . . . . . . . . . . . . . . . . . . . . . . . . . . . . . . . . . . . . . . . . . . . . .
Backplane . . . . . . . . . . . . . . . . . . . . . . . . . . . . . . . . . . . . . . . . . . . . . . . . . . . . . . . . . . . .
Modules . . . . . . . . . . . . . . . . . . . . . . . . . . . . . . . . . . . . . . . . . . . . . . . . . . . . . . . . . . . . . .
Mounting 470 IPS 258 00 and 470 NAV 511 00 . . . . . . . . . . . . . . . . . . . . . . . . . . .
Installing the CAN Line . . . . . . . . . . . . . . . . . . . . . . . . . . . . . . . . . . . . . . . . . . . . . . . .
Grounding . . . . . . . . . . . . . . . . . . . . . . . . . . . . . . . . . . . . . . . . . . . . . . . . . . . . . . . . . . . .
Dimension Drawings . . . . . . . . . . . . . . . . . . . . . . . . . . . . . . . . . . . . . . . . . . . . . . . . . . .
30
30
31
33
35
36
43
47
47
49
52
54
55
60
64
Chapter 4
Software Installation . . . . . . . . . . . . . . . . . . . . . . . . . . . . . . . . . . . . 67
4.1
4.2
4.3
CANopen Installation Routine . . . . . . . . . . . . . . . . . . . . . . . . . . . . . . . . . . . . . . . . . . . 68
Layer 2 Applications . . . . . . . . . . . . . . . . . . . . . . . . . . . . . . . . . . . . . . . . . . . . . . . . . . . 69
Configurator . . . . . . . . . . . . . . . . . . . . . . . . . . . . . . . . . . . . . . . . . . . . . . . . . . . . . . . . . . 70
Chapter 5
EFB’s for AS--BCAN--259 . . . . . . . . . . . . . . . . . . . . . . . . . . . . . . . . 71
5.1
5.1.1
5.1.2
5.1.3
5.1.4
5.1.5
5.2
5.2.1
5.2.2
5.3
5.3.1
5.3.2
5.4
5.5
5.5.1
5.5.2
5.5.3
IV
HW Configuration . . . . . . . . . . . . . . . . . . . . . . . . . . . . . . . . . . . . . . . 29
CAN_CFG . . . . . . . . . . . . . . . . . . . . . . . . . . . . . . . . . . . . . . . . . . . . . . . . . . . . . . . . . .
Short Description . . . . . . . . . . . . . . . . . . . . . . . . . . . . . . . . . . . . . . . . . . . . . . . . . . . . . .
Layout . . . . . . . . . . . . . . . . . . . . . . . . . . . . . . . . . . . . . . . . . . . . . . . . . . . . . . . . . . . . . . .
Datatype CAN_CFG_DATA . . . . . . . . . . . . . . . . . . . . . . . . . . . . . . . . . . . . . . . . . . . . .
Relais operation control . . . . . . . . . . . . . . . . . . . . . . . . . . . . . . . . . . . . . . . . . . . . . . . .
Data Type CAN_ACCPT . . . . . . . . . . . . . . . . . . . . . . . . . . . . . . . . . . . . . . . . . . . . . . .
CAN_SND . . . . . . . . . . . . . . . . . . . . . . . . . . . . . . . . . . . . . . . . . . . . . . . . . . . . . . . . . . . .
Short Description . . . . . . . . . . . . . . . . . . . . . . . . . . . . . . . . . . . . . . . . . . . . . . . . . . . . . .
Layout . . . . . . . . . . . . . . . . . . . . . . . . . . . . . . . . . . . . . . . . . . . . . . . . . . . . . . . . . . . . . . .
CAN_RCV . . . . . . . . . . . . . . . . . . . . . . . . . . . . . . . . . . . . . . . . . . . . . . . . . . . . . . . . . . . .
Short Description . . . . . . . . . . . . . . . . . . . . . . . . . . . . . . . . . . . . . . . . . . . . . . . . . . . . . .
Layout . . . . . . . . . . . . . . . . . . . . . . . . . . . . . . . . . . . . . . . . . . . . . . . . . . . . . . . . . . . . . . .
CANopen . . . . . . . . . . . . . . . . . . . . . . . . . . . . . . . . . . . . . . . . . . . . . . . . . . . . . . . . . . . .
ProCanOpen . . . . . . . . . . . . . . . . . . . . . . . . . . . . . . . . . . . . . . . . . . . . . . . . . . . . . . . . .
Configure Network . . . . . . . . . . . . . . . . . . . . . . . . . . . . . . . . . . . . . . . . . . . . . . . . . . . .
Variable Connections . . . . . . . . . . . . . . . . . . . . . . . . . . . . . . . . . . . . . . . . . . . . . . . . . .
The slavecfg Tool . . . . . . . . . . . . . . . . . . . . . . . . . . . . . . . . . . . . . . . . . . . . . . . . . . . . .
72
72
72
73
74
75
76
76
76
78
78
78
80
81
81
83
84
20
Contents
5.5.4
5.5.5
Downloading the configuration into AS--BCAN--259 . . . . . . . . . . . . . . . . . . . . . . . . 85
Generating the *.DTY File . . . . . . . . . . . . . . . . . . . . . . . . . . . . . . . . . . . . . . . . . . . . . . 85
Chapter 6
CANopen Integration into Concept . . . . . . . . . . . . . . . . . . . . . . . 87
6.1
6.2
6.3
6.3.1
6.3.2
6.3.3
6.4
6.4.1
6.4.2
6.5
6.5.1
6.5.2
6.6
6.6.1
6.6.2
6.7
6.7.1
6.7.2
6.8
6.8.1
6.8.2
6.9
6.9.1
6.9.2
6.10
6.10.1
6.10.2
Configurator . . . . . . . . . . . . . . . . . . . . . . . . . . . . . . . . . . . . . . . . . . . . . . . . . . . . . . . . . . 88
EFB Overview . . . . . . . . . . . . . . . . . . . . . . . . . . . . . . . . . . . . . . . . . . . . . . . . . . . . . . . . 89
CIA_SVR . . . . . . . . . . . . . . . . . . . . . . . . . . . . . . . . . . . . . . . . . . . . . . . . . . . . . . . . . . . . . 90
Short Description . . . . . . . . . . . . . . . . . . . . . . . . . . . . . . . . . . . . . . . . . . . . . . . . . . . . . . 90
Layout . . . . . . . . . . . . . . . . . . . . . . . . . . . . . . . . . . . . . . . . . . . . . . . . . . . . . . . . . . . . . . . 90
Datatype NWK_STATE . . . . . . . . . . . . . . . . . . . . . . . . . . . . . . . . . . . . . . . . . . . . . . . . . 91
CIA_SDOW . . . . . . . . . . . . . . . . . . . . . . . . . . . . . . . . . . . . . . . . . . . . . . . . . . . . . . . . . . 93
Short Description . . . . . . . . . . . . . . . . . . . . . . . . . . . . . . . . . . . . . . . . . . . . . . . . . . . . . . 93
Layout . . . . . . . . . . . . . . . . . . . . . . . . . . . . . . . . . . . . . . . . . . . . . . . . . . . . . . . . . . . . . . . 93
CIA_SDOR . . . . . . . . . . . . . . . . . . . . . . . . . . . . . . . . . . . . . . . . . . . . . . . . . . . . . . . . . . . 95
Short Description . . . . . . . . . . . . . . . . . . . . . . . . . . . . . . . . . . . . . . . . . . . . . . . . . . . . . . 95
Layout . . . . . . . . . . . . . . . . . . . . . . . . . . . . . . . . . . . . . . . . . . . . . . . . . . . . . . . . . . . . . . . 95
CIA_NMT . . . . . . . . . . . . . . . . . . . . . . . . . . . . . . . . . . . . . . . . . . . . . . . . . . . . . . . . . . . . 97
Short Description . . . . . . . . . . . . . . . . . . . . . . . . . . . . . . . . . . . . . . . . . . . . . . . . . . . . . . 97
Layout . . . . . . . . . . . . . . . . . . . . . . . . . . . . . . . . . . . . . . . . . . . . . . . . . . . . . . . . . . . . . . . 97
CIA_CMT . . . . . . . . . . . . . . . . . . . . . . . . . . . . . . . . . . . . . . . . . . . . . . . . . . . . . . . . . . . . 99
Short Description . . . . . . . . . . . . . . . . . . . . . . . . . . . . . . . . . . . . . . . . . . . . . . . . . . . . . . 99
Layout . . . . . . . . . . . . . . . . . . . . . . . . . . . . . . . . . . . . . . . . . . . . . . . . . . . . . . . . . . . . . . . 99
CIA_EMCY . . . . . . . . . . . . . . . . . . . . . . . . . . . . . . . . . . . . . . . . . . . . . . . . . . . . . . . . . . 101
Short Description . . . . . . . . . . . . . . . . . . . . . . . . . . . . . . . . . . . . . . . . . . . . . . . . . . . . . 101
Layout . . . . . . . . . . . . . . . . . . . . . . . . . . . . . . . . . . . . . . . . . . . . . . . . . . . . . . . . . . . . . . 101
CIA_ISCL . . . . . . . . . . . . . . . . . . . . . . . . . . . . . . . . . . . . . . . . . . . . . . . . . . . . . . . . . . . 103
Short Description . . . . . . . . . . . . . . . . . . . . . . . . . . . . . . . . . . . . . . . . . . . . . . . . . . . . . 103
Layout . . . . . . . . . . . . . . . . . . . . . . . . . . . . . . . . . . . . . . . . . . . . . . . . . . . . . . . . . . . . . . 103
CIA_OSCL . . . . . . . . . . . . . . . . . . . . . . . . . . . . . . . . . . . . . . . . . . . . . . . . . . . . . . . . . . 104
Short Description . . . . . . . . . . . . . . . . . . . . . . . . . . . . . . . . . . . . . . . . . . . . . . . . . . . . . 104
Layout . . . . . . . . . . . . . . . . . . . . . . . . . . . . . . . . . . . . . . . . . . . . . . . . . . . . . . . . . . . . . . 104
Chapter 7
Error Diagnostics for I/O Modules . . . . . . . . . . . . . . . . . . . . . . 105
7.1
7.1.1
7.1.2
7.1.3
7.2
7.2.1
20
Breite: 178 mm
Höhe: 216 mm
Slot Check . . . . . . . . . . . . . . . . . . . . . . . . . . . . . . . . . . . . . . . . . . . . . . . . . . . . . . . . . .
EFB (Elementary Function Block) ”RIOSTAT” . . . . . . . . . . . . . . . . . . . . . . . . . . . .
Configuring the EFB ”RIOSTAT” . . . . . . . . . . . . . . . . . . . . . . . . . . . . . . . . . . . . . . . .
Uploading the Status Bits . . . . . . . . . . . . . . . . . . . . . . . . . . . . . . . . . . . . . . . . . . . . .
Error Markers and Status Messages . . . . . . . . . . . . . . . . . . . . . . . . . . . . . . . . . . . .
Module--specific Register Assignment . . . . . . . . . . . . . . . . . . . . . . . . . . . . . . . . . . .
106
106
107
108
109
110
V
Contents
Module Descriptions . . . . . . . . . . . . . . . . . . . . . . . . . . . . . . . . . . . 115
AS--BADU 256 Analog inputs . . . . . . . . . . . . . . . . . . . . . . . . . . . . . . . . . . . . . . . . . .
AS--BDAP 250 Discrete Inputs and Outputs . . . . . . . . . . . . . . . . . . . . . . . . . . . . .
AS--BDAP 252, AS--BDAP 253 Discrete
Inputs and Outputs . . . . . . . . . . . . . . . . . . . . . . . . . . . . . . . . . . . . . . . . . . . . . . . . . . .
AS--BDAP 258 Discrete Outputs . . . . . . . . . . . . . . . . . . . . . . . . . . . . . . . . . . . . . . .
AS--BDAU 252 Analog Outputs . . . . . . . . . . . . . . . . . . . . . . . . . . . . . . . . . . . . . . . .
AS--BDEP 254 Discrete Inputs . . . . . . . . . . . . . . . . . . . . . . . . . . . . . . . . . . . . . . . . .
AS--BDEP 256, AS--BDEP 257 Discrete Inputs . . . . . . . . . . . . . . . . . . . . . . . . . .
AS--BCAN--259 Communications Module for CAN . . . . . . . . . . . . . . . . . . . . . . . .
AS--BNUL--200, AS--BNUL--202 Dummy Modules . . . . . . . . . . . . . . . . . . . . . . . .
AS--HDTA--200 ... 202 Backplane . . . . . . . . . . . . . . . . . . . . . . . . . . . . . . . . . . . . . .
PC--E984--258C CPU . . . . . . . . . . . . . . . . . . . . . . . . . . . . . . . . . . . . . . . . . . . . . . . . .
470 IPS 258 00 Power Supply Module . . . . . . . . . . . . . . . . . . . . . . . . . . . . . . . . . .
117
131
139
147
153
159
165
171
181
185
191
197
Appendix . . . . . . . . . . . . . . . . . . . . . . . . . . . . . . . . . . . . . . . . . . . . . . 205
Appendix A The Object Dictionary of AS--BCAN 259 00 . . . . . . . . . . . . . . 207
Appendix B EFB Error Codes . . . . . . . . . . . . . . . . . . . . . . . . . . . . . . . . . . . . . . 213
Appendix C Firmware Download . . . . . . . . . . . . . . . . . . . . . . . . . . . . . . . . . . . . 217
Appendix D Overview of Standards . . . . . . . . . . . . . . . . . . . . . . . . . . . . . . . . . 219
Appendix E Accessory Supplier References . . . . . . . . . . . . . . . . . . . . . . . . 221
Glossary . . . . . . . . . . . . . . . . . . . . . . . . . . . . . . . . . . . . . . . . . . . . . . 223
Index . . . . . . . . . . . . . . . . . . . . . . . . . . . . . . . . . . . . . . . . . . . . . . . . . 257
VI
20
Info.50
i
Information
This publication is the basic document for programmable controllers used in rail
applications with MVB. It describes the performance range of the programmable
controller and provides the user with all the information required to complete a
design used to operate standard applications as well as download the user
program.
The description includes:
H
H
H
H
H
Configuration (I/O points, programming unit, control unit)
Hardware assembly
Configuration of the network supply
Connection of the cables leading to the process
Procedure for intial start up
Furthermore, whenever appropriate, there are references to publications that are
dealing with special applications, e.g. programming.
H
H
H
H
Symbols used
Terms and abbreviations
Additional documentation
Scope of application
Caution
For applications using controllers with security requirements, the
appropriate regulations must be observed.
For reasons of safety and maintenance of documented systems data, repairs
on components should only made by the manufacturer.
20
Breite: 178 mm
Höhe: 216 mm
1
Information
Symbols Used
Note
This symbol is used to emphasize important facts.
Caution
This symbol refers to sources of frequently occurring errors.
STOP
STOP
Warning
This symbol points out potential sources of danger, that may lead to
financial losses and health hazards or other serious consequences.
Expert
This symbol is used when further information is provided exclusively intended for
experts (specialized training). Skipping this information in no way impedes the
understanding of the document, nor does it restrict the standard operation of the
product.
Tip
This symbol is used to emphasize the explanation of special tips when working
with the product.
Example
Example
This symbol represents examples of application.
"
2
Please proceed as follows:
This marks the beginning of a series of instructions that must be executed in
order to achieve a certain product function.
20
Information
This symbol points to manuals/sources dealing more thoroughly with the theme in
question.
This symbol identifies the menu path.
20
Breite: 178 mm
Höhe: 216 mm
3
Information
Terms and Abbreviations Used
Numbers are written according to international practice as well as according to the
approved SI (Système International d’ Unités) layout: The thousands are
separated by a space, and the decimal point is used, e. g. 12 345.67.
You will find all abbreviations used listed in the appendix under ”Abbreviations, and
Standards”.
4
20
Information
Scope of Application
This user manual is based on version 2.1 of Concept and version 2.101 of the
TCN tool.
20
Breite: 178 mm
Höhe: 216 mm
5
General Information Concerning the
Compact PLC
1
This chapter provides an overview of the CAN rail components and describes the
integration in its programming technology. The main topic discussed is ”What are
the possibilities when using the TSX Compact for rail applications and what are its
performance limits?”.
Chapter 3 deals with hardware configuration and provides very concrete and
detailed work instructions.
Each of the following topics are explained:
21
Breite: 178 mm
Höhe: 216 mm
H
Construction and Configuration limits
H
Programming technology (special programming languages, programming and
peripheral devices)
H
Overview of the components (Software, Hardware)
7
General Information Concerning the Compact PLC
1.1
Design
Figure 1
Primary unit
Modules
Top hat rail
Front panel
Backplane
Label inlays
Modicon TSX Compact is a controller with front connection that has a modular
architecture suitable for small to medium size automation tasks.
This includes:
H
H
H
H
H
H
H
Controlling and computing
Rules
Processing the measured values
and monitoring
Control sequencing
Diagnostics
Communication via CAN
This architecture facilitates installation on the top hat rail where the backplane is
secured (see Figure).
The backplane is a baseplate for the accommodation of modules.
8
21
General Information Concerning the Compact PLC
Backplanes come in a width of 1/2 19” and 3 height units. To cover the front
connectors of the modules, front panels matching the backplane can be used.
The function indicators are visible through the front panel which has spaces for
label inlays to identify individual terminal assignments. When the modules are
exchanged, the label identification remains.
21
Breite: 178 mm
Höhe: 216 mm
9
General Information Concerning the Compact PLC
1.2
Configuration Limits
The TSX Compact consists of a primary unit and of up to 3 expansions
depending on the definition of the design (refer to Figure 2 figure).
The primary unit is made up of:
H
Primary backplane AS--HDTA--200, a CPU with integrated power supply
module, an CAN communications module and up to 2 I/O modules
An expansion consists of:
H
H
Expansion backplane AS--HDTA--201 with up to 5 I/O modules
or
Terminating backplane AS--HDTA--202 with up to 2 I/O modules
The following maximum build limits apply to the TSX Compact I/O peripherals:
Table 1
Maximum build limits
Configuration
Primary backplane AS--HDTA--200
Expansion backplane AS--HDTA--201
Expansion backplane AS--HDTA--202
TSX Compact with 3 AS--HDTA--201 expansion
backplanes (maximum build)
10
I/O slots
3
5
2
18
21
General Information Concerning the Compact PLC
Figure 2
All possible options for a single line TSX Compact design
AS--HDTA--200
AS--HDTA--200
AS--HDTA--202
AS--HDTA--200
AS--HDTA--201
.
.
.
.
.
.
AS--HDTA--200
AS--HDTA--201
AS--HDTA--201
AS--HDTA--202
AS--HDTA--200
AS--HDTA--201
AS--HDTA--201
AS--HDTA--201
21
Breite: 178 mm
Höhe: 216 mm
11
General Information Concerning the Compact PLC
1.3
Programming
H
H
H
1.3.1
Expert programming languages
Creating programs
Programming units
Expert Programming Languages
Concept
Programming is performed off-line in compliance with IEC 1131-3.
The following specific editors are available for working with various programming
languages:
H
H
H
H
H
FBD editor (function block language)
LD editor (contact plan)
SFC editor (job sequencing)
IL editor (instruction list)
ST editor (structured text)
The detailed programming description is included in the documentation supplied
with the software package.
1.3.2
Creating Programs
A PLC is programmed using Concept according to a hierarchy of projects,
configurations, programs and sections. Programming can be performed top down
or bottom up.
12
21
General Information Concerning the Compact PLC
Figure 3
Programming hierarchy in Concept
Project
Program
Section
21
Breite: 178 mm
Höhe: 216 mm
Section
Configuration
Section
13
General Information Concerning the Compact PLC
Program
A program is made up of one or several sections, describing the functional details
of the entire system. The section processing order is specified in the program. In
addition, this is where the variables, constants, literals, and direct addresses used
are managed.
Various data types are available for variables, constants and literals.
Section
A program consists of one or several sections. A section describes the operating
mode of a technological unit (e.g. a motor) in a system. Sections can be
programmed using the IEC programming languages FBD and SFC. Only one of
the listed programming languages can be used within a given section.
Configuration Data
The configurator is the interface between the program and the hardware.
The configuration data mainly consists of the I/O map and the specification of
address ranges for the program.
1.3.3
Programming Units
When using standard PCs, the following conditions apply:
H Windows ≥ 3.1 or Windows 95 on a suitable PC
H 4 MB RAM
H 60 MB hard disk
H 3 1/2” diskette drive (1.44 MB)
H VGA graphic display adapter and screen
H Microsoft compatible mouse
H MS--DOS version ≥ 6.0
The programming unit is connected to the ”MB1” RS 232C interface on the CPU.
14
21
General Information Concerning the Compact PLC
1.4
Overview of the Components
H
H
H
H
1.4.1
Software
Hardware (rail--qualified components)
Indicator elements
Control elements
Software
Table 2
Software overview
Type
372 SPU 429 01
TCN--Tool
Function
Program Compact using Concept
Define the parameters of the CAN nodes
Further information can be found in the documentation enclosed with each
software package.
1.4.2
Hardware (Rail--qualified Components)
Table 3
21
Breite: 178 mm
Höhe: 216 mm
Overview of backplanes, CPUs, interface modules
Module
Function
AS--HDTA--200
AS--HDTA--201
AS--HDTA--202
Backplane
Primary backplane, 5 slots
Expansion backplane, 5 slots
Termination backplane, 2 slots
PC--E984--258
CPUs
CPU for rail applications
AS--BCAN--259
470 NAV 511 00
AS--WCAN--201
Communication
CAN communications module
CAN TAP (Terminal Access Point)
Connecting cables AS--BCAN--259 to 470 NAV 511 00
15
General Information Concerning the Compact PLC
Table 4
Overview of discrete I/O modules
Module
Function
AS--BDEP--254
AS--BDEP--256
AS--BDEP--257
Input modules
16 inputs 24 ... 48 VDC, isolated
16 inputs 24 VDC, isolated
16 inputs 110 VDC, isolated
AS--BDAP--258
Output modules
8 relay outputs 24 VDC ... 230 VAC, 2 A, isolated
AS--BDAP--250
AS--BDAP--252
AS--BDAP--253
Table 5
Overview of analog I/O modules
Module
Function
AS--BADU--256
Input modules
4 inputs +/--1 V / +/--10 V / 0 ... 10 VDC /
+/--20 mA / 0 ... 20 mA, isolated
AS--BDAU--252
16
Input and output modules
8 inputs 24 VDC, isolated, 8 semiconductor outputs 24 VDC, 2 A, isolated
8 inputs 24 VDC isolated, 4 relay outputs 24 VDC ... 230 VAC, 2 A
8 inputs 110 VDC isolated, 4 relay outputs 24 VDC ... 230 VAC, 2 A
Output modules
2 outputs +/--10 V / +/--20 mA, isolated back--to--back
21
General Information Concerning the Compact PLC
Table 6
Overview of accessories
Module
Function
470 IPS 258 00
Power supply modules
Power supply module 24 VDC (--30 % ... +25 %) to 22 VDC (+/--5 %)
AS--BNUL--200
AS--BNUL--202
SIM 011
Module accessories for Compact
Dummy for the pre--wiring of future points
Dummy for the placement of supply lines
Simulator, clip--on, for 8 discrete inputs
170 XTS 006 00
170 XTS 005 00
170 XTS 004 00
170 XCP 200 00
170 XTS 011 00
TIO accessories (bus bars, terminals)
Single--row screw terminal
Double--row screw terminal
Triple--row screw terminal
Set of coding wedges and coding riders
Set of screw/plug--in terminals (8--pin, 3 each)
HUT 3573
CER 001
EDS 000
GND 001
OVP 001
OVP 2480
Physical system
Top hat rail as per DIN--EN 50 022, profile 35 x 7.5 mm (by the meter)
Cable grounding rail for 8 cables
Grounding clamp
Capacitive discharge terminal
Overvoltage protection 10 A
Overvoltage protection 25 A
AS--WBXT--201
Cables
DTA bus extension 500 mm (stacked drop layout)
110 XCA 282 01
110 XCA 282 02
110 XCA 282 03
110 XCA 203 00
KAB--2205--LI
21
Breite: 178 mm
Höhe: 216 mm
Programming cable CPU to PC, 1 m long
Programming cable CPU to PC, 3 m long
Programming cable CPU to PC, 6 m long
Adapter RJ45 to 9--pin for PC (AT)
Cable with shield (by the meter) 2 x 2 x 0.5 sq/mm for the connection of
analog sensors and actuators
17
General Information Concerning the Compact PLC
1.4.3
Indicator Elements
Most modules have LED indicators for diagnostic purposes. There are yellow and
red LEDs having the following basic meaning (there are possible deviations):
Yellow LED
Red LED
The LED lights up when the power, working voltage or the sensor supply
required by the corresponding module are available or when one of the
processors on the module is operating. In output modules it signals overload or a
short--circuit.
In TIO modules, the yellow LED indicates a ”1” signal at the respective
inputs/outputs.
In TSX Compact I/O modules, the red LED indicates a ”1” signal at the
respective inputs/outputs. Otherwise, its function is module--specific.
A list of the indicator elements of each module and a concrete explanation of their
function is included in the description of each module.
1.4.4
Control Elements
The PLC does not have any specific control elements intended for its operation.
Therefore, there are no accessible control switches on the mounted front plate.
Details regarding default settings for configuration and maintenance are included
in the description of each individual module.
Note
The switches on the CPU that can be accessed upon removing the front panel of
the DTA are configuration settings.
18
21
General Information Concerning the Compact PLC
21
Breite: 178 mm
Höhe: 216 mm
19
Controller Area Network (CAN)
2
The Controller Area Network (CAN) is a serial communications protocol which
combines realtime data transfer and a high level of security with no network
administration overhead. Messages have a fixed format of different but limited
length. Messages may be sent whenever the bus is available. In CAN networks a
specific node does not need to be known to other nodes.
The content of a message is recognized by a so--called identifier.This identifier
does not indicate the source or destination of the message. It merely describes the
content of the data. Any node interested in these data may act upon them.
As a consequence of the above mentioned functionality any number of nodes may
receive a particular message. This behavior is also known as multicast or -- if all
nodes are interested in the data -- as broadcast.
CAN provides mechanisms to achieve data consistency of the entire network. This
is done by assuring that a message is either accepted by all nodes or be none.
Two voltage levels may exist on the bus. The level with the relatively high voltage
is called recessive and equals to value logical high. A level of zero volts is called
dominant and equals to a logical low. If two transmitters are sending a different
level at the same time than the resulting level on the bus is zero, hence the
expression of ’dominant’ and ’recessive’.
If two messages are to be transmitted simultaneously the resulting bus access
conflict is resolved by a bitwise arbitration using the identifier. During the
transmission of the message every transmitter compares the level on the bus with
the level transmitted. If levels are equal the device continues to
transmit. Otherwise it is assumed that a message with a higher priority is also
transmitted and the unit withdraws from the bus. It will try to start transmitting
again once the current message has been transmitted.
20
Breite: 178 mm
Höhe: 216 mm
21
Controller Area Network (CAN)
Because arbitration is based on the identifier messages are automatically given a
certain priority on the bus thus insuring well defined latency times. The lower the
identifier the higher the priority
In order to facilitate clock synchronization of nodes the method of ’bit stuffing’ is
employed. Bit stuffing is done whenever a sequence of more than five bits of the
same polarity is transmitted. In this case a bit of the complentary polarity is
inserterd into the bit stream.
22
20
Controller Area Network (CAN)
2.1
Hardware and Bus Topology
The CAN bus topology is a single cable segment of up to 1 km length
approximately. At each end of the cable a terminating resistor of 120 Ohms must
be installed to avoid signal reflexions. All Schneider CAN devices feature
terminating resistors that may be connected to the bus if the device is the last on
the segment. Star topologies without additional hardware are not allowed.
Node A
Node B
Node B
CAN_H
Terminating
Resistor
120 Ohms
Terminating
Resistor
120 Ohms
CAN_L
The following table shows the range of baudrates supported Schneider by CAN
devices and the resulting maximum length of the bus cable.
Baudrate
1 MBit/s
800 kBit/s
500 kBit/s
250 kBit/s
125 kBit/s
50 kBit/s
20 kBit/s
10 kBit/s
20
Breite: 178 mm
Höhe: 216 mm
Maximum cable length in m
25
50
100
250
500
1000
2500
5000
23
Controller Area Network (CAN)
2.2
Message Types
There are four mesage types on a CAN network that are used for data
transmission and security purposes.
H
H
H
H
2.2.1
Data frames carry data from transmitters to receivers
Remote frames are transmitted to request data from devices
Error frames are transmitted by a unit on detecting a bus error
Overload frames are used to provide an extra delay between consecutive
remote frames or data frames
Data Frame -- Standard and Extended Format
There are two different types of data frames specified by the CAN 2.0
specification. Standard and Extended dataframes. The difference between the two
of them is the maximum message number allowed. In order to increase this
number the number of bits used for message identification is 29 bit for extended
frames in comparison to 11 bit for standard frames.
The general format of a CAN data frames is as follows:
Interframe
Space
Interframe
Space
Start of Frame
or
Overload
Frame
Start of Frame
Arbitration
Field
Control Field
Data Field
CRC Field
ACK Field
End of Field
24
20
Controller Area Network (CAN)
2.2.2
Data Frame -- Standard Format
A Standard format data frame is composed of the following seven bit fields:
Start of Frame, Arbitration Field, Control Field,Data Field, CRC Field, ACK Field,
End of Frame. The length of the data may also be zero.
Start of Frame
Arbitration Field
Marks the beginning of Data frames and Remote frames
The Arbitration Field consists of the Identifier and the RTR--Bit
Control
Field
Arbitration Field
S
O
F
Identifier
RTR--Bit
Control Field
Data Length Code
20
Breite: 178 mm
Höhe: 216 mm
11 bit IDENTIFIER
R I
T D
R E
r
0
Data Field
DLC
The Identifier’s lerngth is 11 This Bits are transmitted in the order from 10 to 0.
The LSB is Bit 0.
In data frames this bit has to be dominant whereas in remote frames it will be
recessive.
The Control Field consists of six bits. The Identifier Extension Bit (IDE) is
dominant and distinguishes standard from extended frames.The second bit is
reserved for future use and the four succeeding bits are the Data Length Code.
The Data Length Code indicates the number of data bytes transmitted according
to the following table.
25
Controller Area Network (CAN)
Number of Data Bytes Data Lengh Code
DLC3
DLC2
0
d
d
1
d
d
2
d
d
3
d
d
4
d
r
5
d
r
6
d
r
7
d
r
8
r
d
Data Field
CRC Field
ACK Field
END of Frame
26
DLC1
d
d
r
r
d
d
r
r
d
DLC0
d
r
d
r
d
r
d
r
d
The Data Field contains up to eight bytes. Each byte is transmitted MSB first.
The CRC Filed holds the CRC value, and a recessive delimiter bit.
All nodes having correctly received the message so far will superscribe the
transmitters recessive bit with a dominant bit. A recessive bit is the ACK Field
delimiter.
Each Data and Remote frame is delimited by flag seqeunce of seven recessive
bits.
20
Controller Area Network (CAN)
2.2.3
Data Frame -- Extended Format
A Extended format data frame is composed of the following seven bit fields:
Start of Frame, Arbitration Field, Control Field,Data Field, CRC Field, ACK Field,
End of Frame. The length of the data may also be zero.
Start of Frame
Arbitration Field
Marks the beginning of Data frames and Remote frames
The Arbitration Field consists of the 29 Bit Identifier, the SRR--Bit, the IDE--Bit
and the RTR--Bit
Control
Field
Arbitration Field
S
O
F
Identifier
SRR--Bit
IDE--Bit
RTR--Bit
Control Field
11 bit IDENTIFIER
S I
R D
R E
18 bit IDENTIFIER
R
T
R
r
1
r
0
Data Field
DLC
In contrary to the standard formt the Identifier’s length is 29 bit There are two
sections defined in this format. The Base ID consisting of 11 bits and the
extended ID consisting of 18 bits. The base ID is transmitted in order from 28 to
18. It is equivalent to to the format of the standard Identifier.
The Substitute RTR--Bit is always a recessive bit.
Mixing of standard and extended frames is allowed giving standard frames
a higher priority.
The Identifier Extension Bit is recessive
In data frames this bit has to be dominant whereas in remote frames it will be
recessive
The Control Field consists of six bits. The first two of them are reserved for
future use and the four succeeding bits are the Data Length Code
Data Length Code
20
Breite: 178 mm
Höhe: 216 mm
27
Controller Area Network (CAN)
The Data Length Code indicates the number of data bytes transmitted
Data Field
CRC Field
ACK Field
END of Frame
2.2.4
The Data Field contains up to eight bytes. Each byte is transmitted MSB first
The CRC Filed holds the CRC value, and a recessive delimiter bit
All nodes having correctly received the message so far will superscribe the
transmitters recessive bit with a dominant bit. A recessive bit is the ACK Field
delimiter
Each Data and Remote frame is delimited by flag seqeunce of seven recessive
bits
Remote Frame
A Remote frame is transmitted in order to request data from a source device. It is
used in both standard and extended frame formats. A Remote frame is composed
of the following six bit fields:
Start of Frame, Arbitration Field, Control Field, CRC Field, ACK Field, End of
Frame. In contrary to the data frame the RTR--Bit is recessive. There is no data
field
Interframe
Space
Interframe
Space
REMOTE FRAME
or
Overload
Frame
Start of Frame
Arbitration
Field
Control Field
CRC Field
ACK Field
End of Field
28
20
Controller Area Network (CAN)
2.2.5
Error Frame
An Error frame is used to indicate that at least one node on the network has not
received the last message correctly. An Error frame consists of two fields the Error
Flags and the Error Delimiter.
Usually an error is indicated by consecutively transmitting six dominant bits thus
violating the rule of ’bit stuffing’. This is how the transmitting node can tell whether
or not all nodes have received the last message without error.
Data
Frame
ERROR FRAME
Error Flag
superposition of
Error Flags
Interframe
Space or
Overload
Frame
Error Delimiter
Overload frames are used to indicated that a node on the network needs some
extra time before the next node is allowed to transmit a message. Up to two
consecutive frames may be transmitted. Today there is hardly a CAN chip
available that makes use of this feature. Schneider CAN devices do not generate
Overload frames.
2.2.6
Remark on Identifiers
Due to compatibility with certain old CAN controllers identifiers must not have the 7
most significant bits set to all ones, so only the identifiers 0..2031 are left for the
11--bit identifiers, and the user of 29--bit identifiers can use 532676608 different
values.
20
Breite: 178 mm
Höhe: 216 mm
29
Controller Area Network (CAN)
2.3
The ISO/OSI Reference Model
According to the ISO/OSI reference model communication can be regarded as a
layered architecture consisting of the following layers.
Layer
Layer 1
Layer 2
Layer 3
Layer 4
Layer 5
Layer 6
Layer 7
Function
Physical
Datalink
Network
Transport
Session
Presentation
Application
Description
The actual hardware involved (voltage levels, timing, etc. )
How messages are transmitted
Provides for routing functionality
Mechanisms for ensuring communication via unreliable media
Dynamically connect and disconnect functions
How data are stored and passed to and from the network
The actual meaning of the data
ISO 11898 is definining the standards for Layer 1 and 2 to a certain extend ( see
chapter ’Message Types). When dealing with realtime networks in the automation
area Layer 3 to 6 are usually not implemented, e.g. digital I/O modules do not
need a functionality equivalent to ’LOGON’.
2.3.1
CANopen as the Application Layer (Layer 7)
The Application Layer also referred to as Layer 7 defines the actual meaning of
the data transmitted. In order to transfer a certain value from one node to another
node on a CAN network the identifier of the message and the value’s byteposition
within the message must be defined. It is obvious, that defining all messages,
message contents and transmission conditions for a larger automation network
can become a complex and error prone task.
For this reason several standards have been created in order to facilitate this
undertaking. One of them is the CANopen standard defined by the CAN in
Automation (CiA) e.V. Erlangen, Germany.
CANopen is actually a subset of the CAN Application Layer (CAL) according to
CiA Draft Standard (DS) 201 -- 207. The communication protocol is described in
DS 301. In order to reflect the specifics of certain device types a set of so--called
device profiles ( DS 40X ) has been created, e.g. HMI devices are described in DS
403.
30
20
Controller Area Network (CAN)
2.3.2
Communications model
The CANopen protocol defines several methods for transmission and reception of
messages over the CAN bus. These messages are referred to as communication
objects. Synchronous data transfers allow network wide coordinated data
acquisition and actuation. Synchronous transfers are supported by predefined
communication objects i.e. Sync Objects transmitted on a cyclic time period and
Time Stamp objects. Asynchronous or event messages may be sent at any time
and allow a device to immediately notify another device without having to wait for a
synchronous data transfer to take place. The content of both synchronous and
event messages (Process Data Objects) may be dynamically configured at boot
up by the machine controller. Although CAN is restricted to transfers of a
maximum of 8 data bytes within one message, data transfers larger than 8 bytes
are also provided for by the protocol (Service Data Objects).
2.3.3
The Object Dictionary
All device parameters and data are listed in the standardized CANopen Object
Dictionary and each entry is assigned a 16 bit index which is used to access the
data. The Object Dictionary contains the description, data type and structure of
each parameter.
The CANopen Object Dictionary is organized in several sections comprising a
data type area, a communication profile area, a device profile area and a
manufacturer specific area. The general structure is shown in the following table:
Index
0001--001F
0020--003F
0040--005F
0060--009F
1000--1FFF
2000--5FFF
6000--9FFF
20
Breite: 178 mm
Höhe: 216 mm
Object Dictionary Section
Static Data Types (e.g. Boolean, Integer 16)
Complex Data Types (e.g. PDO, CommPar, SDO Parameter)
Manufacturer Specific Data Types
Device Profile Specific Data Types
Communication Profile Area
Manufacturer Specific Area
Device Profile Area (as defined in the CANopen Device Profiles)
31
Controller Area Network (CAN)
2.3.4
Service Data Objects (SDO)
Service Data Objects (SDO)’s are normally used for device configuration such as
setting device parameters or downloading programs. They are also used to define
the type and format of information communicated using the Process Data Objects.
Service Data Objects provide the following functionality:
H
H
H
H
H
2.3.5
Transmit data of any size (boolean to large files)
Confirmed services (request/response) for read and write of any data
Expedited transfer of data less than or equal to 4 bytes total length
Segmented transfer of data greater than 4 bytes total length
Abort of data transfer by either Client or Server with optional error feedback
Process Data Objects (PDO)
The Process Data Objects (PDO) do not contain any explicit protocol overhead
and this allows very fast and flexible exchange of data between applications
running on each node. PDO’s can be transmitted directly from any device on the
network simultaneously to any number of other devices. This multicast capability
is one of the unique features of CAN and is exploited to the full by CANopen.
32
20
HW Configuration
3
This chapter contains detailed configuration descriptions, hardware settings as
well as design guidelines with instructions for start--up of the Modicon TSX
Compact.
For the system design, configure the following:
21
Breite: 178 mm
Höhe: 216 mm
H
I/O map and definition of I/O nodes as well as total current on the I/O bus
(refer to chapter 3.1, page 34)
H
Power supply for supply voltage UB (refer to chapter 3.2, page 38 and
chapter 3.2.2, page 41)
H
Power supply for working voltage US (refer to chapter 3.2, page 38 and
chapter 3.2.3, page 48)
H
Sensor cabling (refer to chapter 3.2.2, page 41 and chapter ”Grounding
Shielded Lines”, page 68)
H
Cabling actuators (refer to chapter 3.2.3 , page 48 and chapter ”Grounding
Shielded Lines”, page 68)
H
Installation, (refer to chapter 3.3, page 52)
H
Installation of the CAN line (refer to chapter 3.3.5, page 60)
H
Grounding (refer to chapter 3.3.6, page 65)
33
HW Configuration
3.1
Hardware Configuration
H
H
3.1.1
Mapping and specifying I/O slots
Total current
Mapping and Specifying I/O Slots
During configuration it must be defined where to plug in which modules, i.e. at
which location in the respective backplane.
In the primary backplane the CPU has the fixed slots 1--1 and 1--2
All other slot numbers are used to receive the I/O modules or the communications
modules.
Not all I/O slots must be equipped with a module (leave empty or insert a dummy).
For each I/O slot number, use the programming software to enter the
corresponding I/O type.
Specifying I/O slots without stacked drop layout
When designing the controller in a single row, the slots are numbered according to
the following figure.
The first I/O slot in the primary backplane AS--HDTA--200 has position 1--3.
The first expansion backplane AS--HDTA--201 has the positions 2--1 to 2--5. The
next, 3--1 to 3--5, etc.
34
21
HW Configuration
Figure 4
Slot numbers on the TSX Compact
AS--HDTA--200
1--1
1--2
1--3
1--4
AS--HDTA--201
1--5
1--2
1--3
1--4
21
Breite: 178 mm
Höhe: 216 mm
2--2
2--3
2--4
2--5
AS--HDTA--201
3--1
3--3
3--5
3--2
3--4
4--1
4--2
4--3
4--4
4--5
AS--HDTA--202
AS--HDTA--200
1--1
2--1
AS--HDTA--201
1--5
2--1
2--2
35
HW Configuration
Note
The slot number is also called node number, device number, or address number,
refer to module descriptions.
When using the termination backplane AS--HDTA--202, addressing can not be
continued.
Specifying I/O slots in stacked drop layout
Refer to the Basic User Manual Modicon TSX Compact
3.1.2
Total Current
Please check whether the CPU can sufficiently supply all nodes attached to the
I/O bus (PAB).
In the table of power load actuators (Table 8) List of power load actuators (I/O
and communications modules)you will find the list of all nodes with an indication of
the maximum current requirement.
The loading for the dimensioning of the 24 V power supply units can be
determined in the same way.
Table 7
36
List of current sources
Module
Type of potentials
I (24 V) max.
primary
I (5 V) max.
secondary for I/Os
PC--E984--258R
Isolated
1.2 A
approx. 2.3 A
21
HW Configuration
Table 8
List of power load actuators (I/O and communications modules)
I (UB = 24 V)
max.
I (UB = 22 V)
max.
I (US = 24 V)
max.
100 mA
100 mA
--
--
35 mA
60 mA
70 mA *)
--
8A
20 mA
25 mA
50 mA *)
70 mA
8 A **)
AS--BDAP 253
20 mA
25 mA
30 mA for
110 VDC *)
70 mA
8 A **)
AS--BDAP 258
50 mA
60 mA
--
150 mA
16 A **)
AS--BDAU 252
40 mA
60 mA
150 mA
--
--
AS--BDEP 254
15 mA
22 mA
160 mA *) for
24...48 VDC
--
--
AS--BDEP 256
20 mA
25 mA
100 mA *)
--
--
AS--BDEP 257
20 mA
25 mA
50 mA for
110 VDC *)
--
--
AS--BCAN--259
500 mA
600 mA
--
--
--
Module
I (5 V)
typical
I (5 V)
max.
AS--BADU 256
60 mA
AS--BDAP 250
AS--BDAP 252
*) For sensor power supply
**) also suitable for the switching of actuators using other working voltages, e.g. 110 VDC.
21
Breite: 178 mm
Höhe: 216 mm
37
HW Configuration
Configuring the Power Supply
3.2
At the entry of the fused supply voltage into the system, an overvoltage protection
(suppressor diode) must be interconnected (see Figure).
The suppressor diodes, e.g. overvoltage protection for OVP 001 top hat rail
mounting or overvoltage protection for securing OVP 2480, must be wired like
quadripoles and must be aligned close to the power supply unit using a
low--resistance reference conductor.
Each branch must be fused, and if the lines are long it must be wired with a
suppressor diode, e.g. 1N5646A. The fuse must be adjusted to the permissible
current loading of the suppressor diode. The advantage of this layout is a selective
interruption of a branch through the attached fuse even if there is a short--circuit of
the diode. In areas that are very lightning prone, additional lightning surge
protection measures must be taken.
Figure 5
Principal power supply design
U
...
F
1
24 VDC
F
F
3
1V
4
...
0V
2
M
F
V1
1, 2, 3, 4
38
Legend
Automatic circuit--breaker or fuse
Overvoltage protection OVP 001 (10 A max.) or OVP 2480 ( 25 A max.),
configured next to the power supply
OVP terminals, refer to both of the following figures
21
HW Configuration
Figure 6
OVP 001 terminals and dimension drawing
62.5
60
75
12.5
OVP 2480 and dimension drawing
1
U(+)
3
M(--)
2
M(--)
4
54
U(+)
=
4.5
Figure 7
=
17.5
25
21
Flat pin connector 6.3 x 0.8
Related topics
Planning and Distribution of Circuits
Connection scheme for power supply UB
Connection scheme for the working voltage power supply
21
Breite: 178 mm
Höhe: 216 mm
39
HW Configuration
3.2.1
Planning and Distribution of Circuits
The following must be distinguished:
H
H
H
Supply voltage UB(1) feeding the modules and sensors,
Supply voltage UB(2) feeding the relay coils
as well as the
Working voltage US driving the actuators
It is generally recommended to draw the supply voltage UB and the working
voltage US from different power supply units (e.g. 10 A or 25 A, identified as N1
and N2 in the following), so that interruptions caused by switching operations do
not affect the power supply of the electronics. For larger load currents, additional
power supply units must be configured for the working voltage (N3, ...).
When designing the power supply, please make sure that:
H
Each system is fed point--to--point with UB, US, and M2, M4 from the power
supply
H
The UB / M2 and US / M4 supply lines are run in pairs (avoid induction
loops)
H
You avoid any serial connection of several automatic circuit breakers
because of increased inductive line share in the lead wires of the working
voltage
Note
Your system will only be able to operate perfectly if the individual modules are
guaranteed a sufficient supply of power (refer to chapter ”Total Current” and to the
respective module descriptions under ”Technical Specifications”). However,
start--up currents, large cable lengths, and small line profiles may be responsible
(especially given a high coincidence factor) for breakdowns in voltage supply.
Therefore, power supply units should be configured with a sufficient power
back--up, and cable profile as well as cable length must be selected appropriately!
40
21
HW Configuration
Connection Scheme for Power Supply UB
(24 VDC for Modules and Sensors)
3.2.2
Configure a joint power supply circuit with its own power supply unit for the supply
of the modules and sensors (inputs).
Note
The layout shown applies to supply voltage line lengths between the power supply
and TSX Compact of approx. 5 m.
The circuits shown must be regarded as examples.
1
(1)
(2)
(3)
(4)
21
Breite: 178 mm
Höhe: 216 mm
2
3
DAU 252
ADU 256
DAP 258
DAP 252/
DAP 253
DAP 250
DEP 256
DEP 254
CAN 259
Mapping example for connection scheme of power supply UB (24 VDC)
CPU
Figure 8
4
Refer to Detailed connection for CPUs and remote I/Os
Refer to Detailed connection for the supply of discrete inputs
Refer to Detailed connection for the supply of output relays
Refer to Detailed connection for the supply of analog I/Os
41
HW Configuration
Figure 9
Example of layout for installation accessories
to ALU 202
to ADU, DAU, CAN
N3
F1 1 V
F
Z1
1C Z2
Z3
C1 capacitive discharge terminal GND 001
F automatic circuit--breakers
F1 automatic circuit--breaker 10 A
N3 DC/DC transformer IPS 258
V1 overvoltage protection OVP 001
Z1 shield connection, included in delivery as part of cable grounding rail CER 001
Z2 grounding clamp EDS 000
Z3 cable grounding rail CER 001
42
21
HW Configuration
Figure 10
Connection overview of power supply UB (24 VDC)
U (UB = 24 VDC)
IPS 258
F
F
F
2
2.5 mm Cu
N
DEP,
DAP
DAP
ADU
DAU
1
2
3
4
F10
24 VDC
--24 V
CPU
1V
0V
2.5 mm
2
Cu
M
21
Breite: 178 mm
Höhe: 216 mm
F automatic circuit--breaker of fuse
F10 power protection switch 10 A or 25 A
N1 power supply unit or battery for 24 VDC, 25 A max.
V1 overvoltage protection
43
HW Configuration
Figure 11
Detailed connection for CPUs and remote I/Os
1
U (UB = 24 VDC)
F2
+
CPU
--
M2
M
F2 = fuse 2 A, medium time--lag
Note
The CPU has a suppressor diode already built--in that is dimensioned as EMC
protection.
Note
For all subsequent I/O modules!
Noise immunity can be increased if discharge capacitors are connected to the U
and M terminals of the corresponding module.
Further details can be found on page 67 under ”Improvement of EMC stability on
the modules” .
44
21
HW Configuration
Figure 12
Detailed connection for the supply of discrete inputs
2
U (UB = 24 VDC)
Inputs
............
E9
E16
1
2
3
4
5
6
7
8
9
10
11
12
13
14
15
16
17
18
19
20
21
22
E1
E8
E9
E16
12
13
14
15
16
17
18
19
20
21
22
DAP 250
Us
M4
E1
............
E8
DEP 256
1
2
3
4
5
6
7
8
9
10
11
............
............
E1
DEP 254
............
F2
E8
1
2
3
4
5
6
7
8
9
10
11
12
13
14
15
16
17
18
19
20
21
22
M1
M
F2 = automatic circuit--breaker 2 A max. for up to 150 inputs
Note
Module AS--BDEP 257 requires a 110 VDC connection, refer to the description of
the module.
21
Breite: 178 mm
Höhe: 216 mm
45
HW Configuration
Detailed connection for the supply of output relays
U (UB = 24 VDC)
See Detailed Connection
IPS 258
F2
max.
0.7
A
F2
Inputs
Us
Us
Us
Us
............
E1
M1
E8
3
4
Relay coils
DAP 252
DAP 253
DAP 258
1
2
3
4
5
6
7
8
9
10
11
1
2
3
4
5
6
7
8
9
10
11
1
2
3
4
5
6
7
8
9
10
11
12
13
14
15
16
17
18
19
20
21
22
Us
Us
Us
Us
110 VDC
E1
............
Figure 13
E8
M1
12
13
14
15
16
17
18
19
20
21
22
Us
Us
Us
Us
Us
Us
Us
Us
12
13
14
15
16
17
18
19
20
21
22
M2
M
F2 = automatic circuit--breaker 2 A max. for up to 150 inputs or 40 relays
Note
The DAP modules have built--in suppressor diodes that are dimensioned for EMC
protection.
46
21
HW Configuration
Figure 14
Detailed connection for the supply of analog I/Os
4
Source see Detailed Connection 3
DAU 252
ADU 256
E1
E2
E3
E4
1
2
3
4
5
6
7
8
9
10
11
12
13
14
15
16
17
18
19
20
21
22
1A
2A
1
2
3
4
5
6
7
8
9
10
11
12
13
14
15
16
17
18
19
20
21
22
M2
M
Note
Modules AS--BADU256 and AS--BDAU 252 have built--in suppressor diodes that
are dimensioned for EMC protection.
Detailed connection schemes for sensors and actuators can be found in the
respective module description, Appendix A.
The shields must be grounded according to chapter ”Grounding Shielded Cables”
(page 68).
21
Breite: 178 mm
Höhe: 216 mm
47
HW Configuration
Connection Scheme of the Working Voltage Supply
(US = 24 VDC)
3.2.3
The working voltages for two or more outputs are joined (corresponds to a group).
Each group must be fused separately.
Please make sure that switching operations of inductive actuators do not cause
unacceptable overvoltages that could result in damaging or destroying
semiconductors in the programmable controller.
US = 24 VDC
The 24 VDC working voltage should come from a separate power supply unit.
Configure additional power supply units for load currents >25 A.
According to VDE 0100 and VDE 0113 it is permissible to operate auxiliary circuits
either grounded or non--grounded. For non--grounded operation, use an insulation
monitoring device that will initiate a signal in case of an insulation error.
Note
With a 24 VDC power requirement of <25 A for the entire system and an increased
interference risk, the use of a single power supply unit is authorized.
Please refer to chapter ”Configuration of Network Supplies”, page 38.
Figure 15
Mapping example for the connection scheme of the working voltage
5
5
6
48
DAP 258
DAP 253
DAP 252
DAP 250
supply
6
Refer to Detailed connection for modules with semiconductor outputs (US = 24
VDC)
Refer to Detailed connection for modules with relay outputs (US = 24 VDC)
21
HW Configuration
Figure 16
Connection overview of power supply US (24 VDC)
U (Us = 24 VDC)
F
...
F
F
......
24 VDC
N
0V
2.5 mm
2
DAP 252
DAP 253
DAP 258
5
6
F10
2
2.5 mm Cu
--24 V
DAP 250
1V
Cu
......
...
...
......
F automatic circuit--breaker or fuse
M F10 power protection switch 10 A or 25 A
N2 power supply unit or battery for 24 VDC, 25 A ma
V1 overvoltage protection OVP ...
We recommend the distribution of the circuits according to the following detailed
connection drawings:
The connection schemes provide additional information regarding measures to be
taken according to the supply voltage, such as:
H
H
H
21
Breite: 178 mm
Höhe: 216 mm
Fuse protection
Overvoltage protection
Protective circuit made up of inductive actuators, etc.
49
HW Configuration
Figure 17
Detailed connection for modules with semiconductor outputs (US = 24 VDC)
5
U (Us = 24 VDC)
F10
2V
.......
............
1A
2V
8A
UB
M4
M4
M4
M
50
M1
DAP 250
1
2
3
4
5
6
7
8
9
10
11
12
13
14
15
16
17
18
19
20
21
22
F10 = automatic circuit breaker 10 A max.
V2 = clamping diode required if inductive loads are connected and if conventional contact elements
are in the output lines, e.g. for safety lock--outs. Perform the protective circuit directly at the inductance.
21
HW Configuration
Figure 18
Detailed connection for modules with relay outputs (US = 24 VDC)
6
U (Us = 24 VDC)
F4
F4
F4
F4
F4
F4
DAP 252,
DAP 253
DAP 258
2V
UB
1A
2V
2A
3A
4A
M2
5A
2V
7A
2V
8A
6A
1
2
3
4
5
6
7
8
9
10
11
12
13
14
15
16
17
18
19
20
21
22
2V
UB
1A
2V
2A
2V
3A
2V
M2
UB
4A
M1
1
2
3
4
5
6
7
8
9
10
11
12
13
14
15
16
17
18
19
20
21
22
M4
M4
M4
M4
M4
M4
M
F4 = Automatic circuit--breaker 4 A max.
V2 = Freewheeling diode is mandatory (directly at inductance due to contact service life)
21
Breite: 178 mm
Höhe: 216 mm
51
HW Configuration
3.3
Installation
3.3.1
Top hat rail
The TSX Compact can be installed onto the following top hat rails (refer to the
figure):
H
Clearance 7.5 mm as per DIN--EN 50 022
H
Clearance 15 mm.
Figure 19
Top hat rail with 7.5 mm clearance (left) and with 15 mm clearance (right)
52
15
35
35
7.5
21
HW Configuration
Figure 20
Drill holes for top hat rail and backplane in back panel mounting
approx. 920
approx. 125
approx. 215
for M4/M5
approx. 10
backplane
60,5
125 ... 130
≥ 6HU = 266.7
top hat rail for
80
65
150
M4
top hat rail for automatic circuit--breakers and for shield dissipation
second row
Figure 21
Drill holes for top hat rail and backplane in 19” cabinet mounting
max. 450
approx. 125
approx. 215
for M4/M5
approx. 10
backplane
60,5
80
65
150
top hat rail for automatic circuit--breakers and for shield dissipation
second row
21
Breite: 178 mm
Höhe: 216 mm
≥ 125
125 ... 130
≥ 6HU = 266.7
top hat rail for
Note:
The distance of 6 HU to the second row
must be observed when using the stacked
drop cable BXT 201.
53
HW Configuration
3.3.2
Backplane
Backplane mounting
Fit the AS--HDTA--200, --HDTA--201, and --HDTA--202 backplanes onto the top hat
rail in the following order (7.5 mm):
Step1
Step2
Step3
Step4
Step5
54
Pull off the two clamps located underneath the DTA.
Hang the backplane.
With 15 mm top hat rails:
First, enclosed spacer A must be snapped into place flush to the drillings in the
rear of the DTA.
Swing the backplane towards the top hat rail and snap it in.
The backplane must also be secured using two screws (4 mm ø max.).
With 7.5 mm top hat rails as per DIN--EN 50 022: approx. 20 mm long
With 15 mm top hat rails: approx. 25 mm long.
Move the two clamps back into their initial position. Hang the backplane
21
HW Configuration
Figure 22
Mounting the backplanes
2
3
1
1
4
4
A
Connecting the backplanes
Interconnect the backplanes as follows:
Step1
Step2
Step3
Step 4.1
Step 4.2
Step 4.3
21
Breite: 178 mm
Höhe: 216 mm
Mount expanding DTA flush onto joint top hat rail
Unlock and remove the cover of the bus connection
Slip on and lock the bus cable. Make sure the eject lever is flush with the
plug--and--socket device after attaching the cable (ribbon cable or stacked drop
layout cable BXT 201)
Loosen both screws
Move 0V ground strap to the left
Tighten both screws
55
HW Configuration
Figure 23
Coupling DTA 200 or DTA 201 with DTA 201 or DTA 202
Both backplanes are now interconnected via the bus and ground strap.
Installation and connection of the backplanes using the BXT 201
Refer to Basic User Manual ”Modicon TSX Compact, Modular Programmable
Controller”
56
21
HW Configuration
3.3.3
Modules
Figure 24
Mounting the CPU
1.
2.
CPU
3.
Mount the communications module and the CAN--TAP according to the description
of module AS--BCAN--259 (starting on page 181).
21
Breite: 178 mm
Höhe: 216 mm
57
HW Configuration
Figure 25
Installation of remaining modules
1.
2.
3.*
* secures contacting
to top hat rail
Figure 26
58
Completed installation of the Modicon TSX Compact
21
HW Configuration
3.3.4
Mounting 470 IPS 258 00 and 470 NAV 511 00
Figure 27
Top hat rail mounting
1
2
The grounding spring integrated into the right back panel establishes the electric
contact to the top hat rail.
Figure 28
Installation on machine housing or wall
4 x 25 mm
The screws are used to ground the module.
21
Breite: 178 mm
Höhe: 216 mm
59
HW Configuration
3.3.5
Installing the CAN Line
Figure 29
Example of an CAN line
CAN line
CAN--TAP
for Compact 1
CAN--TAP
for Compact 2
CAN--TAP
CAN termination
The final nodes (Compact 1 and Compact 2) for Compact 3 must be equipped with
terminators (CAN terminators):
H
H
At beginning of bus (Compact 1)
At end of bus (Compact 3)
Figure 30
Electrical structure of the terminator
CAN_H
120 Ω
CAN_L
60
21
HW Configuration
CAN connection
The user will have to build the CAN cable to network all individual nodes.
Required installation material:
H
CAN--Bus cabel ”UNITRONIC--Bus FD P LD 2 x 2 x 0.25 sq mm” (2 twisted
pairs with common shield; the characteristic wave impedance amounts 100
through 120 Ohm)
H
Male connector assembly set (pins) ”748046--1” for outgoing CAN
H
Female connector assembly set (sockets) ”748047--1” for incoming CAN
The above mentioned cable is suitable for the most of the applications if the length
of the cable will not decrease 100 m and the number of nodes will not decrease
64. General recommendations are:
Length of cable
100 m
250 m
500 m
32 Nodes
0.25 sq mm
0.34 sq mm
0.75 sq mm
64 Nodes
0.25 sq mm
0.5 sq mm
0.75 sq mm
You will find the references of the suppliers of installation hardware in the appendix
”Supplier References” (page 228).
21
Breite: 178 mm
Höhe: 216 mm
61
HW Configuration
Perform the wiring of the individual cables as follows:
Figure 31
CAN cable wiring (grounding and housing)
Male
(outgoing CAN)
Female
(incoming CAN)
CAN--TAP
CAN--TAP
Contact point occupied
Contact point not occupied
Pin
1
2
3
4
5
6
7
8
9
62
Signal
-CAN_L
CAN_GND
-CAN_SHLD
GND
CAN_H
-CAN_V+
Meaning
Reserved
CAN_L bus line (dominant low)
CAN ground
Reserved
Optional CAN shield
Optional CAN ground
CAN_H bus line (dominant high)
Reserved
Optional external positive supply
21
HW Configuration
CAN Grounding (Through the Housing)
Within the respective CAN module, the male and female connectors are
connected to the top hat rail and to the PE port directly with the ground contact
springs. The shielding of the CAN cable must be connected directly with the male
and female connector housing (refer to figure ”CAN cable wiring”). Through the
connector union, via the top hat rail the shielding is connected at both ends with
the ground, also refer to chapter ”Grounding”.
Note
For further details and how to open the TAP’s housing, please refer to Appendix
AS--BCAN--259.
21
Breite: 178 mm
Höhe: 216 mm
63
HW Configuration
Optional: Galvanized CAN Grounding
Optional each cable between two TAP’s can be grounded directly via CER 001.
Perform the wiring of the individual cables as follows:
Figure 32
CAN cable wiring (galvanize grounding)
Male
(outgoing CAN)
Female
(incoming CAN)
CER 001
CAN--TAP
CAN--TAP
Contact point occupied
Contact point not occupied
Pin
1
2
3
4
5
6
7
8
9
Signal
-CAN_L
CAN_GND
-CAN_SHLD
GND
CAN_H
-CAN_V+
Meaning
Reserved
CAN_L bus line (dominant low)
CAN ground
Reserved
Optional CAN shield
Optional CAN ground
CAN_H bus line (dominant high)
Reserved
Optional external positive supply
Note
For further details and how to open the TAP’s housing, please refer to Appendix
AS--BCAN--259.
64
21
HW Configuration
3.3.6
Grounding
Grounding the Compact components
The grounding of the 0 V on the backplane is already preset when delivered.
For uninterrupted operation, take the following grounding measures (also refer to
chapter ”Grounding and EMC Measures” in the Basic User Manual ”Modicon TSX
Compact, Modular Programmable Controller”).
Figure 33
Grounding the top hat rails and Compact components
N
to M of the power supply N1, N2, . . .
DTA 200
≥
6 sq mm
DTA 201/202
2.5 sq mm
Z1
1C
≥
DTA 201
Z2
2.5 sq mm
DTA 201/202
Legend
1C
Capacitive discharge terminal GND 001 (optional)
N
Power supply module CPU
Z1
Grounding clamp EDS 000
Z2
Cable grounding rail CER 001 (optional, for grounding of analog lines)
21
Breite: 178 mm
Höhe: 216 mm
65
HW Configuration
Grounding TIO components 470 IPS 258 00 and 470 NAV 511 00
For uninterrupted operation, perform the following grounding measures. Make sure
the contact is properly established!
Figure 34
Grounding the top hat rails and TIO components
to M of the power supply N1, N2, . . .
N
Z1
≥
2
2.5 mm
Z2
Z1
1C
≥
≥
2
2.5 mm
6 mm2
Legend
1C
Capacitive discharge terminal GND 001 (optional)
N
470 IPS 258 00 (power supply module), 470 NAV 511 00 (CAN--TAP)
Z1
Grounding clamp EDS 000
Z2
Cable grounding rail CER 001 (optional, for grounding of analog lines)
Caution
Heavy EMC interference can lead to problems with the telegram traffic to the
TIO modules. This leads to intermittent absence of inputs / outputs in the
TIOs.
You must therefore make sure that the top hat rail mounted onto the TIO is
grounded adequately. With more recent TIOs, the possibility for grounding
through the fixed connector should be used.
66
21
HW Configuration
Improvement of the EMC stability on the modules
To improve EMC stability on the modules it is recommended that the U and M
connections used here have a capacitive discharge that is as short as possible
from terminal to functional ground. This is the purpose of the capacitive discharge
terminal GND 001, refer to the figure below.
Figure 35
Improvement of EMC stability on the modules
U = 24 VDC
F Automatic circuit--breaker
C1 capacitive discharge terminal GND 001
F
I/O module
U
M
1
2
3
4
5
6
7
8
9
10
11
12
13
14
15
16
17
18
19
20
21
22
1 2
3 4
5 6
7 8
1C
M
≥ 2.5 sq mm Cu
9 10 11 12 13 14 15 16
In an interference--prone environment, it is recommended to increase the capacity
on the C1 from 2.2 nF to 22 nF.
21
Breite: 178 mm
Höhe: 216 mm
67
HW Configuration
Grounding the shielded cable lines
The shielded cable lines must be grounded as follows:
H
Run the shielded cables via the cable grounding rail CER 001
H
Remove the shield insulation at the level of the corresponding cable clamp
H
Press the cable with the uncovered shield into the cable clamp (contact to
top hat rail)
H
Use cable clips to strain--relieve the individual cables according to the figure
Figure 36
Grounding the I/O line shields to the ADU, DAU
Cable grounding rail CER 001,
170 mm wide, 50 mm high
68
21
HW Configuration
3.3.7
Dimension Drawings
Figure 37
Dimension drawing of the Modicon TSX Compact
125
213
64
7,5
127
Space for mounting/dismounting
16
142
21
Breite: 178 mm
Höhe: 216 mm
8
69
HW Configuration
470 IPS 258 dimension drawing (units in mm)
at least 60
at least 125
141.5
93
74.2
56.2
approx. 62 at least 60
Figure 38
The vertical distances must be observed for ventilation purposes!
70
21
HW Configuration
141.5
93
approx. 62
470 NAV 511 dimension drawing (units in mm)
at least 220
Figure 39
56.2
74.2
21
Breite: 178 mm
Höhe: 216 mm
43
at least 105
71
Software Installation
21
Breite: 178 mm
Höhe: 216 mm
4
73
Software Installation
4.1
CANopen Installation Routine
In order to operate the AS--BCAN 259 Concept 2.1 must be installed on the
programming panel. If you intend to use the AS--BCAN 259 within a CANopen
network it is recommended to install the CANopen network configuration tool prior
to installing the EFB’s for AS--BCAN 259.
Along with the AS--BCAN 259 two 3,5” disks have been shipped. To start the
installtion insert the disk labled disk 1 into the floppy drive and execute the
program SETUP.EXE using the start-->execute function from the taskbar. Make
sure that concept is not running.
After having selected the Concept 2.1 installation path your have several options
to install:
It is recommended to install the respective example programs for a better
understanding of the system and as a basis for application programming.
74
21
Software Installation
If you decided on installing the CANopen related files you are prompted to enter
your CANopen network configuration tool installation path. Setup will install all
related files into the subdirectory \EDS and \EXEC. If you have not installed the
CANopen network configuration tool yet you may use any existing directory or
create a new one.
After finishing the installation you may take look at the provided help file which is
installed into Concept 2.1 installation directory.
4.2
Layer 2 Applications
This chapter provides information on how to program simple CAN applications.
Because this type of application uses only messages with user defined identifiers
and data contents and no standardized Layer 7 protocol is employed it is also
referred to as Layer 2 application.
21
Breite: 178 mm
Höhe: 216 mm
75
Software Installation
4.3
Configurator
When using the AS--BCAN 259 it is a necessarry to enter the module into the
I/O--map by selecting ”BKF201(16W)” from I/O--modules selection. This indicates
that the corresponding slot is used and therefore not available for other modules.
The 3XXXX and 4XXXXX references that must be assigned to this module should
not be used in PLC program.
You do not need to use the Params option in the I/O--map dialog.
76
21
EFB’s for AS--BCAN--259
5
This type of application requires three different EFB’s:
CAN_CFG
CAN_SND
CAN_RCV
Used for initialization of the AS--BCAN--259
Used to send user defined messages
Used to receive user defined messages
They can be found in the CAN library in a group named Layer 2.
21
Breite: 178 mm
Höhe: 216 mm
77
EFB’s for AS--BCAN--259
5.1
5.1.1
CAN_CFG
Short Description
This EFB enables Layer 2 functionality. It must be used in applications that do not
require CANopen functionality. It defines parameters of Layer 2 operation such as
baudrate and message acceptance. CAN_CFG must be used exactly once within
the PLC program for every AS--BCAN--259 installed. CAN_CFG builds a list of
Layer 2 messages that are to be received in the module’s DPM based on the data
provided by the ACCPT input. Therefore it should be executed before CAN_RCV.
5.1.2
Layout
Symbol
CAN_CFG
ENABLE ERROR
SLOT
STATE
CFG
ACCPT
Description of the Parameters
78
Parameter
ENABLE
Data Type
BOOL
SLOT
CFG
ACCPT
ERROR
STATE
UINT
CAN_CFG_DATA
CAN_ACCPT
BOOL
UINT
Meaning
Enable EFB, every rising edge will reconfigure the
module
Slot where the AS BCAN 259 is located (3...5)
Configuration data
Message acceptance data
Error occured
Current status or errorcode
21
EFB’s for AS--BCAN--259
5.1.3
Datatype CAN_CFG_DATA
This structure describes the mode of operation of the AS BCAN 259 module. It is
evaluated when ENABLE is triggered by a rising edge. The entries are as follows:
Entry
Datatype
PROTOCOL0 UINT
BAUD0
UINT
PROTOCOL1 UINT
21
Breite: 178 mm
Höhe: 216 mm
Meaning
Protocol selection
channel 0
Baudrate channel 0
Protocol selection
channel 1
Baudrate channel 1
BAUD1
UINT
RELAISCTL0
UINT
RELAISCTL1
UINT
RELAISDATA
UDINT
Relais operation
control word 0
Relais operation
control word 1
Relais operation data
NUMDIGIN
NUMDIGOUT
NUMANAIN
NUMANAOUT
NUML2MSG
UINT
UINT
UINT
UINT
Number digital inputs
Number digital outputs
Number analog inputs
Number analog outputs
UINT
Number of Layer 2 messages to receive, 73 max
Comment
0 = Layer 2 only
1 = CANopen + Layer 2
Baud rate in kBit/s
(10, 20, 50, 125, 250, 500,
800, 1000)
0 = Layer 2 only
Baud rate in kBit/s
(10, 20, 50, 125, 250, 500,
800, 1000)
e.g. Identifier of message to
be monitored
(CANopen only ) 1024 max.
(CANopen only ) 1024 max.
(CANopen only ) 128 max.
(CANopen only ) 128 max.
79
EFB’s for AS--BCAN--259
5.1.4
Relais operation control
These parameters define the operation mode of the AS--BCAN--259 internal relais
or they may be used to enable passive nodeguarding. The least significant byte of
RELAISCTL0 defines the global operation mode.
Mode
0
1
2
3
4
5
Operation
relais off
monitor CAN message
all nodes configured and network started (CANopen on channel 0)
flash if module is healthy
copy module firmware version into RELAISCTL1 (format XX.XX )
relais off, activate passive nodeguarding (CANopen)
The most significant byte of RELAISCTL0 hold additional information for operation
mode 1 and 2:
Bit
31 (MSB)
30
29
28
Meaning if bit is set to TRUE
channel select ( 0 = channel 0, 1 = channel 1)
message is RTR frame ( layer 2 only )
message is extended identifier ( layer 2 only )
If mode 1 is selected
0 = after timeout has occured and message is received switch
on relay again
1 = after timeout has occured relay remains in inactive state
until module is restarted
If mode 1 is selected RELAISCTL1 holds the timeout value in milliseconds for the
CAN message to be monitored. RELAISDATA is the identifier of this message.
If mode 4 is selected RELAISCTL1 will receive the firmware version for the
module. If mode 5 is selected RELAISCTL1 holds the timeout value in
milliseconds for the CANopen nodeguard message to receive.
80
21
EFB’s for AS--BCAN--259
5.1.5
Data Type CAN_ACCPT
CAN_ACCPT is a table of 73 entries of the type CAN_MSG that describes which
Layer 2 messages are accepted by the AS--BCAN--259 for reception from the
network. Only messages entered in this table can be received by CAN_RCV.
There is one line for every message. The entries are as follows:
Entry
CHANNEL
IDENT
EXT
RTR
21
Breite: 178 mm
Höhe: 216 mm
Data Type
UINT
UDINT
BOOL
BOOL
Meaning
Channel to receive data from (0,1)
Message identifier
Message has extended frame
Message is RTR frame
81
EFB’s for AS--BCAN--259
5.2
5.2.1
CAN_SND
Short Description
This EFB enables the transmission of simple Layer 2 messages. The parameters
are as follows:
5.2.2
Layout
Symbol
CAN_SND
ENABLE
DONE
SLOT
CHANNEL
ERROR
IDENT
STATE
EXT
RTR
DATA
82
21
EFB’s for AS--BCAN--259
Description of the Parameters
Parameter
ENABLE
SLOT
CHANNEL
IDENT
EXT
RTR
DATA
Data Type
BOOL
UINT
UINT
DINT
BOOL
BOOL
ANY
DONE
ERROR
STATE
BOOL
BOOL
UINT
Meaning
Start transmission (rising edge)
Slot where the AS BCAN 259 is located (3...5)
Channel for transmission (0,1)
Message identifier
Use extended identifier (29 bit)
Send RTR frame (DATA is ignored)
Data to be transmitted (up to 8 byte)
The number of bytes transmitted is determined by
the size of DATA variable. If the size of the DATA
variable is greater than 8 then DLC ist set to zero
and and no data bytes are transmitted
Function completed (active for one scan)
Error occured
Current status or errorcode
Note
Even when transmitting RTR messages a length information is required to
generate the DLC (Data Length Code) field entry.
21
Breite: 178 mm
Höhe: 216 mm
83
EFB’s for AS--BCAN--259
5.3
5.3.1
CAN_RCV
Short Description
This EFB enables the reception of simple Layer 2 messages. Only messages that
match the given parameters and that have been listed in the ACCPT ( Message
acceptance) field of the CIA_SVR or CAN_CFG EFB’s are accepted. CAN_CFG
or CIA_SVR must be executed before CAN_RCV can be used. The parameters
are as follows:
5.3.2
Layout
Symbol
CAN_RCV
SLOT
CHANNEL
RCV
IDENT
DATA
EXT
RTR
ERROR
STATE
84
21
EFB’s for AS--BCAN--259
Description of the Parameters
Parameter
SLOT
CHANNEL
IDENT
EXT
RTR
RCV
DATA
Data Type
UINT
UINT
DINT
BOOL
BOOL
BOOL
ANY
ERROR
STATE
BOOL
UINT
Meaning
Slot where the AS BCAN 259 is located (3...5)
Channel for transmission (0,1)
Message identifier
Extended identifier (29 bit)
RTR frame
Matching message received (active for one scan)
Data received (up to 8 byte)
The number of bytes to be received is determined
by the size of DATA variable. If the size is greater
than 8 a frame of zero length is expected and no
data will be copied
Error occured
Current status or errorcode
If ERROR is zero, STATE gives the Index into the
Message acceptance data field
Note
Even when receiving RTR frames a length information is required to check the
DLC (Data Length Code) field entry. Therefore do not omit the DATA parameter.
21
Breite: 178 mm
Höhe: 216 mm
85
EFB’s for AS--BCAN--259
5.4
CANopen
This chapter provides information about how the AS--BCAN--259 is integrated into
a CANOpen network. It describes the implemented functionality and how it is
used.
The AS--BCAN--259 can have several functions within a CANopen network:
CMT Master
NMT Master
NMT Slave
Store the CANopen configuration of all or selected devices and downloads them
into the devices
Start and stop all network devices and monitors them using the CANopen
defined nodeguarding mechanism
Send and receive PDO’s to/from the network
Of course, a combination of the above mentioned functions is also possible.
Moreover if the module is used for PDO communication it may operate in two
modes with respect to acquistion and distribution of PDO data. These two modes
are referred to as ”Network mode” and ”High density mode”
Network Mode (NWM) receives data from the network and stores them in a
datastructure of the *.DTY provided datatype CANOPEN_DATA_SLOT0. Data
send to the network are taken from this structure. A PLC application using this
mode needs PLC programming in order to drive PLC outputs and to route PLC
inputs to the network
High Density Mode (HDM) routes incoming data from the network directly to PLC
outputs. PLC inputs are routed directly to the network. This mode requires a very
simple PLC program only and is used in those cases where the PLC simply acts
as a complex I/O module.
Both modes may be combined.
Note
The Object Dictionary of AS--BCAN--259 you will find in Appendix A.
86
21
EFB’s for AS--BCAN--259
5.5
ProCanOpen
If the AS--BCAN--259 is to be used within a CANopen network a network
configuration tool is necesarry. The tool ProCANopen Version 2.0B or higher of
Vector Informatik GmbH, Stuttgart has been tested with this module and is highly
recommended.
This chapter describes the basic steps that need to be taken in order to integrate
the AS--BCAN--259 into the network. For details refer to the provided ProCANopen
documentation.
5.5.1
Configure Network
Network configuration is done by adding nodes to an empty network and assigning
node id’s, names and groups to them.
ProCANopen has the ability to scan the network for installed nodes. This is the
most convenient and also the safest way to add nodes to the network. If you
intend to use this feature make sure that all connected devices have a different
node id and the same baudrate. The result may look like this :
If the ASBC259.EDS file of AS--BCAN--259 is located in the ProCanopen \EDS
subdirectory and the module is configured by the CIA_SVR EFB (see chapter
CIA_SVR) the module will be recognized by ProCANopen.
21
Breite: 178 mm
Höhe: 216 mm
87
EFB’s for AS--BCAN--259
If you decide on entering nodes manually you need to add nodes by using the new
node menu option from the main menu and configure the node using the
configuration dialog available from the node’s context menu.
If you intend to use the AS--BCAN--259 as the CMT master notify ProCANopen by
entering the appropriate data into the Global Configuration Dialog. Only one node
may be the CMT manager.
88
21
EFB’s for AS--BCAN--259
5.5.2
Variable Connections
Once all nodes are configured you may start to assign the connections beween
nodes by either using the graphical connection or entering the connection using
the connection dialog. These options can be selected by right--clicking on the
corresponding node.
New variables in the AS--BCAN--259 are created by clicking on the New button in
the graphical connection dialog. If two AS--BCAN--259 module are to be connected
click on the Pair button. In either case it is possible to assign a name to the
variable within the AS--BCAN--259. This variable must only exist once within a
single AS--BCAN--259 as it will be used in the corresponding Concept program.
Not adhering to this rule will prevent the variables from being accessible from
within the Concept application. Note that variable names can be changed by the
user anytime after the connection has been made by using the node’s variable list
dialog or -- preferably -- the device access dialog.
21
Breite: 178 mm
Höhe: 216 mm
89
EFB’s for AS--BCAN--259
5.5.3
The slavecfg Tool
Using the device access dialog of the AS--BCAN--259 you may assign NMT and
CMT specific parameters according to the object dictionary listed above.
In order to symplify NMT parameter setting you may select index 1F80H and click
on the symbolic button. The appearing dialog enables you to set the NMT master
guarding parameters to the same value for all slaves in the network. You may also
select the NMT master to start all nodes simultaneously. It is recommed to use this
dialog and afterwards change those entries for nodes that need different guarding
parameters.
Still, the entries in the corresponding configurations of the network NMT slaves
need to be entered so as to enable guarding error reactions. The option ”Config all
slaves” which is available by right--clicking on the AS--BCAN--259 will start a tool
that drastically speeds up this task. You need to save the network before
performing this operation. The tool will set all guarding parameters in the network.
If the option ”Derive guarding settings from NMT Mastr” is selected the resulting
slave’s entries will be exactly the same as the corresponding master’s entries of
index 1F80H. If the option is not selected the entries will be taken from the dialog’s
appropriate entry fields. All nodes on the network except the selected
AS--BCAN--259 will be affected.
90
21
EFB’s for AS--BCAN--259
5.5.4
Downloading the configuration into AS--BCAN--259
After finishing the actual configuration the network configuration is downloaded to
the AS--BCAN--259 that acts as the CMT/NMT master. Select ”Store in network”
from the ”Network” menu. Before starting the operation click on the Info button to
check the size of the actual configuration that will be downloaded. Currently the
maximum configuration size supported is 16384 byte. After powercycling the
AS--BCAN--259 all nodes in the network will be configured according to entries in
the obeject dictionary of the module.
5.5.5
Generating the *.DTY File
In order to access network data in NWM from within concept a special datatype
must be created. This is done by selecting ”DTY Generator” from the
AS--BCAN--259 context menu. A file named DXXX.DTY is created in the network’s
subdirectory. XXX is the node id of the AS--BCAN--259.This file specifies a
variable type named CANOPEN_DATA_SLOT0. By connecting an instance of the
datatype to the NWK_DATA pin of the CIA_SVR EFB the transfer of data from the
CANopen network to the plc’s state memory and vice versa will be enabled.
The *.DTY file must be copied to the local DFB directory of the concept project the
AS--BCAN--259 is associated with.
Note
Because the datytype and therefore the *.DTY file is unique for every
AS--BCAN--259 concept projects for PLC’s within the same network must not
reside in the same subdirectory.
If you intend to use more than one AS--BCAN--259 in one PLC as CANopen nodes
you need to merge the resulting *.DTY files and rename the datatype
CANOPEN_DATA_SLOT0 to e.g.
CANOPEN_DATA_SLOT1, CANOPEN_DATA_SLOT2,
CANOPEN_DATA_SLOT3.
21
Breite: 178 mm
Höhe: 216 mm
91
EFB’s for AS--BCAN--259
92
21
CANopen Integration into Concept
6
This chapter describes how CANopen is integrated into the IEC 1131 environment
of Concept 2.1. It explains which Elementary Function Blocks (EFB’s) are used
and what type of variables are necessarry.
21
Breite: 178 mm
Höhe: 216 mm
93
CANopen Integration into Concept
6.1
Configurator
When using the AS--BCAN--259 it is a necessarry to enter the module into the
I/O--map by selecting ”BKF201(16W)” from I/O--modules selection. This indicates
the the corresponding slot is used and therefore not available for other modules.
The 3XXXX and 4XXXXX references that must be assigned to this module should
not be used in PLC program.
You do not need to use the Params option in the I/O--map dialog.
94
21
CANopen Integration into Concept
6.2
EFB Overview
A standard CANopen application requires at least the CIA_SVR EFB. More
sophisticated applications that need to perform special tasks on the network may
take advantage of the additional EFB’s. Here is an overview of the EFB’s that can
be found in the library CAN in the group named Canopen.
CIA_SVR
CIA_SDOW
CIA_SDOR
CIA_NMT
CIA_CMT
CIA_EMCY
CIA_ISCL
CIA_OSCL
21
Breite: 178 mm
Höhe: 216 mm
Used for Initialization of the AS--BCAN--259,
PDO data transfer and network diagnosis
Used for SDO write operations. Either the
local object dictionary or any network node’s
object dictionary can be written to
Used for SDO read operations. Either the
local object dictionary or any network node’s
object dictionary can be read
Used to issue NMT Master commands
Used to initiate CMT downloads to specific
nodes or the entire network
Transmits the CiA defined emergency object
Used for scaling of analog values coming in
from the network
Used for scaling of analog values sent to the
network
95
CANopen Integration into Concept
6.3
6.3.1
CIA_SVR
Short Description
This EFB enables the CANopen functionality. It is used for AS--BCAN--259
initialization, CANopen configuration and communication. It also enables Layer 2
functionality. Either CIA_SVR or CAN_CFG must be used exactly once for every
AS--BCAN--259 installed. Data are sent to and received from the network (NWM).
Plc inputs (1XXXX and 3xxxx ) may also be sent to the network directly (HDM).
Data that are received from the network may also be copied to plc outputs (
0XXXX and 4XXXX ) directly without any additional logic. Make sure that the
outputs configured in your CANopen Configuration are not written elsewhere in plc
program. The number of data to be copied by the latter two funtions is determined
by the Configuration data parameter.
6.3.2
Layout
Symbol
CIA_SVR
ENABLE
ERROR
STATE
SLOT
CFG
NWK_STAT
ACCPT
NWK_DATA
96
21
CANopen Integration into Concept
Description of the Parameters
Parameter
ENABLE
Data Type
BOOL
SLOT
CFG
ACCPT
NWK_DATA
UINT
CAN_CFG_DATA
CAN_ACCPT
ANY
ERROR
STATE
NWK_STAT
BOOL
UINT
NWK_STATE
Meaning
Enable EFB, every rising edge will reconfigure the
module
Slot where the AS BCAN 259 is located (3...5)
Configuration data
Message acceptance data
Data to to send to the network (first half of used
memory, e.g byte 1--18 of ByteArr36) and data
receive from the network (second half, e.g byte
19--36 of ByteArr36). Usually an instance of CANOPENDATA_SLOT0 is connected to this input
Error occured
Current status or errorcode
Network status information
For additional info on the CFG anf ACCPT parameter refer to the the description of
the CAN_CFG EFB.
6.3.3
Datatype NWK_STATE
Along with this EFB library a set of derived datatypes has been created. One of
them is NWK_STATE. It is a STRUCT of two arrays named NETWORK0 and
NETWORK1. They represent the CANopen networks that are connected to
channel 0 and channel 1. Currently CANopen is only available on channel 0,
therefore NETWORK1[1] to NETWORK1[127] are not used.
These arrays are tables of 128 entries of the datatype NODE_STATE.
NODE_STATE describes the status of a single CANopen node. Index 1 represents
the status of CANopen node 1.
NODE_STATE consists of the following components:
Entry
ONLINE
INFO
ERROR
ERRORCODE
21
Breite: 178 mm
Höhe: 216 mm
Datatype
BOOL
UINT
BOOL
BYTE
Meaning
Node is online
General node status
Node is in erroneous state
Error information from node, valid if ERROR is
TRUE
97
CANopen Integration into Concept
If the corresponding node is guarded and nodeguarding errors that indicate that
the node is not present are encountered the node will be considered offline. In this
case the ONLINE bit will be set to FALSE state.
If an emergency object is received from the corresponding node the first byte of
the received emergency object is written to the ERRORCODE entry and ERROR
is set to TRUE state. Upon reception of the message ”No error or error reset” the
ERROR bit is set to FALSE state.
Note
Data received from the network are not automatically set to zero if the source node
is not online. Therefore additional action must be taken to achieve this behavior on
the PLC application level.
NETWORK0[0] and NETWORK1[0] are reserved for local status information.
Entry
NETWORK0[0].ONLINE
NETWORK1[0].INFO
NETWORK1[0].ONLINE
NETWORK1[0].ERRORCODE
NETWORK1[0].INFO
98
Meaning
This CANopen node is operational
holds the CAN Controller Chip states
If this node is guarded by an external NMT Master, this
bit is set to TRUE if guarding messages are received and
passive nodeguarding is activated using Relais Operation Control
reserved for internal error information
reserved for internal error information
21
CANopen Integration into Concept
6.4
6.4.1
CIA_SDOW
Short Description
This EFB sends a SDO ( Service Data Object) write request to the CANopen
network.
6.4.2
Layout
Symbol
CIA_SDOW
ENABLE
DONE
SLOT
ERROR
CHANNEL
STATE
DEVICE ERRORINF
INDEX
SUBINDEX
LENGTH
DATA
21
Breite: 178 mm
Höhe: 216 mm
99
CANopen Integration into Concept
Description of the Parameters
100
Parameter
ENABLE
Data Type
BOOL
SLOT
CHANNEL
DEVICE
INDEX
SUBINDEX
LENGTH
DATA
DONE
ERROR
STATE
ERRORINF
UINT
UINT
BYTE
WORD
BYTE
UINT
ANY
BOOL
BOOL
UINT
CIA405_SDO_ERROR
Meaning
Start transmission (rising edge). If ENABLE is
FALSE while the operation is still in progress the
transfer of data is aborted
Slot where the AS--BCAN--259 is located (3...5)
Channel for transmission (0...1)
Device to write SDO to
Index to write data to
Subindex to write data to
Number bytes to write
Data to be send (up to 132 byte)
Function completed
Error occured
Current status or errorcode
SDO error structure as defined in CiA DS 405
document
21
CANopen Integration into Concept
6.5
6.5.1
CIA_SDOR
Short Description
This EFB sends a SDO ( Service Data Object) read request to the CANopen
network.
6.5.2
Layout
Symbol
CIA_SDOR
ENABLE
DONE
SLOT
ERROR
CHANNEL
STATE
DEVICE ERRORINF
INDEX
SUBINDEX
LENTH
DATA
21
Breite: 178 mm
Höhe: 216 mm
101
CANopen Integration into Concept
Description of the Parameters
Parameter
ENABLE
Data Type
BOOL
SLOT
CHANNEL
DEVICE
INDEX
SUBINDEX
DONE
ERROR
STATE
ERRORINF
UINT
UINT
BYTE
WORD
BYTE
BOOL
BOOL
UINT
CIA405_SDO_ERROR
UINT
ANY
LENGTH
DATA
102
Meaning
Start transmission (rising edge). If ENABLE is
FALSE while the operation is still in progress the
transfer of data is aborted
Slot where the AS BCAN 259 00 is located (3...5)
Channel for transmission (0...1)
device to read SDO from
index to read data from
subindex to read data from
Function completed
Error occured
Current status or errorcode
SDO error structure as defined in CiA DS 405
document
Number bytes received
Data read (up to 132 byte)
21
CANopen Integration into Concept
6.6
6.6.1
CIA_NMT
Short Description
This EFB is used to set a node’s NMT state in a CANopen network.
6.6.2
Layout
Symbol
CIA_NMT
ENABLE
DONE
SLOT
ERROR
CHANNEL
STATE
DEVICE ERRORINF
STATUS
21
Breite: 178 mm
Höhe: 216 mm
103
CANopen Integration into Concept
Description of the Parameters
Parameter
ENABLE
SLOT
CHANNEL
DEVICE
Data Type
BOOL
UINT
UINT
BYTE
STATUS
UINT
DONE
ERROR
STATE
ERRORINF
BOOL
BOOL
UINT
CIA405_SDO_ERROR
Meaning
Start function (rising edge)
Slot where the AS BCAN 259 is located (3...5)
Channel for transmission (0...1)
device whose status is to be changed
0 = All devices
Status to set device into:
4 = Prepared
5 = Operational
6 = ResetNode
7 = ResetCommunication
127 = PreOperational
Function completed
Error occured
Current status or errorcode
SDO error structure as defined in CiA DS 405
The EFB performs the operation by writing to the object dictionary of the local
AS--BCAN--259 using a SDO write function. If the EFB fails ERRORINF holds
additional information on the error.
104
21
CANopen Integration into Concept
6.7
6.7.1
CIA_CMT
Short Description
If the AS--BCAN--259 module has been configured to be CANopen configuration
manager this EFB is used to configure a single node or an entire CANopen
network.
Note
Configuring nodes on a running network is a highly crucial operation
and should only be done after close consideration of the operation’s impact
on the the network and the application.
6.7.2
Layout
Symbol
CIA_CMT
ENABLE
DONE
SLOT
ERROR
CHANNEL
STATE
DEVICE ERRORINF
21
Breite: 178 mm
Höhe: 216 mm
105
CANopen Integration into Concept
Description of the Parameters
Parameter
ENABLE
SLOT
CHANNEL
DEVICE
Data Type
BOOL
UINT
UINT
BYTE
DONE
ERROR
STATE
ERRORINF
BOOL
BOOL
UINT
CIA405_SDO_ERROR
Meaning
Start function (rising edge)
Slot where the AS BCAN 259 is located (3...5)
Channel for transmission (0...1)
device that is to be configured
0 = All devices
Function completed
Error occured
Current status or errorcode
SDO error structure as defined in CiA DS 405
The EFB performs the operation by writing to the object dictionary of the local
AS--BCAN--259 using a SDO write function. If the EFB fails ERRORINF holds
additional information on the error.
106
21
CANopen Integration into Concept
6.8
6.8.1
CIA_EMCY
Short Description
This EFB enables transmission of the local emergency state to the CANopen
network. The emergency message is transmitted whenever the values of
ERROR_REGISTER or EMY_ERROR_CODE of the EMY_ERR variable has
changed.
6.8.2
Layout
Symbol
CIA_EMCY
SLOT
ERROR
CHANNEL STATE
EMY_ERR
21
Breite: 178 mm
Höhe: 216 mm
107
CANopen Integration into Concept
Description of the Parameters
Parameter
SLOT
CHANNEL
EMY_ERR
ERROR
STATE
108
Data Type
UINT
UINT
CIA405_EMY_ERROR
BOOL
UINT
Meaning
Slot where the AS--BCAN--259 is located (3...5)
Channel for transmission (0...1)
Error structure as defined in CiA DS 405 document
Error occured
Current status or errorcode
21
CANopen Integration into Concept
6.9
6.9.1
CIA_ISCL
Short Description
This EFB is used for scaling of analog inputs from a CANopen network.
6.9.2
Layout
Symbol
CIA_ISCL
NW_IN
MX
MN
OUT
Description of the Parameters
Parameter
NW_IN
MX
MN
OUT
21
Breite: 178 mm
Höhe: 216 mm
Data Type
WORD
INT
INT
INT
Meaning
Analog value received from network
Max value
Min value
Scaled value
109
CANopen Integration into Concept
6.10
6.10.1
CIA_OSCL
Short Description
This EFB is used for scaling of analog values prior to sending them to a CANopen
network.
6.10.2
Layout
Symbol
CIA_OSCL
IN
MX
MN
NW_OUT
Description of the Parameters
Parameter
IN
MX
MN
OUT
Data Type
INT
INT
INT
WORD
Meaning
Analog value to send to network
Max value
Min value
Scaled value
Note
The input value is not checked against the MN and MX values. Make sure that the
IN value does not exceed these boundaries
110
21
Error Diagnostics for I/O Modules
7
A useful feature for checking the configuration is the diagnosis of errors.
This provides you with:
H
A slot check for I/O assignment
H
Information concerning error markers and status messages
The slot query informs you of the module’s operability and is available for all
modules.
The error markers / status messages are made available by some I/O modules as
well as by intelligent modules. These inform you of the device--specific status,
including open circuits and overload.
20
Breite: 178 mm
Höhe: 216 mm
111
Error Diagnostics for I/O Modules
7.1
Slot Check
The slot check is used to check the configured I/O modules. Each module sends a
control bit for this purpose. The control bits of each backplane are combined into a
word and transferred to the CPU by the EFB ”RIOSTAT”. According to the
maximum configuration limit of four backplanes four words are produced.
7.1.1
EFB (Elementary Function Block) ”RIOSTAT”
The status bits (healthy bits) of the configured modules can be made available
using the ”RIOSTAT” EFB refer to Figure 40.
Figure 40
Symbolic representation of the ”RIOSTAT”
RIOSTAT
UNIT
DROP STATUS 1
Control bits of primary backplane HDTA 200
STATUS 2
Control bits in 1st expansion backplane HDTA 201
STATUS 3
Control bits in 2nd expansion backplane HDTA 201
STATUS 4
Control bits in 3rd expansion backplane HDTA 201
STATUS 5
(Not used with Compact)
Always enter a ”1” under ”Unit”. Under STAT1 ... STAT4 enter the addresses under
which you want to store the single control words (4:xxxxx Register).
Bit = 1:
Bit = 0:
Significance of the control bits
The module is OK, i.e., the module answered with its hardware ID code (HW--ID)
and has been entered appropriately in the I/O map.
The module is defective, not entered appropriately, not entered or missing.
The status of a module thus is ”1”, when it answers from the parameterized slot
using the right hardware ID code. The status = 0 means that the module is not
configured, inappropriately configured, not assigned or defective. This status
information is supplied by all I/O modules.
112
20
Error Diagnostics for I/O Modules
7.1.2
Configuring the EFB ”RIOSTAT”
The individual steps required to configure the ”RIOSTAT” EFB are described in the
order in which they should be performed.
1. Open a new section via the File -> New Section -> FBD menu
command.
2. Enter a section name, e.g., iostatus. Confirm with OK.
3. Select the RIOSTAT EFB via Objects -> FFB selection ->
Library -> System and confirm with Close.
4. Place the ”RIOSTAT” EFB and then deselect the EFB.
5. Allocate the EFB’s inputs and outputs. Activate the input menu field by
double--clicking on the input/output. In order to activate the EFB RIOSTAT,
input DROP must be set to 1. You can assign the 4xxxxx output registers as
you like. A possible assignment is provided in the table below.
Table 9
Input
Outputs
Example of addressing for the RIOSTAT
DROP e.g. literal 1
STATUS 1
STATUS 2
STATUS 3
STATUS 4
STATUS 5
e.g., direct address 4:00001
e.g., direct address 4:00001
e.g., direct address 4:00001
e.g., direct address 4:00001
(Not used with Compact)
Once the addresses of the outputs have been successfully assigned, the status
information (healthy bits) of the I/O modules is available.
20
Breite: 178 mm
Höhe: 216 mm
113
Error Diagnostics for I/O Modules
The 4:xxxxx registers assigned in Table 9 are assigned to the corresponding
backplanes as follows:
Register 4:00001
Register 4:00002
Register 4:00003
Register 4:00004
Status bit in primary backplane DTA 200
Status bits in the 1st expansion backplane DTA 201
Status bits in the 2nd expansion backplane DTA 201
Status bits in the 3rd expansion backplane DTA 201
Partitioning of the status bits
The status bits are stored as follows in the 4:xxxxx registers:
15
0
87
CPU CPU Slot Slot Slot Not used
3
4
5
=0
Not used
=0
Primary backplane (4:00001)
15
Slot Slot Slot Slot Slot Not used
1
2
3
4
5
=0
87
0
Not used
=0
Expansion backplane (4:00002 to 4:00004)
7.1.3
Uploading the Status Bits
To be able to read the current state of the status bits (healthy bits), an online
connection must be established (Online -> Connect -> Modbus -> OK).
Subsequently, the 4:xxxxx registers can be displayed in the RDE editor
(Reference Data Editor). To access it, choose Online -> Reference Data
Editor. Enter the register addresses in the Address column. To clearly identify
the status bits, the Bin display type must be set in the format settings.
The information of the status bits can be uploaded and processed as you like, in
the same way as for any other data stored in the stack.
114
20
Error Diagnostics for I/O Modules
7.2
Error Markers and Status Messages
A series of modules, essentially analog I/O modules and experts, provide specific
error markers and/or status messages (e.g., open circuits, overload/underload of
the measuring range, short circuit/overload, etc.).
The following modules do not supply any device--specific status:
AS--BDAP--258; AS--BDAP252; AS--BDAP--253; AS--BDEP--254; AS--BDEP--256;
AS--BDEP--257.
Status information in drop status
One word is reserved for each slot for status messages. There are thus 20
successive words available, of which the first two words are reserved for the CPU.
The 3x range can be defined by the user. To do this, choose the Project ->
Config -->I/O Map --> Status menu command. The following Table 10 lists the
structure of the 3x registers.
Table 10
Register partitioning
3x
Word
1
2
3
4
5
6
7
8
9
10
11
12
13
14
15
16
17
18
19
20
3x + 19
20
Breite: 178 mm
Höhe: 216 mm
Slot
CPU slot
CPU slot
1 I/O module
2 I/O module
3 I/O module
4 I/O module
5 I/O module
6 I/O module
7 I/O module
8 I/O module
9 I/O module
10 I/O module
11 I/O module
12 I/O module
13 I/O module
14 I/O module
15 I/O module
16 I/O module
17 I/O module
18 I/O module
Backplane
1. Backplane
2. Backplane
3. Backplane
4. Backplane
115
Error Diagnostics for I/O Modules
For all modules that have status information, the storage of information appears as
follows in the I/O map word:
ID code (MSB) bit 2
MSB
15
14
13
12
11
10
7
9
8
7
6
5
4
3
2
1
0
LSB
The high byte register (bit 27) specifies whether the module supplies status
information. In this context the meaning is as follows:
MSB = 0
MSB = 1
7.2.1
no status information for the module
the module has status information
Module--specific Register Assignment
Next to the status information in the drop status, the following modules power
supply module--specific information. The information is stored in one or several
registers according to the module.
Register partitioning of AS--BADU 256
Input module AS--BADU 256 with four analog, isolated inputs requires five 3x
registers. These are partitioned as follows:
Input Status Word
3x register 1
MSB
15
14
13
12
11
10
9
8
7
6
5
4
3
2
1
0
LSB
The status information of the low byte register are assigned as follows:
Bit 0
Bit 1
Bit 2
Bit 3
Bit 4
Bit 5
Bit 6
Bit 7
116
Overflow or open circuits (I< 2.08 mA) at input 1
Overflow or open circuits (I< 2.08 mA) at input 2
Overflow or open circuits (I< 2.08 mA) at input 3
Overflow or open circuits (I< 2.08 mA) at input 4
Unipolar
4 ... 20 mA / 2 ... 10 V at inputs 1 ... 4
24 VDC missing
ADU not ready, cause:
-- Overflow or open circuit at one or several inputs
-- Processor monitoring has responded
-- 24 VDC is missing
-- ADU is in initialization phase
20
Error Diagnostics for I/O Modules
The high byte register (bits 8 -- 15) has no function.
Translation value storage
The translation values are stored in the 3x registers word by word in a range from
0 to 4095. This applies to each of the four inputs.
Channel 1 (0 ... 4095 = --10 V / +10 V; etc.)
3x register 2
MSB
LSB
Channel 2 (0 ... 4095 = --10 V / +10 V; etc.)
3x register 3
MSB
LSB
Channel 3 (0 ... 4095 = --10 V / +10 V; etc.)
3x register 4
MSB
LSB
Channel 4 (0 ... 4095 = --10 V / +10 V; etc.)
3x register 5
MSB
LSB
I/O map status word of AS--BADU 256
7
Bit 2
MSB
15
14
13
12
11
10
9
8
7
6
5
4
3
2
1
0
LSB
reserved
20
Breite: 178 mm
Höhe: 216 mm
117
Error Diagnostics for I/O Modules
Register partitioning of AS--BDAP 250
Input / output module AS--BDAP 250 with eight isolated inputs / outputs requires
one 3x register and one 4x register each. These are partitioned as follows:
3x register
MSB
15
14
13
12
11
10
9
8
7
15
14
13
12
11
10
5
4
3
2
1
#Input 1
4x register
MSB
6
9
8
7
6
0
LSB
#Input 8
5
4
3
2
1
#Output 1
0
LSB
#Output 8
I/O map status word of AS--BDAP 250
7
Bit 2
MSB
15
14
13
12
11
10
9
8
7
6
5
4
3
2
1
0
LSB
reserved
Additional function of the status word of the AS--BDAP 250:
If 27is set (MSB = 1), this can mean of the following:
-- the working voltage US is missing
-- the 10 A fuse went
-- there is a short circuit or overload
118
20
Error Diagnostics for I/O Modules
Register partitioning of AS--BDAU 252
Output module AS--BDAU 252 with two isolated outputs requires one 3x register
and one 4x register. These are partitioned as follows:
4x register 1 (output 1)
MSB
15
14
13
12
11
10
9
8
7
6
5
4
3
2
1
0
6
5
4
3
2
1
0
LSB
4x register 2 (output 2)
15
14
13
12
11
10
9
8
7
MSB
LSB
I/O map status word of AS--BDAU 252
7
Bit 2
MSB
15
14
13
12
11
10
9
8
7
6
5
4
3
2
1
0
LSB
reserved
20
Breite: 178 mm
Höhe: 216 mm
119
Error Diagnostics for I/O Modules
Register partitioning of AS--BCAN--259
Communications module AS--BCAN--259 requires one 3x register and one 4x
register.
H
3x register: contains the slot number of module AS--BCAN--259.
H
4x register: reserved
MVB input data
3x register 1
MSB
LSB
MVB output data
4x register 1
MSB
LSB
I/O map status word
The message ID is stored in the I/O map status word (refer to the appendix for
AS--BCAN--259).
7
Bit 2
MSB
15
14
13
12
11
10
reserved
120
9
8
7
6
5
4
3
2
1
0
LSB
Module status
20
Module Descriptions
The module descriptions are documented in alphabetical order.
20
Breite: 178 mm
Höhe: 216 mm
121
122
20
AS--BADU 256
AS--BADU 256
Analog inputs
The AS--BDAU 256 is an input module for rail--specific applications with 4 analog,
isolated inputs. The AD converter works with step--by--step approximation.
Enclosed you will find the following module--specific information:
22
Breite: 178 mm
Höhe: 216 mm
H
Features and functions
H
Configuration
H
Diagnostics
H
Technical specifications
123
AS--BADU 256
124
1
Features and Functions
1.1
Features
H Various measuring ranges can be selected through the software or through
wiring:
Input voltage
+/--1 V; 0 ... 1 V; 0.2 ... 1 V; +/--10 V; 0 ... 10 V; 2 ... 10 V
Input current
+/--20 mA; 0 ... 20 mA; 4 ... 20 mA
H
Each input can be set to one of the measuring ranges 1 V (20 mA) or 10 V
max. individually. Line supervision can be selected via the software.
H
The converter works with a resolution of 11 bits plus sign.
H
The 5 V power supply is provided internally through the installation bus.
The 24 VDC power supply must be set externally.
H
Extended temperature operating range from --25 to +70 degrees Celsius.
22
AS--BADU 256
1.2
Operating mode
5 VDC
1 of 4 inputs
--15 V 0 V +15 V
80C31
Bit 14
Bit 13
Bit 12
--15 V 0 V +15 V
PSB
PSB
Bit 11
MUX
U
1
2
M
U
3
4
M
2
1
2
3
4
5
6
7
8
9
10
11
12
13
14
15
16
17
18
19
20
21
22
Param.
A/D
.
.
.
.
.
.
.
.
.
.
serial
PSB
Bit 0
REF
YE ”ready”
TOTUSN
PSB
YE ”U”
--
+15 V
0V
--15 V
--
Configuration
Configure the following:
2.1
Mounting Location
Select the module’s mounting location (slot) on the backplane according to the
Concept list ”I/O map”.
For each respective mounting location, use the software to select the module
designation ”ADU 2x6/282”.
For installation onto the backplane, follow the enclosed user information.
22
Breite: 178 mm
Höhe: 216 mm
125
AS--BADU 256
2.2
Wiring
H Use shielded cables (twisted 2 x 2 x 0.5 qmm, for each input e.g.,
KAB--2205--LI) for connection purposes. All analog inputs or outputs can be
routed in a common shielded cable as well.
H When connecting sensors in a 4--wire connection, e.g. Pt 100, the wires
must be twisted in pairs.
H The shield must be connected to the ground/earth with a short wire (<20 cm)
on one side.
H The cable may not be run together with power supply wires or any other
similar source of electrical noise. Distance >0.5 m.
Grounding of shields
H Run the shielded cables through cable grounding rail CER 001.
H Remove the shield isolation at the level of the corresponding cable clamp.
H Slip the exposed part of the cable into the cable clamp (contact with the top
hat rail).
H Relieve the tension of each cable using cable clips.
Figure 41
Shield grounding
Cable grounding rail CER 001
126
22
AS--BADU 256
2.3
Connection
Perform the connection of the peripherals according to the Concept lists ”I/O Map”
and ”Variable List”.
Figure 42
Example of connection
UB
M2
0.16 A
1
2
*
+
1
I
--
*
+
2
I
--
3
+
4
5
6
U
7
+
8
9
10
--
U
--
3
4
5
6
7
8
9
10
11
12
13
+
3
U
-+
4
U
--
*
15
16
17
+
I
*
19
20
21
--
+
I
--
14
15
16
17
18
19
20
21
22
*)
With power
inputs, please
use enclosed
jumpers
Optionally, the following can be connected:
2--pole voltage sensor
+/--1 V; 0 ... 1 V; 0.2 ... 1 V; +/--10 V; 0 ... 10 V; 2 ... 10 V or
2--pole current sensor
+/--20 mA; 0 ... 20 mA; 4 ... 20 mA.
The selection for power input (I) or voltage input (U) is established with the
connection (mixed operation is allowed).
22
Breite: 178 mm
Höhe: 216 mm
127
AS--BADU 256
When connecting current sensors, the following jumpers are required:
3-4 for input 1
7-8 for input 2
14-15 for input 3
18-19 for input 4.
An additional pack of 4 jumpers is also enclosed.
Unused voltage inputs must be short--circuited as follows:
3-4 and 5--6 for input 1
7-8 and 9--10 for input 2
14-15 and 16--17 for input 3
18-19 and 20--21 for input 4.
The measuring ranges +/--1 V / +/--10 V / +/--20 mA are individually valid for each
input. The measuring ranges 2 ... 10 V / 4 ... 20 mA are jointly valid for all 4
inputs. This requires the unused inputs to be wired with a valid measuring value.
After the conversion, the analog input values are forwarded as input words to the
ref. 3x + 1 to 3x + 4.
The appropriate signal names or signal addresses should be entered on the label
inlays.
2.4
Measuring Range Selection and Error Analysis
The selection for current input or voltage input is made through the type of
connection. The respective measuring range is set in Concept under ”I/O
mapping”, ”Parameters...”.
In the basic settings (factory settings) the content is = 0, which means:
H
H
H
H
128
All 4 inputs are set to measuring range +/--1 V or +/--20 mA depending on
the connection.
No overload detection.
No open wire detection.
Bipolar operation.
22
AS--BADU 256
Deviating from the basic settings, the following individual preferences are possible.
Table 11 Potential combinations with the following parameters:
Priority = bipolar, no monitoring of open--circuit and overload
Contents
*
0
1
2
3
4
5
6
7
8
9
10
11
12
13
14
15
Input 1
Input 2
Input 3
Input 4
+/--1 V; +/--20 mA
+/--10 V
+/--1 V; +/--20 mA
+/--10 V
+/--1 V; +/--20 mA
+/--10 V
+/--1 V; +/--20 mA
+/--10 V
+/--1 V; +/--20 mA
+/--10 V
+/--1 V; +/--20 mA
+/--10 V
+/--1 V; +/--20 mA
+/--10 V
+/--1 V; +/--20 mA
+/--10 V
+/--1 V; +/--20 mA
+/--1 V; +/--20 mA
+/--10 V
+/--10 V
+/--1 V; +/--20 mA
+/--1 V; +/--20 mA
+/--10 V
+/--10 V
+/--1 V; +/--20 mA
+/--1 V; +/--20 mA
+/--10 V
+/--10 V
+/--1 V; +/--20 mA
+/--1 V; +/--20 mA
+/--10 V
+/--10 V
+/--1 V; +/--20 mA
+/--1 V; +/--20 mA
+/--1 V; +/--20 mA
+/--1 V; +/--20 mA
+/--10 V
+/--10 V
+/--10 V
+/--10 V
+/--1 V; +/--20 mA
+/--1 V; +/--20 mA
+/--1 V; +/--20 mA
+/--1 V; +/--20 mA
+/--10 V
+/--10 V
+/--10 V
+/--10 V
+/--1 V; +/--20 mA
+/--1 V; +/--20 mA
+/--1 V; +/--20 mA
+/--1 V; +/--20 mA
+/--1 V; +/--20 mA
+/--1 V; +/--20 mA
+/--1 V; +/--20 mA
+/--1 V; +/--20 mA
+/--10 V
+/--10 V
+/--10 V
+/--10 V
+/--10 V
+/--10 V
+/--10 V
+/--10 V
* of the control register:
H
22
Breite: 178 mm
Höhe: 216 mm
Set in Concept under ”I/O mapping”, ”Parameters...”
129
AS--BADU 256
Table 12 Potential combinations with the following parameters:
no monitoring in case of overload.
Contents
Input 1
Input 2
Input 3
Input 4
Priority
Overload
monit.
16
0 ... 1 V /
0 ... 20 mA
0 ... 10 V
0.2 ... 1 V /
4 ... 20 mA
2 ... 10 V
0.2 ... 1 V /
4 ... 20 mA
2 ... 10 V
0 ... 1 V /
0 ... 20 mA
0 ... 10 V
0.2 ... 1 V /
4 ... 20 mA
2 ... 10 V
0.2 ... 1 V /
4 ... 20 mA
2 ... 10 V
0 ... 1 V /
0 ... 20 mA
0 ... 10 V
0.2 ... 1 V /
4 ... 20 mA
2 ... 10 V
0.2 ... 1 V /
4 ... 20 mA
2 ... 10 V
0 ... 1 V /
0 ... 20 mA
0 ... 10 V
0.2 ... 1 V /
4 ... 20 mA
2 ... 10 V
0.2 ... 1 V /
4 ... 20 mA
2 ... 10 V
Unipolar
no
Unipolar
Bipolar
no
yes
Bipolar
Unipolar
yes **
yes
Unipolar
yes **
31
32*
47*
48
63
* This requires the wiring of unused inputs with a valid measuring value.
This can happen when using a reference measuring location or with voltage
input (parallel connection) or current input (serial connection) of inputs.
** Monitoring with voltages <2 V
Table 13 Potential combinations with the following parameters:
Priority = bipolar, no open--circuit monitoring, with overload monitoring
Contents
64
65
66
67
68
69
70
71
72
73
74
75
76
77
78
79
130
Input 1
+/--1 V; +/--20 mA
+/-- 10 V
+/--1 V; +/--20 mA
+/-- 10 V
+/--1 V; +/--20 mA
+/-- 10 V
+/--1 V; +/--20 mA
+/-- 10 V
+/--1 V; +/--20 mA
+/-- 10 V
+/--1 V; +/--20 mA
+/-- 10 V
+/--1 V; +/--20 mA
+/-- 10 V
+/--1 V; +/--20 mA
+/-- 10 V
Input 2
+/--1 V; +/--20 mA
+/--1 V; +/--20 mA
+/-- 10 V
+/-- 10 V
+/--1 V; +/--20 mA
+/--1 V; +/--20 mA
+/-- 10 V
+/-- 10 V
+/--1 V; +/--20 mA
+/--1 V; +/--20 mA
+/-- 10 V
+/-- 10 V
+/--1 V; +/--20 mA
+/--1 V; +/--20 mA
+/-- 10 V
+/-- 10 V
Input 3
+/--1 V; +/--20 mA
+/--1 V; +/--20 mA
+/--1 V; +/--20 mA
+/--1 V; +/--20 mA
+/-- 10 V
+/-- 10 V
+/-- 10 V
+/-- 10 V
+/--1 V; +/--20 mA
+/--1 V; +/--20 mA
+/--1 V; +/--20 mA
+/--1 V; +/--20 mA
+/-- 10 V
+/-- 10 V
+/-- 10 V
+/-- 10 V
Input 4
+/--1 V; +/--20 mA
+/--1 V; +/--20 mA
+/--1 V; +/--20 mA
+/--1 V; +/--20 mA
+/--1 V; +/--20 mA
+/--1 V; +/--20 mA
+/--1 V; +/--20 mA
+/--1 V; +/--20 mA
+/-- 10 V
+/-- 10 V
+/-- 10 V
+/-- 10 V
+/-- 10 V
+/-- 10 V
+/-- 10 V
+/-- 10 V
22
AS--BADU 256
Table 14 Potential combinations with the following parameters:
with overload monitoring
Contents
80
95
96*
111*
112
127
Input 1
Input 2
Input 3
Input 4
Priority
0 ... 1 V /
0 ... 20 mA
0 ... 10 V
0.2 ... 1 V /
4 ... 20 mA
2 ... 10 V
0.2 ... 1 V /
4 ... 20 mA
2 ... 10 V
0 ... 1 V /
0 ... 20 mA
0 ... 10 V
0.2 ... 1 V /
4 ... 20 mA
2 ... 10 V
0.2 ... 1 V /
4 ... 20 mA
2 ... 10 V
0 ... 1 V /
0 ... 20 mA
0 ... 10 V
0.2 ... 1 V /
4 ... 20 mA
2 ... 10 V
0.2 ... 1 V /
4 ... 20 mA
2 ... 10 V
0 ... 1 V /
0 ... 20 mA
0 ... 10 V
0.2 ... 1 V /
4 ... 20 mA
2 ... 10 V
0.2 ... 1 V /
4 ... 20 mA
2 ... 10 V
Unipolar
Open-circuit
monit.
no
Unipolar
Bipolar
no
yes
Bipolar
Unipolar
yes **
yes
Unipolar
yes **
* This requires the wiring of unused inputs with a valid measuring value.
This can happen when using a reference measuring location or with voltage
input (parallel connection) or power input (serial connection) of inputs.
** Monitoring with voltages <2 V
Note After powering up, the first value measured corresponds to the initial
position of the input type. Changing the input type will not have any effect on the
measuring value until the cycle following the next one, at the earliest.
Since one ADU 256 conversion cycle takes 10 ms, this could even take longer
given cycle times below 10 ms.
22
Breite: 178 mm
Höhe: 216 mm
131
AS--BADU 256
Table 15
Analog
val.
+/--1 V
--1.024 ...
--1.015
--1.001
--1.00
--0.50
--0.10
--0.05
--0.01
--0.001
--0.0005
0.00
+0.0005
+0.001
+0.01
+0.05
+0.10
+0.50
+1.00
+1.001 ...
+1.024
Table 16
Analog
val.
V0...1
0
0.1
0.5
1
132
Bipolar translation values with Concept
Analog
val.
+/--10 V
--10.24 ...
--10.15
--10.01
--10.00
--5.00
--1.00
--0.50
--0.10
--0.01
--0.005
0.00
+0.005
+0.01
+0.10
+0.50
+1.00
+5.00
+10.00
+10.01 ...
+10.24
Analog
val.
2 ... 10 V
+2.00
+2.004
+2.008
+2.08
+2.40
+2.80
+6.00
+10.00
+10.01 ...
+10.19
Analog
val.
+/--20 mA
--20.48 ...
--20.30
--20.02
--20.00
--10.00
--2.00
--1.00
--0.20
--0.02
--0.01
0.00
+0.01
+0.02
+0.20
+1.00
+2.00
+10.00
+20.00
+20.02 ...
+20.47
Analog
val.
4...20 mA
+4.00
+4.008
+4.016
+4.16
+4.80
+5.60
+12.00
+20.00
+20.02 ...
+20.38
Decimal
value
(Concept)
0
47
48
1 048
1 848
1 948
2 028
2 046
2 047
2 048
2 049
2 050
2 068
2 148
2 248
3 048
4 048
4 095
Range
Overload
linear
linear
linear
linear
linear
linear
linear
linear
linear
linear
linear
linear
linear
linear
linear
Overload
Unipolar translation values with Concept
Analog
val.
V0...10
0
1
5
10
Analog
val.
0.2...10 V
0.2
Analog
val.
V2...10
2
1
10
Analog
val.0...20
mA
0
2
10
20
Analog
val.4...20
mA
4
20
Decimal
val.
0
400
2 000
4 000
22
AS--BADU 256
3
Diagnostics
3.1
LED Indicators
The front of the module contains the following displays:
Table 17
3.2
22
Breite: 178 mm
Höhe: 216 mm
No.
1
Designation
(label inlay)
U
Color
Function
yellow
12
ready
yellow
for 24 V supply
on: Supply available
off: Supply not available
for the processor run
on: Error--free data run
off: Bad data run
Error Analysis
The first 3x ref. assigned to the ADU contains the detailed error information.
Table 18
Error Analysis
Bit
0
1
2
3
4
5
6
7
Function
Overload or open--circuit with currents <2.08 mA at Input 1
Overload or open--circuit with currents <2.08 mA at Input 2
Overload or open--circuit with currents <2.08 mA at Input 3
Overload or open--circuit with currents <2.08 mA at Input 4
Unipolar
2 ... 10 V / 4 ... 20 mA at Inputs 1 ... 4
U=24 V missing
ADU not ready, cause:
Overload or open--circuit at one of the 4 inputs or
processor monitoring has responded or
U = 24 V is missing or
ADU is still in initialization phase.
133
AS--BADU 256
4
Technical Specifications
Allocation
Device
Structure
TSX Compact (rail applications)
in I/O range
Power supply
external supply
Reference potential M
internal via I/O bus
U = 20 ... 30 VDC; 100 mA max., typically 70 mA
M2
5 V; 100 mA max., typically 60 mA
Inputs
Number
Type of networking
Linear measuring range (selectable)
maximum input voltage
maximum input current
Input resistance
Translation values
Common--mode voltage on return
conductors stacked
Insulation voltage
Common--mode rejection to
ground
Filter time const. of the inputs
conversion time
Resolution
Operational limit
(0 ... 60 degrees Celsius)
4, (2--pole as voltage or current inputs)
Optical coupler against supply and I/O bus
Varistor opposite protective ground
Inputs stacked non--isolated
+/--1 V / +/--20 mA (subject to connection)
0.2 ... 1 V/4 ... 20 mA (subject to connection)
0 ... 1 V / 0 ... 20 mA (subject to connection)
+/--10 V / 0 ... 10 V / 2 ... 10 V (subject to measuring
range selection)
+/--30 V inputs stacked for 1 min. max.
40 mA max. continuously
50 ohms for current inputs
>1 MOhm for voltage inputs
refer to Ch. ”Translation Values”
at 10 V, upper range value +2 V max.
at 1 V, upper range value +11 V max.
500 V max. process connection to internal I/O bus or
to ext. 24 V supply
60 dB min at 1 kHz
1.5 ms
10 ms max. for all inputs
11 bits plus sign (bipolar), 12 bit (unipolar)
0.40 % max. relative to voltage range
0.56 % max. relative to current range
Processor
Type of processor
Memory
134
Microprocessor Intel 80C31 (8--bit)
128 bytes RAM for data exchange
32 Kbytes EPROM for firmware
22
AS--BADU 256
Data interface
internal I/O bus
parallel I/O bus, refer to Basic User Manual, Ch. ”Specifications”
Physical characteristics
Module
Format
Ground
in standard--size case
3 HE, 8 T
approx. 330 g
Type of connection
Process
cable to process
Installation distance
Cable length
I/O bus (internal)
2 pluggable 11--pole screw/plug--in terminals
minimum cross--section 0.5 sq. mm, twisted--pair,
reference conductor incorporated, shielded.
e.g. KAB--2205--LI (2 x 2 x 0.5 sq. mm)
>0.5 m side--by--side potential sources of electrical
noise
100 m max.
1/3 C30M
Environmental conditions
Regulations
Systems data
Authorized ambient
operating temperature
Power dissipation
Shock, vibration
22
Breite: 178 mm
Höhe: 216 mm
VDE 0160, LES--DB
refer to Basic User Manual, Ch. ”Specifications”
--25 ... +70 degrees Celsius permanent
--30 ... +85 degrees Celsius temporary (10 minutes)
3 W max., typically 2 W
according to LES--DB
135
AS--BADU 256
136
22
AS--BDAP 250
AS--BDAP 250
Discrete Inputs and Outputs
The AS--BDAP 250 is an output module for rail--specific applications
with 8 discrete, isolated 24 VDC (+/--40 %) inputs and 8 discrete outputs. The
outputs are isolated, they have short circuit and overload protection for 24 VDC
(+/--40 %), 2 A (semiconductor design).
Enclosed you will find the following module--specific information:
21
Breite: 178 mm
Höhe: 216 mm
H
Features and functions
H
Configuration
H
Diagnostics
H
Technical specifications
137
AS--BDAP 250
1
Features and Functions
1.1
Features
Operating voltage UB = 24 VDC for sensor supply (inputs) and working voltage US
= 24 VDC for the outputs must be provided externally.
The 5 V supply is provided internally through the I/O bus.
The operating temperature range was extended to --25 ... +70 degrees Celsius.
1.2
Operating mode
YE
I>
PSB
1 von 8 outputs
U
1A
.
.
.
.
.
.
8A
M
U
E1
.
.
.
.
.
.
E8
M
138
1
2
3
4
5
6
7
8
9
10
11
12
13
14
15
16
17
18
19
20
21
22
PSB
YE
RD
1 of 8 inputs
YE
PSB
RD
21
AS--BDAP 250
2
Configuration
Configure the following:
21
Breite: 178 mm
Höhe: 216 mm
H
Module’s mounting slot (backplane slot) on the backplane (according to the
Concept list ”I/O Map”).
For each respective mounting location, use the software to select the module
designation ”DAP 2x0”.
For installation onto the backplane, refer to the enclosed user information.
H
Short circuit behavior, refer to chapter ”Diagnostics”.
H
Connection of the peripheral device (according to the Concept lists ”I/O Map”
and ”Variable List”).
139
AS--BDAP 250
Figure 43
Example of connection
US = 24 VDC
M4
UB = 24 VDC
10 A
0.16 A
M1
1
2
.............
1A
8A
3
4
5
6
7
8
9
10
11
12
13
.............
E1
E8
14
15
16
17
18
19
20
21
22
Caution
In case of inductive loads on the outputs, make a local protective circuit
(parallel to the operating coil) using a freewheeling diode. The protective
circuit is mandatory if there are conventional contact elements in the output
lines, if the lines to the peripherals are very long, or the load current is >1 A.
The appropriate signal names or signal addresses should be entered on the label
inlays.
140
21
AS--BDAP 250
3
Diagnostics
The front of the module contains the following displays:
Table 19
Explanation of the LEDs
No.
1
Designation (label
inlay)
U
Color
Function
yellow
2
I>
yellow
3 ... 10
1 ... 8
red
for the working voltage of 8 outputs
on: working voltage available
off: working voltage not available
for overload or short circuit at the outputs
on: Short circuit or overload
off: Error--free operation
for the output signals
on: Output carries ”1” signal
off: Output carries ”0” signal
12
U
yellow
14 ... 21
1 ... 8
red
for external sensor supply
on: Sensor supply available
off: Supply not available
for input signals
on: Input carries ”1” signal
off: Input carries ”0” signal or is not connected
Cause:
-- Sensor supply not available
-- Reference potential M1 interrupted
For simulation, the SIM 011 simulator can be plugged into the 8 inputs (bottom
11--pole screw/plug--in terminal).
Short circuit behavior
The output stages do not have fault cut--off with status hold in case of overload. If
the load voltage is not switched off during overload, there are continuously
repeating turn--on attempts at the output stage which result in increased
component temperature.
Therefore, link the system marker assigned to the slot of the DAP 250 in such a
way in the user program that the outputs are switched to 0 signal in case of
overload. This system marker switches to signal 1 if:
H
H
H
21
Breite: 178 mm
Höhe: 216 mm
the switching voltage US is missing
there is a short circuit or an overload
the 10 A fuse went
141
AS--BDAP 250
Note
Please note that in case of a single overload all other related outputs are cut off as
well.
4
Technical Specifications
Allocation
Device
Structure
TSX Compact (rail applications)
in I/O range
Power supply
external sensor voltage
external working voltage
internal via I/O bus
UB = 24 VDC (+/--40 %)
US = 24 VDC (+/--40 %)
5 V; 60 mA max., typically 35 mA
Inputs
Sensor supply
Reference potential M
Number of inputs
Type of networking
Rated signal value
Signal level
Input current
Input delay
142
UB = 14.4 ... 33.6 VDC for all 8 inputs
M1 for all 8 inputs
8
Optical coupler, isolation to I/O bus
and to outputs
+24 V
1 signal: +12 ... +37 V
0 signal: --2 ... +5 V
7 mA at 24 V, 8.5 mA at 30 V
4 ms
21
AS--BDAP 250
Outputs
Working voltage U
Reference potential M
Number
Design
Type of networking
Actuator connection
Signal language
Signal output level
Load current per output
Starting current for incandescent
lamp
Load current of all outputs
Required external fuse
Operating delay
Protective circuit with inductive
loads
switching cycles
US = 14.4 ... 33.6 VDC, for all 8 outputs
M4 for all 8 outputs
8 semiconductor outputs
-- short circuit and overload protected
-- without reclosing lockout
-- group display in case of overload/short circuit
-- group signal through systems marker
potential--free (optical coupler)
between output and reference potential M4
positive logic
1 signal: U = Us -- 0.4 V;
0--Signal: 0 ... +2 V, <1 mA
Upper limit of inductive disconnect voltage at --15 VDC
(built--in field forcing)
10 mA ... 2 A, 10 W max. for incandescent lamps
lon = 10 x l
8 A max.
10 A, fast
<1 ms
refer to chapter ”Configuration” page 140
1000 /h (0.28 /s) with inductive load and perm. max.
power per output
100 /s with ohmic load
10 /s with max. lamp load
Data interface
Internal I/O bus
parallel I/O bus, refer to basic user manual ”Modicon
TSX Compact”, chapter ”Specifications”
Physical characteristics
Module
Format
Weight
in standard--size case
3 HE, 8 T
280 g
Type of connection
Process
Systems bus (internal)
21
Breite: 178 mm
Höhe: 216 mm
2 clip--on 11--pole screw/plug--in terminals
1/3 C30M
143
AS--BDAP 250
Environmental conditions
Regulations
Systems data
Authorized ambient
operating temperature
Power dissipation
Shock, vibration
144
VDE 0160, LES--DB
refer to the basic user manual ”Modicon TSX Compact”, chapter ”Specifications”
--25 ... +70 degrees Celsius permanent
--30 ... +85 degrees Celsius temporary (10 minutes)
typically 5 W
according to LES--DB
21
AS--BDAP 252, AS--BDAP 253
AS--BDAP 252, AS--BDAP 253
Discrete Inputs and Outputs
The AS--BDAP 252 is an output module for rail--specific applications with 8
discrete isolated inputs for 24 VDC (+/--40 %) and 4 discrete relay outputs.
The AS--BDAP 253 is an output module for rail--specific applications with 8
discrete isolated inputs for 110 VDC (+/--40 %) and 4 discrete relay outputs.
The relay contacts are led through potential--free as normally open contacts.
Enclosed you will find the following module--specific information:
H
H
H
H
21
Breite: 178 mm
Höhe: 216 mm
Features and functions
Configuration
Diagnostics
Technical specifications
145
AS--BDAP 252, AS--BDAP 253
1
Features and Functions
1.1
Features
The 22 VDC supply of the relay coils and the sensor supply must be provided
externally.
The 5 V supply is provided internally through the I/O bus.
The operating temperature range was extended to --25 ... +70 degrees Celsius.
1.2
Operating mode
Figure 44
DAP 252 Operating mode
RD
47 Ω
1 of 4 outputs
15 nF
U
1A
2A
3A
4A
M
U
E1
.
.
.
.
.
.
E8
M
146
1
2
3
4
5
6
7
8
9
10
11
12
13
14
15
16
17
18
19
20
21
22
PSB
YE
1 of 8 inputs
YE
PSB
RD
21
AS--BDAP 252, AS--BDAP 253
Figure 45
DAP 253 Operating mode
RD
47 Ω
1 of 4 outputs
15 nF
U
1A
2A
3A
4A
M
U
E1
.
.
.
.
.
.
E8
M
21
Breite: 178 mm
Höhe: 216 mm
1
2
3
4
5
6
7
8
9
10
11
12
13
14
15
16
17
18
19
20
21
22
PSB
YE
YE
1 of 8 inputs
PSB
RD
147
AS--BDAP 252, AS--BDAP 253
2
Configuration
Configure the following:
H
H
Mounting slot (backplane slot) of the module onto backplane (according to
the Concept list ”I/O Map”).
For each respective mounting location, use the software to select the module
designation ”DAP 2x2/253”.
For installation onto the backplane, refer to the enclosed user information.
Connection of the peripheral device (according to the Concept lists ”I/O Map”
and ”Variable List”).
Figure 46
Example of connection DAP 252, DAP 253
US = 24 ... 110 VDC / L = 24 ... 230 VAC
M4/N
UB2 = 22 VDC
M2
UB1 = 24 VDC at DAP 252; UB1 = 110 VDC at DAP 253
4A
4A
0.16 A
M1
0.16 A
1
2
3
1A
4
5
2A
6
7
3A
4A
8
9
10
11
12
13
.............
E1
E8
14
15
16
17
18
19
20
21
22
148
21
AS--BDAP 252, AS--BDAP 253
The appropriate signal names or signal addresses should be entered on the label
inlays.
In case of inductive loads for switching, make a local protective circuit parallel to
the inductance (operating coil):
3
H
In case of working voltages of L = 230 VAC an additional RC circuit of
appropriate dimensions (according to the manufacturers specifications) is
required to increase the service life and the EMC stability.
H
In case of working voltages US = 24 to 110 VDC a freewheeling diode is
required to increase the service life.
Diagnostics
The front of the module contains the following displays:
Table 20
Explanation of the LEDs
No.
1
Designation (label inlay)
U
Color
Function
yellow
3, 5, 7, 9
1 ... 4
red
for the supply of relay coils
on: Supply voltage available
off: Supply voltage not available
for the output signals
on: Outputs carry ”1” signal
off: Outputs carry ”0” signal
12
U
yellow
14 ... 21
1 ... 8
red
for the sensor supply
on: Supply available
off: Supply not available
for input signals
on: Inputs carry ”1” signal
off: Inputs carry ”0” signal
For simulation of the AS--BDAP 252, the SIM 011 simulator can be plugged into
the 8 inputs (bottom 11--pole screw/plug--in terminal).
Caution
It is prohibited to combine the use of the SIM 011 simulator with the
AS--BDAP 253.
21
Breite: 178 mm
Höhe: 216 mm
149
AS--BDAP 252, AS--BDAP 253
4
Technical Specifications
Allocation
Device
Structure
TSX Compact (rail applications)
in I/O range
Power supply
External input voltage for sensor
voltage
External input voltage for relay
coils
Reference potential M
internal via I/O bus
UB = 24 VDC (+/--40 %), 50 mA max. with DAP 252
UB = 110 VDC (+/--40 %), 30 mA max. with DAP 253
UB = 22 VDC, +/--5 %, 70 mA max.
M2
5 V; 15 mA max., typically 10 mA
Inputs AS--BDAP 252
Sensor supply
Reference potential M
Number of inputs
Type of networking
Rated signal value
Signal level
Input current
Input delay
UB = 14.4 ... 33.6 VDC for all 8 inputs,
residual ripple max. 20 % SS
M1 for all 8 inputs
8 (with LED indicators)
Optical coupler, isolation to I/O bus and to outputs
+24 V
1 signal: +12 ... +37 V
0 signal: --2 ... +5 V
4 mA at 24 V, 6 mA at 37 V
typically 7 ms
Inputs AS--BDAP 253
Sensor supply
Reference potential M
Number of inputs
Type of networking
Rated signal value
Signal level
Input current
Input delay
UB = 66 ... 154 VDC for all 8 inputs,
residual ripple max. 20 % SS
M1 for all 8 inputs
8 (with LED indicators)
Optical coupler, isolation to I/O bus and to outputs
+110 V
1 signal: +55 ... +170 V
0 signal: --2 ... +10 V
typically 2.2 mA
typically 6 ms
Relay outputs
Number
Type of networking
Operating delay
Working voltages, load currents,
service life of contacts
150
4 normally open contacts (with LED indicators)
Contacts, potential--free led through as normally open
contacts
approx. 10 ms
refer to the description of module AS--BDAP 258
21
AS--BDAP 252, AS--BDAP 253
Data interface
Internal I/O bus
parallel I/O bus, refer to basic user manual ”Modicon
TSX Compact”, chapter ”Specifications”
Physical characteristics
Module
Format
Weight
in standard--size case
3 HE, 8 T
240 g
Type of connection
Process
Systems bus (internal)
2 clip--on 11--pole screw/plug--in terminals
1/3 C30M
Environmental conditions
Regulations
Systems data
Authorized ambient
operating temperature
Power dissipation
Shock, vibration
21
Breite: 178 mm
Höhe: 216 mm
VDE 0160, LES--DB
refer to the basic user manual ”Modicon TSX Compact”, chapter ”Specifications”
--25 ... +70 degrees Celsius permanent
--30 ... +85 degrees Celsius temporary (10 minutes)
typically 2 W
according to LES--DB
151
AS--BDAP 252, AS--BDAP 253
152
21
AS--BDAP 258
AS--BDAP 258
Discrete Outputs
The AS--BDAP 258 is an output module for rail--specific applications with
8 discrete relay outputs.
The relay contacts are led through potential--free as normally open contacts.
Enclosed you will find the following module--specific information:
H
H
H
H
21
Breite: 178 mm
Höhe: 216 mm
Features and functions
Configuration
Diagnostics
Technical specifications
153
AS--BDAP 258
1
Features and Functions
1.1
Features
The 22 VDC supply of the relay coils and the sensor supply must be provided
externally.
The 5 V supply is provided internally through the I/O bus.
The operating temperature range was extended to --25 ... +70 degrees Celsius.
1.2
Operating mode
U
1A
2A
3A
4A
M
U
5A
6A
7A
8A
M
154
1
2
3
4
5
6
7
8
9
10
11
12
13
14
15
16
17
18
19
20
21
22
47 Ω
RD
1 of 8 outputs
15 nF
PSB
YE
21
AS--BDAP 258
2
Configuration
Configure the following:
H
Module’s mounting location (slot) on the backplane (according to Concept list
”I/O map”).
For each respective mounting location, use the software to select the module
designation ”DAP 2x8”.
For installation onto the backplane, refer to the enclosed user information.
H
Peripheral connection (according to the Concept lists ”I/O Map” and ”Variable
List”).
Figure 47
Example of connection
4A
4A
4A
4A
US = 24 ... 110 VDC /
L = 24 ... 230 VAC
M4/N
UB = 22 VDC
M2
0.16 A
1
2
1A
2A
3A
4A
3
4
5
6
7
8
9
10
11
12
5A
6A
7A
8A
21
Breite: 178 mm
Höhe: 216 mm
13
14
15
16
17
18
19
20
21
22
155
AS--BDAP 258
The appropriate signal names or signal addresses should be entered on the label
inlays.
In case of inductive loads for switching, perform a protective circuit locally
parallel to the inductance (operating coil):
3
H
In case of working voltages of L = 230 VAC an additional RC circuit of
appropriate dimensions (according to the manufacturers specifications) is
required to increase the service life and the EMC stability.
H
In case of working voltages US = 24 to 110 VDC a freewheeling diode is
required to increase the service life.
Diagnostics
The front of the module contains the following displays:
Table 21
Explanation of the LEDs
No.
1
3, 5, 7, 9, 14,
16, 18, 20
4
Designation (label inlay)
U
Color
Function
yellow
1 ... 8
red
for the supply of relay coils
on: Supply voltage available
off: Supply voltage not available
for the output signals
on: Outputs carry ”1” signal
off: Outputs carry ”0” signal
Technical Specifications
Allocation
Device
Structure
TSX Compact (rail applications)
in I/O range
Power supply
External input voltage for relay
coils
Reference potential M
internal via I/O bus
156
UB = 22 VDC, +/--5 %, 70 mA max.
M2
5 V; 60 mA max., typically 50 mA
21
AS--BDAP 258
Data interface
Internal I/O bus
parallel I/O bus, refer to basic user manual ”Modicon
TSX Compact”, chapter ”Specifications”
Relay outputs
Number
Type of networking
Operating delay
Working voltages
Minimum load current
8 normally open contacts (with LED indicators)
Contacts, potential--free led through as normally open
contacts
approx. 10 ms
US = 24 ... 110 VDC, L = 24 ... 230 VAC, 250 VAC
max.
10 mA for new contacts
Load currents of the relay contacts
with 230 VAC
with 24 VDC
with 60 VDC
with 110 VDC
with 140 VDC
Protective circuit
Overload protection
max. 2 A continuous with cos phi= 1
max. 4 A temporary with cos phi = 1
max. 1 A continuous with cos phi = 0.5
max. 1.5 A/ 240 V acc. to AC 11, VDE 0660, Section
200
max. 2 A continuous (ohmic load)
max. 4 A temporary (ohmic load)
max. 1.5 A pilot duty
max. 1 A continuous (L/R = 20 ms)
max. 0.5 A/ 24 V acc. to DC 11, VDE 0660, Section
200
max. 1 A continuous (ohmic load)
max. 0.5 A (L/R = 20 ms)
max. 0.45 A continuous (ohmic load)
max. 0.25 A (L/R = 20 ms)
max. 0.3 A continuous (ohmic load)
max. 0.15 A (L/R = 20 ms)
all normally open contacts are wired with 68 Ohm + 15
nF, residual current approx. 1 mA, also refer to chapter
”Configuration” page 156
to be planned externally
Service life of contacts
mechanical
electric (ohmic load)
electric (cos phi = 0.5)
21
Breite: 178 mm
Höhe: 216 mm
20 million switching cycles
10 million switching cycles (230 VAC/ 0.2 A)
7 million switching cycles (230 VAC/ 0.5 A)
typ. 8 million switching cycles (30 VDC/ 2 A, with clamping diode)
typ. 1 million switching cycles (60 VDC/ 1 A, with clamping diode
and 3000 switching cycles/ h max.)
5 million switching cycles (230 VAC/ 0.5 A)
157
AS--BDAP 258
Left: Service life of contact with ohmic load
107
8
6
Reduction factor F
Number of operating cycles
Figure 48
4
2
Right: Reduction factor for inductive load
1
Number of operating cycles eff. =
Number of operating cycles (ohmic)
x reduction factor F
0.9
0.8
106
8
6
0.7
4
0.6
2
105
0.5
0
0.2 0.4 0.6 0.8 1 1.2 1.4 1.6 1.8 2
Switched AC capacity (kVA)
1
0.9
0.8
0.7
0.6
0.5
0.4 0.3
cos ϕ
Physical characteristics
Module
Format
Weight
in standard--size case
3 HE, 8 T
360 g
Type of connection
Process
Systems bus (internal)
2 clip--on 11--pole screw/plug--in terminals
1/3 C30M
Environmental conditions
Regulations
Systems data
Authorized ambient
operating temperature
Power dissipation
Shock, vibration
158
VDE 0160, LES--DB
refer to the basic user manual ”Modicon TSX Compact”, chapter ”Specifications”
--25 ... +70 degrees Celsius permanent
--30 ... +85 degrees Celsius temporary (10 minutes)
typically 2 W
according to LES--DB
21
AS--BDAU 252
AS--BDAU 252
Analog Outputs
The AS--BDAU 252 is an output module for rail--specific applications with
2 analog, isolated outputs for current or voltage output. Each output can be
connected with actuators for +/--10 V or +/--20 mA.
Enclosed you will find the following module--specific information:
H Features and functions
H Configuration
H Diagnostics
H Technical specifications
Module elements:
1
2
3
21
Breite: 178 mm
Höhe: 216 mm
159
AS--BDAU 252
1
Features and Functions
1.1
Features
The 24 VDC supply voltage must be provided externally.
The 5 V supply is provided internally through the I/O bus.
The digital--analog converter works with a signed 11--bit resolution.
The operating temperature range was extended to --25 ... +70 degrees Celsius.
1.2
Operating mode
1 of 2 outputs
REF
0 V +15 V
D/A
+
Bit 0
--15 V 0 V +15 V
U
U
I1
M
U
U
I2
M
160
1
2
3
4
5
6
7
8
9
10
11
12
13
14
15
16
17
18
19
20
21
22
U
+
--15 V 0 V +15 V
.
.
.
.
.
PSB
Bit 11
I
--
YE
+15 V
0V
--15 V
YE (ready) +15 V
0V
--15 V
--
for output 1
for output 2
21
AS--BDAU 252
2
Configuration
Configure the following:
2.1
Mounting Location
Select the module’s mounting location (slot) on the backplane according to
the Concept list ”I/O Map”.
For each respective mounting location, use the software to select the module
designation ”DAU 2x2”.
For installation onto the backplane, refer to the enclosed user information.
2.2
Wiring
Refer to chapter ”Wiring” in the description of module AS--BADU 256.
2.3
Connection
Connect the peripherals according to the Concept lists ”I/O Map” and ”Variable
List”.
Figure 49
Example of connection
UB = 24 VDC
M2
0.16 A
1
2
+
U
3
4
-- 5
6
I1
7
+ 8
-- 9
10
11
12
13
U
14
+ 15
-- 16
17
I2
18
+ 19
-- 20
21
22
21
Breite: 178 mm
Höhe: 216 mm
161
AS--BDAU 252
Each output can be used for current output (I) or voltage output (U).
After conversion in the DAU, the two decimal words in ref. 4x are forwarded to
outputs 1 and 2 as analog values.
The appropriate signal names or signal addresses should be entered on the label
inlays.
2.4
3
Translation Values for AS--BDAU 252
Analog value
Current output
in mA
Analog value
Voltage output
in V
Decimal value
in Concept
--20.48...
--20.01
--10.24...
--10.005
0
47
--20.00
--10.00
48
0
0
2048
+20.00
+10.00
4048
+20.01...
+10.005...
4049
+20.48
+10.24
4095
0
0
4096...
Range
Under--range
Normalrange
Üverrange
Diagnostics
The front of the module contains the following displays:
Table 22
4
Explanation of the LEDs
No.
1
Designation (label inlay)
U
Color
Function
yellow
for the 24 V supply
on: Supply available
off: Supply not available
12
ready
yellow
for the isolated supply from the DC/DC
converter
on: Supply available
off: Supply not available
Technical Specifications
Allocation
Device
Structure
162
TSX Compact (rail applications)
in I/O range
21
AS--BDAU 252
Power supply
external supply
Reference potential M
internal via I/O bus
UB = 24 VDC (20 ... 30 VDC), 150 mA max.
M2
5 V; 60 mA max., typically 40 mA
Outputs
Number
Type of networking
Current output
Voltage output
Overload
Fault at 0 ... 60 degrees Celsius
Conversion time per output
Translation values
Resolution
2, optionally as current or voltage output
Isolation through optical coupler to I/O bus, 24 V supply and 2nd Output
+/--20 mA, <500 Ohm
+/--10 V, >5 kOhm, short circuit proof
approx. 2.4 %
approx. 0.6 %
approx. 11 ms
refer to chapter ”Translation values”, page 162
11 bits plus sign
Data interface
Internal I/O bus
parallel I/O bus, refer to basic user manual ”Modicon
TSX Compact”, chapter ”Specifications”
Physical characteristics
Module
Format
Weight
in standard--size case
3 HE, 8 T
300 g
Type of connection
Process, supply
cable to process
Installation distance
Cable length
Systems bus (internal)
2 clip--on 11--pole screw/plug--in terminals
minimum cross section 0.5 sq. mm, twisted pair,
reference conductor incorporated, shielded e.g.
KAB--2205--LI (2 x 2 x 0.5 sq. mm)
>0.5 m (to potential sources of electrical noise)
100 m max.
1/3 C30M
Environmental conditions
Regulations
Systems data
Authorized ambient
operating temperature
Power dissipation
Shock, vibration
21
Breite: 178 mm
Höhe: 216 mm
VDE 0160, LES--DB
refer to the basic user manual ”Modicon TSX Compact”, chapter ”Specifications”
--25 ... +70 degrees Celsius permanent
--30 ... +85 degrees Celsius temporary (10 minutes)
typically 4 W
according to LES--DB
163
AS--BDAU 252
164
21
AS--BDEP 254
AS--BDEP 254
Discrete Inputs
The AS--BDEP 254 is a module for rail--specific applications with 16 discrete
inputs for 24 to 48 VDC, isolated from the bus and from the second input group.
Enclosed you will find the following module--specific information:
21
Breite: 178 mm
Höhe: 216 mm
H
Features and functions
H
Configuration
H
Diagnostics
H
Technical specifications
165
AS--BDEP 254
1
Features and Functions
1.1
Features
The reference potential of the external 24 ... 48 VDC sensor supply extends to 8
inputs, respectively.
The 5 V supply is provided internally through the I/O bus.
The operating temperature range was extended to --25 ... +70 degrees Celsius.
1.2
Operating mode
1 of 16 inputs
U
E1
.
.
.
.
.
.
E8
M
U
E9
.
.
.
.
.
.
E16
M
166
1
2
3
4
5
6
7
8
9
10
11
RD
COMP
PSB
YE
IK
+
--
12
13
14
15
16
17
18
19
20
21
22
21
AS--BDEP 254
2
Configuration
Configure the following:
H
Module’s mounting slot (backplane slot) on the backplane (according to the
Concept list ”I/O Map”).
For each respective mounting location, use the software to select the module
designation ”DAP 2x4”.
For installation onto the backplane, refer to the enclosed user information.
H
Connection of the peripheral device (according to the Concept lists ”I/O Map”
and ”Variable List”).
Figure 50
Example of connection
UB = 24 ... 48 VDC
M1
0,16 A
0,16 A
1
2
.............
E1
E8
3
4
5
6
7
8
9
10
11
12
13
.............
E9
E16
14
15
16
17
18
19
20
21
22
21
Breite: 178 mm
Höhe: 216 mm
167
AS--BDEP 254
The appropriate signal names or signal addresses should be entered on the label
inlays.
3
Diagnostics
The front of the module contains the following displays:
Table 23
Explanation of the LEDs
No.
1, 12
Designation (label
inlay)
U
Color
Function
yellow
for external sensor supply
on: Sensor supply available
off: Supply not available
1 ... 16
red
for input signals
on: Input carries ”1” signal
off: Input carries ”0” signal or is not connected
Cause:
-- Sensor supply not available
-- Reference potential M1 interrupted
3 ... 10,
14 ... 21
For simulation, the SIM 011 simulator can be plugged into each of the 8 inputs
(11--pole screw/plug--in terminal).
168
21
AS--BDEP 254
4
Technical Specifications
Allocation
Device
Structure
TSX Compact (rail applications)
in I/O range
Power supply
external sensor voltage
internal via I/O bus
UB = 24 / 48 VDC (+/--40 %)
5 V; 22 mA max., typically 15 mA
Inputs
Sensor supply
Reference potential M
Number of inputs
Type of networking
Signal level at 24 VDC:
Voltage/Current (IE) at 1 signal
Voltage/Current at 0 signal
Reference current (IR)
Signal level at 48 VDC:
Voltage/Current (IE) at 1 signal
Voltage/Current at 0 signal
Reference current (IR)
Operating level (0 after 1 signal)
Input delay
Operating frequency
Input current per group
IG = 8 x IE + IR
UB = 24 ... 48 VDC, +/--40 % for 8 inputs, respectively,
residual ripple 20 % SS max.
M1 for 8 inputs each
2 x 8 in groups
Isolation through optical coupler to I/O bus
and 2 stacked groups
+12 ... +33.6 V / +6.0 ... +7.1 mA
--3 ... +5 V / --1.7 ... +2.9 mA
10.1 mA max.
+24 ... +72 V / +2.0 ... +2.5 mA
--6 ... +10 V / --3.4 ... +2.5 mA
7.1 mA max.
28 ... 33 % of Usch
4 ms
100 Hz max.
80 mA max.
Data interface
Internal I/O bus
parallel I/O bus, refer to basic user manual ”Modicon
TSX Compact”, chapter ”Specifications”
Physical characteristics
Module
Format
Weight
in standard--size case
3 HE, 8 T
approx. 260 g
Type of connection
Process
Systems bus (internal)
21
Breite: 178 mm
Höhe: 216 mm
2 clip--on 11--pole screw/plug--in terminals
1/3 C30M
169
AS--BDEP 254
Environmental conditions
Regulations
Systems data
Authorized ambient
operating temperature
Power dissipation
Shock, vibration
170
VDE 0160, LES--DB
refer to the basic user manual ”Modicon TSX Compact”, chapter ”Specifications”
--25 ... +70 degrees Celsius permanent
--30 ... +85 degrees Celsius temporary (10 minutes)
typically 4 W
according to LES--DB
21
AS--BDEP 256, AS--BDEP 257
AS--BDEP 256, AS--BDEP 257
Discrete Inputs
The AS--BDEP 256 is a module for rail--specific applications with 16 discrete,
isolated inputs for 24 VDC (+/--40 %).
The AS--BDEP 257 is a module for rail--specific applications with 16 discrete,
isolated inputs for 110 VDC (+/--40 %).
Enclosed you will find the following module--specific information:
21
Breite: 178 mm
Höhe: 216 mm
H
Features and functions
H
Configuration
H
Diagnostics
H
Technical specifications
171
AS--BDEP 256, AS--BDEP 257
1
Features and Functions
1.1
Features
The reference potential of the external 24 or 110 VDC sensor supply must be
provided for each of the 8 inputs.
The 5 V supply is provided internally through the I/O bus.
The operating temperature range was extended to --25 ... +70 degrees Celsius.
1.2
Operating mode (AS--BDEP 256 and AS--BDEP 257)
U
E1
.
.
.
.
.
.
E8
M
U
E9
.
.
.
.
.
.
E16
M
172
1
2
3
4
5
6
7
8
9
10
11
1 of 16 inputs
PSB
YE
RD
12
13
14
15
16
17
18
19
20
21
22
21
AS--BDEP 256, AS--BDEP 257
2
Configuration
Configure the following:
H
Module’s mounting slot (backplane slot) on the backplane (according to the
Concept list ”I/O Map”).
For each respective mounting location, use the software to select the module
designation ”DAP 2x6/2x7” for both modules.
For installation onto the backplane, refer to the enclosed user information.
H
Connection of the peripheral device (according to the Concept lists ”I/O Map”
and ”Variable List”).
Figure 51
Example of connection
0,16 A
0,16 A
UB = 24 VDC at DEP 256; UB = 110 VDC at DEP 257
M1
1
2
.............
E1
E8
3
4
5
6
7
8
9
10
11
12
13
.............
E9
E16
14
15
16
17
18
19
20
21
22
21
Breite: 178 mm
Höhe: 216 mm
173
AS--BDEP 256, AS--BDEP 257
The appropriate signal names or signal addresses should be entered on the label
inlays.
3
Diagnostics
The front of the module contains the following displays:
Table 24
Explanation of the LEDs
No.
1, 12
Designation (label
inlay)
U
Color
Function
yellow
for external sensor supply
on: Sensor supply available
off: Supply not available
1 ... 16
red
for input signals
on: Input carries ”1” signal
off: Input carries ”0” signal or is not connected
Cause:
-- Sensor supply not available
-- Reference potential M1 interrupted
3 ... 10,
14 ... 21
For simulation, the SIM 011 simulator can be plugged into each of the 8 inputs
(11--pole screw/plug--in terminal).
4
Technical Specifications
Allocation
Device
Structure
TSX Compact (rail applications)
in I/O range
Power supply
external sensor voltage
internal via I/O bus
174
UB = 24 VDC (+/--40 %) with AS--BDEP 256;
UB = 110 VDC (+/--40 %) with AS--BDEP 257
5 V; 25 mA max., typically 20 mA
21
AS--BDEP 256, AS--BDEP 257
AS--BDEP 256 inputs
Sensor supply
Reference potential M
Number of inputs
Type of networking
Rated signal value
Signal level
Input current
Input delay
UB = 14.4 ... 33.6 VDC for 8 inputs each,
residual ripple 20 % SS max.
M1 for 8 inputs each
2 x 8 in groups
Optical coupler, isolation to I/O bus
and to second group
+24 V
1 signal: +12 ... +37 V
0 signal: --2 ... +5 V
4 mA at 24 V, 6 mA at 37V
4 ms
AS--BDEP 257 inputs
Sensor supply
Reference potential M
Number of inputs
Type of networking
Rated signal value
Signal level
Input current
Input delay
UB = 66 ... 154 VDC for 8 inputs each,
residual ripple 20 % SS max.
M1 for 8 inputs each
2 x 8 in groups
Optical coupler, isolation to I/O bus
and to second group
+110 V
1 signal: +55 ... +170 V
0 signal: --2 ... +10 V
typically 2.2 mA
4 ms
Data interface
Internal I/O bus
parallel I/O bus, refer to basic user manual ”Modicon
TSX Compact”, chapter ”Specifications”
Physical characteristics
Module
Format
Weight
in standard--size case
3 HE, 8 T
approx. 220 g
Type of connection
Process
Systems bus (internal)
21
Breite: 178 mm
Höhe: 216 mm
2 clip--on 11--pole screw/plug--in terminals
1/3 C30M
175
AS--BDEP 256, AS--BDEP 257
Environmental conditions
Regulations
Systems data
Authorized ambient
operating temperature
Power dissipation
Shock, vibration
176
VDE 0160, LES--DB
refer to the basic user manual ”Modicon TSX Compact”, chapter ”Specifications”
--25 ... +70 degrees Celsius permanent
--30 ... +85 degrees Celsius temporary (10 minutes)
typically 3 W
according to LES--DB
21
AS--BCAN--259
AS--BCAN--259
Communications Module for CAN
AS--BCAN--259 is an interface module on the CAN as per CIA specification (CAN
in Automation). It is used to link the ”Modicon TSX Compact” to the CAN.
Enclosed you will find the following module--specific information:
H
H
H
H
Features and functions
Hardware configuration
Diagnostics
Technical specifications
AS--BCAN--259
AS--WCAN--201
CAN TAP
470 NAV 511 00
Connectors to
activate the
Bus terminator
21
Breite: 178 mm
Höhe: 216 mm
7
8
9
10
11
12
13
14
15
16
17
18
19
20
21
22
CAN interface 1 and relay
output for a Watchdog
signal
CAN interface 2 and
RS 232 interface
CAN TAP
470 NAV 511 00
Connectors to
activate the
Bus terminator
177
AS--BCAN--259
1
Figure 52
Features and Functions
H
Connection to the CAN via CAN--TAP (470 NAV 511 00) and module
connecting cable (AS--WCAN--201)
H
Compliance with the EN 50 155 standard (railway application)
H
One CAN port for the CANopen protocol (CAN 1)
H
CANopen Master and CANopen Slave functionality
H
Address setting using the DIP switch
H
One CAN interface for CAN layer 2 protocols based on V2.0A and V2.0B
H
Three CAN modules can be configured in the rack AS--HDTA--200 of the
Compact PLC
Function of the CPU part (CAN--259 CPU)
USWN
RS--232--Schnittstelle
PAB
DPM
CPU
SRAM
Systembus MC68332
div. Anzeige--LEDs
CAN L
CAN1
Optocoupler
11--pole
Terminalblock
CAN H
CAN L
Flash
CAN2
Optocoupler
11--pole
Terminalblock
CAN H
Motorola Processor 68332--16 (16 MHz)
64 K/ 16 Bit SRAM, 64 K/ 16 Bit FLASH, 8 K Byte DPM
178
21
AS--BCAN--259
Figure 53
Function of the CAN--TAP
CAN Bus interface (9--pole D--sub male)
8--pole Terminalblock
Bus terminator
CAN L
CAN GND
CAN H
C_GND
male
21
Breite: 178 mm
Höhe: 216 mm
9--pole D--sup
female
179
AS--BCAN--259
2
Configuration
2.1
Setting Device Addresses
The DIP switch for address setting is located at the back of the module.
Figure 54
Rear view of the AS--BCAN--259
”1” ”0”
Table 25
DIP
switch
2 to 7
2 to 6
2 to 5
2 to 5
2 to 3
2 to 2
2 to 1
2 to 0
H
H
180
Address settings
Address
1
”0”
”0”
”0”
”0”
”0”
”0”
”0”
”1”
Address
2
”0”
”0”
”0”
”0”
”0”
”0”
”1”
”0”
... .....
Address
254
”1”
”1”
”1”
”1”
”1”
”1”
”1”
”0”
Address
255
”1”
”1”
”1”
”1”
”1”
”1”
”1”
”1”
Setting Device Adresses is only necessary for the CAN interface 1
(CANopen protocol)
Please note that address 0 and address above 127 must not be used within
CANopen networks.
21
AS--BCAN--259
2.2
Installation
H Mount the CAN module on one of the I/O slots (1--3, 1--4, 1--5) on primary
backplane AS--HDTA--200 (related topics: chap. ”Installtion”, ”Modules” in the
user manual).
H
Mount the CAN--TAP below the backplane on a DIN top hat rail (bus tap,
refer to Figure 55).
Figure 55
21
Breite: 178 mm
Höhe: 216 mm
Mounting the CAN--TAP onto the top hat rail
H
Connect the terminal block of connecting cable AS--WCAN--201 to the lower
pins of the CAN module.
H
Establish the connection to the CAN--TAP (insert the connecting cable’s
connector into the CAN--TAP).
181
AS--BCAN--259
2.3
Connection to the MVB Interface
Figure 56
9
5
Pin assignment of the MVB interface on the MVB--TAP
8
4
7
3
6
2
6
1
1
7
2
8
3
9
4
5
Socket (right)
Pin (left)
2
3
5
6
7
8
9
CAN_L
CAN_GND
(CAN_SHLD)
(CAN_0V)
CAN_H
(ERR)
(CAN_VCC)
Contact point occupied
Contact point not occupied
Figure 57
1
2
3
4
5
6
7
8
9
10
11
12
13
14
15
16
17
18
19
20
21
22
182
Terminal assignment of TAP connecting cable AS--WMVB--201
1
2
3
4
5
6
7
8
9
10
11
PE
CAN1_H
CAN1_L
CAN1_GND
RES1_L
RES1_H
RES2_L
RES2_H
REL1
REL2
PE
(PE for the shield of the Drop cable)
(CAN1_H)
(CAN1_L)
(CAN1_GND)
12
13
14
15
16
17
18
19
20
21
22
PE
CAN2_H
CAN2_L
CAN2_GND
-TxD
DTR
RxD
DSR
GND
PE
(PE for shield of the Drop cable)
(CAN2_H)
(CAN2_L)
(CAN2_GND
(Bus terminator to be bridged with 5)
(Bus terminator for CAN2 to be bridged with 7)
(Watchdog Relay contact N.C.) not supported
(Watchdog Relay contact N.C.) not supported
(PE for shield of the Drop cable)
(Send RS 232)
(Handshake)
(Receive RS 232)
(Handshake)
GND RS 232
(PE for the shield of the Drop cable)
21
AS--BCAN--259
3
Diagnostics
The front panel of the CAN module has the following LEDs:
Table 26
LED
Ready
Error
Rx0
Tx0
Rx1
Tx1
Init
Qovr
Ovr
Act0
Relay
CMT
Explanation of the LEDs
No.
1
2
3
4
5
6
7
8
9
10
11
12
Color
yellow
red
yellow
yellow
yellow
yellow
yellow
yellow
yellow
yellow
yellow
yellow
Function
Processor running
General error (Hardware)
Channel 0 receive
Channel 0 transmit
Channel 1 receive
Channel 1 transmit
Module has been initialized by PLC
Queue overrun
Internal overrun
Channel 0 operational
Status of internal relay
Module configured as CMT Master
If the modules configured to use layer 2 massages only LED Act0 on indicates that
the CAN controller chip of channel 0 is initialized and will go off if the chip is in Bus
Off state.
21
Breite: 178 mm
Höhe: 216 mm
183
AS--BCAN--259
4
Technical Specifications
Allocation
Device
Structure
Number
CAN device class
TSX Compact (rail application)
I/O area (1--3, 1--4, 1--5) in AS--HDTA--200
3 AS--BCAN--259 module per PLC
CANopen and CAN layer 2 (V2.0 A and V2.0B)
support interface
internally
5 VDC, max. 500 mA
Data interface
Internal I/O bus
parallel I/O bus, refer to basic User Manual, ”Modicon
TSX Compact” Ch. ”Specifications”
Processor, memory capacity
Type of processor
24 KB
Flash
CAN ports
Maximum number devices
Supported Baudrates
Supported CAN Bus Spec.
Protocol
Motorola 68332 (16 MHz)
128 K bytes
128 K bytes
2 x SJA 1000 according to ISO11898, optically isolated, internal terminating resistor (120 OHM) per channel
64 per channel
10, 20, 50, 125, 250, 500, 800, 1000 kbps
2.0A and 2.0B (11 bit and 29 bit identifires)
CANopen (channel 0) Slave, CANopen (channel 0)
NMT Master, simple Layer 2 (channel 0 and 1). 16
Kbyte Flash 1 x RS 232 for firmware download
Physical characteristics
Module
Format
Weight
Indicators
in standard case
3 HE, 8 T
approx. 400 g
refer to Chapter ”Diagnostics”, page 183
Type of connection
CAN interface
RS 232C interface
Systems bus (internal)
184
9--pole D--sub plug and 9--pole D--sub socket on CAN-TAP
11--pin screw/plug--in terminal
1/3 C30M
21
AS--BCAN--259
Environmental conditions
Regulations
Systems data
Authorized ambient
operating temperature
Power dissipation
Shock, vibration
21
Breite: 178 mm
Höhe: 216 mm
EN 50 155, EN 50 121--3--2
refer to basic User Manual, ”Modicon TSX Compact”
Chapter ”Specifications”
--25 ... +70 degrees Celsius permanent
--30 ... +85 degrees Celsius temporary (10 minutes)
typically 2.5 W
as per EN 50 155
185
AS--BCAN--259
186
21
AS--BNUL--200, AS--BNUL--202
AS--BNUL--200, AS--BNUL--202
Dummy Modules
Dummy module AS--BNUL--200 is used to prewire spare locations or to support
lines that are not required.
Dummy module AS--BNUL--202 is used to support supply lines for the process
inputs (e.g., initiators).
In partially equipped backplanes, the dummy modules are also used as a support
for the snap--in front cover.
Enclosed is the following module--specific information:
24
Breite: 178 mm
Höhe: 216 mm
H
Configuration
H
Technical specifications
187
AS--BNUL--200, AS--BNUL--202
5
Configuration
Configure the following:
H
Assignment of the terminals to the non--active peripheral signals
H
Assignment of the power supply to each of the output modules
Figure 58
Connections AS--BNUL--200 (left) and AS--BNUL--202 (right)
U
M
↑
1
↓
ΣΙ ≤ 6 A
1
2
2
3
3
4
4
5
5
6
6
7
7
8
8
9
9
10
10
11
11
12
12
13
13
14
14
15
15
16
16
17
17
18
18
19
19
20
20
21
21
22
22
The appropriate signal names or signal addresses should be entered on the label
inlays.
188
24
AS--BNUL--200, AS--BNUL--202
6
Technical Specifications
Allocation
Device
Structure
TSX Compact (A120, 984), Geadat 120, Micro
in I/O range
Physical characteristics
Module
Format
Ground
in standard--size case
3 HE, 8 T
approx. 190 g
Connection
Terminals
max. voltage for AS--BNUL 200
max. voltage for AS--BNUL 202
24
Breite: 178 mm
Höhe: 216 mm
2 clip--on 11--pole screw/plug--in terminals
< 250 V between non--adjoining terminals,
</= 50 V between adjoining terminals
</= 50 V, 6 A max. (total current per terminal group)
189
AS--BNUL--200, AS--BNUL--202
190
24
AS--HDTA--200 ... 202
AS--HDTA--200 ... 202
Backplane
Racks AS--HDTA--200, 201 and 202 are backplanes mounted onto a top hat rail
intended for each individual module. They are used for the installation of the
Modicon TSX Compact programmable controller. In addition, they serve as a
backplane for: Geadat 120, central process peripherals of the micro and remote
process peripherals with Compact components via system field bus, INTERBUS,
PROFIBUS--DP.
AS--HDTA--200 is the primary backplane. It has a width of 42 parts (T) and for
equipment mounting it is designed with the 16T wide central unit, with three 8T
wide I/O modules, and with the 2T wide diskette box.
AS--HDTA--201 serves as an expansion backplane. It has a width of 42 parts (T)
and for equipment mounting it is designed with a max. of five 8T wide I/O modules,
and with the 2T wide diskette box.
AS--HDTA--202 serves as a terminating backplane. It has a width of 18 parts (T)
and for equipment mounting it is designed with a max. of two 8T wide I/O modules,
and with the 2T wide diskette box. The I/O bus cannot be continued on the right
side.
The module--specific information includes:
25
Breite: 178 mm
Höhe: 216 mm
H
Features and functions
H
Configuration
H
Technical specifications
191
AS--HDTA--200 ... 202
Figure 59
Front view of the AS--HDTA--200 backplane
Z--screw
Figure 60
192
Front view of the AS--HDTA--201 backplane
25
AS--HDTA--200 ... 202
Figure 61
1
Front view of the AS--HDTA--202 backplane
Features and Functions
Backplanes AS--HDTA--200, 201, and 202 carry the individual modules which are
inserted on the top edge and then latched tightly in a vertical position. Once they
are in place, the contact to the I/O bus is established via a 30--pole connector.
The bus connects the central unit with the corresponding modules. Each module is
connected with the frame potential of the mounting rail (top hat rail)
through openings cut into the board.
The multiplexing of the I/O bus spanning up to 3 expansion backplanes is
achieved using either of the following:
25
Breite: 178 mm
Höhe: 216 mm
H
The 30--pole bus connector (when multiplexing at the same frequency)
H
Bus extension BXT 201 (when skipping lines).
193
AS--HDTA--200 ... 202
2
Configuration
2.1
Z--screw
To achieve high EMC stability, the 0V reference potential and the DIN top hat rail
(grounding) are connected with the Z--screw (factory settings). Doing this, will
electrically short--circuit the connection between the 0V potential and the ground.
The Z--screw is on the AS--HDTA--200 (see Figure 59).
For a potential--free installation, loosen the Z--screw in the AS--HDTA--200. This
will ground the capacitance of the 0V potential (1 nF). For details on grounding,
please refer to chapter ”Grounding” in the TSX Compact user manual.
The expansion backplanes AS--HDTA--201 and 202 do not have a Z--screw. The
0V only connection to the DIN top hat rail is strictly capacitive.
2.2
Equipment Mounting
Please perform the equipment mounting as required for this task.
The following applies:
Primary backplane AS--HDTA--200
The AS--HDTA--200 in slot 0 must be equipped with a CPU or a connection
module (DEA).
The 3 remaining slots 1 ... 3 are free to be used for I/O modules and experts.
Expansion backplane AS--HDTA--201
The AS--HDTA--201 can be equipped with up to five 8T wide I/O modules and the
corresponding amount of 16T wide modules.
Termination backplane AS--HDTA--202
The AS--HDTA--202 can be equipped with two 8T wide or one 16T wide I/O
module.
You may leave single I/O slots free.
194
25
AS--HDTA--200 ... 202
2.3
Installation
Use the enclosed user information to carry out the installation. You can also carry
out the installation according to chapter ”Installation” ! ”Backplane” in the TSX
Compact User Manual.
All modules of each individual backplane are fitted with a front panel of the proper
width which:
H
covers the wiring
H
contains a window for the signal LEDs underneath
H
contains panels for insertable label inlays for indicator LEDs or terminals.
Note
In order to be able to latch the front panel a module must be mounted onto both
the first and the last slot of the DTA. If necessary, use a dummy as a base.
For increased mechanical use, the backplane can also be screwed to the DIN rail.
In a rail application, the screw connection must be performed.
25
Breite: 178 mm
Höhe: 216 mm
195
AS--HDTA--200 ... 202
3
Technical Specifications
Allocation
Device
TSX Compact (A120, 984), Geadat 120, Micro
Potentials
0 V potential
insulated design, connection to DIN top hat rail in the
AS--HDTA--200 possible via Z--screw
Shield potential
Ground connection via DIN top hat rail
Current for 5 V bus power supply
2 A max.
Physical characteristics
Type of protection
IP 00 (backplane is not equipped)
Format
AS--HDTA--200
AS--HDTA--201
AS--HDTA--202
(1 HE = 44.45 mm, 1 T = 5.08 mm)
3 HE, 16 T + 3 x 8 T + 2 T = 42 T
3 HE, 5 x 8 T + 2 T = 42 T
3 HE, 2 x 8 T + 2 T = 18 T
Dimensions (B x H x T)
AS--HDTA--200 and 201
AS--HDTA--202
213.4 x 142 x 31 mm
91.4 x 142 x 31 mm
Weight (weight, baseplate with front panel)
AS--HDTA--200 and 201
AS--HDTA--202‹
330 g
150 g
Port / Connector
in the AS--HDTA--200
Slot 0
Slots 1 ... 3
Bus expansion
1
3 R30M + 2 x /3 C30F
3 x 1/3 C30F
30--pole plug
in the AS--HDTA--201
I/O slots
Bus expansion
5 x 1/3 C30F
30 pole plug
in the AS--HDTA--202
I/O slots
2 x 1/3 C30F
1/
Environmental conditions
196
Regulations
VDE 0160, UL 508
Systems data
refer to the basic user manual ”Modicon TSX Compact”, chapter ”Specifications”
25
PC--E984--258C
PC--E984--258C
CPU
PC--E984--258C is the CPU of the programmable controller ”Modicon TSX
Compact for rail applications”.
The module--specific information includes:
H
H
H
H
20
Breite: 178 mm
Höhe: 216 mm
Features and functions
Configuration
Diagnostics
Technical specifications
197
PC--E984--258C
1
Features and Functions
Compliance with the EN 50 155 standard (rail application)
2
Configuration
2.1
Settings
Figure 62
Switches
mem prot
ON = with memory protect
OFF = without memory protect
def
mem
Parameters for RTU:
9600 baud, parity ”Even”, 8 data bits, 1 stop bit
Possible parameters:
Transfer rates 50 ... 19200 baud,
parity ”Even” / ”Uneven” (1 stop bit) / ”None” (2 stop bits)
Data bits 8 (RTU) / 7 (ASCII)
The memory protect switch ”mem prot” prevents modifications to the user program
with a programming device (ON).
When the second switch is set to ”def” (default, ↑ ) the default parameters apply.
When it is set to ”mem” ( ↓ ), the interface parameters that you specified using the
configuration editor apply.
2.2
198
Backplane Mounting Slot
Mount the CPU onto slots 1--1 and 1--2 in the primary backplane AS--HDTA--200.
The individual installation steps must be carried out according to the
accompanying user documentation.
20
PC--E984--258C
2.3
Connection
Figure 63
Power supply
UB
M
2.4 A
20
Breite: 178 mm
Höhe: 216 mm
199
PC--E984--258C
RS 232C (Modbus interface MB1)
The connection between CPU and PC is established via the MB1 interface
(Modbus 1).
The connection cable(s) to be used are:
Cable 110 XCA 282 01 (1 m)
Cable 110 XCA 282 02 (3 m)
Cable 110 XCA 282 03 (6 m).
These cables are equipped with 8--pin modular connectors (RJ45). Therefore, the
PC side must also have the 9--pin adapter 110 XCA 203 00.
Figure 64
Pin assignment
1
8
Connection
1
2
3
4
5
6
7
8
3
Signal
+5 V
M1 (DSR)
D1 (TXD)
D2 (RXD)
E2 (GND)
S2 (RTS)
M2 (CTS)
Meaning
Voltage from I/O bus, 150 mA max.
Ready for operation (data set ready)
Send data
Receive data
Signal ground
Request to send
Clear to send
Device ground
Diagnostics
The front panel of the CPU has the following LEDs:
Table 27
LED
ready
run
bat low
Modbus 1
Modbus 2
200
Explanation of the LEDs
No.
1
2
3
4
5
Color
yellow
yellow
red
yellow
yellow
Function
Supply voltage available, processor running
User program running
Battery has low voltage or is missing
Transfer in progress
has no function
20
PC--E984--258C
4
Technical Specifications
Allocation
Device
Structure
TSX Compact (rail applications)
Slots1--1 and 1--2 in primary backplane AS-HDTA--200
support interface
external input voltage
Primary fusing
Reference potential M
Protective ground
Secondary voltage
UB = 24 VDC, --30 % ... +25 % (16.8 ... 30 V, as
per EN 50 155), 1.4 A max. at 16.8 V
2.4 A medium time--lag
M1
PE
5.15 VDC, +/--4 %, 2.3 A max. for I/Os, isolated
Ripple
typ. 50 mV peak--to--peak at IA = 1 A
Overshoot (load variation behavior)
Back--up time
typ. 120 mV at 1.5 A load impulse
10 ms max. at UE = 16.8 V and IA = 2 A
Power--up time of the output
Overload protection
0.1 s max. at UE = 16.8 V
through current limiting
Chopper frequency of the switched--mode power supply
50 ... 77 kHz
Efficiency level
typ. 0.725 at UE = 24 V, IA = 2 A
Parallel switching of power supply
modules
not allowed
Figure 65
Startup surge current curve
Making current / A
40
30
20
10
0
0
10
20
30
Time / ms
20
Breite: 178 mm
Höhe: 216 mm
201
PC--E984--258C
Data interface
RS 232C
Internal I/O bus
Processor
Type of processor
serial as per DIN 66 020,
For pin assignment refer to Figure 64, page 200
parallel I/O bus, refer to basic User Manual, ”Modicon
TSX Compact” Ch. ”Specifications”
Intel 386 EX
Memory capacity
24 KB
Flash
512 KB
1 MB for basic software and user program
Backup battery (optional)
Size
Voltage (in no--load operation)
1/2 AA
3.6 V
Physical characteristics
Module
Format
Weight
Indicators
in double--size case
3 HE, 16 T
550 g
refer to Chapter ”Diagnostics”, page 200
Type of connection
Power supply
RS 232C
Systems bus (internal)
3--pin screw terminal
Modular socket RJ45
2 plug connectors 1/3 C30M, 1 socket connector 1/3
R30F
Environmental conditions
Regulations
Systems data
Authorized ambient operating
temperature
Internal power dissipation
Shock, vibration
202
EN 50 155, EN 50 121--3--2, UL 508
refer to basic User Manual, ”Modicon TSX Compact”
Chapter ”Specifications”
--25 ... +70 degrees Celsius permanent, as per EN
50 155 T3
typically 7 W
as per EN 50 155
20
470 IPS 258 00
470 IPS 258 00
Power Supply Module
According to the EN 50 155 standard, devices for rail applications must be
resistant to supply deviations --30 % ... +25 %.
Output modules with relay and analog modules do not meet this standard. These
modules must have a connected serial stabilizer (power supply module 470 IPS
258 00).
470 IPS 258 00 converts the supply from 24 VDC, --30 % ... +25 % to 22 VDC/0.7
A, +/-- 5 %.
The module--specific information includes:
H
H
H
H
Features and Functions
Configuration
Diagnostics
Technical Specifications
Type of module
Labeling foil
LED field
Protective cover
Mounting area for terminal block (2)
Input voltage 24 VDC
Plug for PE connection
Mounting area for terminal block (3)
Output voltage 22 VDC
21
Breite: 178 mm
Höhe: 216 mm
203
470 IPS 258 00
1
Features and Functions
Physical characteristics
The power supply module has a flat plastic housing that is narrower than the other
TIO modules.
Above and below the labeling foil are ventilation slits which provide natural
convection for cooling that will be sufficient for vertical mounting.
In case of failure, the device can be easily exchanged, because the wired terminal
blocks can be pulled out without using any tools.
The labeling foil can be exchanged using a screw driver.
Function
The input voltage (24 VDC) is clocked.
The 22 VDC output voltage is controlled directly.
Electronic current limiting protects the power supply module against overloads.
A Transzorb diode protects the output against overvoltages.
204
2
Configuration
2.1
Installing the Module
Install the module onto a DIN mounting rail or on a wall using 2 screws only.
Mounting rail installation does not require any additional positioning measures
because a stopper attached to the back of the housing will prevent side--shifting. A
spring that is integrated into the back panel establishes the electric ground contact
to the mounting rail.
21
470 IPS 258 00
2.2
Coding of Terminal Blocks
Code terminal block and counterpart on the module for 24 VDC.
Coding wedges and coding riders are included in the set (Order No.)
170 XCP 200 00. The module is also shipped with precoded pin connectors.
The terminal blocks (not coded by manufacturer) must be coded by the user.
Additional information, refer to chapter ”Terminal Block Selection of the TIO” in this
manual
Insert coding wedges in position as drawn
2.3
Mounting/Dismounting Terminal Blocks
The power supply and the output voltage each run through one 8--pin terminal
block (rows 2 and 3).
The terminal blocks can be purchased as a screw/plug--in terminal set (3 each)
under order No. 170 XTS 011 00.
Figure 66
Mounting and dismounting terminal blocks
To mount, simply slide the terminal blocks into the pin connector of the module. To
release the terminal blocks, push down on both ejectors (1).
Caution
The terminal blocks may only be mounted or dismounted in off--circuit state.
21
Breite: 178 mm
Höhe: 216 mm
205
470 IPS 258 00
Connection
U = 24 VDC
M2
PE
2.4
IN+ IN+ IN-- IN--
2
3
NC
UB COM
UB NO
UB UB UB
M
IN
M
PE
PE
M
UB
M
2A
Note
The fast--on connector on the front side of the housing is intended to provide a
safe and short support for the PE.
3
Diagnostics
Pwr ok
206
Table 28
Explanation of the LEDs
LED
Pwr ok
Color
yellow
Function
on: Power supply module is ready
off: not ready
21
470 IPS 258 00
4
Technical Specifications
Allocation
Device
TSX Compact (rail applications)
Supply (primary circuit)
Voltage range as per
EN 50 155, classes S2 and S3
U = 24 VDC, --30 % ... +25 % (16.8 ... 30 V)
Input current
1.4 A at 0.7 A output current (as per EN 50 155)
2 A at 1 A output current
external with 2 A medium time--lag at 0.7 A output
current
external with at least 2.8 A medium time--lag at 1 A
output current
Fusing
Figure 67
Startup and surge current curve
Power on current / A
40
30
20
10
0
0
1
2
3
Time / ms
21
Breite: 178 mm
Höhe: 216 mm
207
470 IPS 258 00
Output data (secondary circuit)
Output voltage
22 VDC, +/--5 % (21.0 ... 23.2 V) non--isolated
Output current
0 ... 0.7 A as per EN 50 155;
0 ... 1 A please observe derating!
through TransZorb diode SM6T36A
through electronic current limiting
Overvoltage protection
Overload protection
Ripple
typ. 40 mV peak--to--peak at IA = 0.7 A
typ. 50 mV peak--to--peak at IA = 1 A
Overshoot (load variation behavior)
typ. 150 mV at 0.4 A load impulse, e.g. 0.8 A on 0.4 A
Standby behavior
at least 10 ms at UE = 24 V and IA = 0.7 A
Power--up time of the output
0.4 s max. at UE = 16.8 V
Output current [A]
Figure 68
Derating of the output current
1.0
0.9
0.8
0.7
0.6
0.5
0.4
0.3
0.2
0.1
0
--40 --20
208
0
20 40 60 80 100
Ambient temperature (air supply) [oC]
21
470 IPS 258 00
General information
Chopper frequency of the switched--mode power supply
40 ... 60 kHz
Efficiency level
typ. 0.86 at UE = 24 V, IA = 1 A
Parallel switching of power supply
modules
not allowed
Physical characteristics
Housing
narrow TIO housing (4/7 of normal housing)
Dimensions (H x W x D)
150 x 74.2 x 60 (mm) also refer to User Guide, chapter ”Dimension Drawing”, page 70
Weight
230 g (with 2 terminal blocks)
Type of connection
Supply (primary)
8--pin screw/plug--in terminal
Output (secondary)
8--pin screw/plug--in terminals
Environmental conditions
21
Breite: 178 mm
Höhe: 216 mm
Regulations
EN 50 155, EN 50 121--3--2
Systems data
Authorized ambient
operating temperature
refer to User Guide, chapter ”Specifications”
--25 ... +70 degrees Celsius permanently free convection, as per EN 50 155
Shipping and storage temperatures
--40 ... +85 degrees Celsius
Internal power dissipation
Shock, vibration
approx. 0.3 + 4.9 x IA (in W, IA in A)
as per EN 50 155
209
470 IPS 258 00
210
21
Appendix
You will find below a list of all the abbreviations and standards used.
20
Breite: 178 mm
Höhe: 216 mm
211
212
20
The Object Dictionary of AS--BCAN
259 00
A
This chapter describes the Object Dictionary of the AS--BCAN 259 00.
21
Breite: 178 mm
Höhe: 216 mm
Index, Subindex
1000H
1001H
Meaning
Value/Comment
Device Type
Error Register
302
content defined by EFB CIA_EMCY
else 0
1004H
1004H,1
1004H,2
1004H,3
1008H
Number of PDO’s supported
TxPDO’s/RxPDO
synch TxPDO’s/RxPDO’s
asynch TxPDO’s/RxPDO’s
Device Name
1009H
100AH
100BH
Hardware Version
Software Version
Node ID
100CH
Guardtime
100DH
Lifetime Factor
1010H
1010H,0
1010H,1
1011H
1400H...
1600H...
Store Parameters
Largest supported Subindex
Store all Paremeters
Restore Parameters
Receive PDO Parameter
Receive PDO Mapping
144 Rx and 144 Tx
0 and 0
144 Rx and 144 Tx
AS BCAN 259: CAN Communication
Adapter for PLC series TSX Compact
”1.0”
”1.37”
defined by DIP--Switches, see
Hardware installation
Guardtime and Lifetimefactor are
provided for compatibility reasons
only. If the module is guarded as an
NMT slave the resulting timeout is
defined using Relais Oeration mode
5
1
supported
supported
213
The Object Dictionary of AS--BCAN 259 00
Index, Subindex
1800H...
1A00H..
1F22H
1F22H,0
Meaning
1F22H,1...12
8
1F25H
1F25H,0
ConciseDCF_1...127
1F25H,1...12
7
1F25H,128
Configure slave with
node id of subindex
Configure all nodes
1F80H
SlaveInfo
Transmit PDO Parameter
Transmit PDO Mapping
Concise DCF
Number of Elements
ConfigureSlave
Number of Elements
byte 0: bit 0 0
1
bit 1,2,3
0
1
2
3
4
byte 0 (own node id)
bit 0 0
1
bit 1 0:
1
1F81H
214
byte 1
byte2,3
ForceNMT
Value/Comment
Used for Configuration Manager
127 ( max. Number of nodes on
CANopen network)
Domain for node 1 configuration
Used to control CMT operation
128 ( max. Number of nodes on
network + 1 entry for all nodes)
if ’conf’ (666E6F63H) is written,
to subindex n node n is configured
same as subindex 1..127 but
all nodes are configured
CMT and NMT information
the value consists of four bytes:
this node is no slave
this node is associated slave. It will
be configured and set to operational
state
describes guarding error behavior if
bit 0 = 1
stop guarding and notify PLC
Set into operational mode and restart guarding
Set all nodes into pre--operational
state and restart guarding
Set all nodes into pre--operational
then operational state and restart
guarding
notify PLC and restart guarding
start associated slaves only
send ’start all nodes’ command after
boot--up
go into pre--operational state after
’reset communication’ power on
go into operational state after ’reset
communication’ power on
Lifetimefactor
Guardtime in ms
Set nodes into specific state
21
The Object Dictionary of AS--BCAN 259 00
21
Breite: 178 mm
Höhe: 216 mm
Index, Subindex
1F81H,0
Meaning
Value/Comment
Number of Elements
1F81H,1...12
7
Force slave with
node id of subindex
1F81H,128
Force all nodes
1FA0H
Rtr Timer
1FA0H,1
1FA0H,2
RtrTimer_Cycle
RtrTimer_Jitter
128 ( max. Number of nodes on
network + 1 entry for all nodes)
Desired state
4 = prepared
5 = operational
6 = Reset node
7 = Reset Communication
127 = pre--operational
same as subindex 1..127 but
all nodes are forced
Definition of transmission interval for
RX_PDO’s of transmission type 253
Rate of remote frames transmitted
This value defines the interval
between two remote frames so that
the network is not oveloaded. Make
sure that the condition
Number of RTR * Jitter < RTR cycle
is met.
215
The Object Dictionary of AS--BCAN 259 00
Index 5000 variables are used for Network Mode PDO’s.
Index, Subindex
5000H
5000H,1
5000H,2
5100H
5100H,1
5100H,2
5200H
5200H,1
5200H,2
5200H
5200H,1
5200H,2...
5300H
5300H,1
5300H,2
5400H
5400H,1
5400H,2
Meaning
Value/Comment
Network output Variables
Number of Elements
First byte
Network output Variables
Number of Elements
First word
Network output Variables
Number of Elements
First doubleword
Network input Variables
Number of Elements
First byte
Network input Variables
Number of Elements
First word
Network input Variables
Number of Elements
First doubleword
Type = 8 Bit
254
Type = 16 Bit
254
Type = 32 Bit
254
Type = 8 Bit
254
Type = 16 Bit
254
Type = 32 Bit
254
Index 6000 variables are used for High Density Mode (HDM) PDO’s. The number
of variables is derived from the parameters given in the CAN_CFG_DATA variable,
e.g. if NUMDIGIN is set to 64, 8 variables named DigIn8_1 to DigIn8_8 will be
available. If more subindexes are necessarry than given in the provided *.EDS file.
Vector Informatik’s tool pvovides an option that enables the automatic generation
of these subindexes in the resulting device configuration file. This option is
available by selecting the subindex 1 which states e.g. the number of analog
Inputs and clicking on the device access dialog Adjust Arrray button.
216
21
The Object Dictionary of AS--BCAN 259 00
Index, Subindex
6000H
6000H,1
6000H,2
6000H,3...
6100H
6100H,1
6100H,2
6100H,3...
6120H
6120H,1
6120H,2
6120H,3...
6200H
6200H,1
6200H,2
6200H,3...
6300H
6300H,1
6300H,2
6300H,3...
6320H
6320H,1
6320H,2
6320H,3...
6401H
6401H,1
6401H,2
6401H,3...
6401H
6401H,1
6401H,2
6401H,3...
Meaning
Value/Comment
PLC digital inputs
Number of Modules
DigIn8_1
DigIn8_2
PLC digital inputs
Number of Modules
DigIn16_1
DigIn16_2
PLC digital inputs
Number of Modules
DigIn32_1
DigIn32_2
PLC digital outputs
Number of Modules
DigOut8_1
DigOut8_2
PLC digital outputs
Number of Modules
DigOut16_1
DigOut16_2
PLC digital outputs
Number of Modules
DigOut32_1
DigOut32_2
Analog Inputs
NrAnaIn
AnaIn
AnaIn2
AnalogInputs
NrAnaOut
AnaOut
AnaOut2
Type = 8 Bit
I/O Data 10001--10008
I/O Data 10009--10016
Type = 16 Bit
Number of 8 bit modules
I/O Data 10001--10016
I/O Data 10017--10032
Type = 32 Bit
I/O Data 10001--10032
I/O Data 10033--10064
Type = 8 Bit
Number of 8 bit modules
I/O Data 00001--00008
I/O Data 00009--00016
Type = 16 Bit
I/O Data 00001--00016
I/O Data 00017--00032
Type = 32 Bit
I/O Data 00001--00032
I/O Data 00033--00064
PLC analog input data 16 Bit
Data 30001
Data 30002
PLC analog output data 16 Bit
Data 40001
Data 40002
Note
The number of modules or channels resp. that are actually available is derived
from the values stated in the CFG parameter of the CIA_SVR EFB.
21
Breite: 178 mm
Höhe: 216 mm
217
The Object Dictionary of AS--BCAN 259 00
218
21
EFB Error Codes
2
All errorcodes are given in hexadecimal format. Use the reference data editor to
display the value in hex format.
21
Breite: 178 mm
Höhe: 216 mm
219
EFB Error Codes
?
1000
1001
1002
1003
1004
1005
1006
11XX
2000
2001
2002
2003
2004
2005
2006
3000
3001
4001
4002
4003
4004
4005
5000
5001
5002
5003
5004
5005
5006
5007
6000
7000
?
invalid slot number
no module installed
wrong type of module installed
module unhealthy
send queue full
module firmware not running
general CAN or API error see Network status information of node 0 of network 1
general hardware error where XX represents specific CAN chip states
invalid baudrate
invalid relais configuration
invalid number of digital inputs
invalid number of digital outputs
invalid number of analog inputs
invalid number of analog outputs
invalid number of network variables
invalid channel number
invalid data length
invalid identifier
invalid receive table
invalid number of receive messages
no matching message in Message acceptance data field found
received message has less bytes than size of DATA variable
invalid device number
invalid SDO data length
invalid SDO entry
general SDO errror see ERRORINF for details
more data received than expected
less data received than expected
invalid NMT status value
size of given DATA variable less than LENGTH value
PLC running in simulator mode
Module is initializing, no errror, information only
In the general hardware error XX represents a byte value whose meaning is as
follows :
220
21
EFB Error Codes
bit
0
1
2
3
4
5
21
Breite: 178 mm
Höhe: 216 mm
meaning
channel 0 bus OFF
channel 0 error passive
channel 0 overrun
channel 1 bus OFF
channel 1 error passive
channel 1 overrun
221
EFB Error Codes
222
21
Firmware Download
C
Using the RS232 port of AS--BCAN 259 00 it is possible to load the latest version
of the module’s firmware. Related files can be found in the directory \CAN259FW
of the Concept installation directory. In order to do this you need to prepare a
serial cable to connect your PC to the AS--BCAN 259 00. The cable pinout is as
follows:
PC 9--pin DSUB connector
Pin 2
Pin 3
Pin 5
AS--BCAN 259 00
17
19
21
You may use any available terminal emulation software for your PC that supports
ASCII file transfers and the stated communication parameters to perform the
download. The communication parameters must be set to the following values:
Baudrate
Data
Stopbit
Parity
Protocol
21
Breite: 178 mm
Höhe: 216 mm
38400 kbps
8 Bit
1 Bit
No
XON/XOFF
223
Firmware Download
After connecting the cable and setting up the terminal software perform the
following steps :
H
H
H
H
H
H
H
H
connect to the module by typing ’x’. This will activate the RS232
communication and LED 1 is turned on
type ’f’ to prepare the module for firmware download operation
type ’d’ to activate the download procedure within the module. The module
will send the message ’waiting for s--record (XON/XOFF)’
Choose upload or send to transmit a text or ASCII file from your terminal
software.
Select the firmware file named co259fw.S19
Start the download. While the download is active LED 1 is flashing
When the download is completed the module will give the appropriate
information
Type ’r’ to reset the module
To simplify firmware download the file asbcan.ht has been provided that can be
used if Microsoft -- Hyperterminal is available. It will set the communication
parameters to the correct values.
224
21
Overview of Standards
D
The following list will provide an overview of currently applicable international
standards for rail(way) applications.
CCITT V24
CCITT Z1OO--104
DIN 19 245 Part 1
DIN 41 652
EIA RS--485
EN 50 155
IEC 96--1
IEC 571
IEC 801
List of definitions for interchange circuits between data terminal equipment and
data--circuit terminating equipment, CCITT Recommendation Fascicle VIII.1
Rec. V24.
Functional specifications and description language (SDL), Vol.VI, Fascile VI.11
(red book) 1985.
Process Field Bus, August 1990 (Process Field Bus August 1990).
Connectors for Rack--mounted devices, Part 1, 1990.
Electronic Industries Assosiation standard for electrical characteristics of
generators and receivers for use in balanced digital multipoint systems, April
1983.
European Norm elaborated by CENELEC, extending IEC 571.
to be added
Rules for electronic equipment used on rail vehicles (GENELEC EN 50 155)
Electromagnetic compatibility for industrial process measurement and control
equipment, Parts 1 through 5.
225
Breite: 178 mm
Höhe: 216 mm
Overview of Standards
IEC 807--2
IEC 870--5--1
IEC 1158--2
226
Sup--miniature connector standard (see DIN 41 652).
Telecontrol equipment and systems Part 5: Transmission protocols. Section 1:
Transmission frame formats (formerly: TC 57).
Fieldbus standard for use in industrial control systems Part 2: Physical layer
specification and service definition.
Overview of Standards
ISO 3309
ISO 7498/1
ISO 8073
ISO 8482
ISO 8802.2
ISO 9506/1
ISO 9506/2
ISO/IEC 9646--1
UIC 556
UIC 558 VE
Information Processing Systems -- Data communication -- High--level data link
control procedures -- Frame strucure, 3rd edition 1984--10--01.
Information Processing Systems -- Open Systems Interconnection -- Basic
Reference Model.
Information Processing Systems -- Open Systems Interconnection -(Connection--oriented) Transport Service Specification, 1988.
Transceiver standard -- see EIA RS--485
ANSI/IEEE Std 802.2--1985) Local Area Networks -- Logical Link Control.
Manufacturing Message Specification -- Service Definition.
Manufactoring Message Specification -- Protocol Specification Definition.
Information technology -- Open Systems Interconnection -- Conformance testing
methodology and framework, Part 1:General concepts, 1991
ORE B 108.3 Fiche No. 556, Information transmission in the train--train bus, April
1992 (”Transmission d‘informations dans le train bus de train,” Avril 1992)
UIC directive on the UEC--cable
227
Breite: 178 mm
Höhe: 216 mm
Accessory Supplier References
E
In this appendix you will find an overview of accessory suppliers.
20
Breite: 178 mm
Höhe: 216 mm
229
Accessory Supplier References
E.1
Reference Addresses
Table 29
Addresses for accessories
Item
Male plug kit (pins) type
748046--1 for outgoing MVB
Female plug kit (sockets) 748047
for incoming MVB
MVB--ESDB cable 1x4x0.5 sq.
mm + 4x1x0.25 sq. mm, Radox
GKW S
CAN cable
UNITRONIC--Bus FD P LD
2 x 2 x 0.25 sq mm
Material number:
2170214T
230
Supplier Address
AMP Deutschland GmbH
Amperestr. 7--11
63202 Langen, Postfach 1240
HUBER + SUHNER AG
Geschäftsbereich Energie-- und Signalübertragung
CH--8330 Pfäffikon/ZH
U.I.LAPP GmbH & Co. KG
Schulze--Delitzsch--Straße 25
D--70565 Stuttgart
Postfach 80 06 40
D--70506 Stuttgart
Chapter
3.3.5 on page 60
3.3.5 on page 60
3.3.5 on page 60
20
Glossary
Here you will find a short description of the terms.
20
Breite: 178 mm
Höhe: 216 mm
231
232
20
Glossary
984LL
Refer to ladder logic 984
A
Active Window
The window that is currently selected. At any given moment there can only be one
active window. When a window becomes active, the color of its title bar changes
so that it may be distinguished form the other windows. Windows that are not
selected are inactive.
Actual Parameter
Current online input/output parameter.
Addresses
(Direct) addresses are memory areas on the PLC. These are located in the signal
memory and can have input/output modules assigned to them.
Analysis
The process through which the value of a function or of the outputs of a function
block is determined during the execution of the program.
ANL_IN
ANL_IN stands for data type ”Analog input” and is used for analog value
processing. The 3x references of the configured analog input module specified in
the I/O map are automatically assigned to the data type and may therefore only be
allocated by unlocated variables.
ANL_OUT
ANL_OUT stands for data type ”Analog output” and is used for analog value
processing. The 4x references of the configured analog output module specified in
the I/O map are automatically assigned to the data type and may therefore only be
allocated by unlocated variables.
ANY
In the present version ”ANY” includes data types ANL_IN, ANL_OUT, BOOL,
BYTE, DINT, INT, REAL, UDINT, UINT, TIME and WORD as well as derived data
types.
ANY_BIT
In the present version ”ANY_BIT” includes data types BOOL, BYTE and WORD.
20
Breite: 178 mm
Höhe: 216 mm
233
Glossary
ANY_ELEM
In the present version ”ANY_ELEM” includes data types BOOL, BYTE, DINT, INT,
REAL, UDINT, UINT, TIME and WORD.
ANY_INT
In the present version ”ANY_INT” includes data types DINT, INT, UDINT and UINT.
ANY_NUM
In the present version ”ANY_NUM” includes data types DINT, INT, REAL, UDINT
and UINT.
ANY_REAL
In the present version ”ANY_REAL” includes data type REAL.
Application Window
The window containing the workspace, the menu bar and the toolbar for the
application program. The name of the application program appears in the title bar.
An application window may contain several document windows.
In Concept the application window corresponds to a project.
Argument
Synonymous with actual parameter.
Array Variables
Variables to which a derived data type defined with the ARRAY keyword is
assigned.
An array is a collection of data elements of the same data type.
ASIC
Application Specific Integrated Circuit
Note:
The x, after the first digit of the reference type, represents a five--digit storage
location in the user data memory, e.g., the reference 000201 signifies an output or
marker bit at address 201 of the signal memory.
Note:
The x, after the first digit of the reference type, represents a five--digit storage
location in the user data memory, e.g., the reference 400201 signifies a 16--bit
output or marker word at address 201 in the signal memory.
234
20
Glossary
ASCII Mode
American Standard Code for Information Interchange
The ASCII mode is used for the communication with various host devices. ASCII
works with 7 data bits.
B
Backup File (Concept EFB)
The backup file is a copy of the last source code file. The name of the backup file
is ”backup??.c” (this assumes that you never make more than 100 copies of your
source code file). The first backup file is named ”backup00.c”.
In the event that you have carried out modifications on the definition file, which do
not call for any interface changes on the EFB, you can avoid having to create a
backup file, by editing your source code file (Objects → Source).
If a backup file is created, you can name it source file.
Base 2 Literals
Base 2 literals are used to declare integer values in the binary number system.
The base must be marked with the prefix 2#. The values may not have any (+/--)
signs. Single underscores ( _ ) between the digits are not significant.
Example:
2#1111_1111 or 2#11111111 (decimal 255)
2#1110_0000 or 2#11100000 (decimal 224)
Base 8 Literals
Base 8 literals are used to declare integer values in the octal number system. The
base must be marked with the prefix 8#. The values may not have any (+/--) signs.
Single underscores ( _ ) between the digits are not significant.
Example:
8#3_77 or 8#377 (decimal 255)
8#34_0 or 8#340 (decimal 224)
20
Breite: 178 mm
Höhe: 216 mm
235
Glossary
Base 16 Literals
Base 16 literals are used to declare integer values in the hexadecimal number
system. The base must be marked with the prefix 16#. The values may not have
any (+/--) signs. Single underscores ( _ ) between the digits are not significant.
Example:
16#F_F or 16#FF (decimal 255)
16#E_0 or 16#E0 (decimal 224)
Bit String
A data element made up of one or several bits.
BOOL
BOOL stands for data type ”Boolean”. The length of the data elements is 1 bit
(stored in 1 byte in the memory). The values for variables of this data type range
from 0 (FALSE) to 1 (TRUE).
Bridge
A bridge is a facility connecting networks. It makes the communication between
the nodes on either network possible. Each network has its own token rotation
sequence -- the token is not relayed via the bridges.
236
20
Glossary
BYTE
BYTE stands for data type ”bit string 8”. It is entered as a base 2 literal, base 8
literal or base 16 literal. The length of the data elements is 8 bits. A numeric range
of values cannot be assigned to this data type.
C
Call
The process through which the execution of the operations, specified by an FFB
type, is triggered.
CAN
Controller Area Network
Coil
A coil is an LD component that transfers the status of the horizontal short on its left
side unchanged to the horizontal short on its right side. The status is stored in the
associated variable/direct address.
Compact Format (4:1)
The first digit in the reference is separated from the address by a colon (:). The
leading zeros of the address are not specified.
Constants
Constants are unlocated variables that are assigned a value which cannot be
modified by the program logic (write protected).
Contact
A contact is an LD component that provides a status on the horizontal short on its
right side. This status results from the Boolean AND operation between the status
of the horizontal short on its left side with the status of the associated variables /
direct address. A contact does not modify the value of the associated variables /
direct address.
Contact Diagram
Refer to
Ladder Diagram (LD),
Ladder Logic 984 (LL)
CPU
Central Processing Unit
20
Breite: 178 mm
Höhe: 216 mm
237
Glossary
D
Data Types
ANY
ANY_ELEM
ANY_NUM
ANY_REAL
REAL
ANY_INT
DINT
INT
UDINT
UINT
ANY_BIT
BOOL
BYTE
WORD
TIME
System data types (IEC extensions)
ANL_IN
ANL_OUT
Derived (from ”ANY” data types)
The overview shows the hierarchy of generic data types as they are used by the
inputs and outputs of functions and function blocks. Generic data types are
identified by the prefix ”ANY”.
Data Transfer Settings
Settings that specify how information is transferred from your programming unit to
the PLC.
238
20
Glossary
DCP Drop
With a Distributed Control Processor (D908) you can set up a decentralized
network with a superset PLC. When implementing a D908 with a decentralized
PLC, the superset PLC considers the decentralized PLC as a decentralized drop.
The D908 and the decentralized PLC communicate over the system bus, thus
providing high performance with a minimum effect on cycle time. The data
exchange between the D908 and the superset PLC takes place over the
decentralized I/O bus at 1.5 megabits per second. A superset PLC can support up
to 32 D908 processors.
DDE (Dynamic Data Exchange)
The DDE interface allows dynamic data exchange between two programs in
Windows.
Through the DDE connection between Concept and the Concept graphic tool, the
signals of a configuration can be represented as a timing diagram.
DDT
Refer to Derived Data Type
Definition File (Concept EFB)
The definition file contains general descriptions concerning the selected EFB and
its formal parameter.
Decentralized Network
Decentralized programming in the Modbus Plus network allows for maximum
performances during data transfers and set particular demands on connections.
The programming of a decentralized network is straight forward. There is no need
to create an additional contact diagram logic when creating the network. All
demands for the data transfer are dealt with the corresponding entries in the peer
cop processor.
Declaration
Mechanism used to determine the definition of a language element. A declaration
usually includes the connection of an identifier with a language element and the
assignment of attributes such as data types and algorithms.
Derived Data Type
Refer to Derived Data Type
20
Breite: 178 mm
Höhe: 216 mm
239
Glossary
Derived Data Type
Derived data types are data types that were derived from the elementary data
types and/or other derived data types. Derived data types are defined in the
Concept data type editor.
A distinction is made between global data types and local data types.
Derived Function Block
Refer to Derived Function Block
Derived Function Block (DFB)
A derived function block represents the call to a derived function block type. You
will find details concerning the graphic form of the call in the definition of
”Functional Block (Instance)”. In contrast to EFB--type calls, DFB--type calls are
identified by double vertical lines on the left and right side of the rectangular block
symbol.
The root of a derived function block type is designed in FBD language, but only in
the current version of the programming system. Other IEC languages cannot be
used to define DFB types as of yet, neither can derived functions be defined in the
current version.
A distinction is made between local and global DFBs.
DFB
Refer to Derived Function Block
DINT
DINT stands for data type ”double integer”. It is entered as an integer literal, base
2 literal, base 8 literal or base 16 literal. The length of the data elements is 32 bits.
The values for variables of this data type range from --2 exp (31) to 2 exp (31) --1.
Direct Representation
A method for representing variables in the PLC program from which the
assignment to the logical storage location -- and indirectly to the physical storage
location -- can be directly derived.
Discrete Connections
Connections between FFB outputs and inputs of data type BOOL.
240
20
Glossary
Document Window
A window within an application window. Several document windows can be open
at the same time within an application window. However, only one document
window may be active at any given time.
Document windows in Concept are, for example, sections, the message window,
the reference data editor and the configurator.
DPM
Dual Ported Memory
Dummy
A dummy file made up of a text header containing general information such as, for
example, author, creation date, EFB identifier, etc. The user must complete this
dummy file by entering additional data.
Duration Literals
Authorized units for a duration (TIME) is expressed in days (D), hours (H), minutes
(M), seconds (S) and milliseconds (MS) or any combination thereof. The duration
must be identified by prefix t#, T#, time# or TIME#. The ”overflow” of the highest
unit value is allowed, e.g., the entry T#25H15M is allowed.
Example:
t#14MS, T#14.7S, time#18M, TIME#19.9H, t#20.4D, T#25H15M,
time#5D14H12M18S3.5MS
DX Zoom
This feature allows you to connect with a programming object to observe and
possibly modify its data values.
20
Breite: 178 mm
Höhe: 216 mm
241
Glossary
E
EFB
Refer to Elementary Functions/Function Blocks
Elementary Functions/Function Blocks (EFB)
Identifier for functions or function blocks whose standard definition is not
expressed in any of the IEC languages, i.e., their roots cannot be modified using
the DFB editor (Concept DFB). EFB types are programmed in ”C” and are made
available precompiled in libraries.
EN / ENO (Enable / Error Indication)
In case the value of EN equals ”0” when the FFB is called, the algorithms defined
by the FFB are not executed. The value of ENO is automatically set to ”0” in this
case.
In case the value of EN equals ”1” when the FFB is called, the algorithms defined
by the FFB are executed. Upon the error--free execution of these algorithms, the
value of ENO is automatically set to ”1”.
If an error occurs during the execution of these algorithms, the value of ENO is
automatically set to ”0”.
The output behavior of the FFBs is independent from whether the FFBs were
called with EN/ENO or with EN=1.
If the display of EN/ENO is on, the EN input must be switched. Otherwise the FFB
will never be executed.
The configuration of EN and ENO is switched on or off in the module properties
dialog box. To open the dialog box choose the Objects → Properties...
menu command or double click on the FFB.
242
20
Glossary
EPROM
Erasable Progarmmable Read Only Memory
Error
If an error occurs during the processing of an FFB or of a step (e.g., invalid input
value or time error), an error message is produced, which you can view via the
Online → Online events... menu command. For FFBs the ENO output is
set to ”0”.
Execution language (SFC)
The SFC language elements make it possible to subdivide a PLC program
organization unit into a number of steps and transitions, that are connected one to
another by one--way connections. For each step there is a number of actions and
a transition condition is associated with each transition.
Expression
Expressions are made up of operators and operands.
F
FB
Refer to Function Block (Instance)
FBD
Refer to Function Block Language
FFB (Functions/Function Blocks)
Collective term for EFB (Elementary Functions/Function Blocks) and DFB
(Derived Function Blocks)
FIR Filter
(Finite Impulse Response Filter)
Filter with a finite impulse response.
20
Breite: 178 mm
Höhe: 216 mm
243
Glossary
Formal Parameter
Input/Output parameter used within the logic of an FFB and led out of the FFB as
inputs/outputs.
Function (FUNK)
A program organization unit delivering exactly one data element at execution. A
function has no internal status information. Multiple calls to the same function with
the same input parameter values always deliver the same output values.
You will find details concerning the graphic form of the function calls in the
definition of ”Function Block (Instance)”. In contrast to calls to function blocks,
function calls only have a single unnamed output, since its name is the name of
the function itself. In FBD each call is identified by a unique number through the
graphic block. This number is created automatically and cannot be modified.
244
20
Glossary
Function Block (Instance) (FB)
A function block is a program organization unit that calculates values for its
outputs and internal variable(s), according to the functionality defined in its
function block type description, when it is called as a specific instance. All output
and internal variable values of a specific function block instance remain
unchanged from one call to the function block to the next. Multiple calls to the
same function block instance using the same arguments (input parameter values)
therefore do not always deliver the same output value(s).
Each function block instance is graphically represented by a rectangular block
symbol. The name of the function block type appears on top, in the middle, inside
the box. The name of the function block instance also appears on top, but outside
the box. It is generated automatically when an instance is created, but it can be
modified by the user according to his or her needs. Inputs appear on the left side,
outputs on the right side. The names of the formal input/output parameters are
displayed inside the box at the corresponding places.
The above description of the graphic representation in principle also is valid for
function calls and for DFB calls. Any differences are described in the
corresponding definitions.
Function Block Type
A language element is made up of: 1. The definition of a data structure, subdivided
into input, output and internal variables. 2. A set of operations that is carried out
using the components of the data structure when an instance of the function block
type is called. This set of operations can either be expressed in one of the IEC
languages (DFB type) or in ”C” (EFB type).
A function block type can be instantiated several times.
Function Block Language (FBD)
One or several sections containing the graphically represented networks of
functions, function blocks and connections.
20
Breite: 178 mm
Höhe: 216 mm
245
Glossary
Function Number
The function number is used to clearly identify a function in a program or DFB. The
function number cannot be edited and is assigned automatically. The function
number is always structured as follows: .n.m
n = section number (running number)
m = number of the FFB object in the section (running number)
G
Generic Data Type
A data type that can take the place of several other data types.
Global Derived Data Types
Global derived data types are available in all Concept projects and are stored in
directory DFB directly under the Concept directory.
Global DFBs
Global DFBs are available in all Concept projects and are stored in directory DFB
directly under the Concept directory.
Global Macros
Global macros are available in all Concept projects and are stored in directory DFB
directly under the Concept directory.
Groups (EFBs)
Some EFB libraries (e.g., the IEC library) are broken down into groups. This
makes it much easier to find EFBs, especially in very large libraries.
H
HU
19” height units (1 HU = 44.45 mm)
246
20
Glossary
I
Icon
Graphic representation of different objects in Windows, e.g., drives, application
programs and document windows.
Identifier
Refer to the IEC nomenclature
Icon
Refer to Icon
IEC
International Electronic Committee
IEC 1131--3
International standard: Programmable Logic Controllers -- Part 3: Programming
Languages. March 1993.
IEC Nomenclature (Identifier)
An identifier is a sequence of letters, digits, and underscores which must begin
with a letter or an underscore (e.g., the name of a function block type, of an
instance, of a variable or of a section). Letters from national character sets (e.g., ö,
ü, é, õ) can be used, except in project and DFB names.
Underscores are significant in identifiers, e.g., ”A_BCD” and ”AB_CD” are
interpreted as different identifiers. The use of several leading or of several
consecutive underscores is not allowed.
Identifiers may not contain any blank characters.
Identifiers are not case sensitive, e.g., ”ABCD” and ”abcd” are interpreted as the
same identifier.
Identifiers may not be keywords.
IIR Filter
(Infinite Impulse Response Filter)
Filter with an infinite impulse response.
IL
Refer to Instruction List (IL)
20
Breite: 178 mm
Höhe: 216 mm
247
Glossary
Initial Step
The starting step of a sequence. An initial step must be defined in each sequence.
The sequence is started with the initial step upon the first call to it.
Initial Step
Refer to Initial Step
Initial Value
The value assigned to a variable when the program is started.
Input Bits (1x References)
The 1/0 status of input bits is controlled by the process data that reaches the CPU
via the input device.
Note:
The x, after the first digit of the reference type, represents a five--digit storage
location in the user data memory, e.g., the reference 100201 signifies an input bit
at address 201 of the signal memory.
Input Parameter (Input)
Transfers the associated argument during a call to an FFB.
Input Words (3x References)
An input word contains information from an external source and which represents
a 16--bit number. A 3x register may also contain 16 consecutive input bits that
were uploaded to the register in binary or BCD (binary coded decimal) format.
Note:
The x, after the first digit of the reference type, represents a five--digit storage
location in the user data memory, e.g., the reference 300201 signifies an 16--bit
input word at address 201 of the signal memory.
Instance
Refer to Function Block (Instance)
Instance Name
An identifier that belongs to a specific function block instance.
The instance name is used to clearly identify a function block in a program
organization unit. The instance name is created automatically, but it can be edited.
The instance name is unique in the entire program organization unit and it is not
case sensitive. If the name already exists, you will be warned of this and you will
248
20
Glossary
have to choose another name. The name must be in accordance with the IEC
nomenclature, otherwise an error message will appear. The instance name
created automatically is always structured as follows: FBI_n_m
FBI = function block instance
n = section number (running number)
m = number of the FFB object in the section (running number)
Instancing
The creation of an instance.
Instruction (LL984)
When programming electrical controllers, the user must implement op coded
instructions in the form of graphic objects divided into recognizable types of
contacts. The program objects designed are converted to op codes usable by the
computer during the loading process at the user level. The op codes are decoded
in the CPU and processed by the firmware functions in such a way that the
desired control is being implemented.
Instruction (IL)
Instructions are the ”commands” of the IL . Each instruction starts on a new line
and is followed by an operator, possibly including modifiers, and by operands, if
required for the operation. In case several operands are used, they are separated
by commas.
A marker followed by a colon may appear in front of the instruction. The comment,
if any, must be the last part of the line.
Instruction List (IL)
IL is a text language as per IEC 1131, in which operations such as conditional or
unconditional calls to function blocks and functions, conditional or unconditional
jumps, etc. are represented by instructions.
INT
INT stands for data type ”integer”. It is entered as an integer literal, base 2 literal,
base 8 literal or base 16 literal. The length of the data elements is 16 bits. The
values for variables of this data type range from --2 exp (15) to 2 exp (15) --1.
Integer Literals
Integer literals are used to declare integer values in the decimal number system.
The values may be preceded by a (+/--) sign. Single underscores ( _ ) between the
digits are not significant.
20
Breite: 178 mm
Höhe: 216 mm
249
Glossary
Example:
--12, 0, 123_456, +986
Intermediate Storage
The intermediate storage is a temporary memory for cut or copied objects. These
objects can be inserted into sections. Each time a new object is cut or copied, the
contents of the intermediate storage is overwritten.
I/O Map
The drops of the various CPUs are configured in the I/O Map.
ISO
International Standardization Organization
J
Jump
Element of the SFC language. Jumps are used to skip areas in the sequence.
K
Keywords
Keywords are unique combinations of characters that are used as special
syntactical elements, as defined in Appendix B of IEC 1131--3. All keywords used
in IEC 1131--3 and thus used in Concept are listed in Appendix C of IEC 1131--3.
The keywords listed may not be used for any other purpose, e.g., not as variable
names, section names, instance names, etc.
KOP
Refer to
Ladder Diagram (LD),
Ladder Logic 984 (LL)
250
20
Glossary
L
Ladder Diagram (LD)
Ladder diagram is a graphic programming language as per IEC1131, that is
optically orientated according to the ”path of the current” on the contact diagram of
a fuse.
Ladder Logic 984 (LL)
In the terms ladder logic and ladder diagram the word ladder (Contact) refers to
execution. In contrast to a schematic circuit diagram, a contact diagram is used by
electrical engineers to draw an electric circuit (using electrical symbols), intended
to show the sequence of events and not the actual wires connecting the parts one
to another. A standard user interface used to control the actions of automation
devices allows for a contact diagram interface, that prevents electrical engineers
from having to learn a programming language they are not familiar with when
implementing a control program.
The construction of the actual contact diagram makes it possible to connect the
electrical components in such a way as to produce a control output, dependent on
the logical power flow through the electrical objects used, which represents the
previously requested condition of a physical electrical device.
In simple terms, the user interface is a video display generated by the PLC
programming application, that sets up a horizontal and vertical grid into which the
programming objects are placed. The diagram obtains the current from the left
side of the grid and as the connection is made with the active objects, the current
flows from left to right.
Landscape Format
Landscape format means that the page is wider than it is high when you look at
the printed text.
Language Element
Each basic element in one of the IEC programming languages, e.g., a step in
SFC, a function block instance in FBD or the initial value of a variable.
LD
Refer to Ladder Diagram (LD)
Library
Collection of software objects intended to be reused while programming new
projects, or to build new libraries. An example of this is the library of elementary
function block types.
20
Breite: 178 mm
Höhe: 216 mm
251
Glossary
EFB libraries may be subdivided into groups.
Link
A control or data flow link between graphic objects (e.g., steps in the SFC editor,
function blocks in the FBD editor) within a section, graphically represented as a
line.
Literals
Literals are used to directly assign values to FFB inputs, transition conditions, etc.
These values cannot be overwritten by the program logic (write protected).
LL
Refer to Ladder Logic 984 (LL)
Local Derived Data Types
Local derived data types are only available in a single Concept project and its local
DFBs and are stored in directory DFB under the project directory.
Local DFBs
Local DFBs are only available in a single Concept project and are stored in
directory DFB under the project directory.
Local Link
The local network link is the network that either links the local nodes with other
nodes directly or through a bus amplifier.
Local Macros
Local macros are only available in a single Concept project and are stored in
directory DFB under the project directory.
Local Network Node
The local node is the one currently being configured.
Located Variable
An address is assigned to the variables in the PLC. Located variables are used in
the SFC and FBD editors, in order to read signal statuses from the PLC and to
output them to the PLC. Located variables can also be exported and displayed via
a DDE interface.
252
20
Glossary
M
Macro
Macros are created using the Concept DFB software.
Macros are used to duplicate frequently used sections and networks (including
their logic, variables and variable declarations).
A distinction is made between local and global macros.
Macros have the following characteristics:
Macros can only be created using the FBD programming language
Macros contain no more than one section
Macros can contain any complex program
In terms of programming there is no difference between an instantiated
macro, i.e., a macro inserted into a section, and a section created
conventionally.
H Call to a DFB in a macro
H Variable declaration
H Use of macro--specific data structures
H Variables declared in the macro are carried over automatically
H Init values for variables
H Multiple instantiation of a macro in the overall program using different
variables
H The secition name, the variable names and the data struture name must
contain the character ~ as an exchange marker.
MMI
Man Machine Interface
H
H
H
H
Module SA85
Module SA85 is a Modbus Plus adapter for IBM--AT or compatible computers.
Multi Element Variables
Variables to which is assigned a derived data type defined with STRUCT or
ARRAY.
A distinction is made between array variables and structured variables.
MVB
Multifunction Vehicle Bus
20
Breite: 178 mm
Höhe: 216 mm
253
Glossary
N
Network
A network is the interconnection of devices on a common dataway, that use a
common protocol to communicate one with another.
Node Address
The node address is used to clearly identify a network node in the routing path.
The address is set directly in the node, e.g., using rotary switches on the back side
of the modules.
Network Node
A node is a device with an address (1...64) on the Modbus Plus network.
O
OD
Object Directory
Operand
An operand is a literal, a variable, a function call or an expression.
Operator
An operator is a symbol for an arithmetic or Boolean operation to be executed.
OSI
Open System Interconnection
Output / Marker Bits (0x References)
An output / marker bit can be used to control real output data through the output
unit of the control system, or to define one or several discrete outputs in the signal
memory.
Output / Marker Words (4x References)
An output / marker word can be used to store numeric data (binary or decimal) in
the signal memory, or to transmit data from the CPU to an output unit in the control
system.
Output Parameter (Output)
A parameter used to return the result(s) of an FFB analysis.
254
20
Glossary
P
PC
Personal Computer
Peer Processor
The peer processor processes the token cycles and the data flow between the
Modbus Plus network and the PLC user logic.
PLC
Programmable Logic Controller
Portrait Format
Portrait format means that the page is higher than it is wide when you look at the
printed text.
Program
The uppermost program organization unit. A program is exclusively loaded onto a
single PLC. A program is refined using IEC language elements.
Programming Units
Hardware and software supporting the programming, configuring, testing, initial
start--up and troubleshooting of PLC applications as well as decentralized system
applications, to facilitate source documentation and archiving. The programming
unit may also possibly be used for viewing processes.
Program Organization Unit
A function, a function block, or a program. This term may either refer to a type or
to an instance.
Program Cycle
A program cycle includes the input of input data, the processing of the program
logic and the output of output data.
Project
General term for the uppermost level of a software tree structure that determines
the superset project name of a PLC application. Once the project name has been
determined, you can save your system configuration and control program under
this name. All data produced through the creation of the configuration and of the
program, belong to the superset project for this specific automation task.
20
Breite: 178 mm
Höhe: 216 mm
255
Glossary
General term for the complete set of programming and configuration data in the
project database, representing the source code, which describes the automation of
a system.
Project Database
The database in the programming unit containing the configuration data of a
project.
Prototype File (Concept EFB)
The prototype file contains all the prototypes of the assigned functions.
Furthermore, a standard definition of the internal status structure is specified, if
any.
PSB
Parallel Systems Bus
PV
Process Variable
Q
R
24 KB
Random Access Memory
REAL
REAL stands for data type ”floating point”. It is entered as a real literal or as a real
literal with exponent. The length of data elements is 32 bits. The values for
variables of this data type range from 8.43E--37 to 3.36E+38.
Real--Literals
Real literals are used to declare floating point values in the decimal number
system. Real literals are identified through the declaration of the decimal point.
The values may be preceded by a (+/--) sign. Single underscores ( _ ) between the
digits are not significant.
Example:
--12.0, 0.0, +0.456, 3.14159_26
Real Literals with Exponent
Real literals with exponent are used to declare floating point values in the decimal
number system. Real literals with exponent are identified through the declaration
256
20
Glossary
of the decimal point. The exponent indicates the decimal power by which the
number must be multiplied to obtain the value to be represented. The values may
be preceded by a (+/--) sign. Single underscores ( _ ) between the digits are not
significant.
Example:
--1.34E--12 or --1.34e--12
1.0E+6 or 1.0e+6
1.234E6 or 1.234e6
Reference
Every direct address is a reference, starting with an identification character
specifying whether it is an input or an output and whether it is a bit or a word.
References starting with code 6, represent registers in the extended memory of
the signal memory.
0x range = Output / Marker bits
1x range = Input bits
3x range = Input words
4x range = Output / Marker words
6x range = Register in the extended memory
Note:
The x, after the first digit of each reference type, represents a five--digit storage
location in the user data memory, e.g., the reference 400201 signifies an 16--bit
output or marker word at address 201 in the signal memory.
RIO (Remote I/O)
Remote I/O indicates a physical place of the I/O positioning control system
devices with respect to the processor controlling them. Remote inputs/outputs are
linked to the controlling device via a wired communications cable.
Runtime Error
Error that occurs during the execution of the program on the PLC in SFC objects
(e.g., steps) or FFBs. These are, for example, value range overflows in counters
or time errors in steps.
RTU Mode
Remote Terminal Unit
The RTU mode is used for the communication between the PLC and an IBM
compatible personal computer. RTU works with 8 data bits.
20
Breite: 178 mm
Höhe: 216 mm
257
Glossary
S
Statement (ST)
Statements are the ”commands” of the ST programming language. Statements
must end with semicolons. There may be several statements (separated by
semicolons) on the same line.
Step
SFC language element: Situation in which the behavior of a program, with respect
to its inputs and outputs, follows the operations defined by the associated actions
of the step.
Step Name
The step name is used to clearly identify a step in a program organization unit.
The step name is created automatically, but it can be edited. The step name must
be unique in the entire program organization unit, otherwise an error message is
produced. The step name created automatically is always structured as follows:
S_n_m
S = step
n = section number (running number)
m = number of the step in the section (running number)
258
20
Glossary
Section
A section can be used, for example, to describe the mode of operation of a
technological unit, such as an engine.
A program or DFB is made up of one or several sections. Sections can be
programmed using the IEC programming languages FBD and SFC. Only one of
the listed programming languages can be used within any given section.
Each section has its own document window in Concept. To get a good overview, it
is best to breakdown a large section into several small ones. The scroll bar can be
used to scroll through the section.
Serial Ports
Information is transferred bit by bit in serial ports (COM).
Separator Format (4:00001)
The first digit in the reference is separated by a colon (:) from the five digit
address.
SFC
Refer to execution language
Signal Memory
The signal memory is the memory location of all items referred to by references
(direct representation) in the user program. For example, input bits, output /
marker bits, input words and output / marker words are located in the signal
memory.
Source Code File (Concept EFB)
The source file is a standard C++ source file. Upon choosing the Library →
Produce files menu command, this file contains an EFB code frame, into
which you must enter a specific code for the selected EFB. To do this, choose the
Objects → Source menu command.
ST
Refer to Structured Text (ST)
Standard Format (400001)
The five digit address appears right after the first digit of the reference.
20
Breite: 178 mm
Höhe: 216 mm
259
Glossary
Status Bits
For each node with global input or specific input/output of peer cop data there is a
status bit. If a defined group of data is successfully transferred within the preset
timeout, the corresponding status bit is set to 1. In the opposite case, the bit is set
to 0 and all data belonging to this group is cleared (to 0).
Structured Text (ST)
ST is a text language as per IEC 1131, in which operations, such as calls to
function blocks and functions, conditional execution of statements, repetition of
statements, etc. are represented by statements.
Structured Variables
Variables to which a derived data type defined with STRUCT (Structure) is
assigned.
A structure is a collection of data elements generally containing different data
types (elementary data types and/or derived data types).
SY/MAX
In quantum controllers, Concept includes the preparation of the I/O map of
SY/MAX I/O modules for RIO control through the quantum PLC. The SY/MAX
remote backplane has a Remote I/O adapter in slot 1, which communicates over a
Modicon S908 R I/O system. The SY/MAX I/O modules are listed for labeling and
inclusion in the I/O map of the Concept configuration.
System Data Types
In the present version, system data types include data types ANL_IN and
ANL_OUT.
260
20
Glossary
T
T
19” width unit (! T = 5.08 mm)
TAP
Terminal Access Point
TCN
Train Communication Network
Template File (Concept EFB)
The template file is an ASCII file including layout information for the Concept FBD
editor, and the parameters for the creation of the codes.
TIME
TIME stands for data type ”duration”. It is entered as a duration literal. The length
of the data elements is 32 bits. The values for variables of this data type range
from 0 to 2 exp (32) --1. The unit for data type TIME is 1 ms.
TIO
Terminal I/O
TM
Traffic Memory
20
Breite: 178 mm
Höhe: 216 mm
261
Glossary
Token
The network ”token” controls the ownership of the temporary permission to
transmit through a node. The token runs through the nodes in the increasing order
of their addresses. All nodes follow the token cycle and can contain any possible
data sent along.
Traffic Cop
The traffic cop is an I/O map generated from user I/O maps. The traffic cop is
managed in the PLC and, for example, also contains status information concerning
the drops and modules, in addition to the user I/O map.
Transition
The condition in which the control of one or several predecessor step(s) is/are
transferred to one or several successor step(s) along a one--way connection.
TS
Traffic Store
U
UDEFB (User Defined Elementary Functions/Function Blocks)
Functions or function blocks created in the C programming language and made
available by Concept in libraries.
UDINT
UDINT stands for data type ”unsigned double integer”. It is entered as an integer
literal, base 2 literal, base 8 literal or base 16 literal. The length of the data
elements is 32 bits. The values for variables of this data type range from 0 to 2 exp
(32) --1.
UINT
UINT stands for data type ”unsigned integer”. It is entered as an integer literal,
base 2 literal, base 8 literal or base 16 literal. The length of the data elements is 16
bits. The values for variables of this data type range from 0 to 2 exp (16) --1.
Unlocated Variable
The variable is managed and stored by the system. The address assigned on the
PLC is not revealed since the variable is only referred to by its symbolic name.
UP
User Program
262
20
Glossary
V
Variables
Variables are used for the exchange of data within sections, between several
sections and between the program and the PLC.
If a direct address (reference) is assigned to a variable, it is referred to as a
located variable. If no direct address is assigned to the variable, it is referred to as
an unlocated variable. If a derived data type is assigned to the variable, it is
referred to as a multi element variable.
In addition, there also are constants and literals.
W
Warning
If a critical condition occurs during the processing of an FFB or of a step (e.g.,
critical input value or time limit exceeded), a warning is produced, which you can
view via the Online → Online events... menu command. For FFBs the ENO
output stays set to ”1”.
WORD
WORD stands for data type ”bit string 16”. It is entered as a base 2 literal, base 8
literal or base 16 literal. The length of the data elements is 16 bits. A numeric
range of values cannot be assigned to this data type.
X
Y
Z
20
Breite: 178 mm
Höhe: 216 mm
263
Glossary
264
20
Index
B
AC
You will find the index of keywords below.
20
Breite: 178 mm
Höhe: 216 mm
265
Index
266
20
Zahlen
470 IPS 258 00, 197
A
Accessories for modules, 14
Address No., 31
Analog input, 13, 117
Analog output, 13, 153
Analog value processing, 13
AS--BCAN 259, 171
AS--BDAP 250, 131
AS--BDAP 252, 139
AS--BDAP 253, 139
AS--BDAP 258, 147
AS--BDAU 252, 153
AS--BDAU 256, 117
AS--BDEP 254, 159
AS--BDEP 256, 165
AS--BDEP 257, 165
AS--BNUL 200, 181
AS--BNUL 202, 181
AS--HDTA 200, 185
AS--HDTA 201, 185
AS--HDTA 202, 185
B
Backplane, 49
C
Cables, 14
CAN--TAP, 171
Capacitive discharge terminal, 62
Clamping diode, 143, 150
Coding of terminal blocks, 199
Communicating, 12
Concept, 12
Configuration data, 11
Configuring the power supply, 33
Connection scheme, 36, 43
CPU, 191
21
Breite: 178 mm
Höhe: 216 mm
Creating programs, 10
Current measure, 128
Current output, 157
D
Digital value processing, 13
Dimension drawings, 64
DIN-top hat rail, 60
Discharge terminal, 62
Discrete input and output, 13
Discrete inputs, 13, 159, 165
Discrete inputs and outputs, 131, 139
Discrete output, 13, 147
Dummy module, 181
E
EMC-measures, 62
Error analysis AS--BADU 256, 122
Expansion, 8
Expert programming language, 10
F
Fault cut--off, 135
G
General, 5
General information concerning
programs, 11
Grounding, 60
I
I/O modules, 53
I/O node, 30
Indicator elements, 15
Installation, 47
Installing the MVB line, 55
L
Load currents of the relay outputs, 151
267
Index
M
Mapping, 30
Measuring range selection AS--BADU
256, 122
Module accessories, 14
Mounting terminal blocks, 199
N
Node-No., 30
O
Overview of the components, 12
Overvoltage protection, 33
P
PC--E984--258, 191
Physical design resources, 14
Power supply, 33
Power supply module, 14, 197
Primary unit, 8
Program, 11
Program hierarchy, 10
Programming language, 10
Programming units, 11
Project, 10
Project design
Configuration data, 11
Program, 11
Project, 10
Section, 11
Protective circuit, 143, 150, 151
R
Rack, 185
RC combination, 143, 150
Relay outputs, 144, 151
Reset lockout, 135
S
Section, 11
Service life of contacts, 151
Shield, 42, 63
SIM 011, 135, 143, 162, 168
Slot No., 31
Software packages, 12
Suppressor diode, 33
T
TIO accessories, 14
Top hat rail, 47
Total current, 31
Translation values of the AS--BDAU
252, 156
V
Voltage measure, 128
Voltage output, 157
W
Wiring of analog modules, 120
Working voltage, 43
Z
Z--screw, 188
268
21