1
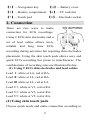
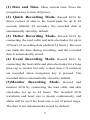
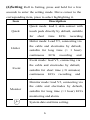
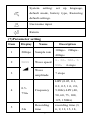
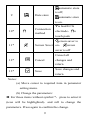
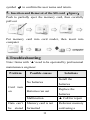
Micro Ambulatory ECG Recorder DiCare-m1C Series User’s Quick Start Manual & Warranty Card Dimetek Digital Medical Technologies, Ltd. Thanks for using Micro Ambulatory ECG Recorder. It is important to use the recorder correctly for effective ECG recording and monitoring. Please read the manual and follow instructions carefully in order to use this device properly. More detailed instructions can be obtained at www.dimetek.net or through the authorized distributors. The device is designed for adult’s ECG monitoring, ambulatory ECG recording, ECG data storage and review. Both skin touch pad mode and ECG skin electrode mode are provided for easy, flexible, and reliable recording. The expected usage of this device is for clinic reference. Please consult your doctor instead of diagnosing or treating by yourself. Be aware that there are several versions of this device which have slight differences in operations and technical specifications. 1. Basic structure [5] [6] [1] [2] [3] [8] [4] [7] 【1】—Display panel 【2】—Indicator 1 【3】—Navigation key 【4】—Battery cover 【5】—Battery compartment 【6】—TF card slot 【7】—Touch pad 【8】—Electrode socket 2. Connection There are two ways to make connection for ECG recordings. Using 2 ECG skin electrodes and a set of lead cables allows more reliable and long time ECG recording during activities but requiring skin electrodes placement. Using the skin touch pads allows easy and quick ECG recording but prone to interferences. The combinations of recording sites are illustrated below. (1) Using 2 ECG skin electrodes and lead cables Lead Ⅰ: white at LA, red at RA. Lead Ⅱ: white at LL, red at RA. Lead Ⅲ: white at LL, red at LA. Lead V1: white at V1, red at RA. Lead V3: white at V3, red at RA. Lead V5: white at V5, red at RA. (2) Using skin touch pads Choose quick mode and make connection according to 2 the illustrations (Lead I, II, and Chest). Press the navigation key to start ECG recording. It may affect the recording quality if the skin is not clean, and so wash the skin with soap before recording. Remain relaxed during recording, take smooth breath, and keep away from strong electromagnetic environment. 3. Operations Power on: Press the navigation key to turn on the device. Power off: Roll the navigation key to move to the interface with [ ], then press to turn the recorder off. The device will turn off if not in operation for minutes. Record: Press to start ECG recording in the default mode that can be preset as Quick, Holter, Event, or Monitor mode. The recording mode can also be selected by rolling the navigation key. The connection method is illustrated on the screen that should be followed for appropriate ECG recording. 3 Review: Roll to Review and press to see the list of recording date and time on the display. Then roll to select a recording and press to review it. The elapsed recording time is shown above the waveform. Roll to go backward/forward. Press again to quit Review. 4. Menu and selection Press and roll for a selection. Power & Time Quick Recording Holter Recording Event Recording Monitor Recording Mode setting Parameter setting System setting User name input Review Setting Record Menu Instruction 4 (1) Date and Time. Show current time. Press the navigation key to turn off power. (2) Quick Recording Mode. Record ECG by direct contact of skin to the touch pads for up to 48 seconds (default 24 seconds), the recorded data is automatically stored by default. (3) Holter Recording Mode. Record ECG by connecting the lead cable and skin electrodes for up to 32 hours of recording data (default 24 hours). The user can mark the time during recording, and the recorded data is automatically stored. (4) Event Recording Mode. Record ECG by connecting the lead cable and skin electrodes for a long time (up to weeks) but only a short time (<8 minutes) are recorded when navigation key is pressed. The recorded data is automatically stored by default. (5)Monitor Recording Mode. Record and monitor ECG by connecting the lead cable and skin electrodes for up to 24 hours. The recorded ECG waveform and heart rate is shown continuously, and alarm will be on if the heart rate is out of preset range. The data is not automatically stored by default. 5 (6)Setting Roll to Setting, press and hold for a few seconds to enter the setting mode. Move cursor to the corresponding item, press to select highlighting it. Icon Description Quick mode: lead I, skin contact with Quick touch pads directly by default, suitable for short time ECG recording Holter mode: Lead V5, connecting via the cable and electrodes by default, Holter suitable for long time (> 1 hour) continuous ECG recording and Event mode: lead V5, connecting via the cable and electrodes by default, Event suitable for short time (<8 minutes) continuous ECG recording and t Monitor mode: lead V5, connecting via Monitor the cable and electrodes by default, suitable for long time (>1 hour) ECG monitoring and alarm. System date and time setting. 6 System setting: set up language, default mode, battery type, Restoring default settings. User name input. Return (7)Parameter setting Item Display Name 1 200sps Sample rate 2 >>>> Wave speed Wave 3 amplitude Description 100sps、200sps、 400sps >、>>、>>>、> >>>, 4 stops 7 stops HPF (0.05, 0.1, 4 0.575Hz 0.2, 0.5, 1.0, 2.0, Frequency 5.0Hz)-LPF (40, 50, 60, 75, 100, 125, 150Hz) 5 24s Recording recording time (3, time 6, 9, 12, 15, 18, 7 24, 30, 36, 42, 48sec, or 1, 2, 3, 4, 5, 6, 7min, or 2, 4, 8, 12, 18, 24, 32h; mode and sample rate dependant) First value is the low threshold and 6 60100bpm Heart rate second is high alarm threshold. threshold Adjustable between 30bpm-250bpm 7 I Lead setting I, II, III, V1, V3, V5 High volume 8 、 medium volume Audio monitoring 、low volume 、no volume 8 automatic store 9 Date store is off, automatic store is on. Connection 10* method is lead ECG electrode, is touch pads screen saver is 11* Screen Saver on, screen saver is off Cancel all 12* Cancel changes and return 13* Save changes and Save return Notes: (a) Move cursor to required item in parameter setting menu. (b) Change the parameters: For those items without symbol *,press to select it (icon will be highlighted),and roll to change the parameters. Press again to confirm the change. 9 For those items with symbol *, press to switch between two options list in the table above. (c) Move cursor to【 】then press to cancel the operation and return. Move cursor to【 】 then press to accept the operation and return. (8)System Setting Item Icon Instruction 1 EN System language setting, EN for English, and CN for Chinese. 2 Quick Default ECG recording mode when Power is on. It can be set as Quick, Holter, Event, or 3 Monitor. Restore all settings to the factory default settings. 4 Battery type, could be alkaline or NiHM (9)User name Entry Roll navigation key to change letters, press to select. Maximally 20 letters can be entered. Select backspace symbol to remove the last one, or select return 10 symbol to confirm the user name and return. 5. Insertion and Removal of the SD card(figure) Push to partially eject the memory card, then carefully pull out Put memory card into card reader, then insert into computer 6.Troubleshooting Note: Items with ‘▲' need to be operated by professional maintenance engineer. Problem Possible causes Install the No batteries batteries Can't turn on Solutions Batteries run out Replace the batteries Malfunction ▲ Call for repair Data can’t Memory card is not Reformat memory be formatted card using a stored 11 or computer retrieved Memory card is Replace memory damaged card Malfunction ▲ Call for repair The power is off Can’t Electrodes or lead capture cable are loose or ECG broken signals ECG is too small or do not see the ECG No ECG waveform Turn on the device ▲ Call for repair or replace the electrodes or lead cable Malfunction ▲ Call for repair Select wrong Select correct connection method input Sensitivity setting is Adjust display incorrect sensitivity setting Connection is loose Make reliable connection Electrode placement Replace is incorrect or the electrodes and skin is not clean. clean the skin. Bad connection 12 Replace the electrodes and / or is displayed ECG signal fluctuation lead cable Sensitivity setting is Adjust display incorrect sensitivity Wash hands, legs, Electrostatic and skin then dry interference them before recording / interferenc Interfered by other e devices Keep away from other devices or compliances 7. Technical specifications ECG Connection: Recording Time: Recording Mode: Bandwidth: Finger contact(lead I and II), chest contact, standard ECG electrode connection (with electrode cable), user selectable. Up to 48s (no TF card) or up to 32 hours (with TF card), adjustable. Limb lead contact record mode, chest lead record mode, chest lead continuous record mode, chest lead dynamic record mode, quick ECG recording mode 0.05Hz - 150Hz,adjustable 13 High-Pass Filter: 0.05Hz - 5.0Hz,adjustable Low-Pass Filter: 40Hz - 150Hz,adjustable Sample Rate: 100/200/400sps,adjustable Input Dynamic Range: >100dB Common Mode Rejection: >100dB Input Impedance: >10Mohm (0.05Hz - 10Hz) Inner Noise: <10uV (RMS) Display Speed: 2.5mm/s - 100mm/s, adjustable Amplitude: 2.5mm/mV - 80mm/mV, adjustable Power supply: Two AAA batteries, working time >16 hours without screen saver, >32 hours with screen saver. ECG Storage: >650 hours(200sps sample rate) Control Key: Navigation key Dimension: 90×60×16mm3 Weight: 85g(including 2 AAA batteries) 8.Warranty card Thank your for purchasing Dimetek’s product. Please read the Warranty card carefully and keep it available. It will be required for service. Please send Registration Card back to Dimetek to fulfill the warranty. Warranty 1. Please present the warranty card to the authorized 14 representatives when service is requested. The warranty is void if the product is disassembled without Dimetek’s authorization. 2. For non-quality problems, please contact Dimetek’s service provider. 3. If the product needs to be serviced, please contact a Dimetek’s authorized representative. 4. When warranty is expired or upgrade services are required, please contact Dimetek’s authorized representatives. 5. For the damage caused in transportation, please contact the transportation agency and inform Dimetek in time. This warranty is applied if the product is used in accordance with the manufacturer’s recommendations listed in the user’s manual. Repair will be charged in the following situations 1. Damages caused by un-authorized installation or recommend environment. 2. Damages caused by improper repair or misuse. 3. Damages caused by using unmatched power source. 4. Damages caused by force majeure. 15 Registration Product Name: Product Model: Order No.: Date of Shipment: Expired Date: Warranty Method: Mail The following items need be filled to complete the warranty card. Product Series No.: Company Name: Address: Postcode: Contact Person: Tel: Fax: Email: Note: Refer to the label on the back of product for the S/N 16