1
Eidgenössisches Finanzdepartement EFD
Bundesamt für Informatik und Telekommunikation BIT
Lösungszentrum
E-Government
sedex Client 5.0:
Installation and User Manual
Project Name:
sedex
Project Number:
LZGPR07-00259
Document Version:
5.0.1
Status
in Process
for approval
approved to be
used
Parties involved
Author:
Sergey Abagyan, Thomas Wenger, Markus Antener
Users:
IT staff installing and operating a sedex client.
Change Management and approval
When
Version Who
Description
10.01.2008
1.0
Sergey Abagyan
Final version
04.02.2008
1.0.2
Sergey Abagyan
Added the property for local DB cleaning
18.04.2008
1.1.3
Thomas Schmidt
Version number changed, Logging Configuration
18.04.2008
1.1.4
Thomas Schmidt
Version number changed, formatting changed
23.09.2008
1.3.0
Thomas Schmidt
Version number changed
03.11.2008
2.0
Thomas Schmidt
Final version 2.0
22.04.2009
2.0.9
Markus Antener
Updated for 2.1
06.07.2009
2.1
Jörg Böhlen
Genehmigung
27.11.2009
2.2
Markus Antener
Added new requirements for firewall
25.02.2011
3.0
Markus Antener
Updated for Adapter 3.0
06.12.2011
4.0
Thomas Wenger
Major rewrite and updates for sedex client 4.0
01.02.2012
4.0.1
Michel Gentile
Version number changed
21.05.2012
4.0.2
Markus Antener
Monitoring interval parameter added
15.11.2012
4.0.3
Markus Antener
Version number changed
25.07.2013
4.0.4
Markus Antener
Version number changed
02.04.2015
5.0.0
Markus Antener
Updates for sedex client 5.0
08.10.2015
5.0.1
Markus Antener
Updated migration chapter
sedex Client Installation and User Manual (English)
Table of Contents
1
INTRODUCTION ............................................................................................ 5
1.1
sedex Client ............................................................................................................................. 5
1.2
Overview of the sedex system .............................................................................................. 6
1.3
1.3.1
1.3.2
1.3.3
Messaging Interface to the sedex Client for End User Systems........................................ 8
File-based Messaging Interface ................................................................................................ 8
Message format ........................................................................................................................ 8
Sending and receiving messages ............................................................................................. 8
1.4
References ............................................................................................................................... 8
2
OPERATIONAL REQUIREMENTS ................................................................ 9
2.1
2.1.1
2.1.2
2.1.3
2.1.4
2.1.5
2.1.6
2.1.7
2.1.8
System requirements ............................................................................................................. 9
Supported Platforms ................................................................................................................. 9
Client needs to be autostartable (service/deamon) .................................................................. 9
CPU ........................................................................................................................................... 9
RAM ........................................................................................................................................ 10
Disk Space .............................................................................................................................. 10
Maximum Message Size ......................................................................................................... 10
Firewall .................................................................................................................................... 11
Network Speed ....................................................................................................................... 11
2.2
Folder Structure of the sedex Client ................................................................................... 12
2.3
2.3.1
2.3.2
2.3.3
2.3.4
2.3.5
Migration ................................................................................................................................ 14
Important note when upgrading from versions 2.x and 3.x ..................................................... 14
Prerequisites/Things to do before updating ............................................................................ 14
Migrating from Versions 4.x and 5.x ....................................................................................... 15
Migrating from Versions 2.x or 3.x .......................................................................................... 16
Downgrading ........................................................................................................................... 17
3
MANUAL INSTALLATION FROM ZIP FILE ................................................ 18
3.1.1
3.1.2
3.1.3
3.1.4
3.1.5
3.1.6
3.1.7
3.1.8
3.1.9
Verify Prerequisites ................................................................................................................. 18
Extract the sedex Client Archive ............................................................................................. 18
Add Executable Rights (on Unix Systems only) ..................................................................... 18
Environment Variables Configuration ..................................................................................... 19
Install Java JCE Unlimited Strength Policy Files .................................................................... 19
sedex Controller Configuration ............................................................................................... 20
sedex Adapter Configuration .................................................................................................. 20
Logging Configuration ............................................................................................................. 22
Final Notes .............................................................................................................................. 23
4
AUTOMATIC INSTALLATION USING THE INSTALLER ........................... 24
4.1.1
4.1.2
4.1.3
4.1.4
4.1.5
4.1.6
4.1.7
Choose an Installer Distribution .............................................................................................. 24
Verify Prerequisites ................................................................................................................. 25
Download one of the installer programs ................................................................................. 25
Run the installer program ........................................................................................................ 25
Additional installation tasks on Non-Windows systems (e.g., Unix) ....................................... 38
Installation Check .................................................................................................................... 38
Final Notes .............................................................................................................................. 38
5
INSTALLATION CHECK .............................................................................. 39
20150930_client_installation_user manual_V5_0_1.docx
2 / 54
sedex Client Installation and User Manual (English)
5.1
Start the sedex Client ........................................................................................................... 39
5.2
Send an echo test message ................................................................................................. 39
5.3
Check if this message has been sent and received .......................................................... 40
6
STARTING AND STOPPING THE SEDEX CLIENT .................................... 41
6.1
Manual Start and Stop .......................................................................................................... 41
6.2
6.2.1
6.2.2
Automatic Start (Installation as a Service/Daemon) ......................................................... 41
Unix ......................................................................................................................................... 41
Windows.................................................................................................................................. 42
6.3
Install Multiple Adapter Instances on the Same Machine ................................................. 42
7
CLIENT CONFIGURATION REFERENCE .................................................. 44
7.1
Controller Configuration ...................................................................................................... 44
7.2
Adapter Configuration .......................................................................................................... 46
7.3
7.3.1
7.3.2
Certificate configuration ...................................................................................................... 48
Initial Certificate Requests ...................................................................................................... 48
Optional Elements ................................................................................................................... 49
7.4
Logging Configuration ......................................................................................................... 49
8
MONITORING .............................................................................................. 50
8.1
Windows Service .................................................................................................................. 50
8.2
Built-In Monitoring ................................................................................................................ 50
9
COMMON PROBLEMS AND SOLUTIONS ................................................. 51
10
APPENDIX ................................................................................................... 53
10.1
Glossary ................................................................................................................................. 53
10.2
10.2.1
10.2.2
10.2.3
Receipt Versions ................................................................................................................... 53
Overview ................................................................................................................................. 53
Version 1.0 .............................................................................................................................. 53
Version 2.0 .............................................................................................................................. 53
20150930_client_installation_user manual_V5_0_1.docx
3 / 54
sedex Client Installation and User Manual (English)
Important Notices
New sedex network addresses
The network addresses used for communication with the sedex server changed in version 5.0! From
now on, sedex uses the same host and port for all of its outgoing communications:
https://sedex-service.admin.ch, port: 443
For more information, have a look at section 2.1.7.
WebSocket
The sedex server uses WebSocket to notify sedex clients about new events, e.g., when a new sedex
message arrived on the sedex server.
WebSocket is an outgoing connection, based on http and tcp, and should work on most network
environments without problems.
However, if your network does not properly support WebSocket, you can turn it off and rely on the
polling mechanism like in previous versions of the sedex client.
For more information about WebSocket, have a look at http://en.wikipedia.org/wiki/WebSocket.
RMI
Previous versions of the sedex client started an RMI registry as an external process. This external
process kept running even if the sedex client was stopped.
In the new version of the sedex client, the RMI registry runs in the same process as the client, and
therefore is shut down every time the client stops.
20150930_client_installation_user manual_V5_0_1.docx
4 / 54
sedex Client Installation and User Manual (English)
1 Introduction
Welcome to the installation and user manual for the sedex client!
This document describes the installation and configuration of the sedex client. The sedex
client is a Java application that together with the sedex server implements a secure
asynchronous messaging middleware. The sedex client is required on end-user systems that
have to exchange messages between domain specific applications via the sedex platform.
Typically, these end-user systems are hosts located at Swiss communes, cantons, and
federal offices like BFS, ZAS, and Infostar.
1.1 sedex Client
The sedex client provides the following core functionalities:
secure transport of sensitive data (international and Swiss standard on data security
level 3)
sender-side message encryption for target recipients – only the recipients can decrypt
the message (known as end-to-end security)
message content integrity check by the means of digital signatures
reliable transport for very large data files (1 GB or higher, compressed or
uncompressed)
sending/receiving of messages is non-repudiable
audit trail of the message exchange (envelope information only)
Note: The sedex system is asynchronous by design. This means that in practice a
message may reach a recipient within about 5 minutes. But generally no guarantee can be
given about the message transfer durations to be expected. If, e.g., the recipient’s client is
down or offline, the message even may never reach the receiver. In such a case, after 30
days of non-delivery, an according receipt will be generated by the system to inform the
sender.
20150930_client_installation_user manual_V5_0_1.docx
5 / 54
sedex Client Installation and User Manual (English)
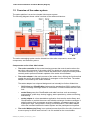
1.2 Overview of the sedex system
The sedex platform is a service oriented client-server system.
The following diagram shows a brief overview of the sedex architecture:
The sedex messaging system can be divided into client side components, server side
components, and external systems.
Components on the client side include:
The sedex controller is the central steering process that controls and monitors the
two other main processes of the sedex client (for details see next two components).
The sedex-controller is e.g. able to control the sedex client components locally and/or
remotely and to perform automatic updates of the sedex client software.
The sedex adapter is the main process of the sedex client, offering the functions that
enable the secure and reliable exchange of messages on the client side. The sedex
adapter is controlled by the sedex controller.
The sedex adapter has a layered design and can internally be further divided into:
o
OSCI client and ClientEnabler implement the standardized OSCI protocol for a
secure message exchange based on certificates. It communicates with the OSCI
hub.
o
sedex library uses the ClientEnabler and adds functions such as message
segmentation, public keys lookup, logging, status persistency, status monitoring,
and alerting.
o
sedex adapter is a Java standalone application that uses the sedex library and
ClientEnabler to provide the secure and reliable exchange of sedex messages. It
adds functions such as message envelope validation, message mapping to the
subscription topic, configuration, routing, and authorization. The sedex adapter
offers the interface between the sedex system and the participant end systems.
The sedex Webservice Proxy is an optional process that offers the utility function of
a secure proxy for SOAP web services. It is not needed for the normal sedex
20150930_client_installation_user manual_V5_0_1.docx
6 / 54
sedex Client Installation and User Manual (English)
message exchange. The Webservice Proxy is controlled by the sedex controller.
The WebService Proxy is not covered by this manual. See the separate WebService
Proxy manual for details.
Components on the server side are:
OSCI hub (low level messaging hub) covers the core functions of the server for a
secure and reliable exchange of messages following the OSCI standard. A sedex
message is mapped to one or more such OSCI messages. The OSCI hub provides
an inbox for each participant having a valid sedex certificate. The OSCI client
communicates via HTTPS with the OSCI hub in polling mode. Normally, the polling
interval is 5 minutes.
eGov Services complement the functions of the OSCI hub with generic functions like
central logging.
sedex server offers services for the clients enabling the sedex message exchange
(e.g. message authorization and routing). Other services allow the configuration of
the system and especially the administration of the sedex participants.
IdM Directory (Identity Management): Meta directory of the system participants. The
certificates of the participants are published in this directory.
sedex database is used to centrally store data of the server side components. E.g.
the messages are stored in this DB when they are sent to the OSCI hub.
Update webhost is where the update packages for remote updates of the sedex
clients are stored. If locally enabled in the client, the sedex controller can download
sedex client updates from this server.
External systems are:
Office directory (“Amtsstellenverzeichnis”): The office directory holds data on Swiss
communes, cantons, and federal offices like BFS, ZAS, Infostar. Currently, the office
directory is administered by the Bundesamt für Statistik BFS (Federal Statistical
Office). It will probably be superseded by the Bundeskanzlei (Federal Chancellery)
office directory in the future.
Swiss Government PKI (formerly known as AdminPKI) is the Certificate Authority of
the Bundesamt für Informatik BIT (Federal Office for Information Technology and
Telecommunication) that delivers qualified certificates for physical entities (persons)
as well as legal entities (organizations).
SAM: sedex customer care management system at the BFS. SAM takes care of the
contracts with the sedex participants, and therefore their authorization and
representation.
BO: Business intelligence platform based on Business Objects by SAP. Allows
sophisticated generation of reports, e.g., for accounting purposes. The relevant data
is loaded through an ETL process into a sedex data mart.
End systems: End user systems that use the sedex platform for message exchange.
Typical users are communes, cantons, and federal registers.
20150930_client_installation_user manual_V5_0_1.docx
7 / 54
sedex Client Installation and User Manual (English)
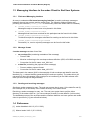
1.3 Messaging Interface to the sedex Client for End User Systems
1.3.1
File-based Messaging Interface
An easy to understand file-based messaging interface is used to exchange messages
between the end user system and the sedex client. The following folders together are
providing this interface (<sedex_home> is the directory where the sedex client is installed.)
<sedex_home>/interface/outbox
Messages ready to be sent have to be placed in this folder.
<sedex_home>/interface/inbox
Messages that have been received for this participant can be found in this folder.
<sedex_home>/interface/receipts
Technical receipts for messages submitted for sending can be found in this folder.
<sedex_home>/interface/processed
Processed (i.e., sent or rejected) messages can be found in this folder.
1.3.2
Message format
A sedex message consists of two files:
an envelope file (containing metadata of the message)
o
Format: XML
o
Must be conforming to the envelope schema definition (XSD, eCH-0090 standard)
o
Convention for the file name: envl_XXX.xml
a data file (containing the payload of the message)
o
Format: arbitrary content format
o
Convention for the file name: data_XXX.YYY
The base part in the names (XXX in the example) of both envelope and data file must be
identical (e.g., a unique identifier generated by the end user system). The sedex client will
not send but reject a message if the envelope is not conforming to the XML schema eCH0090 (an error receipt will be generated).
1.3.3
Sending and receiving messages
Sending a sedex message is easy: The end user system has to save (1) the data file and (2)
the envelope file (in this order) in the outbox directory of the sedex client.
Receiving a sedex messages is easy, too: The end user system has to poll the inbox
directory of the sedex client for (1) a new envelope file and (2) a new data file (in this order).
The detailed structure of the envelope and the interface between end user system and sedex
client is specified in [1] (see references below).
1.4 References
[1] sedex-Handbuch V4.0.3 (15.11.2012)
[1] Manuel sedex V4.0.3 (15.11.2012)
20150930_client_installation_user manual_V5_0_1.docx
8 / 54
sedex Client Installation and User Manual (English)
2 Operational Requirements
The sedex client is a set of two Java standalone applications (or three applications when the
optional web service proxy is installed).
The client has to be installed on a host in a network zone which is connected (http/https
protocols only) to the sedex servers (see 2.1.7 for details).
The client can be installed either on a dedicated host or on the same host where the end
user application is running, as long as the server fulfills the system requirements (see below
for details).
Basically, there are two different ways how the sedex client can be installed:
manual install from the ZIP file (covered in chapter 3)
guided automatic install using the installer application (covered in chapter 4)
2.1 System requirements
2.1.1
Supported Platforms
The sedex client is (nearly) a pure Java application. As such it should run on all platforms
supporting Java 1.7.0 or 1.8.0 ( “Write once run everywhere.”). However, the sedex client
has been fully tested on the following platforms with Java 1.7 and 1.8 only:
Windows Server 2003 R2 64Bit
Windows Server 2008 R2 64Bit
Windows Server 2012 RTM 64Bit
Windows 7
SuSE Linux 11.0
Linux Ubuntu 12.04
CentOS 6.2
2.1.2
Client needs to be autostartable (service/deamon)
In normal installations the sedex client has to run permanently.
To ensure an automatic restart of the client after a reboot of the host, the sedex controller
process can be configured to run as a service (on Windows) or as a daemon from a start
script (on Unix).
Alternatively, user-specific mechanisms may be used to make sure that the sedex controller
process is started after a reboot of the host.
Note: Only the sedex controller process has to be made autostartable, as the other
processes are started/stopped indirectly through the sedex controller.
2.1.3
CPU
As the sedex client is more an I/O intensive application than a CPU intensive one, normally
any CPU capable of running one of the supported operating systems should be sufficient.
The CPU performance may become a bottleneck on high traffic installations only.
20150930_client_installation_user manual_V5_0_1.docx
9 / 54
sedex Client Installation and User Manual (English)
2.1.4
RAM
There should be total of at least 512 MB of free memory available for all the processes of the
sedex client together.
2.1.5
Disk Space
The disk space needed for the sedex client applications files is below 200 MB.
The total disk space needed for the sedex client at runtime heavily depends on the number
and size of messages being sent and received and how fast these messages are processed
and cleaned up by the end user system. More precisely, the concrete disk space consumed
depends on how long messages are stored in the inbox, outbox, and processed folders,
respectively how long receipts are stored in the receipts folder.
As a simple heuristic, the following rules may be considered.
Sending messages:
The disk space required for all messages being sent may go up to a maximum of 4 times of
the original messages size.
The outbox directory must be capable of holding all messages.
Internal copies of all the messages are generated.
The internal copies may be broken into segmented copies.
The processed messages folder must be capable of holding all messages.
Note: While the sedex client will remove the messages that have been sent/processed from
the outbox folder, it will by default not remove any file from the processed folder. Therefore,
the processed messages directory must be cleaned up by the end user system, or the sedex
client has to be configured to do a periodic cleanup by itself (see 7.1 “Cleanup” for details).
Receiving messages:
The disk space required for all messages being received may go up to a maximum of 3 times
of the received messages size.
The inbox directory must be capable of holding all messages.
The segmented messages are internally received and stored.
The segmented messages are internally assembled to complete messages.
Note: The sedex client will never remove received messages from the inbox folder.
Therefore the inbox folder must be cleaned up by the end user system.
2.1.6
Maximum Message Size
The maximum size of a single message the sedex client can send is currently limited to
10GB.
20150930_client_installation_user manual_V5_0_1.docx
10 / 54
sedex Client Installation and User Manual (English)
2.1.7
Firewall
The firewall has to be configured so that the sedex client can communicate with the sedex
server components. Outgoing connections to the following network endpoints are created:
2.1.8
sedex-service.admin.ch port 443, https protocol
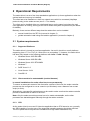
Network Speed
sedex needs a connection that allows to upload at least 5 Megabytes data within 5
minutes. Therefore, the recommended minimum upload speed is 150 kbit/s.
Note: This recommendation assumes that the whole bandwidth of the connection is available
for the sedex client. If the client has to share the available bandwidth with other applications,
the bandwidth needed has to be secured for the sedex client.
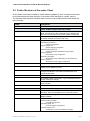
In practice, the minimum upload/download speed has to be adapted to the message volume
being handled by the client. The following table gives an overview of the typical durations
required for the transfer of messages:
Network speed
150 kbit/s
Message
Size
300 kbit/s
1'000 kbit/s
10'000 kbit/s
5 MB 4.5 minutes
2.3 minutes
36 seconds
3.6 seconds
50 MB 44.5 minutes
22.3 minutes
6.6 minutes
36 seconds
500 MB 7.4 hours
3.7 hours
1.2 hours
6.7 minutes
1000 MB 14.8 hours
7.4 hours
2.3 hours
13.4 minutes
Table 1: Message transfer times *
* Note: These transfer times are calculated for one message, i.e., one data file only. If the
data size is distributed over several smaller messages, the communication overhead per
message has to be taken into account, especially if large numbers of very small messages
are sent (messages of a few KB in size only).
20150930_client_installation_user manual_V5_0_1.docx
11 / 54
sedex Client Installation and User Manual (English)
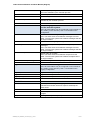
2.2 Folder Structure of the sedex Client
As the sedex client has the ability to install software updates by itself, it needs write access
to all folders within the base directory of the sedex client (denoted as <sedex_home>).
The following table shows the default folder structure of an installed sedex client within the
base directory:
Folder
Description
/adapter
sedex adapter component main folder
/adapter/axis2
Web service proxy component main folder
(Note: the web service proxy depends on the adapter and
thus is a subcomponent of the sedex adapter component)
/adapter/bin
Scripts used for starting and stopping the sedex adapter by
the sedex controller (not by the end user).
/adapter/conf
Configuration files for the adapter and the web service proxy:
sedexAdapter.properties
Adapter configuration
adapter-logback.xml
Adapter logging configuration
certificateConfiguration.xml
Adapter credentials (certificate and password)
wsproxy.properties
Web service proxy configuration
wsproxykey.properties
Web service proxy credentials (cert. and password)
wsproxy-log4j.xml
Web service proxy logging configuration
/adapter/deploy
Deploy directory for web service proxy
/adapter/internalmessages
Temporary directory for internal messages. Has to be
writable by the adapter process.
/adapter/jce
Java Cryptography Extension policy files for unlimited
strength. Provided for Sun-based and IBM-based Java
runtime environment.
/adapter/lib
All the required Java libraries for the adapter.
/adapter/schema
All necessary XML schema files, e.g. the eCH0090 schema
(sedex message envelope).
/adapter/certificate
Private PKI user keys and certificates for the secure
communication.
/controller
sedex-controller component main folder
/controller/backup
Before a remote update is carried out, a backup is created in
this folder. Has to be writeable by the controller process.
/controller/certificates
Certificate for checking author and integrity of a remote
update package.
/controller/conf
Configuration files for the sedex controller:
sedexController.properties
Controller configuration
controller-logback.xml
Controller logging configuration
controller-wrapper.conf
Configuration of the service/daemon wrapper
20150930_client_installation_user manual_V5_0_1.docx
12 / 54
sedex Client Installation and User Manual (English)
/controller/download
Remote update packages are downloaded into this folder.
Has to be writeable by the controller process.
/controller/lib
All the required Java libraries for the controller.
/controller/schema
All necessary XML schema files.
/controller/temp
Temporary working directory for the controller. Has to be
writeable by the controller process.
/interface
The messaging interface between the sedex client
and the end user system.
Note: All these folders may be configured to exist outside of
the <sedex_home> directory. See 7.2 for details on the
configuration.
/interface/inbox
Default folder for incoming messages.
Note: The sedex client never deletes messages from this
folder. The end user system has to delete messages that are
no longer needed.
/interface/outbox
Default folder for outgoing messages.
/interface/processed
Default folder for processed (i.e., sent or rejected)
messages.
Note: The sedex client never deletes messages from this
folder. The end user system has to delete messages that are
no longer needed.
/interface/receipts
Default folder for receipts.
Note: The sedex client never deletes receipts from this
folder. The end user system has to delete receipts that are
no longer needed.
/interface/sedextempmessage
Default working folder for temporary message files.
/logs
Default folder for all log files.
Note: All these folders may be configured to exist outside of
the <sedex_home> directory. See 7.4 for details on the
logging configuration.
/logs/adapter
Log files written by the adapter.
/logs/controller
Log files written by the controller.
/logs/wsproxy
Log files written by the web service proxy.
Misc folders
/bin
User scripts for starting and stopping the sedex controller.
Administrators should use these scripts to start/stop the
sedex client.
/jre
Java Runtime Environment
/lib
All the required Java libraries for the service/daemon
wrapper
/temp
Working directory for temporary files.
20150930_client_installation_user manual_V5_0_1.docx
13 / 54
sedex Client Installation and User Manual (English)
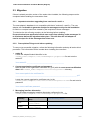
2.3 Migration
If there is already an older version of the sedex client installed, the following steps must be
completed when installing the new sedex client.
2.3.1
Important note when upgrading from versions 2.x and 3.x
The new adapter’s database is not compatible with that of versions 2.x and 3.x. The new
adapter will not be able to generate receipts for messages sent by the old installation
for which no receipts have been created by the recipients of these messages.
To minimize the risk of losing receipts, do the following before updating:
Prevent the business application which uses sedex from sending sedex messages 30
to 60 minutes before the migration takes place. This will allow the old adapter to
receive receipts for all the messages that it has sent.
2.3.2
Prerequisites/Things to do before updating
To carry out a successful migration, collect the following information and stop all sedex client
processes. This information will be needed when installing the new client.
1. sedex ID
Locate the adapterSedexId identifier in the
<sedex_home>/adapter/conf/sedexAdapter.properties file and note the
sedex ID.
Your sedex ID: ________________________________________
2. Current organization certificate and password
Note the path to the organization certificate file (.p12) with the most recent modification
date in the <sedex_home>/adapter/certificate/prod-bit directory.
Your current path for the certificate file:
__________________________________________________________________.p12
Locate the newest organization certificate entry in the
<sedex_home>/adapter/conf/certificateConfiguration.xml file and note its
password.
Your current certificate password: ________________________________
3. Messaging interface directories
Note the sedex messaging interface directories configured in the
<sedex_home>/adapter/conf/sedexAdapter.properties file.
Directory
Inbox
Outbox
Default Value (Client
V5.0)
Your Directory Name
<sedex_home>/inte
rface/inbox
<sedex_home>/inte
rface/outbox
20150930_client_installation_user manual_V5_0_1.docx
14 / 54
sedex Client Installation and User Manual (English)
SentItemsDir
Receipts
<sedex_home>/inte
rface/processed
<sedex_home>/inte
rface/receipts
Note: Between versions 3.0 and 4.0 the layout of the messaging interface was changed.
If your messaging interface directories differ from the 5.0 default directories shown
above, it is important that you provide your current interface directories when updating
your installation. If you do not, the version 5.0 default interface directories will be used
and any application that depends on the previously used directories will no longer be able
to send and receive messages. An alternative is to adapt the applications to use the
default directories of the new installation.
4. Stop your running sedex client processes
On Windows:
i. If the sedex client has been started as a Windows service, it must be
stopped using the Windows Service Manager.
ii. If not, execute <sedex_home>/bin/controller-stop.bat
On Unix/Linux: Execute <sedex_home>/bin/controller-stop.sh
5. If the sedex client was registered as a Windows service, that service configuration must
be unregistered by executing the following script.
<sedex_home>/bin/controller-UninstallWindowsService.bat
6. Kill the RMI registry
On Windows:
taskkill /F /IM rmiregistry.exe
On Unix/Linux:
killall -9 rmiregistry
Alternatively, you can kill the task with the task manager or reboot the computer.
2.3.3
Migrating from Versions 4.x and 5.x
Complete the following steps if migrating from a sedex client version 4.x. or 5.x
1. Rename the current installation directory
On Windows:
rename <sedex_home> <sedex_home>-backup
On Unix/Linux:
mv <sedex_home> <sedex_home>-backup
2. Install new client
Install the new sedex client using the installer or by unpacking the ZIP into the same path
as before (<sedex_home>) using the parameters you noted in chapter 2.3.2.
3. Copy current client messaging state to new installation
Copy the databases containing the current client messaging state from their backup
location to the new installation directory as follows.
20150930_client_installation_user manual_V5_0_1.docx
15 / 54
sedex Client Installation and User Manual (English)
On Windows:
xcopy <sedex_home>-backup/adapter/eGovTmp
<sedex_home>/adapter/eGovTmp /E
xcopy <sedex_home>-backup/adapter/h2db
<sedex_home>/adapter/h2db /E
On Unix/Linux:
cp -R <sedex_home>-backup/adapter/eGovTmp
<sedex_home>/adapter
cp -R <sedex_home>-backup/adapter/h2db <sedex_home>/adapter
4. Copy messages into the interface folders if needed
If the messaging interface directories (see prerequisite 3) are subdirectories within the
client installation (the default), then copy them from their backup location to the new
installation folder as follows.
If you did not use the default folders, substitute your specific directory names in the
following commands.
On Windows:
xcopy <sedex_home>-backup/interface <sedex_home>/interface /E
On Unix/Linux:
cp -R <sedex_home>-backup/interface <sedex_home>
2.3.4
Migrating from Versions 2.x or 3.x
Complete the following steps if migrating from a sedex client version 2.x or 3.x.
1. Prevent your business application from writing new messages
Prevent your business application from writing new messages into the outbox for 30 to 60
minutes before migrating the client. This allows the old adapter to receive receipts for all
the messages that it has sent.
2. Rename the current installation directory
On Windows:
rename <sedex_home> <sedex_home>-backup
On Unix/Linux:
mv <sedex_home> <sedex_home>-backup
5. Install new client
Install the new sedex client using the installer or by unpacking the ZIP into the same path
as before (<sedex_home>), using the parameters you noted in 2.3.2.
6. Copy messages in the interface folders if needed
If the messaging interface directories (see prerequisite 3) are subdirectories within the
client installation (the default), then copy them from their backup location into the new
installation folder as follows:
On Windows:
xcopy <sedex_home>-backup/inbox <sedex_home>/inbox /E /I
xcopy <sedex_home>-backup/outbox <sedex_home>/outbox /E /I
20150930_client_installation_user manual_V5_0_1.docx
16 / 54
sedex Client Installation and User Manual (English)
xcopy <sedex_home>-backup/receipts <sedex_home>/receipts /E /I
xcopy <sedex_home>-backup/sent <sedex_home>/sent /E /I
On Unix/Linux:
cp -R <sedex_home>-backup/inbox <sedex_home>
cp -R <sedex_home>-backup/outbox <sedex_home>
cp -R <sedex_home>-backup/receipts <sedex_home>
cp -R <sedex_home>-backup/sent <sedex_home>
2.3.5
Downgrading
It is strongly recommended NOT to revert to an earlier version of the sedex client. A
downgrade can result in the loss of messages and receipts. If a problem arises during or with
the new installation, consult the Frequently Asked Questions (FAQ) V4.1 (25.08.2011) and
contact the BfS’s Service Clientèle before attempting a downgrade.
20150930_client_installation_user manual_V5_0_1.docx
17 / 54
sedex Client Installation and User Manual (English)
3 Manual Installation from ZIP File
Note: This chapter describes the manual installation of the sedex client.
See chapter 4 for an automated wizard-like installer.
Overview:
To install the adapter manually, carry out the following steps (the following sections describe
the steps in detail):
1.
Verify prerequisites
2.
Extract the sedex client archive
3.
Add executable rights (on Unix systems only)
4.
Environment variables configuration
5.
Install JAVA JCE unlimited strength policy files
6.
sedex controller configuration
7.
sedex adapter configuration
8.
Logging configuration
9.
Installation check
3.1.1
Verify Prerequisites
See chapter 2 for general operational requirements for running a sedex client.
Additionally, the JDK or JRE of Java 7 or 8 must be available on the target machine to run
the sedex client.
Note: No Java Runtime Environment is needed during the installation process.
3.1.2
Extract the sedex Client Archive
The sedex client for manual installation is shipped as one ZIP file.
Download and extract the ZIP file into a new folder of your choice (e.g., folder
“SedexClient”).
Note: The new folder containing the sedex client will be denoted as <sedex_home> for the
rest of this manual.
3.1.3
Add Executable Rights (on Unix Systems only)
When installing on a Unix based system, some additional steps are necessary after the
extraction of the archive:
1.
Change into the directory <sedex_home>/bin
2.
Change the permissions of the controller start/stop scripts to executable:
chmod +x controller-start.sh controller-stop.sh
3.
Change into the directory <sedex_home>/adapter/bin
20150930_client_installation_user manual_V5_0_1.docx
18 / 54
sedex Client Installation and User Manual (English)
4. Change the permissions of the adapter start/stop scripts to executable:
chmod +x adapter-start.sh adapter-stop.sh
5.
Change the permissions of the web service proxy start/stop scripts to executable:
chmod +x wsproxy-start.sh wsproxy-stop.sh
6.
Change into the directory <sedex_home>/adapter/axis2/bin
7. Change the permissions of the Axis2 start/stop scripts to executable:
chmod +x *.sh
3.1.4
Environment Variables Configuration
The following system environment variables must be set:
JAVA_HOME
must contain the path to the Java 6 SE installation folder
Usually, the JAVA_HOME variable is either set as a system variable in Windows or is set
during login on Unix by adding the variable assignment to a shell startup script, for example
~/.profile.
To set the environment variable, e.g., the following CLI commands can be used:
Windows:
set JAVA_HOME=C:\Program Files\Java\jre1.7.0_ 75
Unix (depends on the specific Unix shell used, here shown for bash):
export JAVA_HOME=/usr/java/jre1.7.0_75
3.1.5
Install Java JCE Unlimited Strength Policy Files
Due to US export restrictions, the default Java JCE policy files bundled in JRE 6 allow limited
cryptography only. As sedex needs to have really strong security, thus the “Unlimited
Strength Java(TM) Cryptography Extension Policy Files” have to be installed manually in
your <JAVA_HOME>.
The sedex client already provides the needed JCE policy files from Sun/Oracle and IBM.
These files can be found in:
<sedex_home>/adapter/jce/sun
<sedex_home>/adapter/jce/ibm
To install these policy files, simply copy all *.jar files contained in the corresponding folder
into the following directory of your Java installation (overwrite existing files):
<JAVA_HOME>/lib/security
on Windows systems
<JAVA_HOME>/bin/lib/security
on Unix systems
Note: In Switzerland, the provided policy files can also be downloaded directly from Oracle
or IBM websites.
20150930_client_installation_user manual_V5_0_1.docx
19 / 54
sedex Client Installation and User Manual (English)
3.1.6
sedex Controller Configuration
The sedex controller configuration file is:
<sedex_home>/controller/conf/sedexController.properties.
While chapter 7.1, “Controller Configuration,” describes all configuration values for reference
purposes, the following table is narrowed down to the variables which must be set in order
to get an operational sedex client.
Optional variables have to be set if necessary. E.g., the HTTP proxy server variables have to
be set only if access to the web has to go through an HTTP proxy server in your
organization.
Variable
Description
sedex.home
Path to the base directory of the sedex client.
This corresponds to the root in the ZIP file.
For example, “C:/Program Files/SedexClient”
The value used is referred to by “<sedex_home>” elsewhere in
this document.
Note: It is important to use the “/” path separator, even on
Windows installations.
controller.monitoring.se The port for accessing the controller’s monitoring information
rver.port
page using an HTTP client. Is set to “8000” by default. This
value has to be changed if the port is in use already.
Note: The configuration of the optional web service proxy component is not covered in this
manual. If you intend to run the web service proxy component, then follow the dedicated
installation and user manual for the web service proxy.
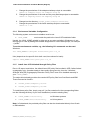
3.1.7
sedex Adapter Configuration
The sedex adapter configuration file is:
<sedex_home>/adapter/conf/sedexAdapter.properties.
While the chapter 7.2 “Adapter Configuration” describes all configuration values for reference
purposes, the following table is narrowed down to the variables which must be set in order
to get an operational sedex client.
Optional variables have to be set if necessary. E.g., the proxy variables have to be set only if
access to the web has to go through an HTTP proxy server in your organization.
Variable
Description
sedex_home
Path to the base directory of the sedex client.
This corresponds to the root in the ZIP file.
For example “C:/Program Files/SedexClient”
Note: It is important to use the path separator “/”, even on
Windows installations.
adapterSedexId
The sedex ID of the client. Example: “1-123-1”
20150930_client_installation_user manual_V5_0_1.docx
20 / 54
sedex Client Installation and User Manual (English)
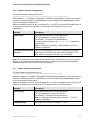
Further, you need to configure your sedex certificate.
Variant 1: If you already have a valid sedex certificate file (*.p12):
You need to configure the path and password to your private certificate file. The sedex
adapter certificate configuration file is:
<sedex_home>/adapter/conf/certificateConfiguration.xml
<?xml version="1.0" encoding="ISO-8859-1" standalone="yes"?>
<certificateConfiguration
xmlns="http://www.sedex.ch/xmlns/certificateConfiguration/1">
<privateCertificate>
<location>(1)</location>
<password>(2)</password>
</privateCertificate>
<transportCertificate>
<location>${ADAPTER_HOME}/certificate/prodbit/transportCertificate.cer</location>
</transportCertificate>
<webserviceTruststore>
<location>${ADAPTER_HOME}/certificate/prodbit/adaptertrust.jks</location>
<password>trustme</password>
<truststoretype>JKS</truststoretype>
</webserviceTruststore>
</certificateConfiguration>
Replace the two placeholders (1) and (2) with the actual values:
(1) Insert the path to your private certificate file (.p12) between <location> and
</location>.
You can use ${sedex_home} to specify a path relative to sedex_home, but you
can also use an absolute path.
E.g. <location>${sedex_home}/certificates/prod-bit/T501.p12</location>
Note: It is important to use the path separator “/”, even on Windows
installations.
(2) Insert your password for the certificate between <password> and </password>.
E.g. <password>myPassword123</password>
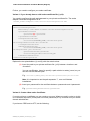
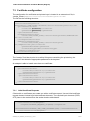
Variant 2: Create a New sedex Certificate:
If you do not have a certificate, you can create a new one. What you need in order to do this
is a certificate request ID (CRID) and a one-time password (OTP), received from your sedex
domain administrator.
If you have a CRID and an OTP, do the following:
20150930_client_installation_user manual_V5_0_1.docx
21 / 54
sedex Client Installation and User Manual (English)
copy the file
adapter\conf\certificateConfiguration.xml.certificateRequest to
adapter\conf\certificateConfiguration.xml
Now you have to edit the new file
<sedex_home>/adapter/conf/certificateConfiguration.xml
<?xml version="1.0" encoding="ISO-8859-1" standalone="yes"?>
<certificateConfiguration
xmlns="http://www.sedex.ch/xmlns/certificateConfiguration/1">
<initialCertificateRequest>
<requestId>(1)</requestId>
<oneTimePassword>(2)</oneTimePassword>
</initialCertificateRequest>
<transportCertificate>
<location>${ADAPTER_HOME}/certificate/prodbit/transportCertificate.cer</location>
</transportCertificate>
<webserviceTruststore>
<location>${ADAPTER_HOME}/certificate/prodbit/adaptertrust.jks</location>
<password>trustme</password>
<truststoretype>JKS</truststoretype>
</webserviceTruststore>
</certificateConfiguration>
Replace the two placeholders (1) and (2) with the actual values:
(1) Insert your certificate request ID (CRID) between <requestId> and
</requestId>.
You may have received this ID from your sedex domain administrator.
E.g. <requestId>c1eee6d7-8035-4513-a672-362198fd7a29</requestId>
(2) Insert your one time password (OTP) between <oneTimePassword> and </
oneTimePassword >.
E.g. <oneTimePassword>TJYT-LLAR-NBZN-XLCM</oneTimePassword>
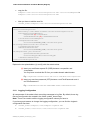
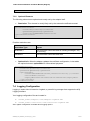
3.1.8
Logging Configuration
All components of the sedex client are writing messages to log files. By default, these log
files are configured to be created in the folder <sedex_home>/logs.
Note: There is no need to edit the logging configuration unless you have to.
If you have good reasons to change the logging configuration, you can find the Logback
configuration files here:
<sedex_home>/adapter/conf/adapter-logback.xml
<sedex_home>/controller/conf/controller-logback.xml
20150930_client_installation_user manual_V5_0_1.docx
22 / 54
sedex Client Installation and User Manual (English)
In these files, it is, e.g., possible to change the path to the log files and their rotation strategy.
See Logback documentation for details.
3.1.9
Final Notes
To make sure that the sedex client is started automatically after the system is rebooted, it is
required to be configured as a service (Windows) or called from a start script on UNIX. See
chapter 6 for the different ways to start a sedex client.
20150930_client_installation_user manual_V5_0_1.docx
23 / 54
sedex Client Installation and User Manual (English)
4 Automatic Installation Using the Installer
Note: This chapter describes the automatic and guided installation of the sedex client using
the installer program. See chapter 3 for a manual installation from a ZIP file.
Overview:
To install the sedex client using the installer program, carry out the following steps (the
following sections describe the steps in detail):
1. Choose an installer distribution
2. Verify prerequisites
3. Download one of the installer programs
4. Run the installer program
5. Additional installation tasks on non-Windows systems
6. Installation check
7. Final notes
Notes:
Always use one of the installer programs to do a fresh installation of the sedex client.
Never do a new installation by copying an existing installation.
4.1.1
Choose an Installer Distribution
The automatic installer program for the sedex client is a Java based application and available
in the form of two different distributions:
1. Java installer (JAR)
for all operating systems
The Java installer (a JAR file) contains the Java installer program and can be run on
any operating system offering a preinstalled Java Runtime Environment (JRE) for
Java 1.7.
2. Windows Installer (EXE) for Windows only
The Windows installer (an EXE file) contains the Java installer together with an
integrated Java Runtime Environment (JRE) for Java 1.7. Using this EXE installer
does not need a preinstalled Java Runtime Environment (JRE), as it has its own.
Choose one of the two available installer program distributions:
For Windows systems, the Windows installer program (EXE) is recommended.
For all other systems, the JAR installer program must be used.
20150930_client_installation_user manual_V5_0_1.docx
24 / 54
sedex Client Installation and User Manual (English)
4.1.2
Verify Prerequisites
See chapter 2 for general operational requirements for running a sedex client.
The other prerequisites depend on the type of installer you choose:
Prerequisites for the Java installer (JAR):
- To run the Java installer and later on the installed sedex client, a preinstalled Java
Runtime Environment (JRE) for Java 1.7 is required.
Environment variable JAVA_HOME has to be set to point to that JRE.
- On Linux based systems, the X Window System graphical desktop has to be
available.
Prerequisites for the Windows installer (EXE):
There are no further requirements to run the Windows installer.
The Windows installer already contains an integrated Java Runtime Environment
(JRE) to run the installer itself and automatically installs a dedicated JRE to run the
installed sedex client.
Note: On Windows systems, both installer programs (EXE and JAR) will automatically install
a dedicated JRE to run the sedex client.
4.1.3
Download one of the installer programs
Download one of the installer programs:
For Windows systems, the Windows installer program (EXE) is recommended.
For all other systems, the JAR installer program must be used.
4.1.4
Run the installer program
To install the sedex client, run the installer program:
On most systems, both installer programs (JAR and EXE) can be started by a double
click.
To run the JAR installer from a command line interface, you can alternatively type:
java –jar [FileName].JAR
Once running, the program will guide you through a sequence of dialogues and do the
automatic installation.
The following pages show the steps during a typical installation on Windows.
20150930_client_installation_user manual_V5_0_1.docx
25 / 54
sedex Client Installation and User Manual (English)
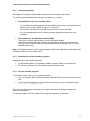
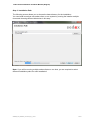
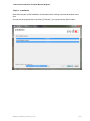
Language Selection
The first screen allows you to choose the language used to guide you through the
installation:
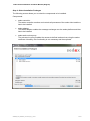
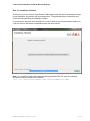
Step 1: Welcome
The following screen has no functionality but shows some important information about the
installation. Please read the provided information.
20150930_client_installation_user manual_V5_0_1.docx
26 / 54
sedex Client Installation and User Manual (English)
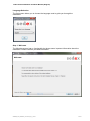
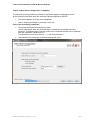
Step 2: Additional Information
The following screen has no functionality but shows some important information about the
network access needed by the sedex client. Please read the provided information.
20150930_client_installation_user manual_V5_0_1.docx
27 / 54
sedex Client Installation and User Manual (English)
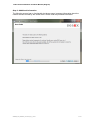
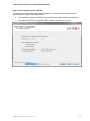
Step 3: Installation Path
The following screen allows you to choose the base directory for the installation.
You can install more than one sedex client on one system by running the installer multiple
times and choosing different directories in this step.
Note: If you will be running multiple sedex clients on one host, you are required to select
different installation paths for each installation!
20150930_client_installation_user manual_V5_0_1.docx
28 / 54
sedex Client Installation and User Manual (English)
Step 4: Select Installation Packages
The following screen allows you to select the components to be installed.
Components:
sedex controller.
The sedex controller monitors and controls all processes of the sedex client and thus
has to be installed.
sedex adapter.
The sedex adapter enables the message exchange over the sedex platform and thus
has to be installed.
sedex web service proxy.
The web service proxy enables the access to defined web services using the sedex
certificate. Normally, this functionality is not necessary and thus optional.
Step 3: Additional Information
20150930_client_installation_user manual_V5_0_1.docx
29 / 54
sedex Client Installation and User Manual (English)
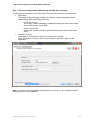
Step 6: sedex Client Configuration 1 (Adapter)
The following screen provides input fields for important adapter configuration values.
All the fields must be filled using the individual values assigned by the BFS.
The sedex adapter ID of this client installation.
Use an existing certificate or generate a new one.
If you have an existing certificate:
The private certificate file used by this client.
The file you specify here will automatically be copied into the adapter directory
structure. This allows you to indicate a path to the certificate that will not be available
after the installation (USB stick etc.).
The specified file must end with the .p12 file name extension.
The password for the private certificate used by this client.
20150930_client_installation_user manual_V5_0_1.docx
30 / 54
sedex Client Installation and User Manual (English)
If you need to create a new certificate:
The sedex client can create a new sedex certificate. To do this, ask your sedex domain
administrator to create a certificate request.
The certificate request ID (CRID), received from your sedex domain administrator.
The password (OTP) for the given CRID, typically received in an e-mail.
20150930_client_installation_user manual_V5_0_1.docx
31 / 54
sedex Client Installation and User Manual (English)
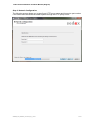
Step 7: Services Configuration 2 (Monitoring and Web Service Proxy)
The following screen allows you to specify the two services offered by the sedex client:
Monitoring
The sedex client periodically publishes its state for monitoring purposes by the
administration staff maintaining the server.
o
HTTP monitor port
At this port, a simple webpage is published showing the state of the sedex
client. Default value is port 8000.
o
Path for monitor file
At this path, a simple text file is published showing the state of the sedex
client.
Web service proxy
Listening port of the web service proxy. Default value is 8080.
Note: The web service proxy will only be available if selected in step 3 of the
installation.
Note: If you will be running multiple sedex clients on one host, you are required to select
different ports for each installation!
20150930_client_installation_user manual_V5_0_1.docx
32 / 54
sedex Client Installation and User Manual (English)
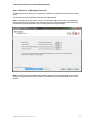
Step 8: Network Configuration
The following screen allows you to specify an HTTP proxy server and its service port number
if the sedex client accesses the sedex system through an HTTP proxy server.
20150930_client_installation_user manual_V5_0_1.docx
33 / 54
sedex Client Installation and User Manual (English)
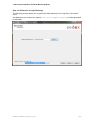
Step 9: Directories 1 (Message Directories)
The following screen allows you to specify the different message directories for the sedex
client.
These folders are the interface to the end-user applications.
Note: If migrating from a previous version of the sedex client, provide the corresponding
existing directories which have been used up until now. Using the default directories may
prevent the end-user application from sending and receiving messages.
Note: A technical folder (sedextempmessage) containing the messages being sent will be
created in the parent folder of the outbox. This folder must never be deleted on an active
system.
20150930_client_installation_user manual_V5_0_1.docx
34 / 54
sedex Client Installation and User Manual (English)
Step 10: Directories 2 (Logs Directory)
The following screen allows you to specify the base directory for the log files of the sedex
client.
A subdirectory per component (named controller, adapter, wsproxy) will be generated
in this folder.
20150930_client_installation_user manual_V5_0_1.docx
35 / 54
sedex Client Installation and User Manual (English)
Step 11: Installation
Now the main part of the installation of the sedex client is being executed and takes some
time.
As soon as the progress bar is showing “[Finished]”, you may press the “Next” button.
20150930_client_installation_user manual_V5_0_1.docx
36 / 54
sedex Client Installation and User Manual (English)
Step 12: Installation Finished
At this point, you can choose to generate an XML-based script file that is describing all steps
of this installation by pressing the according button. The generated script contains all user
values as entered during the installation wizard.
If you choose to generate such an XML-file, it can be archived for documentation reasons or
it can be used for automatic reinstallations with the same values.
Note: To reinstall the sedex client with the above generated XML file, type the following
command using a command line interface:
java –jar [InstallerFileName].JAR [GeneratedXmlFile].XML
20150930_client_installation_user manual_V5_0_1.docx
37 / 54
sedex Client Installation and User Manual (English)
4.1.5
Additional installation tasks on Non-Windows systems (e.g., Unix)
This section can be skipped for installations on Windows systems.
On non-Windows systems, especially on Unix based systems, the following steps have to
be done:
Environment variables configuration
See section 3.1.4 of the manual installation instruction for details.
Install JAVA JCE unlimited strength policy files
See section 3.1.5 of the manual installation instruction for details.
4.1.6
Installation Check
See chapter 5 for a check of the installation.
4.1.7
Final Notes
To make sure that the sedex client is started automatically after the system is rebooted, it is
required to be configured as a service (Windows) or called from a start script on Unix.
See chapter 6 for the different ways to start a sedex client.
20150930_client_installation_user manual_V5_0_1.docx
38 / 54
sedex Client Installation and User Manual (English)
5 Installation Check
To verify that the sedex client has been installed and configured correctly, the following steps
can be executed:
1. Start the sedex client
2. Send an echo test message
3. Check if this message has been sent and received
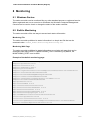
5.1 Start the sedex Client
To start the sedex client, execute the steps described in chapter 6.1 “Manual Start and Stop”.
For example, the Windows command to start the sedex client is:
<sedex_home>\bin\controller-start.bat
If the sedex client is configured correctly, the sedex controller as the main process starts up
and automatically starts the sedex adapter as a new process. The sedex adapter as the
messaging process should then continuously be polling for waiting inbound and outbound
messages.
Open the technical log file of the sedex adapter:
<sedex_home>\logs\adapter\adapter-technical.log
The sedex adapter runs a connection check while starting up. If everything has been
configured correctly, the sedex adapter should be able to connect to the sedex server. In this
case, you will find the following lines in the technical log:
[...] Connection test for <https://sedex-service-r.admin.ch/sedex-clientServices-ws/clientServices?WSDL> :passed
[...] Connection test for <https://sedex-service-r.admin.ch/osci-manager-entry/externalentry> : passed
[...] Connection test finished successfully
As a further test, you can check if the sedex adapter was able to report its software version
to the sedex server. If it was, you will find the following line in the technical log:
[…] ch.admin.bit.sedex.threads.AdapterInfoSendScheduler: Submitting Adapter - Version was successful
If this line is missing, there may be an installation or configuration error. Check the log files
for error messages. Most often, the reason is a wrong configuration. Please see also chapter
9 “Common Problems and Solutions” for common configuration mistakes.
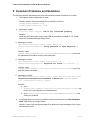
5.2
Send an echo test message
After the client (i.e., sedex controller and sedex adapter) has been started successfully, a
test message can be sent.
The following procedure will send a so-called “echo message”–a message addressed to the
sender. This message will be transferred from the client to the server and back to the client
again.
To send the message, create two text files with a text editor of your choice:
1.
data_test.txt
This file contains the data of the message to be transferred.
Simply enter some random example text in this file (e.g., “Hello Sedex”).
2.
envl_test.xml
This file contains the envelope of the message to be transferred.
20150930_client_installation_user manual_V5_0_1.docx
39 / 54
sedex Client Installation and User Manual (English)
In this envelope file, enter the metadata for the message as described below.
Paste the following template into the envelope file and adapt the parts that are
marked in red:
<?xml version="1.0" encoding="UTF-8"?>
<eCH-0090:envelope version="1.0" xmlns:eCH0090="http://www.ech.ch/xmlns/eCH-0090/1"
xmlns:xsi="http://www.w3.org/2001/XMLSchema-instance"
xsi:schemaLocation="http://www.ech.ch/xmlns/eCH-0090/1 eCH-0090-1-0.xsd ">
<eCH-0090:messageId>TestMessageId</eCH-0090:messageId>
<eCH-0090:messageType>Use case MessageType</eCH-0090:messageType>
<eCH-0090:messageClass>0</eCH-0090:messageClass>
<eCH-0090:senderId>Your sedex ID here</eCH-0090:senderId>
<eCH-0090:recipientId>Your sedex ID here</eCH-0090:recipientId>
<eCH-0090:eventDate>2015-06-01T11:30:00</eCH-0090:eventDate>
<eCH-0090:messageDate>YYYY-MM-DDTHH:MM:SS</eCH-0090:messageDate>
</eCH-0090:envelope>
Note: You must edit the marked strings before sending the message as follows.
The value of “TestMessageId” has to be a unique identifier per message.
Examples “TestMessage01”, “TestMessage02”, etc.
The value of “Use case MessageType” has to be one of the message types valid for
your sedex domain.
“Your sedex ID here” has to be replaced with the sedex ID you have during the
installation
The value of “YYYY-MM-DDTHH:MM:SS” needs to be changed to the current date and
time, e. g. 2015-06-19T16:00:00
Finally, copy (or save) first the data file and then the envelope file into the outbox directory
(by default <sedex_home>/interface/outbox).
5.3
Check if this message has been sent and received
If the sedex client is configured correctly, sedex will send the message to the server, and as
the message recipient is the sending adapter itself, the sent message should be fetched from
server into the inbox directory (by default <sedex_home>/interface/inbox).
You can monitor the controller’s log files (by default in
<sedex_home>/logs/controller/) and the adapter’s log file (by default in
<sedex_home>/logs/adapter/) to see the sending progress or detect possible errors.
20150930_client_installation_user manual_V5_0_1.docx
40 / 54
sedex Client Installation and User Manual (English)
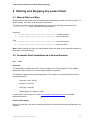
6 Starting and Stopping the sedex Client
6.1 Manual Start and Stop
All processes of the sedex client are started and stopped by the sedex controller process. To
start the client, the sedex controller has to be started.
The sedex controller can be started/stopped by running the following commands in the
<sedex_home>/bin folder from within a command line:
Windows:
<sedex_home>\bin\controller-start.bat – to start the client
<sedex_home>\bin\controller-stop.bat – to stop the client
Unix:
<sedex_home>/bin/controller-start.sh – to start the client
<sedex_home>/bin/controller-stop.sh – to stop the client
Note: Before starting the client, the configuration has to be done by the automatic installer or
manually by an administrator.
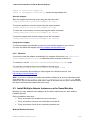
6.2 Automatic Start (Installation as a Service/Daemon)
6.2.1
Unix
Overview
The sedex client is distributed with a service wrapper from Tanuki Software. This wrapper
allows the sedex client to be run as a detached daemon process.
The wrapper supports many operating systems. The sedex client provides binaries for the
following systems:
-
Linux ppc / x86 / x86 64
-
AIX ppc 32 / ppc 64
-
OSX ppc / universal
-
Solaris Sparc 32 / Sparc 64 / x86
If your system is not in this list, check http://wrapper.tanukisoftware.org to download
additional modules.
Prepare the wrapper
Before you can start, you have to change permission for start script and the appropriate Unix
wrapper:
20150930_client_installation_user manual_V5_0_1.docx
41 / 54
sedex Client Installation and User Manual (English)
chmod +x controller-wrapper.sh
chmod +x libwrapper-linux-x86.so (choose the appropriate file)
Start the wrapper
Start the wrapper by executing script using the start command:
<sedex_home>/bin/controller-wrapper.sh start
To stop the application rerun the script using the stop command:
<sedex_home>/bin/controller-wrapper.sh stop
To check the current status, run the script using the status command:
<sedex_home>/bin/controller-wrapper.sh status
To start the wrapper with console output just use the command:
<sedex_home>/bin/controller-wrapper.sh console
Integrate the wrapper
To start the adapter automatically at boot time, just add the wrapper to your etc/init.
For more info about the wrapper visit http://wrapper.tanukisoftware.org/
6.2.2
Windows
If you want to start the adapter automatically (for example after reboot), run controllerInstallAsWindowsService.bat to install the sedex controller as a service.
To uninstall it, use the controller-UninstallWindowsService.bat script.
You can also reconfigure the service installation settings using
<sedex_home>/controller/conf/controller-wrapper.conf.
For more information about starting a Java program as a Windows service, see
http://wrapper.tanukisoftware.org.
Note: You have to configure the sedex client before installing it as service. Especially make
sure that in the <sedex_home>/controller/conf/controller-logback.xml file the
paths to the log files are absolute paths when used as Windows service (this is automatically
the case if the automatic installer has been used).
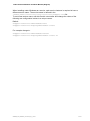
6.3 Install Multiple Adapter Instances on the Same Machine
Basically you may install as many adapters on the same machine as you want–and the
hardware permits.
During installation make sure:
Every client has to be installed into its own directory.
Every client has to have its own certificate and sedex ID.
Every client has to have its own monitoring network port.
Multiple Windows Services
20150930_client_installation_user manual_V5_0_1.docx
42 / 54
sedex Client Installation and User Manual (English)
When installing under Windows as a service, each service instance is required to have a
different service name. The service name is defined in the
<sedex_home>/controller/conf/controller-wrapper.conf file.
To set a new service name, edit this file with a text editor and change the values of the
following two configuration entries to a unique names:
Default:
wrapper.ntservice.name=SedexClient
wrapper.ntservice.displayname=Sedex Client
For example change to:
wrapper.ntservice.name=SedexClient01
wrapper.ntservice.displayname=Sedex Client 01
20150930_client_installation_user manual_V5_0_1.docx
43 / 54
sedex Client Installation and User Manual (English)
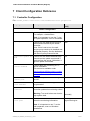
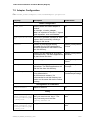
7 Client Configuration Reference
7.1 Controller Configuration
File: <sedex_home>/controller/conf/sedexController.properties
Property
Description
Default Value
[Unit]
Basic Configuration
sedex.home
Directory where sedex client is installed. n/a
For example, c:/sedexClient.
Note: It is important to use the “/” sign
as a path separator, even on Windows.
wsproxy.enabled
If set to true, the web service proxy is
started and controlled by the sedex
controller.
Note: If this is set to true, the web
service proxy needs to be installed and
configured properly. See the dedicated
web service proxy manual for this.
controller.update.ena If set to true, the sedex controller may
bled
execute remote update commands it
false
true
receives from the server. Otherwise, it
ignores update commands.
controller.monitoring If set to false, the monitoring HTTP
.server.enabled
server is disabled.
true
This service is available under
http://localhost:8000/monitoring unless
a different port is configured (see next
setting.)
controller.monitoring Changes the port of the monitoring
.server.port
service.
8000
controller.monitoring If set to false, the monitoring file will not true
.file.enabled
be generated.
controller.monitoring Defines the interval in which the
300
.interval
controller updates its monitoring values.
Warning: Too small values can lead to
high system load.
controller.monitoring Defines the file to which the controller
.file.path
writes the monitoring information.
[seconds]
<sedex_home>/monito
ring/monitoring.txt
Note: It is important to use “/” as the
path separator, even on Windows
installations.
20150930_client_installation_user manual_V5_0_1.docx
44 / 54
Eidgenössisches Finanzdepartement EFD
Bundesamt für Informatik und Telekommunikation BIT
Lösungszentrum
E-Government
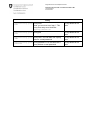
Proxy
controller.http.proxy Proxy host
.host
Note: you must not use “http://”. The
n/a, by default is not
used
proxy host entry must look like:
myproxy.server.ch
controller.http.proxy Proxy port
.port
n/a, by default is not
used
controller.http.proxy Proxy user. You can also use a proxy
.user
without a user/password
n/a, by default is not
used
controller.http.proxy Proxy password. You can also use a
.password
proxy without a user/password
n/a, by default is not
used
sedex Client Installation and User Manual (English)
7.2 Adapter Configuration
File: <sedex_home>/adapter/conf/sedexAdapter.properties
Property
Description
Default Value
Basic Configuration
sedex_home
n/a
Directory where the sedex adapter is
installed.
For example, c:/sedex_adapter.
Note: It is important to use the “/” sign as
a path separator, even on Windows.
sendingSentToServerM If set to true, generate a receipt for each false
sg
recipient after successfully sending a
message to the server.
inboxDir
Location of received and already
decrypted files for EWR applications.
The EWR applications will read the files
from this directory.
outboxDir
Directory for files waiting for encryption ${sedex_home}/interfa
and transmission. The EWR applications ce/outbox
will place those files here.
sentItemsDir
Sent messages will be saved here
${sedex_home}/interfa
ce/sent
receiptDir
Location of receipts for EWR
applications. The EWR applications will
read the files from this directory.
${sedex_home}/interfa
ce/receipt
processingDir
Directory where messages are stored
during transmission.
For performance reasons, it is
recommended to set this directory to a
location on the same disk as the outbox
directory.
${sedex_home}/interfa
ce/sedextempmessage
${sedex_home}/interfa
ce/inbox
Configuration of credentials
adapterSedexId
Adapter’s sedex ID
n/a
Proxy
ch.admin.bit.egov.eg Proxy host
ovlib.transport.osci
Note: you must not use “http://”. The
.TransportFactoryImp
proxy host entry must look like:
l.proxy.host
n/a, by default is not
used
ch.admin.bit.egov.eg Proxy port
ovlib.transport.osci
.TransportFactoryImp
l.proxy.port
n/a, by default is not
used
myproxy.server.ch
20150930_client_installation_user manual_V5_0_1.docx
46 / 54
sedex Client Installation and User Manual (English)
Property
Description
Default Value
ch.admin.bit.egov.eg Proxy user. You can also use a proxy
ovlib.transport.osci without a user/password
.TransportFactoryImp
l.proxy.user
n/a, by default is not
used
ch.admin.bit.egov.eg Proxy password. You can also use a
ovlib.transport.osci proxy without a user/password
.TransportFactoryImp
l.proxy.password
n/a, by default is not
used
Timer
Message.Retry.Period Retry period for outbound messages.
720
Defines how long the sedex adapter tries
to send a message in case of connection [minutes]
errors.
Cleanup
cleanProcessedFilesO Clean processed (sent and rejected)
lderThan
messages which are older than the
number of days specified (use -1 to
disable automatic message deletion)
20150930_client_installation_user manual_V5_0_1.docx
-1
[days]
47 / 54
sedex Client Installation and User Manual (English)
7.3 Certificate configuration
The configuration for certificates and private keys is located in an external xml file, in
<sedex_home>/adapter/conf/certificateConfiguration.xml.
The file has the following structure:
<?xml version="1.0" encoding="UTF-8" standalone="yes"?>
<certificateConfiguration
xmlns="http://www.sedex.ch/xmlns/certificateConfiguration/1/0">
<privateCertificate>
<location>(location)</location>
<password>(password)</password>
</privateCertificate>
<transportCertificate>
<location>${sedex_home}/certificates/prod-bit/AdminCA-CDT01.cer</location>
</transportCertificate>
<webserviceTruststore>
<location>${sedex_home}/certificates/prodbit/adaptertrust.jks</location>
<password>trustme</password>
<truststoretype>JKS</truststoretype>
</webserviceTruststore>
</certificateConfiguration>
The “location” field has to point to a valid p12 keystore containing the private key, the
“password” field holds the appropriate password to the keystore.
An adapter is able to handle more than one certificate:
[…]
<privateCertificate>
<location>(location
<password>(password
</privateCertificate>
<privateCertificate>
<location>(location
<password>(password
</privateCertificate>
1)</location>
1)</password>
2)</location>
2)</password>
[…]
7.3.1
Initial Certificate Requests
Clients with no certificates can create one with a certificate request. Use an initial certificate
request element instead of private certificate elements. The required input elements (CRID,
OTP) have to be received from the sedex domain administrator.
[…]
<initialCertificateRequest>
<requestId>SETUP_REQUEST_ID(CRID)</requestId>
<oneTimePassword>SETUP_ONE_TIME_PASSWORD(OTP)</oneTimePassword>
</initialCertificateRequest>
20150930_client_installation_user manual_V5_0_1.docx
48 / 54
sedex Client Installation and User Manual (English)
[…]
7.3.2
Optional Elements
The following elements are optional and mostly set by the adapter itself.
Restriction: This element is mostly likely set by the automatic certificate renewal.
[…]
<privateCertificate>
<location>(location)</location>
<password>(password)</password>
<restriction>READONLY<restriction>
</privateCertificate>
[…]
Possible restrictions are:
Restriction Type
Impact
READONLY
This certificate cannot be used for sending messages, only
for receiving
DISABLED
This certificate cannot be used at all
Optional Info: When the adapter updates the certificate configuration, it also adds
the optional element optionalInfo for informational purposes.
<privateCertificate>
<location>(location)</location>
<password>(password)</password>
<optionalInfo>
<issuer>CN=vAdminCA-CD-T01,OU=Certification[…]</issuer>
<serial>4545</serial>
<expirydate>2012-06-19T13:34:50.000+02:00</expirydate>
</optionalInfo>
</privateCertificate>
7.4 Logging Configuration
Logging in sedex client is based on Logback, a powerful log manager that supports the slf4j
Logging Interface.
Your logging configuration files are located in:
<sedex_home>/adapter/conf/adapter-logback.xml
<sedex_home>/controller/conf/controller-logback.xml
See Logback configuration for details about logging options.
20150930_client_installation_user manual_V5_0_1.docx
49 / 54
sedex Client Installation and User Manual (English)
8 Monitoring
8.1 Windows Service
The sedex controller can be monitored like any other standard process or registered service.
When registered and run as a service on Windows, the Windows Computer Management
Console can be used to check or change the status of the sedex controller.
8.2 Built-In Monitoring
The sedex controller offers two ways to access basic status information:
Monitoring File
The sedex controller publishes its status information in a simple text file that can be
accessed under <sedex_home>/monitoring/monitoring.txt.
Monitoring Web Page
The sedex controller publishes its status information on a simple web page that can be
accessed under http://<HOST>:<MONITORING_PORT>/monitoring. By default, the
MONITORING_PORT is set to 8000.
Example of the built-in monitoring page:
### sedex client monitoring ###
adapter-uptime=22:15:27
adapter-version=5.0.0
adapter-sedexId=1-500-1
adapter-profile=small
adapter-organisationCertificateExpirationDate=2012-10-21T14:42:23
adapter-interfaceFoldersPresent=OK
adapter-moveToSedexTempMessageFolder=OK
adapter-connectionToSedexServer=OK
adapter-lastConnectionCheck=2011-12-08T07:11:11
adapter-writeAccessToDatabase=OK
wsp-uptime=22:15:11
wsp-version=WSP 5.0.0
wsp-trustStoreVersion=20111215
wsp-aarVersion=checksedexws 5.0.0
wsp-aarVersion=echows 5.0.0
wsp-aarVersion=upicomparews 5.0.0
wsp-aarVersion=upiqueryws 5.0.0
wsp-lastWebServiceCall=2015-06-07T14:02:10
controller-uptime=22:15:26
controller-version=Controller 5.0.0
controller-updateCertificateExpirationDate=2017-12-02T13:09:05
monitor-lastCheckUp=2015-06-01T11:37:13
20150930_client_installation_user manual_V5_0_1.docx
50 / 54
sedex Client Installation and User Manual (English)
9 Common Problems and Solutions
The following section describes some often encountered problems and how to fix them.
1.
The adapter cannot restart after a crash.
Solution: please check and delete (if they exist) the lock files
<sedex_home>/adapter.lock
<sedex_home>/controller.lock
2.
Message in logfile:
Could not start engine: JCE is not installed properly.
Solution:
Install the JCE policy files in your local JVM as described in chapter 3.1.5 “Install
Java JCE Unlimited Strength Policy Files”.
3. Message in log file:
The sedex-controller cannot start: Error in
certificateConfiguration: Wrong password to open keyStore in
[…]
Solution: open
<sedex_home>/adapter/conf/certificateConfiguration.xml and check
the password and location to the private certificate.
4. Message in log file:
The sedex-controller cannot start: Error in
certificateConfiguration: KeyStore not found in location: […]
Solution: open
<sedex_home>/adapter/conf/certificateConfiguration.xml and fix the
path the private certificate.
5. Message in log file:
The sedex-controller cannot start: There was an error with your
RequestId/OneTimePassword/SedexId combination. Please update
your configuration and try again.
Solution:
a. open
<sedex_home>/adapter/conf/certificateConfiguration.xml and
check your requestId and oneTimePassword.
b. open <sedex_home>/adapter/conf/sedexAdapter.properties and
check your sedexId
6.
A message was not received; instead a receipt containing the text "Not allowed to
send" was written to receipts folder.
Solution: check if the configured sedex ID is allowed to send messages for the type
that has been used.
20150930_client_installation_user manual_V5_0_1.docx
51 / 54
sedex Client Installation and User Manual (English)
7.
A message was sent by the sending adapter but was not received. No receipt
arrived, no error was written in the adapter’s log file.
Solution: the receiving adapter might be down or not responsive. (Re-)start the
receiving adapter.
20150930_client_installation_user manual_V5_0_1.docx
52 / 54
sedex Client Installation and User Manual (English)
10 Appendix
10.1 Glossary
Term
BFS
CA
Keystore
Meta-directory
PKI
public key
certificate
Definition
Federal Statistical Office
Certificate Authority
A keystore is a database of keys. Private keys in a keystore have a
certificate chain associated with them that authenticates the corresponding
public key. A keystore also contains certificates from trusted entities.
Identity management component used to harmonize two different directories
by mapping the meta-data describing both directories.
Public Key Infrastructure; implements an independent trusted third-party
which vouches for the real identity of IKT users.
You can think of a public key certificate as the digital equivalent of a
passport.
10.2 Receipt Versions
10.2.1 Overview
New releases may contain new message codes and may use a different XML namespace
that requires changes in the application. To offer backward compatibility, the adapter can be
configured to use an old message error schema with old message error codes.
10.2.2 Version 1.0
The sedex client 5.0 and later does not support receipt version 1.0 anymore.
10.2.3 Version 2.0
Since:
Adapter 2.0
Receipt xml namespace:
eCH0090/2
New codes since version 1.0:
Code
203
204
313
330
404
501
601
Remark
Message too old to send
Message expired
Other recipients are not allowed to receive
Message size exceeds limit
Authorization service not reachable
Error during receiving
Message successfully sent
20150930_client_installation_user manual_V5_0_1.docx
53 / 54
sedex Client Installation and User Manual (English)
Code
701
Remark
Message expires soon
Deprecated Codes since 1.0:
Code
320
Remark
Changed to code 204, “Message expired”
Full list of Codes:
Code
100
200
201
202
203
204
300
301
302
303
304
310
311
312
313
330
400
401
402
403
404
500
501
601
701
Remark
Message correctly transmitted
Invalid envelope syntax
Duplicate message ID
No payload found
Message too old to send
Message expired
Unknown sender ID
Unknown recipient ID
Unknown physical sender ID
Invalid message type
Invalid message class
Not allowed to send
Not allowed to receive
User certificate not valid
Other recipients are not allowed to receive
Message size exceeds limit
Network error
OSCI hub not reachable
Directory not reachable
Logging service not reachable
Authorization service not reachable
Internal error
Error during receiving
Message successfully sent
Message expires soon
20150930_client_installation_user manual_V5_0_1.docx
54 / 54