1
WiMAX Modem Application for
BreezeMAX™ TDD
Operator Manual
SW Version 4.1
June 2007
P/N 214587
Document History
Document History
Topic
Description
This is the first publication of this manual.
ii
Date Issued
June 2007
WiMAX Modem Application Operator Manual
Legal Rights
Legal Rights
© Copyright 2007 Alvarion Ltd. All rights reserved.
The material contained herein is proprietary, privileged, and confidential and
owned by Alvarion or its third party licensors. No disclosure thereof shall be made
to third parties without the express written permission of Alvarion Ltd.
Alvarion Ltd. reserves the right to alter the equipment specifications and
descriptions in this publication without prior notice. No part of this publication
shall be deemed to be part of any contract or warranty unless specifically
incorporated by reference into such contract or warranty.
Trade Names
Alvarion®, BreezeCOM®, WALKair®, WALKnet®, BreezeNET®, BreezeACCESS®,
BreezeMANAGE™, BreezeLINK®, BreezeConfig™, BreezeMAX™, AlvariSTAR™,
AlvariCRAFT™, BreezeLITE™, AlvariCRAFT™, MGW™, eMGW™, and/or other
products and/or services referenced here in are either registered trademarks,
trademarks or service marks of Alvarion Ltd.
All other names are or may be the trademarks of their respective owners.
Statement of Conditions
The information contained in this manual is subject to change without notice.
Alvarion Ltd. shall not be liable for errors contained herein or for incidental or
consequential damages in connection with the furnishing, performance, or use of
this manual or equipment supplied with it.
Warranties and Disclaimers
All Alvarion Ltd. ("Alvarion") products purchased from Alvarion or through any of
Alvarion's authorized resellers are subject to the following warranty and product
liability terms and conditions.
Exclusive Warranty
(a) Alvarion warrants that the Product hardware it supplies and the tangible
media on which any software is installed, under normal use and conditions, will
be free from significant defects in materials and workmanship for a period of
fourteen (14) months from the date of shipment of a given Product to Purchaser
(the "Warranty Period"). Alvarion will, at its sole option and as Purchaser's sole
remedy, repair or replace any defective Product in accordance with Alvarion'
standard R&R procedure.
(b) With respect to the Firmware, Alvarion warrants the correct functionality
according to the attached documentation, for a period of fourteen (14) month from
WiMAX Modem Application Operator Manual
iii
Legal Rights
invoice date (the "Warranty Period")". During the Warranty Period, Alvarion may
release to its Customers firmware updates, which include additional performance
improvements and/or bug fixes, upon availability (the "Warranty"). Bug fixes,
temporary patches and/or workarounds may be supplied as Firmware updates.
Additional hardware, if required, to install or use Firmware updates must be
purchased by the Customer. Alvarion will be obligated to support solely the two (2)
most recent Software major releases.
ALVARION SHALL NOT BE LIABLE UNDER THIS WARRANTY IF ITS TESTING
AND EXAMINATION DISCLOSE THAT THE ALLEGED DEFECT IN THE PRODUCT
DOES NOT EXIST OR WAS CAUSED BY PURCHASER'S OR ANY THIRD
PERSON'S MISUSE, NEGLIGENCE, IMPROPER INSTALLATION OR IMPROPER
TESTING, UNAUTHORIZED ATTEMPTS TO REPAIR, OR ANY OTHER CAUSE
BEYOND THE RANGE OF THE INTENDED USE, OR BY ACCIDENT, FIRE,
LIGHTNING OR OTHER HAZARD.
Disclaimer
(a) The Software is sold on an "AS IS" basis. Alvarion, its affiliates or its licensors
MAKE NO WARRANTIES, WHATSOEVER, WHETHER EXPRESS OR IMPLIED,
WITH RESPECT TO THE SOFTWARE AND THE ACCOMPANYING
DOCUMENTATION. ALVARION SPECIFICALLY DISCLAIMS ALL IMPLIED
WARRANTIES OF MERCHANTABILITY AND FITNESS FOR A PARTICULAR
PURPOSE AND NON-INFRINGEMENT WITH RESPECT TO THE SOFTWARE.
UNITS OF PRODUCT (INCLUDING ALL THE SOFTWARE) DELIVERED TO
PURCHASER HEREUNDER ARE NOT FAULT-TOLERANT AND ARE NOT
DESIGNED, MANUFACTURED OR INTENDED FOR USE OR RESALE IN
APPLICATIONS WHERE THE FAILURE, MALFUNCTION OR INACCURACY OF
PRODUCTS CARRIES A RISK OF DEATH OR BODILY INJURY OR SEVERE
PHYSICAL OR ENVIRONMENTAL DAMAGE ("HIGH RISK ACTIVITIES"). HIGH
RISK ACTIVITIES MAY INCLUDE, BUT ARE NOT LIMITED TO, USE AS PART OF
ON-LINE CONTROL SYSTEMS IN HAZARDOUS ENVIRONMENTS REQUIRING
FAIL-SAFE PERFORMANCE, SUCH AS IN THE OPERATION OF NUCLEAR
FACILITIES, AIRCRAFT NAVIGATION OR COMMUNICATION SYSTEMS, AIR
TRAFFIC CONTROL, LIFE SUPPORT MACHINES, WEAPONS SYSTEMS OR
OTHER APPLICATIONS REPRESENTING A SIMILAR DEGREE OF POTENTIAL
HAZARD. ALVARION SPECIFICALLY DISCLAIMS ANY EXPRESS OR IMPLIED
WARRANTY OF FITNESS FOR HIGH RISK ACTIVITIES.
(b) PURCHASER'S SOLE REMEDY FOR BREACH OF THE EXPRESS
WARRANTIES ABOVE SHALL BE REPLACEMENT OR REFUND OF THE
PURCHASE PRICE AS SPECIFIED ABOVE, AT ALVARION'S OPTION. TO THE
FULLEST EXTENT ALLOWED BY LAW, THE WARRANTIES AND REMEDIES SET
FORTH IN THIS AGREEMENT ARE EXCLUSIVE AND IN LIEU OF ALL OTHER
iv
WiMAX Modem Application Operator Manual
Legal Rights
WARRANTIES OR CONDITIONS, EXPRESS OR IMPLIED, EITHER IN FACT OR BY
OPERATION OF LAW, STATUTORY OR OTHERWISE, INCLUDING BUT NOT
LIMITED TO WARRANTIES, TERMS OR CONDITIONS OF MERCHANTABILITY,
FITNESS FOR A PARTICULAR PURPOSE, SATISFACTORY QUALITY,
CORRESPONDENCE WITH DESCRIPTION, NON-INFRINGEMENT, AND
ACCURACY OF INFORMATION GENERATED. ALL OF WHICH ARE EXPRESSLY
DISCLAIMED. ALVARION' WARRANTIES HEREIN RUN ONLY TO PURCHASER,
AND ARE NOT EXTENDED TO ANY THIRD PARTIES. ALVARION NEITHER
ASSUMES NOR AUTHORIZES ANY OTHER PERSON TO ASSUME FOR IT ANY
OTHER LIABILITY IN CONNECTION WITH THE SALE, INSTALLATION,
MAINTENANCE OR USE OF ITS PRODUCTS.
Limitation of Liability
(a) ALVARION SHALL NOT BE LIABLE TO THE PURCHASER OR TO ANY THIRD
PARTY, FOR ANY LOSS OF PROFITS, LOSS OF USE, INTERRUPTION OF
BUSINESS OR FOR ANY INDIRECT, SPECIAL, INCIDENTAL, PUNITIVE OR
CONSEQUENTIAL DAMAGES OF ANY KIND, WHETHER ARISING UNDER
BREACH OF CONTRACT, TORT (INCLUDING NEGLIGENCE), STRICT LIABILITY
OR OTHERWISE AND WHETHER BASED ON THIS AGREEMENT OR
OTHERWISE, EVEN IF ADVISED OF THE POSSIBILITY OF SUCH DAMAGES.
(b) TO THE EXTENT PERMITTED BY APPLICABLE LAW, IN NO EVENT SHALL
THE LIABILITY FOR DAMAGES HEREUNDER OF ALVARION OR ITS EMPLOYEES
OR AGENTS EXCEED THE PURCHASE PRICE PAID FOR THE PRODUCT BY
PURCHASER, NOR SHALL THE AGGREGATE LIABILITY FOR DAMAGES TO ALL
PARTIES REGARDING ANY PRODUCT EXCEED THE PURCHASE PRICE PAID
FOR THAT PRODUCT BY THAT PARTY (EXCEPT IN THE CASE OF A BREACH OF
A PARTY'S CONFIDENTIALITY OBLIGATIONS).
WiMAX Modem Application Operator Manual
v
Legal Rights
Important Notice
This user manual is delivered subject to the following conditions and restrictions:
This manual contains proprietary information belonging to Alvarion Ltd. Such
information is supplied solely for the purpose of assisting properly authorized
users of the respective Alvarion products.
No part of its contents may be used for any other purpose, disclosed to any
person or firm or reproduced by any means, electronic and mechanical,
without the express prior written permission of Alvarion Ltd.
The text and graphics are for the purpose of illustration and reference only.
The specifications on which they are based are subject to change without
notice.
The software described in this document is furnished under a license. The
software may be used or copied only in accordance with the terms of that
license.
Information in this document is subject to change without notice. Corporate
and individual names and data used in examples herein are fictitious unless
otherwise noted.
Alvarion Ltd. reserves the right to alter the equipment specifications and
descriptions in this publication without prior notice. No part of this
publication shall be deemed to be part of any contract or warranty unless
specifically incorporated by reference into such contract or warranty.
The information contained herein is merely descriptive in nature, and does not
constitute an offer for the sale of the product described herein.
Any changes or modifications of equipment, including opening of the
equipment not expressly approved by Alvarion Ltd. will void equipment
warranty and any repair thereafter shall be charged for. It could also void the
user's authority to operate the equipment.
vi
WiMAX Modem Application Operator Manual
About This Manual
This manual describes the WiMAX Modem Application, how to install it, and how
to customize it to the operator’s needs. The manual is intended for the operator, to
help him prepare the installation package.
The manual covers the following options:
Preparing the installation kit:
Creating and editing configuration files, Section 2.1
Localizing the application, Section 2.2
Hiding and displaying information, Section 2.3
Setting automatic updates, Section 2.4
Changing the logo and color scheme, Section 2.5
Packing the configuration files, Section 2.6
Installing and uninstalling the WiMAX Modem application, Section 4
Using the WiMAX Modem Management application, Section 5
Troubleshooting, Section 6
Contents
Chapter 1 - Introduction
Chapter 2 - Preparing the Installation Kit
2.1 Working with Configuration Files ................................................................................2
2.1.1 Accessing the Configuration Files ........................................................................2
2.1.2 Creating Configuration Files .................................................................................2
2.2 Localization....................................................................................................................6
2.2.1 Creating the List of Supported Languages ...........................................................6
2.2.2 Setting the Default Language...............................................................................7
2.2.3 Adding a Language ..............................................................................................8
2.2.4 Removing a Language .........................................................................................9
2.2.5 Changing the Language’s ID ................................................................................9
2.2.6 GUI Translation ..................................................................................................10
2.3 Customizing the Display.............................................................................................10
2.3.1 Temporary Hiding of Information ........................................................................12
2.3.2 Permanent Hiding of Information........................................................................12
2.3.3 Read-Only Parameters.......................................................................................13
2.4 Editing the Update Files..............................................................................................13
2.5 Changing the Displayed Logo....................................................................................15
2.6 Packing the Configuration Files.................................................................................16
Chapter 3 - Preparing an Update Package
3.1 Creating the Executable File ......................................................................................17
3.2 Saving Files on the HTTP Server ...............................................................................18
Chapter -
Chapter 4 - Installation
4.1 Installing the WiMAX Modem Application................................................................. 20
4.2 Uninstalling the Application....................................................................................... 22
4.3 Updating the Application............................................................................................ 22
Chapter 5 - Using the WiMAX Modem Management Application
5.1 The Status Tab............................................................................................................. 25
5.1.1 Network Page..................................................................................................... 25
5.1.2 General Page ..................................................................................................... 26
5.1.3 Link Parameters Page........................................................................................ 27
5.1.4 Counters Page ................................................................................................... 28
5.2 The Settings Tab ......................................................................................................... 29
5.2.1 User Information Page ....................................................................................... 29
5.2.2 BS Information Page .......................................................................................... 31
5.2.3 Radio Settings Page .......................................................................................... 31
5.2.4 Ethernet Page (E-Model Only) ........................................................................... 32
5.3 Tools Tab ..................................................................................................................... 33
Chapter 6 - Troubleshooting
Appendix A - Update Checklist
x
WiMAX Modem Application Operator Manual
Introduction
1.
Introduction
The WiMAX Modem Application guides the user through the installation and
configuration of the WiMAX Modem. It also enables the user to change the
modem’s configuration as necessary and monitor the quality of the link.
The supplied installation kit includes all the files necessary for the installation of
the WiMAX Modem and the WiMAX Modem Application. A single configuration file
with default settings is included in the kit to serve as a template. The operator
should create as many configuration files as necessary, according to the network
requirements.
The application can be customized according to the operator’s needs.
Customization is done on the installation files and requires the operator to
prepare the installation kit prior to sending to the end-user.
2.
Preparing the Installation Kit
The following can be customized in the application to meet the operator’s needs:
The WiMAX Modem Application comes with a sample configuration file. New
configuration files according to the network requirements need to be created
and inserted within the WiMAX Modem Application package. See Section 2.1.
Localization - The WiMAX Modem Application has built-in localization
support. See Section 2.2.
Updates - The WiMAX Modem Application checks for updates every time it is
accessed. See Section 2.4.
Display Customization - See Section 2.3.
Changing the logo and color scheme - See Section 2.5.
Customization is done on the files in the installation kit. To customize the
application to your needs, you will need to unpack and pack CAB files in the
application’s installation package.
NOTE
You can download CabPack, a free Cabinet Manager application from
http://www.larshederer.homepage.t-online.de/english.htm
WiMAX Modem Application Operator Manual
1
Preparing the Installation Kit
2.1
Working with Configuration Files
Configuration files are ASCII text files that contain settings for many of the Si CPE
configuration parameters. You can customize your own set of configuration files
according to your specific needs.
A sample configuration file is provided with the WiMAX Modem Application.
2.1.1
Accessing the Configuration Files
To access the sample configuration file:
1
In the WiMAX Modem installation kit, open the Setup folder.
2
Unpack the html.cab file.
3
Within the unpacked html.cab file, go to Homelan > Config > WiMAX >
Location.
4
2.1.2
Open the Location1.cfg file with any text editor.
Creating Configuration Files
To create a new configuration file:
1
Open the sample configuration file in any ASCII text editor and change the
values of the listed parameters, as required. After each value, enter a
semicolon (;) to indicate the end of the value. Any text after the semicolon is
disregarded by the application.
IMPORTANT
As the configuration file is an ASCII text file, any value can be entered for the parameters. However,
for the Si CPE to function properly, only values that are recognized by it must be entered for each
parameter. Follow the guidelines described below and in the CPEs Product Manual.
2
Parameter
Description
FILE_STAMP
An obligatory header stamp that identifies the configuration
files. Without it, the application will not recognize the file as
a valid configuration file and automatic configuration for the
set of parameters listed in it will not be possible.
WiMAX Modem Application Operator Manual
Preparing the Installation Kit
Parameter
Description
TDD Base Station ID
The BST/AU ID used together with the BST/AU ID Mask to
define the range of BSTs/AUs that can synchronize with the
unit.
The BST/AU ID comprises 6 groups of up to 3 digits each,
where the range of each group is 0 to 255. The first 3 groups
form the Operator ID. The next 2 groups form the Cell ID,
and the last group forms the Sector ID.
The groups of digits are separated by a white space.
The default TDD Base Station ID is 186.190.0.0.250.206
TDD Base Station ID Mask
The BST/AU ID Mask comprises 6 groups of up to 3 digits
each, where the range of each group is 0 to 255. The first 3
groups form the mask for the Operator ID. The next 2
groups form the mask for the Cell ID, and the last group
forms the mask for the Sector ID.
The groups of digits are separated by a white space.
The default TDD Base Station ID Mask is
255.255.255.0.0.0.
NSP_location
The location(s) that the parameters cover. The auto
configuration of the Si CPE will be done according to the
selected location. You can enter several locations,
separated by commas, to create a list of locations that will
load the same configuration set to the WiMAX modem.
Organization
Optional. According to administrator policy.
The name of the organization (customer) using the unit.
The Organization name can include up to 32 printable
characters.
The default Organization name is an empty string (no
Organization name).
Address
Optional. According to administrator policy.
The address at which the unit is located.
The Address can include up to 32 printable characters.
The default Address is an empty string (no address).
WiMAX Modem Application Operator Manual
3
Preparing the Installation Kit
Parameter
Description
Country
Optional. According to administrator policy.
The name of the country where the unit is located.
The Country name can include up to 12 printable
characters.
The default Country name is an empty string (no Country
name).
Best AU Option
The Best AU Option allows enabling or disabling the Best
BST/AU feature in the SU. When disabled, the SU will start
scanning and select the first found AU.
Enter one of the following values:
0 = Enable
1 = Disable
The default option is 0 (Disable).
Preferred AU ID
The BST/AU ID used together with the BST/AU ID Mask to
define the range of BSTs/AUs that can synchronize with the
SU.
The Preferred BST/AU ID consists of 6 groups of up to 3
digits each, where the range of each group is 0 to 255. The
first 3 groups form the base ID for the Operator ID. The next
2 groups form the base ID for the Cell ID, and the last group
forms the base ID for the Sector ID.
The groups of digits are separated by a white space.
The Preferred BST/AU ID must be in the range defined by
the BST/AU ID and the BST/AU ID Mask.
Preferred AU Mask
The BST/AU ID Mask used together with the BST/AU ID to
define the range of BSTs/AUs that can synchronize with the
SU.
The Preferred BST/AU ID Mask consists of 6 groups of up to
3 digits each, where the range of each group is 0 to 255.
The first 3 groups form the mask for the Operator ID. The
next 2 groups form the mask for the Cell ID, and the last
group forms the mask for the Sector ID.
The groups of digits are separated by a white space.
4
WiMAX Modem Application Operator Manual
Preparing the Installation Kit
Parameter
Description
TDD Bandwidth
Defines the bandwidth of the signal. Enter a value from 0 to
4, as follows:
0 = 1.75 MHz
1 = 3.5 MHz
2 = 5 MHz
3 = 7 MHz
4 = 10 MHz
In the current version, only 3.5 MHz and 5 MHz are
supported.
Scanning Start Frequency
The lowest frequency in the range of frequencies to be
scanned.
Scanning Stop Frequency
The highest frequency in the range of frequencies to be
scanned.
Scanning Steps Bitmap
The 8 Bits that define the intermediate scanning steps. Enter
a value of 1-8. Refer to the CPEs Product Manual for more
details.
Scanning Discrete Frequencies
Enables to define up to 10 discrete frequencies (separated
by a white space) to be used in the scanning process in
addition to the frequencies defined by the Frequency
Scanning parameters.
If you enter a single discrete frequency, it will overwrite only
the discrete frequency in the corresponding slot in the Si
CPE. To overwrite all discrete frequencies, enter a 0 for
each frequency slot.
Scanning Main Steps
The Main Scanning Step, that together with the Intermediate
Scanning Steps define the frequencies to be scanned
between the Start and End Frequencies.
User Name
The user name, to be used for service provisioning.
Password
The user password.
Antenna Select
Enables selection of either an internal antenna, an external
(detached) antenna or automatic antenna selection, as
follows:
1-6 = one of six internal antennas
7 = External (detached) antenna
8 = Automatic antenna selection
The default is internal antenna 3 (opposite to the
connectors' side).
WiMAX Modem Application Operator Manual
5
Preparing the Installation Kit
NOTE
The configuration file has the ability to change the parameters settings in the Si CPE. It cannot
delete or add parameters. If a parameter in the configuration file is left empty, or is deleted, or a
value outside the valid range is entered, the default value set in the unit will not be changed.
2
2.2
Save As a new file with the extension .cfg.
Localization
The WiMAX Modem Application has built-in localization support. During
installation, the user is prompted to select a language. All configuration windows
and the application’s windows will display text in the selected language. This
section describes how the operator can adapt the application to the local
language(s) used in his region and set a default language.
Before you can access the files for translation, you need to unpack the html.cab
file (see Section 2.1.1).
Localization is achieved in the following steps (the order of which is not
important):
1
Creating the list of supported languages.
2
Setting the default language.
3
Adding a language.
4
Removing a language.
5
Translating the WiMAX Modem Management application windows.
After translating all the necessary files, you need to re-pack the html.cab file (see
Section 2.6).
2.2.1
Creating the List of Supported Languages
During installation, the user is prompted to select a language for the application.
The list of supported languages is compiled in an editable .ini file.
NOTE
The application is supplied with English support only.
To edit the list of supported languages:
6
WiMAX Modem Application Operator Manual
Preparing the Installation Kit
1
In the WiMAX Modem installation kit, open the Setup folder.
2
Open the SetupDefs.ini file using any text editor.
3
Scroll down to the [LanguageList] at the bottom of the file. The default
language list is as follows:
[LanguageList]
DefaultLanguage=English
LanguageName1=English
LanguageID1=0009
LanguageName2=French
LanguageID2=0012
The Language List within the SetupDefs.ini file includes the following
information:
Parameter
Description
DefaultLanguage
The default language to be used.
LanguageName1,
LanguageName2
The name of the first/second language. The number reflects
the language’s position in the list. Any language added to
the list will receive the next consecutive number.
LanguageID1, LanguageID2
The ID associated with LanguageName1/2 respectively. Any
number can be selected for any language. By default, 0009
is associated with English, and 0012 with French. The ID
number is used in the folder name of all .ini files associated
with the language, and in the name of the XML file conaining
all the language’s text.
To avoid clashes with other defined IDs, it is recommended
to use a four digit ID for , beginning with a zero (0).
2.2.2
Setting the Default Language
The default language sets the language for the installation of the WiMAX Modem
Application. All installation windows will reflect the default language selected.
To change the default language:
1
In the SetupDefs.ini file, scroll down to the Language List at the end of the file
and locate the following line:
DefaultLanguage=English
2
Change the value of this parameter to any of the available language names on
the list.
WiMAX Modem Application Operator Manual
7
Preparing the Installation Kit
3
2.2.3
Save the SetupDefs.ini file.
Adding a Language
To add a language:
1
In the SetupDefs.ini file, add the following pair of lines at the end of the
Language List:
LanguageName3=<language name>
LanguageID3=<language ID>
Substitute <language name> with an actual language (e.g., Italian) and
<language ID> with any number (e.g., 0010).
NOTE
To avoid clashes with other defined IDs, it is recommended to use a four digit ID for , beginning with
a zero (0).
Repeat this step for each added language.
NOTE
It is not important to use consecutive numbers for the different languages. However, make sure that
the number you have chosen for a specific language name, matches the ID number. Otherwise, the
language will not appear in the displayed list.
2
Save and close the SetupDefs.ini file. In the next installation, the new language
will appear on the list. At this stage, however, there are no files associated with
the new language.
3
Copy the following folders located in the opened html.cab file:
\Homelan\UI_0009\. Rename the new folder UI_0010 (replace 0010 with
the actual language ID).
\Homelan\Config\WiMAX\UI_0009\. Rename the new folder UI_0010
(replace 0010 with the actual language ID).
\Main\xml\0009.xml. Rename the new file 0010.xml (replace 0010 with the
actual language ID).
4
8
Proceed to translate the files (see Section 2.2.6).
WiMAX Modem Application Operator Manual
Preparing the Installation Kit
2.2.4
Removing a Language
1
In the SetupDefs.ini file, scroll down to the of the file and delete the following
lines from the Language List:
LanguageName#=<language name>
LanguageID#=<language ID>
where # stands for any of the numbers available on the list.
Repeat this step for each deleted language.
2
Save and close the SetupDefs.ini file. In the next installation, the deleted
language(s) will not appear on the list.
3
You can optionally remove the folders containing the files associated with the
deleted language, or you can leave them for future use. To remove the files,
delete the following folders located in the open html.cab file:
\Homelan\UI_<language ID>
\Homelan\Config\WiMAX\UI_<language ID>
\Main\xml\<language ID>.xml
2.2.5
Changing the Language’s ID
Changing the ID number of an existing language requires searching and replacing
all instances of the ID number in the setup folder.
To change the ID of an existing language:
1
In the SetupDefs.ini file, scroll down to the Language List at the end of the file
and replace the <language ID> with a new value. For example, to change the
default ID for French from 0012 to 0001, locate the following line:
LanguageID2=0012
and change the value from 0012 to 0001.
NOTE
To avoid clashes with other defined IDs, it is recommended to use a four digit ID for , beginning with
a zero (0).
2
Save the SetupDefs.ini file.
3
In the unpacked html.cab file rename the following items:
WiMAX Modem Application Operator Manual
9
Preparing the Installation Kit
\Homelan\UI_0012\ rename the folder as UI_0001.
\Homelan\Config\WiMAX\UI_0012, rename the folder as UI_0001.
\Main\xml\0012.xml, rename the file as 0001.xml
2.2.6
GUI Translation
The WiMAX Modem Application’s GUI is XML based. Translation of the text
displayed on screen is done directly in the xml and ini files.
The relevant files/folders for translation are:
\Homelan\UI_<language ID>\*.ini (located in the unpacked html.cab file) includes the configuration windows that appear during installation.
\Homelan\Config\WiMAX\UI_<language ID>\*.ini (located in the unpacked
html.cab file) - includes the unit installation windows.
\Main\xml\<language ID>.xml (located in the unpacked html.cab file) - the GUI
of the management application.
The above listed files include all GUI text, buttons, tabs, menus, messages, etc.
You need to translate all of the relevant text in these files.
CAUTION
In ini files, be careful not to change the parameters’ names, only their values. In xml files, do not
change the parameters’ ID. Changing the parameters names/IDs may be harmful to the operation of
the application.
After completing the translation, re-pack the html.cab file (see Section 2.6).
2.3
Customizing the Display
The WiMAX Modem Application can be customized to hide/display information
(relevant only to the Settings tab) and to disable changing the parameters’ setting
by making them Read-Only.
Two types of hiding methods are supported:
Temporary - parameters and groups are hidden from the display, but can be
revealed using the F3 function key and concealed again using the F4 function.
Permanent - parameters, groups and tabs are hidden and cannot be revealed
by the user.
10
WiMAX Modem Application Operator Manual
Preparing the Installation Kit
The hiding of information (both temporary and permanent) is done via the
Settings.xml file, located in the Main\xml\ folder in the unpacked html.cab file. For
information on unpacking the html.cab file, see Section 2.1.1).
The structure of the Settings.xml file reflects the structure of the Settings window.
The Settings tab has four sub-tabs, each displaying different information. Within
each window, parameters appear in groups. Each individual parameter, or group,
or the entire tab, can be hidden from the display.
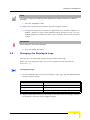
The following is an example of the code for an entire tab in the Settings tab (the
colors are for emphasis only, as they would appear in an Internet browser):
<tab id="1" name="1019" visible="1">
<group title="1019_1" display="1">
<parameter name="p1" getid="EWSUSRNAME" setid="EWSUSRNAME" type="text"
display="1" hidden=“true”></parameter>
<parameter name="p2" getid="EWSUSRPASSWORD" setid="" type="text"
display="1" hidden=“true”></parameter>
</group>
<group title="1019_2" display="1">
<parameter name="p3" getid="EWSCOMMNAME_ACTUAL"
setid="EWSCOMMNAME_CONFIGURED" type="text" display="0"
hidden=“true”></parameter>
<parameter name="p4" getid="EWSORGANIZATION" setid="EWSORGANIZATION"
type="text" display="1" disabled="false" hidden=“true”></parameter>
<parameter name="p5" getid="EWSADDRESS" setid="EWSADDRESS" type="text"
display="1" hidden=“true”></parameter>
<parameter name="p6" getid="EWSCOUNTRY" setid="EWSCOUNTRY" type="text"
display="1" disabled="false" delete="false" hidden=“true”></parameter>
</group>
</tab>
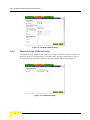
Figure 1: Settings Tab - XML Code
The tab named 1019 is associated with the User Information tab and has to groups
of parameters: 1019_1 (User Information) and 1019_2 (CPE Parameters). Each
group includes a set of parameters. For example, the User Information group
includes two parameters: User Name and Password.
In the example above, <tab...> denotes the beginning of a tab and </tab> denotes
the end of the tab. Together, they form a complete tab. Similarly, <group title...> ...
</group> is a complete group and <parameter...> </parameter> is a single
parameter. The parameter’s ID (e.g., p2) is associated with the label on screen. If
you search for p2 in the <language ID>.xml file (see Section 2.2.6), you will find
the association with the label “Password”.
WiMAX Modem Application Operator Manual
11
Preparing the Installation Kit
2.3.1
Temporary Hiding of Information
The temporary hiding of displayed information is supported in the Settings tab
only and only to parameters and groups, not to entire tabs.
To hide individual parameters:
Locate the parameter you want to hide (you can search for the name of the
parameter) and add the sequence: hidden=“true”. This means that when you open
the application, the hidden parameter will not be displayed by default. Clicking on
F3 will reveal the parameter and F4 will conceal it again.
hidden=“true” can be added to the code of any parameter in the Settings tab.
To disable hiding, you need to delete the entire hidden=“true” sequence.
NOTE
Changing the value of “hidden” from “true” to “false” will not disable the hiding feature.
To hide a group of parameters:
Hiding all the parameters within a group also hides the entire group (including its
group label). The function key F3 will reveal the entire group and F4 will conceal it
again.
2.3.2
Permanent Hiding of Information
The permanent hiding of displayed information is supported in the Settings tab
only and applies to parameters, groups, and entire tabs.
NOTE
The Hiding of parameters is intended for the prevention of accidental configuration of the unit. It is
not intended to substitute encryption or security. The xml files are not encrypted.
To permanently hide a parameter or group:
Locate the parameter/group you want to hide (you can search for the name of the
parameter/group) and change the value of the sequence display=“1” to zero
12
WiMAX Modem Application Operator Manual
Preparing the Installation Kit
(display=“0”). This means that when you open the application, the hidden
parameter/group will not be displayed. This parameter/group cannot be revealed.
To enable the display of the hidden parameter/group, change the value back to
“1”.
To permanently hide a tab:
Locate the tab you want to hide and change the value of the sequence visible=“1”
to zero (visible=“0”). This means that when you open the application, the hidden
tab will not be displayed.
To enable the display of the hidden tab, change the value back to “1”.
2.3.3
Read-Only Parameters
You can change editable parameters to read-only and vice versa in any of the
application’s windows.
To make parameters read-only:
1
Open the xml file that corresponds to the window where the parameter is
located (e.g., Settings.xml).
2
In the xml file (see example in Figure 1), locate the parameter you want to
make read-only and change the value of the string: disabled=“false” to “true”
(disabled=“true”). This means that the parameter cannot be changed.
3
Save the xml file.
To enable changes again, change the value back to “false”.
2.4
Editing the Update Files
The WiMAX Modem Application periodically checks for updates. The operator
needs to perform the following in order to ensure smooth updates:
1
Edit the update files in the installation kit, that will direct the application to an
HTTP server, where the update is stored. Described in this section.
2
Compile an update package with all the customized files into a single
self-extracting executable file. This step must be performed for every new
update. When creating the update package, the operator needs to decide
whether this package will update only the WiMAX Modem Application, or
WiMAX Modem Application Operator Manual
13
Preparing the Installation Kit
whether reconfiguration of the Si CPE is required as well. This will be crucial
to the creation of the package. See Section 3.1.
3
Save the update package on the HTTP server. See Section 3.2.
Before you can access the update files, you need to unpack the html.cab file (see
Section 2.1.1).
The following files are responsible for the update process:
File Name
Location
Description
FTUpdate.ini
Installation kit: <unpacked
html.cab>\add-ons\
Contains the URL of the HTTP server
where the update package is located.
Also identifies the application’s SW
version.
FTAgent.xml
Installation kit: <unpacked
html.cab>
Defines the intervals in which the
application should check for updates.
FTUpdate.exe
Installation kit: <unpacked
html.cab>\add-ons\
Executes the update. No editing
required.
FTAgent.exe
Installation kit: <unpacked
html.cab>
Runs the FTUpdate.exe. No editing
required.
Update.ini
The operator’s HTTP server
Defines which version to update to
which version and identifies the
update’s executable file to run.
<Update file>.exe
The operator’s HTTP server
The update’s executable file.
To edit the files in the installation kit:
1
Within the unpacked html.cab file, open the add-ons > FTUpdate.ini file using
any text editor.
a
Change the URL in the following line to the actual URL and folder where
the upgrade files are located:
UpgradeServer=http://example.com
b
Note that in the [Version] section, the following line reflects the
application’s current SW version:
SettingsVer=1.0
14
WiMAX Modem Application Operator Manual
Preparing the Installation Kit
NOTE
You can also change the message that will be displayed (for example, translate it to a different
language).
c
2
Save the FTUpdate.ini file.
Within the unpacked html.cab file, open the FTAgent.xml file.
a
Change the frequency in which the application is to check for updates, as
follows: change the value of the following string: Frequency="5d". Use the
following legend to change the time unit: s=seconds, m=minutes, h=hours,
d=days.
IMPORTANT
Do not change any of the other parameters.
b
2.5
Save the FTAgent.xml file.
Changing the Displayed Logo
The operator can optionally change the logo with his own logo.
Before you can change the logo, you need to unpack the html.cab file (see
Section 2.1.1).
To change the logo:
1
In the installation kit, search for all images (.bmp, .jpg, .gif). The following files
include Alvarion’s logo:
2
File Name
Location
setup logo.bmp
Setup
HL_bg.bmp
<unpacked html.cab> > Homelan > Bitmap
topbar.jpg
<unpacked html.cab> > Main > Images
Replace these files with your own images. The size of the new images should
be identical to the size of the supplied images.
WiMAX Modem Application Operator Manual
15
Preparing an Update Package
NOTE
You can also change the background and colour scheme by replacing the existing images in a
similar manner. Make sure you maintain the size of the objects.
2.6
Packing the Configuration Files
All the location files must be packed in a single cab file. The WiMAX Modem
Application will recognize the files as location files during installation.
To pack the configuration files:
1
Pack the configuration files in a single cab file. Name the file html.cab.
IMPORTANT
When packing the cab file, use the compression type MSZIP. Make sure that you exclude the folder
in which the files are stored and that you maintain the folder structure, including subfolders.
2
3.
Save the html.cab file in the Setup folder.
Preparing an Update Package
When a new version of the WiMAX Modem Application is released, the operator
needs to generate an update package that the user can automatically download
and install.
Each new version of the application is sent as an installation kit with sample
location files and default parameters settings and languages. The operator needs
to replace the default files with his own files (created for the installation kit for the
end-user), as described in Section 2. After compiling all of the files with the new
installation kit, the operator needs to generate a self-extracting executable file
that will serve as the update package.
An additional file, update.ini, is sent with each new version (together with the
installation kit). This file needs to be updated and saved on the operator’s HTTP
server.
The WiMAX Modem Application installed on the end-user’s computer periodically
checks for updates (in pre-specified intervals). If the application finds a new
update package, a message is displayed to confirm or cancel the downloading of
the update.
To facilitate the update process, it is good practice to keep a copy of your
customized files in an accessible location and use a checklist to save these files in
16
WiMAX Modem Application Operator Manual
Preparing an Update Package
their correct locations in the update packages. See Appendix A for a recommended
checklist.
3.1
Creating the Executable File
To create an update package:
1
Replace the default configuration files (Location1.cgf and Location2.cgf) with all
your configuration files (see Section 2.1).
2
If you have localized the application (see Section 2.2):
a
Replace the default SetupDefs.ini file with your own file.
b
Copy all the folders corresponding to the languages supported by your
application (according to the Language ID) in the following locations:
¾ Homelan\<Language ID>
¾ Homelan\Config\WiMAX\<Language ID>
¾ Main\xml\<Language ID>
CAUTION
If the update consists of changes in the parameters, copy the added information for each language
and translate as necessary..
3
If you have customized the display (see Section 2.3), either replace the default
Settings.xml file (located in the Main\xml folder) with your customized file, or
customize again the default Settings.xml file provided with the update.
CAUTION
If the update consists of changes in the parameters, replacing the default file with your customized
file will not reflect the changes introduced by the update. Copy any added information to your file, or
customize the default file again.
4
Replace the default FTUpdate.ini and FTAgent.xml files with your customized
files.
5
Use a self extract application to generate the self extracting executable update
file. When generating the executable file:
In the program filename, enter Setup.exe.
WiMAX Modem Application Operator Manual
17
Preparing an Update Package
If you want to update the application without reconfiguring the unit, use
the -update command line switch. Otherwise, leave this field empty.
Select the default temporary folder as the destination for extracting the exe
file (in the end-user’s computer).
The name of the executable file should be identical to the name specified in
the update.ini file (located on the operator’s HTTP server).
3.2
Saving Files on the HTTP Server
1
Save the update.ini file provided together with the update installation kit on
the HTTP server, in the location specified in the FTUpdate.ini file within the
installation kit supplied to the end-user. Open the file using any text editor,
and edit it as follows:
To edit the update.ini file:
a
In the [Settings] section, list all the versions that can be upgraded and the
version to which to upgrade them, as follows:
Example 1
[Settings]
1.0=1.3
1.1=1.3
1.2=1.3
Example 1 means that versions 1.0, 1.1, and 1.2 (on the end-user’s
computer) will all be upgraded to version 1.3.
Example 2
[Settings]
1.0=1.1
1.1=1.2
1.2=1.3
Example 2 means that version 1.0 (on the end-user’s computer) will be
upgraded to version 1.1; version 1.1 will be upgraded to version 1.2; and
version 1.2 will be upgraded to version 1.3. For this option to work, three
update packages must be stored on the HTTP server (for versions 1.1, 1.2
and 1.3).
b
You need to add a version section for each supported update version. In
this section, enter the exact location of the update’s executable file. The
18
WiMAX Modem Application Operator Manual
Preparing an Update Package
following are examples of the version’s section, corresponding to Example 1
and Example 2 above.
Example 1
[1.3]
URL=http://www.example.com/Updates/update1.3.exe
DlgTitle=WiMax update found
DlgMsg=Your WiMax application is not updated, click 'OK' to update your
version.
DlgCheckBox=Don't ask me again
;DlgOKBtn=
;DlgCancelBtn=
Example 2
[1.1]
URL=http://www.example.com/Updates/update1.1.exe
DlgTitle=WiMax update found
DlgMsg=Your WiMax application is not updated, click 'OK' to update your
version.
DlgCheckBox=Don't ask me again
;DlgOKBtn=
;DlgCancelBtn=
[1.2]
URL=http://www.example.com/Updates/update1.2.exe
DlgTitle=WiMax update found
DlgMsg=Your WiMax application is not updated, click 'OK' to update your
version.
DlgCheckBox=Don't ask me again
;DlgOKBtn=
;DlgCancelBtn=
[1.3]
URL=http://www.example.com/Updates/update1.3.exe
DlgTitle=WiMax update found
DlgMsg=Your WiMax application is not updated, click 'OK' to update your
version.
DlgCheckBox=Don't ask me again
;DlgOKBtn=
;DlgCancelBtn=
NOTE
You can also change the message that will be displayed (for example to a different language).
2
Save the self extracting executable file in the location specified in the
update.ini file. In Example 2 above, you need to save all update files
(update1.1.exe, update1.2.exe, and update1.3.exe) on the HTTP server.
WiMAX Modem Application Operator Manual
19
Installation
4.
Installation
4.1
Installing the WiMAX Modem Application
The executable file (Setup.exe) is available in the WiMAX Modem Installation CD.
The installation wizard will guide you through the installation of the WiMAX
Modem Application and the WiMAX Modem.
IMPORTANT
During configuration, the computer’s IP address changes to a static IP address.
If you are using Windows 2000 or Windows XP, when you close the application the settings on your
computer return to the previous settings that enable you to automatically receive an IP address from
your service provider.
If you are using Windows 98 or Windws ME, an IP address (192.168.254.xxx) is added to your
computer, in addition to the regular IP address provided by your internet supplier.
NOTE
When installing the WiMAX Modem Application, the USB drivers for the (Si CPE U model) are also
installed.
To install the WiMAX Modem Application:
1
Run the executable program (Setup.exe). The InstallShield wizard opens.
2
Follow the instructions on the screen and click Finish to complete the
installation of the WiMAX Modem Application. The modem installation and
configuration wizard is displayed.
To install the WiMAX Modem:
1
After the application has been installed, the modem setup wizard opens.
Enter the User Name and Password provided by your operator and click Next.
NOTE
You can also return to this stage from the start menu: Start > Programs >WiMAX Modem > WiMAX
Modem Installation.
20
WiMAX Modem Application Operator Manual
Installation
Figure 2: WiMAX Modem Setup Wizard
2
Select your location from the list and click Next.
NOTE
If your location is not on the list, quit the installation and contact customer support.
3
Follow the instructions on screen to connect the WiMAX modem (click Next at
the end of each step) as follows:
a
Connect the power adapter to the WiMAX Modem’s POWER connector.
b
Connect one end of the power cable to the power adapter and the other end
to the power outlet.
c
Connect one end of the data cable to the Ethernet or USB connector on the
WiMAX modem and the other end to the Ethernet or USB connector on
your computer. Wait a few seconds for the modem to initialize.
After connecting the modem to your computer, the automatic configuration
stage begins.
NOTE
You can skip the instructions on connecting the modem and go directly to the configuration screen
by clicking on Skip.
4
In the Configuring your WiMAX Modem window, click Next to begin the
modem’s automatic configuration. The modem’s detection process begins. This
process may take a few minutes.
WiMAX Modem Application Operator Manual
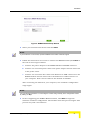
21
Installation
IMPORTANT
If your computer is protected by a firewall, a warning message may appear. Click on Allow to
continue. This is applicable to most standard firewalls. Alternatively, disable the firewall and
continue with the configuration. Remember to enable the firewall after the configuration is complete.
5
When the modem’s detection process is complete, the following screen should
be displayed.
Figure 3: WiMAX Modem Automatic Configuration Completed Successfully
NOTE
If a red X appears anywhere, refer to “Troubleshooting” on page 34.
6
Click Finish to conclude the installation. The WiMAX Modem Management
application icon is installed on the desktop and a message that the application
needs to check for available updates is displayed.
4.2
Uninstalling the Application
Uninstalling the WiMAX Modem Application will only remove the program from
your computer. It will not affect the operation of your WiMAX modem.
To uninstall the WiMAX Modem Application:
From the Start menu, select Programs > WiMAX Modem > Uninstall WiMAX Modem
Application.
4.3
Updating the Application
To check for updates:
22
WiMAX Modem Application Operator Manual
Using the WiMAX Modem Management Application
1
2
Close the WiMAX application.
From the Start menu, select Programs > WiMAX Modem >Check update.
The application checks for updates and if it finds an update file, downloads it.
5.
Using the WiMAX Modem Management
Application
To access the WiMAX Modem Management Application’s main window:
Double-click on the WiMAX Modem Management icon on your desktop or open
the application from the Windows Start menu (Programs>WiMAX Modem>WiMAX
Modem Management). The Main window opens and an icon is added to the
notification area. The icon’s color reflects the status of the device:
Device is connected.
No device connection. To identify the problem, refer to the Network page
(Section 5.1.1). For the corrective action required, refer to
“Troubleshooting” on page 34.
WiMAX Modem Application Operator Manual
23
Using the WiMAX Modem Management Application
Figure 4: The Main Window
The WiMAX Modem Management Application’s Main Window comprises the
following components:
Title Bar: Identifies the application's name. It also includes standard icons for
minimizing or closing the application.
Status Area: Displays general information (the user name, the status of the
connection to the PC, the link status, and the application’s SW version).
Tab Selection Area: The Tab Selection Area comprises three tabs:
“The Status Tab” on page 25
“The Settings Tab” on page 29
“Tools Tab” on page 33
The tabs may include a number of pages, each corresponding to a work area
displaying a specific group of parameters.
24
WiMAX Modem Application Operator Manual
Using the WiMAX Modem Management Application
Selected Tab Area: The Selected Tab Area is a workspace that varies according
to the selected tab, enabling to view status or performance data and modify
specific parameters.
Status Popups: Popup messages are displayed, notifying you of any change in
the status of the WiMAX modem.
To configure the WiMAX modem, change the relevant parameters and click OK.
The unit will be reset with the new parameters.
5.1
The Status Tab
The Status tab includes the following pages:
“Network Page” on page 25
“General Page” on page 26
“Link Parameters Page” on page 27
“Counters Page” on page 28
5.1.1
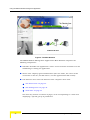
Network Page
The network page includes an overall graphic display of the connection. After
installing the modem, the connection diagram should be as follows:
WiMAX Modem Application Operator Manual
25
Using the WiMAX Modem Management Application
Figure 5: The Network Page
The connection diagram includes the following connections, where a green check
mark (9) indicates successful connection and a red X mark indicates a failed
connection.
Connection established between the computer and the WiMAX
modem.
Connection to the wireless network established.
CPE has been authorized.
If any of the connections fails, refer to “Troubleshooting” on page 34.
5.1.2
General Page
The General page displays information, such as SW and HW versions, serial
number, MAC address, etc., on the WiMAX modem. For more information, refer to
the BreezeMAX CPEs Product Manual.
26
WiMAX Modem Application Operator Manual
Using the WiMAX Modem Management Application
Figure 6: The General Page
5.1.3
Link Parameters Page
The Link Parameters page provides continuously updated link quality indication.
For more information about each parameter, refer to the BreezeMAX CPEs Product
Manual.
Figure 7: The Link Parameters Page
In addition to the parameters, the Link Parameters page also provides a graphical
display of the link.
WiMAX Modem Application Operator Manual
27
Using the WiMAX Modem Management Application
Figure 8: Link Chart
Each slice in the pie chart denotes an internal antenna. The chart provides and
indication of the selected antenna, or when auto-select has been chosen, the
currently used antenna. The numbers in Figure 8 denote the internal antenna.
When all slices are lit, this means that an external antenna is used.
The graphic display also provides indication of the quality of the link. The more
area covered in green, the better the link quality. Orange indicates no link.
5.1.4
Counters Page
The Counters page displays the current status of traffic counters. The counts are
the accumulated number of relevant Bytes since the last unit reset or the last
Counters Reset. The counters indicate the traffic at the Ethernet and Wireless
ports. For information on the specific counters, refer to the BreezeMAX CPEs
Product Manual.
28
WiMAX Modem Application Operator Manual
Using the WiMAX Modem Management Application
Figure 9: The Counters Page
5.2
The Settings Tab
The Settings tab includes the following sub-tabs:
“User Information Page” on page 29
“BS Information Page” on page 31
“Radio Settings Page” on page 31
“Ethernet Page (E-Model Only)” on page 32
NOTE
Any changes to the settings will be followed by a reset to the WiMAX modem upon clicking OK.
5.2.1
User Information Page
The User Information page enables to change user information and CPE
parameters.
WiMAX Modem Application Operator Manual
29
Using the WiMAX Modem Management Application
Figure 10: The User Information Page
The User Information page includes the following parameters:
Parameter
Description
User Information
User Name
The user name. Consists of up to 32 printable characters,
case sensitive.
Password
The user password used for authentication. Consists of up
to 32 printable characters, case sensitive.
CPE Parameters
Organization
Optional. The name of the organization (customer) using the
unit. The Organization Name can include up to 32 printable
characters.
Country
Optional. The name of the country where the unit is located.
The Country name can include up to 12 printable
characters.
Address
Optional. The location of the unit. The Address can include
up to 32 printable characters.
IMPORTANT
For proper authentication and service provisioning, always consult with your system administrator
before changing your user name and password.
30
WiMAX Modem Application Operator Manual
Using the WiMAX Modem Management Application
5.2.2
BS Information Page
The BS Information page enables to configure the BS/AU ID parameters. For more
information on the BS/AU ID parameters, refer to the BST/AU ID Parameters
Menu in the BreezeMAX CPEs Product Manual.
Figure 11: BS Information Page
5.2.3
Radio Settings Page
The Radio Settings page displays and enables to change the Bandwidth, Uplink
Frequency (Standard Mode), Antenna Selection and Rx Attenuator parameters.
For more information on the radio parameters, refer to the Radio Parameters
Menu in the BreezeMAX CPEs Product Manual.
WiMAX Modem Application Operator Manual
31
Using the WiMAX Modem Management Application
Figure 12: The Radio Settings Page
5.2.4
Ethernet Page (E-Model Only)
The Ethernet page displays and enables to change the Ethernet port settings. The
Ethernet page is not applicable to U-model CPEs. For more information, refer to
the Ethernet Port Operation Mode in the BreezeMAX CPEs Product Manual.
Figure 13: The Ethernet Page
32
WiMAX Modem Application Operator Manual
Using the WiMAX Modem Management Application
5.3
Tools Tab
Figure 14: The Tools Tab
The Tools tab comprises the following buttons:
Device Re-Config: Enables to re-configure the modem (see Section 4.1). After
reconfiguration, the WiMAX modem will be reset.
Restore Default: Resets the unit to factory defaults. This operation uploads the
configuration files to the unit and discards all configuration changes made via
the WiMAX Modem Management application. This will reset the WiMAX
modem.
WiMAX Modem Application Operator Manual
33
Update Checklist
6.
Troubleshooting
Problem and Indication
Possible Cause
Corrective Action
Connection to modem is down
1
Cables are not properly
connected.
1
Reconnect the power and
Ethernet/USB cables.
2
Network card is not
properly configured.
2
Reconfigure the Network
Interface Card via the NIC
Re-config option in the
Tools tab. See
Section 5.3.
3
Contact your operator.
1
Reconfigure the modem
via the Device Re-config
option in the Tools tab and
select your location. If your
location is not on the list,
contact your operator. See
Section 5.3.
2
Check the connection of
the detached antenna.
3
Position the antenna and
modem according to the
guidelines provided with
the modem.
4
Contact your operator.
1
Reconfigure the modem
via the Device Re-config
option in the Tools tab and
enter the User Name and
Password provided by
your operator. See
Connection to wireless
network is down
Authentication failed
1
Incorrect radio parameters
(incorrect location
selected).
2
The detached antenna is
disconnected.
3
Interferences are blocking
the signal
1
Incorrect User Name or
Password.
Section 5.3
2
34
Contact your operator.
Operation
Troubleshooting
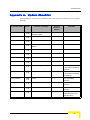
Appendix A. Update Checklist
The following is a list of all customized files that need to be added to each update
package.
File/Folder Name
Status
Location in Package
Refer to
Section in
Manual
Remarks
Configuration files
<html.cab>\Homelan\Config\
WiMAX\Location\
2.1
All configuration files
SetupDefs.ini
\Setup\
2.2.1
Localization
UI_<Language ID>
<html.cab>\Homelan\
2.2.3
Localization
UI_<Language ID>
<html.cab>\Homelan\Config\
WiMAX
2.2.3
Localization
<Language ID>.xml
<html.cab>\Main\xml\
2.2.3
Localization
Settings.xml
<html.cab>\Main\xml\
2.3
Customized Display
FTUpdate.ini
<html.cab>\add-ons\
2.4
Updates
FTAgent.xml
<html.cab>\
2.4
Updates
<Update file>.exe
HTTP Server (generated)
3.1
Save on the HTTP server
in the location specified in
update.ini
update.ini
HTTP Server
3.2
Save on the HTTP server
in the location specified in
FTUpdate.ini
setup_logo.bmp
\Setup\
2.5
Logo (Installation
windows)
HL_bg.bmp
<html.cab>\Homelan\Bitmap\
2.5
Logo (Configuration
windows)
topbar.jpg
<html.cab>\Main\Images\
2.5
Logo (Application
windows)
Images
--
2.5
Save any other
customized image in its
original location.
WiMAX Modem Application Operator Manual
35