1
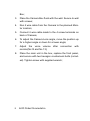
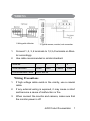
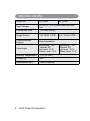
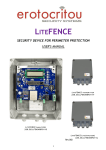
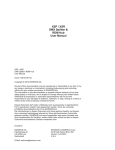
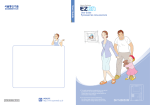
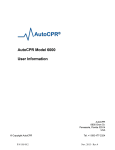
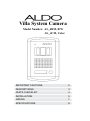
Villa System Camera
Model Number: AL_4BM, B/W
AL_4CM, Color
IMPORTANT CAUTIONS
2
DESCRIPTIONS
3
PARTS CHECKLIST
4
INSTALLATION
5
WIRING
7
SPECIFICATIONS
8
ALDO Product Documentation
1
IMPORTANT CAUTIONS
1. To prevent fire or shock hazard, do not expose the unit
to rain, moisture or liquid and do not overload the power
cord.
2. Instructions! Read and keep the instructions-all safety
and operating instructions should be read and followed
before the unit is operated
3. Power Sources! This equipment should be operated only
from the type of power source indicated on the marking
label and the power cord protection is needed.
4. Servicing and replacement of parts! Do not attempt to
service this product or replace any part inside by yourself as opening or removing covers may expose you to
dangerous voltage or other hazards. Refer all servicing
to qualified service personnel.
5. Lightning! For added protection for this product before a
lightning storm, or when it is left unattached and unused
for long periods of time, unplug it from the wall outlet and
disconnect the cable system. This will prevent damage
to the product due to lightning and power-line, telephoneline, RF cable and Actuator/Polarization surge protectors
to protect your system from possible damage.
6. Move with care! This product is easy for damage, care
for it during transportation, storage and installation.
2
ALDO Product Documentation
DESCRIPTIONS
1.
2.
Microphone;
Camera Lens;
9.
3.
Camera Protection Window;
Speaker;
Call Button __Pressed to
call the monitor;
Front Panel ;
Name Card __Used to indicate horst’s name or address;
Screw Hole __ Used to assemble panel;
the camera by manual;
10. Connection Terminals __
Used to connect wire with
monitor;
11. Lock Wire __Used to connect lock or lock power
supplier;
12. Volume
regulator
for
speaker;
13. Volume regulator for microphone;
4.
5.
6.
7.
8.
View angle Control __Used
to adjust the angular field of
Note: Do not make any wire connecting to High voltage power;
those terminals are used to connect DC power suppliers.
ALDO Product Documentation
3
PARTS CHECKLIST
•
Camera Unit
1
•
User Manual
1
•
Mounting Box
1
•
Accessory Bag
1
(Hexagon countersunk bolts x2, Wrench x1)
4
ALDO Product Documentation
INSTALLATION
1. Make a sink in the wall large enough to allow placement
of Camera Box, and at the height from ground about
145cm;
2. Remove the front panel and main unit from the Camera
ALDO Product Documentation
5
Box;
3. Place the Camera Box flush with the wall. Secure to wall
with screws ;
4. Run 4 wire cable from the Camera to the planned Monitor location;
5. Connect 4 wire cable leads to the 4 screw terminals on
back of Camera;
6. To adjust the Camera Lens angle, move the position up
for a higher angle or down for a lower angle;
7. Adjust
the
voice
volume
after
connection
with
monitor(No12 and No 13);
8. Place the main unit in the box, replace the front panel,
and secure with two hexagon countersunk bolts (included). Tighten screw with supplied wrench;
6
ALDO Product Documentation
WIRING
1.Wiring with a Monitor
2.Typical camera, monitor, lock connection
1. Connect 1, 2, 3, 4 terminals to 1,2,3,4 terminals on Monitor accordingly.
2. Use cable recommended or similar standard.
Wire No.
1
2
3
4
Wire Definition
Audio
GND
Control
Video
Recommended Cable
AWG #22-26
Wiring Precautions
1. If high voltage cable exists in the vicinity, use a coaxial
cable.
2. If any external wiring is exposed, it may cause a short
and become a cause of malfunction or fire.
3. When connect the monitor and camera, make sure that
the monitor power is off.
ALDO Product Documentation
7
SPECIFICATIONS
8
Model No.
AL_4BM
Input Voltage
DC12V,+_10% (Power from the monitor)
Connection Wire
4 Wires(Polarity)
Image Device
1/4’’ B/W CCD
Communication
System
Synchronization
View Angle
Horizontal : 120°
Vertical: 55°
Up Level: 12.5°
Down Level: 12.5°
Ambient Temperature
-10℃ to +40℃
Weight (g)
600
Dimensions(mm)
238x130x80mm
ALDO Product Documentation
AL_4CM
1/3” Color CCD
Horizontal : 120°
Vertical: 55°
Up Level: 12.5°
Down Level: 12.5°