1
"‘Today people are
not any more rooted
but networked."
Anna Heine
Contents
1
Introduction
2
Administration
2.1 Installation . . . . . . . . . . . . . . .
2.1.1 System requirements . . . . . .
2.1.2 Installation . . . . . . . . . . .
2.2 Configuration . . . . . . . . . . . . . .
2.2.1 General notes about parameters
2.2.2 Advanced configuration . . . .
2.2.3 Debugging . . . . . . . . . . .
2.3 Programming interface . . . . . . . . .
2.3.1 JavaScript API . . . . . . . . .
2.3.2 Functions . . . . . . . . . . . .
2.3.3 Callback functions . . . . . . .
2.3.4 Example . . . . . . . . . . . .
2.4 JUpload Plugins . . . . . . . . . . . . .
2.4.1 Filetype chooser . . . . . . . .
2.4.2 Folder chooser . . . . . . . . .
2.4.3 Simple file chooser plugin . . .
2.4.4 Image preview plugin . . . . . .
2.4.5 Progress meter plugin . . . . .
2.4.6 Remote control . . . . . . . . .
3 User manual
3.1 Handling . . . . . . . . .
3.1.1 Startup . . . . . .
3.1.2 Overview . . . . .
3.1.3 Selecting files . . .
3.1.4 Remove files . . .
3.1.5 Uploading . . . . .
3.1.6 Status display . . .
3.1.7 Image preview . .
3.1.8 Recursive selection
3.1.9 File filter . . . . .
3.1.10 Error messages . .
3.2 More help . . . . . . . . .
3.2.1 Online-Hilfe . . .
5
.
.
.
.
.
.
.
.
.
.
.
.
.
.
.
.
.
.
.
.
.
.
.
.
.
.
.
.
.
.
.
.
.
.
.
.
.
.
.
.
.
.
.
.
.
.
.
.
.
.
.
.
3
.
.
.
.
.
.
.
.
.
.
.
.
.
.
.
.
.
.
.
.
.
.
.
.
.
.
.
.
.
.
.
.
.
.
.
.
.
.
.
.
.
.
.
.
.
.
.
.
.
.
.
.
.
.
.
.
.
.
.
.
.
.
.
.
.
.
.
.
.
.
.
.
.
.
.
.
.
.
.
.
.
.
.
.
.
.
.
.
.
.
.
.
.
.
.
.
.
.
.
.
.
.
.
.
.
.
.
.
.
.
.
.
.
.
.
.
.
.
.
.
.
.
.
.
.
.
.
.
.
.
.
.
.
.
.
.
.
.
.
.
.
.
.
.
.
.
.
.
.
.
.
.
.
.
.
.
.
.
.
.
.
.
.
.
.
.
.
.
.
.
.
.
.
.
.
.
.
.
.
.
.
.
.
.
.
.
.
.
.
.
.
.
.
.
.
.
.
.
.
.
.
.
.
.
.
.
.
.
.
.
.
.
.
.
.
.
.
.
.
.
.
.
.
.
.
.
.
.
.
.
.
.
.
.
.
.
.
.
.
.
.
.
.
.
.
.
.
.
.
.
.
.
.
.
.
.
.
.
.
.
.
.
.
.
.
.
.
.
.
.
.
.
.
.
.
.
.
.
.
.
.
.
.
.
.
.
.
.
.
.
.
.
.
.
.
.
.
.
.
.
.
.
.
.
.
.
.
.
.
.
.
.
.
.
.
.
.
.
.
.
.
.
.
.
.
.
.
.
.
.
.
.
.
.
.
.
.
.
.
.
.
.
.
7
7
7
7
7
9
10
12
12
12
13
14
14
15
15
16
16
18
18
18
.
.
.
.
.
.
.
.
.
.
.
.
.
.
.
.
.
.
.
.
.
.
.
.
.
.
.
.
.
.
.
.
.
.
.
.
.
.
.
.
.
.
.
.
.
.
.
.
.
.
.
.
.
.
.
.
.
.
.
.
.
.
.
.
.
.
.
.
.
.
.
.
.
.
.
.
.
.
.
.
.
.
.
.
.
.
.
.
.
.
.
.
.
.
.
.
.
.
.
.
.
.
.
.
.
.
.
.
.
.
.
.
.
.
.
.
.
.
.
.
.
.
.
.
.
.
.
.
.
.
.
.
.
.
.
.
.
.
.
.
.
.
.
.
.
.
.
.
.
.
.
.
.
.
.
.
.
.
.
.
.
.
.
.
.
.
.
.
.
.
.
.
.
.
.
.
.
.
.
.
.
.
.
.
.
.
.
.
.
.
.
.
.
.
.
.
.
.
.
.
.
.
.
.
.
.
.
.
21
21
21
22
22
23
24
24
25
25
26
26
26
26
4
4
5
Developers manual
4.1 Programming interface
4.1.1 API JavaDoc .
4.2 Notes . . . . . . . . .
4.2.1 Protocols . . .
4.2.2 JavaScript . . .
.
.
.
.
.
.
.
.
.
.
.
.
.
.
.
.
.
.
.
.
.
.
.
.
.
.
.
.
.
.
.
.
.
.
.
.
.
.
.
.
.
.
.
.
.
.
.
.
.
.
.
.
.
.
.
.
.
.
.
.
.
.
.
.
.
.
.
.
.
.
.
.
.
.
.
.
.
.
.
.
.
.
.
.
.
.
.
.
.
.
.
.
.
.
.
.
.
.
.
.
.
.
.
.
.
.
.
.
.
.
.
.
.
.
.
29
29
29
29
29
29
Appendix
5.1 Configuration . . . . . . . .
5.1.1 Plug-In Settings . . .
5.1.2 JUpload Parameters
Abbildungsverzeichnis . . . . . .
Quellenverzeichnis . . . . . . . .
.
.
.
.
.
.
.
.
.
.
.
.
.
.
.
.
.
.
.
.
.
.
.
.
.
.
.
.
.
.
.
.
.
.
.
.
.
.
.
.
.
.
.
.
.
.
.
.
.
.
.
.
.
.
.
.
.
.
.
.
.
.
.
.
.
.
.
.
.
.
.
.
.
.
.
.
.
.
.
.
.
.
.
.
.
.
.
.
.
.
.
.
.
.
.
.
.
.
.
.
.
.
.
.
.
.
.
.
.
.
31
31
32
33
41
42
.
.
.
.
.
.
.
.
.
.
Chapter 1
Introduction
JUpload is a tool (a java applet) for the upload of local files from the client to the
webserver using the standard protocol HTTP.
The application replaces a function, which is not integrated into todays browsers
very comfortable. It expands the functionality of the supported browsers. In its main
function, this is to select multiple resources and to upload them in one step to the
server. Secondly, the usability if increased. That is achieved especially through such
neat features like image previewing or progress meters. Such features are not part of
the standard browsers.
Furthermore JUpload is designed to support secure transfer of the files using SSL.
A specialty of JUpload is it’s Resume-feature, but this has to be supported on
server-side too. You don’t need to re-implement your web application. All you have to
do is to replace the part which accepts the uploaded files.
This manual gives you the information for installation and configuration (for administrators and web application developers), usage (user manual). Developers get all
the required information in the Developers section.
5
6
CHAPTER 1. INTRODUCTION
Chapter 2
Administration
The administrational section is about installation and configuration of the applet on the
server-side. For usage of the applet, see the user manual section.
2.1
Installation
In these subsections, you will find the system requirements for the applet and the procedure to install and to configure the applet.
2.1.1
System requirements
On server side: There are no special server-side requirements, except: The server
must be able to deliver binary data, so the applet can be downloaded by the users.
Important to know is, that some of the webservers can’t handle multipart requests
properly. This is the case with older ASP and PHP versions. Please use current versions
of the server extensions.
On client side: On the client side, we need at least Java 1.4. This version includes
the Java Plug-In which is used to run applets in the browser. The applet may run on
Java 1.3, but this is not officially supported.
It is not possible to use Microsoft Virtual Machine. The reason is that MS-JVM is
based on Java 1.1 and does not support some of the required features.
The client also requires a browser which can handle signed applet. The applet runs
fine on Internet Explorer, Mozilla and Opera. It does not run in Konqueror.
2.1.2
Installation
Uncompress the downloaded archive (jupload.zip) into a directory beneath the documentroot
of your webserver.
The most important file is JUpload.jar, which contains the signed application.
2.2
Configuration
The applet’s can be configured to fit the requirements of your web application. The
easiest way is to use the sample handler JUpload.php which is included in the archive.
7
8
CHAPTER 2. ADMINISTRATION
Please make sure that PHP is properly installed and configured before using any of the
provided samples.
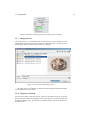
Also make sure that normal file upload is working. To test this, you can create a
html file with the following conten:
Example:
<html>
<form method="POST"
action="JUpload.php"
enctype="application/form-data">
<input type=file>
<input type=submit>
</form>
</html>
Result on the HTML page:
Figure 2.1: A standard file input tag for upload
Start your browser and open the URL of the HTML file. Do not open the file using
your filesystem. To make sure you’re running it from a webserver, you can use another
machine.
Select a readable file from your local hard disk and click on submit. Is the file
being uploaded and if you can find it on the server’s target location (specified in JUpload.php), the upload works and you can go on with the configuration of JUpload.
The most important parameter is actionURL. This settings tells where to send the
files. For the understanding: this should be same URL as in the action attribute of the
form.
Example:
<applet ...>
<param name="actionURL"
value="http://localhost/JUpload.php">
</applet>
Most webbrowsers are case-sensitive. So make sure you entered the correct URL!
The complete applet tag can be retrieved from sample files. In productive environments, you should not use applet, but instead a combination of OBJECT and EMBED tags.
With the help of these two tags, it’s possible to auto-update the users java version.
The following APPLET tag is an example you can use to test your installation:
2.2. CONFIGURATION
<applet
code="JUpload/startup.class"
archive="JUpload.jar"
width="650"
height="400">
<param name="actionURL"
value="JUpload.php">
</applet>
applet The applet tag tells the browser that a java applet is following. The attributes
have all required information for the java plugin to find and to run the specified
applet from the given archive.
code The code tag specifies the name of the main class. This main class (startup)
resides in a package or namespace called JUpload.
archive The applet consists of multiple class files, and for clarity, these are archived
into a single file. You have to specify the name of this archive to find the main
classes. Also, the archive contains the signature, which is required. With the help
of the signature, the applet gains access to the users local filesystem. If there is
no signature, the users won’t be questioned and the applet automatically looses
the possibility to work properly.
width This is the width in pixel of the space reserved for the applet.
height Same as width, but for the height.
param The param tag is used for configurate the applet. All param tags can be read
within the applet. It’s like the command line arguments, just for applets. You’ve
got a name attribute and a value attribute. All the supported parameters are
described later in this document. Names and values should be quoted. Note that
the names and values are case-sensitive!
Parameter names must not have any spaces. It is not possible to use the same
parameter name twice or more times.
actionURL This is the address of the server-side application, which will accept the
uploaded files. Addresses can be specified relative or absolute to the codebase
of the applet. The codebase of the applet is the current html document which is
displayed in the browser and which holds the applet tag.
2.2.1
General notes about parameters
A list of all supported parameters can be found later in this document.
All parameters have default values. When a parameter is not specified explicitly,
the applet will use its default values. The default values are compiled-in into the source
code and can vary from version to version.
There are differernt types of parameters:
URL An URL specifies a web address. This can be relative or absolute to the codebase. Examples:
9
10
CHAPTER 2. ADMINISTRATION
http://localhost/jupload.php
jupload.php
/myapplication/upload.asp
http://other.server:88/apps/upload.php
Boolean This is a parameter of the type Boolean. These are on/off values. It can be
specified using the following values: true, false, on, off, 1, 0, yes, no
String This is a parameter containing multiple characters, a string. It’s used for messages or labels.
Integer This is a parameter for configuring some numbers. If used for file sizes or
limits, the unit is always bytes. Often you can switch off the limit by using a
value of -1.
2.2.2
Advanced configuration
The advanced configuration is for customizing the applet for your needs.
Internationalization
JUpload is capable of i18n. With the help of properties-files, you can easily specify your own translation. If you want to creat your own translation, uncompress the
archive, go to the subfolder JUpload/. The filenames of the language packs look like
this:
jupload_xx_YY.properties
Language (xx) und Country (YY) are standardized, see
Language codes: http://ftp.ics.uci.edu/pub/ietf/http/related/iso639.
txt
Country codes: http://userpage.chemie.fu-berlin.de/diverse/doc/ISO_3166.
html or. http://www.iso.org/iso/en/prods-services/iso3166ma/index.html
The files are simple ASCII files, each line has a keyword and a value. The keyword
is concatenated by the class name and an identifier. Often you can use formatting
patterns like (
n etc.)
While initialising, the applet tries to gather information about the locale settings
on client side and tries to find the corresponding language file automatically. You do
not need to specifiy the language explicitly. If no corresponding language file can be
found, a default one will be loaded: jupload.properties
Part of a translated language file:
...
HTTPPostRequest.6=Anfrage vorbereiten...
HTTPPostRequest.8=SecureHTTP vorbereiten...
HTTPPostRequest.13=Öffne Verbindung...
HTTPPostRequest.16=Lese Dateiinformation...
HTTPPostRequest.21=Aushandeln...
...
2.2. CONFIGURATION
11
Recursive selection
If a folder is selected in the file chooser dialog, the folder will be processed recursively.
This means that all files and folders which are contained in the selected folder, will be
processed and added to the file upload queue.
This feature is enabled by default and can be disabled by the administrator. The
administrator can also enable and disable the feature of transmitting path information. Many servers recognize path information in the uploaded files and replace them
(remove them) for safety. If you require the path information for your application,
JUpload has a special feature to encode the path information so the webserver can’t
remove it.
JUpload will encode the path information into the content type information, because the content-type can be read by any server-side application.
To switch on this feature, use the following parameter tag:
<param name="useRecursivePaths" value="true">
If the path information is encoded into the content type, it looks like this:
Content-Type: JUpload/Fgjfg73dfhdlkj3jfdklsdfu4=
The prefix JUpload is a string for identification, the rest (after the Slash) is encoded in
base64. Your web application in php can simply decode the string by using base64_decode($string)1
and can use the path information.
Some examples:
You have got the following files on your local filesystem:
/home/mike/work/work10.txt
/home/mike/work/old/work05.txt
/home/mike/work/backup/work02.txt
Uploading without the useRecursivePaths-feature will result into the server having this
information:
work10.txt
work05.txt
work02.txt
It’s not possible to extract the relative path information (old, backup etc.) of these files.
With the recursive path feature enabled, the server will receive:
work/work10.txt
work/old/work05.txt
work/backup/work02.txt
This is based on the user residing in the home folder, and then adding the folder "work"
to the file queue. Please note that there are limitations in the length of the content-type.
The functionality of this feature can’t be guaranteed.
1 http://www.php.net/base64_decode
12
CHAPTER 2. ADMINISTRATION
2.2.3
Debugging
In this section, the process of finding application errors will be discussed. If there are
problems in the transmission or the functionality of JUpload, you should enable the
debug mode to locate the problematic part. Enabling the debug mode is done by using
the following parameter:
<param name="debug" value="true">
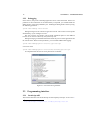
Debug messages will be written into the Java Console. This console can be opened
automatically, if your configure it in the 2 .
The Java Console Log Window can be found at different places in the different
browser. It can also be accesses by the system tray icon.
Debug messages give detailed information about the process of the application and
the current status. With a second parameter, you can enable addition file logging:
<param name="debugLogfile" value="c:/jupload.log">
or for linux users
<param name="debugLogfile" value="/home/username/jupload.log">
It is important that the user has write permissions to that file.
Figure 2.2: Java Console Log Window
2.3
2.3.1
Programming interface
JavaScript API
The interface between Java and JavaScript was developed by Netscape: LiveConnect3
2 Einstellung
im Plugin Control Panel
3 http://wp.netscape.com/eng/mozilla/3.0/handbook/javascript/livecon.htm
2.3. PROGRAMMING INTERFACE
With the help of this packet, Java can access JavaScript functions (and DOM) and
vice versa. Both is used by JUpload. Using JavaScript functions, you can remote
control the applet. But before being able to do so, you must name the applet with a
specific name:
<applet width=123
height=456 name="JUpload" alt="My Applet">
</applet>
With the name-tag, the applet can now be accessed as document.JUpload
In the following section, we will describe the JavaScript functionality.
2.3.2
Functions
jsIsReady() Returns true, if JUpload is ready to be remote controlled.
jsRegisterAddListener(String) Hooks the given javascript function to the Add (Adding
files) event. See next section for details.
jsRegisterAddedListener(String) Hooks the given javascript function to the Added
(After all selected files have been queued) event. See next section for details.
jsRegisterRemoveListener(String) Hooks the given javascript function to the Remove (Removing files) event. See next section for details.
jsRegisterUploadListener(String) Hooks the given javascript function to the Upload
(Before the upload starts) event. See next section for details.
jsRegisterUploaded(String) Hooks the given javascript function to the Uploaded (After the upload is finished) event. See next section for details.
jsGetFileNumber() Returns the number of files in the upload file queue.
jsGetFileAt(Index) Returns the full qualidifed filename (with path information) of
the file in the file queue at position Index.
jsGetFileSizeAt(Index) Returns the file size at the given position in bytes.
jsClickAdd() Opens the Add Files dialog (simulates a click on the Add button)
jsClickRemove() Simulates a click on the Remove button: removes all selected files
from the file upload queue. If no files are selected, a message is shown.
jsClickUpload() Simulates a click on the Upload button, e.g. starts the upload process.
jsGetTotalProgressbarValue() Returns the current value of the total progress bar in
percent.
jsRemoveFileAt(Index) Removes the file from the queue at the specified position.
13
14
2.3.3
CHAPTER 2. ADMINISTRATION
Callback functions
To use the callback functions, JUpload needs to know their names, and the applet must
be given the permission to access JavaScript. To give it the permission, the keyword
mayscript is used. To tell JUpload the names of the user-defined hooks (also called
listeners), the following functions can be used:
jsRegisterAddListener(Functionname) This function registers the given function name
as a function for the Add event. Each time a file is added (for each of the added
files) this function is called.
jsRegisterAddedListener(Functionname) The given function will be called when all
files has been added. If the user selectes 5 files and adds them in parallel, this
hook will be called once at the end.
jsRegisterRemoveListener(Functionname) Each time a file is removed, this hook is
called.
jsRegisterUploadListener(Functionname) This hook will be called right before the
upload process starts. Attention: JavaScript functions will interrupt the applet as
long until they return with return or finish.
jsRegisterUploaded(Functionname) This hook will be called right after the upload
is done.
2.3.4
1
2
3
4
5
6
7
8
9
10
11
12
13
14
15
16
17
18
19
20
21
22
23
24
25
26
27
28
29
30
31
32
33
34
35
36
37
38
39
40
41
42
43
44
45
46
47
48
49
Example
< html >< head >< t i t l e > J U p l o a d J a v a S c r i p t API Example < / t i t l e >
<SCRIPT l a n g u a g e =" JavaScript ">
<!−−
f u n c t i o n myOnLoad ( )
{
i f ( ! document . J U p l o a d ) r e t u r n ;
/ / c h e c k i f j u p l o a d i s up and r u n n i n g
i f ( document . J U p l o a d . j s I s R e a d y ( ) )
{
/ / Register the l i s t e n e r s
document . J U p l o a d . j s R e g i s t e r A d d L i s t e n e r ( " myAddListener " ) ;
document . J U p l o a d . j s R e g i s t e r R e m o v e L i s t e n e r ( " myRemoveListener " ) ;
document . J U p l o a d . j s R e g i s t e r U p l o a d L i s t e n e r ( " myUploadListener " ) ;
document . J U p l o a d . j s R e g i s t e r U p l o a d e d ( " myUploaded " ) ;
}
else
{
/ / w a i t and t r y a g a i n u n t i l J U p l o a d i s r e a d y
window . s e t T i m e o u t ( ’ myOnLoad () ’ , 4 0 0 ) ;
}
}
f u n c t i o n myAddListener ( )
{
a l e r t ( "A file was added " ) ;
}
f u n c t i o n m y Re m o ve L i st e ne r ( )
{
a l e r t ( "A file was remove " ) ;
}
f u n c t i o n myUploadListener ( )
{
a l e r t ( " Upload will be started " ) ;
}
f u n c t i o n myUploaded ( )
{
a l e r t ( " Upload is finished " ) ;
}
function displayFileQueue ()
{
/ / i f t h e r e i s no JUpload , go b a c k
i f ( ! document . J U p l o a d ) r e t u r n ;
i f ( ! document . J U p l o a d . j s I s R e a d y ( ) ) r e t u r n ;
2.4. JUPLOAD PLUGINS
50
51
52
53
54
55
56
57
58
59
60
61
62
63
64
65
66
67
68
69
70
71
72
73
74
75
76
77
78
79
80
81
82
83
84
85
86
87
88
/ / open a new empty document
F1=window . open ( " about : blank " , " queueWindow " , " width =300 , height =400 " ) ;
F1 . document . w r i t e l n ( " <html >< body ><h1 > file list : </h1 > there are " ) ;
v a r number = document . J U p l o a d . j s G e t F i l e N u m b e r ( ) ;
F1 . document . w r i t e l n ( number ) ;
F1 . document . w r i t e l n ( " files .<ul >" ) ;
/ / write a f i l e l i s t
f o r ( i = 0 ; i <number ; i ++)
{
F1 . document . w r i t e l n ( " <li >"+ document . J U p l o a d . j s G e t F i l e A t ( i ) ) ;
F1 . document . w r i t e l n ( " <br >< font color = green > Size : "+ document . J U p l o a d . j s G e t F i l e S i z e A t ( i ) +" </ font >" ) ;
}
F1 . document . w r i t e l n ( " </ul >< body > </ html >" ) ;
}
/ / −−>
</ SCRIPT > </HEAD>
<BODY onLoad=" myOnLoad () ;">
< form name=" JUploadForm ">
< i n p u t t y p e = b u t t o n v a l u e =" Add files " o n C l i c k =" document . JUpload . jsClickAdd () ;">
< i n p u t t y p e = b u t t o n v a l u e =" Remove files " o n C l i c k =" document . JUpload . jsClickRemove () ;">
< i n p u t t y p e = b u t t o n v a l u e =" Start Upload " o n C l i c k =" document . JUpload . jsClickUpload () ;">
< i n p u t t y p e = b u t t o n v a l u e =" Display File Queue " o n C l i c k =" displayFileQueue () ;">
</ form >
<applet
c o d e =" JUpload / startup . class "
a r c h i v e =" JUpload . jar "
name=" JUpload "
mayscript
w i d t h =" 650 "
h e i g h t =" 400 "
a l t =" JUpload uploads files to webserver ">
<PARAM NAME=" actionURL " VALUE=" JUpload . php ">
</ a p p l e t >
</ body >
</ html >
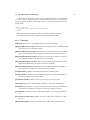
2.4
JUpload Plugins
This section will give an introduction to the integrated JUpload plugins. They are used
as standalone java applets on the same html page. It is not possible to use them in
different frames. With the help of the JUpload Plugins, you can customize the look and
feel and the behaviour of the applet.
2.4.1
Filetype chooser
Figure 2.3: Filetype chooser plugin
The plugin with the name JUploadPlugin_FiletypeChooser let’s you integrate a
file type (or file filter) chooser on the page. Selecting a different file type filter in
this plugin will set it in the file selection window of the other plugin JUploadPlugin_SimpleFileChooser
Usage:
<applet
code="JUploadPlugin_FiletypeChooser"
archive="../jupload.jar"
width="300"
height="24"
15
16
CHAPTER 2. ADMINISTRATION
mayscript
name="JUploadPlugin_FiletypeChooser"
alt="JUpload Plugin: Filetype chooser">
</applet>
2.4.2
Folder chooser
Figure 2.4: Folder chooser plugin
The plugin JUploadPlugin_FolderChooser lets you choose the folder for adding
files from. Like the file type chooser plugin, it depends only on the SimpleFileChooser
plugin and not on the standard Add files dialog of JUpload.
<applet
code="JUploadPlugin_FolderChooser"
archive="../jupload.jar"
width="300"
height="24"
mayscript
name="JUploadPlugin_FolderChooser"
alt="JUpload Plugin: Folder chooser">
</applet>
2.4.3
Simple file chooser plugin
Figure 2.5: Simple file chooser plugin in List view
This plugin JUploadPlugin_SimpleFileChooser will give you a view of your local
file system, like the one in the Add files dialog. It will display all the files of your
2.4. JUPLOAD PLUGINS
Figure 2.6: Simple file chooser plugin in Detailed view
current directory. With the help of the filetype plugin, the folder chooser plugin, and
some JavaScript functions, you can create your own customized Add files dialog. And
best is, it will be integrated into your html page and style - no annoying popup dialog
window.
Here are the JavaScript functions available to remote control the plugin:
jsMoveUP(); This will jump from the current folder to its parent folder.
jsGotoHome() This will jump to the users home directory.
jsGotoDefault() This will jump to the users default directory for selecting files.
jsViewList() This will switch the viewing mode to the (default) list mode. This will
only display the filenames and the icons for that filetype as requested by the
operating system.
jsViewDetailed() This will switch to a detailed viewing mode, displaying a table with
more information about the files. It will display the filename, it’s size, a description about the file type and the last modified timestamp.
jsViewThumbnail() This will switch to a view with thumbnails of images.
Here is the code to integrate the simple file chooser plugin into the html document:
<applet
code="JUploadPlugin_SimpleFileChooser"
archive="../jupload.jar"
width="300"
height="300"
mayscript
name="JUploadPlugin_SimpleFileChooser"
alt="JUpload Plugin: Simple file chooser">
</applet>
17
18
2.4.4
CHAPTER 2. ADMINISTRATION
Image preview plugin
The JUploadPlugin_ImagePreview shows a thumbnail of the currently selected file.
The file can be selected in JUpload’s file queue list, or in the view of simple file chooser
plugin.
Integration code:
<applet
code="JUploadPlugin_ImagePreview"
archive="../jupload.jar"
width="300"
height="300"
mayscript
name="JUploadPlugin_ImagePreview"
alt="JUpload Plugin: Image preview">
</applet>
2.4.5
Progress meter plugin
The JUploadPlugin_ProgressMeter shows the same progress bar as JUpload would do
in its status panel. With the plugin, you can customize its position and size on the html
page.
<applet
code="JUploadPlugin_ProgressMeter"
archive="../jupload.jar"
width="900"
height="50"
mayscript
name="JUploadPlugin_ProgressMeter"
alt="JUpload Plugin: Progress meter">
</applet>
2.4.6
Remote control
A sample of how to use the remote control features of JUpload and its plugins:
<input
type="button"
value="Parent folder"
onClick="document.JUploadPlugin_SimpleFileChooser.jsMoveUp();">
<input
type="button"
value="Home folder"
onClick="document.JUploadPlugin_SimpleFileChooser.jsGotoHome();">
<input
type="button"
value="Remove first file"
onclick="document.JUpload.jsRemoveFileAt(0);">
2.4. JUPLOAD PLUGINS
<input
type="button"
value="Upload"
onclick="document.JUpload.jsClickUpload();">
19
20
CHAPTER 2. ADMINISTRATION
Chapter 3
User manual
This section describes the handling of JUpload and its functionality.
Die to the variety of different settings, it’s no possible to go into all eventualities.
3.1
3.1.1
Handling
Startup
When the product is installed correctly on the webserver and the HTML document is
coded, the applet will be called automatically if this document is opened in a browser.
The Java Plug-In will start up and run the given JUpload class. While Java is loading
the archive, it’s possible to display a progress bar.
When the applet is fully loaded, the Java Plug-In will check its certificate. It will
show a dialog with information about the certificate which was used to sign the applets archive. Please check the certificate for correctness and accept with Yes or with
Always.
Figure 3.1: Certificate details
21
22
CHAPTER 3. USER MANUAL
3.1.2
Overview
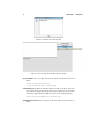
If the JUpload applications is loaded and the certificate has been acceptes, the main
window will appear. In the upper left corner, you will see the file queue. In the lower
left corner, you will see the realtime response window. It will display the server
response in realtime, eg. while it’s still reading the same. This feature can be switched
on and off via parameters. 1
On the right side, you will see the control area. There are three buttons: Add,
Remove and Upload which are self-explanatory: Add will open a dialog where the
user can select files and add them to the file queue. Remove will remove the selected
files from the file queue. Upload will start the upload process, send all files to the server
and remove them from the file queue.
Figure 3.2: JUpload main view
3.1.3
Selecting files
To prepare files for the upload, you have to select them. Selected files will appear in
the upper left corner of JUpload, the file queue. File names will be displayed in short,
if you need to know the full pathname, use the tooltip (move your mouse above the file
and wait until the tooltip appears).
To add new files to the file queue, click on the button labeled Add. This will display
Java file chooser dialog, where you can select files and folders. Accept the dialog to add
all selected (marked) files to the file queue. More information about the standard file
chooser dialog can be read in the Java user manual or in the manual of your operating
system.
While selecting files, JUpload provides a nice gadget: image previewing. This will
create a preview of the selected image file. It can be switched off using parameters.
Use the mouse wheel to zoom in and out of the preview (this is only functional with
Java 1.4 or higher).
Select one or multiple files with a single left click on your mouse, optionally pressing control key or shift key. If you want to select all files, press control and ’A’.
If you do not want to select any files and want to close the dialog, select Abort.
1 see
Administrators manual: showRealTimeResponse
3.1. HANDLING
Figure 3.3: File chooser with customized Look And Feel
Drag’n’Drop
You can use Drag’n’Drop to drag files from your filesystem explorer directly into the
file queue of JUpload.
Click on the file you want to upload in the explorer and don’t release the mouse
button. Now, move your mouse over to the running JUpload applet. Move your mouse
cursor into the file queue and then release the mouse button. Dragging files out from
JUpload is not supported.
File queue
The file queue display all the files which will be uploaded when the upload process
starts. It will display the filename, and optionally a small thumbnail of image files. If
you rest your mouse cursor over a filename for a few seconds, you will see a tooltip
containing the full path information of that file.
3.1.4
Remove files
If there are items in the file queue, you do not want to upload, you can remove them
from the file queue. Select them using the mouse (single click for single files, hold shift
or control to select multiple files) and click the Remove button. The selected items will
be removed from the file queue and no longer be uploaded. If the upload process has
already started, it’s not possible to remove any files. If you remove files from the file
queue, no files will be erased from the hard disk.
23
24
CHAPTER 3. USER MANUAL
Figure 3.4: File queue
3.1.5
Uploading
If you’re ready with selecting and adding files to the file queue, you can start the upload
process. Click on the Upload button to start. Note that the upload can’t be stopped or
paused.
Figure 3.5: Buttons and some info
A cancelled upload process cannot be resumed at the same position, if you’re working with standard POST method. Are JUpload and the server configured for using PUT
method, upload resuming is possible. This will save you time and nerves.
Using PUT, you can resume the upload. Simply add the same files again and hit the
Upload button. JUpload will automatically determine which files have already been
uploaded, and which have to be resumed. Please keep in mind that this feature must
be supported by the server and the server-side scripts. If you have any questions about
this, please ask your system administrator.
3.1.6
Status display
While uploading, you will see a status display on the right side of the applet, just under
there the buttons have been. It will display some status messages (like "Looking up
server name" or "Connecting" etc.). There is also a progress bar which will display
the amount of time elapsed and remaining for the current file and for the total upload
process. The current filename is also displayed.
The status display shows the state of the application and the process. It will display
messages about handshaking and how many files are already uploaded. It will try
to display the bandwidth (speed of upload in kilobyte per second) and the approx.
remaining time (ETA).
The upper progress bar will show the progress in percent of the file, the lower one
shows the total progress.
25
3.1. HANDLING
Figure 3.6: Buttons, status and progress bar while process is running
3.1.7
Image preview
The image preview is a comfortable way to find the file you were looking for. The
supported file types are the same as Java supports (GIF, JPEG, PNG). You can zoom in
and out using the mouse wheel (only in Java 1.4 or higher).
Figure 3.7: File chooser with image preview
The image preview will display the dimension of the image file (height and width)
in pixel and their file size in bytes.
3.1.8
Recursive selection
You can select folders in the file chooser, which will be added recursively to the file
queue. That means that every subfolder and every file which is contained in them will
be added to the file queue. This feature is enabled by default and can be disabled by
the administrator.
26
3.1.9
CHAPTER 3. USER MANUAL
File filter
File filter are used to hide files which should not be uploaded at all. They filter files by
their file type. In JUpload, there are predefined file filters for all files, for images and
so on. The administrator can create his own file filters, e.g. all Office documents.
3.1.10
Error messages
Error messages are display in modular dialogs. There are error messages about exceeded limits, connection problems or handling errors.
3.2
More help
If you need more help on JUpload, you can browse to the product homepage:
http://www.jupload.biz/
3.2.1
Online-Hilfe
Due to space reasons, there is no onliny help in the applet. But there is a list of known
parameters and licensing information. You can get the about dialog by clicking on the
background under the buttons with the right mouse button.
3.2. MORE HELP
Figure 3.8: Uploading and showing about window
27
28
CHAPTER 3. USER MANUAL
Chapter 4
Developers manual
This section of the manual is for Java developers. They will find descriptions about the
internal application structure.
4.1
4.1.1
Programming interface
API JavaDoc
You can find the JavaDoc help in the subfolder javadoc. The JavaScript API is described in the administrators section.
4.2
4.2.1
Notes
Protocols
The protocol information can be found here: (http://www.faqs.org/rfcs/rfc1867.
html und ftp://ftp.rfc-editor.org/in-notes/rfc2387.txt).
Details about HTTP protocol (ftp://ftp.rfc-editor.org/in-notes/rfc2616.
txt)
4.2.2
JavaScript
JavaScript: LiveConnect packet 1 is not implemented in all browsers:
Browser
Windows2 Linux3 Macintosh
Internet Explorer 6
Ok
Opera 7
Ok
Mozilla 1.5
Ok
Ok
Konqueror
Failed
"-" : not tested.
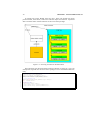
Access to HTML form fields
If you need to send user inputs with the uploaded files, you can use HTML forms.
1 For
developers: included in Netscape Navigator 3.0: java_30.jar
29
30
CHAPTER 4. DEVELOPERS MANUAL
To transfer user inputs, HTML forms are used. These can include text inputs,
password fields, check boxes, radio boxes and other inputs and selection. JUpload is
able to read the values of these elements via the LiveConnect package.
Figure 4.1: Accessing structure for DOM elements
Für Entwickler sieht der Zugriff auf JavaScript Objekte wie folgt aus: This is an
example how JUpload uses the LiveConnect package to access the DOM model internally:
1
2
3
4
5
6
7
8
9
10
11
12
13
14
15
16
/ / Get t h e b r o w s e r window , t h e document and t h e h t m l form
J S O b j e c t win= p a r e n t . a p p l e t . jsBrowserWindow ;
J S O b j e c t doc = ( J S O b j e c t ) win . getMember ( " document " ) ;
J S O b j e c t form = ( J S O b j e c t ) doc . getMember ( " JUploadForm " ) ;
J S O b j e c t e l e m e n t s = ( J S O b j e c t ) form . getMember ( " elements " ) ;
/ / Get t h e amount o f f i e l d s
Double dnum=new Double ( e l e m e n t s . getMember ( " length " ) . t o S t r i n g ( ) ) ;
int
num=dnum . i n t V a l u e ( ) ;
/ / Read
for ( int
Object
String
String
}
the f i e l d s
i = 0 ; i < num ; i + + } {
t h i s S l o t =elements . getSlot ( i ) ;
f i e l d N a m e = ( S t r i n g ) j s T h i s S l o t . getMember ( " name " ) ;
f i e l d V a l u e = ( S t r i n g ) j s T h i s S l o t . getMember ( " value " ) ;
Chapter 5
Appendix
5.1
Configuration
This is an example how to integrate JUpload into a website:
<applet
code="JUpload/startup.class"
archive="JUpload.jar"
width="500"
height="300"
mayscript
name="JUploadApplet"
alt="JUpload applet">
<!-- include the PARAM tags here -->
</applet>
code The startup class of JUpload
archive The name of the archive where JUpload is stored (jupload.jar)
width Sets the width in pixel for the applet. You should not use 0x0 pixel, but instead
use 1x1 and a invisible div, if you need to hide the applet.
height Sets the height in pixel for the applet. Width and height cannot be changed
after the applet while it’s running.
alt Sets an alternative description for the applet (e.g. for blind users)
mayscript This is a keyword to enable JUpload to access JavaScript, and enable the
remote control features of JUpload via JavaScript. In newer HTML, you should
user mayscript="mayscript"
name Sets the name of the JUPload applet in the DOM tree, so you can access it via
JavaScript like document.<name>
You should not use the applet tag but the OBJECT and EMBED tags. These two
are newer and have much more features.
Mozilla.org shows how to use the OBJECT tag for Mozilla browsers.
31
32
CHAPTER 5. APPENDIX
<OBJECT classid="java:appletname.class" type="application/java"
codebase="..." archive="..." width="..." height="...">
<PARAM name="..." value="..." /> [...]
</OBJECT>
For a detailed description of the Object-Tag, see the W3C page: (http://www.w3.
org/TR/html401/struct/objects.html#edef-OBJECT)
This is the common Applet-Tag:
<APPLET code="XYZApp.class" codebase="html/" align="baseline"
width="200" height="200">
<PARAM NAME="model" VALUE="models/HyaluronicAcid.xyz">
No Java 2 SDK, Standard Edition v 1.3 support for APPLET!!
</APPLET>
The following code is an example for the equivalent Java Plug-In tag as you can
see it in the documentation of Sun Microsystems:
1
2
3
4
5
6
7
8
9
10
11
12
13
14
15
16
17
18
19
20
21
22
23
24
25
26
27
28
29
30
31
32
33
34
35
36
37
38
39
40
41
42
43
44
45
46
47
48
49
< !−− The f o l l o w i n g code i s s p e c i f i e d a t t h e b e g i n n i n g o f t h e <BODY> t a g . −−>
<SCRIPT LANGUAGE=" JavaScript ">< !−−
var _ i n f o = n a v i g a t o r . u s e r A g e n t ; var _ n s = f a l s e ;
var _ i e = ( _ i n f o . i n d e x O f ( " MSIE " ) > 0 & & _ i n f o . i n d e x O f ( " Win " ) > 0
&& _ i n f o . i n d e x O f ( " Windows 3.1 " ) < 0 ) ;
/ /−−>< / SCRIPT>
<COMMENT><SCRIPT LANGUAGE=" JavaScript1 .1 ">< !−−
var _ n s = ( n a v i g a t o r . appName . i n d e x O f ( " Netscape " ) > = 0
&& (( _ i n f o . i n d e x O f ( " Win " ) > 0 & & _ i n f o . i n d e x O f ( " Win16 " ) < 0
&& j a v a . l a n g . System . g e t P r o p e r t y ( " os . version " ) . i n d e x O f ( " 3.5 " ) < 0 )
| | _ i n f o . i n d e x O f ( " Sun " ) > 0 ) ) ;
/ /−−>< / SCRIPT>< /COMMENT>
< !−− The f o l l o w i n g code i s r e p e a t e d f o r e a c h APPLET t a g −−>
<SCRIPT LANGUAGE=" JavaScript ">< !−−
i f ( _ i e = = t r u e ) document . w r i t e l n ( ’
<OBJECT
c l a s s i d =" clsid :8 AD9C840 -044 E -11 D1 - B3E9 -00805 F499D93 "
width =" 200 " h e i g h t =" 200 " a l i g n =" baseline "
c o d e b a s e =" http :// java . sun . com / products / plugin /1.3/ jinstall -13 - win32 . cab # Version =1 ,3 ,0 ,0 ">
<NOEMBED><XMP> ’ ) ;
e l s e i f ( _ n s = = t r u e ) document . w r i t e l n ( ’
<EMBED
t y p e =" application /x - java - applet ; version =1.3 " width =" 200 " h e i g h t =" 200 "
a l i g n =" baseline " code =" XYZApp . class " c o d e b a s e =" html /"
model =" models / HyaluronicAcid . xyz "
p l u g i n s p a g e =" http :// java . sun . com / products / plugin /1.3/ plugin - install . html ">
<NOEMBED><XMP> ’ ) ;
/ /−−>< / SCRIPT>
<APPLET code =" XYZApp . class " c o d e b a s e =" html /" a l i g n =" baseline "
width =" 200 " h e i g h t =" 200 ">
< /XMP>
<PARAM NAME=" java_code " VALUE=" XYZApp . class ">
<PARAM NAME=" java_codebase " VALUE=" html /">
<PARAM NAME=" java_type " VALUE=" application /x - java - applet ; version =1.3 ">
<PARAM NAME=" model " VALUE=" models / HyaluronicAcid . xyz ">
<PARAM NAME=" scriptable " VALUE=" true ">
No J a v a 2 SDK , S t a n d a r d E d i t i o n v 1 . 3 s u p p o r t f o r APPLET ! !
< / APPLET>< /NOEMBED>< /EMBED>
< / OBJECT>
< !−−
<APPLET code =" XYZApp . class " c o d e b a s e =" html /" a l i g n =" baseline "
width =" 200 " h e i g h t =" 200 ">
<PARAM NAME=" model " VALUE=" models / HyaluronicAcid . xyz ">
No J a v a 2 SDK , S t a n d a r d E d i t i o n v 1 . 3 s u p p o r t f o r APPLET ! !
< / APPLET>
−−>
5.1.1
Plug-In Settings
Here you can find param settings for the behaviour of the Java Plugin:
progressBar Enables the progress bar while loading the jar file from the webserver.
<param name="progressbar" value="true">
5.1. CONFIGURATION
33
Figure 5.1: Loading process with progressbar and boxmessage
boxmessage Sets the displayed message while loading the jar file.
<param name="boxmessage" value="Loading JUpload Applet ...">
boxbgcolor Set a background color for the applet frame.
<param name="boxbgcolor" value="#e0e0ff">
5.1.2
JUpload Parameters
A list of available parameters to customize the product:
actionURL Address of the server-side script which will process the uploaded files.
This can be an absolute URL or a relative URL (relative to the code base of the
applet). It’s possible to append a query string or any other GET parameters to the
URL (e.g. for transmitting a session id). HTTP and HTTPS are supported protocols, as well as different ports. Note that most webservers are case-sensitive.
<param name="actionURL" value="http://localhost/demo/JUpload.php">
completeURL Set the URL where the browser is redirected after a finished upload
process. Same rules as for the actionURL.
<param name="completeURL" value="http://www.example.com/upload-ok.html">
errorURL Set the URL where the browser is redirected, when JUpload reports any
upload errors from the server-side.
<param name="errorURL" value="http://www.example.com/upload-error.html">
debug Switch on debug mode. This will print out much debug stuff on the Java Console and possibly write a logfile. see debugLogfile parameter
<param name="debug" value="true">
debugLogfile Sets a file name for the debug log filename.
<param name="debugLogfile" value="c:/jupload.log">
34
CHAPTER 5. APPENDIX
askAuthentification This setting tells JUpload to ask the user for a username and a
password. The authentification information will be sent via basic method to a
secured URL on the webserver (e.g. if you have secured the upload folder with
a .htaccess file). Can also be used if a proxy needs authentification in this way.
<param name="askAuthentification" value="false">
Figure 5.2: Input dialog for the askAuthentification parameter
tagName This is the name for the POST variable where the files are stored. It defaults to uploadedFiles. JUpload will append an increasing number to the end of
this string for each file uploaded (like uploadedFiles0, uploadedFiles1, uploadedFiles2 etc.)
<param name="tagName" value="uploadedFiles">
checkResponse Enable the check of the http server response.
<param name="checkResponse" value="true">
showSuccessDialog Shows a dialog to the user when the upload process has finished.
<param name="showSuccessDialog" value="true">
Figure 5.3: Successful upload
imageFileFilter Enable the file type filter in the Add files dialog for images, pictures.
<param name="imageFileFilter" value="false">
hideShowAll Disable the file type filter for "All files".
<param name="hideShowAll" value="false">
backgroundColor Sets the main background color for the applet
<param name="backgroundColor" value="#e0e0ff">
5.1. CONFIGURATION
showPicturePreview Enables the picture preview in the Add files dialog.
<param name="showPicturePreview" value="false">
addWindowTitle Set a customized title for the Add files dialog.
<param name="addWindowTitle" value="Dateien auswählen">
imageURL Specifiy an URl with an Image which will be display in the applet. Can
be used for branding the applet with your logo.
<param name="imageURL" value="../images/applet-logo.gif">
labelFiles Set the text for the amount of files label.
<param name="labelFiles" value="Dateien:">
Figure 5.4: The labels for files and sizes
labelBytes Sets the text for the size of the upload
<param name="labelbytes" value="Größe:">
labelAdd Set the text for the add button
<param name="labelAdd" value="Hinzufügen">
labelRemove Set the text for the remove button
<param name="labelRemove" value="Entfernen">
labelUpload Set the text for the upload button
<param name="labelUpload" value="Hochladen">
successDialogMessage Set the text for the successful upload dialog.
<param name="successDialogMessage" value="Hochladen war erfolgreich">
successDialogTitle Set the title for the successful upload dialog.
<param name="successDialogTitle" value="Alles Okay!">
addToolTip Set the tooltip text for the add button.
35
36
CHAPTER 5. APPENDIX
<param name="addToolTip" value="Klicken um Dateien hinzuzufügen">
removeToolTip Set the tooltip text for the remove button.
<param name="removeToolTip" value="Klicken um Dateien zu entfernen">
uploadToolTip Set the tooltip text for the upload button.
<param name="uploadToolTip" value="Klicken um gewählte Dateien zu übertragen">
useRecursivePaths Enables the feature to support recursive (and relative) path information. The path information will be coded into the Content-Type field of the
upload. The reason for this is that many webserver will remove the path information from uploaded files for security reasons. The encoding is very simple and
can be decoded easily with the PHP function base64_decode($strEncodedPath)
<param name="useRecursivePaths" value="true">
checkJavaVersion Checks for the installed java version before trying to run.
<param name="checkJavaVersion" value="true">
checkJavaVersionGotoURL If the java version is not sufficient for the applet, go to
this URL.
<param name="checkJavaVersionGotoURL" value="http://www.java.com/">
browserCookie With this tag you can set a cookie value, which will be transferred to
the server. This can be used for server session ids, which cannot be used in the
query-field or in form fields. You must fill this parameter via JavaScript:
document.write(’<param name=browserCookie value="’);
document.write(document.cookie);
document.writeln(’">’);
JUpload can not access the cookies in the browser directly.
defaultAddDirectory Sets a starting directory for the Add files dialog.
<param name="defaultAddDirectory" value="c:/dateien">
usePutMethod Enables the PUT method. Please read the chapter about the PUT
method for details on this superb transfer method, which supports file upload
resuming and unlimited file sizes.
<param name="usePutMethod" value="true">
maxFreeSpaceOnServer Sets the maximum size of the total request.
<param name="maxFreeSpaceOnServer" value="20000000">
5.1. CONFIGURATION
37
maxFreeSpaceOnServerWarning Warning message when the limit is exceeded.
<param name="maxFreeSpaceOnServerWarning" value="Ihr Server-Account ist überfüllt!">
maxFreeSpaceOnServerTitle Title of the above warning message.
<param name="maxFreeSpaceOnServerTitle" value="Serverplatz reicht nicht aus">
maxTotalRequestSize Sets a maximum size of a single request. If a request exceeds
this limit, it will the splitted into multiple smaller requests. A single file size can
not exceed this value.
<param name="maxTotalRequestSize" value="2000000">
maxTotalRequestSizeWarning The warning message for the total request size limit.
maxTotalRequestSizeTitle The warning title for the total request size limit.
customFileFilter Enables a customized file filter.
<param name="customFileFilter" value="true">
customFileFilterDescription Sets the descriptive text for the customized file filter.
<param name="customFileFilterDescription" value="Bilddateien (Jpeg und GIF)">
customFileFilterExtensions Sets a list of file extensions for this custom file filter,
separated with commas.
<param name="customFileFilterExtensions" value="gif,jpg,jpeg">
maxNumberFiles Sets the maximum number of files to be uploaded.
<param name="maxNumberFiles" value="1000">
maxNumberFilesWarning Warning message for the maxNumberFiles limit.
maxNumberFilesTitle Warning title for the maxNumberFiles limit.
fixJakartaBug If you experience problems using the jakarta-fileupload package, please
try to use this parameter settings.
<param name="fixJakartaBug" value="false">
maxFilesPerRequest Sets the maximum amount of files in a single request.
showServerResponse Enables the display of the server response
<param name="showServerResponse" value="true">
if the server response is disabled, the response will be displayed in the realtime
response window:
38
CHAPTER 5. APPENDIX
Figure 5.5: Window with a html response
Figure 5.6: Error message in the realtime response window
preselectedFiles Sets a list of files which will be marked for upload on start of the
applet.
<param name="preselectedFiles"
value="d:/webcam1.jpg;d:/webcam2.jpg">
realTimeResponse Enables the realtime response window in the lower left corner.
This displays the server-side output of the script as simple html. It can display
server results in realtime, that means while they are printed out, if the server does
not use any output buffering. In PHP, you can use it with the flush() function.
<param name="realTimeResponse" value="false">
mainSplitpaneLocation Sets the position of the main slider (from left border, in
pixel)
5.1. CONFIGURATION
<param name="mainSplitpaneLocation" value="450">
leftSplitpaneLocation Sets the position of the left slider (from top border, in pixel)
<param name="leftSplitpaneLocation" value="250">
hideAddButton Hides the add button.
<param name="hideAddButton" value="true">
hideRemoveButton Hides the remove button.
hideUploadButton Hides the upload button.
showStatusPanel Switch on or off the right status information panel.
<param name="showStatusPanel" value="false">
skinThemePackURL Set an address to a compressed theme pack for the SkinLF feature. Note that you need to include the skinlf.jar package in the codebase for this
feature to work.
<applet ...
archive="skinlf.jar,jupload.jar"
... alt="JUpload Applet">
<param name="skinThemePackURL" value="aquathemepack.zip">
</applet>
useProxy Force the use of the proxy servers as set in the Java Plugin or the browser
itself.
<param name="useProxy" value="false">
showThumbnails Enable or disable the thumbnails in the file queue.
<param name="showThumbnails" value="false">
targetFrame Sets the target frame for the completeURL feature. The new page will
be directed to the html frame with the specified target name.
<param name="targetFrame" value="MyLeftFrame">
39
40
CHAPTER 5. APPENDIX
Figure 5.7: You can easily customize the applet with skins
List of Figures
2.1
2.2
2.3
2.4
2.5
2.6
A standard file input tag for upload . . . . .
Java Console Log Window . . . . . . . . .
Filetype chooser plugin . . . . . . . . . . .
Folder chooser plugin . . . . . . . . . . . .
Simple file chooser plugin in List view . . .
Simple file chooser plugin in Detailed view
.
.
.
.
.
.
.
.
.
.
.
.
.
.
.
.
.
.
.
.
.
.
.
.
.
.
.
.
.
.
.
.
.
.
.
.
.
.
.
.
.
.
.
.
.
.
.
.
8
12
15
16
16
17
3.1
3.2
3.3
3.4
3.5
3.6
3.7
3.8
Certificate details . . . . . . . . . . . . . . . . . . . . .
JUpload main view . . . . . . . . . . . . . . . . . . . .
File chooser with customized Look And Feel . . . . . .
File queue . . . . . . . . . . . . . . . . . . . . . . . . .
Buttons and some info . . . . . . . . . . . . . . . . . .
Buttons, status and progress bar while process is running
File chooser with image preview . . . . . . . . . . . . .
Uploading and showing about window . . . . . . . . . .
.
.
.
.
.
.
.
.
.
.
.
.
.
.
.
.
.
.
.
.
.
.
.
.
.
.
.
.
.
.
.
.
.
.
.
.
.
.
.
.
.
.
.
.
.
.
.
.
.
.
.
.
.
.
.
.
21
22
23
24
24
25
25
27
4.1
Accessing structure for DOM elements . . . . . . . . . . . . . . . . .
30
5.1
5.2
5.3
5.4
5.5
5.6
5.7
Loading process with progressbar and boxmessage
Input dialog for the askAuthentification parameter .
Successful upload . . . . . . . . . . . . . . . . . .
The labels for files and sizes . . . . . . . . . . . .
Window with a html response . . . . . . . . . . . .
Error message in the realtime response window . .
You can easily customize the applet with skins . . .
33
34
34
35
38
38
40
41
.
.
.
.
.
.
.
.
.
.
.
.
.
.
.
.
.
.
.
.
.
.
.
.
.
.
.
.
.
.
.
.
.
.
.
.
.
.
.
.
.
.
.
.
.
.
.
.
.
.
.
.
.
.
.
.
.
.
.
.
.
.
.
.
.
.
.
.
.
.
.
.
.
.
.
.
.
.
.
.
.
.
.
.
.
.
.
.
.
.
.
.
.
.
.
.
.
.
.
.
.
.
.
.
.
.
42
LIST OF FIGURES
Bibliography
[1] E. Nebel, L. Masinter (1995), "‘Form-based File Upload in HTML"’,
http://www.faqs.org/rfcs/rfc1867.html
[2] E. Levinson (1998), "‘The MIME Multipart/Related Content-type"’,
ftp://ftp.rfc-editor.org/in-notes/rfc2387.txt
[3] R. Fielding, J. Gettys, J. Mogul et al. (1999), "‘Hypertext Transfer Protocol –
HTTP/1.1"’,
ftp://ftp.rfc-editor.org/in-notes/rfc2616.txt
[4] Keld Simonsen et al. (1990-1996), "‘Code for the representation of names of
languages"’,
http://ftp.ics.uci.edu/pub/ietf/http/related/iso639.txt
[5] Maintenance Agency for ISO 3166 country codes (1999), "‘ISO 3166 Codes
(Countries)"’,
http://www.iso.org/iso/en/prods-services/iso3166ma/index.html
[6] Philippe Le Hégaret et al. (2002), "‘Document Object Model (DOM)"’,
http://www.w3.org/DOM/
[7] Dave Raggett et al. (1999), "‘HTML 4.01 Specification"’,
http://www.w3.org/TR/html401/struct/objects.html#edef-OBJECT
43