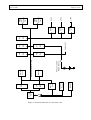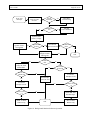
1
PROJECT
REF:
JET-X(95)BU-042
JET-X
WP:
STATUS:
1- DRAFT
X
2- FINAL
3- APPROVED
University of Birmingham
School of Physics
and
Space Research
Space Research Group
Command And
Data Management System Software
User's Manual
CONTRIBUTORS:
O.Al-Emam
M.Bull
M.Cooke
C.Eyles
APPROVALS
By
3
2
1
ISSUE
28/10/96
27/09/96
05/05/94
DATE
M.Cooke
M.Cooke
M.Bull
PREPARED
BY
CHANGE
PROPOSAL
Signature
JET-X FM CDMS : Software User's Manual
Issue 3 Draft
JET-X(95)BU-042
Page 2 of 113
Contents
1. Introduction ................................................................ ................................ ................................ .............. 7
1.1 Design Objective Summary................................................................ ................................ ................. 7
2 Reference Documents................................................................ ................................ ................................ .8
3. Hardware Architecture Overview ................................................................ ................................ .............. 9
3.1 Relay Interface Control................................................................ ................................ ....................... 9
3.2 SRG Commanding................................................................ ................................ .............................. 9
3.3 System Control Bus Mediation................................................................ ................................ .......... 13
3.4 JET-X Diagnostic Information ................................................................ ................................ .......... 16
4. Software Design Overview................................................................ ................................ ...................... 18
4.1 Systems Layer ................................................................ ................................ ................................ .. 18
4.2 Application Support Layer ................................................................ ................................ ................ 18
4.3 Applications Layer................................................................ ................................ ............................ 18
5. System Operational Overview ................................................................ ................................ ................. 20
5.1 Processor Switch-On................................................................ ................................ ......................... 20
5.2 Software Bootstrap Routine ................................................................ ................................ .............. 20
6. The System Layer ................................................................ ................................ ................................ ... 22
6.1 Initial Switch-On Memory Checkout and Processor Polling Routine................................................... 22
6.1.1 Common Start-up Operations................................................................ ................................ ..... 22
6.1.2 Telescope Processor Initial Start-up Conditions................................................................ .......... 24
6.1.3 Control Processor Initial Start-up Conditions ................................................................ ............. 25
6.1.4 Control Processor Initial Start-up Processing ................................................................ ............. 26
6.1.5 Failed-Boot Counter Processing ................................................................ ................................ . 26
6.2 Hardware Driver Routines ................................................................ ................................ ................ 27
6.3 General Memory Management Utilities ................................................................ ............................. 27
6.4 Triple Redundant Memory Management Utilities................................................................ ............... 28
6.5 Main Task Scheduler ................................................................ ................................ ........................ 28
7. Application Support Layer ................................................................ ................................ ...................... 33
7.1 Control Processor Health Monitor ................................................................ ................................ ..... 33
7.2 Control Processor Initial Switch-on Memory Initialisation ................................................................ . 34
7.3 Control Processor General Memory and Hardware Initialisation ........................................................ 35
7.4 Control Processor 1Hz Interrupt Handler................................................................ ........................... 35
7.5 Telescope Processor Health Monitor ................................................................ ................................ . 36
7.6 Telescope Processor General Memory and Hardware Initialisation..................................................... 37
8. Control Processor Software................................................................ ................................ ..................... 38
8.1 SRG Bus Interface Control ................................................................ ................................ ............... 38
8.1.1 'Prepare to Receive Onboard Timecode'................................................................ ...................... 38
8.1.2 'Prepare to Transmit Science Data'................................................................ ............................. 38
8.1.3 'Prepare to Receive Command Block' ................................................................ ......................... 41
8.1.4 'Transmit Status Word' ................................................................ ................................ .............. 41
8.1.5 'Transmit Vector Word'................................................................ ................................ .............. 41
JET-X FM CDMS : Software User's Manual
Issue 3 Draft
JET-X(95)BU-042
Page 3 of 113
8.1.6 Broadcast Modechange Commands ................................................................ ............................ 41
8.1.7 Addressed Modechange Commands................................................................ ............................ 41
8.1.8 'Transmit H/K Data' ................................................................ ................................ .................. 41
8.1.9 'Transmit BM Data' ................................................................ ................................ ................... 42
8.2 Command Interpreter ................................................................ ................................ ........................ 42
8.2.1 Serial Command Processing................................................................ ................................ ....... 42
8.2.1.1 Configuration Table Updates ................................................................ .............................. 43
8.2.1.2 XRT Configuration Table Copying ................................................................ ..................... 43
8.2.1.3 Miscellaneous Commands................................................................ ................................ ... 44
8.2.2 Modechange Command Processing ................................................................ ............................ 44
8.3 Slow Housekeeping Interface Control................................................................ ................................ 45
8.4 Housekeeping Data Formatting ................................................................ ................................ ......... 46
8.5 Mass Memory Data Formatting ................................................................ ................................ ........ 48
8.5.1 JET-X Data Structure................................................................ ................................ ................ 48
8.5.2 JET-X Data-stream Generation................................................................ ................................ .. 50
8.5.3 JET-X Data-stream Supply................................................................ ................................ ........ 51
8.6 Attitude Monitor Control ................................................................ ................................ .................. 53
8.6.1 Introduction................................................................ ................................ ............................... 53
8.6.2 AM Serial Communication ................................................................ ................................ ........ 53
8.6.3 Attitude Monitor Image Pre-Processor Configuration Control..................................................... 56
8.6.3 Attitude Monitor Pixel Acquisition Routine................................................................ ................ 56
8.6.4 AM Image Processing Routine................................................................ ................................ ... 56
8.7 Relay Control ................................................................ ................................ ................................ ... 60
8.7.1 Latching Relay Control................................................................ ................................ .............. 62
8.7.2 Mirror Baffle Heater Control ................................................................ ................................ ..... 63
8.7.3 De-icing Heater Control................................................................ ................................ ............. 63
8.7.4 Control Bus Interface Switching................................................................ ................................ . 63
8.8 Mass Memory Control ................................................................ ................................ ...................... 64
8.9 Background Monitor Control ................................................................ ................................ ............ 67
8.10 Control Processor Housekeeping Data Record Production................................................................ 69
8.11 Telescope Processor Serial Interface Control ................................................................ ................... 69
8.11.1 Data Transmission to the Telescope Processors ................................................................ ........ 69
8.11.2 Data Reception from the Telescope Processors ................................................................ ......... 70
9. Telescope Processor Software ................................................................ ................................ ................. 72
9.1 XRT Data Processing ................................................................ ................................ ....................... 72
9.1.1 Detection of Incoming Data ................................................................ ................................ ....... 72
9.1.2 Initial Checks on New Pixel Data................................................................ ............................... 75
9.1.4 Pixel Association and Event Class Allocation................................................................ ............. 75
9.1.5 Handling of DMA Buffer Overflow Condition................................................................ ............ 76
9.1.6 Pre-Processor Amplitude Threshold Behaviour................................................................ ........... 77
9.2 Output Buffers................................................................ ................................ ................................ .. 77
9.3 Inter-Processor UART Control................................................................ ................................ .......... 78
9.3.1 Telescope Processor Command Reception and Processing .......................................................... 78
9.3.2 Data Transmission................................................................ ................................ ..................... 79
9.4 TE Serial Communication................................................................ ................................ ................. 80
9.5 Filter Wheel Control ................................................................ ................................ ......................... 80
9.6 End of Frame Interrupt Handler ................................................................ ................................ ........ 84
9.7 DMA Control Module................................................................ ................................ ....................... 84
JET-X FM CDMS : Software User's Manual
Issue 3 Draft
JET-X(95)BU-042
Page 4 of 113
9.8 Bad Columns and Pixels, and Diagnostic Patch Handler ................................................................ .... 84
9.8.1 Bad Column and Pixel Table Pre-Processing Routine ................................................................ . 84
9.8.2 Bad Column and Pixel Identification Routine ................................................................ ............. 85
9.8.3 Diagnostic Patch Movement Routine................................................................ .......................... 87
9.8.4 Diagnostic Patch and Stripe Pixel Identification Routine............................................................. 87
10. Uplinked Commanding................................................................ ................................ .......................... 88
10.1 Serial Command Descriptions ................................................................ ................................ ......... 88
10.1.1 Control Processor Configuration Block Update Commands ...................................................... 88
10.1.2 Control Processor Memory Patching and Copying Commands .................................................. 92
10.1.3 Telescope Processor Configuration Table Update ................................................................ ..... 93
10.1.4 TE Register Update ................................................................ ................................ ................. 95
10.1.5 TP/TE Configuration Table Copying Commands ................................................................ ..... 95
10.1.6 Telescope Processor Miscellaneous Commands ................................................................ ........ 95
10.1.7 Filter Wheel Movement Commands................................................................ .......................... 96
10.1.8 Attitude Monitor Bad Column and Pixel Update Commands..................................................... 97
10.1.9 Relay Control Commands ................................................................ ................................ ........ 97
10.1.10 Command Macros................................................................ ................................ .................. 98
10.2 Modechange Commands ................................................................ ................................ ................. 99
10.2.1 BM Alarm................................................................ ................................ ............................... 99
10.2.2 MCBATDIS - Battery Discharge................................................................ ............................ 99
10.2.3 MCCONTAC - Begin Ground Contact ................................................................ .................... 99
10.2.4 MCCUTOFF - Emergency Cut-off ................................................................ ........................ 100
10.2.5 MCFINOBS - Finish Observation Time................................................................ ................. 100
10.2.6 MCRADPAS - Radiation Belt Passage ................................................................ .................. 100
10.2.7 MCSTAOBS - Start Observation Time................................................................ .................. 100
10.2.8 MCSTATUS - Transmit Status Word................................................................ .................... 100
10.2.9 MCVECTOR - Transmit Vector Word ................................................................ .................. 101
10.3 Commanding Examples................................................................ ................................ ................. 102
10.3.0 Observation Session Starting from 'Unconfigured Off' State ................................................... 102
10.3.2 Observation Session Starting from 'Configured Off' State ....................................................... 104
11. JET-X Modes ................................................................ ................................ ................................ ..... 105
11.1 Instrument Modes ................................................................ ................................ ......................... 105
11.2 Observing Modes................................................................ ................................ .......................... 107
12. Onboard Software Patching................................................................ ................................ ................. 109
12.1 Procedure for Patching Control Processor Object Code................................................................ .. 109
12.2 Procedure for Patching Telescope Processor Object Code .............................................................. 109
13. Timing Issues................................................................ ................................ ................................ ...... 110
A. Document Abbreviations ................................................................ ................................ ...................... 112
B. Relay Control Register Bit Specification................................................................ ............................... 113
JET-X FM CDMS : Software User's Manual
Issue 3 Draft
JET-X(95)BU-042
Page 5 of 113
Figures
1. General Architecture of the JET-X Electronics System ................................................................ ............ 11
2. General Architecture of a Processor Card................................................................ ................................ 12
3. Block Diagram of the JET-X CDMS................................................................ ................................ ....... 15
4. CDMS Software Architecture ................................................................ ................................ ................. 19
5. System Switch-On Sequence ................................................................ ................................ ................... 23
6. Main Task Scheduler ................................................................ ................................ .............................. 30
7. Control Processor Application Modules................................................................ ................................ ... 39
8. SRG Bus Command Processing Overview................................................................ ............................... 40
9. Flowchart for Housekeeping Generation ................................................................ ................................ .. 47
10. Mass Memory Data-stream Format ................................................................ ................................ ....... 49
11. Mass Memory Data-stream Supply Algorithm................................................................ ....................... 52
12. Attitude Monitor Search Mode Operation ................................................................ .............................. 54
13. Overview of Relay Control Processing................................................................ ................................ ... 61
14. Mass Memory Control During Data Storage................................................................ .......................... 66
15. Background Monitor Software Operation ................................................................ .............................. 68
16. Telescope Processor Modules................................................................ ................................ ................ 73
17. Telescope Processor Data Processing ................................................................ ................................ .... 74
18. Filter Wheel Operation................................................................ ................................ .......................... 81
19. Co-ordinate Scheme used in Bad Column and Pixel Specification........................................................... 86
20. JET-X Safe Mode State Transitions ................................................................ ................................ .... 106
21. Timing Chart ................................................................ ................................ ................................ ...... 111
JET-X FM CDMS : Software User's Manual
Issue 3 Draft
JET-X(95)BU-042
Page 6 of 113
Tables
1. JET-X Relay Commands................................................................ ................................ ........................... 9
2. Modechange Commands ................................................................ ................................ ......................... 13
3. Housekeeping Record Types ................................................................ ................................ ................... 16
4. Battery Relay Switching................................................................ ................................ .......................... 24
5. System Bus Availability................................................................ ................................ .......................... 24
6. Variable Delay Start-up Durations for the Control Processor ................................................................ ... 25
7. Control Processor Scheduler Table................................................................ ................................ .......... 31
8. Telescope Processor Scheduler Table ................................................................ ................................ ...... 31
9. Control Processor Event Time-out Reset Conditions ................................................................ ................ 33
10. Control Processor Actions Taken on Event Time-outs................................................................ ............ 34
11. Telescope Processor Actions Taken on Event Time-outs ................................................................ ........ 36
12. Maximum Diagnostic Patch Co-ordinates in Standard Readout Modes................................................... 87
13. Instrument Subsystem States in JET-X Operating Modes................................................................ ..... 107
14. Telescope Processor Default Configuration Tables ................................................................ .............. 108
15. Telescope Electronics Default Configuration Tables ................................................................ ............ 108
JET-X FM CDMS : Software User's Manual
Issue 3 Draft
JET-X(95)BU-042
Page 7 of 113
1. Introduction
The Command and Data Management System (CDMS) onboard software has been designed to meet the
requirements of the JET-X program during standalone and integration testing, and during the Spectrum-X
mission. The package has been designed to provide sufficient flexibility to allow JET-X to cope with as wide
a range of foreseeable operating conditions as possible, while still allowing autonomous operation to continue
in the presence of spacecraft modechange commands only. It has also been designed to be tolerant of
subsystem malfunctions and single event upsets (SEUs) in both hardware and processor registers. This
document provides a design overview of the software and describes in detail the operation of its various
component modules and default parameter settings.
The serial commands and housekeeping parameters related to each module are identified, and a separate
commanding reference section provides a functional description of each command. It is intended that if further
detail is required, this document will provide the reader with sufficient information to understand the pseudocode program design notes provided within the source listing. A section on patching and copying explains how
the CDMS memory patch and copy commands may be used to allow the functions of the onboard software to
be modified while in orbit.
1.1 Design Objective Summary
•
•
•
•
•
•
Reliable platform for x-ray observation.
Autonomous operation.
Wide range of operating conditions available and 3 onboard sets of configuration defaults.
Tolerant of subsystem malfunctions.
Tolerant of single event upsets (SEUs) in the onboard storage.
Flexible in-orbit software modification scheme.
JET-X FM CDMS : Software User's Manual
Issue 3 Draft
JET-X(95)BU-042
Page 8 of 113
2 Reference Documents
N.R.Waltham
D.Pullan
D.Pullan
M.Denby & M.Ricketts
Cambridge Consultants
JET-X Attitude Monitor Command and Status Interface JET-X(94)RAL-157
and Functionality
JET-X FM Telemetry Format Specification
JET-X(94)UL-225
JET-X Command Specification
JET-X(92)UL-138
Interpretation of JET-X Science Data
JET-X(94)UL-256
TE Command Format
JET-X FM CDMS : Software User's Manual
Issue 3 Draft
JET-X(95)BU-042
Page 9 of 113
3. Hardware Architecture Overview
The JET-X system architecture is reviewed in Figure 1. The two CDMS boxes each contain two processor
cards, each of which is fitted with software to enable it to function either as a 'Control Processor' (CP) or a
'Telescope Processor' (TP). Each of the four processor cards are identical, and contain all of the interfaces
necessary to function in either role. Figure 2 shows a simplified block diagram of a processor card, and the
available interfaces.
3.1 Relay Interface Control
The interfaces in each processor card are operated in a number of distinct ways. Relay commands are used
initially to configure CDMS functions without the need for a processor card to be powered up. For example, a
relay command is used to select the power supply used for JET-X. A complete list of relay commands, and a
summary of their function is given in Table 1. The standard sequence during switch-on is to switch on Power
System A or B, and then to switch on one processor to act as CP. For example, RLPSAON followed by
RLCPU1.
Relay Command
RLPSAON
RLPSBON
RLPSSEP
RLCPU1
RLCPU2
RLCPU3
RLCPU4
RLBIUS1
RLBIUS2
RLTCSAON
RLTCSBON
RLPOWOFF
RLRECON
RLTCSOFF
Function
Switch on Power System A
Switch on Power System B
Separate the Power Systems
Select Processor 1 as Control Processor
Select Processor 2 as Control Processor
Select Processor 3 as Control Processor
Select Processor 4 as Control Processor
Select Normal 1553 Interface to BIUS
Select Redundant 1553 Interface to BIUS
Switch on TCS A
Switch on TCS B
Switch off Power Systems A and B
Reconfigure the CDMS. Switch off all Processor Cards
Switch off TCS A and B
Table 1. JET-X Relay Commands
Once a control processor is switched on, further relay commands can be issued as necessary, and fine control
of the instrument can be achieved by use of serial commands, which are received by the control processor over
the SRG bus. A more detailed description of the entire configuration process is given later in this document.
3.2 SRG Commanding
All other operations JET-X performs are controlled by commands transmitted over the currently selected 1553
SRG bus to the Control Processor. Here, commands are interpreted, and the desired operations performed.
There are two distinct classes of commands, namely modechange commands, and serial commands. The
distinction is purely in the interpretation of the commands, with a modechange moving the instrument between
major modes of operation, and serial commands generally changing the configuration parameters of these
major operating modes. Full details of these commands are given later in this document, and a summary of the
modechange commands is given in Table 2. A number of commanding examples are also given later in this
document, which illustrate normal operations.
To/From
Spacecraft
Mass Memory
Interface
Spacecraft
Interfaces
Mass Memory
Mass Memory
Interface
Spacecraft
Interfaces
AM Interface
Figure 1. General Architecture of the JET-X Electronics System
(Power distribution and regulation system excluded)
RCON
BM Interface
Background
Monitor 2
Background
Monitor 1
Attitude
Monitor 1
Attitude
Monitor 2
BM Interface
RCON
AM Interface
Analog
Monitors +
TAM 1/2 I/F
Analog
Monitors +
TAM 1/2 I/F
CPU4
CPU1
Control Bus 2
Links
Serial
Control Bus 1
Telescope
Electronics 2
PreProcessors
+ TE Interface
PreProcessor
+ TE Interface
Telescope Bus 2
CPU3
CPU2
Telescope Bus 1
Telescope
Electronics 1
JET-X FM CDMS : Software User's Manual
Issue 3 Draft
JET-X(95)BU-042
Page 10 of 113
To/From
Spacecraft
Clock
Gen
Figure 2. General Architecture of a Processor Card
Powerup
Reset
Command
Reset
Watch
Dog
8086
uP
DMA
Relay Controlled
Battery Backup
Decoder
Data/Address/Control Lines
Interrupt
Control
RAM
8x8K
ROM
8x8K
Switched 5V
RAM
8x8K
ROM
8x8K
ROM
8x2K
UART
3
UART
2
UART
1
CPU4
CPU3
CPU2
CBUS
Data
Address
Control
TBUS
Data
Address
Control
JET-X FM CDMS : Software User's Manual
Issue 3 Draft
JET-X(95)BU-042
Page 11 of 113
JET-X FM CDMS : Software User's Manual
Issue 3 Draft
Modechange Command
MCSTATUS
MCCONTAC
MCSTAOBS
MCFINOBS
MCCUTOFF
MCRADPAS
MCBATDIS
MCVECTOR
BM ALERT1
JET-X(95)BU-042
Page 12 of 113
Function
Transmit JET-X Status Word
Begin Ground Contact
Start Observation Time
Finish Observation Time
Emergency Power Cut-off
Prepare for Radiation Belt Passage
Spacecraft Battery Discharge
Transmit JET-X Vector Word
Background Radiation Monitor Alert.
Table 2. Modechange Commands
3.3 System Control Bus Mediation
Each processor may communicate with any other processor using high speed bi-directional serial links2. The
two CDMS boxes both contain a set of 'Control Bus' electronics, to support the activities of one CP, and a set
of 'Telescope Bus' electronics to support the activities of one TP. Each processor can communicate with
systems on either bus, although a processor may only be associated with one bus at any time. The system was
not designed to support both processors in one CDMS box controlling the same bus, and the software boot-up
sequence is designed to prevent this. In practice, a single processor is assigned the role of CP with a relay
command, RLCPUx, at initial switch-on. The second processor in the same CDMS box as the CP can be run
as TP, as can one of the processor cards in the second CDMS box. A CP can only be run as a TP after the
system is reconfigured by the RLRECON relay command, and a different processor started as a new CP. A
fully operating CDMS configuration consists of one CP and two TPs (one in each CDMS box). The fourth
processor should be switched off, and left in cold redundancy.
The CP uses the control bus electronics to control the following interfaces:
•
•
•
•
•
•
All interfaces with the spacecraft.
The interface with the JET-X Mass Memory (MM).
The interface with the Power Distribution and Regulation System (PDRS).
The interface with the Background Monitor (BM).
The interface with the Analogue Monitors (AMON).
The interface with the Attitude Monitor (AM).
Normally, each of the two TPs uses its telescope bus electronics to control interfaces with one of the sets of
XRT Focal Plane Electronics (Telescope Electronics or TE), although the hardware allows a range of crosslinking options for dealing with hardware failures. Each TP usually controls the following interfaces:
•
•
•
1BM
296k
Serial command and housekeeping interface to the TE.
Control and Monitoring interfaces to the Filter Wheel.
Fast serial interface for XRT CCD data.
ALERT is generated onboard JET-X, and transmitted to the other instruments when requested.
baud, 8bit, even parity. TPs use 2 stop bits. CP uses 1 stop bit.
JET-X FM CDMS : Software User's Manual
Issue 3 Draft
JET-X(95)BU-042
Page 13 of 113
The command and data pathways in a standard operating configuration between the control processor,
telescope processors, telescope electronics, and the spacecraft are shown in Figure 3.
Figure 3. Block Diagram of the JET-X CDMS
CCDs
Telescope Electronics
1
Attitude Monitor
Background Monitor
Telescope Processor
1
Telescope Processor
2
Control Processor
Spacecraft
CCDs
Telescope Electronics
2
Mass Memory
JET-X FM CDMS : Software User's Manual
Issue 3 Draft
JET-X(95)BU-042
Page 14 of 113
JET-X FM CDMS : Software User's Manual
Issue 3 Draft
JET-X(95)BU-042
Page 15 of 113
3.4 JET-X Diagnostic Information
The JET-X instrument has a wide range of diagnostic information available in the form of housekeeping
records. These records are detailed in the 'JET-X Telemetry Format Specification' document. The control
processor generates these records at 5 second intervals based upon the 1Hz clock from the spacecraft and the
'housekeeping acquisition table'. Once produced, the records are stored in the mass memory, and transmitted
to the spacecraft on request. There are fourteen different record types, and Table 3 shows the primary data
returned in each type. Those records which are loaded into the 'housekeeping acquisition table' by default are
marked 'D'. The 'housekeeping acquisition table' holds 11 record requests and can be modified using patch
commands. Requests can be repeated in the acquisition table if necessary.
ID
0
1
2
3
4
D
Housekeeping Record Name
Control Processor Memory Dump
Telescope Processor 1 Memory Dump
Telescope Processor 2 Memory Dump
CDMS Control Processor Status
Registers
CDMS Analogue Monitors
5
D
XRT1 and TP1 - Part A
6
D
XRT1 and TP1 - Part B
7
8
9
D
D
D
XRT2 and TP2 - Part A
XRT2 and TP2 - Part B
Attitude Monitor
10
D
Configuration Block 1 and Oddments
11
12
13
D
*
D*
Configuration Block 2 and Oddments
Attitude Monitor - Track Mode
Attitude Monitor - Search Mode
D
D
Information Summary
53 bytes from the Processor Memory
53 bytes from the Processor Memory
53 bytes from the Processor Memory
Relay Status. Mass Memory Status. Error
Counters. Modechange History. Reboot Counters.
System Temperature Monitors. Voltage Monitors.
Current Monitors. Memory Scrubbing Error
Locations. XRT Countdown Timers.
CCD Bias Voltages. Pre-Amp Configurations.
Sequencer Settings. Filter Wheel Positions.
CCD Bias Voltages. RadFET Voltage. Event
Counters. Cycle Counter.
As Record 5.
As Record 6.
CCD Bias Voltages. AM Temperatures.
Diagnostic Pixel Data.
Baffle Heater Control. Event Filter Parameters.
Filter Wheel Stepping Rates. System Bus
Configuration.
As Record 10.
Tracked Star Amplitude and Position Data.
Search Threshold. Amplitude and Position Data of
Candidate Stars.
* Records 12 and 13 are automatically switched to reflect the current mode of the Attitude Monitor
Table 3. Housekeeping Record Types.
Housekeeping records are transmitted to the spacecraft via either the currently selected SRG bus, which is the
default route, or via a dedicated slow housekeeping interface. Selection of the data path is done using the
serial command CPSTWORD to change the control processor status word.
The generation of housekeeping records is done using one of two algorithms, dependant upon the current
operating mode of the instrument, and the differences are examined in close detail later in this document. If
the instrument is storing JET-X science data to the mass memory, and is not in 'test mode', then priority is
given to ensuring that record production is optimum for subsequent ground processing of the observation data.
JET-X FM CDMS : Software User's Manual
Issue 3 Draft
JET-X(95)BU-042
Page 16 of 113
During 'test mode', which is set using CPSTWORD, or if the instrument is not observing, priority is given to
the production of records which reflect changes made by uplinked commands. This allows for more real-time
monitoring of the instrument than the observing mode algorithm, and is best used for instrument diagnostics.
JET-X FM CDMS : Software User's Manual
Issue 3 Draft
JET-X(95)BU-042
Page 17 of 113
4. Software Design Overview
The software has been based around a three layer design, as shown in Figure 4. This architecture is similar to
that proposed by the Hierarchical Object-Oriented Design (HOOD) method, currently favoured by ESA for
embedded software. However, the use of assembly language, and the high degree of optimisation required has
prevented the implementation from being truly object-oriented. The functions of the three layers are explained
below.
4.1 Systems Layer
The systems layer is largely invisible to the user, but provides a set of facilities required to support the two
applications. Facilities provided are:
•
•
•
•
•
•
Initial switch-on memory checkout and processor polling routine.
Hardware set-up and driver routines.
General memory management utilities.
Triple redundant memory management utilities, including error scrubbing.
Main task scheduler.
Timed delay utility.
4.2 Application Support Layer
The application support software provides utilities which are specifically associated with one of the two
applications. Facilities provided are:
•
•
•
•
•
•
CP health monitor.
CP initial switch-on memory initialisation.
CP general memory and hardware initialisation.
CP 1Hz interrupt handler.
TP health monitor.
TP general memory and hardware initialisation.
4.3 Applications Layer
The control processor and telescope processor applications consist of collections of interacting software
modules or objects, designed to be run in a time-sliced fashion under the control of a simple cyclic task
scheduler in the system layer (Figure 10). Each module has responsibility for control of a single hardware
interface or major data structure. This architecture is intended to make the software easier to understand,
maintain and test, both during development and in orbit. The functions of the individual software modules in
the two applications are described in detail in Sections 8 and 9.
JET-X FM CDMS : Software User's Manual
Issue 3 Draft
JET-X(95)BU-042
Page 18 of 113
Control
Processor
Application
Software
Telescope
Processor
Application
Software
Application Support Layer Software
System Layer Software
Hardware
Figure 4. CDMS Software Architecture
JET-X FM CDMS : Software User's Manual
Issue 3 Draft
JET-X(95)BU-042
Page 19 of 113
5. System Operational Overview
5.1 Processor Switch-On
When a processor card is switched on or rebooted, control is passed to the initial switch-on routine in the
system layer. There are two methods used to switch-on processor boards, namely by relay or serial
commands. A single relay command, RLCPUx, is used to select the control processor. This relay command
also switches on the RAM battery backup relay for the processor, and the state of this relay is used by the
software boot-strap routine to configure the processor as a potential CP if the relay is on, or TP if it is off.
Once a CP is configured and active, the operator can issue serial commands, CPUx, to switch on other
processors without switching on their RAM battery backup relay. Processors switched on by serial command
therefore run as TPs. The state of the battery relay is also used by the hardware to select which system bus
the processor can access. If the relay is on, then the processor has access to the 'Control Bus' electronics, and
if not, to the 'Telescope Bus' electronics.
5.2 Software Bootstrap Routine
The first action of this routine is to disable DMA, calculate a checksum for the onboard ROM, and perform an
integrity check on the RAM. The results of these checks are stored in RAM, where they become visible to the
operator through the housekeeping records3 once one of the applications has been started. Once this is
completed, the stack is loaded with underflow protection bytes. The next action of the routine is to initialise
the inter-processor communication hardware4 and attempt to establish communications with the other three
processors.
The first stage taken is to check the status of the RAM battery backup relay. If this monitor shows that the
relay is off, the software assumes that the processor is to be configured as a TP. It then enters a loop,
repeatedly transmitting activation queries on all three of its inter-processor UARTs until an active CP
responds. Only when this acknowledgement has been received from the CP5, does the processor configure its
memory for TP usage, and enter the main scheduler. Any response, other than this acknowledgement, received
by the processor on any of the UARTs is ignored.
If the RAM battery relay status is shown enabled, the software assumes that this processor is to be configured
as the sole CP. A number of other checks which are detailed in Section 8 are performed prior to activation of
the control bus to prevent a duplicate CP from starting. If an active CP is not found, this processor assumes
the role of CP, and then enters the main scheduler. However, if the processor detects that another CP is
already running, then the processor enters an idle loop as it must have been switched on by a commanding
error. The only way to subsequently recover the use of this idle processor is by reconfiguring the system using
the RLRECON relay command.
3The
checksum is only returned in the cyclic RAM housekeeping records, and this record type is not enabled by
default for the TP.
4Three UARTs operating at 96k baud.
5An active CP will transmit the acknowledgement if there is no TP already activated in the same CDMS box as the
querying processor. If there is already an active TP, the CP will switch off the querying processor.
JET-X FM CDMS : Software User's Manual
Issue 3 Draft
JET-X(95)BU-042
Page 20 of 113
Thus, after switch-on, the CDMS reaches a configuration known as Ready Mode, in which a control processor
and one or two telescope processors are operating. The control processor begins sending housekeeping
records through the selected channel (either the current SRG bus or the slow housekeeping channel) and
monitors the SRG bus for incoming commands. If the switch-on was from a 'Normal Off'6 state, the control
processor also switches on the previously selected subsystems and interfaces. If the attitude monitor has been
switched on, it begins to process AM readout frames and identify suitable star images for tracking. If the TEs
are switched on, the telescope processors begin collecting housekeeping data from these, and relaying it to the
control processor7.
When a 'start observation' modechange command, MCSTAOBS, is received by the active control processor,
subsystems are activated, and a block of configuration data is passed to the telescope processors. A set of
software patching information is also sent. The telescope processors are then commanded by the control
processor to pass sequencer software to their associated TEs, and to select filter wheel positions.
Subsequently the telescope processors begin to process science data from the TEs, passing acceptable science
data back to the control processor. Within the control processor, science data from the two telescopes is
combined with image data from the attitude monitor, and housekeeping records from all subsystems, to form
the science data stream. This data stream is passed to the Mass Memory, where it is stored for the remainder
of the session, ready to be transferred to the spacecraft telemetry system via the SRG bus during a ground
contact session.
6'Normal
Off' is achieved when the system has been fully configured, and an RLPOWOFF relay command is sent.
This shuts down JET-X, but the CP battery backup relay is left enabled.
7If the TEs are not switched on, the TPs will relay empty housekeeping records in response to CP requests for TE
housekeeping.
JET-X FM CDMS : Software User's Manual
Issue 3 Draft
JET-X(95)BU-042
Page 21 of 113
6. The System Layer
The system layer is largely invisible to the user. It provides a set of common facilities to support the two
applications, effectively acting as the operating system. The following sections describe the system layer
software.
6.1 Initial Switch-On Memory Checkout and Processor Polling Routine
The flow chart followed by the system start-up routines is given in Figure 5. This routine is used immediately
after a processor is switched on or physically rebooted. It is also used if the processor is reset after the Main
Task Scheduler detects a program flow error. Its purpose is to determine the current state of the CDMS
system and the role the processor is to assume (i.e. CP or TP), then to initialise the processor using the
appropriate routines from the Application Support Layer, before passing control to the Main Task Scheduler.
It also performs checks on the processor RAM and ROM, recording the results in memory, where they are
accessed through the housekeeping data system.
6.1.1 Common Start-up Operations
The first function of the routine is to disable interrupts and DMA, and then to calculate the XOR checksum of
the onboard program ROM, storing the resulting word at address 0x000A. A word register is cleared, and
then all locations in the processor 16K ROM are XORed into this register. The address range which this
checksum covers is from 0xC000 to 0xFFFF inclusive. The expected value of this checksum is 0x____ for
CDMS software version 4.C.
Then the routine initialises the processor stack, which starts with the 16bit word at address 0x3FF6-7 and
expands downwards. The stack has 16 words of value 0xC0008 loaded into it as underflow protection.
Should the stack become corrupt, and too many words popped out, a RET instruction returning to 0xC000
will re-enter this routine, causing a soft reboot. The working extent of the stack in the CP application extends
down from 0x3FF4 to 0x3F80, and for the TP application from 0x3FF4 to 0x____. Thus RAM available for
patching in the CP extends from 0x3000 to 0x3F00, and in the TP from 0x3200 to 0x____9.
The next operation performed is a read/write check on each 16 bit word of processor RAM, storing the total
word error count at address 0x000C and the address of the last (i.e. lowest addressed) word containing an
error at address 0x000E. The address range checked is from 0x3FFE to 0x0000, counting downwards
towards 0x0000. Each word has the original value saved, before 0xFFFF and then 0x0000 is written into it to
check for stuck-bit errors. The original word is then restored. The error count and address are not reset,
unless the processor is switched off, with the RAM battery backup disabled. It should be noted that even then,
these location are not explicitly cleared, and will contain the power-on defaults for the RAM10.
The routine then checks the status of the RAM battery backup relay of this processor, using an I/O read. The
only way to switch-on this relay is by using a relay command, RLCPUx. It should be noted that the only way
to switch off the RAM battery backup relay is by reconfiguring the system using RLRECON. This means
that a CPU which has been running as control processor cannot be run as a telescope processor without
issuing a reconfigure. Connection to the control bus and telescope bus is also switched by this relay.
80xC000
is the first byte of the 16K ROM, and contains a jump into the start-up routine.
give 128 byte safety margins.
10In testing, it appeared temperature dependant. At room temperature the value of each byte is usually 255. At cold
temperatures, the byte value is likely to be a corrupted bit pattern of the contents of the location before switch-off.
9These
JET-X FM CDMS : Software User's Manual
Issue 3 Draft
Perform ROM and
RAM Checks and
Setup Uarts
JET-X(95)BU-042
Page 22 of 113
Disable DMA and
Interrupts
Processor
Reboot/Crash
No
Battery
On?
No
Received
Startup?
Startup As
Telescope Processor
Yes
CBus
Active?
Broadcast TP
Startup Request
No
Yes
Listen for
CP Asserts
Variable Delay
No
Yes
Uart
Asserting
CBus?
Received
Assert?
CBus
Active?
Yes
No
Yes
No
Yes
Assert CBus
Disable
Timeout on
Listen?
Enter Idle State
Yes
Yes
Startup as Control
Processor
Ram ID
for CP?
No
CBus Active?
No
Yes
Bad Boots
under 2?
Yes
Warm Boot CP
No
Cold Boot CP
Figure 5. System Switch-On Sequence
No
JET-X FM CDMS : Software User's Manual
Issue 3 Draft
JET-X(95)BU-042
Page 23 of 113
If the RAM battery backup relay is switched off, the routine decides that the processor has been switched on
by a serial command from the CP, and that it is to either start-up as a TP, or has been switched on in error. If
this relay is switched on, then the processor executes the control processor start-up routine. The next sections
detail the different initial start-up procedures for TP and CP.
Command
Processor On Relay Command
System Reconfigure
Processor On Serial Command
Processor On Serial Command
Battery Relay Status
On
Off
Mnemonic
Battery Relay
Switched On
RLCPUx
Switched Off
RLRECON
Unchanged (off)
CPUx
Unchanged (on)
CPUx
Table 4. Battery Relay Switching
Processor Use
Control Processor
Switched Off
Telescope Processor
Idle Control Processor
System Bus Available
Processor Use
Control Bus
Control Processor
Telescope Bus
Telescope Processor
Table 5. System Bus Availability
6.1.2 Telescope Processor Initial Start-up Conditions
A potential TP, i.e. with the RAM battery backup relay off, enters a loop in which it disables telescope bus,
and sends out an INITIAL11 start-up request on all three inter-processor UARTs. It continues in this loop
until either the active CP switches it off, or a TPSTARTUP12 byte is received.
The control processor will switch-off this processor if the other processor card in this CDMS box is already
configured as a telescope processor. It should be noted that the flag maintained by the control processor which
indicates which processors are enabled as telescope processors is not cleared when a serial command,
@SUBSYS -CPUx, is sent to switch off a processor card. This means that the operator cannot switch from
using the existing telescope processor in a CDMS box to the cold-redundant processor without issuing
RLRECON13, and completely reconfiguring the system.
The TPSTARTUP command causes the newly activated telescope processor to enable its telescope bus in its
CDMS box. Next, the processor RAM is initialised with default settings from the ROM, and the UART
which the TPSTARTUP command was received on is stored. The telescope processor will subsequently
transmit housekeeping and science data only on this UART. The main task scheduler is then entered, and the
telescope processor application modules are processed.
If the TP receives bytes other than TPSTARTUP, they are discarded, and the processor continues to poll for
an active CP.
11The
value transmitted on the UARTs for INITIAL is 0x01.
value transmitted on the UARTs for TPSTARTUP is 0x10.
13It is possible, but not recommended, to use a patch command to reset these flags by hand.
12The
JET-X FM CDMS : Software User's Manual
Issue 3 Draft
JET-X(95)BU-042
Page 24 of 113
6.1.3 Control Processor Initial Start-up Conditions
If the RAM battery backup relay is enabled, then the processor is either to become the first CP to start-up, or
it has been switched on by a commanding error. The first check is to read the status of the control bus.
If this first check shows the bus is disabled, then the other processor in this CDMS box is not an active control
processor, and this processor enters a delay loop for a processor dependant time. The delay ensures that a
predictable processor board activates as control processor when the system is switched on using RLPSxON,
after a normal-off command, RLPOWOFF. The approximate delay times are given in Table 6. Due to the
delay timings, processor boards 1 or 3 are normally configured as control processor. This provides fallback in
the event of a dual system failure that prevents a processor from being reconfigured. In that case, switching
on a processor with a shorter variable delay will allow this processor to become control processor
preferentially after a normal-off, and subsequent normal-on. command.
Processor
Variable Delay At Start-up (seconds)
CPU 1
1.4
CPU 2
0.8
CPU 3
1.2
CPU 4
0.4
Table 6. Variable Delay Start-up Duration for the Control Processor
After this variable delay, the potential control processor enters a loop, polling for a CPASSERT14 from any of
its three inter-processor UARTs.
If a CPASSERT is received, then the processor enters a tight idle loop, where it resets the watchdog timer, and
repeatedly reads bytes from all of its inter-processor UARTs. This ensures that it does not affect the normal
operations of the existing control processor. This loop also asserts control bus disable, so that an SEU in this
flag only has a short transient effect, and should not stress the control bus hardware due to contention between
the control processors.
If a CPASSERT is not received in an approximately two second period, then the processor checks the control
bus status again, and if it is not active, it starts as control processor. If it is enabled, then the other processor
in the CDMS is already running as control processor, and therefore this processor enters the tight idle loop
detailed earlier.
If the first check shows that the control bus is active, the status of the control bus enable is checked for this
processor, and if this processor card has enabled the bus, then the routine assumes that this processor is
restarting after a reboot, and immediately starts up as control processor.
If the bus is enabled and this processor has not enabled the bus, then the processor asserts the bus disable, and
then checks the bus monitor again. If the bus is still enabled, then it is certain that the other processor in this
CDMS box is enabling the control bus, and it enters the tight idle loop. If it is clear, then we assume that the
UART was in an inconsistent state after power-up15, and the routine continues processing at the variable delay
routine, detailed above.
14The
15The
value transmitted on the inter-processor UARTs for CPASSERT is 0x09.
UART was asserting the control bus, but the monitor was reading incorrectly.
JET-X FM CDMS : Software User's Manual
Issue 3 Draft
JET-X(95)BU-042
Page 25 of 113
6.1.4 Control Processor Initial Start-up Processing
The CP start-up code enables the control bus, and immediately writes a CPASSERT on all of its interprocessor UARTs to inform any other processors that are incorrectly configured to start as CP, that a CP is
becoming active. Due to the processor dependant delay in the start-up routine, this should ensure that the race
condition after a normal-on, RLPSxON, is eliminated, and the race condition if multiple RLCPUx commands
are issued is small.
A flagword is kept in the processor TRM that is set to a defined value, 0x5A78, if the processor has already
booted as a CP16. This value is checked and if it is incorrect, then a complete cold-start of the CP is
performed, and any previously uplinked commands are discarded.
If the flagword is correct, and the failed-boot counter (Section 6.1.5) is below 2, then a warm-start is
attempted, which does not discard existing information in the processor RAM. In either case, before the
scheduler is entered, the entire TRM region is scrubbed for errors, and locations with uncorrectable errors are
restored from the ROM defaults.
6.1.5 Failed-Boot Counter Processing
This routine also uses a failed-boot counter, which is used to detect when repeated warm-boot attempts do not
bring the processor to a stable state. This would normally be due to an SEU or error in an uplinked patch, or
a fault in the processor ROM. This counter is incremented prior to entering the Main Task Scheduler, and
cleared once the processor has completed 65536 complete cycles of the scheduled tasks.
It should be noted that there is no in-built check for an error in the telescope processor preventing normal
operation. This can be caused if an uplinked patch to the telescope processor application is incorrect, either
due to an SEU in the control processor patch memory, a commanding error, a fault in the TP ROM, or other
reason. In this case, the system cannot recover and will not perform observations without operator
intervention.
16For
a TP, the flagword is set to 0xA587.
JET-X FM CDMS : Software User's Manual
Issue 3 Draft
JET-X(95)BU-042
Page 26 of 113
6.2 Hardware Driver Routines
This section includes general subroutines for setting up and operating CDMS hardware. The subroutines are:
•
•
•
•
•
•
•
•
Inter-processor UART setup.
Inter-processor UART soft reset.
Inter-processor UART polling.
Processor identity read.
Priority interrupt controller setup.
Mass Memory UART setup.
SRG bus output routine.
Processor delay routine.
6.3 General Memory Management Utilities
This section includes subroutines for manipulating RAM memory. Subroutines provided are:
•
•
•
•
•
•
Zero small block of RAM.
Zero large block of RAM (includes watchdog timer service).
Copy to small block of RAM.
Copy to large block of RAM (includes watchdog timer service).
Copy to large block of RAM from the 2K extension ROM (includes watchdog timer service).
Clear main RAM routine, and initialise TRM (includes watchdog timer service).
JET-X FM CDMS : Software User's Manual
Issue 3 Draft
JET-X(95)BU-042
Page 27 of 113
6.4 Triple Redundant Memory Management Utilities
The subroutines in this module allow operations on parameters in the Triple Redundant Memory, or TRM.
This region of RAM is used for critical parameters, and a majority-voting scheme is used to refresh, or scrub,
the tables to remove any radiation induced errors. In the case that all three copies of the tables are incorrect, a
default value is restored into the location from the parameter tables in ROM, and the TRM error counter, and
address counters in the housekeeping records are updated. This allows unrecoverable changes to the system
due to SEUs to be tracked during an observation. A flowchart showing the operation of the TRM reading
routine is given in Figure 6.
The first table starts at address 0x0020, and the three copies of the tables are displaced from each other by
0x4FF bytes. The third copy is stored as the inverse of the other two. This is intended to provide a high
degree of SEU tolerance. The subroutines provided for modifying and accessing this region are:
•
•
•
•
•
•
•
•
Scrubbing ( i.e. error removal ) routine.
Location read word and correct routine.
Block copy to TRM.
Write word to TRM.
Write byte to TRM.
Logic AND into TRM byte.
Logic OR into TRM byte.
Logic XOR into TRM byte.
It should be noted that there are areas in the onboard software where the TRM tables are directly modified
without using these routines. This is done for performance reasons.
One word of TRM is scrubbed for each complete cycle through the scheduler as part of the application health
check monitoring. For the expected range of 300 to 700 cycles per second, the time taken to refresh the entire
TRM table is approximately three seconds.
6.5 Main Task Scheduler
The operation of the task scheduler is shown in Figure 7. The task scheduler supervises program flow while
either the control or telescope processor application is operating. It implements a simple cyclic scheduling
scheme. The scheduler passes control in turn to each of the subroutines whose start addresses are listed in a
task schedule contained in the TRM. The subroutines listed are the main processing routines of each of the
dominant modules of the selected application. When the subroutine has completed the required processing
tasks, it returns control to the task scheduler. Tables 7 and 8 show the default scheduler configurations for the
control processor and telescope processors.
In order to prevent an SEU corruption of the task schedule from causing the processor to crash, the scheduler
checks that the first two copies of the call vectors in TRM agree before the call is performed17. It also checks
that when control is returned from the subroutine, the correct return code is contained in the AX register of the
processor18. If the correct return code is not present, the task scheduler concludes that program flow has been
interrupted by a radiation induced SEU or other problem, and as a precaution passes control back to the initial
switch-on routine, triggering a soft reset of the processor.
17
If the values do not agree, a TRM scrub is performed on that location, and the operation is retried.
correct return value is the address of the scheduled routine contained in the task schedule.
18The
JET-X FM CDMS : Software User's Manual
Issue 3 Draft
JET-X(95)BU-042
Page 28 of 113
Compare Copies in
First and Third TRM
Tables
Read TRM
Word
Compare Copies in
Second and Third
TRM Tables
Yes
Identical
No
Compare Copies in
Second and Third
TRM Tables
Identical
No
Copy Third Table
Value to First and
Second Tables
Yes
Identical
No
Compare Copies in
First and Second
TRM Tables
Copy Second Table
Value to Third
Table
Yes
Identical
Yes
Return Value From
TRM Table
Increment
Correctable Error
Counter
No
Cold Reboot TP
Yes
Battery Off
No
Return Default
Value
Restore Word
Requested With
Default Value
Store Error Location
in UCE Table and
Update Pointer
Figure 6. TRM Reading / Scrubbing Flowchart
Increment
Uncorrectable Error
Counter
Cyclic
Pointer
Scheduler Entry 1
Scheduler Entry 2
Scheduler Entry 3
Scheduler Entry 4
Scheduler Entry 5
Scheduler Entry 6
Scheduler Entry 7
Scheduler Entry 8
Scheduler Entry 9
Scheduler Entry 10
Scheduler Entry 11
Scheduler Entry 12
Scheduler Entry 13
Scheduler Entry 14
Scheduler Entry 15
Scheduler Entry 16
Figure 7. Main Task Scheduler
Yes
Reset Watchdog Timer
Correct Return
Value?
Check Security Code
Jump to Address From
the Scheduler Table
Yes
Do First 2 TRM
Copies Match?
Read in Address of
Next Scheduled
Routine
From Startup Routine
No
No
Restart This
Processor
Scheduled Code
Scrub Scheduler
Table Location & Reset
Watchdog Timer
JET-X FM CDMS : Software User's Manual
Issue 3 Draft
JET-X(95)BU-042
Page 29 of 113
JET-X FM CDMS : Software User's Manual
Issue 3 Draft
JET-X(95)BU-042
Page 30 of 113
Each time control is returned to the task scheduler, the hardware watchdog timer of the processor is reset. If a
hardware problem or SEU affects program flow in such a way that control is not returned within a time-out
period of 60ms, the watchdog timer physically resets the CPU card, causing program flow to be passed to the
initial switch-on routine. It should be noted that some tasks called from the scheduler take more than this
time-out period, and have their own watchdog timer reset code to prevent a reboot.
Entry
1
2
3
4
5
6
7
8
9
10
11
12
13
14
15
16
CP Function
p_uart
e_mmout
p_uart
n_amdom
p_uart
q_commandq
p_uart
n_amdom
p_uart
e_mmout
p_uart
n_amdom
p_uart
a_cpheal
p_uart
jb_dohk
Function Operation
Input and output data to the inter-processor UARTs
Output available data to the mass memory
Input and output data to the inter-processor UARTs
Process data from the attitude monitor
Input and output data to the inter-processor UARTs
Process commands from the command queue
Input and output data to the inter-processor UARTs
Process data from the attitude monitor
Input and output data to the inter-processor UARTs
Output available data to the mass memory
Input and output data to the inter-processor UARTs
Process data from the attitude monitor
Input and output data to the inter-processor UARTs
Perform application health checks
Input and output data to the inter-processor UARTs
Update the control processor analogue monitor data
Table 7. Default Control Processor Scheduler Table
Entry
1
2
3
4
5
6
7
8
9
10
11
12
13
14
15
16
TP Function
g_uartw
b_dmabu
g_uartw
h_filter
g_uartw
b_dmabu
g_uartw
b_dmabu
g_uartw
a_tpheal
g_uartw
b_dmabu
g_uartw
j_teuart
g_uartw
g_uartr
Function Operation
Output data to the inter-processor UART to the CP
Input data from the DMA input buffers
Output data to the inter-processor UART to the CP
Process filter wheel commands
Output data to the inter-processor UART to the CP
Input data from the DMA input buffers
Output data to the inter-processor UART to the CP
Input data from the DMA input buffers
Output data to the inter-processor UART to the CP
Perform application health checks
Output data to the inter-processor UART to the CP
Input data from the DMA input buffers
Output data to the inter-processor UART to the CP
Process telescope electronics UART communications
Output data to the inter-processor UART to the CP
Input data from the inter-processor UART to the CP
Table 8. Default Telescope Processor Scheduler Table
JET-X FM CDMS : Software User's Manual
Issue 3 Draft
JET-X(95)BU-042
Page 31 of 113
7. Application Support Layer
The application support software provides utilities which are closely associated with, but not actually part of,
one of the two applications. The following sections describe the various parts of the application support layer
software.
7.1 Control Processor Health Monitor
This module is called directly by the main task scheduler when the CP application is running, in a similar way
to the dominant CP application modules. It is invisible to the application modules themselves. Its functions
are to continuously refresh, or scrub, the TRM for errors introduced by SEUs, and to monitor the operation of
CP application modules, checking that critical events are occurring correctly. The events monitored are:
•
•
•
•
•
•
1Hz interrupts.
SRG bus interrupts.
AM image data interrupts.
Successful reception of incoming serial data from the TPs.
Successful transmission of commands to the TPs.
Event timing flags from the 1Hz routine - XRT calibration completed.
Table 10 shows the actions taken by the CP in the event of a time-out. It should be noted that there is no
persistent flag to show that an inter-processor write time-out has occurred in the housekeeping, although
examining the control processor RAM dump will show the time-out reboot counter not equal to zero19, and the
housekeeping will show a TP reboot. This allows differentiation between this form of TP reboot, and a TP
crash. The time-out counters are reset on the conditions given in Table 9.
The CP health monitor only monitors the activity of those interfaces which are not routinely reinitialised by the
application module processing.
Event
Time-out Counter Reset Condition20
1Hz Interrupt
Entering the 1Hz interrupt routine
Inter-processor UART Write
UART transmit clear (TC) and clear to send (CTS) status bits set.
Inter-processor UART Read
UART data ready status bit set.
AM Interrupt
Entering the AM interrupt routine
SRG Interrupt
Entering the SRG interrupt routine
General Refresh
No conditional reset
Table 9. Control Processor Event Time-out Reset Conditions
19This
counter is used to prevent a hardware problem causing the control processor to repeatedly switching on and off
the relays for another processor board.
20In addition to the standard conditions listed, whenever a event time-out occurs, the time-out counter for the event is
reset.
JET-X FM CDMS : Software User's Manual
Issue 3 Draft
Event
1Hz Interrupt
Time-out (cycles21)
1000-125522
Inter-processor
UART Write
6144
Inter-processor
UART Read
AM Interrupt
SRG Interrupt
General Refresh
65536
JET-X(95)BU-042
Page 32 of 113
Action Taken
Simulate 1Hz interrupt by a software interrupt, and reprogram
the interrupt controller.
Set UART communications interrupted flag23. If the time-out
reboot count for the processor associated with this UART is
below 5, set bits in the relay control register to switch it off
and on to try to clear any latch-up.
Clear the UART input and status registers.
65536
Reprogram the interrupt controller.
65536
Reprogram the interrupt controller.
65536
Reprogram the Mass Memory and inter-processor UARTs.
Table 10. Control Processor Actions Taken on Event Time-outs.
The timing flags set by the 1Hz interrupt routine are also checked in the CP health monitor module to provide
a reliable timing mechanism for the x-ray calibration period at the start of each observation. The default
operation of the system is to command the filter wheel to the calibration position for 10 minutes at the start of
an observation to allow the CCD to be calibrated against the Fe55 calibration source. After the calibration
period is completed, the filter wheel is commanded to the normal observing position. Both the calibration and
observing positions and the duration of the calibration period are patchable. The pairs of positions can be
specified independently for each telescope processor, but the calibration timer is shared between the telescope
processors.
7.2 Control Processor Initial Switch-on Memory Initialisation
This subroutine is called when the initial switch-on routine concludes that the processor is to become the active
CP, but the flagword in TRM is incorrect, or the 'failed reboot' counter reaches two.24. This routine reinitialises the state of the TRM using default values from ROM. The tables contain the following information:
•
•
•
•
•
•
•
•
The task schedule.
Interrupt vectors.
Indirect call tables.
'Safe Mode' switching configurations.
Safe and calibration mode filter wheel control macros.
CP, TP and TE configuration tables.
Empty bad column and pixel tables for XRTs and AM.
Empty patch and copy tables for the TPs and CP.
All previously uplinked commands and patches are discarded if this routine is called during control processor
start-up.
21The
control processor performs between 300 and 700 cycles per second depending on the number of subsystems
activated, the data rate from the telescope processor(s), and other factors.
22If the SRG and AM interrupt time-outs also occur at this point, then the time-out could be as much as 1767 cycles.
23The communications interrupted flag is cleared when a normal TP boot sequence is completed successfully.
24This usually occurs the first time a control processor is switched on after a reconfigure, but could also be called if the
control processor does not complete a complete scheduler cycle before crashing, or the flagword is invalid.
JET-X FM CDMS : Software User's Manual
Issue 3 Draft
JET-X(95)BU-042
Page 33 of 113
7.3 Control Processor General Memory and Hardware Initialisation
This subroutine is invoked after the initial switch-on routine concludes that the processor is to operate as a CP.
Its function is to initialise all control bus hardware and all control processor memory apart from the TRM, and
a large area reserved for the storage of patches. If the initial switch-on routine has detected that initialisation
of TRM is required, the CP initial switch-on memory initialisation routine (Section 7.2) is performed first.
The CP General Memory and Hardware Initialisation performs the following functions:
•
•
•
•
•
•
•
•
•
Increments CP boot-up counter and initialises 'time since boot-up' field in the housekeeping.
Switches on subsystem power bus.
Re-asserts switching status of subsystems, including the power buses.
Copies initialisation values to non-TRM memory fields where required.
Clears all other used memory fields.
Recalculates the block error code lookup tables.
Initialises the priority interrupt controller.
Initialises interfaces to spacecraft, mass memory and attitude monitor.
Initialises the background monitor ignore time-out.
7.4 Control Processor 1Hz Interrupt Handler
This section of code is normally invoked by an interrupt generated by the 1Hz sync signal from the spacecraft.
Its main function is to trigger activities in CP application modules. Since these activities are essential for the
correct operation of several important modules, including the relay control module and the H/K data
formatting module, it is simulated by the CP health monitor if the 1Hz signal becomes temporarily
unavailable. In case of permanent failure of the 1Hz signal, a more sophisticated solution will need to be
designed and patched up, (for example, reprogramming an unused UART to act as a timer) since the software
time-outs generated by the CP health monitor inevitably occur at a rate somewhat lower than 1Hz. The CP
application modules activated by the 1Hz interrupt handler are:
•
•
•
•
The background monitor control module.
The relay control module.
Housekeeping record data collection module (2s cycle).
Header block generation by the science data formatting module (2s cycle).
The last two activities are triggered only once every 2s, so the 1Hz interrupt handler derives a 2s cycle from
the 1s interrupts. The derived cycle is resynchronised by each arrival of the onboard timecode on the SRG bus
(Section 8.1.1). This timecode is received every 2 seconds from the spacecraft. Other activities of the module
are to increment the 'time since boot-up' fields, and reinitialise the CP cycle counter, storing the final value
ready for inclusion in the next CP H/K record.
JET-X FM CDMS : Software User's Manual
Issue 3 Draft
JET-X(95)BU-042
Page 34 of 113
The 1Hz routine is also used to process a number of other time dependent events:
•
•
•
•
•
•
Holding the command queue for a delay period while processing mode-change commands.
Setting a flag for the regular transmission of CPASSERT bytes on the inter-processor UARTs.
Updating the 'time since boot-up' counters for the control and telescope processors.
Reassert the control bus enable bits.
Scrubbing the Hodgart-Burton code tables25 to remove SEU errors.
Signalling the end of the XRT calibration period.
7.5 Telescope Processor Health Monitor
This module is called directly by the main task scheduler when the TP application is running, in the same way
as the dominant TP application modules. It is invisible to the application modules themselves. Its functions are
to continuously 'scrub' the TRM for errors introduced by SEUs, and to monitor the operation of TP
application modules, checking that critical events are occurring correctly. Events monitored are:
•
•
•
•
•
End-of-frame interrupts during observations.
Incoming XRT data during observations.
Successful reception of incoming command data from the CP.
Successful transmission of data to the CP.
Reassert the telescope bus enable bits.
If any of these events fail to occur within a time-out interval of approximately 2 minutes, the relevant
hardware and state variables are reinitialised. The TP health monitor only monitors the performance of those
interfaces which are not reinitialised routinely by the application software modules themselves.
Event
Time-out
(Cycles26)
65536
65536
65536
Action Taken
General Refresh
Reprogram the inter-processor UARTs
Inter-processor UART read
Soft reset of the inter-processor UART
Inter-processor UART
Force UART status into 'ready to transmit'
write
End-Of-Frame Interrupt
65536
Reprogram the interrupt controller
(observation time only)
DMA Data Transfer
65536
Reset the DMA controller
(observation time only)
Table 11. Telescope Processor Actions Taken on Event Time-outs.
25The
Hodgart-Burton tables are used in the generation of the block error correction code for packets stored in the
mass memory.
26The telescope processor generally performs between 10,000 and 18,000 cycles per housekeeping update. This
translates to approximately 400 to 850 cycles per second. This is very dependent on data rate from the CCDs, and it is
also greatly reduced if the filter wheel is in motion.
JET-X FM CDMS : Software User's Manual
Issue 3 Draft
JET-X(95)BU-042
Page 35 of 113
7.6 Telescope Processor General Memory and Hardware Initialisation
This subroutine is invoked after the initial switch-on routine concludes that a processor is to operate as a
telescope processor. Its function is to initialise all telescope bus hardware and all memory, including the TRM
and software patch areas. Since RAM battery backup is disabled for a TP, no information from previous
sessions is retained within it. However, when the CP is commanded to start an XRT observation, it passes
configuration tables, and patch information to the TP, which overwrite initial values in TP TRM, to define the
current observing mode.
The TP General Memory and Hardware Initialisation performs the following functions:
•
•
•
•
•
•
•
•
Clear all RAM locations.
Copies initialisation values to fields with non zero initialisation values.
Sets pointer to UART used to communicate with CP (passed by initial switch-on routine).
Enables the telescope bus interface.
Initialises the priority interrupt controller.
Initialises the DMA (direct memory access) controller.
Initialises interfaces to TE.
Configures the delays for ADC automatic recalibration timers.
JET-X FM CDMS : Software User's Manual
Issue 3 Draft
JET-X(95)BU-042
Page 36 of 113
8. Control Processor Software
The module architecture of the control processor application is illustrated in Figure 8. Modules annotated “D”
are “dominant” modules, and control is passed directly to these modules by the task scheduler. Control is
passed to modules annotated '1Hz' by the 1Hz interrupt handler, which is in turn triggered by a positive edge
on the spacecraft 1Hz clock. The 1Hz interrupt has an important role in controlling a number of CDMS
activities. Modules annotated 'I' are activated in response to other control bus interrupts, while modules
annotated 'S' are active only when called by dominant or interrupt driven modules. The following sections
describe in detail the individual modules within the CP application.
8.1 SRG Bus Interface Control
This module controls all interactions between the CDMS and the SRG bus. Since the instrument hardware
interface only responds to the SRG bus when it detects SRG bus command words with either the global
address or the unique experiment address27, the module is activated by a control bus interrupt in these two
cases. When it is called, the module first reads the incoming SRG bus command word and any associated data
words from the hardware interface, and stores them in RAM, performing overflow checks as data is received.
The command word is then identified, and a course of action chosen. If the SRG command queue is full, then
the entire received command is discarded, and no acknowledgement is sent for reception. This prevents partial
commands being executed. A summary of the actions taken is given in Figure 9. The response of the
instrument to defined SRG commands is given in the following sections.
8.1.1 'Prepare to Receive Onboard Timecode'
In response to this command, the associated data words (2 words are expected) are passed to the
Housekeeping Data Formatting and Mass Memory Data Formatting modules, to be included in these two data
streams. The 1Hz interrupt routine is also resynchronised. The starting position for the x-ray diagnostic
patch is derived from this timecode, so that for each observation a pseudo-random start position is used. This
gives better average CCD patch coverage if the instrument performs a number of short observations.
8.1.2 'Prepare to Transmit Science Data'
In response to this command, the module first checks that the instrument is configured in ground contact mode,
and that the mass memory dump is not complete. This is accomplished by reading a flag set from the current
'vector word' in TRM. During ground contact sessions, the vector word contains the number of blocks ready
to be dumped by the MM. If the vector word is non zero, the module sends a command to the Mass Memory
Control module to initiate a science block transmission. It then transmits a status word onto the SRG bus,
followed by four science data header words. The mass memory hardware then takes over control of the SRG
bus, sending 2040 bytes of science data, with every 5th byte an EDAC code if the MM has EDAC enabled. If
the two criteria that the instrument is in ground contact mode, and the vector word is non-zero are not
satisfied, a status word is transmitted on the SRG bus, with the 'busy' flag set.
27
00001 for JET-X
Telescope
Processors
Relay Control
Registers
S
Figure 8. Control Processor Application Modules
Attitude
Monitor
AM Control
TP Serial
I/F Control
1Hz
D
Mass Memory
Control
D
Mass Memory
S
Mass Memory
Data Format
T Process
PT
Configuration
H/K Data
Formatting
D
1Hz
Relay Control
H/K Record
Production
Background
Monitor
1Hz
BM Control
CP Application
D
SRG Bus
I/F Control
Command
Interpreter
I
I/S
Slow H/K
I/F Control
SRG Bus
Interface
Interrupt
Secondary
S
I
Dominant
D
Data Flow
Command Flow
Key
Slow H/K
Interface
JET-X FM CDMS : Software User's Manual
Issue 3 Draft
JET-X(95)BU-042
Page 37 of 113
Figure 9. SRG Command Processing Overview
Send Status
Word
Send Status
and Vector
Words
Send Status?
Lockout
State?
Yes
No
Update queue
pointers and
send status word
No
No
No
Yes
Yes
Store
Modechange if
no high priority
change pending
Push registers
and read in
word from I/F
Yes
Send
Vector
Word?
Read word
from I/F
Calculate
Checksum
Store in
queue
SRG Interrupt
Yes
No
Checksum
Correct?
Send 15
words of
H/K Data
Yes
Send
H/K
Data?
No
No
No
Increment Error
count & send
status word
Yes
Broadcast
Command?
Yes
Data waiting?
No
Send BM
Count
(1 word)
Yes
Send
BM
Data?
Increment
Error count &
set status flag
No
No. of
Words
Correct?
Yes
Serial
Command?
Timedout
Waiting?
No
No
Store Modechange
if no high priority
change pending
Yes
Mode
Change?
Send 'busy'
status on SRG
No
More Data?
Yes
Send
Science
Data?
Yes
Send Status
Word
Send MM
data block
No
New
Timecode?
Decrement
MM Block
Count
Yes
No
No
Queue
Overflow?
Resync the
1Hz toggle
flag
Increment
SRG Error
Counter
Reset health
check timer
and return
Update patch
initial Y
coordinate
Copy
timecode to
storage
Yes
Yes
JET-X FM CDMS : Software User's Manual
Issue 3 Draft
JET-X(95)BU-042
Page 38 of 113
JET-X FM CDMS : Software User's Manual
Issue 3 Draft
JET-X(95)BU-042
Page 39 of 113
8.1.3 'Prepare to Receive Command Block'
The module first checks that the number of data words received is equal to the number specified in the
command word. If not, the message error bit in the stored status word is set, the SRG bus error count is
incremented, and processing of the command block is suspended. If the number of data words is correct, the
XOR sum of the whole block is calculated. If this is zero, the command words are added to the incoming
serial command queue, ready to be processed by the command interpreter (Section 8.2). The valid command
counter is incremented, and the command block checksum is saved, ready for inclusion in the H/K and science
data formats, and a status word is transmitted. If the XOR checksum is non-zero, a checksum error count is
incremented, and the command words are not added to the queue. In this case, a status word is not sent.
8.1.4 'Transmit Status Word'
In response to this command, the stored status word is transmitted onto the bus to indicate to the BIUS
whether an SRG bus commanding error has occurred. The message error bit in the stored status word is then
reset.
8.1.5 'Transmit Vector Word'
The module examines the current vector word, stored in CP RAM. If JET-X is in ground contact mode, the
vector word will indicate the number of data blocks currently ready for downlink, otherwise it will be set to
zero. A status word is transmitted onto the bus, followed by the value of the vector word.
8.1.6 Broadcast Modechange Commands
In response to a broadcast modechange command, a token indicating the particular command received is
buffered in RAM, ready to be processed by the command interpreter (Section 8.2). No status word is returned
via the SRG bus.
8.1.7 Addressed Modechange Commands
Processing of addressed modechange commands is carried out in the same manner as for the broadcast
equivalents. However, in this case, a status word is transmitted via the SRG bus.
8.1.8 'Transmit H/K Data'
In response to this command, the module first reads the CP status byte to establish whether the SRG bus is the
currently selected route for housekeeping record transmission. It also checks via the housekeeping data
formatting module whether housekeeping data is currently available for transmission. If both of these
conditions are true, a status word is transmitted onto the bus, followed by 15 words of housekeeping data
supplied by the housekeeping data formatter. If either condition is not true, the status word is transmitted,
followed by 15 data words with value 0xFFFF.
JET-X FM CDMS : Software User's Manual
Issue 3 Draft
JET-X(95)BU-042
Page 40 of 113
8.1.9 'Transmit BM Data'
In response to this command, a status word is transmitted onto the SRG bus, followed by one data word
supplied by the BM control module. This word contains the 12 lsbs of the current count rate, and 4 flags to
show the current BM on/off state, a numeric overflow condition, an 'Ignore BM' flag, and a BM alarm
condition. The BIUS re-transmits this information onto the SRG bus for use by other experiments. Due to the
oscillations of the background monitors after switch on at certain temperatures, the 'Ignore BM' flag was
added. This is set for a patchable time after a BM, or the instrument, is switched on to provide a status
indicator to the spacecraft and other instruments that the readings of background rate are unreliable.
8.2 Command Interpreter
This section describes the operation of the command interpreter itself, but does not include details of the
individual commands, or the command mnemonics used by the EGSE. This information is included in
Section 10.
Since the command interpreter is a dominant module, it is invoked at regular intervals by the main task
scheduler. Its main function is to process serial commands from the serial command queue, and make
corresponding changes to the instrument configuration. These commands are usually placed in the queue by
the SRG bus interface module, but may also be placed there by the command interpreter itself, in response to a
modechange command token or when a serial command macro is expanded.
In order to fully understand the activities of the command interpreter, it is necessary to understand the
configuration control scheme for the instrument. The CP is responsible for maintaining a complete definition
of the current instrument configuration. The information is stored as a set of tables and lists, in the triple
redundant memory storage section of CP RAM. The tables are initialised to default values within ROM when
a CP is switched on from an 'unconfigured off' state (i.e. after an RLRECON relay command) or after a coldreboot28, and can thereafter be modified by uplinked commands. The CDMS hardware provides battery
backup for CP RAM, so the configuration information is retained if spacecraft power is lost, or the instrument
is powered down by a 'Normal Off' (RLPOWOFF) relay command. For the two TPs and associated XRTs,
RAM storage is provided for current configurations of both telescopes, and also for three alternative sets, each
defining a particular observing mode. Normally, these will be used to hold definitions of Framestore 1 Node,
Framestore 2 Nodes, and Timing Modes. These modes are defined in Section 11.2. Configuration copying
commands are provided for copying data between the mode definition tables and the current configurations.
These act as high level commands, allowing the default operating mode of a telescope to be completely
changed with a single command. The current TP/TE configuration is passed to a TP when it is switched on or
rebooted, or when a 'Start Observation Time' modechange command, MCSTAOBS, is processed.
8.2.1 Serial Command Processing
The first action of this section of code is to check the number of words currently present in the serial command
queue. If no command words are present, processing is terminated immediately. If commands are present, the
module interprets and processes each command in turn, advancing the queue by the required amount after each
command is processed, until either the queue is empty, or a 'queue hold condition' is detected. The function of
the two queue hold conditions is to ensure that commands are not processed until the system is ready for them.
The two queue hold conditions are:
28This
can be caused by an SEU in the application flagword, or by corruption of an unlinked patch command
preventing normal operation of the instrument in a non-default mode.
JET-X FM CDMS : Software User's Manual
Issue 3 Draft
•
•
JET-X(95)BU-042
Page 41 of 113
A non-zero value in the 'queue delay' counter.
Command transmission pending for either telescope processor, and the UART ignore flag is not
set.
The UART ignore flags are held for each of the three inter-processor UARTs separately. It is set if the control
processor time-out on a write operation to a UART occurs. This allows the processing of the queue to
continue in the event of a hardware failure, as the system will not stall waiting for UARTs with the ignore flag
set to become clear to send. The UART ignore flag is cleared by the control processor communications
module when it detects a telescope processor transmitting the INITIAL request (Section 8.11).
To process a command, the software first examines bits 13 through 15 (the 3 msbs) of the first word. These
act as a 'sub-address', and determine the meaning of the remainder of the command. They are encoded as
follows:
000 =
001 =
010 =
011 =
100 =
101 =
110 =
111 =
TP1 current configuration block update.
TP2 current configuration table update.
TE1 current configuration table update.
TE2 current configuration table update.
CP current configuration table update.
*spare* (due to removal of OM instrument).
XRT configuration table copying.
Miscellaneous Commands.
8.2.1.1 Configuration Table Updates
If the sub-address indicates a configuration table update, bits 8 through 12 define the offset (0 to 31) of the
byte to be updated within the referenced configuration table. Bits 0 through 7 define the value to be written to
that location. All three TRM copies of the referenced table are updated to the new value. If an update is
applied to a TE configuration table, the address and updated contents of the location are passed to the TP
serial interface control module to be sent to the TP. From the TP, they are passed directly to the TE, allowing
on-line modifications to the TE configuration for fault finding purposes.
8.2.1.2 XRT Configuration Table Copying
As explained earlier, these commands allow an XRT observing mode to be selected using a single command.
Each default table contains settings for both the TP and TE configuration tables for a particular observation
mode. The configuration copying commands affect the TP and TE configuration tables simultaneously. If the
sub-address indicates that configuration table copying is required, bits 8 through 11 determine the destination
table, while bits 0 through 3 determine the source. The contents of both fields is interpreted as follows:
0000
0010
0100
0110
1000
=
=
=
=
=
Framestore 1 node mode configuration table.
Framestore 2 node mode configuration table.
Timing mode configuration table.
XRT 1 current configuration table (TP1 and TE1 tables).
XRT 2 current configuration table (TP1 and TE1 tables).
JET-X FM CDMS : Software User's Manual
Issue 3 Draft
JET-X(95)BU-042
Page 42 of 113
Values in the range 1010 to 1110 have undefined effects, as a predictable, but undefined region of address
space will be used. The operator should never use field addresses other than those given above, as this would
corrupt sections of the control processor RAM.
8.2.1.3 Miscellaneous Commands
The commands with sub-address 111 invoke a variety of responses by the CP, generally of a more active
nature than the configuration management commands discussed so far. CP memory patching and macro
commanding are accessed by this route, along with bad column and pixel list updates and XRT filter wheel
control. Full details are provided in Section 10. When this sub-address is detected, bits 8 through 12 are
extracted and used to index a jump table. Control is then passed to the command handler routine with the start
address indicated by the table entry. Bits 0 through 7 are passed to the command handler routine as a
parameter to modify the response. For example, in the CP patching routine, this byte determines the number
of subsequent bytes associated with the command.
One command of particular interest is the MACRO command. When this command is received, the software
loads a user-uplinked 'command macro' from the specified address within the 'command macro area' in CP
RAM, into the serial command queue. Valid command macros consist of several serial commands, headed by
one word specifying the length (in bytes) of the serial command block. These user-defined macros are loaded
into the command macro area using the CP patch command CPPATNTR with a destination address within the
macro store. The command macro area is 256 words in length, and it should be noted that it is not in TRM,
and so it is not scrubbed, and is therefore vulnerable to SEU corruption.
Once the macro blocks have been loaded into the serial command queue, they are processed in the same way
as the ROM-based macro commands that the software uses in response to modechange and other commands.
The user-defined macro remains intact within the command macro area ready to be invoked again by a
subsequent MACRO command.
The onboard software provides no checking when installing command macros within the command macro
area, and for this reason the process should always be supervised by an onboard software expert.
8.2.2 Modechange Command Processing
In response to a modechange command token, the command interpreter initiates a complex set of responses
within the instrument, in order to configure it in the required mode. The main method of achieving the
responses required is by loading pre-defined command macros from ROM into the serial command queue.
These command macros are executed in the same way as the user-specified macros available with the
MACRO command. Full details of the responses to modechange commands are given in Section 10.2.
When the modechange response subroutine is called, which happens every cycle of the task scheduler, the
software first checks whether a modechange command token is ready for processing. Modechange command
tokens are generated by the SRG bus interface, in response to spacecraft modechange commands, or by the
BM control module. If the token has a 'high priority' (i.e. MCCUTOFF or MCBATDIS), it is processed at
once, otherwise it is only processed once all serial commands already present in the serial command queue
have been processed.
JET-X FM CDMS : Software User's Manual
Issue 3 Draft
JET-X(95)BU-042
Page 43 of 113
When a token is processed, its value is used to select the appropriate pre-defined modechange command macro
from ROM. The first word of the macro is the command word count, which specifies the number of
commands it contains, while subsequent words contain the commands themselves. This is identical to the
storage of user specified macros detailed in the previous section. The software routine to insert the commands
into the queue has been carefully designed to avoid problems which could arise when new serial commands are
received by the SRG Bus Interface while this is happening. First, the queued command count is increased by
the command word count. Next, in order to make room for the new commands, any commands already in the
queue are then moved backwards the required number of places. Finally, the commands from the macro are
copied into the space created at the start of the command queue, ready to be processed the next time the serial
command processing software is called.
When a token is processed, the value of the token is also placed in a four entry cycling buffer which is visible
in the CP housekeeping block. This provides user verification of the last four modechange commands received
by the instrument. The EGSE also uses this field to ascertain the current mode of the instrument. To provide
a better diagnostic capability, there is a different encoding returned in this table for an executed SOT, as
opposed to an SOT which is not performed29.
The command queue can hold up to 64 words, which includes the word used to indicate the size of each
command macro block in the queue. Commands which do not fit are discarded, as detailed in Section 8.1.
The control processor can accept back-to-back commands from the spacecraft until the queue is full. The
command processing rate is lower, but is well in excess of the required one command per second. Given the
nature of the commands, and the differing times taken to process each command, an absolute sustainable limit
is difficult to define. It should be noted that for certain modechange commands, a delay is inserted into the
queue. This suspends all command processing for the duration of that delay30. If the instrument is receiving
commands during this period, then care must be taken not to overflow the command queue.
8.3 Slow Housekeeping Interface Control
The slow housekeeping interface or 'Serial Digital Array' provides an alternative output channel for the 120
byte housekeeping data records created by the housekeeping data formatting module (Section 8.4). The
default route is via the SRG bus (Section 8.1.8).
The module is called from the task-scheduled housekeeping data formatting module whenever a housekeeping
record is completed. The software first checks a flag in the CP status byte to establish whether the slow
housekeeping interface is the currently selected route for housekeeping data, and if so, then selects the main or
alternate channel. If the flag is set, the module executes an I/O operation to set the 'H/K data ready' output
high. It then performs a second I/O instruction to pre-load the output shift register with the first 16 bits of the
record. The module then returns control of the processor to the main task scheduler until the spacecraft begins
to take data.
29For
30Full
instance, SOTs are not performed if the instrument is in safe mode 3a.
details of all the modechange command processing is given in Section 10.
JET-X FM CDMS : Software User's Manual
Issue 3 Draft
JET-X(95)BU-042
Page 44 of 113
When the spacecraft responds to the 'H/K data ready' signal from JET-X, it sets the 'transmit data' line high,
and activates the data clock. Data in the output shift register is then shifted out by the clock. When all data in
the shift register has been sent, the hardware generates a 'H/K data required' interrupt, which passes control to
a routine within the Slow Housekeeping Interface Control module. This routine performs an I/O instruction to
load the next 16 bits of the data block into the output shift register, then releases control of the CPU again,
until the next 'H/K data required' interrupt. This process is repeated until the whole of the block has been sent.
The module is then ready to accept the next block from the Housekeeping Data Block Formatting module.
The JET-X hardware contains logic to reset the 'H/K data ready' line after a whole block has been sent.
8.4 Housekeeping Data Formatting
This module requests the acquisition of housekeeping data records by the H/K Data Record Production
module (Section 8.10), assembles the housekeeping data record, and supplies this to the SRG bus interface
module or the slow housekeeping (SDA) interface control module, depending on which is the selected route for
housekeeping data. The sequence in which H/K data records are requested is controlled primarily by the ‘H/K
acquisition schedule’, which resides in CP TRM. A flow chart of this process is shown in Figure 10.
The main subroutine of this module is called every 2 seconds by the 1Hz interrupt routine. It is programmed
to behave in two distinctly different ways, depending on the current state of the CP. If the MM data
formatting module is not supplying 'JET-X data'31, or the 'set H/K to ground contact mode' flag (bit 2) in the
CP status word is set, the module operates in 'ground contact mode'. In this mode, priority is given to making
the correct H/K records available for the H/K data block as quickly as possible, leading to unpredictable
record order in the MM header packets if JET-X data is being supplied to the MM.
When the main subroutine is called, if a H/K record is required for insertion into the H/K data block, the latest
record is inserted (a record request will previously have been sent to the H/K record production module). If
the block is now complete, it is made available to the SRG bus interface module or the slow housekeeping
(SDA) interface control module, depending on the selected route for H/K data. The software next checks
whether a 'special request' for a particular H/K record type has been received from the command queue
interpreter. These special requests are used to facilitate more responsive monitoring of changes made due to
issued commands.
If a special request has been received, this is used to update the 'current H/K record type' field which is read by
the H/K data record production module on the next 1Hz clock tick. If no special request has been received, the
current H/K record type field is loaded with the next entry in the H/K acquisition schedule.
If the MM Data Formatting module is supplying ‘JET-X’ data, and bit 2 of the CP status word is cleared, the
module operates in 'mass memory mode'. In this mode, H/K records are gathered by the H/K record
production module strictly in the sequence defined by the H/K acquisition schedule, regardless of the
requirements of the H/K data format. When the main subroutine is called, if a H/K record is required for
insertion into the H/K data block the software first checks whether a special request for a particular H/K
record type has been received from the command queue interpreter.
31A
list of possible data types is given in Section 8.5
Figure 10. Flowchart for Housekeeping Generation
Queue TP H/K
Transmit
Command
TP
HK Type
Insert sync and
timecode into
MM Frameheader
Invert 1Hz Toggle
Flag
Causes AM or H/K buffer to be
filled from the main scheduler.
Key
Overlay
Non-Analog H/K.
Setup CP Analog
Data Gathering
CP Analog
Clear frame data
counter & queue
frame for MM
Copy AM data
into
MM Frame
From 1Hz
Interrupt
Refresh A/M Uart
Configuration
Setup AM H/K
Gathering
Copy Requested
H/K data to
H/K Buffer
Other
No
Start AM
Intergration
Toggle = 1?
Return to 1Hz
Interrupt Routine
Queue H/K
Pre-Request if
TP H/K.
Advance H/K
pipe, inserting any
special requests
Increment header
packet count
Copy H/K buffer
into MM Frame
Copy AM mode
and HK type to
MM FrameHeader
Yes
JET-X FM CDMS : Software User's Manual
Issue 3 Draft
JET-X(95)BU-042
Page 45 of 113
JET-X FM CDMS : Software User's Manual
Issue 3 Draft
JET-X(95)BU-042
Page 46 of 113
If a special request is pending, and the most recently gathered H/K record is of the correct type, this record is
inserted into the block. If the record type is not correct, the record is not inserted. If no special request is
pending, the software checks whether the current H/K record is the correct one to continue the normal H/K
record sequence within the H/K block stream. The record is inserted if the record type is correct. If the block
is now complete, it is made available to the SRG bus interface module or the slow housekeeping (SDA)
interface control module.
8.5 Mass Memory Data Formatting
This module receives data from the TPs, the AM and the housekeeping data formatting module, and creates
the formatted data stream which is inserted into the mass memory by the MM control module. Alternatively,
the module can generate several types of test data required during mass memory checkout. The 'data type'
may be selected using the CP configuration update command MMTYPE. Options available are:
JETX
JET-X Science and H/K packet stream.
EDACT
A pattern designed to verify the MM hardware EDAC facility.
RAMP
Ascending byte sequence, designed to be easy to check visually.
FIX
Fixed value 0xA5.
PSEUDO
Pseudo-random byte sequence generated from a 16 byte seed, designed to fill the whole
memory without repetition of any sequence of 16 bytes.
-PSEUDO
Bit-wise inversion of the above.
Since the MM EDAC facility is a feature of the MM hardware, and is 'downstream' of this module, each of the
above data types is available with EDAC either enabled or disabled.
8.5.1 JET-X Data Structure
The JET-X data option supplies a sequence of fixed length 'packets' of data to the mass memory control
module. The packets are 136 bytes long, so an integral number will fit into the 2048 byte SRG bus data
block, whether EDAC is enabled or disabled. A full specification for these data formats is given in 'JET-X
FM Telemetry Format Specification'32. Provided the control processor is not rebooted during a memory fill
session, by an SEU or other reason, the SRG bus data blocks will always contain whole packets. However, a
control processor crash may cause the packet boundaries to become misaligned relative to the SRG bus block,
so the ground segment software must be capable of locating packet boundaries wherever they occur.
The structure of the JET-X data stream is represented in the form of a 'Jackson' data structure diagram in
Figure 11. The structure is synchronised to a 2s cycle generated from the spacecraft 1Hz signal. Every 2s, a
'header packet' is made available to the mass memory interface.
32Document
reference JET-X(94)UL-225
Header
Packet Sync
Pattern
Figure 11. Mass Memory Data-stream Format
0
0
AM Data
Record
Search Mode
H/K Record
Switch
Subsystems
Command
Verification &
Timecode
Header Packet
Track Mode
0
Block Error
Correction
Code
2 Second
Main Cycle
MM Data Stream
*
0
Select on
CCD Identity
Science
Packet Sync
Pattern
Appropriate
Format
XRT Event
0
*
Science Packet
*
Block Error
Correction
Code
* = Iterated Data Object
0 = Data Object Selection
KEY
JET-X FM CDMS : Software User's Manual
Issue 3 Draft
JET-X(95)BU-042
Page 47 of 113
JET-X FM CDMS : Software User's Manual
Issue 3 Draft
JET-X(95)BU-042
Page 48 of 113
This packet format contains the following fields:
1.
24 bit sync pattern
Intended to allow the detection of packet boundaries (6E 7C 2C A1).
2.
SRG onboard timecode
Either 2s or 4s 'late' at time of transmission.
3.
Last command checksum
Intended for verifying serial command reception.
4.
Command count
Also intended for command verification.
5.
56 byte H/K record
H/K record data from one of 13 possible subsystem sources.
6.
60 byte AM record
Star data from the AM in either search or track mode.
7.
3 byte packet ECC
Error correction code for the header packet.
Between the header packets, a variable number of 'science packets' are inserted, containing 'event records' from
the two XRTs. Each event record contains information for one XRT event or diagnostic pixel, or an end-offrame or TP overflow condition. The event records are of variable length, and the software minimises the
volume of data by selecting record formats containing the minimum x and y information required to
reconstruct images during ground processing. The science packet format contains the following fields:
1.
12 bit sync pattern
Intended to allow the detection of packet boundaries (AA 5x).
2.
4 bit CCD identification
Identifies which XRT and CCD the packet originates from.
3.
131 bytes of science data
This field is packed with as many whole records as possible.
4.
3 byte packet ECC
Error correction code for the header packet.
8.5.2 JET-X Data-stream Generation
The generation of the science data stream is performed as follows. The MM data formatting module is
supplied with XRT events in a fixed format, by the serial interface control modules processing incoming data
from the two TPs. The software then extracts from the TP-CP transmission format33, the CCD and readout
node, the 'event class' (Section 9.1.4), and the x and y co-ordinates. For each CCD, the software maintains
two 136 byte packet formatting areas, which are used as a double buffer. Since data from two CCD readout
nodes is merged into each CCD data packet, the software maintains records of the x and y values of the
previous event from each node.
For each incoming event, the previous x and y values for that node are subtracted from the new values, and
negative result conditions are handled appropriately. A table lookup is then performed, which returns the
length of the event format appropriate for the particular combination of event class and co-ordinate
differences, and the address of the appropriate formatting routine. If the event will fit into the current packet,
the formatting routine generates an event with the appropriate format. The stored x and y values are then
updated.
33The
inter-processor transmission format is defined in Sections 8.11.2 and 9.3.1.
JET-X FM CDMS : Software User's Manual
Issue 3 Draft
JET-X(95)BU-042
Page 49 of 113
If insufficient space is available, the currently filling packet is judged to be full. A flag is raised to indicate
this, and a pointer to the packet is inserted into the 'full science packet queue'. This queue operates on the
first-in-first-out principle, and holds the identities of all packets currently full, and awaiting transfer to the
MM control module. The alternative CCD packet area now becomes the currently filling packet. The stored x
and y values are zeroed, and x and y differences for the new event are recalculated in order that the first event
record in each packet has co-ordinates specified relative to 0,0.34 The table lookup is performed again to
derive the start address of the appropriate formatting routine, and this routine is used to insert an event with
the correct format into the packet. The stored x and y values are then updated.
If both of a pair of packet buffers are full, then a flag is set. This flag is cleared when a packet is returned
from the 'full science packet queue'. While the flag is set, all additional events from the TP associated with
that full buffer pair are discarded. Housekeeping data transmissions are unaffected by this blocking. There is
no diagnostic information available to indicate this condition has occurred.
The header packet generation routine is performed in response to every other 1Hz interrupt. The routine
copies the latest timecode and command verification fields, the latest AM star data, and the latest H/K record
into a header packet template. It then sets a 'header packet ready' flag.
8.5.3 JET-X Data-stream Supply
The MM control module requests data from the MM data formatting module each time the MM is ready to
receive a byte of data. If the MM data type is set to 'JET-X data', the software first checks whether any JETX data is available and awaiting transfer. It does this by checking the 'packet present' flag, the 'housekeeping
packet ready' flag, and finally the science packet queue.
If the packet present flag is set, this means that a packet is currently being passed to the MM. The module
incorporates the next byte of the current packet into the calculation of the packet ECC, then sends the byte to
the MM control module for immediate transfer to the MM. After 133 bytes of the current packet have been
passed, the packet ECC calculation is complete, and the completed ECC is inserted into the last three bytes of
the packet.
If the packet present flag is not set, the software checks the housekeeping packet ready flag. If this is set, a
pointer is set to indicate that the housekeeping packet is currently being sent. The housekeeping packet ready
flag is cleared, the packet present flag is set, and the first byte of the housekeeping packet is returned to the
MM control module.
If the housekeeping packet ready flag is not set, the software checks the science packet queue. If entries are
present, the first entry is taken as a pointer to the next available science packet. The science packet queue is
advanced, the packet present flag is set, and the first byte of the new packet is returned to the MM control
module. If no packets are present, the routine returns to the MM control module with a 'no data' condition.
If the MM data type corresponds to one of the test patterns, the next byte of the chosen sequence is generated,
and returned to the MM control module. Since the 'no data' condition is never returned, all test data types are
loaded into the MM at the maximum speed the software will allow.
A flow chart describing this process is given in Figure 12.
34Specifying
the first event in a packet relative to 0,0 allows straightforward error recovery in the event that a packet
is corrupted before it is downlinked.
Figure 12. Mass Memory Data-stream Supply Algorithm
Return No
Data Ready
Condition
Clear Queue
Full Flags
From
MM Control
No
Return Packet
To Packet
Queue
Science
Packet In
Queue
No
H/K
Packet
Ready
No
Packet
Already Being
Stored
Yes
Data Type
JET-X
Yes
Yes
No
Reached
Observation
Maximum
Increment
Packet Count
Yes
Yes
Return Next
Test Pattern
Byte Value
No
Set Current
Packet to
New Packet
No
Return Data
Byte
Return Stored
Packet To
Packet Queue
Yes
Last Byte
Of Packet
Generate ECC
Byte For
Packet
Yes
ECC Bytes
Read and Zero
Next Byte of
Packet
No
JET-X FM CDMS : Software User's Manual
Issue 3 Draft
JET-X(95)BU-042
Page 50 of 113
JET-X FM CDMS : Software User's Manual
Issue 3 Draft
JET-X(95)BU-042
Page 51 of 113
8.6 Attitude Monitor Control
8.6.1 Introduction
The AM control module is the most complex single module in the CDMS software. Its functions are as
follows:
•
•
•
•
•
•
To send serial commands to the AM in order to prompt the return of H/K data or to trigger an
image integration and readout cycle.
To control the configuration of the AM Image pre-processor hardware in the CDMS.
To grab AM image data from the pre-processor FIFO buffer in response to 'AM data ready'
interrupts.
To process the image data from the AM, and identify, select and track suitable star images.
To format data from the images for the MM header block, and the AM H/K record.
To provide active thermal control of the lens temperature
The software has three modes of operation:
•
Search Mode
•
Track Mode
•
Diagnostic Mode
Used to identify and select suitable star images for tracking. When
suitable images are identified, the software switches into track mode.
Selected star images are tracked, and information from the images is
inserted in the MM header block. When star images are lost, the software
switches back into search mode.
A large diagnostic patch (3 by 12 pixels) is moved frame by frame across
the whole CCD. Information from this is inserted in the MM header
block. This mode is intended for system checkout, and in particular
characterising the performance of the CCD.
Flowcharts for AM search mode are given in Figures 13 and 14.
8.6.2 AM Serial Communication
The serial communication software is activated every two seconds by the 1Hz interrupt routine. Each time it
is activated, the routine sends a fixed sequence of 32 serial command bytes to the AM. The AM responds to
each command byte by returning a byte of status or housekeeping information, and these bytes are loaded into
the AM H/K block as they arrive. The first byte of the command sequence is the 'Begin Image Readout'
command, which synchronises the AM frame acquisition process. Two valid formats exist for this command,
specifying long or short AM integration time. Selection of the current integration time setting is made by the
AMINT command. The remainder of the commands act merely as H/K or status requests, apart from a heater
status command, which controls the switching of the AM lens main and alternate heaters. The software closes
the loop for AM thermal control by monitoring the temperature of the lens via AM serial H/K readings, and
comparing this reading with the required value in the CP configuration block. If the current reading is below
the set value, the software alters the format of the corresponding heater status command to switch on the
required heater (i.e. main or redundant). A new lens temperature is selected using the AMLENS command.
This command also allows selection of the main or alternate heaters.
From Track Mode
Check Image
Quality
Search for
star images
Set Threshold to
initial value
Figure 13. Attitude Monitor Search Mode Operation
Select Best Stars
Add to Accepted
Image Table
Add To New
Image Table
JET-X FM CDMS : Software User's Manual
Issue 3 Draft
JET-X(95)BU-042
Page 52 of 113
Y
Figure 14. AM Search Mode Operation (detailed)
Increment
Repetition Counter
Clear Processing
Active Flag
Return APRE To
Search Mode
Add Patch To
Accepted Patch
List
Set Search Mode
Sub-Mode To 3
Set Secondary
Overflow Flag
Y
Sufficient
Stars
Detected
Add Patch To
Rejected Patch
List
Y
Add Patch To
Rejected List
Add Patch To
New Patch List
Test Patch
Position Is
Valid
Space For
Pixel In New
Patch List
N
Y
Y
N
Set Search
Threshold To
Starting Value
N
New Patch
List Has 4
Entries
Add Pixel To New
Patch List
Set Overflow Flag
Restart Search
Mode Processing
N
N
N
N
N
N
Patch Or
Secondary
Overflow
Y
Perform Shape
Test For
New Patches
Patch Passed
Shape Test
Clear Processing
Active Flag
N
Increment Particle
Count
Y
Test Patch Total
Amplitude=0
Y
Y
Rejected
Table Full
Last Pixel
In Frame
N
Set Processing
Active Flag
Set APRE Track
Mode Flag
More Test
Patches To
Check
Y
Pixel In
Rejected
Patch List
Y
Y
Pixel In
New
Patch List
Set Repetitions
To 1
Reset Searching
Tables
N
N
N
Repetition
Counter > 4
Y
Buffer
Overflow Flag
Set
Wait For Next
Pixel
(Unused at 400,400)
Set Patch Positions.
Move New
Patches To
'Test-Patch' List
Pixel In
Accepted
Patch List
Y
Set Search Mode
Sub-Mode To 1
Y
N
N
Set Flags For
Track Mode
Clear Track Mode
Frames Counter
Increment
Overflow Counter
Reduce Threshold By
Reduction Factor
Set Processing
Active Flag
N
Last Pixel
In Frame
Y
Do Positional Check
On New Patches
Pixel In
Border
Region
Y
Clear Patch Tables
And X,Y Bins
Exit
Select Best Stars
Two
Overflows
Detected
Pixel In
New
Patch List
N
Wait For Next
Pixel
Clear Processing
Active Flag
Set Processing
Active Flag
Set naa_status
To 0
Y
Y
N
Y
N
Reset Search
Mode To Restart
N
Sufficient
Stars
Detected
Y
Minimum
Threshold
Reached
Add Pixel Amplitude
To New Patch Total
Set Search Mode
Sub-Mode To 2
Y
Last Pixel
In Frame
Wait For Next
Pixel
N
JET-X FM CDMS : Software User's Manual
Issue 3 Draft
JET-X(95)BU-042
Page 53 of 113
JET-X FM CDMS : Software User's Manual
Issue 3 Draft
JET-X(95)BU-042
Page 54 of 113
8.6.3 Attitude Monitor Image Pre-Processor Configuration Control
The configuration of the AM image pre-processor is setup every 2 seconds, just before the 'begin image
readout' command is sent to the AM.
In the 'regions of interest' mode, the pre-processor examines each pixel of the CCD image, and passes on to the
input FIFO buffer only those pixels with co-ordinates within one of four addressable 5 by 5 pixel regions of
interest, or two fixed Diagnostic Regions at the start and end of the CCD image. This pre-processor
configuration is used when the AM software is in track mode or diagnostic mode, and also used intermittently
when the software is in search mode.
In the 'threshold' mode, the pre-processor compares the amplitude of each pixel of the CCD image with an
amplitude threshold value loaded into the hardware by the software. Only those pixels with an amplitude
above the amplitude threshold and pixels within the fixed diagnostic regions at the start and end of the image
readout are loaded into the pre-processor FIFO buffer. Threshold mode is employed only while the software is
in search mode. Bad column and pixel checks are performed in software.
8.6.3 Attitude Monitor Pixel Acquisition Routine
When data from a pixel is accepted by the pre-processor hardware and passed to the pre-processor FIFO
buffer, the AM data ready interrupt signal is raised, and this invokes the AM pixel acquisition routine. This
routine reads the pixel amplitude and the x and y co-ordinates from the hardware. If the pre-processor is in
'regions of interest' mode, these values are immediately placed in a buffer in RAM, ready for processing. If
the hardware is in 'threshold' mode, several checks must be performed before the pixel is accepted. First, the y
co-ordinate is checked, and the pixel is rejected if this has a value less than 12. Next, the x co-ordinate is
checked against a table of bad columns stored in the TRM, and the pixel is rejected if a match is found. These
checks are necessary to stop bright columns or a bright feature in the first few rows from over-running the
input buffer. The bad column table is filled using the AMCOLUP command, and it can hold a maximum of
20 columns. The columns do not need to be sorted. If more than 20 columns are uplinked, only the first 20
are stored, and the additional columns are silently discarded. Bad pixels are filtered out later in the AM
processing.
In order to maximise throughput performance, the pixel acquisition routine continues to grab pixels from the
pre-processor FIFO until the input buffer is filled, or the FIFO is empty.
8.6.4 AM Image Processing Routine
The purpose of this routine is to process the input pixel stream stored in the input buffer, to identify, select and
track star images, and to pass the relevant image information to the MM and H/K data-streams. The start
address for the routine is included in the main task schedule, so control is passed to it by the task scheduler at
regular intervals. Each time the routine is called, it checks for unprocessed pixels in the input buffer. If one
or more pixels exist, processing is carried out on one pixel only, before control is returned to the main task
scheduler. Figure 15 shows this process.
When an unprocessed pixel is detected, the software first checks whether the x and y co-ordinates place the
pixel in either of the two fixed diagnostic regions. If they do, the pixel amplitude is formatted into the AM
H/K frame, and processing for this pixel is suspended.
JET-X FM CDMS : Software User's Manual
Issue 3 Draft
JET-X(95)BU-042
Page 55 of 113
From this point onwards, the nature of the processing applied to all other pixels is dependant on the current
operating mode of the software.
Figure 15. AM Image Processing Flowchart
AM Routine
Exit
N
AM UART
Active
N
Pixel In Buffer
AM Routine
Start
Y
Y
N
APRE
Switched On
Y
Setup AM
Interface A or B
Update Search
Mode H/K
Call Search Mode
with SI=0xFFFF
Y
Input Buffer
Overflow
N
N
Send Sequencer
Status Request
Y
Sequencer
Status
Override
Y
In Send State
Update Track
Mode H/K
Y
In Hardware
Track Mode
Read In Pixel
N
Send Heater
Override Request
Y
Heater
Selection
Override
N
N
Calculate ROI
Track/Scan
Update H/K Mode
Send Heater-Off
Request
Y
Heater
Switch-Off
Override
N
Y
N
Last Pixel In
Frame
Data Ready
Y
Shaded boxes are expanded on
separate figures.
NOTE
N
Send Heater-On
Request
Y
Heater
Switch-On
Override
H/K Being
Output
N
Y
Send Standard
H/K Request
N
Y
N
N
N
In Hardware
Track Mode
N
In H/W
or S/W Track
Mode
Store Data in H/K
& set Send State
Do Search Mode
Pixel Processing
Update H/K Data
For Pixel
Y
Pixel In H/K
Region
Flag H/K Gather
Activity Complete
Y
AM H/K
Update
Complete
Increment H/K
Byte Counter
Do Track Mode
Pixel Processing
Y
JET-X FM CDMS : Software User's Manual
Issue 3 Draft
JET-X(95)BU-042
Page 56 of 113
JET-X FM CDMS : Software User's Manual
Issue 3 Draft
JET-X(95)BU-042
Page 57 of 113
If the software is in track mode (i.e. star images are being tracked) the routine first identifies which of the
moveable regions of interest the pixel derives from. If the pixel is within a 3 by 3 pixel inner region in the
centre of the region of interest, its amplitude is inserted in the AM star data format in the MM header block,
and also added to row and column totals for that region, and to an amplitude total for the inner part of the
region. If the pixel is not within the inner region, its amplitude is added to an outer region total. When all
pixels from a frame have been processed, the row and column totals for each region of interest are checked to
establish whether the region should be moved in order to keep track of the star image. If the total amplitude of
one of the outer rows or columns exceeds the total amplitude of the central row or column for two successive
readout frames, the position of the centre of the region is moved so as to return the maximum amplitude to the
centre of the region. The software also judges whether the star image is still present in the region, and assesses
the 'significance' of the image by calculating the ratio of the inner region amplitude total to the outer region
total. If this significance is below a commandable threshold, the star is judged to have been lost. The
significance threshold is set by the command AMTMSIG. The software also checks that the inner region total
is above a threshold value set by the command AMTMMINA. If a star image is lost, the number of stars still
being tracked is compared with the minimum acceptable star count. If the current count is below the
minimum, the software is returned to search mode. The minimum acceptable star count is set using the
command AMLEAST.
If the software is in diagnostic mode, the pixel amplitude is inserted into the correct part of the MM header
block. When all of the pixels from a frame have been processed, the current positions of the moveable regions
of interest are also inserted into the header block. New positions for each region are then calculated, so that
the regions form a continuous diagnostic patch which gradually moves across the whole CCD.
If the software is in search mode, the amplitude and co-ordinates of the pixel are passed to a complex routine
responsible for the star search process. The routine uses a context saving process to allow the whole search
process to be implemented as a single algorithm, the execution of which is spread over many AM readout
cycles.
A flow diagram for the star search algorithm is shown in Figures 13 and 14. Use is made of the threshold
mode of the AM pre-processor, and over the course of several readout frames, the hardware amplitude
threshold is gradually lowered onto the image data. As star images or other bright features break through the
threshold, they are examined further to assess their suitability as star images. The total amplitude and
significance are measured, and the image position is checked against the bad column and pixel tables. The
positions of suitable images are added to an acceptable candidate table, while unsuitable images are placed in
a rejected candidate table. When sufficient acceptable images have been identified, or the threshold has
reached a commanded minimum value, or the noise floor is reached, a star selection algorithm is applied to the
acceptable candidate table, which assesses the stars for amplitude and mutual separation. This algorithm
works as follows:
•
•
•
•
The brightest star is identified. This star is given the highest preference.
For each of the other candidates, the sum of the x and y displacements from the brightest star is
calculated.
The separations are then scaled by a 'weighting factor', derived by performing a table lookup,
according to the amplitude of the candidate.
The stars are allocated an order of preference according to the weighted separations.
JET-X FM CDMS : Software User's Manual
Issue 3 Draft
JET-X(95)BU-042
Page 58 of 113
Provided the search has identified sufficient acceptable stars (the star count threshold is set by the command
AMLEAST), the co-ordinates of the preferred star images are stored, and the software is configured into track
mode. If insufficient stars have been identified, the search algorithm is repeated.
The following commands are available to alter the characteristics of the search algorithm to suit different
operating requirements.
AMSTART sets the initial amplitude threshold value for the star search.
AMSMMINT sets the amplitude threshold minimum point. A star search is terminated when the amplitude
threshold falls below this setting. Setting this to a high value will reduce the maximum time that a search can
take, but will also reduce the minimum detectable image amplitude.
AMSMMAXA sets the maximum acceptable total star amplitude. An upper limit is required because star
images whose central pixel could possibly saturate during the tracking phase will not be acceptable for
centroiding.
AMSMSIG sets the minimum acceptable star significance in search mode. This should be set higher than the
star significance threshold for track mode, in order to provide a degree of hysteresis.
AMSMMINA sets the minimum acceptable total star amplitude. Again, this should be set so a higher value
than the equivalent parameter for track mode, in order to provide hysteresis.
AMSTARS sets the number of accepted candidates required to trigger termination of the search algorithm.
Setting this to a low value will help to make the search algorithm complete quickly, but will reduce the number
of candidates available to the star selection algorithm, meaning that the optimum choice is not always made.
AMSMRED sets the fraction by which the amplitude threshold is reduced for each search iteration. A high
rate of reduction will ensure a rapid completion of the search, but may make the search less effective if image
quality is poor or large amounts of stray light are present.
8.7 Relay Control
The relay switching control module is responsible for controlling and maintaining a record of the state of the
latching and non-latching relays accessible through the relay control registers on the control bus. The
switching of the battery-backed RAM on the processor cards is not controlled via this route. This module is
driven by the 1Hz interrupt, so it is called by the 1Hz interrupt handler in the CP application support layer.
The individual bits of the relay control registers have been categorised according to the type of system they
control, and a separate control algorithm is applied for each category. The four categories are:
•
•
•
•
Latching relays. These are used for all instrument subsystem switching.
Non-latching relays controlling mirror baffle heaters.
Non-latching relays controlling de-icing heaters.
Control bus interface enable flags.
A flow chart showing the order of operations is shown in Figure 16.
Figure 16. Overview of Relay Control Processing
No
Set BM Ignore
period counter
Yes
BM
Turn On
Change
requested
Yes
Scan change
registers in
reverse
Scan change
registers
forwards
No
Yes
Mask this CPU
from change
register
Refresh
change
register TRM
In safe
mode
Update baffle
heater timer
From 1Hz
Interrupt
No
Update H/K
status
registers
Read in NLR
Status
MM Turn
Off
Yes
Write to RCON
Register 4
Update NLR
baffle enable
bits
Update
Deicing heater
status bits
Return to 1Hz
Interrupt
Write NLR
status to
RCON
Yes
Clear LR
hardware.
No
MM Using
RCON
No
Clear busy flag
(MM usage
guard)
Read in baffle
timer
Switch off MM
modules and
reset MM flags
Set busy flag and
write to RCON if
not Register 4
Update baffle
heater
on-timers
Update RCON
Register 4
Baffle Bits
Update relay register
in RCON
Key
JET-X FM CDMS : Software User's Manual
Issue 3 Draft
JET-X(95)BU-042
Page 59 of 113
JET-X FM CDMS : Software User's Manual
Issue 3 Draft
JET-X(95)BU-042
Page 60 of 113
8.7.1 Latching Relay Control
Latching relays have been used extensively throughout the instrument in order to retain the current
configuration when the system is powered off. In most cases, each latching relay is allocated two adjacent
control bits in the relay control registers, one to switch the relay on, the other to switch it off. In certain cases
only one bit is allocated. For example, the main subsystems power switch is only allocated an ON bit, so
subsystem power may only be switched off directly by the spacecraft relay command RLPOWOFF.
When changes are made to the current latching relay configuration, bits are set in a change request area in
RAM. The bit allocation of this area maps directly onto the bit allocations of the latching relay control
registers. Each time control is passed to the algorithm, it searches the change request area for a non zero bit
value. In safe modes, the search is done on register 4, then 2, then 0, while in normal mode this order is
reversed. This ensures that the TEs are switched off after the TPs, and switched on before them. This
prevents a partial power-up of the TEs. Each register examined is searched starting at bit 0. It should be
noted that only 1 non-zero bit is processed each second.
If a non zero bit is found, a pulse of one second duration is applied to the corresponding bit in the control
registers, and to an enable bit associated with that register. The latching relay control algorithm also
maintains a 'latching relay status record', in the form of another area of RAM with the same bit allocation as
the control registers. When a pulse is applied to a latching relay control bit, the corresponding bit in the
latching relay status record is set. If the relay affected has a corresponding control bit of opposite sense, the
corresponding bit in the latching relay status record is cleared. This record is visible via the CP housekeeping
page, and is retained in TRM in order to preserve it securely when power is switched off35.
The change request area is accessible to uplinked commanding using the LRMODL and LRMODM
commands, although these are usually used via the @SUBSYS utility on the EGSE. The area is also accessed
automatically by the CP software in order to perform mode change operations.
If the latching relay control software detects a command to switch off the MM control card (MCON), the MM
control software is first used to issue commands to switch off the twelve memory modules (MMODs). When
this has been completed, MCON is switched off.
If a command to switch on a background monitor was issued, then the background monitor unstable timer is
set. This provides a commandable delay before readings from the background monitor are used. This is
necessary as the background monitors were observed to oscillate immediately after switch-on.
35TRM
scrubbing is not performed when the processor is switched-off. This means corruption of TRM can accrue
over time.
JET-X FM CDMS : Software User's Manual
Issue 3 Draft
JET-X(95)BU-042
Page 61 of 113
8.7.2 Mirror Baffle Heater Control
Each of the four mirror baffles (inner and outer baffles for both mirror shells) is provided with two
independently switched baffle heaters - one main, the other redundant. The mirror baffle heater control
software is designed to control the non-latching relays which switch power to these heaters, applying pulses
which last a commandable fraction of a duty cycle which is normally set to 256 seconds duration. The
software is controlled by commanding eight 'on-time' parameters in TRM, using the uplinked command
BHONT. Normally, the on-times for the redundant heaters will be set to zero, so that these are always
switched off, while the on-times for the main heaters will be set to around 128, meaning that these are
switched on for half of the duty cycle. For optimum thermal performance, the switching of the inner and outer
heaters for each telescope are phase shifted by 90 degrees.
It is also possible to adjust the length of the switching duty cycle by using the command BHRATE to set the
duty cycle control byte in the TRM. This is normally set to 1, giving the default duty cycle of 256 seconds.
Commanding a higher value reduces the duty cycle length.
It is not desirable to use the redundant baffle heaters for telescope 2, except in the case of a hardware failure.
Their use results in the enable bit for one of the latching relay control registers being permanently set, making
the register vulnerable to SEUs. This feature results from the late stage at which the mirror heater control
system was implemented, after the relay control hardware had been designed and built.
8.7.3 De-icing Heater Control
The de-icing heater control software controls the non-latching relays which switch power to the de-icing
heaters. Three alternative commands are provided for each heater.
NLROND activates a de-ice heater for a default time of 100 seconds.
NLRONT activates a de-ice heater for a user specified time of up to 64k seconds.
NLROFF may be used to deactivate a de-ice heater before its operating time has elapsed.
The de-icing heaters are switched off if the system enters a safe mode while the heaters are on. While in safe
mode, the heater interval timers continue to countdown, and if the system is leaves safe mode, and the interval
timers are non-zero, the heaters are switched back on for the remaining duration.
8.7.4 Control Bus Interface Switching
The switching status of three circuits on the control bus is also controlled by this module. These are the AM
pre-processor (AMPP), the Analogue Monitors (AMON) and the alternate AM housekeeping channel
(AM2P). Each of these is allocated a control bit in the control bus interface status byte in the TRM. This
byte is accessible using the command CPINT. The stored bit values are loaded directly into the relevant
hardware register every time the relay control software is activated.
JET-X FM CDMS : Software User's Manual
Issue 3 Draft
JET-X(95)BU-042
Page 62 of 113
8.8 Mass Memory Control
This module is responsible for loading data into the mass memory, and sending appropriate commands to
control the MM hardware operating modes during filling and dumping. The main subroutine is called directly
by the main task scheduler. To maximise overall data throughput, each task scheduler cycle includes two calls
to this module. When a MM fill is started (usually by the first SOT modechange command following a
ground contact), the software reinitialises the MM hardware and switches on the first two memory modules in
a commandable fill sequence. Data is loaded into the first module until a module full condition is detected.
The third module in the fill sequence is then switched on, and data loading is switched to the second module.
This sequence ensures that each module (other than the first) is switched on some time before data loading
commences.
Each time the main subroutine is called, it first checks whether the MM 'data type' field in TRM is non-zero
(Section 8.5), indicating that the MM filling is occurring. If the data type is zero, processing is suspended.
The subroutine next checks that the MM has been set up and is ready for data. If not, a subroutine is called
which reinitialises the MM hardware and software working storage.
JET-X FM CDMS : Software User's Manual
Issue 3 Draft
JET-X(95)BU-042
Page 63 of 113
It performs the following functions:
•
•
•
•
•
•
•
•
Switch off all active MM modules.
Switch off alternate MM control card (i.e. the one associated with the other CDMS box) in order
to avoid hardware contention.
Switch off current MM control card (i.e. the one associated with this CDMS box) in order to
ensure that it is fully reinitialised.
Switch on current MM control card (i.e. the one associated with this CDMS box).
Send a command to disable MM EDAC function if the EDAC status byte in the TRM is set to
'disabled'. This byte may be modified using the MMEDAC command.
Switch on the first MM module, and record this by setting a bit in the 'modules enabled' word in
TRM. The identity of the first module is read from the 'first module' parameter in TRM, which
can be modified using the MMFIRST command.
Initialise the mass memory software working storage.
Switch on the next available MM module, and record this by setting a bit in the 'modules enabled'
word in TRM. The identity of the module is derived by searching the 'modules disabled'
parameter in TRM, starting with the bit associated with the previous module switched on, and
locating the next zero bit value. The modules disabled parameter can be modified using the
commands MMFLAGSL and MMFLAGSM.
The software next reads the control lines from the MM, in order to check that the current module is not full. If
it is, the software modifies the current module ID to indicate that the most recently enabled module is now to
be filled. It then identifies the next available module by searching the 'modules disabled' parameter in TRM,
starting with the bit associated with the previous module switched on, and locating the next zero bit value.
This module is switched on, and the change in status is recorded by setting the appropriate bit in the 'modules
enabled' word in TRM.
The software next calls the data supply subroutine of the MM data formatting module (Section 8.5.3) four or
five times, depending on the EDAC status, in order to obtain the next bytes of the data stream. Each byte is
passed to the input register of the MM hardware. If data is unavailable on any of these attempts, processing is
suspended. Otherwise, having passed the correct number of bytes, a 'load data' command, tagged with the
current module ID is sent to the MM, in order to load the data into that module. Having done this, control is
returned to the main task scheduler. The software keeps a count of the number of bytes loaded into the MM,
and increments a count of blocks loaded each time the byte count reaches 2040. When the all available MM
modules have been filled, the MM data type field is reset to 0, and filling is suspended. Subsequent attempts
to recommence memory filling will have no effect until the memory contents have been downloaded or
discarded. The flowchart in Figure 17 shows the operation of the mass memory while JET-X is storing
science data.
When a begin ground contact (BGC) modechange command is received, the command interpreter module
switches the MM into 'dump mode' by sending the appropriate command from the MM driver. The count of
blocks loaded to the MM is used to set the vector word (Section 8.1.5). Subsequently, when the SRG bus
interface control module detects a request for a science data block, it returns a header on the SRG bus, and
commands the MM to send the remainder of the block. In order to meet the SRG bus timing requirements, the
command to the MM is sent directly from the SRG bus interface control module.
Figure 17. Mass Memory Control During Data Storage
Command MM to
'Load Data' and
Increment Counter
4/5 Bytes
Loaded In MM
Buffer
Clear MM
Command and
Protection
No
Current
Module
Full
Yes
MM Already
Configured
Return To
Scheduler
No
Yes
Yes
Call Data
Supply
Routine
Increment
Loaded Byte
Counter
MM
Data Type
Non-Zero
No
Data Available
Yes
Write Byte To
MM Buffer
From
Scheduler
Yes
No
2040 Bytes
Written
Switch On
Next Module
No
All Modules
Filled
Initialise
Mass Memory
No
Yes
Yes
Increment
Block Counter
Return To
Scheduler
JET-X FM CDMS : Software User's Manual
Issue 3 Draft
JET-X(95)BU-042
Page 64 of 113
JET-X FM CDMS : Software User's Manual
Issue 3 Draft
JET-X(95)BU-042
Page 65 of 113
8.9 Background Monitor Control
This module is responsible for monitoring the particle count rate from the Russian supplied JET-X
background monitor, and initiating a 'BM alarm' safing sequence for JET-X if the rate reaches an
unacceptable level. It is also responsible for packaging information from the BM into the required format,
ready for transmission to other instruments via the SRG bus. The module is called every second by the 1Hz
interrupt routine. A flow chart of the operation of the BM control software is shown in Figure 18.
The first function of the software is to perform an I/O read operation in order to read and then reset the
particle count register via the control bus. The 12 lsbs of the particle count are inserted into the SRG bus BM
data format (see SRG bus specification), and bits 12-15 within the format are set to indicate the current
switching status of the BMs, the presence (or absence) of a 12 bit overflow in the count value. If the BM is
reading is deemed valid, then the VALID flag is set, and the software next checks a flag in TRM to establish
whether the system is currently in a BM alarm state, and sets the 'alarm condition' flag in the BM data format
accordingly.
A BM reading is deemed valid only if the time elapsed since the BM was switched on is greater than a
commandable limit. This limit is by default set at 240 seconds, and can be patched to be any duration between
0 and 504 seconds. To change this default, a value between 0 and 63 must be patched into the byte
i_bmdefault. The software uses bit 7 of this counter as a status flag, and the operator must not set this
counter to a value greater than 63. This value is internally scaled by 8 to give the 0 to 504 second range. It
should be noted that this elapsed time counter is also reinitialised during a CP reboot, as the software has no
way to determine if the CP had just been switched on after a normal off, or if it had crashed. The countdown
timer is reflected in the housekeeping as a decrementing value between 63 and 0 if the system is counting
down, or 255 if the system is outside the ignore duration.
If the system is not currently in the BM alarm state and is outside the switch-on time-out, the current BM
count reading is checked against an upper count rate threshold stored in TRM. The threshold is encoded as a
power of two, and can be modified using the BMTHOFF command. If the current BM count rate exceeds the
upper threshold for three samples in succession, a 'BM alarm' token is passed to the command queue
processor, to trigger an instrument safing sequence, and a flag in TRM is set to indicate that the system is now
in the BM alarm state. While this flag is set, SOT modechange commands will not cause the instrument to reenter observing mode.
If the system is currently in the BM alarm state and is outside the switch-on time-out, the current BM count
reading is checked against a lower count rate threshold stored in TRM. The threshold is encoded as a power
of two divisor to be applied to the upper count threshold, and can be modified using the BMTHON command.
If the current BM count rate is below the lower threshold for ten successive samples, the BM alarm flag in
TRM is reset, allowing the next SOT modechange command to switch the instrument back into observing
mode.
JET-X FM CDMS : Software User's Manual
Issue 3 Draft
JET-X(95)BU-042
Page 66 of 113
Read and reset
count for last
second
From 1Hz
Interrupt
Count
Overflow
Yes
Set 12bit
overflow flag
Yes
Set BM
Count Enabled
No
Switched
On
No
Update SRG
Count + Flags
Assert
Ignore Count
Terminated
Ignore BM
Count
No
Yes
Decrement
Ignore Counter
Reached
Zero
No
Update SRG
Flags to show
BM VALID
'In Alert'
Set
Yes
Update SRG
Flags to show
BM ALERT
Count<Off
Threshold
Yes
Exit
No
Count>On
Threshold
No
Yes
No
Increment
Sample Count
Set Sample
Count to zero
Yes
Increment
Sample Count
No
Sample Count
>2
Yes
Sample Count
>9
No
Raise BM Alert
Modechange
Yes
Clear 'In Alert'
Status Flag
Exit
Figure 18. Background Monitor Software Operation
Set 'In Alert'
Status Flag
JET-X FM CDMS : Software User's Manual
Issue 3 Draft
JET-X(95)BU-042
Page 67 of 113
8.10 Control Processor Housekeeping Data Record Production
The function of this module is to produce formatted housekeeping data records ready for inclusion in the
housekeeping blocks and MM header packets. Thirteen different H/K data record formats are defined, each
dealing with a different aspect of instrument functionality. Full details of these are included in the telemetry
format specification, JET-X(94)UL-225. The order in which records of the various types are produced is
controlled by the housekeeping data formatting module, via a ‘current H/K record type’ field.
The main subroutine is triggered once every 2 seconds by the 1Hz interrupt routine. The routine examines the
current H/K record type, and takes an appropriate course of action to ensure that the H/K record of the
required type is ready in a ‘H/K record buffer’ on the next 1Hz interrupt, when it is picked up and used by the
H/K data formatting and MM data formatting modules. The following H/K record types are created
immediately, by copying data already available in CP memory:
•
•
•
•
•
•
CP cyclic memory dump.
CP status information.
AM housekeeping.
TP 1 Configuration Block (resides within CP TRM).
TP 2 Configuration Block (resides within CP TRM).
AM Star data (search and track modes).
If an analogue monitor data record is required, a dominant subroutine is activated which reads data from all
analogue monitor channels over the course of the next forty task scheduler cycles. If XRT part A or B
records, or TP cyclic records are required, the subroutine uses the TP serial interface control module (Section
8.11) to issue a request for the current H/K buffer contents from the appropriate TP.
A second subroutine operates on a 2 second cycle of opposite phase, to give the TPs a one second warning
when a H/K record is required from them. This ensures that the TPs have sufficient time to obtain necessary
data from the TEs.
8.11 Telescope Processor Serial Interface Control
This module controls the serial interfaces to and from the TPs including the transmission of configuration data
at the start of an observation, the transmission of command bytes and the reception of science and
housekeeping data.
8.11.1 Data Transmission to the Telescope Processors
The purpose of the transmission routine is to service requests from other modules to pass commands and
configuration data to the TPs. Commands are sent at regular intervals in response to requests from the
housekeeping data record production module, in order to gather housekeeping data. Whenever a H/K record
request is transmitted to a TP, the data reception routine (Section 8.11.2) is informed, and begins to monitor
the incoming data for a H/K record header.
Every second, the control processor transmits a CPASSERT byte to the other three processors. This byte is
used to inhibit a second control processor activation in the other CDMS box. This byte is ignored by the
telescope processor(s).
JET-X FM CDMS : Software User's Manual
Issue 3 Draft
JET-X(95)BU-042
Page 68 of 113
The remainder of the commands are sent in response to requests from the command interpreter. Uplinked
commands requesting TE register updates, or filter wheel activity, trigger immediate transmission of
corresponding commands to the TE. In addition, uplinked TSET commands (Section 10.1.6) trigger
transmission of configuration data to the TP. Note that TSET and filter wheel commands may be generated
onboard in response to modechange commands, as detailed in Section 10.2.
Details of command formats accepted by the TP are given in Section 9.3.1.
8.11.2 Data Reception from the Telescope Processors
The role of the reception routine is to process the input data streams from the TPs, identify the boundaries
between data objects (event records and TP H/K records) and pass whole event records to the MM data
formatting module, and H/K records to the H/K data formatting module.
It must also check the data-streams for processor initial switch-on messages sent by a TP during boot-up, and
respond to these by transmitting a start-up message to the booting processor via the transmission routine
(Section 8.11.1) or switching it off. If two TPs are already operating, and a third TP is inadvertently switched
on, the initial switch-on message will be received in the usual way. In this case, the control processor software
responds by switching off the third processor.
The data objects recognised by the reception routine have the following formats. It important to note that
these formats apply only to inter-processor communication, and are quite different to the optimised formats
used in the MM data stream:
TP Housekeeping record transmission format.
00000000
d7ddddddd 0
d7ddddddd 0
d7ddddddd 0
d7ddddddd 0
d7ddddddd 0
d7ddddddd 0
d7ddddddd 0
d7ddddddd 0
d7ddddddd 0
d7ddddddd 0
d7ddddddd 0
d7ddddddd 0
d7ddddddd 0
d7ddddddd 0
00000000
11111111
11111111
11111111
11111111
11111111
11111111
11111111
11111111
11111111
11111111
11111111
11111111
11111111
11111111
d7ddddddd 0
d7ddddddd 0
d7ddddddd 0
d7ddddddd 0
d7ddddddd 0
d7ddddddd 0
d7ddddddd 0
d7ddddddd 0
d7ddddddd 0
d7ddddddd 0
d7ddddddd 0
d7ddddddd 0
d7ddddddd 0
d7ddddddd 0
where d = Housekeeping data bit.
11111111
11111111
11111111
11111111
11111111
11111111
11111111
11111111
11111111
11111111
11111111
11111111
11111111
11111111
d7ddddddd 0
d7ddddddd 0
d7ddddddd 0
d7ddddddd 0
d7ddddddd 0
d7ddddddd 0
d7ddddddd 0
d7ddddddd 0
d7ddddddd 0
d7ddddddd 0
d7ddddddd 0
d7ddddddd 0
d7ddddddd 0
d7ddddddd 0
//**** Header ****
11111111 d7ddddddd 0 11111111
11111111 d7ddddddd 0 11111111
11111111 d7ddddddd 0 11111111
11111111 d7ddddddd 0 11111111
11111111 d7ddddddd 0 11111111
11111111 d7ddddddd 0 11111111
11111111 d7ddddddd 0 11111111
11111111 d7ddddddd 0 11111111
11111111 d7ddddddd 0 11111111
11111111 d7ddddddd 0 11111111
11111111 d7ddddddd 0 11111111
11111111 d7ddddddd 0 11111111
11111111 d7ddddddd 0 11111111
11111111 d7ddddddd 0 11111111
JET-X FM CDMS : Software User's Manual
Issue 3 Draft
JET-X(95)BU-042
Page 69 of 113
Type 0 event.
1000a11aaa8 a7aaaaaaa0
0100cnx9x8
x7xxxxxxx0
001000y9y8
y7yyyyyyy0
Type 0 event (in diagnostic stripe mode - y omitted).
1000a11aaa8 a7aaaaaaa0
0100cnx9x8
x7xxxxxxx0
0100cnx9x8
x7xxxxxxx0
001000y9y8
y7yyyyyyy0
0100cnx9x8
x7xxxxxxx0
001000y9y8
y7yyyyyyy0
0100cnx9x8
x7xxxxxxx0
001000y9y8
y7yyyyyyy0
0100cnx9x8
x7xxxxxxx0
001000y9y8
y7yyyyyyy0
Type 1 event.
1001a11aaa8 a7aaaaaaa0
Type 2 event.
1010a11aaa8 a7aaaaaaa0
0001b11bbb8 b7bbbbbbb0
Type 3 event.
1011a11aaa8 a7aaaaaaa0
00010000
p3ppp00000
Type 5 event.
1101****
********
End-of-frame marker.
1110*cn*
f7fffffff0
Input buffer overflow marker.
11110cn*
f7fffffff0
Processing buffer overflow marker.
11111cn*
where a
b
x
y
c
n
p
f
*
f7fffffff0
=
=
=
=
=
=
=
=
=
Event amplitude data bit.
Adjoined pixel amplitude data bit.
X co-ordinate data bit.
Y co-ordinate data bit.
CCD identity bit.
Node identity bit.
Event pixel count data bit.
Readout frame count data bit.
Unused bit - zero.
Types 2 & 3, the a field contains the total amplitude of all the pixels in the event.
Types 2, 3 & 5, the x and y fields contain co-ordinates of the rightmost pixel on the final line of the event.
Initial Switch-on Message (2 or more).
00000001
00000001
JET-X FM CDMS : Software User's Manual
Issue 3 Draft
JET-X(95)BU-042
Page 70 of 113
9. Telescope Processor Software
The module architecture of the telescope processor application is illustrated in Figure 19. Modules annotated
'D' are dominant modules. Control is passed directly to these modules by the main task scheduler. The
module annotated 'I' is activated by an interrupt generated in response to an 'end of readout frame' condition in
the XRT data stream, while modules annotated 'S' are subordinate modules, active only when called by
dominant or interrupt driven modules. The configuration of the TP application is determined by the TP
configuration blocks, which are stored and manipulated within the CP, and passed to the TPs each time an
observation is started. The encoding of the TP configuration blocks is described in Section 10.1.3. The
following sections describe in detail the operations of individual modules within the TP application.
9.1 XRT Data Processing
This module is designed to read and process the incoming science data streams from the readout nodes of one
XRT. This processing involves identifying CCD events, and allocating event types. It also involves
performing bad column and pixel rejection, and controlling pre-processor amplitude thresholds. A flow chart
showing an overview of the data processing done by the telescope processor is given in Figure 20.
Prior to arrival at the telescope processor, the pixel stream from each CCD node passes through the telescope
pre-processor hardware. The telescope pre-processors decode the serial input streams, rejecting pixels which
are flagged as invalid, and generating x and y co-ordinates for each valid pixel. The pre-processors then
examine each pixel, and accept only those pixels which are above a programmable amplitude threshold, or
within a diagnostic region. This ensures that the data rate arriving at the telescope processors is reduced to an
acceptable level. In practice, the threshold is maintained well above the mean level for 'dark' pixels, so most
accepted pixels contain extra charge deposited by an x-ray photon. The diagnostic region has a programmable
position, and may be configured as either a four pixel by four pixel patch, or a 'vertical' stripe four columns
wide. It may also be disabled completely. Pixels which pass these tests are inserted into cyclic buffers in TP
RAM by direct memory access (DMA) hardware. Another function of the pre-processors is to detect end-offrame conditions within the incoming data, responding to these by toggling a frame identification flag in the
data, and raising an end-of-frame interrupt flag to the TP.
9.1.1 Detection of Incoming Data
Each time the XRT data processing module is called, the software checks for incoming data in one input
buffer, by reading the appropriate address pointer register within the DMA chip. The flag bits in the buffer
location holding the x-value are tested to determine whether a new pixel is present. If a new pixel is detected,
the x, y and amplitude words are loaded into processor registers, and flag bits are then set to zero. The
software now checks for a buffer 'wrap around' or overflow condition, by examining corresponding flag bits in
the previous pixel location within the buffer. These flags should normally be set to zero, and a non zero value
indicates that a buffer overflow has occurred. If an overflow is detected, a subroutine is invoked to handle the
condition, and the new pixel is rejected. This condition also results in an 'input buffer overflow' flag being
inserted in the output data-stream.
Figure 19. Telescope Processor Modules
CCD Readout
Hardware
TE Serial
Communication
Hardware
Filter Wheel
Control Hardware
Telescope
Electronics
Image
Preprocessors
DMA
Hardware
D
XRT Data
Processing
I
D
EOF Interrupt
Handler
Communication
TE Serial
D
S
Output
Buffers
S
D
Inter-Processor
UART Control
TPT
Configuration
Filter Wheel
Control
DMA
Control
TP Application
Dominant
Secondary
Interrupt
D
S
I
Data Flow
Command Flow
Key
Control
Processor
JET-X FM CDMS : Software User's Manual
Issue 3 Draft
JET-X(95)BU-042
Page 71 of 113
Figure 20. Telescope Processor Data Processing
No
Key
Amplitude
Adjustment
Event
Processing
Enabled
No
Yes
Yes
Valid Pixel
Subtract
Fixed (80)
Offset
Store Pixel
As Type 1
Increment
Threshold at
EOF
No
No
Resync DMA
Buffer
Perform
Event
Coalesing
Yes
Performs Event Class Filtering and Transfers
Complete CCD Lines to the TP-CP Transmission
Buffer.
Return To
Scheduler
Set Input
Buffer
Overflow
Flag
No
Auto
Increment
Threshold
No
Yes
Buffer
Overrun
Frame
Ditch
Discard
Pixels Until
Next EOF
Yes
Read Byte
From DMA
Buffer
From
Scheduler
No
Yes
No
Bad
Column/Pixel
Enabled
No
In Pass
Column
No
In
Patch or
Stripe
Subtract
Gatti Offset
From
Amplitude
No
New
Frame
Return To
Scheduler
Yes
Yes
Yes
Pixel
Match
No
Column
Match
Yes
Perform
Mean
Calculation
Update Data
Store
Interlacing
Set EOF
Processing
Flag
Yes
Yes
Return To
Scheduler
Store Pixel
As Type 0
No
Interlace
Discard
Data
Update
Mean
Background
Update
Patch
Coordinates
Yes
JET-X FM CDMS : Software User's Manual
Issue 3 Draft
JET-X(95)BU-042
Page 72 of 113
JET-X FM CDMS : Software User's Manual
Issue 3 Draft
JET-X(95)BU-042
Page 73 of 113
9.1.2 Initial Checks on New Pixel Data
Flags within the new pixel data are next checked to ensure that the software is correctly synchronised with the
data. If a loss of synchronisation is detected, the new pixel is discarded, and the assumed position of the interpixel boundary is adjusted to correct the problem.
The software then checks for a start-of-frame condition within the data stream, indicated by a change in the
frame bit, contained within the x word of the data. If a start of frame condition has occurred, a software flag
is set, to be examined during the event class allocation process. The software also executes a routine to
calculate a new value for the pre-processor amplitude threshold. This is described in Section 9.1.6.
The co-ordinates are next checked against the current position of the diagnostic patch or stripe. Pixels within
the patch or stripe are included in a mean amplitude calculation used for setting the pre-processor amplitude
threshold. If diagnostic pixels are being included in the output stream for the current node, the pixel is
allocated event type 0 and placed in the 'pixel association buffer' for the current input channel. Otherwise it is
discarded. Diagnostic data from each node is passed on to the output for either 1 in 2, or 1 in 4 CCD frames.
If any of the bad column/pixel node-mapping bits are set, then the mask is set to 1 in 2, as these bits are only
set for 1 node readout. Pixels within the 'boundary column' are always passed to the pixel association buffer
with event type 0. The boundary column is the column adjacent to the centre of the CCD. Pixels here are
allocated type 0 to allow pixel association algorithms to be applied during ground processing if required.
Since columns on either side of the centre of the CCD are read out through different nodes, and processed
separately within the TP, it is inconvenient to perform this processing onboard. Since the position assumed for
the boundary column has been made commandable in order to support the various TE sequencer modes, this
feature may be disabled by commanding it outside the valid CCD area.
If a pixel is not in the diagnostic region or the boundary column, it is next checked against tables of bad
columns or pixels. These tables are stored within the CP and passed to the TP at the start of each observation.
Once passed, they are sorted and mapped to each telescope pre-processor input channel (TPRE), depending on
the definitions of a set of bits in the TP configuration block. This allows the node to TPRE mapping to be
altered, without the need to uplink new bad column and pixel tables. A co-ordinate match results in the pixel
being discarded.
In timing mode these tables are ignored by setting a bit in the TP configuration table using TPCONFIG. If no
co-ordinate match is found, the pixel is inserted into the appropriate pixel association buffer with a provisional
event type of 1. Immediately prior to this insertion, the TP configuration block is tested, and unless the inhibit
flag is set, a fixed offset of 80 is subtracted from the event amplitude. A test is done at this point to ensure
that a negative result is detected, and replaced with zero. Subtraction of the fixed offset avoids the reduction
in dynamic range of amplitude for multi-pixel events which would otherwise result from the dc offset in the TE
analogue processing chains. The pixel association and classification algorithm is then applied.
9.1.4 Pixel Association and Event Class Allocation
The purpose of the pixel association algorithm is to identify adjacency between pixels passed into the pixel
association buffer, and hence generate as output a stream of events, each allocated an event type. An event
may consist of an isolated pixel or any number of pixels associated with each other by direct (i.e. nondiagonal) adjacency.
JET-X FM CDMS : Software User's Manual
Issue 3 Draft
JET-X(95)BU-042
Page 74 of 113
The pixel association buffer is structured as a swing buffer, holding pixels from the last two CCD rows.
When a pixel arrives from a new row, all fully processed events from the earlier row in the association buffer
are passed to the output buffer module (Section 9.2) to make room for the new row. The output buffer module
performs some final filtering of the event stream before including events in the science data stream (Section
9.2). If the pixel is not from a new row, it is added to the input side of the swing buffer. An overflow
condition encountered at this point results in a 'processing buffer overflow' flag being inserted into the output
event stream when the row is transferred to the output buffer. Each row can hold a maximum of 30 pixels,
before this overflow condition occurs.
A search is then made for adjacency between the new pixel and pixels already in the association buffer. If
adjacency is found, the pixels concerned are flagged as 'not for output', and fields in the buffer location
containing the new pixel are updated to indicate the total amplitude in the event, and the number of pixels it
contains. If no further pixels subsequently arrive which are adjacent to the new pixel, or any other pixel in the
event, this information is eventually passed to the output buffer as a fully processed event.
If the current TE operating mode is an imaging mode, the software searches for inter-row pixel adjacency, as
well as adjacency along a row. In timing mode, only adjacency along a row is recognised. This is the only
difference between onboard processing of imaging and timing mode data.
For further information on the pixel association algorithm, the reader should consult the pseudo code design
notes in the software source file. It should also be noted that pixel association, and the line adjacency tests can
be independently disabled by setting appropriate bits in the TP configuration block using the TPCONFIG
command, if this becomes desirable.
9.1.5 Handling of DMA Buffer Overflow Condition
The first action on detection of an overflow is to increment the buffer overflow counter, which can be read via
TP housekeeping record. If unconditional amplitude threshold incrementing is enabled (commandable via the
TP configuration block (CB)) the value of the pre-processor amplitude threshold offset for the current node is
increased by one channel at the next end of frame interrupt. If conditional incrementing is specified, the
threshold is only increased if the y co-ordinate of the last successfully read pixel is greater than six. This
option is intended for the situation where the first few CCD rows are bright. Threshold incrementing may also
be completely disabled. This option is included to prevent a large persistently bright feature from forcing the
amplitude threshold up to an excessive level.
The software next resets the DMA registers for the buffer in question, discarding all unprocessed data
contained in it. If frame ditching is enabled (via CB), the DMA hardware is left disabled until the next end-of
frame interrupt is detected, effectively rejecting the remainder of the CCD frame. If frame ditching is disabled,
the DMA hardware is immediately re-enabled. Enabling frame ditching is a preferable strategy under normal
circumstances, because it allows backlogs of data to clear through the system before data input is resumed. If
the overflow is caused by a marginal excess of input data, this normally results in the next frame being
processed correctly. The other option is included mainly for use in case a concentrated bright feature appears
due to a TE or CCD problem.
JET-X FM CDMS : Software User's Manual
Issue 3 Draft
JET-X(95)BU-042
Page 75 of 113
9.1.6 Pre-Processor Amplitude Threshold Behaviour
For consistent optimum XRT spectral performance, it is important that the pre-processor amplitude threshold
is set a constant small height above the mean CCD dark charge. Since the dark charge tends to vary during an
observation, the software determines the correct threshold setting for each node dynamically during the
observation. An option exists to override this feature if problems are encountered, and is enabled using the TP
configuration block.
If automatic threshold setting is enabled, each pixel within the diagnostic patch for a node is checked for
acceptable amplitude. Pixels with amplitudes above 251 are discarded, since this is outside the range expected
for dark charge. A count is kept by node of acceptable pixels, and pixel amplitudes are added to node totals.
At the end of each CCD frame, the number of acceptable pixels for a given node is checked. If all 16 pixels
within the patch were accepted, the total for the frame is added to a grand total amplitude for the node, and a
count of acceptable frames is incremented. Otherwise, the total for the frame is discarded. When the count of
acceptable frames reaches 16, the grand total amplitude is divided by 256 by discarding the eight lsbs. This
value gives a good measure of the mean dark charge. This is added to the pre-processor amplitude threshold
offset stored in the configuration block to give the pre-processor amplitude threshold. It is also added to the
event amplitude threshold offset to derive the event amplitude threshold applied as the events enter the output
buffer module (Section 9.2). The newly calculated thresholds become effective immediately after they have
been output to a TP housekeeping block. The housekeeping block contains a frame counter, and this allows
the changes to thresholds to be associated precisely with a CCD frame.
If automatic threshold setting is disabled, the threshold offset fields in the configuration block specify the
absolute threshold settings, rather than relative values.
The pre-processor amplitude threshold offset is incremented each time an input buffer overflow occurs if
threshold offset incrementing is enabled (Section 9.1.5). This allows the system to recover if the threshold
offset is commanded to too low a value, and the data rate is initially too high to be processed. If this feature is
disabled, and a fixed threshold is used, care must be taken to ensure the commanded threshold is sufficiently
high to provide a sustainable data rate for the instrument.
9.2 Output Buffers
The output buffer module filters the event stream from the XRT data processing module, and stores a
formatted output stream in a ring buffer. It also supplies bytes from the buffer to the UART output module
for transmission to the CP. A separate buffer is used for assembling and storing the latest H/K block, which
can also be supplied to the UART module on request.
When an event is passed to the output buffer from the XRT data processing module, the software examines the
event type and the total event amplitude. If the event type is 0 (i.e. data from the diagnostic patch or boundary
column), the event is formatted into the output ring buffer. If the event has a non zero type, the total event
amplitude is compared with the event amplitude threshold. If the amplitude is below the threshold level, the
event is discarded and the event counters are not incremented. The event type is then compared with the event
type threshold. If the event type is below or equal to the threshold, the event is formatted into the ring buffer.
In either case, the appropriate event counters for the event type and node are incremented. The event
amplitude threshold is adjusted onboard to allow for amplitude offset subtraction (Section 9.1.2).
JET-X FM CDMS : Software User's Manual
Issue 3 Draft
JET-X(95)BU-042
Page 76 of 113
If the pre-processors are currently operating in diagnostic stripe mode, the event formats used in the ring
buffer are shortened by omitting the y co-ordinate. Y co-ordinates are reconstructed after the data arrives at
the CP. This is necessary to allow the inter-processor link to handle the high event rate generated when the
system is in diagnostic mode. In this mode, pixels from two of the four columns in the diagnostic stripe are
rejected. This is necessary to reduce the event rate to a sustainable level for processing. The instrument
should be operated in single node readout in diagnostic stripe mode.
If the ring buffer approaches an overflow condition, the software suspends the processing of new data by the
XRT data processing module. This stops the flow of data into the ring buffer, preventing overflow from
occurring. However, if processing is suspended for too long, it can cause a DMA input buffer overflow
condition, which is then handled as explained in Section 9.1.5.
The output buffer module also contains subroutines to supply data from the ring buffer or the H/K block to the
UART control module. When it is ready to send data to the CP, the UART control module calls the
appropriate data supply subroutine. If data of the requested type is available, the next data byte is returned,
otherwise a 'no data' condition is returned.
9.3 Inter-Processor UART Control
This module is responsible for servicing the serial data link to and from the control processor. At a hardware
level, this link is controlled by one of the three UARTs on the processor card, each providing communication
with one other processor. The initial switch-on polling routine determines the identity of the UART which is
connected to the current CP, and stores this in TP memory, and the software uses only this UART. Data
transmission and reception are handled by two separate routines, both called by the main task scheduler.
9.3.1 Telescope Processor Command Reception and Processing
Each time the reception routine is called, it tests a flag to detect the presence of incoming data from the CP. If
no data as been received, processing is aborted. Incoming data consists of either single byte commands or
blocks of configuration data.
Single byte commands are interpreted as follows. Note that entries marked '#' cause TE communication
requests to be raised in the TE serial communication module (Section 9.4):
0x00
Transmit contents of H/K record buffer to the control processor.
0x01
Halt XRT data processing (sent at FOT modechange).
0x02
Configuration data header.
0x03
#
TE register update header.
0x04
Resynchronise UART data stream.
0x05
Fill H/K buffer with TP memory dump data.
0x06
#
Fill H/K buffer with TP/TE block 1 format (includes TE register contents).
0x07
#
Fill H/K buffer with TP/TE block 2 format (includes TE analogue readings).
0x08
Patch and copy data header.
0x09
CP assert message (discarded by TP).
0x0A
#
Configure TE registers and sequencers, and start TE sequencers.
JET-X FM CDMS : Software User's Manual
Issue 3 Draft
0x0B
JET-X(95)BU-042
Page 77 of 113
Start XRT data processing (sent at SOT modechange).
0x0C
#
Gather TE register contents from cross-linked TE (if 2 TEs controlled by 1 TP).
0x0D
#
Gather TE analogue readings from cross-linked TE (if 2 TEs controlled by 1 TP).
0x0E
#
For cross-linked TE, configure TE registers and sequencers, and start TE
sequencers (if 2 TEs controlled by 1 TP).
0x0F
#
Cross-linked TE register update header.
0x10 - 0x57
Unused commands.
0x58 - 0x7F
Commands passed to filter wheel control module (Section 9.5).
0x80 - 0xFF
7 lsbs specify default filter wheel step count (Section 9.5).
Command blocks are as follows:
Configuration Block
Consists of 31 bytes of TP configuration, 32 bytes of TE register settings and
200 bytes of bad column and pixel tables. The configuration data and register
settings are stored in TRM, and the bad column and pixel tables are passed to the
bad columns and pixels module (Section 9.8).
TE register update
Sent by the CP in response to an uplinked TE register update command.
Consists of 1 byte of register address and 1 byte of updated contents. The new
value is stored in TRM and passed to the TE UART control module for
transmission to the TE.
This block consists of seven 6 byte memory copy requests followed by a number
of patch requests. Each copy request record contains the source address, the
destination address and the number of bytes to be copied. The required copying
is performed as complete 6 byte requests arrive. A destination address of
0xFFFF results in no copying being carried out for this record. Destination
addresses within the TRM result in all three copies being updated.
The copy requests are followed by up to six memory patch requests, terminated
by value 0xFFFF or after 6 requests. No terminator is sent if all 6 patch
requests are used. Each request record specifies a destination address for the
patch, the number of bytes to be installed, and the patch data itself. Patch data is
moved immediately to the correct memory addresses, as it arrives. Destinations
within the TRM result in all three copies being updated.
Patch and copy data
9.3.2 Data Transmission
Each time the data transmission routine is called, it first checks whether the UART hardware is ready to
transmit a byte of data. If the hardware is ready, the software checks what type of data is currently being
transmitted (either housekeeping data or science data), then checks data availability by calling the appropriate
buffer output routine (Section 9.2). If a data byte is available, it is written to the UART output register ready
for transmission to the CP.
The current data type is usually science data, unless a command byte 0x00 is received from the CP. This
causes the data type to be set to housekeeping data until the current contents of the housekeeping buffer have
been sent. The CP will previously have ensured that the housekeeping buffer has been filled with
housekeeping data by sending a command byte 0x05, 0x06, 0x07, 0x0c or 0x0d.
JET-X FM CDMS : Software User's Manual
Issue 3 Draft
JET-X(95)BU-042
Page 78 of 113
9.4 TE Serial Communication
This module controls all serial communication between the TP and the TEs. At a hardware level, the
communication link is controlled by two UARTs on the telescope bus, each programmed to run at 19.2k baud.
One UART is connected to each of the two sets of telescope electronics.
The software is programmed to allow the TP to communicate with the TE in a number of different ways:
•
•
•
•
•
Updating the contents of a specified TE register.
Writing a new Gatti factor to the TE Gatti factor registers.
Reading back the contents of all TE registers, storing the contents in the housekeeping buffer.
Reading back values from all TE analogue monitor channels, storing readings in the
housekeeping buffer.
Full TE configuration sequence. This involves loading all TE registers with current settings from
the TRM, loading a sequencer file to the TE sequencer RAM and starting the TE sequencers.
Each of the above activities may be requested by the command reception and processing module by setting the
appropriate flag in a 'request byte' in TP RAM in response to commands from the CP, with the exception of
the transfer of new Gatti factors, which are requested by the XRT data processing module each time an end of
frame condition is detected in the incoming science data.
If only one UART is currently enabled (determined by the telescope bus configuration byte in the TP
configuration table) all transactions are automatically routed to this UART. If both UARTs are enabled (this
option will only be used in a failure mode, when both TEs must be controlled by a single TP), transactions are
normally routed to the UART controlling the TE directly connected with the current CDMS box. In this case
reception of commands 0x0C, 0x0C and 0x0E by the command reception and processing module result in
communication with the cross-linked TE, via the other UART.
9.5 Filter Wheel Control
This module uses the stepper motor control circuits contained within the TE to control the movement of the
two filter wheel mechanisms located in the focal plane assemblies. The module consists of a movement control
routine, which is called by the main task scheduler, and an operation request queue. Operation requests are
entered into the queue in response to certain commands bytes received by the command reception and
processing module (Section 9.3.1). A flowchart of the filter wheel process is shown in Figure 21.
If no filter wheel operation is currently in progress, the first activity of the movement control routine when it is
called by the main task scheduler, is to check the input queue for operation requests. If no request is present,
processing is aborted. If a request is present, it is read from the queue, and the movement control routine
prepares to perform the required operation.
JET-X FM CDMS : Software User's Manual
Issue 3 Draft
JET-X(95)BU-042
Page 79 of 113
From
Scheduler
Command In
Progress
No
Yes
Yes
Fixed
Number of
Steps
No
Fixed
Position
Yes
Inter-step
Short Delay
(100ms)
Clear Step
Counter
No
Delay In
Progress
No
Yes
Decrement
Delay
Counter
Fast Step
Filter Wheel
Read Encoder
Position
No
No
Finished
Moving
Known
Position
Yes
No
Requested
Position
Yes
Command
Pending
Yes
Yes
Prepare
For
Command
No
Pending
Command
Slow Step
Filter Wheel
In Reverse
Yes
Clear
Pending
Command
No
No
Calculate
Steps to
Position
Yes
Moved 5
Steps
Clear Current
Command
Return To
Scheduler
Fast Step
Filter Wheel
Yes
Yes
Slow Step
Filter Wheel
Known
Position
No
Key
No
Finished
Moving
Figure 21. Filter Wheel Operation
Returns to scheduler
after each step.
Execution resumes
here next cycle
JET-X FM CDMS : Software User's Manual
Issue 3 Draft
JET-X(95)BU-042
Page 80 of 113
All filter wheel operations are based on sequences of filter wheel step pulses, the timing of which are
controlled by the software. Certain operations also involve checking the readings from the filter wheel position
encoders between steps. The software allows combinations of two different motor drive rates to be used
during filter wheel operations. These rates are implemented by means of a long or short separation between
pulses. The actual values assigned to these intervals are set via entries in the TP configuration table using the
TPCONFIG command. During an operation, the movement control routine frequently returns control to the
main task scheduler when stepping at the slow rate, in order that other TP activities may proceed, albeit at a
much reduced rate.
The filter wheel operations provided are as follows:
•
Movement by a fixed number of steps. This operation may be used to make adjustments to the filter
wheel by 'dead reckoning'. It is most likely to be used for investigating partial failures of the filter wheel
control hardware. If the filter wheel is to move more than 10 steps, then it is moved at the fast rate.
Otherwise it is moved at the slow rate.
•
Movement to a specified encoder position. This operation is used to move the filter wheel into one of its
normal operating positions, typically at the start and end of XRT observations. The operation is
implemented in the following way:
i)
The filter wheel position is checked by reading the appropriate encoder, and if it is in the requested
position, the command is complete, and it is removed from the queue.
ii)
The filter wheel is stepped in the opposite direction to that commanded for 5 steps at the slow rate.
This is to account for any anomalous stepping immediately after the mechanism is turned on.
iii) The filter wheel is then stepped forwards at the slow rate, until a known encoder position is reached.
The system will stop stepping the filter wheel after 200 steps are performed if no valid position is
found. Without ground assistance, the system cannot close the filter wheel and safe the instrument if
the encoders fail.
iv) The filter wheel command queue is then checked for any pending commands after the current one,
and if there is a pending command, further processing of the current movement request is aborted.
This check allows a faster response to urgent movement requests, such as those generated by
emergency modechange commands. It is not done prior to this point if the operation, as steps ii and
iii need to be performed for any movement command, and if the filter wheel is in a known position,
then the time taken by ii and iii is negligible (around 5 seconds).
v)
A table lookup is performed to establish the number of pulses required to move the filter wheel from
the current position to the requested position in the required direction.
vi) The filter wheel is stepped by the required number of pulses. If the required number was greater
than 10, the filter wheel is pulsed at the fast rate. It is now assumed to be in the required position.
No checks are made during this movement for a pending command in the filter wheel movement
queue, as the time taken to complete this movement is short.
It should be noted that the movement rate of the filter wheel is affected by the load on the telescope processor
due to data processing when it is moving at the slow rate (1-2Hz). However, at the fast rate this module does
not yield to the scheduler and disables DMA, so that the timing is very regular (60Hz).
JET-X FM CDMS : Software User's Manual
Issue 3 Draft
JET-X(95)BU-042
Page 81 of 113
It is expected that after the calibration period36 the system may experience a small number of DMA buffer
overflows while the filter wheel is moved. There is code in place to prevent the thresholds auto-incrementing
while the filter wheel is moving.
36Ten
minutes is the onboard default.
JET-X FM CDMS : Software User's Manual
Issue 3 Draft
JET-X(95)BU-042
Page 82 of 113
9.6 End of Frame Interrupt Handler
The end of frame interrupt handler is triggered when an end-of-frame condition is detected in the XRT input
data stream by one of the telescope pre-processors (TPREs). The functions of this module are as follows:
•
•
•
•
•
Incrementing of the frame count field in the TP housekeeping data. This field is an essential part
of the strategy for reconstructing frame time tags during ground processing.
Loading the current hardware amplitude threshold, including the latest Gatti factor into the
TPREs ready for the next frame.
Loading a new diagnostic patch position into the TPREs.
Generation of a new Gatti factor, and triggering of transmission to the TE by the TE serial
communication module. The Gatti factor is double buffered in the TE so the new value will not
be used before the start of the next frame.37
Increment automatic ADC recalibration counter, and flag an ADC recalibration if the given
number of frames have been processed. The default interval is 400 frames. No data will be
received from the TEs for frames coincident with a recalibration.
9.7 DMA Control Module
The DMA control module contains routines to initialise the Direct Memory Access hardware on the CDMS
processor cards into the correct mode for TP operations. The required mode is a four channel auto initialising
single word transfer mode, with a buffer length of 512 bytes. This allows data from each TPRE input channel
to flow freely into a separate cyclic buffer.
The DMA control software provides two separate options for DMA initialisation. The first option is to
reinitialise the entire DMA IC. This option is used at the start of an XRT observation. The second is to reset
a single DMA channel. This option is used during handling of an input buffer overrun condition (Section
9.1.5) where a full reset would unnecessarily affect data flow on the other channels.
9.8 Bad Columns and Pixels, and Diagnostic Patch Handler
This module implements a number of functions related to the XRT bad column and pixel tables, and the
diagnostic patch. These routines allow undesired features on the CCDs to be filtered out, and allow the
characteristics of the CCDs to be monitored.
9.8.1 Bad Column and Pixel Table Pre-Processing Routine
This routine takes as input the raw bad column and pixel tables passed to the TP in the bad column and pixel
configuration block. This block is held in the control processor RAM and is 200 bytes long. It can hold up to
20 bad columns and 30 bad pixels. The CP sends this block to the TPs at an SOT modechange, when
commanded using the TSET command, or if the TP reboots during an observation.
37The
TE serial communications module is called from the main task scheduler, and is asynchronous to the end of
frame interrupt. The double buffering provides a window (inter-frame period) during which the TP updates the Gatti
factor.
JET-X FM CDMS : Software User's Manual
Issue 3 Draft
JET-X(95)BU-042
Page 83 of 113
The routine first rejects entries which pertain to the other telescope, then sorts the remainder into separate
tables, each corresponding to one TPRE input channel. This is done using the association of CCD node to
TPRE specified in the TP configuration block, and reduces greatly the processing required later. The tables
are also sorted into ascending order, and this is used to allow 'early-completion' of searches performed by the
bad column and pixel identification routine. The tables for each TPRE can hold the full 20 columns and 30
pixels needed if every entry in the configuration block is for the same telescope and node.
The bad columns and pixels are specified relative to a fixed co-ordinate system relative to the telescope and
CCD, and based on 2 node readout modes. This is shown in Figure 22. The associations of nodes and TPREs
is specified in the TP configuration block, and allows the readout mode to be modified without having to
upload a new table for the bad columns and pixels.
9.8.2 Bad Column and Pixel Identification Routine
This routine takes as input the co-ordinates and input channel (TPRE) of each input pixel. It returns a fail
condition if the pixel matches an entry in the bad column or pixel tables for that input channel. This function
can be disabled by setting the appropriate bit in the TP configuration block.
The bad column table is searched first, and is searched until a match is found, the end of the table is reached,
or the x co-ordinate of the pixel being checked is less than that of the column. This 'early-completion'
condition improves throughput, and is possible because the pre-processing routine sorts the columns into
ascending order.
The bad pixel table search algorithm is slight more complex. When the first pixel of a new frame is processed,
the 'current index' pointer into the pixel table is reset to the start of the table. This pointer is used to improve
throughput by reducing the time taken to search the table.
For each pixel, the table is searched for a match starting from the entry pointed to by the 'current index'
pointer. This continues until a match is found, the end of the table is reached, or the table entry co-ordinates
are after38 the current pixel co-ordinates.
The 'current index' pointer is updated during this search to point to the next entry in the bad pixel table after
the current pixel. The means that the next search begins with the first possible match, and so enhances
throughput by avoiding the need to check against table entries which cannot match.
38'After'
ordinate.
in this context is defined as either having a greater y co-ordinate, or equal y co-ordinates and a greater x co-
1.
2.
Figure 22. Co-ordinate Scheme used in Bad Column and Pixel Specification
CCD 2
CCD 2
Node 4
0,512
Notes
Half 0
CCD
400,512
Half 1
x
y
Expanded View Of A Single CCD
y
x
400,0
Coordinates are specified relative to Node 1 and Node 2.
Onboard manipulation of the coordinates allows single node readout without re-uplinking
coordinates.
CCD 1
XRT 2
CCD 1
XRT 1
Node 1
0,0
Node 3
0,512
Node 2
0,0
JET-X FM CDMS : Software User's Manual
Issue 3 Draft
JET-X(95)BU-042
Page 84 of 113
JET-X FM CDMS : Software User's Manual
Issue 3 Draft
JET-X(95)BU-042
Page 85 of 113
9.8.3 Diagnostic Patch Movement Routine
This routine is called at the end of each XRT frame. Its function is to move each diagnostic patch to its next
logical position. Patch positions are controlled so that a patch moves along CCD rows in the direction of
decreasing x, moving to a new row, each time the x co-ordinate reaches 0.
The limits on the number of columns and rows covered by each diagnostic patch is set by two entries in the TP
configuration block specifying the maximum x and y extents for the patch. It is important that this limit
matches the extent of the pixel co-ordinates expected for the current CCD readout mode. If the extent is too
small then the diagnostic patch will cover a reduced region of the CCD. If the extent is too large, then there
will be no diagnostic pixel information returned until the patch progresses onto the valid CCD region. Also
note that the patch extent is defined in patch co-ordinates, which are pixel co-ordinates divided by 4.
Readout Mode
Pixel Co-ordinates
Patch Co-ordinates
1 node
800 x 512
199 x 127
2 node
400 x 512
103 x 127
Table 12. Maximum Diagnostic Patch Co-ordinates in Standard Readout Modes
9.8.4 Diagnostic Patch and Stripe Pixel Identification Routine
This routine takes as input the co-ordinates and input channel of each input pixel. It compares the location of
the pixel with the current patch location for that input channel, and returns a pass condition if the pixel falls
within the current spatial limits of the diagnostic patch or stripe.
JET-X FM CDMS : Software User's Manual
Issue 3 Draft
JET-X(95)BU-042
Page 86 of 113
10. Uplinked Commanding
This section describes the response of the instrument to each serial or modechange command. It also describes
the way in which uplinked commands might be used to perform two hypothetical observation sessions. Within
this section, the individual commands are referred to by the mnemonics defined in the EGSE command
database.
10.1 Serial Command Descriptions
In this section, numeric parameters taken by each command are specified as follows:
n
nn
[keyname]
1-8 data bits.
9-16 data bits.
An option with mnemonic choices.
Where the parameter is divided into a number of bit fields, details are given of the bit definitions. The JET-X
Command Specification, JET-X(92)UL-138, contains definitions used by the EGSE and should be considered
the definitive document.
10.1.1 Control Processor Configuration Block Update Commands
The following commands affect the activities of modules in the control processor software by changing entries
in the CP configuration block.
AMHTRSEL,[htr],[temp]
AMINT,[mode]
Selects the AM Heater and temperature monitor to use.
follows:
HTR1
Use lens heater 1.
HTR2
Use lens heater 2.
LENS
Use lens temperature monitor.
SURV
Use survival temperature monitor.
Options are as
Switches the AM frame integration time between the two allowed settings:
LONG
Long integration time.
SHORT
Short integration time.
AMLEAST,#n
Sets the minimum number of acceptable star images required to enter and
remain in AM track mode. If a star search is completed, and the number of
acceptable star images detected is less than this value, a new star search is
initiated. Similarly, if the AM is in track mode and the number of acceptable
star images falls below this value, the AM is switched into search mode.
AMMODE,[mode]
Selects the AM data processing mode. Options are as follows:
DIAG
Diagnostic mode.
PATCH
Three star mode with diagnostic patch.
SEARCH
Search mode.
STAR4
Four star mode.
JET-X FM CDMS : Software User's Manual
Issue 3 Draft
JET-X(95)BU-042
Page 87 of 113
AMSETLT,#n
Sets the control byte for the temperature sensor associated with the current
heater. If the value read back from the sensor falls below the control value,
the currently selected AM Heater is switched on.
AMSMMAXA,#n
Sets the maximum amplitude required for a star image to be accepted in AM
search mode. This command sets only the most significant byte of the
maximum amplitude. The least significant byte is set to zero.
AMSMMINA,#n
Sets the minimum amplitude required for a star image to be accepted during
an AM star search. The amplitude is the total value within a 3 by 3 pixel
region centred on the star. This parameter is a byte.
AMSMMINT,#n
Sets the minimum value for the AM hardware amplitude threshold in search
mode. This parameter is a byte.
AMSMRED,#n
Sets the rate at which the AM hardware amplitude threshold is reduced in
search mode. For each search iteration, the threshold is reduced to (N/256) of
the previous value. This parameter is a byte.
AMSMSIG,#n
Sets the minimum 'significance' required for a star image to be accepted in
AM search mode. The significance of the image is measured by taking the
ratio of the total pixel amplitude within a 3 by 3 pixel region centred on the
star to the total pixel amplitude inside a 5 by 5 pixel region but outside the
inner region. This parameter is a byte.
AMSTARS,#n
Sets the number of acceptable star images required to terminate an AM star
search. After this number of acceptable images have been detected, the star
search is terminated, and the star selection algorithm is used to identify the
optimum stars for use in track mode.
AMSTART,#n
Sets the initial value of the AM hardware amplitude threshold in search mode.
This command sets only the most significant byte of the threshold. The least
significant byte is set to zero.
AMTMMINA,#n
Sets the minimum amplitude required for a star image to be acceptable during
AM star tracking. If the amplitude is unacceptable for two successive
readout frames, the software assumes that the star image has been lost. The
amplitude used is the total value within a 3 by 3 pixel region centred on the
star. This parameter is a byte.
AMTMSIG,#n
Sets the minimum 'significance' required for a star image to be acceptable in
AM track mode. The significance of the image is measured as above. If a
star image is unacceptable for two successive readout frames, the software
assumes that the star image has been lost. This parameter is a byte.
JET-X FM CDMS : Software User's Manual
Issue 3 Draft
BHONT,[id],#n
JET-X(95)BU-042
Page 88 of 113
Sets the time for which a baffle heater is switched on during a baffle heater
control cycle. The selected heater will be switched on for (N/256) of the cycle
set by BHRATE. The available heaters are identified as follows:
T1INA
XRT1 Inner Heater A.
T1OUTA
XRT1 Outer Heater A.
T1INB
XRT1 Inner Heater B.
T1OUTB
XRT1 Outer Heater B.
T2INA
XRT2 Inner Heater A.
T2OUTA
XRT2 Outer Heater A.
T2INB
XRT2 Inner Heater B.
T2OUTB
XRT2 Outer Heater B.
BHRATE,#n
Sets the length of the baffle heater control cycle. The control cycle length
decreases with increasing N.
BMTHOFF,#n
Sets the maximum permitted BM count rate. If the count rate from the BM is
above this level for three successive one second intervals, the instrument is
placed in a safe mode, and the action of subsequent modechange commands is
disabled. The numeric value is encoded as a power of 2 and has a valid range
of 2 to 14, giving count rates between 2 and 32768. The count is specified in
counts per second.
BMTHON,#n
Sets the lower BM threshold. If the count rate from the BM is below this
level for ten successive one second intervals, the radiation alarm condition is
removed, allowing the instrument to be returned to observing mode by an
SOT modechange command. The numeric value is encoded as a power of 2
divisor, to be applied to the upper threshold, and has a valid range of 1 to
(higher threshold - 1). This count is specified in counts per second.
CPSTWORD,#n
Sets the current CP status byte. Bits in this location can be set to enable
several non-default CP operation options as follows:
bit 0
Use alternate background monitor.
bit 1
Route housekeeping records to the slow telemetry data channel
(SDA).
bit 2
Force housekeeping record sequencing into ground contact mode.
bit 3
Enable fixed CP memory dump. The memory dump address can
be changed using the CPPATTRS command to patch the address
pointer (a word value in j_dumpad).
bit 4-6
Unused (0).
bit 7
Enable housekeeping block test pattern. Housekeeping blocks
are then filled with a ramp pattern. Byte 0 of the housekeeping
record is always zero.
JET-X FM CDMS : Software User's Manual
Issue 3 Draft
MMTYPE,[type]
MMEDAC,[option]
JET-X(95)BU-042
Page 89 of 113
Sets the type of data currently being loaded into the Mass Memory.
Available data types are:
DIS
No data currently being loaded.
DISFIL
No data currently being loaded. Inhibit action of modechange
command 'SOT' until MM is fully dumped.
EDAC
EDAC test pattern. This is designed to be loaded with MM
EDAC disabled, then dumped with EDAC enabled.
JETX
JET-X Data Format.
PSEUDO
Pseudo-random sequence derived from 16 byte seed.
IPSEUDO
Bit-wise inversion of the above sequence.
RAMP
Ascending byte test sequence.
SING
Constant byte value 0xA5.
Enables and disables MM hardware error detection and correction system.
Disabling the facility increases effective MM capacity by 25%. Options are
as follows:
DISABLE
EDAC disabled.
ENABLE
EDAC enabled.
MMFLAGSL,#n
Sets the 8 lsbs of the MM module disable flags. If the bit corresponding to an
MM module is set, the module will not be used when filling or dumping the
MM. Bit 0 of N corresponds to MM module 1, and bit 7 to MM module 8.
MMFLAGSM,#n
Sets the 4 msbs of the MM module disable flags. If the bit corresponding to
an MM module is set, the module will not be used when filling or dumping the
MM. Bits 0-3 of N correspond to modules 9 through 12.
MMMASK,[tp],#n
Specifies an 8 bit data reduction mask for XRT data. The value specified is
combined with the 8 lsbs of the current XRT frame number using a logical
AND operation, and if the result is zero, data from the frame is allowed to
enter the MM. Otherwise, data from that frame is discarded. Setting this
value to 0 disables data reduction. Valid options for specifying the telescope
to set the mask for are:
MMMODID,#n
TP1
Telescope processor in the same CDMS box as the CP.
TP2
Telescope processor in the other CDMS box.
Specifies the first MM module to be used during the MM fill and dump
operations. N is a number in the range 1 to 12 specifying the module number.
JET-X FM CDMS : Software User's Manual
Issue 3 Draft
MMSCIDAT,#n
JET-X(95)BU-042
Page 90 of 113
Specifies the maximum number of packets of science data which may enter
the MM during a single observation. Once this number of packets have been
loaded, subsequent packets are discarded. Setting this parameter to 0 disables
the feature. The value specified is multiplied by 4096 by the onboard
software. The valid range for this parameter is 0 to 255, although a value of
113 would specify a 60Mb block (all) of mass memory. It should be noted
that each packet is 136 or 170 bytes long (dependent on EDAC
enabled/disabled mode). This gives an allocation resolution of 544 packets or
680Kbytes. Housekeeping data is not blocked, nor counted in this limit.
10.1.2 Control Processor Memory Patching and Copying Commands
CPCOPNTR,#n./”dd”h”ss”h/
Copies #n bytes (maximum 255) starting from source address #ss into
addresses starting at #dd within the CP RAM.
CPCOPTRS,#n./”dd”h”ss”h/
Copies #n bytes (maximum 255) starting from source address #ss into
addresses starting at #dd within the CP TRM, updating all three copies.
CPPATNTR,#n./”dd”h”pp”h.../
Patches the specified #n bytes into addresses starting at #dd within the CP
RAM. “pp”h is repeated as necessary.
CPPATTRS,#n./”dd”h”pp”h.../
Patches the specified #n bytes into addresses starting at #dd within the CP
TRM, updating all three copies. “pp”h is repeated as necessary.
JET-X FM CDMS : Software User's Manual
Issue 3 Draft
JET-X(95)BU-042
Page 91 of 113
10.1.3 Telescope Processor Configuration Table Update
TPCONFIG,[TP1/TP2],#a,#n Loads the location #a within the selected TP current configuration table with
the data value #n. This command provides full control of the operating
configurations of the TPs. The table is encoded as follows:
byte 0
byte 1
byte 2 - 3
byte 4 - 5
byte 6 - 7
byte 8
byte 9
byte 10 - 11
byte 12
byte 13
byte 14
byte 15 - 16
byte 17
bit 0
bit 1
bit 2
bit 3
bits 4 - 7
bits 0 - 9
bit 15
bit 0-3
bit 7
byte 18
byte 19 - 20
bits 0 - 11
bit 12
bit 13
bit 14
bit 15
byte 21-22
byte 23-24
byte 25-26
byte 27
bits 0 - 3
byte 28
byte 29
bit 0
bit 1
bit 2
bit 3
bit 4
bit 5
Spare for in-orbit use.
Bright object mode integration time. The specified value overwrites byte 5 of the Bright
Object Mode TE sequencer file.
Lower boundary of event amplitude window.
X co-ordinate of boundary column (Section 9.1.2), in which pixels are classified as Type 0.
Upper boundary of event amplitude window.
Filter wheel fast step rate (Section 9.5).
Filter wheel slow step rate (Section 9.5).
Bad column and pixel manipulation flags (Section 9.8.1).
X co-ordinate of the last diagnostic patch position in patch co-ordinates.
Y co-ordinate of the last diagnostic patch position in patch co-ordinates.
Inhibit pixel amplitude offset subtraction for pixels classified in event Types 1 - 5.
Inhibit all anti-coincidence processing. This causes all events to be classified as Type 0 or
Type 1. All pixel association processing must them be done on the ground.
Inhibit adjacent line coincidence processing.
Inhibit bad column and pixel processing.
Event class threshold. Events below this value are passed.
TE Gatti Offset.
Inhibit Gatti factor ramping.
DMA channel mask register contents - setting a bit to 1 disables data input on the
corresponding channel.
Select TP fixed memory dump.
Pre-Processor control register contents:
01000000 Diagnostic stripe mode.
01010000 Imaging mode with diagnostic patch.
01110000 Imaging mode without diagnostic information.
Pre-Processor pixel amplitude threshold, channel 1.
Set to enable automatic threshold setting. If enabled, bits 0-11 specify the offset of the
amplitude threshold above the mean noise.
Enable threshold offset adjustment after input buffer overflow.
Adjust offset after every input buffer overflow (if bit 13 set).
Enable frame ditching after buffer overrun.
As bytes 19 - 20, channel 2.
As bytes 19 - 20, channel 3.
As bytes 19 - 20, channel 4.
End-of frame interrupt mask. One bit should be non zero, specifying the TPRE currently
providing end-of-frame interrupts. The TPRE used should be providing data to the TP.
TE software sequencer file number * 2:
0
Full frame, 2 node
2
Frame Store, 1 node, node 1
4
Frame Store, 1 node, node 2
6
Bright Object
8
Room Temperature
10
Frame Store, 2 node
12
Timing, node 3
14
Timing, node 4
Telescope bus control byte:
Disable pre-processor channel 1 and 2 if set.
Disable pre-processor channel 3 and 4 if set.
Disable H/K normal interface if set.
Disable H/K alternate interface if set.
‘1’ = Clock A. ‘0’ = Clock B.
‘1’ = Select Main Telescope. ‘0’ = Select Alternate Telescope.
JET-X FM CDMS : Software User's Manual
Issue 3 Draft
bits 6-7
Filter-wheel mechanism control (not usually commanded - set to ‘1’)
JET-X(95)BU-042
Page 92 of 113
JET-X FM CDMS : Software User's Manual
Issue 3 Draft
JET-X(95)BU-042
Page 93 of 113
10.1.4 TE Register Update
TECROSS
If two TEs are being controlled by a single TP, this command indicates that
the next TEFILREG command is to be sent to the cross-linked TE attached to
the specified TP. Note: If only the cross linked TE is being controlled, this
command is not required and would cause incorrect operation.
TEFILREG,[TP1/TP2],#a,#n
Loads the register at address #a within the TE controlled by the selected TP
with the data byte #n. The value stored in the equivalent position within the
associated TE current configuration table is also updated, making the
specified value the new default value. The valid range of #a is 0 - 31. TE
settings are fully documented in the Cambridge Consultants 'TE Command
Format' document.
10.1.5 TP/TE Configuration Table Copying Commands
TCOPYCM1,[TP1/TP2]
Copy the current mode configuration tables for the selected telescope into the
current Framestore 1 node mode tables (thus updating properties of this
mode).
TCOPYCM2,[TP1/TP2]
Copy the current mode configuration tables for the selected telescope into the
current Framestore 2 node mode tables (thus updating properties of this
mode).
TCOPYCM3,[TP1/TP2]
Copy the current mode configuration tables for the selected telescope into the
current timing mode tables (thus updating properties of this mode).
TCOPYM1C,[TP1/TP2]
Copy the current Framestore 1 node mode configuration tables into the
current mode table for the selected telescope (thus selecting full frame mode
as next observing mode).
TCOPYM2C,[TP1/TP2]
Copy the current Framestore 2 node mode configuration tables into the
current mode table for the selected telescope (thus selecting Framestore mode
as next observing mode).
TCOPYM3C,[TP1/TP2]
Copy the current timing mode configuration tables into the current mode table
for the selected telescope (thus selecting timing mode as next observing
mode).
10.1.6 Telescope Processor Miscellaneous Commands
TPCOLUP/”xx”h/
Add column address word #xx to XRT bad column table. The input channel
to which the bad column entry applies is encoded in the 3 msbs of #x:
Bit 15
0
1
XRT 1.
XRT 2.
Bit 14
0
1
CCD 1.
CCD 2.
Bit 13
0
1
HALF 1.
HALF 2.
JET-X FM CDMS : Software User's Manual
Issue 3 Draft
JET-X(95)BU-042
Page 94 of 113
TPCOPCP,#nn,#dd,#ss
Add an entry to TP memory patch table such that on each TP boot-up, #nn
bytes of data are copied from address #ss within CP memory into address #dd
within TP memory. If address #dd is within the lowest addressed copy of TP
TRM, the other two copies will be updated accordingly. Usually address #ss
within the CP will previously have been loaded with patch data for the TP
using the CPPATNTR command (Section 10.1.2).
TPCOPTP,#n,#d,#s
Add an entry to TP memory copy down table such that on each TP boot-up,
#nn bytes of data are copied from address #ss within TP memory into address
#dd within TP memory. If address #dd is within the lowest addressed copy of
TP TRM, the other two copies will be updated accordingly.
TPPIXUP/”xx”h”yy”h/
Add pixel address (#xx, #yy) to XRT bad pixel table. The input channel to
which the bad pixel entry applies is encoded in the 3 msbs of the #xx word, as
specified in the TPCOLUP command.
TSET,[TP1/TP2],[option], ...
This command provides various options for configuring a specified TP/TE
system as follows. Note: If all options are specified, the execution order is: 1,
0, 2, 3. This allows changes to the TP code to be made before the other
information is transferred.
0
Supply configuration information to TP, including the XRT
bad column and pixel tables.
1
Supply patch and copy information to TP.
2
Configure TE with current settings and start sequencers.
3
Start processing of XRT data.
10.1.7 Filter Wheel Movement Commands
TPFWCD,[TP1/TP2],[M1/M2],[FWD/REV],[POSITION]
Command a TP to set the default position command to the mechanism drive
circuit, direction and position specified. Operating positions are specified in
the TPFWM command.
TPFWCSTP,[TP1/TP2],#n
Update default step count for TP filter wheel movement. The valid range of
#n is 0 to 127.
TPFWSTEP,[TP1/TP2],[M1/M2],[FWD/REV]
Command a TP to use the specified mechanism drive circuits to move a filter
wheel in the specified direction by the default number of steps.
JET-X FM CDMS : Software User's Manual
Issue 3 Draft
JET-X(95)BU-042
Page 95 of 113
TPFWM,[TP1/TP2],[M1/M2],[FWD/REV],[POSITION]
Command a TP to use the mechanism drive circuit specified to move a filter
wheel in the specified direction to the specified operating position. This
command does not set the default position to the commanded position.
Operating positions are as follows:
CLOSED
Blanking plate.
CAL
Fe55 calibration source.
F1
Thick filter 1.
F2
Open.
F3
Thin filter.
F4
Thick filter 2.
TPFWMCD,[TP1/TP2],[M1/M2],[FWD/REV],[POSITION]
Command a TP to use the mechanism drive circuit specified to move a filter
wheel in the specified direction to the specified operating position. This
command also sets the default position to the commanded position. Operating
positions are specified in the TPFWM command.
TPFWMD,[TP1/TP2]
Command a TP to use the default mechanism drive circuit to move the filter
wheel in the default direction to the default position. The default positions
can be set using the TPFWMCD or TPFWCD commands.
10.1.8 Attitude Monitor Bad Column and Pixel Update Commands
AMCOLUP,#xx
Add column address word #xx to AM bad column table.
AMPIXUP,#xx,#yy
Add pixel address (#xx, #yy) to AM bad pixel table.
10.1.9 Relay Control Commands
CPINT,[option],...
This command updates the current status of the switchable control bus
interface circuits. When this command is sent, a switching status should be
included for each subsystem. Subsystems for which no status is specified will
be assumed to be off. Allowed options are as follows:
AMPP
Switch on AM pre-processor.
-AMPP
Switch off AM pre-processor.
AMON
Switch on Analogue Monitors.
-AMON
Switch off Analogue Monitors.
AM2I
Select AM interface 2.
-AM2I
Select AM interface 1.
JET-X FM CDMS : Software User's Manual
Issue 3 Draft
JET-X(95)BU-042
Page 96 of 113
LRMODL,#r,#m
Apply latching relay switching pulses to relay bits specified by #m within the
low byte of latching relay control register #r. The valid range for #r is 0-2.
This command also makes appropriate adjustments to the stored latching
relay configuration. Note: The EGSE @SUBSYS utility should be used in
preference to this command. Bit specifications are detailed in Appendix B.
LRMODM,#r,#m
Apply latching relay switching pulses to relay bits specified by #m within the
high byte of latching relay control register #r. The valid range for #r is 0-2.
This command also makes appropriate adjustments to the stored latching
relay configuration. Note: The EGSE @SUBSYS utility should be used in
preference to this command. Bit specification are detailed in Appendix B.
NLROFF,[option]/”0”d/
Switch off non-latching relay specified in [option]. Allowed options are as
follows:
XRT1A
Telescope 1, system A de-icing heater.
XRT1B
Telescope 1, system B de-icing heater.
XRT2A
Telescope 2, system A de-icing heater.
XRT2B
Telescope 2, system B de-icing heater.
AMA
Attitude monitors, system A de-icing heaters.
AMB
Attitude monitors, system B de-icing heaters.
NLRON,[option]
Switch on non-latching relay specified in [option] for the default number of
seconds (100). Allowed options are specified in the NLROFF command.
NLRONT,[option],/”tt”d/
Switch on non-latching relay specified in [option] for #t seconds. The valid
range for #t is 1 to 65535 seconds. Allowed options are specified in the
NLROFF command.
10.1.10 Command Macros
MACRO,#aa
Execute the uplinked command macro with start address specified by (#aa *
2) relative to the start of the uplinked command macro storage area (Section
8.2.1.3).
JET-X FM CDMS : Software User's Manual
Issue 3 Draft
JET-X(95)BU-042
Page 97 of 113
10.2 Modechange Commands
This section describes the response of the JET-X software to each modechange command. These commands
elicit complex responses by loading several entries into the serial command queue.
10.2.1 BM Alarm
This ‘modechange command’ is unique, in that it is generated internally by the BM control module
(Section 8.9) in response to a high BM count reading. The response to this condition is identical to that
described for the ’battery discharge’ command (Section 10.2.2).
10.2.2 MCBATDIS - Battery Discharge
The response to this command is described by the following pseudo code:
Set start observation lockout state.
Queue commands to assume ‘safe mode 3’ relay switching state.
Queue RAM resident (i.e. patchable) command macro to close filter wheels.
IF instrument is in observing mode:
Store observing mode relay configuration (ready for next start observation command).
END IF
10.2.3 MCCONTAC - Begin Ground Contact
The response to this command is described by the following pseudo code:
IF ‘start observation lockout’ state exists:
clear start observation lockout state.
END IF
queue commands to assume ‘safe mode 2’ relay switching state.
set Mass Memory into dump mode.
set SRG bus Vector Word.
IF vector word is non zero:
set SRG bus service request flag.
END IF
Queue RAM resident (i.e. patchable) command macro to close filter wheels.
IF instrument is in observing mode:
Store observing mode relay configuration (ready for next start observation command).
END IF
JET-X FM CDMS : Software User's Manual
Issue 3 Draft
JET-X(95)BU-042
Page 98 of 113
10.2.4 MCCUTOFF - Emergency Cut-off
Response to this command is as described for ‘battery discharge (Section 10.2.2).
10.2.5 MCFINOBS - Finish Observation Time
The response to this command is described by the following pseudo code:
Queue commands to assume ‘safe mode 1’ relay switching state.
Queue RAM resident (i.e. patchable) command macro to close filter wheels.
IF instrument is in observing mode:
Store observing mode relay configuration (ready for next start observation command).
END IF
10.2.6 MCRADPAS - Radiation Belt Passage
The response to this command is described by the following pseudo code:
Queue commands to assume ‘safe mode 2’ relay switching state.
Queue RAM resident (i.e. patchable) command macro to close filter wheels.
IF instrument is in observing mode:
Store observing mode relay configuration (ready for next start observation command).
END IF
10.2.7 MCSTAOBS - Start Observation Time
The response to this command is quite complex. The logic flow is described by the following pseudo code:
IF no ‘radiation alert’ or ‘start observation lockout’ state exists:
IF ( mass memory data type is ‘DISFIL’ AND vector word equal to zero )
OR mass memory data type is ‘DISABLE’:
queue commands to start XRTs.
IF instrument is currently in a ‘safe’ mode:
queue commands to resume observing mode relay switching state.
END IF
queue commands to set MM data type to ‘JETX’.
END IF
END IF
10.2.8 MCSTATUS - Transmit Status Word
This command prompts JET-X to return the current SRG bus status word.
JET-X FM CDMS : Software User's Manual
Issue 3 Draft
10.2.9 MCVECTOR - Transmit Vector Word
This command prompts JET-X to return the current SRG bus vector word.
JET-X(95)BU-042
Page 99 of 113
JET-X FM CDMS : Software User's Manual
Issue 3 Draft
JET-X(95)BU-042
Page 100 of 113
10.3 Commanding Examples
The following sections demonstrate the use of uplinked commands in two situations. Firstly, an observation is
performed starting from an 'unconfigured off' state. Secondly, the same observation session is performed
starting from a 'configured off' state. These examples have been included partly to demonstrate how the CPs
configuration storage facilities help to minimise the number of serial commands required once the instrument
has been configured.
10.3.0 Observation Session Starting from 'Unconfigured Off' State
RLPSAON
1 Relay command to switch on PDRS.
RLCPU1
1 Relay command to switch on a CP. The processor immediately begins to
send H/K data via the SRG bus.
@SUBSYS CPU2, CPU4
2 Serial commands to switch on two TPs (one in each CDMS box). These
begin to return H/K via the CP.
MMTYPE,JETX
1 Serial command to enable filling of MM with JET-X data. Sending this
command now ensures that the MM holds H/K data for the whole operating
session.
LRMODL,LRMODM
6 Serial commands sent to CDMS to switch each latching relay into a known
state. Main subsystems power is disabled at this stage.
LRMODL,#0,#1.
1 Serial command sent to CP to switch subsystem power on. All selected
subsystems now begin to return H/K data via the CP. The AM enters Search
Mode.
CPPATNTR
Several Serial commands to load all required patches (for both the CP and
TP) are inserted into CP RAM. Command macros are installed in the 512
byte command macro store.
CPPATTRS
Several serial commands to activate all CP patches by modifying the task
schedule and/or the call indirection tables.
TPCOPCP
Several serial commands to set up TP patch list. This ensures that patches
destined for the TP are copied across from the CP when the TPs are
configured.
AMLEAST,#2.
1 Serial command to modify the minimum star count required for AM star
tracking. This command ensures correct AM operation when only a small
number of stars are expected in the field of view.
TCOPYM3C,TP1
1 Serial command to copy default timing mode table into TP1 current
configuration table.
TCOPYM2C,TP2
1 Serial command to copy default Framestore 2 node mode table into TP2
current configuration table.
TPCONFIG,TP1,#16.,#130.
1 Serial command to modify XRT1 configuration block so Gatti Technique is
disabled.
JET-X FM CDMS : Software User's Manual
Issue 3 Draft
JET-X(95)BU-042
Page 101 of 113
TCOPYCM3,TP1
1 Serial command to copy modified table back to default timing mode table,
thus updating the default settings.
MCSTAOBS
Modechange command 'Start Observation Time'. This runs an onboard
command macro to switch the instrument into the selected observing
configuration.
MCFINOBS
Modechange command 'Finish Observation Time'. This runs an onboard
command macro to bring the instrument into a safe configuration.
TCOPYM3C,TP2
1 Serial command to copy modified default timing mode table into TP2
current configuration table.
TCOPYM2C,TP1
1 Serial command to copy default Framestore 2 node mode table into TP1
current configuration table.
MCSTAOBS
Modechange command 'Start Observation Time'.
MCFINOBS
Modechange command 'Finish Observation Time'.
TCOPYM1C,TP2
1 Serial command to copy default bright object mode table into TP2 current
configuration table.
TPCONFIG,TP2,#14.,#"30"h
1 Serial command to modify TP2 Configuration Block entry to alter event
class threshold to 3.
MCSTAOBS
Modechange command 'Start Observation Time'.
MCFINOBS
Modechange command 'Finish Observation Time'.
MCCONTAC
Modechange command 'Begin Ground Contact'. This loads a command
macro to switch off the XRTs and the TPs, and prepare the MM for data
dumping.
MCVECTOR
Command from spacecraft to establish how many data blocks JET-X has
available to dump.
TSCIENCE
Commands from spacecraft prompt JET-X to dump blocks of MM data via
the SRG bus.
RLPOWOFF
Relay command switches JET-X into Configured Off Mode.
configuration is stored in CP RAM and latching relay positions.
Current
JET-X FM CDMS : Software User's Manual
Issue 3 Draft
JET-X(95)BU-042
Page 102 of 113
10.3.2 Observation Session Starting from 'Configured Off' State
RLPSAON
1 Relay command to switch PDRS on. The CP is still connected to the power
supply, with configuration data stored in RAM. The CP boots up and
corrects any errors in the configuration data. It then begins to return H/K
data.
AMLEAST,#2.
1 Serial command to modify minimum star count required for AM star
tracking, to deal with a small number of stars in field of view.
TCOPYM3C,TP1
1 Serial command to copy modified timing mode table into TP1 current
configuration table.
TCOPYM2C,TP2
1 Serial command to copy default Framestore 2 node mode table into TP2
current configuration table.
MCSTAOBS
Modechange command 'Start Observation Time'. This runs an onboard
command macro to switch the instrument into the selected observing
configuration. In this case, this will include switching on the TPs and other
subsystems.
MCFINOBS
Modechange command 'Finish Observation Time'. This runs a command
macro to bring the instrument into a safe configuration.
TCOPYM3C,TP2
1 Serial command to copy modified timing mode table into TP2 current
configuration table.
TCOPYM2C,TP1
1 Serial command to copy default Framestore 2 node mode table into TP1
current configuration table.
MCSTAOBS
Modechange command 'Start Observation Time'.
MCFINOBS
Modechange command 'Finish Observation Time'.
TCOPYM1C,TP2
1 Serial command to copy default bright object mode table into TP2 current
configuration table.
TPCONFIG,TP2,#14.,#64.
1 Serial command to modify TP2 Configuration Block entry to alter event
class threshold to 2.
MCSTAOBS
Modechange command 'Start Observation Time'.
MCFINOBS
Modechange command 'Finish Observation Time'.
MCCONTAC
Modechange command 'Begin Ground Contact'. This loads an onboard
command macro to switch off the XRTs and the TPs, and prepare the MM
for data dumping.
MCVECTOR
Command from spacecraft to establish how many data blocks JET-X has
available to dump.
TSCIENCE
Commands from spacecraft prompt JET-X to dump blocks of MM data via
the SRG bus.
RLPOWOFF
Relay command switches JET-X into Configured Off Mode. Current
configuration is stored in CP RAM and latching relay positions.
JET-X FM CDMS : Software User's Manual
Issue 3 Draft
JET-X(95)BU-042
Page 103 of 113
11. JET-X Modes
11.1 Instrument Modes
This section describes the operation of the JET-X instrument in terms of transitions between various standard
modes. Transitions between modes occur in response to relay commands, modechange commands and serial
commands. It is important to note that the modes described represent default operation of the instrument, and
that the flexibility of the serial command interface allows a broad range of non-default instrument operation to
be obtained if required.
The transitions between the operating modes are represented by the state transition diagram shown in
Figure 23. On initial switch-on, or after an RLRECON relay command, the instrument begins in the
‘Unconfigured Off’ state. Relay commands RLPSAON or RLPSBON are first used to switch-on a power
converter in the PDRS. A ‘CPU On’ relay command (RLCPU1 etc.) is then used to activate a Control
Processor, placing the system in CP On Mode. Various serial command words are sent to ensure that the
telescope processors and all required subsystems are switched on, and all non-required subsystems are
switched off . The instrument is now in Ready Mode, prepared to commence autonomous operation in the
presence of modechange commands alone.
A modechange command MCSTAOBS switches the instrument into Observing Mode, using current
observation settings. Normally, from here the instrument is switched into Safe Mode 1 by a modechange
command MCFINOBS. From here the instrument will normally be switched either back into Observing Mode
by another MCSTAOBS modechange command or into Ground Contact mode by an MCCONTAC command.
From any of the above states, the instrument may be switched into Safe Mode 2 by an MCRADPAS
modechange command or into Safe Mode 3 by a BM Alarm token from the BM control software or by
MCCUTOFF or MCBATDIS modechange commands. However, modechange commands cannot switch the
instrument from a high level of safing into a lower level, e.g. from Safe Mode 3 into Safe Mode 2.
From any active state, the relay command RLPWOFF switches the system into the ‘Configured Off’ state,
with all subsystem switching information retained, but with only the CP RAM left powered up (under battery
backup), containing the current software configuration. From this state, the relay command RLPSAON or
RLPSBON will return the instrument to its former state. For safe instrument operation, the RLPOWOFF
command should be issued from a safe mode or from Ground Contact Mode, in order to ensure that the filter
wheels are in the closed position. It is important to note that issuing RLPOWOFF or putting the system in
Safe Mode 3 will cause MM contents to be lost, by cutting power to the memory modules.
It should also be noted that while the instrument is running under battery backup, no parameter table
scrubbing is performed. After long periods in this configuration, the system may perform an unconfigured
switch on process if RAM contents are corrupted sufficiently. This is dependant on both the locations and rate
of SEU induced errors.
JET-X FM CDMS : Software User's Manual
Issue 3 Draft
State
Unconfigured
Off
JET-X(95)BU-042
Page 104 of 113
Possible Next States
Key
Convertor
Running
Via Relay Command
RLPS?ON
Via SRG Bus Command
Convertor
Running
CP On
CP On
Unconfigured
Off
RLCPU?
RLPOWOFF
Ready
Sub-system switchon
Ready
Observing
Ground
Contact
Safe Mode
1
Safe mode
2
Safe Mode
3
MCSTAOBS
RLPS?ON
MCFINOBS
MCRADPAS
MCCUTOFF/
MCBATDIS/
BM ALARM
Ground
Contact
Safe Mode
1
Safe mode
2
Safe Mode
3
Configured
Off
MCCONTAC
MCFINOBS
MCRADPAS
MCCUTOFF/
MCBATDIS/
BM ALARM
Observing
Safe mode
3
Configured
Off
MCCUTOFF/
MCBATDIS/
BM ALARM
RLPOWOFF
Ground
Contact
Safe mode
2
Safe Mode
3
MCCONTAC
MCRADPAS
MCCUTOFF/
MCBATDIS/
BM ALARM
Configured
Off
RLPOWOFF
Observing
Ground
Contact
MCSTAOBS
Safe Mode
1
Observing
MCSTAOBS
Safe Mode
2
Safe mode
3
Configured
Off
Observing
Ground
Contact
Safe mode
3
Configured
Off
MCSTAOBS
MCCONTAC
MCCUTOFF/
MCBATDIS/
BM ALARM
RLPOWOFF
Ground
Contact
Configured
Off
MCCONTAC
RLPOWOFF
CP On
Ready
Safe Mode
1
Safe mode
2
RLPS?ON
RLPS?ON
RLPS?ON
RLPS?ON
Figure 23. JET-X Safe Mode State Transitions
Configured
Off
RLPOWOFF
Safe Mode
3
RLPS?ON
JET-X FM CDMS : Software User's Manual
Issue 3 Draft
JET-X(95)BU-042
Page 105 of 113
The table below describes the instrument modes in terms of the status of each subsystem:
PDRS
CP
TP
TE
Filter
AM
BM
AMON
MM
Unconfigured
Off
Converter
Running
CP On
--------
--------
--------
--------
--------
--------
--------
--------
On
--------
--------
--------
--------
--------
--------
--------
On
On
--------
--------
--------
--------
On
--------
Ready
On
On
On
On
--------
On
On
On
On
Not
Running
Running
--------
Running
Observing
Ground
Contact
Safe Mode 1
Not
Processing
Processing
--------
Normally
Closed
Normally
Closed
Normally
Closed
Normally
Closed
As Defined
Closed
Running
--------
On
On
On
On
Filling
Dumping
On
On
Running
Closed
--------
On
On
Filling
Safe Mode 2
Safe Mode 3
On
On
On
On
Not
Processing
---------------
---------------
Closed
Closed
---------------
On
On
On
On
Filling
--------
Configured
Off
--------
RAM On
--------
--------
Normally
Closed
--------
--------
--------
--------
Table 13. Instrument Subsystem States in JET-X Operating Modes.
11.2 Observing Modes
Tables 14 and 15 below show the instrument parameters used for the three sets of operating defaults in the
onboard ROM. Mode 1 is Framestore, 1 node. Mode 2 is Framestore, 2 node. Mode 3 is Timing mode.
Variable
b_modes
j_bomod
b_thresl
b_passcol
b_thres
h_quick
h_slow
ce_size
c_xlength
c_ylength
d_thres
e_gattifact
g_dmamask
i_mode
i_thresh
k_intmask
j_teramno
x_tconcx
Offset
Size
Mode 1
Mode 2
0
byte
0
0
1
byte
0x7D
0x7D
2
word
0x45
0x45
4
word
0x0FFF
0x018F
6
word
0x07FF
0x07FF
8
byte
0x08
0x08
9
byte
0xFF
0xFF
10
word
0x3750
0x1B00
12
byte
0xC7
0x67
13
byte
0x7F
0x7F
14
byte
0x60
0x60
15
word
0x0200
0x0200
17
byte
0xFC
0xF0
18
byte
0x50
0x50
19
word
0x3013
0x3013
21
word
0x3013
0x3013
23
word
0x3013
0x3013
25
word
0x3013
0x3013
27
byte
0xFE
0xFE
28
byte
0x02
0x0A
29
byte
0xF8
0xF8
Table 14. Telescope Processor Default Configuration Tables.
Mode 3
0
0x7D
0x45
0x0FFF
0x07FF
0x08
0xFF
0x1B5F
0x67
0x7F
0x6C
0x0200
0xFE
0x50
0x301E
0x301E
0x301E
0x301E
0xFE
0x0E
0xFA
JET-X FM CDMS : Software User's Manual
Issue 3 Draft
Offset
0
1
2
3
4
5
6
7
8
9
10
11
12
13
14
15
16
17
18
19
20
21
22
23
24
25
26
27
28
29
30
31
JET-X(95)BU-042
Page 106 of 113
Mode 1
Mode 2
Mode 3
0
0
0
0
0
0
0
0
0
0
0
0
0
0
0
0
0
0
0
0
0
0
0
0
0x84
0x84
0x84
0x83
0x83
0x83
0x83
0x83
0x83
0x77
0x77
0x77
0x54
0x54
0x54
0x84
0x84
0x84
0x83
0x83
0x83
0x83
0x83
0x83
0x77
0x77
0x77
0x54
0x54
0x54
0
0
0
0
0
0x04
0
0
0
0x08
0
0x04
0
0
0
0
8
0x0C
0
0
0
0x08
8
0x0C
0
0
0
0
0
0
0x3C
0x3C
0x3C
0
0
0
0xE3
0xEF
0xA1
0x64
0x64
0x24
Table 15. Telescope Electronics Default Configuration Tables.
JET-X FM CDMS : Software User's Manual
Issue 3 Draft
JET-X(95)BU-042
Page 107 of 113
12. Onboard Software Patching
Two factors make patching of the onboard software for JET-X somewhat less straightforward than on many
other projects (e.g. ROSAT).
•
•
To improve tolerance of SEUs, object code normally runs in ROM. To allow softer patching,
selected subroutine calls are made indirectly, through address tables stored in the TRM.
The multi-processor architecture requires that TP patches must be routed through and stored
within the CP RAM., so that the patches may be re-installed each time a TP is switched on or
rebooted.
12.1 Procedure for Patching Control Processor Object Code
•
•
•
The object code for the subroutine to be modified is copied into the unused section of memory
below the stack, using the CPCOPNTR command.
Modifications to the code are patched in using several CPPATNTR commands.
The modified subroutine is activated by changing the appropriate entry in the indirect call table
in the TRM to point to the new RAM resident version. This modification is made using the
CPPATTRS command.
In some situations, it may be more efficient to create the new subroutine entirely by patching, in which case
the use of the CPCOPNTR instruction may be omitted.
12.2 Procedure for Patching Telescope Processor Object Code
Details of all patches to be applied to the two TPs must be stored in CP RAM, so the patches may be reinstalled each time a TP is switched on or rebooted. The procedure for commanding a TP patch is as follows:
•
•
•
Details of 'copy' operations required within the TP are added to the TP copying list in CP TRM
using the TPCOPTP command.
All patches destined for TP memory locations are patched into the unused section of CP memory
below the stack.
For each TP patch, the storage address within CP memory, the destination address within TP
memory, and the size of the patch, are inserted into the TP patch list using CPCOPTP.
The patch will now be installed automatically in TP memory each time the TP boots up, or whenever the CP
receives an SOT modechange command. The following processes occur to achieve this:
•
•
•
•
•
The CP sends a message to the TP indicating that copying and patching instructions are about to
be sent.
The TP suspends execution of all application modules and enters a wait loop until further
instructions arrive from the TP (or a time-out occurs).
The TP receives the 'TP copy list' from the CP, and responds to each list entry by copying data
from ROM into the specified areas of RAM.
The TP receives the 'TP patch list' from the CP. After each patch list entry, the CP also sends the
appropriate patch data from CP memory. The TP installs each patch at the specified location.
Once all patches have been installed, the TP resumes execution of the application modules.
JET-X FM CDMS : Software User's Manual
Issue 3 Draft
JET-X(95)BU-042
Page 108 of 113
13. Timing Issues
The diagram in Figure 24 shows the relative timing of major activities within the JET-X instrument while an
observation in frame transfer mode is underway on one XRT. Shading has been added in order to show the
time scale on which data from different sources progresses through the processing pipeline into the Mass
Memory. Particular points to note are:
•
•
•
•
•
The operating cycle of the XRT is asynchronous with the main 2 second operating cycle of the
CDMS. In addition, if two XRTs are operating, no phase relationship between their operating
cycles can be guaranteed.
Events from a CCD readout frame are processed in real time, as the frame is read out. However,
because XRT data is packed into packets of fixed size, the event data is sent to the MM a short
time after it is processed. The size of this delay is dependant on the XRT data rate.
Housekeeping records from CP subsystems are passed to the MM 2 seconds after they are
generated. Housekeeping records from the TPs are passed to the MM 3 seconds after they are
generated.
The operating cycle of the AM is synchronous with the main 2 second operating cycle of the
CDMS. Information from a particular frame is inserted into the MM header packet 2 seconds
after readout and processing of the frame is completed, and 4 seconds after frame integration is
completed.
Each spacecraft onboard timecode is inserted into the MM header packet 2 seconds after it is
generated. It is also inserted into the next header packet, 2 seconds later.
An important aspect of the ground processing of XRT data will be the reconstruction of timing information for
each CCD frame. This can be achieved satisfactorily by processing information from the MM header packets
in the following way. An automated implementation of the process will be required in the ground segment, the
process being performed independently for the two XRTs:
•
•
•
•
•
•
Examine the timecode information in each header packet. Adjust the second occurrence of each
timecode by adding 2 seconds.
Select header packets containing XRT and TP part A records for the XRT in question.
Subtract 1 second from each timecode (to allow for 1 second offset between onboard timecode
generation and TP housekeeping record generation).
Plot a graph of current XRT frame number (from XRT and TP part A records) against onboard
timecode.
The gradient of the straight line of best fit indicates the XRT frame readout rate.
If this line is moved upwards until all readings fall on or below it, accurate time tags for each
frame may be read from it.
Figure 24. Timing Chart
Key
Shaded boxes show block data flow through the instrument
XRT Data To MM
Header To MM
AM Readout
AM Integration
1Hz Interrupt
SRG Time Signal
SRG 1Hz Sync
CP HK Gathering
TP HK Gathering
TP Event Processing
EOF Interrupt
XRT Readout
XRT Frameshift
XRT Integration
JET-X FM CDMS : Software User's Manual
Issue 3 Draft
JET-X(95)BU-042
Page 109 of 113
JET-X FM CDMS : Software User's Manual
Issue 3 Draft
A. Document Abbreviations
AM
AMON
BM
CCD
CDMS
CP
MM
PDRS
TE
TP
Attitude Monitor
Analogue Monitors
Background Monitor
Charge Coupled Device
Command and Data Management System
Control Processor
Mass Memory
Power Distribution and Regulation System
Telescope Electronics
Telescope Processor
JET-X(95)BU-042
Page 110 of 113
JET-X FM CDMS : Software User's Manual
Issue 3 Draft
JET-X(95)BU-042
Page 111 of 113
B. Relay Control Register Bit Specification
Register 0
bit 0
bit 1
bit 2
bit 3
bit 4
bit 5
bit 6
bit 7
SSA On
SSB On
T1A On
T1A Off
T1B On
T1B Off
T2A On
T2A Off
bit 8
bit 9
bit 10
bit 11
bit 12
bit 13
bit 14
bit 15
T2B On
T2B Off
AM2A On
AM2A Off
??? OMB On
??? OMB Off
BM1 On
BM1 Off
Register 1
bit 0
bit 1
bit 2
bit 3
bit 4
bit 5
bit 6
bit 7
BM2 On
BM2 Off
TAM1 On
TAM1 Off
TAM2 On
TAM2 Off
AM1A On
AM1A Off
bit 8
bit 9
bit 10
bit 11
bit 12
bit 13
bit 14
bit 15
MM Norm On
MM Norm Off
MM Alt Off
Spare
Spare
Spare
??? OM I/F Select
??? AM I/F Select
Register 2
bit 0
bit 1
bit 2
bit 3
bit 4
bit 5
bit 6
bit 7
CPU4 Off
CPU4 On
CPU3 Off
CPU3 On
CPU2 Off
CPU1 Off
CPU2 On
CPU1 On
bit 8
bit 9
bit 10
bit 11
bit 12
bit 13
bit 14
bit 15
AM B On
AM B Off
Spare
Spare
T2B Outer Baffle
T2B Inner Baffle
Spare
Spare
Register 3
bit 0
bit 1
bit 2
bit 3
bit 4
bit 5
bit 6
bit 7
T2A Outer Baffle
T2A Inner Baffle
T1A De-Ice
T1B De-Ice
T2A De-Ice
T2B De-Ice
AM A De-Ice
AM B De-Ice
bit 8
bit 9
bit 10
bit 11
bit 12
bit 13
bit 14
bit 15
T1B Outer Baffle
T1B Inner Baffle
T1A Outer Baffle
T1A Inner Baffle
Spare
??? OM On
AMON On
APRE On