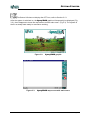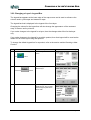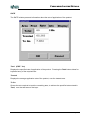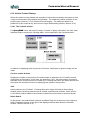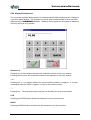
1
Copyright 1997 - 2004 by Rinex Technology COPYRIGHT NOTICE All rights reserved. No part of this publication may be reproduced, stored in a retrieval system, or transmitted in any form or by any means, electronic, mechanical photocopying, recording, or otherwise, without the prior written permission of RINEX Technology. DISCLAIMER No Liability is assumed with respect to the use of information contained herein. While every precaution has been taken in the preparation of this publication, RINEX assumes no responsibility for errors or omissions, nor is any liability assumed for damages resulting from the use of the information contained herein. Further, this publication and features described herein are subject to change without notice. Use of this system is strictly limited to providing guidance assistance and mapping to the operator who must remain in control of the vehicle at all times. RINEX, including its officers servants and agents, does not make any representation to any party and will not accept any responsibility or liability whatsoever for any loss or damage of whatever nature suffered by any such person or corporation choosing or seeking to use this system or any part thereof. By use of this system you agree that RINEX is not liable or responsible for any damage whatsoever to the vehicle, any property, personal injuries, or death that may result from the use or abuse of this system. SprayTRAX FARMTRAX User Manual Written for FARMTRAX Software, Version 2.0 Version 2.0 Revision “A” Issue Date September 2004 Part Number 1-1205 Copyright 1997 to 2004 by RINEX Technology All rights reserved. ACKNOWLEDGEMENTS Windows®95/98/CE and XP and Wordpad® are registered to Microsoft Corp. All other trademarks are the property of their respective owners. RINEX TECHNOLOGY ABN ACN 93 071 258 734 071 258 734 Office Location: 19 Lyall Street South Perth WA 6151 Telephone: Facsimile: (08) 9474 4771 (08) 9474 4772 Postal Address: PO Box 945 South Perth WA 6951 Internet: Web Home Page Email: http://www.rinex.com.au [email protected] LIMITED WARRANTY NOTICE Products This warranty covers all products (the “Products”) manufactured and or sold by RINEX Technology or their authorised dealers. RINEX Technology Limited Warranty RINEX Technology (“RINEX”) hereby warrants solely to the end purchaser of the Products, subject to the exclusions and procedures set forth herein below, that the Products sold to such end purchaser shall be free, under normal use and maintenance, from defects in material and workmanship for a period of 12 months from delivery. Repairs and replacement components are warranted, subject to the exclusions and procedures set forth below, to be free, under normal use and maintenance, from defects in material and workmanship for 90 days from delivery, or for the balance of the original warranty period, whichever is greater. Purchaser’s Exclusive Remedy The end purchaser’s exclusive remedy under this warranty shall be limited to the repair or replacement, at the option of RINEX, of any defective Products or components thereof. The end user shall notify RINEX or a RINEX authorised dealer immediately of any claimed defect. Repairs shall be made through RINEX only. Exclusions RINEX does not warrant damage occurring in transit or due to misuse, abuse, improper installation, neglect, alteration, abnormal use, lightning (or other electrical discharge), exposure to moisture or dampness, excessive temperatures, spill of liquids or fluids, or acts of God. Repair, modification or service of RINEX products by any party other than an authorised RINEX dealer shall render this warranty null and void. RINEX does not warrant any Product where the Product serial number or nameplate has been removed, defaced or altered. RINEX does not warrant claims asserted after the end of the warranty period. RINEX does not warrant or guarantee the precision or accuracy of positions obtained when using Products. The potential accuracy of Products as stated in RINEX literature and/or Product specifications serves to provide only an estimate of achievable accuracy based on: • Specifications provided by the US Department of Defense for GPS Positioning, • GPS OEM Receiver specifications of the appropriate manufacturer (if applicable), and • DGPS service provider performance specifications. RINEX reserves the right to modify Products without any obligation to notify, supply or install any improvements or alterations to existing Products. No Other Warranties The foregoing warranty is exclusive of all warranties, whether written, oral, implied or arising by statute, course of dealing or trade usage, in connection with the design, sale, installation, service or use of any products or any components thereof, including, but not limited to, any warranty of merchantability or fitness for a particular purpose. Limitation of Liability The extent of RINEX’S liability for damages of any nature to the end purchaser or any other person or entity whether in contract or tort and whether to persons or property shall in no case exceed, in the aggregate, the cost of correcting the defect in the Product or, at RINEX’S option, the cost of replacing the defective item. In no event will RINEX be liable for any loss of production, loss of profits, loss of use for any special, indirect, incidental, consequential or contingent damages, even if RINEX has been advised of the possibility of such damages. Without limiting the foregoing, RINEX shall not be liable for any damages of any kind resulting from installation, use, quality, performance or accuracy of any products. Governing Legislation To the greatest extent possible, this warranty shall be governed by the laws of the State of Western Australia. In the event that any provision hereof is held to be invalid by a court of competent jurisdiction, such provision shall be severed from this warranty and the remaining provisions shall remain in full force and effect. Obtaining Warranty Service In order to obtain warranty service, the end purchaser must bring the Product to an authorised RINEX dealer along with the end purchaser’s proof of purchase. The end purchaser must produce the original invoice or other purchase documents as proof of the purchase date. The end purchaser is solely responsible for the cost of transportation of the Product to RINEX or an authorised RINEX dealer and the Product is at the end purchaser's risk whilst in transit. For any questions regarding warranty service or to obtain information regarding the location of any of RINEX’s approved dealers, contact RINEX at the following address: Rinex Technology 19 Lyall Street South Perth Western Australia 6151 Telephone : Facsimile : Internet : (08) 9474 4711 (08) 9474 4772 www.rinex.com.au FARMTRAX User Manual Ver 2.0-Rev A Release Date September 2004 SPRAYTRAX 1 OVERVIEW 1.1 1.2 1.3 1.4 1.5 2 FarmTRAX Product Overview ................................................................1-1 FarmTRAX Hardware Components Overview.......................................1-2 FarmTRAX Software Components Overview ........................................1-3 This Manual ............................................................................................1-4 Terminology Used In This Manual .........................................................1-5 CONCEPTS 2.1 2.2 2.3 2.4 2.5 2.6 2.7 2.8 2.9 2.10 2.11 2.12 2.13 2.14 2.15 3 TABLE OF CONTENTS Starting the System ................................................................................2-1 Shutting down the System......................................................................2-4 Storing your Information .........................................................................2.5 The Layer Concept .................................................................................2-7 Layer Display Attributes..........................................................................2-8 The Displayed Screen ............................................................................2-9 View All Paddocks Mode ......................................................................2-12 Product..................................................................................................2-14 Username & Passwords .......................................................................2-15 Variable Rate Treatment Maps ............................................................2-16 Summary Reports.................................................................................2-19 Turn Indication ......................................................................................2-20 Virtual Road (VR) Guidance.................................................................2-21 Exporting & Importing Data ..................................................................2-22 The Launcher........................................................................................2-23 SYSTEM OPERATIONS 3.1 3.2 3.3 3.4 3.5 3.6 3.7 3.8 3.9 3.10 3.11 3.12 3.13 3.14 3.15 3.16 3.17 3.18 3.19 3.20 3.21 3.22 3.23 Setting up SprayTRAX for the First Time...............................................3-1 Changing Applications............................................................................3-5 Create a New Farm ................................................................................3-7 Create a New Paddock.........................................................................3-10 Setup Vehicle Offsets ...........................................................................3-12 Change the Swath Width......................................................................3-16 Enter the Overlap Distance ..................................................................3-22 Selecting a Flow Controller ..................................................................3-25 Selecting the Vehicle Product ..............................................................3-27 Entering Product Batch Information .....................................................3-29 Create a New Product ..........................................................................3-31 Changing an Existing Product Details..................................................3-35 Importing a Backdrop Map ...................................................................3-36 Activating a Backdrop Map...................................................................3-38 Turning off Layers.................................................................................3-40 Making a Layer a Top Layer.................................................................3-41 Viewing Layer Information....................................................................3-42 Changing a Layers Display Attribute....................................................3-44 Changing a Layers State ......................................................................3-46 Changing a Layers Legend Bar ...........................................................3-48 Deleting a Layer....................................................................................3-51 Zooming & Panning in GPS Mode .......................................................3-53 Zooming & Panning in View Mode .......................................................3-55 FARMTRAX User Manual Ver 2.0 Rev A Page i SPRAYTRAX 3 SYSTEM OPERATIONS (continued) 3.24 3.25 3.26 3.27 3.28 3.29 3.30 3.31 3.32 3.33 3.34 3.35 3.36 3.37 3.38 3.39 3.40 3.41 3.42 3.43 3.44 3.45 3.46 3.47 3.48 3.49 3.50 3.51 3.52 3.53 3.54 3.55 3.56 3.57 3.58 3.59 3.60 4 TABLE OF CONTENTS Printing..................................................................................................3-57 Creating a Summary Text Report ........................................................3-59 Setting the Import/Export mode............................................................3-60 Exporting a Paddock to a Diskette .......................................................3-61 Importing a Paddock from a Diskette ...................................................3-63 Exporting a Farm to a Diskette.............................................................3-65 Importing a Farm from a Diskette.........................................................3-67 Activating the Legend Bar ....................................................................3-69 Changing the Plot Line Type ................................................................3-70 Username and Passwords ...................................................................3-73 Changing Application Options ..............................................................3-75 Setting up a Screen Grid ......................................................................3-77 Activating/Deactivating Grids ...............................................................3-79 Vehicle Nose setting.............................................................................3-80 Changing Job View Setting ..................................................................3-81 Assigning a Job to a Layer ...................................................................3-83 Changing the Dataset Year ..................................................................3-87 Changing to a Different FARMTRAX box Dataset...............................3-88 Selecting the Keyboard Layout ............................................................3-89 Entering Weather Information ..............................................................3-90 Entering Driver Information ..................................................................3-91 Using Distance and Area Tools............................................................3-93 Changing Lightbar Limits......................................................................3-97 Changing Lightbar Display Brightness .................................................3-99 Changing Guide Lock Direction .........................................................3-100 Activating & Configuring Turn Warnings ............................................3-101 Configuring the Virtual Road (VR) window ........................................3-103 Activating the Virtual Road (VR) Guidance window...........................3-104 Activating the Direction Guide Indicator.............................................3-105 Creating Rate Maps............................................................................3-106 Saving a Rate Map .............................................................................3-112 Loading a Rate map to a Bin..............................................................3-113 Removing a Rate map from a Bin ......................................................3-115 Importing a Rate map .........................................................................3-117 Setting the Rate Manually ..................................................................3-118 Viewing Treatment Maps....................................................................3-122 Using the Saturn HX Launcher ..........................................................3-123 USING GUIDANCE 4.1 4.2 4.3 4.4 4.5 4.6 Parallel Method.......................................................................................4-3 Race Track Method ................................................................................4-6 Contour Lines Method ............................................................................4-8 Centre Pivot Method.............................................................................4-10 Virtual Road Guidance .........................................................................4-13 Using the Direction Guide Window ......................................................4-15 FARMTRAX User Manual Ver 2.0 Rev A Page ii SPRAYTRAX 5 THE MENU SYSTEM 5.1 5.2 5.3 5.4 5.5 5.6 5.7 5.8 5.9 5.10 5.11 5.12 5.13 5.14 5.15 5.16 6 TABLE OF CONTENTS Main Menu ..............................................................................................5-2 View Menu ..............................................................................................5-3 View More Menu.....................................................................................5-4 View More-More Menu ...........................................................................5-5 Tools Menu .............................................................................................5-6 Farm Menu .............................................................................................5-7 Farm More Menu ....................................................................................5-8 Vehicle Menu ........................................................................................5-10 Vehicle More Menu...............................................................................5-11 Guide Menu ..........................................................................................5-12 Guide More Menu .................................................................................5-13 Lightbar Menu.......................................................................................5-14 Application Menu ..................................................................................5-15 Rates Menu ..........................................................................................5-16 Rate Map Editor Menu..........................................................................5-17 Manual Rates Menu .............................................................................5-18 DIALOGUE WINDOWS 6.1 6.2 6.3 6.4 6.5 6.6 6.7 6.8 6.9 6.10 6.11 6.12 6.13 6.14 6.15 6.16 6.17 6.18 6.19 6.20 6.21 6.22 6.23 6.24 6.25 6.26 6.27 6.28 6.29 6.30 Shutdown System...................................................................................6-2 GPS Details ........................................................................................... 6-3 Backdrop Map - Select File ....................................................................6-5 About FarmTRAX ...................................................................................6-6 General Setup.........................................................................................6-7 Units ......................................................................................................6-10 Grid Setup.............................................................................................6-11 View Setup............................................................................................6-12 Applications ..........................................................................................6-13 Module Select .......................................................................................6-15 Password ..............................................................................................6-16 Farm......................................................................................................6-17 Paddock ................................................................................................6-19 Select Layers ........................................................................................6-21 Layer Details.........................................................................................6-23 Import/Export Farm Windows...............................................................6-40 Print.......................................................................................................6-41 Vehicle Product Dialogues ..................................................................6-44 Product Details .....................................................................................6-48 Product Unit ..........................................................................................6-49 Unit Select.............................................................................................6-50 Vehicle Swath .......................................................................................6-51 Boom Sections......................................................................................6-53 Offsets...................................................................................................6-54 Flow Controller......................................................................................6-56 Driver ....................................................................................................6-57 Alphanumeric Keyboard .......................................................................6-58 Numerical Keyboard .............................................................................6-59 Legend ..................................................................................................6-61 Weather ................................................................................................6-63 FARMTRAX User Manual Ver 2.0 Rev A Page iii SPRAYTRAX 6 DIALOGUE WINDOWS (continued) 6.31 6.32 6.33 6.34 6.35 6.36 6.37 6.38 6.39 6.40 6.41 6.42 6.43 6.44 6.45 7 TABLE OF CONTENTS Calender ...............................................................................................6-65 Guide Options.......................................................................................6-67 VR Settings ...........................................................................................6-69 Lightbar Limits ......................................................................................6-70 Lightbar Intensity ..................................................................................6-72 Direction Guide .....................................................................................6-73 Event Warning ......................................................................................6-75 Edit Rate Map Legend..........................................................................6-76 Edit Rate Map Legend Number of Rates .............................................6-78 Paint Brush Setup.................................................................................6-79 Load Rate Map .....................................................................................6-80 Select Rate Map ...................................................................................6-82 Save Rate Map .....................................................................................6-83 Bin Status..............................................................................................6-84 Manual Rates Setup .............................................................................6-85 TROUBLE SHOOTING 7.1 7.2 Blank Forms............................................................................................7-1 Troubleshooting ......................................................................................7-1 FARMTRAX User Manual Ver 2.0 Rev A Page iv 1 Overview 1.1 FARMTRAX Product Overview The RINEX FARMTRAX system is a rugged, vehicle-mounted task controller that can be used year round for a number of farming and agricultural applications. FARMTRAX brings together advanced GPS satellite guidance, data acquisition and mapping, and variable rate capabilities in the one integrated package. Both farmers and agricultural contractors will quickly realize the advantages to using the FARMTRAX system for vehicle guidance where previous navigation methods haven been surpassed by today’s technology. Combined with a logical database the FARMTRAX system provides an easy and intuitive method for storing accurate records of chemical and fertiliser applications to paddocks/fields and entire farms. The FARMTRAX system comprises of several major components including ♦ FARMTRAX HARDWARE • Computer system • GPS receiver • Lightbar • Peripheral controllers (interface connections) ♦ FARMTRAX SOFTWARE • • Vehicle component Office component The FARMTRAX user manual will describe the product and how to use the system to ensure that maximum benefit is derived from the system. FARMTRAX User Manual Ver 2.0-Rev A Page 1-1 1.2 FARMTRAX Hardware Components Overview The RINEX FARMTRAX product has evolved over a number of years and as electronic components have been revised so has the product. This manual was initially developed for a hardware platform which was marketed as the FARMTRAX system which was released in 1997. Fig 1.1 The FARMTRAX product The physical hardware was revised in 2000 with the launch of the Saturn series, more specifically the Saturn GX which incorporated the features of the FARMTRAX software. The Saturn FX was also launched in the same period as a sister product to the GX with different hardware specifications. Fig 1.2 The Saturn GX product Fig 1.3 The Saturn FX product In 2004 the Saturn HX was introduced with further hardware revisions, however the features of the FARMTRAX software are still incorporated within the HX system. The operating system was also revised to the Windows® XP embedded system which has necessitated some changes within the operational characteristics. These are detailed within this manual and are denoted by the following icon within the manual. Fig 1.4 The Saturn HX product FARMTRAX User Manual Ver 2.0-Rev A Page 1-2 1.3 FARMTRAX Software Components Overview The FARMTRAX software system provides specialised software modules which are tailored to the individual precision farming operations that can be carried out throughout the year. In each module, GPS satellites with differential corrections are used to locate the exact location of the tractor/combine or 4WD vehicle. The current location and the position history is automatically recorded and displayed on the colour screen inside the vehicle cab. Your FARMTRAX system may be configured for one or all of the following operations: ¾ SpreadTRAX Fertiliser spreading ¾ SprayTRAX Chemical spraying ¾ SoilTRAX Soil Sampling ¾ SeedTRAX Crop seeding ¾ HarvestTRAX Crop harvesting FARMTRAX User Manual Ver 2.0-Rev A Page 1-3 1.4 This Manual This manual is designed to assist users of the FARMTRAX system in the operational use of the product. Installation of the FARMTRAX hardware is covered in a separate document, entitled “FARMTRAX Installation Manual”. The Saturn HX installation manual is covered in the Saturn H series installation. The first part of this manual presents information on the basics and general concepts of the FARMTRAX software system, and covers parts of the software which are not applicationspecific. Following this general information, the manual provides application-specific details on how to carry out a particular precision farming operation (for example: Harvesting) using the software. To present additional information considered a Hint or Tip, the graphic to the left of the italicized text. FARMTRAX User Manual Ver 2.0-Rev A will be shown Page 1-4 1.5 Terminology used in this Manual. When we say…… We Mean…. Application A FARMTRAX software module (e.g. SpreadTRAX, HarvestTRAX) which is customised for a particular agricultural operation, such as fertiliser spreading, or harvesting. Attributes An inherent characteristic or aspect of an object such as a layer or flow controller. An attribute of a controller may be the ability to record both Actual and Requested product application rates, or yield and moisture levels in a harvesting operation. Backdrop map A graphics file, with positional information, which can be displayed as a background on the map screen. Barcode Reader/BCR An optional device which will read the values represented in bar codes. Boom Settings Boom details such as the number of sections and the width of each section. Button A symbol representing a function shown on the touch screen which allows the input of data or performs a function when tapped. Client Same as FARM. Contractors may prefer to store paddock information by CLIENT name, rather than a FARM name. Dataset A grouping of data, usually by FARMTRAX box serial number and year. Literally, a “set of data” Dataset Directory A subdirectory of C:\Rinex on the hard drive of the subject machine. The subdirectory is named FX{serno}_{dataset} where {serno} is the serial number of the FARMTRAX box for which the software is licensed, and {dataset} is the dataset in which the system is currently running. An example is: C:\Rinex\FX97500_1999 DGPS Differential Global Positioning System. A correction signal which when applied to the GPS information, increases the accuracy of the reported position. Differential See DGPS Dry Yield A rate, expressed in Tonnes per Hectare using the weight of the grain without moisture. FARMTRAX User Manual Ver 2.0-Rev A Page 1-5 Farm A term used to describe a group of paddocks. See also Client. FARMTRAX hardware The hardware system installed in your vehicle cabin which is used by the FARMTRAX software modules. That is, the FARMTRAX controller box, touch-screen, and light bar (if fitted), GPS antennae, and can include any connected yield monitor or flow sensor, cables and connectors. FARMTRAX software The software modules (programs) produced by RINEX Technology which run on the FARMTRAX hardware. GDA2000 FARMTRAX uses the Geocentric Datum of Australia (GDA2000) datum when referencing all objects and maps. GPS Global Positioning System. Provides the basic positioning information for the system. Guideline The red line displayed on the map screen. This line may have been created by either lock or parallel guidance. Guide Points A set of two positions used to compute the set of parallel guidelines when using parallel guidance. Icon A symbol representing a function, shown on the touch-screen, which allows the input of data or commands when pressed. Job/Job Number A number or text description assigned to a layer, for the purposes of grouping this layer with other layers of the same job. Key Layer The layer to which the plot information is currently being written. Launcher Program The utility program produced by RINEX which is installed on the Saturn HX system and is used to run FARMTRAX and maintain the system. Layer An object or group of objects with a common function, that can be viewed on the map screen. Legend Layer The layer in a paddock which determines which legend is shown on the map screen Lightbar An L.E.D. display device mounted in front of the vehicle operator, which is used to display course changes, distances and other messages. Lock guidance The type of guidance used when working the field/paddock in either a racetrack or contour method. FARMTRAX User Manual Ver 2.0-Rev A Page 1-6 Map screen The area of the touch screen to the left of the menu icons, which displays the paddock information and maps. Menu A group of icons shown on the right of the touchscreen, which allow access to other menus or functions. Multi Section Boom Interface (MSBI) A device that is connected to the controller port on the interface box that provides an interface to the spray controller. The MSBI allows the FARMTRAX to read the current status of each boom section on the spray controller and displays the status on the screen along with the treated area for each section. PC The PC device running the Microsoft Wndows® operating system and the FARMTRAX software. Paddock A file in which treatment data is recorded and saved. Pane Part of a single window. (As in a window-pane) Parallel Guidance The type of guidance used when working the field/paddock in an up and back method. A set of parallel guidelines will be drawn on the screen one swath width apart. Password The sequence of letters and numbers which are used in conjunction with the Username to enable use of the FARMTRAX system. Product The contents of the vehicle bins or tanks. If harvesting, this is the crop being harvested. If spraying, the chemical(s) being sprayed. Rate Map A paddock map showing areas to be treated at differing application rates. These rates are colourdifferentiated. Relative Bearing The required bearing to the selected object, relative to the vehicle’s current direction. i.e. if the vehicle is moving directly away from the object, the relative bearing is always 180degrees. If the selected object is a line, then the relative bearing is the direction of the vehicle relative to the direction of the line. Right-Click Performed using a PC with a mouse, this is pressing the button on the right side of the mouse, instead of the more normal left side. Sample Number/Sample ID# The number, or letter & number combination which identifies the physical soil sample bag to the testing laboratory. FARMTRAX User Manual Ver 2.0-Rev A Page 1-7 Sample point The actual location of where a soil sample has been taken. Sample Point ID The single-letter given to identify a sample point on the map screen. Saturn Hardware The hardware system installed in your vehicle cabin which is used to run the FARMTRAX software. That is the interface box, GPS receiver and antenna , and can include any connected device, cables, connectors and the touch screen. Sub-menu A menu which appears as a result of selecting an icon from a previously appearing menu. Swath Width The total width of the boom/implement. Tap To touch the screen once with your finger at an intended position on the screen. Care must be taken to tap the screen gently. Toggle Switch A device that is connected to the controller port on the interface box that allows the treatment to be turned on or off without having to touch the VPM on the screen. Toolbar Button Similar in functionality to an icon, these boxes appear across the lower part of the screen and can be pressed to allow input of information. Top (or front) Layer The layer which is drawn last on-screen. Layer number 1. Touch-screen The display which shows the progress of your operation, and accepts commands by pressing (touching with your finger) icons shown on the screen. Treatment Refers to the spraying state of the boom. If treatment is on, then the spraying state of the boom is on and treatment data will be recorded in the current paddock/field. If the treatment is off, then the spraying state of the boom is off and treatment data is not recorded. Treatment Data The position information stored in a field when the treatment is on. The treatment data is represented on the screen as either tracks behind the vehicle or colour shaded areas. Treatment Map A paddock map produced as the result of treating a paddock. The map shows areas treated, with areas of different application rates in differing colours. FARMTRAX User Manual Ver 2.0-Rev A Page 1-8 Unit The measurement unit used to evaluate mass, volume, area, length etc. (Example: Kilogram, Tonne, Litre) Unit Type The type of measurement. (Example: Mass, volume, area.) Username The name which is registered as the licensed user of the program. This name is associated with the password. Vehicle Position Marker (VPM) The symbol appearing on the map screen to mark the position of either the vehicle, or in view mode, the focal point. Virtual Road (VR) Virtual Road. A method of guidance which draws a "virtual road" on the screen of the path ahead of the vehicle. Waypoint A marker, identified by a number on the map screen, to guide an operator to a location in a paddock. Wet Yield A rate, expressed in Tonnes per Hectare using the weight of the grain including the indicated moisture levels. Window A separate area of the displayed screen. One window can appear over the top of another window. FARMTRAX User Manual Ver 2.0-Rev A Page 1-9 FARMTRAX User Manual Ver 2.0-Rev A Page 1-10 2 Concepts 2.1 Starting the system Once all system hardware components have been connected, the system is started by operating the ON/OFF switch on the front panel of the FARMTRAX box. Note: Once the switch has been turned on, do not switch it off until the proper shutdown sequence has completed. The Saturn HX is powered when the vehicle is started as described in section 2.1.1. The FARMTRAX box has been configured to start running the software as soon as the preliminary system checks are completed. No manual intervention is normally required. Note: The normal Windows95 prompt to “Press Start to begin” which runs along the bottom of the screen should be ignored. The application which starts will be that which was last run, i.e. the application which was running when the box was last shut down. Instructions on how to change the currently running application are contained in section 3.2. The first visual indication that the FARMTRAX software is initialising is the appearance of the opening graphic, which illustrates the operation that is to be carried out. Some examples of opening graphics are: Note: HarvestTRAX does not show an opening graphic. FARMTRAX User Manual Ver 2.0-Rev A Page 2-1 While the FARMTRAX software is initialising, the GPS receiver may also need some time before being fully operational. While this process is occurring, the GPS Status icon on the map screen may show an error condition. (Refer to section 2.6.10. for details) When the icon changes to a moving - then the receiver is ready for normal operation. If the system has not been used recently, other icons indicating lack of signal may remain for up to 15 minutes, while the GPS receiver gathers new information about available GPS satellites. Should these icons not be removed after this period, refer to the Troubleshooting section of this manual. The system will always start in the “default” farm and paddock. The default is the farm and paddock that were open at the time that the system was last shut down. Any paddock information that was active at that time will be re-loaded and displayed on the map screen. If the FARMTRAX system repeatedly exits with “Illegal Operation” error messages on startup, then it is likely that for some reason the paddock data in the default farm and paddock is corrupted. Use the SAFE FARMTRAX desktop icon or start menu option to start the system in this case. Further instructions are contained in the Troubleshooting section of this manual. Fig 2.1 Loading of paddock information In cases where the default farm and paddock contain a large amount of data, to save time, it may be preferable to abort the loading process. Pressing the “Cancel” button on the Loading File indicator window will stop the loading of data, and allow the user to select another paddock, or turn the display of that data off. It may be necessary to press “Cancel” more than once to stop all loading activity. FARMTRAX User Manual Ver 2.0-Rev A Page 2-2 Once the loading of all data has completed, the map screen will display the information, as shown in section 2.6. 2.1.1 Saturn HX The Saturn HX should be installed and powered as described in the Saturn H series installation manual. The Saturn HX senses the ignition status of the vehicle and will be powered to the ON state 20 seconds after the vehicle’s engine is started. The Isolation switch on the Saturn HX is to be used only when the system is not required to be powered ON when the vehicle is started, or when it is necessary to use the diagnostics software through the Launcher mode. In normal operation mode the Isolation switch on the Saturn HX box should be left in the ON position. 2.1.2 Office Mode The FARMTRAX software is also able to run on your home PC. This is to allow you to analyse data and print reports in the comfort of your office. When running in this situation, it is not necessary for the software to check for GPS signals or maintain connections to controller devices. The GPS Status icon will show as: FARMTRAX User Manual Ver 2.0-Rev A Page 2-3 2.2 Shutting Down the System Before removing power to the FARMTRAX box, the software must be correctly shut down. button on the main menu screen. Further details on the This is achieved by using the dialog windows appear in section 6 of this manual, however the bottom line is that power must not be removed until the “It is now safe to turn off your FARMTRAX” message is displayed. Fig 2.2. -The final shutdown message 2.2.1 Saturn HX In order to shut down the Saturn HX the only step required is to turn the vehicle’s ignition OFF. The Saturn HX should not be switched OFF at the Isolation switch. In normal operation mode the Isolation switch on the Saturn HX box should be left in the ON position. FARMTRAX User Manual Ver 2.0-Rev A Page 2-4 2.3 Storing Your Information The FARMTRAX software uses a hierarchical structure for the storage of data gathered in paddock operations. Understanding how the FARMTRAX software stores the data gathered from your paddock operations will assist you in: ♦ Deciding on farm and paddock names, when setting up for the first time. ♦ accessing that information at a later time. Consider the following diagram, illustrating the structure used to store your data. All data is grouped into a yearly “dataset” The datasets contain multiple Farms (or Clients). The Farms contain multiple paddocks. The paddocks contain multiple layers. Each layer contains the data for one particular paddock operation (Harvesting, spraying, etc) Fig 2.3. – Data Storage (normal) FARMTRAX User Manual Ver 2.0-Rev A Page 2-5 In addition, each layer can be “stamped” with a job number or description. These job numbers can be used to group information about operations from different layers and paddocks, but with the same job number. Fig. 2.4. -Data Storage (using job numbers) (Instructions on setting up and using jobs are shown in section 3 of this manual.) 2.3.1 Multiple FARMTRAX boxes. Data that has been imported into the Office PC is stored in separate datasets for each FARMTRAX box. Users who own more than one FARMTRAX box need to be able to access the data from each box, when using the Office PC. To switch the Office PC from one FARMTRAX box to another, right-click using the mouse on any vacant area in the FARM dialog window. A Select window will be raised, allowing the required FARMTRAX box to be selected. FARMTRAX User Manual Ver 2.0-Rev A Page 2-6 2.4 The Layer Concept Information relating to objects or treatments for a paddock is stored in layers. Each layer contains information about objects of a similar type. (For example, CSBP Soil Samples for a paddock would be stored in one layer, boundary information in another layer and backdrop maps in another.) Storing the information in this way makes it easy to access, print or display only the information you need at the time. All layers, regardless of the application that created them, are available for display or the accessing of details, from any application. For example, you don’t have to be in SoilTRAX to view soil samples or access information on any particular sample point. You do however need to be in the correct application if you wish to add more data to a layer. The map screen draws the paddock information on the screen layer by layer, with the top layer being drawn last. (Each layer draws over the previous one.) Each individual layer can be turned on or off, and the order of drawing can also be changed. Only layers which are turned on are loaded into memory. Turning off layers will reduce delays when switching between paddocks. Layers can be deleted from the system. FARMTRAX User Manual Ver 2.0-Rev A Page 2-7 2.5 Layer Display Attributes When the FARMTRAX system collects information from an external device, such as a flow controller or yield monitor, it is sometimes possible to examine different aspects of the data and display them on-screen separately. Having more than one display attribute for a layer enables the user to choose which aspect of the recorded data is to be shown. For example: In a Harvesting layer it is possible to change the display attribute from Yield to Moisture, effectively changing the map display from a yield map to a map of moisture levels in the same paddock. In the same way it could be possible to show Target and Actual values for a treatment layer, depending on the reporting capabilities of your connected flow controller. The Display Attribute is changed by editing the Attribute field in the FARM - LAYER DETAILS - DISPLAY window for the relevant layer. If there is more than one display attribute available for the selected layer, then these attributes will be shown in a list, for selection. Step-by-step instructions on how to change the display attribute are contained in section 3 of this manual. Yield Map FARMTRAX User Manual Moisture Map Ver 2.0-Rev A Page 2-8 2.6 The Displayed Screen The FARMTRAX touchscreen display has been designed to show the maximum information on-screen, while still providing large “buttons” which are easy to target for command decisions on the move. Major components of a typical display are: 2.6.1 The Map screen. Occupying most of the display, the map screen area is where the paddock information is shown. A grid may optionally be overlaid on the map screen. 2.6.2 Menu Buttons These are “buttons” which when touched or pushed, perform an action in the program. Different buttons will be displayed, depending on which buttons have been previously pressed. Where there are more buttons in a menu than can be displayed on one screen, then a MORE button will be available, to display more menu choices. The BACK button will return the user to the previous menu. FARMTRAX User Manual Ver 2.0-Rev A Page 2-9 2.6.3 Legend or Weed Buttons The Legend bar displays a legend for displayed yield values, or variable rates. In some applications, the Legend bar may be replaced by a row of weed buttons. 2.6.4 Program Messages. Various messages related to program operation will appear here. Some examples are: ♦ Ready This indicates that the software is waiting for a change in position. ♦ E = 325911.4 N = 6870185.9 When the vehicle position marker is in the OFF state and moving, this is a readout of its geographic position, displayed as an Easting and Northing, in metres. ♦ Yield = 1.5 T/Ha An indication of the instantaneous yield value for that point in the paddock. ♦ Moisture = 10% An indication of the moisture level for that point in the paddock ♦ Dist = 152m, Bearing = 125 Degrees. Distance and bearing to selected object, relative to current position and bearing. Shown when navigating back to a pre-determined point in the paddock. ♦ Rate = Bin #1: 36Kg/Ha.. Bin to be used, and output rate when distributing product in the paddock. 2.6.5 Time The current time, according to the system. If incorrect, the time can be changed in the Windows 95® Date/Time section of Control Panel, accessible under the Start button, on the Windows 95® desktop. (A keyboard is required) 2.6.6 Application Displays the Application currently selected. (e.g. SprayTRAX, SpreadTRAX, HarvestTRAX) 2.6.7 Farm Name Displays the currently selected FARM. 2.6.8 Paddock Name Displays the currently selected PADDOCK. If the view mode is set to display ALL paddocks, then this field will not be shown. 2.6.9 Job Displays the currently selected JOB. If the view mode is set to display ALL jobs, then this field will not be shown. 2.6.10 GPS Status This graphical icon gives a continuous indication of the status of the GPS signals. Possible icons and their meanings are: FARMTRAX User Manual Ver 2.0-Rev A Page 2-10 ICON MEANING The software is in View Mode, and all GPS signals will be ignored. (Refer Section 5.7.2) The blue satellite symbol moving through the icon indicates normal GPS operation. The Differential signal is not being received. The GPS signal is not being received. No data is being received from the GPS receiver. The software is in Office mode. GPS and controller signals are ignored. 2.6.11 Vehicle Position Marker (VPM) This appears as either a symbol when ON or when OFF, depending on the state of the selected controller. In manual controller mode, changing the state is done by touching the symbol on the screen. A "nose" can be added to the VPM to clearly identify the direction of travel. (Refer to Section 3 for details) 2.6.12 Backdrop maps These are displayed on the map screen area and can be any image in Windows® bitmap format (filename ends in .bmp). As they are shown with a geographical reference position, any image needs to be registered beforehand, to provide the correct geographic coordinates. FARMTRAX uses the Geocentric Datum of Australia (GDA2000) datum when referencing all objects and maps. Contact RINEX Technology for assistance in registering your bitmap images. 2.6.13 Application Objects The nature of the “object” varies with the selected application. The image in para. 2.6 shows SprayTRAX as the selected application, and Soil Samples are displayed as the “object” in this case. The displayed object could have been a spread trail pattern (called a treatment map), and for HarvestTRAX, a yield map. . These objects are stored in what is termed “layers” of information. Objects from any application can be viewed in any other application. However, to change or add data requires the original application to be running. FARMTRAX User Manual Ver 2.0-Rev A Page 2-11 2.7 View All Paddocks Mode The normal mode of operation for the map screen is to display one paddock at a time. However, it is now possible to display all paddocks in a farm on the one screen. The view may also be further modified to show either all layers, or only layers for a specific job number. Fig. 2.5. All paddocks displayed This view may be printed, or used to select individual paddocks by geographic location. (This may be useful if you know where a paddock is, but don't remember the name allocated to it in the FARMTRAX system). Just touch the screen over the required paddock, and a window will appear, listing the paddock(s) covered by the touched area. FARMTRAX User Manual Ver 2.0-Rev A Page 2-12 Fig. 2.6. After touching a paddock. One more touch on the OK button, shows the selected paddock on it's own, or CANCEL to return to the map screen and select another paddock. Fig. 2.7. The selected paddock. Instructions on using the VIEW ALL mode of display are found in Section 3 of this manual. Plotting all this information can take some time if there are a large number of paddocks or layers. This function is best used on the Office PC, or when you are not in a hurry to get started. FARMTRAX User Manual Ver 2.0-Rev A Page 2-13 2.8 Product Having separate “products” allows the system to differentiate between similar but separate operations carried out in the paddock. The product itself is determined by the material selected in the VEHICLE-PRODUCT section of the program, and can be considered as the product being carried by the vehicle performing the operation. Example1: When spraying a paddock, multiple spraying operations (treatments) may be carried out on a paddock using different products. Each chemical name or type would be entered in the VEHICLE-PRODUCT dialog window at the time of spraying that product. Example2: When harvesting, different paddocks may contain different crops. The crop type would be stored as separate products, and the appropriate one for that paddock selected when starting to harvest. 2.8.1 Multi-component products. Where the product being carried consists of a mixture or “cocktail” of components, those components or sub-products can be separately specified. (SprayTRAX only) 2.8.2 Products in Separate bins Where the external flow controller supports the use of multiple bins, the product for each bin can be individually specified. FARMTRAX User Manual Ver 2.0-Rev A Page 2-14 2.9 Username and Passwords The FARMTRAX software uses a system of username and password to control access to the various applications that are available for use. This is determined by your original purchase arrangements with RINEX Technology, and the username and password are determined and configured when your system is set up. Note: Do not attempt to change your username or password without reference to RINEX Technology. Incorrectly changing either field may leave your system in an inoperable state. This system allows a simple method of upgrading your system, when you decide to purchase additional software functionality. One phone call to RINEX Technology is all that is needed to upgrade your system. You are not permitted, under the terms of your licence, to distribute copies of RINEX software to third parties. Please be aware that any copies of software will only operate with your username and password. (Instructions for viewing and changing usernames and passwords are contained in Section 3 of this manual.) FARMTRAX User Manual Ver 2.0-Rev A Page 2-15 2.10 Variable Rate Treatment maps Variable Rate Treatment maps, allow you to selectively treat individual areas within a paddock, or show differing rates applied to different paddocks. 2.10.1 Rate maps The rate map is a map which tells the FARMTRAX system, and through it the flow controller, which rate of chemical, fertiliser or seed to apply at any given location. Fig 2.8 - A Rate map in the Rate map Editor Your FARMTRAX system gives you the ability to create your own rate maps, either by geographically referencing them to a yield map, or other FARMTRAX paddock map, or by creating an outline of the paddock with boundary lines. The Rate map Editor function uses simple painting tools to quickly create effective rate maps for the paddock. Based on the rate map, the system can also estimate the amount of product which will be required to treat the area at the prescribed rates. As you apply a treatment to the paddock, Your FARMTRAX system will determine the correct rate of application of the treatment product from the rate map, instruct the selected controller to vary the application rate as required, and produce a treatment map from the rate information supplied back from the controller.2 2 Functionality is dependent on the capabilities of the selected controller. FARMTRAX User Manual Ver 2.0-Rev A Page 2-16 Fig 2.9 – Applying the treatment from the rate map In the above figure, the application rate requested by the rate map is highlighted. The treatment plot or “trail” of treated area can be seen as before, while the system is gathering the required information to produce a treatment map. FARMTRAX User Manual Ver 2.0-Rev A Page 2-17 2.10.2 Treatment Maps Treatment maps are the maps produced as a result of applying a paddock treatment, and show the areas of differing rates of product applied to the paddock. Fig 2.10. – The Treatment map The resultant map can be printed out “as-is”, or the operator can choose to replace the FARMTRAX-calculated figures for Area Treated and Total Product, with figures from the flow controller. Fig 2.11. – Calculated figures on a map before printing. FARMTRAX User Manual Ver 2.0-Rev A Page 2-18 2.11 Summary Reports The FARMTRAX system is able to create reports suitable for printing, in either a paddockby-paddock graphical form, or as a text-format summary report. This summary report gives totals for all farms and paddocks in the current dataset. The report is created as summary.doc in the dataset directory, and is displayed using the Wordpad® text editor, in which the report can be changed, saved to a different destination, or printed, as required. Fig. 2.12 Summary Report The information in the summary report is in TAB-Delimited format. This makes the information easy to import into spreadsheets or other software packages, for further processing. FARMTRAX User Manual Ver 2.0-Rev A Page 2-19 2.12 Turn Indication Turn indication is an enhancement to the Guidance function of the FARMTRAX system3. In addition to the normal guideline which shows the centre-line of the next pass, Turn Indication provides visual prompting, via the lightbar and on-screen display, of the distances to the next turn. Turn indication is optional, and is enabled or disabled from the Guide Options Dialog window.(Section 6.31) If enabled, turn indication will activate when the LOCK button is pressed in the GUIDE menu, during paddock operations. Fig 2.13. Turn Indicators on the map screen. When approaching a turn in the paddock, the Guidance Lightbar will flash a warning of the distance to the next turn. Fig 2.14. Lightbar turn warning. Defining turn angles and setting the distance from a turn at which warnings start are made from the Guide Options dialog window (Section 6.31). 3 Guidance functions are only enabled in SpreadTRAX and SprayTRAX applications. FARMTRAX User Manual Ver 2.0-Rev A Page 2-20 2.13 Virtual Road (VR) Guidance Virtual Road guidance is an alternate way of presenting guidance information to the driver. It can be used with, or as an upgrade to the "arrow" information provided by the current lightbar, and can be used with either parallel line or lock guidance methods. VR information can also be shown on the touchscreen display. Virtual Road guidance information, as the name suggests, draws a virtual road on the screen in front of you, showing bends and turns in the path in front of the vehicle, and the vehicle's current position and direction with regard to the "road" ahead. Thus, advance warning is given of turns and bends, however slight they may be. Fig 2.15 - Virtual Road Display enabled FARMTRAX User Manual Ver 2.0-Rev A Page 2-21 2.14 Exporting and Importing Data In the past, FARMTRAX data was transferred between the Office PC and the 'Box' in the vehicle on a paddock-by-paddock basis. This could be a time-consuming, repetitive task when multiple paddocks needed to be transferred. Larger-capacity diskette drives such as the LS120™ Superdrive®, compact flash cards and USB portable drives now make it possible to transfer data in bigger quantities; on a farm-byfarm basis, including backdrop and rate maps. All paddock data and maps for the selected farm can now be transferred in one operation. The drive to which data should be written when using the Export function is determined by the setting in VIEW-MORE-MORE-GENERAL SETUP (MORE to the second page). If there is an external disk drive, whether it be a LS120, compact flash card or USB Cruzer® as the export device, the setting will usually be D:. For an external 3.5” floppy disk drive select A:’ When installing FARMTRAX software to the Office PC check the drive letter assigned by Windows to the required drive, by opening Windows Explorer and noting the assigned drive letter. Select this letter in the GENERAL SETUP window. Transferring data by the old method is still possible. To enable farm-by-farm transfers, you need to select this mode on both the Office PC and FARMTRAX box. Entire farms can also be deleted from either the FARMTRAX system or the diskette. Use this option with caution. It is possible to use the farm-by-farm method of transfer with the standard 1.44MB 3½" HDD floppy drives and diskettes. However, it is likely that the amount of data will exceed the capacity of the diskette, resulting in "Insufficient Room…" error messages. It is recommended that the paddock-by-paddock method is used with these drives. The mode of transfer (single paddock or farm) is set in the General Setup window. Refer to Section 3 for details. FARMTRAX User Manual Ver 2.0-Rev A Page 2-22 2.15 The Launcher The Launcher is a utility that is pre-installed onto the Saturn HX system. It is used to perform various functions such as resetting the system, upgrading the software and accessing the Windows® shell. 2.15.1 Opening the Launcher In normal operations, the Launcher program will not be seen. The system will normally start the FARMTRAX software automatically when the vehicle ignition is started. However if you wish to open the Launcher program to perform some of the functions mentioned above, he following steps must be taken. 1. Turn the vehicle ignition OFF 2. Turn the Isolation switch on the Saturn HX interface box to the OFF position 3. Turn the vehicle ignition ON 4. After the vehicle has started, turn the Saturn HX Isolation switch to the ON position, the Saturn HX will start 20 seconds after the switch has toggled 5. The Saturn HX will now display the Launcher program 6. Enter the Launcher functions as detailed in Section 3 FARMTRAX User Manual Ver 2.0-Rev A Page 2-23 FARMTRAX User Manual Ver 2.0-Rev A Page 2-24 GETTING STARTED 3 System Operations 3.1 Setting Up SprayTRAX for the First Time Note: The FARMTRAX system hardware should have already been installed at this point, in the cabin of the vehicle from which the Spraying will be done. Refer to the Installation Manual for assistance with installing the hardware. The following section of the manual is designed for first time users of SprayTRAX with step by step instructions and some helpful hints on how to best use the system. Experienced operators may find it useful to glance through the preamble at the beginning of each section, before proceeding to the menu descriptions. Here again are a few tips and explanation of terminology used, for the first time users on the menu systems. A menu system allows the user to interact with SprayTRAX. A menu is a group of icons displayed on the right of the screen. An icon is a small pictorial button with a name. Activating an icon is done by pressing or touching the screen. This may lead to either: • the presentation of another menu, known as a sub-menu, or • the display of a dialog window, where information can be entered or selected, or • the execution of the selected function. For example, the main menu could have five selections available, depending on selected options. Four of these selections go to sub menus, whilst the last selection, OFF, powers down the system. (Refer to Fig. 3.1 below) VIEW MENU FARM MENU GUIDE MENU RATES MENU POWER OFF SYSTEM Figure 3.1. FARMTRAX User Manual SprayTRAX main menu icons Ver 2.0-Rev A Page 3-1 GETTING STARTED The Saturn HX does not display the OFF Icon, refer to Section 2.2.1 After the system is switched on, the SprayTRAX graphic will temporarily be displayed (Fig 3.2), then disappear to leave the map screen and the main menu (Fig 3.3). The system is then in a steady state ready to commence working. Figure 3.2. Figure 3.3. FARMTRAX User Manual SprayTRAX graphic SprayTRAX map screen with main menu Ver 2.0-Rev A Page 3-2 GETTING STARTED Once the vehicle starts moving, a cross in the centre of the screen shows its current position and direction. When spray operations commence, the cross changes to the symbol shown below. Guidance is provided to the operator using both the map screen and the light bar. The map screen provides a view from above of where the vehicle is moving and the direction it is heading. A typical map screen is shown in figure 3.4 Figure 3.4 The typical map screen with spray trail showing The lightbar provides a left-right indicator showing which way the operator must turn to get on to the correct alignment. After powering on the system the lightbar will display FARMTRAX until either guidance commences, or another system message is displayed. The light bar after power up is shown in figure 3.5. Figure 3.5 The lightbar display after powering up Prior to commencing any spraying operations there are a number of items that need to be entered into the FARMTRAX database. Firstly there are several important measurements needed from the GPS antenna to points on the spray rig. The GPS antenna is computing the position of the antenna, which is not necessarily the position which needs to be tracked. In reality it is the spray boom which may well be tens of metres from the GPS antenna. In addition to this the actual width of the boom is required so that an adjacent swath abuts the present swath. SprayTRAX stores information about spraying operations in individual paddock files, in the same way as other FARMTRAX modules, and as such, it is necessary to enter Farm and Paddock information before actually carrying out the spray operation. Additionally, if background maps or graphics are to be used, they also need to be imported, and mapped in order that the GPS positioning can be correctly referenced. FARMTRAX User Manual Ver 2.0-Rev A Page 3-3 GETTING STARTED The following section suggests one way of commencing spraying operations. It is not necessarily the only way of using SprayTRAX, but one which has been successfully used in the field. Read and carry out the steps in the following sections: Title Section: Shows you how to: Changing Applications (Section 3.2.) Select the right software application for the paddock operation to be carried out. Create a New Farm (Section 3.3) Setup the individual farm or client. Create a New Paddock (Section 3.4) Set up the individual paddock in which operations will be carried out. Select a Spray Controller (Section 3.8) Tells the system which boomspray controller to talk to. Setup Vehicle Offsets (Section 3.5) Configure the system to allow for antenna positions and boom spray time delays. Change the Swath Width (Section 3.6) Enter the boomspray swath widths and number of sections Enter the Overlap distance (Section 3.7) Abut spray nozzle coverage Change the Vehicle Product (Section 3.9) Defines the product used for the current operation Import a Backdrop Map (Section 3.13) (optional) Import a background map. Activate a Backdrop Map (Section 3.14) (optional) Activate the imported map for a paddock. The sections following those shown above are recommended reading. They contain useful information on other operations and functionality that is available in the system. Chapter 4 “Using Guidance” should also be read and understood before commencing operations. It is recommended that you do any practice runs in the default RINEX farm and associated paddocks. This is to prevent cluttering your “working” farm paddocks with invalid data. FARMTRAX User Manual Ver 2.0-Rev A Page 3-4 CHANGING APPLICATION 3.2 Changing Applications The last time your system was used was when you were taking soil samples; now you are ready to spray agricultural chemicals. How do you change the application running on the FARMTRAX system? (Note: Screens shown below do not necessarily show a SoilTRAX to SprayTRAX transition, but do show the method involved.) Step 1 Action From the main menu screen press the Response Screen The VIEW-MORE-MORE menu is displayed. buttons. 2 3 Press the button to view different applications. The Application Menu dialog window appears. Applications not configured in your software system appear with a red slash through the picture. Touch the icon for the desired operation The frame and title move to the selected operation 4 Press button FARMTRAX User Manual The application dialog window is replaced by the opening graphic for the selected application. Ver 2.0-Rev A Page 3-5 CHANGING APPLICATION Step 5 Action From the main menu screen press the 6 Response The shutdown window is displayed. button. FARMTRAX is shut down. System returns to the Windows95™ Desktop screen. Press the button . 7 Screen Restart FARMTRAX by either double-clicking the (Your desktop may vary in appearance) FARMTRAX restarts in the selected application. shortcut on the desktop, or by pressing the button, and then pressing the FARMTRAX selection, under the Programs menu. The Saturn HX does not have the OFF button as described in Step 5. Steps 5-7 should be ignored and the vehicle will need to be shut down and restarted in order to restart the FARMTRAX software. FARMTRAX User Manual Ver 2.0-Rev A Page 3-6 CREATE A NEW FARM 3.3 Create a New Farm In order to identify individual farms or clients in FARMTRAX it is first necessary to enter this information into the database system. For the purpose of the manual, names entered into the database will be known as a farm. However the name could also refer to a client, locality, or any system which manages multiple paddocks. The database stores the name of the farm and then individual paddocks are associated with the respective farm names. The name of the farm can be up to 32 characters long from the on-screen keyboard. When the system is first operated, a farm called RINEX is automatically generated. This farm can not be deleted and can be used for any test paddocks. In order to enter the name of a Farm, the following steps are taken from the main menu screen after startup. Note: It is possible to enter FARM and PADDOCK names from a keyboard connected to the FARMTRAX system. This is NOT recommended, as it is possible to enter characters from the external keyboard which will not be recognised by the program as valid characters for a farm or paddock name. Always use the keyboard dialog window touch buttons to enter these names. FARMTRAX User Manual Ver 2.0-Rev A Page 3-7 CREATE A NEW FARM Step 1 Action Response press the button. 2 Press the the Farm menu button from 3 Press the button to enter a new Farm/Client name. 4 Enter the Farm/Client name as required (eg. on the keyboard. ) 5 Press when finished entering the name. FARMTRAX User Manual Screen The Farm menu is displayed. From the main menu screen The Farm/Client dialog box is displayed. The RINEX name always appears as the default client, and is presently selected in the entry window. The keyboard is displayed, no name is displayed in the entry window. The Farm/Client name appears in the entry window. The Farm/Client dialog is displayed with the name just entered highlighted and in the entry window. The RINEX name cannot be deleted. Ver 2.0-Rev A Page 3-8 CREATE A NEW FARM Step Action 6 to accept Press Farm/Client name. 7 Response Screen The Farm menu is displayed. The current farm name is shown in the blue bar at the top of the screen. The Main menu is displayed. Press the Main menu. FARMTRAX User Manual to return to Ver 2.0-Rev A Page 3-9 CREATE A NEW PADDOCK 3.4 Create a New Paddock Each paddock will be given a number unique to each farm, and it is recommended that paddock names, while optional, are entered so that each can be individually and easily identified. In order to enter the name of a paddock the following steps are taken from the main menu screen after startup. Always enter the paddock name from the on-screen keyboard. If an external keyboard is used to enter paddock names, invalid characters could cause improper system operation. Step 1 Action Response The Farm menu is displayed. From the main menu screen press the button. 2 Press the the Farm menu button from 3 Enter the paddock name as required (eg. on the keyboard. FARMTRAX User Manual The paddock dialog box is displayed. Each paddock is sequentially numbered starting at 00. The default paddock (P00_), which has no name, is presently selected in the entry window. The keyboard is displayed, no name is displayed in the entry window. Press the button to enter a new paddock name. 4 Screen ) The paddock name appears in the entry window. Ver 2.0-Rev A Page 3-10 CREATE A NEW PADDOCK Step Action 5 Press when finished entering the name. 6 Response Screen The paddock dialog is displayed with the name just entered highlighted and in the entry window. The new paddock is number zero-one (P01_DEMO). The Farm menu is displayed. Press to accept paddock name. 7 (The currently open Farm name and paddock are shown at top of screen) The Main menu is displayed. Press the Main menu. FARMTRAX User Manual to return to Ver 2.0-Rev A Page 3-11 SETUP VEHICLE OFFSETS 3.5 Setup Vehicle Offsets As previously discussed the actual point which is being positioned is the GPS antenna. However if the antenna can not be mounted on the centre alignment of the vehicle then an offset distance needs to entered into the system to compensate for this. Similarly the antenna will most likely not be directly over the front steering axle, or the actual spray boom. Two offsets are used here as there are two different points to consider. The vehicle is manoeuvred left to right from the steering wheels located at the front. Hence this point is where the steering guidance should be located. However the spray boom is where the actual product is applied and it is necessary to see where this occurs. The described offsets are shown in Figure 3.6. Finally if there is a time delay from the moment when the boom is switched on, until the spray is delivered from the nozzles then this delay can also be accounted for. Figure 3.6. Spray rig offset measurements. The Cross track is negative if the GPS antenna is located to the left of the rig centreline. The offset distances from the GPS antenna to the feature points on the spray rig are entered using the following steps. FARMTRAX User Manual Ver 2.0-Rev A Page 3-12 SETUP VEHICLE OFFSETS Step 1 Action Response From the FARM menu screen press the Screen The VEHICLE menu is displayed. button. The VEHICLE -MORE menu is displayed. 2 button Press the from the Vehicle menu 3 button from Press the the Vehicle setup menu. The offsets dialog box is displayed. 4 Press the button alongside the Long Track (Steer) entry window. The numerical keyboard is displayed, with the default Long Track (Steer) in the entry window. 5 Enter the offset distance from the GPS antenna to the steering wheel alignment axis The entry window in the numerical keyboard displays the number entered. (eg. FARMTRAX User Manual ). Ver 2.0-Rev A Page 3-13 SETUP VEHICLE OFFSETS Step Action 6 Press the button to accept the number entered. Response The offsets dialog box is displayed with the new offset for the Long Track (steer). 7 Press the button alongside the Cross Track entry window. The numerical keyboard is displayed, with the default Cross Track in the entry window. 8 Enter the offset distance from the GPS antenna to the centreline of the spray rig (eg. The entry window in the numerical keyboard displays the number entered. The number is entered as a positive number as the antenna is right of the centreline ). 9 Press the button to accept the number entered. 10 Press the button alongside the Long Track (Flow) entry window. FARMTRAX User Manual Screen The offsets dialog box is displayed with the new offset for the Cross Track. The numerical keyboard is displayed, with the default Long Track (Flow) in the entry window. Ver 2.0-Rev A Page 3-14 SETUP VEHICLE OFFSETS Step 11 Action Enter the offset distance from the GPS antenna to the axis of the spray boom (eg. Response Screen The entry window in the numerical keyboard displays the number entered. ). 12 Press the button to accept the number entered. 13 Press the button to accept the number entered. FARMTRAX User Manual The offsets dialog box is displayed with the new offset for the Long Track (Flow). The Vehicle/more menu is displayed. Ver 2.0-Rev A Page 3-15 CHANGE THE SWATH WIDTH 3.6 Change the Swath Width The spray boom will consist of one or more boom sections. SprayTRAX can handle up to eight boom sections. The boom sections that are referred to here are those which are controlled by the flow controller. Typically this will relate to the physical construction of the boom as shown in figure 3.7. It is important that the true swath width, and not the actual boom is entered into the SprayTRAX system. If multiple boom sections are used then boom section one will be the left hand side standing at the rear of the boom spray looking forward. Figure 3.7. Boom Section measurements. Multiple sections are numbered sequentially from the left hand side. The current VEHICLE setting for swath width is used whenever a new treatment layer is created. Ensure that the VEHICLE swath setting is correct before commencing spray operations. If you find that you have started spraying with the swath width set incorrectly, you will need to change the setting in both the VEHICLE and the relevant treatment LAYER. The vehicle position marker must be in the "Off" state before attempting to change the swath settings. The swath width of the spray rig is entered using the following steps. FARMTRAX User Manual Ver 2.0-Rev A Page 3-16 CHANGE THE SWATH WIDTH 3.6.1 Changing the setting in the Vehicle. Step 1 Action Response From the FARM menu screen press the The VEHICLE menu is displayed. button. 3 Press the button to enter the swath width of the spray rig. 4 Screen The swath dialog box is displayed. The default swath is 1.00m with one boom section. The number of boom sections is entered first. Press the total number of The boom sections box is displayed. The default setting sections button(eg. ) to is for one boom section, which change the number of sections. is displayed in the entry window. 5 Press to enter the number of boom sections on the spray rig. 6 Press to accept the number of boom sections entered. FARMTRAX User Manual The boom sections box is displayed. The entry window will show the number of boom sections selected from pressing the UP or DOWN button. A minimum on one boom section is used. The swath dialog box is displayed with the number of boom sections selected. Section 1 of the total number of sections is presently selected. The sections are numbered from left to right. Ver 2.0-Rev A Page 3-17 CHANGE THE SWATH WIDTH Step Action 7 Press the button to change the swath width of the boom section one. 8 11 Screen The numerical keyboard is displayed, with the default boom width section in the entry window. Enter the width of boom section The entry window in the numerical keyboard displays ). one (eg. the number entered. 9 10 Response Press the button to accept the number entered. The swath dialog box is displayed with the new swath width for section one. The total swath width is shown in the boom section icon. Press the section number button to increment the section number. The swath dialog box is displayed with the swath width for section two. The total swath width is shown in the boom section icon. Repeat steps seven to nine to The swath dialog box is enter the swath width of section displayed with the swath width two. for section two. The total swath width is shown in the boom section icon. FARMTRAX User Manual Ver 2.0-Rev A Page 3-18 CHANGE THE SWATH WIDTH Step 12 13 Action Response Press the section number button to increment the section number. The swath dialog box is displayed with the swath width for section two. The total swath width is shown in the boom section icon. Screen Repeat steps seven to nine to The swath dialog box is enter the swath width of section displayed with the swath width three. for section three. The total swath width is shown in the boom section icon. 14 Press the button to close the message window. FARMTRAX User Manual System returns to the Vehicle menu. Ver 2.0-Rev A Page 3-19 CHANGE THE SWATH WIDTH 3.6.2 Changing the setting for a Layer Step Action Response 1 The FARM menu is shown Press the 2 button. Select the correct layer and press the 3 System displays details of the selected layer. button Press the INFO tab System shows the INFO details screen. 4 The swath window is shown Press the 5 Screen button. Press the CHANGE button to change the section widths, or the SECTION number button to select sections. FARMTRAX User Manual The numeric keyboard is raised to allow entry of a different swath width value for the selected section. Ver 2.0-Rev A Page 3-20 CHANGE THE SWATH WIDTH Step 6 Action Response Screen Enter the changed value for the The system returns to the INFO section swath width and press details screen, showing the changed total swath width value. 7 Press INFO window FARMTRAX User Manual to exit the System returns to the map screen. Any plot data is redrawn using the changed swath setting. Ver 2.0-Rev A Page 3-21 ENTER THE OVERLAP DISTANCE 3.7 Enter the Overlap distance The swath distance previously entered assumes that there will be a perfect abutment from one spray nozzle coverage to the next, as though the two nozzles were on the same boom as seen in figure 3.7. However in real life this will not be possible due to inaccuracies with the guidance system, inaccuracy with the spray nozzle footprint, and human error when guiding the spray rig along an alignment. Hence FARMTRAX allows an overlap distance to be entered into the system to ensure that no gaps occur in the area being sprayed. The overlap distance can be set to the user’s preference and driving capability. As the user becomes more competent at driving a spray rig the overlap distance can be decreased accordingly. It is important to note that the swath width of the spray rig should not be decreased to act as an overlap system as turning off individual boom sections could lead to an error this way. The overlap from two swath passes is shown in figure 3.8. Figure 3.8. Overlap of two swath passes. The overlap of the spray rig is entered using the following steps. FARMTRAX User Manual Ver 2.0-Rev A Page 3-22 ENTER THE OVERLAP DISTANCE Step 1 Action Response From the MAIN menu screen press the Screen The guide menu is displayed. button. The guide/more menu is displayed. 2 button Press the from the guide menu 3 Press the button from the guide/more menu. 4 Press the button 5 The guide options window is displayed. The numerical keyboard is displayed. Enter the overlap distance to be The entry window in the numerical keyboard displays ). used(eg. the number entered. FARMTRAX User Manual Ver 2.0-Rev A Page 3-23 ENTER THE OVERLAP DISTANCE Step Action 6 Press the button to accept the number entered. 7 Press the button to accept the changes and exit the window. FARMTRAX User Manual Response Screen The guide options window is displayed with the new distance entered in the Overlap width. The guide /more window is displayed. Ver 2.0-Rev A Page 3-24 SELECTING A FLOW CONTROLLER 3.8 Selecting a Flow Controller If the controller you are using is supported by the FARMTRAX system it first needs to be selected using the following steps. NOTE: After entering the FLOW CTL window, it is necessary to restart the FARMTRAX software, even if no changes were made. Failure to restart will cause loss of GPS and controller data. Step 1 Action Response From the main menu screen press the Screen The Vehicle menu is displayed. button. The Vehicle/more menu is displayed. 2 button Press the from the Vehicle menu 3 Press the button from the vehicle setup menu. 4 The flow controller window is displayed. The default selection is for Manual Control. The selected flow controller is highlighted in the entry window. Press the button to select the appropriate controller (eg. Farmscan 2405). 5 Press to accept the selected flow controller. FARMTRAX User Manual The system returns to the vehicle/more menu is displayed. Ver 2.0-Rev A Page 3-25 SELECTING THE VEHICLE PRODUCT 3.9 Selecting the Vehicle Product Whenever an operation is carried out in a paddock, products are used or created. Using the rationale that these products are carried in the vehicle, the place to define them is from the VEHICLE menu. As multiple operations can be carried out in one paddock, these products are also stored in the paddock layer for each operation. Each time a different product is selected for the Vehicle, and that product is applied, a new paddock layer is created, and the details of each separate operation are stored in these individual layers. (Refer to Concepts section, for information on layers.) Where multiple component products are used, such as in spraying, each component of the product, including water, can be separately specified. The rates of application entered here determine the proportions of each product in the "cocktail" and these proportions are used when calculating product usage in reports. The current VEHICLE setting for Product is used whenever a new treatment layer is created. Ensure that the correct Product is specified in VEHICLE before commencing spray operations. If you find that you have started spraying with the incorrect Product specified, you will need to change the setting in both the VEHICLE and the relevant treatment LAYER. The vehicle position marker must be in the "Off" state before attempting to change the vehicle product. The list of available products is stored in a separate database, together with relevant information about each product, such as Units (Kg or L), and default Legend values, for each product. Only products relevant to the currently selected application (e.g. SprayTRAX) will be shown. The EDIT button changes not only the product selection for that paddock, but also the product database. Any other paddock in the farm using this entry in the database as its product will request confirmation of the Product in use, when they are next opened. WARNING: Application rate calculations are made with the assumption that the "BOOM RATE" is in effect the delivery or output rate to the paddock. The actual quantity of water is reduced to accommodate the constituent components of the output product. This is correct if it is required to apply a fixed amount of chemical per area, (e.g. 1L/Ha), but will be inaccurate if the mixing instructions of the product specify "mix 1L of this product to 40L of water" or similar. This error reduces as the proportions of water to chemical increases. Always follow the mixing instructions of the chemical manufacturer or supplier. The ability to specify the tank size and capacity is not enabled by default on the standard SprayTRAX system and some of the graphics in these sections utilise this option. If you wish to use the option for SprayTRAX to compute the chemicals required in a paddock please contact your RINEX representative to discuss this option. FARMTRAX User Manual Ver 2.0-Rev A Page 3-26 SELECTING THE VEHICLE PRODUCT Step 1 Action Response From the FARM menu, press the The vehicle menu is shown button 2 button Press the 3 Press the to add a product. 4 Screen button If the product to be used is contained in the list, select it using the The Cocktail window is shown, giving the ability to ADD or DELETE products and subproducts to the tank. System displays the product dialog window, showing products available for selection. System returns to the Cocktail window, with the selected product added to the list. and arrows, and press . Otherwise, press NEW to create a new product. 5 Enter the boom rate for applying the product , by pressing the button next to the System returns to the Cocktail window. The BOOM RATE value is shown. button, to bring up the numeric keyboard. Enter the value and press OK to accept. 6 Enter the rate at which this product component will be applied, by pressing the value System returns to the Cocktail window. The PER AREA value for this product is shown. button next to the button, to bring up the numeric keyboard. Enter the value and press OK to accept. FARMTRAX User Manual Ver 2.0-Rev A Page 3-27 SELECTING THE VEHICLE PRODUCT Step Action Response 7 Enter the product batch information if required. (optional) (Refer section 3.10) The entered batch information is shown . 8 Repeat steps 3 to 5 until all components of the product "cocktail" have been specified. Enter WATER as the last product. The cocktail window shows total number of products. Each product can be viewed and details entered, by pressing the top button until the required product is shown. 9 Press to accept the specified products. FARMTRAX User Manual Screen System returns to the map screen Ver 2.0-Rev A Page 3-28 ENTERING PRODUCT BATCH INFORMATION 3.10 Entering Product Batch Information When specifying a product for use in a paddock treatment, information regarding the manufacturer's batch data can be entered in the Cocktail window. (Section 6.18.1). Both a batch number and a batch date can be specified, at the time of defining the product(s) in the VEHICLE menu, for each individual product specified. Batch information will remain current, from paddock to paddock and farm to farm until the vehicle product is changed. It is the operator's responsibility to update this information when required. Batch information can also be changed from the Details screen of a treatment LAYER. Changing the batch information there will affect that layer only. The format of the dates shown depend on the setting specified as the Short Date in Windows Control Panel, Regional Settings. In Australia, this should already be set to dd/mm/yyyy Step 1 Action Response From the FARM menu, press the The vehicle menu is shown button The Cocktail window shows the current vehicle product(s) 2 Press the 3 Screen button To enter the batch number, press the BATCH # button FARMTRAX User Manual The alphanumeric keyboard is shown. Ver 2.0-Rev A Page 3-29 ENTERING PRODUCT BATCH INFORMATION Step 4 Action Enter the batch number, then Response Screen The batch number is displayed on the button. press 5 A monthly calendar is raised, showing today's date circled in red and highlighted. Press the in the Batch Details field. 6 If required, change the month The selected date is shown in the respective window of the and buttons. with the Press the day number shown in Cocktail window. black, to select a specific day. FARMTRAX User Manual Ver 2.0-Rev A Page 3-30 CREATING A NEW PRODUCT 3.11 Creating a New Product If the product to be used in a paddock operation does not already exist in the list of available products, then it is possible to add a new product to the list. The new product will only be available in the application in which it was created. i.e. a product created in Spraytrax will not be shown in the list if the application is changed to SpreadTRAX. When creating a new product, you must also enter details about the product such as Units (Kg or L) and default legend values. Step 1 Action Response From the FARM menu, press the Screen The vehicle menu is shown button 2 Press the button 3 Press the to add a product. button 4 Press the FARMTRAX User Manual button. The Cocktail window is shown, giving the ability to ADD or DELETE products and subproducts to the tank. System displays the product dialog window, showing products available for selection. The Product window is shown, with the product name field as “New Product” Ver 2.0-Rev A Page 3-31 CREATING A NEW PRODUCT Step 5 Action Response Press the button labelled “New Product” The keyboard window is raised, to enable a new product name to be entered. 6 Press the button, then type in the new product name, using the on-screen keyboard 7 Press the button. The new product name appears in the entry field. The system returns to the Product window, showing the changed product name . 8 Press the button labelled “Kilogram” The Amount window is raised. 9 Press the Unit Type button The button label changes from “Mass” to “Volume”, and the Unit button label changes accordingly. 10 Press the Unit buton to change the units to be used for this product. The Unit Select window is raised, with a list of units relevant to the selected Unit Type. FARMTRAX User Manual Screen Ver 2.0-Rev A Page 3-32 CREATING A NEW PRODUCT Step 11 Action Select the unit using the and Response Screen System returns to the Amount window, showing the selected unit. arrows, and press 12 If required, change the Density value, by pressing the Density button. The numeric keyboard window is shown, to allow entry of a new density value. Press the button to accept the new value. System returns to the amount window, showing the changed density value. Press the button to accept the new values. System returns to the Product window, showing the changed value for the Unit field. 13 14 15 Press the button labelled “Legend” to change the default legend for this product. FARMTRAX User Manual The Legend window is raised. Ver 2.0-Rev A Page 3-33 CREATING A NEW PRODUCT Step Action Response 16 Change the , Screen System returns to the Product window. and values as required, then press when finished. 17 Press the button to accept the new values. 18 Press the FARMTRAX User Manual button. System returns to the Product List, with the new product added to the list. System returns to the Vehicle menu. (The currently selected product is unchanged) Ver 2.0-Rev A Page 3-34 CHANGING AN EXISTING PRODUCT 3.12 Changing an Existing Product Details Changes to an existing product’s details are possible, using the CHANGE button on the Product dialog window. Follow the instructions given in the previous section, using the CHANGE button instead of the NEW. NOTE: The CHANGE button changes not only the product selection for that paddock, but also the product database. Any other paddock in the farm using this entry in the database as its product will request confirmation of the Product in use, when they are next opened FARMTRAX User Manual Ver 2.0-Rev A Page 3-35 IMPORTING A BACKDROP MAP 3.13 Importing a Backdrop map Note: Any graphic required to be imported as a map background must contain geographic positional information, in order that the software can correctly display the vehicle position marker against the correct point on the map. RINEX Technology is able to process your graphic file and supply you with the files needed to work with your FARMTRAX system. Displaying maps as a backdrop to the map screen involves two steps. 1. Importing the required map files into the FARMTRAX system. 2. Selecting and activating an individual map file from those imported, to view as a backdrop for a particular paddock. Follow the steps below to import the required files into your FARMTRAX box Note: Connecting a floppy drive to FARMTRAX box should be done before power is applied. The media, whether it be a floppy disk, compact flash card or USB should be connected with the FARMTRAX system. Step Action Response 1 Select FARM button FARM menu displayed 2 Select FARM Farm dialog window is raised, allowing selection of existing farms, or creation of a new farm. 3 Select farm for which the backdrop map is to be imported, then, press OK Returns to FARM menu FARMTRAX User Manual Ver 2.0-Rev A Screen Page 3-36 IMPORTING A BACKDROP MAP Step Action 4 Response Screen GPS or view mode menu displayed Select button 5 Select VIEW mode View mode menu displayed 6 Select Import Any map files found on the diskette will be imported into the current farm. . A dialog window shows whether the import was successful or not 7 Press button System returns to FARM menu, still in View Mode. (Note GPS status icon) Any map imported into the FARMTRAX system will be stored in the map directory for the current farm, and will not be available to any other farms. If you wish to make a map available to all farms, then the two files must be moved to the dataset directory. If you are unsure how to do this, please contact RINEX Technology for assistance. FARMTRAX User Manual Ver 2.0-Rev A Page 3-37 ACTIVATING A BACKDROP MAP 3.14 Activating a Backdrop map The following steps explain how to activate a previously imported backdrop map for a particular paddock. Information on how to import these files is provided in the previous section “Importing Backdrop Map” Once a background map is selected, the associated layer is switched “on”. If the system is in GPS mode, the map may not be visible due to the vehicle location being different from that of the map. In this case, zoom out until the map is visible, then switch to view mode (from the FARM-MORE menu), touch the map to relocate the cursor, and zoom in on the map. Step Action Response 1 From the FARM menu, press the PADDOCK button The paddock dialog screen is displayed, allowing the selection of existing, or creation of new paddocks. 2 Highlight the required paddock and press OK System returns to FARM menu. Selected farm and paddock names are shown at top of screen, indicating that this is the currently open paddock. 3 Screen System returns to the MAIN menu Press the button The VIEW/MORE/MORE menu is displayed 4 Press the buttons. FARMTRAX User Manual Ver 2.0-Rev A Page 3-38 ACTIVATING A BACKDROP MAP Step Action Response 6 Press the button The BACKDROP dialog window is displayed, showing the imported map files available for selection 7 Scroll up or down to select the required map file Required map is highlighted 8 Press OK System displays map file as a backdrop to the map screen FARMTRAX User Manual Screen Ver 2.0-Rev A Page 3-39 TURNING OFF LAYERS 3.15 Turning off Layers Sometimes the inclusion of one layer for display presents information that slows down system operation, or clutters the screen or printout with unwanted detail. The following steps detail how to change the display state of (turn off) individual layers. Step Action Response 1 From FARM Menu, press Layers ‘Edit Layers’ dialog window is raised. 2 Press Layer number button until layer to be turned off is shown. Operation Name & Product Name display selected layer details 3 Press ON/OFF button Button toggles to OFF state 4. Press OK System exits to Farm Menu. Selected layer (soil samples) is removed from the map screen. FARMTRAX User Manual Ver 2.0-Rev A Screen Page 3-40 MAKING A LAYER THE TOP LAYER 3.16 Making a Layer the Top Layer To be able to select an object contained in a layer, it is first necessary to make that layer the top (or "Front") layer. This also has the effect of drawing that object layer last on the map screen, preventing other objects from making it disappear, or hard to see. Step 1 Action Response From the Main menu, press the The Farm menu is shown. The map screen shows any map layers that are designated ON, with the top layer drawn last. button 2 Screen The Edit Layers dialog window is shown. Press the button to view all available layers 3 Press the Layer Number button, to cycle to the required layer. For each press of the Layer Number button, the number on the button increments and layer names are shown. 4 When the required layer type is shown, press the Bring to Front button, then press OK. The map screen is redrawn, with the front or “top” layer (in this case Waypoints) drawn last. FARMTRAX User Manual Ver 2.0-Rev A Page 3-41 VIEWING LAYER INFORMATION 3.17 Viewing Layer Information Details of all layers can be viewed, and in some cases, changed. The appearance of the detailed layer information screens will vary according to the type of layer being viewed. The following screens are typical of a Treatment or Harvesting layer. For an explanation of the screens presented for each layer type, refer to Section 6.15. Editing of Treatment layers, to change Swath width or associated Product(s), is explained in sections 3.6 and 3.9. Editing of Treatment Layers, to enter user-specified values for Area Treated and Total Product, is explained in section 6.15. Note: If there is only one layer in the selected paddock, then the screen shown in step 2 may be bypassed, as there is no need to select the layer. Step 1 Action Response From the Main menu, press the FARM button The Farm menu is shown. The map screen shows any layers that are designated ON, with the front layer drawn last. 2 Screen The Edit Layer dialog window is shown. button to Press the view layer information 3 button Press the to view details of the layer. FARMTRAX User Manual The format of the Layer Details windows will vary, depending on the layer type. The window shown here is for a treatment layer. Ver 2.0-Rev A Page 3-42 VIEWING LAYER INFORMATION Step Action Response 4 Press the tabs at the top of the window (AREA, PROD, RATE, INFO, DISPLAY) to view related information. The window changes to display information related to the tab which was selected. (In this case, Product.) 5 When finished, press the OK button. The system returns to the Edit Layers window FARMTRAX User Manual Ver 2.0-Rev A Screen Page 3-43 CHANGING THE DISPLAY ATTRIBUTE 3.18 Changing a Layer’s Display Attribute By changing a layer’s display attribute, it is possible to show different aspects of the collected data, for a layer. For example, in SprayTRAX it may be possible to view Target Rates or Actual Rates for the treatment, in SpreadTRAX there may be more than one bin for the treatment, and in HarvestTRAX either yield or moisture levels may be viewed. The parent application of the layer must be running, and the correct controller specified in the VEHICLE menu. The layer must be in the ACTIVE state. (Refer section 3.19) Step 1 Action Response From the FARM menu, press the The Edit Layers window is shown button. System displays details of the selected layer 2 Press the 3 Screen Press the DISPLAY tab FARMTRAX User Manual button. System displays the DISPLAY details window. The currently selected attribute is shown. (in this case – yield) Ver 2.0-Rev A Page 3-44 CHANGING THE DISPLAY ATTRIBUTE Step Action Response 4 Press the ATTRIBUTE button currently labelled YIELD. Selectable attributes for this window are shown. 5 Select the required attribute System returns to the DISPLAY details window, with the newly selected attribute displayed. The LEGEND values also change, to reflect the changed display attribute. using the and arrows, and press 6 Press accept these changes. FARMTRAX User Manual to Screen The data is reloaded and the map screen is redrawn, showing the information and legend for the currently selected display attribute. Ver 2.0-Rev A Page 3-45 CHANGING A LAYER'S STATE 3.19 Changing a Layer's State A layer can be in one of two states. These states are ACTIVE and CLOSED. If a layer is CLOSED, then no additional treatment data can be added to the layer, or changes made to layer details. The layer is displayed on-screen as a bitmap image, which can speed up the display for large paddocks. Should you need to change the layer information, or add new data to the layer, it can again be made ACTIVE. To change a layer's state, follow these steps: Step 1 Action Response From the Main menu, press the FARM button The Farm menu is shown. The map screen shows any layers that are designated ON, with the front layer drawn last. 2 button to Press the view layer information 3 button Press the to view details of the layer. 4 Press the INFO tab FARMTRAX User Manual Screen The Layer select window is shown. Ensure that the correct layer is shown. The format of the Layer Details windows will vary, depending on the layer type. The window shown here is for a treatment layer. The INFO detail window is shown. Ver 2.0-Rev A Page 3-46 CHANGING A LAYER'S STATE Step 5 Action Response Press the button currently labelled ACTIVE An advisory message is displayed. Press the Progress bars are shown along the lower status bar. At the end of the process, the button changes to show CLOSED 6 button 7 Press the button to accept the changes 8 Press the button to accept the changes FARMTRAX User Manual Screen System returns to the Edit Layer window The system returns to the map screen. The closed layer is shown as a bitmap. Ver 2.0-Rev A Page 3-47 CHANGING A LAYER'S LEGEND BAR 3.20 Changing a Layer's Legend Bar The legend bar appears at the lower edge of the map screen and is used to reference the colours used in yield maps and treatment maps. The legend bar that is displayed is the legend of the front layer. Changing the values for the legend bar will also change the appearance of the treatment map, on-screen and in printouts. If you make changes to the legend for a layer, then the changes take effect for that layer only. If you make changes to the legend for a vehicle product, then that legend will be used as the default for all future layers using that product. To change the default legend bar for a product, refer to the section entitled Creating a New Product. Step 1 Action Response From the FARM menu, press the The Edit Layers window is shown button. System displays details of the selected layer 2 Press the 3 Screen Press the DISPLAY tab FARMTRAX User Manual button. System displays the DISPLAY details window. The currently selected legend parameters can be seen. Ver 2.0-Rev A Page 3-48 CHANGING A LAYER'S LEGEND BAR Step Action Response 4 Press the LEGEND button. A window showing the currently selected legend parameters appears. 5 To change the minimum value that will be represented in the legend bar, press the The numeric keyboard appears, allowing entry of a new value. Screen button. 6 To change the maximum value that will be represented in the legend bar, press the The numeric keyboard appears, allowing entry of a new value. button. 7 To change the number of divisions, or separate colours in the legend bar, press the The numeric keyboard appears, allowing entry of a new value. button. 8 After entering in new values with the on-screen keyboard, press the FARMTRAX User Manual System returns to the Legend dialog window, showing new values. button Ver 2.0-Rev A Page 3-49 CHANGING A LAYER'S LEGEND BAR Step Action Response 9 Press the button to accept the new settings System returns to the Layer Details window,showing the changed legend parameters Press the System returns to the Edit Layer screen 10 button 11 Press the buttons to return to the map screen. FARMTRAX User Manual Screen System returns to display the map screen, with the changed legend at lower edge of screen (if turned on) Ver 2.0-Rev A Page 3-50 DELETING A LAYER 3.21 Deleting a Layer Layers which are no longer required can be removed from the list of layers for the paddock. To protect your data, the layer information is not deleted from the system, but is assigned to the Recycle job. This allows for the possibility to restore the information, in the case of accidental deletion. (See Restoring a Deleted Layer) Step 1 Action Response Ensure that the Vehicle Position Marker is in the OFF state. 2 The marker appears in its OFF state The FARM menu is shown Press the button. 3 Press the 4 Screen button. Press the Layer button until the layer you wish to delete is shown. 5 System displays the Layer Select window, showing number of layers for this paddock. The Layer information fields change as each of the layers is selected. A confirmation request window is shown. Press the FARMTRAX User Manual button. Ver 2.0-Rev A Page 3-51 DELETING A LAYER Step Action Response 6 Press the FARMTRAX User Manual button Screen The Edit Layers window returns, showing the reduced number of layers. Ver 2.0-Rev A Page 3-52 ZOOMING & PANNING IN GPS MODE 3.22 Zooming & Panning in GPS mode Zooming in reduces the scaling factor and presents a “closer in” view of the area around the vehicle. Zooming out increases the scale factor, presenting a wider view of the area around the vehicle. Zoom All changes the map scaling so that all information, including the backdrop map or entire paddock boundary, (in fact, any layer which is switched ON) and the present location of the vehicle is visible on the map screen. If the vehicle subsequently moves off this screen, the view presented will be that determined by the last zoom in or zoom out command. Note: Using the Zoom All function will attempt to display all layer elements that are designated ON. This may lead to a less than optimal display if the elements are widely separated. Turn OFF the unwanted layer(s) in Layer Details, in this case. The focal point for zooming in or out when in GPS mode is the vehicle, and as such, it is not possible to pan (move the view laterally) when in GPS mode. Step 1 Action From the Main menu, press the VIEW button 2 Response Screen The View menu is shown The view becomes closer Press the button (Zoom in) Press the button (zoom out) 3 The view becomes wider FARMTRAX User Manual Ver 2.0-Rev A Page 3-53 ZOOMING & PANNING IN GPS MODE Step Action 4 Press the button FARMTRAX User Manual (zoom all) Response Screen The scale factor of the display is changed to show all elements of the map screen at the optimal magnification for clear viewing. Ver 2.0-Rev A Page 3-54 ZOOMING & PANNING IN VIEW MODE 3.23 Zooming & Panning in View mode Zooming in reduces the scaling factor and presents a “closer in” view of the area around the position marker. Zooming out increases the scale factor, presenting a wider view of the area around the position marker. Zoom All changes the map scaling so that all information, including the backdrop map or entire paddock boundary and the present location of the position marker, (in fact, any layer which is switched ON) is visible on the map screen. Note: Using the Zoom All function will attempt to display all layer elements that are designated ON. This may lead to a less than optimal display if the elements are widely separated. Turn OFF the unwanted layer in Layer Details, in this case. The focal point for zooming in or out when in view mode is the position marker. The lateral position of the marker can be changed (Panning), so that a different view of an area can be seen, particularly when zooming in. Step Action Response 1 From the Main menu, press the VIEW button The View menu is shown 2 Touch the screen to move the position marker to the area of interest. The position marker moves to the “touched” area. 3 Press the Zoom in button The view becomes closer. Screen Compare this to the view shown in step 2 of the previous section. FARMTRAX User Manual Ver 2.0-Rev A Page 3-55 ZOOMING & PANNING IN VIEW MODE Step Action Response 4 Press the zoom out button The view becomes wider 5 Press the zoom all button The scale factor of the display is changed to show all elements of the map screen at the optimal magnification for clear viewing. FARMTRAX User Manual Ver 2.0-Rev A Screen Page 3-56 PRINTING 3.24 Printing Printing may be done at any stage. The exact format of the printed page depends on which application is being used when the print function is called. The printed map will contain all activated layer objects, together with detailed text information relevant to the type of operation. To turn a layer on or off, refer to section 3.15. To make a layer the top layer, refer to section 3.16. The RINEX logo appearing at the lower-right corner of printouts can be replaced with one of your choice. To change the logo, replace the file Logo.bmp in the C:\Rinex directory with one containing the required graphic. The new file must be called Logo.bmp and the image must be 8-bit (max 256 colour) .bmp format. Step 1 Action Response From the Main menu, press the Screen The Farm menu is shown button The View or GPS mode menus are shown. 2 Press the 3 button If the GPS menu is shown, press the button 4 Press the FARMTRAX User Manual The view mode menu is shown button A preview of the map to be printed is shown. Press the NEXT PAGE button to preview the second page of the report. Ver 2.0-Rev A Page 3-57 PRINTING Step 5 6 Action Press the (at top-left of screen) Response button When you are satisfied with the selected printer and configuration, Press the Screen The standard Windows printer dialog window is raised, allowing changes to printer configuration. Map is sent to the printer. System returns to the View Mode menu. button on the Print dialog window. FARMTRAX User Manual Ver 2.0-Rev A Page 3-58 SUMMARY TEXT REPORTS 3.25 Creating a Summary Text Report Another form of report which can be printed is the Treatment Summary Report, in text form. This report collates all the treatment information for all farms and paddocks in the current data-set, filtered by the JOB view setting, and provides a simple summary in text form. The report is presented using the simple Wordpad editor of Windows95 and can be changed, resaved, (perhaps to an external drive for export) using this or any other word-processing software package, if required. Step 1 Action Response From the Main menu, press the FARM button The View or GPS mode menus are shown. 2 Press the 3 button If the GPS menu is shown, press the The system switches to View mode, enabling the offline functions. button 4 Press the 5 Screen The Farm menu is shown The Treatment Summary report is created and displayed using Wordpad ® text editor. button To return to the FARMTRAX The report in Wordpad is closed. The system returns to in the View menu system, press either the the top right corner of the screen, or select Exit from the File menu. FARMTRAX User Manual Ver 2.0-Rev A Page 3-59 SETTING THE IMPORT/EXPORT MODE 3.26 Setting the Import/Export mode FARMTRAX data may be sent to an external drive, for either archiving purposes or to transfer the data to another system. These transfers may be made in a single paddock-by-paddock mode, or by sending entire farms in one transfer. NOTE: The transfer mode chosen should take into account the amount of data to be transferred and the capacity of the export device. Generally, farm mode should only be selected only when a drive capacity exceeds 100Mb. Configuring the system to transfer in either mode is achieved using the following steps. Step 1 Action From the Main menu, press the Response Screen The General Setup window appears buttons. 1 The second page of options is button to shown Press the access the second page of options. 2 Press the button labelled BACKUP = until the desired option is shown. On each press of the button, the selected option changes.. 3 Ensure that the drive letter shown on the button labelled BACKUP DRIVE = is correct. On each press of the button, the selected drive letter changes. 4 Press the OK button to save the changes. The General Setup window is closed. FARMTRAX User Manual Ver 2.0-Rev A Page 3-60 EXPORTING A PADDOCK TO DISKETTE 3.27 Exporting a Paddock to a Diskette FARMTRAX data may be sent to most external drives connected to the FARMTRAX system for either archiving purposes or to transfer the data to another system. FARMTRAX data is stored on a paddock by paddock basis. Consequently, the information you wish to export must be contained in the currently displayed paddock. Note: Backdrop maps are not stored with other paddock information, and are not included when exporting paddock data. If you need to transfer backdrop maps, the standard Windows® Explorer interface should be used to copy (NOT MOVE) the relevant .BMP and .MAP files. Note: Connecting the external drive to FARMTRAX box should be done before power is applied. Insert an empty media into the external drive after the system has finished booting. Step 1 Action Response From the Main menu, press the Screen The Farm menu is shown button The View or GPS mode menus are shown. 2 Press the 3 If the GPS menu is shown, press the 4 button button Insert an empty media into the drive 5 Press the FARMTRAX User Manual The view mode menu is shown button No change The disk access lamp on the front of the disk drive lights as the information is written to the diskette. Progress of the operation is shown on-screen. Ver 2.0-Rev A Page 3-61 EXPORTING A PADDOCK TO DISKETTE Step 6 Action Once the disk access lamp on the floppy drive goes off, the diskette can be removed, or another paddock selected for export. FARMTRAX User Manual Response Screen A window is raised advising the result of the operation Ver 2.0-Rev A Page 3-62 IMPORTING A PADDOCK FROM DISKETTE 3.28 Importing a Paddock from a Diskette FARMTRAX data which has previously been exported, for archival purposes, may be restored to the system through this option. FARMTRAX data is stored on a paddock by paddock basis. The import function will import all paddocks found on the diskette. Importing data should always be done while the current farm is RINEX. This is to ensure that files for the imported farm can be updated correctly. When importing paddock data, if the data contains a product which does not exist in the Office PC database, the system will ask whether to create the new product in the database. Only the name is created by this method. The user still needs to edit that product afterwards to enter product details (mass/volume, units and legend) or defaults will apply. This information is not contained in the imported data. Data will always be imported into the currently selected dataset. Ensure that the current dataset is the one into which you wish to import the paddock data. Note: Connecting the external drive to FARMTRAX box should be done before power is applied. Insert media containing map files into the drive after the system has finished booting. Step 1 Action Response From the Main menu, press the Screen The Farm menu is shown button The View or GPS mode menus are shown. 2 Press the 3 If the GPS menu is shown, press the 4 button button Insert the media containing the exported data into the drive. FARMTRAX User Manual The view mode menu is shown No change Ver 2.0-Rev A Page 3-63 IMPORTING A PADDOCK FROM DISKETTE Step Action Response 5 Press the Import button The disk access lamp on the front of the disk drive lights as the information is read from the diskette. If the imported file already exists on the FARMTRAX file system, confirmation is requested before it is overwritten. 6 Once the disk access lamp on the floppy drive goes off, the diskette can be removed. Message is raised advising the result of the operation. 7 Press OK System returns to the View Mode menu FARMTRAX User Manual Ver 2.0-Rev A Screen Page 3-64 EXPORTING A FARM TO DISKETTE 3.29 Exporting a Farm to a Diskette When exporting a farm to a diskette, all files for all paddocks, including backdrop and rate maps are included. Note: The LS120™ Superdrive® must always be connected to the system while the power is off. Shutdown the system, and power off. Connect the drive, then restart the system. USB devices, such as compact flash card readers and USB disk drives can be attached and detached whilst the system is powered ON. To start the export, select the Export button from the FARM-VIEW MODE menu. The Export window is shown. Fig. 3.9 - The Export window. The Export window shows both the contents of the FARMTRAX system and the selected export drive. The left pane shows the farms/clients on the FARMTRAX system, and the right pane shows those on the diskette in the export drive. If you forgot to insert a diskette into the drive, or wish to change the diskette, insert it now and press the button, to refresh the contents of the panes. In the example above, the currently selected farm/client is SUTTON in the FX97500_1999 dataset. To change the farm/client to export, touch the required farm/client in the list. When selected, this farm/client will also appear at the top of the list. FARMTRAX User Manual Ver 2.0-Rev A Page 3-65 EXPORTING A FARM TO DISKETTE If the farm to be exported is in another dataset on the system, change the dataset by button above the left pane. Datasets which appear on your pressing the FARMTRAX system will be shown, together with the farms/clients which are contained in that dataset. To change the selected export drive letter, refer to the section "Setting the Import/Export mode" When the correct farm/client is selected, press the send the data to the export drive. button between the panes to After a successful export, the selected farm/client will also appear in the right pane, showing that it is now a valid farm/client on the export drive disk. In the example above, the selected farm/client did not already exist on the export drive diskette. If it had existed, the user would have been asked to confirm the overwriting of the information already on the diskette. The operation can be continued (overwrite) or cancelled at this point. Alternatively, the farm/client can be deleted from the diskette by pressing the button under the right pane. WARNING! Use of the DELETE function in either pane will remove all information for the selected farm/client from either the diskette, or your FARMTRAX system. Use this function with caution, ensuring that the correct farm/client is selected, and that you are using the delete button for the correct pane. FARMTRAX User Manual Ver 2.0-Rev A Page 3-66 IMPORTING A FARM FROM DISKETTE 3.30 Importing a Farm from a Diskette When importing a farm from a diskette or other media, all files for all paddocks, including backdrop and rate maps are included. However, only new files and files which have changed are actually imported. Note: The LS120™ Superdrive® must always be connected to the system while the power is off. Shutdown the system, and power off. Connect the drive, then restart the system. USB devices, such as compact flash card readers and USB disk drives can be attached and detached whilst the system is powered ON. To start the import, select the Import button from the FARM-VIEW MODE menu. The Import window is shown. The arrow button is different from the Export window, to show that files are being taken from the import drive and copied to the FARMTRAX system. Fig. 3.10 - The Import window The Import window shows both the contents of the FARMTRAX system and the selected import drive. The left pane shows the farms/clients on the FARMTRAX system, and the right pane shows those on the diskette in the import drive. If you forgot to insert a diskette into the drive, or wish to change the diskette, insert it now and press the button, to refresh the contents of the panes. In the example above, no farm/client is currently selected to import. The MYERS farm/client in the FX97500_1999 dataset is showing as the only available selection on the import drive. To select this farm/client to export, touch it in the list. When selected, this farm/client will also appear at the top of the list. FARMTRAX User Manual Ver 2.0-Rev A Page 3-67 IMPORTING A FARM FROM DISKETTE If the farm to be imported is in another dataset on the system, change the dataset by button above the right pane. If other datasets exist on the pressing the import drive diskette, they will be shown in the list for the appropriate dataset. To change the selected import drive letter, refer to the section "Setting the Import/Export mode" To preserve data integrity, a farm/client in one dataset will always be imported to the same dataset. You cannot import it to a different dataset. When the correct farm/client is selected, press the import the data to the FARMTRAX system. button between the panes to In the example above, the selected farm/client already exists on the FARMTRAX system. The user is asked to confirm the overwriting of the information already on the system. The operation can be continued (overwrite) or cancelled at this point. Alternatively, the farm/client can be deleted from the FARMTRAX system by pressing the button under the left pane. WARNING! Use of the DELETE function in either pane will remove all information for the selected farm/client from either the diskette, or your FARMTRAX system. Use this function with caution, ensuring that the correct farm/client is selected, and that you are using the delete button for the correct pane. If the overwrite function is chosen, only those files which are new or have been changed are overwritten in the farm/client on the FARMTRAX system. If the farm/client had not already existed, after a successful import, the selected farm/client will also appear in the left pane, showing that it is now a valid farm/client on the FARMTRAX system. You cannot import to the farm/client that was open, or current at the time that you entered the IMPORT function. To import this farm/client, exit the import function, change the current farm/client to any other, then re-enter the IMPORT function. When you are finished importing or exporting farms, press the FARMTRAX User Manual Ver 2.0-Rev A button. Page 3-68 ACTIVATING THE LEGEND BAR 3.31 Activating the Legend Bar Turning the Legend bar on and off is done from the VIEW - MORE menu. Pressing the icon more than once will toggle the Legend bar display on and off. The legend bar which appears is determined by the key layer product. The legend will only appear if there are layers in the paddock. Step 1 Action Response From the Main Menu, press the Screen The View menu is shown. button. The second view menu is shown 2 button. Press the 3 Press the 4 button. To remove the legend bar from the map screen, press the The Legend bar is shown along the lower edge of the map screen. The Legend bar is removed from the map screen. button again. FARMTRAX User Manual Ver 2.0-Rev A Page 3-69 CHANGING THE PLOT LINE 3.32 Changing the Plot Line Type When plotting data on the screen, there are options available as to the appearance of the plot line. The types of plot line drawing are: Plot Type Description Default for: Tracks Black parallel lines SprayTRAX, SpreadTRAX, SeedTRAX Lines Black single line Colour Swaths Colour blocks HML Tracks Variable number of parallel lines Colour Lines Colour single line HarvestTRAX However, it may be preferable in some circumstances to change the type of drawing, to speed screen redraws, or make variable rate treatment maps colourful, and therefore more meaningful. Changes are made as follows: Step 1 Action Response From the Main Menu, press the Screen The FARM menu is shown button. 2 System displays the Edit Layers window. Press the FARMTRAX User Manual button. Ver 2.0-Rev A Page 3-70 CHANGING THE PLOT LINE Step 3 Action Response Select the required layer, then Screen System displays details of the selected layer button. press the 4 Press the DISPLAY tab System displays the DISPLAY details window. The currently selected legend parameters can be seen. 5 Press the LINE TYPE button that is currently showing TRACKS. Selectable line types for this window are shown. 6 Select the required line type System returns to the Layer Details window,showing the changed Line Type setting using the and arrows, and press 7 Press the FARMTRAX User Manual button System returns to the Edit Layer window Ver 2.0-Rev A Page 3-71 CHANGING THE PLOT LINE Step Action 8 Press changes. Response Screen Map screen is redrawn, using to accept these the selected plot line type. FARMTRAX User Manual Ver 2.0-Rev A Page 3-72 USERNAME AND PASSWORDS 3.33 Username and Passwords This section will show you how to view and change the username and password that are set up on your FARMTRAX system. It will also show you which applications are available on your system. Please Note: You are not permitted, under the terms of your licence, to distribute copies of FARMTRAX software to third parties. Be aware that any copies of software will contain your username and password. Step 1 Action From the VIEW-MORE-MORE menu press the button. 2 Press the button. 3 Response Screen The Application Menu dialog window appears. Applications not configured in your software system appear with a red slash through the picture. The Password dialog window appears with the currently operating name and password. To change the password, touch The keyboard dialog window appears. the button displaying the current password. 4 The changed password appears in the entry field the existing password, then enter the changed password, ensuring key is used that the as the separator. FARMTRAX User Manual Ver 2.0-Rev A Page 3-73 USERNAME AND PASSWORDS Step Action 5 Press button 6 Press 7 button Ensure an application is Response Screen The password dialog window reappears with the new password. If the password is correct, the application dialog window appears, with the red slash removed from newly allowed applications. (Compare SeedTRAX picture to that shown in Step 1) The system restarts the selected application. selected. Press button to return to the selected application. FARMTRAX User Manual Ver 2.0-Rev A Page 3-74 CHANGING APPLICATION OPTIONS 3.34 Changing Application Options Within an application (e.g. SprayTRAX), optional functionality such as VARIABLE RATE, FEATURE MAPPING and GUIDANCE may be available, depending on whether or not the system was purchased with those options. If, for example, VARIABLE RATE functionality was purchased and required, then turning ON this option will make the RATES icon appear on the Main menu, providing access to related Variable Rate functionality. Similarly, unwanted options can be temporarily removed from the menus, to avoid confusion. Step 1 Action Response From the VIEW-MORE-MORE menu press the button. 2 Press the 3 button. To change the status of any option, press the relevant button. (e.g. RATES – for the Variable Rate option.) FARMTRAX User Manual Screen The Application Menu dialog window appears. Applications not configured in your software system appear with a red slash through the picture. The Module Select dialog window appears with the available options for this application, and their status. The button labelled RATES changes state to ON Ver 2.0-Rev A Page 3-75 CHANGING APPLICATION OPTIONS Step Action Response 4 Press the to accept the change. 5 Press button FARMTRAX User Manual button Screen System returns to Application dialog window. The system restarts in the selected application. The main menu with the changed functionality is shown. Ver 2.0-Rev A Page 3-76 SETTING UP A SCREEN GRID 3.35 Setting up a Screen Grid Before activating the screen grid feature, it is necessary to first tell the system how you want the grid displayed. The distance between the grid-lines can be specified, and the easting and northing grid labels turned on and off. Even if the grid labels are turned on, if the scaling of the map screen doesn’t allow space between the gridlines for the labels, then they will not be displayed. In this case, either make the distance between gridlines greater, or zoom in on the map screen. Step 1 Action From the Main menu, press the Response Screen The General Setup window appears buttons. Press the button labelled GRID The Grid Setup window appears. 2 To change the spacing between gridlines, press the Grid Size button. The numeric keyboard window is raised. 3 Enter the new value. When System returns to the Grid Setup window, showing the changed value for Grid Size. completed, press the button to accept the change. FARMTRAX User Manual Ver 2.0-Rev A Page 3-77 SETTING UP A SCREEN GRID Step 4 Action To turn the grid labels on or off, press the Labels button. 5 Press button to accept the changes Response Screen The button toggles to the opposite state. The Grid Setup window is closed. Note: This procedure does not activate the grid feature. Refer to the separate procedure for this. FARMTRAX User Manual Ver 2.0-Rev A Page 3-78 ACTIVATING/DEACTIVATING GRIDS 3.36 Activating/Deactivating Grids Use this procedure to turn on or off the map screen grids. To change how the gridlines and labels appear, use the procedure in Section 3.35. Step 1 Action Response From the Main menu, press the The grid feature is activated, as configured in Grid Setup. Screen buttons. 2 To deactivate the grid feature, press the FARMTRAX User Manual The grid (and labels) disappear from the map screen. button. Ver 2.0-Rev A Page 3-79 VEHICLE NOSE SETTING 3.37 Vehicle Nose setting To more clearly identify the direction of travel of the Vehicle Position Marker, a "nose" can be shown. To activate or deactivate the nose feature, follow these steps. Step 1 Action From the Main menu, press the Response Screen The General Setup window appears. buttons. 2 To activate the VPM nose, press the button currently labelled NOSE OFF. 3 Press the button to accept the change. FARMTRAX User Manual The button label changes to read System returns to the map screen. The VPM has changed to include the directional nose. Ver 2.0-Rev A Page 3-80 CHANGING THE JOB VIEW SETTING 3.38 Changing Job View Setting FARMTRAX can be set to show either ALL layers for a paddock, or show only layers with the SELECTED job name. This can be combined with the ability to show either one or all paddocks for a farm, to show all paddocks treated on a farm under one job name/number. To change the job view setting to display only SELECTED layers: Step Action Response 1 Ensure that you are currently in the required farm, and that the Vehicle Position Marker is in the OFF state. The marker appears in its OFF state 2 Press the VIEW-MORE-MORE- The GENERAL SETUP window is shown. Screen buttons. 3 System displays the Layer Setup window. Press the button. 4 Press the Job button until the button displays The button text changes with each press, cycling through states of DISABLED, SELECTED, ALL . FARMTRAX User Manual Ver 2.0-Rev A Page 3-81 CHANGING THE JOB VIEW SETTING Step Action Response 5 Press the button. 6 Press the FARMTRAX User Manual button. Screen System returns to the VIEW SETUP screen. System closes the VIEW SETUP window. The currently selected JOB appears at the top of the map screen, after the paddock name. Ver 2.0-Rev A Page 3-82 ASSIGNING A JOB TO A LAYER 3.39 Assigning a Job to a Layer There are two ways to assign a job to a layer. These are: 1. Before the layer is created, by changing the current job to the job required and then starting the paddock operation. 2. After the layer has been created, by changing the assigned job for the layer from the current job to the required job. Note: It is assumed that Jobs functionality has been enabled. Refer to the preceding section, if this is not the case. 3.39.1 Before Starting the Operation Step Action Response 1 Ensure that you are currently in the required farm and paddock, and that the Vehicle Position Marker is in the OFF state. The marker appears in its OFF state 2 Check the current job selection. The currently selected JOB appears at the top of the map screen, after the paddock name. 3 From the Main menu, Press FARM-PADDOCK 4 button Press the 5 If the required job number does not appear in the list of available jobs, press the Screen The PADDOCK dialog window is shown, with the currently selected paddock highlighted. The PADDOCK SELECT window changes to show JOBS instead of PADDOCKS for selection. The on-screen keyboard is shown, to allow entry of a new job name. button, or jump to step 7. FARMTRAX User Manual Ver 2.0-Rev A Page 3-83 ASSIGNING A JOB TO A LAYER Step Action Response 6 Enter the new job name and press OK The system returns to the job select window, with the new job available for selection in the list. 7 Select the required job and press OK to select. The system returns to the map screen. The current job is shown at top of screen [in brackets] Screen Any layers subsequently created, will have the currently selected job assigned to the layer. 3.39.2 After the Layer has been created 1 Press the LAYERS button System displays the Layer Select window, showing number of layers for this 1 paddock. 2 Select the layer to be restored, by pressing the Layer Number button. The Layer information below the layer button changes as each layer is selected. (Ensure the selected layer is designated ON) 1 If jobs mode is set to SELECTED, only layers with the currently selected job number will be shown. FARMTRAX User Manual Ver 2.0-Rev A Page 3-84 ASSIGNING A JOB TO A LAYER Step Action Response 3 Press the DETAILS button The AREA details window appears. 4 Press the INFO tab Other Information, (including the JOB) is shown. If this layer has previously been deleted, the Job field will display RECYCLE BIN 5 Press the JOB button, to change the job. A select window appears, showing jobs which may be selected. The currently selected job is Recycle Bin. 6 Press the UP or DOWN arrows The highlight changes to the to select the required job. If you selected Job do not usually use the JOBS function, select NONE 7 Press the FARMTRAX User Manual button. Screen Screen returns to the INFO page of LAYER - DETAILS. (Note that the Job has been changed) Ver 2.0-Rev A Page 3-85 ASSIGNING A JOB TO A LAYER Step 8 Action Response Press the OK button. 9 Screen Screen returns to the LAYER window. Note that the number of layers in the current job has been reduced by one. LAYER window closes. Press the FARMTRAX User Manual button. Ver 2.0-Rev A Page 3-86 CHANGING THE DATASET YEAR 3.40 Changing the Dataset Year Data collected by the FARMTRAX system is stored in individual “datasets”, with each year’s data being separately accessible. This separation allows older data to be archived and removed from the system, freeing-up space for new data to be added. The following steps illustrate how to change between dataset Years. The option to change datasets is only present when more than one dataset is present on the system. Step 1 Action Response From the main menu screen press the 3 The Farm menu is displayed. button. 2 Press the the Farm menu Screen button from The Farm dialog window appears. If more than one dataset is present on the system, a dataset button (currently labelled 1999) is shown. Press the dataset button to step Each press of the dataset through available datasets. button displays the next available dataset. Farms available for each dataset are shown in the select window. If the current farm from the previous dataset is also in the selected dataset, this farm will be highlighted for selection. 4 Press the button to accept the current selection. FARMTRAX User Manual The system returns to the farm menu, with data for the currently selected farm displayed (if any). Ver 2.0-Rev A Page 3-87 CHANGING THE BOX DATASET 3.41 Changing to a Different FARMTRAX box Dataset Data collected by the FARMTRAX system is stored in individual “datasets”, with the data from individual FARMTRAX boxes being separately accessible after importing to the Office PC. For those users with more than one FARMTRAX box, the following steps illustrate how to change between box datasets. This option can only be used when using the FARMTRAX software on the Office PC. It cannot be used on the FARMTRAX box itself. Step 1 Action Response From the main menu screen press the The Farm menu is displayed. button. 2 Press the the Farm menu button from The Farm dialog window appears. If more than one dataset is present on the system, a dataset button (currently labelled 1999) is shown. 3 Right-click using the mouse on any unused area in the FARM dialog window. 4 Each press of the UP and DOWN buttons changes the and Use the buttons to highlight the required blue highlight bar from one selection to the next. On box number, and press the pressing OK, the FARM dialog window returns, showing farms button to accept the and dataset years for the current selection. selected box. FARMTRAX User Manual Screen A Select window is raised, showing the serial numbers of FARMTRAX boxes which have data stored on the system. Ver 2.0-Rev A Page 3-88 SELECTING THE KEYBOARD LAYOUT 3.42 Selecting the Keyboard Layout The FARMTRAX system offers a choice of layout for the on-screen keyboard. The keyboard can either be laid out with keys appearing in alphabetic sequence (A,B,C,D etc), or in the “QWERTY” order. To change the keyboard layout, follow these steps from the Main menu. Action 1 From the Main menu, press the Response Screen The General Setup window appears. buttons. 2 To change the on-screen keyboard layout, press the button labelled KEYB=ALPHA 3 button to Press the accept the change. FARMTRAX User Manual The button changes to show KEYB=QWERTY The General Setup window is closed. Any subsequent raising of the on-screen keyboard will show the keys arranged in the QWERTY layout. Ver 2.0-Rev A Page 3-89 ENTERING WEATHER INFORMATION 3.43 Entering Weather Information Weather information can be stored for Treatment and Harvesting layers, so that the conditions under which the treatment was carried out can be recorded. Entering and viewing this information is through the FARM-LAYER-DETAILS-INFO window, so the layer must first be created by starting the treatment. Refer to the paragraph Viewing Layer Information for information on selecting the required layer, then section 6, Weather, for details on the Weather window. FARMTRAX User Manual Ver 2.0-Rev A Page 3-90 CHANGING THE DRIVER 3.44 Entering Driver Information The FARMTRAX system allows the entry of up to ten different drivers, so that it is possible to record who it was that carried out a paddock operation. The list of drivers is accessible from the FARM-VEHICLE menu, where the names can be changed, and one driver made the current driver. This driver will be used as the driver on all subsequently created layers, until the current driver is again changed. Maintain one entry on the list as "None" or "Unknown", so as to be able to select it in a Layer if required. 3.44.1 Creating and Selecting the current Driver Step 1 Action From the FARM - VEHICLE MORE menu, select the Response Screen The driver list window appears. The currently selected driver is highlighted. (in this case, blank) button. 2 If the driver you wish to make The currently selected driver is current is shown on the list, use highlighted. the UP and DOWN buttons to select, or press CHANGE to modify an unused position in the list. 3 Press the button to accept the change and make this driver the current driver. System returns to the FARMVEHICLE-MORE menu. 3.44.2 Changing the Driver in the Layer The driver for a particular treatment is stored with the layer information. This information can be changed in the layer, if required. As with other layer details, if the information is changed in the layer, the change will take effect for only that layer. Any layers subsequently created will use the current Vehicle setting. FARMTRAX User Manual Ver 2.0-Rev A Page 3-91 CHANGING THE DRIVER Refer to the paragraph Viewing Layer Information for information on selecting the required layer. Once in LAYER DETAILS for the required layer, follow these steps: Step Action Response 1 Press the INFO tab The INFO page of LAYER DETAILS appears. 2 To change the current driver, press the button labelled DRIVER A list of drivers to choose from is shown in a Select window.. 3 Select the required driver from the list. The new driver is highlighted in the list Press the button to accept the change. The system returns to the INFO window, showing the changed driver 4 FARMTRAX User Manual Ver 2.0-Rev A Screen Page 3-92 USING DISTANCE AND AREA TOOLS 3.45 Using Distance and Area Tools These tools are presented as an aid to calculating distances and areas shown on the map screen. Three tools are presented: RULER - to show distances and a bearing from point A to point B in a straight line. POINT - to show the total distance of a line with intermediate points. AREA - to show the area of an enclosed shape. These tools are accessible from the VIEW-MORE menu. 3.45.1 Ruler Step 1 Action Response From the MAIN menu, press the VIEW-MORE buttons. 2 The VIEW-MORE-TOOLS menu is shown. Press the button. 3 No visible change, but the RULER tool is activated. Press the 4 2 Screen The VIEW-MORE menu is shown button. Touch the map screen at the start point of the line you want to measure, then drag your finger, without lifting it from the screen until you reach the end 2 point. A straight line will be drawn from the start to end points. On a normal screen, click and drag using the left mouse button. FARMTRAX User Manual Ver 2.0-Rev A Page 3-93 USING DISTANCE AND AREA TOOLS Step 5 Action Response Lift your finger from the touchscreen. 6 Press the button to close the window. Screen An advisory window is raised, showing Bearing and Distance calculations of the line. The window and line are removed. (To draw another line, press the RULER button again.) 3.45.2 Point Step 1 Action Response From the MAIN menu, press the VIEW-MORE buttons. 2 The VIEW-MORE-TOOLS menu is shown. Press the button. 3 Press the 4 Screen The VIEW-MORE menu is shown button. Touch the map screen at the start point of the line you want to measure, then lift and touch the next point. Repeat until the end point is entered. FARMTRAX User Manual No visible change, but the multiple POINT tool is activated. A line will be drawn between the touched points. Ver 2.0-Rev A Page 3-94 USING DISTANCE AND AREA TOOLS Step 5 Action Response Touch the POINT button. 6 Press the button to close the window. Screen An advisory window is raised, showing the Total Distance of the line. The window and line are removed. (To draw another line, press the POINT button again.) 3.45.3 Area Step 1 Action Response From the MAIN menu, press the VIEW-MORE buttons. The VIEW-MORE menu is shown The VIEW-MORE-TOOLS menu is shown. 2 Press the button. 3 Press the 4 Screen button. Touch the map screen at the start point of the area you want to measure, then lift and touch the next point. Repeat until the end point is entered. The end point does not need to be exactly on the start point. FARMTRAX User Manual No visible change, but the AREA tool is activated. A line will be drawn between the touched points. Ver 2.0-Rev A Page 3-95 USING DISTANCE AND AREA TOOLS Step 5 Action Touch the AREA button. 6 Press the button to close the window. FARMTRAX User Manual Response Screen The area is enclosed by connecting the last entered point to the first. An advisory window is raised, showing the Total Area of the enclosure. The perimeter of the enclosure is also shown. The window and line are removed. (To draw another enclosure, press the AREA button again.) Ver 2.0-Rev A Page 3-96 CHANGING LIGHTBAR LIMITS 3.46 Changing Lightbar Limits The distance limits which determine the display on the lightbar can be changed from the default values. Currently, the defaults are set up as follows: X 0m to 0.299m > .3m to .599m >> .6m to 0.99m >>> 1m to 1.99m >>>> 2m to 2.99m NOTE: When carrying out changes to these values, ensure that the LOCK function is OFF. Step 1 Action Response From the Main menu, press the Screen The GUIDE/MORE menu is shown buttons The LIGHTBAR menu is shown 2 Press the button 3 The LIGHTBAR-LIMITS dialog window is shown Press the FARMTRAX User Manual button Ver 2.0-Rev A Page 3-97 CHANGING LIGHTBAR LIMITS Step Action Response 4 Press the button for the display level you wish to change The numeric keyboard is displayed 5 Change to the desired value The system returns to the Lightbar Limits dialog window, with the changed value(s) and press complete when 6 Press when finished changing values FARMTRAX User Manual Screen The system returns to the LIGHTBAR menu Ver 2.0-Rev A Page 3-98 CHANGING LIGHTBAR DISPLAY BRIGHTNESS 3.47 Changing Lightbar Display Brightness The brightness level of the lightbar can be changed from the FARMTRAX software. Step 1 Action Response From the Main menu, press the Screen The GUIDE/MORE menu is shown buttons The LIGHTBAR menu is shown 2 Press the button 4 The Lightbar Intensity dialog window is shown Press the 5 button. Press the button for the required brightness level 6 Press when finished changing values FARMTRAX User Manual The lighbar brightness changes The system returns to the LIGHTBAR menu Ver 2.0-Rev A Page 3-99 CHANGING GUIDE LOCK DIRECTION 3.48 Changing Guide Lock Direction This option is used when employing the Racetrack (round-and-round) and contour methods of spraying. In order to be able to calculate the position for the next pass, the guide attempts to lock onto a previous pass and looks both to the left and right of the present position. The lock process is made quicker and more reliable if the system knows which side of the present position to look first. i.e. Left for clockwise patterns and right for anti-clockwise. Step 1 Action Response From the Main menu, press the Screen The GUIDE/MORE menu is shown buttons The guide options window is displayed. 2 Press the 4 button Press the The button toggles to button from the guide options window. This is the selected state. 5 Press when the button displays the required state. FARMTRAX User Manual The system returns to the GUIDE-MORE menu Ver 2.0-Rev A Page 3-100 TURN WARNINGS 3.49 Activating & Configuring Turn Warnings This option is used when employing the Racetrack (round-and-round) and contour methods of spraying. Turn Indication provides visual prompting, via the lightbar and on-screen display, of the distances to the next turn. Turn indication is optional, and is enabled or disabled from the Guide Options Dialog window.(Section 6.32) If enabled, turn indication will activate when the LOCK button is pressed in the GUIDE menu, during paddock operations. Step 1 Action Response From the Main menu, press the Screen The GUIDE/MORE menu is shown buttons The Guide Options window is displayed. 2 Press the 4 button Press the The Event Warning window is raised, showing options for turn warnings. button from the guide options window. 5 Press the button currently The button changes to the ON state. labelled FARMTRAX User Manual Ver 2.0-Rev A Page 3-101 TURN WARNINGS Step 5 Action Change any other options to their required value and press settings. to save the FARMTRAX User Manual Response Screen The system returns to the Guide Options window, with the button for Turn Warnings showing the changed state. Ver 2.0-Rev A Page 3-102 CONFIGURING THE VR WINDOW 3.50 Configuring the Virtual Road (VR) window The distances represented in the VR window can be changed to your preference. Before changing any settings, take a note of their current values, in case your changes do not have the desired effect. A description of the individual settings for the VR window is found in Section 6 of this manual. The VR window will activate when the VIRTUAL ROAD button is pressed in the GUIDEMORE menu. A Virtual Road will only be drawn in the VR window when a valid guideline exists. Step 1 Action Response From the Main menu, press the Screen The GUIDE/MORE menu is shown buttons The Guide Options window is displayed. 2 button Press the 3 4 Press the button from the guide options window. The Virtual Road Settings window is raised, showing available options for VR settings. Change any options to their required value and The system returns to the Guide Options window. press settings. to save the FARMTRAX User Manual Ver 2.0-Rev A Page 3-103 ACTIVATING THE VR WINDOW 3.51 Activating the Virtual Road (VR) Guidance window Virtual Road guidance information, as the name suggests, draws a virtual road on the screen in front of you, showing bends and turns in the path in front of the vehicle, and the vehicle's current position and direction with regard to the "road" ahead. Thus, advance warning is given of turns and bends, however slight they may be. When the VR window is activated, the map-screen is divided to show both the VR guidance information and the normal paddock plot data. De-activating the VR window restores the normal full-screen view. A Virtual Road will only be drawn in the VR window when a valid guideline exists. Step 1 Action Response From the Main menu, press the Screen The GUIDE/MORE menu is shown buttons 2 Press the 3 button To close the VR window, press the FARMTRAX User Manual The map-screen is split to show both the VR window at left, and the plotted data. If the guideline is active, a Virtual Road is drawn in the VR window. The VR window is removed. The map-screen reverts to the normal full-screen mode. button again. Ver 2.0-Rev A Page 3-104 ACTIVATING THE DIRECTION GUIDE INDICATOR 3.52 Activating the Direction Guide Indicator This on-screen indicator gives text and graphical information, in addition to the normal lightbar indication. It can be used for both guidance when carrying out a treatment such as spraying, or when navigating back to a pre-defined sample or waypoint. Refer to section 6 Direction window for an explanation of the information shown in the window. When using the indicator for navigating back to a sample or waypoint, the indicator should be activated after defining the point to which you wish to navigate. When using the indicator for spray/spread guidance, the indicator should be activated after the guide-line has been created. Step 1 Action Response From the Main menu, press the Screen The GUIDE/MORE menu is shown buttons 2 Press the 3 button To close the direction window, press the again. FARMTRAX User Manual The Direction window is shown over the map screen. (You can move the window by touching and dragging the blue title bar) The direction window is removed. button Ver 2.0-Rev A Page 3-105 CREATING RATE MAPS 3.53 Creating Rate Maps The creation of rate maps is done in the Rate map Editor. Simple paint tools are used to define and fill-in discrete areas, and errors can be easily erased. There are many different ways of creating a rate map from scratch, using different source material such as yield maps, aerial photographs or soil sample points. If no pre-prepared material is available, consider driving the outside lap, applying material as you go. One method of creating a rate map is outlined below. Some helpful tips and points to be noted are as follows: 3.53.1 Geographic Location. The rate map needs to be referenced against something, to place it geographically. The something can be a boundary line, or other paddock information, such as a yield map or backdrop map. Set the reference up before trying to create the rate map. 3.53.2 Position the Source Information. Do this before entering the Editor. Use view mode and zoom in/out facilities to position the source material centrally on the screen. The rate map will be created over the source information, and panning facilities are not available within the editor. 3.53.3 Determine the Legend. Decide how many different rates of product will be needed for this paddock, and define them on the legend bar. 3.53.4 Draw the Outlines first. The fill function (paint-can) may not completely fill in an area if there are other lines or colours present. It may be better to draw the coloured outlines of discrete areas over the source material using the paintbrush first, then save your work to a file, turn off the source material layer, and re-enter the editor, to then fill-in the marked areas and complete the rate map. 3.53.5 Saving your work. To save a Rate map, touch the Exit button. Your next touch determines whether: ♦ The rate map is saved to a file only. ♦ The rate map is saved to a file and loaded to a bin ♦ Nothing is saved. ♦ The Exit operation is cancelled More information on Saving a Rate Map follows in section 3.54. FARMTRAX User Manual Ver 2.0-Rev A Page 3-106 CREATING RATE MAPS Step Action Response 1 Activate a backdrop map, as detailed in section 3.14. The backdrop map is shown 2 From the main menu, press the The Rates menu is displayed Screen button 3 Press the button 4 5 Akin to Excalibur rising from the misty waters of Olde England, the Rate map Editor magically appears, with the default legende bar across the lower part of the screen. Press the button to configure the legend bar. The legend bar dialog window appears, with options to define the number of discrete colours representing rates, and the rate value for each colour. Press the button following the word “of” to set the total number of discrete rate settings that will be used in your rate map. The Rate number dialog window appears, allowing you to set the total number of different rates that will be defined in your rate map. FARMTRAX User Manual Ver 2.0-Rev A Page 3-107 CREATING RATE MAPS Step Action Response 6 Press the or button to either increase or decrease the total number value. 7 Press the 8 button. To change the rate defined for each of the four colours, press the rate number button Screen The number increments or decrements once for each button press. The system returns to the legend bar dialog window, showing the changed value of total rates. The numeric keyboard appears, to allow the rate for each colour to be changed. ) to select (currently each discrete colour, and press button to change the the rate value for each. 9 Clear the old value and enter in the desired rate value, using the on-screen keyboard buttons. 10 button. Press the Repeat for each rate colour. FARMTRAX User Manual The new value appears in the window. The new rate values are shown in the legend bar dialog window. To view all rates, repeatedly press the rate number button. Ver 2.0-Rev A Page 3-108 CREATING RATE MAPS Step Action 11 Press the button to save your legend bar settings 12 icon to Press the activate the paintbrush tool. Press a colour on the legend bar to select a rate with which to paint. 13 To change the brush width, press the 14 button. Select the brush width by pressing the required width button. (I = narrowest) FARMTRAX User Manual Response Screen The legend bar changes to reflect current values. The selected rate/colour is highlighted on the legend bar. The cursor has changed to the paintbrush tool - The paint brush setup dialog window is shown. The current brush width setting is shown with an asterisk. The asterisk moves to the selected width. Ver 2.0-Rev A Page 3-109 CREATING RATE MAPS Step Action 15 Press setting. to accept the 16 To use the paintbrush, simply touch the screen where you want to start painting, and without releasing pressure, drag your finger to the point where you want to stop painting. 17 Define the borders of each of the different rate areas, in their respective colours, until all areas are covered. 18 Exit the editor, by pressing the Response Screen The system returns to the Editor window. A line is drawn in the selected rate colour. The Save Rate map dialog is displayed. button. 19 Save the rate map by pressing the button FARMTRAX User Manual A blue progress bar indicates the status of the save operation, until completion, when the system returns to the Rates menu. (The new rate map may not be shown) Ver 2.0-Rev A Page 3-110 CREATING RATE MAPS Step Action Response 20 Turn off the backdrop map layer. (Refer section 3.15) Ensure that the Rate map layer is the top layer. (Refer section 3.16) The newly-saved Rate map is shown on the map screen, without the backdrop map. 21 Re-enter the Rate map Editor The rate map is shown without the backdrop map. 22 Using the paintpot tool, fill in the discrete areas with their associated colour. The areas are filled. There may exist some dots of another colour, left over from the backdrop map. 23 Using the paintbrush tool, paint over any dots of a foreign colour in an area, making each area one pure colour. The required rate map is complete. FARMTRAX User Manual Ver 2.0-Rev A Screen Page 3-111 SAVING A RATE MAP 3.54 Saving a Rate Map Once the rate map has been created, there exist several options for saving it. Saving a rate map begins by pressing the BACK button from the Rate map Editor menu. (Section 5.15) 3.54.1 Changing the rate map name. The rate map name can be changed from the default. Once the progress bars have cleared, the keyboard dialog window is raised to allow entry of a new filename. Use the on-screen keyboard to enter the new name. Note: Use the on-screen keyboard only. Using an external keyboard may create a filename with invalid characters. 3.54.2 Saving to a file only. Rate maps can be saved to a file without being loaded to a bin. Press the button showing Bin 1 until FILE is shown. 3.54.3 Saving to a Vehicle Bin. Depending on the selected Controller, up to three bins may be available to select from for the saving of the rate map. Press the button showing the available bin numbers, until the desired bin is selected. The rate map will also be saved to file, with the displayed filename. Fig. 3.11 - The Save Rate Map window Note: Saving to a bin does not automatically start applying product using the rate map. The bin must be in the AUTO mode before the map is used to output rates to the flow controller. See next section. FARMTRAX User Manual Ver 2.0-Rev A Page 3-112 LOADING A RATE MAP TO A BIN 3.55 Loading a Rate map to a Bin A previously created rate map can be loaded to a vehicle bin at any time. A newly created or modified rate map from the rate map Editor can be loaded to a bin either through this option, or when saving the map to a bin. (Refer previous section: Saving to a Vehicle Bin). Either action will result in the creation of a new Rate map layer. To ensure that a rate map is used to output product from a bin, the bin mode must be set to AUTO. Setting a bin mode to MANUAL will allow rates to be set manually, ignoring the rate map. (Refer section 3.58) Step 1 Action Response From the Main menu, press the Screen The Rates menu is shown button The Rate Setup dialog window is shown. 2 Press the button 3 Press the button to select the bin number to which the rate map is to be loaded. (This will in most cases not be changeable) 4 button Press the to select the rate map file to load to the bin. FARMTRAX User Manual On each press of the button, the bin number cycles through available choices. The Map File Select dialog window is shown, with available rate map choices listed. Ver 2.0-Rev A Page 3-113 LOADING A RATE MAP TO A BIN Step Action Response 5 Using the and Screen The required rate map filename is highlighted. buttons, select the required rate map. 6 button to Press the accept the rate map file choice. 7 The system returns to the Rate Setup dialog window, with the selected file in the field window. The button changes to Press the button 8 Press the button to accept these settings. FARMTRAX User Manual . The bin is now configured to output rates from the rate map. The system returns to the RATES menu Ver 2.0-Rev A Page 3-114 REMOVING A RATE MAP FROM A BIN 3.56 Removing a Rate map from a Bin. A rate map which is loaded to a vehicle has an associated “layer”, which can be turned on or off as required. Removing or “clearing” a rate map from a vehicle bin also removes the associated layer. Note: To adjust the rates manually, it is not necessary to clear the rate map. Manual adjustment of rates will change the bin operating mode from Auto to Manual. (Refer Section 3.58) Step 1 Action Response From the Main menu, press the Screen The RATES menu is shown, (with the rate map, if the rate map layer is turned on.) button The Rate Setup dialog window is shown. 2 Press the button 3 Press the button to select the bin number to which the rate map is loaded. (This will in most cases not be changeable) 4 Press the button to clear the rate map file from the bin. FARMTRAX User Manual On each press of the button, the bin number cycles through available choices. If a rate map is loaded to a bin, the filename will be shown in the window. The filename is removed from the window. The associated layer is also removed. Ver 2.0-Rev A Page 3-115 REMOVING A RATE MAP FROM A BIN Step Action 5 Press the button to accept these settings. FARMTRAX User Manual Response Screen The system returns to the RATES menu Ver 2.0-Rev A Page 3-116 IMPORTING A RATE MAP 3.57 Importing a Rate map Rate Maps previously created and exported can be imported back into the FARMTRAX system with this option. Rate maps, like backdrop maps, are stored with other information relative to a particular farm or client. Before importing the rate map, you must select the farm/client to which this rate map will be stored. Once the rate map has been imported, it still needs to be loaded to a bin, before it can be used. (Refer Section 3.55) Follow the steps below to import the required files into your FARMTRAX box Note: Connecting the external drive to FARMTRAX box must be done before power is applied. Insert media containing map files into the drive after the system has finished booting. Step 1 Action Response From the MAIN menu, press the Screen Displays the FARM menu button. GPS or view mode menu displayed 2 Select button View mode menu displayed 3 Select button. 4 Select FARMTRAX User Manual button Any map files found on the diskette will be imported into the current farm. . A dialog window shows whether the import was successful or not Ver 2.0-Rev A Page 3-117 SETTING THE RATE MANUALLY 3.58 Setting the Rate Manually Instead of using a rate map to determine the product application rates, you can set your FARMTRAX system to instruct the flow controller to output rates which are manually set and changed. There are two areas in the software from which you can set rates manually. Which one you choose to use will depend on: ♦ The type of controller connected to your system ♦ whether the RATES option is enabled on your system. ♦ your personal preference. One method allows you to set the rate by entering a value from a numeric keyboard. To change the rate, you type in a new value. The other allows you to determine a “step” value, and then by pressing an “increase” or “decrease” button, the rate is varied up or down by the “step” value. 3.58.1 Numeric Keyboard method. (“Manual” controller selected) Step 1 Action From the FARM Menu, press the Response Screen The VEHICLE menu is displayed button 2 Manual Flow Control dialog window is shown. Select button 3 The numeric keyboard is shown Press the rate. FARMTRAX User Manual to change Ver 2.0-Rev A Page 3-118 SETTING THE RATE MANUALLY Step 4 Action Response Change the application rate by clearing the old and entering a new value, using the on-screen numeric keyboard. The new Value is shown in the value window 5 to accept the Press changed value 6 Press to accept the changed value FARMTRAX User Manual Screen The new value is shown in the Manual Flow Control window System returns to the map screen. (Note message at bottom of screen) Ver 2.0-Rev A Page 3-119 SETTING THE RATE MANUALLY 3.58.2 RATES Section “Step” Method Step 1 Action Response From the Main Menu, press the The RATES menu is displayed Screen button 2 Manual Rate menu is shown Select button The Manual Rate Setup dialog window is shown. 3 Press "step" value. to set the rate 4 Press step value. 5 to change the The numeric keyboard is shown. Using the on-screen keys, enter The value as entered is shown a value by which the application in the window rate is to “step” or change. FARMTRAX User Manual Ver 2.0-Rev A Page 3-120 SETTING THE RATE MANUALLY Step Action Response 6 Press to accept the changed value 7 Press to accept the changed value Press the 10 System returns to the map screen button button The requested rate shown onscreen is decreased by the step amount twice. 9 Press the twice. System returns to the Manual Rate Setup dialog window, showing the changed step value The requested rate shown onscreen is increased by the step amount. 8 The current rate can also be seen (and changed) using the Screen The appearance of this window will vary, depending on the selected controller. button FARMTRAX User Manual Ver 2.0-Rev A Page 3-121 VIEWING TREATMENT MAPS 3.59 Viewing Treatment Maps The treatment map is being created as you drive the paddock, applying the product. It is possible to view the treatment map creation in real-time, but as this involves a performance cost, in terms of the speed of screen redraws, it is recommended that the normal spray-pattern drawing is used while driving. Use of the coloured track marker, as used in the treatment map, should be used to view and print the results of the treatment. Step Action Response 1 While applying the treatment, The system draws the ensure that the Treatment layer treatment tracks over the rate for the product to be applied is map as black lines. the top layer, that the Rate map layer is present, switched on, and the bin is set to Auto mode. 2 When the product treatment is completed, switch off the rate map layer. The rate map disappears. 3 From the Main Menu, select The RATES menu is shown the Screen button. 4 Press the FARMTRAX User Manual button The Spray track changes to a colour display. Rate changes can be seen. Ver 2.0-Rev A Page 3-122 USING THE SATURN HX LAUNCHER 3.60 Using the Saturn HX Launcher The Saturn HX Launcher is only used on Saturn HX systems and does not appear in on the original FARMTRAX systems, unless they have been specifically modified by RINEX for HX operations. Figure 3-12 The Startup Window of the Launcher Overview: The Launcher buttons and their functions are listed below: Item Description Start FarmTRAX Tapping the Start FarmTRAX button will close the Launcher program and open the FarmTRAX software. Setup Options Tapping the Setup Options button will open the Launcher Main Window. See Section 3.60.1 for more details. FARMTRAX User Manual Ver 2.0-Rev A Page 3-123 USING THE SATURN HX LAUNCHER 3.60.1 Launcher Main Window Figure 3-13: The Launcher Main Window Overview: The Launcher buttons and their functions are listed below: Item Description Start FarmTRAX Tapping the Start FarmTRAX button will close the Launcher program and open the FarmTRAX software. Upgrade Software Tapping the Upgrade Software button will attempt to look on the USB storage device for an install folder. The Launcher will then proceed to copy any files in the install folder to the system. Reset Options Tapping the Reset Options button will display a set of reset options that can be selected. See section 3.60.2 for more details. Utilities Tapping the Utilities button will open a window from which a password can be entered. The correct password must be entered before the Utilities menu can be accessed. Please call RINEX if you wish to access the Utilities menu. The Utilities menu contains access to various troubleshooting utilities. See Section 3.60.3 for more details. Calibrate The Calibrate button allows the touch screen to be calibrated. The appropriate calibration program for your touch screen will be opened when the Calibrate button is tapped. Follow the onscreen instructions of the calibration program to calibrate your touch screen. Restart System Tapping the Restart System button will restart the system. FARMTRAX User Manual Ver 2.0-Rev A Page 3-124 USING THE SATURN HX LAUNCHER 3.60.2 Reset Options Figure 3-14: The Reset Options Window WARNING: Resetting the system will delete data on the system. Overview: Reset Options allows the system to be reset so that the factory settings are restored. The two reset options are explained below: Item Description Soft Reset Tapping the Soft Reset button will perform a soft reset on the system. Any data that has been recorded with the FarmTRAX software will be removed to a temporary folder for later analysis. All settings will remain on a soft reset. After a soft reset, the system will reboot. Hard Reset Tapping the Hard Reset button will restore the factory settings. All data that has been recorded with the FarmTRAX software will be deleted and all settings will be set back to the default factory settings. After a hard reset, the system will reboot. Back Tapping the Back button will return to the Launcher Main window. You will be asked to confirm the actions of either a soft or hard reset. FARMTRAX User Manual Ver 2.0-Rev A Page 3-125 USING THE SATURN HX LAUNCHER 3.60.3 Utilities Item Description Windows® Shell ® Tapping the Windows Shell button will display the Windows Shell interface ® from which Windows commands can be entered. To return to Launcher if ® the Windows Shell is opened simply type “Exit” using a keyboard. Toolkit Tapping the Toolkit button will open the Toolkit program for use with your GPS receiver. The Toolkit program will allow you to view the serial number of your GPS receiver and the expiry date. The supported GPS receivers for use with Toolkit are: Ag114, 3000L, G12 and GEM receivers. View GPS Tapping the View GPS button will display the current NMEA string being received from the GPS receiver. Use this tool to test the connection with the GPS receiver on the GPS port of the Interface Box. Back Tapping the Back button will return to the Launcher Main Window. FARMTRAX User Manual Ver 2.0-Rev A Page 3-126 USING GUIDANCE 4 Using Guidance A major feature of SprayTRAX is the ability to provide guidance to the operator enabling them to apply a treatment product a paddock in a systematic manner. In order to treat an entire paddock the operator will want to ensure that no areas are missed and minimize over lapping sprayed areas. Due to the never ending shapes of paddocks a number of different spraying techniques have been adopted. These techniques, as shown in figure 4.1 are summarized as follows. Parallel lines Straight lines which are parallel. Parallel Circles Concentric circles for centre-pivot areas. Racetrack Lines which are in an ever decreasing shape. The pattern is not necessarily a square or circle. Contour lines Lines which are parallel, however they are not straight. These lines are typically found around contour banks. Figure 4.1. Typical Spray patterns used in paddocks (i) Parallel lines (ii) Race track (iii) Contour lines (iv) Parallel circles It is not the intention of SprayTRAX to decide which method is superior as each operator has their own preferences as to which method they use. More importantly it should be noted that the operator can use any of these techniques, or a combination, for guidance in applying a treatment to a paddock. Guidance is provided to the operator using both the map screen and the light bar. Each device presents information to the operator which enables them to make decisions on which direction to travel and where to go next. The map screen provides a bird’s eye view from above. The map view clearly shows where the vehicle is and the direction it is heading. The spray trail shows which areas have already been treated and the area yet to be treated. A typical map screen with a spray trail is shown in figure 4.2. FARMTRAX User Manual Ver 2.0-Rev A Page 4-1 USING GUIDANCE Figure 4.2. The map screen display showing the vehicle moving in a south easterly direction having just passed the start point. The light bar provides a left-right indicator showing which way the operator must turn to get on to the correct alignment. The operator simply maneuvers the vehicle to either the left or right as indicated until the vehicle is on-line. A typical light bar display is shown in figure 4.3. Figure 4.3. The lightbar display showing the vehicle is on-line. If the vehicle veers off-line, the lightbar will display arrows indicating the direction (left or right) needed to steer to regain the guidance line. The number of arrows shows how far offtrack the vehicle is, unless the vehicle is over a preset distance off-line, after which a number is displayed, showing how many metres the vehicle is away from the guideline. Figure 4.4. The lightbar display showing the vehicle is between 1 and 2 metres to the left of the guideline. Figure 4.5. The lightbar display showing the vehicle is 5 metres off-line. The distances which determine the number of arrows which will be shown is configurable. Refer to section 3 for instructions on how to change from the default values. FARMTRAX User Manual Ver 2.0-Rev A Page 4-2 PARALLEL METHOD 4.1 Parallel Method Spraying a paddock using the parallel method is very simple. As previously described the parallel method is for straight lines only and consequently the first task is to set out a straight line to work from. This is easily achieved by defining one point at one end of the paddock and one at the other end and connecting the two points with a line. This is termed the base line. From the baseline the next parallel line is calculated to be across one swath width less half of the overlap distance. This is not important to the user as SprayTRAX automatically calculates these measurements for the user. A typical parallel spray pattern is shown in figure 4.6. Figure 4.6. Typical Spray pattern using parallel lines. Points “A” and “B” define the baseline for all other parallel lines. The points “A” and “B” should be as far apart as practical to minimize errors in determining the baseline. Ideally the points should be located prior to commencing spraying so that the actual spray pattern along the baseline is truly straight. Once the baseline is defined the operator simply needs to follow the indicators on the light bar to stay on-line. As one swath line is finished and the spray boom is turned off to turn back to start the next pass SprayTRAX will automatically increment to the next swath line. Swath lines can be sprayed in any order and the guidance will always be automatically selected for the appropriate line by SprayTRAX. Swath lines will not be missed as the spray trail on the map screen will always show exactly which areas have been treated and those areas remaining. Second Parallel Line. A second parallel line can be defined for guidance, and the user can swap from one line to the other while operating. To enable this feature, select "Use Spare A/B " from the second page of General Setup. To define points for the two lines, enter the two points for the first line as normal, then enter the points for the second line. When the "Points already defined" message appears, press OK to delete, then enter the points for the second line. (The first line will not be deleted.) To swap between lines when operating, press the POINT A button, then press OK, to swap to the other line. Deleting a line can only be done when all points have been defined. Note that when deleting, the points that are deleted are those for the line NOT currently selected and displayed. In order to use parallel guidance the following steps are taken from the main menu screen after startup. In this example it is assumed that the Guide Setup dialog window is showing Par=Parallel as the parallel guidance mode. (Section 6.32) FARMTRAX User Manual Ver 2.0-Rev A Page 4-3 PARALLEL METHOD Step Action 1 button to Press the activate the guidance menu. 2 Switch on the spray boom, for users without automatic boom controllers press the on the map screen after switching on the spray boom. Response Screen The guidance menu is displayed. The disappears from the appears screen and the with a spray trail appearing behind the position of the spray rig. 3 button when A Press the is displayed on the at an appropriate point to form map screen representing Point one end of the baseline. “A”. 4 button when A Press the is displayed on the at an appropriate point to form map screen representing Point the other end of the baseline. “B”. 5 button to Press the activate the parallel guidance. 6 A blue baseline connecting Points “A” and “B” is displayed on the map screen. The light bar is activated showing left or right indicators as required At the end of the swath line turn the spray boom off and turn The around for next swath line. disappears and is , the replaced by the spray trail is deactivated (Manual users can switch off the spray trail by pressing the if required). FARMTRAX User Manual Ver 2.0-Rev A Page 4-4 PARALLEL METHOD Step 7 Action Turn the spray boom back on as required to spray the next swath line. Response The Screen is replaced with and spray trail. A red parallel line appears as the next swath line. 8 Repeat steps 5 to 6 as The spray trail continues to necessary to complete spraying show areas sprayed. of paddock. FARMTRAX User Manual Ver 2.0-Rev A Page 4-5 RACE TRACK METHOD 4.2 Race Track Method The racetrack method of spraying a paddock is also very simple. The operator merely has to drive around the perimeter of the paddock as they would normally. Typically the outside perimeter would be governed by a fence line which dictates the shape of the paddock, this may be rectangular or some irregular shape. This is not important to SprayTRAX as the next swath line will be adjacent to the last swath by the distance of one swath width less half the overlap distance. Once again this is not important as SprayTRAX automatically calculates this for the operator. A typical racetrack spray pattern is shown in figure 4.7. Figure 4.7. Typical Spray pattern using racetrack Once the perimeter swath line is completed the vehicle moves towards the next swath line using the map screen for guidance. Once the spray rig comes alongside the last swath line (perimeter lap) the operator engages the racetrack guidance lock and then follows the indicators on the light bar to stay on-line. A blue guide line is displayed on the map screen indicating the line need to be followed. SprayTRAX will continue to automatically update the guide line as the vehicle moves around the paddock. The blue guide line will always be computed to be adjacent to the last swath line. Hence if the vehicle maneuvers around a tree the subsequent guide line will also show a deviation. Naturally the operator can choose to ignore this guide line and simply steer straight through. This is illustrated in figure 4.8. Figure 4.8. Typical guide line from racetrack guide lock In order to use racetrack guidance the following steps are taken from the main menu screen after startup. In this example it is assumed that the vehicle is moving as the spray trail does not change if the vehicle is stationary. FARMTRAX User Manual Ver 2.0-Rev A Page 4-6 RACE TRACK METHOD Step Action 1 button to Press the activate the guidance menu. 2 Switch on the spray boom, for users without automatic boom controllers press the Response The disappears from the on the map screen after switching on the spray boom. appears screen and the with a spray trail appearing behind the position of the spray rig. 3 Drive the perimeter lap of the paddock moving towards the next swath line when approaching the start. The spray trail is displayed showing where the spray rig has been. 4 Press the LOCK button when the spray rig is alongside the last swath line. The blue guide line appears on the map screen. The light bar is activated providing left-right guidance around the paddock 5 Continue driving around the paddock to spray the entire paddock. The blue guide line is continuously updated. The spray trail continues to be displayed showing areas sprayed. FARMTRAX User Manual Screen The guidance menu is displayed. Ver 2.0-Rev A Page 4-7 CONTOUR LINES METHOD 4.3 Contour Lines Method A contour line is a set of parallel lines which are not straight, the adjacent lines are parallel to each other, although they may be of any shape. The contour lines method is the same in operation as the racetrack method for spraying a paddock. The Guidance Lock button is used to lock on to an adjacent line, which is the contour line to be followed. The operator merely has to drive the first contour line in a paddock as they would normally. Typically this will be alongside a contour bank which dictates the pattern or shape of the contour line to be followed. Similar to before, SprayTRAX computes the next swath line adjacent to the last swath by the distance of one swath width less half the overlap distance. Once again this is not important as SprayTRAX automatically calculates this for the operator. A typical contour spray pattern is shown in figure 4.9. Figure 4.9. Typical Spray pattern using contour lines As the first contour swath line is completed the vehicle turns around to commence the next swath line using the map screen for guidance. Once the vehicle comes alongside the last swath line (first contour line) the operator engages the guidance lock and then follows the indicators on the light bar to stay on-line. A blue guide line is displayed on the map screen indicating the line need to be followed. At the end of the contour line the guidance is switched off. Then as the vehicle is turned around to commence the next contour swath line the guidance lock is once again engaged. This pattern is repeated until the paddock treatment has been completed. As with the racetrack guidance the blue guide line will always be computed to be adjacent to the last swath line. As shown previously if the spray rig maneuvers around a tree or some other feature the next line will show the same pattern. In order to use contour guidance the following steps are taken from the main menu screen after startup. In this example it is assumed that the vehicle is moving as the spray trail does not change if the vehicle is stationary. FARMTRAX User Manual Ver 2.0-Rev A Page 4-8 CONTOUR LINES METHOD Step Action 1 button to Press the activate the guidance menu. 2 Switch on the spray boom, for users without automatic boom controllers press the on the map screen after switching on the spray boom. Response Screen The guidance menu is displayed. The disappears from the appears screen and the with a spray trail appearing behind the position of the spray rig. 3 Drive the first lap of the contour bank, at the end of the swath disappears and is line turn the spray boom off and The turn around for next swath line. , the replaced by the spray trail is deactivated (Manual users can switch off the spray trail by pressing the 4 Turn the spray boom back on as required to spray the next if required). The is replaced with swath line. Press the and spray trail. A blue lock button to lock on to the last guide line appears as the next swath line. swath line. Use the light bar and map screen for guidance. 5 Drive along the contour line using the light bar for guidance. disappears and is At the end of the swath line turn The off the spray boom and press , the replaced by the spray trail is deactivated button. the (Manual users can switch off the spray trail by pressing the if required). 6 Repeat steps 4 to 5 as necessary to continue spraying in the paddock. FARMTRAX User Manual The spray trail shows which areas have been sprayed . Ver 2.0-Rev A Page 4-9 CENTRE PIVOT METHOD 4.4 Centre Pivot Method This method of guidance is designed for areas that have been laid out around a centre-spigot irrigation equipment, and are therefore circular in shape. The type of guidance provided for this type of area is a variation of the parallel method of guidance, however three points on the perimeter define the circle, instead of two points defining a line. Once the three points (A,B & C) are defined on the perimeter, the system calculates the required laps from the centre-point to the outside, using increments of the vehicle swath width. A typical parallel spray pattern is shown in figure 4.10. Figure 4.10. Typical Spray pattern using circular lines. The points “A” ,“B” and “C” should be as far apart as practical to minimize errors in determining the circle. Ideally the points should be located prior to commencing spraying so that the actual spray pattern along the baseline is accurate. Once the circle is defined the operator simply needs to follow the indicators on the light bar to stay on-line. As one lap is finished and the vehicle moves to the next, SprayTRAX will automatically increment to the nearest swath line. Swath lines can be sprayed in any order and the guidance will always be automatically selected for the appropriate line by SprayTRAX. Swath lines will not be missed as the spray trail on the map screen will always show exactly which areas have been treated and those areas remaining. In order to use circular parallel guidance the following steps are taken from the main menu screen after startup. FARMTRAX User Manual Ver 2.0-Rev A Page 4-10 CENTRE PIVOT METHOD Step 1 Action From the Main Menu, press 2 Press the button. 3 Press the button to accept the change and exit this option. 4 Response Screen The guide setup dialog window is shown. Button label changes to Par=Circle System returns to the GUIDE – MORE menu. The first guidance menu is displayed. Press the button to return to the first guidance menu. 5 Drive along the perimeter of the is displayed on the map A area to be treated. Press the screen representing Point “A”. button when at an appropriate position. 6 is displayed on the map A button Press the screen representing Point “B”. when at an appropriate position to form another point on the baseline. FARMTRAX User Manual Ver 2.0-Rev A Page 4-11 CENTRE PIVOT METHOD Step 7 Action 10 Screen is displayed on the map A button Press the screen representing Point “C”. when at an appropriate position to form another point on the baseline. button to Press the activate the parallel guidance. A blue baseline connecting Points “A” , “B” and “C” is displayed on the map screen. The light bar is activated showing left or right indicators as required Switch on the spray boom, for users without automatic boom controllers press the The on the map screen after switching on the spray boom. Zoom in as required. appears screen and the with a spray trail appearing behind the position of the spray rig. 8 9 Response At the end of the lap, turn the spray boom off and move into position for next swath line. The disappears from the disappears and is , the replaced by the spray trail is deactivated (Manual users can switch off the spray trail by pressing the if required). 11 Turn the spray boom back on as required to spray the next swath line. The is replaced with and spray trail. A blue parallel line appears as the next swath line. FARMTRAX User Manual Ver 2.0-Rev A Page 4-12 VIRTUAL ROAD (VR) GUIDANCE 4.5 Virtual Road (VR) Guidance Virtual Road guidance is an alternate way of presenting guidance information to the driver. It can be used with, or as an upgrade to the "arrow" information provided by the current lightbar, and can be used with either parallel line or lock guidance methods. VR information can also be shown on the touchscreen display. Virtual Road guidance information, as the name suggests, draws a virtual road on the screen in front of you, showing bends and turns in the path in front of the vehicle, and the vehicle's current position and direction with regard to the "road" ahead. Thus, advance warning is given of turns and bends, however slight they may be. On-screen VR Display When viewing VR information on the FARMTRAX touch-screen, the screen is split into two windows. The left window shows the VR information and the right shows the normal plot information. To activate the VR window, select the Virtual Road button from the GUIDE-MORE menu. A virtual road will be drawn in the new window when guidance is activated. Pressing the Virtual Road button again will remove the VR window and restore the normal display, to occupy the full screen. In the example below, the VR window shows the vehicle approaching a turn to the left. The vehicle can be seen to be just to the left of the guide centreline, shown by the blue triangle (representing the centre of the vehicle) being just to the left of the blue VR centreline. Fig 4.11 - Split-screen VR display FARMTRAX User Manual Ver 2.0-Rev A Page 4-13 VIRTUAL ROAD (VR) GUIDANCE The VR Display Layout The "Road" comprises three lines, one blue and two green. The blue line is the centreline of the required track to be directly on the guideline. The two green lines are guides to indicate how far the vehicle is off the centreline. The default distance represented by these green lines is two metres, and can be changed if required. The centre of the vehicle is represented by a blue triangle on the lower edge of the window. The virtual road guidelines are drawn over a grid of red lines, the size of which is also changeable, the default size being ten metres. Some examples of VR displays and their meanings follow: Correct direction, but 2m left of centreline Correct direction and on centreline On centreline, but direction is too far to the right FARMTRAX User Manual Correct direction, but 2m right of centreline On centreline, but direction is too far to the left Ver 2.0-Rev A Page 4-14 4.6 Using the Direction Guide window The Direction Guide window provides another means of indicating the current position of the vehicle, and moreover the direction of the vehicle with respect to the guideline or predefined point. Once the guideline has been activated, the window will indicate the bearing and distance in text at the top of the window, and a rotating arrow with "glidescope" bar graphically indicate the distance and bearing of the vehicle with respect to the guideline. FARMTRAX User Manual Ver 2.0-Rev A Page 4-15 FARMTRAX User Manual Ver 2.0-Rev A Page 4-16 5 The Menu System A menu displays a number of options for the user to choose from, to make the system react in a particular manner. Some choices will cause an immediate action whilst others will display another window, also called a dialog box. Some choices will lead to further menus, which are called sub menus. In this section the menus used in SprayTRAX are described in detail so that the user will know what to expect when a particular button is pressed. Where the selection of a particular menu option leads to a sub-menu or dialog window, a link is shown in brackets to the section of the manual which explains the next action. Note: The menu screens on your FARMTRAX system may not appear exactly as shown here, as each system is individually configurable. However, menus shown here contain the maximum number of options available, for completeness of information. FARMTRAX User Manual Ver 2.0-Rev A Page 5-1 MAIN MENU 5.1 Main Menu The main menu is the top level menu. This is the menu displayed when the system is first started. All of the choices, excepting one, presented in this menu lead to further menus. The OFF button is the only choice in this menu which will not lead to a further menu. Note: Map & Variable Rate capabilities are optional, and your system may not be configured to show these functions. Brings up the View menu with options for changing the scale of the map view, backdrop maps and application changes (Section 5.2). Brings up the Farm menu with options for entering the client or farm name, selecting and creating paddock layer information, etc (Section 5.6). All options concerned with guidance and the lightbar are selectable here. (Section 5.10). ) If GUIDANCE capabilities are not configured in your system, This icon will not appear All options concerned with variable rate applications are selectable under this sub-menu. (Section 5.14) If VARIABLE RATE capabilities are not configured in your system, This icon will not appear This option either shuts down the FARMTRAX program, or the entire operating system, thereby making the system ready to power down. (Section 6.1) The Saturn HX does not have the OFF button as shown. Refer to section 2.2.1 for instructions on shutting down the Saturn HX FARMTRAX User Manual Ver 2.0-Rev A Page 5-2 VIEW MENU 5.2 View Menu The View menu configures the map view for optimal viewing by the user. It is possible to magnify (zoom in) on the area where the vehicle is currently working showing greater detail. Conversely it is also possible to zoom out (expand) the map view to see a larger area with less detail. The Zoom In button causes the map view to be drawn at twice the scale so that everything is twice as large. The Zoom Out button causes the map view to be drawn at half the scale so that more area is shown on the screen but twice as small. The Zoom All button redraws the map view at the appropriate scale so that all data collected for this paddock fits onto the screen. The More button allows access to further View menu options (Section 5.3). The Back button returns the system to the main menu. FARMTRAX User Manual Ver 2.0-Rev A Page 5-3 VIEW - MORE MENU 5.3 View-More Menu This menu allows the configuration of less frequently accessed view information. This button raises a dialog window showing positional information given by the GPS receiver, and the tripmeter function. (Section 6.2) On-screen grids are activated and deactivated using this button. The Legend Bar, which runs along the lower part of the map screen, is activated and deactivated using this button. (Section 3.31) This button gives access to tools for measuring distances and areas on the map screen. (Section 5.5) The More button allows access to further View menu options (Section 5.4). The Back button returns the system to the View menu. FARMTRAX User Manual Ver 2.0-Rev A Page 5-4 VIEW - MORE - MORE MENU 5.4 View-More-More Menu This menu allows the configuration of less frequently accessed view information. The appearance of functions such as grid, keyboard, nose, and the selection of units are configured here. (Section 6.5) Backdrop maps are selected here. (Section 6.3) The application menu allows for the changing of FARMTRAX application, and the changing of Username, application options and Password. (Section 6.9 to 6.11) Product information, including software version, is displayed on selection of this item. (Section 6.4) The Back button returns the system to the View-more menu. FARMTRAX User Manual Ver 2.0-Rev A Page 5-5 TOOLS MENU 5.5 Tools Menu The Tools menu presents options for measuring and performing calculations on on-screen map information. The RULER tool shows distances and a bearing from point A to point B in a straight line. The POINT tool shows the total distance of a line with intermediate points. The AREA tool shows the area of an enclosed shape. The Back button returns the system to the View-more menu. FARMTRAX User Manual Ver 2.0-Rev A Page 5-6 FARM MENU 5.6 Farm Menu The Farm menu is used for entering details related to the farm and paddock. The information is stored in the systems database for future reference. The Farm button brings up a dialog window where a name can be defined to describe a group of paddocks or paddock treatments. (Section 6.12) In some cases this may be a farm name, a client name or even a farm and season. Dataset selection is also made here. The Paddock button brings up a window where a paddock or job can be selected, changed or created.(Section 6.13) The Layers button shows all the layers currently present for the paddock and allows selection of their display order. (Section 6.14) Brings up the vehicle menu with all options relating to the GPS equipped vehicle, including product selection, swath widths, antenna offsets etc (Section 5.8). The More button allows access to further Farm menu options (Section 5.7). The Back button returns the system to the Main menu. FARMTRAX User Manual Ver 2.0-Rev A Page 5-7 FARM – MORE MENU 5.7 Farm-More Menu The Farm-More menu allows the user to switch between GPS and View modes, and provides access to functionality which is only available in View mode. In View Mode the GPS data is disabled, allowing previous data to be viewed without the screen updating due to the arrival of a new GPS position. GPS mode is the normal mode of operation, where the input of new GPS position information is required. The appearance of the Farm-More menu will differ, depending on which mode is currently selected. 5.7.1 GPS Mode menu Pressing the View mode button forces the system into a view only mode. The GPS is inactive when the system is in this mode and it is not possible to use any guidance or navigation while in this mode.(Section 5.7.2) The Import button is disabled in GPS mode. To enable, switch to View Mode. The Export button is disabled in GPS mode. To enable, switch to View Mode. The Print button is disabled in GPS mode. To enable, switch to View Mode. The Report button is disabled in GPS mode. To enable, switch to View Mode. The Back button returns the system to the Farm menu. FARMTRAX User Manual Ver 2.0-Rev A Page 5-8 FARM – MORE MENU 5.7.2 View Mode menu Pressing this icon returns FARMTRAX to GPS mode (normal mode) (Section 5.7.1) Copies information from the external drive into the computer. (Section 3.28 & 3.30) Backdrop map files are also imported here. (Section 3.13) Copies information from the computer to the external drive. (Section 3.27 & 3.29) Brings up the Print Preview dialog showing exactly how the current paddock will look if printed. Selecting print from this screen will send the paddock to the printer.(Section 6.17) Produces a text-based summary report of paddock operations in all farms and paddocks.(Section 3.25) The Back button returns the system to the Farm menu. FARMTRAX User Manual Ver 2.0-Rev A Page 5-9 VEHICLE MENU 5.8 Vehicle Menu The Vehicle menu is used for entering and viewing details related to the vehicle, the GPS system, and any connected implement controllers. The information is stored in the systems database for future reference. The Product button brings up a window where the current product being carried in the vehicle, and applied to the paddock can be entered. (Section 6.18) The Swath button displays a window allowing the user to enter the swath width of the vehicle. For spray rigs the number of boom sections can also be entered and a width for each section. (Section 6.22) The Detail button displays a window providing details about the flow controller. As such it is dependent on the type of controller selected under the VEHICLE-MORE menu. The More button allows access to further Vehicle menu options (Section 5.9). The Back button returns the system to the Farm menu. FARMTRAX User Manual Ver 2.0-Rev A Page 5-10 VEHICLE - MORE MENU 5.9 Vehicle-More Menu The Vehicle-More menu allows information relating to the vehicle to be entered into the database. In particular the swath widths and measurements from points on the vehicle to the GPS antenna are entered in this menu. The Offsets button displays a window that allows entry of offsets from the GPS antenna to the steering point and the flow delivery point. These items are usually only selected once. (Section 6.24) The Flow Controller button allows selection of automated flow controllers which interface directly to the FARMTRAX system. A list of available flow controllers is presented for selection. (Section 6.25) The current vehicle driver is selected here. Changes can also be made to the list of vehicle drivers. (Section 6.26) The Back button returns the system to the Farm menu. FARMTRAX User Manual Ver 2.0-Rev A Page 5-11 GUIDE MENU 5.10 Guide Menu The Guide menu provides most of the functionality concerned with guidance operations, including selecting the guidance type (parallel, contour, racetrack, circular) and starting and stopping the guide lines. (Refer to Section 4 for details of using guidance) Pressing this button turns off both the on-screen guide lines and the lightbar readout. If no guide is activated then selecting this button has no effect. Pressing the lock guide button causes FARMTRAX to search for a previous path one swath width to the left or right of the current position. If a previous path is found, then a guide line is generated parallel to this line and drawn on the screen. The lightbar can then be used to provide steering information to allow the driver to keep on this line. Pressing the parallel guide button, sets up the parallel guide lines. For this function to work, the required number of points must have been previously selected using the POINT button. Upon selecting the POINT button, a marker will be draw on the screen at the current position. The second time the POINT button is selected, a second marker will be drawn. If the two buttons are less than 1.0m apart an error will be posted. Pressing this button after the required number of points have already been defined will raise a message asking whether or not to delete the already-defined points. The More button allows access to further Guidance menu options (Section 5.11). The Back button returns the system to the Main menu. FARMTRAX User Manual Ver 2.0-Rev A Page 5-12 GUIDE - MORE MENU 5.11 Guide-More Menu The Guide-More menu allows the user to set parameters for both guide lines and the lightbar. Calls up the LIGHTBAR menu which allows setting of information related to the lightbar (Section 5.12). Calls up a dialog with options related to the setting up of guide lines (Section 6.32). Activates the on-screen guidance direction window. (Section 6.36) Activates the Virtual Road guidance window. (Section 4.5) The Back button returns the system to the Guide menu. FARMTRAX User Manual Ver 2.0-Rev A Page 5-13 LIGHTBAR MENU 5.12 Lightbar Menu This menu allows changes to be made to lightbar operations. Brings up a dialog where the lightbar limits can be selected. That is, the offset values that cause the light bar arrows to be illuminated (Section 6.34). Brings up a dialog where the intensity of the lightbar can be selected (Section 6.35). The Back button returns the system to the Guide - more menu. FARMTRAX User Manual Ver 2.0-Rev A Page 5-14 APPLICATION MENU 5.13 Application Menu Whilst termed a “menu”, this facility is actually a dialog window, and as such, appears in Section 6 “Dialog Windows” of this manual FARMTRAX User Manual Ver 2.0-Rev A Page 5-15 RATES MENU 5.14 Rates Menu This menu is concerned with Variable Rate application of paddock treatments. Previously created rate maps are loaded to a vehicle bin with this option. (Section 6.41) Selecting this option brings up the Rate map Editor. Rate maps can be created or modified with this option. (Section 5.15) This icon activates and deactivates the bin status window, allowing further information to be shown about bin selection and usage. Press this icon again to close the window. (Section 6.44) Used when using manually-defined rates for product application, this option raises the Manual Rates sub-menu. (Section 5.16) Selection of this icon toggles the treatment layer from black & white to colour, and when in colour, rate differences can be seen. (The treatment layer must be the front layer!) The Back button returns the system to the Main menu. FARMTRAX User Manual Ver 2.0-Rev A Page 5-16 RATE MAP EDITOR MENU 5.15 Rate Map Editor menu Selection of this icon changes the cursor to a paintbrush, and allows the drawing of lines on a rate map. The brush width can be changed under SETUP and the applied colour by touching the Editor Legend bar. Selection of this icon allows for an area of the rate map to be flood-filled with the colour selected on the RATES Editor legend bar. Touching this icon will remove the effects of the last operation from the rate map image. It is used to remove mistakes from the image. Discrete rate values, and the colours which represent them are set up using this icon. (Section 6.38) The Paintbrush tool is configured under this option. (Section 6.40) The Back button returns the system to the Rates menu. FARMTRAX User Manual Ver 2.0-Rev A Page 5-17 MANUAL RATES MENU 5.16 Manual Rates menu This functionality is used on those occasions when it is required to set the rates manually, instead of being set automatically from a rate map. Note: Varying the rate using this menu will change the operating mode for a loaded bin from “Auto” to “Manual” Instructs the controller to increase the output rate by the step value. Instructs the controller to decrease the output rate by the step value. Raises the Flow Controller dialog window for the currently selected controller, showing the currently selected rates. Raises the Manual Rates Step dialog window, which allows the entry of the step value. (Section 6.45) The Back button returns the system to the Rates menu. FARMTRAX User Manual Ver 2.0-Rev A Page 5-18 6 Dialog Windows Dialog windows are windows that are raised as a result of a menu selection, and either display results of your earlier actions for confirmation, or allow you to enter or change information needed to complete an action (For example, entering a paddock name). The following pages list the dialog windows that can be raised in the SprayTRAX module, with a brief explanation of each. The Section references in brackets refer to the paragraph in section 5 of this manual, which deals with the menu option which was responsible for calling the dialog window in the first place. FARMTRAX User Manual Ver 2.0-Rev A Page 6-1 MAIN MENU/SHUTDOWN 6.1 Shutdown System This dialog window is shown after selecting the button from the main menu. Windows Pressing this button will only close the current FARMTRAX software module, leaving the operating system running. OK Pressing this button will close down the current FARMTRAX software module and the Windows 95™ operating system, returning the User to the “It is now safe to turn off your FARMTRAX” standard shutdown prompt. Cancel Pressing this button will cancel the shutdown and return the user to the main menu. The Saturn HX does not have the OFF button and consequently the Shutdown dialogue window will not be displayed on the Saturn HX. FARMTRAX User Manual Ver 2.0-Rev A Page 6-2 VIEW MENU/GPS DETAILS 6.2 GPS Details General details relating to the vehicle and satellite constellation are accessed from the View (more) menu (Section 5.3) by selecting the GPS button. The dialog window displays the following information, which is updated only when the vehicle is moving. Speed The current speed of the vehicle. Direction The current direction of the vehicle PDOP The positional dilution of precision (PDOP) is a qualitative measure of the accuracy of the GPS constellation. As an indication a value below 3 is considered to be good and greater than 10 is very poor and map drawing will be inaccurate. No Sats The number of satellites currently being tracked by the GPS system. A minimum of four satellites are required to provide positioning. Trip Distance The distance travelled since the last time this field was reset. (Shutting down FARMTRAX will also reset.) FARMTRAX User Manual Ver 2.0-Rev A Page 6-3 VIEW MENU/GPS DETAILS Reset Zeroes the Trip Meter. Next Toggles the Speed and Direction fields to show Altitude and Slope values. Altitude Displays the current height reading from the GPS. Slope Calculates the current inclination or declination in height, based on the height values. FARMTRAX User Manual Ver 2.0-Rev A Page 6-4 VIEW MENU/BACKDROP 6.3 Backdrop Map – Select File This window displays all backdrop maps which have previously been imported for the current farm, and allows for the selection of the map(s) to be used for the current paddock. The window is selectable from the View-more-more menu. (Section 5.4) Up The Up button is used to change the current selection in the list box. Down The Down button is used to change the current selection in the list box. OK The OK button saves the changes made and exits from the dialog window. Cancel The Cancel button deletes any changes made and exits from the dialog window. FARMTRAX User Manual Ver 2.0-Rev A Page 6-5 VIEW MENU/ABOUT 6.4 About FARMTRAX This window displays the version of the FARMTRAX module currently running. The version information appears in the window title bar at top of screen. (Section 5.4) OK The OK button closes the dialog window. FARMTRAX User Manual Ver 2.0-Rev A Page 6-6 VIEW MENU/GENERAL SETUP 6.5 General Setup The General Setup window allows the user to determine settings for various system-wide functions. The options are presented on two screens. Press the MORE and BACK buttons from within the windows to access both pages. 6.5.1 First Page Units Determines the measurement units that will be used when displaying information. Pressing this button raises the Units dialog window, (Section 6.6.) allowing the individual selection of measurement units for Length, Distance and Area. Grid Raises the Grid Select dialog window, (Section 6.7.) allowing the configuration of the onscreen grid. Keybd= This button determines the layout of the on-screen keyboard. Pressing the button will toggle the selection from Alpha (sequential ABC layout) to QWERTY. View This button activates the View Setup dialog window, (Section 6.8.) which changes the way in which layer information is selected and viewed. Nose Off/On Determines whether a "nose-cone" appears on the front of the Vehicle Position Marker. The nose-cone is an aid to viewing vehicle direction, on-screen. FARMTRAX User Manual Ver 2.0-Rev A Page 6-7 VIEW MENU/GENERAL SETUP Autolayer Pressing this button toggles the Autolayer function ON/OFF. When this function is ON, the system goes straight to the layer Details window whenever there is only one layer in the current selection. 6.5.2 Second Page More General Setup options are available on this page. Backup Drive The drive letter which has been assigned by your system to the external backup drive. Click on the My Computer icon on the Windows Desktop to see what letter has been assigned to your external drive. The drive must be connected to appear in the list. Backup = Determines the type of backup or restore operation that is carried out when the Import or Export menu buttons are selected. If set to Client, the operation is on a farm-by-farm basis. If set to Paddock, individual paddocks are transferred. Standard AB Determines whether one or two sets of lines can be defined when using parallel line guidance. Standard A/B allows only one set of A/B points to be defined. Use Spare A/B allows two lines to be defined. FARMTRAX User Manual Ver 2.0-Rev A Page 6-8 VIEW MENU/GENERAL SETUP User Treatments User Treatments setting uses the values entered for Total Area and Product in print reports. These values can be entered by the user. Meas Treatments uses the values calculated by the system for reports. Lightbar = Configures the system for the type of external lightbar that is connected to the Lightbar port. Available choices are >>>> for the standard "arrow and cross" type, and VR for the Virtual Road lightbars. PrintType = Changes the layout of text on page two and subsequent pages of print reports. Use Print Preview to slect the format that you prefer. FARMTRAX User Manual Ver 2.0-Rev A Page 6-9 VIEW MENU/GENERAL SETUP 6.6 Units Selected from the General Setup window, (Section 6.5) this window allows the selection of units, both metric and Imperial, for system measurements. Pressing the associated button for each measurement category allows the selection of relevant units. Length Displays the current setting for the Length unit. This unit is used in functions displaying short-to-medium length measurements, such as swath widths. Distance Displays the current setting for the Distance unit. This unit is used in functions displaying medium-to-long length measurements, such as Distances travelled by the vehicle. Area Displays the current setting for the Area unit. This unit is used when calculating the area of paddocks, sprayed areas etc. OK Accepts the current selections and returns to the previous window. Cancel Ignores any changes to the selections and returns to the previous window. FARMTRAX User Manual Ver 2.0-Rev A Page 6-10 VIEW MENU/GENERAL SETUP 6.7 Grid Setup Selected from the General Setup window, (Section 6.5) this window presents options related to the on-screen grid. Note: This window is used only to configure the grid sizing and labels – it does not activate/deactivate the grid display. Grid Size Pressing this button raises the numeric keyboard, to allow the entering of a value which will determine the spacing in metres between horizontal and vertical grid lines. Labels This toggle button determines whether or not Easting and Northing labels are displayed when the screen grid is activated. OK Accepts the current selection and exits from this dialog window. Cancel Discards the current selection and exits from this dialog window. FARMTRAX User Manual Ver 2.0-Rev A Page 6-11 VIEW MENU/GENERAL SETUP 6.8 View Setup The settings on this window determine how the paddocks for a farm are displayed, and whether filtering by job is enabled. Paddock The current setting for viewing paddocks. The selections are DISABLED, SELECTED and ALL. ♦ DISABLED The button to VIEW ALL paddocks does not appear on the Paddock dialog window. The system operates in SELECTED mode. ♦ SELECTED Individual paddocks can be selected and displayed. ♦ ALL All paddocks for a farm are displayed together on the map screen. Job The current setting for viewing layers with respect to their allocated job. The selections are DISABLED, SELECTED and ALL. ♦ DISABLED The JOBS button does not appear on the Paddock dialog window. The system operates as if in SELECTED mode, with the selected job = "NONE" ♦ SELECTED Only layers designated with the current job are displayed. ♦ ALL All layers are included regardless of job, (except "Recycle Bin"). OK Accepts the current selection and exits from this dialog window. Cancel Discards the current selection and exits from this dialog window. FARMTRAX User Manual Ver 2.0-Rev A Page 6-12 VIEW MENU/APPLICATIONS 6.9 Applications This screen was designed to graphically illustrate those applications which are available in the FARMTRAX suite of precision farming software and those which are configured in your particular system. It is designed to quickly and easily see which application is currently operating, while still providing access to related functionality, such as password maintenance. Further information on applications and password maintenance is available in Sections 3.2 and 3.33 of this manual. Applications Pictures The screen displays graphically those applications which are available in your FARMTRAX system, and the currently running application. The red diagonal slash indicates that that application is not available for use with the current Username and Password. If a picture without a slash is touched, then the system will restart, with the touched application as the currently operating application. The pictures shown above represent: SpreadTRAX SeedTRAX FARMTRAX User Manual SoilTRAX HarvestTRAX Ver 2.0-Rev A SprayTRAX MapTRAX Page 6-13 VIEW MENU/APPLICATIONS Password Select this button to change the system Username and Password. (Sections 5.4, 3.33) Options Allows the setting of optional menu items, such as MAPPING, GUIDANCE and VARIABLE RATES, through the Module Selection dialog window. OK The OK button saves the changes made and exits from the dialog window. Cancel The Cancel button deletes any changes made and exits from the dialog window. FARMTRAX User Manual Ver 2.0-Rev A Page 6-14 VIEW /APP MENU/OPTIONS 6.10 Module Select The password which has been entered onto the FARMTRAX system determines which options, such as VARIABLE RATE, FEATURE MAPPING and GUIDANCE appear on this dialog window for selection. If an available option is turned on, then that option will become available as an icon in the currently selected application’s Main menu. GUIDE, MAP, RATES These buttons toggle to the opposite state when pressed. When turned ON, the relevant functionality is provided from the Main menu. OK The OK button saves the changes made and exits from the dialog window. Cancel The Cancel button deletes any changes made and exits from the dialog window. FARMTRAX User Manual Ver 2.0-Rev A Page 6-15 VIEW /APP MENU/PASSWORD 6.11 Password This dialog window allows the changing of the system Username and Password. (Section 5.4). Name The registered username for the licenced user of this software. Press this button to raise the on-screen keyboard window and change the Username. Password The password which is registered to the licenced user of the software. Press this button to raise the on-screen keyboard window and change the password. OK The OK button saves the changes made and exits from the dialog window. Cancel The Cancel button deletes any changes made and exits from the dialog window. Warning! Do not attempt to change your username or password without reference to RINEX Technology. Incorrectly changing either field may leave your system in an inoperable state. FARMTRAX User Manual Ver 2.0-Rev A Page 6-16 FARM MENU/FARM 6.12 Farm The Farm dialog window is where a farm, owner, or client name can be selected, or created and saved into the FARMTRAX database. The window is accessed from the Farm button on the Farm menu (Section 5.6). The name is used in FARMTRAX so that many paddocks may be associated with one farm. The name could be a farm with a season to differentiate between seasons. Note: When this software is used on the Office PC, right-clicking with the mouse on any blank part of this window raises a Select window showing the serial numbers of other FARMTRAX boxes that you may own. Selecting another serial number allows access to the data from that FARMTRAX box. Farm/Owner/Client (List) The name of the current farm is shown in the top box. The list shows other names that can be selected. Up The Up button is used to change the current selection in the Farm/Owner/Client list box. Down The Down button is used to change the current selection in the Farm/Owner/Client list box. New The New button is used to activate the on-screen keyboard (Section 6.27) which allows the user to enter the name of a new farm, owner or client. The name is typed in from the onscreen keyboard and the user then presses OK which returns them to this dialog window. FARMTRAX User Manual Ver 2.0-Rev A Page 6-17 FARM MENU/FARM Change The Change button activates the on-screen keyboard (Section 6.27) with the current farm name, so that it may be edited. After entry the user presses OK to return to this dialog window. Dataset If more than one dataset exists, this button will appear, giving the ability to access data in the other datasets. The button label shows the current dataset. OK The OK button saves the changes made and exits from the dialog window. Cancel The Cancel button deletes any changes made and exits from the dialog window. FARMTRAX User Manual Ver 2.0-Rev A Page 6-18 FARM MENU / PADDOCK 6.13 Paddock The Paddock dialog window is where a paddock name can be selected, or created and saved into the FARMTRAX database. The window is accessed from the Paddock button in Farm menu (Section 5.6). Paddock Name (List) The name of the current paddock is shown in the top box. The list shows other names that can be selected. Up The Up button is used to change the current selection in the Paddock Name list box. Down The Down button is used to change the current selection in the Paddock Name list box. New The New button is used to activate the on-screen keyboard (Section 6.27) which allows the user to enter the name of a new paddock. The name is typed in from the on-screen keyboard and the user then presses OK which returns them to this dialog window. Change The Change button activates the on-screen keyboard (Section 6.27) with the current paddock name, so that it may be edited. After entry the user presses OK to return to this dialog window. FARMTRAX User Manual Ver 2.0-Rev A Page 6-19 FARM MENU / PADDOCK View All Pressing this button changes the paddock view mode from Selected to All. Data from layers in all paddocks of the currently selected farm is displayed on the map screen. This feature is optional. To disable this option, set the Paddock setting in GENERAL SETUP to DISABLED. If the setting is DISABLED, the View All button will not appear. Job After pressing this button, the select list displays jobs that already exist in the system, instead of paddocks. Selecting a job from the list will make that job the current job. Layers subsequently created, will have this job assigned to them. To view layers with this job only, the Job View setting in GENERAL SETUP must be set to SELECTED. The selected job will appear after the paddock name at the top of the map-screen. If the setting is DISABLED, the Job button will not appear. OK The OK button saves the changes made and exits from the dialog window. Cancel The Cancel button deletes any changes made and exits from the dialog window. FARMTRAX User Manual Ver 2.0-Rev A Page 6-20 FARM MENU / LAYERS 6.14 Select Layers This window shows the Summary information for the layers which are enabled by the General Setup - View setting. (Refer section 6.8). Details of the currently selected layer can be accessed, the layer order can be changed, and layers deleted. Layer No (Push Button) This button shows the ID number of this layer. Pushing the button increments the layer number and the name of the layer is shown. Total Layers (Text) This button shows the total number of layers available for this paddock. Details (Push Button) Pressing this button will provide detailed information on the selected layer. On/Off The display state of the selected layer. If this button is pressed, the display state will toggle. When in the OFF state, the layer will not be shown on the map-screen. Operation Name (Text) The type of layer shown is displayed as a text field. (Treatment) If the layer has an associated “Product” (Sprayprod), then this is displayed below the layer description. Date The date that the layer was created is shown here. FARMTRAX User Manual Ver 2.0-Rev A Page 6-21 FARM MENU / LAYERS Del Pressing this button will effectively delete the layer, by assigning it to the Recycle Bin job. Paddock The paddock with which the layer is associated is shown here. Bring to Front Pressing this button makes the displayed layer the front, or top layer. OK The OK button saves the changes made and exits from the dialog window. FARMTRAX User Manual Ver 2.0-Rev A Page 6-22 FARM MENU/LAYERS/DETAILS 6.15 Layer Details Pressing the DETAILS button from the Edit Layers window will display details of the selected layer. This information will vary depending on the layer type. The layout of the different layer types are shown in the following sub-sections, together with a table to describe the various fields. Explanation of Edit Notes: No No Editing of this field is allowed. Yes Pressing the button raises the on-screen numeric keyboard. To revert to the calculated figure, enter zero (0) from this keyboard. Update Pressing the EDIT button updates this field to the value which is currently set for the vehicle. Toggle Pressing the EDIT button toggles this field to the opposite state. The layer information is retained in the FARMTRAX database so that it may be viewed at any time. Changing values in layers for PRODUCT or SWATH only makes changes to data that has already been collected. If you want to change parameters for data that is yet to be collected, change the parameter in the VEHICLE menu. A new layer will be created that matches the changed parameters. FARMTRAX User Manual Ver 2.0-Rev A Page 6-23 FARM MENU/LAYERS/DETAILS 6.15.1 Treatment Layer (SpreadTrax, SprayTrax, Seedtrax) The Treatment layer contains plot information about a particular spraying, spreading or seeding operation. Application rates are also stored in this layer. Associated with each treatment layer is one or more Products. These products are the Vehicle Products current at the time of creation of this layer. The information may be viewed either during the field operation or after the paddock has been completed. Details are grouped into separate windows. Each window is opened by selecting the "tags" running across the top of the window.. The default window is the AREA window. FARMTRAX User Manual Ver 2.0-Rev A Page 6-24 FARM MENU/LAYERS/DETAILS The first three windows - AREA, PRODUCT and RATE are similar in layout, and the values displayed therein are inter-related. The TOTAL figure in each case can be edited, if required, and this will change the appropriate fields in other windows. AREA Total (EDIT: Yes) This field is either calculated from the first lap of the paddock operation, or can be manually entered. This value also affects the PRODUCT and RATE windows. (e.g. Increasing the Total area to be treated will increase the Total Product required.) Treated This field is calculated by the system, and is automatically updated as more of the paddock is treated. To Go The area still to be treated is displayed here. It is calculated as the Treated Area subtracted from the Total Area . Overlap This figure shows the swath overlap, (as entered in GUIDE - GUIDE OPTIONS) expressed as a percentage of the total swath width. It is not calculated from the plotted data. FARMTRAX User Manual Ver 2.0-Rev A Page 6-25 FARM MENU/LAYERS/DETAILS PRODUCT Total (EDIT: Yes) This field shows either the Total product required to treat the total area reported in the previous screen, or values can be manually entered. Changing this value also affects the RATE window. (e.g. Increasing the total amount of product to be applied will increase the Total Rate required.) Treated Shows the amount of product that has been applied to the paddock. This field is calculated by the system, and is automatically updated as more of the paddock is treated. To Go The amount of product still to be applied is displayed here. It is calculated as the Treated Product subtracted from the Total Product amounts. Product (EDIT: Yes) This button displays the selected product for the layer, and allows for the product or product details to be changed for the layer. If more than one product is currently selected for this layer, the word Cocktail will be shown. FARMTRAX User Manual Ver 2.0-Rev A Page 6-26 FARM MENU/LAYERS/DETAILS RATE The RATE window presents information about the rate of application of the product. Total (EDIT: Yes) Displays the specified rate of application of the product. Pressing the Total button allows for keyboard entry of the required rate. Treated Displays the average application rate of the product, over the treated area. To Go Shows the rate required to treat the remaining area, to achieve the specified rate entered in Total, over the total area of the layer. FARMTRAX User Manual Ver 2.0-Rev A Page 6-27 FARM MENU/LAYERS/DETAILS INFO The INFO window presents ancillary information about the paddock operation, such as weather, the driver, vehicle swath width, and job number (if any). Job The job assigned to this layer is shown here. Pressing the JOB button allows the job for this layer to be changed. Swath The swath width for this layer is shown here. The swath width is taken from the vehicle settings, at the time that the layer was created. Pressing the SWATH button allows the swath width value for this layer only to be changed. NOTE: If you change this field away from that which is the current vehicle setting, new data will not be written to this layer. Either a new layer will be created, or data will be written to any existing layer which matches the current vehicle settings for Product and Swath. Driver The driver who carried out this operation can be assigned here. Press the DRIVER button to select or change drivers on the list of drivers. Weather/Date The date that the layer was created is shown here. Pressing the WEATHER button raises the Weather dialog window, which allows the entry and display of weather-related information associated with the paddock operation. FARMTRAX User Manual Ver 2.0-Rev A Page 6-28 FARM MENU/LAYERS/DETAILS Active/Closed This button displays whether the layer is currently in the ACTIVE or CLOSED state for the addition of new data to the layer. Pressing the button will change the state. FARMTRAX User Manual Ver 2.0-Rev A Page 6-29 FARM MENU/LAYERS/DETAILS DISPLAY The DISPLAY window shows details which affect how the layer is shown on the screen. The Controller which was selected for this layer is also shown, together with the FARMTRAX application which created the layer. Line Type Determines how the plot data is shown on the screen. Pressing this button raises a select window with the choices shown in a list. Attribute Determines which attribute of the collected data is shown on the map screen. For example, either yield or moisture can be shown for harvest data, and target or actual values for spray data. Where multiple bins are used, this button may be used to select the data relevant to a particular bin.1 Legend Pressing this button will allow the displayed legend for this layer to be changed. The values originally set for the layer legend are those of the product shown in the PRODUCT window. For this legend to be shown on the map screen, the layer must be the front layer for the paddock. 1 Functionality is dependent on the capabilities of the selected controller. FARMTRAX User Manual Ver 2.0-Rev A Page 6-30 FARM MENU/LAYERS/DETAILS 6.15.2 Photomap Layer This window presents information about any photomap or image loaded to the system as a Backdrop map Filename The filename of the photomap or backdrop map. OK The OK button exits from the dialog window. FARMTRAX User Manual Ver 2.0-Rev A Page 6-31 FARM MENU/LAYERS/DETAILS 6.15.3 Soil Sample Layer (MAP option) The soil sample layer details dialog shows the information pertaining to each soil sample. The values contained in each field of each sample can be seen by selecting the field and the individual sample number. Sample ID (Push Button) The sample ID number of the soil sample. This is a consecutive number assigned to each soil sample within a paddock. It is not the same as the unique lab number assigned to the sample. If a sample has been previously selected (from the touch screen) then this sample will be shown. If none has been selected then sample number will be set to one. Pressing the ID button increments to the next sample. Field Label (Push Button) There are many fields collected in a soil sample analysis. The name of the field currently displayed for a sample point is displayed along with the index number of the field within the sample. Pressing the Field label increments the field value and information for the next field is then displayed. Field Value (Text Box) The field value displays the value for the currently displayed soil sample field. Edit (Push Buttons)2 Used to perform functions on individual soil samples from the layer. 2 Not active in this version. FARMTRAX User Manual Ver 2.0-Rev A Page 6-32 FARM MENU/LAYERS/DETAILS OK/Cancel Allows the user to accept/cancel changes made. FARMTRAX User Manual Ver 2.0-Rev A Page 6-33 FARM MENU/LAYERS/DETAILS 6.15.4 Waypoint Layer (MAP option) The layer details dialog for waypoints is similar to that for soil samples, except that there are fewer fields available for selection. Waypoint ID (Push Button) The ID number of the waypoint. This is a consecutive number assigned to each waypoint within a paddock. If a waypoint has been previously selected (from the touch screen) then this waypoint will be shown. If none has been selected then the waypoint ID will be set to one. Pressing the ID button increments to the next waypoint. Field Label (Push Button) The name of the field currently displayed for a waypoint is displayed along with the index number of the field within the waypoint. Pressing the Field label increments the field, and information for the next field is then displayed. Field Value (Text Box) The field value displays the value for the currently displayed soil waypoint field. Edit (Push Buttons)3 Used to perform functions on individual waypoints in the layer. 3 Not active in this version. FARMTRAX User Manual Ver 2.0-Rev A Page 6-34 FARM MENU/LAYERS/DETAILS OK/Cancel Allows the user to accept/cancel changes made. FARMTRAX User Manual Ver 2.0-Rev A Page 6-35 FARM MENU/LAYERS/DETAILS 6.15.5 Boundary Layer (MAP Option) The boundary layer contains information about any defined boundaries for the current paddock. Boundaries can be created around discrete areas, and their area value either subtracted or added to the total area of the paddock, to more accurately define areas for spraying or spreading operations4. Boundary Number (Push Button) The number of the boundary. This is a consecutive number assigned to each boundary within a paddock. If a boundary has been previously selected (from the touch screen) then this boundary will be shown. If none has been selected then the boundary will be set to one. Pressing the Boundary Number button increments to the next boundary. Field Label (Push Button) The name of the field currently displayed for a boundary is displayed along with the index number of the field within the boundary. Pressing the Field label increments the field, and information for the next field is then displayed. Field Value (Text Box) The field value displays the value for the currently displayed boundary field. Edit (Push Buttons)5 Used to perform functions on individual boundaries in the layer. 4 Not active in this version 5 Not active in this version FARMTRAX User Manual Ver 2.0-Rev A Page 6-36 FARM MENU/LAYERS/DETAILS OK/Cancel Allows the user to accept/cancel changes made. FARMTRAX User Manual Ver 2.0-Rev A Page 6-37 FARM MENU/LAYERS/DETAILS 6.15.6 Rate map Layer (RATES option) This window presents detail information on rate maps. Field Label (Push Button) The Index Number and Title of the field currently showing in the Field Value window is displayed. Pressing the Field Label button increments to the next field, and information for that field is then displayed. Fields available for Rate map layers are: Index Title Edit Note 1. Description 1 Application No 2 Product No The filename and path of the Rate map storage location. 3 Total Area No Calculated area of entire rate map 4 Total Product No Calculated amount of product needed to treat the calculated area at the specified rates. 5 Ave Rate No Average Rate of application over the entire rate map. Permanently set to “Rate map” Field Value (Text Box) The field value displays the value for the currently displayed layer field. FARMTRAX User Manual Ver 2.0-Rev A Page 6-38 FARM MENU/LAYERS/DETAILS Edit (Push Button) Used to perform functions on individual fields in the layer. OK The OK button saves any changes made and exits from the dialog window. Cancel The Cancel button exits from the dialog window. FARMTRAX User Manual Ver 2.0-Rev A Page 6-39 FARM VIEW MODE MENU/IMPORT-EXPORT WINDOWS 6.16 Import/Export Farm Windows These two windows only appear if the Backup mode has been set in General Setup to the Client option. The appearance and functionality of these windows is described in Section 3 of this manual. FARMTRAX User Manual Ver 2.0-Rev A Page 6-40 FARM/VIEW MODE MENU/PRINT 6.17 Print A map similar to that shown on the map screen may be printed on any Windows® 95 compatible printer. The Print button displays a screen showing a preview of the report to be printed. The Print button is accessed from the Farm View Mode menu (Section 5.7.2.). First Page of a Report The print preview will show a map similar to that of the map screen, and changes made to the display of layers on the screen will also affect the printed map. Other information about the paddock is also printed, on the reverse, or second sheet, which is accessible by pressing the Next Page button. (The layout of information on subsequent pages can be changed from the General Setup window) To zoom in or out on the preview page, press the associated button at the top of the screen, or to zoom in on a particular part of the preview, simply touch the screen over the area to be zoomed. After reaching the maximum magnification, the next touch will restore the view to normal magnification. FARMTRAX User Manual Ver 2.0-Rev A Page 6-41 FARM/VIEW MODE MENU/PRINT Second Page of a Report In order to print the report it is first necessary to have the Windows® 95 software correctly configured for your particular printer. If unsure, the user should contact RINEX for information on how to configure the system. Assuming that the printer is installed and correctly configured for use with FARMTRAX, then the Print button on the top left side of this dialog window will initiate the report to be printed. Pressing the Close button closes this dialog window and returns to the Farm Setup View Mode menu. A standard Windows® 95 dialog window will be displayed as shown below. This confirms the printer selection and allows the user to configure the number of pages to print. FARMTRAX User Manual Ver 2.0-Rev A Page 6-42 FARM/VIEW MODE MENU/PRINT OK The OK button starts the printer and exits from the dialog window. Cancel The Cancel button exits from the dialog window. FARMTRAX User Manual Ver 2.0-Rev A Page 6-43 FARM MENU/VEHICLE/PRODUCT 6.18 Vehicle Product Dialogs When the vehicle is being loaded with a product it should be recorded by the system so that it may be referenced to the paddock being treated. The treatment product is shown on the printed report (Section 6.17) for historical record keeping. The treatment details for a paddock may be viewed at any time from the Layer Details dialog window (Section 6.15). 6.18.1 The Cocktail window For SprayTRAX users, who may be using a "cocktail" of spray chemicals in the tank, each separate product component, including water, can be specified in the Cocktail window. In addition to displaying each component of the tank, calculations of product usage can be made. Product number & Name Displays the number of the product, the total number of products in the "Cocktail" and the name given to the product. In this case, the product is 2,4-D , the total number of products specified is two, and this product is number one. Pressing this button will display product two, and cause the calculation buttons to display figures related to that product. Add Add a product to the "Cocktail". Pressing this button raises the Product Select dialog window, where individual products can be created, specified and modified. (Refer section 6.18.2) Each product added to the cocktail increases the total number of products shown. Batch Details In this section, the product Batch Number and Batch Date can be entered in the respective fields. Pressing the arrow to the right of the displayed default date raises the Calendar window. (Refer to Section 6.31) FARMTRAX User Manual Ver 2.0-Rev A Page 6-44 FARM MENU/VEHICLE/PRODUCT Delete Remove the currently displayed product from the "Cocktail". Pressing this button decreases the total number of products by one. Per Area value Displays the value for the amount of product to be applied. Pressing this button will raise the numeric keyboard, where the relevant value can be entered. This figure is used to calculate projected total product requirements, for the total area of the treatment. Boom Rate value Displays the value for the rate of application of all products including water. Pressing this button will raise the numeric keyboard, where the relevant value can be entered. OK The OK button saves any changes made and exits from the dialog window. FARMTRAX User Manual Ver 2.0-Rev A Page 6-45 FARM MENU/VEHICLE/PRODUCT 6.18.2 The Product Select window. In this window, individual products are created, modified or selected. Only products relevant to the current application are shown in the list. Product (List) The name of the current product is shown in the top box. The list shows other names that can be selected. Up Moves the highlighted bar to select the names of the product from the current list. Down Moves the highlighted bar to select the names of the product from the current list. New The New button is used to enter a new product. The name and other product details are entered in subsequent on-screen windows. Change This button is used to make changes to the details of the presently highlighted product. OK The OK button saves the changes made and exits from the dialog window. FARMTRAX User Manual Ver 2.0-Rev A Page 6-46 FARM MENU/VEHICLE/PRODUCT Cancel The Cancel button deletes any changes made and exits from the dialog window. FARMTRAX User Manual Ver 2.0-Rev A Page 6-47 FARM MENU/VEHICLE/PRODUCT 6.19 Product Details This window is raised as a result of pressing either NEW or CHANGE from the Product Dialog window (Section 6.18.2), and allows changes to be made to the various properties of the selected product. Product Name Currently set to “New Product”, this field allows the entry of a new or changed name for the product. Units Displays the currently selected unit for the product. Pressing this button raises a further window which allows for the Unit Type, Unit and Density to be entered. (Section 6.20) Legend Pressing this button raises the Legend dialog window (Section 6.29), to set the default legend values for this product. OK The OK button saves the changes made and exits from the dialog window. Cancel The Cancel button deletes any changes made and exits from the dialog window. FARMTRAX User Manual Ver 2.0-Rev A Page 6-48 FARM MENU/VEHICLE/PRODUCT 6.20 Product Unit Called as a result of pressing the Unit button in the Product Detail window (Section 6.19), this window allows the setting of the UNIT, UNIT TYPE and DENSITY values for the product. Unit Allows the selection of unit (Kg,Lb,) for the product, relevant to the Unit Type selected. Unit Type Determines whether the product is measured by Mass or Volume. Density Allows for a density scaling factor of other than 1.0 . OK The OK button saves the changes made and exits from the dialog window. Cancel The Cancel button deletes any changes made and exits from the dialog window. FARMTRAX User Manual Ver 2.0-Rev A Page 6-49 FARM MENU/VEHICLE/PRODUCT 6.21 Unit Select In this window, the actual measurement units are selected for the product. The setting of the Unit Type field in the PRODUCT UNIT window determines whether units for mass or volume are presented for selection. Mass Volume Up Moves the highlighted bar upwards through the list of choices for selection. Down Moves the highlighted bar downwards through the list of choices for selection. OK The OK button accepts the selection and exits from the dialog window. Cancel The Cancel button ignores the selection and exits from the dialog window. FARMTRAX User Manual Ver 2.0-Rev A Page 6-50 FARM MENU/VEHICLE/SWATH 6.22 Vehicle Swath The swath width of the spray boom is entered in this dialog window, which is accessed from the VEHICLE-MORE menu (Section 5.9). If the spray boom has multiple sections then the boom width of each section may also be entered. This function is particular useful for spray booms with automated controllers as SprayTRAX records exactly which boom sections are operational. The spray boom controller must be selected from the available flow controllers (Section 6.24) Swath = XXXX The total swath width of the spray boom is displayed, if multiple sections are used then the sum of these sections are displayed. Additionally the sections are graphically displayed for a quick reference. Section X of Y This line is only present in SprayTRAX if multiple sections are being utilized. Please contact RINEX if multiple sections are required for a particular spray rig. It shows the section currently selected (X,) and the total number of sections defined (Y,) . The width of the current selection is shown in the entry window below, which is edited with the CHANGE button. If the spray boom has multiple sections, pressing the left hand (X) button selects the next boom section. To edit the number of boom sections press the right hand (Y) button to select the boom sections dialog window (Section 6.23). Change the number of boom sections BEFORE entering individual section widths. Changing the number of sections causes all individual boom section widths to be reset to the default value. FARMTRAX User Manual Ver 2.0-Rev A Page 6-51 FARM MENU/VEHICLE/SWATH Change To change the swath width of any section press the Change button to activate the numerical keyboard (Section 6.28) where the width may be entered. OK The OK button saves the changes made and exits from the dialog window. Cancel The Cancel button deletes any changes made and exits from the dialog window. FARMTRAX User Manual Ver 2.0-Rev A Page 6-52 FARM MENU/VEHICLE/SWATH/BOOM SECTIONS 6.23 Boom Sections If your spray rig has more than one boom section, enter the total number of sections here. This window is called by pressing the Y button in Section X of Y in the previous Vehicle Swath dialog window. (Section 6.22) Note: Changing the total number of boom sections will require all section widths to be reentered. No Sections (Display Field) This field displays the number of sections selected. Up Increase the number of sections shown in the No Sections display field by one. Down Decrease the number of sections in the No Sections by one. OK The OK button saves the changes made and exits from the dialog window. Cancel The Cancel button deletes any changes made and exits from the dialog window. FARMTRAX User Manual Ver 2.0-Rev A Page 6-53 FARM MENU/VEHICLE/OFFSETS 6.24 Offsets The true point being monitored with a GPS guidance system is the actual GPS antenna. However it is unlikely that the antenna will be mounted directly over the spray boom, hence it is necessary to measure offset distances from the antenna to the spray boom. In addition to this it is also desirable to have the guidance system responding to the steering axle of the vehicle as this is the point which will initially respond to any steering deviations. Finally if the GPS antenna is not mounted on the central axis of the spray rig then an offset distance can be entered into the system. The last adjustment to the system is for a time delay which can be used to compensate for GPS reporting, and flow controller change delays. All of these measurements may be entered into the SprayTRAX system from the VEHICLE-MORE menu (Section 5.9). Long Track (Steering) This is the distance between the GPS antenna and steering point of the vehicle. The steering point of the vehicle is usually near the driver. It is the point displayed on the map as the vehicle. Cross Track The cross track distance is the distance from the GPS antenna to the line along the centre of the vehicle. This distance is very important if the GPS antenna is on one side of the vehicle and parallel guides are used. The offset is negative if the antenna is located on the left-hand side of the vehicle. Time Delay There is a small time delay between when a GPS position measurement is made and when it is displayed on the screen. During this time (usually a fraction of a second) the vehicle has moved a small amount. A correction can be applied to account for this by multiplying the velocity of the vehicle by this delay error and adjusting the plotted position. This field can FARMTRAX User Manual Ver 2.0-Rev A Page 6-54 FARM MENU/VEHICLE/OFFSETS also be used to compensate for delays introduced by the flow controller and physical characteristics of product delivery. Long Track (Flow) The distance between the GPS antenna and the spray boom as measured along the centreline of the vehicle to the spray boom. This is where the spray trail is plotted on the map screen. OK The OK button saves the changes made and exits from the dialog window. Cancel The Cancel button deletes any changes made and exits from the dialog window. FARMTRAX User Manual Ver 2.0-Rev A Page 6-55 FARM MENU/VEHICLE/FLOW CONTROLLERS 6.25 Flow Controller A number of spray boom controllers now provide an electronic interface which can be used by SprayTRAX to detect certain aspects of the spraying operations. Functionality varies according to the capabilities of the controller. The flow controllers may be entered into the SprayTRAX system from the VEHICLE-MORE menu (Section 5.9). New flow controllers are added to the SprayTRAX system as available, a check should be made with RINEX for the latest list of controllers available. Available flow controllers The name of the current flow controller is shown in the top box. The list shows other names that can be selected. Only controllers relevant to the current application are shown. Up Moves the highlighted bar to select the name of the flow controller from the current list. Down Moves the highlighted bar to select the name of the flow controller from the current list. OK The OK button saves the changes made and exits from the dialog window. Cancel The Cancel button deletes any changes made and exits from the dialog window. FARMTRAX User Manual Ver 2.0-Rev A Page 6-56 FARM MENU/VEHICLE/DRIVER 6.26 Driver Changes to the list of drivers are made from this window, which is raised from both the FARM-VEHICLE-MORE menu, (Section 5.9) and by pressing DRIVER in the INFO window of LAYER-DETAILS for treatment layers. (Section 6.15.1.) By highlighting a different driver in the list, either the current vehicle driver is defined, or if raised from within a layer, the driver for that layer is changed. The CHANGE button allows changes to the entries in the list. NOTE: If changes are made to an entry which has been previously selected for a treatment layer, then any changes made here will also be seen in the layer. Up Moves the highlight bar up one entry in the list Down Moves the highlight bar down one entry in the list Change Raises the alphanumeric keyboard, allowing changes to be made to the name for the currently highlighted option. OK Accepts any changes and exits from the window Cancel Ignores any changes and exits from the window. FARMTRAX User Manual Ver 2.0-Rev A Page 6-57 VARIOUS MENUS/KEYBOARD 6.27 Alphanumeric Keyboard The Keyboard dialog window is activated typically after pressing New or Change in a previous dialog window. The keyboard is used to enter alphanumerical data, such as a farm name into the FARMTRAX database. The keyboard is arranged in either alphabetical order, or QWERTY order, for ease of use. Text typed into the system is displayed in the top left hand entry window. Buttons A-Z, 0-9, -, # Pressing any of these buttons will place the respective character in the entry window. Pressing the key twice will cause two characters to be displayed in the entry window. In the above dialog window ROAD is entered by pressing the R button, then the O button, then A button, then D button. SPACE Pressing the SPACE button will place a space at the current position in the entry window. BACK Pressing the BACK button will delete the last character in the entry window. CLEAR Pressing the CLEAR button deletes all characters from the entry window. OK The OK button saves the changes made and exits from the dialog window. Cancel The Cancel button deletes any changes made and exits from the dialog window. FARMTRAX User Manual Ver 2.0-Rev A Page 6-58 VARIOUS MENUS/KEYBOARD 6.28 Numerical Keyboard The numerical keyboard dialog window is activated typically after pressing New or Change in a previous dialog window. The keyboard is used to enter numerical data, such as an offset distance into the FARMTRAX database. Whatever text is typed into the system is displayed in the top left hand entry window. Buttons 0-9 Pressing any of these buttons will place the respective number in the entry window. Pressing the key twice will cause two numbers to be displayed in the entry window. “+/-“ Pressing the “+/-“ key toggles whether the value entered is positive or negative. A –ve sign is displayed when the value is negative, no sign is show when positive. “.” Pressing the “.” (decimal point) button will place a decimal point in the entry window. CLR Pressing the CLEAR button deletes all characters from the entry window. BACK Pressing the BACK button will delete the last character in the entry window. FARMTRAX User Manual Ver 2.0-Rev A Page 6-59 VARIOUS MENUS/KEYBOARD OK The OK button saves the changes made and exits from the dialog window. Cancel The Cancel button deletes any changes made and exits from the dialog window. FARMTRAX User Manual Ver 2.0-Rev A Page 6-60 VARIOUS MENUS/LEGEND 6.29 Legend The Legend appears as a bar across the lower part of the map screen. (It is not visible in some applications). The purpose of the legend is to relate displayed colours on a map to actual values. This dialog window allows the customisation of the colours displayed for a range of values in a displayed map. When called from the Layer Details dialog window of the FARM menu, it is used to configure the displayed legend for a layer. When called from the Product Details window of the VEHICLE menu (Section 5.8), it is defining the default legend for a product. Min The lowest value that will be represented by a colour in the map. Max The highest value that will be represented by a colour in the map. Number The number of colour divisions in the map. For example; a value of six would only allow six discrete colours to be displayed. Unit Label The unit which is associated with the product for this legend. In this case it is "L" for Litre FARMTRAX User Manual Ver 2.0-Rev A Page 6-61 VARIOUS MENUS/LEGEND This setup window is used for determining the legend bar values in different applications (Rate maps, yield maps), and as such, settings for different types of maps and products will vary greatly. Values below approximately 20 have a more dramatic effect on changing the colours shown in the map. It is suggested that in order to objectively compare different paddocks and seasons, a colour scheme and ranges are agreed upon at the beginning, and are not frequently changed. OK The OK button saves any changes made and exits from the dialog window. Cancel The Cancel button deletes any changes made and exits from the dialog window. FARMTRAX User Manual Ver 2.0-Rev A Page 6-62 LAYERS/DETAILS/INFO/WEATHER 6.30 Weather This window allows entry of information about the weather conditions prevailing when a paddock treatment was carried out. The information is entered from the FARM-LAYERS-DETAILS Info window of the relevant treatment layer. (Section 6.15.1) Wind Strength Pressing this button cycles through the available choices of Low, Med & High for wind strength. Wind Direction Pressing one of the buttons indicating compass directions will enter that value as the wind direction. The value will be shown in the centre of the compass. Temp The numeric keyboard is raised allowing entry of a value for air temperature, in degrees Celsius. Humidity The numeric keyboard is raised allowing entry of a value for air humidity, as a percentage. Comment The alphanumeric keyboard allows for up to 32 characters of text to be entered for miscellaneous weather information. OK Accepts any changes made and exits from this window. FARMTRAX User Manual Ver 2.0-Rev A Page 6-63 LAYERS/DETAILS/INFO/WEATHER Cancel Ignores any changes made and exits from this window. FARMTRAX User Manual Ver 2.0-Rev A Page 6-64 VARIOUS MENUS/CALENDAR 6.31 Calendar This window allows a date to be specified, from a calendar-type layout. Next Month - Previous Month (Arrows) These buttons appear at the top corners of the window, and are used to change the displayed month to the preceding or following month. Year When touched, scrollbars appear, allowing the year value to be incremented or decremented. Touch the up or down scrollbars to change the selected year. Month When touched, a list of months appears, for quick selection. Touch the required month in the list. Days The days for the displayed months are displayed in BLACK. Those days for either the preceding or following months are shown in GREY. Touch the day number to select it. The selected day will be highlighted with a blue oval. Touching a day value exits the calendar window, so be sure to set the year and month first. Today's Date The current date is shown circled in red, and displayed at the bottom of the window. If this value is not correct, you need to set the correct date in the Windows Control Panel Setting of your PC or FARMTRAX box. FARMTRAX User Manual Ver 2.0-Rev A Page 6-65 VARIOUS MENUS/CALENDAR The format of the displayed date should be dd/mm/yyyy. For Example: 10/06/1999. If the format of your displayed date is not correct, the Short Date setting can be changed in Windows Control Panel, Regional Settings section. If you are using the software in Office Mode on your office PC, the date can be set by using the arrow keys on your keyboard. (up, down, left, right, page up, page down). FARMTRAX User Manual Ver 2.0-Rev A Page 6-66 GUIDE MENU/GUIDE OPTIONS 6.32 Guide Options The guidance options dialog window allows entry of options which affect the operation of the guidance function. These guidance options are entered into the FARMTRAX system from GUIDE-MORE-GUIDE menu selections (Section 5.11). Lock Right First This option refers only to racetrack or contour line (lock features) guidance. When the Lock button (Section 5.10) is pressed, the system searches one swath width to the left and right of the vehicle’s current position a previous track. This option defines whether the system searches left or right first. The selection is toggled by pressing the Lock Left First button, to Lock Right First. Overlap width The overlap width is the amount of overlap that maintained during the spreading application. The appropriate overlap depends on the accuracy of the GPS and how important the risk of underlap/overlap is for a particular chemical or crop. The distance between any two guide lines is calculated as the vehicle swath width less the overlap defined here. To change the overlap width press the Overlap button to activate the numerical keyboard (Section 6.28) where the overlap width may be entered. FARMTRAX User Manual Ver 2.0-Rev A Page 6-67 GUIDE MENU/GUIDE OPTIONS Turn Warning This button enables or disables the turn warning feature of the guidance function. (Refer Section 2.12). Pressing this button will display the Event Warning window where other turn warning settings can be changed. (Section 6.37). Event Allows the entry of parameters for turn warnings when using parallel guidance. Guide Length (points) This setting determines how far the guideline is created in advance of the vehicle. Where the vehicle is approaching the middle of a nearly-completed paddock, this value may be reduced, to avoid erroneous guidance warnings. Note: Reducing this value will also increase the frequency of screen redraws. Par Changes the parallel guidance setting from Parallel to Circular, to enable support for circular, centre-spigot related areas. Turn Angle (degrees) Changing the value of this field determines how “sensitive” the system is to the presence of turns. Increasing this value makes the system less sensitive to turns, and increases the deviation in course needed before the system detects it as a turn. Virtual Road Pressing this button raises the Virtual Road Settings window, (Section 6.33) which allows the changing of settings for the VR window. OK The OK button saves the changes made and exits from the dialog window. Cancel The Cancel button ignores any changes made and exits from the dialog window. FARMTRAX User Manual Ver 2.0-Rev A Page 6-68 GUIDE -MORE/GUIDE/VR SETTINGS 6.33 VR Settings Distances represented in the VR display can be configured to your preference. These settings are found by selecting the Guide menu option from the GUIDE-MORE menu, and then selecting the Virtual Road button. The following window is shown. Front Width The distance represented by the width of the VR window at the lower edge. Back Width The distance represented by the width of the VR window at the upper edge. Depth The distance represented by the height of the VR window. Road Width The distance from the blue centreline to either of the green outer lines. Grid Size The distance between grid lines. To change the values for any of the above settings, simply press the grey button displaying the current value for that setting, and enter the new value using the on-screen keyboard. OK The OK button saves the changes made and exits from the dialog window. Cancel The Cancel button deletes any changes made and exits from the dialog window. FARMTRAX User Manual Ver 2.0-Rev A Page 6-69 GUIDE MENU/LIGHTBAR/LIGHTBAR LIMITS 6.34 Lightbar Limits The Lightbar Limits dialog window is used for setting the accuracy limits of the lightbar symbols. Each symbol relates to a particular accuracy (limit), which is shown on the right hand side in the entry window. The lightbar displays one the following symbols whenever the current offset is larger than the defined distances. The lightbar limits are set from the Lightbar menu (Section 5.12). >< This symbol will be displayed whenever the vehicle is within the defined distance, either side of the guide line. The distance may be edited by pressing the symbol button to activate the numerical keyboard where the distance may be changed. > This symbol will be displayed whenever the vehicle is within the defined distance, on the left hand side of the guide line. A mirror image of the symbol will be displayed when the vehicle is on the right hand side of the guide line. The distance may be edited by pressing the symbol button to activate the numerical keyboard where the distance may be changed. >> This symbol will be displayed whenever the vehicle is within the defined distance, on the left hand side of the guide line. A mirror image of the symbol will be displayed when the vehicle is on the right hand side of the guide line. The distance may be edited by pressing the symbol button to activate the numerical keyboard where the distance may be changed. FARMTRAX User Manual Ver 2.0-Rev A Page 6-70 GUIDE MENU/LIGHTBAR/LIGHTBAR LIMITS >>> This symbol will be displayed whenever the vehicle is within the defined distance, on the left hand side of the guide line. A mirror image of the symbol will be displayed when the vehicle is on the right hand side of the guide line. The distance may be edited by pressing the symbol button to activate the numerical keyboard where the distance may be changed. >>>> x This symbol will be displayed whenever the vehicle is within the distance displayed (x), on the left hand side of the guide line. A mirror image of the symbol will be displayed when the vehicle is on the right hand side of the guide line. The distance may be edited by pressing the symbol button to activate the numerical keyboard where the distance may be changed. OK The OK button saves the changes made and exits from the dialog window. Cancel The Cancel button deletes any changes made and exits from the dialog window. FARMTRAX User Manual Ver 2.0-Rev A Page 6-71 GUIDE MENU /LIGHTBAR/LIGHTBAR INTENSITY 6.35 Lightbar Intensity The Intensity dialog window allows the brightness of the lightbar to be intensified for working in strong sunlight or dimmed for night work. There are eight predefined settings for the lightbar. The lightbar intensity is set from the Lightbar menu (Section 5.12). Buttons 1-8 Pressing any of these numerical buttons adjusts the brilliance of the lightbar. The settings are a simple scale with 1 being the dimmest setting and 8 being the brightest setting. OK The OK button saves the changes made and exits from the dialog window. Cancel The Cancel button deletes any changes made and exits from the dialog window. FARMTRAX User Manual Ver 2.0-Rev A Page 6-72 GUIDE MENU /DIRECTION GUIDE 6.36 Direction Guide This window is used for both spray/spread guidance and for navigating back to sample or waypoints. It provides graphical and text information about the relative distance and bearing to the guideline or point. The meanings of the individual indicators varies slightly depending whether the window is being used for spray/spread guidance or for navigating back to points, so each case is described separately. 6.36.1 Spray/Spread Guidance Bearing (-ve = left, +ve = right) The difference in the direction of the vehicle, compared to the direction of the guideline. For Example: If the guideline direction is straight up the screen and the vehicle direction is 2 deg to the left of this, then this field will indicate -2 This field is shown graphically by the Arrow Distance The distance to the guideline. If the vehicle is 3m to the left of the guideline, this field will indicate -3m FARMTRAX User Manual Ver 2.0-Rev A Page 6-73 GUIDE MENU /DIRECTION GUIDE Arrow A graphical representation of the Bearing field. In the case above, the arrow would rotate to the left from the vertical by 2 degrees. When the direction of the vehicle and the direction of the guideline are the same (parallel), then the arrow will point straight up. Distance Bar A graphical representation of the Distance field. In the case above, the Distance Bar would move horizontally to the left. The amount that the bar moves from the centre is directly related to the distance value. A bigger value shows a bigger offset from the centre. 6.36.2 Navigation back to Points Bearing field (-ve = left, +ve = right) The relative bearing to the selected point. If the vehicle is steering 20degrees too far left of the direction needed to drive to the point, then this field will show -20. If the vehicle is steering directly towards the point, the field will show 0 degrees. Distance field The distance from the vehicle to the selected point. Arrow The arrow will indicate the relative bearing to the selected point. In the case above, the arrow will rotate to the left by 20 degrees. When the arrow is pointing straight up, then the vehicle is moving directly towards the selected point. Distance Bar A graphical representation of the Distance field. When the line moves to the centre of the arrow, the vehicle is moving directly towards the selected point. If the vehicle's relative bearing is to the left or right of the selected point, then the bar will move over to the respective side of the arrow, indicating the error. The amount that the arrow moves is a reflection of the distance to the point. FARMTRAX User Manual Ver 2.0-Rev A Page 6-74 GUIDE MENU/GUIDE OPTIONS/EVENT WARNING 6.37 Event Warning This window allows customisation of the turn warning displays. Separate settings can be entered for parallel and lock guidance methods. Warning Enables or disables the warning. How Often The distance interval between turn warnings. How Far before The furthest point from the event location (turn) at which warnings commence. OK Accept these settings and exit from this window. Cancel Ignore these changes and exit this window. FARMTRAX User Manual Ver 1.0-Rev J Page 6-75 RATE MENU/RATE LEGEND 6.38 Edit Rate Map Legend The following Dialog allows the user to define or edit the legend used in preparing a rate map. It allows the user to define the number of different rates and the value for each rate. NOTE: Colours are automatically selected and cannot be changed. Rate Number This button shows the number of the rate value being displayed. Pressing this button will increment to the next number. Total Number of Rates This button shows the total number of rates currently defined. Pushing this button brings up a dialog box which allows this number to be changed. NOTE: Changing the number of rates of an existing rate map will cause changes to rate values and assigned colours. Default Pressing this button makes the currently selected rate the default rate for the legend. The default rate is shown with a ‘D’ in its centre. This rate is used to fill areas of the map without a valid colour. Also during application, the default colour is used for areas where GPS is not present. Change Pressing the change button brings up the numeric keyboard dialog to allow the rate value displayed to be changed. Rate Value The rate value field shows the current rate for the selected rate number. FARMTRAX User Manual Ver 1.0-Rev J Page 6-76 RATE MENU/RATE LEGEND Rate Value Units This shows the units of the currently displayed rate. (e.g. Kg/Ha) OK/Cancel On OK save all changes and exit, on cancel changes are not saved. FARMTRAX User Manual Ver 1.0-Rev J Page 6-77 RATE MENU/LEGEND/NUMBER OF RATES 6.39 Edit Rate Map Legend Number of Rates This Dialog allows the total number of rates to be selected. NOTE1: Changing the number of rates of an existing rate map will affect previously set colours and rates. NOTE2: The maximum number or rates that can be selected is 9. Up Pressing this button will increase the displayed number of rates by one. Down Pressing this button will decrease the displayed number of rates by one. OK The OK button saves any changes made and exits from the dialog window. Cancel The Cancel button deletes any changes made and exits from the dialog window. FARMTRAX User Manual Ver 1.0-Rev J Page 6-78 RATES MENU/PAINTBRUSH SETUP 6.40 Paint Brush Setup This dialog window allows changing of the width of the brush used in the Rate map Editor. I II III IIII Buttons The currently selected width is shown by and asterisk (*). There are four pen widths that can be selected, ranging from thin (I) to thick (IIII). Pressing any button will make this button the active pen width. OK The OK button saves any changes made and exits from the dialog window. Cancel The Cancel button deletes any changes made and exits from the dialog window. FARMTRAX User Manual Ver 1.0-Rev J Page 6-79 RATES MENU/LOAD RATE MAP 6.41 Load Rate Map Selecting RATES-LOAD from the main menu raises this dialog window. This window allows the user to select a rate map for each bin6 in the current paddock. Note: Loading a rate map to a bin creates a new layer in the system. This layer is removed by using the Clear function of this window. Bin Number This button shows the currently selected bin number. Pressing this button increments the selection to the next bin. By pressing the button repeatedly the selection can be cycled back to the first bin. Auto/Manual Pressing this button toggles the selection between Auto and Manual. If set to Auto, the selected rate map will be used to send rate information to the flow controller, while traversing the rate map. Selecting Manual mode will allow manually-determined rate information to be sent to the controller, instead of those from the rate map. Select Pressing this button raises the Map Select dialog window, to allow the user to select a rate map from those currently available on the system. Note: Rate maps are stored with other information for the currently selected farm/client. Rate maps imported or created for other farms will not be shown. 6 Functionality is dependent on the capabilities of the selected controller. FARMTRAX User Manual Ver 1.0-Rev J Page 6-80 RATES MENU/LOAD RATE MAP Clear Pressing this button with a rate map currently loaded to a bin, will clear that rate map from the bin and remove the associated layer from the system. OK The OK button saves any changes made and exits from the dialog window. Cancel The Cancel button deletes any changes made and exits from the dialog window. FARMTRAX User Manual Ver 1.0-Rev J Page 6-81 RATES MENU/SELECT RATE MAP 6.42 Select Rate Map This dialog window is raised after pressing SELECT from the Load Rate Map dialog window. Rate maps which are available within the system for the currently selected farm/client are listed for selection. Up/Down Changes the currently highlighted file in the list. OK Accepts the current selection and exits from this dialog window. Cancel Discards the current selection and exits from this dialog window. FARMTRAX User Manual Ver 1.0-Rev J Page 6-82 RATES MENU/SAVE RATE MAP 6.43 Save Rate Map This dialog window is raised when exiting the Rate map Editor. Various options are presented for saving the edited rate map. Bin Number (or File) Pressing this button cycles through the available destinations for the rate map. Saving the rate map to a Bin also saves to the displayed filename, for later use. Saving to a file only, does not load the map to any bin. Change Allows the changing of the filename for the currently loaded rate map. Pressing this button raises the Keyboard dialog window for the entry of the filename. Exit (Don’t Save) Allows exiting of the Rate map Editor without saving the rate map. OK Accepts the current settings and exits from the Rate map Editor. Saving may take 10-20 seconds. A blue progress bar at the bottom of the screen shows progress of the save operation. Cancel Discards the current settings and returns to the Rate map Editor. FARMTRAX User Manual Ver 1.0-Rev J Page 6-83 RATES MENU/BIN STATUS 6.44 Bin Status This window is displayed down the right edge of the map screen, and shows the status of individual vehicle bins. The appearance of this window will vary, depending on the capabilities and configuration of the selected flow controller. Each square window represents a bin on the vehicle, and are numbered in this case, (1) through to (5). Touching a bin window will cause the display to show the controller rates of that bin at the bottom of the map screen. The selected bin window has a thick black border drawn around it. In the above case, Bin1 is selected. Inside each bin window, text values are shown. For Example: (3) A:150 A (3) This is the bin number A:150 This is the Actual Rate of application from this bin. The figure is output from the flow controller. A This is the mode that the bin is currently in. A for Auto, or M for Manual FARMTRAX User Manual Ver 1.0-Rev J Page 6-84 RATE MENU/MANUAL RATES SETUP 6.45 Manual Rates Setup Displays a dialog allowing the user to select the step or interval for manual rate changes. Bin Number Displays the bin number that is currently under manual control. Pressing this button selects the next bin. If the currently selected controller has only one bin, then pressing this button has no effect. Step Button Pressing this button raises the numeric keyboard, allowing a new step value to be entered. Step Field This text field displays the current step value. This step amount is used whenever the rate is manually increased or decreased using the manual rate buttons. (Section 3.58.2) OK Accepts the current selection and exits from this dialog window. Cancel Discards the current selection and exits from this dialog window. FARMTRAX User Manual Ver 1.0-Rev J Page 6-85 FARMTRAX User Manual Ver 1.0-Rev J Page 6-86 TROUBLESHOOTING 7 Troubleshooting 7.1 Blank Forms At RINEX Technology, we know that the most effective and valuable feedback on our products comes from you, the system user. To encourage the reporting of features that you would like to see in the product, or the reporting of problem areas or bugs in the software, we have attached some blank forms for you to use. Please describe your requests or problems as fully as possible, with the full and proper wording of error messages, if applicable. Either form can be faxed or posted to our office, using the address or facsimile number appearing at the front of this manual. Please be assured that all your submissions will receive prompt attention. 7.2 Troubleshooting The following section is designed to assist you in correctly identifying the cause of commonly-occurring problems with the FARMTRAX software and hardware. Where multiple "Possible Causes" are listed, the most likely and/or quickest-to-test cause is listed first. For "Possible Cause" 1, carry out "Recommendation" item numbered 1, "Possible Cause" 2, "Recommendation" 2, etc. FARMTRAX User Manual Ver 2.0-Rev A Page 7-1 TROUBLESHOOTING Problem Vehicle Position Marker doesn’t move on the screen. ("G" in the status icon) Possible Causes 1. Crushed, kinked, or otherwise damaged coaxial cable to the GPS antenna 2. Corrosion in the connector at the antenna end of the GPS coaxial cable. 3. Damaged or inoperative GPS antenna Recommendations 1. Examine the cable to the GPS antenna, looking for sections crushed in doors or windows. If found, do not attempt to repair - order a new cable or antenna & cable. 2. If your GPS antenna has a separable cable, undo the connector and check for moisture and/or corrosion. If found, order a new cable. (These connectors should always be covered with amalgamating tape.) 3. Replace the faulty antenna. Vehicle Position Marker doesn’t move on the screen. ("D" in the status icon) 1. Crushed, kinked, or otherwise damaged coaxial cable to the differential antenna 2. Corrosion in the connector at the antenna end of the differential coaxial cable. 3. Damaged or inoperative differential antenna 4. Insufficient time allowed for loading of new data 1. Examine the cable to the differential antenna, looking for sections crushed in doors or windows. If found, do not attempt to repair - order a new cable or antenna & cable. 2. Undo the antenna-end connector and check for moisture and/or corrosion. If found, order a new cable. (These connectors should always be covered with amalgamating tape.) 3. Replace the faulty antenna. Vehicle Position Marker doesn’t move on the screen. (Both D and G in the status icon) FARMTRAX User Manual 1. No communication between Omnistar DGPS receiver and FARMTRAX software 2. Yearly subscription has expired. 3. Corrupted system settings Ver 2.0-Rev A 4. If this is the first time the system has been used for more than a day, time should be allowed for the updating of almanac data. This should not take more than 15 minutes at most. 1. Shut down the FARMTRAX box. Switch off, and leave off for ten seconds. Restart the system. 2. If accessible, confirm that the subscription light is lit on the Omnistar receiver. This can be seen by removing the vent cover from the right side of the FARMTRAX box, and observing the LED's. Contact RINEX Technology to confirm and arrange a new subscription. 3. Contact RINEX Technology Page 7-2 TROUBLESHOOTING Problem Possible Causes Recommendations Vehicle Position Marker doesn’t move on the screen. (VIEW MODE shown in the status icon) 1. Software has been changed to View mode. 1. Change to GPS (normal) mode. Refer to the User Manual. Vehicle Position Marker doesn’t move on the screen. (OFFICE MODE shown in the status icon) 1. This is the normal mode of operation when the software is running on your Office PC. If this message is seen on a FARMTRAX box, then the system security settings have been changed. 1. Contact RINEX Technology. Vehicle Position Marker doesn’t move on the screen. (Normal moving satellite shown in the status icon) 1. Mapscreen view is zoomed right out. 1. Use the ZOOM IN button until the VPM moves. 2. Changes in software configuration require reinitialisation of communication port. 2. Restart the FARMTRAX software. The Vehicle Position Marker will not change from the OFF state to ON 1. Incorrect Flow Controller specified in software settings 1. Set correct controller in FARM-VEHICLE-FLOW CONTROLLER window. After entering this window, restart the FARMTRAX software. The Vehicle Position Marker moves, and is turned ON, but no " trail" can be seen. 1. Mapscreen view is zoomed right out. 1. Use the ZOOM IN button until the trail can be seen. 2. Layer for the current treatment is not the front layer, and other data is drawing over the trail. 2. Change the layer order, so that the KEY layer is the front layer. 3. 3. No legend is defined for the treatment. Check that a valid legend is defined for the layer currently being plotted. 4. The layer display has been turned OFF 4. Make sure that the layer to which the information is being written is turned ON 5. The current JOB is different to that of the layer being written, and JOB VIEW is set to Selected. 5. Check current JOB, and JOB VIEW settings in General Setup are correct. The trail, waypoints or other mapscreen objects disappear when the screen redraws. FARMTRAX User Manual 1. A backdrop map, or rate map is being drawn over the required object(s) Ver 2.0-Rev A 1. Change the layer order, so that the screen is redrawn in the required order. Page 7-3 TROUBLESHOOTING Problem Every time I press ZOOM ALL, everything disappears from the mapscreen. Backdrop maps and rate maps do not appear on the mapscreen Treatment data does not appear on the mapscreen, but I'm sure there was data in this paddock (Edit Layers window shows zero layers) Possible Causes Recommendations 1. In the current paddock, there exists data from more than one geographic area. Zoom All attempts to display all data in the paddock. 1. Turn OFF each layer in the paddock in turn until the incorrect zoom stops. 2. The vehicle is not currently in the same area as the mapscreen information. 2. Change to View Mode, to prevent the current vehicle location from being included in the Zoom. 1. The vehicle is not currently in the same area as the map information. 1. Zoom out, until the map appears, or change to View mode. 2. The map has not been correctly registered. 2. 3. The map has been imported, but is not yet selected for display. Backdrop maps need to be geographically "registered" before being able to be used by FARMTRAX. Contact RINEX Technology for assistance. 3. Select the map from the list of available maps in the VIEWMORE-BACKDROP menu option. 1. Ensure that the current job is the same as that of the missing data, or change Job View to ALL setting in General Setup window. 2. Contact RINEX for instructions on restoring accidentally deleted layers. 3. Data files may still exist on your hard drive. Contact RINEX for instructions on restoring these files to the system. 1. Job view is SELECTED. Job number has changed. 2. Layer(s) has/have been deleted 3. Farm database file corrupted by an "Illegal Operation" or abnormal shutdown of FARMTRAX. Treatment data does not appear on the mapscreen, but I'm sure there was data in this paddock (Edit Layers window shows layers are present) 1. Layer(s) have been turned OFF 1. Turn display of layer(s) back on, in Edit Layers window. 2. Vehicle position is different to location of paddock data 2. Change to View mode. Zoom All. The last paddock I was working in now cannot be found. 1. Wrong Farm 1. Change Farm to that in which the paddock was created. 2. Wrong dataset 2. Change dataset to that in which the paddock was created. 3. Farm database file corrupted by an "Illegal Operation" or abnormal shutdown of FARMTRAX. 3. Data files may still exist on your hard drive. Contact RINEX for instructions on correcting the farm database file. FARMTRAX User Manual Ver 2.0-Rev A Page 7-4 TROUBLESHOOTING Problem Possible Causes Recommendations Cannot see screen grid and/or grid labels 1. View is zoomed in or out too far. 1. Change map screen scale factor, by using the zoom in/out functions. Guidance - "Could not find lock! Move and try again" message after pressing LOCK button. 1. Vehicle is more than half of one swath width off-line from the correct position for this lap. 1. Move the vehicle closer to the correct alignment for this lap. 2. 2. Data being locked onto is from a different layer. (Vehicle settings have changed) Either change vehicle product and swath settings to match that of the existing layer data, or apply one lap with the new settings, then re-lock. 1. Incorrect export drive letter set in General Setup window. 1. Set option to the correct letter for the connected drive device. (LS120 = D: , Datalux external floppy (3½" 1.44MB diskettes) = A: 2. Drive is not plugged in to the correct port on the FARMTRAX box 2. 3. Disk is not inserted into the drive. Connect cables to correct ports for your device. LS120 data to "PARALLEL" port, power cable (thin cable) to "FLOPPY DRIVE" port. Datalux external floppy drives connect only to the "FLOPPY DRIVE" port. 3. Insert a diskette into the drive. Exports fail to write to the export drive Dots appear on-screen while using guidance. 1. Turn or Event warnings are turned on. 1. Turn off turn or event warnings in Guide Setup, if not required. Repeated "Illegal Operation" error messages on starting the FARMTRAX system. 1. Data in the paddock that the system is trying to open has been corrupted by an abnormal shutdown. 1. Restart FARMTRAX system in "safe" mode. Use the SAFE FARMTRAX option from the desktop, or Start Menu. Once started in RINEX farm, Create NEW farm instead of returning to the corrupted farm. Contact RINEX if required, to arrange for repair of corrupted files. "Could not open port: COM3" message (#1024), followed by "Could not open port: COM1" message 1. The FARMTRAX software is already running. A second attempt has been made to run the same software. 1. Shut down the FARMTRAX software. Restart the FARMTRAX controller box. Do NOT use the START button while the FARMTRAX software is initialising. 2. Another Windows application has the required ports open. 2. Shut down any other Windows software application which may be running, before re-starting the FARMTRAX software. FARMTRAX User Manual Ver 2.0-Rev A Page 7-5 TROUBLESHOOTING Problem Possible Causes Recommendations Pressing the LAYERS button has no effect. 1. No layer has yet been created for the paddock. Treatment layers are not created until the treatment actually starts. (Vehicle icon is turned ON) 1. Press the button again after starting the treatment. (To see the current vehicle settings, use the VEHICLE menu) No legend is displayed on-screen. 1. The LEGEND display is set to OFF 1. From the main menu, press VIEW-MORE-LEGEND buttons. 2. No layer has yet been created for the paddock 2. 3. The legend layer is set to a different layer. The legend will appear on starting the treatment. To view the legend for a product beforehand, use the VEHICLE-PRODUCT menu selections, and press CHANGE on the current product. 3. Press FARM-LAYERS button. The legend layer is that layer with an "L" in the Total Number of Layers field. To change the legend layer, press the Legend button on this window when the required layer is selected. Product amounts in printed report are all Kg, when some products are liquids and should be reported in Litres 1. Data has been imported from another FARMTRAX system. The product did not exist before, and the defaults are still being used. 1. Edit each incorrect product from the FARM-VEHICLE-PRODUCT window, and set the correct product details for each. Run the report again. Backdrop maps and rate maps appear in the wrong place on the mapscreen. 1. The backdrop or rate map has been produced with a program using a different geographic datum. 1. Contact RINEX Technology for information on how to convert the map registration data to the correct values. Values on print reports for Product and Area are zero, with an asterisk in brackets. 1. The system is set to use User-entered values for these fields, and none have been entered. 1. Change the setting in General Setup (page 2) to Meas Treatments FARMTRAX User Manual Ver 2.0-Rev A Page 7-6 SOFTWARE SUGGESTION Name ....................................................... Address ........................................................................................................................ Contact Phone No. ........................................... Name of Software: SoilTRAXLITE Other ____________________ Running on: H/PC device Office PC Current Version of Software: _______ Both/Other (from GENERAL SETUP-ABOUT menu selections) Suggested change 1: __________________________________________________ __________________________________________________________________________ __________________________________________________________________________ __________________________________________________________________________ __________________________________________________________________________ __________________________________________________________________________ __________________________________________________________________________ Suggested change 2: __________________________________________________ __________________________________________________________________________ __________________________________________________________________________ __________________________________________________________________________ __________________________________________________________________________ __________________________________________________________________________ __________________________________________________________________________ __________________________________________________________________________ __________________________________________________________________________ __________________________________________________________________________ FARMTRAX Suggestion Form Fax to: 08 94744772 Page 1 SOFTWARE SUGGESTION Suggested change 3: __________________________________________________ __________________________________________________________________________ __________________________________________________________________________ __________________________________________________________________________ __________________________________________________________________________ __________________________________________________________________________ Suggested change 4: __________________________________________________ __________________________________________________________________________ __________________________________________________________________________ __________________________________________________________________________ __________________________________________________________________________ __________________________________________________________________________ Suggested change 5: __________________________________________________ __________________________________________________________________________ __________________________________________________________________________ __________________________________________________________________________ __________________________________________________________________________ __________________________________________________________________________ (RINEX Use Only) Received:____________ By: _______________ Investigation Result:____________________________ FARMTRAX Suggestion Form Fax to: 08 94744772 Feature Req. no. _____________ Client Advised: ______________ Page 2 SOFTWARE SUGGESTION Name ....................................................... Address ........................................................................................................................ Contact Phone No. ........................................... Name of Software: SoilTRAXLITE Other ____________________ Running on: H/PC device Office PC Current Version of Software: _______ Both/Other (from GENERAL SETUP-ABOUT menu selections) Suggested change 1: __________________________________________________ __________________________________________________________________________ __________________________________________________________________________ __________________________________________________________________________ __________________________________________________________________________ __________________________________________________________________________ __________________________________________________________________________ Suggested change 2: __________________________________________________ __________________________________________________________________________ __________________________________________________________________________ __________________________________________________________________________ __________________________________________________________________________ __________________________________________________________________________ __________________________________________________________________________ __________________________________________________________________________ __________________________________________________________________________ __________________________________________________________________________ FARMTRAX Suggestion Form Fax to: 08 94744772 Page 1 SOFTWARE SUGGESTION Suggested change 3: __________________________________________________ __________________________________________________________________________ __________________________________________________________________________ __________________________________________________________________________ __________________________________________________________________________ __________________________________________________________________________ Suggested change 4: __________________________________________________ __________________________________________________________________________ __________________________________________________________________________ __________________________________________________________________________ __________________________________________________________________________ __________________________________________________________________________ Suggested change 5: __________________________________________________ __________________________________________________________________________ __________________________________________________________________________ __________________________________________________________________________ __________________________________________________________________________ __________________________________________________________________________ (RINEX Use Only) Received:____________ By: _______________ Investigation Result:____________________________ FARMTRAX Suggestion Form Fax to: 08 94744772 Feature Req. no. _____________ Client Advised: ______________ Page 2 SOFTWARE SUGGESTION Name ....................................................... Address ........................................................................................................................ Contact Phone No. ........................................... Name of Software: SoilTRAXLITE Other ____________________ Running on: H/PC device Office PC Current Version of Software: _______ Both/Other (from GENERAL SETUP-ABOUT menu selections) Suggested change 1: __________________________________________________ __________________________________________________________________________ __________________________________________________________________________ __________________________________________________________________________ __________________________________________________________________________ __________________________________________________________________________ __________________________________________________________________________ Suggested change 2: __________________________________________________ __________________________________________________________________________ __________________________________________________________________________ __________________________________________________________________________ __________________________________________________________________________ __________________________________________________________________________ __________________________________________________________________________ __________________________________________________________________________ __________________________________________________________________________ __________________________________________________________________________ FARMTRAX Suggestion Form Fax to: 08 94744772 Page 1 SOFTWARE SUGGESTION Suggested change 3: __________________________________________________ __________________________________________________________________________ __________________________________________________________________________ __________________________________________________________________________ __________________________________________________________________________ __________________________________________________________________________ Suggested change 4: __________________________________________________ __________________________________________________________________________ __________________________________________________________________________ __________________________________________________________________________ __________________________________________________________________________ __________________________________________________________________________ Suggested change 5: __________________________________________________ __________________________________________________________________________ __________________________________________________________________________ __________________________________________________________________________ __________________________________________________________________________ __________________________________________________________________________ (RINEX Use Only) Received:____________ By: _______________ Investigation Result:____________________________ FARMTRAX Suggestion Form Fax to: 08 94744772 Feature Req. no. _____________ Client Advised: ______________ Page 2 SOFTWARE PROBLEM REPORT Name FARMTRAX Box Number _______________ Address Contact Phone No.________________ Problem is on: FARMTRAX box Office PC Name of Software: FARMTRAX Other ____________________ Version of Software: _______ Symptoms of Problem: Both (from VIEW-MORE-MORE-ABOUT menu selections) __________________________________________________ __________________________________________________________________________ __________________________________________________________________________ __________________________________________________________________________ __________________________________________________________________________ __________________________________________________________________________ __________________________________________________________________________ Application in use: SprayTRAX SpreadTRAX SeedTRAX SoilTRAX HarvestTRAX MapTRAX Guidance in use? Yes No Flow Controller selected: __________________________________________________ If Yes, Type_________________ Has this problem happened before? Yes No How often? Sometimes Rarely Every Time How do you make this problem happen? (Describe fully the sequence of events BEFORE the problem happened.)__________________________________________________________ __________________________________________________________________________ __________________________________________________________________________ __________________________________________________________________________ __________________________________________________________________________ __________________________________________________________________________ (RINEX Use Only) Received:____________ _______________ Problem Report no.___________ Investigation Result:____________________________ Client Advised: ______________ FARMTRAX Problem Report By: Fax to: 08 94744772 Page 1 SOFTWARE PROBLEM REPORT Space for more information: __________________________________________________________________________ __________________________________________________________________________ __________________________________________________________________________ __________________________________________________________________________ __________________________________________________________________________ __________________________________________________________________________ __________________________________________________________________________ __________________________________________________________________________ __________________________________________________________________________ __________________________________________________________________________ __________________________________________________________________________ __________________________________________________________________________ __________________________________________________________________________ __________________________________________________________________________ FARMTRAX Problem Report Fax to: 08 94744772 Page 2 SOFTWARE PROBLEM REPORT Name FARMTRAX Box Number _______________ Address Contact Phone No.________________ Problem is on: FARMTRAX box Office PC Name of Software: FARMTRAX Other ____________________ Version of Software: _______ Symptoms of Problem: Both (from VIEW-MORE-MORE-ABOUT menu selections) __________________________________________________ __________________________________________________________________________ __________________________________________________________________________ __________________________________________________________________________ __________________________________________________________________________ __________________________________________________________________________ __________________________________________________________________________ Application in use: SprayTRAX SpreadTRAX SeedTRAX SoilTRAX HarvestTRAX MapTRAX Guidance in use? Yes No Flow Controller selected: __________________________________________________ If Yes, Type_________________ Has this problem happened before? Yes No How often? Sometimes Rarely Every Time How do you make this problem happen? (Describe fully the sequence of events BEFORE the problem happened.)__________________________________________________________ __________________________________________________________________________ __________________________________________________________________________ __________________________________________________________________________ __________________________________________________________________________ __________________________________________________________________________ (RINEX Use Only) Received:____________ _______________ Problem Report no.___________ Investigation Result:____________________________ Client Advised: ______________ FARMTRAX Problem Report By: Fax to: 08 94744772 Page 1 SOFTWARE PROBLEM REPORT Space for more information: __________________________________________________________________________ __________________________________________________________________________ __________________________________________________________________________ __________________________________________________________________________ __________________________________________________________________________ __________________________________________________________________________ __________________________________________________________________________ __________________________________________________________________________ __________________________________________________________________________ __________________________________________________________________________ __________________________________________________________________________ __________________________________________________________________________ __________________________________________________________________________ __________________________________________________________________________ FARMTRAX Problem Report Fax to: 08 94744772 Page 2 SOFTWARE PROBLEM REPORT Name FARMTRAX Box Number _______________ Address Contact Phone No.________________ Problem is on: FARMTRAX box Office PC Name of Software: FARMTRAX Other ____________________ Version of Software: _______ Symptoms of Problem: Both (from VIEW-MORE-MORE-ABOUT menu selections) __________________________________________________ __________________________________________________________________________ __________________________________________________________________________ __________________________________________________________________________ __________________________________________________________________________ __________________________________________________________________________ __________________________________________________________________________ Application in use: SprayTRAX SpreadTRAX SeedTRAX SoilTRAX HarvestTRAX MapTRAX Guidance in use? Yes No Flow Controller selected: __________________________________________________ If Yes, Type_________________ Has this problem happened before? Yes No How often? Sometimes Rarely Every Time How do you make this problem happen? (Describe fully the sequence of events BEFORE the problem happened.)__________________________________________________________ __________________________________________________________________________ __________________________________________________________________________ __________________________________________________________________________ __________________________________________________________________________ __________________________________________________________________________ (RINEX Use Only) Received:____________ _______________ Problem Report no.___________ Investigation Result:____________________________ Client Advised: ______________ FARMTRAX Problem Report By: Fax to: 08 94744772 Page 1 SOFTWARE PROBLEM REPORT Space for more information: __________________________________________________________________________ __________________________________________________________________________ __________________________________________________________________________ __________________________________________________________________________ __________________________________________________________________________ __________________________________________________________________________ __________________________________________________________________________ __________________________________________________________________________ __________________________________________________________________________ __________________________________________________________________________ __________________________________________________________________________ __________________________________________________________________________ __________________________________________________________________________ __________________________________________________________________________ FARMTRAX Problem Report Fax to: 08 94744772 Page 2