Download Adviser / Manager User Guide

Transcript
Adviser / Manager User Guide
Introduction to the software and getting started
Adviser & Manager V9.0.2
 2010 Back Paddock Company Pty Ltd
PO Box 823 Cleveland QLD 4163
Phone 1800 557 166
Email [email protected]
Back Paddock Adviser/Manager – User Guide
Table of Contents
Getting Started ....................................................................................................................................................................... 4
Help Desk and Support ........................................................................................................................................................... 4
Licencing ................................................................................................................................................................................. 6
Updates .................................................................................................................................................................................. 8
Existing Client File ................................................................................................................................................................. 10
Merging Files ........................................................................................................................................................................ 11
Backing-Up, Auto Save & Email Client Files .......................................................................................................................... 13
Modifying Master Database ................................................................................................................................................. 16
Key Buttons........................................................................................................................................................................... 21
Key Tabs ................................................................................................................................................................................ 21
The Farm Year ....................................................................................................................................................................... 21
Settings - Options ................................................................................................................................................................. 22
Navigation Pane .................................................................................................................................................................... 24
Add Dates ............................................................................................................................................................................. 25
Symbols and Footnotes ........................................................................................................................................................ 26
Paddock Notes ...................................................................................................................................................................... 26
Flags ...................................................................................................................................................................................... 26
Coverage Map....................................................................................................................................................................... 27
Timings ................................................................................................................................................................................. 27
Farms .................................................................................................................................................................................... 29
Paddocks and Areas .............................................................................................................................................................. 30
Modifying Paddocks and Areas ............................................................................................................................................. 31
Share Farming ....................................................................................................................................................................... 34
Sowing Crops ........................................................................................................................................................................ 37
Paddock Linking .................................................................................................................................................................... 39
Irrigation ............................................................................................................................................................................... 41
Fertiliser ................................................................................................................................................................................ 43
Soil Health History ................................................................................................................................................................ 44
Elements ............................................................................................................................................................................... 44
Tests...................................................................................................................................................................................... 45
Adding Chemicals ................................................................................................................................................................. 46
Spray Manager...................................................................................................................................................................... 48
Chemical History ................................................................................................................................................................... 50
QA – Quality Assurance ........................................................................................................................................................ 50
Operations ............................................................................................................................................................................ 52
Summary............................................................................................................................................................................... 54
Diary ..................................................................................................................................................................................... 54
Production ............................................................................................................................................................................ 55
Gross Margins ....................................................................................................................................................................... 58
Copying Data between Paddocks ......................................................................................................................................... 60
Find & Replace ...................................................................................................................................................................... 64
CornerPost™ Synchronisation............................................................................................................................................... 69
Synchronising Client files to CornerPost™ ............................................................................................................................ 69
Spray Recommendations ...................................................................................................................................................... 74
Report Tab ............................................................................................................................................................................ 77
Notes Editor Tab ................................................................................................................................................................... 78
Settings Tab .......................................................................................................................................................................... 79
Use Recommendation Template in Mobile App ................................................................................................................... 79
Area Summary ...................................................................................................................................................................... 81
Rotation Summary ................................................................................................................................................................ 81
Analysis ................................................................................................................................................................................. 84
Cash Flow .............................................................................................................................................................................. 85
Summary Reports ................................................................................................................................................................. 86
Rainfall .................................................................................................................................................................................. 91
Gauges .................................................................................................................................................................................. 91
Navigation............................................................................................................................................................................. 91
Finding Rainfall Data ............................................................................................................................................................. 93
Entering Rainfall Data ........................................................................................................................................................... 96
Rainfall Chart and Deciles ..................................................................................................................................................... 97
2
Back Paddock Adviser/Manager – User Guide
Livestock ............................................................................................................................................................................... 99
Stock Groups and Mobs ........................................................................................................................................................ 99
Livestock Income and Expenses .......................................................................................................................................... 100
Paddock Allocation ............................................................................................................................................................. 102
Livestock Gross Margin and Report .................................................................................................................................... 104
Inventory ............................................................................................................................................................................ 107
Acquire ............................................................................................................................................................................... 107
Reports ............................................................................................................................................................................... 112
Using Reports...................................................................................................................................................................... 112
Customising Reports ........................................................................................................................................................... 113
Different Reports ................................................................................................................................................................ 115
Report Extensions ............................................................................................................................................................... 116
Creating Paddock Boundaries ............................................................................................................................................. 120
Mapping Tab ....................................................................................................................................................................... 128
Map Types .......................................................................................................................................................................... 132
Scenarios (Available only with Adviser) .............................................................................................................................. 139
Client File Setup Guidelines for Adviser users .................................................................................................................... 144
Back Paddock Reader Licence Installation Process ............................................................................................................. 146
3
Back Paddock Adviser/Manager – User Guide
Getting Started
Help Desk and Support
There are several ways in which you can access help and support
1. User Manual
1.
Go to www.backpaddock.com.au > Click Products>Click Product from List>Click Download
User Manual>Save to Documents>Back Paddock Company>Adviser for easy reference.
Note: The Manual will be updated to reflect the improvements and new features added to
the program. Download regularly and replace with current version.
2. Back Paddock Website – 24/7 Help
There is a Members Only area on the Back Paddock website which provides a wide range of Help
materials and online references, including: Help Sheets, Videos and Live Chat to email questions
or request a call back.
1.
Obtain a Password from the Help Desk on 1800 557 166.
Note: This is the same password for all of the mobile apps and SoilMate Login.
2.
Go to www.backpaddock.com.au >Click Products>Help Desk>Login.
3.
Enter Username (your email) and password.
4.
Click on Adviser, Manager or SoilMate to access more information OR Click Site Consultant
Offline to leave a message.
4
Back Paddock Adviser/Manager – User Guide
5.
Click How To Guides in the Menu>Click either Video or Help Sheet for required Help Topic.
Note: This section will be updated regularly and will include instructions for any
improvements or new features added to the Adviser/Manager program.
3. Adviser Help – located within the Adviser Program there is a Help function which allows
search by topic.
1.
Click Question Mark button top left hand corner of the Adviser/Manager toolbar.
2.
Click Contents, Index, Search or Favourites tabs to help with your topic search.
4. Help Desk
Please contact our friendly help desk staff on 1800 557 166 between 9am-5pm EST weekdays.
5
Back Paddock Adviser/Manager – User Guide
Licencing
1. Obtaining a Licence
When commencing use of the Back Paddock Adviser or Manager program, a Licence is to be request
and issued which will switch the program from a Demonstration version to full use mode.
1.
Click File tab>Click Help>Click Licence Manager.
2.
Click on the dot next to the Product to be purchased>Add details below>Click Next.
Note: If this window does not appear>Click User Details under Licence Request.
3.
Click on Send Email Request or Save Request File to Desktop and Send email to
[email protected].
4.
A Licence will be provided by return email upon payment for the subscription.
6
Back Paddock Adviser/Manager – User Guide
2. Licence Current Status
1.
To check the status of the current licence click File>Help>Licence Manager.
2.
Click Current Licence Status to view Licence Expiry Date.
3. Product Comparison
The product comparison section shows a table with all products offered by Back Paddock
Company. In the neighbouring columns are the products description and its limitations. This
section is important in determining what product would best be suited for your particular needs.
4. Licence Agreement
This particular section of the report displays the licence agreement for the software issued. It is
important that this is read and understood before purchasing and using the software.
7
Back Paddock Adviser/Manager – User Guide
Updates
Updates of Adviser/Manager occur regularly. A notification will be provided instructing that an
update is available.
1. Check for updates. Click File tab>Click Help>Click Check for Updates.
2.
A notification will appear for either installing the latest version or notifying the program is
the latest version.
3.
Alternatively download the new versions from www.backpaddock.com.au>Products and
choose the product>Choose to download the program.
Tip: Check the version number.
8
Back Paddock Adviser/Manager – User Guide
New Client File
1. Creating a New Client File
1. Go to File tab>Click New.
2. Enter name of File. We recommend the company or trading name.
3. The default location for saving the client file is My Documents/Back Paddock
Company/Adviser/Clients
4. Select Save to create new file. Your newly created file will now open ready to start entering
data.
2. Entering New Client Details
1. Click on File tab >Info > Client Options.
2. Click on Client Details tab>Enter Client details>Click Ok to finish.
9
Back Paddock Adviser/Manager – User Guide
Existing Client File
1. To Rename the File
1. Open Windows Explorer or Hold Windows Key
and Tap letter ‘E’ key.
Caution: To re-name a file you have worked with via CornerPost, see Duplicating Files.
2. Find the file in My Documents/Back Paddock Company/Adviser/Clients.
3. Single right mouse click on the file name.
4. Click on Rename>Type in new name overtop>Hit Enter key.
Note: It is essential that the file has the “.adv” extension. It is possible to accidentally
change the file name extension when renaming files.
2. Duplicating Files
When creating a duplicate copy of an existing file with a different name, the following steps are
required for the file to be recognised as different from the original file by Corner Post.
1.
File tab>Save Client File As.
2.
Warning box appears – Not to use for Back Up>Click Yes.
10
Back Paddock Adviser/Manager – User Guide
3.
Rename –Type over top>Click Save or Click Save to keep existing name.
4.
Click File tab>Open>Click on the re-saved Client File.
5.
The Client File will then open in Adviser/Manager.
6.
Click on File tab>CornerPost>Re-set Sync clock for Current File.
Note: There now are two files with the same information. Either continue to edit both
differently named files separately or delete the original.
Caution: Failing to follow these instructions will result in two files called different names
on CornerPost with the same file number. This means that CornerPost becomes confused
about which file to send/retrieve or sync with. Call Help Desk for assistance if required.
Merging Files
Files can be merged together for a variety of reasons such as:

transfer information from one file into another such as Lease or Share Farms passed onto
other Clients; or

to capture the data from both files into one file such as when Advisers create plans and
email it to Clients to update into their current file that has all the historical data in it, and
vice versa.
11
Back Paddock Adviser/Manager – User Guide
1.
Open the file to be merged into. File tab>Open.
2.
In Management Zone>Select Year to be imported into. Click arrows to move forward and
back.
Note: Data will be imported to the Currently Open file. Farm and paddock names must be
the same. If transferring a farm to another client file, create farm and paddocks in file to
be added to first. Then merge>repeat for each year by selecting past years in Home tab.
Note: This will only import data into the current year - prior to merge select the past years
in the Home tab.
3.
Go to File tab>Save and Send>Click Merge
4.
Browse for the Client File to source the data from.
Caution: Save the source Client File to your computer under a different name - if came
from your Adviser with the same name).
5.
Tick Overwrite Existing Data.
Warning: Not ticking this will add data to what is already in the program for that year,
possibly creating duplicates in Fertiliser, Sprays, Operations and Production tabs. It doesn’t
merge existing same inputs/outputs together.
6.
Click Merge button>Click OK when Complete.
12
Back Paddock Adviser/Manager – User Guide
Note: a Back Up of the Client File is create as per prior to merge. It is located in
Documents/Back Paddock Company/Adviser/Clients – same folder as your existing Client
File. It will have a Date added to its name.
Backing-Up, Auto Save & Email Client Files
1. Back Up & Saving to Thumb Drive
Backing up and saving your file periodically is imperative. This will prevent loosing precious the
data and having to re-start from scratch.
1.
In File tab, Select Save and Send> Export File As.
2.
Rename File with a Date. This avoids confusion at a later date not to confuse old with the
current version of the file.
3.
Select to a new save location.
Tip: Recommend purchase a small Thumb Drive and label Back Paddock. Save/Backup
periodically to this Thumb Drive.
2. Auto Save
When adding data into the program there is no need to Save.
The Adviser/Manager program automatically saves at each step. This means there is:
No Undo button!
Tip: If accidently delete inputs, operations, crops or paddocks use Copy and Paste to reinstate
data exact/similar data.
3. Emailing Client Files
Email your file directly as an attachment to an Adviser or Client.
1.
Click on File tab>Click Send & Save>Click Send to button.
13
Back Paddock Adviser/Manager – User Guide
14
Back Paddock Adviser/Manager – User Guide
The Master Database/Global
Catalogue
The Master database is a common repository of information for ALL client files. It provides a
catalogue of products, inputs, default prices, yields and usage rates as well as other details such as
Pests, timings, and so on. These details in the Master Database are what populate the drop down
lists in your program.
1. Download New Master Database
1.
Download the Master Database from the Back Paddock Website. www.backpaddock.com.au
2.
Click on Products> Choose Adviser or Manager>Download Master Database.
3.
Choose Save As>Save to Desktop. This is a zip file.
4.
Once finished downloading>Click Open.
5.
Single right mouse click on the Master Database File name>Copy.
6.
Open Documents/Back Paddock Company/Adviser/Master Database.
7.
Single right mouse click>Select Paste.
8.
Then follow Install a Master Database instructions.
2. Install a Master Database file
1.
Save the Master Database file in Documents/Back Paddock Company/Adviser/Master
Database.
2.
Open Adviser/Manager and select Master Database or Icon top left corner of screen.
3.
Select Set Master File button.
4.
Select Browse – notice Current Master File listed.
15
Back Paddock Adviser/Manager – User Guide
5.
Click on the desired Master Database and select Open.
6.
New selected Master Database will be listed under Current Master File. Select Done when
complete. New Master Database will appear in view.
Note: Master Database can be used with Apps. See Upload Master Database to Mobile
App for more information
Modifying Master Database
Modifying and customising Master Database is possible. Prices and rates listed in the Master
Database are default only and can be modified. New crop types, chemicals, sprays, operations,
timings, and more are also able to be entered into the Master Database.
Note: There is no Find or Search function with the Master Database.
1. Adding a New Item
1.
Open Master Database to desired spot. For example if adding a new crop, expand all ‘+’ till
at the correct Crop type.
16
Back Paddock Adviser/Manager – User Guide
2.
Click on Add New Record button. A blank line will be displayed at the bottom of list.
3.
Type in correct name and details. This is how Items will appear in summaries and reports.
4.
Click on Sort Table Alphabetically which will insert the new Item in order for the drop down.
2. Updating and Modifying Items
1.
To update or modify costs, rates, or details of listed Items, find the correct Item listed.
For example: Glyphosate 450 is a Group M Glycine Chemical.
2.
Click on the desired cell such as $/Unit to update price or Default Rate (Unit/ha).
17
Back Paddock Adviser/Manager – User Guide
Note: Changes to the Master Database ARE NOT automatically reflected in Client files.
3. Update Client File with Changes made in Master Database
Updating Client from Master will carry through the new costs and rates into the Client file for
existing entries. New entries will pick up the updated costs and rates.
1.
In Home tab>Click on Update client From Master.
2.
Tick the desired boxes to update.
Note: This will completely overwrite any specific data entered in the Client File. Choose
Cost and/or Default Rates.
Note: Nutrients analysis for Fertilisers can also be updated in Master Database and carried
through either individually or with Costs and/or Default Rates.
3.
Complete for every year as required.
4. Excluding and Un-Excluding Individual Items
Open Master Database to desired Section where items are to be Excluded or Unexcluded.
1.
Click the box in the Exclude column for each Item:
1. Exclude is to tick the Exclude box at the beginning of the item row.
2. Unexclude is to remove the tick from the Exclude box at the beginning of the item row.
18
Back Paddock Adviser/Manager – User Guide
5. Quick Customisation - Exclude All
1.
Click on Exclude All Items in table. These will auto-tick all boxes in the Exclude column.
2.
Click Yes. This will overwrite any previous customisations with the Exclusion.
3.
Individually un-tick the Excluded box for each Item to ensure they are automatically
immediately available in the drop downs throughout the program.
Note: Continue to use the program as per usual. No need to save or update client file.
6. Quick Customisation - UnExcluding All Items
1.
UnExclude All Items in Table will un-tick all Exclude Boxes. This will overwrite any previous
customisations.
19
Back Paddock Adviser/Manager – User Guide
2.
Click Yes. This will overwrite any previous customisations with the Exclusion
3.
Individually tick the Excluded box for each Item to ensure they are automatically
immediately not available in the drop downs throughout the program.
Note: Continue to use the program as per usual. No need to save or update client file.
7. Uploading Master Database to Corner Post™
1.
Open Master Database.
2.
Click on Corner Post™ tab> Click on Upload.
3.
Using MobileApp>Select Pull Master Database button on the Login Screen
20
Back Paddock Adviser/Manager – User Guide
Orientation
Key Buttons
Throughout the program the process for adding, editing or deleting records is consistent. The
common buttons are as follows:
Add new record to bottom of each section
Delete selected record
Shift record Up and Down
one row (sort order)
Black arrow displays the active entry/row.
Caution: Deleting an entry is permanent. There is no undo function.
Key Tabs

File – Where functions and setup are regarding the Client File.

Home – Where all the data is added for paddocks in the Cropping program.

Farm – Where to add Farms, Paddocks and Areas.

Rotation – Rotation and Area Summaries.

Analysis – Financial Analysis of operation year.

Rainfall – Rain gauge and trends.

Cashflow – Activity cashflow per annum.

Livestock – Livestock costs and operations

Inventory – Input stock control.

Reports – Reports and extensions

Mapping – Maps.
The Farm Year
In Home tab, Farm Year is set in the toolbar of the Management Zone.
1. Change Farm Year
21
Back Paddock Adviser/Manager – User Guide
1.
To change a year, select the left or right buttons to move to the previous or next year
respectively. By default the program opens in the current year.
2. Reset Farm Year to Calendar, Seasonal or Financial Year
1.
Click File tab>Info>Client Option> Configuration. Choose a Start month from the drop down
list.
Settings - Options
1. Auto-Open Last File
1.
Click File tab>Click Options>Choose True from dropdown at Auto-Open Last File.
2.
Open desired Client File>Close Adviser/Manager program>Restart to reveal auto-opened
file.
2. Rotation Setup
To set the number of years visible as Rotations throughout the program.
1.
Click File tab>Click Options>Choose Rotations tab.
2.
Choose from dropdowns the Number of Years Displayed and Column Position of Current
Year>Click Ok.
22
Back Paddock Adviser/Manager – User Guide
3. Default Values
1.
Click File tab>Click Options>Choose Default Values.
2.
Change the Seasonal Finance and Number of Months Per Year, plus Growing season as
required.
4. Compact and Repair
Use Compact and Repair after fixing any errors with the file. It manages the current data on the
current machine.
1.
Click File tab>Click Info>Click Compact and Repair button>Click Ok when complete.
23
Back Paddock Adviser/Manager – User Guide
Navigation Pane
In Home tab>To move between paddocks you must use the Navigation Pane.
The Navigation Pane has several modes of presentation - once a paddock is selected its name will be
in bold.
1. Normal Mode
Tree shows hierarchy of Farms and Paddocks (Default view).
1.
Click on the paddock name to see the details in the Management Zone.
2. Crop Mode
Tree shows hierarchy of Crop type and Paddocks.
1.
Click the ‘+’ to expand the crop type view to see which paddocks are listed.
3. Link Mode
Tree shows paddocks / master paddocks as parent nodes of any paddocks or management zones
that are linked to them using paddock linking.
24
Back Paddock Adviser/Manager – User Guide
4. Map Mode
Navigation by paddock map. Use mouse wheel to zoom. (Not included in Standard versions)
1.
Click on the paddock to see the details in Management Zone.
Add Dates
1.
Click on the date cell and on the drop down arrow.
2.
Click on the day or scroll using the arrows to the desired month. OR
3.
Click on the Month name (March) and click on the month. Repeat for the Year.
25
Back Paddock Adviser/Manager – User Guide
Alternatively, the date can be directly typed into the date cell in the following format d/m/yy
For example: 8/9/11.
Symbols and Footnotes
Footnotes and symbols can be added in all sections within Management.
1.
Click on a symbol from the drop down.
2.
Enter information in Footnote section.
In Report the correct footnote is referenced to the Entry, similar to a text book. See below.
Paddock Notes
Paddock Notes displays the notes added in Farm. They are displayed above the paddock name.
Flags
1.
In Home tab>Click on Flag button.
26
Back Paddock Adviser/Manager – User Guide
2.
Check boxes appear next to Sowing Date:
Pasture, U/sow and Blend, Grade, Irrigated, Summer, Hort. and Perm.
 Pasture - tick when selecting a pasture crop. Allows for allocation of paddock to livestock
in the Livestock tab.
 Under Sow/Blend – If entering an Undersow or Blend ensures that the correct box is
ticked.
 Grade, Irrigated, Summer and Hort - automatically ticked depending on the Crop
selected.
 Permanent – is for plantings rather than annual crops.
Tip: Recommend not to tick Perm and instead treat the planting as an annual crop without
adding any costs $/t in the sowing zone. This will ensure that the Gross Margin is relevant
per annum rather than as a total over the lifetime of the planting.
Coverage Map
This opens the map editor allowing modification of the map for that paddock for that year. Maps can
be modified to reflect where the fertiliser applied, spraying and sowing has occurred. The amended
boundary for these three inputs occurs in mapping, this does not modify the original boundary or
arable area. See Mapping for more instructions on how to modify and edit boundaries. (Not included
in Standard versions.)
Timings
Adding ‘Timing’ into the program assists with identifying at which stage of the cropping program the
input or operation occurred.
1.
Click on the drop down arrow in the Timing box.
2.
Scroll through or start typing the initial letters of the timing. For example: typing ‘sowi’ will
take you straight to Sowing/Seeding.
27
Back Paddock Adviser/Manager – User Guide
3.
Select the timing from the drop down list by either clicking with your mouse on it or hit
enter once highlighted as per above.
Note: Images are attached to the Timings for display in Reports. This is why it may take
an extra second or two for the drop down to fall. Please be patient.
28
Back Paddock Adviser/Manager – User Guide
Setting Up Farms & Paddocks
To set up farms and paddocks, click on the Farm tab along the top toolbar.
Farms
1. Adding a Farm
In the Multi farm section you can add more farms or change the name of default ‘Home Farm’.
1.
Click on Edit Farms.
2.
Click on Home Farm name>Type new Farm name>Close.
2. Adding Multiple Farms
1.
To add a new farm>Click on Edit Farms button.
2.
Click Add button.
3.
Rename ‘New Farm’ – Highlighted.
4.
Modify farms – modifies navigation pane.
1. To re-order farms, select Farm name then click the up or down buttons.
2. To delete a farm, select the row of the farm you wish to delete and press Delete.
3. To exclude farms tick the Exclude box. See Reports for more information.
5.
Close the Multi-Farm dialog when complete.
Caution: Deleting Farms will permanently remove all data and paddocks for all years.
Note: Excluding Farms removes the Farm from Navigation View but the data remains in
the Client File for future use.
29
Back Paddock Adviser/Manager – User Guide
Paddocks and Areas
1. Quick Entry (default)
The Quick Entry feature is set as the default.
This allows you to automatically add a new paddock after editing the area cell and pressing the
Enter key on the keyboard. This can make it easy to work through a list of paddock names and
areas using minimal keystrokes.
Caution: Be careful when on the last paddock not to add an extra paddock. If you do, then
simply delete the surplus paddock.
2. Adding Paddocks and Areas
The paddock table on the Farm tab allows you to allocate any number of paddocks to a
particular farm. The table can only include the paddocks from the currently selected farm.
1.
Select the desired farm from the Multi-Farm Drop down box.
2.
Click on the Add button to add a Paddock. A default name appears.
3.
Replace default Paddock Name> Hit the Enter key.
TIP: Name the paddocks Alpha numerically including a Zero (0) for all number
paddocks between 1-9. For example B01, B02, B03. Sort paddocks Alpha Numerically
click A-Z Sort.
4.
Enter the Area in hectares (ha) in the next column. Hit Enter Key again>Repeat Steps 2-4.
5.
This is the (Boundary) Area of the paddock. (See Quick Entry Default)
6.
In the Production System column select from drop down either Broadacre or Horticulture.
7.
Notes (All Year) allow you to add significant information about the paddock which can be
recorded for historical purposes and can be displayed in Reports. Useful when splitting or
combining paddocks, stating obstacles or chemical residues, or situations for future noting.
3. Arable Areas
The Arable area is the productive area of the paddock minus roads, channels, trees, dams, etc.
The Arable % of the paddock will auto calculate.
1.
Click on an Arable cell and enter hectares (ha) >tap the down arrow key on your keyboard
and enter area as you go until all paddock areas are completed.
30
Back Paddock Adviser/Manager – User Guide
Modifying Paddocks and Areas
1. Changing Area after setup complete
Once farm setup is completed, areas can be changed afterwards, however the change does not
automatically flow through to the Paddocks in the Home tab.
1.
Farm tab>Change area(s) for required paddock(s).
2.
Home tab>Tools Section>Click Update Area from Paddock Master.
Caution: Any paddocks where areas have been modified will be overwritten with the new
area. For example: Areas for split paddocks, or part paddocks where sprays, fertiliser and
operations have not been applied to entire paddock area. Suggest manually change the
area in the target paddock instead to retain integrity of the modified areas in the other
paddocks.
2. Insert a paddock between existing paddocks
1.
In Farm tab>Click on the row of the paddock that you wish a new paddock to appear above.
2.
Click on the Insert button.
3. To delete a paddock
1.
Click on the row of the paddock you wish to delete. Double check it is the correct paddock.
2.
Click on the Delete button.
Caution: Deleting Paddocks will permanently remove all data for all years.
Excluding paddocks removes the paddocks from view and the data remains for future use.
4. Restructure Paddocks and Farms
This allows easy movement of existing paddocks to other farms.
1.
Click on Restructure Paddocks.
31
Back Paddock Adviser/Manager – User Guide
2.
Click on the paddock to be re-allocated to another farm.
3.
Choose the desired farm to be reallocated into.
Tip: Proceed from top to bottom of the list to ensure that paddock order is maintained
into the new farm, otherwise you may have to manually re-sort.
5. Merging Paddocks
This allows easy merging of existing paddocks into neighbouring paddocks.
1.
Click on Restructure Paddocks.
2.
Choose Area to Paddock Option.
3.
Choose a Paddock at merging Year>Click on paddock to merge with from dropdown.
4.
Repeat for paddock until all future years have been allocated to selected neighbour
paddock.
For Example: Pine Tree (100ha) 2012 was merged with Kurrajong (125). There are now 2
divisions if there were crops already entered into Management tab which one can be
deleted.
32
Back Paddock Adviser/Manager – User Guide
5.
Once completed all years>Click Management tab>Click Update Area from Paddock Master.
6.
Removed Merged paddock from Navigation list>Click Farm tab>Select Farm from
dropdown>Tick Exclude for the paddock merged.
33
Back Paddock Adviser/Manager – User Guide
Share Farming
1. Set up Share Farming
1.
Share Farming set up in File>Info>Client Options>Configuration.
Click on the ‘+’ next to the Share Farming title and change False to True.
2.
In Home tab>Navigation>Click on a Paddock to be Share farmed.
It will highlight in blue.
3.
Click on the Share Farming Handshake.
4.
Select Edit Share Farmers.
5.
Add a New Share Farmer
>Enter notes about each Share Farmer>Click Close.
34
Back Paddock Adviser/Manager – User Guide
6.
Adjust the percentage of income and costs that are attributed to the particular share
farmer>Select the Share Farmer in the bottom cell from drop down>Click Close.
2. Copy Share Farming to other paddocks
1.
In Home tab>Prior to Sowing Crops, Copy and Paste Crop to all relevant paddocks. This saves
repeating setup. Remember not to copy to other irrelevant paddocks.
1. Click on Share Farmed Paddock in navigation tree so it highlights Blue.
2. Click Copy Data between Paddock button on the top toolbar.
3. Tick only Crop> Hold CTRL key on keyboard down>Click using mouse on all paddocks
to copy Share farming too> Release CTRL key> Click Copy button.
35
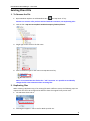
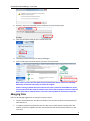
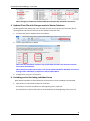
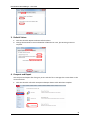
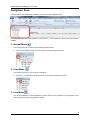
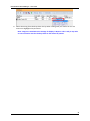
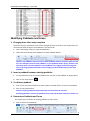
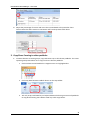
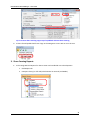
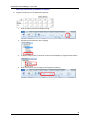
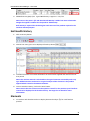
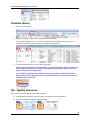
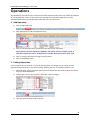
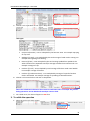
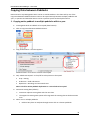
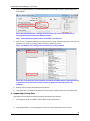
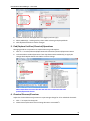
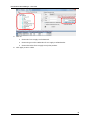
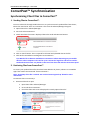
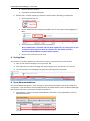
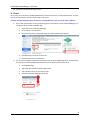
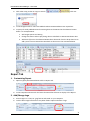
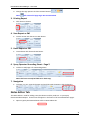
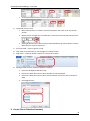
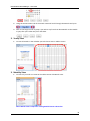
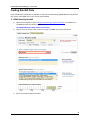
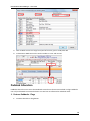
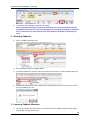
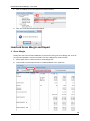
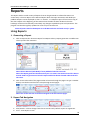
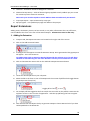
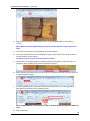
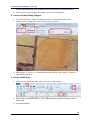
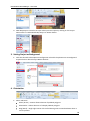
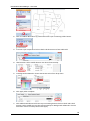
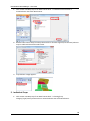
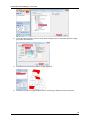
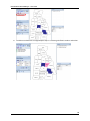
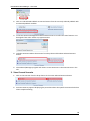
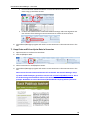
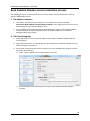
Back Paddock Adviser/Manager – User Guide
Tip: to remove Share Farming copy Crop of a paddock without Share Farming.
2.
A share farmed paddock will have a logo in the Navigation screen with an S on the icon.
3. Share Farming Reports
1.
At this stage General Reports for Share Farmer and Landholder are in development.
1. Click Report tab.
2. In Report Library (on left side)>Click General or General (Link Mode).
36
Back Paddock Adviser/Manager – User Guide
Management Zone
Sowing Crops
1. Adding Crop and Dressing
1.
Select Paddock from Navigation pane to add a Crop.
Note: For the initial crop in each paddock the Sowing line will automatically appear.
2.
Click on Crop Type Cell>Select Crop Type from drop down> Repeat for Variety.
The Crop Rotation is displayed above the sowing row.
Tip: To sow only a part of the paddock, either adjust the area figure or use Coverage Map
to map and auto-calculate the area covered.
Note: Flags must be ticked to Pasture for paddock allocation to Livestock. See Flags for
more information.
3.
The $/t and kg/ha is provided by default from the Master Database. To change click on the
cell and type over top.
4.
Complete the Date, Symbol and Footnote as required.
5.
Click Dress button to add Dressing to Sowing.
6.
Click Add button>Select Product from Drop down>Click Close.
37
Back Paddock Adviser/Manager – User Guide
7.
To complete additional paddocks either: Repeat steps 1-6: Copy and Paste or Link Paddocks.
Tip: Link Paddocks if paddocks are treated EXCATLY the same. See Linked Paddocks for
more information.
Tip: At Sowing, add Share Farming and Irrigation to relevant paddocks. See Share Farming
and Irrigation sections for more information.
2. Creating a Blend or Undersow
1.
Add Crop (as per above).
2.
Select Blend/Undersow button for adding more crop types in Sowing Mix.
3.
Click Add button> Seed Blends Box appears>Select Crop Type and Variety to create a Blend
or as an Under Sown with the main crop>Click Close.
Blend
Undersow
3. Splitting Paddocks
This allows for two (2) crops in the one paddock with the area split between the different
cropping zones.
1.
Follow instructions as above for the initial crop zone.
2.
Click on the Add button next to the Year to add a second sowing zone.
Note: Click the delete button if not required. Blank sowing lines can create unnecessary
bulk in Reports and Rotations tabs.
38
Back Paddock Adviser/Manager – User Guide
Tip: In sowing line change the area of each section of the paddock so that the new area
appears when adding inputs or operations. Note: See Coverage Map and Mapping for
mapping the split and auto-calculating the area.
3.
Click in the Area Cell>Type over top the new Area for each zone>Complete adding inputs and
production as per usual.
Note: Clicking on each of the sowing lines will change the bottom frame to display the
Fertilisers, Sprays, Operations, Production, Gross Margins, Spray Recommendations, etc,
that are specific for that Crop/Crop Zone.
Tip: If changing a sowing area after inputs and operations have been added either
manually the change the area in each input and operations OR copy a paddock which has
the same/very similar inputs and operations over the top of the paddock zone to reset the
new sowing area throughout the paddock. See Copy and Paste for more information.
4. Two Crops Harvested within the Same Year (Summer Cropping)
Having two Crops harvested in the same year is necessary when growing summer crops. It is
recommended that Summer Crops are added into the paddock as per the year in which Harvest
occurs. This allows for the Gross Margin to be in its entirety for the Crop.
1.
Follow instructions as above for the initial crop zone.
2.
Click on the Add button next to the Year to add a second sowing zone.
Note: Click the delete button if not required. Blank sowing lines can create unnecessary
bulk in Reports and Rotations tabs.
3.
Complete inputs, operations and production as per usual. The areas remain the same.
Note: Clicking on each of the sowing lines will change the bottom frame to display the
Fertilisers, Sprays, Operations, Production, Gross Margins, Spray Recommendations, etc,
that are specific for that Crop/Crop Zone.
Tip: For inputs and operations that occur in the previous year, manually change the year in
the date to the previous year. For example: 29/12/11.
Paddock Linking
Paddock linking gives you the ability to link paddocks to other paddocks which are treated exactly
the same for long or entire periods.
39
Back Paddock Adviser/Manager – User Guide
This allows for one paddock to become the master paddock where changes made to it automatically
flow through to the other linked paddocks.
It also compiles all linked paddocks into an individual paddock report in General (link mode) Report.
See Reports for more information.
1. To link a paddock
1.
Choose a paddock as Master (no action required)>Click on paddock in Navigation pane.
2.
Click on another paddock to link to the Master paddock.
Note: Once linked, all changes to sowing, inputs, operations and production must be made
in Master paddock to automatically change in the linked paddocks.
3.
Click the Link button.
4.
Click on the Link To (Plan Only) cell>Click on Master Paddock from the drop down list.
5.
Repeat for all paddocks as required.
Note: Once linked only the area can be changed.
Tip: This can be used as an alternative to copying data and to produce smaller reports for
large farms where crops are the same. For example: Ley or native pastures with no costs.
2. View Linked Paddocks
1.
In Navigation Pane>Click Link-Mode button. Displays Master Paddock with linked paddocks
underneath. Click on the ‘+’ to see more.
Paddocks that are linked to a Master Paddock are displayed as above.
3. To unlink a paddock
1.
In Navigation Pane>Click Link-Mode button.
2.
Click on a Linked Paddock in Navigation Pane.
40
Back Paddock Adviser/Manager – User Guide
3.
Click on Paddock Linking button.
4.
Click in the Link To cell.
5.
Press Delete key on keyboard to remove Master Paddock name. The Linked To cell should be
blank.
6.
Paddock is then visibly unlinked in the Navigation Pane.
Irrigation
This section allows water costs and volumes to be attributed to the paddock.
1.
Click on Irrigation button.
2.
Enter a Default $/ML. Can include delivery and pumping costs per MegaLitre if desired.
Note: Default $/ML appears in new entries.
3.
Click the Add button.
4.
Add Date of irrigation and number of MegaLitres per ha
5.
Enter Notes as desired.
41
Back Paddock Adviser/Manager – User Guide
Note: Can print this list per paddock as required.
6.
Irrigation Summary can be displayed in Reports.
1. Click on Report tab>Click on Report Setup.
2. Expand Input Summaries>Tick Irrigating.
3. In Report Library>Click on General or General (Link Mode) to regenerate the Report.
4. Click the arrows to skip through to the Irrigation Summary.
42
Back Paddock Adviser/Manager – User Guide
Soil Health
Fertiliser
1. Adding a Fertiliser
1.
Click on Soil Health tab.
2.
Click Add button to create a new Item.
3.
Click on blank cell in Fertiliser Column>Click on Product from drop down list.
4.
Adjust default cost ($/t), area (ha), and application rate (kg/ha).
Tip: To apply Fertiliser to only a part of the paddock, either adjust the area figure or use
Coverage Map to map and auto-calculate the area covered.
5.
Click on Cell under Timing>Select Timing from drop down list>Add Date.
Tip: Click on the Fertiliser>Click on up or down arrows to move into data order top to
bottom.
2. Liquid Fertiliser
1.
Repeat above steps 1-5.
2.
Tick Liquid box (if not already ticked as default when choosing product).
43
Back Paddock Adviser/Manager – User Guide
3.
Add Bulk Density (BD) t/m3. Typical Bulk density is approx. 1-1.4 t/m3.
Note: Be sure the price is $/T and that the Bulk Density is added. For more information
Google the supplier’s website for the products’ bulk density.
Bulk Density is required for calculating the total amount of the product required in the
Fertiliser Summary Report.
Soil Health History
1.
Click on History button.
2.
Choose how many years to be displayed from drop down.
3.
Tick Nutrient Audit to see what the balance of each nutrient applied and removed is over
that period.
Note: The nutrient removal is calculated on the typical amounts removed by each crop
type. Added nutrients are based on a typical analysis of the elements in the product
applied which is listed in the Master Database.
4.
To Print Fertiliser History, click on the Print button.
Note: Data in the Plan section must be copied to ‘Actual’ for the previous year’s fertiliser
records to be displayed in the fertiliser history. See Copy Plan to Actual for more
information.
Elements
1.
In Fertiliser>Tick the Element box to display elemental analysis (%) for each fertiliser
product.
44
Back Paddock Adviser/Manager – User Guide
Tests
1.
Click on Test button.
2.
Click Add button >Enter details for each soil test result – one test per line.
Note: This is a very manual way of entering soil test data. Ask your agronomist if they use
Back Paddock Soil Mate for soil tests. The soil test information, results and
recommendations can be directed loaded into each paddock within your Back Paddock
Adviser/Manager file. See Soil Mate section for more information.
45
Back Paddock Adviser/Manager – User Guide
Sprays
Adding Chemicals
1. Add a Chemical Mix
1.
Click on Sprays tab.
2.
Set Default Water Rate (L/ha).
3.
Click Add button to add a new mix.
4.
Adjust the Hectares (ha) and water rate as desired.
Tip: To apply chemical to only a part of the paddock, either adjust the area figure or use
Coverage Map to map and auto-calculate the area covered.
5.
Add Target Species, Timing, Date and Notes.
6.
Sort mixes in date order>Click on Mix line>Use up and down arrows to move into order.
2. Adding Chemicals & Adjuvants
46
Back Paddock Adviser/Manager – User Guide
1.
Click Add button below in Chemicals section.
2.
Click on Drop Down> Chemical from list.
Note: Either scroll down or begin typing the product name. For Example: ‘Rou’ for
Roundup.
Data will auto populate the entry based on information in the Master Database.
3.
Change the Units, $/Unit, Units/ha as desired. Required Auto-calculates Total Amount.
4.
To add a Footnote>Select a Symbol from drop down>Type note in the footnote section.
5.
Activator and Utility agents including, Surfactants, Wetters, Oils, and Ammonia Sulphate are
available through the Adjuvant tab.
6.
To add a Surfactant>Repeat steps 1-4 in the Adjuvants tab.
Note: The % column is automatically calculated based on the Water Rate. Enter the
amount of adjuvant as follows: 100mls = 0.1%, 110mls = 0.11%, 1L =1%, 1.5L=1.5%, etc.
Tip: To keep Chemical costs up-to-date use the Find and Replace function.
47
Back Paddock Adviser/Manager – User Guide
3. Concentrated Spray
1.
Ticking the Conc. Spray box, adjusts the spraying method to a concentrated spray, as used in
horticulture, rather than a broad acre spraying method.
2.
Add a figure in the Runoff/ha column that appears in the Mix for addition into the Chemical
calculation.
3.
In Chemical section below choose from drop down either Units/100l or Units/ha.
Note: Units/ha do not auto-calculate a CF or Conc.Rate.
Spray Manager
1.
Edit View Mode
1. Untick Show Chemical and Adjuvants to change the view on the corresponding
screen. This Removes Chemical and Adjuvants section (highlight below). Not
Recommended.
2.
In Summary View Mode
1. Tick the various boxes to add columns to the display.
48
Back Paddock Adviser/Manager – User Guide
2. Rearrange view by:
i. Moving column order - Hold Right Mouse button>Drag>Drop (left go button)
next/before/ after desired columns.
ii. Sort by ascending or descending order per column>Click on column title till arrow
points up or down.
For example: Date – recent data at top or bottom of list.
iii. Drag>Drop into Column Header box above to Group view by the Column (Diagram
below).
Tip: The Summary View can be done per paddock or by selecting the Farm Name
or Client File Name at the top if the Navigation Pane in Home tab to display all
chemicals per farm or per client file.
3. To Print Summary View>Click on the Print button.
49
Back Paddock Adviser/Manager – User Guide
Chemical History
1.
Click on History button.
2.
Select the number of years to be displayed from drop down.
The columns display the year, crop of the particular year, chemical class, group, type,
chemical brand name, units, units/ha, area, date and the timing.
3.
To Print Chemical History, click on the Print button.
Note: To generate History in the Plan section – Data must be already copied to ‘Actual’ for
the previous year’s Chemical records to be displayed in the Chemical history. See Copy
Plan to Actual for more information.
Tip: The History can be done per paddock or by selecting the Farm Name or Client File
Name at the top if the Navigation Pane in Home tab to display all chemicals per year per
paddock, farm or client file.
QA – Quality Assurance
This section is to enter data as a Spray Diary function.
1.
Copy Plan data to Actuals. See Copy Plan to Actuals for more information.
2.
Click on Plan button>Change to Actuals Mode.
>
50
Back Paddock Adviser/Manager – User Guide
Note: Must be in Actuals for QA button to appear.
3.
Select paddock in Navigation view>Click on Sprays tab> Click QA button.
New columns are added: Date:Time, Operator, Method, Machine Reference, Plant
Condition, Weather, Soil Moisture, Water Source, Wind Direction, Wind Speed, Temp, Delta
T, Humidity, Rain-24, Rain, and Rain.
4.
Enter data specific to each Mix into each column except for:

Date/Time – Click on the cell>Type in time in hours:minutes and AM/PM.

Operator – Choose name from drop down list. See Inventories>People to add Operators.

Machinery Reference – Choose Machine from drop down list. See Farm>Machinery to
add Machines.

Rain -24 – Refers to the Rain within the 24hour period prior to spraying.
Note: Data is unable to be printed or accessed in a Report setting.
51
Back Paddock Adviser/Manager – User Guide
Operations
The Operations pane allows you to input the particular operations that will occur within the paddock
at a particular point in time. In this section you are able to link particular operations to other
activities and choose if to cost operation either per tonne or per hectare.
1. Add Operation
1.
Click on Operations tab.
2.
Click Add button to add new Operation entry.
3.
Click on the blank Operation cell>Click on Operation from drop down.
Note: Default cost from the Master Database will appear. Where multiple rounds of
operations appear the cost is multiplied. For example: Boomspray x 03 is $7x3 = $21.
4.
Click on Timing cell>Click on Timing from drop down.
5.
Click on Date>Select Date.
2. Linking Operations
Costs of operations are entered on a per hectare (ha) basis. To change to a per tonne (t) basis
requires linking operation to Crop area (sowing), Seeding, Harvest, or Fertilisers (Select or All).
1.
Add Operation, Timing and Date. Notice the Area figures that are coloured Red. This means
they are Linked Operations.
2.
Change figure in Cost ($) column to reflect per a $/Tonne figure.
3.
Click on Linking Operation button.
4.
Link Type and Link Item columns appear.
52
Back Paddock Adviser/Manager – User Guide
5.
Choose a Link Type>Click on Link Type in drop down.
Link Types
6.

Crop Area (ha Sown) - Cost is multiplied by the hectares sown. For example: Spraying
of crop area.

Seeding ($/t seed) – Cost multiplied by the total tonnage of seed used in sowing. For
example: Seed grading and cleaning.

Harvest ($/Unit) – Cost multiplied by the total tonnage yielded from paddock. The
Yield is based on the Expected tonnes/ha average estimated in Production tab. For
example: Cartage of crop.

Fertiliser ($/T All) – Cost multiplied by total tonnage of fertiliser used in Soil Health.
For example: Cartage of fertiliser.

Fertiliser ($/T Select Fertiliser) – Cost multiplied by tonnage of a specific fertiliser
used in Soil Health. For example: Cartage or spreading of selected fertiliser.
Choose a Link Item>Click on Link Item in drop down.
Note: The Linked Item is based on the entries in Production tab. For example: Hay/Cotton
baling operations can be added and costed per tonne or bale.
7.
For Linked Items, the Area will appear in RED font.
3. To unlink the operation
1.
Select No Link in Link Type column.
53
Back Paddock Adviser/Manager – User Guide
Summary
The Summary tab provides a central location to get Summaries of information.
1.
Choose from dropdown at Crop and Quantity for options.

Crop - seed quantity, cost and total area sown

Variety – Quantity, cost and total area sown

Fertiliser – Quantity, cost and total area spread

Chemicals – Quantity, cost and total area applied

Operations – Quantity, cost and total area applied.
2.
To display the summary over a monthly period, simply tick the show months box.
3.
Summary in view can be printed.
Diary
The diary pane allows for you to enter notes or data for particular dates in regards to the selected
paddock.
1. Adding Details to Diary
1.
Click on desired paddock in Navigation Pane for Diary Entry.
2.
Click Diary tab>Use arrows at either side of the month title to scroll to a desired month>
Click on a date.
3.
Click Add button to add an entry.
54
Back Paddock Adviser/Manager – User Guide
4.
Enter text into Details box.
5.
Repeat Step 2 and 3 for multiple entries on that paddock.
Tip: Copy text to another paddock or date by highlight text>single right mouse click>Select
Copy>Add diary entry in desired paddock and/or date>Single right mouse click in Details
cell>Select Paste.
2. Summary of Diary Details
1.
Click on a desired paddock or on the Client File name (at top) in Navigation Pane.
2.
Tick Summary Mode.
3.
Scroll through and Click on a start date>Click on From.
4.
Scroll through and click on an end date> Click on To.
A view with the paddocks (if file name selected), dates and details will appear.
Tip: Can print the diary per paddock or in summary view.
Tip: Details can be edited in Summary Mode, although additional entries can only be made
in each paddock.
Production
The production pane determines the expected prices and yields for the particular paddock
highlighted in the navigation section. In this section you able to add additional harvest units like
Grain, Straw, Bales, Boxes, Cartons, ect.
1. Add Product, Yield and Returns (Price)
1.
Select Production tab.
2.
Click Add button.
A blank entry will appear.
55
Back Paddock Adviser/Manager – User Guide
3.
Click on the empty product cell>Select product from drop down.
4.
Enter data into all cells including:
1. Date of Harvest.
2. Kg/Unit – for example 1000kgs/tonne.
3.  Per Ha – Tick if Yield/Price estimate is per ha. Untick if per paddock (total area).
4. Target Grade.
5. Yield (Units/ha) - Low, Expected, High Yield estimate.
6. Price ($/Unit) - Low, Expected and High Price estimate.
7. Retain Units - Amount of Units retained from that specific paddock.
5.
Repeat steps 2-4 for additional products yielded from same paddock in the same production
year. For example Straw, Lucerne, etc.
6.
Copy and Paste Production into other paddocks with the similar Product/Yield/Returns.
1. Click Copy button>Untick all options except for Production.
2. Hold Ctrl Key down on Keyboard>Single mouse click on relevant paddocks.
56
Back Paddock Adviser/Manager – User Guide
3. Release Ctrl key>Click Copy button.
2. Production Summary
The Production Summary provides a crop production forecast specifically per crop and variety in
tonnes by Low, Expected and High yield estimates.
1.
As Yield estimates are entered, the Production Summary - Plan calculates the estimated
total and Retained for that Paddock area. For example 3 Tonne/ha x 206ha = 618 Tonnes.
2.
For total yield views per Client File or Farm
1. In Navigation pane>Click either Client File Trading Name (at very top) or Farm Name.
For example: Crop View – Displays total Tonnage per crop on Green Swamp Farm.
2. Choose Crop or Variety from drop down.
For Example: Variety View – Displays total Tonnage by Variety on Green Swamp
Farm.
57
Back Paddock Adviser/Manager – User Guide
Gross Margins
The Gross Margins pane can show the gross margins of each individual paddock or of the entire farm
and Client File. Gross margins can be viewed in “Plan” or “Actual” modes.
1.
Click on Gross Margins tab.
2.
Gross Margin View can be modified to display different Costs, Yield and Return Gross
Margins depending on which level is being viewed. In Navigation pane> Click on:
1. Client File Trading Name –Display Gross Margins per crop for the entire file.
2. Farm Name – Displays Gross Margins per Crop for the selected Farm.
3. Paddock Name – Displays Gross Margin for the crop in the selected Paddock.
Typical Gross Margin View: Note: this is for Barley across all paddocks.

Expected Price and Yield = $278,000 Return.

Costs: Total = $166,475; $/ha = $299.42.

Gross Margin $/ha = $200.58.
58
Back Paddock Adviser/Manager – User Guide
Note: When viewing Gross margins by Client File Trading Name or by Farm, scroll down to
view Gross Margins for the other Crops.
3.
Interest and Depreciation can be added to the Gross Margin by ticking the boxes. Then the
accumulated interest and depreciation for the year are displayed in the gross margin. These
contribute to the costs of the farm but are generally absent from the gross margins as they
are commonly fixed costs.
4.
To Print the Gross Margin>Click Print button next to Interest.
59
Back Paddock Adviser/Manager – User Guide
Copying Data between Paddocks
Data entered in any Management Zone can be re-used elsewhere in the Client File by use of the
Copy Data between Paddocks button. Data can be copied entirely between multiple paddocks and
years, or portions and individual entries can be copied to specific and multiple locations.
1. Copying entire paddock to multiple paddocks within a year.
1.
In Navigation>Click on Paddock to be copied (data location).
2.
Click on Copy Data between Paddocks button.
3.
Copy Paddock Data – Plan box appears.
Paddock listed in red is Source of Data to be Copied
4.
Only Ticked Data Copied – tick on/off to select portion to be copied.

Crop = Sowing

Production = Yield and Returns

Operations = Workings and associated costs
Note: Tick all for Entire paddock duplication or a mix of tabs to be copied.
5.
6.
Overwrite existing data (default)

Overwrite replaces existing data with the new data.

The Append to existing Data option will merge with the existing data at the destination
area.
Select one or multiple paddocks.
1. Hold Ctrl Key down on Keyboard>Single mouse click on relevant paddocks.
60
Back Paddock Adviser/Manager – User Guide
2. Use scroll bar on Right side to move up and down the list.
7.
Click Copy button.
2. Copying to multiple paddocks in another year.
1.
Complete Steps 1-7.
2.
Change the Destination Year from the drop down. Scroll up for past years/ down for future
years.
3.
Click Copy button.
3. Copying Individual Inputs Between Paddocks
To copy an individual entry such as chemical mix, a fertiliser or an operation to other paddocks.
1.
Find and Click on Input Entry (black arrow appears and cursor is blinking on that row).
Note: For a Chemical mix – Ensure the cursor is blinking in Mix section (black arrow at
beginning and cursor blinking on Mix row).
2.
Select Copy Data between Paddocks button.
61
Back Paddock Adviser/Manager – User Guide
3.
Click on Append Selected …Fertiliser/Operation/Chemical Mix> In Red – details about the
item appears.
Note: The Append Selected….changes based on where the cursor was placed prior to
selecting the Copy Data Between Paddocks button.
Note: Ticked Data boxes (left) become unavailable and irrelevant.
4.
Click on one or multiple paddocks by holding Ctrl Key down and Clicking on the name of each
Paddock. Use scroll bar on Right side to move up and down the list
Note: This displays the existing mixes and chemicals in each paddock.
Note: This view shows the Chemical Mixes and Chemicals added. When selecting fertilisers
or Operations they will show list each Fertiliser or Operations already listed in the
paddocks.
5.
Release Ctrl key when finished>Click Copy button.
6.
The copied Entry is added at the bottom of the section copied too>Re-Sort into date order.
4. Appending Existing Data
Copying Sections without overwriting existing data within that Section.
1.
In Navigation>Click on Paddock where data is to be copied from.
2.
Copy Paddock Data – Plan box appears>Tick one or more Data Boxes to be copied.
62
Back Paddock Adviser/Manager – User Guide
Paddock listed in red is Source of Data to be Copied
3.
Click on one or multiple paddocks by holding Ctrl Key down and Clicking on the name of each
Paddock. Use scroll bar on Right side to move up and down the list.
4.
Click on Append to Existing Data>Click Copy button.
For Example:
1. Copying 2 Fertiliser Items listed in Soil Health tab.
2. To another paddock with only 1 Map Item.
3. Resulting in 3 Fertiliser Items listed in Soil Health.
63
Back Paddock Adviser/Manager – User Guide
Find & Replace
The Find and Replace feature allows quick updating and changing of prices, rates and products
within Client or Scenario Files. It also enabled enquiries to find where and when instances that
inputs, products and prices are used throughout the File. This saves having to trawl through each
paddock manually. This function is also used as a quick check prior to finalising the Plan or Actuals.
1. Open Find/Replace
1.
Open Client File>Select Correct Year (Use arrows to change year).
Note: Find replace only updates prices/rates/products in that client file only for that year.
It does not update the Master Data Base. Although use copy and paste into other years
the changes carry through.
2.
Click Find/Replace button.
3.
Find/Replace Box appears>Click on the ‘+’ next to the Coloured dots to expand each
section>Continue to click to drill down into each section.
2. Find/Replace Sowing Rate and Seed Cost
Update sowing rates and seed costs in each paddock without the need to use Copy and Paste.
1.
Click on ‘+’ next to Crops/Crop/ Type/Variety.
For Example: Click on Wheat APH to view all the Varieties. And/Or
Click on the Variety name Chara to view only paddocks with Chara.
64
Back Paddock Adviser/Manager – User Guide
Crop Type
Variety
2.
Tick Rate and/or Cost box>Enter figures to replace.
3.
Replace Selected Records only by choosing individual paddocks>Hold Ctrl Key on Keyboard
down>Single click on each Paddock Name to select>Release Ctrl Key> Click Replace button.
Or
4.
Click Replace button to Replace All Records in Table.
5.
Click Yes to confirm Replace Selected Records.
6.
Changes appear in Rate – Kg/ha and Cost $/t columns.
3. Find/Replace Crop Type and Variety
Change crops and varieties in each paddock without the need to use Copy and Paste.
1.
Click on ‘+’ next to Crops/Crop/ Type.
65
Back Paddock Adviser/Manager – User Guide
2.
Tick Item>Select Crop Type from drop down>Select Paddock(s) to apply the change>Click
Replace button>Click Ok to confirm change.
3.
Click on ‘+’ Crop/Type to view change to Crop in paddock(s)>Variety is blank.
4.
Tick Variety and Item boxes>Choose Variety from drop down>Select paddock(s) to apply
change>Click Replace>Click Ok to confirm change.
5.
Variety appears with default sowing rate (kg/ha) and cost ($/t) from Master Database.
4. Find/Replace Costs and Rates for Fertiliser/Chemical/Operations
This is particularly handy when estimating costs rather than using default in the Master
Database or when updating actual costs.
1.
Click ‘+’ Fertiliser/Chemical/Operations>Click Fertiliser/Chemical/Operation Name.
66
Back Paddock Adviser/Manager – User Guide
2.
Tick Rate and Cost> Add application rate (kg/ha) and cost ($/t).
3.
Select paddock(s) – holding Ctrl key down while selecting multiple paddocks.
4.
Click Replace>Click Ok to confirm changes.
5. Find/Replace Fertiliser/Chemical/Operations
Changing products or operations is simple when using Find Replace.
1.
Click on ‘+’ Fertiliser/Chemical/Operations>Click Fertiliser/Chemical/Operation Name
2.
Tick Item>Select Product/Operation from drop down>Select Paddock(s) to apply the
change>Click Replace button>Click Ok to confirm change.
Note: Remember to ensure that the rate and cost is relevant to the new
product/operation chosen.
6. Chemical Discount/Premium
Adjust the chemical discount/premium as a percentage change for all or individual chemicals.
1.
Click ‘+’ to expand to Chemicals.
2.
Chem.Discount/Premium %Price Change becomes active>Add %.
67
Back Paddock Adviser/Manager – User Guide
3.
Click on:
1. Chemicals for it to apply to all Chemicals.
2. Chemical Type such as Herbicides for it to apply to All Herbicides.
3. Chemical Product for it to apply to only that product.
4.
Click Apply to ALL in Table.
68
Back Paddock Adviser/Manager – User Guide
CornerPost™ Synchronisation
Synchronising Client files to CornerPost™
1. Sending Files to CornerPost™.
To access Client File through mobile devices or to synchronise with updated files from Clients,
Client Files need to be ‘Sent’ to CornerPost™ first from the Adviser/Manager Program.
1. Open Client File in Adviser/Manager.
2. Go to File tab>CornerPost™.
3. Check the Client File name is displayed above the Send and Retrieve buttons.
4. Click on ‘Send’ button. This is required for all initial and uploaded data in the file.
5. Click OK for Succeeded in Pushing Data to CornerPost™.
Tip: Wait for file to become available on CornerPost™ before Retrieving on your mobile
device or other computers. This can be up to a minute for large files and less for smaller.
Send and retrieval times vary based on the size of the client file and the connection speed.
2. Retrieving Files from CornerPost™
To access your updated client files that have been added to by clients, advisers or via Mobile
App> files need to be ‘Retrieved’ from CornerPost™.
Note: A Back Up of the file is created. See section ‘Restoring Back Up’ below for more
information.
To Retrieve there are two ways:
1.
Retrieve while File is open.
1. Open Client file in Adviser/Manager.
2. Go to File tab>CornerPost™.
3. Check the Client File name is displayed ‘Currently Open Client File’.
69
Back Paddock Adviser/Manager – User Guide
4. Click on ‘Retrieve’ button.
5. Click OK for Download Complete.
2.
Refresh Files – without opening up each file. Quicker when ‘Retrieving’ multiple files.
1. Click on Refresh File List.
2. Review which files have Changes Available> Click on the required File (highlights in
Blue).
3. Click on Retrieve Selected File from CornerPost™.
Note: Updated File is retrieved and new data copied into your existing file on your
computer and a progressive Back Up created in the .bak Folder located in
Documents\Back Paddock Company\Adviser\Clients.
4. Finished. Use Client File as per usual.
3. Sorting View
The columns in the Files Available on CornerPost™ section can be sorted into several views.
1. Click on the column headings to sort by column. OR
2. Click and hold on a column heading and drag to the grey box. This will sort as a priority.
3. To remove Click on the heading in the grey box and drag back into position.
4. Spray Recommendations
The contact details, disclaimers, notes and logo in Spray Recommendations has to be loaded onto
CornerPost™. This will allow it to be available both on the mobile devices and in all Adviser/Manager
files in general and as it synchronises through CornerPost™.
1.
Open Adviser > Click on Spray Recommendations tab> Click on any Job Number > Click on
Edit Selected button.
70
Back Paddock Adviser/Manager – User Guide
2.
Update details in Report, Notes Editor and Settings tabs>Click Save.
3.
Go to File tab > CornerPost™.
4.
Click on Upload Recommendation Template to CornerPost™.
5.
Repeat if details change at a later stage.
5. Restoring Back Up
1.
A back up copy is saved in Documents/Back Paddock Company/Adviser/Clients/Bak folder.
2.
Back Up Name will have (date and time).bak.
3.
To restore Back Up > Single right mouse click on file name > Click Copy.
4.
Single right mouse click on Client folder> Click Paste.
71
Back Paddock Adviser/Manager – User Guide
5.
Prior to restoring the Back Up file>In Client Folder>Single right mouse click on the corrupted
Client File name>Select Delete unless renaming the Back Up File to a new different name.
6.
To Restore Back Up Client File >Single right mouse click on copied Back Up Client File name.
7.
It will highlight the entire name in blue>Tap Backspace key on keyboard to remove the
brackets, date, time and .bak. (Rename here to a different new name if desired).
8.
Type .adv. next to file name.
9.
Open Back Paddock Program > File tab > Open File.
10. Go to File tab > Click CornerPost™ > Click Reset Sync. Clock for Current File.
11. Click Yes.
72
Back Paddock Adviser/Manager – User Guide
12. Finished. Use Client File as per usual.
6. Errors
Errors may occur where the updated data doesn’t load into the file or to the mobile device. To reset
the file in CornerPost™ the Sync.Clock needs to be reset.
Caution: Contact Help Desk prior to discuss as unintended miss-use can cause more problems.
1.
Errors with information not correctly being sent to CornerPost™ from Adviser/Manager or is
not able to be retrieved by Mobile App.
1. Open Client File in Adviser/Manager.
2. Go to File tab > CornerPost™.
3. Check the file name is displayed above the Send and Retrieve buttons.
4. Click Reset Sync.Clock for current file.
5. Click Send the file to CornerPost™.
2.
An error occurs where information in the file is not correctly appearing when retrieved from
CornerPost™ to Adviser/Manager Client Files. Or not able to be retrieved at all.
1. Go to Mobile App
2. Tap Reset Sync Clock just above Skip button.
3. Tap Connect & Sync on the Login screen.
4. Retrieve in Adviser/Manager Client file.
73
Back Paddock Adviser/Manager – User Guide
Spray Recommendations
1. Create a Recommendation
1.
Click on require paddock>select Spray Recommendation tab.
2.
Click on Create New button.
3.
Modify Job number if required.
4.
Click on Edit Selected button. This will open up to the new Spray Recommendation view.
2. Creating New/Modify Existing Spray Recommendation
1.
Click on the desired Spray Recommendation>Click Edit Selected.
2.
Click on the Cells underneath the titles to add/edit data>Add or choose different options
from drop down.
74
Back Paddock Adviser/Manager – User Guide

Paddock - Add one or several paddock per mix from different farms listed in the Client File.
Area automatically displays.
Note: Use Arable Area is the area default.

Crop Details (Optional) - Choose from drop downs the Crop, Variety, Crop Stage, Conditions
which the Mix is to be applied to. Tip: For the same mix over different crops simply leave this
section blank.

Undersown (Optional) - Choose from drop down a crop undersown, if required.

Application
-
Water Rate - Default set to 75L/ha. Click on cell and retype to change.
-
Droplet size - Fine to Course. Choose grade from drop down.
-
Application method - Defaults to Ground. Change if required.
-
Rainfast (hrs) and Buffer Zone - May default from Master Database. Change as
required.
-
Withholding Periods and Plant Back - May default from Master Database. Change as
required.
-
Timing - Add a timing from drop down.

Recommendation - Choose Chemicals from drop down. Can add several chemicals to the
mix.

Rate - The application rate defaults from the Master Database. Change if required.
Units – Defaults from Master Database. Adjuvant - change the Unit cell to % to recalculate
the amount required.

Required - Auto-calculates the amount required for each chemical for that mix.

Reason/Pest - Select from drop down.

Growth Stage/Density - Type into cell, as required.

Chemical Group and Active Constituent - Deafult from Master Database.
3.
Click on Save button
> Exit button.
3. Adding a Second Mix
1.
Click Add Mix.
2.
Repeat steps 1 -10.
75
Back Paddock Adviser/Manager – User Guide
3.
Re-order the Mixes use up and down buttons
to move them up or down.
4. Recommendation History
1.
To view Recommendation History>Click on File name at the top of the Navigation pane.
2.
Click on Spray Recommendation tab.
This will display the Recommendation for all paddocks in that client file for that year.
Enter Job Number for the recommendation.
Date recommendation was Created.
Date recommendation was Last Modified.
Add Advice type e.g. phone, office, on farm, field inspection.
Add Remarks e.g. with farmer/employee/owner.
5. Copy to Plan or Actuals
Copy recommendations to Plan or Actuals once Recommendation complete. This
Recommendation will turn into Spray Mix(es) with chemicals and information carried through to
all paddock(s) listed.
1.
Click on the Job Number of the desired Recommendation. For Example: 9.
76
Back Paddock Adviser/Manager – User Guide
2.
Click either Copy to Plan or Copy to Actuals.
>Click Yes.
3.
In the Navigation Pane> select the Paddock where Recommendation was copied too.
4.
In Sprays for each paddock>Enter the missing data to the Mix and in the Chemical section
below. For Example Mix 6.
1. Add Target species and Timing.
2. Change the Date to when spray being done as it defaults to Recommendation date.
3. Add Prices $/Unit in the Chemical OR Re-select chemicals from the drop down list to
add a price but must amend the Rate back to what was in the recommendation.
Report Tab
1. Customising Report
1.
Open any Spray Recommendation>Click on Report tab.
2.
In the Component Section tick the boxes that would be relevant to display in the Report.
2. Add/Change Logo
1.
Ensure Logo is in a .bmp or .jpeg format and saved on your computer.
2.
Tick the Show Logo box>Click on the yellow folder >Open and select a logo.
77
Back Paddock Adviser/Manager – User Guide
3.
Change the Logo position click the Position buttons.
Note:
will create a full page Logo. Not recommended.
3. Printing Report
1.
Click the Print button.
4. Save Report as Pdf
1.
To Save as PDF click the Save as PDF button.
5. Email Report as PDF
1.
To Email PDF click the Email PDF button.
6. Spray Operator Recording Sheet – Page 2
1.
Tick box to add page 2 for a Recording Sheet.
Note: This form can only be filled out in hard copy.
7. Navigation
1.
To Zoom in or out, view whole page and Scroll through the Report click the buttons.
Notes Editor Tab
The Notes Editor is used for adding notes, disclaimers and key codes etc. to your Spray
Recommendation Report. These notes will appear in the footer of all recommendation pages.
1.
Open any Spray Recommendation>Click on Notes Editor tab.
78
Back Paddock Adviser/Manager – User Guide
2.
Copy desired text from source.
3.
Click on Paste
4.
Edit text> Adjusting the font, size, indent and spacing of the footer.
for text to appear in Notes section. Formatting carries through.
Settings Tab
1.
Open any Spray Recommendation>Click on Settings tab
2.
Click on ‘+’ Agronomist to add contact details. These will be displayed at the top of the
Recommendation Report.
Note: Client Details carry through from listing in File>Info>Client Details.
Note: Upload these Settings to CornerPost™ for use with the Mobile App.
3.
Job Numbers - Adjust the Prefix to reflect your internal Job Numbering System.
Note: Job Start Number changes with each new recommendation automatically.
4.
Editing Font and Layout - Review and customise options in Recommendation Fonts, Page
title, Page Footer, Notes, PDF Email and Other Details.
Use Recommendation Template in Mobile App
The contact details, disclaimers, notes and logo in Spray Recommendations has to be loaded onto
CornerPost™. This will allow it to be available both on the mobile devices and in all Adviser/Manager
files in general and as it synchronises through CornerPost™.
79
Back Paddock Adviser/Manager – User Guide
1.
After updating Spray Recommendation details>Go to File>CornerPost™.
2.
Click on Update Recommendation Template to CornerPost™.
Note: MUST reload if details/information changes at a later stage.
80
Back Paddock Adviser/Manager – User Guide
Rotations
Area Summary
The Area Summary table displays a tally of total area for different crop types, varieties and
categories per year. This is handy for planning the balance of production or calculating the
percentages required for the spread of Cereal, Broadleaf and Pasture.
1.
The Area Summary View can be manipulated to show various views. Tick boxes on and off to
change the display for:
1. Varieties,
2. Subtotals and,
3. Percentages.
2.
Total Area Sown – bolded total at the very bottom of the table (
3.
Print the Table – either to printer or pdf.
4.
Copy Table to spread sheet or word program to modify further.
).
Rotation Summary
1. Rotation View
The Rotations View provides an alternative data presentation to the Management View as it can
multiple year view of crop types / variety data at one time.
1.
Crop variety.
1. To see variety>Click on the Year title of each column.
81
Back Paddock Adviser/Manager – User Guide
2. To remove variety>Click on the year title of each column.
2.
To expand columns view.
1. Move mouse pointer to column vertical line between the Years at the top of each
column.
2. Mouse pointer changes into a symbol with a vertical line and two horizontal arrows.
3. Hold right Mouse button down>Drag to desired width>let go mouse button. Column
will expand or contract as desired.
3.
Print the Table – either to printer or pdf.
4.
Copy Table to spread sheet or word program to modify further.
5.
Align Years – Ticked by default. Allows for columns to be wider.
6.
Setting number of years viewed in Rotation Summary.
1. Click File tab>Options>Rotations tab.
2. Click on the drop down box to select Number of Years Displayed.
3. Click on the drop down box to select Column Position of Current Year in Rotations
table.
4. Click Apply button.
2. Create Plan in Rotation Summary
82
Back Paddock Adviser/Manager – User Guide
Using this feature creates a rotation summary plan for future or past years in a quick way.
1.
Click on Year Crop Title at top of an empty column. This will reveal the Variety column for
that year.
2.
Click in first cell underneath Year Crop>Click on Drop down list – either scroll or type first
few letters of Crop type. For example ‘Wh’ for Wheat>Click on desired Crop Type in drop
down list.
3.
Repeat for Variety. Repeat for each paddock till complete.
Note: must have chosen a Crop Type prior to choosing a Variety.
4.
In Home tab>This method populates only the Crop Type and Variety of each paddock with
nothing else defaulting from the Master Database.
83
Back Paddock Adviser/Manager – User Guide
Finance
Analysis
To review the overall Gross Margins for the entire enterprise, the Analysis tab can help.
1. Analysis View
1.
Click on the Analysis tab>A typical view will appear with totals for each paddock calculated
in Red at the bottom of the Gross Margin table.
2. Modifying View and Calculations
This view can be modified in several ways, manipulated to re-calculate for different scenarios
and view options.
1.
Options for modification can be found in the tool bar above the Gross Margin Table. They
are:
1. Plan/Acutals – Can change the Gross Margins to view Plan or Actuals figures.
2. Print/Send – Can Print or Copy the table into an Excel spread sheet program to
manually make adjustments.
3. Sort Order – Ascending or descending the order by clicking on the Column headings
in the Table to sort.
4. Group Farms – To group the paddocks by farm in the Gross Margin Table rather than
a combined listing.
84
Back Paddock Adviser/Manager – User Guide
5. Price – Pessimistic/Expected (Exp)/Optimistic (High) returns based on figures in
Production per paddock.
6. Production – Low/Expected/High based on the Yield in Production per paddock.
7. $/Ha – View as a $/ha breakdown basis rather than total per paddock.
8. Costs – Ticked to reveal the cost breakdown per paddock.
9. Interest – Tick to add interest.
10. Farm Name – Tick to add Farm Name to table.
11. Total/Average – For bottom row in red to view Total or Average figures.
Note: For Livestock, you can see costs per paddock for inputs and operations. The
Stock column is based on the total of cost added in the Livestock section per mob.
For Example: This figure is calculated based on total Costs for Sheep divided by the
total area allocated then multiplied by paddock area to get a figure that is a
proportioned cost for each paddock.
$8700/800ha=$10.756/ha x paddock size 115ha = $1251
Cash Flow
The Cash Flow tab displays the current year’s incomes and expenditures and calculates total
expenditures, balance and Cash flow. This section derives its information from other parts of the
Client File and is mainly used as a reference to the activity cash flow over the months of the year.
Note: Please be aware of the date source and do not confuse activity date with purchase date.
1.
To view Cashflow>Click on Cashflow tab.
2.
A chart for the Year will appear with monthly columns across the top. Each column is broken
down into sections with Income and Expenses listed for each month.
Income
85
Back Paddock Adviser/Manager – User Guide
Expenses
Totals, Balance and Cashflows
Caution: This is not a comprehensive cash flow.
3.
Not Date – Data will appear in the No Date column if a date has not been entered at the
input entry in the Home tab section for each paddock.
4.
Tool bar - Change between Plan and Actuals figures, Or Print Or Copy to clipboard to paste
into another program for manual adjustments.
Summary Reports
As part of the General Report, a variety of summaries and tables are pre-calculated. These can assist
with reviewing financials including costings of inputs and operations and tracking Gross Margins per
Crop type and by paddock. See Reports section to generate a General Report with the Summaries.
Note: Reports can be broken down by farm rather than entire enterprise. See Reports section.
1.
Seed Summary
2.
Fertiliser Summary
86
Back Paddock Adviser/Manager – User Guide
3.
Chemical Summary
4.
Operation Summary
5.
Irrigation Summary
87
Back Paddock Adviser/Manager – User Guide
6.
Cost by Crop – Table and Chart – Overview of costs and income per crop
88
Back Paddock Adviser/Manager – User Guide
7.
Gross Margin Summary By Crop – Check which crop is performing.
89
Back Paddock Adviser/Manager – User Guide
8.
Gross Margin by Paddock - Costs per Input, Totals and Gross Margin per paddock.
9.
Livestock Gross Margin
See Livestock Section.
90
Back Paddock Adviser/Manager – User Guide
Rainfall
Recording Rainfall is an easy function to setup and maintain in Adviser/Manager.
Gauges
1. Setting Up Gauge(s)
1.
Setup Rain Gauge> Click Rain Gauge button.
2.
Click Add button>Enter a new name for Rain Gauge 2 (as desired). Enter in more details as
desired.
3.
To allocate Rain Gauges to specific Farms/Paddocks>Got to Farm tab>Click Rainfall Sites
button>In Rain Site column, select Rain Gauge as appropriate.
Navigation
1. Calendar
Use the calendar to move around the months and years.
1.
Click on the day desired within the Month or click Today button.
91
Back Paddock Adviser/Manager – User Guide
2.
Using the Arrows either side of the month name will scroll through the Months and years.
3.
Click on the Single arrows to jump a year either way from that date OR Click on the Double
to jump five years either way from that date.
2. Yearly View
1.
To view all months in the calendar year>Click Year View in Tables section.
3. Monthly View
1.
To view only a month at a time>In the Table section click Month view.
Note: Month View is helpful for viewing Rainfall Charts and Deciles.
92
Back Paddock Adviser/Manager – User Guide
Finding Rainfall Data
Daily and Monthly rainfall data is available on the Bureau of Metrology (BOM) Website. Simply find
the closest active BOM site to your farm(s) and load data.
1. BOM Monthly Rainfall
1.
Open Internet Explorer>Type in http://www.bom.gov.au/climate/data/ into address bar.
The BOM Climate Data Online page will appear.
Tip: Add BOM Climate Data Online to Favourites.
2.
Type in name of closest town to your farm (Step 2 of BOM site)>Click Find button.
3.
Select from Nearest Bureau Stations.
93
Back Paddock Adviser/Manager – User Guide
Note: The Data for selection station table below tells you what data is available and how
recent it is.
4.
Select Year from drop down.
5.
Click Get Data button (Step 3 of BOM site)
6.
Scroll to the bottom of the Rainfall table to see the Monthly totals>Manually type monthly
rainfall totals in the 28th row of every month in Adviser/Manager Rainfall Table. See Entering
Rainfall Data – Manually for more information.
2. BOM Rainfall History
94
Back Paddock Adviser/Manager – User Guide
1.
To get all recorded Historical data> Open Internet Explorer>Type in
http://www.bom.gov.au/climate/data/ into address bar. The BOM Climate Data Online page
will appear.
Tip: Add BOM Climate Data Online to Favourites.
1.
Click to Monthly> Type in name of closest town to your farm (Step 2 of BOM site)>Click Find
button>Continue through till choose Get Data button at the bottom.
2.
On the Monthly Rainfall page>Click All Years of Data>Save folder to desktop>Open.
3.
Open Zip folder on Desktop>Click through several folders
C:\Users\xxxx\Desktop\rainfall.zip\web\htdocs\tmp\cdio> Reach a file with a name similar
to this IDCJAC0001_074221_Data12.csv (double click on the second of the two files listed)
which will open in Excel.
4.
Once open in Excel>Delete Product Cod, Station number and Annual columns.
95
Back Paddock Adviser/Manager – User Guide
5.
Save as the file> Rename it>Save as a CSV Comma Delimited File>Save to Desktop>Click Yes
to saving in that format question>Click Close>Click Save (again)>Click Yes (again). Ready for
Importing data from .csv excel spread sheet (below).
Entering Rainfall Data
1. Manually
1.
Click on Year view in Table section under the calendar. Ensure the year is correct.
2.
Click on the cell where to add desired numbers>Type numbers>Click on (or arrow to) next
cell.
Note: Total automatically calculates at the bottom of the month.
2. Importing data from .csv Excel spreadsheet
1.
Import data from BOM .csv spread sheet>Click Import Rainfall Data button>Click Folder to
find/open .csv file.
2.
Find .csv spread sheet file saved to desktop on your computer>Click on File name>Click
Open.
96
Back Paddock Adviser/Manager – User Guide
Note: Ensure it is a Comma Separated Variable format (.csv)
3.
Once file open and data is visible>Click Green Arrow to import data to Client File>View will
close and automatically revert back to rainfall year view.
Note: This will physically add all monthly data to the rainfall year for every year that it has
data for. This could add data for the past 100 years. This data is what is used to compare
recent rainfall with historical data in the deciles chart.
Rainfall Chart and Deciles
1.
To chart the rainfall view>In Tables, Click Month View>Tick Show Rainfall Chart.
97
Back Paddock Adviser/Manager – User Guide
2.
To show deciles to compare monthly rainfall with historical data>Tick Show Deciles.
3.
Note: This displays the monthly total against 10 decile bands – the heist rainfall being the
lightest pink band and the lowest rainfall being in the darkest red band. This is dependent
on how many years data is entered into the calendar. See BOM Rainfall website to get
more historical data.
98
Back Paddock Adviser/Manager – User Guide
Livestock
Livestock tab is where you create and manage stock groups and mobs.
Stock Groups and Mobs
1. Adding Stock Group
1.
Click on Add button in Table 1: Stock Groups>Choose Stock group from drop down.
2.
Enter Group Name in Item line.
2. Adding Mobs
1.
Click Add button in Table 2: Mobs>Choose Stock Class from drop down.
2.
Enter Description (eg Tag Colour).
3.
Enter Open Number – the total for the mob.
Note: When adjusting mob numbers due to buying, selling or deaths/rations, the Open
Number needs to be manually changed. All future costs, income and copying of the mob
will reflect the adjusted Open Number.
4.
Modify DSE and Value ($/hd).
Note: The Year viewed can be adjusted by selecting the arrows located above table 2.
99
Back Paddock Adviser/Manager – User Guide
Livestock Income and Expenses
1. Adding Expenses
1.
Click on desired Mob in Table 2: Mobs>Click on Costs tab.
2.
Click Add button>Select Cost item from drop down.
Note: All Costs are sourced from the Master Database. To add/change/exclude or delete
items or its details, see Modifying Master Database for more information.
3.
Modify details:
 $/Unit – Cost of Item per hd.
 Units/hd – Number of units of Item applied to cost.
 hd – Number in mob Item applied too.
 Date – Date of Item completed.
 Notes – A good place to list Chemical names of drenches, dips and injections or more
descriptive information about the activity. Is displayed in the Livestock Report.
2. Adding Income
1.
Click on desired Mob in Table 2: Mobs>Click on Income tab.
2.
Click Add button>Select Income Type item from drop down.
100
Back Paddock Adviser/Manager – User Guide
3.
Modify details:
 Units – Adjust as appropriate. A default may appear.
 $/Unit (Low/Expected/High) – Return of Item per Item Unit.
 Units/hd – Number of units of Item applied to Return ($/Unit).
 hd – Number in mob Item applied too.
 Date – Date of Item completed.
 Notes – List additional descriptive information about the activity. Is displayed in the
Livestock Report.
Note: Costs and income can be rearranged. Click on the Item to be moved>Click on the
arrows to move the item up to down in the list. This is helpful in sorting by date order
for easy view in Reports.
3. Copying Income and Expenses between Mobs and Years
1.
Click on Mob entry in Table 2>Click on Copy/Paste button.
2.
Tick Costs/Income>Choose Append or Replace option. (Doesn’t matter for initial copy)
101
Back Paddock Adviser/Manager – User Guide
3.
Click on Mob as source to copy from (can be from any year or mob)>Click Ok.
4.
In destination Mob>Correct the stock numbers in costs and income.
Paddock Allocation
Paddocks where the costs are to be attributed to Stock must have Pasture ticked in Flags. Paddocks
can only be allocated to one Stock Classes at a time but not allocated to individual mobs.
1. Pasture Paddocks - Flags
1.
In Home tab>Click on Flag button.
102
Back Paddock Adviser/Manager – User Guide
2.
Tick Pasture box if paddock is grazed at any stage.
Note: For grazing of feed/grain crops to be harvested. It is not recommended to allocate
the paddock to Livestock as it will carry through all costs to the Gross Margin for that Stock
Class. Tick Pasture as a record that the crop was grazed thus potential for reduced grain
yield.
2. Allocating Paddocks
1.
Click on Paddock Allocation tab.
2.
Click Add button>Click on Paddock Name.
3.
To allocate Paddock to another Stock Class>Click on Stock Class in Table 1>Repeat Steps 1-2.
4.
Paddocks already allocated are unable to be shared between Stock Classes. Only one Stock
Class per paddock per year.
3. Removing Paddock Allocation
1.
To remove paddock allocation>Click on the Stock Class then Paddock Allocation tab where
the paddock is listed as allocated.
103
Back Paddock Adviser/Manager – User Guide
2.
Click on Paddock to be removed>Click on Delete button.
3.
Click Yes to De-allocate Selected Paddock.
Livestock Gross Margin and Report
1. Gross Margin
Review the costs and income breakdown per Stock Class using the Gross Margin tab. Costs of
any allocated paddocks are also included in the Gross Margin for the Stock Class.
1.
Select Stock Class in Table 1>Click on Gross Margin tab.
2.
Tick Include Livestock Capital Costs to include paddock costs. (optional)
104
Back Paddock Adviser/Manager – User Guide
Note: Gross Margin table displays for total Stock Class not per mob. For Per Mob Gross
Margin see Livestock Report.
2. Livestock Report
Displays a more detailed report broken down by Mobs and Stock Class.
1.
Click on Report tab> Click Livestock Report in the Report Library.
2.
Livestock Report Displays:
 Livestock Cost and Requisite Summary (All Stock) – Displaying All Costs for all Stock
Classes.
 Paddock Details Summary
 Stock Summary – All Mobs.
105
Back Paddock Adviser/Manager – User Guide
 Gross Margin per Mob.
 Gross Margin by Stock Class – Includes stock and paddock costs.
106
Back Paddock Adviser/Manager – User Guide
Inventory
The Inventory section allows you to list certain inventory items as stored available chemicals on
farm. Also able to list people who are qualified to apply chemical on farm for QA Chem Diary
reporting.
Acquire
1. Orientation and View
1.
Click on Inventory tab>Click Acquire button to generate view>
2.
Timeframe
1. Tick (default)/untick Use Date Range from Current Farming Year>Change Dates in
From/To boxes.
2. To Change Date>Untick Use Date Range from Current Farming Year>Click down
arrow in From/To box>Select date from calendar>Click Acquire button when
complete.
3.
Batch Filters> Tick and Untick Filters:
107
Back Paddock Adviser/Manager – User Guide
1. Use Date Range from Timeframe –Displays only chemicals with Purchase Date within
Timeframe.
2. Show Stocktake Items only – Displays only Stocktake Items.
3. Exclude Spent Batches – Removes Spent Batches from view.
2. Adding Chemicals to Inventory
1.
In Chemicals View>Click Chemicals in List>Click Add button>Click on Chemical Cell>Click on
chemical from drop down list.
Note: Chemicals used in the year viewed are listed. Alternatively can click on existing
chemical then click add button.
2.
Enter in other details as required. Details are to be manually kept up to date.
1. Units – Litre (L), Kilogram (Kg), Millilitre (ml), Gram (g). (Defaults from Master
Database).
2. Pack Size – Quantity of pack size.
3. Packs – Number of Packs purchased/stock on hand.
4. Batch Number – Production details stamped by Manufacturer.
5. Chemical – Add a descriptor such as Glyphosate/Insecticide/Fungicide/Herbicide.
Can add same description to several products.
6. Invoice Number- From supplier.
7. Brand – Chemical Manufacturer. (Default from Master Database).
8. Vendor – Supplier.
9. Cost – Per Pack.
10. Storage Location – Where Chemical is being stored. Type in Location or select from
drop down.
11. Source – Stocktake or Purchase. Choose Stocktake to enter existing chemicals into
Inventory initially. Purchase is anything added after initial Stocktake.
12. Withholding Period/Re-Entry Period – details about use of chemical.
13. NRA Number – Registered number for chemical (Defaults from Master Database).
14. Disposal Date – Date of disposal of drum.
108
Back Paddock Adviser/Manager – User Guide
15. Disposal Location – Drum disposal site.
16. Notes – Any detail as desired.
17. Spent – When batch is used up.
Actuals
1. Allocating to Chemical Batch to Spray Mixes in Actuals
1.
Add Chemicals to Inventory>Click Home tab>Click Sprays>Click QA button>Find chemicals in
Mixes>Choose batch from drop down.
Note: This assists with calculation of chemical quantities required and used in Inventory
Reports.
2. Adding People to Inventory and Spray Actuals
1.
Click Inventory tab>Click People button.
2.
View Changes to People> Click Add button>Enter details about people who are qualified to
apply chemicals on farm.
3.
Click Home tab>Sprays tab>Click QA button>Select Operator from drop down.
109
Back Paddock Adviser/Manager – User Guide
Inventory Reports
1. Monthly Balance
1.
Click Report button>Monthly Balance.
For example: Achieve WG (kg) has 490kgs acquired in May 2011. In June 2011 279.3 is used
in Sprays leaving 210.7 Closing balance.
2. Full Report
1.
Click Report button>Select Full Report>Click Chemical Product from list.
Note: Provides a listing per Chemical Product for where it is used and what the balance is.
3. Navigation

Export Report – Save and Export Report as PDF.
110
Back Paddock Adviser/Manager – User Guide

Print

Toggle Group Tree button –Add or remove Chemical Products list.

Pages and Arrows – Allows for movement between
pages.

Stop Loading.

Refresh.

View – Page Width, Whole Page and %.
111
Back Paddock Adviser/Manager – User Guide
Reports
The Report tab has a wide variety of Reports that can be generated to collate information in a
various ways. The main Report is the General Report which has input summaries and details per
paddock. Reports can be displayed as ‘Plan’ or ‘Actuals’. It is helpful to print off and save a copy of
the ‘Plan’ Report at the beginning of the season when the Plan has been finalised. Then the
hardcopy can be used to manually record daily any changes to paddock inputs and operations. The
program can then be regularly updated at a time of your convenience.
Note: All prices stated in the Report are to be GST exclusive and used as only a guide.
Using Reports
1. Generating a Report
1.
Click on Reports tab> Choose a Report from Report Library. Report generates in middle view.
This may take a few moments.
Note: Choose General (Link Mode) if have paddocks linked in Home tab.
Note: The Report generates based on what year is in view in the Home tab and if in Plan or
Actuals mode. To generate an ‘Acutals’ Report>Click Plan button located underneath File
tab name.
2.
Click arrows either side of the page number to browse through the pages. Or type a number
directly into the box and hit enter to skip through several pages.
Note: The arrows with the vertical line navigate to the first and last pages.
2. Report Tab Navigation
1.
Plan/Actuals – Click to change from Plan to Actuals easily. Refresh report to regenerate.
2.
Print – Print Report in view.
112
Back Paddock Adviser/Manager – User Guide
3.
Export – Export Report to Save as a pdf and Email.
4.
Refresh – Regenerates/Refreshes Report view.
5.
Find – Allows searching by a term within the Report.
6.
Zoom – Use various options to make the report view larger or smaller.
7.
Report Navigator – Click on a Title to be direct to that section of the Report.
Customising Reports
1. Reporting on Individual Farms
1.
Click on Farm tab>Click Edit Farms button>Tick to Exclude farm(s) not to be included in
Reports.
2.
Click Report tab>Click General/General (link mode).
Note: Details in General Report will be specifically only for the un-excluded farm(s). View
input/production totals and Gross Margin per farm.
2. Report Set up
113
Back Paddock Adviser/Manager – User Guide
3.
Generate a Report>Click on Setup button.
4.
Click ‘+’ to expand list>Tick/untick the various options to customise the Report.
5.
Paddock Order and Arrangement>Choose to Group by Farm or Crop type. Other options also
available below.
6.
Adjust Font size and type as required.
3. Removing $ figures from Report
1.
Removing $ figures only for Paddock Report pages (not in Summaries)>Untick Economics
(All), plus in Paddock Details: Interest/Depreciation/Input totals/Total Costs and Gross
Margin.
114
Back Paddock Adviser/Manager – User Guide
4. Add a Logo
1.
Add Logo to Report>Click ‘+’ Headers>Tick Logo>Click Browse>Find and open Logo image.
Note: Image be saved as a Bitmap.
5. Add Prepared By
1.
Add Prepared By to the Report front page>Click ‘+’ Footers>Tick Prepared By>Enter in
details in blank cell to the right.
Different Reports
There are a variety of pre-defined Reports available for selection:
1.
General – Full Report.
2.
General (Link Mode) – Full Report to be used if Paddocks have been Linked.
3.
Share Farming – Under Construction.
4.
Recommendation Reports – Provide a listing of Chemical mixes with no costs per paddock.
Handy for spray contractors/application.
115
Back Paddock Adviser/Manager – User Guide
5.
Livestock – Summaries and Gross Margins for Livestock.
6.
Chemical Group History – Table of chemical groups applied to each paddock per year. Great
for review to prevent chemical resistance.
Note: Each year must be Copied to Actuals OR have data entered directly into Actuals.
7.
Crop Input Report – Input summaries by Crop type.
8.
Spray Program – Lists paddock per page with Mixes to be sprayed.
Report Extensions
Adding notes, disclaimers, photos, soil test results, or any other information that is in pdf format,
can be added to the front or the rear of the General Report. All Extensions must be PDF only.
1. Adding An Extension
1.
In Report tab, the Report Extensions are located on the right side of the screen.
2.
Click on the Add extension button.
3.
A dialogue box will appear to name the Extension Group. Once generated a blue jigsaw piece
will appear - this is the Extension.
Tip: Add a Name such as General or Results followed by the relevant year. This will allow
collation of extensions by year over time. Be aware can only use one Extension at a time.
4.
Click on the Extension name> Click on the Add File to Report Extension button.
5.
Locate the desired pdf file on your computer.
6.
Move the file to the front or rear of the Report>Click on name of pdf file>Click Toggle button
(Paperclip moves front/rear)
Toggle pdf to front
or rear
7.
For multiple pdf files toggled at the front and/or the rear>Click on the pdf file name>Use the
up/down arrows to sort in order of appearance - with the top pdf being the first to appear.
8.
Click General from the Report Library to generate a Report. Choose General Link if you have
Linked paddocks in the Home tab.
116
Back Paddock Adviser/Manager – User Guide
Note: Must have a Report generated prior to adding an Extension.
9.
Click on Extension Name>Click Refresh button.
Note: Can only have one Extension added at a time. All pdfs listed under that Extension
will be displayed.
10. The New General Report with the Extension will regenerate with the pdfs toggled at the
front beginning at page two (2) and the rear starting after the Index page.
11. Either Export (Save) or Print the new General Report with the added Report Extensions.
Note: Reports with extensions will need to be regenerated every time, it is not permanent.
117
Back Paddock Adviser/Manager – User Guide
Plan and Actuals
When finalised planning in Plan, Adviser/Manager has an area called Actuals. This is simply a copy of
the Plan being available in Actuals to modify reflecting what actually happened. This allows Plan to
remain for review at a later date comparing Plan to Actuals.
1. Switching between Plan and Actuals
1.
Click on Plan button. Note button changes to Actuals.
Note: Plan button changes to Actuals and colour scheme changes.
2. Copy Plan to Actuals
1.
Ensure Year is correct>Click Copy Plan to Actuals button.
2.
Click Yes to confirm copying Plan data to Actuals.
Note: Copying Plan to Actuals is important for information to be displayed in some reports
and history sections.
3.
In Home tab>Fertiliser/Sprays/Operations and Production have their own P/A button. This
allows copying Plan to actuals specifically for that section for only that paddock>Click P/A
button>Click Yes to confirm change.
Note: Use this feature if mistakenly updated inputs in Plan rather than actuals. This will
carry through the changes but will overwrite anything in Acutals.
3. Entering Data into Actuals Mode
118
Back Paddock Adviser/Manager – User Guide
1.
Click on Plan button>Note button changes to Actuals.
2.
REMEMBER to change to Actuals mode before updating. Adviser/Manager defaults to Plan
every time.
Caution: Re-Copying Plan to Actuals – all information in Actuals is over written with the
current Plan information. Any changes in Actuals will be wiped.
3.
Updating information in Actuals works exactly the same as in Plan mode. Short Cuts such as
Copy and Paste, and Find/Replace function in the same way.
Note: Must be in Actuals mode to get a General Report for Actuals. For a General Report
for Plan, must be in Plan mode.
119
Back Paddock Adviser/Manager – User Guide
Mapping
Creating Paddock Boundaries
1. Opening Aerial Image
1.
Click on Farm tab> Choose Maps>Click in top cell in Boundary column.
2.
In Boundary Tools>Click Open File button.
Note: Select Background Image once Aerial Image is Set as Background.
3.
Search for saved image in My Documents\Back Paddock Company\Adviser\Maps>Click on
image name>Click Open.
4.
Image opened.
120
Back Paddock Adviser/Manager – User Guide
5.
Follow instructions to Create Mapping Projects then Select Map as Background.
2. Orientation

Select (Arrow) – Selects a particular layer such as a particular paddock boundary.

Drag (Hand) – Hold down right mouse button on desired spot>Drag mouse to pan
around map.

Zooms in to the maps full extent for all layers.

Zooms in to fit all selected shapes.


1.
Zooms in/out to fit rectangle drawn by clicking, holding and dragging rectangle to
desired size.
Zooms specifically on location.
To Zoom>Click on Edit tab> Click on Magnifying Glass button>Hold right mouse button
down>Pull or Push mouse>Release button when complete.
121
Back Paddock Adviser/Manager – User Guide
2.
To reposition view>Click on Drag (Hand) button>Hold right mouse button down>Drag mouse
right/left/up/down to reposition> Release button when complete.
3.
Auto-Area (default)>Tick Auto-Area for automatic calculation of the area of each paddock
based on the boundaries>Click on the drop down next to Zero (0) to choose how many
decimal places the Area is to be calculated too.
4.
Snapping (default)> Tick Snapping to allow automatic snapping of nodes together on the
same spot if the nodes of the new boundaries are clicked in areas close by existing nodes of
adjacent paddocks. This allows for no gaps between boundary lines.
5.
Snap Nodes> Tick Snap Nodes to displays the nodes of nearby boundaries.
6.
Node Numbers> Tick Node Numbers to display a number at each node in relevance to their
order of creation.
3. Create a Paddock Boundary (Polygon)
1.
Click on Create New Polygon button.
122
Back Paddock Adviser/Manager – User Guide
2.
Single right mouse click at a boundary corners on the image>Repeat for all boundary
corners.
Note: Work around the paddock being careful not to twist the line. If twist, remove the
node.
3.
To remove a node>Click on the offending node till disappears.
4.
To move a node>Click on the node holding the right mouse button down>Drag to desired
location>Release mouse button.
Tip: Zoom in closer for more accurate location of nodes.
5.
At the base of the image the GPS coordinates appear and hectares for the selected area
calculated. Keep adjusting node till the desired area appears.
6.
When complete boundaries>Click on Select All to set polygon>Use Select (Arrow) button to
re-select paddock polygon.
7.
To name paddock>Select drop down at Paddocks button>Click on an existing Paddock
Name>Name will appear next to Paddock Name.
Note: If paddock Name not exist>Type in name in Paddock Name box>Appoint paddock to
Farm.
8.
Click Save button.
123
Back Paddock Adviser/Manager – User Guide
Caution: MUST SAVE after every paddock as this section doesn’t automatically save.
9.
Repeat steps to create paddock boundaries for the remaining paddocks.
4. Create a Circle (Pivots) Polygon
1.
Click Tools tab>Type in Radius and Sides>Click Select (Arrow) button>Click Create
Polygon>Click on image where centre of the circle is to appear.
2.
Shift polygon: X = across, Y = vertical>Move incrementally by 5 (up or left) or -5 (down or
right)>Click Apply Shift.
5. Create Arable Area
1.
Click on Farm tab> Choose Maps>Click in top cell in Arable column.
2.
Open Image as Background Project – See Creating Mapping Projects and Setting Project as
Background.
3.
Tick Show Paddocks.
124
Back Paddock Adviser/Manager – User Guide
4.
In Edit tab>Image appears with two outlines:

Green - Represented the Arable Boundary line. Paddock polygon to be rearranged to cut out
Trees, water ways, dams, roads, channels, or anything that is not cropped.
Note: Paddocks used for grazing only can remain untouched as arable.

Orange - Represents the existing paddock boundary previously drawn.

To edit the Paddock Polygon to display the arable crop-able area, see Editing Paddock
Boundaries.
6. Create a Hole
1.
Click Tools tab>Type in Radius and Sides>Click Select (Arrow) button>Click Create
Polygon>Click on image where centre of the hole is to appear.
125
Back Paddock Adviser/Manager – User Guide
2.
Single left mouse click on hole edge to reactivate nodes from blue to green/red>Drag and
drop nodes to desired location>Click to add more nodes as required.
7. Editing Paddock Boundaries
1.

Edit an existing paddock boundary.

Delete current selected boundary.

Undo.

Redo.
To modify an existing paddock boundary>Click on Select (Arrow) button>Click on Paddock
Polygon>Click on Edit Mode button.
126
Back Paddock Adviser/Manager – User Guide
2.
Cursor changes to a pinched Hand>Click on Green or Red Nodes (dots)>Hold right mouse
button down>Push/pull mouse to desired location>Release mouse button.
3.
Click Save button periodically during editing and at completion of editing.
8. Problems in Creating Paddocks
Distorted Boundary
1.
Begin Clicking Nodes at the most straightforward area>Move around in a natural circle.
2.
Where there is distortion>Click on distorted Node to remove>Click a node that creates the
desired shape>Click and hold right mouse button>Drag and release on desired location.
Blue Nodes (Overlapping boundaries)
Overlapping of polygons can create blue nodes which cuts the polygon into parts.
Note: Blue Nodes appear when editing or selecting the paddock.
Tip: This can be useful if have a waterway or obstruction through the paddock.
3.
To edit blue node section(s): Single Left mouse click on a blue node to change to Green/Red
colour>Edit as desired.
4.
To remove blue node section: Either Delete the entire polygon OR Click to edit blue node
section>Double click on each offending node to remove>When complete use Select (Arrow)
to deselect then select polygon>Blue nodes should disappear.
127
Back Paddock Adviser/Manager – User Guide
Mapping Tab
After obtaining a Geo-Referenced photo map projects can be created. Mapping projects allow
various functions and provides quick access to mapping.
1. Opening Aerial Image.
1.
Open desired image>Click the Open map layer from external file button.
2.
Search for saved image in My Documents\Back Paddock Company\Adviser\Maps>Click on
image>Click Open.
2. Creating a Mapping Project
1.
Open Map Image >Click Map Project button in Layer Library panel.
2.
Click on Create New Map projects button>Create a Project Name (Aerial Image)>Click Ok.
128
Back Paddock Adviser/Manager – User Guide
3.
New Map Project is listed in the Layer Library>Access Project by clicking on the Project
Name>Click on Load Selected Map Project to Viewer button.
3. Setting Project as Background
1.
Click File tab>Info>Client Options>Configuration tab>Click drop down next to Background
Project>Click on desired Project Name>Click Ok.
4. Orientation
1.
Select and Zoom

Select (Arrow) – Pointer allows selection of paddock polygons.

Select Multi – Allows selection of multiple paddock polygons.

Drag (Hand) – Single right mouse click and hold>Drag mouse around>Release when in
correct position.
129
Back Paddock Adviser/Manager – User Guide
2.
3.
4.

Zoom All – Click Zoom all for image to reset to original size.

Zoom Selected – Use Arrow to select a paddock polygon>Click Zoom Selected for image
to magnify to that polygon.

Zoom – Click Zoom>Hold right mouse button down on required spot>Pull mouse to
magnify/ Push mouse to reduce>Release mouse button when complete.

Zoom Rectangle – Hold right mouse button down>Drag rectangle selection box over
desired area>Release mouse button>Magnification automatic.
Vectors

Select All – Selects all the paddock polygons.

Deselect All – Un-selects all paddock polygons.
View

Scale – Add a scale bar to the map image.

Layer Library – (default) Library menu available on left side of map.

Legend – Adds legend to right side of map view and to map image when printed.

Nav Map – Allows for navigation around the Background Project.

Attributes – When selecting paddock polygons using Select (arrow), the attributes of
that paddock will be displayed 9pending what you have in view).
Layer Manager
1. Click on a Layer Name>Use buttons below to re-organise view.

Move selected Layer up one.

Move selected Layer down one.

Move selected Layer to top.

Move selected Layer to bottom.

Reverse Layer order for all Layers.

Close selected Layer.

Close all Layers.

Vector Properties such as Polygon, Labels, Charts, etc.

Transparency of the selected Layer.
5. Printing
130
Back Paddock Adviser/Manager – User Guide
1.
Click Use Printer Ratio button>Click Zoom button>Hold right mouse button down>Pull or
push to magnify image>Click Drag (hand) to re-position image in Printer Ratio view.
2.
Choose to add options in View>Scale and/or Legend.
3.
Choose from drop down under Printer button to Add Heading and Logo on Screen.
4.
Click Print button.
5.
Click Setup>Choose Portrait or Landscape>Choose paper size and source>Choose
Printer>Click Ok button.
6.
Click Print button (either)>Click Ok button.
6. Export to PDF
1.
Click drop down arrow under Print button>Click Export to PDF.
131
Back Paddock Adviser/Manager – User Guide
2.
Choose name and location to save PDF map image.
Map Types
There are a wide range of maps that can be created using the mapping functions. Following are a list
of Maps that can be generated from the information in Home tab that can be displayed as a map.
1. Paddock Boundaries and Paddock Names and Areas
To create a map with paddock boundaries with and without aerial image, paddock names and
areas.
1.
Open an Aerial Image -Either Open the image from an external file or by loading an existing
Map Project (see instructions on previous pages).
2.
Boundaries>Click on Show Boundaries button>Click on drop down to Show Paddock Names.
Note: the Boundaries and Names appear. Turn (tick) off the Paddock Names by reselecting Show Paddock Names.
3.
Boundaries only>Untick Aerial (Avonlea) Map Or Click on Map Name (highlights in
Blue)>Click Close Selected Layer button.
Note: Create Mapping Projects to save these Map views to reload in future.
2. Paddock Areas
Add Area by Adding another Paddock Boundary Layer over the top of Paddock Boundaries and
Name
1.
Show Area>Click on Predefined Layer button>Click on Paddock Boundaries>Click on Load
Layer button. A second Paddock Boundaries (1) is displayed.
132
Back Paddock Adviser/Manager – User Guide
2.
Click on Paddock Boundaries (1) name>Select Set Layer Formatting Folder button.
3.
In Vector Layer Properties>Click on Labels tab>Choose Area from Label Field.
4.
Label Position: Select middle bottom row dot>Tick No Overlap.
5.
In Background and Border: Choose Automatic Colour from drop down.
6.
Click Apply when complete.
7.
Click Paddock Boundaries>Click Set Layer Formatting button>Click on Labels tab> Label
Position: Select middle top row dot>Tick No Overlap>In Background and Border: Choose
Automatic Colour from drop down>Click Apply.
133
Back Paddock Adviser/Manager – User Guide
8.
Resulting in Area and Paddock Names being displayed. Save as a Map project to reload later.
3. Arable Area Map
1.
Open Aerial Image (if desired)>Click Paddock Boundaries button.
2.
In Layer Library>Click Pre-defined Layer button>Select Arable Area>Click Load button.
Tip: Select Non-Arable Areas>Click Load button to get image with both views. Tick and
untick in Layer Manager above to turn them on and off.
4. Crop Rotation Image (Colour)
134
Back Paddock Adviser/Manager – User Guide
1.
Click Create new Map Layer from Data button>Click ‘+’ Production>Choose Plan or
Actual>Choose Year>Click Next button.
2.
Render Field: Choose Crop from drop down>Click on Custom Legend (must be next)>Choose
Crop in Label Field list>Click Finish button.
3.
Crop Rotation image appears.
5. Individual Crops
1.
Click Create new Map Layer from Data button>Click ‘+’ Planting/Crop
Category/Type/Variety>Choose Plan or Actual>Choose Year>Click Next button.
135
Back Paddock Adviser/Manager – User Guide
2.
In Render Field: Choose Crop from drop down>Change Colour in Fill Colour (Default is light
grey)>Click Finish button.
3.
Individual Crop coloured in paddock image displayed.
4.
To add more Crops to image>Repeat steps 1-3 selecting a different Crops and Colours.
136
Back Paddock Adviser/Manager – User Guide
Tip: When printing ensure the legend is visible.
6. Individual Chemicals
1.
Click Create New Map Layer from Data button>Click ‘+’ Sprays/Spray
Category/Group/Product>Choose Plan or Actual>Choose Year>Click Next button.
2.
Change Colour>Click Finish button.
3.
Individual Chemical coloured in paddock image displayed.
137
Back Paddock Adviser/Manager – User Guide
4.
To add more Chemicals to image>Repeat steps 1-3 selecting a different Product and Colour.
138
Back Paddock Adviser/Manager – User Guide
Advisers Notes
Scenarios (Available only with Adviser)
Scenarios is a function in Adviser that allows Advisers to short cut data entry into Client Files.
Cropping scenarios which are common are able to be saved as a Scenario to be reused over and
over. This saves a lot of time replicating entries where the same information for sowing, fertiliser,
spray, operation and production is typical for a Crop Type. Scenarios can easily be modified and
costs kept up to date.
1. Scenario Manager Setup – Selecting a Scenario file
1.
Click on the Scenario Setup the bottom right of the Scenario Manager.
2.
In Scenario Manager Setup>Click on the Browse button.
Note: To select a specific Scenario file, firstly the file has to be saved in: My
Documents\Back Paddock Company\Adviser\Scenarios.
3.
Select the desired Scenario File to be linked with the program>Click Open.
4.
Close Adviser/Manager program and restart to reset Scenarios to the new Scenarios in the
File.
2. Creating and Deleting Scenarios
The primary way of creating a Scenario is to open an existing client file and load the Scenario
directly to the Scenario table.
1.
In Navigation Pane, click on the paddock name where the desired information is located.
139
Back Paddock Adviser/Manager – User Guide
2.
Click on Load Selected Paddock to Scenario button from the currently selected paddock with
the desired paddock variables.
3.
In the Save Scenario dialogue box>Name new Scenario so to reflect the main features or to
distinguish from other similar crop type Scenarios.
4.
To delete Scenarios>Select the Scenario from drop down>Click Delete Selected Scenario
button.
5.
Close Adviser/Manager program and restart to reset Scenarios to the new Scenarios in the
File.
3. View Current Scenario
1.
Click on the Scenario from the drop down> Click on View Selected Scenario button
2.
Scenario Summary appears displaying the particulars about that specific Scenario>Click Close
when complete viewing.
140
Back Paddock Adviser/Manager – User Guide
3.
To Print Scenario>Click Print button.
4. Load Scenario into Paddock
1.
In the Navigation pane>Click on the destination paddock.
2.
Select Scenario from drop down>Click on Add Scenario to Selected Paddock button.
5. Open Scenario File as a Client File.
2.
Open desired Scenario File> Click Scenario Setup button.
3.
In Scenario Manager Setup box>Click the Yellow folder
Editing.
4.
Select your favourite Scenario File>Click Open.
to open Existing Scenario File for
141
Back Paddock Adviser/Manager – User Guide
5.
The Scenario File opens as a typical farm file which can be edited as per usual.
6.
Close Adviser/Manager program and restart to reset Scenarios to the new Scenarios in the
File.
6. Editing and Customising Scenario File
1.
In Farm tab>Tick Exclude for Scenarios that are irrelevant but want to keep. Or
Click on the Scenario name>Click Delete for the Scenarios that will not be used at all. By
deleting irrelevant Scenarios tidies up other areas of the program.
2.
To change Scenario name> In Farm tab>Click on Paddock Name cell>Re-type over existing
name.
3.
In Home tab> Modify or add to the Sowing, Fertiliser, Sprays, Operations and Production
sections of each Scenario.
Note: Copy and Paste Crop, Fertiliser, Sprays, Operations and Production sections to other
similar crop types. For Example: Copy Operations or Fertilisers for Barley Malt to other
Barley paddocks. OR Copy to a Wheat Scenario then make amendments and re-copy the
customisations to other operations/fertilisers sections in other Wheat Scenarios.
4.
Creating a new Scenario:
142
Back Paddock Adviser/Manager – User Guide
1. In Farm tab>Click Add New Paddock or Insert New buttons>Re-name>Sort A-Z or
move using up and down arrows.
2. In Home tab> Add Scenario to Selected Paddock OR Copy and Paste segments into
new scenario from existing scenarios>Customise to reflect the new scenario.
6.
Close Adviser/Manager program and restart to reset Scenarios to the new Scenarios in the
File.
7. Keep Costs and Prices Up-to-Date in Scenarios
1.
Open Scenarios as a Client File. See above.
2.
Click Find/Replace Data.
3.
Follow instructions in Find/Replace section.
4.
Close Adviser/Manager program and restart to reset Scenarios to the new Scenarios in the
File.
Note: Ensure the new customised Scenario File is selected. See Scenario Manager Setup.
Tip: Back Paddock Company provides a Scenario File at www.backpaddock.com.au. Go to
the Products Page>Back Paddock Adviser>Click Download Scenario and follow the
prompts. Remember to save to Documents\Back Paddock Company\Adviser\Scenarios.
143
Back Paddock Adviser/Manager – User Guide
Client File Setup Guidelines for Adviser users
1. Gather Enterprise Information From Client
1.
To complete setup Advisers may need to gather information from clients on:
1. Farm names.
2. Paddocks and areas per farm.
3. Crop rotation – variety.
4. Inputs.

Fertiliser program

Spray program

Operations – paddock preparation and costs

Production – estimated yield and return $/T
Note: A template is available that may assist which the Client can complete. Alternatively
information can directly be added by the Adviser on the spot.
2. Client File Setup
1.
Open Adviser program>Click File tab>Click New.
2.
Name the file using the Clients’ surname followed by their name(s) or initials. Alternatively
Trading Names can be used.
3.
Click File tab>Click Info> Click Client Options >Go to Client Details tab>Complete Client
details.
4.
Click Farm Tab>Click Edit Farms>Edit Farm Name or Add additional farms.
5.
Select Farm Name from drop down>Add paddock name>Hit Enter Key>Add boundary
Area>Hit Enter Key to continue adding paddocks and areas.
Tip: Keep paddock names or numbers very short.
6.
Use a Numbered paddocks format - first initial of the farm first followed by 01, 02 etc. For
example: Avonlea Farm = A01, A02 or Abigail Farm = AB01.
7.
Add arable areas if known. Click on Arable area cell>type in area number>Hit down arrow
key to continue entering in remaining arable areas.
3. Adding Crop Rotation
1.
Click Rotations tab> Click on Year/Crop column title name to get variety column to appear.
2.
Click on first cell>Either select from list or type first few letters of the crop type. For
Example: Whe – to display Wheat options.
Note: Limit the number of different crop types even though each paddock maybe different
eg Oats, Wheat APH, Wheat AH, Barley Feed, Ley Pasture, Fallow, Peas Field
3.
Repeat in Variety column.
144
Back Paddock Adviser/Manager – User Guide
4.
Expand on other columns to continue for past years and the future year.
4. Adding Paddock Data and Inputs
1.
Click Home Tab. The list of farms and paddocks with crop type and variety should appear.
2.
Set up Share Farming feature to be set up at this point on relevant paddocks. See Back
Paddock Adviser/Manager Manual for instructions.
3.
Click on first paddock>Using Scenarios>Choose appropriate Scenario from drop down>Click
Add Scenario to selected paddock>Repeat for one paddock per crop type.
Note: It is essential Scenarios is used as it provides the timings/dates/operations… etc.
4.
In the paddock where the scenario has been loaded>Customise the crop details> Adjust crop
variety, seeding rate, seed dressing, fertilisers and rates, spray mixes, chemicals and rates,
operations, production and irrigation.
Tip: Load the paddocks with as much detail as possible as it is also much easier to delete
items rather than add.
5.
When complete a paddock per crop type>Copy the entire paddock to the other paddocks
with the same crop type/variety>Make adjustments for each paddock as required.
Tip: Easier to copy entire paddocks and change the variety, sowing rates, etc. rather than
start from scratch at each paddock.
6.
Select the Find and Replace button (Black Binoculars) to change costs, rates, and prices.
1. Click ‘+’ next to Crops, Fertilisers, Chemicals, or Operations>Drill down to specific
variety or product>Click on a specific variety or product name.
2. Tick the Rate and/or Cost box>Type in rate and/or cost>Click Replace All.
Tip: Use Ctrl key to select specific paddocks to apply change>Choose Replace
Selected button to apply.
3. Repeat for each product, variety or operation.
Note: Costs are ex GST.
7.
Once paddocks have been customised>Select a paddock>Copy to past or next years.
5. Add Rainfall Data
1.
Click Rainfall Tab>See Back Paddock Adviser/Manager Manual for instructions on how to get
rainfall data and install.
145
Back Paddock Adviser/Manager – User Guide
Back Paddock Reader Licence Installation Process
The following process is to be followed where a current Adviser user would like their clients to
obtain a FREE Reader Licence.
1. On Adviser Computer
1.
Copy clients .adv file from your computer onto a USB drive. Locate file in folder:
Documents>Back Paddock Company>Adviser>Clients. Then single right mouse click on File
Name>Select Send to: Choose USB stick name.
2.
On the USB drive>Download the Back Paddock Manager Program from the Back Paddock
Company website at: www.backpaddock.com.au >Select Products then Download
Manager>Follow the prompts.
2. On Client Computer
1.
Insert USB drive into Client computer>Open to view folders>Find Back Paddock Adviser
Install program.
2.
Single right mouse click on Install program>Copy and paste onto Desktop>Double click and
follow installation instructions.
3.
Once Install complete>Double click on Adviser Icon on the desktop>Click “Request Licence”
(right side above red line).
1. Select “Adviser Reader”>Enter Client details> Click Next.
2. Save the Request File to Desktop>Close request table window and Back Paddock
program.
146
Back Paddock Adviser/Manager – User Guide
4.
Open Client Email program>Create new email>Address to [email protected]
1. Attach Request File from the desktop.
2. In subject area type: Reader request, the Client name and Adviser name.
3. In the body of the email re-type: the clients contact details.
4. Click Send.
5.
Wait for a reply email from Back Paddock with a licence file attached.
Note: If urgent ring the Help desk 1800 557166.
6.
Open Email>Right mouse click on attachment>Save adviser.lic attachment to:
Documents>Back Paddock Company>Adviser folders.
7.
Copy client .adv file from USB stick into the Clients folder in: Documents>Back Paddock
Company>Adviser>Clients.
8.
Open Back Paddock Manager Reader from the Desktop icon.
9.
Open Client file>Select File Tab>Options.
10. Find Auto Open Last File>Change from False to True>OK.
11. Close program and re-open program to open up the Client file automatically.
Any issues ring the Back Paddock Help Desk for assistance 1800 557 166
147