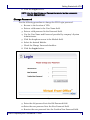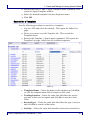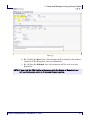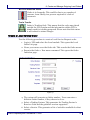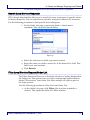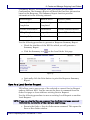
1
WISOR VIRTUAL FRONT OFFICE 11.4 USER GUIDE Wisor System Documentation VFO-1104-USERGUIDE-070708 Wisor Telecom Corporation 7470 New Technology Way, Suite A Frederick, MD 21703 Tel: 301-417-9401 URL: www.wisor.com Wisor Corporation Confidential RESTRICTED ACCESS This document and the confidential information it contains shall be distributed, routed or made available solely to authorized persons having a need to know within Wisor, except with written permission of Wisor. Prepared by: Wisor Target audience: Wisor Application Users Technical contact: Customer Service Center (CSCC) at 800-522-6943. To obtain copies of this document, contact your company’s document coordinator or your Wisor account manager, or call 877-947-6767 (from the USA and Canada). Copyright © 2005-2008 Wisor Telecom Corporation. All rights reserved. Trademark Acknowledgments Wisor is a trademark of Wisor Telecom Corporation. Adobe Acrobat is a registered trademark and FrameMaker+SGML is a trademark of Adobe Systems Incorporated. Microsoft, Windows, and Windows NT are either registered trademarks or trademarks of Microsoft Corporation in the United States and/or other countries. Oracle is a registered trademark of Oracle Corporation. SUN and Solaris are registered trademarks of Sun Microsystems, Inc. UNIX is a registered trademark of The Open Group in the United States and other countries. WebLogic is a registered trademark of BEA Systems, Inc. All other brand or product names are trademarks of their respective companies or organizations. Table of Contents Table of Figures ..................................................................................................... vi Introduction............................................................................................................. 1 About This Manual ................................................................................................... 2 Audience ................................................................................................................................... 2 Conventions.............................................................................................................................. 2 Purpose ..................................................................................................................................... 2 Wisor Contact Information ......................................................................................................2 Introduction to Virtual Front Office (VFO) ................................................................. 4 VFO - Exchange Path Connection............................................................................................ 4 What are the Benefits of VFO?................................................................................................. 5 Getting Started with VFO ......................................................................................... 6 Login Procedure ....................................................................................................................... 6 Change Password...................................................................................................................... 7 Module Lists ............................................................................................................................. 8 Sorting the List ....................................................................................................................... 10 Using VFO's Action Icons....................................................................................................... 10 Access Module ...................................................................................................... 13 Access PreOrder Search and Response ................................................................ 14 New Access PreOrder Inquiry Procedure .............................................................................. 14 Save Access PreOrder Response .............................................................................................17 Print Access PreOrder Response.............................................................................................17 Search Access PreOrder Responses ........................................................................................17 Print Access PreOrder Search Results ................................................................................... 19 Create and Manage Outgoing Access Orders ......................................................... 20 Using the Access Order List ...................................................................................................20 Work Status Icons ..................................................................................................................20 Access Order Statuses ............................................................................................................ 22 Create an Access Order .......................................................................................................... 25 Access Four-Step Ordering Process ........................................................................................31 Validate an Access Order.........................................................................................................31 Tracking Access ...................................................................................................................... 32 Search Access Orders ............................................................................................................. 33 Filter Access Order List .......................................................................................................... 35 Create Access Response ......................................................................................................... 37 Access Supplement................................................................................................................. 38 Cancel Order Details ......................................................................................................................39 Save As an Access Request .....................................................................................................40 Update Access Request General Information........................................................................ 41 View Last Notification ............................................................................................................ 41 Using the History Function.................................................................................................... 42 View the History.............................................................................................................................42 Revert to Last Saved ............................................................................................................... 43 Revert to Last Submitted........................................................................................................ 43 View Error List ....................................................................................................................... 43 Resend Access......................................................................................................................... 43 Wisor Proprietary and Confidential © 2008 iii Wisor VIRTUAL FRONT OFFICE 11.4 USER GUIDE External Applications ............................................................................................................. 43 Working with Templates ........................................................................................ 45 Create a Template................................................................................................................... 45 Save As Template.................................................................................................................... 46 Apply Template After Order Initiation .................................................................................. 46 Search for a Template............................................................................................................. 47 Create and Manage Incoming Access Orders ......................................................... 49 Overview ................................................................................................................................. 49 Access Receive Order Statuses ......................................................................................................49 Using the Access Order List ................................................................................................... 54 Search Access Requests.......................................................................................................... 55 Filter Access Order List .......................................................................................................... 55 Assign Access Receive Orders ................................................................................................ 56 Create Access Response ......................................................................................................... 57 View the History ..................................................................................................................... 58 Reverting to a Previously Saved Response ............................................................................ 59 Local Module......................................................................................................... 63 Local PreOrder Search and Response ................................................................... 64 Local PreOrder Inquiry Procedure......................................................................................... 64 Save Local PreOrder Response .............................................................................................. 65 Print Local PreOrder Response.............................................................................................. 66 Search Local PreOrder Responses ......................................................................................... 66 Print Local PreOrder Search Results ..................................................................................... 67 PortQual ............................................................................................................... 68 Introduction ...........................................................................................................................68 Residential versus Business PortQual....................................................................................68 Directions ............................................................................................................................... 69 Create and Manage Outgoing Local Orders............................................................ 72 Local Service Request Work List............................................................................................ 72 Action Icons....................................................................................................................................72 Work Status Icons...........................................................................................................................72 Create a Local Service Order .................................................................................................. 73 Validate a Local Service Order ............................................................................................... 74 Local Service Request Supplement ........................................................................................ 75 Tracking Local Service Requests............................................................................................ 76 Create Local Service Request Responses ............................................................................... 76 Search Local Service Requests ............................................................................................... 77 Filter Local Service Request Order List ................................................................................. 77 Generate Local Service Request Response Summary Report ...............................................80 Save As a Local Service Request............................................................................................. 81 Update Status/Create Response ............................................................................................82 View the History .....................................................................................................................84 Supplement vs. Resubmit Original Order..............................................................................84 Supplement .....................................................................................................................................85 Resubmit Original Order ................................................................................................................85 Revert to Last Saved ...............................................................................................................86 Revert to Last Submitted........................................................................................................86 View Error List .......................................................................................................................86 View Last Notification ............................................................................................................ 87 iv Wisor Proprietary and Confidential © 2008 Table of Contents Void......................................................................................................................................... 87 Printable Version.................................................................................................................... 87 Working with Templates ........................................................................................ 88 Create a Template...................................................................................................................88 Save As Template....................................................................................................................89 Apply Template After Order Initiation ..................................................................................89 Search for a Template.............................................................................................................90 Create and Manage Incoming Local Orders............................................................ 92 Overview ................................................................................................................................. 92 Using the Local Order List .....................................................................................................92 Search Local Requests............................................................................................................ 92 Filter Local Order List ............................................................................................................ 92 Assign Local Receive Orders .................................................................................................. 94 Create Local Response ........................................................................................................... 94 View the History ..................................................................................................................... 95 Revert to Last Saved ............................................................................................................... 95 E911 Module ......................................................................................................... 97 Enhanced 911 ....................................................................................................... 98 E911 List GUI..........................................................................................................................98 Filter E911 List........................................................................................................................98 Update an E911 Order ............................................................................................................ 99 View E911 History..................................................................................................................101 Save As an Update Request ...................................................................................................101 Save As Template.................................................................................................................. 102 Perform an E911 Inquiry ...................................................................................................... 103 Search for an E911 Inquiry ................................................................................................... 104 TA Module ........................................................................................................... 107 Trouble Administration ........................................................................................ 108 Login Procedure ................................................................................................................... 108 Trouble Administration Work List....................................................................................... 108 History ................................................................................................................................... 113 Create a Trouble Report ........................................................................................................114 Trouble Templates.................................................................................................................116 Modify Trouble Report.......................................................................................................... 117 Additional Trouble Information ...........................................................................................118 Cancel Trouble Report ..........................................................................................................119 Late Bonding ........................................................................................................................ 120 Escalation Request ............................................................................................................... 120 Retrieve Trouble Info Request .............................................................................................. 121 Retrieve Trouble Report Status............................................................................................ 122 Verify Repair Completion Request ...................................................................................... 122 Attribute Value Change Notifications .................................................................................. 123 Status Notifications ......................................................................................................................123 Authorization Request Notifications ............................................................................................123 Request to Close Notifications .....................................................................................................123 Mechanized Loop Test (MLT) .............................................................................................. 123 POTS Service Test Results(MLT)................................................................................................124 Trouble Administration Contact Information ......................................................... 127 Glossary ............................................................................................................. 129 Wisor Proprietary and Confidential © 2008 v Wisor VIRTUAL FRONT OFFICE 11.4 USER GUIDE Table of Figures Figure 1 ..................................................................................................................................................... 6 Figure 2 ..................................................................................................................................................... 7 Figure 3 ..................................................................................................................................................... 8 Figure 4 ..................................................................................................................................................... 9 Figure 5 ................................................................................................................................................... 14 Figure 6 ................................................................................................................................................... 15 Figure 7 ................................................................................................................................................... 15 Figure 8 ................................................................................................................................................... 16 Figure 9 ................................................................................................................................................... 18 Figure 10 ................................................................................................................................................. 26 Figure 11 ................................................................................................................................................. 26 Figure 12 ................................................................................................................................................. 27 Figure 13 ................................................................................................................................................. 28 Figure 14 ................................................................................................................................................. 29 Figure 15 ................................................................................................................................................. 29 Figure 16 ................................................................................................................................................. 30 Figure 17 ................................................................................................................................................. 32 Figure 18 ................................................................................................................................................. 33 Figure 19 ................................................................................................................................................. 34 Figure 20 ................................................................................................................................................. 35 Figure 21 ................................................................................................................................................. 37 Figure 22 ................................................................................................................................................. 38 Figure 23 ................................................................................................................................................. 39 Figure 24 ................................................................................................................................................. 41 Figure 25 ................................................................................................................................................. 42 Figure 26 ................................................................................................................................................. 45 Figure 27 ................................................................................................................................................. 47 Figure 28 ................................................................................................................................................. 55 Figure 29 ................................................................................................................................................. 56 Figure 30 ................................................................................................................................................. 57 Figure 31 ................................................................................................................................................. 57 Figure 32 ................................................................................................................................................. 58 Figure 33 ................................................................................................................................................. 59 Figure 34 ................................................................................................................................................. 60 Figure 35 ................................................................................................................................................. 61 Figure 36 ................................................................................................................................................. 64 Figure 37 ................................................................................................................................................. 65 Figure 38 ................................................................................................................................................. 69 Figure 39 ................................................................................................................................................. 70 Figure 40 ................................................................................................................................................. 71 Figure 41 ................................................................................................................................................. 73 Figure 42 ................................................................................................................................................. 74 Figure 43 ................................................................................................................................................. 75 Figure 44 ................................................................................................................................................. 76 Figure 45 ................................................................................................................................................. 77 vi Wisor Proprietary and Confidential © 2008 Table of Contents Figure 46 ................................................................................................................................................. 78 Figure 47 ................................................................................................................................................. 81 Figure 48 ................................................................................................................................................. 82 Figure 49 ................................................................................................................................................. 82 Figure 50 ................................................................................................................................................. 83 Figure 51 ................................................................................................................................................. 84 Figure 52 ................................................................................................................................................. 88 Figure 53 ................................................................................................................................................. 90 Figure 54 ................................................................................................................................................. 92 Figure 55 ................................................................................................................................................. 93 Figure 56 ................................................................................................................................................. 94 Figure 57 ................................................................................................................................................. 95 Figure 58 ................................................................................................................................................. 98 Figure 59 ................................................................................................................................................. 99 Figure 60 ............................................................................................................................................... 100 Figure 61 ............................................................................................................................................... 100 Figure 62 ............................................................................................................................................... 102 Figure 63 ............................................................................................................................................... 102 Figure 64 ............................................................................................................................................... 103 Figure 65 ............................................................................................................................................... 104 Figure 66 ............................................................................................................................................... 105 Figure 67 ............................................................................................................................................... 108 Figure 68 ............................................................................................................................................... 109 Figure 69 ............................................................................................................................................... 114 Figure 70 ............................................................................................................................................... 115 Figure 70a ............................................................................................................................................. 116 Figure 71 ............................................................................................................................................... 117 Figure 72 ............................................................................................................................................... 118 Figure 73 ............................................................................................................................................... 119 Figure 74 ............................................................................................................................................... 119 Figure 75 ............................................................................................................................................... 121 Figure 76 ............................................................................................................................................... 121 Figure 77 ............................................................................................................................................... 122 Figure 78 ............................................................................................................................................... 124 Wisor Proprietary and Confidential © 2008 vii Introduction Wisor Proprietary and Confidential © 2008 1 Wisor VIRTUAL FRONT OFFICE 11.4 USER GUIDE About This Manual This manual is the property of Wisor Corporation. The contents of this manual may not be reproduced or distributed without written consent of Wisor Corporation. Virtual Front Office (VFO) also provides complete documentation in an accessible HTML-based Help system. While you are in the VFO application, you can launch this system by clicking the Help link, which is in the upper right hand corner. The Help system includes information on all the application's tools, commands, and features. Audience The primary users of this guide will be the provisioning specialists or users whose responsibilities include provisioning resources from outside sources. It is assumed that the users of this manual are knowledgeable about the telecommunications industry as well as efficient provisioning practices. Conventions This manual is organized as follows. • Buttons and links that you click will be bold. • Windows will be displayed as screen shots. • Paths are represented by the ‘>’ key. For example, Start > Programs > Microsoft Word. This path represents the steps followed to use certain functions within the application. The examples used in this guide are fictitious. Any similarity to actual data is merely coincidental. The sample data does not represent proprietary data from any other company. Furthermore, the screen shots used in this document are not specific to any industry version. Purpose This manual is intended to provide methods of processing and maintaining orders. Specifically, this manual explains how to: • Create and manage Service Requests • Create and manage Service Order templates • Perform tasks in the Service Ordering process • The VFO User Guide is designed to act as a tool to provide a systematic process for conducting daily tasks. Wisor Contact Information Should you need further assistance, contact Wisor’s Technical Support Team by: 2 Wisor Proprietary and Confidential © 2008 About This Manual • E-mail: [email protected] • Phone: 301.417.9401 • Fax: 301.417.9423 Hours of operations are Monday through Friday, 9 a.m. to 5 p.m. Eastern Standard Time (GMT -5:00). Wisor Proprietary and Confidential © 2008 3 Wisor VIRTUAL FRONT OFFICE 11.4 USER GUIDE Introduction to Virtual Front Office (VFO) VFO is a gateway between service/network providers. The application is accessible via a web-based Graphic User Interface (GUI), in addition to the following features/functionality: • Flexible and automatic validation of Access Service Requests, Local Service Requests, Trouble Reports and/or E911. • Storage and management of all service requests submitted, and the subsequent notifications received. • Ordering of local and access services with Local Exchange Carriers (LECs) by the forward and reverse transmission of Access information. • Secure and efficient business interactions between the companies. VFO - Exchange Path Connection To understand VFO, it is helpful to understand how it works with Wisor’s Exchange Path application. Exchange Path enables real-time data transfer with other Trading Partners. Exchange Path uses the following transaction and message formats: • Local - EDI, XML, PDF order form • Access – MechSpec, UOM/XML, PDF order form • NENA – Flatfile, XML • Trouble Administration – XML, CMIP • B2B Trading MechSpec Exchange Path can also use the following transmission protocols: 4 • Wisor Interactive Agent • Connect:Direct • FTP (active and passive) • SMTP (email) • Fax • PGP Encryption/Decryption • CORBA • CMIP • HTTP • JMS • SOAP Wisor Proprietary and Confidential © 2008 Introduction to Virtual Front Office (VFO) • SOAPRPC The process begins with the end user populating the VFO GUI, followed by the below list of activities: 1. VFO creates an XML based on the values entered in the VFO GUI. 2. The XML is sent to Exchange Path where the XML is compared against the Trading Partner's Business Rules. 3. If no rules are violated, the XML is translated into the Trading Partner's preferred format. 4. Exchange Path transfers the message to the Trading Partner. 5. The Trading Partner checks the message against their system. 6. The Trading Partner transfers the response-message to Exchange Path. 7. Exchange Path translates the message back into XML and then sends that XML back to VFO and updates the order's status. What are the Benefits of VFO? High quality, cost-effective interactions between telecommunications providers can be attained through a high degree of mechanization. However, direct interfaces between the OSSs of various providers are costly and create opportunities for insecure handling of critical business information. Wisor’s VFO provides a secure gateway for handling these interactions and helps to realize the following benefits: • Achieve cost-effectiveness by handling requests as part of a mainstream operations flow (i.e., automated flow through) instead of a manual effort. • Facilitates interactions between associated communications customers and providers via integration into existing/evolving operations systems architectures. • Improves time to service by minimizing manual efforts and the errors associated with manual processing. • Maintains a historical record of orders processed. • Meets the transmission protocol requirements. • Performs order functions over a user-friendly, completely webbased interface. • Generates notifications and alarms when Service Level Agreements (SLAs) are in violation. • Provides the ability to validate transaction data before submission to the Trading Partners; thus reducing costs to manage fall-out. Wisor Proprietary and Confidential © 2008 5 Wisor VIRTUAL FRONT OFFICE 11.4 USER GUIDE Getting Started with VFO VFO is web-based application that runs on Internet Explorer version 7 or earlier; therefore, the user must open a Web browser to access the application. (If necessary, consult the browser’s User’s Manual for the browser’s setup and operating procedures.) When the browser opens, enter the following in the Address line: http://<host name>:<port number> The <host name> is the name of the server on which the VFO files are stored and the <port number> is the port that was defined during the creation of the WebLogic Domain. This information can be obtained from the company’s System Administrator. Login Procedure Use the following procedure to log into VFO. 1. Browse to the VFO location by entering the following address in the Address field: http://<host name>:<port number> Figure 1 2. Enter a valid name in the User Name field. 3. Enter a valid password in the Password field. 4. Click the dropdown arrow in the Module field. 5. Select the desired Module. 6 Wisor Proprietary and Confidential © 2008 Getting Started with VFO 6. Click the Login button. NOTE: Use the User Name and Password provided by the company’s System Administrator. Change Password Use the following procedure to change the VFO Login password. 1. Browse to the location of VFO. 2. Enter a valid name in the User Name field. 3. Enter a valid password in the Password field. 4. Use the User Name and Password provided by company’s System Administrator. 5. Click the dropdown arrow in the Module field. 6. Select the desired Module. 7. Check the Change Password checkbox. 8. Click the Login button. Figure 2 9. Enter the old password into the Old Password field. 10. Enter the new password into the New Password field. 11. Reenter the new password into the Confirm New Password field. Wisor Proprietary and Confidential © 2008 7 Wisor VIRTUAL FRONT OFFICE 11.4 USER GUIDE 12. Click the Update Password button. Figure 3 13. Log in using the new password. Module Lists In each module, the first screen to appear is the list of existing orders that are stored in the application. The list name is referred to differently in some of the modules, as referenced below: 8 Module List Name Access Order List Local Order List E911 E911 List TA (Trouble Administrator) Work List Wisor Proprietary and Confidential © 2008 Getting Started with VFO Note: A company’s internal process for managing orders will dictate what orders will be viewable to a user. Viewing capabilities are managed via the Filter function, which will be covered further down in the document. Figure 4 Access Service Request Order List <Module> - Use this drop down menu to change modules without logging out of VFO. Select the module from the dropdown menu, and then click the Launch button next to the <Module> to open the home page of the selected module. Home - Click this link to return to the Order List page. About - Click this link to open a popup window that lists: • the login name of the current user • the current user’s full name • the date and time the current version of the application was installed • any TP Package details for installed TP Packages • Wisor VFO copyright information Help - Click this link to access VFO Online Help. Logout - Click this link to logout of VFO and return to the Login page. Wisor Proprietary and Confidential © 2008 9 Wisor VIRTUAL FRONT OFFICE 11.4 USER GUIDE Order - Hover over this tab to access functionality to create or search for an order. PreOrder - This tab allows you to initiate, search and/or submit preorder transactions. Template - Hover over this tab to access functionality to create or search for a template. Administration - Hover over this tab to access User Profiles and other security related information. This tab will only be visible if you have sufficient permissions. Another feature of the List is the shading of certain orders. • When an order has been reassigned it will be appear in gray. • If the order is considered a Protected Circuit, its PON will appear shaded yellow. • If an order was initiated by a user that is no longer active, it will appear in pink. NOTE: The default colors can be changed to suit the needs of the user. Check with the System Administrator if different colors are observed. Sorting the List A module list can be sorted in ascending or descending alpha or numeric order based on the specific column header selected. In the E911 and TA modules, there is a downward facing arrow in one of the column headers when the module is opened to the home page. Clicking the column name of any other column will move the arrow and re-sort the list according to the selected header. For example, if you wish to sort the entries by State, you would click the State column. The arrow would then appear to the right of that column's name and the orders would be sorted alphabetically according to the State. Clicking the header a second time will reverse the sorting order. Please note that while clicking on the headers in the Access and Local modules will sort the orders, no arrows will display in the column header. The Order List will nonetheless be sorted. Using VFO's Action Icons The following icons are used throughout VFO, in most modules and in almost every pop-up. In situations where they are not seen, it is because they are context specific and not always a viable function. NOTE: To specify a particular record, you must first click on the checkbox or radio button to the left of the record. 10 Wisor Proprietary and Confidential © 2008 Getting Started with VFO Open Book – History Function This function will allow a user to see any previous actions that have been performed on a particular order. This icon is not used in the E911 module. Sheet of Paper – Create Response Function This is used primarily in Service Request Receive functions but is also available for manual creation of responses sent. This icon is not used in the E911 or TA modules. Funnel – Filter Function The Filter function allows the user to specify which records appear in a specific module list. The most recent filter is automatically stored in the system so that the next time the user logs in the list will display the latest filter selection. Different filter options are applicable for each module. NOTE: Different Filter options are applicable for each module and will be discussed the in the appropriate sections below. Gray Box in Front of Computer – Return to Default Sort Function This resets the view to the Default sort, which arranges items in the list based on date and time of last update. This icon is not used in the E911 or TA modules. Two Green Arrows - Refresh Function This function will refresh the window in which the icon is displayed. It applies to a pop-up window that is displaying the details of an order that was just placed, or to the module list to check the current status of all orders. Wisor Proprietary and Confidential © 2008 11 Wisor VIRTUAL FRONT OFFICE 11.4 USER GUIDE Box above Note – Back to Order Function This will take the user back to the previous screen. Specifically, it will allow the user to return to an Order after viewing the History. Printer – Print Function Clicking on this icon will print the current screen through the default printer that is configured with the browser. This function is valuable to provisioners who require hard copies of orders. This icon is not used in the TA module. Disks – Save Function This function allows the user to save any changes to a currently displayed order. This function, when used with the History function, allows the user to save previous versions of an order as the current version. This icon is not used in the TA module. Running Man – Submit Function This function first validates the order based on the rules built into the GUI. (e.g.: required fields, correct date and number formats, etc.). Once this GUI validation is completed, the order is sent to Exchange Path for Business Rule Validation. If the order passes the Business Rule validation, it is then sent to the Trading Partner. Green Check Mark – Validate Function This performs the GUI validation and Business Rule validation on the order displayed. This is automatically performed when Submitting the order, but this gives the user the option of performing the validation process without submitting the order. This icon is not used in the TA module. 12 Wisor Proprietary and Confidential © 2008 Access Module Wisor Proprietary and Confidential © 2008 13 Wisor VIRTUAL FRONT OFFICE 11.4 USER GUIDE Access PreOrder Search and Response New Access PreOrder Inquiry Procedure Use the following procedure to perform a new PreOrder Inquiry. 1. Login to VFO and select the Access module. The Order List page opens. 2. Execute the PreOrder>New menu command. The PreOrder Initiation window opens. WARNING: An error message will be displayed if configurartion to this function is not accessible. Figure 5 3. The Message ID will be automatically populated with an incremented entry. The Message ID value that was auto-populated can be manually changed. 4. Select an ICSC. 5. Select the Service Type from the dropdown menu. 6. Click Initiate. This opens the PreOrder Request window. 7. Selecting the CFA Inquiry in the Initiation window will generate the following PreOrder Request window to appear. 14 Wisor Proprietary and Confidential © 2008 6. Create and Manage Outgoing Access Orders Figure 6 8. Selecting the Location Inquiry in the Initiation window will generate the following PreOrder Request window to appear. Figure 7 9. Populate the fields with the relevant search criteria. Fields Wisor Proprietary and Confidential © 2008 15 Wisor VIRTUAL FRONT OFFICE 11.4 USER GUIDE highlighted yellow are typically require when the section is populated. 10. Click Submit. The results are then displayed in the PreOrder Response window. Figure 8 11. For large responses, to view the entire response you may need to use the pagination provided for each section containing more than the specified number of items. Enter the number of records you want displayed at any one time for that section and click the SHOW link. The default is to show up to 10 items at a time before needing to move to the next page. Click the outside arrows to move to the first or last page. Click the inside arrows to move page by page. 12. To modify the PreOrder Request, click the Inquiry tab. This reopens the PreOrder Request. 13. Click the Change button to edit the fields. 14. Make the desired changes and click Submit to resubmit the PreOrder Inquiry. NOTE: This window can remain open while starting another Order. This allows a user to cut values that are in the Response window and paste them into the respective fields in the Order window. The query can also be performed from within the Order itself. 16 Wisor Proprietary and Confidential © 2008 6. Create and Manage Outgoing Access Orders Save Access PreOrder Response Use the following procedure to save PreOrder Inquiry and Response transactions. 1. Execute a PreOrder Inquiry. Be sure to be in the PreOrder Response window. 2. Scroll to the bottom of the window and click Save. Print Access PreOrder Response Use the following procedure to print PreOrder response details immediately after generating the response. 1. Execute a PreOrder Inquiry. Be sure to be in the PreOrder Response window. 2. Click Printable Version to open a new window with a version of the Response that is better formatted for a printer. 3. Click Print. The Print dialog box opens to allow printing based on the user’s print configuration. Search Access PreOrder Responses Use the following procedure to view PreOrder Response details. 1. Login to VFO and select the Access module. The Access Order List page opens. 2. Hover your cursor over the PreOrder tab. A dropdown menu opens. 3. Execute the PreOrder > Search menu command. The PreOrder Search page opens. Wisor Proprietary and Confidential © 2008 17 Wisor VIRTUAL FRONT OFFICE 11.4 USER GUIDE Figure 9 4. Users can search using the following criteria. 18 • TX Num—Enter the number of the Transaction to search. This field supports wildcard searches using the % symbol. • ICSC—Click the dropdown menu to select the ICSC on which to search. This populates the TX Type menu with the transactions that are available for the selected Interexchange Customer Service Center (ICSC). • Service Type—Click this dropdown menu to select a type of service (i.e. Address Validation, CFA_Inquiry, Location_Inquiry). • Public Search—Check the checkbox to search for all PreOrders. This enables a search that is no longer limited to a specific user ID. • TX From Date (MM/DD/YYYY)—The first day of the daterange the inquiry was sent from VFO. • TX To Date (MM/DD/YYYY)—The last day of the date-range the inquiry was sent from VFO. If left blank, the system searches up to the current date. • Response Type—Click this dropdown menu to select the type of response (i.e. Alternatives Exists, Found, Not Found, Restricted). • Go—Click this button to submit the search criteria and view the returns. • Clear—Click this button to empty all the populated fields. Wisor Proprietary and Confidential © 2008 6. Create and Manage Outgoing Access Orders 5. Enter the appropriate search criteria. 6. Click Go to perform the search. The results will display in the bottom half of the window. Print Access PreOrder Search Results Use the following procedure to print the PreOrder Search results. 1. Execute a PreOrder Search. 2. Click the Message ID link of the PreOrder to be printed. 3. Click Print. The Print dialog box opens to allow printing based on the user’s print configuration. Wisor Proprietary and Confidential © 2008 19 Wisor VIRTUAL FRONT OFFICE 11.4 USER GUIDE Create and Manage Outgoing Access Orders Using the Access Order List The Order List pages display all of the orders entered into VFO. Each row represents a particular order and shows the following information: • • • • • • • • • • • • • Receiver Code Customer Code Purchase Order Number Version of the Order Supplement Type (if any) Current Status Transmission Type Service Type Request Type Activity Desired Due Date Owner Date Sent/Received Work Status Icons There may be an icon in front of some of the tickets to indicate different work states. Following are what these icons represent: Clock The order is in a "Pending" state. A pending state exists when an order has not been updated by the Trading Partner within the Service Level Agreement (SLA) timeframe. The work state will change as soon as the Trading Partner updates the status of the order. This icon also appears when the order is pending a Firm Order Confirmation, Design Layout Report or Completion Notification from the Trading Partner. Flame The order has been rejected by the Trading Partner. This is not due to Business Rule violations, as those would result in a different work status icon. Green Check Mark The order has been completed by the Trading Partner. 20 Wisor Proprietary and Confidential © 2008 6. Create and Manage Outgoing Access Orders Red Bell The order has Business Rules Violations. These violations were detected in Exchange Path and the order was stopped before it reached the Trading Partner. Red Hand The order has been canceled by the user or by the Trading Partner. White Check on Green Folder The order has been confirmed. This means that the Trading Partner has accepted the order and is in the process of fulfilling the request. Red Exclamation Mark The order is in jeopardy. This could be due to any number of reasons, from a delay in processing to a lack of resources. The following icons are not related to status changes. They allow the user to determine key information about an order via the icon. Train Tracks The order was placed outside the VFO system and the order within VFO is only being used for tracking purposes. United States Map This is a Multi-EC order, which means that the order has been placed through multiple Inter-Exchange Carriers. Wisor Proprietary and Confidential © 2008 21 Wisor VIRTUAL FRONT OFFICE 11.4 USER GUIDE Access Order Statuses Status 22 Description User Action Wait for the FOC. Accepted Access Provider (Trading Partner) has returned a positive acknowledgement. Exchange Path has updated the status, stored the message in the Exchange Path Database and sent a notification message to VFO. Cancel Accepted The Trading Partner has returned a No action positive acknowledgement of canceling an required. ASR; Exchange Path has updated the status, stored the message in the Exchange Path Database, and sent a notification message to VFO. Cancel Rejected The Trading Partner has returned a negative rejection acknowledgment for a cancellation. View the Reject Reason and take the recommended action. Cancel Resent The Cancel Request has been resent. No action required. Cancel Sent A Cancel Request has been sent to the receiver/Trading Partner. No action required. Cancel Submitted A Cancel Request has been sent to Exchange Path for validation and subsequent processing. No action required. Cancel Tracked The Tracking Only Order has been cancelled. No action required. Cancelled The request has been supplemented with a No action Cancel Request. required. Clarification The Trading Partner has returned a Clarification message via the communications gateway. Exchange Path has updated the status, stored the message in the Exchange Path Database, and sent a Clarification notification message to VFO. Review the Clarification message and take the recommended action. Clarification The Trading Partner has returned a Cleared Clarification Cleared message for the Access Order and Exchange Path has sent a notification message to VFO to update the status. No action required. Wisor Proprietary and Confidential © 2008 6. Create and Manage Outgoing Access Orders Status Description User Action Completed Review Response The VFO user has manually updated the ASR status to Completed or a Trading Partner has sent a Completed clarification message. This message is optional and not all Trading Partners support this notification. Confirmed The Trading Partner has returned a Confirmation message for the ASR; Exchange Path has updated the status, stored the message in the Exchange Path Database, and sent a notification message to VFO. Review Response Design Order The Trading Partner has returned a Design Review Response Confirmed Order Confirmation message for the Access Order and Exchange Path has sent a notification message to VFO to update the status. DLR/Design The Trading Partner has returned a Design Review Response Layout Request (DLR) for the ASR; Exchange Path has updated the status, stored the message in the Exchange Path Database, and sent a notification message to VFO. Errored The ASR Order has failed the Exchange Correct the Rule Path Validation process; Exchange Path Error and Validate has updated the Request Status, stored the the Order again. ASR, and sent an Error Notification to VFO. Jeopardy Indicates there is a situation(s) that may Review the jeopardize critical dates of the ASR Order. Response and take the recommended action. Jeopardy with Errors Indicates there is a situation(s) that may jeopardize critical dates of the ASR Order and there is an error(s) with the request. Review the Response and take the recommended action. Pending Completion The Exchange Path Monitor Process determines that a Completion Notice has not been received in the time allotted, and issues a notification message to VFO. Contact the Trading Partner to find out the cause of the delay in response. Pending Design The Exchange Path Monitor Process determines that a DLR or Design information has not been received in the Contact the Trading Partner to find out the cause Wisor Proprietary and Confidential © 2008 23 Wisor VIRTUAL FRONT OFFICE 11.4 USER GUIDE Status Description User Action time allotted, and issues a notification message to VFO. 24 of the delay in response. Pending The Exchange Path Monitor Process Confirmation determines that a confirmation, such as FOC, has not been received in the time allotted, and issues a notification message to VFO. Contact the Trading Partner to find out the cause of the delay in response. Pending Response The Exchange Path Monitor Process determines that a response has not been received in the time allotted, and issues a notification message to VFO. Contact the Trading Partner to find out the cause of the delay in response. Pending Validation An initial request, or a change to a request, (other than a Cancel) has been created, but the request has not been sent to Exchange Path for validation or submission to the Trading Partner. After select Submit or Validate the resulting response from Exchange Path will be Validated or Errored. Complete and Submit the order. Received This status appears when service requests are sent to VFO for processing. This indicates the customer’s request has been received. No action is required. Rejected The Trading Partner has returned a negative (rejection) acknowledgment. Exchange Path has updated the status, stored the message in the Exchange Path Database, and sent a notification message to VFO. Review the Response and take the recommended action. Resent The VFO user has requested that another copy of the last submitted version be sent to the Trading Partner. No action is required. Sent Exchange Path has sent the request to the Trading Partner, updated the status, and sent a notification message to VFO. No action is required. Submitted This message indicates that an initial request or a change to a request has been sent to Exchange Path for validation and subsequent processing. This does not apply to a Cancel Request. No action is required. Supplement Received This status appears when the customer has No action is sent a Supplement to the previously required. Wisor Proprietary and Confidential © 2008 6. Create and Manage Outgoing Access Orders Status Description User Action received Service Request. System Errored VFO has received a system error message from Exchange Path. Read the error message and Submit Order again. Contact your System Administrator to alert them of the issue. TP Cancelled The provider has cancelled the customers ASR Order due to no response to the Clarification/Notification Request. If the order is still needed create a new request. TP Errored The Trading Partner has returned one or more error messages for the ASR Order. Exchange Path has updated the status, stored the message in the Exchange Path Database, and sent a notification message to VFO. Review the Response and take the recommended action. Tracked The order was initiated as a Tracking Only No action is request and will not be transmitted to the required. Trading Partner. This option is used when the order was sent outside of the VFO system; however, the progress of the order will be manually tracked in VFO. Validated Exchange Path returns a validation successful message. Submit Order Voided. The VFO user has placed the ASR in Voided status to indicate that the ASR should not be transmitted to the Trading Partner. No action is required. Create an Access Order Use the following procedure to create an Access Order: 1. Login to VFO and select the Access module. 2. Execute the Order > New menu command. This opens the Order Initiation page. Wisor Proprietary and Confidential © 2008 25 Wisor VIRTUAL FRONT OFFICE 11.4 USER GUIDE Figure 10 Some users will receive the below Order Initiation screen, if they require the ability to manage both Send and Receive orders, Figure 11 26 Wisor Proprietary and Confidential © 2008 6. Create and Manage Outgoing Access Orders The screen that appears below is what will be seen by users that can only place orders on behalf of other companies. Please note, ESPs that only Receive orders cannot initiate orders, therefore, you may receive the below message informing you that there is no configuration setup. Figure 12 3. The Order Number field will be automatically populated with an incremented entry; however, the value can be changed manually. 4. Enter the Receiver Code. Enter the entire Receiver Code or just the first characters of the Receiver Code, thereby filtering a dropdown menu from which to select required code. The name of the Receiver Code appears to the right of the Receiver Code field and a list of the service center's guideline versions populate in the Guideline Version dropdown. 5. Select a Guideline Version. The guideline version is automatically populated by the system based on the Receiver Code picked by the user. 6. Select Firm Order from the Type of Request dropdown. 7. Select a Service. This generates a list of activities available for the service type. 8. Select an Activity. 9. Optionally, select a Template. 10. Click Initiate. This opens a new Order form. Wisor Proprietary and Confidential © 2008 27 Wisor VIRTUAL FRONT OFFICE 11.4 USER GUIDE Figure 13 11. Populate the fields as necessary. Yellow highlighted fields are required when its section is populated. Next to each section name, it states whether the section is optional, conditional, or required. 12. Validate the address without leaving the order by populating the address field and clicking the Validate link next to the section header. 28 Wisor Proprietary and Confidential © 2008 6. Create and Manage Outgoing Access Orders Figure 14 13. You can also validate the CFA by clicking the Validate link next to the CFA field name after populating that field. Figure 15 14. Browse through each of the remaining forms to ensure all required fields are populated. Wisor Proprietary and Confidential © 2008 29 Wisor VIRTUAL FRONT OFFICE 11.4 USER GUIDE NOTE: Click the Save icon in the upper-right corner of the page if you intend to validate the order later. 15. Click the Submit icon. 16. Executing the Submit command validates the order against the business rules. You can also execute the Save, Submit, and Validate functions through the Order menu. NOTE: You can also submit the order without validation. This is not recommended. Only Managers are given permission to perform this action. If the Trading Partner you are transmitting the order to allows methods of transmission other than Mech Spec, you will be given the option of choosing a transmission method. NOTE: For Non-ASOG orders, choosing a transmission method will always be required. Users can populate the transmission method next to the Receiver Code value. Figure 16 17. Select the method of transmission from the dropdown and populate the blank field with the required information. For example, if e-mail is the selected method, the email address the order is to be transmitted to must be entered the in the field. 18. If transmitting by Fax or Email, you can add Remarks. The text in the Remarks field will be inserted into the body of the email or the cover sheet of the Fax. 19. Click OK to submit the order. 30 Wisor Proprietary and Confidential © 2008 6. Create and Manage Outgoing Access Orders Access Four-Step Ordering Process The VFO Access Four-Step Ordering Process allows you to send an Access Order as an Inquiry before you send it as a Firm Order. Use the following procedure to perform a Four Step Order. 1. Begin creating a new Access order as usual. (Order > New) 2. Select Service Request (Manual/Mechanized) or Service Request (Follow-up to Verbal) from the Type of Request dropdown. 3. Submit the order. 4. Once you receive a response from the Trading Partner, click the PON link of that Response. 5. In the resulting pop-up window, use the Order > Action > Convert to Firm Order menu functionality. 6. Make any changes necessary and submit the new Firm Order. You can still execute the Save, Submit, and Validate functions through the Order menu. Validate an Access Order The Validate command in VFO validates Access Orders against the business rules. The validation request is sent to the Business Rule Management System which performs initial validations, service provider business rule validations, and/or Trading Partner specific business rule validations. To validate an order, simply click the Validate icon . NOTE Executing the Submit command (by using the menu command or by clicking the Submit tool) automatically validates the Access Order. If any portion of the order fails validation, a window detailing the errors, by field, will appear. Wisor Proprietary and Confidential © 2008 31 Wisor VIRTUAL FRONT OFFICE 11.4 USER GUIDE Figure 17 By clicking the link that appears in the Error Text column, the user will be taken to the first occurrence of that error. NOTE: These errors only refer to specific fields. If entire sections are in error, users will need to locate them manually. Tracking Access Tracking is used by customers that have sent an order to a Trading Partner outside of VFO and now want to track the progress of the order manually within VFO. Many companies want all orders centralized in VFO for reporting purposes. To use this function, from the Order Initiation window, check the Tracking check box. 32 Wisor Proprietary and Confidential © 2008 6. Create and Manage Outgoing Access Orders Figure 18 The order can then be entered and the Submit button allows you to enter the date the order was actually submitted and stores the order with all the automated orders in the database. Once an order is tracked, responses cannot be applied to it until the order enters the Cancel Tracked status. Once in this state the only two responses that can be applied are Accepted – Response Accept or Rejected – Response Reject. If the user selects the Accepted – Response Accept Response, then the new status of the order will be Cancel Accepted. If the user selects Rejected – Response Reject then the new status of the order will be Rejected – Response Reject. Search Access Orders The VFO Search functionality allows you to search all Access Orders for the occurrence of specific values. You can extend your search by using the wildcard (%) character. Use the following procedure to find a specific Access Order(s): 1. On the Order List page, execute the Order > Search menu command. This opens the Search dialog, as shown below. Wisor Proprietary and Confidential © 2008 33 Wisor VIRTUAL FRONT OFFICE 11.4 USER GUIDE Figure 19 2. Select the criterion from the Search On list. 3. Enter the value you wish to search for in the Search For field. This field is not case sensitive. 4. Click Search. Many of the fields in the search criteria list start with the ASR form where the field resides. For example, “Transport Connecting Facility Assignment,” is the CFA field on the Transport form. Below are the values that appear without the form noted: Search On Value 34 Location on Access Order ACTL ASR form>Administative>ACTL field ASR Number Appears on responses from receiver. Bandwidth Gen. Info form* 911 Gen. Info form* Initiator ASR form> Contact section> INIT field Market Gen. Info form* Mobile Technology Gen. Info form* Multi-EC Order Multi-EC form Other Exchange Company Multi-EC form> Other Exchange Company section> ICSC field Project Code 1 Gen. Info form* Project Code 2 Gen. Info form* Project Code 3 Gen. Info form* Protected Circuit Gen. Info form* Provider Name Gen. Info form* Purchase Order ASR form Region Gen. Info form* Wisor Proprietary and Confidential © 2008 6. Create and Manage Outgoing Access Orders Search On Value Served By Fiber Location on Access Order Gen. Info form* * Gen. Info form was created to allow companies a form to enter information for internal use only. Please check with your company to see which fields your company wants you to use and the information that should be entered. The information on this form is not sent to the Receiver of the Access request. Contact your Wisor Sales Representative if you want to add fields to this form. Filter Access Order List The Filter function allows you to limit the selection of orders displayed in the Order List. You can save the filter settings and apply them to future sessions. Your Order List filter settings will open as part of the login process. Use the following procedure to filter the Access Order List: 1. At the Order List page, click the Filter icon . 2. This opens the Order List Filter window. Below are some of the field descriptions. Figure 20 • Receiver Code: This is the code used to identify the Trading Partner (i.e. Interexchange Customer Service Center or ICSC Wisor Proprietary and Confidential © 2008 35 Wisor VIRTUAL FRONT OFFICE 11.4 USER GUIDE code). • Customer Code: Filters the orders based on the code used to identify the sender of the order request. • Public Search: When checked, all orders will be listed or those for a selected Initiator. When unchecked, only orders placed by the user will be displayed. • Owner: During a Public Search, the orders can be filtered by a specific Initiator by selecting a user from the dropdown menu. • Due Date: These fields can be used to find order within a due date range. • Date Sent/Received: These fields can be used to limit the range of the orders based on the date sent or received. • Service: Filters the results by the service being performed. • Type of Request: Filters the results by the type of request: o Firm Order o Firm Order (Follow-Up to Verbal) o Firm Order (Manual/Mechanized) o Service Request (Follow-Up to Verbal) o Service Request (Manual/Mechanized) • Activity: Filters by the kind of order that has been placed. • Guideline Version: Filters by the Guideline Version that the order has followed. • Direction: Filters the Order List based on whether the orders were Sent or Received. • Status Fields: Lists all the possible statuses. 3. Select the items you want displayed on your Order List, or check the Exclude box, which allows you to display all items except the items you have checked. 4. By clicking the checkbox next to the header of a subsection, you select all the statuses within it. 5. Some of the available filter options may be minimized into their headers. By clicking the blue downward arrow you can open these sections up. Minimizing them is accomplished by clicking the upward facing arrow . 6. Click OK. The Order List results will only contain the items matching your selections. NOTE: Click Clear on the Order List Filter window to erase all previous selections. 36 Wisor Proprietary and Confidential © 2008 6. Create and Manage Outgoing Access Orders Create Access Response VFO allows you to manually create a response for Access orders. Use the following procedure to manually create a response: 1. From the Order List page, browse to the Access order. 2. Click the radio button that corresponds to the Access order. 3. Click the Create Response icon in the upper right corner of the Order List page, or execute the Order > Create Response menu command. NOTE: You can create a response from within an Order by executing the Order > Edit > Create Response menu command. 4. This opens the Order Response Creation window. Figure 21 5. Select a Response Type from the dropdown menu. Following is a list of available Access Response Types: • Access Service Ordering Guideline (ASOG) and Non-ASOG Responses o Completed – CNR Access Completion o Clarification Cleared – CNR Errors o Clarification – CNR Errors o Jeopardy with Errors – CNR Jeopardy with Errors o Jeopardy – CNR Jeopardy o TP Cancelled – CNR Provider Initiated Cancellation o DLR – DLR o Design Order Confirmed – Design Order Confirmation o TP Errored – Error o Confirmed – Firm Order Confirmation o Accepted – Response Accept o Rejected – Response Reject • Postal Telephone and Telegraph (PTT) Responses Wisor Proprietary and Confidential © 2008 37 Wisor VIRTUAL FRONT OFFICE 11.4 USER GUIDE o Accepted – PTT Accept o Rejected – PTT Reject o Clarification – PTT Clarification o Confirmed – PTT Confirmation o Design – PTT Design 6. Click OK. This opens the Access Order <Response> Creation page. Figure 22 7. Populate the fields. The fields highlighted in yellow are required when its section is populated. Remember to scroll through the remainder of the form to find and complete all of the fields you want to populate. 8. Click Save. NOTE: This will update the status of the order in the Order List. Access Supplement VFO allows the user to supplement information to an order that has already been submitted. These supplements, as well as the numbers used to identify them, are as follows: 38 • 1-Cancel • 2-New Desired Due Date Wisor Proprietary and Confidential © 2008 6. Create and Manage Outgoing Access Orders • 3-Other (Change After FOC) • 4-Other (Change Before FOC) In order to supplement an order it must have a status of Sent or any response other than Complete from the provider. Use the following steps to supplement an order: 1. Select an order from the Order List by clicking the PON. 2. Hover over the Order menu and select the Supplement option. Alternately you can click the number, in the upper right hand corner, that corresponds with the Supplement you wish to perform. NOTE: When other changes are being made, you can select icon 3 and the system will select Sup Type 3 or 4 based on the status of the order. 3. If you perform a Cancel Supplement you will be asked to confirm the action. 4. If you perform a New Desired Due Date Supplement, the following image will pop up. Figure 23 5. Click the Calendar icon to the right of the DDD field to select available dates for the new DDD. 6. Click Change to apply the changed DDD to the order. 7. If you perform a Change Before FOC or Change After FOC, the order window will display the current order and allow you to change the fields. 8. Click within the Remarks field and explain the purpose of the Supplement order. 9. Click Submit. Cancel Order Details A Cancel Order is treated as a Supplement to the original Access Order. Canceling an Access Order does not delete it from the VFO database or Wisor Proprietary and Confidential © 2008 39 Wisor VIRTUAL FRONT OFFICE 11.4 USER GUIDE affect any Supplements. The Cancel Order function is enabled for the following statuses: • Accepted • Clarification • Pending Response • Confirmed • Rejected DLR • Sent Auto • DLR Confirmed • Sent Manual • Errored • System Errored • Pending DLR • TP Errored • Pending FOC • Validated The Cancel Order is disabled when the following conditions are met: • Access Order was never submitted • Access Response status is: o Cancel Accepted o Cancel Rejected o Cancel Resent o Cancel Sent o Cancel Submitted o Cancel Tracked Save As an Access Request VFO allows you to save a copy of a selected or current Access Order under a different PON. You can execute the Save As command from the Order List page or from within an existing Access Order. This can be performed on both ASOG and Non-ASOG orders. Use the following procedure to Save As an Access order. NOTE: If you are doing a Save As from the Order List page, you must first click the radio button of the order you want to copy. 40 Wisor Proprietary and Confidential © 2008 6. Create and Manage Outgoing Access Orders 1. If performing the action from the Work List, use the Order > Save As Order menu command. If performing it from within the order itself, use the Order > Action > Save As Order menu command. This opens the Save As New Order window. Figure 24 2. Enter a new, unique PON. 3. Optionally, select a new Receiver Code and change the activity. 4. Click Save. Update Access Request General Information When a Trading Partner sends a Completion Notification, the CLEC or customer often has work to do before the service can be turned up. VFO allows users to add or update the customer Completion Date field, as well as other data on the General Information form. Use the following procedure to update the General Info tab: 1. Open the Access Order. 2. Execute the Order > Edit > Update Custom Form command. 3. In the Completion Date box, click the Calendar icon. 4. Click the new Completion Date. 5. Click Change. View Last Notification You can link to the order in its most recent status by clicking the link in Wisor Proprietary and Confidential © 2008 41 Wisor VIRTUAL FRONT OFFICE 11.4 USER GUIDE the Status column that corresponds to the order you want to view. NOTE: You can open, view and modify multiple Access Orders simultaneously. Using the History Function View the History Use the following procedure to view the history of an Access Order. 1. Log into the Access module. VFO opens on the Order List page. 2. Click the History icon (the icon that looks like an open book). This opens the Order History page where you can view and print the history of the selected Access Order. Alternately, users can use the Order > View History menu functionality, after selecting the order with the radio button, to open the Order History page. Figure 25 NOTE: If the History is opened from within an Order, users will see the following icon. This icon allows users to return to the previous window. 3. Click View XML to show the XML, which will be or was sent to Exchange Path if the user clicks Validate and/or Submit. 4. Click the Download XML icon to download the Request XML and all the associated response XMLs in a single zip file. The zip file name will be PON_Version.zip (where PON is purchase order number from the Order being downloaded). NOTE: Wisor provides access to a Provisioning team. Responses manually entered by Wisor’s Business Process Outsourcing (BPO) team are identified in the Updated By column of the Access Order History page. The Updated By 42 Wisor Proprietary and Confidential © 2008 6. Create and Manage Outgoing Access Orders column reads MRS when the response was entered by Wisor BPO via the Mech Spec Response system. Revert to Last Saved If you are entering values into the fields of an Access Order and then decide to return to the previously saved version of the Access Order, execute the Order > Revert > Revert to Last Saved menu command. NOTE: This only goes back to the data that was saved before the current saved data. So after you save the data, you can revert to the way the order was before you hit SAVE the last time. Revert to Last Submitted If you modify an Access Order after you successfully submitted it (i.e., started a Supplement request), you can return to the previously submitted version of the Access Order by executing the Order > Revert > Revert to Last Submitted command. This command restores the previously submitted version of the Request even if you executed the Save command to save those changes. View Error List VFO allows you to view the errors that were found in an order. Violated rules are displayed in the Error Code List in a pop-up browser. To view the errors, open the Access Order and execute the Order > View > View Error List menu command. This same command can be used to view the errors from the Trading Partner. TP Errored and Rejected statuses will generate an Error List of the fields the Trading Partner rejected or required. Some of these errors will link to field when clicked. Others will need to be navigated to manually. This behavior is dependent on how the field is returned by the Trading Partner. You must Supplement the order before you can correct the errors. Resend Access VFO allows you to re-transmit an Access Order in the event that the transmission of the Access Order is not received by the Trading Partner. This version of the Access Order will correspond to the latest version containing a Sent status in the History Log. At the Access Order List page, select the Access Order you want to resend and then execute the Order > Resend menu command. The last saved version of the Access Order will be re-transmitted from Exchange Path. External Applications Your System Administrator can configure VFO to support External Wisor Proprietary and Confidential © 2008 43 Wisor VIRTUAL FRONT OFFICE 11.4 USER GUIDE Application functionality. Use the following procedure to access the external applications configured for your system: 1. Initiate an Access Order. 2. Execute the Order > External App Data> menu command. This opens a menu of the external applications configured for your system. 3. Select the desired external application. 44 Wisor Proprietary and Confidential © 2008 7. Create and Manage Incoming Access Orders Working with Templates Create a Template Templates use common data values to pre-populate orders, thereby reducing, or eliminating altogether, redundant data entry and the attendant errors. VFO lets you tailor your own templates for every type of Service Request, as well as giving you the ability to modify, update, or delete an existing template from VFO. Use the following procedure to create a template: 1. Log into VFO and select a module. This opens the Order List page. 2. Hover your cursor over the Template tab. This reveals the Template menu. 3. Execute the Template > New menu command. This opens the Template Initiation page. Figure 26 • Template Name — Enter a user-defined, unique name for the template. • Template Description — Enter a user-defined value that describes the template. • Trading Partner — Select a Service Provider to display their available Service Centers. • Service Center — Select a Service Center to generate a list of their available versions. Wisor Proprietary and Confidential © 2008 45 Wisor VIRTUAL FRONT OFFICE 11.4 USER GUIDE • Guideline Version — Select a version. • Service — Click this dropdown menu to select the Service Type for the negotiation of Service Request. • Activity — Click this dropdown menu to identify the activity involved in this service request • Initiate — Click this button to submit the values entered on this page and add the new template to the list of available templates. • Cancel — Click this button to ignore the values entered on this page and return to the Order List page. 4. Populate the Template Initiation page. 5. Click Initiate. This opens a shell of an order, update or trouble ticket, depending on the module you are logged into. 6. Populate the fields with common data values that, when selected, will pre-populate a new form. 7. Browse through each of the remaining forms and repeat step 6. 8. Click the Save icon in the upper-right corner of the page. This saves the values to the database. Save As Template Another way to create a template is to execute the Save As Template menu command. This command is available in the Order menu on the Order List page and in the Order menu on the Service Request. Use the following procedure to save a Service Request as a template: 1. If you are on the Order List page, click the radio button of the Service Request you want to use as a template and execute the Order > Action > Save As Template menu command. 2. If you are in the Service Request, execute the Order > Action > Save As Template menu command. Either of these commands opens the Saved Order as New Template window. 3. Enter a unique value in the Template Name field. 4. Click Save. Apply Template After Order Initiation The Apply Template command populates blank fields of a Service Request with the respective values of the selected template. Use the following procedure to apply a template from within a Service Request Order form: 1. Initiate a Service Request. 46 Wisor Proprietary and Confidential © 2008 7. Create and Manage Incoming Access Orders 2. Execute the Order > Edit > Apply Template menu command. This opens the Apply Template window. 3. Select the desired template from the dropdown menu. 4. Click OK. Search for a Template Use the following procedure to search for a template. 1. Log into VFO and select the module. This opens the Order List page. 2. Hover your cursor over the Template tab. This reveals the Template menu. 3. Execute the Template > Search menu command. This opens the Template List page, which lists all available templates. Figure 27 • TemplateName — Enter the name of the template and click Go, or click the template name link to search on that value. • Trading Partner — Enter the value that identifies the service provider in this service request and click Go to search on that value. • ServiceType — Enter the value that identifies the type of service and click Go to search on that value. • Activity — Enter the value that identifies the activity involved in Wisor Proprietary and Confidential © 2008 47 Wisor VIRTUAL FRONT OFFICE 11.4 USER GUIDE this service request and click Go to search on that value. • Delete — Click a radio button(s) that corresponds to the template you wish to remove. Then click the red X in the upper right corner of the page to remove a template from the Template List and from the database. • Go — Click this button to submit the search criteria entered on the page to the Template database. • Clear — Click this button to remove search criteria from the fields on the Template List page. NOTE: Executing the Clear command does not clear radio button selections. 48 Wisor Proprietary and Confidential © 2008 7. Create and Manage Incoming Access Orders Create and Manage Incoming Access Orders Overview Access Order forms are used to request various services. VFO can be used as either a Send and Receive application or just a Receive application. In both situations, VFO allows the user to manage Access orders. As an Access Receive application, VFO will accept Access orders made by customers. As an Access Send/Receive function, VFO will allow users to place their own Access Orders while managing their customer's Access Orders, all from within the same system. When VFO performs only the Access Receive function, the following steps are performed: 1. The Customer sends an Access Request to their Service Provider (Access Request may be of Mech Spec or ASR UOM XML format). 2. The Service Provider receives the Access Order and provisions the request. The Service Provider involved may send Access Responses using VFO Response creation functionality to the Customer who sent the request. Access Receive Order Statuses Below is a list of the possible Access Receive Orders Statuses. NOTE: VFO allows any responses to post for ASR Receive when an order’s current status is Received. STATUS DESCRIPTION NEXT STEP Accepted The ASR passed fatal validations. The response goes to Accept_Submitted, so it can be transmitted to the ASR originator. Accepted_Submitted The Accept response is sitting in queue, waiting to be transmitted to the ASR originator. Once the Accept has been transmitted, the status is changed to Accepted_Sent. Accepted_System_Errored The Accept response could Once the system errors not be transmitted to the have been resolved, the ASR originator. Accept response can be submitted again. Accepted_Sent The Accept response has been transmitted to the Wisor Proprietary and Confidential © 2008 The user can create and submit any of the 49 Wisor VIRTUAL FRONT OFFICE 11.4 USER GUIDE STATUS DESCRIPTION ASR originator. NEXT STEP following statuses. Clarification Cleared_Saved The ClarificationCleared A ClarificationCleared has been cancelled and a response is submitted response notification has by the user. been created and saved by the user in VFO. ClarificationCleared _Submitted The ClarificationCleared response is sitting in queue, waiting to be transmitted to the ASR originator. Once the ClarificationCleared response has been transmitted, the status is changed to ClarificationCleared _Sent. ClarificationCleared _System_Errored The Clarification Cleared response could not be transmitted to the ASR originator. Once the system errors have been resolved, ClarificationCleared response can be submitted again. Clarification Cleared_Sent The ClarificationCleared response has been transmitted to the ASR originator. The user can create and submit any of the subsequent statuses. Clarification_Saved There are issues/questions The Clarification response is submitted about an ASR and a Clarification response has by the user. been created and saved by the user in VFO. Clarification_Submitted The Clarification response is sitting in queue, waiting to be transmitted to the ASR originator. Clarification _System_Errored The Clarification response Once the system errors could not be transmitted have been resolved, the to the ASR originator. Clarification response can be submitted again. Clarification_Sent The Clarification response The user can create and submit any of the has been transmitted to subsequent statuses. the ASR originator. 50 Once the Clarification response has been transmitted, the status is changed to Clarification _Sent. Wisor Proprietary and Confidential © 2008 7. Create and Manage Incoming Access Orders STATUS DESCRIPTION NEXT STEP Completed_Saved The Completed response The ASR has been Completed and a response is submitted by the user. has been created and saved by the user in VFO. Completed_Submitted The Completed response is sitting in queue, waiting to be transmitted to the ASR originator. Once the Completed response has been transmitted, the status is changed to Completed _Sent. Completed_System_Errored The Completed response could not be transmitted to the ASR originator. Once the system errors have been resolved, the Completed response can be submitted again. Completed_Sent The Completed response has been transmitted to the ASR originator. No further updates are allowed once the order is in a Completed_Sent status. Confirmed_Saved The Confirmed response The Confirmation response has been created is submitted by the user. and saved by the user in VFO. Confirmed_Submitted The Confirmed response is sitting in queue, waiting to be transmitted to the ASR originator. Once the Confirmed response has been transmitted, the status is changed to Confirmed _Sent. Confirmed_System_Errored The Confirmed response could not be transmitted to the ASR originator. Once the system errors have been resolved, the Confirmed response can be submitted again. Confirmed_Sent Indicates that the Confirmed response has been transmitted to the ASR originator User can create and submit any of the subsequent statuses DLR_Saved The DLR response is The DLR response has been created and saved by submitted by the user. the user in VFO. DLR_Submitted The DLR response is Wisor Proprietary and Confidential © 2008 Once the DLR response 51 Wisor VIRTUAL FRONT OFFICE 11.4 USER GUIDE STATUS DESCRIPTION NEXT STEP sitting in queue, waiting to has been transmitted, be transmitted to the ASR the status is changed to DLR _Sent. originator. DLR_System_Errored The DLR response could not be transmitted to the ASR originator. Once the system errors have been resolved, DLR response can be submitted again. DLR_Sent The DLR response has been transmitted to the ASR originator. The user can create and submit any of the subsequent statuses. Design Order Confirmed_Saved The DOC response has The DOC response is been created and saved by submitted by the user. the user in VFO. Design Order Confirmed_Submitted The DOC response is sitting in queue, waiting to be transmitted to the ASR originator. Once the DOC response has been transmitted, the status is changed to Design Order Confirmed _Sent. Design Order Confirmed_System_Errored The DOC response could not be transmitted to the ASR originator. Once the system errors have been resolved, the DOC response can be submitted again. Design Order Confirmed_Sent The DOC response has been transmitted to the ASR originator. The user can create and submit any of the subsequent statuses. Jeopardy with Errors_Saved The FOC date is in jeopardy due to errors on the ASR and a response has been created and saved by the user in VFO. The Jeopardy with Errors response is submitted by the user. Jeopardy with Errors_Submitted The Jeopardy with Errors response is sitting in queue, waiting to be transmitted to the ASR originator. Once the Jeopardy with Errors response has been transmitted, the status is changed to Jeopardy with Errors _Sent. Jeopardy with Errors_System_Errored The Jeopardy with Errors response could not be transmitted to the ASR Once the system errors have been resolved, Jeopardy with Errors response can be 52 Wisor Proprietary and Confidential © 2008 7. Create and Manage Incoming Access Orders STATUS DESCRIPTION NEXT STEP originator. submitted again. Jeopardy with Errors_Sent The Jeopardy with Errors response has been transmitted to the ASR originator. The user can create and submit any of the subsequent statuses. Jeopardy_Saved The FOC date is in jeopardy and a response has been created and saved by the user in VFO. The Jeopardy response is submitted by the user. Jeopardy_Submitted The Jeopardy response is sitting in queue, waiting to be transmitted to the ASR originator. Once the Jeopardy response has been transmitted, the status is changed to Jeopardy _Sent. Jeopardy_System_Errored The Jeopardy response could not be transmitted to the ASR originator. Once the system errors have been resolved, Jeopardy response can be submitted again. Jeopardy_Sent The Jeopardy response has been transmitted to the ASR originator. The user can create and submit any of the subsequent statuses. Received The ASR has been received The Accept response is and is being processed by generated by the system the system. if fatal validations are passed. Supplement Received The Supplement has been received and is being processed by the system. TP Cancelled_Saved The ASR is being cancelled The TP Cancelled response is submitted by the access provider because clarifications have by the user. not been resolved and a response has been created and saved by the user in VFO. TP Cancelled_Submitted The TP Cancelled response Once the TP Cancelled is sitting in queue, waiting response has been transmitted, the status to be transmitted to the is changed to TP Wisor Proprietary and Confidential © 2008 The Accept response is generated by the system if fatal validations are passed. 53 Wisor VIRTUAL FRONT OFFICE 11.4 USER GUIDE STATUS DESCRIPTION ASR originator. NEXT STEP Cancelled _Sent. TP Cancelled_System_Errored The TP Cancelled response Once the system errors have been resolved, the could not be transmitted TP Cancelled response to the ASR originator. can be submitted again. TP Cancelled_Sent The TP Cancelled response The user can create and has been transmitted to submit any of the the ASR originator. subsequent statuses. TP Errored_Saved The TP Errored The ASR has validation errors and a response has response is submitted been created and saved by by the user. the user in VFO. TP Errored_Submitted The TP Errored response is sitting in queue, waiting to be transmitted to the ASR originator. Once the TP Errored response has been transmitted, the status is changed to TP Errored _Sent. TP Errored_System_Errored The TP Errored response could not be transmitted to the ASR originator. Once the system errors have been resolved, the TP Errored response can be submitted again. TP Errored_Sent The TP Errored response has been transmitted to the ASR originator. The user can create and submit any of the subsequent statuses. Using the Access Order List The Order List pages display all of the orders received by the system. Each line represents a particular order and shows the Receiver Code, the Purchase Order Number, Version of the Order, Supplement Type (if any), Current Status, Transaction Type, Service Type, Request Type, Action, Desired Due Date, Initiator and Date Sent. In situations where both incoming and outgoing Access orders will be managed by the same team, an icon will be used to differentiate between Access Service Requests that are received and those that are sent. Downward Arrow This icon signifies that the Access Order is an Access Order that was received. 54 Wisor Proprietary and Confidential © 2008 7. Create and Manage Incoming Access Orders Search Access Requests VFO's Search functionality allows you to search all Orders for the occurrence of specific values. You can extend your search by using the wildcard (%) character. Use the following procedure to find a specific Order(s). 1. On the Order List page, execute the Order > Search menu command. This opens the Search dialog. Figure 28 2. Select the criterion from the Search On list. 3. Enter the value you wish to search for in the Search For field. This field is not case sensitive. 4. Click Search. Filter Access Order List The Filter function allows you to limit the selection of orders displayed in the Order List. You can save the filter settings and apply them to future VFO sessions. Your Order List filter settings will open as part of the login process. Use the following procedure to filter the Access Order list: 1. At the Order List page, click Filter (the icon that resembles a funnel). This opens the Order List Filter window. Wisor Proprietary and Confidential © 2008 55 Wisor VIRTUAL FRONT OFFICE 11.4 USER GUIDE Figure 29 NOTE: To search through the Incoming Access Orders, make sure Direction is set to Receive. The Receive Statuses that appear in the filter correspond to the Responses that can be sent in reaction to an incoming Access order. 2. Select the items you want displayed on your Order List, or check the Exclude box, which allows you to display all items except the items you have checked. 3. Click OK. The resulting Order List only contains the items matching your selections. By clicking the checkbox next to the header of a subsection, you select all the statuses within it. Some of the available filter options may be minimized into their headers. By clicking the blue downward arrow you can open these sections up. Minimizing them is accomplished by clicking the upward facing arrow . NOTE: Click Clear on the Order List Filter window to erase all previous selections. Assign Access Receive Orders VFO allows you to manually create a response for Access Orders. Before you can create a Response; however, the order must be assigned to a user and follow the below process: 1. Click the checkboxes of the Access Receive orders that you wish to assign. 56 Wisor Proprietary and Confidential © 2008 7. Create and Manage Incoming Access Orders 2. Use the Order >Reassign Orders menu function and the following window will display. Figure 30 3. Using the dropdown menu, select the user to whom you wish to assign the orders. 4. Click Save. Create Access Response Once a user has been assigned, you may create a Response to an Access Receive Order. Use the following procedure to manually create a response. 1. From the Order List page, browse to the Access Order. 2. Click the checkbox that corresponds to the Access Order. 3. Click the Create Response icon in the upper right corner of the Order List page, or execute the Order > Create Response menu command. This opens the Order Response Creation window. NOTE: You can create a response from within an Order by executing the Order > Edit > Create Response menu command. Figure 31 4. Select a Response Type from the dropdown menu. 5. Click OK. This opens the Service Request <Response> Creation page. For example, if you selected Clarification, the CNR form would appear. Wisor Proprietary and Confidential © 2008 57 Wisor VIRTUAL FRONT OFFICE 11.4 USER GUIDE Figure 32 6. Populate the fields. The fields highlighted in yellow are required when its section is populated. Remember to scroll through the remainder of the form to find and complete all of the fields you want to populate. 7. Click the Submit icon to send the Response. 8. You may also save the response by clicking the disk icon or using the Order >Save menu function. 9. Validate the response without submitting it by clicking the green checkmark or using the Order > Validate menu function. 10. Print the response by clicking the Print icon . This will display the printable version of the response. You can also use the Order > View> View Printable Version to get to this point. Click Print to begin the printing process. View the History Use the following procedure to view the history of an Access Order: 1. Login to the Access module. VFO opens on the Order List page. 2. Click the checkbox that corresponds to the desired Order. 3. Click the History icon (the icon that looks like an open book). This opens the Order History page where you can view and print 58 Wisor Proprietary and Confidential © 2008 7. Create and Manage Incoming Access Orders the history of the selected Access Order. Figure 33 4. Click the View XML link to show the XML which was sent to Exchange Path when the user clicked Validate and/or Submit. 5. Click the Download XML icon to download the Request XML and all the associated response XMLs in a single zip file. The zip file name will be PON_Version.zip (where PON is purchase order number from the Order being downloaded). Reverting to a Previously Saved Response Users have the ability to revert a response to a previous instance. This is to allow users to undo changes that may have been performed and saved. For example, a user begins creating a response, saves it and later finds that the data used was incorrect. Rather than recreating a new response, users can use the History window to locate the previous response and save it as the current response. By Submitting this new response, the previous instance of the response will be validated and sent. Use the following procedure to revert to a previously saved response: 1. Click the checkbox that corresponds to the desired Order. 2. Click the History icon (the icon that looks like an open book). This opens the Order History page where you can view and print the history of the selected Access Order. 3. Click the PON link of the instance to which you wish to revert the response. This will open that instance for you to review. 4. If you cannot revert to this instance, you will only see the Print Wisor Proprietary and Confidential © 2008 59 Wisor VIRTUAL FRONT OFFICE 11.4 USER GUIDE icon in the upper right corner. See below for an example. Figure 34 5. If you can, you will be given the option to Save, Validate, Submit, Print or Close. See below for an example. 60 Wisor Proprietary and Confidential © 2008 7. Create and Manage Incoming Access Orders Figure 35 6. By clicking the Save icon, this instance will be saved as the newest instance of the Response, but not Submitted. 7. By clicking the Submit icon, this instance will be sent as a new Response. NOTE: If you click the PON link for a Response with the Status of Received, you will see the Access order as it was sent to your system. Wisor Proprietary and Confidential © 2008 61 Local Module Wisor Proprietary and Confidential © 2008 63 Wisor VIRTUAL FRONT OFFICE 11.4 USER GUIDE Local PreOrder Search and Response Local PreOrder Inquiry Procedure WARNING: You will notice an error if you have not been configured to use the PreOrder functionality. Use the following procedure to perform a new PreOrder Inquiry. 1. Log into VFO and select the Local module. The Order List page opens. 2. Execute the PreOrder>New menu command. The PreOrder Initiation window opens. Figure 36 64 • TXNUM: This will be automatically populated with an incremented entry. Optionally, you can change the value in the TXNUM field manually. • Trading Partner: This dropdown will contain all the Trading Partners that have been configured for use in this module. • Service Center: The options listed will be determined by the choice of Trading Partners. • TX Type: The Transaction Type will be determined based on the selected Service Center. Wisor Proprietary and Confidential © 2008 4. Local PreOrder Search and Response 3. Click Initiate. This opens the PreOrder Request window. Figure 37 4. Populate the fields with relevant search criteria. Yellow fields are required when its section is populated. 5. Click Submit. The returns are displayed in the PreOrder Response window. 6. For large responses, to view the entire response you may need to use the pagination provided for each section containing more than the specified number of items. Enter the number of records you want displayed at any one time for that section and click the SHOW link. The default is to show up to 10 items at a time before needing to move to the next page. Click the outside arrows to move to the first or last page. Click the inside arrows to move page by page. 7. If you want to modify the PreOrder Request, click the Inquiry tab. This reopens the PreOrder Request. 8. Click the Change button to edit fields. 9. Make the desired changes and click Submit to resubmit the PreOrder Inquiry. Save Local PreOrder Response VFO allows you to store the PreOrder Inquiry and Response transactions. Wisor Proprietary and Confidential © 2008 65 Wisor VIRTUAL FRONT OFFICE 11.4 USER GUIDE Use the following procedure to save Inquiry and Response transactions. 1. Execute a PreOrder Inquiry. Make sure you are in the PreOrder Response window. 2. Scroll to the bottom of the window and click Save. Print Local PreOrder Response Use the following procedure to print from the PreOrder List. 1. Execute a PreOrder Inquiry. Make sure you are in the PreOrder Response window. 2. Click Printable Version to open a new window with a version of the Response that is better formatted for a printer. 3. Click Print. The Print dialog box opens allowing you to print based on your print configuration. Search Local PreOrder Responses VFO allows you to view the details of a previously completed PreOrder Response. Use the following procedure to view PreOrder Response details. 1. Log into VFO and select the Access module. The Access Order List page opens. 2. Hover your cursor over the PreOrder tab. A dropdown menu opens. 3. Execute the PreOrder > Search menu command. The PreOrder Search page opens. 4. Users can perform the search using the following criteria: • TXNUM: This number was either generated by the system or by the user. Using this field is the most direct way of locating a PreOrder. • Trading Partner: This dropdown will contain all the Trading Partners that have been configured for use in this module. • TX Type: The Transaction Type will be determined by the selected Service Center. • TX From Date and TX To Date: These fields define the beginning and the end dates for the search. • Go: Click this button to submit the search criteria and view the returns. • Clear: Click this button to refresh the screen and empty all the populated fields. 5. Enter the appropriate search criteria. 6. Click Go. The results will display in the bottom half of the window. 66 Wisor Proprietary and Confidential © 2008 4. Local PreOrder Search and Response Print Local PreOrder Search Results Use the following procedure to print the PreOrder Search Results. 1. Execute a PreOrder Search. 2. Click the result you wish to print. 3. Click Print. The Print dialog box opens allowing you to print based on your print configuration. Wisor Proprietary and Confidential © 2008 67 Wisor VIRTUAL FRONT OFFICE 11.4 USER GUIDE PortQual Introduction Wisor’s PortQual functionality allows service providers to easily verify the portability of a subscriber’s wireline phone number at the time of initial order entry, without waiting for the order to fallout. PortQual is a completely automated solution. It compresses the complex process of verifying the portability of a subscriber’s wireline phone number to a simple one-step process. Subscriber information is entered into VFO and all of the processing takes place in the backend of the application.. In just a few seconds, the result of the search is returned with information about the number’s porting eligibility. In summary, PortQual: • Validates line owner and eligibility for porting. • Identifies common barriers to a successful port. • Provides real-time data correction capability. • Delivers remedies to fix potential problems. Residential versus Business PortQual PortQual can be performed for Residential or Business lines. The differences are detailed below. Residential Port Qualification Business Port Qualification Single telephone number queries for port eligibility. Range of telephone number queries for port eligibility. USOCs that prevent porting are many in numbers and can be unique for every telephone number (TN) belonging to the same account. USOCs that prevent porting are few in numbers. USOCs that prevent residential numbers from being ported are not port inhibiting in a business scenario. Telephone number belonging to a hunt group or Centrex prevent number port from happening unless the TN is removed from the hunt group or Centrex. Telephone numbers belonging to a hunt group and Centrex means all the numbers in the hunt group or Centrex must be ported. Port Inhibiting USOCs are found at individual TN (Account Telephone Numbers) on the CSR. Port Inhibiting USOCs are found at the Billing Telephone Number (BTN) level at the CSR. Individual numbers can be ported, All the TN ranges belonging to a single 68 Wisor Proprietary and Confidential © 2008 8. Create and Manage Outgoing Local Orders Residential Port Qualification Business Port Qualification leaving other TNs in the account unaffected. BTN must be ported or disconnected in a single LSR request. CSRs will contain limited to no telephone number ranges. CSRs will contain large telephone number ranges. Typically 100 TNs to over 5000 TNs in a single CSR. Directions Use the following procedure to verify the portability of a subscriber’s wireline phone number. 1. Login to VFO and select the Local module. The Order List page opens. 2. Hover your cursor over the PreOrder tab. A dropdown menu opens. 3. Execute the PreOrder > New menu command. This opens the PreOrder Initiation window. 4. Optionally, change the value in the TXNUM field. 5. Select WISOR from the Trading Partner dropdown menu. This automatically populates the Service Center field. 6. Select PQ - PortQual from the TX Type dropdown menu. 7. Click Initiate. This opens the PQ - PortQual window. Figure 38 Wisor Proprietary and Confidential © 2008 69 Wisor VIRTUAL FRONT OFFICE 11.4 USER GUIDE 8. Populate the fields with their respective values. The required fields are highlighted yellow but are only required when its section is populated. 9. For business customers, enter the name of the company in the FIRSTNAME field and leave blank the LASTNAME field. 10. For residential customers, enter their first name into the FIRSTNAME field, and enter their last name into the LASTNAME field. 11. Enter only numeric characters into the TN field. 12. Click Submit. If there are any issues preventing the porting, you will receive an Error Code and Description, similar to the screen shot below. Figure 39 70 Wisor Proprietary and Confidential © 2008 8. Create and Manage Outgoing Local Orders If the porting can occur, you will see a screen shot with a similar message as below: Figure 40 • The feature(s) that is preventing the phone number from being portable is listed in the Feature On Account Stopping Port field. • The action(s) that would make the phone number portable is listed in the Action Required field. • Users can click on View CSR to view the Customer Service Record, or View AVQ to see the results of the Address Validation. • After performing the action(s) listed in the Action Required field, you can then repeat the process to verify the portability of the wireline phone number. Wisor Proprietary and Confidential © 2008 71 Wisor VIRTUAL FRONT OFFICE 11.4 USER GUIDE Create and Manage Outgoing Local Orders Local Service Request Work List Action Icons Clipboard This icon allows users to generate a Summary of all the Responses from a particular order. Please note that this icon is unique to Local Orders. Work Status Icons There may be an icon beside some of the Orders to indicate different work states. Following are what these icons indicate: Flame Order has been rejected by the Trading Partner. This is not due to Business Rule violations, as those would result in a different icon. Green Check Mark Order has been completed by the Trading Partner. Validation Check Mark with Slash Order has Business Rules Violations. The violation(s) was detected in Exchange Path and stopped before it reached the Trading Partner. White Check on Green Folder Order has been confirmed. This means that the Trading Partner has accepted the order and is in the process of fulfilling it. 72 Wisor Proprietary and Confidential © 2008 8. Create and Manage Outgoing Local Orders Red Exclamation Mark Order is in Jeopardy. This could be due to any number of reasons, from a delay in a process required to a lack of resources. Train Tracks Order is Tracking Only. This means that the order was placed outside the VFO system and the information within VFO is simply used for tracking purposed. Please note that this status is not related to status changes. Create a Local Service Order Use the following procedure to create a Local Service Request order. 1. Login to VFO and select the Local module. This opens the Local Order List page. 2. Hover your cursor over the Order tab. This reveals the Order menu. 3. Execute the Order > New menu command. This opens the Order Initiation page. Figure 41 4. The system will generate an Order number. Users can enter a different Order number, if they choose to do so. 5. Select a Trading Partner. This generates the Trading Partner's Receiver Code and the guideline version supported. 6. Select a Service. This generates a list of activities available for that service. Wisor Proprietary and Confidential © 2008 73 Wisor VIRTUAL FRONT OFFICE 11.4 USER GUIDE 7. Select an Activity. 8. Optionally, select a Template. 9. Click Initiate. This opens a new Service Request Order form. Figure 42 10. Populate the fields. If a section is required, its header will display the word Required. If any fields within that section are required, they will be highlighted in yellow. Yellow fields in an optional section are only required when that section is populated. 11. Browse through each of the remaining forms and repeat the previous step. NOTE: Click the Save icon in the upper-right corner of the page if you intend to validate the order later. 12. Click the Submit icon. Executing the Submit command validates the service request order against the business rules. NOTE: You can also Save, Submit, and Validate by clicking the Order tab and executing that function through the menu command. Validate a Local Service Order The Validate command in VFO validates Service Request Orders against the business rules. The validation request is sent to the Business Rule Management System which performs initial validations, service provider business rule validations, and ILEC specific business rule validations. NOTE: Executing the Submit command (by using the menu command or by clicking 74 Wisor Proprietary and Confidential © 2008 8. Create and Manage Outgoing Local Orders the Submit tool) automatically validates the Service Request. Use the following procedure to validate a service request. 1. Click the link in the PON column, on the Order List page, to open the applicable Service Request. This opens the Service Request order. 2. Click the Validate icon in the upper right corner of the page or execute the Order > Validate menu command. Violated rules are displayed in the Error Code List window. Figure 43 3. Click the link in the Error Text column. This links you to the violated field. NOTE: The errors in the figure above only refer to specific fields. If entire forms or sections are in error, users will need to manually navigate to the form or section to make corrections. 4. Refer to the Form and Section/Field columns to determine the location of the violating field. Refer to the Occurs column to determine how many occurrences of the violation are in the Request. 5. Make the required changes. 6. Click Save. Local Service Request Supplement VFO allows you to supplement Local Service Requests. If you execute the Wisor Proprietary and Confidential © 2008 75 Wisor VIRTUAL FRONT OFFICE 11.4 USER GUIDE Order > Supplement menu command from within a Service Request, you must change the value in the SUP field. Tracking Local Service Requests Tracking is used by customers that send orders to small Trading Partners that do not have connectivity with Wisor Exchange Link but want to keep track of the request in VFO. To use this function, on the Order Initiation window check the Tracking check box. The order can then be entered and the Submit button allows you to enter the actual submit date and stores the order with all the automated orders in the database. Create Local Service Request Responses VFO allows you to manually create a response for Service Request orders. Use the following procedure to manually create a response. 1. From the Order List page, browse to the Service Request Order. NOTE: The status of the Service Request must be in Sent status before you can create a response for it. 2. Click the radio button that corresponds to the Service Request order. 3. Click the Create Response icon in the upper right corner of the Order List page, or execute the Order > Create Response menu command. NOTE: You can create a response from within an Order by executing the Order > Edit > Create Response menu command. This opens the Order Response Creation window. Figure 44 4. Select a Response Type from the dropdown menu. 5. Click OK. This opens the Service Request <Response> Creation page. 6. Populate the fields. Yellow fields are required when its section is populated. Remember to scroll through the remainder of the form 76 Wisor Proprietary and Confidential © 2008 8. Create and Manage Outgoing Local Orders to find and complete all of the fields you want to populate. Search Local Service Requests VFO's Search functionality allows you to search for every occurrence of specific values in Service Requests. You can extend your search by using the wildcard (%) character. Use the following procedure to find specific Service Requests. 1. On the Order List page, execute the Order > Search menu command. This opens the Search dialog. Figure 45 2. Select the criterion on which you want to search. 3. Enter the value you wish to search for in the Search For field. This field is not case sensitive. 4. Click Search. Filter Local Service Request Order List The Filter function allows you to limit the selection of orders displayed in the Order List. The system saves your filter settings and applies them to future VFO sessions. Your Order List filter settings will open as part of the login process. Use the following procedure to filter the Local Order List. 1. At the Order List page, click Filter (the icon that resembles a funnel). This opens the Order List Filter window. Wisor Proprietary and Confidential © 2008 77 Wisor VIRTUAL FRONT OFFICE 11.4 USER GUIDE Figure 46 2. Select the items you want displayed on your Order List, or check the Exclude checkbox, which allows you to display all items except the items you have checked. 3. Click OK. The resulting Order List only contains the items matching your selections. 4. By clicking the checkbox next to the header of a subsection, you select all the statuses within it. 5. Some of the available filter options may be minimized into their headers. By clicking the blue downward arrow you can open these sections up. Minimizing them is accomplished by clicking the upward facing arrow . NOTE: Click Clear on the Order List Filter window to erase all previous selections. Below is a list of the statuses included in the Filter and their meaning: Status Description User Action Acknowledged The request has passed the TP initial validation of the request. - Accepted Wait for Confirmation Acknowledged The request could not be processed by the – Rejected TP’s initial system. Contact your System Administrator 78 Wisor Proprietary and Confidential © 2008 8. Create and Manage Outgoing Local Orders Status Description User Action Billing Completed TP has completed the billing process and will be generating a bill for services rendered. No action required Clarification The Trading Partner has returned a Clarification that may or may not require a supplement to the order. Review Clarification and take recommended action. Confirmed TP has returned a confirmation message for that LSR. Review Response DSR Cancel TP has returned a cancel on a Directory Only request. No action required DSRED Error TP has returned an error on a Directory Only request. Correct the errors or create new request Directory Only Confirmation TP has returned a confirmation message that they can accommodate the Directory Only request. Wait for completion response Directory Service Completion TP has completed the Directory Only request. No action required Errored LSR has failed the Exchange Path validation process. Correct Rule Error and Validate again Jeopardy Indicates there are situations that may jeopardize critical dates of the LSR (PON). Review Response and take recommended action Pending Submission The VFO application is unable to communicate with the gateway application. As soon as communication is restored, the request will be sent. Contact your system administrator Pending Validation An initial request or a change to a request has Complete the order, not been sent to Exchange Path for validation validate and submit or submission to the Trading Partner. After request validation, the resulting response from Exchange Path will be Validated or Errored. Provider Initiated Action Not currently supported Provider Not currently supported Wisor Proprietary and Confidential © 2008 79 Wisor VIRTUAL FRONT OFFICE 11.4 USER GUIDE Status Description User Action Notification Provisioning Completed TP has completed the provisioning of the service. No action required Rejected (Non-Fatal) TP has returned a negative (rejection) acknowledgment. This reject is not fatal to the request and in most cases you can supplement the request to correct the error. Review Response and take recommended action Rejected (Fatal) TP has returned a negative (rejection) acknowledgment that is fatal to this request. In most cases, you cannot supplement the request to correct the errors. Review Response and take recommended action Sent Exchange Path has sent the request to the TP, No Action updated the status, and sent a notification message to VFO. Submitted This message indicates that an initial request or a change to a request has been sent to Exchange Path for validation and subsequent processing. As soon as the request is electronically processed, the status will change to “Sent.” System Errored VFO has received a system error message from Read the error and Exchange Path. Submit Order again. Contact your System Administrator to alert them of the issue if it continues. Tracked The order was initiated as a Tracking Only request and will not be transmitted to the Trading Partner. This is used when the order was sent manually outside of VFO and you want to track the order progress manually in VFO. Validated Exchange Path returns a validation successful Submit Order message. Voided VFO user has placed the ASR in this status to indicate that this request should not be transmitted to the Trading Partner. No Action No Action No Action Generate Local Service Request Response Summary Report After a Service Request receives a Response, VFO allows you to generate 80 Wisor Proprietary and Confidential © 2008 8. Create and Manage Outgoing Local Orders a Summary Report. For example, after you receive a Firm Order Confirmation, the Summary Report will detail the Due Date information based on the Response. The Summary Report function provides information for the following statuses: Acknowledged DSRED-Error Rejected (Fatal) Directory Service Completion Provisioning Completed Confirmed Provider Notification Clarification Provider Initiated Action Billing Completed Jeopardy Rejected (Non-fatal) Directory Only Confirmation Use the following procedure to generate a Response Summary Report. 1. Check the checkbox of the PON for which you will generate a Summary Report. 2. Click the Summary icon , on the Local Order List page. Figure 47 3. Optionally click the Print button to print the Response Summary Report. Save As a Local Service Request VFO allows you to save a copy of the selected or current Service Request under a different PON. You can execute the Save As command from the Order List page or from within an existing Service Request. Use the following procedure to save an existing Local Request as another Local Request. NOTE: If you are using the Save-as command from the Order List page, you must first click the radio button of the order you want to copy. 1. Execute the Order > Save As Order menu command. This opens the Save as New Order window. Wisor Proprietary and Confidential © 2008 81 Wisor VIRTUAL FRONT OFFICE 11.4 USER GUIDE Figure 48 2. Enter the new, unique PON. 3. Click Save. If you are performing a Save As from within an existing Service Request, open the Service Request you want to copy and execute the Order > Action > Save As Order menu command. Update Status/Create Response VFO allows you to update the status of a Service Request. These orders must be in at least Submitted or Sent status. Use the following procedure to update the status of a Service Request: 1. Open the Service Request to update. 2. Execute the Order > Create Response menu command. The Order window opens. Figure 49 3. Select the Response Type from the dropdown menu. Following is a list of available Local Response Types. 82 • Error /Reject • Fatal Error /Reject • Clarification – CNR Errors • 997 FUNCTION ACK • Jeopardy Wisor Proprietary and Confidential © 2008 8. Create and Manage Outgoing Local Orders • Local Response Confirmation • Local Response Clarification • Local Response Status • Billing Completion Notice • Provision Completion Notice • Provider Notification 4. Click OK. This opens the Local Order Response Creation page. Figure 50 5. Populate the fields. Yellow fields are required when its section is populated. Remember to scroll through the remainder of the form to find and complete all of the fields you want to populate. 6. Click Save. NOTE: This will update the status of the order in the Order List. Wisor Proprietary and Confidential © 2008 83 Wisor VIRTUAL FRONT OFFICE 11.4 USER GUIDE View the History Use the following procedure to view the history of a Service Request order. 1. Log into Local module. VFO opens on the Order List page. 2. Click the radio button that corresponds to the desired Order. 3. Click the History icon. This opens the Order History page where you can view and print the history of the selected Service Request. You can also download the XML generated for each item in the Order History screen. Figure 51 NOTE: Responses manually entered by Wisor’s BPO team are identified in the Updated By column of the Local Order History page. The Updated By column reads MRS when the response was entered by Wisor BPO. Supplement vs. Resubmit Original Order Depending on the response from the Trading Partner, you will need to either supplement or resubmit the original version of the order. The table below describes when some of the trading partners support supplements and when the original version is required based on the Trading Partner's response, as indicated by the VFO Status. VFO Status Confirmed Directory Only Confirmation DSRED- Error 84 BS Yes SUP Original PON SBC QST VZE VZW Yes Yes Yes Yes Yes Yes Resend Original PON BS SBC QST VZE VZW No No No No No No No Wisor Proprietary and Confidential © 2008 8. Create and Manage Outgoing Local Orders VFO Status DSR Cancel Rejected (Non-Fatal) Rejected (Fatal) Jeopardy Provisioning Completed Billing Completed Provider Notification Directory Service Completion Provider Initiated Action Clarification Confirmed Acknowledged-Reject Acknowledged-Accept BS SUP Original PON SBC QST VZE VZW Resend Original PON BS SBC QST VZE VZW Yes No Yes Yes No Yes Yes No Yes Yes Yes No Yes Yes No No Yes No No Yes No No No Yes No Yes Yes No Yes Yes No Yes Yes No Yes Yes No Yes Yes No Yes No No Yes No No Yes No No Yes No No Yes No No Yes No No See instructions below for supplementing and resubmitting the original order. Supplement If you need to send another version of the order to indicate a change, execute the Order > Supplement menu command. You will then indicate a supplement type and make the changes. To submit the supplement, execute the Order > Validate and Submit menu command. Resubmit Original Order If the initial version of an order is rejected and you need to make corrections and send it again, you can resubmit the original order (using the same version) without performing a supplement. 1. Locate the order and click the PON on the Order List. 2. Execute Order > Edit > Resubmit Original Order menu command. Wisor Proprietary and Confidential © 2008 85 Wisor VIRTUAL FRONT OFFICE 11.4 USER GUIDE 3. Modify the order as needed. 4. Submit the revised order by executing Order > Validate and Submit menu command. Revert to Last Saved If you entered values into the fields of a Service Request and clicked Save then decided to return to the previously saved version of the Service Request, execute the Order > Revert > Revert to Last Saved menu command. Revert to Last Submitted If you modify a Service Request after you successfully submitted it (i.e., started a supplement request), you can return to the previously submitted version of the Service Request by executing the Order > Revert > Revert to Last Submitted command. This command restores the previously submitted version of the Request even if you executed the Save command to save those changes. View Error List VFO allows you to view the errors that were found in the Order. Violated rules are displayed in the Error Code List in a pop-up browser. Open the Service Request and execute the Order > View > View Error List menu command to view the errors. This same command can be used to view the errors from the Trading 86 Wisor Proprietary and Confidential © 2008 8. Create and Manage Outgoing Local Orders Partner. TP Errored and Rejected statuses will generate an Error List of fields the Trading Partner rejected or required. Some of these errors will link to fields when clicked. Others will need to be navigated to manually. This is dependent on how the field is returned by the Trading Partner. NOTE: Before you can correct the errors returned by the Trading Partner, you must first supplement the order. View Last Notification You can link to the Order in its most recent status by clicking the link in the Status column that corresponds to the Order you want to view. Void VFO allows you to void a Service Request for any reason, as long as the Service Request has not been sent to the Trading Partner. To void a Service Request that has not been sent, open the Service Request and then execute the Order > Void menu command. Printable Version The Printable Version command in VFO displays the current Service Request in a format that is friendlier to your printer. From the Service Request page, execute the Order > Printable Version menu command. A new window opens that displays the fields of the Service Request without the application controls. Use the browser’s print tool to print the window. Wisor Proprietary and Confidential © 2008 87 Wisor VIRTUAL FRONT OFFICE 11.4 USER GUIDE Working with Templates Create a Template Templates use common data values to pre-populate orders, thereby reducing or eliminating redundant data entry and the attendant errors. VFO lets you tailor your own templates for every type of Service Request, as well as give you the ability to modify, update, or delete an existing template from VFO. Use the following procedure to create a template. 1. Login to VFO and select a module. This opens the Order List page. 2. Hover your cursor over the Template tab. This reveals the Template menu. 3. Execute the Template > New menu command. This opens the Template Initiation page. Figure 52 88 • Template Name - Enter a user-defined, unique name for the template. • Template Description - Enter a user-defined value that describes the template. • Trading Partner - Select a service provider to display their available Service Centers. • Service Center - Select a Service Center to generate a list of their available versions. Wisor Proprietary and Confidential © 2008 8. Create and Manage Outgoing Local Orders • Guideline Version - Select a version. • Service - Click this dropdown menu to select the Service Type for the negotiation of the service request. • Activity - Click this dropdown menu to identify the activity involved in this service request. • Initiate - Click this button to submit the values entered on this page and add the new template to the list of available templates. • Cancel - Click this button to ignore the values entered on this page and return to the Order List page. 4. Populate the Template Initiation page. 5. Click Initiate. This opens the shell of an order, update or trouble ticket, depending on the module you are logged into. 6. Populate the fields with common data values that, when selected, will pre-populate a new form. 7. Click the Save icon in the upper-right corner of the page. This saves the values to the database. Save As Template Another way to create a template is to execute the Save As Template menu command. This command is available in the Order menu on the Order List page and in the Order menu on the Service Request. Use the following procedure to save a Service Request as a template: 1. If you are on the Order List page: a. Click the radio button of the Service Request you want to use as a template. b. Execute the Order > Action > Save As Template menu command. 2. If you are in the Service Request: a. Execute the Order > Action > Save As Template menu command. 3. Either of these commands opens the Saved Order as New Template window. 4. Enter a unique value in the Template Name field. 5. Click Save. Apply Template After Order Initiation The Apply Template command populates blank fields of a Service Request with the respective values of the selected template. Use the following procedure to apply a template from within a Service Request Order form: Wisor Proprietary and Confidential © 2008 89 Wisor VIRTUAL FRONT OFFICE 11.4 USER GUIDE 1. Initiate a Service Request. 2. Execute the Order > Edit > Apply Template menu command. This opens the Apply Template window. 3. Select the desired template from the dropdown menu. 4. Click OK. Search for a Template Use the following procedure to search for a template. 1. Login to VFO and select the module. This opens the Order List page. 2. Hover your cursor over the Template tab. This reveals the Template menu. 3. Execute the Template > Search menu command. This opens the Template List page, which lists all available templates. Figure 53 90 • Template Name - Enter the name of the template, then click Go or click the template name link to search on that value. • Trading Partner - Enter the value that identifies the service provider in this service request, then click Go to search on that value. Wisor Proprietary and Confidential © 2008 8. Create and Manage Outgoing Local Orders • ServiceType - Enter the value that identifies the type of service and then click Go to search on that value. • Activity - Enter the value that identifies the activity involved in this service request, then click Go to search on that value. • Delete - Click a radio button(s) that corresponds to the template to remove, and then click the red X in the upper right corner of the page to remove a template from the Template List and the database. • Go - Click this button to submit the search criteria entered on the page to the Template database. • Clear - Click this button to remove the search criteria from the fields on the Template List page. NOTE: Executing the Clear command does not clear radio button selections. Wisor Proprietary and Confidential © 2008 91 Wisor VIRTUAL FRONT OFFICE 11.4 USER GUIDE Create and Manage Incoming Local Orders Overview As a Local Receive application, VFO will accept Local Orders made by customers. As a Local Send/Receive function, VFO will allow users to place their own Local Orders while managing their customers' Local Orders, all from within the same system. Using the Local Order List The Order List pages display all of the orders received by the system. Each line represents a particular order and shows the Receiver Code, Purchase Order Number, Version of the Order, Supplement Type (if any), Current Status, Transaction Type, Service Type, Request Type, Action, Desired Due Date, Initiator and Date Sent. Search Local Requests VFO's Search functionality allows you to search all Orders for the occurrence of specific values. You can extend your search by using the wildcard (%) character. Use the following procedure to find a specific Order(s). 1. On the Order List page execute the Order > Search menu command. This opens the Search dialog. Figure 54 2. Select the criterion from the Search On list. 3. Enter the value you wish to search for in the Search For field. This field is not case sensitive. 4. Click Search. Filter Local Order List The Filter function allows you to limit the selection of orders displayed in 92 Wisor Proprietary and Confidential © 2008 5. PortQual the Order List. You can save the filter settings and apply them to future VFO sessions. Your Order List filter settings will open as part of the login process. Use the following procedure to filter the Local Order list: 1. At the Order List page, click Filter (the icon that resembles a funnel). This opens the Order List Filter window. Figure 55 NOTE: To search through the Incoming Local Orders, make sure Direction is set to Receive. 2. Select the items you want displayed on your Order List or check the Exclude checkbox, which allows you to display all items except the items you have checked. 3. Click OK. The resulting Order List only contains the items matching your selections. 4. By clicking the checkbox next to the header of a subsection, you select all the statuses within it. 5. Some of the available filter options may be minimized into their headers. By clicking the blue downward arrow you can open these sections up. Minimizing them is accomplished by clicking the upward facing arrow Wisor Proprietary and Confidential © 2008 . 93 Wisor VIRTUAL FRONT OFFICE 11.4 USER GUIDE NOTE: Click Clear on the Order List Filter window to erase all previous selections. Assign Local Receive Orders VFO allows you to manually create a response for Local Orders. The order must be assigned to a user before you can create a Response. Use the following procedure to assign an order to a user: 1. Click the checkboxes of the Local Receive orders that you wish to assign. 2. Use the Order >Reassign Orders menu function. 3. The following window will display. Figure 56 4. Using the dropdown menu, select the user to whom you wish to assign the orders. 5. Click Save. Create Local Response VFO allows users to manually create responses for Local Orders. Note: Make sure the order has an owner before attempting to create a response. Use the following procedure to manually create a response: 1. From the Order List page, browse to the Local Order. 2. Click the radio button that corresponds to the Local Order. 3. Click the Create Response icon, in the upper right corner of the Order List page, or execute the Order > Create Response menu command. NOTE: You can create a response from within an Order by executing the Order > Edit > Create Response menu command. 4. This opens the Order Response Creation window. 5. Select a Response Type from the dropdown menu. 6. Click OK. 7. This opens the Service Request <Response> Creation page. 8. Populate the fields. Yellow fields are required when its section is 94 Wisor Proprietary and Confidential © 2008 5. PortQual populated. Remember to scroll through the remainder of the form to find and complete all of the fields you want to populate. 9. After you are finished you can click the Save icon and/or the Submit icon or use the menu options in the Order tab. View the History Use the following procedure to view the history of a Local Order. 1. Log into Local module. VFO opens on the Order List page. 2. Click the radio button that corresponds to the desired Order. 3. Click the History icon. This opens the Order History page where you can view and print the history of the selected Local Order. Figure 57 Revert to Last Saved You can create responses and choose to Save them. Then you can use the History screen to open the last saved version of the response or revert to an earlier saved version. Click the PON next to the response you want to view, modify, transmit, etc. Once you click Save, Validate, or Submit this response becomes the current response. Wisor Proprietary and Confidential © 2008 95 E911 Module Wisor Proprietary and Confidential © 2008 97 Wisor VIRTUAL FRONT OFFICE 11.4 USER GUIDE Enhanced 911 E911 List GUI The E911 List has two major differences from the Access and Local Order Lists. Instead of Order and PreOrder tabs, the E911 Module has Update and Inquiry tabs. Figure 58 Filter E911 List The Filter function allows you to limit the selection of E911 Orders displayed in the E911 List. Users can filter by several criteria. The E911 List filter settings will open as part of the login process. This means that any filter created will be retained even after the user exits the system. Use the following procedure to filter the Orders displayed on the E911 List. 1. On the E911 List page (E911 Home page), click Filter (the icon that resembles a funnel). This opens the E911 Filter window. 98 Wisor Proprietary and Confidential © 2008 11. Enhanced 911 Figure 59 2. Select the criteria for the items you want displayed on your E911 List. 3. Click Go. The resulting Order List contains only the items matching your selections. Update an E911 Order ALI Update allows you to Change, Delete, Insert, Migrate, or Unlock the telephone number. VFO automatically pulls status updates from Intrado. These updates are reflected in the Status column of the E911 List page. Use the following procedure to initiate an E911 Update: 1. Log into the E911 module on the VFO Login page. This opens the E911 List page. 2. Execute the Update > New menu command. This opens the Update Initiation window. Wisor Proprietary and Confidential © 2008 99 Wisor VIRTUAL FRONT OFFICE 11.4 USER GUIDE Figure 60 3. Optionally, change the automatically populated Order Number. 4. The default value for the Transaction Type is ALI Update. 5. Select the Function Code that reflects the type of update you want to occcur (Insert, Change, Delete, Migrate, or Unlock). 6. You may select a Template at this time. 7. Enter a Telephone Number if your company also uses the VFO LSR Module. The system will attempt to retrieve the address associated with the TN. 8. Click Initiate. Figure 61 9. Populate the appropriate fields. Fields highlighted yellow are 100 Wisor Proprietary and Confidential © 2008 11. Enhanced 911 required when its section is populated. 10. Click Submit or execute the Update > Submit menu command. NOTE: Click the Print icon in the upper right corner of the ALI Update form to generate a printer-friendly version of the ALI Update form. If you select Validate and Submit: 1. ALI Update transaction is validated against business rules. 2. Any errors are returned to the User. 3. The User corrects errors and executes Submit >Validate with Submit menu function. 4. Errors are returned until no more errors are detected. 5. When no errors are detected, VFO posts the response and updates the status of the ALI Update transaction. If you select Submit Without Validate: 1. The ALI Update transaction is not validated against any business rules so no errors are returned to the User. 2. VFO posts the response and updates the status of the ALI Update transaction. View E911 History The VFO E911 History page displays processing events for the selected E911 Order, and can be used to access the related request or response window. Use the following procedure to view the history of an E911 Update Request: 1. Browse to the E911 Home page. By default, the ALI Updates are listed. 2. Click the radio button of the request you want to view. 3. Click the History icon in the upper right corner of the page, or execute the Update > View History menu command. Save As an Update Request VFO allows you to save a copy of the selected or current E911 Update Order under a different order number. You can execute the Save As command from the E911 List page or from within an existing Service Request. Use the following procedure to save an E911 Update under a different order number: 1. If you are saving-as from the E911 List page, you must first click the radio button of the order you want to copy. Wisor Proprietary and Confidential © 2008 101 Wisor VIRTUAL FRONT OFFICE 11.4 USER GUIDE 2. Execute the Order > Save As menu command. This opens the Save As New E911 Order window. Figure 62 3. Enter the new, unique, Order Number. 4. Click Save. If you are saving-as from within an existing Order, open the Order you want to copy, and then execute steps 2 through 4. Save As Template VFO allows Users to save a copy of the selected or current E911 Update Order as a new template. You can execute the Save As Template command from the E911 List page or from within an existing Service Request. Use the following procedure to save an E911 Update as a new template: 1. If you are saving-as from the E911 List page, you must first click the radio button of the Order you want to copy. 2. Execute the Order > Save As Template menu command. This opens the Save As New E911 Template window. Figure 63 3. Populate the fields. 4. Click Save. 102 Wisor Proprietary and Confidential © 2008 11. Enhanced 911 If you are saving-as from within an existing Order, open the Order you wish to copy, and then execute steps 2 through 4. Perform an E911 Inquiry Use the following procedure to launch an E911 Inquiry: 1. Log into the E911 module on the E911 Login page. This opens the E911 List page. 2. Execute the Inquiry > New menu command. This opens the Inquiry Initiation window. Figure 64 3. Optionally, change the automatically populated Order Number. 4. Select a Transaction Type. 5. Enter a Telephone Number. 6. Click Initiate. The Transaction Type you select in step 4 determines what fields are presented to be populated on the Inquiry tab. The following images are from an ALI Query Request. Wisor Proprietary and Confidential © 2008 103 Wisor VIRTUAL FRONT OFFICE 11.4 USER GUIDE Figure 65 7. Populate the applicable fields. Fields highlighted yellow are required when its section is populated. Search for an E911 Inquiry The E911 Inquiry Search allows you to separate or limit the selection of E911 Orders displayed in the E911 List. You can filter by several criteria. Use the following procedure to search for a specific E911 inquiry. The search results will be displayed in the E911 List. 1. From the E911 Home page, execute the Inquiry > Search menu command. The page that opens displays the E911 Search controls in the upper portion and the list of E911 inquiries in the lower portion. 104 Wisor Proprietary and Confidential © 2008 11. Enhanced 911 Figure 66 2. Select the criteria (e.g., date, initiator, etc.) from the respective controls. 3. Click Go. The results will appear in the bottom half of the page. Wisor Proprietary and Confidential © 2008 105 TA Module Wisor Proprietary and Confidential © 2008 107 Wisor VIRTUAL FRONT OFFICE 11.4 USER GUIDE Trouble Administration Login Procedure Use the following procedure to login to VFO. 1. Browse to the location of VFO by entering the following address in the Address field: http://<host name>:<port number> Figure 67 2. Enter a valid name in the User Name field. 3. Enter a valid password in the Password field. 4. Choose TA from the Module Drop Down list on the VFO sign in page. 5. Click the Login button. NOTE: You must use the User Name and Password provided by your system administrator. Trouble Administration Work List The Work List displays all of the tickets entered into the system. Each line represents a particular ticket and shows the Ticket ID, Time and Date Created, date/time last update received, Network ID, State and Status of the ticket, the Agent Trouble Report ID, the Customer Trouble Ticket number, the last tech assigned to the ticket and the trouble type. 108 Wisor Proprietary and Confidential © 2008 12. Trouble Administration Figure 68 • Ticket - Hover over this tab to allow Users to create Trouble Tickets and reassign Trouble Tickets to other Users. • MLT - Hover over this tab to access the Mechanized Loop Test function. This function is detailed in the last section of this chapter. • Search - Hover over this tab to access the search functionality. This function will allow the User to perform a Trouble Report Search, a TA message search, an MLT search and an ECCKT search. This tab also allows Users to return to the most recent search performed during their session. • Template - Hover over this tab to draft ticket information that can be applied to actual tickets. • Administration - This tab only appears for those Users with access to Administrative functions. These Users can create new users, reset passwords, delete users, etc. NOTE: The Last Assignment field is only populated after a Trouble Ticket has been reassigned. Below are some States you may see in the Work List: • Queued • Open Active – status codes 1-12, 18, 19, 21-23, 34 or 35 might Wisor Proprietary and Confidential © 2008 109 Wisor VIRTUAL FRONT OFFICE 11.4 USER GUIDE apply • Deferred – status codes 13 - 17 might apply • Cleared – status codes 20, 24, 25 or 26 might apply • Closed – status codes 27 – 33 might apply • Disabled Below are some Statuses you may see in the Work List: 110 1. Screening 2. Testing 3. Dispatched In 4. Dispatched Out 5. Pre Assigned Out 6. Bulk Dispatched Out 7. Start Repair 8. Pending Test 9. Pending Dispatch 10. Request Repair 11. Refer Maintenance Center 12. Refer Vendor 13. No Access Other 14. Start No Access 15. Stop No Access 16. Start Delayed Maintenance 17. Stop Delayed Maintenance 18. Trouble Escalated 19. Craft Dispatched 20. Temporary OK 21. Cable Failure 22. Originating Equipment Failure 23. Back Order 24. Cleared/Customer not advised 25. Cleared/Customer advised 26. Cleared Awaiting Customer Verification 27. Closed Out 28. Closed Out by Customer Request Wisor Proprietary and Confidential © 2008 12. Trouble Administration 29. Closed Out Customer Verified 30. Closed Out Customer Denied 31. Cancelled Pending Work in Progress 32. Cancelled Pending Test Completion 33. Cancelled Pending Dispatch Completion NOTE: Only ATT(SBC) supports these Status codes - 1, 2, 3, 4, 9, 14, 15, 16, 17, 21, 26, 28, 29, and 30 There may be an icon in front of some of the tickets to indicate different work states. Following are what these icons represent: Double Vertical Bar Ticket is in "New" state. A ticket will be in the "New" State when it has been sent, but has not received a "Create Response" from the Trading Partner, or received a "Reject Response" or “Fallback Error”. The ticket can be corrected and sent again by clicking on the radio button next to that ticket and choosing the "Create As" option from the "Ticket" drop down list. Reject Errors Below are some examples of Reject Responses that might cause the ticket to remain in “New” status. These errors are displayed in the Error Column in the Ticket History. Resource Limitation - Trading Partner OSS back end system is down and information cannot be sent/received. Access Denied – The Network ID and Account Name combination are incorrect. No such Object/Instance – If a transaction is sent to the Trading Partner on a ticket that is closed in their back end system this error may be returned. Must be Present Attribute Missing – A required field is not populated on the Create Request. Invalid Attribute Value – A field is populated with incorrect data – i.e. hyphens in a telephone number field. Missing Attribute Value – A required field is not populated on a transaction sent after the ticket has been opened (after Create is sent and a good response received). Cannot Verify or Deny at this time– If a transaction is sent on a ticket in a state/status of “Cleared Waiting customer verification” or a Verify Completion transaction is sent to the Trading Partner but no AVC request to close was previously received from the Trading Partner for that ticket, this error message may be returned. Wisor Proprietary and Confidential © 2008 111 Wisor VIRTUAL FRONT OFFICE 11.4 USER GUIDE Trouble Report Change Denied – When a transaction is sent on an open ticket but the ticket is not in the appropriate state/status for that type of transaction, i.e. an escalation request is sent on a ticket in cleared state. Trouble Report Already Exists – A Create is sent to the Trading Partner but they already have an open ticket on that circuit (may have been opened via a phone call). Fallback Errors Below are industry standard fallback error codes that might cause the ticket to stay in “New” status. (The values in bold type below are the ones most commonly returned.) • Circuit Mismatch • Create in Progress • Circuit Ownership • Invalid State Code • Invalid Segment • Leading Zeros • New Service Pending • Circuit Disconnected • Invalid Company Assigning Code • Invalid Circuit Format Clock Ticket is in a "Pending" state. A pending state exists when a ticket is going to be dispatched (Pending Dispatch), in the process of being tested (Pending Test) or in the process of having some other task applied. When the task has been applied, Pending Dispatch would change to Dispatch, or Pending Test would change to Testing, etc. 112 Wisor Proprietary and Confidential © 2008 12. Trouble Administration Flame Ticket needs attention. The ticket has received a notification from the Trading Partner requesting authorization or closure of the ticket. Green Check Mark Ticket has been "Closed". The repair was successfully completed and the ticket has been closed by the Trading Partner. Red Bell Ticket has errors. The GUI Validation has found a violation in one or more fields and requires correction before the ticket can be successfully sent to the Trading Partner. History To view additional information on the tickets listed in the Work List, you can access the History section. The History section can be accessed by clicking the icon that looks like an open book . From the screen above, you can click the ID number to access the Trouble Report Detail screen. Wisor Proprietary and Confidential © 2008 113 Wisor VIRTUAL FRONT OFFICE 11.4 USER GUIDE Create a Trouble Report Use the following procedure to create a Trouble Report: 1. Hover your cursor on the Ticket Tab and a drop down list will be displayed 2. Execute the Ticket>Create Trouble Report menu command. This opens the first page of the Create Trouble Report Request. Figure 69 3. Populate required fields on the Create Trouble Report Request page. • TRFD is chosen depending on whether the service is POTS, a Circuit with a premise address, or a circuit without a premise address, such as a Message Trunk. • Account Name is the identifier for your company that has been specified by the Trading Partner chosen in the Network ID entry. • Network ID is the ID for the Trading Partner to whom the ticket will be sent. • Service ID is the 10 digit telephone number or Circuit ID for the ticket that you are entering. 4. If you have a template, you can select the template applicable to the ticket you are entering, and then populate the remaining fields. 5. Click Next. This opens the second page of the Create Trouble Report Request. 114 Wisor Proprietary and Confidential © 2008 12. Trouble Administration Figure 70 6. Populate the relevant fields under the Ticket Info and Loc & Access tabs. 7. The A Location Address under the Loc & Address Tab will be autopopulated when the customer has an Access/Local order in the VFO system and the Service ID is found on one of those orders that has been submitted and accepted by the Trading Partner. 8. If the TRFD chosen on the initial Create Trouble Ticket Request page is a TRFD1 or TRFD2, you must populate the relevant fields under the Authorization and Escalation tabs. 9. Click Validate and Submit icon, it looks like a person running. VFO validates the information contained on the Report and generates a list of violations based on industry standard rules. There are no Trading Partner specific rules included in the validation. Wisor Proprietary and Confidential © 2008 115 Wisor VIRTUAL FRONT OFFICE 11.4 USER GUIDE Figure 70a 10. If the Report Request contains violations, click the violation(s) in the Validation Error(s) list to link to the field that needs correction. Once you have made all necessary corrections, click Submit again to send Report Request to the Trading Partner. 11. When the request has been accepted by the Trading Partner, a Create Response will be returned and the Ticket will be updated with the Agent Ticket number and Trading Partner contact information. The Create Request and Create Response will be retained under the History tab. Trouble Templates Templates help save time by pre-populating data that is entered frequently on Trouble Tickets. Use the following procedure to create Trouble Report templates. 1. Hover your mouse over the Template tab. 2. Click the desired template (e.g. New Escalate). This will open the template page. 116 Wisor Proprietary and Confidential © 2008 12. Trouble Administration Figure 71 3. Populate the template with the frequently used data for that ticket transaction. 4. Click the Save icon at the top of the page. Modify Trouble Report Use the following procedure to modify a Trouble Report Request. NOTE: The Report Request must be in Open status in order to be modified. 1. Click the radio button that corresponds to the Trouble Report Request you want to modify. 2. Execute the Ticket > Modify Attributes menu command. This opens the Modify Attributes Request page. Wisor Proprietary and Confidential © 2008 117 Wisor VIRTUAL FRONT OFFICE 11.4 USER GUIDE Figure 72 3. Make the desired changes. 4. Click Submit. When the ticket is received and accepted by the Trading Partner, a Modify Response will be returned. The Modify Request and Response will be retained under the History Tab. Additional Trouble Information Use the following procedure to submit additional information on a Trouble Report to a Trading Partner. 1. The Report Request must be in Open status in order to add information. 2. From the Work List, click the radio button that corresponds to the Trouble Report Request on which you want to add information. 3. Execute the Ticket > Add Trouble Info menu command. This opens the Add Trouble Info Request page. 118 Wisor Proprietary and Confidential © 2008 12. Trouble Administration Figure 73 4. Enter additional information as text. 5. Click Submit. When the Trading Partner receives the Add Info Request, a Modify Response will be returned. Both the Request and Response will be retained under the History tab and the information will be updated on the appropriate section of the ticket. Cancel Trouble Report Use the following procedure to Cancel a Trouble Report if the ticket was created by mistake. 1. The Report Request must be in Open status in order to be cancelled. 2. From the Work List, click the radio button corresponding to the Report Request you want to cancel. 3. Execute the Ticket > Cancel menu command. This opens the Cancel Trouble Report Request window. Figure 74 4. Populate the relevant fields. 5. Click Submit. Wisor Proprietary and Confidential © 2008 119 Wisor VIRTUAL FRONT OFFICE 11.4 USER GUIDE When the Trading Partner receives the Cancel Request, a Cancel Response will be returned and the status of the Ticket will be changed to show that it has been canceled. The Cancel Request and the Response will be retained under the History tab. Late Bonding If a ticket was called into the Trading Partner and you wish to create a ticket so that you can receive updates and send modifications electronically, you can execute the Late Bonding process. Use the following procedure to execute the Late Bonding process. 1. Hover over the Ticket tab and execute the Ticket>Create Trouble Ticket menu command. This opens the Create Trouble Ticket initial entry page. 2. Follow the steps under the Create Trouble Ticket section to enter a ticket for the Telephone Number or Circuit that had a Trouble Report called into the Trading Partner Repair Center. 3. When the Create Request is received by the Trading Partner and it is found that there is already a ticket in an open status the Trading Partner returns a "Ticket Already Exists" reject response. 4. When the Trading Partner received the request and already has the ticket, a Response will be returned containing all of the information on the Trading Partner Trouble Ticket. The ticket will be updated with all of the information in the Trading Partner’s response, the State and Status will be updated to reflect what was returned on the Retrieve Trouble Info response. The Ticket is now electronically bonded, will receive status updates and notification from the Trading Partner, and can be modified by the User. Escalation Request Use the following procedure to escalate a Trouble Report Request. NOTE: Escalations cannot be sent electronically to any Trading Partners. In some cases an escalation will need to be requested by a phone call. NOTE: The Report Request must be in Open status in order to be escalated. 1. From the Work List, click the radio button that corresponds to the Trouble Report Request you wish to escalate. 2. Execute the Ticket > Escalate menu command. This opens the Escalation Request. 120 Wisor Proprietary and Confidential © 2008 12. Trouble Administration Figure 75 3. Populate the relevant fields. Yellow fields are required when its section is populated. 4. Click Submit. When the Escalation Request has been received by the Trading Partner, a Modify response will be returned. Both the request and response will be retained under the History tab and the Escalation information will be updated under the Escalation tab. Retrieve Trouble Info Request Use the following procedure to get information on a Trouble Report Request. NOTE: The Report Request must be in Open status in order to get information. 1. From the Work List, click the radio button that corresponds to the Trouble Report Request on which you want information. 2. Execute the Ticket > Retrieve Trouble Info menu command. This opens the Retrieve Trouble Info Request page. Figure 76 3. Click Submit. Wisor Proprietary and Confidential © 2008 121 Wisor VIRTUAL FRONT OFFICE 11.4 USER GUIDE When the Request has been received by the Trading Partner, a Retrieve Trouble Info Response will be returned by the Trading Partner and the information displayed on the Trouble Ticket will be updated to match the data returned if it is different than what was previously displayed. The Retrieve Trouble Info Request and the Response will be retained under the History tab. Retrieve Trouble Report Status Use the following procedure to check the status of a Trouble Report Request. NOTE: The Report Request must be in Open status in order to be checked. 1. From the Work List, click the radio button that corresponds to the Trouble Report Request you want to check. 2. Execute the Ticket > Retrieve Trouble Status menu command. This opens the Retrieve Trouble Status Request page. 3. Click Submit. When the Retrieve Trouble Info Request is received by the Trading Partner a response is returned. The Status of the ticket will be updated if the status returned on the response is different than what was previously displayed. Verify Repair Completion Request Use the following procedure to create a Verify Repair Completion Request. 1. From the Work List, click the radio button that corresponds to the Trouble Report Request that requires the Verify Repair Completion Request. 2. Execute the Ticket>Verify Repair Completion menu command. This opens the Verify Repair Completion Request page. Figure 77 122 Wisor Proprietary and Confidential © 2008 12. Trouble Administration 3. Populate the relevant fields to either approve the ticket closure (Verified) or deny the closure because there is still an issue. 4. Click Submit. If the ticket closure is approved (Verified), the AVC returned from the Trading Partner will change the ticket status to Closed. If the ticket closure is Denied, the AVC returned from the Trading Partner will change the ticket status to Dispatch, Pending Test, Screening or whatever status is returned on the AVC, and the ticket will remain open. Attribute Value Change Notifications The Trading Partner will send an Attribute Value Notification (AVC) to update the ticket information or request an action on the part of the User. Status Notifications The Trading Partner will send an AVC to update the ticket Status whenever a change is made to the ticket, and on a regular basis corresponding to the time interval entered in the Status Window fields when the Create Trouble Ticket was submitted. Authorization Request Notifications The Trading Partner may send an AVC to request authorization for Dispatch, After Hours Repair or any of the other valid requests listed under the Authorization tab. The Flame icon will appear next to the ticket in the Work List when an AVC for authorization is received. If an Authorization Request is received, the User will send a Modify Request and populate the relevant fields under the Authorization tab to either approve (Provide) the Authorization or Deny it. Request to Close Notifications If the Trading Partner sends an AVC request to close the Trouble Ticket the status will be changed - "Cleared waiting Customer Verification" is a status that might be received on the AVC and updated in the Status field on the ticket. In the Work List, that ticket will also have a Flame icon to alert the User that an action is required. After checking to be sure that the repair issue has been fixed, the User will submit a Verify Repair Completion Request. Mechanized Loop Test (MLT) Before entering a Ticket for a POTS service, you may wish to request that a Mechanized Loop Test be done to ensure that the trouble resides at the Wisor Proprietary and Confidential © 2008 123 Wisor VIRTUAL FRONT OFFICE 11.4 USER GUIDE Trading Partner. Use the following procedure to enter the MLT Request. 1. Hover your cursor over the MLT Tab and choose Create MLT Request from the drop down list. This will open the MLT Request page. Figure 78 2. Populate the MLT fields with the relevant information. (i.e. Account Name, Network ID Service ID and Test Request Type). 3. Click Submit. When the response is received, the Response ID will be displayed on the screen. The response from the ILEC will provide the test results for that POTS service. You can view all MLT test responses by using the MLT search selection under the Search Tab. If the MLT test is done and a ticket is subsequently entered, or it is done on a ticket that already exists, the MLT results will be displayed under a "Last MLT" tab which will be displayed after the Assignments tab on the Trouble Report Detail Screen. Click the Last MLT tab to display the Test Results. Trading Partners may provide any combination of the following information depending on the type of request: POTS Service Test Results(MLT) FULL - Summary description of the test results Optionally, DC Signature results: Tip to ground resistance Tip to ground voltage Ring to ground resistance Ring to ground voltage Tip to ring resistance Optionally, AC Signature results: Ringers - 0 or 1 Tip to ground resistance Ring to ground resistance 124 Wisor Proprietary and Confidential © 2008 12. Trouble Administration Tip to ring resistance Optionally, balance results: Capacitive (percent) Longitudinal (decibels) Optionally, loop results, either: Total loop Open distance from the CO Optionally, central office results: Line circuit status Dial tone status QUICK Optionally, DC Signature results: Tip to ground resistance Tip to ground voltage Ring to ground resistance Ring to ground voltage Tip to ring resistance Optionally, AC Signature results: Ringers - 0 or 1 Tip to ground resistance Ring to ground resistance Tip to ring resistance Optionally, balance results: Capacitive (percent) Longitudinal (decibels) Optionally, loop results, either: Total loop Open distance from the CO CENTRAL OFFICE - Summary description of the test results Optionally, DC Signature results: Tip to ground resistance Tip to ground voltage Ring to ground resistance Ring to ground voltage Tip to ring resistance Optionally, AC Signature results: Ringers - 0 or 1 Tip to ground resistance Ring to ground resistance Tip to ring resistance Optionally, central office results: Line circuit status Dial tone status LOOP - Summary description of the test results Optionally, DC Signature results: Wisor Proprietary and Confidential © 2008 125 Wisor VIRTUAL FRONT OFFICE 11.4 USER GUIDE Tip to ground resistance Tip to ground voltage Ring to ground resistance Ring to ground voltage Tip to ring resistance Optionally, AC Signature results: Ringers - 0 or 1 Tip to ground resistance Ring to ground resistance Tip to ring resistance Optionally, balance results: Capacitive (percent) Longitudinal (decibels) Optionally, loop results, either: Total loop Open distance from the CO 126 Wisor Proprietary and Confidential © 2008 12. Trouble Administration Trouble Administration Contact Information For issues with TA that are system related, please contact Wisor at the following number: • 800.522.6943 For issues with TA that are LEC related, please contact the LEC at the following numbers: • ATT (Bell South): EC Support at 888.462.8030. • ATT (SBC): o Daytime: Sharon Wagner, EBSPOC for application to application issues at AT&T, at 314.235.0326. o After hours or if Sharon Wagner not available: On call pager number at 314.235.2899 • QWEST: Wholesale Systems Help Desk (WSHD) 888.796.9102. • Verizon: o For TAXI Local system concerns please contact: Partner Solutions Customer Care Center (PSCCC) 877.WHOLCCC (877.946.5222). o For TAXI Access system concerns please contact: National Support Center (NSC) at 800.483.7766 - Component Code TXI; Reporter Identification Code 980-07-0686. Wisor Proprietary and Confidential © 2008 127 Glossary Glossary # 911: Emergency short cut dialing used to contact police departments for dispatch of officers, fire fighters, or ambulances. The system identifies the caller’s location and other pertinent information to dispatch accurately. A Abbreviated Dialing: A feature that permits the calling party to dial a destination telephone number in fewer digits than normal. Speed dialing is an example. Access Code: Denotes a uniform five or seven digit code assigned by the provider to an individual customer. The five digit code has the form 10XXX and the seven digit code has the form 950XXXX or 101XXXX. It is important to be cognizant of another access code used within an end user switching vehicle (PBX, CENTREX). This access code is usually a three digit code for tie-trunk, FX, WATS, etc. or is a one digit code such as used in hotels for accessing various telecommunication services. Access Provider: See Trading Partner Access Service: Includes service and facilities provided for the origination or termination of InterLATA or foreign telecommunications. Access Service Request (ASR): This form is used by the customers to request various access services, as specified in the contracts and tariffs. ACI Form: Additional Circuit Information (ACI) Request Form. Used by the customer or the provider for stipulating circuit specific information that cannot be readily provided on a service specific request form. Generally, the customer will not submit an ACI Form for ordering a group of circuits, but will simply identify the order using the quantity field, the CKR field and the (ECCKT) Exchange Company Circuit Identification field (for existing circuits). ACTL: Access Customer Terminal Location Additional Ciruict Information (ACI) Request: This form is used by both the customer for stipulating circuit specific information that cannot be readily provided on a service specific request form. ARI Form: All information required for ordering Additional Ring Information is provided in the various fields contained within the ARI Form and the SALI Form. The ARI CircuitDetail Section provides entries for the specification of ordering options. The LocationSection provides entries for describing the termination of the ARI. ASOG: Access Service Ordering Guidelines ASOG System: Access Service Ordering Guidelines System ASR: Access Service Request ASR Forms Descriptions: See ASOG 30 Forms and Fields for a summary of all forms. ATIS: Alliance for Telecommunication Industry Solutions Wisor Proprietary and Confidential © 2008 129 Wisor VIRTUAL FRONT OFFICE 11.4 USER GUIDE AVC: Attribute Value Change B BHC: Batch Hot Cut BILLCON Email: Billing Contact Electronic Mail Address Blocking: The inability of a calling party to be connected to the called party because either all permitted trunk paths are busy, or a path between a given inlet and any permitted free outlet of the switching network of a switching system is unavailable. Bundled Services: Local service such as business or residence lines, etc. C Carrier: A telecommunications company providing either local exchange service, interLATA service, or both. Carrier or Common Carrier: Denotes any individual, partnership, association, joint-stock company, trust or corporation engaged for hire in interstate, intrastate or foreign communication by wire or radio. CCNA: Customer Carrier Name Abbreviation Central Office: ILEC's primary point to connect customers to the network. These highly secure buildings contain computerized network switching equipment. CFA: A Channel Facility Assignment (CFA) is a provider carrier system and channel to be used from a wide ban analog, high capacity, or optical network facility when the customer has assignment control. Channel Facility Assignment: A Channel Facility Assignment (CFA) is a provider carrier system and channel to be used from a wide ban analog, high capacity, or optical network facility when the customer has assignment control. CKR: Circuit CLC: Certified Local Carrier CLEC: Competitive Local Exchange Carrier. A telecommunications company, certified by a state utilities commission, which provides local exchange service within a local exchange and its associated local calling area. Service may be provided through its own facilities by leasing part or all of an ILEC’s network, or by reselling an ILEC’s finished services. CLLI code: (Common Language Location Identifier) An 11-digit code that an ILEC assigns to a carrier’s location to designate the Central Office or area served by a Central Office. Characters 5 and 6 are the state code, 7 and 8 are the Central Office name, and 9 through 11 specify equipment type. CLLI is a trademark of Telcordia. CMIP: Common Management Information Protocol CMLG: Commingling Completion Notification: Completion Notification is issued by the Network Service Provider upon completion of a request from the Local Service Provider. Confirmation Notice (CN): This form is prepared by the provider and is forwarded to the customer to 130 Wisor Proprietary and Confidential © 2008 Glossary confirm the services. CR: Clarification Request CSR: Customer Service Record. A CSR is the total record of all services and items for an interexchange carrier's account. D D (Directory) form: The directory service request is prepared by the customer and submitted to the Local Service Center (LSC) for the ordering of directory service, directory listing and assistance. Database: A collection of interrelated data stored in computer memory with a minimum of redundancy. DDD: Desired Due Date DIR1: Directionality, which identifies the direction of the circuit's path. Direct Inward Dial (DID): The original service provider routes calls to the dialed number over a dedicated facility to the new service provider's switch instead of translating the dialed number to a new number. Disconnect: The Disconnect feature allows you to generate requests to disconnect circuits using information that exists on the original request or the circuits to be disconnected. DLR: Design Layout Report is a report containing technical and administrative information that describes the service provided by the provider. The technical information is needed by the customer to design the overall service and includes such items as cable makeup (gauge, loading, length, etc.), carrier channel bank type and system mileage, facility interfaces, etc. The DLR is sent to the designated customer representative by the provider. DSR: Directory Service Request E E911: Enhanced 911 EB-TA: Electronic Bonding Trouble Administration EC: Exchange Carrier ECI Form: The Enhanced Customer Interface (ECI) is a process that enables customers and providers to communicate data elements that are either not national in scope or that require a turn around time sooner than the request process allows. EDI: Electronic Data Interchange EL: Exchange Link End Office (EO): Denotes a local provider central office switching entity serving end user customers. It is represented by an 11 character CLLI code. End Office Detail (EOD): This form is used by the customer to forecast traffic routed from end offices subtending a tandem, identify end offices for SAC Code activity, identify subtending end Wisor Proprietary and Confidential © 2008 131 Wisor VIRTUAL FRONT OFFICE 11.4 USER GUIDE offices for originating traffic, Estimate Traffic Distribution Requirements. End User (EU): A customer that uses, rather than provides, telecommunications services (i.e., one who originates and/or terminates telecommunications). End User form: This form is prepared by the customer to provide location and the access information for the end user and other provisioning details necessary to provide the requested service. End User Special Access (EUSA) Request: This Form is used by the customer for ordering special access: Premise to Premise, Premise to Central Office, Central Office to Central Office. ESP: Enhanced Service Provider; Retail customer using the application. F F/C: Final Closure FCIF: Flexible Control Interface Format—Flexible Computer Interface Form language. A data interface language that is used to exchange data between systems or processes. FDT: Frame Due Time Feature Group A Form: All information required for ordering a FGA Access Line is provided for in the various fields contained within the FGA Form. The circuit detail section provides entries for the specification of ordering options, transmission levels, hunting requirements and General Exchange Tariff options. The Location section provides entries for describing the termination of the FGA. End user information entries are provided for end user billing of the FGA offering. Firm Order Confirmation (FOC): A Firm Order Confirmation is issued in response to a Firm Order ASR. It provides the customer with non-design information such as critical dates and circuit identification. Design information will be provided on the Design Layout Report (DLR), when requested by the customer. Flexible Computer Interface Form: See FCIF. FNT: Finer Network Type FOC: Firm Order Confirmation (also referred to as CN/Confirmation Notification) Foreign Exchange Service: Refers to telephone exchange service furnished to a customer through a Central Office of an exchange other than the exchange in which the customer is physically located. Frame Relay Service (FRS): Frame Relay Service is a high performance, packet mode, public data communications service which enables local area network (LAN) type connectivity among multiple distributed customer locations over a wide area. Data is relayed from the source to the desired destination by means of "virtual" connections, that is, through a fixed path established through the network. H Header: The part of a data packet (message) that contains address, routing, and origination information. HTTP: Hypertext Transfer Protocol. A communications protocol, which the Web is based, that sets rules for how information is passed between a server and browser software. 132 Wisor Proprietary and Confidential © 2008 Glossary HUB: Denotes a provider building/location designated for multiplexing and/or bridging capabilities. A provider building with end office(s) and/or access tandem(s) may also be a multiplexing HUB for the purposes of terminating switched access services into switching entities in that wire center building. I IC: Initial Closure or Interexchange Carrier ICP: Integrated Communication Provider; The owner of the Wisor application. ICSC: Interexchange Customer Service Center ILEC: Incumbent Local Exchange Carrier Input: Any data being sent to a computer from a user, another computer, or other equipment. Inquiry: A transaction that requests specific information from a computer system and results in a formatted output. Inquiry Response Indicator: The IRI - Inquiry Response Indicator is used in the ASR response header in Wisor’s XML. It identifies the type of response provided for this request using 1 alpha character. Inside Wiring: Wiring within a customer's premise that is used for internal communications or to connect CPE to the network interface. Interexchange: Communication between two different LATAs. Interexchange Customer Service Center (ICSC): A point of contact in the provider area designated to handle negotiating, provisioning and billing inquiries for services. Interface: A common boundary between two systems or pieces of equipment over which there is intersystem communications. InterLATA: A communications service in which the origination and termination are in different LATAs. IntraLATA: A communications service in which the origination and termination are within the same LATA. Intranet: A computer network only available to members within an organization as a company-wide Web resource. IP: Internet Protocol IPQPR: Quantity of Port References (ACTL and/or PRILOC). IRI: Inquiry Response Indicator—Used in Wisor’s XML ASR response header. It identifies the type of response provided for this request using 1 alpha character. ISI: Industry Support Interface IXC: Inter-Exchange Carrier J JavaScript: A scripting language, developed by Netscape and Sun Microsystems, specialized for controlling Web browser processes. JavaScripts are supported by HTML Help and can be added Wisor Proprietary and Confidential © 2008 133 Wisor VIRTUAL FRONT OFFICE 11.4 USER GUIDE to HTML Help topics. JPEG: A compressed true-color or high-color bitmap format, developed by the Joint Photographic Experts Group of the International Standards Organization. JPEG is used for photographic images. L LATA: Local Access and Transport Area, which defines a geographical area with common economic and social attributes. A LATA may cross a state boundary. AT&T subdivided the United States into some 160 LATAs upon divestiture of its local exchange operations in 1984. Each LATA approximates the subdivision of AT&T's LongLine network prior to divestiture. As part of the divestiture agreement, AT&T and other interexchange carriers (IXCs) could provide service between LATAs (interLATA), while the LECs could provide service within a LATA (intraLATA). LEC: Local Exchange Carrier (or Local Exchange Company) whose principal line of business is local phone service. LECs also provide the bulk of the intraLATA toll connections. LIDB: Line Information Data Base, provides additional call information to enable real-time verification of calling card, third party billing calls, and caller id calls. LISC: Local Interconnection Service Center Local Service Confirmation (LSC): Local Service Confirmation (LSC) is provided by the Network Service Provider upon receipt and processing of the request from the Local Service Provider. Local Service Provider (LSP): A company that sells local service to end users. Local Service Provider Authorization Number (LSPAN): Authorization to the new LSP to affect the current LSP's billing and service. LSPAN is returned on the Loss Notification upon completion of the request. Location Inquiry: Allows a customer to issue an inquiry to obtain a valid service address. Loop (LS) form: Used for Loop services. An Unbundled Local Loop is a two-way transmission path, which connects an end user’s premise to an ILEC’s Central Office (CO) location. It is an ILEC facility that is leased by the CLEC to provide local service to an end user customer. Loop w/ NP (LSNP) form: Ordering a number porting request with an Unbundled Local Loop is a two-way transmission path that connects an end user’s premise to an ILEC's Central Office location. It is an ILEC facility that is leased by the CLEC to provide local service to an end user customer. Loss Alert: Issued at the beginning of the change process, the Loss Alert can be issued at the same time as the request for Transition Information. The Loss Alert should contain: OCN of new Reseller/LSP; WTN(s)/Circuit Ids; End User Name; Anticipated Due Date; Indication that LOA is on file; potential unauthorized move indicator. Loss Notification (LN): Issued by the Network Service Provider upon completion of a request to the "old" Local Service Provider. LSR form: Local Service Request. This form is prepared by the customer to request a provider to provide the services as specified in the specific tariffs/contracts/agreements. LTP: Local Transport 134 Wisor Proprietary and Confidential © 2008 Glossary LTR: Local Transport Restructure M MI: Minimal Input System, which contains customer service records. MQ Series: IBM queue management software. Multi—EC Form: Used whenever an access service passes through more than one provider's territory. This form identifies the additional administrative and billing information for each provider. The Access Service Coordination Exchange Company (ASC-EC) details must always be populated. MultiPoint Service Legs (MSL) Request: This form is used by the customer to relate circuit legs to specific bridge points; and bridge points to bridge points. N NAI Form: Network Assignment Information (NAI) Form, used when the customer is providing: intermediate connecting facility assignment(s); alternate facility; alternate ACTL; and/or drop port equipment assignment information. Network Providers: A company that sells bundled or unbundled services to service providers. Non-ASOG Fax: The Non-ASOG Fax feature allows VFO users the option of sending Non-ASOG ASR orders via Fax or Email. NPA: Numbering Plan Area, or the area code for a geographic region. NXX: A generic name, in which N refers to a number between 2 and 9, and X to a number from 0 through 9. NXX represents the Central Office Code of a telephone number in North America. Number Portability: Provides end user customers the ability to change local service providers for basic local exchange service without changing their telephone number. Number Portability (NP) form: Number Portability allows an End User who has converted to a facility-based CLEC to retain his current telephone number. If the End User is located in an area which has put Local Number Portability (LNP) to the CLEC’s switch into effect, the End User may connect to the facility-based CLEC’s network using his current telephone number. The end user’s telephone number will be “ported”. If the End User is located in an area which is still operating under Interim Number Portability (NP), the End User will only have the appearance of keeping his current telephone number. Arrangements are established to forward calls to the End User’s CLEC telephone number when calls are made to the End User’s previous telephone number. There are three types of NumberPortability (NP) - Remote, based on remote call forwarding; Direct, which is a DID-like trunk arrangement and Local Routing # LRN. The CLEC may order Number Portability with or without an unbundled loop. O OBF: Order and Billing Forum Open Database Connectivity (ODBC): A standard or open application programming interface (API) for accessing a database. By using ODBC statements in a program, you can access files in a number of different databases. Oracle: Vendor software package used to provide database format. Wisor Proprietary and Confidential © 2008 135 Wisor VIRTUAL FRONT OFFICE 11.4 USER GUIDE P PC: Protocol Converter PIC: Primary Interexchange Carrier. A long-distance company assigned code for routing long-distance calls over the correct network. Point of Presence (POP): Denotes the customer terminal location at which the provider's responsibility for access service ends. PON: Purchase Order Number Port Out/Port In: Port Out is defined for Number Portability as a ten digit number leaving the control of an old Network Service Provider (NSP) switch. Port In is defined for Number Portability as a ten digit number being added to a new Network Service Provider (NSP) switch. Port Service: Used to request an Unbundled Network Element (UNE) which represents the capability derived from the central office switch required to permit end users to transmit and receive information over the Network Service Provider's (NSP) public switched network. The port provides service enabling network features and functionality such as translations, telephone number, switching, announcements, supervision, and touch-tone capability. In addition, a port with outgoing network access also provides access to other services such as operator services, long distance services, etc. It also includes connectivity from the switch to the Main Distribution Frame (MDF). Port Service (Unbundled Local Switching) Form: An Unbundled Local Switching (Port) is a line or trunk side connection from an ILEC Switch, cross connected to a frame. PortQual: Allows service providers to verify the portability of a subscriber’s wireline phone number at the time of initial order entry, without waiting for the order to fallout. POTS: Plain Old Telephone Service Pre-Order Process: Pre-Order identifies those functions that occur prior to the ordering of service. Those functions may include number assignment, appointment scheduling, feature/service availability and address validation. PRILOC: Primary Location PV: Programmable Validations Q QPR: Quantity of Port References (SECLOC) Queue: A backup of packets or messages waiting to be processed. R Receiver Code: Same as ICSC Remote Call Forwarding (RCF): An existing LEC service that redirects calls in the telephone network and can be adapted to provide a semblance of service provider number portability. Required Usage: An LSR field that must be populated. Resale (RS) form: Resale allows a CLEC to purchase SWB retail services in order to resell these 136 Wisor Proprietary and Confidential © 2008 Glossary services to their own end user. The CLEC may or may not be billed a discounted rate. Resale Services: Resale services are those bundled services where the service provider is different from the network provider. The Resale Service (RS) Form is used to request services purchased from a Network Service Provider (NSP) and provided to the end user customer by a Local Service Provider (LSP). Response Type: The type of response XML: Alternatives Exist; Found; Not Found; Restricted Retail: Those services that access customers can order from the service providers. Ring Form: All information required for ordering the first segment of ring services is provided in the various fields contained within the Ring and SALI Forms. The Ring Form provides entries for the specification of ordering options and describing the termination of the ring services. Additional segments of the ring service are ordered using the Additional Ring Information (ARI) and SALI Forms. Ring Service: A dedicated high capacity network. This network consists of fiber routed through internodal and/or interoffice facilities. Route Index (RI): Identifies the routing index to be used by the provider's switching equipment to forward/port the provider's telephone number to the customer's non-RCF trunk group. RS: Resale RSM: Retail Service Manager S SALI: Service Address Location Information is a form designed to consolidate the service address fields in the following forms: Transport, EUSA, MSL, RING, and/or ARI. SECLOC: Secondary Location Service Configuration: Contains what the components of the existing service are; e.g. Resale versus Facility Based. Service Manager (SM): A software system that provides a secure, mediated access gateway to enable interactions between retail network providers and multiple retailers. SM uses the support of existing Operations Support Systems to enable flow-through processing of retail local service requests. Service Order: A record that describes a customer request to establish, change, or terminate a service. It contains all information required to meet a customer's needs. Service Request Confirmation (SRC): Identifies or provides a series of responses to the customer's request, such as provisioning interval, estimated charges or BHMCs converted to a quantity of circuits. SM: Service Manager SMDB: Service Manager Database SOAP: Simple Object Access Protocol—SOAP is a lightweight protocol for exchange of information in a decentralized, distributed environment. SUP: A change/supplement that has been made to an existing service order. Wisor Proprietary and Confidential © 2008 137 Wisor VIRTUAL FRONT OFFICE 11.4 USER GUIDE T TAG: Telecommunications Access Gateway TCP/IP: Transmission Control Protocol/piped over Internet Protocol. tML: Telecommunications Markup Language TP (Trading Partner): The telecommunications network owner you are negotiating with (via VFO) for services and/or network access. Also called an Access Provider (AP). TR: Trouble Report Traffic: Originating traffic (OT) is one-way trunking from an ILEC to a CLEC. Terminating traffic (TT) is one-way trunking from a CLEC to an ILEC. OT/TT is two-way traffic between a CLEC and an ILEC. Transition Information: Contains which providers are: e.g. network, Number Portability, Directory. Also included is information specific to the service provided; e.g. loop circuit number. Translation Questionnaire (TQ) Form: This form is used by the customer to order: Translation, Routing, and/or SAC NXX Activity. Transport Service Request: This form is used by the customer to order: Narrow-band, Voice Grade, Unbundled Transport, Unbundled Multiplexing, Program Audio, Television, Wideband Analog, Wideband Digital, Digital Access, High Capacity, and/or DNAL. TRFD: Trouble Report Format Definition Trunk: Denotes a communications path connecting two switching systems in a network, used in the establishment of an end-to-end connection. Trunking Service Request: This form is used by the customer to order: Trunkside BSA; Trunking; FGB, C, D; Local Interconnection; Wireless Trunking; CCS Links and Unbundled STP Ports. TX From Date (MM/DD/YYYY): The first day of the date-range the inquiry was sent from VFO. TX Num: Transaction Number TX To Date (MM/DD/YYYY): The last day of the date-range the inquiry was sent from VFO. TX Type: Transaction Type U Unbundled Services: Services that can be ordered separately, such as port, number portability, listings, etc. UNE-P (Unbundled Network Element Platform): An end-to-end circuit made up of parts of an ILEC network. A UNE-P network may then be used by a CLEC to provide local services. UNE (Unbundled Network Element): Physical and functional parts of an ILEC network such as circuits, switches, etc. These are combined to form an end-to-end circuit, a UNE-P (platform). The UNE-P may then be used by a CLEC to provide local services. Universal Service Order (USO): A standard order for service, at a customer's request, commonly called a "service order." Universal Service Order Code (USOC): A three or five character code used on service orders to provide the information needed for billing and provisioning of services and equipment. 138 Wisor Proprietary and Confidential © 2008 Glossary URL: Uniform Resource Locator. An Internet address, as well as a standard method of naming files on the Web. A URL begins with a protocol name (such as http), followed by a colon and two slashes, followed by the name of the Internet server that the file is stored on, then the directories that hold the file, separated by forward slashes (/). The filename comes last. USOC: Universal Service Order Code V VC Form: All information required for ordering Virtual Connection services is provided in the various fields contained within the VC Form. The virtual circuit detail section provides entries for the specification of ordering options. The related circuit detail section provides entries for describing the information related to establishing the physical connection associated with the VC order. VFO: Virtual Front Office W Wholesale Services: Those services that resellers can order from the service providers. Wire Center (WC): Denotes a building in which one or more central offices, used for the provision of Telephone Exchange Services, are located. WKTEL: Working telephone number X XML: Extensible Markup Language Wisor Proprietary and Confidential © 2008 139