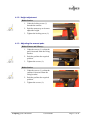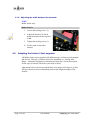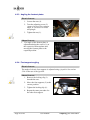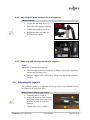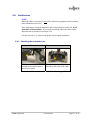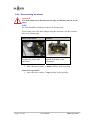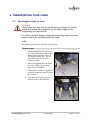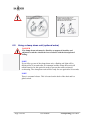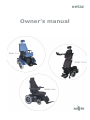
1
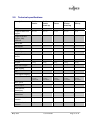
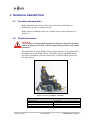
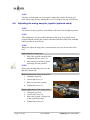
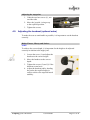
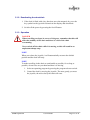
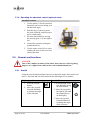
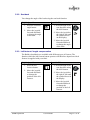
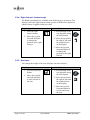
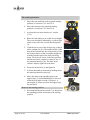
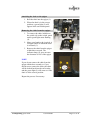
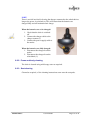
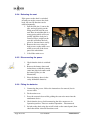
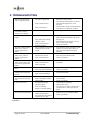
Owner’s manual
(This page is blank)
CONTENTS
1. INTRODUCTION.....................................................................................................................5
1.1.
Purpose of the product ....................................................................................................5
1.2.
Making your chair ready for use.....................................................................................5
1.3.
Individual labelling .........................................................................................................5
1.4.
Contact addresses if you require assistance ....................................................................5
1.5.
Use of hazard symbols ....................................................................................................6
1.6.
Available documentation ................................................................................................6
1.7.
The environment .............................................................................................................6
2. KEY DATA................................................................................................................................7
2.1.
Restrictions during normal use .......................................................................................7
2.1.1.
Number of people ........................................................................................................7
2.1.2.
Surfaces........................................................................................................................7
2.1.3.
Descending slopes........................................................................................................7
2.2.
Technical specifications..................................................................................................9
3. TECHNICAL DESCRIPTION..............................................................................................10
3.1.
Function and operation .................................................................................................10
3.2.
Physical structure ..........................................................................................................10
3.2.1.
Joystick ......................................................................................................................11
3.2.1.1. Dolphin joystick......................................................................................................11
3.2.1.2. Joystick G90............................................................................................................12
3.2.2.
Operating program .....................................................................................................13
3.2.3.
Wheelchair attachment points....................................................................................13
3.2.4.
Attendant control (optional extra)..............................................................................14
3.2.4.1. Fitting / removal......................................................................................................15
3.2.5.
Swing away for joystick (optional extra)...................................................................15
4. ADAPTING YOUR WHEELCHAIR ...................................................................................16
4.1.
Adapting the armrests ...................................................................................................16
4.1.1.
Angle adjustment .......................................................................................................16
4.1.2.
Height adjustment ......................................................................................................17
4.1.3.
Adjusting the armrest pads.........................................................................................17
4.1.4.
Adjusting the width between the armrests .................................................................18
4.2.
Adapting the footrest / foot supports ............................................................................18
4.2.1.
Length adjustment, electric footrests .........................................................................19
4.2.2.
Length adjustment, manual footrests .........................................................................19
4.2.3.
Angling the footrest plates .........................................................................................20
4.2.4.
Foot support angling ..................................................................................................20
4.2.5.
Adjusting the width between the foot supports..........................................................21
4.2.6.
4.3.
4.4.
4.5.
Removing and pivoting out the foot supports............................................................21
Adjusting the joystick ...................................................................................................21
Adjusting the swing away for joystick (optional extra)................................................22
Adjusting the headrest (optional extra).........................................................................23
5. CHAIR OPERATION ............................................................................................................24
5.1.
Activation, normal operation and deactivation.............................................................24
5.1.1.
Wheelchair activation ................................................................................................24
5.1.2.
Deactivating the wheelchair.......................................................................................25
5.1.3.
Operation....................................................................................................................25
5.1.4.
Operating the attendant control (optional extra)........................................................26
5.2.
General seat functions...................................................................................................26
5.2.1.
Seat tilt .......................................................................................................................26
5.2.2.
Seat back ....................................................................................................................27
5.2.3.
Left footrest / length compensation ...........................................................................27
5.2.4.
Right footrest / footrest angle ....................................................................................28
5.2.5.
Seat raise ....................................................................................................................28
5.3.
Stand up function ..........................................................................................................29
5.4.
Interference ...................................................................................................................31
5.4.1.
Checking the automatic fuse......................................................................................31
5.4.2.
Disconnecting the wheels ..........................................................................................32
6. TRANSPORTING YOUR CHAIR .......................................................................................33
6.1.
Securing the chair in a car.............................................................................................33
6.2.
Using a clamp down unit (optional extra).....................................................................34
6.3.
Transportation by air.....................................................................................................36
6.3.1.
Preparations prior to transportation by air .................................................................36
7. STORAGE ...............................................................................................................................37
8. MAINTENANCE....................................................................................................................38
8.1.
Maintenance – Overview ..............................................................................................38
8.2.
Maintenance procedures ...............................................................................................38
8.2.1.
Battery charging.........................................................................................................38
8.2.2.
Frame and body cleaning ...........................................................................................39
8.2.3.
Seat cleaning ..............................................................................................................39
8.2.4.
Releasing the seat.......................................................................................................40
8.2.5.
Disconnecting the power............................................................................................40
8.2.6.
Fitting the batteries ....................................................................................................40
8.2.7.
Tyres ..........................................................................................................................41
9. TROUBLESHOOTING .........................................................................................................42
10. OPTIONAL EXTRAS ............................................................................................................43
1. INTRODUCTION
1.1. Purpose of the product
Balder wheelchairs are multifunctional electric wheelchairs which are very
comfortable and highly flexible in terms of functionality. Balder wheelchairs
combine the qualities of an outdoor chair with the flexibility of an indoor
model and are designed for daily use in all situations.
1.2. Making your chair ready for use
Before you start to use your chair, we recommend that you make sure your
chair is adjusted to meet your own specific needs. Each chair comes with
simple control and adjustment options to help you sit as comfortably as
possible. Find out more about the control and adjustment options in the
technical description.
1.3. Individual labelling
All Balder wheelchairs are labelled individually with their own unique serial
number. This is located on the chassis, between the wheels.
Always quote the serial number of your chair if you require any assistance.
1.4. Contact addresses if you require assistance
Contact your local dealer or the Assistive Device Centre in your district if you
need any assistance. See also the troubleshooting list in section 9.
Introduction
User manual
Page 5 of 45
1.5. Use of hazard symbols
All warnings must be heeded in order to avoid injury to people or damage to
machinery or the environment. The following three hazard symbols will be
used in this book.
DANGER
If you do not follow these instructions, staff WILL be seriously injured.
WARNING
If you do not follow these instructions, machinery WILL be seriously
damaged.
NOTE
If you do not follow these instructions, staff MAY be injured or machinery or
the environment MAY be damaged.
1.6. Available documentation
If you have problems reading this manual, it is also available in electronic
format so that the text and pictures can be enlarged, etc. if so required. Contact
your local dealer if you need an electronic copy.
1.7. The environment
These chairs must be sorted at source in accordance with applicable
regulations on waste. Batteries and electronic equipment in particular must be
taken into account.
Page 6 of 45
User manual
Introduction
2. KEY DATA
2.1. Restrictions during normal use
2.1.1. Number of people
All Balder wheelchairs are designed to transport one – 1 – person.
Never allow anyone else to ride with you, either behind you or on the footrests.
2.1.2. Surfaces
DANGER
Take care when using the wheelchair on uneven, wet or slippery surfaces
(gravel, loose sand/earth, wet grass, etc.). These are conditions in which
you could overturn or lose control of your chair.
Bear in mind that negotiating obstacles can involve a risk of overturning.
Remember that your chair is heavy. Do not travel in areas where there is
a risk of the surface on which you are travelling collapsing.
Avoid travelling through water more than 7 cm deep. This may damage
the electric motor and systems, as well as the battery.
When travelling on slopes in excess of 6 degrees, remember that this will
affect the stability of the chair and there is a risk of the chair
overturning.
2.1.3. Descending slopes
NOTE
When your vehicle drives downhill, the motor generates energy. This
energy charges the battery. However, if the battery is already fully
charged, it cannot accept the generated energy anymore. When this
happens the battery voltage becomes too high, which can result in
damage to either the controller or the batteries. The controller will try to
prevent this damage and if needed it will ultimately force the vehicle to
halt abruptly.
When you go downhill at a slower speed, the motor will generate less
energy. The batteries will have more time to absorb this energy before
they are fully charged. This will reduce the risk of a sudden halt, and it
will extend the life of the batteries.
Key data
User manual
Page 7 of 45
To have a smooth journey downhill:
Page 8 of 45
x
Select a drive profile that has a lower maximum speed
x
If your vehicle has lights, turn them on. The lights will use
energy, and as a result less energy will go to the batteries. This
allows you to go downhill at a slightly faster speed than with the
lights off.
x
When the LEDs of the battery gauge start to flash as a warning
that the batteries are overcharging, do not ignore this warning.
Drive at a lower speed. If you do not slow down, you will damage
the batteries. When your speed has been too fast for too long,
the vehicle will halt to prevent more damage.
x
If you often need to go downhill with fully charged batteries, ask
your installer/technician/therapist to optimize the program values
of your chair for your situation.
User manual
Key data
2.2. Technical specifications
Description
Balder
Junior
Balder
Junior
Stand up
Balder
Finesse
Balder
Finesse
Stand up
Balder
Liberty
Width
64 cm
64 cm
64 cm
64 cm
65 cm
Length without foot
support
88.3 cm
88.3 cm
88.3 cm
88.3 cm
83 cm
Length with foot
support, fully
retracted
113 cm
113 cm
113 cm
113 cm
110 cm
Seat width
30 - 35 cm
32.5 cm
40 -48 cm
40 -48 cm
40 - 48 cm
Seat depths
35 - 40 cm
37.5 cm
40 -52.5 cm
40 -52.5 cm
40 - 52.5 cm
Seat height
38 - 82 cm
38 - 82 cm
38 -82 cm
38 -82 cm
39.5 – 83.5 cm
Back height
40 -42 cm
41 cm
44 - 62 cm
44 -62 cm
44 - 62 cm
Height beneath
chassis
7 cm
7 cm
7 cm
7 cm
8.5 cm
Axle spacing
61.5 cm
61.5 cm
61.5 cm
61.5 cm
52 cm
Weight
126 kg
130 kg
130 kg
140 kg
130 kg
Max. user weight
75 kg
75 kg
120 kg
100 kg
120 kg
Back angling
0° to 90°
0° to 90°
0° to 90°
0° to 90°
0° to 90°
Tilt
-15° to 45°
-15° to 15°
-15° to 45°
-15° to 15°
-15° to 45°
Foot support angling
0° to 90°
0° to 90°
0° to 90°
0° to 90°
0° to 90°
Batteries
Sonnenschein
A-500C
GF12044Y
Sonnenschein
A-500C
GF12044Y
Sonnenschein
A-500C
GF12044Y
Sonnenschein
A-500C
GF12044Y
Sonnenschein
A-500C
GF12044Y
Max. speed
7 km / h
7 km / h
7 km / h
7 km / h
8 km / h
Travel, up to
50 km
50 km
50 km
50 km
50 km
Front wheels,
dimensions
3 x 8"
3 x 8"
3 x 8"
3 x 8"
2.8/2.5 x 4"
Rear wheels,
dimensions
2.5 x 3"
2.5 x 3"
2.5 x 3"
2.5 x 3"
3.5 x 8"
Front wheels, air
pressure
30 psi
Puncture-free
30 psi
Puncture-free
40 psi
Rear wheels, air
pressure
50 psi
Puncture-free
50 psi
Puncture-free
30 psi
Key data
User manual
Page 9 of 45
3. TECHNICAL DESCRIPTION
3.1. Function and operation
Balder wheelchairs are electric. The electric functions of this chair are
controlled by joystick or function switch.
Balder Finesse and Balder Junior are available with a vertical function. See
section 5.3.
3.2. Physical structure
DANGER
Do not remove or disassemble equipment which may affect the operation
and/or functions of the chair. Contact authorised personnel if you require
assistance.
The illustration shows the Balder Finesse, but the structure is also applicable to
the Balder Junior and Balder Liberty. The Balder Finesse and Balder Junior
are electric wheelchairs with front wheel drive, while the Balder Liberty has
rear wheel drive.
Figure 1 Overview of a Balder wheelchair
Key:
1. Neck support
2. Back
3. Joystick
4. Seat
Page 10 of 45
5. Leg pads
6. Footplates
7. Battery (located beneath the chassis)
8. Armrests
User manual
Technical description
3.2.1. Joystick
The chair is supplied with a programmable joystick. This joystick is
programmed by the manufacturer depending on the specifications of the chair.
3.2.1.1.
Dolphin joystick
Figure 2 - Dolphin joystick
1
System status /
indicator lamp
9
Right footrest /
footrest angle
2
Battery indicator *)
10
eat tilt
3
On/off switch
11
Key function (sensor)
4
Right indicator
(accessory)
12
Left footrest / length
compensation
5
Program selection
display
13
Seat back angle
6
Horn
14
Hazard warning
lights (accessory)
7
Lights (accessory)
15
Program selector
8
Seat raise
16
Left indicator
(accessory)
*) 3 red, 4 yellow and 3 green LEDs will be on when the battery is at full
capacity. These will gradually go out as the remaining battery capacity is
reduced.
Technical description
User manual
Page 11 of 45
3.2.1.2.
Joystick G90
Figure 3 – Joystick G90
2
System status /
indicator lamp
Battery indicator *)
11 Right footrest / footrest
angle
12 eat tilt
3
On/off switch
13 Key function (sensor)
4
Right indicator
(accessory)
Program selection
display
14 Left footrest / length
compensation
15 Seat back angle
6
Horn
16 Hazard warning lights
(accessory)
7
Lights (accessory)
17 Program selector
8
Light (accessory)
18 Left indicator (accessory)
9
Light Mode
(accessory)
19 ASK (seat functions,
Lights, ECU)
1
5
10 Seat raise
*) 2 red, 2 yellow and 2 green LEDs will be on when the battery is at full
capacity. These will gradually go out as the remaining battery capacity is
reduced.
Page 12 of 45
User manual
Technical description
3.2.2. Operating program
This chair is preprogrammed with five different default operating programs.
The illuminated display shows the program or function that you are using.
The operating program is selected by pressing the program
selector switch.
The various operating programs are as follows:
1. An operating program in which emphasis is placed on quiet movements
and low speed, a typical program which can be used where there is not
much space and precise movement is important.
2. An operating program very like program 1, but with slightly faster
reactions to joystick movements.
3. An operating program defined according to average values. This
program is ideal the first time you use the chair.
4. Programs which are intended to be used as standard once you have
learned how the chair reacts and feel secure in all situations. This
program is created to allow rapid feedback to your control operations,
maximum speed and rapid application of the motor brake.
5. This program is designed for outdoor operation and gives maximum
forward propulsion without being too sensitive to minor corrections.
3.2.3. Wheelchair attachment points
There are attachments on the wheelchair – 2 in front (1) and 1 ring (2) at the
rear. These are indicated by means of symbols as shown in the illustration.
Front:
Rear:
For securing the wheelchair during transportation, see section 1.
Technical description
User manual
Page 13 of 45
3.2.4. Attendant control (optional extra)
All Balder chairs are available with attendant control. This guide describes a
standard attendant control. See also section 5.4.1 for more information.
Attendant control:
1. Fixing bracket
2. Panel for electrical functions
3. Ring for moving the wheelchair
forwards or backwards.
4. Speed regulator
5. Ring for turning the chair
6. Switches for changing the
attendant control angle
7. Rotary switch for selecting
whether the user or the escort is to
control the chair
Page 14 of 45
User manual
Technical description
3.2.4.1.
Fitting / removal
If the chair is fitted with a removable attendant control, this can be
attached/removed as follows.
Attendant control:
Fitting:
1. Place the attendant control in the
groove (1) at the back of the chair.
2. Tighten the stop screw (2).
3. Connect the cables for the joystick
and control panel.
4. Change the angle of the attendant
control by pulling out the switches
(3) and adjusting it. Release the
switches when the required angle
has been attained.
Removal:
1. Remove by loosening the stop
screw (2).
2. Disconnect the cables to the
joystick and control panel.
3. Pull the attendant control out of
the groove (1).
3.2.5. Swing away for joystick (optional extra)
Swing away for joystick:
All Balder chairs are available with
swing away (1) for the joystick.
The swing away makes the
positioning and accessibility of the
joystick more flexible.
See section 4.4 for a description of
the fitting and adjustment of this.
Technical description
User manual
Page 15 of 45
4. ADAPTING YOUR WHEELCHAIR
Before starting to use your wheelchair, it is important to make sure that it is
adjusted to suit you so as to ensure optimum comfort. You will be helped with
this when your chair is delivered. If you want to change your chair settings
afterwards, you can do this by contacting either your supplier or other suitable
staff.
4.1. Adapting the armrests
For optimum comfort, it is important that you find the ideal position between
resting and supporting your arms without restricting your freedom of
movement.
4.1.1. Angle adjustment
Balder Finesse and Liberty:
1. Undo the screws (1) on the
back cover.
2. Remove the back cover.
3. Loosen the nut and adjust the
screw (2) to change the angle
of the armrest tubes, and also
the height.
4. Do the same for the armrest on
the other side.
5. Tighten the screws, place the
back cover (1) in position.
Page 16 of 45
User manual
Adapting your wheelchair
4.1.2. Height adjustment
Balder Junior:
1. Undo the locking screw (1)
beneath the armrest.
2. Push the armrest up or down to
adjust the height.
3. Tighten the locking screw (1).
4.1.3. Adjusting the armrest pads
Balder Finesse and Liberty:
1. Undo the screws (1) so that the
pad is loosened from the fixing
bracket.
2. Push the pad into the required
position.
3. Tighten the screws (1).
Balder Junior:
1. Undo the screws (1) so that the
cushion is loosened from the
fixing bracket.
2. Push the pad into the required
position.
3. Tighten the screws (1).
Adapting your wheelchair
User manual
Page 17 of 45
4.1.4. Adjusting the width between the armrests
NOTE
Balder Junior only.
Balder Junior:
1. Loosen the locking screw (1).
2. Adjust the bracket (2) which
holds the armrest at the required
width.
3. Tighten the locking screw (1).
4. Do the same for the other
armrest.
4.2. Adapting the footrest / foot supports
All Balder chairs can be supplied with different types of footrest, both manual
and electric. The type of footrest selected is dependent on – among other
things – what other equipment or functions the chair has. See the description
for the type of footrest with which your chair is fitted.
Adjustment is best carried out with the knee at an angle of 90 degrees, as this
will give the most correct relationship between the length and angle of the
footrest.
Page 18 of 45
User manual
Adapting your wheelchair
4.2.1. Length adjustment, electric footrests
1. Loosen the setting screws (1) at
the back of the brackets for
footrest plates.
2. Adjust to the required height.
3. Tighten the setting screws (1).
4. Test the footrest function once
the footrests have been adjusted
by moving them to their
outermost positions.
The illustration shows a footrest with
electric tilt and length compensation, but
this procedure is the same for all electric
footrests.
4.2.2. Length adjustment, manual footrests
1. Remove the lock screw (1).
2. Adjust the lower part of the foot
support (2) to the required
position.
3. Put back the locking clip (1).
4. Repeat the same procedure for
the other foot support.
Adapting your wheelchair
User manual
Page 19 of 45
4.2.3. Angling the footrest plates
Electric footrest:
1. Loosen the nuts (1).
2. Turn the adjusting screw (2)
counterclockwise for a steeper
angle, or clockwise for a less
steep angle.
3. Tighten the nut (1).
Manual footrest:
1.
The angle of the footrest plate is
adjusted undoing the screws (1) on
the respective footrest plates and
moving the footrest plate to the
required position.
4.2.4. Foot support angling
Electric footrest:
The angle of electric foot supports is adjusted using a joystick. See section
5.2.4 on the use of the joystick.
Manual footrest:
1. Remove the locking clip (1)
beneath the seat.
2. Move the foot supports (2) to the
correct position.
3. Tighten the locking clip (1).
4. Repeat the same procedure for
the other foot support.
Page 20 of 45
User manual
Adapting your wheelchair
4.2.5. Adjusting the width between the foot supports
Manual footrest:
1. Loosen the attaching screw (1).
2. Move the foot supports sideways.
3. Tighten the attaching screw (1).
4. Repeat the same procedure for
the other foot support.
4.2.6. Removing and pivoting out the foot supports
NOTE
Applicable to manual foot supports.
x
The foot support can be pivoted out by lifting it up from the attaching
bracket and pivoting it out.
x
The foot support can be lifted off by lifting it up and off the attaching
bracket.
4.3. Adjusting the joystick
For optimum comfort, it is important for the joystick to be positioned correctly
in relation to the arm of the user.
Balder Finesse, Liberty and Junior:
1. Undo the screws (1 and 2).
2. Adjust the location of the bracket
according to how far forward you
want the joystick to sit on the
armrest.
3. Tighten the screws (1 and 2).
Adapting your wheelchair
User manual
Page 21 of 45
NOTE
You have to undo both screws in order to adjust the joystick forwards and
back, but to angle merely undoing the screw (2) using a star grip is sufficient.
4.4. Adjusting the swing away for joystick (optional extra)
NOTE
You can lower the joystick by a maximum of 20 mm from its highest position.
NOTE
After adjusting it, you must check that the swing away for joystick can be
pivoted without coming into contact with other elements of the chair, and that
cables are able to move freely.
NOTE
When you adjust the stop point, you must make sure you do not remove the
seal.
Tightening the swing away:
1. Move the joystick carefully while
tightening the hex screw (1).
2. Stop when you feel the joystick
becoming fixed in position.
NOTE
Do not turn the adjusting screws so far
that they bottom out.
Height adjustment of the swing away:
1. Clamp the joystick.
2. Loosen the screw (1).
3. Raise or lower the joystick.
4. Tighten the screw (1).
Depth adjustment of the swing away:
1. Clamp the joystick.
2. Loosen the screws (2).
3. Move the joystick / swing away
to the required position.
4. Tighten the screws (2).
Page 22 of 45
User manual
Adapting your wheelchair
Adjusting the stop point:
1. Undo the two hex screws (1), one
on either side.
2. Move the joystick / swing away
to the required position.
3. Tighten the screws.
4.5. Adjusting the headrest (optional extra)
To make the seat as comfortable as possible, it is important to set the headrest
correctly.
Balder Finesse, Liberty and Junior:
NOTE
To achieve the correct depth, it is important for the height to be adjusted
correctly in relation to the angle joint.
1. Loosen the screw (1) and adjust the
headrest to the correct height.
2. Move the headrest to the correct
depth.
3. Tighten the screws (2) and (3) if the
headrest seems loose.
4. Adjust the headrest pad by bending
the pad to the required angle in
order to achieve the required lateral
stability.
Adapting your wheelchair
User manual
Page 23 of 45
5. CHAIR OPERATION
DANGER
If the chair is exposed to direct sunlight or other heat sources, there may
be a risk of burning.
5.1. Activation, normal operation and deactivation
5.1.1. Wheelchair activation
Action:
Balder Junior and Finesse:
Balder Liberty:
Dolphin joystick:
Joystick G90:
1. Make sure that
the release
handles are in
Operation
position (1).
2. Press the
On/off switch
(2).
3. Activate the
key function
(3) if the chair
is fitted with
this by moving
the magnetic
key over the
key symbol on
the joystick.
Page 24 of 45
User manual
Chair operation
5.1.2. Deactivating the wheelchair
1. If the chair is fitted with a key function, move the magnetic key over the
key symbol on the joystick to deactivate the display and wheelchair.
2. Switch off the power by pressing the On/off button.
5.1.3. Operation
DANGER
When travelling on slopes in excess of 6 degrees, remember that this will
affect the stability of the chair and there is a risk of the chair
overturning.
Never switch off the chair while it is moving, as this will result in an
unpleasant abrupt stop.
NOTE
When you release the joystick, it will automatically return to the default
position and the chair will stop.
NOTE
To make travelling in the chair as comfortable as possible, for as long as
possible, do not focus on your hand and how it is moving.
1. Select an operating program by pressing the program selector switch.
2. Control the chair by moving the joystick. The more gently you move
the joystick, the more slowly the chair will react.
Chair operation
User manual
Page 25 of 45
5.1.4. Operating the attendant control (optional extra)
Attendant control:
1. Use the panel (1) for the electrical
functions such as seat raising, seat
tilt and back angle.
2. Push the ring (2) down to move
the chair forwards, and lift it up to
move it backwards.
3. Pivot the wheelchair by moving
the steering gear (3) to the right or
left.
4. Control the speed by turning the
potentiometer (4).
5. Use the rotary switch (5) to select
whether the user or the escort is to
control the chair
5.2. General seat functions
DANGER
Due to the complex structure of the chair, there may be a risk of getting
fingers, etc. caught in the chair in the event of unintentional use.
5.2.1. Seat tilt
Using the seat tilt function allows the user to adjust the angle of the entire seat
unit; i.e. the back and seat will remain at the same angle to one another.
Dolphin joystick:
Joystick G90:
1. Press the seat tilt
button.
2. Move the joystick
forwards and back
to change the angle
of the seat unit.
1. Scroll through to the
seat functions using
the ASK button.
2. Move the joystick to
the right or left until
the symbol shows
on the display.
3. Move the joystick
forwards and back
to change the angle
of the seat unit.
Page 26 of 45
User manual
Chair operation
5.2.2. Seat back
You change the angle of the back using the seat back function.
Dolphin joystick:
Joystick G90:
1. Press the seat back
angle button.
1. Scroll through to the
seat functions using
the ASK button.
2. Move the joystick
forwards and back
to change the angle
of the back.
2. Move the joystick to
the right or left until
the symbol shows
on the display.
3. Move the joystick
forwards and back
to change the angle
of the back.
5.2.3. Left footrest / length compensation
The Balder wheelchairs are available with different types of footrest. The
function which the left footrest button operates will therefore depend on which
footrest is supplied with your chair.
Dolphin joystick:
Joystick G90:
1. Press the left
footrest button.
1. Scroll through to the
seat functions using
the ASK button.
2. Move the joystick
forwards and back
to change the
position of the left
footrest.
2. Move the joystick to
the right or left until
the symbol shows in
the display.
3. Move the joystick
forwards and back
to change the
position of the left
footrest.
Chair operation
User manual
Page 27 of 45
5.2.4. Right footrest / footrest angle
The Balder wheelchairs are available with different types of footrest. The
function which the right footrest button operates will therefore depend on
which footrest is supplied with your chair.
Dolphin joystick:
Joystick G90:
1. Press the right
footrest button.
2. Move the joystick
forwards and back
to change the
position of the right
footrest.
1. Scroll through to the
seat functions using
the ASK button.
2. Move the joystick to
the right or left until
the symbol shows
on the display.
3. Move the joystick
forwards and back
to change the
position of the right
footrest.
5.2.5. Seat raise
You change the height of the seat using the seat raise function.
Dolphin joystick:
Joystick G90:
1. Press the seat raise
button.
2. Move the joystick
forwards and back
to raise and lower
the seat.
1. Scroll through to the
seat functions using
the ASK button.
2. Move the joystick to
the right or left until
the symbol shows
on the display.
3. Move the joystick
forwards and back
to raise and lower
the seat.
Page 28 of 45
User manual
Chair operation
5.3. Stand up function
Balder Finesse and Balder Junior are available with a stand up function. Read
this section if it is applicable to your wheelchair.
DANGER
When in standing position, the wheelchair must only be used indoors and
on a flat surface.
NOTE
The starting position is the position to which the chair will return when you
switch back from standing position.
NOTE
It is important to adjust the footrest into the correct position before switching
to standing position, as this function will not be available once the chair is in
this position.
NOTE
If you use the stand up function from horizontal position, the abduction pad
must not be put on until the legs are in the horizontal position.
NOTE
When the support legs are activated, the stand up function will stop for a
moment to wait for the support legs to move into the correct position. If the
support legs cannot be activated automatically, a green light will flash on the
stand up function panel. In this instance, return to the starting position, move
the chair slightly and try again.
NOTE
In standing position, only the back will be adjustable, to a restricted extent.
The footrest, raise and tilt functions are disabled for safety reasons while the
chair is in the upright position.
NOTE
The chair can be programmed so that the back cannot be operated or adjusted
while the chair is in standing position.
NOTE
The fixings for the stand up function, knee brace cushion and chest belt, do not
replace a safety belt in a car. Ensure correct fixing for use of the stand up
function.
Chair operation
User manual
Page 29 of 45
The stand up function:
1. Move the seat and back to the required starting
position (cf. sections 5.2.1 and 5.2.2)
2. Move the footrest to the required starting
position (cf. sections 5.2.3 and 5.2.4)
3. Activate the seat raise function (cf. section
5.2.5).
4. Raise the seat until you are at the correct height.
The correct height is indicated by a yellow light
which comes on in the vertical function panel
(1).
5. Push the lower part of the lock pin up, so that it
sticks straight out (2a). Thread the buckle of the
knee brace cushion into the fixing bracket. Push
the lock pin back, so that it remains straight up,
with the broadest part of the lock pin facing
down. The lock pin is now in the lock position,
and the knee brace cushion is ready for use of
the stand up function (2b). The knee brace
cushion must be tight below the knee.
6. Put on the breast belt (3) and tighten it
7. Activate the stand up function by holding down
the stand up function switch (4).
8. Move the chair to the upright position, the
support legs (5) will automatically be lowered
when the seat angle exceeds 15 degrees. A
green light (6) comes on when the support legs
are activated.
Return to the starting position:
1. Press and hold down the switch (7) to deactivate
the standing position and return to the starting
position.
Page 30 of 45
User manual
Chair operation
5.4. Interference
NOTE
When the chair is activated, it may affect electrical equipment which contains
radio transmitters/receivers.
If the chair stops, check the automatic fuse as described in section 5.4.1Feil!
Fant ikke referansekilden.. If you need to push the chair, the chair can be
disconnected as described in section 5.4.2.
See also section 9, or contact your dealer if you require assistance.
5.4.1. Checking the automatic fuse
Junior and Finesse:
Liberty:
The automatic fuse (1) is
The automatic fuse (1) is
located on the chassis next to
located on the back of the chair.
the left rear wheel.
1. Push in the automatic fuse (1) if it has been tripped.
Chair operation
User manual
Page 31 of 45
5.4.2. Disconnecting the wheels
DANGER
The chair must not be disconnected on slope, as this may cause it to roll
away!
NOTE
The chair should be switched off when it is disconnected.
If you need to move the chair without using the electronics, the drive motors
have to be disconnected.
Junior and Finesse:
Liberty:
The disconnection switches are The disconnection switches are
located at the front of the
located at the back of the
wheelchair.
wheelchair.
Disconnect:
1. Move the two switches (1) down until they lock in position.
Connect for operation:
1. Move the two switches (1) up until they lock in position.
Page 32 of 45
User manual
Chair operation
6. TRANSPORTING YOUR CHAIR
6.1. Securing the chair in a car
DANGER
Always make sure your chair is secured when you transport it. Always
ensure that the attaching equipment you are using is approved for
transporting your chair in a car.
To secure your chair during transportation, the fixing rings on the chair
must be used as the attachment points for straps.
NOTE
The illustrations show the Q-straint strap system.
Manual straps:
1. Attach and tighten the front straps
(1) to the attachment points at the
front of the wheelchair. There is
one strap on either side. This is
done when the chair is in the
correct position.
2. Attach and tighten the rear straps
(2) to the fixing ring (3) at the
back of the wheelchair.
3. Check that the straps are tightened
properly so that the chair does not
move about.
4. Push down the locking catch to
lock the chair in this position.
Transporting your chair
User manual
Page 33 of 45
MAKE SURE THAT ARMRESTS, WHEELS AND
OTHER COMPONENTS DO NOT PREVENT
BODY CONTACT. THERE MUST BE FULL BODY
CONTACT WITH THE 3-POINT STRAP.
MAKE SURE YOU ALWAYS USE THE
ORIGINAL FIXING EQUIPMENT, IN
ADDITION TO THE EQUIPMENT THAT HAS
BEEN MOUNTED ON THE CHAIR.
6.2. Using a clamp down unit (optional extra)
DANGER
The clamp down unit must be fitted by an approved installer and
adjusted to suit the wheelchair in accordance with the description of
fitting.
NOTE
If you fail to get out of the clamp down unit, a flashing red light will be
displayed for 90 seconds after five attempts and the clamp down unit will
remain inactive for this period in order to prevent the release solenoid
overheating. The clamp down unit will be ready for use again after 90 seconds.
NOTE
There is a manual release. This is located on the back of the chair and is a
gilted switch.
Page 34 of 45
User manual
Transporting your chair
Attaching the chair to the spigot:
1. Roll the chair into the spigot (1).
2. When the chair is in the correct
position, a green light (2) will
appear in the car bracket panel.
Removing the chair from the sspigot:
1. To remove the chair, hold down
the switch (4) on the switch panel
until a green light starts flashing
(2).
2. Move your hand to the joystick. A
red light comes on when the chair
is released (3).
3. Remove the chair from the spigot
within three seconds. The
indicator lamp (2) goes out once
the character is free of the spigot.
NOTE
If you do not remove the chair from the
spigot within three seconds, or if you
decide not to remove the chair, the chair
will be locked back into the car bracket
and the green light (2) will come on if the
chair is in the correct position.
Repeat the process if necessary.
Transporting your chair
User manual
Page 35 of 45
6.3. Transportation by air
NOTE
Balder wheelchairs are supplied in many specially adapted variants, so
equipment may be fitted which has to be removed in addition to what is
described here.
Balder wheelchairs are supplied as standard ex works with Sonnenschein dryfit
gel batteries. These batteries are approved in accordance with IATA
Dangerous Goods Regulations – Packing Instructions 806 and Special
provision A67. The batteries must be labelled with IATA labels. This means
that the batteries are approved for transportation by air. If a situation
nevertheless occurs in which it is necessary to physically disconnect the power
supply from the battery poles, see section 8.2.5 on battery removal.
6.3.1. Preparations prior to transportation by air
You have to make a few preparations prior to removing items in order to
ensure that the chair takes up as little physical space as possible while being
transported.
1. Use the electrical functions on the control panel and move the electric
seat tilt so that the seat pad is more or less horizontal.
2. Move the electric back up to approx. 110 degrees to the seat pad.
3. Move the electric footrests upwards and inwards as far as possible
without them catching on the floor.
4. Move the electric seat raise as far down as possible.
5. Switch off the electrical functions using the on/off button on the
control panel.
Page 36 of 45
User manual
Transporting your chair
7. STORAGE
WARNING
Never leave the batteries standing for a long time fully discharged. If the
chair is to be stored for a period of time, the batteries must be fully
charged once a month.
Your Balder wheelchair must be kept dry, protected from the elements and
preferably kept indoors. If you store your chair for any length of time without
it being used, the batteries must be disconnected.
STORAGE
User manual
Page 37 of 45
8. MAINTENANCE
8.1. Maintenance – Overview
Activity:
Frequency:
Battery charging
hours a day
Recommended service interval
After every 2500 hours of use / once a year
/ as required
Frame and body cleaning
As required
Seat cleaning
As required
8.2. Maintenance procedures
8.2.1. Battery charging
WARNING
Never leave the batteries standing for a long time fully discharged. If the
chair is to be stored for a period of time, the batteries must be fully
charged once a month.
Do not leave the charger connected to the wheelchair is the power cable is
not connected to the mains as this will cause the batteries to gradually
become discharged.
NOTE
To ensure top performance from the batteries, we recommend that the chair be
charged for eight hours a day. If this is not possible, you must ensure that the
chair is fully charged at least once a week.
NOTE
We recommend that batteries to be discarded should be handed to a specialist
centre in order to ensure that they are disposed of correctly.
NOTE
Only use the charger belonging to your wheelchair, and follow the user guide
for the charger as regards how the batteries are to be charged. The charging
point is the same for both types of joystick (Dolphin and Europa).
Page 38 of 45
User manual
Maintenance
NOTE
There is no risk involved in leaving the charger connected to the wheelchair as
long as the power is switched on. This will ensure that the batteries are
charged fully and will maintain their charge.
When the batteries are to be charged:
1. Check that the chair is switched
off.
2. Connect the charger cable to the
charger contact (1)
3. Connect the power supply cable to
the mains.
When the batteries are fully charged:
1. Disconnect the charger from the
mains.
2. Disconnect the charger from the
wheelchair (1).
8.2.2. Frame and body cleaning
The chair is cleaned using mild soapy water as required.
8.2.3. Seat cleaning
Cleaned as required; cf. the cleaning instructions sewn onto the seat pads.
Maintenance
User manual
Page 39 of 45
8.2.4. Releasing the seat
If the power to the chair is switched
off and you need to remove the chair
body, the seat lift function can be
released manually.
1. Pull the lock pin (1) out to the
side, and a gas spring on the
lifting arm will raise the seat
unit. Bear in mind that this is a
strong spring which will react
quickly when the lock pin is
removed. Place weight on the
seat: this will allow the lock
pin to be loosened more easily.
2. Remove the cover using six
body screws on the main cover
which covers all of the lower
part of the wheelchair.
3. Lift off the main cover.
8.2.5. Disconnecting the power
1. Check that the chair is switched
off.
2. Remove the battery shoes and
isolate these so that they cannot
come into physical contact with
the battery poles (see the
illustration).
3. Place the battery shoes in the
cavity behind the batteries.
8.2.6. Fitting the batteries
1. Connecting the power: follow the instructions for removal, but in
reverse order.
2. Fit the main cover.
3. Press the seat unit down while guiding the seat raise motor into the
attachment device.
4. Check that the levers for disconnecting the drive motors are in
Operation position. These are marked Operation – Disconnected.
5. Switch on the chair using the on/off switch on the control panel, then
check that all the electrical functions work.
Page 40 of 45
User manual
Maintenance
8.2.7. Tyres
Your Balder is fitted with either ordinary air-filled tyres or
puncture-free compact tyres.
Even with compact tyres, it is sensible to ensure that these are not worn or
damaged to an unreasonable extent.
If your chair is fitted with air-filled tyres and you happen to sustain a puncture,
contact authorised personnel. Avoid travelling in the chair when it has a
punctured tyre.
See technical specifications, section 2.2.
Maintenance
User manual
Page 41 of 45
9. TROUBLESHOOTING
1. What do you do when the
chair is completely dead?
-
The chair is unpowered.
-
Fault in the electronics.
-
-
Fault in the electrics.
-
2. The chair can be moved but
none of the electrical
functions are working?.
-
Fault in the electrics.
-
Contact your dealer.
3. The chair will not accept a
charge.
-
Fault in the charger.
-
-
Poor contact in the charge
contracts / cable.
Fault in the electronics.
Defective batteries.
Plug in the chair.
Make sure that the indicator lamp on the
charger is on.
If the indicator on the charger is not on,
there is a fault in the charger.
Contact your dealer.
-
-
Remove the charge contact.
Check that the on/off switch is set to On.
Check that the magnetic key is not
activated.
Check that the switches for disconnecting
the motor are in “Operation” position.
4. The chair’s indicator lamp
flashes once, with two
seconds’ gap between
flashes.
-
The joystick has to be purged of data for the rest of the
system.
Leave the chair on for 10 seconds, switch
it off for 10 seconds, then switch it on
again. The chair should be ready for
operation.
5. The chair’s indicator lamp
flashes twice, with two
seconds’ gap between
flashes.
-
The speed limited for the seat lift has been activated.
Fault in the electronics.
-
Not a fault. Lower the seat height until it is
below the speed reduction limit.
Contact your dealer.
6. The chair’s indicator lamp
flashes several times, with
two seconds’ gap between
flashes.
-
Fault in the joystick.
Fault in the electronics.
Fault in the cable.
Count the number of flashes, then contact
your dealer.
7. The chair is difficult to
move.
-
Incorrect operating program. Incorrectly adjusted program. -
Select a different operating program.
Contact your dealer.
8. The speed of the chair is
suddenly halved while it is
moving.
-
Seat position too high.
Fault in the speed limiter.
-
Check the seat height as the chair is fitted
with speed reduction.
9. Electric back function and
electric tilt move forwards
only.
-
Not a fault.
Fault in the limiter switches
and/or diodes.
-
Raise the seat so that the limiter switches
are not enabled.
Contact your dealer.
10. A part seems loose.
-
Not tightened enough.
Threads stripped.
Incorrect assembly
Impact or vibration damage.
-
11. Lift, tilt or back function
moves in one direction only. -
-
-
Fault on the tilt switch
Fault in the electronics.
Trap guard activated if this is mounted on your chair.
Check fitting or tightening.
Tighten loose screws.
If you are not sure what is wrong or how
you should fix it, contact your service
partner.
Check whether there are any foreign
bodies in the cover, and remove these.
Contact your dealer.
These points are intended to provide simple guidance. Contact your dealer for further
assistance.
Page 42 of 45
User manual
Troubleshooting
10.
OPTIONAL EXTRAS
Below is a list of some of the optional extras available for Balder electric
wheelchairs.
Item
Bag with the Balder logo, black
Bag with the Balder logo, small, black
Fixing bar for ruck-sack/bag F/L
Fixing bar for ruck-sack/bag Junior
Kneepads, removable (set), F/L
Thigh supports, removable (set), F/L
Support pads, knees/thighs, Balder Junior, 6x11 cm
Support pads, knees/thighs, Balder Junior, 6x20 cm
Support pads, back, Balder F/L, Comfort 1-3
Support pads, back, Balder F/L, Comfort 4-6
Support pads, back, Balder Junior, 6x11 cm
Attendant control 2
Attendant control with emergency stop function
Separate switch panel with all functions
Optional extras
User manual
Page 43 of 45
This information is subject to change without warning and must not be perceived as
constituting obligations on the part of Hand-Pro AS. Hand-Pro AS undertakes no
responsibility for any errors which may appear in this document. The content of this
document is to be regarded as the property of Hand-Pro AS and must not be used in a
commercial context without the permission of Hand-Pro AS.
Rev.5, 06.06.2007
HAND-PRO AS
Benterudgaten
N-3504 Hønefoss
Etac Norway
Postboks 249, Bråtengt. 66
1501 Moss
Tel. + 47 69 27 59 80
Fax. + 47 69 27 09 11
www.etac.no
Etac Sweden AB
Box 203
334 24 Anderstorp
Tel. + 46 0371 58 73 00
Fax + 46 0371 58 73 90
www.etac.se
Etac Denmark
Parallelvej 1
8751 Gedved
Tel. + 45 79 68 58 33
Fax + 45 75 66 52 57
www.etac.dk
Balder UK
24 Murrell Green Business Park
London Road, Hook, Hampshire, RG27 9GR
Tel. + 44 0125 6 767181
Fax +44 0125 6 768887
www.balder.co.uk
Mobility Vertriebs, Austria
IZ NÖ Süd Strasse 14, Objekt 31
A-2351 Wr. Neudorf
Tel. + 43 14 09 22 33
Fax. + 43 14 09 22 33 4
www.lifter.at
Ato-Form, Switzerland
Binningerstrasse 110 d
Postfach 345
CH-4123 Allschwil
Tel. + 41 61 48 79 44 4
Fax. + 41 61 48 79 94 49
www.ato-form.ch
B&S Comfort, Holland
Kathodeweg 5
1627 LK Hoorn
+31 229 28 50 20
+31 229 28 50 11
www.bscomfort.nl
Jón Eiriksson, Iceland
Hlidasmari 9
200Kopavogur
+ 354 56 42 82 0
+ 354 56 42 42 0
www.je.is
Balder USA
580 TC Jester
Houston, TX 77284
Toll-free: 1 (888) 422-5337
Phone: (713) 864-1460
Fax: (713) 864-1469
www.balderusa.com
Etac GmbH, Germany
Bahnhofstr.131, 45770 Marl
Tel. +49 2365 98710
Fax. +49 2365 986115
www.etac.de
OSD Ortho Sanit Diffusion S.p.A. , Italy
Via Pallodola 48e
I-19038 Sarzana (SP)
Tel: +39 0187 6117
Fax: +39 0187 611900
www.osd.it