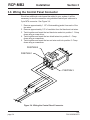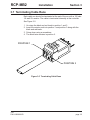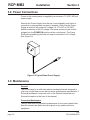
1
RCP-MB2 Control Panel
User's Manual
PESA Switching Systems
330A Wynn Drive
Huntsville, AL 35805
Document No. 81-9059-0347-0 Rev. B
Manual Updates:
07/15/95
Manual released for preliminary printing.
05/08/98
Manual released for as REV A.
03-02-01 Rev B: Deleted Printing Specification per ECO CE00113. GLT
Ordering Assistance,
Service & Inquiries
Service and
Ordering
Assistance
Sales Office
PESA Switching Systems, Inc.
330A Wynn Drive
Huntsville, AL 35805
Main Numbers:
Tel: (256) 726-9200
Fax: (256) 726-9271
Service Department Numbers:
Tel: (256) 726-9222
Fax: (256) 726-9268
National Sales Office
PESA Switching Systems, Inc.
35 Pinelawn Road, Suite 99E
Melville, NY 11747
Tel: (800) 328-1008
Fax: (516) 845-5023
NOTE
PESA reserves the right to change any information contained in this manual without notice. Unauthorized copying,
modifications, distribution, or display is prohibited. All rights
reserved.
Please address all comments or suggestions concerning
this or other PESA manuals to:
Publications Department
Attn: Charles E. Jaynes
(Engineering Technical Writer)
PESA Switching Systems, Inc.
330A Wynn Drive
Huntsville, Alabama 35805
(256) 726-9200 EXT. 145
[email protected]
ATTENTION
ATTENTION
ALL EQUIPMENT ITEMS MANUFACTURED BY OR SOLD BY PESA
SWITCHING SYSTEMS, INC. SHOULD
BE SERVICED BY QUALIFIED SERVICE PERSONNEL OR BY QUALIFIED
SERVICE TECHNICANS ONLY.
Table of Contents
RCP-MB2 Control Panel
Section 1. INTRODUCTION
1.1
1.2
1.3
Manual Overview ...................................................................... 1.1
General Description .................................................................. 1.1
Figure 1-1 RCP-MB2 Front and Rear Views ....................... 1.2
Specifications............................................................................ 1.2
Section 3. OPERATION
2.1
2.2
2.3
2.4
2.5
2.6
2.7
2.8
2.9
2.10
2.11
2.12
2.13
2.14
Introduction ............................................................................... 2.1
General ............................................................................... 2.1
Fubtional Description .......................................................... 2.1
Breakaway Operation ............................................................... 2.1
Hot Take Mode ................................................................... 2.2
Single Level Mode .............................................................. 2.3
Display Preset Mode ........................................................... 2.4
Split Operation .......................................................................... 2.5
Key Types ................................................................................. 2.6
Figure 2-1 RCP-MB2 Front View ........................................ 2.6
RCP-MB2 Modes of Operation ................................................. 2.7
Panel Configuration .................................................................. 2.9
Statusing ................................................................................... 2.10
Status by Default Status Level............................................ 2.10
Breakaway Statusing .......................................................... 2.11
Error Statusing .................................................................... 2.11
Hot Take/Hot Take Breakaway Mode ....................................... 2.12
Preset Display Mode ................................................................. 2.14
Store Preset Mode .................................................................... 2.16
Destination Select Mode ........................................................... 2.18
Salvo Select Mode .................................................................... 2.20
Chop Mode ............................................................................... 2.22
Single Level Mode .................................................................... 2.24
7/95
P/N 8195903470
i
Table of Contents
RCP-MB2 Control Panel
Section 3. INSTALLATION
3.1
3.2
3.3
3.4
3.5
3.6
3.7
3.8
3.9
ii
Introduction ............................................................................... 3.1
Receipt Inspection .................................................................... 3.1
Location and Mounting ............................................................. 3.1
Figure 3-1 Chassis Installation ........................................... 3.2
Polling Address ......................................................................... 3.2
Figure 3-2 DIP Switch Location .......................................... 3.3
Control Panel/Controller Interconnection .................................. 3.3
Figure 3-3 Typical Control Panel Interconnection ............... 3.3
Wiring the Control Panel Connector ......................................... 3.4
Figure 3-4 Wiring the Control Panel Connector .................. 3.4
Terminating Cable Runs ........................................................... 3.5
Figure 3-5 Terminating Cable Runs .................................... 3.5
Power Connections ................................................................... 3.6
Figure 3-6 Typical Panel Power Supply .............................. 3.6
Maintenance ............................................................................. 3.6
General ............................................................................... 3.6
Preventive Maintenance ..................................................... 3.6
Adjustment/Alignment ......................................................... 3.7
Factory Repair Service ....................................................... 3.7
7/95
P/N 8195903470
RCP-MB2
Introduction
Section 1
1.1 Manual Overview
This manual provides detailed instructions for installing and operating the
PESA RCP-MB2 Control Panel. This manual is divided into three sections
as shown.
Section 1, INTRODUCTION, summarizes the manual, describes the RCPMB2, presents a list of terms, and provides the panel specifications.
Section 2, OPERATION, provides a brief functional description and describes panel operational procedures.
Section 3, INSTALLATION, provides installation, setup, and maintenance
instructions.
1.2 General Description
The RCP-MB2 is a Rotary Multibus panel with a full complement of features allowing direct access and control of up to sixteen destinations at a
time. The panel allows an operator to directly view and control the status
of eight individual destinations. A single keystroke allows another eight
destinations to be displayed. A rotary selector is utilized for selection of
PRESETS and other panel functions including accessing additional destinations. With a single keystroke, a Preset selection can be transferred
ON-LINE to any one of the destinations.
The RCP-MB2 has an additional eight, user programmable pushbuttons
for instant access. These programmable pushbuttons can be configured
to represent sources or soft sources. Individual source assignments can
be changed locally at the panel if desired. With the capability to control up
to 8 individual switching levels, the RCP-MB2 can control any size switching system.
The Rotary Multibus has a large display area for immediate viewing of
panel MODE, LEVEL, and PRESET.
Full function operation modes include PRESET DISPLAY, DESTINATION
SELECT, STORE PRESET, SALVO SELECT, SINGLE LEVEL, AND
HOT TAKE/HOT TAKE BREAKAWAY. The panel also provides the ability
to PROTECT or LOCK selected destinations.
The RCP-MB2 Control Panel comes packaged in a standard 19" two rack
unit chassis requiring three inches of depth.
7/95
P/N 81905903470
page 1.1
RCP-MB2
Introduction
Section 1
1.2 General Description Continued:
Figure 1-1 RCP-MB2 Front and Rear View
1.3 Specifications
GENERAL
Mounting
Pushbuttons
INPUT
POWER
Voltage Requirements
MECHANICAL
Two Rack Units
ENVIRONMENTAL
Temperature
Humidity
page 1.2
Standard 19" Rack
Illuminated and Legendable
RS485
+7.5VDC @ 800mA
19"W x 3"D x 3 1/2" H
482.6mmx76.2mmx88.9mm
0°C to 40°C
20% to 90%
Non-Condensing
7/95
P/N 81905903470
RCP-MB2
Operations
Section 2
2.1 Introduction
Operations of the RCP-MB2 require that it be configured at the controller
console with the appropriate polling addressing assigned. Connections
and power up procedures should be performed on each panel controlled.
Refer to the Operations Section in your controller manual for setup.
General
All RCP-MB2 panels in a routing switcher system are custom configured
at the factory prior to shipment. The information needed to configure the
panels comes from the System Design Guide filled out by the customer.
However, if the system configuration changes, the RCP-MB2 can be
reconfigured on site using the control system configuration software.
Functional Description
The RCP-MB2 Control Panel contains two printed circuits boards; the
Switchcard and the CPU Board. The Switchcard contains the electronic
circuitry necessary for customer interface between the control panel and
the system controller via the RS485 communications circuitry on the CPU
Board. The Switchcard is responsible for scanning the control panel's
switches and rotary knob for customer actions. The Switchcard is also
responsible for providing visual displays to the user through the use of
LCD displays and switch LEDs. The CPU Board is responsible for interfacing with the system controller and controlling the operational functions
of the control panel. The heart of the CPU Board is a Motorola 68HC11
microprocessor. The microprocessor contains the peripheral circuitry
used to operate the control panel and is loaded with the control panel's
operational software.
2.2 Breakaway Operation
Breakaway allows you to select a source on a specific level to be taken to
a destination on that level. Breakaways can be accomplished in the Hot
Take, Single Level, or Display Preset modes of operation. The preferred
mode of operation for taking breakaways in is Hot Take but all methods of
taking breakaways are shown for your convenience.
7/95
P/N 81905903470
page 2.1
RCP-MB2
Operations
Section 2
2.2 Breakaway Operation Continued:
Hot Take Mode (Preferred)
Action:
1. Press the CLEAR Key.
Results:
Clears the contents of the Preset
Registers.
2. Select the desired source by
The source name selected will be
scrolling through the selections using shown in the Preset Display.
the Rotary Knob or by pressing a Data
Key.
3. Press the desired Level Key.
The level names are shown in the
Level Display. The Level Key is
illuminated. "HOT TAKE
BREAKAWAY" is displayed.
4. Press the desired Destination or
Soft Destination Key.
Takes the source on-line at the
specified level. "HOT TAKE" is
displayed.
5. Repeat step 4 to take the same
source on the same level to the other
destinations. Repeat steps 2-4 to
select other sources and levels.
page 2.2
7/95
P/N 81905903470
RCP-MB2
Operations
Section 2
2.2 Breakaway Operation Continued:
Single Level Mode
Action:
Results:
1. Depress the CLEAR Key
Clears the contents of the Preset
Registers.
2. Press the SINGLE LEVEL Key
SINGLE LEVEL Key lights. The
Rotary Knob is used to scroll through
the available sources. LEVEL Keys
are used to select a specific level to
control.
3. Press the desired LEVEL Key
The level names are shown in the
Level Display. The "All Levs"
selection represents all levels
assigned to the panel. This is the
default level selection. LEVEL Key is
illuminated.
4. Select the desired source on the
breakaway level by scrolling through
the valid source selections using the
Rotary Knob or by entering a
selection using the Data Keys.
The source name selected will be
shown in the Preset Display. Invalid
source names entered will blink.
5. Depress a DESTINATION or
SOFT DESTINATION Key.
Takes the source selected in the
Preset on-line to the selected level.
6. Steps 3-5 above can be repeated
as long as the user wishes to
continue to breakaway input
selections on the selected level.
7/95
P/N 81905903470
page 2.3
RCP-MB2
Operations
Section 2
2.2 Breakaway Operation Continued:
Display Preset Mode
NOTE: The desired source must be placed in the Preset Register prior to
executing a breakaway in the Display Preset Mode.
Action:
Results:
1.Press the desired Level Key.
The level names are shown in the
Level Display. The Level Key is
illuminated.
2. Press a Destination or Soft
Destination Key.
Takes the source selected in the
Preset on-line to the selected level.
3. Repeat step 2 to take the same
source on the same level to the other
destinations. Repeat steps 1-2 to
select a different level.
page 2.4
7/95
P/N 81905903470
RCP-MB2
Operations
Section 2
2.3 Split Operation
Split operation is like Breakaway operation but it allows you to perform a
breakaway on more than one level simultaneously.
To Make a Split Breakaway:
1. Depress the CLEAR Key.
Results:
Clears the contents of the Preset
Register.
2. Scroll through the sources using the The source name will be shown in the
Rotary Knob or by entering a selection Preset Display.
using the Data Keys.
3. Depress the desired Level Key.
The level names are shown in the
Level Display. The "ALL LEVS"
selection represents all levels
assigned to the panel. This is the
default level selection. The Level Key
is illuminated. "HOT TAKE
BREAKAWAY" is displayed.
4. Repeat steps 2-3 again.
Enters a breakaway source selection
on all levels desired.
5. Depress the desired Destination or
Soft Destination Key.
Takes all levels with a breakaway
source selection on-line. "HOT TAKE"
is displayed.
7/95
P/N 81905903470
page 2.5
RCP-MB2
Operations
Section 2
2.4 Key Types
Figure 2-1 RCP-MB2 Front View
Data Keys - The panel has eight Data Keys located on the left of the
panel and arranged as two columns of four keys each. Data Keys are
configurable at the controller as Source or Soft Source Keys.
Destination Keys - The panel has eight Destination/Soft Destination Keys
which are toward the left side of the panel and surround the Destination
Status Page Display. These keys represent two pages of eight destinations/soft destinations and are configurable from the controller. The area
of the Destination Status Page Display immediately above or below each
key shows the source currently switched to the destination assigned to the
key for the active page unless the panel is in Destination Select Mode or if
the DEST NAME Key is depressed. In the Destination Select Mode, the
name shown directly above or below each Destination Key is the name of
the destination assigned to that key for the active page. Select which page
of destinations to make active by pressing the PAGE1 or PAGE2 Keys.
PAGE 1 and PAGE 2 Keys - Used to select which page of eight destinations to make active (see preceding Destinations Keys description).
Rotary Knob - The panel has a Rotary Knob which allows the you to
scroll through valid Source, Destination, Salvo or Level selections depending on the active mode of the panel.
Function Keys - The panel has six function keys, two located above and
below the PAGE1 and PAGE2 Keys and four located on the far right side
of the panel. Most of the function keys are associated with two possible
functions. NOTE: The primary function is executed when the key is
held down less than one second. The secondary function is executed
when the key is held down more than one second. The four function
keys located on the far right side of the panel work as toggles. If a function
is currently enabled, pressing the associated Function Key in the same
fashion as before (less than or greater than one second) will disable it.
page 2.6
7/95
P/N 81905903470
RCP-MB2
Operations
Section 2
2.4 Key Types Continued:
Level Keys - The panel has eight level keys located between the Rotary
Knob and the four function keys located on the far right side of the control
panel. These keys are used to make specific level selections.
2.5 RCP-MB2 Modes of Operation
Hot Take/Hot Take Breakaway - Takes the source found in the Preset
and switches it to the destination controlled by a panel by pressing the
associated Destination or Soft Destination Data Keys. Switch requests are
sent immediately. Direct Take is the default mode. Deselecting all other
modes will return the you to the Direct Take Mode. In this mode, the
names displayed in the Destination Status Page Display show the status
of the destination assigned to each Destination Key for the active page.
Sources may be selected in the Preset Display by scrolling with the Rotary
Knob or depressing a Data Key. Depressing a Level Key loads the source
in the Preset to a specific level and places the panel in the Hot Take
Breakaway.
Store - Stores the current selection for Preset Source to an appropriately
configured Soft Data Key. Sources may only be stored to Soft Source
Data Keys. You enter the Store Mode by first entering a valid selection in
the Preset Mode. You then press and hold the DEST/STORE Key for
more than 1 second to enter Store Mode. The DEST/STORE Key LED
blinks while in this mode. Exit the Store Mode by pressing and holding the
DEST/STORE Key for more than 1 second again or by entering another
mode of operation.
Destination Select - Allows the user to scroll through the destinations
available to the panel. Enter the Destination Select Mode by pressing the
DEST/STORE Key for less than 1 second. The DEST/STORE LED is
illuminated in this mode. You may select destination(s) by scrolling the
Rotary Knob. You may exit Destination Select by pressing the DEST/
STORE Key again. In this mode, the names displayed in the Destination
Status Page Display show the names of the destination groups assigned
to each Destination Key for the active page. The selected destination can
be stored to a Soft Destination Key by depressing the desired Soft Destination Key.
7/95
P/N 81905903470
page 2.7
RCP-MB2
Operations
Section 2
2.5 RCP-MB2 Modes of Operation Continued:
Salvo Select - Selects a salvo to be executed. You enter the Salvo Select
Mode by pressing and holding the PRESET/SALVO Key for more than 1
second. The PRESET/SALVO Key LED blinks in this mode. You may
select salvoes by scrolling the Rotary Knob. The name of the salvo selected is shown in the Panel Mode Display. Execute the salvo by pressing
a Destination/Soft Destination Key. Exit the Salvo Select Mode by pressing and holding the PRESET/SALVO Key for more than 1 second again.
In this mode, the names displayed in the Destination Status Page Display
show the status of the destination assigned to each Destination Key for
the active page.
Chop - The panel will alternately switch (about every 1/2 second) the
selected destination between the current On-line Source and the Preset
Source. You enter the Chop Mode of operation by pressing and holding a
Destination/Soft Destination Key for more than 1 second. The selected
Destination/Soft Destination Key LED blinks when the panel is in Chop.
You may exit the Chop Mode by pressing the Destination/Soft Destination
Key again. In this mode, the names displayed in the Destination Status
Page Display show the status of the destination assigned to each Destination Key for the active page.
Protect Mode - Allows the user to protect destinations that are currently
unlocked/unprotected and to unlock/unprotect destinations that are currently locked/protected. Press the PROT/LOCK Key for less than 1 second to enter the Protect Mode. The PROT/LOCK LED will be illuminated.
The Panel Mode Display will display "PROTECT". Press a Destination/
Soft Destination Key to protect or unlock/unprotect a destination. A protected destination will have an exclamation mark displayed before the
status name in the Dest Status Page Display for that destination.
Lock Mode - Allows the user to lock destinations that are currently unlocked/unprotected. Press the PROT/LOCK Key for greater than 1 second
to enter the Lock Mode. The PROT/LOCK will blink and the Panel Mode
Display will display "LOCK". Press a Destination/Soft Destination Key to
lock or unlock/unprotect a destination. A locked destination will have an
asterisk displayed before the status name in the Dest Status Page Display.
page 2.8
7/95
P/N 81905903470
RCP-MB2
Operations
Section 2
2.5 RCP-MB2 Modes of Operation Continued:
Display Preset Mode - Allows the user to view the status for the individual levels. Press the PRESET/SALVO Key for less than 1 second to
enter the Preset Select Mode. The PRESET/SALVO LED will be illuminated and the Preset Mode Display will display "DISPLAY PRESET". Use
the Rotary Knob or Level Keys to select specific levels. If a Destination/
Soft Destination Key is pressed, then the source found in the Preset
Display will be taken on-line for the selected level (or all levels if in All
Levels).
Single Level Mode - Allows the user to do single level breakaways. Press
the LEVEL/ADDR Key for less than 1 second to enter the Single Level
Mode. The LEVEL/ADDR LED will be illuminated solid and the Panel
Mode Display will show "SINGLE LEVEL". Use the Rotary Knob or
Source/Soft Source Key to load a source into the Preset at the desired
level. Press a Level Key to select a specific level. Press a Destination/Soft
Destination Key to take the source on-line.
2.6 Panel Configuration
Address: Decimal number from 1 to 1023 which is used to distinguish
each panel on the panel communications bus. Address must match the
dip switch settings on the rear of the panel.
Panel Name: Any 8 alphanumeric characters. Currently used only by the
controller configuration program to provide a user-friendly method of
referring to each panel.
Priority: Choice of 256 priorities: 0-255. Priorities are used when panel
attempts to set or clear a destination Protect or Lock. Only the panel which
sets a Protect or Lock or someone of higher priority can un-Protect or unLock a destination once it is Locked. The lower the number, the higher the
priority.
Status Method: The panel displays status differently based on whether
the panel is set for All Levels (changing all levels assigned to panel) or
Breakaway (changing only selected levels) operation.
1. Default Status Level Status: Panel will always display the status of the
Default Status Level.
7/95
P/N 81905903470
page 2.9
RCP-MB2
Operations
Section 2
2.6 Panel Configuration Continued:
Default Status Level: Level to be statused when panel is in All Levels
operation (refer to the preceding Status Method description).
Level List: List of levels to be controlled by panel. Any level not in the
assigned Level List will not be accessible to or affected by panel operations.
Include Source List: List of all source groups accessible by this panel.
Include Destination List: List of all destination groups controllable by
this panel.
Salvo List: List of all salvoes the panel can execute.
Key Assignment List: List containing the assignment of all 24 Keys as
configured by the user. Each key is individually configurable as one of the
following:
1. Source Selection (Keys 1-8)
A. Non Soft (not locally reconfigurable)
B. Soft (locally reconfigurable)
2. Destination Selection (Keys 9-24)
A. Non Soft (not locally reconfigurable)
B. Soft (locally reconfigurable)
2.7 Statusing
Status by Default Status Level
Status Display - The name shown in the Status Display represents the
source switched to the destination controlled by the panel on the Default
Status Level. If “All Levs” is displayed in the Level Display and a source
on at least one level is different in the Status or Preset Registers, then a
“#” character is placed at the end of the Status/Preset Display. To view the
source assigned on each level, enter the Display Preset Mode and scroll
through each level. As you scroll through the levels, the displays will
change to show the source assigned for the level currently selected. If the
destination currently selected has no output on the Default Status Level
the status will show "NO LEVEL" where "LEVEL" is the name of the Default Status Level.
page 2.10
7/95
P/N 81905903470
RCP-MB2
Operations
Section 2
2.7 Statusing Continued:
Breakaway Statusing
Status Display - Name shown represents the source switched to the
destination currently controlled by the panel on the currently selected
level. To determine the status of each level controlled by the panel, enter
the Display Preset Mode and scroll through each level. As you scroll
through the levels, the display will change to show the source switched to
the output controlled by the panel for the level currently selected. If the
destination currently selected has no output on the currently selected
level, the panel will blank the Status Display.
Error Statusing
"READBACK" will be displayed in the Status Display if a readback error
has occurred.
"CONF ERR" will be displayed in the Status Display is a confidence error
has occurred.
7/95
P/N 81905903470
page 2.11
RCP-MB2
Operations
Section 2
2.8 Hot Take/Hot Take Breakaway Mode
Source and Soft Source Data Keys - The source assigned to the Data
Key is loaded into the Preset. The method of statusing used by the panel
is determined by configuration at the controller and whether breakaway
levels are currently selected.
Destination and Soft Destination Data Keys - Takes the Preset to the
selected destination.
Level Keys - Assigns the source found in the Preset Display to a specific
level.
PROT - Places the panel in the Protect Mode.
LOCK - Places the panel in the Lock Mode.
DEST - Exits the Direct Take Mode and enters Destination Select Mode.
page 2.12
7/95
P/N 81905903470
RCP-MB2
Operations
Section 2
2.8 Hot Take/Hot Take Breakaway Mode Continued:
STORE - Panel is placed in Store Preset Mode.
PRESET - Exits Direct Take Mode and enters the Display Preset Mode.
SALVO - Exits the Direct Take Mode and enters Salvo Select Mode.
LEVEL - Exits the Hot Take Mode and places the panel in the Single Level
Mode.
ADDR - Displays the panel address in the Preset Display while the key is
held down.
DEST NAME - Displays destination names in the Status Display.
CLEAR - Clears the Preset Source for all level(s). If in Hot Take Breakaway Mode, places the panel in Hot Take Mode.
ROTARY KNOB - Scrolls the Preset Source selection to the next source
accessible to the panel. Sources are presented in alphabetical order.
CHOP - Continuously toggles Preset and On-Line Sources every 1/2
second.
7/95
P/N 81905903470
page 2.13
RCP-MB2
Operations
Section 2
2.9 Preset Display Mode
Source and Soft Source Data Keys - No effect.
Destination and Soft Destination Data Keys - Takes source found in
Preset on-line at selected level (or all levels).
Level Keys - Selects specific level to view or change.
PROT - Exits Display Preset Mode and places the panel in Protect Mode.
LOCK - Exits Display Preset Mode and places the panel in Lock Mode.
DEST - Exits the Display Preset Mode and enters Destination Select
Mode.
STORE - Enters the Store Preset Mode.
PRESET - Exits Display Preset Mode and returns to Direct Take Mode.
page 2.14
7/95
P/N 81905903470
RCP-MB2
Operations
Section 2
2.9 Preset Display Mode Continued:
SALVO - Exits the Display Preset Mode and enters Salvo Select Mode.
LEVEL - Enters Single Level Mode.
ADDR - Displays the panel address in the Preset Display while the key is
held down.
DEST NAME - Displays destination names in the Status Display.
CLEAR - Returns panel to All Levels.
ROTARY KNOB - Scrolls through levels.
CHOP - Continuously toggles Preset and On-Line Sources every 1/2
second.
7/95
P/N 81905903470
page 2.15
RCP-MB2
Operations
Section 2
2.10 Store Preset Mode
Soft Source Key - Pressing any Data Key configured as a Soft Source
will store the contents of the Preset to the Data Key on all levels. Pressing
any other type of Data Key has no effect. Alternately, you may decide not
to store the Preset Source to a Data Key and exit from the Store Mode by
pressing and holding the DEST/STORE Key for more than 1 second.
Level Keys - No effect.
PROT - Places the panel in Protect Mode.
LOCK - Places the panel in Lock Mode.
DEST - Exits the Store Preset Mode and enters Destination Select Mode.
STORE - Exits the Store Preset Mode and enters the Hot Take Mode.
page 2.16
7/95
P/N 81905903470
RCP-MB2
Operations
Section 2
2.10 Store Preset Mode Continued:
PRESET - Exits the Store Preset Mode and enters the Preset Display
Mode.
SALVO - Exits the Store Preset Mode and enters the Salvo Select Mode.
LEVEL - Exits the Store Preset Mode and enters the Single Level Mode.
ADDR - Displays the panel address in the Preset Display while the key is
held down.
DEST NAME - Displays destination names in the Status Display.
CLEAR - No effect.
ROTARY KNOB - No effect.
CHOP - No effect.
7/95
P/N 81905903470
page 2.17
RCP-MB2
Operations
Section 2
2.11 Destination Select Mode
Source and Soft Source Data Keys - No effect.
Soft Destination Data Keys - Stores destination in Panel Mode Display
to selected soft destination key.
Levels Keys - No effect.
PROT - Places the panel in Protect Mode.
LOCK - Places the panel in Lock Mode.
DEST - Exits the Destination Select Mode and returns the panel to the Hot
Take Mode.
STORE - Exits the Destination Select Mode and enters the Store Preset
Mode.
page 2.18
7/95
P/N 81905903470
RCP-MB2
Operations
Section 2
2.11 Destination Select Mode Continued:
PRESET - Exits the Destination Select Mode and enters the Preset Display Mode.
SALVO - Exits the Destination Select Mode and enters the Salvo Select
Mode.
LEVEL - Exits the Destination Select Mode and enters the Single Level
Mode.
ADDR - Displays the panel address in the Preset Display while the key is
held down.
DEST NAME - No effect.
CLEAR - Clears the destination selection from the Panel Mode Display.
ROTARY KNOB - Scrolls destination selection to the next destination.
Destinations are presented in alphabetical order. NOTE: In order for a
destination name to be selected it must be the name of a current Destination Group in the panel's Include Destinations List.
CHOP - No effect.
7/95
P/N 81905903470
page 2.19
RCP-MB2
Operations
Section 2
2.12 Salvo Select Mode
Source and Soft Source Data Keys - No effect.
Destination and Soft Destination Data Keys - Salvo displayed in Panel
Mode Display is executed.
Level Keys - No effect.
PROT - Places the panel in Protect Mode.
LOCK - Places the panel in Lock Mode.
DEST - Exits the Salvo Select Mode and enters the Destination Select
Mode.
STORE - Exits the Salvo Select Mode and enters the Store Preset Mode.
page 2.20
7/95
P/N 81905903470
RCP-MB2
Operations
Section 2
2.12 Salvo Select Mode Continued:
PRESET - Exits the Salvo Select Mode and enters the Hot Take Mode.
SALVO - Exits the Salvo Select Mode and enters the Hot Take Mode.
LEVEL - Exits the Salvo Select Mode and enters the Single Level Mode.
ADDR - Displays the panel address in the Preset Display while the key is
held down.
DEST NAME - Displays destination names in the Status Display.
CLEAR - Clears the salvo selection from the Panel Mode Display.
ROTARY KNOB - Scrolls salvo selection to the next salvo executable by
the panel. Salvoes are presented in alphabetical order. NOTE: In order for
a salvo name to be valid or selected it must be the name of a current salvo
in the panel's Salvo List.
CHOP - No effect.
7/95
P/N 81905903470
page 2.21
RCP-MB2
Operations
Section 2
2.13 Chop Mode
Source and Soft Source Data Keys - No effect.
Destination and Soft Destination Data Keys - Exits the Chop Mode and
returns the panel to the Hot Take Mode.
Level Keys - No effect.
PROT - Exits the Chop Mode and enters the Protect Mode.
LOCK - Exits the Chop Mode and enters the Lock Mode.
DEST - Exits the Chop Mode and enters the Destination Select Mode.
STORE - Exits the Chop Mode and enters the Store Preset Mode.
PRESET - Exits the Chop Select Mode and enters the Preset Display
Mode.
page 2.22
7/95
P/N 81905903470
RCP-MB2
Operations
Section 2
2.13 Chop Mode Continued:
SALVO - Exits the Chop Mode and enters the Salvo Select Mode.
LEVEL - Exits the Chop Mode and enters the Single Level Mode.
ADDR - Displays the panel address in the Preset Display while the key is
held down.
DEST NAME - Displays destination names in the Status Display.
CLEAR - No effect.
ROTARY KNOB - No effect.
CHOP - Exits the Chop Mode and enters the Hot Take Mode.
7/95
P/N 81905903470
page 2.23
RCP-MB2
Operations
Section 2
2.14 Single Level Mode
Source and Soft Source Data Keys - Loads source into Preset at selected level.
Destination and Soft Destination Data Keys - Takes the source found in
Preset on-line at the selected level.
Level Keys - Enables the user to select a specific level.
PROT - Exits the Single Level Mode and enters the Protect Mode.
LOCK - Exits the Single Level Mode and enters the Lock Mode.
DEST - Exits the Single Level Mode and enters the Destination Select
Mode.
STORE - Exits the Single Level Mode and enters the Store Preset Mode.
page 2.24
7/95
P/N 81905903470
RCP-MB2
Operations
Section 2
2.14 Single Level Mode Continued:
PRESET - Exits the Single Level Mode and enters the Preset Display
Mode.
SALVO - Exits the Single Level Mode and enters the Salvo Select Mode.
LEVEL - Exits the Single Level Mode and enters the Hot Take Mode.
ADDR - Displays the panel address in the Preset Display while the key is
held down.
DEST NAME - Displays destination names in the Status Display.
CLEAR - Returns the panel to All Levels.
ROTARY KNOB - Scrolls through the sources at the selected level.
CHOP - No effect.
7/95
P/N 81905903470
page 2.25
RCP-MB2
Installation
Section 3
3.1 Introduction
This section details installation procedures. The following topics are
discussed:
• Receipt Inspection
• Location and Mounting
• Polling Address
• Control Panel/Controller Interconnection
• Power Connections
• Maintenance
3.2 Receipt Inspection
The control panel was inspected and tested prior to leaving the PESA
factory. Upon receipt, please inspect the unit for shipping damage. If damage is detected, notify the carrier immediately and hold all packing material
for inspection. If assistance is required, please contact PESA Customer
Service at the telephone number listed in the front of this manual.
After unpacking, compare all parts received against the packing list. If the
unit is undamaged and all components have been received, proceed with
installation.
3.3 Location and Mounting
The control panel has been designed to fit in a standard E.I.A. 19" equipment rack and uses 2 rack units of space (3 1/2"). An area should be selected where temperature does not exceed 40°C inside the equipment rack,
and where air can circulate freely. The unit should be mounted in an area
convenient to control and power connections. Sufficient space must be
provided behind the rack to allow for the control and power cables. When
the control panel is supplied as part of a system including interconnecting
cables, a rack layout drawing is usually provided. While adherence to this
drawing is not required, it will ensure that the cables are of proper length.
All mounting holes should be utilized and hardware tightened securely. All
cable should be strained relieved and secured to racks or other supporting
structures. Failure to provide adequate cable support can result in cables
separating from connectors. If cable runs are to be stored under an elevated floor, they should be tied to the racks as a guide. If cables are run
along the floor, do not allow them to lay in the work area behind the racks.
Stepping or tripping on the cables may result in connections being pulled
free or wire breakage inside the insulation. Figure 3-1 illustrates chassis
installation.
7/95
P/N 81905903470
page 3.1
RCP-MB2
Installation
Section 3
3.3 Location and Mounting Continued:
To install the control panel chassis follow these steps:
1.
2.
3.
4.
Align the chassis with the slotted opening in the rack.
Install the bottom screws first.
Install the two top screws
Tighten all four screws securely.
Figure 3-1 Chassis Installation
3.4 Polling Address
For the controller to identify a particular control panel, a specific device
number or polling address must be assigned to each panel. Sequential
binary numbers (1 thru 1023) are used for this purpose. Refer to your
system controller manual for the maximum number of panels configurable by your system controller. The appropriate binary number is
entered into the control panel by setting an internal 10-position DIP switch
to the binary number. The DIP switch is located on the remote CPU board
and is accessible from the rear of the unit. The panel address is normally
assigned and entered at the factory if the panel is purchased as part of a
system and a design guide has been completed by the user. If the panel is
purchased separately, the user may be required to set the panel address.
Example: To select polling address 21, set switches 6, 8, and 10 in the
"ON" or "1" position. See Figure 3-2.
page 3.2
7/95
P/N 81905903470
RCP-MB2
Installation
Section 3
3.4 Polling Address Continued:
ADDRESS
1
1
2
3
4
5
6
7
8
9
10
0
OPEN
POWER
IN
CONTROL PORT
Figure 3-2 DIP Switch Location
3.5 Control Panel/Controller Interconnection
Each panel has a single 3-pin MTA connector located on the rear panel.
Control panels are daisy chained to a port on the rear of the Controller.
Use shielded twisted pair cable. See Figure 3-3.
PS
PS
Control
Panel
PS
PS
Control
Panel
Control
Panel
Control
Panel
(TWISTED PAIR)
(TWISTED PAIR) - TO CP'S
CONTROLLER
TERMINATE AT THE
END OF THE RUN
(TWISTED PAIR) - TO CP'S
(TWISTED PAIR) - TO CP'S
CP = Control Panel
Figure 3-3 Typical Control Panel Controller Interconnection
7/95
P/N 81905903470
page 3.3
RCP-MB2
Installation
Section 3
3.6 Wiring the Control Panel Connector
Should an additional control panel be added to your system, it will be
necessary to wire the connector using shielded twisted pair cable and a
3-pin MTA connector. See Figure 3-4.
1. Remove approximately 1 1/2" of theinsulating jacket from each of the
two wires.
2. Remove approximately 1/2" of insulation from the black and red wires.
3. Twist together and insert the two black wire ends into position 1. Crimp
down using a screw driver.
4. Twist together and insert the two shield wires into position 2. Crimp
down using a screwdriver.
5. Twist together and insert the two red wire ends into position 3. Crimp
down using a screwdriver.
POSITION 2
POSITION 1
POSITION 3
Figure 3-4 Wiring the Control Panel Connector
page 3.4
7/95
P/N 81905903470
RCP-MB2
Installation
Section 3
3.7 Terminating Cable Runs
Each cable run should be terminated at the end of the run with a 120 ohm
1/4 watt 5% resistor. The cable is terminated internally at the controller.
See Figure 3-5.
1. Un-crimp the black and red leads in position 1 and 3.
2. Insert the resistor ends into position 1 and position 3 along with the
black and red leads.
3. Crimp down using a screwdriver.
4. The shield wire remains in position 2.
POSITION 1
POSITION 3
Figure 3-5 Terminating Cable Runs
7/95
P/N 81905903470
page 3.5
RCP-MB2
Installation
Section 3
3.8 Power Connections
Power for the control panel is supplied by an external +7.5 VDC, 800 mA
power supply.
Remove the Power Supply from the box it was shipped in and check to
insure that no damage has occurred in shipping. Verify that the Power
Supply is rated for the proper AC voltage (i.e. 115 VAC or 230 VAC)
before connection to the AC voltage. The power connector can now be
plugged into the POWER IN position on the control panel. The Power
Pack will immediately power the unit upon connections to AC Voltage.
See Figure 3-6.
Figure 3-6 Typical Panel Power Supply
3.9 Maintenance
General
The control panel is a solid state electro-mechanical device designed to
give long, trouble free service with minimum maintenance requirements. If
technical assistance is required, refer to the General Assistance and
Service information in the front of the manual.
Preventive Maintenance
There is little need for preventive maintenance on the control panel other
than the normal care which should be given to any quality electronic
equipment.
page 3.6
7/95
P/N 81905903470
RCP-MB2
Installation
Section 3
3.9 Maintenance Continued:
Adjustment Alignment
There are adjustments for LCD Display brightness and contrast on the
rear of the control panel. Adjust per your preference.
Factory Repair Service
Equipment or boards may be returned to the factory (transportation prepaid) for repair. Refer to the General Assistance and Service information
sheet in the front of this manual. Contact the PESA Switching Systems
Service Department for a RMA# prior to shipping any equipment items.
NOTE
Pack the equipment securely and label with the correct address. Proper packaging saves
money. The small amount of extra care and time it takes to cushion a part or unit properly
may prevent costly damage while in transit. Make certain that the address is both legible
and complete. Failure to do so often results in delay or even loss.
7/95
P/N 81905903470
page 3.7