1
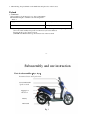
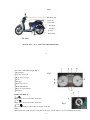
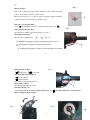
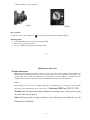
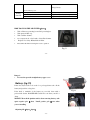
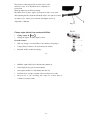
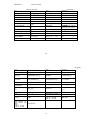
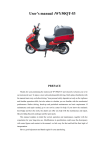
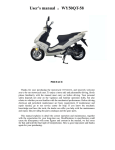
PREFACE Thanks for purchasing a MF150QT-21. We sincerely hope you will be another happy MotoFino customer. To enjoy safe and pleasurable driving, please familiarize yourself with the manual before driving. Your personal safety depends not only on your vigilance and operation skills, but also relates to whether you are familiar with the mechanical capabilities of the scooter. Before driving, checkups and periodical maintenance are the basic requirements. If maintenance and repairs are needed, go to a service center for help. This manual explains the correct operation and maintenance, together with the requirements for your long-time use. Modifications in specifications could cause discrepancies with some pictures and content in the manual. Happy scootering and thanks again for your purchase! Safety considerations Driver and passenger This motorcycle is limited to one driver and one passenger (never children younger than 12 years old). Never exceed the Max load capacity of motorcycle. For your safety, avoid driving the motorcycle in poor weather or cold weather. Be aware of road conditions Only drive on the high points and dry points of the road.! Make sure all lights are visible. Wear a helmet. Modifications in specifications could cause discrepancy with some pictures and content in the manual, make sure you understand fully before operation of scooter Please carefully read the user manual Play close attention to the warnings printed in the user manual. ***WARNING*** Not following the operation instructions in this manual may cause injury or even death to both you and others. Not following the instructions may cause sever damage to the vehicle. Regard this manual as a permanent part of the vehicle. When transferring the vehicle to a new owner remember to transfer the manual at the same time. Catalog I. Notice items for safely driving The rules for riding safely………………………1 Load………………………………………………2 II. VARIOUS PARTS NAMES AND INSTRUCTIONS VARIOUS PARTS NAMES…………………….3 Instrument and indicator………………………5 Ignition switch…………………………………5 Fuel indicator……………………………..…...6 Riding operation………………………………15 Brake operation……………………………..…15 Turning off the engine…………………………16 Stop operation…………………………………16 VI. MAINTENANCE AND SERVICE Maintenance periodic table……………………18 Troubleshooting guide…………………………20 Cleaning the air filter………………………..…22 Maintenance battery……………………………22 Idle speed adjust………………………..………23 Changing oil and cleaning the strainer……..…24 Changing the gear oil………………………..…25 Spark plug………………………………………26 Fuse replacement………………………………26 V. Storage of the vehicle……………………………27 Vehicle……………………………………….…28 Tool set…………………………………………28 Main technique Parameter……………………29 Circuit diagram…………………………..……31 Emergency cut-off Switch……….…………..…6 Starting switch…………………………………6 Floodlight switch………………………………6 Front head switch…………………………..…6 Turn signal light……………………………….7 Horn………………………………………….…7 Steering lock……………………………………7 Seat lock……………………………………..…8 Storage box…………………………………..…8 III. OPERATION INSTRUCTION Check before riding……………………………9 Starting engine…………………………………13 Riding motorcycle…………………………..…14 After Service……………………………………32 General Rules for Riding Safely Rules for driving safely: 1. Many traffic accidents are caused by the inability of a car to see a motorcyclist; the motorcyclist should try his best to be seen by other drivers. Wear bright easy to see colors. Drive with caution in places with dazzling light or in blind spots. 2. Special caution should be exercised at intersections, entrances and exits of parking lots or on the road. 3. Be cautious when passing slower vehicles. 4. Get a drivers license and familiarize yourself with your motorcycle. Take a motorcycle safe driving course. Never lend your motorcycle to others without a driver’s license or who is unfamiliar with your motorcycle. 5. Avoid driving on rough roads. This can easily result in operation failure and structural damage to the vehicle frame. 6. Safety inspect your bike before driving. (Refer to page 9) -1- 7. When driving, keep both hands on the handlebars and place feet on the footrest. Payload a) WARNING Only put light goods in luggage box or other compartments. The maximum weight to conform to the following table 1: Table: 1 Luggage Box Under seat Box Weight (Lbs.) Weight(Lbs.) 10 lbs. 15lbs. b) Max payload ( Max load: 350 lbs), remember to count in the weight of driver, passenger and goods. c) If over-loaded, stability and operation of the motorcycle can be affected. d) Secure all the goods to the motorcycle. e) NEVER ride children under age 12 and never ride on the rear shelf. -2- Subassembly and use instruction Parts & subassemblies Fig:1, Fig:2 Instrument cluster and Speedometer Front brake handle Ignition switch Luggage box Glove box Battery Main stand Fig.1 -3- Fig.2 Rear brake grip Seat Lock Carrier rack Fuel Tank Air filter Footrest Kick-starter Side stand BROKEN LINE INDICATES THE HIDEN PARTS. -4- Speedometer and indicator light (Fig 3) Speedometer Left turn signal light Fig.3 Right turn signal light Clock Fuel gage High beam indicator Brake light indicator Read out of speedometer Odometer Ignition switch(Fig.4) on(( ) Engine starts and you cannot take out the key. off ( ) Engine turns off and you can take out the key. Fig.4 lock ( ) The steering handing is locked, and you can take out the key. Fig.4 Notice: When engine runs at idle speed for a long time on hot days, stop the engine to avoid over-heating and wasting -5- gas. Fig.5 Fuel Gage (Fig.5) Fuel gauge (4) indicates the approximate remainder of fuel. When the pointer points to (F), it indicates full fuel volume 1.5 Gal. When the pointer gets close to the red section, it indicates that the remainder volume is 0.3 Gal (about enough to go 10 miles or less). Emergency cut off switch (Fig6) Press “ ” and the engine turns off, to restart the engine, please press “ ” Fig:6 Starter switch button (1) (Fig 6) Press this button, and the engine starter engages (See p13) Head Light switch (Fig. 7) Three positions of light switch: , and • Headlight, running lights tail lights and instrument lights all turn on. Running lights, taillights and instrument lights turn on. • Headlight, running lights, tail lights and instrument lights all extinguish. -6- Fig: 7 Dimmer switch (1) (Fig.7) High beam. Low beam. Turn signal light switch (2) (Fig. 7) means turn left mean turn right Press it down and signal light turns off Horn switch (3) (Fig 7) Press the button and the horn sounds. Steering lock (Fig. 8, 9) Turn handle left to end, press down ignition key1 to ( ), the steering device is locked do the above in opposite order to open. Fig: 8 Fig: 9 -7- Seat Lock (Fig.10) Put the key into the seat lock and turn clock-wise to open. Press down the seat until it makes a clicking sound, then pull the back of seat to confirm it has been locked and remove the key. Fig.10 Glove box (Fig.11) Put the key into glove box and then turn clock-wise 90 to open it. Put the key into glove box and turn counter clock-wise 90 then push the door of the glove box to confirm it has been locked and remove the key. -8- Pre-Operation Check list Fig.11 1 Check before driving Make a routine check-up before riding to insure the vehicle will perform well and be safe to drive. A minimum inspection should include checking brakes, lights, tires, and tire pressure. Gasoline volume Turn on the ignition switch and check the fuel gage, refill gasoline tank when the pointer is close to the red section, moreover, check the fuel tank and oil filter for leakage. Gasoline tank 1.5 Gal. Turn the tank cap 1 turn counter clockwise to open. Required gasoline: unleaded gas, with minimum octane rating of 90. DO NOT fill gas tank from a fuel can from your garage, your fuel container may contain dirt, water or other contamination. Warning: Refill gas in a well-ventilated place. DO NOT SMOKE! Pay attention to safety rules posted at fuel station. Do not over-fill gas tank, and remember to replace the cap of fuel tank immediately after filling gas tank. -9- Check the oil level of the engine (Fig 11,Fig 12) Use the center stand to support the vehicle on smooth level ground, unscrew the dipstick from engine block (1) clean the oil dipstick with a clean cloth, then, reinsert the dipstick back into the engine block ( do not screw it in) remove and check the oil level. If the oil lever is near to the lower limit mark (2), you should add recommended oil. NEVER exceed the mark of upper limit(3) . Reinsert the dipstick into the engine block, screw it down and check it for leakage. USE ONLY CASTROL 10W-40 SEMISENTHETIC OIL FAILURE TO DO SO MAY VOID YOUR WARRANTY!! 1 3 Fig12 12 2 Fig. 11 - 10 - When the Disc Brake fluid is low refill with DOT 4 fluid. Check fluid level at the observation orifice. (Fig.16 Fig.17) Fig.15 Fig.16 - 11 - Fig. 17 Tires Check the tire pressure regularly and adjust as needed. Check while the tire are cool. Inspect to see if there is any metal, trash, or gravel in the groove of the tires. Inspect to see if there is a nick, embed nail or any other foreign objects on the tread. Inspect whether there is an impression, dent or distortion on the rim. Repair any damage found before operation, have regular inspections by a qualified service department. When the tire tread wears to the wear tread mark replace tire immediately. WARNING: If the tire pressure does not meet the required standards, it may cause loss of vehicle control, cause injury, and possibly life. If the tire pressure is too low, the tire may blow off rim. It is dangerous to use worn tires; it can make the vehicle difficult to drive and cause accidents. - 12 - Engine Starting (Fig 18) Preparation: remove vehicle from main stand. Put the key into ignition switch and turn to “ emergency shut off is to “ ” position. Make sure ” position. Electric-start: press start button (1), in burst less than 5 seconds. Notice: You must hold brake handle for starter to engage. If electric starter fails, try again after 15 seconds. Kick-start: Turn ignition switch on, push kick-starter pedal down quickly with force. Notice: After starting the engine, do pull the pedal back to original position. . For first start, it is better to kick the kick starter several times with ignition switch off, so the engine will start easier. In cold weather start the engine and warm up engine for 3-5 minutes before driving. - 13 - Riding Scooter: WARNING: Wear trousers to avoid touching the exhaust pipe and getting burned. Always wear a helmet. All riding apparel must be worn according to all requirements of the traffic laws. Take a safety riding course. NOTICE: Control the speed and load during the first 500 miles of break in period. Load should be within 350lbs(including driver). Speed according to Break in Chart: Log Miles Speed (mph) 0-100 100-300 300-500 <30 <45 <55 - 14 - Riding operation "Release rear brake lever, accelerate slowly with throttle grip, motorcycle will move forward smoothly. Accelerate slowly with your left leg in a balanced position right leg should be on floorboard obtain a good speed, close the throttle to cut down on speed. Warning: Do not accelerate suddenly with throttle grip to prevent the motorcycle from rushing out and loosing control. · Before driving remove bike from center stand. NEVER rock the bike off center stand while accelerating. Brake operation: 1.Throttle grip control: If you want to reduce speed, you must control the throttle grip. Use both brakes to slow down, this point is very important. Notice: When driving on damp or loose roads or poor weather conditions, that caution when adding brakes or accelerating. 2. Operate front and rear brake: Notice: When driving on a decent use both brakes to reduce speed. Never use brakes continuously, or overheating will destroy the ability of the brakes to stop the bike. Warning: Never use a single brake when driving at high speed, especially on crooked and slippery roads. Always use both brakes to avoid accidents. Close engine Fig.19 Fig.20 - 15 - • Release throttle to stop acceleration. Fig.19 Fig.20 Stop operation: To turn motorcycle off, put the key to “ ” position put down stand and lock handle. (Page 7) Warning points: 1 Lock the handle and do not leave the key in the switch. 2 Keep your scooter in a safe place. 3 Use good quality locks and protection against theft. - 16 - Maintenance and service Periodic maintenance Maintenance is important to the safe operation of your scooter. If you drive at high speeds and in bad or harsh conditions, maintenance must be done more frequently. If your motorcycle has a big repair or an accident, take care to check the repaired parts closely before operation. Repair or change worn parts routinely. Always inspect your bike closely. Ever 1000 miles have a professional inspection. Notice: Don’t modify your scooter. Use good quality spare parts if replacement parts are needed. Use of bad quality spare parts could compromise the safety of motorcycle.—Motofino OEM Parts 706 733 1355 Warning: Turn off engine when doing maintenance or making repairs. Always place scooter on center stand on level ground. Notice: For long periods of storage or little use, remove the battery and stabilize the gas with Stabil (purchase Wal-Mart) - 17 - Maintenance table (do all at set up and at 150 miles) I: check and adjust when necessary C: clean R: change Cycle speedometer x 500 miles 1 Item 4 6 I I Every month I I Fuel pipe line Throttle operation Air filter Spark Plug Note1 Gear oil 300km R 8 12 I I 12 18 I I Ref page 15 22 26 C/500 miles, if need: R C/1000 miles, If need: R I R I I I C/1000 miles, 24 C/ Change oil, 24 engine oil fliter Idle speed I I I I 23 - 18 - Cycle speedometer x500 miles Item 1 4 8 12 6 12 18 Ref page Every month Drive belt Gear oil * Brake system * C/500 miles, if need: R Note 3 300 miles R I I I I Brake handles I I I High-low light I I I Suspension I I I Tighten bolts I 25 Note2 I 11 I and screws Rim, tire Steering Wheel I I I I 12 I DO NOT ATTEMPT TO DO SERVICE OR REPAIRS UNLESS YOU ARE A QUALIFIED MECHANIC WITH ALL NESSACARY TOOLS. FOR YOUR SAFETY, SERVICE AND REPAIRS ARE BEST LEFT TO THE PROFESSIONAL. *For your safety we require all of the items must be done by a professional mechanic. Note: 1. In damp or dusty conditions, increase maintenance. - 19 - 2. If the bike is used often perform this check more often. 3. Change seasonally. Simple trouble shooting Trouble phenomenon THE ENGINE CAN NOT START primary reason Spark plug wear Ignition coil wire CDI Blown fuse Emergency switch on Spark plug gap too small or big Spark plug burned Spark plug is corroded Weak ground No fuel Air gap on gas cap stopped up fuel pump worn Gas line or filter clogged air filter stop up Intake manifold broken Spark plug no spark The spark is weak No fuel mixed air in cylinder Solution Change/check Change/check Change/check Change/check Switch to off Adjust Change Clean off Clean connections Refuel clean Change Change or clean Clean or change Check and replace - 20 - Spark plug seat leak Cylinder cover leak Valves out of adjustment The piston-rings or the cylinder block worn seriously The cylinder compression strength low The piston-ring is broken Trouble phenomenon Trouble reason The octane value of the fuel is too low Gas line pinched or stopped up Ignition time is too early or too late The vehicle is unable to accelerate well performance is bad Spark too weak Mixed air too dense or rich Engine leak Muffler stop up Belt worn The automatic clutch rollers wearing The electricity does not Starter relay wear - 21 - change piston-ring Solution Change fuel (premium only!!) Clean and check fuel line Check wires and change CDI Check ignition and plug Clean adjust carburetor Check Replace Change Change Change Change clutch worn Tighten plug Change head gasket adjust change them Change battery Riding unsteady Lack of Electric power Turning radius too wide Adjust Keep tires inflated to correct pressure Replace or adjust shocks Lack of tire pressure Front and rear shock HOW TO CLEAN THE AIR FLITER Fig21 • Take off the rear protecting bar and left protecting bar. • Take apart air filter cap. • Take out filter element.. • Use compressed air or dry brush to clean filter element. • • Replace if too dirty. Reinstall the air filter. Reassemble the filter following the reverse operation. Fig.21 - 22 - Danger!! • Do not take apart the airtight battery upper cover Battery: (fig: 22) If the motorcycle will not be used for a prolonged time take off the battery and put it into a dry place. If the head or terminals of the battery are corroded, clean with a professional cleaner. DANGER BE Careful You can burn yourself or others. NOTICE: Turn off the ignition switch, when removing battery, take apart negative pole - first. Install positive pole + first when you are installing. Adjusting idle Fig23 Fig24 - 23 - Fig.22 The carburetor adjusted perfectly from the factory, if the carburetor comes out of adjustment; have it adjusted by a professional. Warm up engine very well before starting. Idle adjust screw (1) turn to right to speed up turn to left to slow down. After adjusting the idle, adjust throttle handle cable to free path for 2-4mm, use adjustor (2) to adjust, screw down nut, then tighten set nut (3). Adjust idle to 1200 rpm Fig.23 Change engine oil and clean strainer of oil filter • Change engine oil Fig25 • Change the engine oil while engine is warm. Clean the strainer. • Take out oil plug cover and oil filter 1 take strainer 2 and spring 3! • Using carburetor cleaner/or air clean and dry the strainer. • Reinstall oil filter, strainer and spring! - 24 - • Refill the engine with Castrol 10w-40 semi synthetic oil. • Check dipstick for proper level and reinstall • Start engine and idle for a few minutes then turn off. • Check the level of engine oil again, makes sure there are no leaks. • Keep records of your oil Change and receipts for oil these must be available for warranty claims. - 25 - Fig.24 Change gear oil Fig26 Suggestion engine oil No: SAE 80W/90 Oil Capable Resolving capacity .10 quart Changing capacity .10 Quart 1 Park the bikes with the main stand • Take out the gearbox drain bolt (2), and the refill bolt (1). • Drain oil into a small pan for proper disposal. NOTICE: THE TRANSMISSION MUST BE WARM WHEN DRAINING, Fig26 AND THE VEHCILE MUST BE STEADY ON THE MAIN STAND! • Reinstall the drain bolt after draining oil. • Inject 100ml or .10 quarts to engine through refill bolt • Using an injection tool, inject the oil into the bolt, till full. • Install refill bolt and tighten snugly. - 26 - Spark plug(Fig 27) Specifications of spark plug Standard: • C7HSA NGK Take spark plugs, clean them of any build up set the gap and install. If unsure about spark plug condition install new. • Examine if there is dirt on poles and the porcelain head in center .If it has corroded, change it .Use wire brush if needed. • 1 2 (0.6 Normally the gap between side electrode (1) and Center electrode (2) is 0.6-0.7. • Don’t use off brand spare plug Fig27 Fuse replacement The specified electric current of the total fuse is 15 A If the connection is not good, the fuse will overheat and meltdown. Do not use any fuse which specifications are different from assigned. To do so could cause wires to melt, burn or catch fire. - 27 - 0.7)mm Vehicle Storage Storage For a motorcycle not to be used for a long period of time, for example, in winter or fall, some steps should be taken to prevent malfunction of and damage to components, which might be caused by long storage. Maintenance must be preformed before the long storage, for fear that it might be forgotten when vehicle is put back into use after storage. Change engine oil and oil filter. Drain off fuel from the fuel tank and carburetor, spray atomized anti-rust oil onto the inside wall of the tank and then close the tank. Warning: DANGER DANGER DANGER Gasoline is very flammable and can cause fire and even explosion under certain conditions. Therefore, do not smoke, make sparks or be careless when working with GAS! Take out the spark plug, pour about 15~20ml clean engine oil into the cylinder, turn over engine and finally reinstall spark plug. Store vehicle in a shady and cool place free from humidity and direct sunshine. After washing and drying, Coat all screws or metal pieces with a light coat of oil. Wash the motor, wipe it dry and apply an even coat of wax to all painted surfaces. - 28 - Using the bike after removal from storage • When storing time is more than 4 months, you should change the oil. • Recharge and replace the battery. Please check and perform pre use inspection like a new scooter. Vehicle identify Number Your bike has assigned a VIN (Vehicle Identification Number) Fig28 You should know your VIN and engine number to allow you easy access to parts and technical information VIN located here on center fork. Model listed here. Engine number listed here. Fig28 Your tool set The tool bag in the seat trunk Fig29 contains the following: 8*10 wrench 12*14 wrench Screwdriver Spark plug wrench - 29 - Fig29 Wrench bar 18.5*17 wrench L W H (mm)m Wheel Base mm Ground Clearance mm mm Dry Weight Max Load kg kg Turning Angle Steering Handle Brake Distance Max Speed Program5 Main Specifications Specifications Item of 2101 1418 70 120 150 48 684 1168 Front Tire 100/80-16 110/80-16 Pressure Of Front Tire kPa Pressure Of Rear Tire kPa Transmission Speed Ratio of Derailleur Engine Type 85 68 MPG 16’ Bore/stroke Electric/kick Bore/stroke km/h Gas mileage est. Climbing Performance Starter Model Parameter Rear Tire 7m(30km/n) m Item 34PSI 36PSI CVT 8.56~ 24.17 139QMB 157QMJ Single Cylinder, four stroke Air cooled mm Displacement ml Clutch Type 57.4 57.8 149.6 Auto centrifugal mm Battery 6.8 12V 7Ah - 30 - Program5 Items specifications Items Parameter Lubrication Oil pump Fuse 15 A Rated Power kW/r/min 5.9kW/7000 Headlight 12V18W/18W 2 Max Torque N.m/r/min 8.3N.m/6000r/min Tail light/Braking light 12V 21W/5W 9.2 1 License Plate Light 12V 3W NGK-CR7 HSA Turning light 12V 10W 4 Spark Plug Gap mm 0.6 Fuel Brand Premium 90 OCT or above Idling Speed r/min Oil capacity (1700 0.9L Ignition CDI Compression Ratio Specification of Spark Plug r/min 0.7 170)r/min Trans oil capacity transmission, Gearbox Gear Oil Brand 0.10qT SAE 80W/90 .004~.005 SAE 10w/40 - 31 - Wiring harness - 32 - Motofino USA, Inc. - 33 - 2167 Gordon Hwy. Augusta, GA 30909 Reporting Safety Defects If you believe that your vehicle has a defect which could cause a wreck, injury, or death; you should immediately inform the National Highway Traffic Safety Administration (NHTSA) in addition to Motofino USA, Inc. If NHTSA receives similar complaints it may open an investigation. If it finds that a safety defect exists in a group of vehicles it may order a recall and remedy campaign. However, NHTSA can not become involved in any individual problems between you, your dealer, or Motofino USA, Inc. To contact NHTSA you may either call the Auto Safety Hotline toll-free at 1-800-424-9393 (366-0123 in Washington DC area) or write to: NHTSA U.S. Department of Transport 400 7th Street SW, (NSA-11) Washington, D.C. 20590 You can also obtain other information about motor vehicle safety from the Hotline. Motofino USA Inc. - 34 - Limited Warranty Limited Warranty Motofino USA Inc. (hereinafter referred to as “ Motofino” hereby warrants to the original purchaser that the frame and components of the new Motofino vehicle will be free from defects in materials and workmanship. The period of the warranty is 12 months or 6000 miles from the date of purchase for the engine; 90 days from the date of purchase for the frame and thirty (30) days from the date of purchase for the component parts (except as noted below). Motofino, if notified of a defect in material or workmanship during the period of the warranty, will repair or replace, at its option, the defective part at no charge, other than the reasonable charges for labor and shipping, if necessary to perform a warranty repair. The original purchaser must operate the vehicle and maintain the vehicle in accordance with the instructions provided in the Motofino user manual, the supplements thereto and the labels affixed to the vehicle. Additionally within ten (10) days of the discovery of the alleged defect, the original purchaser must provide written notification to Motofino Customer Service at 2803 WYLDS ROAD Augusta GA 30909 General Exclusions: This limited warranty does not cover component failure or damage caused by any of the following: collision; abnormal strain or stress; neglect; abuse; improper assembly of components which were provided in the factory sealed carton; after the vehicle left Motofino; improper maintenance; improper use of the vehicle, including, but not limited to racing, jumping, stunt driving, off road use or any other use other than normal, prudent, safe usage. Additionally, this warranty does not cover component failure or damage to vehicles leased or rented, or vehicles used for any commercial uses, dirt tracks or hard track purpose. Specific Exclusions: This Warranty does not cover off road Vehicles of any type. This limited warranty does not cover components that are subject to normal wear and tear. These items include but are not limited to the tires, clutch, brakes, brake shoes, - 35 - throttle cable, drive belts, torque converter, chains, seat, lights, fasteners, padding, decals, cosmetic body panels, spark plugs, wires. Additionally, this warranty does not apply to components, which are warranted by the component manufacturer. Motofino makes no other warranty of any kind, express or implied. All warranties of merchantability and fitness for a particular purpose which exceed the obligations and time limitations specified in the warranty above are hereby disclaimed by Motofino and excluded from this warranty. Additionally, this warranty excludes any incidental or consequential damages, including but not limited to loss of use. Some States do not allow a manufacturer to exclude or limit incidental or consequential damages, and therefore, the above exclusion may not apply to you. Some States don’t allow a manufacturer to limit how long; an implied warranty will last. Therefore, the above limitation may not apply to you. This warranty provides specific legal rights. You may also have other legal rights that vary from State to State. Warranty Registration Card - 36 - Motofino USA, Inc **All fields must be filled completely to validate warranty** Warranty must be activated with in 15 days of purchase. Date of Purchase_____/_____/_____ VIN:_____________________________________________Engine #______________________ Model:____________________Year:_______________________Color:____________________ Dealer Name:___________________________________________________________________ Dealer Address:_________________________________________________________________ City:___________________________State:______________________Zip Code:_____________ Customer Name:____________________________Phone #(________)_________-___________ Customer Address:_______________________________________________________________ City:_______________________State:_____________________Zip Code:__________________ Email:_________________________________________________________________________ In order to activate the warranty for your vehicle, please read the following instructions: 1) Please mail your warranty card with a copy of the sales receipt. 2) Please submit a receipt to show a professional inspection and/or set up of your scooter or motorcycle. Warranty coverage will be valid for 12 months following the date of purchase. For more information, please request a Warranty Policy from your dealer, or contact us at: Tel: (706) 733-1355 Fax: (706) 733-1357 Email: [email protected] I understand the above instructions and I verify that all the information provided is correct to the best of my knowledge. Signature______________________________________________________________________ ***Tear out, place in envelope and mail to: Motofino USA, Inc. 2167 Gordon Hwy. Augusta, Georgia 30909 PRE-OPERATION CHECKLIST For your safety and to ensure your warranty, please have a certified technician perform these checks before you - 37 - operate your vehicle. ____HYDRAULIC BRAKE FLUID AT CORRECT LEVEL ____FRONT AND REAR BRAKES ADJUSTED AND FUNCTIONING ____FRONT AND REAR TIRES SET TO PROPER AIR PRESSURE ____ALL CABLES ROUTED CORRECTLY AND FUNCTIONING ____FUEL SYSTEM FLUSHED OUT ____OIL IN CRANKCASE AND TRANSMISSION AT PROPER LEVEL ____INTAKE AND EXHAUST VALVES ADJUSTED IF NEEDED ____ELECTROLYTE IN BATTERY AT PROPER LEVEL ____AIR FILTER CHECKED AND INSTALLED ____IDLE SPEED ADJUSTED TO PROPER RPM ____AIR FUEL MIXTURE ADJUSTED FOR BEST PERFORMANCE ____HEADLIGHTS LOW AND HIGH BEAM OPERATING ____REAR BRAKE LIGHT AND TAIL LIGHT OPERATING ____ALL BLINKERS FUNCTIONING ____EMERGENCY KILL SWITCH OPERATING ____HORN FUNCTIONING PROPERLY ____SPEEDOMETER, LIGHTS, AND GUAGES ON DASH WORKING ____ALL FASTENERS- (nuts, bolts, screws)-TIGHTENED-(thread locker applied on high vibration areas ex:-exhaust manifold bolts) ____CHAIN TENSION ADJUSTED ____COOLANT LEVEL CHECKED-(water cooled engine) ____TEST RIDE PERFORMED BY INSPECTOR INSPECTION PERFORMED BY: ____________________________DATE: _______________________ MAKE AND MODEL OF VEHICLE: ______________________VIN#____________________________ - 38 - I UNDERSTAND THAT ALTHOUGH THIS VEHICLE HAS BEEN INSPECTED FOR SAFETY AND PROPER OPERATION, IT IS MY RESPONSIBILITY TO PERFORM THESE CHECKS EACH TIME BEFORE OPERATION BY OTHERS OR MYSELF. CUSTOMER SIGNATURE: ___________________PRINT: ________________DATE: ______________ PLEASE RETURN THIS WITH YOUR WARRANTY CARD WWW.MOTOFINO.COM - 39 - - 40 -