1
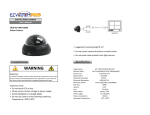
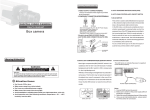
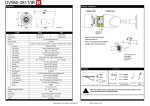
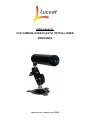
USER'S MANUAL
CCD CAMERA OVER PLASTIC OPTICAL FIBER
NANOVIDA
PRELIMINARY VERSION FEB.
2009
DESCRIPTION
This camera uses a SONY charge coupled device (CCD) image sensor, employs a digital
signal processor (DSP) chip-set for image control and all integrated state circuitry, which
provides extremely long life and high reliability. This camera offers excellent image quality
and it is not subject to distortions due to magnetic fields.
High resistance to shock and vibration, and easy to install: this camera is the best choice
for your CCTV system.
PRECAUTION
–
–
–
–
–
–
Do not keep the camera face a to strong light directly without lens or cap.
Avoid direct sunlight.
Avoid places with temperatures over 50°C .
Do not directly touch the CCD element. To clean the element, use a soft cloth
moistened with alcohol to wipe off dust.
When the camera is not used, keep the lens or the lens cap attached to protect the
CCD sensor.
In case of malfunction, make sure to unplug the unit and contact your local dealer.
SPECIFICATIONS
Color CCD Camera
Pickup Device:
1/3” SONY CCD
Picture elements
500(H)x582(V)
System of signal
PAL O NTSC O
Horizontal Resolution
420 TV Line
Lens Mount
C/CS Mount
Min. illumination
0.5lux at F1.2
Electronic Shutter Control
On/Off Switchable
Auto Again Control
AUTO
Back Light Compensation
AUTO
Electronic Shutter
1/50 – 1/10,000(s)
Auto Iris Lens
VIDEO/DC Driver
White Balance
AUTO
S/N Ratio
≥ 48dB
Power source
DC12V / 3 W
Consumption
160mA
Operating temperature
-10°C - +50°C
14°F - 122°F
Note: design and specifications are subject to change without prior notice.
PRELIMINARY VERSION FEB.
2009
OPERATING INSTRUCTIONS
1. Connect the optical output to the plastic optical fiber.
2. Connect the power source: +12V DC is the red wire on the camera.
3. When the picture appears on the monitor, only if necessary, adjust the focus to
obtain the best picture: remove the cap cover from the top of the lens mount and
screw the lens into the lens mount until the subject is in focus and the picture is
clear.
4. Mount the camera on the mounting bracket by using the hole on bottom of the
camera.
TROUBLE SHOOTING
If problems occur with your camera, please refer to the following. If the guidelines do not
help you to solve the problem, contact an authorized dealer.
PROBLEM
SOLUTION
No video
Check the power supply and line connection between
the camera and monitor.
Dim image
Check the surface of the lens
Weak contrast
Check if the camera is exposed to too strong light
Flicker image
Check if the camera faces to the sun directly or too
strong light.
PRELIMINARY VERSION FEB.
2009
Luceat SpA
Via Angelo Canossi 18
25030 Torbole Casaglia (BS) -Italy
Tel. +39 030 9771125
Email: [email protected]
www.luceat.it
PRELIMINARY VERSION FEB.
2009