1
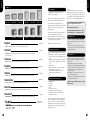
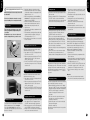
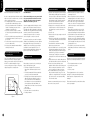
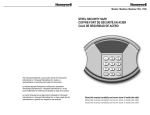
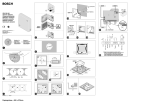
English
English
TREND I & II
Dear Customer,
Congratulations on the purchase of your
SecureLine security product.
We would like to thank you for expressing your
confidence in our product through your choice.
TI/II - 18K
TI/II - 27K
-
English
TI/II - 27E
TI/II - 32K
TI/II - 32E
TI/II - 44K
TI/II - 44E
TI/II - 41K
TI/II - 41E
TI/II - 61K
Your SecureLine safe will help protect your
valuables against the rising tide of crime and help
prevent the loss of possessions with a high
sentimental value.
This manual contains the information required to
achieve maximum benefit from your safe.
We recommend that you read the entire manual
carefully. After all, you cannot be too careful when
it comes to protecting your property.
TI/II - 61E
page 03
•
We wish you many years of security!
• Note: Keep this document in a secure place away from the safe.
Deutsch
What have you received?
Nähe des Tresors.
page 15
•
• Note: Conservez ce document en lieu sûr, à distance du coffre-fort.
Español
página 21
•
• Nota: Guardar este documento en lugar seguro fuera de la caja fuerte.
Italiano
pagina 27
•
Please check carefully that you have received the
following items. If not, please contact your supplier.
• 2 keys, only if your safe is equipped with a key
lock.
• 4 batteries, 1 battery holder and 2 override keys,
only if your safe is equipped with an electronic
lock.
• User manual.
• Fixing set consisting of: screws, plugs and
washers, plastic covers / caps.
• A shelf and shelf supports, if your safe is
equipped with a removable shelf.
• Nota: Conservare questo documento in un luogo sicuro lontano dalla cassaforte.
Nederlands
What can you store in this safe?
•
sida 39
•
• Notera: Förvara detta dokument på ett säkert ställe långt från skåpet.
Suomeksi
•
sivu 45
• Huomautus: Pidä tämä käyttöopas turvallisessa paikassa kassakaapin ulkopuolella.
•
•
02
Opening and closing the safe.
Please check that the safe works correctly
before installing it or securing items inside.
Opening the safe
1. Insert one of the keys supplied in the keyhole.
Note: the key only fits the keyhole in one position:
do not force it!
2. Turn the key clockwise until it stops. Do this
gently. The door can now be opened by pulling
the key towards you.
Closing the safe
1. Insert one of the keys supplied in the keyhole.
Note: the key only fits the keyhole in one position:
do not force it!
2. Ensure that the bolts are not protruding
(the bolts are the metal pins which protrude from
the side of the door and thus secure the safe).
If necessary, turn the key clockwise turn to
retract the bolts.
3. Gently push the door shut. Now turn the key
anti-clockwise until it stops.
4. Now remove the key from the keyhole and store
it safely away from the safe.
pagina 33
• Noot: Houdt dit document op een veilige plaats buiten de kluis.
Svenska
For safes equipped with a key lock:
Seite 09
•
• Hinweis: Bewahren Sie diese Anleitung an einem sicheren Ort und nicht in direkter
Français
* A Tip:
Some insurers appreciate it if you store your
valuable property in a good safe. Therefore ask
your insurance company what effect this will have
on your premium. The high quality security offered
by your safe can make a significant difference.
51
A
•
•
•
•
•
•
•
few suggestions:
Jewellery
Heirlooms
Cash
Credit cards, cheques
Photographic and video equipment
Passport, driving licence, birth certificates
Insurance documents
Note: We recommend that the spare key is not
kept in the safe.
* Please note that this product is not designed to
protect computer or Hi-Fi media. Depending on
where you locate your safe, it may be subject to
humidity. Stamps and other delicate items should
therefore be stored in an airtight container before
being put in the safe.
03
English
English
For safes equipped with an electronic lock:
What should you do before using the safe for
the first time?
Please check that the safe works correctly
before installing it or securing items inside.
Access codes
The electronic lock has two access codes
and are programmed independently from
each other.
Default both access codes are active and
must be changed before you use the safe.
LCD display
emergency
key hole
pull knob
battery socket
battery holder
1. Install the 4 batteries in the battery holder.
2. Plug the battery holder into socket of keypad
(located at the bottom of the keypad); the LCD
display will show “ -SL- “.
3. Enter the default factory code: 1 2 3 4 5 6 or
8 8 8 8 8 8. The door will unlock and the LCD
display will show “OPENED”.
4. Remove the battery holder and remove the
batteries from the battery holder. Store the
battery holder safely away from the safe.
5. Open the door.
6. Open the lid of the battery compartment at the
back of the door.
7. Fit the batteries, ensuring that the positive and
negative terminals are aligned correctly; the
LCD display will show “ -SL- “.
8. Now change the 1st and 2nd access code; this
is done as follows:
Changing the 1st access code
Note: this can only been done when the safe is
unlocked and the door is open.
1. Press button: * * 1. The LCD display will show
“-PROG-” and “-CODE-”.
2. Enter now your personal 6-digit code. The LCD
display will show “-GOOD-”, when the new
code is stored correctly.
3. DO NOT CLOSE THE DOOR YET!; test the new
code before closing the safe. Go to “Testing the
electronic lock”.
Changing the 2nd access code
Note: this can only been done when the safe is
unlocked and the door is open.
1. Press button: * * 2. The LCD display will show
“-PROG-” and “-CODE-”.
2. Enter now your personal 6-digit code. The LCD
display will show “-GOOD-”, when the new
code is stored correctly.
3. DO NOT CLOSE THE DOOR YET!; test the new
code before closing the safe. Go to “Testing the
electronic lock”.
battery
compartment
Default factory codes
The electronic lock is supplied by the manufacturer
with the standard access codes 1 2 3 4 5 6
(1st code) and 8 8 8 8 8 8 (2nd code). These
codes must be changed before you use the safe.
Now do the following:
04
Testing the electronic lock
The lock should only be tested with the door open!
1. Press button: #. The LCD display will show
“CLOSED” and the bolts will be pushed out.
2. Enter your personal code. The LCD display will
show “OPENED” and the bolts will retract.
3. If steps 1 and 2 are carried out successfully, you
can close the door and lock the safe.
Closing the safe
1. Close the door and keep it gently pressed shut
with one hand.
2. Now press button: #. The LCD display will show
“CLOSED” and the lock mechanism will be
activated and the bolts (these are the metal pins
in the side of the door) will be pushed out.
Opening the safe
1. Enter your personal code; If the code has been
entered correctly the LCD display will show
“OPENED” and the door will unlock.
2 The door can be opened further by pulling the
black pin (left side in keypad) towards you.
• If an incorrect access code has been entered,
the LCD display will show “Error” or ”E-Code”.
• If the safe is not closed within 10 sec. you will
hear 2 short beeps as notification.
• An incorrect input can be cancelled by pressing
the * button.
• If an incorrect access code has been entered
three times, the lock will be blocked for 5
minutes and the LCD display will show “HOLD05”.
Security feature
If required the LCD input can be made unreadable
while entering your code. This feature is also called
“anti-spy” function and is enabled when pressing
the * button before entering your personal access
code. The LCD display shows “- - - - - -“ and not
your code!
Emergency opening
4. Turn the key clockwise turn until it stops. Do this
gently. The door can now be opened by pulling
the key towards you.
5. The batteries can be replaced and the door can
be closed again.
6. Gently push the door shut. Now turn the key
anti-clockwise until it stops.
7. Remove the override key and store if safely
away from the safe.
8. Put back the plastic cover in the key hole.
9. You can again use your personal access code to
open the safe.
Replacing the battery
When the safe is locked the battery power can be
checked by pressing the # button. When the
batteries have sufficient power, the display will
show “HI-BAT”. If the display shows “LO-BAT” the
batteries are weak and shall be replaced as soon
as possible. We recommend that you use only
alkaline model LR6-AM3-AA-1.5V batteries.
To replace the batteries, follow these steps:
1. Open the door.
2. Open the lid of the battery compartment at the
back of the door.
3. Replace the batteries; ensuring that the positive
and negative terminals are aligned correctly; the
LCD display will show “ -SL- “.
4. DO NOT CLOSE THE DOOR YET!; test the new
code before closing the safe. For this, see the
instructions on “Testing the electronic lock”.
5. If the lock works correctly, you can close the
safe.
Attention
• Do not store your user manual and override
keys in the safe, but safely away from the safe.
Your safe is equipped with a mechanical override in
case an emergency opening is necessary.
• When the batteries are weak, the LCD display
will show “LO-BAT”. The safe can be opened by
plugging the battery holder (with new batteries!)
into the socket of keypad - located at the
bottom of the keypad. Follow the normal
procedure.
1. If the safe can not be opened via the normal
procedure you can open the safe with the
emergency override key.
2. Remove the plastic cover located on the right
side below the keypad.
3. Insert the override key.
Note: the key only fits the key hole in one position:
do not force it!
05
English
English
Positioning and fixing of the safe
Securing instructions
Where should I place my free-standing safe?
Recommendation
No safe is completely thief-proof. With time and the
right tools any safe can be broken into, so it makes
sense to observe the following:
1. It is important that the safe is as inconspicuous
as possible. We recommend that you never
place the safe anywhere where it is visible from
outside. For example, place your safe in a
cupboard or in the utility room.
2. If you have electronic security i.e. an alarm,
the safe is best positioned within the protected
room.
3. Place the safe with the hinge away from the wall
as this makes it harder to try the door open on
the lock side.
4. Position the safe as near to the floor as possible
in case of outbreak of fire.
5. Keep keys and combination numbers hidden
and away from the safe.
We recommend that you secure your safe with
the screws provided to both the floor and the
wall. This offers the best protection against
unauthorised removal of your safe.
Your safe is equipped with four fixing holes for this
purpose: two in the bottom and two in the back.
The quality of the fixing is dependent on the quality
and nature of the floor and wall into which the fixing
screws are screwed. The best results will be
achieved if you place the safe on a concrete or
stone floor against a concrete or stone wall.
If you wish to install it on a wooden floor it may be
desirable to use different fixings to ensure optimum
fixing strength. Various types of anchor bolts are
available for use in wood which can give a better
result that the screws supplied. The choice of
fixings is largely determined by the thickness and
type of wood on which the safe is placed.
How and with what can I secure my
free-standing safe?
What do you need?
Your safe is equipped with two holes in the bottom
and two holes in the back. Using the supplied
fixings, you can secure the safe to the floor and/or to
the wall. For a detailed description of how to
secure your safe, please see figure 1. This gives a
step by step guide to securing the safe.
To secure the safe you need fixings and tools.
Before starting to secure the safe, check that you
have the following items to hand:
1. The fixing set supplied. This set consists of:
fixing screws, metal washers, plastic covers /
caps.
2. An electric (hammer) drill. If the base material is
concrete, you will need a hammer drill.
3. The fixing holes in the base material need to be
drilled first. If the base material is concrete or
stone, you will need a concrete drill bit. If the
base material is wood, use wood drill bit. Note:
you may therefore require both drill bits, for
example if the floor is made of concrete and the
wall is wood.
4. A socket wrench.
5. A vacuum cleaner to clear the drill holes.
6. Possibly a hammer.
Installation instructions
Maintenance
1. Place the safe in the position you have selected.
Before marking or drilling any holes ensure that
there are no pipes or cables present at the fixing
points. If there is skirting board present at the
desired fixing point, this should be removed to
allow the safe to be fitted flush to the wall.
2. Open the safe and remove any shelves.
3. Using a pencil or a sharp object, mark out the
four drill holes; two on the floor and two on the
wall. (Always try to secure the safe with four
screws).
4. Close the safe.
5. Now move the safe to give enough room to drill
the fixing holes.
6. Drill holes: you will need the concrete drill bit for
a concrete base material, and the wood drill bit
for a wooden base material.
7. Clear the drill holes and remove any drilling
debris using a vacuum cleaner.
8. If you have drilled holes in a concrete floor, insert
the plastic plugs supplied in the holes. Ensure
that the end of the plug is level with the edge of
the drill hole. If necessary, use a hammer to
insert the plug. The plugs are not used when
securing the safe to wooden floor and/or wooden
wall.
9. Now position the safe so that the fixing holes on
safe match the drill holes in the floor and/or wall.
10.Secure the safe using the fixing screws
supplied. Slide the washer over the fixing screw
before screwing it into the drill hole. You will
need a socket wrench to drive in the screw.
11.On a double-walled safe, you can cover the
fixing holes with the plastic covers. This is not
possible on a single-walled safe. The two plastic
caps can be used to cover any unused fixing
holes from the outside.
• Never throw your keys. Distortion of the key
can damage the lock.
• When closing the door, there should never be
anything between the door and the safe (e.g. a
paper clip). The bolts must be fully retracted.
• Do not fill the safe to such an extent that it is
hard to close the door. The locking mechanism
could then seize up as a result of pressure on
the inner plate.
• Ensure that the key in the door does not hit a
wall when opening. This can cause the key to
snap, and can damage the locking mechanism.
• If you find that the lock becomes harder to open
or stiffer, never use oil or graphite powder to
'lubricate' the lock. This can make the tumblers
sticky, which could prevent the lock from opening
at all. Your supplier can advise you on the correct
cleaning product to use.
• The outside of your safe can be cleaned with a
slightly damp cloth. Never use chemical cleaning
agents.
However, we recommend that you do not use just
two screws to secure your safe.
First re-read the manual. If you cannot find a solution,
contact your supplier.
Troubleshooting
Although your safe has been manufactured with the
greatest care, a fault may nevertheless occur, such
as:
• The locking mechanism does not work.
• You cannot open your safe.
• Faulty lock.
• You lose your key.
The most important rule is not to try and force
anything. The locking mechanism in particular is
made of precision components which can be
damaged.
Figure 1
06
07
English
1. All claims under the warranty must be
accompanied by proof of purchase.
2. Claims under the warranty must be made to
the dealer from which the unit was purchased.
3. The warranty applies only to the initial purchaser
and is not transferable.
4. The warranty does not apply in the event of
damage or faults which are the result of:
a) Accidents, misuse, wear and tear, neglect,
wilful damage, fire and or malicious attack.
b) Incorrect installation and/or use in a manner
which conflicts with the relevant legal,
technical and/or safety standards.
c) An unauthorised modification.
d) Repairs carried out by anyone other than an
authorised dealer or the manufacturer.
e) Negligent transportation without appropriate
packaging or protection.
f) The erroneous programming of numerical,
combination and/or electronic locks.
5. No claim will be accepted under this warranty
involving losses occurring in transit.
6. Batteries and faults caused by incorrect insertion
or use of batteries with the wrong voltage are
excluded from the warranty.
7. The warranty gives no right to reimbursement of
any loss apart from the replacement or repair of
the faulty parts. The manufacturer cannot be
held liable for any consequential loss or any
other consequences caused by or connected
with the products supplied by it, including loss
or damage to items stored in it by theft, fire,
water ingress, condensation, chemical attack or
other means.
8. The costs of shipping, packing and shipping
insurance will always be borne by the customer.
9. Only the manufacturer may amend the
conditions of this warranty.
10.Repairs or site visits that are not covered under
this warranty will be chargeable. Please first clarify
with your dealer whether your claim is covered
by warranty.
In the unlikely event of a fault developing, please
contact your supplier.
www.Secure-Line.net
08
Sehr geehrter Kunde / Sehr geehrte Kundin,
herzlichen Glückwunsch zum Kauf Ihres SecureLine
Tresors.
Wir freuen uns, dass Sie sich für ein Produkt von
SecureLine entschieden haben. Der SecureLine
Tresor schützt Ihre Wertsachen, Dokumente und
unersetzlichen Erinnerungsstücke gegen Diebstahl.
Diese Anleitung enthält alles, was Sie wissen müssen, um Ihren SecureLine Tresor optimal zu nutzen.
Bitte lesen Sie sie genau durch. Schließlich kann
man nicht vorsichtig genug sein, wenn es darum
geht, sein Eigentum zu schützen.
Wir wünschen Ihnen viele Jahre Sicherheit!
* Ein Tipp:
Einige Versicherungsgesellschaften bieten
günstigere Beiträge an, wenn Sie Ihre Wertsachen
in einem guten Tresor aufbewahren. Die hohe
Sicherheit, die ein SecureLine Tresor bietet, kann
hier einen wesentlichen Unterschied machen.
Fragen Sie auf jeden Fall bei Ihrem Versicherer
nach.
Deutsch
Standard Warranty terms
Tresore mit Schlüsselschloss:
Öffnen und Verschließen des Tresors.
Bitte kontrollieren Sie, dass der Tresor
ordnungsgemäß funktioniert, bevor Sie ihn
verankern oder etwas darin einschließen.
Das sollten Sie erhalten haben
Öffnen des Tresors
Bitte kontrollieren Sie, ob Sie Folgendes haben.
Wenn etwas fehlt, beanstanden Sie dies bitte
sofort bei Ihrem Händler.
• 2 Schlüssel - nur bei Tresoren mit
Schlüsselschloss.
• 4 Batterien, 1 Batteriehalterung und
Notöffnungsschlüssels - nur bei Tresoren mit
Elektronikschloss.
• Bedienungsanleitung
• Befestigungsmaterial: Verankerungsschrauben,
Dübel, Unterlegscheiben, große
Kunststoffabdeckungen und kleine
Kunststoffkappen.
• Ein Einlegeboden und Einlegebodenunterstützung
- nur bei Tresoren vorgesehen mit Einlegeboden.
Das können Sie in diesem Tresor aufbewahren
Einige Beispiele:
• Schmuck
• Erbstücke
• Bargeld
• Kreditkarten, Schecks
• Foto- und Videoausrüstung
• Reisepass, Führerschein, Geburtsurkunden
• Versicherungsunterlagen
* Bitte beachten Sie, dass dieser Tresor nicht zur
Aufbewahrung von Computer-Datenträgern oder
Hifi-Medien geeignet ist. Je nach dem
Aufstellungs-ort Ihres SecureLine Tresors, ist
eventuell eine Schwitzwasserbildung möglich.
Briefmarken und andere empfindliche Artikel sollten
deshalb in einem luftdichten Behälter im Tresor
aufbewahrt werden.
08
1. Stecken Sie einen der mitgelieferten Schlüssel in
das Schüsselloch.
Hinweis: Der Schlüssel passt nur in einer
Stellung: Versuchen Sie nicht, ihn mit Gewalt
einzustecken!
2. Drehen Sie den Schlüssel vorsichtig im
Uhrzeigersinn, und zwar um eine Viertel
Umdrehung bis zum Anschlag. Sie können die
Tür nun öffnen, indem Sie den Schlüssel auf
sich zu ziehen.
Verschließen des Tresors
1. Stecken Sie einen der mitgelieferten Schlüssel
in das Schlüsselloch.
Hinweis: Der Schlüssel passt nur in einer
Stellung: Versuchen Sie nicht, ihn mit Gewalt
einzustecken!
2. Stellen Sie sicher, dass die Riegelbolzen nicht
ausgefahren sind (die Riegelbolzen sind die
Metallstifte seitlich an der Tür, mit denen der
Tresor verriegelt wird).
3. Schließen Sie die Tür vorsichtig. Drehen Sie
dann den Schlüssel entgegen dem
Uhrzeigersinn, und zwar um eine
Viertelumdrehung bis zum Anschlag.
4. Ziehen Sie den Schlüssel ab, und verwahren Sie
ihn an einem sicheren Ort entfernt vom Tresor.
Hinweis: Bewahren Sie den Ersatzschlüssel
nicht im Tresor auf.
09