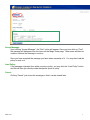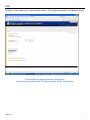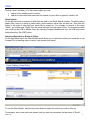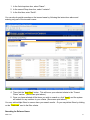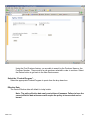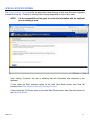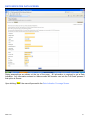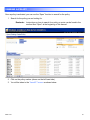
1
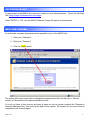
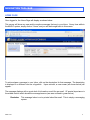
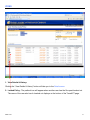
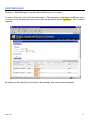
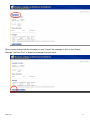
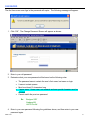
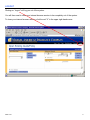
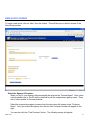
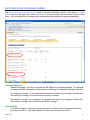
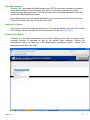
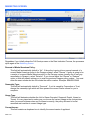
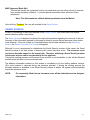
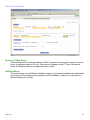
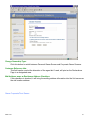
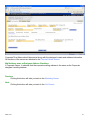
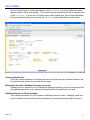
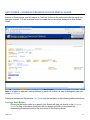
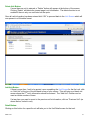
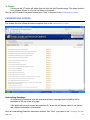
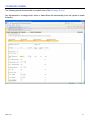
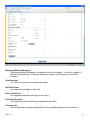
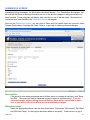
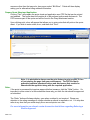
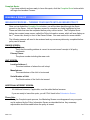
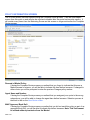
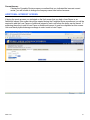
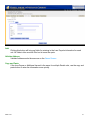
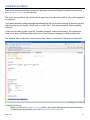
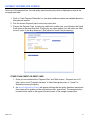
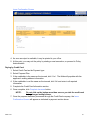
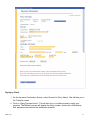
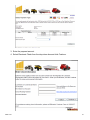
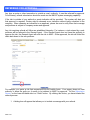
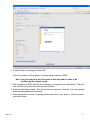
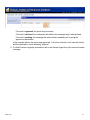
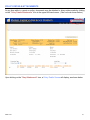
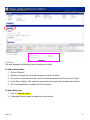
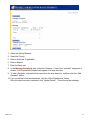
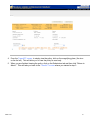
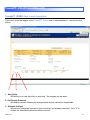
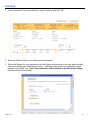
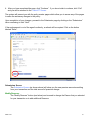
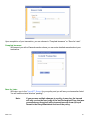
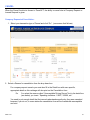
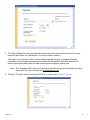
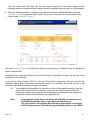
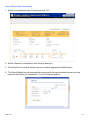
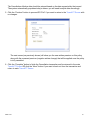
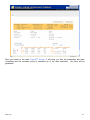
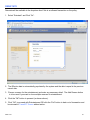
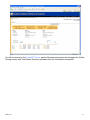
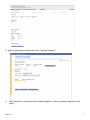
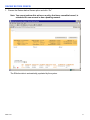
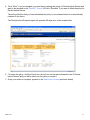
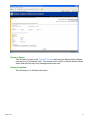
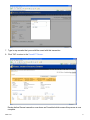
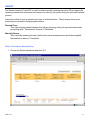
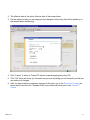
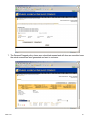
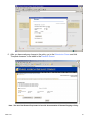
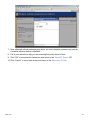
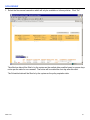
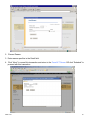
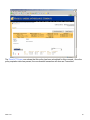
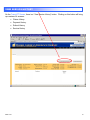
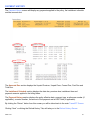
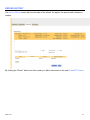
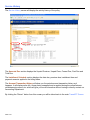
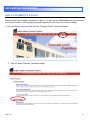
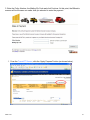
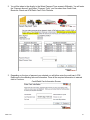
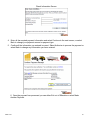
MMH-12-09 1 TABLE OF CONTENTS ACCESSING MAGIC .................................................................................................................................................................. 4 WELCOME SCREEN.................................................................................................................................................................. 4 NAVIGATION TOOL BAR .......................................................................................................................................................... 6 HOME PAGE .................................................................................................................................................................... 6 NEW ................................................................................................................................................................................ 8 OPEN ............................................................................................................................................................................... 9 DIARY/MESSAGES ......................................................................................................................................................... 13 PASSWORD.................................................................................................................................................................... 15 LOGOUT......................................................................................................................................................................... 17 PROCESSING A NEW QUOTE ................................................................................................................................................. 18 NEW QUOTE SCREEN .................................................................................................................................................... 19 SPECIAL NOTICES SCREEN ............................................................................................................................................. 22 RATE INDICATION DATA SCREEN .................................................................................................................................. 23 RATE INDICATION COVERAGE SCREEN ......................................................................................................................... 24 MARKETING SCREEN ..................................................................................................................................................... 26 OWNER SCREENS .......................................................................................................................................................... 27 UNIT SCREEN ................................................................................................................................................................. 31 UNIT SCREEN – SCHEDULE PRESENTATION FOR RENTAL USAGE ................................................................................. 32 UNDERWRITING SCREEN............................................................................................................................................... 34 COVERAGE SCREEN ....................................................................................................................................................... 35 SUBMISSION SCREEN .................................................................................................................................................... 38 ISSUING A POLICY.................................................................................................................................................................. 40 ISSUANCE PROCESS – TURNING YOUR QUOTE INTO AN ISSUED POLICY ..................................................................... 40 POLICY INFORMATION SCREEN..................................................................................................................................... 41 ADDITIONAL INTEREST SCREEN .................................................................................................................................... 42 SUBMISSION SCREEN .................................................................................................................................................... 44 PAYMENT INFORMATION SCREEN................................................................................................................................ 45 REFERRING FOR APPROVAL .................................................................................................................................................. 50 POLICY DETAILS/ATTACHMENTS................................................................................................................................... 53 VIEWING A POLICY ................................................................................................................................................................ 56 TransACT—POLICY MAINTENANCE....................................................................................................................................... 59 TransACT ICONS ........................................................................................................................................................... 59 ENDORSE ....................................................................................................................................................................... 60 MMH-12-09 2 CANCEL.......................................................................................................................................................................... 63 REINSTATE..................................................................................................................................................................... 69 REISSUE ......................................................................................................................................................................... 71 REVIEW BEFORE RENEW ............................................................................................................................................... 73 RENEW .......................................................................................................................................................................... 78 NON‐RENEW ................................................................................................................................................................. 84 VIEW SERVICE HISTORY......................................................................................................................................................... 87 CLAIMS HISTORY ........................................................................................................................................................... 88 PAYMENT HISTORY ....................................................................................................................................................... 89 REFUND HISTORY .......................................................................................................................................................... 90 Service History .............................................................................................................................................................. 91 ACCOUNTING PROCEDURES ................................................................................................................................................. 92 APPLY A PAYMENT TO A POLICY ................................................................................................................................... 92 USER MAINTENANCE ............................................................................................................................................................ 96 AGENT MAINTENANCE.......................................................................................................................................................... 96 TECHNICAL ASSISTANCE........................................................................................................................................................ 96 APPENDIX .............................................................................................................................................................................. 97 Request to add a SubProducer .............................................................................................................. 97 MMH-12-09 3 ACCESSING MAGIC To gain access to the MAGIC site, open up a session on your internet browser. Type in the following URL https://magic.markelamerican.com/magic . Press “ENTER” or “GO” and the MAGIC Welcome screen will appear as shown below. WELCOME SCREEN An authorized username and password are required to log in to the MAGIC site. 1. Enter your “Username”. 2. Enter your “Password”. 3. Click the “Login” button. The system will prompt a new User to change their password the first time they log in. See the section on Passwords for the required password format. If you do not have a User account and need to have one set up, please complete the “Request to Amend Established User” form found at the back of this manual. All requests for new users must be completed by the General Agent. MMH-12-09 4 Please email the completed form to [email protected] or Fax: 262-547-9436. Once your user profile has been established, you will be emailed with a username and password to give you access to your account. MMH-12-09 5 NAVIGATION TOOL BAR HOME PAGE Once logged in, the Home Page will display as shown below. This screen will show any new and/or overdue messages that are in your Inbox. At any time while in the MAGIC system, simply click on “Home” and you will be brought back to this screen. To retrieve/open a message in your Inbox, click on the description for that message. The description is displayed in a different color as a hyperlink. Upon retrieval, a new screen (as shown below) will appear. The message displays with a great deal of information much like an email. Of special importance is the middle section which shows the message/reason (see area outlined in green below). Reminder: MMH-12-09 This message Inbox is not a private Inbox like email. This is simply a messaging system. 6 Accept Message: Upon clicking “Accept Message”, the “Post” option will appear. Once you have click on “Post”, the message will disappear from the Inbox on the Magic Home page. Other users will then be unable to retrieve the message to work on. Once you have accepted the message you have taken ownership of it. You may then load the policy to work on it. Load Policy: If the message originated from within a quote or policy, you may click the “Load Policy” button and this will take you directly inside the specific quote or policy. Cancel: Clicking “Cancel” just closes the message so that it can be viewed later. MMH-12-09 7 NEW Clicking on “New” takes you to the new quote screen. This screen is standard for all Markel products For directions on how to process a New Quote, please see the section titled “Processing a New Quote” that follows. MMH-12-09 8 OPEN Clicking “Open” will take you to the screen where you can: search for an existing quote or policy search for items that have been sent for referral for your office to approve, decline, etc. Quick Search: On the left hand side is a series of fields that are used in the Quick Search function. To quickly build a search filter, enter in a value or partial value, and/or select a value from the drop list. Then click the button to the right of each field you would like to search for. For example, to search of the name “Smith,” you would enter “Smith” into the name field and click the name button. To narrow the search you could set the LOB to Mobile Home by selecting Property Mobilehome from the LOB drop down and pushing the “Set LOB” button. Advanced Search for a Quote or Policy: On the right hand side is the Filter Builder which allows you to select the criteria you would like to use to search for an existing quote or policy. (see screen shot below) To use the Filter Builder, use the drop down boxes to select the criteria you wish to filter on. For example, say a new quote was started, and you can only remember the last name of ‘Smith’. MMH-12-09 9 1. In the first drop down box, select “Name”. 2. In the second Drop down box, select “contains”. 3. In the third box, enter “Smith”. You can also do partial searches on the insured name by following the instructions above and entering only part of the insured’s name. 4. Then click the “Add Filter” button. This will move your selected criteria to the “Current Filters” section. (See screen print above.) 5. Once you have selected all the items you wish to search on, click “Apply” and the system will search for any matches to your criteria. (See screen print above.) You may add multiple filters to narrow down your search results. Or you may delete filters by clicking on the “Trash can” next to the filter criteria. Searching for Referred items: MMH-12-09 10 In the middle of the screen there are 2 buttons that allow you to search for items that have been referred to your office for approval—Quote Referral and Service Request (see the area outlined in red below). Sorting Results: Clicking on a blue column header will sort the results by the column. Click on the header again to reverse the order. Quote Referral: The “Quote Referral” button allows you to quickly search for quotes that have been referred to your office for approval. When you click on “Quote Referral” a list of all the quotes that have been referred to your office will appear. Click on the quote # to load the quote to work on it. Review the request and then proceed to the Submission page. If you have authority, you will have the choice to Approve or Decline the risk or alternatively refer it to MAIC if you desire a 2nd opinion. Once you choose Approve, Decline or Refer, a message box will appear where you may add a message. Add the message and click OK. The risk will then be sent back to the requestor as Approved or Declined, or it will be sent to MAIC as a referral. MMH-12-09 11 ICONS 1. View Details & History: Clicking the “View Details & History” button will take you to the Detail screen. 2. Locked Policy: The padlock icon will appear when another user has the file open/checked out. The name of the user who has it checked out displays on the bottom of the TransACT page. MMH-12-09 12 DIARY/MESSAGES Clicking on “Diary/Messages” from the toolbar will take you to your Inbox. To open a Diary Item, click on the bold description. (The description is displayed in a different color.) If you hover over the description with your mouse, the description will be highlighted. This is called a hyperlink. By clicking on this hyperlink you will retrieve the message, and a new screen will appear. MMH-12-09 13 When you are finished with the message you may “Cancel” the message, or click on the “Accept Message” and then “Post” to delete the message from your inbox. MMH-12-09 14 PASSWORD The first time a new user logs in the password will expire. The following message will appear: 1. Click “OK”. The Change Password Screen will appear as shown: 2. Enter in your old password. 3. Determine what your new password will be based on the following rules: The password cannot contain the user’s first name, last name or login It cannot contain spaces Must be at least 10 characters long 1 upper case, 1 lower case, one numeric and one special character must be included Cannot match the previous password Ex. Badgers.2007 Alabama!99 HAPPY2cu2# 4. Enter in your new password following the guidelines above, and then enter in your new password again. MMH-12-09 15 5. Click “Change Password”. 6. If the password change is complete you will receive the following message: 7. You may now proceed as normal. If you do not have a User account and need to have one set up, please complete the “Request to Amend Established User” form found at the back of this manual. All requests for new users must be completed by the General Agent. Please email the completed form to [email protected] or Fax: 262-547-9436. Once your user profile has been established, you will be emailed with a username and password to give you access to your account. MMH-12-09 16 LOGOUT Clicking on “Logout” will log you out of the system. You will then need to close your internet browser session to be completely out of the system. To close your internet browser session, click the red “X” in the upper right-hand corner. MMH-12-09 17 PROCESSING A NEW QUOTE GENERAL NOTES: Note that the various mobile home usages may have varied field requirements and coverage offerings. To process a rate indication in MAGIC the user will be required to fill out minimal information on the owner, usage, and unit and then proceed to the coverage page. Insurance score will be pulled for a rate indication. The rate indication assumes that the applicant is loss free. Underwriting eligibility is not checked for a rate indication. To process a full quote in MAGIC, the user will go through a series of screens completing all yellow highlighted fields with an asterisk (*) or as prompted by the system. To issue a policy, the user will need to complete all the blue colored fields. Do not use the ampersand (&) symbol as it will cause an error. All quotes are good for 60 days. Once a quote expires you will see a Reset Quote Tab, unless the quote has been left in an approved status. If this occurs you will need to re-pend the quote to receive the reset quote button. Wherever there is a drop down box, you can repeatedly type the first letter of the word to find your selection or you may click the drop down arrow and scroll to your selection. It is not necessary to type the slashes and dashes in phone numbers, dates of birth, etc. Simply click the “Tab” key and the field will be automatically formatted. Bind restriction rules (when in place) have been built into the system at the beginning of the quote process. You will receive a warning that quote can only be bound without physical damage coverage. You will be able to proceed to rating and will be able to either issue the policy with the exclusions OR choose to refer to company with further information. You may use the Previous button or Back button to click from page to page in order, or you may click on the appropriate tab that you need to go to. Click the Save for Later or Exit Buttons to save what you are doing and work on something else. Upon starting a quote a unique quote number will be assigned. At any time, you can Click ‘Save and Exit’ and the quote may be exited and retrieved. Depending on each user’s authority, the functionality will vary slightly. MMH-12-09 If the risk is over their authority, they may only process an indication of premium. The risk must then be referred for approval. If the risk is within their authority, they may process the quote, issue the policy, apply a payment and perform all maintenance (contracted agent only). 18 NEW QUOTE SCREEN To begin a new quote, click on “New” from the toolbar. This will take you to the first screen of the New Quote process. Select the Agency & Producer: When you log in, your Agency will automatically be listed as the “General Agent”. Note: when a sub-producer logs in, the GA will be identified as will the subproducer agency name. There are no other options for the sub producer. Select the subproducing agency’s name from the drop down list located under “Producer Name”. Once you select the Agency from the list, their Producer Number will appear to the right. You can also click the “Find Producer” button. The following screen will appear: MMH-12-09 19 Using the Find Producer feature, you are able to search by the Producer Name or the Producer Number. There must be a sub-producer selected in order to continue. Select the Return button to get back to the New Quote screen. Select the “Product/Program”: Select the appropriate Product/Program to quote from the drop down box. Effective Date: The Quote Effective date will default to today’s date. Note: The policy effective date can be set at time of issuance. Failure to have the correct effective date at issuance will require the policy to be canceled and reissued. MMH-12-09 20 Zip Code: Enter the Zip Code of the location where the risk is located. Hit “TAB” or click on the screen and the location state will populate When the zip code is entered, the system will check to ensure that MAIC is accepting new business in that area at the current time. If not, the user will be notified accordingly. Note: The system will not allow the quote to continue if a zip code is entered for a risk state where your Agency is not licensed to do business with MAIC, if the subproducer is not licensed in that state or if your Agency’s current license for that state is not on file with MAIC. If all required fields are acceptable, both the “Full Quote” or “Rate Indication” buttons will appear and clicking either one will force you to proceed initially to the Special Notices Screen. If you choose “Full Quote:” option you will be taken through the normal quote process where a final rate will be generated. Please note that if you are quoting a rental schedule, you will have to use the “Full Quote” option. If you choose ‘Rate Indication” you will fill out minimum information to deliver a rate indication and then proceed to the coverage screen. MMH-12-09 21 SPECIAL NOTICES SCREEN The Special Notices Screen provides the applicable Fraud Warning as well as a disclosure regarding Insurance Score use. Content of warnings could change depending on risk location state. NOTE: It is the responsibility of the agent to review this information with the applicant prior to starting a quote. Upon clicking “Continue” the user is attesting that this information was disclosed to the applicant. If User chose the Rate Indication option on the initial New Quote screen, then User will proceed to the Rate Indication Data and Coverage Screens. If User chose the Full Quote option on the initial New Quote screen, then User will proceed to the Marketing Screen MMH-12-09 22 RATE INDICATION DATA SCREEN Rating assumptions are shown at the top of the page. All information is required to get a Rate Indication. Any information entered on these screens will transfer over into the Full Quote process if that option is chosen. Upon clicking “Next” the user will proceed to the Rate Indication Coverage Screen. MMH-12-09 23 RATE INDICATION COVERAGE SCREEN The Rate Indication Coverage Screen found in the Rate Indication process is the same Coverage Screen that you will view if you switch over to the Full Quote process so more details can be found there. You may adjust the Coverage values as necessary and system will rerate automatically. Coverage Selection: Standard Package – An owner occupied risk will default to a standard package. The package coverage and limits can easily be changed by un-checking the “Standard Package” checkbox. No Dwelling Coverage – If your applicant is interested in liability only coverage, checking the “No Dwelling Coverage” box will remove all property coverage. No Liability Coverage - If your applicant is interested in property only coverage, checking the “No Liability Coverage” box will remove all liability coverage. Save and Exit: If the Rate Indication is done being processed and no further action is required at that time, click “Save and Exit”. The Rate Indication can then be retrieved at any time. MMH-12-09 24 Print Rate Indication: Clicking “Print” will prepare the Rate Indication as a PDF file that can be printed and emailed. As the Rate Indication is not a final rate, this will be so indicated on the form along with pertinent notices and disclosures. The PDF becomes part of the Rate Indication and will be found in the Diary/Attachment section. Upon clicking print, a box will appear that allows you to enter notes that will print on the form. If you wish to enter notes, do so, and then click “Print”. Switch to Full Quote: If you want to develop the Rate Indication into a Full quote containing a final rate, click “Switch to Full Quote” and you will rejoin the Full quote process on the Marketing Screen. Endorsements Button: If desired, you can attach endorsements to the Rate Indication in the event you want to have coverage included or excluded as part of the general Rate Indication. Clicking the Endorsement button will take you to the Endorsement attachment screen: Select your endorsement and then click “Add”. MMH-12-09 25 MARKETING SCREEN Regardless if you initially chose the Full Quote process or the Rate Indication Process, the processes rejoin again at the Marketing Screen. Renewal of Markel American Policy: This field will automatically default to “No”. If the policy is going to be a manual renewal of a current Markel American policy in the Paragon system, select “Renew.” If policy is going to be a rewrite of a current Markel American policy in the Paragon system (usually due to non-pay cancellation in Paragon), select “Reissue”. If you choose either the “Renew” or “Reissue” option, a field will present asking you to enter the previous Paragon policy number. You must enter the exact number but do not include the edition number. Example: MMH00123446 Ownership Type: This field will automatically default to “Personal”. If unit is owned by Corporation or Trust, change the ownership type which will then present the correct Owner screen for you to complete. Usage Type: This field will determine whether the Unit is Owner Occupied, Seasonal, Rental, Vacant or Tenant. It is very important to make sure you choose the correct Usage as the choice drives rates, forms and business rules and if chosen incorrectly, the policy will need to be flat cancelled and rewritten to correct Usage type. Current Insurer: This field contains a dropdown box to identify the current carrier of applicant. MMH-12-09 26 MAIC Approved Book Roll: This field will usually be ‘unchecked’ and is only used when you are rolling a book of business from another company to Markel. It controls special commission rates and some forms attachment. Note: This field cannot be utilized without permission from the Markel. Upon clicking “Continue” the user will proceed to the Owner Screen OWNER SCREENS In lieu of commenting on each field entered on the Owner Screen, only those fields that require special attention will be noted below. The Owner Screen is designed to capture the required information regarding the owner(s) of the unit. Accuracy of the information entered on this page is critical to ensure that an insurance score is able to be obtained. If the unit is titled in a Corporate Name and this was indicated on the Marketing Screen, the Owner Corporate/Trust Screen will appear. Although it is not a requirement to obtain/enter the Social Security number of the owner, the Social Security number is the best means of securing the correct insurance score. The insurance score can have a favorable impact on the overall rate. Therefore, obtaining a Social Security number in the quote process can be very beneficial for the applicant. If during the quoting process our Insurance Score provider is not accessible, no rate will be delivered and the quote will need to be re-processed later. The address information entered on this screen is considered to be the mailing address location. (The unit’s location is captured during the issuance process.) If during the quoting process the insured’s address is amended or the Social Security number is added, the system will automatically re-pull the insurance score. NOTE: MMH-12-09 On corporately titled risks an insurance score will be obtained based on designee information. 27 Owner Personal Screen Spouse is a Titled Owner: This checkbox will force the appearance of fields to capture the name of the spouse if spouse is also a registered owner of the unit. Their name will appear on the 2nd line of the Insured Name and Address area on any applicable forms output. Validate Address: This button brings up the Address Validation screen. It automatically validates the address that you entered on the screen previous against a USPS database, however, you can enter in a different address if you’d like. MMH-12-09 28 Change Ownership Type: Click this button to switch between Personal Owner Screen and Corporate Owner Screens. Customer Reference Info: This field can be used at the discretion of the agent but if used, will print on the Declarations Page in a designated area. Mail Address same as Residence Address Checkbox: If this checkbox is checked, it will bring the mailing address information into the Unit screen as the risk location address. Owner Corporate/Trust Screen MMH-12-09 29 Corporate/Trust Name should be entered along with the designee’s name and address information. All functions of the screen are identical to the Personal Owner Screen. Mail Address same as Designee Address Checkbox: If Corporate Owner, it indicates that the corporate mailing address is the same as the Corporate designee’s mailing address. Previous: Clicking this button will take you back to the Marketing Screen. Next: Clicking this button will take you back to the Unit Screen. MMH-12-09 30 UNIT SCREEN In lieu of commenting on each field entered on the Unit Screen, only those fields that require special attention will be noted below. The screen shot that follows will provide a complete view of the Unit Screen. If unit is part of a Rental policy with multiple units, then a Rental Schedule will show which will allow you to access the Unit Screen detail individually for each policy Location Address Info: This is the location address of the where the unit is kept and must be in the same state as the zip code that was entered on the New Quote screen. Municipality Override Checkbox (Kentucky risks only): Checking this box will allow you to override the municipal taxes but you must furnish proof that the applicant pays taxes to an untaxed municipality before this feature can be used. Additional Interest on Policy Question: This is where existence of a Loss Payee or Additional Insured is noted. Changing value from None to another choice will force entity information to be collected during issuance process. MMH-12-09 31 UNIT SCREEN – SCHEDULE PRESENTATION FOR RENTAL USAGE If policy is Rental Usage, you will receive an “Add Unit’ button on the unit screen after the initial unit has been created. You can continue to add units and the top tab will be displayed as Risk Sched Detail: Note: It is helpful to add the Location Address for each unit so that it is easy to distinguish each unit on the Unit Screen. Fields are the same as the previous Unit Screen with the exception of the following additional buttons: Coverage Detail Button: Clicking on this button while on a specific Unit Screen will take you directly to the Coverage Screen for that unit however this button will not appear until after you answered the Underwriting Questions found on the next screen in the Quote process. MMH-12-09 32 Delete Unit Button: If more than one unit is entered, a “Delete” button will appear at the bottom of the screen. Clicking “Delete” will delete the current page’s unit information. The delete function is not enabled if there is only one unit listed on the quote. Once all unit information has been entered click “OK” to proceed back to the Unit Screen which will now present in a Schedule format. Add Unit Button: If there is more than 1 unit to be quoted, upon completing the Unit Screen for the first unit, click on “Add Unit” at the top of the left-hand corner of your screen. This will bring up a blank unit screen where the 2nd unit’s information should be entered. The “Add Unit” function can be used an infinite number of times. If at any time you need to revert to the previous unit’s information, click on “Previous Unit” (as shown below, circled in red). Detail Button: Clicking on this button for a specific unit will take you to the Unit Detail screen for that unit. MMH-12-09 33 “X’ Button: Clicking on the “X” button will delete that unit from the Unit Schedule page. The delete function is not enabled if there is only one unit listed on the quote. Once all unit information has been entered click “Next” to proceed to the Underwriting Screen. UNDERWRITING SCREEN The screen shot that follows provides a complete view of the Underwriting Screen. Underwriting Questions: All Underwriting Questions must be answered and any messages due to eligibility will be presented at the top of the next page. If the applicant has prior losses (see question #1), a new tab will display called ‘Loss History’, with required information on loss detail. Once all Underwriting Questions have been entered, click “Next” to proceed to the Coverage Screen. MMH-12-09 34 COVERAGE SCREEN The following screen shots provide a complete view of the Coverage Screen. Any adjustments to coverage limits, terms or deductibles will automatically force the system to rerate the policy. MMH-12-09 35 Rating and Referral Messages: Eligibility and referral messages, will appear at the top of this page. If a risks is ineligible, a rate will not be delivered. If data was entered incorrectly, once corrected, a rate will be provided. Term Premium: The total term premium, not including any taxes. Unit Fees/Taxes: Any taxes/fees that apply to each unit. Policy Taxes/Fees: Any applicable taxes/fees that apply to the policy. Total Term Premium: The total term premium including any applicable taxes/fees. Coverage List: Lists all applicable coverages along with the limit, deductible and premium for each unit. MMH-12-09 36 Unit Premium: The total premium for all of the coverages (not including any applicable taxes) Once all Coverages, Limits and Deductibles have been selected, click “Next” to proceed to the Submission Screen. Coverage Selection: Standard Package – An owner occupied risk will default to a standard package. The package coverage and limits can easily be changed by un-checking the “Standard Package” checkbox. No Dwelling Coverage – If your applicant is interested in liability only coverage, checking the “No Dwelling Coverage” box will remove all property coverage. No Liability Coverage - If your applicant is interested in property only coverage, checking the “No Liability Coverage” box will remove all liability coverage. MMH-12-09 37 SUBMISSION SCREEN At this point, if all information necessary to provide a rate has been entered and there are no outstanding rating messages, the Submission tab should display. If no Submission tab displays, that will indicate that there is missing information on one of the previous pages or rating errors have not been handled. Those page tabs will display with a red line on top of the tab name. Once errors or omissions have been handled, the Submission Screen will appear. Once on the Submission Screen, you can click on Save and Exit (which saves the quote for later), Prepare Quote sheet, Complete the Quote, Refer it, or go back to make any desired changes. Save and Exit: If the quote is done being processed and no further action is required at that time, click “Save and Exit”. The quote can then be retrieved to work on again at a different time. If you do close the browser without hitting Save and Exit the quote will be locked and another user in your office will not be able to access to make any changes. Billing Instructions Select the appropriate choice from the drop down menu. Choices are “Bill Insured”, “Bill Other” and “Bill Loss Payee”, if a loss payee has been added to the policy. If the invoice is to go to MMH-12-09 38 someone other than the insured or loss payee, select “Bill Other”. Fields will then display asking you for alternative billing address information. Prepare Quote Sheet and Application: Clicking “Print” will prepare the quote sheet and application as a PDF file that can be printed and emailed. The quote sheet will contain all of the pertinent notices and disclosures. The PDF becomes part of the quote and will be found in the Diary/Attachment section. Upon clicking print, a box will appear that allows you to enter notes that will print on the quote sheet. If you wish to enter notes, do so, and then click “Print”. Note: It is advisable to always use the print feature to print a quote, in lieu of just printing the page from your web browser. The PDF file that is generated contains important notices and disclosures that need to be shared with the applicant along with the required application. Refer: If the quote is processed but requires approval before issuance, click the “Refer” button. It’s important to enter notes to let the underwriter know why you think the risk should be approved as submitted. The “Refer” button will always display, even when a referral is not required. Please pay attention to the rating messages to confirm whether a referral is required or not. You may also refer at any time that you would simply like a second opinion on a risk. For more information on referrals review the section that follows regarding Referring a Risk for Approval. MMH-12-09 39 Complete Quote: If you have authority and are ready to Issue this quote, click the Complete Quote button which will begin the Issuance Process. ISSUING A POLICY ISSUANCE PROCESS – TURNING YOUR QUOTE INTO AN ISSUED POLICY Once you’ve clicked the Complete Quote button, you will be taken back through the Quote process to the Owner, Unit and Operator screens to complete any fields highlighted in blue. These are fields that must be completed before policy can be issued. The Complete Quote button also created a new screen, called the Policy Information screen, which will now display as the 1st screen tab, directly in front of the Owner Screen. See next section for screen details. The following screens will need to be reviewed and any necessary data entry completed before policy can be issued: OWNER SCREEN: Mailing Address: Verify that the mailing address is correct to ensure insured’s receipt of all policy documents. Primary Phone: The phone number including the area code UNIT SCREEN: Location Address 1: The street address of where the unit is kept Manufacturer: The manufacturer of the Unit to be insured Serial Number of Unit: The Serial number of the Unit to be insured ADDITIONAL INTEREST SCREEN: All Additional Interests, if applicable, must be added before Issuance. If you are ready to Issue this quote, you will ‘Click’ back to the Submission Screen. Please Note: During the Complete quote process, the Marketing Screen now disappears from your quote and is replaced by the Policy Information Screen as described below. Any necessary adjustments should be made before the policy is issued. MMH-12-09 40 POLICY INFORMATION SCREEN This is a new screen that was created during the Complete Quote process. It will be a permanent screen from this point on and will also be used and viewable after the quote has become a policy. It will contain many items from the Marketing Screen as this screen no longer exists after the Complete Quote process. Renewal of Markel Policy: If during the Complete Quote process you realized that you forgot to indicate that this was a Markel renewal or reissue, you will be able to indicate this here before Issuance. If changed to either choice you will be prompted to enter the previous Paragon policy number. Agent Name and Number: If during the Complete Quote process you realized that you assigned your quote to the wrong subproducer, you will be able to change the agent here before Issuance. Selection process is identical to that on the New Quote screen. MAIC Approved Book Roll: If during the Complete Quote process you realize that you did not mark this policy as part of an approved Book Roll, you will be able to indicate this before Issuance. Note: This field cannot be utilized without permission from the Markel MMH-12-09 41 Current Insurer: If during the Complete Quote process you realized that you indicated the incorrect current carrier, you will be able to change the company name here before Issuance. ADDITIONAL INTEREST SCREEN If during the quote process you indicated on the Unit screen that you had a Loss Payee or an Additional Insured, this screen tab will be created during the Complete Quote process and you will be required to add the Loss Payee or Additional Interest to each unit before the policy can be issued. If endorsing the policy to add a Loss Payee or Additional Insured, it must be completed on this screen. Unit must have physical damage coverage in order to add a Loss Payee. MMH-12-09 42 Add: Clicking this button will bring up fields for entering in the Loss Payee’s information for each unit. All fields in blue must be filled out to issue the quote. Validate Address: Validate Address works the same as on the Owner Screen. Copy and Paste: If the Loss Payee or Additional Insured is the same for multiple Rental units, use the copy and paste button to enter the information more quickly. MMH-12-09 43 SUBMISSION SCREEN Once all information necessary for Issuance has been entered during the Complete Quote process, the Submission Screen is your final stop. The action you are able to take at this time is based on your authority as well as if the risk is approved for issuance. If you have received a rating message that advises that the risk must be referred, at this time you will refer the policy by clicking the “Refer” button or click “Exit”. (See instructions that follow regarding referrals) If the Policy is ready to issue, click the “Complete Issuance” button shown below. The system will force you to enter an Effective Date, allow you to Add Notes and change your Billing Instructions. The effective date of the policy cannot be less than 5 days or more than 30 days from today’s date. Complete Issuance: When you Click the Complete Issuance button, the system will load the Payment Information for this policy and will direct you to the Payment Information Screen. MMH-12-09 44 PAYMENT INFORMATION SCREEN At the top of the payment box, the total policy premium and policy term is displayed as well as the coverage start date. 1. Click on “View Payment Schedules” to view what installment plans are available based on that premium amount. 2. Pick the chosen Payment plan from the drop down box. 3. Choose the Payment Type. If paying by credit card or debit card, you will select the Credit Card option in the drop down box. If paying by any other method, you will select the “Mail Invoice” option in the drop down box. (See below for Credit Card processing.) OTHER THAN CREDIT OR DEBIT CARD 1. Once you have selected the “Payment Plan” and “Mail Invoice – Payment due in 21 days” option, click “Complete Issuance” to finish issuing the policy or “Cancel” to discontinue issuing the policy. 2. An Issue Confirmation Screen will appear advising that the policy has been issued and that output will be mailed out the next business day. (see below) The assigned policy number will be visible in the upper left-hand corner of the orange summary box. MMH-12-09 45 Issue Confirmation Screen 4. As soon as output is available, it may be printed in your office. 5. At this point, you may exit the policy by starting a new transaction, or proceed to Policy Administration. Paying by Credit Card: 1. Select Credit Card as the Payment type. 2. Select Payment Plan 3. If the cardholder is the same as the insured, click ‘Yes’. The fields will populate with the applicant’s mailing address information. 4. If the cardholder is not the same as the insured, click ‘No’ and enter in all required information. 5. Complete the Credit Card Information section. 6. Once complete, click Complete Issuance button. Do not click on the button more than once or you risk the credit card being charged multiple times. 7. Once the payment has been processed through the Credit Card company, the Issue Confirmation Screen will appear as indicated in payment section above. NOTE: MMH-12-09 46 Paying by Check 1. On the Issuance Confirmation Screen, select Proceed to Policy Admin. This will take you to the TransAct screen. 2. Click on “Apply Payment button”. This will take you to our billing system to apply your payment. The Billmatrix screen will display the policy number, current due, total balance due, payments received and the installment schedule. MMH-12-09 47 3. Enter the payment amount. 4. Select Electronic Check from the drop down box and click Continue. MMH-12-09 48 5. Enter all required information on the Check Information Screen and click Continue. 6. Verify all the information you entered is correct and click Authorize to continue or back to return to the prior screen. 7. Once the payment has been processed through Billmatrix you will receive Payment Receipt. You can either Make Another Payment or Exit the Billmatrix system. Your payment will automatically apply to the policy. MMH-12-09 49 REFERRING FOR APPROVAL Any time a quote or other transaction is outside a user’s authority, it must be referred for approval. For efficiency, referral submissions should be made via the MAGIC system messaging capability. If the risk is outside of your authority a quote indication will be provided. The system will alert you that approval is required. Quotes may be released as an indication without being submitted to the company. When releasing an indication to an applicant, please be sure to notify them that coverage and premium is subject to company review and approval. Any risk requiring referral will follow an established hierarchy. For instance, a risk entered by a subproducer will be referred to the General Agent. If the General Agent does not have the authority to approve the risk, the General Agent will refer the risk to MAIC. Once approved, the risk will follow the chain back down to the sub-producer. For example, you quote a risk that requested $300,000 liability limits. Your agency does not have authority to issue the policy so it needs to be referred to MAIC for approval. On the Submission Screen, on the lower left-hand side is a “Refer” button. By clicking this button, you have initiated the referral process. 1. A dialog box will appear that allows you to include a message with your referral. MMH-12-09 50 2. If desired, enter a message and click “OK”. Given the scenario outlined above, this quote will be referred to MAIC. Note: Once the referral is sent, the quote is read only and is unable to be modified by the original sender. 3. The underwriter at MAIC will open the message to see why the risk was referred. They will then load the policy and view what has been entered. 4. A decision will then be made. The risk will either be approved, declined, or put into pending status awaiting additional information. 5. Once that decision is made, a message will be sent back to your Agency. (See the screen print that follows) MMH-12-09 51 If the risk is approved, the quote may be issued. If the risk is declined, the underwriter will detail in the message why it was declined. If the risk is pending, the message will advise what is needed prior to giving the approval or declination. In the example above, this quote was approved. In the box outlined in red, note the Activity and the description—both indicating “Approve”. 6. If a Sub-Producer originally referred the risk to the General Agent they will receive the same message. MMH-12-09 52 POLICY DETAILS/ATTACHMENTS At any time while in a quote or policy, documents may be attached or diary entries made by clicking on the “Policy Details/Attachments” Icon in the upper left-hand corner. (See red oval shown below.) Upon clicking on the “Diary/Attachments” Icon, a Policy Details Screen will display, as shown below. MMH-12-09 53 The area displayed in pink above is the Attachment function. To add an Attachment: 1. Click on “Browse”. 2. Search your computer to find the document you’d like to attach. 3. Once you’ve found the document, click on the document name and then click on “Open”. 4. In the “Enter Caption” field, enter the name of how you would like the attachment labeled. 5. Click “Add Attachment” to attach the file to the policy. To add a Diary Item: 1. Click on “Add Diary Item”. 2. A Message Details screen will appear as shown below. MMH-12-09 54 3. Select the Activity/Reason. 4. Select the Priority. 5. Enter a Due Date, if applicable. 6. Enter a Subject. 7. Enter the Body text. 8. In the Message Recipients area, select the Category. If one of the “specified” categories is chosen, a list of potential Recipients will appear in a drop down box. 9. To add a Recipient, click/select their name from the drop down list, and then click the “Add Recipient” button. 10. If you would like to add an attachment, click the “Allow Attachments” button. Once the latter has been completed, click “Update Details”. This will send the message MMH-12-09 55 VIEWING A POLICY Once a policy is activated, you can use the “Open” function to search for the policy. 1. Search for the policy you are looking for. Reminder: Instructions on how to search for a policy or quote can be found in the section titled “Open” at the beginning of this manual. 2. Click on the policy number (shown on the left-hand side). 3. You will be taken to the TransACT screen as shown below. MMH-12-09 56 4. From the TransACT screen, to simply view the policy, click on the magnifying glass, (the icon on the far left). This will allow you to view the policy as read only. 5. When you are finished viewing the policy, click on the Submission tab and then click “Return to Admin”. This will take you back to the TransACT screen where you started in step 3. MMH-12-09 57 From the TransACT screen you may then service the policy as you normally would, including applying a payment. The Section that follows will cover all aspects of Policy Maintenance using TransACT. MMH-12-09 58 TransACT—POLICY MAINTENANCE TransACT ICONS (Next to each transaction) There are 3 Icons that appear on the TransACT Screen next to each transaction. (see screen shot below) 1. 2. 3. 1. View Policy Will allow you to view the policy as read only. No changes can be made. 2. Get Change Summary Will display a screen showing the changes made by that transaction if applicable. 3. Schedule to Abort Will prevent ‘Scheduled’ transaction from occurring if not already committed. If the “X” is clicked, the scheduled transaction will be removed. MMH-12-09 59 ENDORSE 1. In the Transaction Type drop down box, select “Endorse” and click “Go”. 2. Enter the Effective Date of your Endorsement transaction 3. Select the Reason for your transaction from the Reason drop down box (you may select multiple reasons by clicking the “Add Reason” button). Additional notes about your transaction may be entered in the “Detail” box. Note: This information will be printed on the Declarations Page. (See Screen Shot that follows.) MMH-12-09 60 4. After you have completed the page, click “Continue”. If you do not wish to continue, click “Exit” and you will be returned to the TransACT Screen. The system will present you with the policy master pages which allow you to access any of the pages to make the necessary changes to the policy. Upon completion of your changes, proceed to the Submission page by clicking on the “Submission” tab or continuing to click “Next”. If the endorsement is out of the agent’s authority, a referral will be required. Click on the button labeled “Refer”. Submission Screen: The Submission Screen (as shown above) will show you the new premium amounts resulting from your transaction and the total amount of premium change. Modify Reasons: The “Modify Reasons” button (see below) can be used to change the Reason that you selected for your transaction or to add additional Reasons. MMH-12-09 61 Upon completion of your transaction, you can choose to “Complete Issuance” or “Save for Later”. Complete Issuance: Will present you with a Remarks section where you can enter detailed remarks about your transaction. Save for Later: Will return you to the TransACT Screen for your policy and you will see your transaction listed. You will see the status listed as “pending”. Note: MMH-12-09 If you process multiple changes to a policy in one day, the insured will only receive the hard copy of the last Declarations Page that was generated even though all policy transactions will show up in pdf format in the Diary/Attachment section of the policy. 62 CANCEL When the Cancel function is chosen in TransACT, the ability to cancel due to Company Request or Insured Request is given. Company Requested Cancellation: 1. Select your transaction type of Cancel and click “Go”. (see screen that follows) 2. Select a Reason for cancellation from the drop down box. For company request cancels you must also fill in the Detail box with more specific, appropriate detail as this verbiage will also print on the Cancellation form. Ex. You select the reason called “Unacceptable Driving Record” but in the detail box (see below) you insert: “Speeding violations: 1/2007, 3/2006, etc.” You need to put enough detail that the insured understands exactly why they were canceled because if you do not, in some states the cancellation form will be considered unacceptable and void. MMH-12-09 63 3. The Return Method box will automatically populate with the cancel method choices you have based on the Reason for Cancellation. You must choose a method. The Reason you selected in Step 1 above determined that this was a Company Request cancellation so the system automatically populated the Cancellation Effective date with the earliest legal cancel date based on state requirements and proper mailing time. Note: The “Schedule Date” will tell you the actual day that the system will change the policy status from InForce to Cancel and is informational only. 4. Click the “Continue” button to proceed OR “Exit” to return to the TransACT Screen. MMH-12-09 64 The next screen will now show you the new written premium on this policy along with the unearned premium (negative written change) that will be applied once the policy is truly cancelled. 5. Click the “Schedule” button to finish the Cancellation transaction and be returned to the main TransACT Screen OR click the “Abort” button if you want to back out from the transaction and return to main TransACT Screen. The main TransACT Screen will show you that your Cancellation is ‘scheduled’ and will display the effective date as well. Scheduling the transaction will cause the Direct Notice of Cancellation to print and be sent to the customer the next morning. If you click the “Abort” button ( Red ‘X’ to the left of the Cancel transaction), then you will abort the scheduled cancel and if the notice was already printed, a continuation notice will be sent to the customer to tell them their policy will not be cancelled. Ex. Note: MMH-12-09 You scheduled a cancellation on the policy for lack of an updated survey but then you received the survey from the customer, so you use the “Abort” function which will remove the scheduled cancellation and will generate a continuation notice during the nightly batch which will be mailed the next business day. In the example shown above, the policy will officially be cancelled as of 12/4/2008 (policyholder has no coverage from this point on). The policy status in the system will not change from Inforce to Canceled until the transaction is Committed during the nightly batch run on 12/9/08. 65 Insured Requested Cancellation: 1. Select your transaction type of Cancel and click “Go”. 2. Select a Reason for cancellation from the drop down box. 3. If the Detail box is required, please enter any required, appropriate details/reasons. 4. The Return Method box will automatically populate with the cancel method choices you have based on the Reason for Cancellation. You must choose a method. MMH-12-09 66 The Cancellation effective date should be entered based on the date requested by the insured. The system automatically populates today’s date so you will need to adjust date accordingly. 5. Click the “Continue” button to proceed OR “Exit” if you want to return to the TransACT Screen with no changes. The next screen (as previously shown) will show you the new written premium on this policy along with the unearned premium (negative written change) that will be applied once the policy is truly cancelled. 6. Click the “Complete” button to finish the Cancellation transaction and be returned to the main TransACT Screen OR click the “Abort” button if you want to back out from the transaction and return to main TransACT Screen. MMH-12-09 67 Once you return to the main TransACT Screen, it will show you that the transaction has been Committed and the insured’s policy is cancelled as of the date requested. No forms will be generated. MMH-12-09 68 REINSTATE Reinstate will be available in the dropdown box if this is an allowed transaction on the policy. 1. Select “Reinstate” and Click “Go”. 2. The Effective date is automatically populated by the system and the date is equal to the previous cancel date. 3. Choose a reason for the reinstatement and enter any necessary detail. The Add Reason button is to be used if you want to show multiple reasons for reinstatement. 4. Click the “OK” button to proceed (as shown above). 5. Click “OK” to proceed with Reinstatement OR click the “Exit” button to back out of transaction and be returned to TransACT Screen without action. MMH-12-09 69 You will be returned to the TransACT Screen and the Reinstate transaction should negate the Written Change column and Total Written Premium generated from the Cancellation transaction. MMH-12-09 70 REISSUE Reissue will be available in the dropdown box if this is an allowed transaction on the policy. A policy may be reissued up to 7 days prior to the effective date of the policy if the cancellation method used is flat. The policy must be rewritten equal to or greater than the current cancellation date if the cancellation method used is other than cancel flat. 1. Select “Reissue” and Click “Go”. 2. Verify the effective date of the reissue and change if needed. 3. Click on drop down box to change the no to yes if you are reissuing the policy to change the agent or the mooring state. This will enable you to change the agent or location state. 4. If the reissue is for any other reason, click on the drop down box and select the applicable reason. If you have more than one reason you need to enter, click on the add reason box. (See screen print below) 5. Click “Continue” to proceed or “Exit” to stop processing the reissue. 6. Amend the policy as needed. 7. Click the submission tab to be taken to the last page of the reissue. (See the screen print below) MMH-12-09 71 8. Add any applicable comments and click “Complete Issuance”. 9. Verify Pay Plan is correct and commit without payment, if there is already a payment on the policy. MMH-12-09 72 REVIEW BEFORE RENEW 1. Choose the Review before Renew option and click “Go”. Note: You cannot perform this action on a policy that has a committed cancel, is scheduled for non-renewal or has a pending renewal. The Effective date is automatically populated by the system. MMH-12-09 73 2. Enter in the details of why you want to review before policy automatically renews. 3. Click the “Continue” button to proceed or “Exit” to return to TransACT Screen. MMH-12-09 74 4. Click “Abort” if you’ve changed your mind about marking this policy for Review before Renew and want to be returned to the TransACT Screen OR click “Schedule” if you want to Mark the policy for Review before Renew. The policy will show that you have scheduled this policy to be reviewed before it is automatically renewed in the future. The Review before Renewal report will generate 90 days prior to the renewal date. 6. To review the policy, click the Pencil icon (far left icon on the same transaction line of Review before Renew) and you will be taken into the policy to review it. 7. Once your review is complete, proceed to the Submission Screen (as shown below). MMH-12-09 75 Return to Admin: This will take you back to the TransACT Screen and keep your Review before Renew transaction in a ‘Scheduled’ state. This means that it is still in a Review before Renew status and will show up in any messages/reports as such. Review Completed: This will take you to the Remarks screen. MMH-12-09 76 7. Type in any remarks that you would like saved with this transaction. 8. Click “OK” to return to the TransACT Screen. Review before Renew transaction now shows as Committed which means this process is now complete. MMH-12-09 77 RENEW The Renew function in TransACT is used for either manually renewing the policy OR pre-staging the upcoming renewal with information that needs to be used by the system during the automatic renewal process. Instructions follow for how to process each type of renewal function. Please ensure that you are processing the renewal in the appropriate manner. Renewal Prep: This is pre-staging renewal changes that will get picked up during the normal renewal batch processing cycle. Renewal has a status of ‘Scheduled’. Manually Renew: This is actually renewing the policy before the normal renewal process would have applied. Renewal has a status of ‘Committed’. Policy Transaction: Renewal Prep 1. Choose the Renew transaction and click “Go”. MMH-12-09 78 2. The effective date is the policy effective date of the renewal term. 3. Put the reason for why you are staging future changes to this policy (that will be picked up in the renewal batch processing). 4. Click “Cancel” to return to TransACT without renewal prepping the policy OR, 5. Click “OK” which will move you forward in the process by taking you into the policy so that you can make your changes. 6. After you have made the necessary changes to the policy, go to the Submission Screen (as shown below) and click the “Renewal Prep” button which will return you to the TransACT Screen. MMH-12-09 79 7. The Renewal Prepped policy shows as a scheduled renewal and will show as committed once the actual renewal has been generated and sent to customer. MMH-12-09 80 Policy Transaction: Manually Renewing a Policy 1. Choose the Renew transaction and click “Go”. Note: You cannot perform this action on a policy that already has a scheduled renewal. You must abort the scheduled renewal first, before manually renewing policy. 2. The effective date is the policy effective date of the renewal term. 3. Put the reason for manually renewing the policy before the normal renewal process would have applied (see screen shot that follows). 4. Click “Cancel” to return to TransACT without renewing the policy OR, 5. Click “OK” which will move you forward in the process by taking you into the policy for any potential changes. (See Screen shot below) MMH-12-09 81 6. After you have made any change to the policy, go to the Submission Screen and click “Complete Issuance” to be taken to the Remarks Screen. Note: The use of the Renewal Prep button is found in documentation of Renewal Prepping a Policy. MMH-12-09 82 7. Note, although referral messages may show, you may complete issuance any time the Complete Issuance button is available. 8. Put in your remarks on why you are renewing this policy ahead of time. 9. Click “OK” to complete this transaction and return to the TransACT Screen OR, 10. Click “Cancel” to move back a step and return to the Submission Screen. MMH-12-09 83 NON-RENEW 1. Select the Non-renew transaction which will only be available on Inforce policies. Click “Go”. The effective date will be filled in by the system as the earliest date possible based on proper days notice per the state for non-renewal. The notice will be mailed the next day after this date. The Scheduled date will be filled in by the system as the policy expiration date. MMH-12-09 84 2. Choose Reason. 3. Enter reason specifics in the Detail field. 4. Click “Abort” to cancel this transaction and return to the TransACT Screen OR click “Schedule” to proceed with this transaction MMH-12-09 85 The TransACT Screen now shows that this policy has been scheduled for Non-renewal. Once the policy expiration date has passed, the non-renewal transaction will show as ‘Committed’. MMH-12-09 86 VIEW SERVICE HISTORY On the TransACT Screen, there is a “View Service History” button. Clicking on this button will bring up a series of 4 screens: Claims History Payment History Refund History Service History MMH-12-09 87 CLAIMS HISTORY The Claims History screen will display any Claim information associated with the policy. In the example shown below, there is a claim on the policy (see the boxed area). The Claim #, date of loss, claimant name, status, examiner, etc. are all displayed. By clicking the “Return” button from this screen you will be taken back to the main TransACT Screen. Clicking “Next” or clicking the Payment History Tab, will take you to the Payment History Screen. MMH-12-09 88 PAYMENT HISTORY The Payment History screen will display any payments applied to the policy, the installment schedule and the amounts due. The Amounts Due section displays the Unpaid Premium, Unpaid Fees, Current Due, Past Due and Total Due. The Installment Schedule section displays the date due, premium due, installment fees and payment amounts applied to the billing dates. The Payment History section displays the policy effective date, payment type, a reference number (if applicable), a control number, the amount of the payment and an NSF Date (if applicable). By clicking the “Return” button from this screen you will be taken back to the main TransACT Screen. Clicking “Next” or clicking the Refund History Tab, will take you to the Refund History Screen. MMH-12-09 89 REFUND HISTORY The Refund History screen will show the date of the refund, the payee, the amount and a reference number. By clicking the “Return” button from this screen you will be taken back to the main TransACT Screen. MMH-12-09 90 Service History The Service History screen will display the activity history of the policy. The Amounts Due section displays the Unpaid Premium, Unpaid Fees, Current Due, Past Due and Total Due. The Installment Schedule section displays the date due, premium due, installment fees and payment amounts applied to the billing dates. The Account Transaction History will show you the actual account transaction history as it happens. It will display write-offs, money being unapplied and re-applied during the cancel/reissuereinstatement process, etc. which will give you more information without having to directly contact our Accounting Department. By clicking the “Return” button from this screen you will be taken back to the main TransACT Screen. MMH-12-09 91 ACCOUNTING PROCEDURES APPLY A PAYMENT TO A POLICY There are two ways to apply a payment to a policy. You can log on to MarkelAmerican.com and click on Payment Center or you can apply a payment directly from the Trans Act Screen in Magic. 1. From the Markel American Web Site click “Payment Center” (as shown below) 2. Click on “Agent Payment” (as shown below) MMH-12-09 92 3. Enter the Policy Number, the Mailing Zip Code and click Continue. At this point, the Billmatrix screens will be the same no matter how you selected to enter the payment. 1. From the TransACT Screen, click the “Apply Payment” button (as shown below). MMH-12-09 93 2. You will be taken to the directly to the Select Payment Type screen in Billmatrix. You will enter the “Payment Amount” and Select “Payment Type”, you can select from Credit Card, Electronic Check and ATM Debit Card. Click Continue. 3. Depending on the type of payment you selected you will either enter the credit card, ATM Debit card or the checking account information. Once all the required information is entered click to Continue. Credit/Debit Card information Screen MMH-12-09 94 Check Information Screen 4. Enter all the required payment information and select Continue to the next screen, or select Back to change your payment amount or payment type. 5. Confirm all the information you entered is correct. Select Authorize to process the payment or select Back to change any information you have entered. 6. Once the payment has processed you can either Exit out of Billmatrix or select Make Another Payment. MMH-12-09 95 USER MAINTENANCE If changes (deletion or addition) in staffing occur, MAIC must be notified in writing by the agency Principal or other person designated by the Principal to effect user changes. The Request to Amend Established User document will need be sent to MAIC’s Technical Services Dept. at [email protected] or faxed to 262-547-9436. Once they have completed the User change, they will confirm that the user has either been disabled, or if a new user, their new password. Changes to sub-producers should also be communicated in the same manner. The User change form can be found on www.markelamerican.com under the Agent Only access as well as in the Appendix at the back of this manual. AGENT MAINTENANCE To setup a sub-producer in the system, a written request must be provided by the contracted General Agent. The Request to Add a Sub-Producer form will need to be sent to the Product Services Group at [email protected]. The information necessary to setup the sub-producer will be provided to the contracted General Agent to deliver to the sub-producer. The Agent Set-up Form can be found on www.markelamerican.com under the Agent Only access as well as in the Appendix at the back of this manual. TECHNICAL ASSISTANCE For technical assistance with the MAGIC system, please contact MAIC’s Technical Support Department at 1-800-236-2862 x.3334. MMH-12-09 96 APPENDIX Request to Add a Sub-Producer Markel American Insurance Company Request to add a SubProducer Email to: [email protected] -or- fax: 262-548-0117 Due to security requirements brought on by the Sarbanes Oxley Act, each of your subproducers must be assigned an individual user ID and password that will be connecting to our system. Complete a separate form for each subproducer. In order for us to begin setting up this Producer remotely, we need the information provided below. Please complete the following information: GA Agency Name: GA Number: SubProducer Name: SubProducer SubProducer Federal ID #: Number: Is SubProducer YES NO Incorporated? SubProducer Website Address: SubProducer Address: SubProducer City, State & Zip: SubProducer Phone: SubProducer Form Contact Name: Fax Number: Form Contact Email address: PLEASE STATE REQUEST BELOW: MMH-12-09 97