
1
OPERATION
MANUAL
TCR Plugin
Brainstorm Time Code Camera Data Recorder
2nd Edition - Rev.2
Version 2.0
Software License Agreement
This Software License Agreement is a legally binding agreement between you (“User”) and FOR-A Company
Limited (“Company”). The software, user manual and all other associated documentation (collectively, “Product”)
are licensed, not sold, to the User. By installing and using the software, or by using a product of the Company in
which the software is installed, User agrees to be bound by all terms and conditions of this agreement, as set forth
below.
1. License Grant
a. The Company grants User the license to use the Product in the manner specified in the user manual
and other associated documentation. User may not use the Product in any manner other than
specified.
b. The Company only grants User the license to personally use the Product, and does not allow User to
transfer the license to a third person or to enable a third person to use the Product by any other
method.
c. In principle, the software may only be used on a single computer or device.
d. While the software may include various programs, they may not be unbundled and used as
standalone programs.
2. Restrictions on Distribution, Duplication, Lease and Transfer
User may not, without the Company’s prior permission, distribute via communication lines, or lease or
transfer electronic copies of the Product, in whole or in part, nor attempt to do so.
3. Limitations of Guaranty
The Company and its program licensors disclaim all legal warranties, express or implied, with respect to
the Product. User must use the Product at own risk. In no event shall the Company and its program
licensors be liable for any damage resulting from User’s use or inability to use the Product.
4. Provision of Upgrades and Updates
Whenever the software is upgraded or updated, User may use the new version of the software by paying
the amount separately specified by the Company. After upgrading the software, User may not use the
earlier version without the Company’s prior permission.
5. Term of Validity of this Agreement
This agreement shall be effective for a period of one year from the day User begins using the software.
The same conditions of the agreement shall be extended for further one-year terms unless User or the
Company expresses, at least one month prior to expiration of the agreement, the intent not to renew the
agreement.
6. Termination of the Agreement
a. The Company reserves the right to immediately terminate this agreement if User corresponds to
either of the following circumstances.
(1) User violates any terms of this agreement
(2) User is unable or refuses to make the required payment
b. User may terminate this agreement by written notice to the Company in the following circumstances,
but may not seek a refund of the amount that User has already paid to the Company.
(1) User waives the license
(2) User destroys or loses the software package and prevents the Company from being able to
confirm its existence
c. After termination of this agreement, User may not use the Product in any way or form.
7. Ownership
The Company and its program licensors retain all rights, including copyright and intellectual property
rights, to the Product. User may not modify any program included in this software, nor disassemble,
decompile, or reverse-engineer a program to analyze its source code.
8. Others
This agreement will be governed by and construed in accordance with copyright laws and treaties in
Japan and by laws and international treaties relating to intangible property rights. User must comply with
all copyright laws and applicable laws and regulations when using the Product.
9. Jurisdiction
Any dispute relating to the Agreement shall be subject to the jurisdiction of the Tokyo District Court.
10. Support
If the Company discovers a flaw in the software or revises a program within one year after User receives
the software, the Company will provide information regarding the flaw or revision or a revised program to
User free of cost.
Table of Contents
1. Overview .................................................................................................................................. 2
1-1. System Overview .............................................................................................................. 2
1-2. Software Structure............................................................................................................. 3
1-3. System Requirements ....................................................................................................... 3
2. Preparation............................................................................................................................... 4
2-1. Software Installation .......................................................................................................... 4
2-1-1. Installing Windows Installer 3.1 .................................................................................. 4
2-1-2. Installing Notepad++ .................................................................................................. 5
2-1-3. Installing npp.5.9.2.ConfigTCR................................................................................... 8
2-2. Installing TCR.................................................................................................................... 9
3. TCR Plugin for Brainstorm...................................................................................................... 10
3-1. Adding the TCR.py Plug-in Module ................................................................................. 10
3-2. Using TCR Plugin............................................................................................................ 11
3-2-1. Starting TCR Plugin.................................................................................................. 11
3-2-2. TCR Plugin ............................................................................................................... 12
3-3. Notes on Using TCR Plugin............................................................................................. 17
3-3-1. Dbs Name and Item Name ....................................................................................... 17
3-3-2. Notes on Adding Items ............................................................................................. 17
3-3-3. Recorded Data Format............................................................................................. 17
3-3-4. Synchronizing Multiple Virtual Processors ............................................................... 18
4. TcrGuiConfigure ..................................................................................................................... 19
4-1. Starting TcrGuiConfigure................................................................................................. 19
4-2. Editing the Destination Host ............................................................................................ 20
5. TcrGui..................................................................................................................................... 21
5-1. Starting TcrGui ................................................................................................................ 21
5-2. Initial Setup...................................................................................................................... 21
5-3. Using TcrGui ................................................................................................................... 23
6. TcrEdit .................................................................................................................................... 27
6-1. Starting TcrEdit................................................................................................................ 27
6-2. Using TcrEdit................................................................................................................... 28
6-2-1. Setting IN Point and OUT Point................................................................................ 29
6-2-2. Searching for IN Point and OUT Point...................................................................... 30
6-2-3. Checking and Correcting Errors ............................................................................... 31
6-2-4. Checking Errors and Generating a Correct Data File ............................................... 32
6-2-5. Converting For Maya................................................................................................ 32
6-2-6. Converting For dotXSI.............................................................................................. 32
7. Operational Overview ............................................................................................................. 33
7-1. Virtual Processor Setup................................................................................................... 33
7-2. Control PC Setup ............................................................................................................ 33
7-3. Recording Camera Data.................................................................................................. 33
7-4. Extracting and Editing Camera Data ............................................................................... 33
7-5. Converting Camera Data................................................................................................. 34
7-6. Notes on Rendering in Maya ........................................................................................... 34
Upon Receipt
Unpacking
TCR and its accessories are fully inspected and adjusted prior to shipment. Operation can be
performed immediately upon completing all required connections and operational settings.
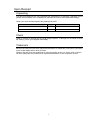
Check your received items against the packing lists below.
ITEM
TCR installation disk
Operation manual
QTY
1
1
REMARKS
CD-ROM
Check
Check to ensure no damage has occurred during shipment. If damage has occurred, or items
are missing, inform your supplier immediately.
Trademark
Microsoft and Windows are either registered trademarks or trademarks of Microsoft Corporation
in the United States and/or other countries.
Pentium and Intel Core are trademarks of Intel Corporation in the U.S. and/or other countries.
All other trademarks are trademarks or registered trademarks of their respective owners.
1
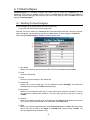
1. Overview
1-1. System Overview
TCR Plugin is a software program that allows you to record virtual system sensor data that is
synced to the camera in real time and use the recorded data for post rendering. The original
sensor data is sent via RS-422. At this stage, the lens curve or position change information
between the studio and virtual set is not included. Such information is generated after the
calibration is completed in Brainstorm. TCR sends and records camera data after the calibration
via LAN. It also has features that allow you to efficiently use recorded data for post rendering
and edit the data.
Camera
&
Sensor
Camera
&
Sensor
Camera
&
Sensor
Camera
&
Sensor
Camera
&
Sensor
RS422
Brainstorm
RS422
Brainstorm
RS422
Brainstorm
LAN
LAN
Control PC
制御PC
(Data
Recording)
LAN
制御PC
(データ記録)
Data
データ補正
Correction
and
と変換
Conversion
RS422
RS422
キャリブレーション前の
RS-422 data before
RS422データ
calibration
Brainstorm
Brainstorm
LAN
LAN
Data
after calibration
キャリブレーション後の
(sent
via LAN)
データ(LANで伝送)
2
Post
ポストレンダ
Rendering
リング
1-2. Software Structure
TCR Plugin (TCR.py):
Plug-in software for Brainstorm. It allows you to send and receive camera data via LAN after
calibration.
TcrGuiConfigure:
Runs on the control PC and allows you to set the destination, frame rate, and time code (drop
frame or non-drop frame) settings of TcrGui described later.
TcrGui:
Runs on the control PC, controls multiple virtual processors simultaneously, and records
camera data. It also loads data from the recorded file and sends it to virtual processors. It has a
feature to check data using time code.
TcrEdit:
An editing program that allows you to check data and correct data gaps and errors. It also has a
feature to convert files to Maya or dotXSI format.
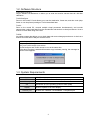
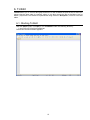
NOTE
Only one TcrGuiConfigure can be run at a time.
Only one TcrGui can be run at a time.
TcrGuiConfigure and TcrGui cannot be run at the same time.
If the above program is started while another copy is already running, the message as
shown below appears.
1-3. System Requirements
Model
CPU
Memory
OS
Display
Network port
PC/AT
Intel® Core™2 Duo 1GHz or faster (or equivalent)
1GB or more
Windows® XP SP2 operating system or later (32bit)
Resolution of 1024 x 768 pixels or better.
Must be capable of full color display.
At least one 100BASE-TX/1000BASE-T compatible port
3
2. Preparation
2-1. Software Installation
This section describes how
npp.5.9.2.ConfigTCR, and TCR.
to
install
Windows
Installer
3.1,
Notepad++,
IMPORTANT
This installation must be done as a user with administrator privileges.
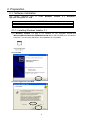
2-1-1. Installing Windows Installer 3.1
(1) If Windows Installer 3.1 (v2) is not installed on you computer, double-click
\Microsoft\WindowsInstaller-KB893803-v2-x86.exe on the CD-ROM to run the wizard.
However, if you are using Windows7, this installation is not needed.
(2) Click Next.
(3) Select I agree and click Next.
4
(4) After the installation is complete, you will be asked to restart your computer. Click Finish
to restart your computer.
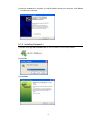
2-1-2. Installing Notepad++
(1) Double-click npp.5.9.2.Installer.exe on the CD-ROM to run the setup wizard.
(2) Click OK.
(3) Click Next.
5
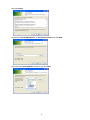
(4) Click I Agree.
(5) Specify C:\usr\bin\Notepad++ for Destination Folder and click Next.
(6) Uncheck the Auto-Updater checkbox and click Next.
6
(7) Click Install.
(8) Uncheck the Run Notepad++ v5.9.2 checkbox and click Finish.
7
2-1-3. Installing npp.5.9.2.ConfigTCR
(1) Double-click npp.5.9.2.ConfigTCR.msi on the CD-ROM to run the setup wizard.
(2) Click Next.
(3) Click Next.
(4) Click Close.
8
2-2. Installing TCR
(1) Double-click TCR.msi on the CD-ROM to run the setup wizard.
(2) Click Next.
(3) Click Next.
(3) Click Close.
9
3. TCR Plugin for Brainstorm
TCR Plugin is a software program that allows you to record Brainstorm camera data to other virtual
processors or to a file. The time code data can also be sent and used for post rendering.
3-1. Adding the TCR.py Plug-in Module
TCR Plug-in is located under the following directory:
C:\usr\FOR-A\TCR\v2\BrainstormPlugin\TCR.py
Adding this Dbs (database) to the Loader used for the program enables its functions. Avoid
moving the above data directly to the Loader as it is the original data. For example, assuming
that the Program A data is all under Folder A, the procedure will be as follows.
① Copying TCR.py
Copy the following data to Folder A.
C:\usr\FOR-A\TCR\v2\BrainstormPlugin\TCR.py
C:\usr\FOR-A\TCR\v2\BrainstormPlugin\TCR
② Adding to Loader
Set the Dbs name for TCR.py to TCR. Although the file name “TCR.py” can be changed to
TAR1.py, TCR2.py, or such, the Dbs name must be set to TCR as the example below.
itemnew("dbs", "<>TCR",
"DBS_FILE", "TCR.py")
Set the Dbs name to TCR.
The file name can be changed from TCR.py.
itemnew("dbs", "<>testScene",
"DBS_FILE", "testScene.py")
The above guidelines must be followed since TcrGui (described later) remotely controls
Brainstorm through the <TCR>TCR1 item as default. This setting can be changed by setting
Item Name in TcrGuiConfigure or itemName in the TcrGui.ini file.
*The Dbs name in TcrGui.ini and Loader must be the same.
10
3-2. Using TCR Plugin
3-2-1. Starting TCR Plugin
Copy all files under C:\usr\FOR-A\TCR\v2\BrainstormPlugin to a folder. After starting
Brainstorm and loading testLoader.py, the windows as shown below appear.
testLoader.py is formatted as below.
itemnew("dbs", "<>TCR",
"DBS_FILE", "TCR.py")
itemnew("dbs", "<>testScene",
"DBS_FILE", "testScene.py")
TCR.py and testScene.py load the Dbs.
The TCR Plugin functions are all handled by TCR.py, and testScene.py simply contains
scene data. testScene.py will be the graphic data used for an actual program.
11
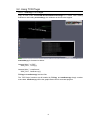
After testLoader is loaded, the GFX window appears as below.
This text object is simply an object.
It is contained in testScene.py.
Displays the Counter value.
It is contained in TCR.py
Displays the time code value. It is contained in
TCR.py. It will not be displayed until the port is
opened.
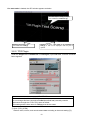
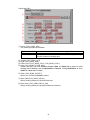
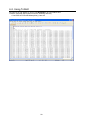
3-2-2. TCR Plugin
Under the Plugins tab in GlobalLists or ListsLayout, open TCR List. A window as shown
below appears.
①
⑤
⑥
⑦
⑧
②
③
④
⑨
IMPORTANT
There exists an item labeled “TCR1”.
Do not change this item name since TcrGui (described later) remotely controls
Brainstorm through the <TCR>TCR1 item as default.
This setting and the item name for TCR.py must be the same.
① Open (TCR_OPEN)
Starts to send, receive, and record camera data according to the mode setting (②).
12
② Mode (TCR_MODE)
The following modes are available.
NetworkSend
Network Recieve
File Write
File Read
Network Recieve2
Sends camera data to the host specified under the Network
tab.
Receives camera data.
Records camera data to the specified file, without sending or
receiving data via network.
Loads camera data from the specified file, without sending or
receiving data via network.
Requests the source host to send camera data and receives
data.
③ Print (TCR_PRINT)
Displays the following data to Brainstorm DOS Prompt, according to the Mode setting
(②).
Network Send
FileWrite
Network Recieve
Network Recieve2
File Read
Displays the data being sent and recorded.
Displays the received data.
Displays the data loaded from a file.
④ Save File (TCR_SAVE)
Shown in Network Send or Network Recieve mode only. It allows you to record data
being sent or received to a file.
⑤ Append Date&Time (TCR_APPEND_DATE)
Appends date and time of when Open is turned on to the specified file.
⑥ File name (TCR_SAVE_FILE)
Allows you to specify the file name for recording.
⑦ File name with date and time (TCR_SAVE_FILE_WDT)
Displays the file name specified in ⑥ followed by the date and time.
⑧ Open (TCR_LITTLERED_OPEN)
Starts loading time code.
⑨ Time Code (LittleRed) Port (TCR_LITTLERED_PORT)
Specifies the destination port on the time code reader, Little Red.
When Little Red is properly opened, the time
code will appear in the GFX window.
13
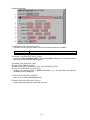
<Network Tab>
②
①
③
④
⑤
① Host (TCR_HOSTNAME)
Specifies the destination IP address or host name for Network Send mode.
② Port (TCR_PORT)
Specifies the network port for Network Send or Network Recieve mode. The port
number for receiving and sending must be the same.
③ Protocol (TCR_PROTOCOL)
The following protocols are supported.
VizRT-1
Brainstorm-1
VizRT-TC
Sends the Counter, Position (x, y, z), Angle (h, p, r), and Field
of View (v, h) parameters. It also sends Actor parameters (x, y,
z), which are user-defined parameters. The time code parameter
is not included.
Basically the same as VizRT-1 except that this protocol also
sends the time code parameter.
Basically the same as VizRT-1 except that this protocol also
sends the time code parameter using the Actor data area. Since
the Actor data area is used by the time code, the Actor
parameters cannot be set.
④ Endian (TCR_ENDIAN)
A read-only parameter that is changed according to the TCR_PROTOCOL setting (③).
The parameter will be BigEndian if VizRT-1 or VizRT-TC is selected for Protocol, and
LittleEndian if Brainstorm-1 is selected.
⑤ Coordinate (TCR_COORDINATE)
A read-only parameter that is changed according to the TCR_PROTOCOL setting (③).
The parameter will be Y up if VizRT-1 or VizRT-TC is selected for Protocol, and Z up if
Brainstorm-1 is selected.
14
<Send Data Tab>
①
②
③
④
⑤
⑥
⑦
⑧
① Source (TCR_SEND_SRC)
The following modes are available.
Pipe Camera
Camera
Manual Bind
②
③
④
⑤
Sends camera data that is selected for <>pipe in Brainstorm.
Sends data of the specified camera item.
Directly binds to the camera data described in steps ② through
⑤ below instead of sending data.
Position (TCR_SEND_XYZ)
Angle (TCR_SEND_HPR)
Field of View (TCR_SEND_FOVV, TCR_SEND_FOVH)
Actor (TCR_SEND_ACTOR_XYZ)
Displays the data to be sent. Position, Angle, FOVV, and FOVH will be read-only while
sending data if Source is set to PipeCamera or Camera. If TCR_PROTOCOL is set to
VizRT-TC, Actor will be hidden
⑥ Offset (TCR_SEND_OFFSET)
Allows you to offset the Position values.
⑦ Delay Field (TCR_SEND_DELAY)
Delays sending data by the specified field unit.
⑧ Delay msec (TCR_SEND_DELAY_MS)
Delays sending data by the specified millisecond amount.
15
<Receive Data Tab>
①
②
③
④
⑤
⑥
⑦
⑧
① Destination (TCR_RECIEVE_DEST)
Specifies how the received data is used. The following modes are available.
Camera
Manual Bind
Applies the received data to the specified camera item.
Binds the received data to the specified parameters.
② Camera (TCR_RECIEVE_DEST_CAM)
Displayed if TCR_RECIEVE_DEST (①) is set to Camera. Allows you to specify a camera
item to which the received data is applied.
③
④
⑤
⑥
Position (TCR_RECIEVE_XYZ)
Angle (TCR_RECIEVE_HPR)
Field of View (TCR_RECIEVE_FOVV, TCR_RECIEVE_FOVH)
Actor (TCR_RECIEVE_ACTOR_XYZ)
Displays the received data. If Offset parameters ( ⑦ ) are specified, the adjusted
parameters will be displayed.
⑦ Offset (TCR_RECIEVE_OFFSET)
Allows you to offset the Position values.
⑧ Delay Field (TCR_RECIEVE_DELAY)
Delays receiving data by the specified field unit.
16
3-3. Notes on Using TCR Plugin
3-3-1. Dbs Name and Item Name
Although TCR Plugin can be used independently, it is assumed to be used with TcrGui. To
control through TcrGui, the Dbs name and item name must be the same as those in
Brainstorm. In TcrGui, the Dbs name and item name can be specified using
TcrGuiConfigure or TcrGui.ini.
[Setting]
HostMax=5
itemName=<TCR>TCR1
…
[Host1]
Address=digistorm1
Port=7001
Alias=C1
[Host2]
…
Set the Loader file and item name of the TCR List according to the Dbs name and item name
specified above.
3-3-2. Notes on Adding Items
Network communication between virtual processors should be a direct, one to one
connection. Do not send data from a single virtual processor to multiple virtual processors,
although it is possible to do so by adding items to the TCR List. In order to avoid operational
failures, the New button in the TCR List is hidden
3-3-3. Recorded Data Format
The format of the recorded file will be z-up regardless of the TCR_PROTOCOL setting
(VizRT-1, Brainstorm-1, or VizRT-TC).
17
3-3-4. Synchronizing Multiple Virtual Processors
By sending camera data to other virtual processors, multiple virtual processors can be
synced to a single camera. In such case, the camera sync delay may be different between
virtual processors. If this is the case, follow the steps below.
① Set Source (TCR_SEND_SRC) under the Send Data tab to Camera, click the down
arrow button (TCR_SEND_SRC_CAM), and specify the camera item.
② Set Destination (TCR_RECIEVE_DEST) under the Receive Data tab to Camera, click
the down arrow button (TCR_RECIEVE_DEST_CAM), and specify the camera item. In
most case, specify RecieveCam under TCR.py.
③ In Brainstorm, set the <>pipe camera (PIPE_CAMERA) to the same setting as
TRC_RECIEVE_DEST_CAM (②).
Example
Virtual Processor 1 receives camera data from ifCalibSTD cam1
↓
Virtual Processor 1 sends data to Virtual Processor 2 (①) > Virtual Processor 2 receives the
data and applies it to the virtual set
↓
Virtual Processor 1 applies the camera data to its RecieveCam (②)
↓
Brainstorm applies the RecieveCam data to the virtual set (③).
If the virtual processor you are operating is faster than the others, increase the Delay value of
Receive Data. On the contrary, if it is slower than the others, adjust the Delay value of Send
Data.
Note that if Pipe Camera is specified for Send Data in step ① above, the source and
destination will be looped and synchronization will stop.
18
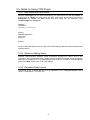
4. TcrGuiConfigure
TcrGuiConfigure is a software program that allows you to modify the TcrGui.ini file. The
destination host setting for TcrGui, the item name of the TCR List controlled through TcrGui, the
frame rate and time code type (drop frame or non drop frame) settings used in TcrEdit can be set
through TcrGuiConfigure.
4-1. Starting TcrGuiConfigure
The executable file is located under the following directory.
C:\usr\FOR-A\TCR\v2\Gui\TcrGuiConfigure.exe
After the .exe file is started, the TcrGui.ini file will automatically load and a window as shown
below will appear. Set the settings and click the Save button to save settings to TcrGui.ini.
After closing TcrGuiConfigure, TcrGui will automatically start.
①
②
③
⑤
④
⑦
⑥
① Item Name
Allows you to specify the item name of the TCR List controlled through TcrGui.
② Load
Loads the Tcr.ini file.
③ Save
Saves the current settings to the Tcr.ini file.
④ Frame rate
Allows you to set the frame rate. To use 1080i/59.94, select 59.94[Hz]. The frame rate
specified here is used by TcrEdit (described later).
⑤ Drop frame
Allows you to set the time code type. To set to drop frame, select the checkbox. To set to
non-drop frame, deselect the checkbox. The time code type that is set here is used by
TcrEdit.
⑥ Address
Allows you to select the host name or IP address that TcrGui (described later) connects to.
If you do not wish to set the host to be connected, select Not Used.
⑦ Alias
Allows you to set the name displayed under Virtual Prosessor in TcrGui. Since the name
that is set here is used by the Maya and dotXSI data output through TcrEdit, use
one-byte alphanumeric characters only.
19
4-2. Editing the Destination Host
The destination host settings are written under the [Setting] section in TcrGuiConfigure.ini. Up
to 10 host names can be specified.
[Setting]
Address1=digistorm1
Address2=digistorm2
Address3=digistorm3
Address4=digistorm4
Address5=digistorm5
20
5. TcrGui
TcrGui is a software program that works in conjunction with TCR Plugin for Brainstorm, records
camera and time code data for post rendering, and check data
5-1. Starting TcrGui
The executable file is located under the following directory.
C:\usr\FOR-A\TCR\v2\Gui\TcrGui.exe
After the program is started, the following window appears.
5-2. Initial Setup
There may be a situation where Brainstorm is used in multiple sub control rooms in a broadcast
station (for example, virtual processors 1 and 2 are used in control room A, and virtual
processors 3 and 4 are used in control room B), and usually the same domain is used in the
same network. In such case, it may be possible to operate an incorrect virtual processor
accidentally. To avoid doing so, TcrGui allows users to restrict which processors can be
operated, by setting the TcrGui.ini file. We also provide TcrGuiConfigure.exe, which allows
you to create an .ini file easier.
C:\usr\FOR-A\TCR\v2\Gui\TcrGuiConfigure.exe
After the program is started, the following window appears.
21
For example, to allow only digistorm 1, 2, and 3 to be operated, set as above and click the Save
button to generate the TcrGui.ini file. Closing TcrGuiConfigure automatically opens TcrGui
and the three virtual processors can only be operated as shown in the figure below.
The TcrGui.ini file is formatted as below.
[Setting]
HostMax=3
itemName=<TCR>TCR1
[Host1]
Address=digistorm1
Port=7001
Alias=C1
[Host2]
Address=digistorm2
Port=7002
Alias=C2
22
[Host3]
Address=digistorm3
Port=7003
Alias=C3
...
Note that itemName under the [Setting] section is the TCR List item name used by TcrGui
when connecting to Brainstorm. This Dbs name and item name must actually exist in
Brainstorm.
5-3. Using TcrGui
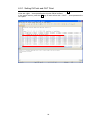
①
②
③
④
⑤
⑥
⑦
① Virtual Processor
Allows you to specify the virtual processor name being used. The indicator turns blue while
TcrGui is properly communicating with the virtual processor.
② Use
Select the Use check box of the virtual processor that is actually being used for recording. If
the check box is turned on while the port on the Little Red is not opened, the port will open.
③ Date/Time
Displays the recording start date and time. The date and time data is taken from the control
PC. If Create Filename under the Mode menu is set to Time Code, the time code data is
added after the Stop button is clicked. In Play Mode, clicking the button to the right of the
Date/Time box displays the file selector to select a file to play.
④ Counter
Displays the counter value included in the data sent from TCR Plugin. If the data is correctly
received, it will count up almost in real time.
⑤ Time Code
Displays the time code value included in the data sent from TCR Plugin. If the data is
correctly received, it will count up almost in real time.
23
⑥ Hostname
Allows you to specify the name or IP address of the virtual processor being connected. The
default setting is the virtual processor specified in the TcrGui.ini file. To change the setting,
deselect the Setup Enable checkbox.
⑦ Port#
Allows you to set the port number for sending and receiving camera data.
IMPORTANT
TCR.py must be loaded into Brainstorm, in order to use TcrGui,
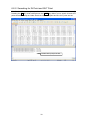
⑦
⑧
⑨
⑩
⑫
⑪
①
②
⑬
③
⑤
④
⑥
① Mode
Allows you to switch between Rec and Play modes.
② Reset Counter
Resets the counter value of the connected virtual processor.
③ Protocol
Allows you to select the protocol between Brainstorm-1 and VizRT-TC (which can both
include time code).
④Rec
Starts recording camera data.
⑤ Stop
Stop recording camera data.
⑥Setup Enable
Enables Hostname and Port# to be edited.
⑦ Set IN
Allows you to set the IN point in the recording period to IN data (⑧).
24
⑧ IN data
Displays the IN point in the recording file. The upper box is to set the counter value, and the
lower box is for the time code value. If the Use Counter checkbox is selected, entering the
time code and clicking the ENTER button automatically calculates the Counter value from
the Ref value (⑬). The value is calculated taking drop frame into consideration.
⑨ Set OUT
Allows you to set the OUT point in the recording period to OUT data (⑩).
⑩ OUT data
Displays the OUT point in the recording file. The upper box is to set the counter value, and
the lower box is for the time code value. If the Use Counter checkbox is selected, entering
the time code and clicking the ENTER button automatically calculates the Counter value
from the Ref value (⑬). The value is calculated taking drop frame into consideration.
⑪ CheckData
Checks if the IN point (⑧) and OUT point (⑩) are included in the recorded file.
⑫ Use Counter
To use the Counter value for calculations such as Check Data, select the Use Counter
checkbox.
⑬ Ref.
Allows you to set the reference value for calculating the Counter value using the Time Code
value when the Use Counter checkbox is selected.
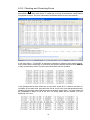
④
⑤
⑥
①
②
③
⑦
① Play
Loads the data from the specified file and sends it to the virtual processor. Since the data
send timing is based on the control PC’s clock, the data playback and recording times are
different.
② Play RT
Loads the data from the specified file and sends it to the virtual processor. The data send
timing is based on the request command received from the virtual processor. If Brainstorm
and TcrGui are running on the same computer, this mode does not function properly.
③ CueUp
Cues up to the IN point displayed under IN data (⑧).
25
④ File Select
Allows you to specify the file being recorded and played. Specify the base name, for example,
“Program A”. The actual file name will be followed by the virtual processor name and date
and time as shown below. The files are generated by an amount equal to the number of
virtual processors.
ProgramAC12006090914h05m05s
ProgramAC22006090914h05m05s
ProgramAC32006090914h05m05s
⑤ Explorer
Allows you to open the folder where the files specified in ④ exist using Explorer.
⑥ Editor
Allows you to open the files specified in ④ using a text editor.
⑦ Message
Displays messages and errors.
26
6. TcrEdit
TcrEdit allows you to correct data gaps and errors of the recorded file and set the IN and OUT
points using the time code (or counter) values. It can also convert the file to the Maya (.ma) or
dotXsi (.xsi) format. This feature is implemented using macros in Notepad++, which is a free text
editor.
6-1. Starting TcrEdit
Click the Editor button in TcrGui or run TcrEdit.bat under the following directory:
C:\usr\FOR-A\TCR\v2\Gui\TcrEdit.bat.
The window as shown below appears.
27
6-2. Using TcrEdit
We will not go into details on how to use Notepad++ as a text editor here.
Load the recorded data located under the following directory.
C:\usr\FOR-A\TCR\v2\Edit\sample\ttt_1cam.dat
28
6-2-1. Setting IN Point and OUT Point
Move the cursor over the line specified as the IN point and press the F1 key.
A line with “@IN…” that represents the IN point will be inserted.
In the same manner, press the F2 key to insert a line with “@OUT…” that represents the
OUT point.
29
6-2-2. Searching for IN Point and OUT Point
If the file size is large, it may be possible for multiple IN or OUT points to be set accidentally.
Pressing the F1 key while holding down the SHIFT key allows you to search IN and OUT
points that are already set. Make sure that only one IN point and one OUT point are set.
Double-click to jump to the line
30
6-2-3. Checking and Correcting Errors
Pressing the F5 key checks data gaps and errors in the recorded file. Data gaps are
determined by the time code values. If a data gap is found, all subsequent values will be
recognized as errors. The error check will be terminated when 10 errors are reached.
In the figure above, “TC ERROR” is reported for situations in which the time code is missing,
that is, when there is a data gap. If such errors are reported, double-click the first TC ERROR
to jump to these time codes. The time code values will be shown as below.
In the example above, there exists only one line with “05:48:15:07” instead of two lines for
two fields. On the other hand, three lines with “05:48:15:08” exist. Such data possesses lower
reliability and therefore these fields should be considered “empty fields”. The empty fields will
be interpolated in Maya or XSI at the end. For empty fields, add an asterisk (*) to the
beginning of the line.
31
Repeat steps as above to check and correct errors. To represent states, # and @ can also be
used in addition to asterisks (*).
#
@
*
Represents a comment. Ignored for error checks and conversions.
Represents the IN or OUT point.
Represents an empty field.
6-2-4. Checking Errors and Generating a Correct Data File
Pressing the F6 key corrects for any data errors automatically and outputs the corrected data
to a separate file. The output file will be named with the original name followed by “out”.
6-2-5. Converting For Maya
Load the file with its file name followed by “out” (6-2-4. Checking Errors and Generating a
Correct Data File), generated by Notepad++. Then press the F8 key to convert the file to the
format that can be used in Maya’s y up environment. The output file will be named with the
same name as that of the original file and its file extension will be “.ma”.To convert the file to
the format that can be used in the z up environment, press the F8 key while holding down the
SHIFT key. The file should be output to the format having the same coordinate system as
that of the scene in Maya for which this data is to be used.
6-2-6. Converting For dotXSI
Load the file with its file name followed by “out” (6-2-4. Checking Errors and Generating a
Correct Data File), generated by Notepad++. Then press the F9 key to convert the file to the
format that can be used in dotXSI’s y up environment. The output file will be named with the
same name as that of the original file and its file extension will be “.xsi”. To convert the file to
the format that can be used in the z up environment, press the F9 key while holding down the
SHIFT key. The file should be output to the format having the same coordinate system as
that of the scene in dotXSI for which this data is to be used.
32
7. Operational Overview
7-1. Virtual Processor Setup
To setup a virtual processor, the following item must be prepared.
- Data content used for recording
① Add TCR.py to the Loader file.
See section 3-1. “Adding the TCR.py Plug-in Module” for details.
7-2. Control PC Setup
To setup a control PC, the following items must be determined.
- Format used for recording
- Time code type (drop frame / non drop frame) used
- Virtual processor used
① Set the Tcr.ini file through TcrGuiConfigure using the above information.
See sections 4. “TcrGuiConfigure” and 5-2. “Initial Setup” for details.
② Adjust the clock of the control PC to the actual time.
7-3. Recording Camera Data
While recording, check whether the data is being recorded for each cut.
① In TcrGui, click the File Select button to specify the file name and folder to save data. Only
alphanumeric characters can be used for the file name.
② Select the Use checkbox of the virtual processor to be used and confirm that the red indicator
to the left turns blue.
③ Switch to Rec mode and click the Rec button to start recording camera data. After clicking
the Rec button, confirm that the Counter and Time code values change.
④ Click the Stop button to stop recording camera data.
⑤ Switch to Play mode and click the Play button to confirm that the camera data has been
recorded.
⑥ Repeat from step ③.
7-4. Extracting and Editing Camera Data
To extract any necessary camera data, use TcrEdit. If a data error is found, edit the data
manually.
See sections 6-2-1. “Setting IN Point and OUT Point”, 6-2-2. “Searching IN Point and OUT
Point” 6-2-3. “Checking and Correcting Errors” and 6-2-4. “Checking Errors and Generating a
Correct Data File” for details.
33
7-5. Converting Camera Data
Camera data can be converted to the Maya or dotXSI format.
See sections 6-2-5. “Converting For Maya” and 6-2-6. “Converting For dotXSI” for details.
7-6. Notes on Rendering in Maya
TCR Plugin allows you to convert camera data to the format that can be used in the modeling
software. For example, it creates 60 keyframes (started from frame 1) per second for
1080i/59.94. Using Field Render will reduce CPU load compared to using Frame Render.
Choose “Both Fields, Interlaced” or “Both Fields, Separate” based on the software used in the
later process.
Field Order and Render Resolution depend on the Codecs used in the later process. If the
render resolution is changed according to the Codecs, confirm that Device Aspect Ratio under
Image Size is set to 1.777.
34
07/01/2011 Printed in Japan
FOR-A COMPANY LIMITED
Head Office
Overseas Division
Japan Branch Offices
R&D/Production
3-8-1 Ebisu, Shibuya-ku, Tokyo 150-0013, Japan
Phone: +81(0)3-3446-3936, Fax: +81(0)3-3446-1470
Osaka/Okinawa/Fukuoka/Hiroshima/Nagoya/Sendai/Sapporo
Sakura Center/Sapporo Center
FOR-A America Corporate Office
11155 Knott Ave., Suite G&H, Cypress, CA 90630, USA
Phone: +1-714-894-3311 Fax: +1-714-894-5399
FOR-A America East Coast Office
2 Executive Drive, Suite 670, Fort Lee Executive Park, Fort Lee, NJ 07024, USA
Phone: +1-201-944-1120 Fax : +1-201-944-1132
FOR-A America Distribution & Service Center
2400 N.E. Waldo Road, Gainesville, FL 32609, USA
Phone: +1-352-371-1505 Fax: +1-352-378-5320
FOR-A Corporation of Canada
346A Queen Street West, Toronto, Ontario M5V 2A2, Canada
Phone: +1-416-977-0343 Fax: +1-416-977-0657
FOR-A Latin America & the Caribbean
5200 Blue Lagoon Drive, Suite 760, Miami, FL 33126, USA
Phone: +1-305-931-1700 Fax: +1-305-264-7890
FOR-A UK Limited
UNIT C71, Barwell Business Park, Leatherhead Road, Chessington Surrey, KT9 2NY, UK
Phone: +44(0)20-8391-7979 Fax: +44(0)20-8391-7978
FOR-A Italia S.r.l.
Via Volturno 37, 20047 Brugherio MB, Italy
Phone: +39-039-881-086/103 Fax: +39-039-878-140
FOR-A Corporation of Korea
801 Dangsan Bldg., 53-1 Dangsan-Dong, Youngdeungpo-Gu, Seoul 150-800, Korea
Phone: +82(0)2-2637-0761 Fax: +82(0)2-2637-0760
FOR-A China Limited
708B Huateng Bldg., No. 302, 3 District, Jinsong, Chaoyang, Beijing 100021, China
Phone: +86(0)10-8721-6023 Fax: +86(0)10-8721-6033
*The contents of this manual are subject to change without notice.


![dotXSIコンバートツール取扱説明書[PDF:2MB]](http://vs1.manualzilla.com/store/data/006613607_2-9a6f4be9046f7bde0c2bcdc89f34044b-150x150.png)


![カタログPDFダウンロード[PDF:1.7MB]](http://vs1.manualzilla.com/store/data/006581727_2-bb010ce40f62d4b878607c76783fb901-150x150.png)
![Brainstorm Controller取扱説明書[PDF:2.4MB]](http://vs1.manualzilla.com/store/data/006621098_2-26b61d070e7c7713362cef53de5f3c89-150x150.png)
![取扱説明書[PDF:1.6MB]](http://vs1.manualzilla.com/store/data/006674964_2-0ad06ea7a36dc3ce6e27f0d4daafb0ee-150x150.png)

![ifCalibSTD取扱説明書[PDF:549.2KB]](http://vs1.manualzilla.com/store/data/006720962_2-f6f093a08a8e1adf50f2443be8c61b6f-150x150.png)
