1
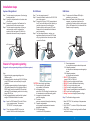
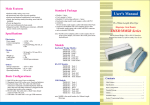
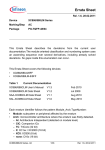
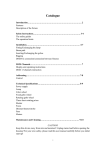
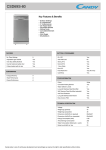
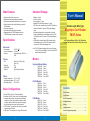
Standard Package
Main Features
· Software utility setting, easy to use.
· Bi-directional card swipe and read capability.
· Software and hardware modification is not required.
· Single, dual and tripe track(s) decoding, meet with
ISO standards.
· Power up diagnostics.
· Card read confirmation by beep sounds.
· Magnetic head life: 300,000 passes minimum,
1,000,000 passes version can be requested.
Specifications
Electronics
Power supply
: +5VDC +10%
Current consumption : <100mA
Interface
: Keyboard Wedge, RS-232, or
USB
Weight (g)
Cable length
Head life
User's Manual
96mm-Length Mini-Type
Magstripe Card Reader
TMSR Series
with Keyboard Wedge, USB, or RS-232 Interface
Program the Reader by software utility, Easy to use
note: The PS/2 power adapting cable is used to replace
the AC-to-DC power adapter, can retrieve the 5VDC
power from keyboard port.
Models
Physics
Size
· Reader x 1 piece
· Sticker x 2 pieces
· User's manual x 1 piece
· Bundled CD with setting software x 1 piece
· RS-232 model, connects with a fixed RS-232 interface
cable, and bundled 1 piece of PS/2 power adapting
cable
· Keyboard wedge model, connects with a keyboard
wedge extended cable, and bundled one piece of RS232 interface cable & 1 piece of PS/2 power adapting
cable.
· USB model, connects with an USB extended cable,
and bundled one piece of RS-232 interface cable &
one piece of PS/2 power adapting cable.
: 96mm(L) x 30.5mm (W) x
32mm (H)
: 57g
: 1.5M
: 300,000 pass minimum
Others
o
o
Storage temperature : -40 C to +60 C
o
o
Operating temperature : 0 C to +50 C
Operating humidity
: 20% to 90%
Basic Configurations
1. Green LED on the cover: Power on indicator.
2. Illuminate Red LED on the cover: Good read indicator.
3. Keyboard wedge cable: One cable-end with Female
connector is connected to standard keyboard, while
the other cable-end with Male connector is plugged
into the keyboard port socket on the computer.
4. RS-232 cable: The cable-end is a Dsub 9 pins female
connector with a DC-jack.
5. USB cable: The cable-end is a A-type USB connector.
1
Keyboard Wedge Models:
TMSR-401
TMSR-402
TMSR-403
TMSR-412
TMSR-423
TMSR-430
Track 1
Track 2
Track 3
Track 1&2
Track 2&3
Track 1&2&3
RS-232 Models:
TMSR-501
TMSR-502
TMSR-503
TMSR-512
TMSR-523
TMSR-530
Track 1
Track 2
Track 3
Track 1&2
Track 2&3
Track 1&2&3
Contents
Main Features.............................................................................. 1
Specifications...............................................................................1
USB Models:
TMSR-U01
TMSR-U02
TMSR-U03
TMSR-U12
TMSR-U23
TMSR-U30
Basic Configurations................................................................. 1
Track 1
Track 2
Track 3
Track 1&2
Track 2&3
Track 1&2&3
2
Standard Package...................................................................... 2
Models........................................................................................... 2
Installation Steps.....................................................................3~5
Reader's Programming/Setting...........................................3~5
Installation steps
Keyboard Wedge Model:
RS-232 Model:
USB Model:
Step 1 Turn the computer system power off, and unplug
the keyboard cable.
Step 2 Connect the keyboard cable into the short-cable
of the Reader.
Step 3 Connect the long-cable of the Reader into the
keyboard socket on the computer system.
Step 4 Turn the computer system power on, then you
can hear a beep sound for confirming the
reader's self-test, and green LED will be lit to
indicate that the reader is ready for operation.
Step 1 Turn the computer power off.
Step 2 Connect the Reader's cable to the RS-232 COM
port on the computer.
Step 3 Connect the DC-plug of 5V DC power adapter to
the DC jack on the cable-end of the Reader, you
can hear a beep sound for confirming the
Reader's self-test, and the green LED on the
Reader will be lit to indicate that the Reader is
ready for operating.
Step 4 Turn the computer power on, and run your
application software, include one RS-232 drive
utility, to get the data from the serial port which
connects the Reader.
Step 1 To make sure the Windows USB utility is
available in your computer.
Step 2 Connect the Reader to the USB port on the
computer, you can hear a beep sound for
confirming the Reader's self-test, and the green
LED on the Reader will be lit to indicate that the
Reader is ready for operating.
USB port
to PC Keyboard port
AC power
source
RS-232 port
16
Reader's Programming/setting
(Suggest to do the programming/setting under Windows system)
Note :
1. Suggest doing the programming/setting under
Windows system
2. All settings should be done through RS-232 COM port,
so the RS-232 model can be set directly through its
installation.
3. To do the programming/setting of keyboard wedge or
USB models, please refer to the Installation Steps of
RS-232 model, using the bundled RS-232 extended
cable and PS/2 power adapting cable to do the setting
through RS-232 port.
4. After programming/setting, install back the keyboard
wedge or USB extended cable to the reader.
1. SETTING: the setting list as following
01
02
03
04
Step 1 Insert the TMSR bundled CD into the CD drive
of your computer system. Then execute
"SETUP.EXE." to setup the program.
Step 2 To run the program "MMSR" that you just
installed. You will see the following screen:
3
06
08
Device selection for KB interface
only available for KB interface
Intercharacter delay
select KB or RS-232 setting, then the delay time
for intercharacter to match the sending speed.
Language for keyboard interface
select one language
Terminator
select one instruction following the data string
Preamble and postamble
set the preamble and postamble characters
attached to the data string
RS-232 parameters
-to select the RS-232 parameters
4
General parameters
to setup the data output mode and beep sound
19-1 Magnetic parameters
to setup the track data sequence and magstripe
format
19-2 Magnetic parameters
to setup the start/end sentinel
2. SELECT: COM port selecting
to select COM1 or COM2 port
3. SEND: to store the setting inside the Reader.
4. DEFAULT: to set the Reader as default setting.
5. PRINT: to list or print the setting result.
6. LOAD: to load the setting data to computer.
7. SAVE: to save the setting data into an indicated file.
8. EXIT: to exit from the setting program.
9. Setting Overview: to display all present settings.
Step 3 The Reader's setting procedure:
1. Select "SETTING" first, and setup all the parameters
as you want.
2. Go to "SELECT", to select a COM port that connects
the Reader.
3. Click "SEND", to store the settings inside the Reader
and finish the setting.
5