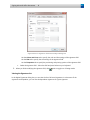
1
CoSign Version 7.5 -------------------------------User Guide Notice This manual contains information that is proprietary to ARX (Algorithmic Research) Ltd. No part of this manual may be reproduced in any form whatsoever without prior written approval by ARX (Algorithmic Research) Ltd. ARX (Algorithmic Research) Ltd. reserves the right to revise this publication and make any changes without obligation to notify any person of such revisions and changes. For further information, contact ARX (Algorithmic Research) Ltd. Trademarks CoSign Central Enterprise, CoSign Central FIPS, CoSign Web App, MiniKey, and CryptoKit are trademarks of ARX (Algorithmic Research) Ltd. Other names are trademarks or registered trademarks of respective owners and are used solely for identification purposes. ARX (Algorithmic Research) Ltd, Tel. 1-866-EASY-PKI (327-9754) Site: www.arx.com © Copyright 2015 ARX (Algorithmic Research) Ltd. All rights reserved. CoSign User Guide Pub. Date 08.15 Pub. No. CSN.INS.USR V75.08.15 i Table of Contents Chapter 1: Overview ............................................................................................................................................. 1 Requirements for Data Authentication Systems .................................................................................................................. 1 Introduction to CoSign .................................................................................................................................................................. 2 Environments Supported by CoSign ................................................................................................................................ 2 CoSign Login Prompt ............................................................................................................................................................. 2 CoSign Extended Authentication ...................................................................................................................................... 3 Using CoSign in an ADFS environment .......................................................................................................................... 4 Using CoSign in Common Criteria Mode ....................................................................................................................... 4 Using CoSign in Manual External CA Mode .................................................................................................................. 5 Applications that Work with CoSign ................................................................................................................................ 6 CoSign Components .............................................................................................................................................................. 7 CoSign Guides ................................................................................................................................................................................... 8 Intended Audience .......................................................................................................................................................................... 8 Organization of this Guide ........................................................................................................................................................... 8 Chapter 2: Installing ........................................................................................................................................... 11 Installing the CoSign Client ....................................................................................................................................................... 11 CoSign Client Components............................................................................................................................................... 11 Installation Pre-requisites .................................................................................................................................................. 12 Installing the Client Directly from the CD ................................................................................................................... 13 Uninstalling the CoSign Client ......................................................................................................................................... 15 Installing the Root Certificate and CoSign Verifier .......................................................................................................... 15 Installing a Root Certificate .............................................................................................................................................. 15 Installing a CoSign Verifier ................................................................................................................................................ 16 Using CoSign Nation ........................................................................................................................................................... 17 Uninstalling the CoSign Verifier ...................................................................................................................................... 20 Chapter 3: Using the CoSign Control Panel .................................................................................................... 21 Using the CoSign Control Panel .............................................................................................................................................. 21 CoSign Control Panel – User Actions ............................................................................................................................ 21 CoSign Control Panel in a Directory Independent Environment ....................................................................... 22 CoSign Control Panel – Administrator Actions ......................................................................................................... 24 CoSign Control Panel Menu Bar ..................................................................................................................................... 25 CoSign Control Panel – Tray Item .................................................................................................................................. 25 Chapter 4: Using the Graphical Signature Management Application ........................................................ 27 Overview ........................................................................................................................................................................................... 27 Installing the Graphical Signature Capture Device .......................................................................................................... 27 Managing Graphical Signatures .............................................................................................................................................. 28 Creating an Image-Based Graphical Signature ......................................................................................................... 30 Creating a Text-Based Graphical Signature ................................................................................................................ 33 ii Using the Signature Designer Utility ......................................................................................................................................35 CoSign Signature Designer Menu Options .................................................................................................................36 CoSign Signature Designer Toolbar Options .............................................................................................................37 CoSign Signature Designer Status Bar Information .................................................................................................37 Chapter 5: Signing Microsoft Office Documents ...........................................................................................39 Signing Office 2007/2010/2013 Documents – New Document Style .......................................................................39 Adding Signature Fields in Office 2007/2010/2013 ................................................................................................40 Configuring Signature Settings in Office 2007/2010/2013 ..................................................................................41 Signing Empty Signature Fields in Office 2007/2010/2013 ..................................................................................42 Validating and Viewing Digital Signatures in Office 2007/2010/2013 .............................................................45 Validating Digital Signatures without Using the ARX Signature Line Provider .............................................46 Using the ARX Office 2007/2010/2013 – CoSign Signatures Toolbar (Ribbon) ...........................................47 Signing Word and Excel Documents – Office XP/2003 Style .......................................................................................47 Overview ...................................................................................................................................................................................48 ARX Legacy Word Add-in Menu .....................................................................................................................................48 ARX Legacy Word Add-in Toolbar Options ................................................................................................................50 Signing and Validating Signatures in Word and Excel Documents ...................................................................51 Word Specific Signing Features .......................................................................................................................................54 Excel Specific Signing Features ........................................................................................................................................54 Configuring Signature Defaults .......................................................................................................................................55 Imposing Dependency ........................................................................................................................................................62 Using Design Mode ..............................................................................................................................................................63 Viewing the Signatures List ...............................................................................................................................................65 Validating Office Signatures by a User Not Using CoSign ....................................................................................68 Signing Word and Excel XP/2003 Documents without Graphical Signatures .......................................................69 Signing a Word or Excel XP/2003 Document without a Graphical Signature ...............................................69 Chapter 6: Signing InfoPath 2007/2010/2013 Forms ...................................................................................71 Understanding Digital Signatures in InfoPath ....................................................................................................................71 Signature Standards in InfoPath......................................................................................................................................71 Using Graphical Signatures in InfoPath ........................................................................................................................71 Signature Scope and Number of Signers ....................................................................................................................72 Signing InfoPath Forms Using CoSign Signature APIs ...........................................................................................72 Typical Work Flow for Using Digital Signatures in InfoPath .................................................................................72 Prerequisites for Signing an InfoPath Form ........................................................................................................................73 Defining Signature Fields in an InfoPath Form Template ..............................................................................................73 Disabling Versioning in InfoPath Form Templates ...................................................................................................77 Signing a Signature Field in an InfoPath Form ..................................................................................................................77 Validating a Signature in an InfoPath Form ........................................................................................................................81 Viewing Signature Details in an InfoPath Form .................................................................................................................82 Removing a Signature from an InfoPath Form ..................................................................................................................84 Chapter 7: Signing Adobe Acrobat Documents .............................................................................................85 Signing an Acrobat Document using Adobe Acrobat X/XI ...........................................................................................85 Setting up Adobe Acrobat X/XI to Use Digital Signatures....................................................................................86 Signing an Adobe Acrobat Document – Acrobat X/XI ...........................................................................................89 Table of Contents iii Operations on Signatures in Adobe Acrobat X/XI Documents .......................................................................... 92 Certifying an Adobe Acrobat Document – Acrobat X/XI ...................................................................................... 94 Using the Update Acrobat Option in the Graphical Signatures Utility ............................................................ 96 Validating CoSign Signatures Using Adobe Reader X/XI ..................................................................................... 96 Signing an Acrobat Document Using Adobe Reader X/XI ................................................................................... 98 Signing a PDF document Without Using Adobe Acrobat .................................................................................... 98 Signing in Adobe Acrobat/Reader X/XI Using Adobe Roaming ID .......................................................................... 98 Generating a Roaming ID Profile.................................................................................................................................... 99 Signing a Signature Field that Contains a URL ....................................................................................................... 102 Chapter 8: OmniSign – Signing PDF and non-PDF Files............................................................................... 105 Overview of OmniSign .............................................................................................................................................................. 105 Launching OmniSign ................................................................................................................................................................. 105 Launching OmniSign with a PDF file ........................................................................................................................... 105 Launching OmniSign with a Remote PDF File Using the WebDAV Protocol .............................................. 106 Launching OmniSign with a non-PDF file ................................................................................................................. 106 Getting Started with OmniSign ............................................................................................................................................. 107 Inserting a Digital Signature Field ........................................................................................................................................ 110 Signing an Empty Digital Signature Field .......................................................................................................................... 111 Creating and Signing a Digital Signature Field ............................................................................................................... 111 Inserting an Electronic Signature Field ............................................................................................................................... 112 Signing an Electronic Signature Field ................................................................................................................................. 112 Creating and Signing an Electronic Signature Field ...................................................................................................... 113 Performing a Multi-Page Signature Operation ............................................................................................................... 113 Saving the Signed File ............................................................................................................................................................... 115 Validating All Signatures .......................................................................................................................................................... 115 Viewing Signature Details ........................................................................................................................................................ 115 Performing Operations on a Single Signature Field...................................................................................................... 117 Configuring Default Signature Settings ............................................................................................................................. 117 Configuring General OmniSign Settings ................................................................................................................... 120 Configuring OmniSign Saving Options...................................................................................................................... 121 Configuring Default Signature Settings for a Single Signature ................................................................................ 121 Configuring the Signature General Parameters ...................................................................................................... 123 Configuring the Signature Appearance ..................................................................................................................... 123 Configuring Clear Signature Field Policy ................................................................................................................... 124 Configuring Date and Time Format............................................................................................................................. 124 Viewing the Signature Field Size and Position ........................................................................................................ 125 Restoring Default Settings....................................................................................................................................................... 125 Batch Signing................................................................................................................................................................................ 126 OmniSign Menu Bar................................................................................................................................................................... 126 Chapter 9: The ARFileSign Utility ................................................................................................................... 129 Overview ......................................................................................................................................................................................... 129 Signing TIFF Files......................................................................................................................................................................... 129 Using ARFileSign for TIFF Files ...................................................................................................................................... 129 Signing XML Files ........................................................................................................................................................................ 130 Using ARFileSign for XML Files ..................................................................................................................................... 130 Signing Other Files ..................................................................................................................................................................... 131 iv Using ARFileSign for Adobe Files ................................................................................................................................ 131 Using ARFileSign for Word 2003 Files ....................................................................................................................... 131 Using ARFileSign for Word/Excel 2007/2010/2013 Files .................................................................................... 131 Using ARFileSign for InfoPath 2007/2010/2013 Files .......................................................................................... 131 Executing arfilesign.exe ............................................................................................................................................................ 132 The arfilesign.exe Options ............................................................................................................................................... 132 Chapter 10: Signing WordPerfect Documents ............................................................................................ 135 Signing a WordPerfect Document ....................................................................................................................................... 135 Modifying a Signed WordPerfect Document .................................................................................................................. 137 Validating Signatures in WordPerfect Documents ........................................................................................................ 137 Viewing Details about Invalid Signatures ................................................................................................................. 138 Validating CoSign Signatures without CoSign........................................................................................................ 138 Chapter 11: Signing Outlook Emails ............................................................................................................. 139 Signing Outlook Emails ............................................................................................................................................................ 139 Configuring Outlook ......................................................................................................................................................... 139 Installing the Root Certificate ........................................................................................................................................ 141 Sending Signed Email Messages .................................................................................................................................. 141 Receiving Signed Email Messages ............................................................................................................................... 141 Signing PDF Attachments ............................................................................................................................................... 142 Signing Outlook Express Emails ............................................................................................................................................ 143 Configuring Outlook Express ......................................................................................................................................... 143 Sending Signed Email Messages .................................................................................................................................. 144 Receiving Signed Email Messages ............................................................................................................................... 145 Installing the Root Certificate ........................................................................................................................................ 145 Chapter 12: CoSign Configuration Utility .................................................................................................... 146 Overview ........................................................................................................................................................................................ 146 Using the CoSign Configuration Utility .............................................................................................................................. 147 CoSign Configuration Utility Menus ........................................................................................................................... 149 Running the CoSign Configuration Utility in End User Mode................................................................................... 150 Viewing and Editing CoSign Client Settings ............................................................................................................ 151 Applying the Changes to the Local Windows Registry ....................................................................................... 151 Reloading the Windows Registry Configuration.................................................................................................... 151 Exporting the Configuration to a Configuration File ............................................................................................ 151 Importing Settings from a Configuration File ......................................................................................................... 152 Setting Client Configuration – CoSign Client .................................................................................................................. 152 Client - Appliances ............................................................................................................................................................. 152 Client – Login Dialog......................................................................................................................................................... 155 Client – Timeouts ................................................................................................................................................................ 157 Client – Miscellaneous ...................................................................................................................................................... 158 Setting Signature API Configuration ................................................................................................................................... 159 Signature API – Time Stamp .......................................................................................................................................... 160 Signature API – Certificate Revocation ...................................................................................................................... 161 Signature API – Graphical Signatures ......................................................................................................................... 163 Signature API – External Validation ............................................................................................................................. 165 Table of Contents v Signature API – Reasons .................................................................................................................................................. 166 Signature API – Miscellaneous ...................................................................................................................................... 167 Setting Microsoft Office Configuration .............................................................................................................................. 169 Microsoft Office – Appearance ..................................................................................................................................... 169 Microsoft Office – Settings ............................................................................................................................................. 171 Microsoft Office – Excel Specific ................................................................................................................................... 173 Microsoft Office – Word Specific.................................................................................................................................. 175 Microsoft Office – Miscellaneous ................................................................................................................................. 176 Setting OmniSign Configuration........................................................................................................................................... 178 OmniSign – Profiles ........................................................................................................................................................... 178 OmniSign – Miscellaneous .............................................................................................................................................. 183 Chapter 13: Troubleshooting .......................................................................................................................... 185 General Problems........................................................................................................................................................................ 185 ARX Add-Ins Present a Failed to Select Certificate Message ............................................................................ 185 Cannot See Any Certificates in Store .......................................................................................................................... 186 Cannot Enable the “Add Digital Signature to Outgoing Messages” Checkbox in Outlook .................. 186 Problems Related to ARX Legacy Word/Excel Add-In.................................................................................................. 186 Cannot Create a Digital Signature Field Using the ARX Legacy Add-in........................................................ 186 Problems Related to OmniSign ............................................................................................................................................. 187 Cannot Create a Digital Signature Field Using OmniSign .................................................................................. 187 Index ................................................................................................................................................................... 189 1 Chapter 1: Overview Over the last four decades, the biggest challenge of IT departments in many organizations was moving to a paperless work environment. Seemingly, there was tremendous success in this regard. Today, most transactions in the business world are performed electronically: Documents are written using word processing programs. Messages are sent via email. Inventories and purchases are tracked using Enterprise Resource Planning (ERP) systems. Medical information is stored in Electronic Medical Record (EMR) systems. Although these transactions are performed in a paperless environment, organizations have still not managed to find an easy way to get rid of the paper used for data authentication (signing the authenticity of the data). Today, although organizations have invested large amounts of funds and other resources in creating paperless environments, their workers are still printing every transaction, signing it, and saving the printed copy. These organizations require a digital method for data authentication. By moving to a viable electronic data authentication system, organizations can reduce their printing, archiving, shipping, and handling costs. In addition, better and more competitive customer service can often be provided. Requirements for Data Authentication Systems A viable data authentication system must meet the following specifications: Security – The system must ensure that no one other than the data creator can tamper with or change the data in any way. Third-party validation – The system must enable any third party to validate the authenticity of the data. If a dispute arises between the parties (the data creator and recipient), any third party must be able to validate the data authenticity in order to settle the dispute. System independence – Data authentication must be independent of the system that created the data. Users must be able to validate the authenticity of the data using a known standard that is independent of any specific system. Validation over time – Users must be able to validate data authenticity at any point in time. Authenticity cannot expire at any point. Currently, the only data authentication method known to support all of these requirements is the Public Key Infrastructure (PKI) method of authenticating data, simply called “digital signatures”. CoSign User Guide 1 2 Introduction to CoSign CoSign is a PKI-based, off-the-shelf digital-signature solution that can be integrated with a wide range of applications. In this way, CoSign enables organizations to embed digital signatures in various documents, forms, and transactions. CoSign is a turnkey, hardware-based solution that is easily and quickly deployed in the network and provides cost-effective digital-signature capabilities for the organization. CoSign includes all the components needed for PKI-based digital-signature deployment. You do not need to install any other device or integrate any other component for the system to work. Environments Supported by CoSign CoSign integrates with leading user management systems, including Microsoft Active Directory and a variety of LDAP (Lightweight Directory Access Protocol) based directories, such as IBM Tivoli. This integration ensures no overhead in managing the digital-signature system and signature credentials (i.e., the private keys that are needed in a PKI environment), solving one of the main problems of legacy digital-signature systems. System managers, network managers, and end-users can continue to use the IT infrastructure in the same manner as before CoSign was installed. CoSign stores the signature credentials in a secure server, ensuring that the signer has exclusive access to his or her signature credentials, while still maintaining a centrally managed solution. This is necessary in order to fulfill the security requirement of the data authentication system. Another option is to use the CoSign Cloud service. An organization can register its users to the service and thus enable them to digitally sign content without having to deploy the CoSign appliance on the organizational premises. CoSign Login Prompt When CoSign is installed in Directory Independent mode, you are prompted with a user login window whenever you access your account in the CoSign appliance. Figure 1 Login Window In the User name field you enter your identity as defined by your organization. Often, this is your email address. Overview 1 3 In the User’s password field you enter your password. Note: Take care not to reveal your password, because it is also used in the digital signature authorization process. Note: Follow your organizational password policy rules, such as minimum password length. Remember to change your password according to the organizational policy. CoSign Extended Authentication In some environments, such as when CoSign is installed in Common Criteria EAL4+ mode, users are required to supply additional information as part of the digital signature to extend the security of the transaction. There are several types of extended authentication; the most common are described below. Simple Extended Authentication In this mode, you must provide your password as part of every digital signature operation. Figure 2 Password required for Digital Signature Operation Extended Authentication based on One Time Password (OTP) In this mode, whenever you wish to sign a document or data, you must provide an OTP. The OTP is displayed in an OTP device provided to you by the organization. Some OTP devices are event-based OTP devices. They include a button that must be pressed whenever you need to provide an OTP. Note: Make sure to always carry your OTP device with you and keep it safe from unauthorized usage. Note: If you are using an event-based OTP device, make sure not to press the button without entering the OTP code in the login window. Otherwise you may lose synchronization between the OTP device and the organizational OTP validation processing. CoSign User Guide 1 4 Extended Authentication based on Password and OTP (One Time Password) This mode is used when CoSign is installed in Common Criteria EAL4+ mode. In this case, you must enter both a password and an OTP in order to authorize a digital signature. Please follow the guidelines listed above for keeping both your OTP device and your password secure. Using CoSign in an ADFS environment It is possible to access a CoSign appliance that is deployed in another organization based on trust between the local organization and the remote hosting organization. Access is enabled as follows: the end user is supplied with a SAML ticket provided by the local organization. This SAML ticket is presented to the remote organization and used to authenticate the local user. This mechanism is based on an ADFS (Active Directory Federation Services) deployment in the local organization. For more information, refer to http://msdn.microsoft.com/en-us/library/bb897402.aspx. To enable this mechanism: If the PC of the CoSign client in the local organization is running Windows 7, install the package from http://www.microsoft.com/en-us/download/details.aspx?id=17331 on the PC of the CoSign client in the local organization. If the PC of the CoSign client in the local organization is running Windows 8, you need only to select the Windows Identity Foundation option in the Control Panel’s Turn Windows features on or off section. To enable end users to use ADFS, perform some minor configuration in the CoSign Configuration utility (refer to Client - Appliances). Using CoSign in Common Criteria Mode The CoSign appliance can be installed in a Common Criteria EAL4+ mode of operation. CoSign Common Criteria deployments must be installed in a Directory Independent environment. In this mode of operation, the following additional procedures and activities are required from the end user: Any digital signature operation must be authorized by presenting the user’s password and an OTP displayed by the user’s OTP device. All first-time users must activate their account before they can perform any operation in the account, such as generating a signature key or signing. For more information, refer to User Activation below. User Activation In a Common Criteria EAL4+ mode, the first time you wish to use your CoSign account you must first perform an activation operation. This operation must be performed only once. During activation you must supply the given activation password (existing password), the new desired password, and the OTP as it appears in your personal OTP device. Overview 1 5 Please make sure you received you activation password and your OTP device from the organization in a secure manner. Note: If you perform an activation procedure and receive a message that the account was already activated, inform the organization immediately Protection of Data/Documents During Signing It is important to make sure malicious software does not alter the data to be signed between the moment the user initiates a signature operation and until the moment the data is actually signed by the CoSign appliance. This section provides some guidelines for preventing non-trusted software from modifying content to be signed. CoSign client installation is signed by Algorithmic Research’s code signing key. Please make sure that when the product is installed, a relevant message appears indicating that the CoSign client software is indeed protected. Every DLL and EXE file of the CoSign Client is signed with Algorithmic Research’s code signing key. It is advised to regularly check that the signature is valid by viewing the digital signatures tab provided as part of the file properties of the CoSign's installation DLLs and EXE files. It is important to use only trusted 3rd party software that was delivered and installed properly. This includes products such as Microsoft Office, Adobe Acrobat and other software tools. It is important that these tools be signed using a code signing certificate and that the vendor who supplied the tools is trusted. It is important to avoid the installation of non-trusted software on the user’s PC that may compromise the security of the data to be signed. Use only trusted software. Keep in mind that new releases of 3rd party software include fixes to found security problems; therefore, make sure that 3rd party software is regularly updated. Using CoSign in Manual External CA Mode CoSign can be installed in a manual external CA mode, in which each end user is allocated an empty account, and must manually enroll for a certificate from an external CA. Certificate enrollment for each user is performed using an external certificate enrollment or RA application software. This application software uses standard Cryptographic APIs to access CoSign, and is not part of the CoSign solution. When CoSign is installed in manual external CA mode, CoSign does not install its internal CA, so users are not automatically provided with a certificate. During the enrollment: The enrollment application software requests that the CoSign appliance generate a new signature key for the specific user. The key is generated within the CoSign appliance and under the specific user account in a non-extractable manner. A certificate request is sent to the external CA. The external CA issues an X-509 certificate and sends it back to the enrollment application software. The enrollment application software uploads the certificate to the user’s CoSign account. The user is now ready to sign with the newly-enrolled certificate. CoSign User Guide 1 6 Several signature keys and certificates can be created and stored for any given user, depending on the organization’s needs. The main drawback of this mode of work is that it requires manual enrollment for each user. Manual enrollment requires user intervention, as well as substantial management time and effort. Manual enrollment also requires additional efforts spent on certificate renewal and certificate revocation. However, there are cases where you must employ manual enrollment. These include: Cases where it is required that the certificate be provided by a qualified CA of a certain country or the EU. Cases where the certificate must have specific or specialized attributes not provided by the built-in CoSign CA. Cases where the certificate must be provided by a World Wide verifiable CA that is not currently supported by CoSign’s automatic external CA. In this case, the verifying party’s PC is already installed with the ROOT certificate, so the verifying party does not have to manually install a ROOT certificate. This makes documentation validation easier. The end user must use the Certificate Authority’s tools or trusted third party tools that are installed in the same PC as the CoSign client is installed. These tools use the CoSign Client to interface the CoSign appliance to generate a signature key for the user in his/her account and generate a certificate request for the user. The certificate request is sent by these third party tools to the Certificate Authority. The Certificate Authority sends the certificate to the end user, who loads it into the CoSign appliance via a PKCS#11, Microsoft CAPI or JAVA JCA interface, which are offered by the CoSign Client software. Applications that Work with CoSign An increasing number of applications can work with CoSign as their digital-signature layer without needing any further integration, including: Microsoft Office 2007/2010/2013 (Word, Excel, and PowerPoint) Microsoft InfoPath 2007/2010/2013 Adobe Acrobat Microsoft SharePoint 2010/2013 XML TIFF files Word Perfect Microsoft Outlook and Outlook Express Adobe Server forms (for signing web forms) AutoCAD Lotus Notes Microsoft BizTalk FileNet eForms Overview 1 Verity Liquid Office ERP systems (e.g., SAP) OpenText Oracle Crystal Reports Web applications Any application that has a print option can use CoSign to generate a PDF file and sign it. 7 For information on using CoSign with other applications, contact ARX technical support. CoSign Components CoSign includes the following components: CoSign appliance – The CoSign appliance hardware and software, connected to the organization’s network. For more information, refer to the chapter Installing CoSign in the CoSign Administrator Guide.. Client – The CoSign Client software, installed on the users’ computers. For more information, refer to Chapter 2: Installing. Administrator – The CoSign Administrative software that includes the CoSign Microsoft Management Console (MMC) snap-in, installed on the administrative computer. For more information, refer to the chapter Managing the CoSign Installation chapter in the CoSign Administrator Guide. CoSign Connector for SharePoint – This connector enables adding digital signature functionality to documents managed by Microsoft SharePoint, or using digital signatures within any workflow procedure that is based on Microsoft SharePoint. CoSign Web App – This application is deployed in the Microsoft Web Server of the organization and enables users to sign documents without installing any client component. CoSign Web App can use either the local CoSign appliance or the CoSign Cloud environment for performing digital signature operations. Applications can interact with the CoSign Web App and add a digital signature to documents using a web based interface. CoSign Mobile App – This mobile application, which can be installed on Android-based devices or Apple iOS devices, enable users to sign documents using their mobile devices. The mobile devices interface directly with the CoSign appliance via a CoSign RESTful interface. The CoSign Mobile App can interface with either the CoSign Cloud, the organizational CoSign appliance, or CoSign’s Trial system. CoSign Cloud – A CoSign cloud-based application that provides digital signature services to users who register for the services. The CoSign cloud supports single users as well as groups of users. CoSign Signature APIs – Developers can use local and network APIs to integrate their applications with CoSign Central appliances and the CoSign Cloud service. CoSign User Guide 1 CoSign Guides CoSign documentation includes the following guides: CoSign Administrator Guide – Provides all the information necessary for an administrator to install and manage the CoSign appliance in the various environments in which CoSign can operate. CoSign User Guide – Provides all the information necessary for an end user to use CoSign. Includes information about special add-ins for various applications such as Microsoft Office. CoSign Connector for SharePoint User Guide – Provides all the information necessary for implementing and using the CoSign Connector for SharePoint. CoSign Web App User Guide – Provides all the information necessary for deploying CoSign Web App in the organization’s environment. CoSign Signature APIs Developer’s Guide – Provides all the information necessary for developers to integrate their application with CoSign. CoSign Mobile App Deployment Guide – Provides all the information necessary for deploying the CoSign Mobile App. Intended Audience This guide is intended for end-users using the CoSign Client. Organization of this Guide This guide is organized as follows: Chapter 1: Overview – Provides an overview and introduction to CoSign. Chapter 2: Installing – Describes how to install the CoSign client, install plug-ins for Microsoft Office, Adobe Acrobat and TIFF, set graphical signatures, use CoSign Verifier, and more. Chapter 3: Using the CoSign Control Panel – Describes how to use the CoSign Control Panel. Chapter 4: Using the Graphical Signature Management Application – Describes how to manage graphical signatures using the Graphical Signature Management application. Chapter 5: Signing Microsoft Office Documents – Describes how to generate and validate digital signatures for Microsoft Office applications, and how to integrate the digital signatures into the general application flow. Chapter 6: Signing InfoPath 2007/2010/2013 Forms – Describes how to generate and validate digital signatures for Microsoft InfoPath forms. Chapter 7: Signing Adobe Acrobat Documents – Describes how to sign and validate an Adobe Acrobat document using Adobe Acrobat or Adobe Reader, as well as how to certify an Acrobat document. 8 Overview 1 9 Chapter 8: OmniSign – Signing PDF and non-PDF Files – Describes how to use OmniSign to sign any printable data from any application. Chapter 9: The ARFileSign Utility – Describes the arfilesign.exe command line utility which can be used to digitally sign any PDF, XML, TIFF, Word/Excel 2007/2010/2013, InfoPath 2007/2010/2013 or Word 2003 file. Chapter 10: Signing WordPerfect Documents – Describes how to generate and validate digital signatures using WordPerfect. Chapter 11: Signing Outlook Emails – Describes how to generate and validate digital signatures using Microsoft Outlook and Microsoft Outlook Express. Chapter 12: CoSign Configuration Utility – Describes how the CoSign Configuration Utility enables the user to set the configuration of any parameter in any of the CoSign client components. Chapter 13: Troubleshooting – Offers solutions to various client-related problems you may encounter while running the CoSign Client. Index – Provides a comprehensive index of the topics discussed in this guide. 11 Chapter 2: Installing This chapter describes how to: Install the CoSign Client. Install the root certificate. Install the CoSign Verifier, used to validate digital signatures that were attached to applications such as Office using CoSign. Note: The installation of CoSign differs slightly depending on whether it is being installed in a Microsoft Active Directory environment LDAP based environment or a Directory Independent environment. These differences are mentioned where applicable. Installing the CoSign Client CoSign enables the end-user to digitally sign transactions, documents, and other types of data. In order to perform these tasks, the CoSign client must be installed. The CoSign client enables applications such as Microsoft Word to use CoSign for generating digital signatures. The following chapters provide information on generating signatures in third-party applications. The CoSign client may be installed on a machine using one of the following operating systems: Windows 2003. Windows VISTA. Windows 7. Windows 2008, Windows 2008 R2. Windows 8 Windows Server 2012 Note: The CoSign client can also be installed in any 64 bit variant of the above operating systems, such as Windows Vista 64 bit or Windows 7 64 bit. Note: You must have local administrative rights in order to install the CoSign client. CoSign Client Components The CoSign Client CD displays a CoSign Client Components Installation screen when the CoSign Client CD is put into the CD driver. Each CoSign component is based on several .msi files. The .msi files are based on the Microsoft Software Installation technology. CoSign User Guide 2 12 The components include: ARX CoSign Client – The standard CoSign client installation without any plug-ins. ARX CoSign Admin – Enables administrators to install and manage CoSign. The installation and management activities are described in Installing CoSign and Managing the CoSign Installation in the CoSign Administrator Guide. Microsoft Office (Word, Excel, InfoPath) – Three types of plug-ins are supported: ARX Signature Line Provider – A digital signature plug-in for Office 2007/2010/2013 for the .docx and .xlsx file types. ARX Legacy Word Add-in – A digital signature plug-in for Word 2007/2010/2013 and Excel 2007/2010/2013 that enables you to sign .doc, .docx, .xls and .xlsx files. For more information, refer to Chapter 5: Signing Microsoft Office Documents ARX OmniSign Printer – A plug-in for signing any printable data from any application. For more information, refer to Chapter 8: OmniSign – Signing PDF and non-PDF Files. Installation Pre-requisites To perform signatures using Office 2007/2010/2013 upon .docx or .xlsx files, it is mandatory to install .NET Framework version 2 in the client machine. If NET Framework version 2 is not already installed, the CoSign client installation installs it, informs the end user it is doing so, and performs an operating system restart. Following the restart, the end user will need to continue with the CoSign client installation. Note that in Windows 8, .NET framework version 2 is not installed by default. To perform signatures upon .docx or .xlsx files using CoSign Signature APIs, it is mandatory to install .NET Framework version 3 in the client machine. The installation is not performed automatically by the CoSign client installation and should therefore be performed by the user. To perform signature field creation upon .docx or .xlsx files using CoSign Signature APIs, it is mandatory to install .NET Framework version 3.5 on the client machine. The installation is not performed automatically by the CoSign client installation and should therefore be performed by the user. To perform signatures upon .xml files using CoSign Signature APIs, it is mandatory to install .NET Framework version 2 in the client machine. The installation is not performed automatically by the CoSign client installation and should therefore be performed by the user. To perform signatures upon InfoPath 2007/2010/2013 files using CoSign Signature APIs, it is mandatory to install .NET Framework version 2 in the client machine. The installation is not performed automatically by the CoSign client installation and should therefore be performed by the user. If you intend to use the ARX add-in for Microsoft Office, you should include the component called "Visual Basic for applications" when installing Microsoft Office. This component is included in the Microsoft Office installation by default. Installing 2 13 Installing the Client Directly from the CD To install the CoSign client directly from the CD: 1. Insert the ARX CoSign CD into the CD drive. 2. If you are using Windows 7 and above or Win2008R2 and above, you are prompted to select a language. Select the desired language from the list and click OK. Figure 3 Language Selection Window The language selection will affect the installation screens, and all end-user Client GUI elements such as OmniSign, the ARX Word Legacy add-in, etc. It will not affect the Configuration Utility or any administrative tools. The following CoSign Client Installation screen appears. CoSign User Guide 2 14 Figure 4 CoSign Client Installation Screen 3. Select the components you wish to install, based on the designation of the current workstation. Keep in mind the following: The ARX CoSign Client component is always selected. If the workstation is an administrative workstation, select the ARX CoSign Admin component. If the workstation is a user workstation, select the applicable components (Microsoft Office or OmniSign Printer). Note: The Microsoft Office component is automatically selected if Microsoft Office is installed in the end-user machine. Note: The OmniSign Printer component installs a new virtual printer in the end-user’s machine. 4. Click Install Now. When installation is complete, a √ appears next to each of the installed components. In case of a failure, an X appears next to the relevant components and a summary information box appears. Alternatively, you can place the contents of the CoSign CD on the network so that end users can install the CoSign Client through the network. While this method eliminates the need to use the CD for each installation, it does not facilitate automatic installations of the software. Installing 2 15 Uninstalling the CoSign Client To uninstall the CoSign client locally: 5. Open the Start menu and select Programs > ARX CoSign > Uninstall CoSign Components. 6. A confirmation box appears. Click Yes to uninstall. The uninstalling process begins. 7. When the CoSign Client is uninstalled from the workstation, a message box appears to inform you that the system finished uninstalling. Click OK. Installing the Root Certificate and CoSign Verifier An organization’s CoSign root certificate is a .cer file that must be installed on your workstation if you wish to sign or validate documents originating from that organization. Every organization has its own root certificate. You can sign documents originating from your own organization, and validate documents originating from your own organization or from another organization. To sign a document, you need to install the root certificate of your organization. You also need to have the CoSign Client installed on your PC, and a CoSign appliance installed in the organization. To validate a document, you need to install the root certificate of the organization that signed the document. You do not need a CoSign Client or CoSign appliance. However, if you do not have a CoSign Client, you need to install a CoSign Verifier if you wish to validate signatures in Office XP/2003 documents and Adobe documents. Many applications have built-in signature validation capabilities; therefore the CoSign Verifier is not necessary for validating signatures in those applications. The applications that do require installing a CoSign Verifier include: Office XP/2003 documents – This application does not have built-in capabilities for verifying graphical signatures, so to verify signed Office XP/2003 documents you need to install an Office CoSign Verifier. After installing the Office CoSign Verifier, you can verify signatures in Office XP/2003 documents as described in Chapter 5: Signing Microsoft Office Documents. Adobe – Although Adobe has built-in verification capabilities for verifying digital signatures in PDF documents, you must modify your Adobe settings to enable Adobe’s verification capabilities. You can do this manually (as shown in Figure 77) or you can download an Adobe CoSign Verifier that modifies the Adobe settings in both Adobe Reader and Adobe Acrobat. After installing the Adobe CoSign Verifier, you can use Adobe’s built-in verification capability to verify signatures. For information on how to install a CoSign root certificate (of your own organization or of another organization) on your PC, refer to Installing a Root Certificate. For information on how to install a CoSign Verifier on your PC, refer to Installing a CoSign Verifier. Installing a Root Certificate To install a root certificate: CoSign User Guide 2 16 If you need to install your own company’s root certificate and you already have the CoSign client installed on your PC, use the CoSign configuration utility to install the root certificate of your company (refer to Installing My Own Organization’s Root Certificate). Note that it is quite likely that your administrator already installed your organization’s root certificate on your PC. If you are unsure whether it was installed, you can always install again. Installation of your own company’s root certificate is not required in the following cases: CoSign is installed in a configuration where an external CA is used. In this case the root certificate is probably already installed. CoSign is installed in a configuration where CoSign is a subordinate to an external CA. In this case the root certificate is probably already installed. CoSign is installed in an Active Directory environment. In this case the root certificate is probably already published and automatically installed in every user’s PC. The CoSign certificate is based on a Worldwide verifiable CA, such as Comodo. If you need the root certificate of a different organization, or you need your own organization’s root certificate but do not have the CoSign client installed, you must download from CoSign Nation the root certificate of the organization that sent the document (refer to Using CoSign Nation). Note that if you also need to install a CoSign Verifier, you can download it at the same time. Keep in mind that for every organization that sends you a document to validate, you need to install the root certificate of that organization in your PC. Installing My Own Organization’s Root Certificate If you have the CoSign client installed on your computer, and you need to install the CoSign root certificate of your own organization: Use the Install CoSign CA Certificate option in the CA menu of the CoSign Configuration Utility (refer to CA Menu). Installing a CoSign Verifier There are two types of CoSign Verifiers – one for verifying signatures in Office documents, and one for verifying signatures in Adobe documents. Keep in mind that each type of CoSign Verifier need only be installed once on a PC. To install a CoSign Verifier: If the document originated from your company and you have the CoSign client installed on your PC, no installation is needed because both types of CoSign Verifiers were already installed during CoSign client installation. Otherwise, you must download a CoSign Verifier, as described in Using CoSign Nation. Note that you can download a root certificate or certificates in addition to a CoSign Verifier. Installing 2 17 Using CoSign Nation CoSign Nation is a website from which you can download to your PC: Root certificates of various organizations that use CoSign to sign and validate documents. The CoSign verifiers, both Office and Adobe. You can access CoSign Nation from any Web browser available, such as Internet Explorer, Firefox, Chrome or Safari. Organizations that wish to add their root certificates to CoSign Nation, should contact ARX by sending an email to [email protected]. To install organizational root certificates and optionally a CoSign Verifier: 1. If you are going to be downloading a CoSign Verifier, ensure you have local administrative permissions. 2. Go to https://cn.arx.com/. The CoSign Nation web page appears. CoSign User Guide 2 18 Figure 5 CoSign Nation Website 3. Specify whether to download a CoSign Verifier, and if so, which type – Office or Adobe. To do so, click Change Default Configuration. The Select Package Components dialog box appears. Installing 2 19 Figure 6 CoSign Nation – Select Package Components a. Specify whether to download the MS Office CoSign verifier, the PDF CoSign verifier, neither, or both. b. Click OK. 4. Specify which root certificates you wish to download, by selecting the checkboxes corresponding to the organizations whose root certificates you wish to download. 5. Click Download. The root certificates of all the organizations you marked in the CoSign Nation page are immediately installed on your PC. 6. If you selected to download a CoSign Verifier or Verifiers, a security warning window appears. Click Run in the security warning window. The installation self-extracts and the following window appears: Figure 7 Security Warning Dialog Box 7. Click Run to continue with the installation. An installation window appears. When installation is complete, the installation window closes. The CoSign verifier or verifiers are now installed on your PC. CoSign User Guide 2 20 Uninstalling the CoSign Verifier In the case of a full verifier installation, there are two components that can be removed. Go to Add/Remove Programs or the Add/Remove features option in the Control Panel, and remove the following components: ARX Office Verifier ARX SAPI Verifier Note: If you installed the Adobe-only version of the verifier, no components need to be removed. 21 Chapter 3: Using the CoSign Control Panel This chapter describes how to use the CoSign Control Panel, which enables you to operate the CoSign main components. Using the CoSign Control Panel All client-based operations are activated through the CoSign Control Panel. To access the Control Panel, you can either select Start ARX CoSign CoSign Control Panel or you can double-click the CoSign icon in the tray. The CoSign Control Panel appears. Figure 8 CoSign Control Panel Some Control Panel options are always active, while others are active depending on the status of the CoSign appliance (Installed/Not Installed) and the type of CoSign appliance installation (Microsoft Active Directory, LDAP, or Directory Independent). CoSign Control Panel – User Actions Client Configuration – This option enables the end user to configure the CoSign client settings. For more information, refer to Chapter 12: CoSign Configuration Utility. Graphical Signatures – This option enables both end users and administrators to manage personal graphical signatures. For more information, refer to Using the Graphical Signature Management Application. Change User Password – This option is relevant only in the case of a Directory Independent environment. For more information, refer to CoSign Control Panel in a Directory Independent Environment. CoSign User Guide 3 22 This option includes also the User Activation option that is mandatory for every first-time user when CoSign is installed in Common Criteria EAL4+ mode. OmniSign Settings – This option activates the OmniSign application. For more information related to OmniSign, refer to Chapter 8: OmniSign – Signing PDF and non-PDF Files. Logoff – This option logs off from the session. This option is relevant when CoSign is installed in a Directory Independent environment or any other configuration where the user needs to login manually. CoSign Control Panel in a Directory Independent Environment The following options are relevant in a Directory Independent environment: Client Configuration – Refer to the explanation in CoSign Control Panel – User Actions. Graphical Signatures – Refer to the explanation in CoSign Control Panel – User Actions. Change User Password – Refer to the explanation in CoSign Control Panel – User Actions. OmniSign Settings – Refer to the explanation in CoSign Control Panel – User Actions. Logoff – Refer to the explanation in Changing the Password in a Directory Independent Environment. Figure 9 CoSign Control Panel – Directory Independent Environment Changing the Password in a Directory Independent Environment To change your password when CoSign is installed in a Directory Independent environment: 1. Click Change User Password in the CoSign Control Panel (Figure 9). The Change Password window appears. Using the CoSign Control Panel 3 23 Figure 10 Change Password in Directory Independent Environment 2. Enter your user name. 3. Enter the old password of the account and the new password of the account. Confirm the new password. 4. Click Change password. Performing User Activation To activate your account when CoSign is installed in a Common Criteria EAL4+ environment: 1. Click Change User Password in the CoSign Control Panel (Figure 9). The Change Password window appears (Figure 10). 2. Select the Activate user tab. 23 CoSign User Guide 3 24 Figure 37 Activate User Window 3. Enter your user name. 4. In the Old Password field enter the Activation password of the account. 5. In the New Password and Confirm New Password fields enter a new password of your choice. The password must follow organizational password policy rules. 6. Enter an Additional Password as it appears in your personal OTP device. 7. Click Activate User. The user account is now activated. You can start working with CoSign – perform key and certificate enrollment, upload graphical images, and sign using your key. Note: Activation can be performed only once per account. Note: If you get a message that the account was already activated, this may indicate a security breach. Inform your organization immediately. CoSign Control Panel – Administrator Actions For administrative operations, refer to the CoSign Administrator Guide. Using the CoSign Control Panel 3 25 CoSign Control Panel Menu Bar The User, Designer and Admin options of the CoSign Control Panel menu bar display all the options that can be activated from the Control Panel. In addition, the Tools option includes two options: Figure 11 CoSign Control Panel Menu Bar Options – This enables you to configure CoSign Control Panel settings. When you select Options from the Tools menu, the following dialog box appears: Figure 12 CoSign Control Panel Settings Show CoSign Control Panel in system tray – Check this option to display the CoSign Control panel in the system tray when the Control Panel is activated. Personal graphical signatures management – In a regular client installation this option is always marked. When this option is checked, the graphical signature application is activated in user mode. If the option is unchecked and the CoSign administrative client is installed, the graphical signature application will operate in administrative mode. For more information, refer to Using the Graphical Signature Management Application. Refresh panel – This option updates the icons in the control panel according to the updated state of the CoSign appliance. CoSign Control Panel – Tray Item The CoSign control panel icon appears in the tray if the option Show CoSign Control Panel in the system tray is selected. Right-click the icon to display a popup that enables you to perform the following operations: Open control panel – Maximizes the control panel. 25 CoSign User Guide 3 Change password – Relevant only for a Directory Independent environment. Logoff – Relevant only if the user is prompted to authenticate in a Directory Independent environment, or is configured to prompt for logon. Exit – Closes the CoSign control panel. 26 27 Chapter 4: Using the Graphical Signature Management Application This chapter describes how to use the Graphical Signature Management application, which enables you to set your graphical signature. The graphical signature can be embedded into the visible signature. Overview The Graphical Signature Management application enables you to view all your graphical signatures and create a new graphical signature. This graphical signature can be attached to all Microsoft Word, Excel, InfoPath, TIFF, and Adobe Acrobat documents that you sign. There are several mechanisms that can be used for capturing a graphical signature: A capturing device such as a Topaz pad. A Mouse or a Tablet PC. A text-based graphical signature. An image uploaded from a file. The following section details how to capture graphical signatures. If you do not capture a graphical signature, a default graphical signature that is based on your name will be used by the signing application, such as Office 2007/2010/2013 or OmniSign. The Graphical Signature Management application can be used in either of two modes of operation: Administrative Mode – An administrator station is used for creating the user’s graphical signatures, as follows: The user supplies his/her identity and password, after which the user can create and then view his/her own graphical signatures. User Mode – The user can create or view his/her own graphical signatures. Installing the Graphical Signature Capture Device The CoSign appliance is supplied with a graphical signature capture device. There are several types of graphical signature capture devices you can use: Graphical signature capture devices produced by Topaz Systems (http://www.topazsystems.com). Two models are available: SigLite LCD 1x5 USB – This model includes an LCD capture device. The entered graphical signature appears on the LCD screen. CoSign User Guide 4 28 SigLite 1x5 USB – This model does not include an LCD capture device. Figure 13 SigLite LCD 1x5 USB Note: Install the signature capture device only on machines in which the CoSign administrative client is installed. To install the graphical signature capture device: Connect the signature capture pad to the USB port on the workstation. The pad’s drivers are automatically installed. Managing Graphical Signatures The Graphical Signature Management application enables you to create and manage graphical signatures. The graphical signatures you create using this utility are stored inside the CoSign’s users database as graphical objects. The Graphical Signature Management application can also manage graphical images that are located in the user’s local hard disk. This is mainly intended for cases where the graphical image files are too big to be uploaded to the CoSign appliance. Using the Graphical Signature Management application, you can view the local graphical signatures, edit their attributes, and delete them. When you first run the Graphical Signature Management application, the following directory is created: <local hard disk>\My Documents\My Pictures\My CoSign Images. In this directory the following sub-directories are created: WetInk Initials Logo You can place graphical signatures in each of these directories. These graphical signatures will appear in the Graphical Signature Management application, and can be managed by that application. Using the Graphical Signature Management Application 4 29 To manage graphical signatures using the Graphical Signature Management application: 1. Open the Start menu and select Programs ARX CoSign CoSign Control Panel, or you can double-click the CoSign icon in the tray. The CoSign Control Panel appears. 2. In the Control Panel, click Graphical Signature. The CoSign Graphical Signatures Viewer dialog box appears, for managing your graphical signatures. Figure 14 Graphical Signature Management Application 3. Select a signature from the drop down list at the top of the window. The corresponding graphical image appears in the middle of the window. You can also use the left and right arrows to browse through all the available graphical signatures – those stored in the CoSign appliance, and also those located in the local wetInk, Logo, or Initials folders, under My Documents/My Pictures/My CoSign images. 4. If you click Update Acrobat, you can define a new appearance with the name ARX Signature <graphical signature label>, based on the graphical signature currently displayed. The appearance, which includes the graphical signature, can be selected in every Adobe signature operation (refer to Chapter 7: Signing Adobe Acrobat Documents). If the image is a logo, you can select this option to change the default logo in the existing Adobe Acrobat or Adobe Reader to the selected logo. 5. If you click Download Images, you can download all your images that are stored in the CoSign appliance to the local disk. After clicking the link, you are requested to specify a local directory. Click OK to export all graphical signatures to the local directory you specified. Note that full signatures are saved to a Wetink subfolder, initials to an initials subfolder, and the logo to a logo subfolder. 6. If you click either New Signature or Edit Signature, the New Signature or Edit signature dialog box appears. CoSign User Guide 4 30 Figure 15 New Signature and Edit Signature Dialog Boxes The display area displays the currently selected graphical signature. The following options are available: Signature Name – Specify the name of the edited graphical signature. Image/Text Only – Specify if the loaded graphical signature is based on an image or text. Depending on the selected option, the set of actions is different. Refer to Creating an ImageBased Graphical Signature and Creating a Text-Based Graphical Signature. Used For – Specify the type of graphical signature: Full Signature, Initials, or Logo. A single logo is allowed per user. Select Color – Specify the color of the foreground of the image. This is available for monochrome images. Delete this signature – Available in the Edit Signature dialog box only. The currently selected graphical signature is deleted. Note: A graphical signature is limited to 29KB. You can use up to a maximum of 140KB for your entire set of graphical signatures. If you wish to use a larger graphical image, you can store it in a local directory as described at the beginning of this section. Each local graphical signature is limited to 1 MB. Note: The first time you create a signature using a signature capture device, you must have local administrative rights. Afterwards, any user can create a signature. Creating an Image-Based Graphical Signature If you select Image in the Edit Signature dialog box (Figure 15), you can create an image-based graphical signature in any of the following ways: Using the Graphical Signature Management Application 4 Upload any local image file to CoSign. Refer to Uploading an Image File. Create an image file and load it into CoSign. Refer to Creating an Image File. Uploading an Image File To load an image file into CoSign: 1. Select Image in the Edit Signature dialog box (Figure 15). 2. Click Upload. 3. In the browse window that appears, browse to the desired image file. You can upload the following types of graphic files: monochrome bmp, multicolor bmp, or jpg. If the size of the image is larger than the maximal size allowed, it is automatically reduced. A window appears (Figure 16), asking whether to upload the reduced size image to the CoSign appliance. Figure 16 Reduce Graphical Image Dialog Box Creating an Image File To create an image file and upload it into CoSign: 1. Select Image in the Edit Signature dialog box (Figure 15). 2. Click Create. A list of available image capturing techniques appears. 31 CoSign User Guide 4 32 Figure 17 Create a Graphical Signature – List of Image Capturing Techniques Select an image capturing technique while keeping the following in mind: Topaz or ePad – Use these options when it is required to enter the graphical signature using a signature capture pad. Use the pad as described in Installing the Graphical Signature Capture Device. If you are using a signature capture device with no LCD display, you will be able to see the signature only on the PC screen, while editing it. If you are using a signature capture device with an LCD display, you will be able to see the signature both on the device and on the PC screen while editing it. Tablet PC/Mouse – Use a Tablet PC and a pen or a regular PC mouse to enter a new graphical signature. Any movement of the mouse or pen in the tablet PC is drawn in the Capture Signature window that appears. Note: You will be able to use the mouse on a regular PC only when using Vista or when Microsoft Office 2003/2007/2010/2013 is installed. The display in the Edit Signature window refreshes (see Figure 18). Using the Graphical Signature Management Application 4 33 Figure 18 Creating a Graphical Image File 3. Use the capturing technique to capture a graphical signature. 4. When capturing is complete, click Done in the Edit Signature window (Figure 18). The graphical signature you created is uploaded into CoSign. 5. If you wish to re-start the capture, click Clear. Note: If the size of the image is larger than the maximal size allowed, the image size is automatically reduced. Creating a Text-Based Graphical Signature To create a text-based graphical image: 1. Select Text only in the Edit Signature dialog box (Figure 15). The options shown in Figure 19 appear. CoSign User Guide 4 Figure 19 Edit Signature Dialog Box– Text-based Graphical Signature 2. Click Font. A Font dialog box appears. Figure 20 Edit Signature Dialog Box– Text-based Graphical Signature – Defining the Text Appearance 3. In the Font dialog box, specify the appearance of the graphical signature text (font, size, color, etc.). 4. Click OK to close the Font dialog box. 5. Using your keyboard, enter the text for the graphical signature. The signature is displayed, with the appearance you defined, in the window of the Edit Signature dialog box (Figure 19). 34 Using the Graphical Signature Management Application 4 Using the Signature Designer Utility The Signature Designer utility enables you to merge several images into a unified graphical signature that can later be uploaded to the CoSign appliance. The utility provides basic design tools to enable this integration. The utility is useful, for example, if you wish to create a graphical signature that includes both a stamp and your signature. To use the CoSign Signature Designer: 1. Select Start > Programs > ARX CoSign > CoSign Signature Designer. The utility appears. Figure 21 CoSign Signature Designer 2. Select File > Import to import an image into the work area. A file selection window appears. Select a file of type BMP, JPG or GIF. The image appears as a rectangle in the upper left corner of the work area. 3. Optionally move the image, or resize it: To move the image, click inside the image and drag. To resize while maintaining proportions, click and drag a corner. To stretch a side, click and drag a handle in a side. As you manipulate the image, you can use the status bar to gain information about the image size and location. The leftmost pane displays the x,y location of the top-left corner of the currently 35 CoSign User Guide 4 36 selected image. The pane second from the left displays the width and height, in pixels, of the currently selected image. 4. Repeat steps 1-2 to import and manipulate additional images, if desired. Each image you import is maintained as a separate graphic element until you save the work area, so you can manipulate it separately. 5. If you have multiple images in the workspace, you can perform the following on any one of them, using the image’s right-click menu: Bring To Front > Bring To Front – Place the selected image in front of the image that is right in front of it. Bring To Front > Bring Forward – Place the selected image in front of all the images. Send To Back > Send To Back – Place the selected image behind the image that is right behind it. Send To Back > Send Backward – Place the selected image behind all the images. Transparency Level – Set the transparency level of the selected image (between 0 - 100%). A higher value sets higher transparency. Clear Image – Delete the image from the work area. 6. Optionally crop the display in the work area, as follows: a. Click and with the mouse mark a region in the work area that you wish to save. The right-most pane in the status bar shows the width and height, in pixels, of the selected region. Optionally move the image, or resize it. b. Click again to exit selection mode. c. Click . The area outside the selected region is cleared. 7. At any point, you can view the pane second from the right in the status bar for information about the width and height, in pixels, of the work area display. 8. When you finish modifying the display in the work area, click to save the display in the work area as an image. A file selection widow appears. Specify the file type (either JPG or BMP), and specify a name and path for the file. CoSign Signature Designer Menu Options The CoSign Signature Designer menu includes the following options: Using the Graphical Signature Management Application 4 Menu Item Option Description File New Create a new work area. Import Import a new image into the work area. Clear All Clear the entire work area. Save Save the current display in the work area as a JPG or BMP file. During the save, empty space surrounding the display is cropped out. Save As Similar to Save. Exit Exit the utility. About Displays information about ARX, and a link to the ARX web site. Help CoSign Signature Designer Toolbar Options The CoSign Signature Designer toolbar includes the following options: Button Description Create a new work area. Save the current display in the work area as a JPG or BMP file. During the save, empty space surrounding the display is cropped out. Activate/deactivate the Select Region option: Click once to activate the Select Region mode, and mark with the mouse a region in the work area that you wish to save. You can move the image, or resize it. Click again to exit from the Select Region mode. Crop the display to the selected region. Clear the entire work area. CoSign Signature Designer Status Bar Information The four panes in the status bar provide the following information: Pane Location Description Left most x,y location of the top-left corner of the currently selected image. Second from left Width and height, in pixels, of the currently selected image. Second from right Width and height, in pixels, of the work area display. When you save, this will be the size of the saved image. Right most Width and height, in pixels, of the selected region. This is relevant when the Select Region tool is used. 37 39 Chapter 5: Signing Microsoft Office Documents CoSign enables generating and validating digital signatures for Microsoft Office applications, and integrating the digital signatures into the general application flow. CoSign supports integration with the following applications: Office 2013 documents – Refer to Signing Office 2007/2010/2013 Documents – New Document Style. Office 2010 documents – Refer to Signing Office 2007/2010/2013 Documents – New Document Style. Office 2007 documents – Refer to Signing Office 2007/2010/2013 Documents – New Document Style. Word XP and Word 2003 – Refer to Signing Word and Excel Documents – Office XP/2003 Style. Excel XP, Excel 2003 – Refer to Signing Word and Excel Documents – Office XP/2003 Style. InfoPath 2007/2010/2013 – Refer to Chapter 6: Signing InfoPath 2007/2010/2013 Forms. Signing Office 2007/2010/2013 Documents – New Document Style CoSign enables you to add digital signatures, as well as graphical signatures, to .docx and .xlsx Office 2007/2010/2013 documents using a special plug-in called ARX Signature Line Provider. To enable the plugin, you must install the ARX CoSign Client and ARX’s Microsoft Office (Word, Excel) client components. For information on installing these components, refer to Installing the CoSign Client. The signing process and the configuration of its various options are performed using the ARX Office Signatures Line Provider. This provider fits into the signature line provider concept in Office 2007/2010/2013. The basic signing process consists of placing signature place-holders (or signature fields) in the desired locations in the document, and signing each field. After signing, you can validate the signatures. Validation assures you that the document was not modified after it was signed and that a trusted CA approved the signers’ certificates. You can also activate the ARX Legacy Word Add-in plug-in on pre-2007 .doc or .xls files when using Office 2007/2010/2013. For more information, refer to Signing Word and Excel Documents – Office XP/2003 Style. CoSign User Guide 5 Adding Signature Fields in Office 2007/2010/2013 Use the Insert tab’s special Signature Line option to add a new signature field (refer to Figure 22). Click ARX CoSign Signatures Add-in for Office. Figure 22 Selecting the ARX CoSign Signatures Add-in for Office A new signature field is generated and embedded inside the Office 2007/2010/2013 document. Figure 23 Creating a New Signature Field in an Office 2007/2010/2013 Document You can perform several operations on this field using the right-click menu, as shown in Figure 24. Figure 24 Signature Field Right-Click Menu Options in Office 2007/2010/2013 The following two operations are relevant to an empty signature field: 40 Signing Microsoft Office Documents 5 Sign – Performs the digital signature on the empty signature field. Refer to Signing Empty Signature Fields in Office 2007/2010/2013 for a full description of the digital signature operation. Signature Setup – Refer to Configuring Signature Settings in Office 2007/2010/2013. All other operations in the right-click menu are applicable to the empty signature field object and are standard Office 2007/2010/2013 operations for displayable objects. Configuring Signature Settings in Office 2007/2010/2013 The following sections describe how to configure signature settings in Office 2007/2010/2013. CoSign Signature Setup in Office 2007/2010/2013 – General Settings When you select Signature Setup from the right-click menu of a signature field (refer to Figure 24), the CoSign Signature Setup dialog box appears, with the Settings tab displayed. Figure 25 CoSign Signature Setup in Office 2007/2010/2013 – Settings Tab This dialog box enables you to define several parameters of the signature field. Some of these parameters will be displayed in the signature field and others are used during future signature operation. The parameters include: Suggested signer – The name of the person who is required to sign this signature field. This parameter is displayed as part of an empty signature block. Suggested signer’s title – The role of the person who is required to sign this signature field. This parameter is displayed as part of an empty signature block. Suggested signer’s e-mail address – The email address of the person required to sign this signature field. Instructions to the signer – The text displayed to the signer during the Sign operation. 41 CoSign User Guide 5 42 Allow the signer to add reason in the Sign dialog – If this option is selected, the signer will be able to add a reason. If you wish this reason to display in the signature field, check the Show Reason field in the Advanced tab. Note: Some of the parameters in the Settings tab can be used to enable CoSign Signature APIs to locate a certain signature, providing the ability to perform digital signatures through CoSign Signature APIs. Note: If you want the CoSign Signature Setup dialog box to appear on creation of each signature field, refer to Setting Microsoft Office Configuration. CoSign Signature Setup in Office 2007/2010/2013 – Advanced Settings Figure 26 CoSign Signature Setup in Office 2007/2010/2013 – Advanced Tab The Advanced tab of the CoSign Signature Setup dialog box includes the following parameters: Date and Time Format – Set the displayed format of the signature date and time. Show – Specify whether to display elements in the graphical signature such as Date and time, Reason, Signed by, Title, and Logo. A single graphical signature can be displayed and you can select whether this graphical signature is a regular graphical signature or Initials. Signing Empty Signature Fields in Office 2007/2010/2013 You can sign the content of an Office 2007/2010/2013 document by right-clicking an empty signature field and selecting Sign from the right-click menu. After performing the Sign operation, nothing can be changed in the document except that other users can sign other empty fields inside the document. A standard signing ceremony is used for the purpose of collecting the information required for the digital signature operation. This includes creating or editing a graphical signature, if desired. Signing Microsoft Office Documents 5 To sign the content of an Office 2007/2010/2013 document: 1. Right-click an empty signature field and select Sign from the right-click menu. The Signing Ceremony dialog box appears. The signing ceremony dialog is identical for all CoSign applications. Figure 27 Standard Signing Ceremony Dialog Box The dialog box may contain some or all of the following sections: Graphical signature selection – In the upper section of the dialog you can specify the graphical signature that will be embedded inside the digital signature. If you select to edit the graphical signature or create a new one, a dialog of the graphical image utility appears (Figure 15). For explanations, refer to the explanations following Figure 15. The only difference is that in the New Signature dialog box you can choose to use a one-time graphical signature (Figure 28). The one-time graphical signature will be used only for this specific digital signature operation and will not be kept in the CoSign appliance or CoSign software token/MiniKey. 43 CoSign User Guide 5 Figure 28 New Signature Dialog Box with One-Time Signature Option Reason – If a Reason field is displayed, select a reason from the predefined list or enter you own specific reason for this signature operation. The list of predefined reasons is identical for all the CoSign add-ins. This list is based on a default list that can be edited by an administrator using the configuration utility (refer to Signature API – Reasons). If a user enters a new reason, all current reasons are in the ownership of the user and maintained locally in the user’s PC account. If you click Reset, you revert to the list of reasons administrated using the configuration utility. Title – If a Title field is displayed, enter the title of the signer. Change – Clicking this link enables you to select the certificate to be used as part of the digital signature operation. The common name of the signer, as taken from the certificate, is displayed on the same line as the link. A digital signature operation is performed using the CoSign appliance or software token/MiniKey, based on parameters that were defined in the Sign this document dialog box (refer to Figure 27) and the CoSign Signature Setup dialog box (Figure 25). The following figure shows a sample outcome of the digital signature operation. Figure 29 Sample Digital Signature in Office 2007/2010/2013 In this example, the top right of the digital signature includes the signature date and time. The center of the graphical signature includes the selected graphical signature. If a graphical signature was not selected, the 44 Signing Microsoft Office Documents 5 45 signer’s name is displayed in a special script font. The reason is displayed beneath the signature line, as well as the signer’s name if an image was selected. The following figure shows an invalid digital signature. Figure 30 Sample Invalid Digital Signature in Office 2007/2010/2013 Note: It is possible to generate an invisible digital signature. Refer to the CoSign Signature APIs Developer’s Guide for information on how to generate an invisible digital signature. Note: The certificate that is used for signing must be fully trusted. This means that the certificate chain must be trusted and all CRLs of the certificates in the certificate chain must be accessible. Failing to trust the entire certificate chain and the certificate CRLs may cause the entire digital signature process to fail. Validating and Viewing Digital Signatures in Office 2007/2010/2013 In an Office 2007/2010/2013 document (.docx or .xlsx file), the visual display of the digital signature indicates the validity of the digital signature. If an existing digital signature is invalid, it will be indicated in the document. The following options are available when you right-click a signed digital signature field: Figure 31 Signed Digital Signature Field Right-Click Options CoSign User Guide 5 46 Signature Details – Displays information related to the digital signature and the signer’s certificate, as shown in Figure 32. Figure 32 CoSign Signature Details in Office 2007/2010/2013 – Signature tab Signature Setup – Displays signature setup without the ability to modify the values. The fields you can view are described in Configuring Signature Settings in Office 2007/2010/2013. Remove Signature – Enables the user to remove the signature. After this operation is acknowledged, the empty signature field is displayed. Note: The option Sign Again is not relevant for the ARX Signature Line Provider. Digital signatures are also listed in a special list of digital signatures that appears to the right of the document. To display the digital signatures list, either select the Prepare/View signatures option from the main icon of Office 2007/2010/2013, or select the digital signature seal indication in the lower left side of the Office window. The digital signature seal indication appears only if there is a signature inside the document. In the list you can see all unsigned signature fields and existing digital signatures of the document. The right-click options available in the list are the same as those available by right-clicking a digital signature or empty signature field inside the document. Validating Digital Signatures without Using the ARX Signature Line Provider Digital signatures that were attached using CoSign in Office 2007/2010/2013 can be validated without using CoSign. This is useful if you receive documents from a company or organization that uses CoSign internally. If the signer’s certificate was created by a Worldwide verifiable CA, you need not perform any action prior to the validation process. Signing Microsoft Office Documents 5 47 To validate signatures: 2. Install the root certificate of the organization that signed the document, as described in Installing a Root Certificate. 3. Validate the signature (refer to Validating Signatures). Note: Although you are able to view the digital signature, you cannot activate the Signature Settings and Signature Details options. Microsoft Office will validate the digital signature and display the valid/invalid image according to the validity of the digital signature. Using the ARX Office 2007/2010/2013 – CoSign Signatures Toolbar (Ribbon) The ARX Office 2007/2010/2013 Signature Line Provider includes a Toolbar (Ribbon) that provides the following functionality: Sign – Performs a “One Touch Signing” operation. This option creates a new signature field in the cursor location and performs a signature operation on the new field. Refer to Adding Signature Fields in Office 2007/2010/2013 and Signing Empty Signature Fields in Office 2007/2010/2013. Add Signature Field – Creates a new signature field in the cursor location. Refer to Adding Signature Fields in Office 2007/2010/2013. Help – Displays the CoSign help module. This option is similar to selecting Help in the ARX Legacy Add-in. About – Displays the CoSign Signature Line Provide About window. The window lists the current version of the ARX Signature Line Provider and some general ARX information. Figure 33 ARX Office 2007/2010/2013 Signature Line Provider Toolbar (Ribbon) Signing Word and Excel Documents – Office XP/2003 Style CoSign enables you to add digital signatures, as well as graphical signatures, to Word and Excel documents in Office 2007, Office 2010 and Office 2013, using the ARX Legacy Word Add-in plug-in. To enable the plugin, you must install the ARX Microsoft Office component. Note: The ARX Legacy Word Add-in for XP/2003 and ARX Legacy Excel Add-in for XP/2003 are relevant also for Word and Excel 2007/2010/2013, unless otherwise stated. Thus, you can use the ARX Legacy Word Add-in and ARX Legacy Excel Add-in for .docx and .xlsx files, in addition to.doc and .xls files. CoSign User Guide 5 48 Overview The signing process and the configuration of its various options are carried out using the ARX Legacy Word Add-in menu or toolbar, and the signatures’ right-click menu. The basic signing process consists of placing signature place-holders (or signature fields) in the desired locations in the document, and signing each field. After signing, you can validate the signatures. Validation assures you that the document was not modified after it was signed and that a trusted CA approved the signers’ certificates. During the signing phase, entering Design mode provides the options of changing the size, location, and layout of signature fields, as well as deleting signature fields from the document. You can optionally create a chronological dependency between signatures in a document. In Independent mode, the order of signing is not important. In Dependent mode, an attempt to re-sign a signature invalidates all the digital signatures created after that signature. CoSign supports two types of signatures: content-based signatures, which sign the textual and other visible content of a document, and file-based signatures, which sign the entire file. In Word, both signature types are supported. In Excel, only content-based signatures are supported. If content-based signatures are used, you can either sign the entire content of the document or a certain section of the document. Section-based signing is highly suitable for workflow procedures where every signer fills in his/her relevant content and signs the relevant content as part of the workflow. The following sections describe the ARX Legacy Word Add-in menu and toolbar, followed by a detailed step-by-step explanation of the signing process, including sections with detailed explanations of the various options and dialog boxes. It is also possible to use the ARX Legacy Word Add-in in Office 2007/2010/2013 on Word 2003 documents. To do so, activate the Add-Ins tab in Word 2007/2010/2013. Both the ARX Legacy Word Add-in menu and its toolbar will appear. ARX Legacy Word Add-in Menu The ARX Legacy Word Add-in plug-in includes a CoSign menu that can be activated from the menu bar of the Office application. Signing Microsoft Office Documents 5 49 Figure 34 CoSign Menu The CoSign menu includes the following options: Menu Option Description Sign All-in-one signature operation. Generates a new empty digital signature field at the cursor location, and performs a signature operation on this newly generated field. Add Signature Field Inserts a new empty digital signature field at the cursor location. The field displays the text: “CoSign Digital Signature”. Design Mode Toggles in and out of Design mode. For more information, refer to Using Design Mode. View All Signatures Displays signatures attached to the document. For more information, refer to Viewing the Signatures List. Validate All Signatures Checks the validity of all existing digital signatures, and updates the images of the signatures according to their validity status. Clear All Signatures Removes all digital signatures but keeps the digital signature fields. Configure Signature Defaults For more information, refer to Default Signature Settings – General Parameters. Toolbar Settings Configures which buttons are displayed in the ARX Office toolbar. Refer to Configuring the ARX Legacy Word Add-in Toolbar. Help Displays this chapter in on-line Help format. About Displays version information about the ARX Legacy Word Add-in, and a link to the ARX web site. CoSign User Guide 5 50 ARX Legacy Word Add-in Toolbar Options ARX Legacy Word Add-in includes a Digital Signatures toolbar with the following buttons: Button Task Toggles in and out of Design mode. For more information, refer to Using Design Mode. All-in-one signature operation. Generates a new empty digital signature field at the cursor location and performs a signature operation on this newly generated field. Inserts a new empty digital signature field at the cursor location. The field displays the text: “CoSign Digital Signature”. Displays signatures attached to the document. For more information, refer to Viewing the Signatures List. Validate All signatures. Checks the validity of all existing digital signatures, and updates the images of the signatures according to their validity status. Clear All signatures. Removes all digital signatures but keeps the digital signature fields. Configure Signature Defaults. For more information, refer to Default Signature Settings – General Parameters. ARX Legacy Word Add-in Help. Displays this chapter in on-line Help format. Displays version information about the ARX Legacy Word Add-in, and a link to the ARX web site. Configuring the ARX Legacy Word Add-in Toolbar You can specify which buttons appear in the ARX Legacy Word Add-in toolbar. To specify which buttons appear in the toolbar: 4. Select Toolbar Settings from the CoSign menu. The Select Buttons dialog box appears. Signing Microsoft Office Documents 5 51 Figure 35 Select Buttons Dialog Box 5. Check the boxes corresponding to the toolbar buttons you wish to display. 6. Click OK. Note: In Office 2007/2010/2013, both the toolbar and the CoSign menu are located inside the Add-ins ribbon. Signing and Validating Signatures in Word and Excel Documents The following sections describe the basic signing process, which includes the following phases: Signing a document (refer to Signing a Document with a Digital Signature). Viewing signatures (refer to Viewing Digital Signatures). Validating signatures (refer to Validating Signatures). In addition, if you modify the document after signing it: Modifying a signed document (refer to Modifying Documents Containing Digital Signatures). Signing a Document with a Digital Signature To sign a Word or Excel document digitally, place digital signature fields in the desired locations, and sign each field. To place digital signature fields: 1. Open the document you wish to sign. 2. Position the cursor where you wish a signature to appear, and click . A digital signature field is created. The field displays the text “CoSign Digital Signature”. Note: To change the field’s size, location, or layout, switch to Design mode by clicking the toolbar. When you finish modifying the field, click since you cannot sign a document in Design mode. in again to toggle out of Design mode CoSign User Guide 52 5 3. Repeat step 2 for every signature field you wish to create. Note: You can click signature operation. to generate a digital signature field and automatically perform a digital Note: If you are signing an entire Word document using either a file-based or a content-based signature, keep in mind that after the first signature is generated, it is not possible to add new digital signature fields to the document. Therefore, make sure to first create all the desired digital signature fields before you begin the process of signing them. To sign each signature field: 4. Right-click the signature field and select Sign from the right-click menu. The standard Signing Ceremony dialog box appears, enabling you to enter all signature related parameters. For a description and explanations, refer to Signing Empty Signature Fields in Office 2007/2010/2013. Note: In Word, when using file-based signatures, if you are working with a new document, you are prompted to save it during the digital signature operation. Note: When you send a document to Print, all the signatures are automatically validated so that the printout will display the updated state of the signatures. Note: When using the ARX Legacy Add-in in Office 2007/2010/2013, you cannot use a file-based digital signature in a .docx formatted document. If you try to do so, an error message appears. Clearing or Deleting Digital Signatures You may wish to delete signature fields or clear the digital signatures inside them. To clear a digital signature from a digital signature field: 5. Right-click the field, and select Clear from the right-click menu. The digital signature is deleted from the field. The field itself remains intact. To delete a digital signature field: 6. Switch to Design mode by clicking in the toolbar. 7. Select the field and click Delete from your keyboard. The digital signature field is deleted from the document. Viewing Digital Signatures Each graphical signature is displayed in the document along with one of the following validation symbols: Signing Microsoft Office Documents 5 – Signature is validated. – Signature is not validated. – Signature needs to be validated, or is in an unknown state. 53 If the signer has created a graphical signature inside CoSign and configured it to display a graphical signature (refer to Default Signature Settings – General Parameters), the graphical signature is displayed on top of the validation symbol. Figure 36 Graphical Signature If the signer has not created a graphical signature, the name of the user is displayed on top of the validation symbol. Figure 37 Digital Signature without Graphical Signature If the following elements were selected in the Default Signature Settings dialog box, they will also appear in the signature field (refer to Default Signature Settings – General Parameters). The signer’s common name. The date and time of the signature operation. The reason for the signature. Figure 38 Signature with Additional Details CoSign User Guide 5 54 Validating Signatures To validate a graphical signature attached to a document: 8. Open the document. 9. Right-click the signature and select Validate from the right-click menu. You can configure the ARX Office plug-in to perform an automatic validation of all digital signatures that exist inside the document. Refer to Setting Microsoft Office Configuration. For information on how to view the signatures’ status, refer to Viewing the Signatures List. Modifying Documents Containing Digital Signatures Modifying the signed data in a Word or Excel document invalidates all its relevant signatures (depending on the signature scope) and an is displayed in each signature field. Refer to Word Specific Signing Features and Excel Specific Signing Features for more details about the different signing options in Word and Excel, which define the scope of the digital signature. If you attempt to save a file-based signed Word document that is modified, the following message appears, “Saving will remove all digital signatures in the document. Do you want to continue?” To delete the file based signatures and save the document, click Yes. Word Specific Signing Features The CoSign Client enables generating two new content-based types of signatures in Word documents, in addition to the file-based signature: Document content signature – This is the new default signature. This signature signs the entire textual and visible content of the document, but not the entire file. This mode is recommended in document management systems to avoid file access or network access to the document file. Section based signature – Signs only the content of a specific section in the document. This functionality is useful for Word documents that are based on workflow operations. Using sectionbased signatures, each signer edits and signs a specific section, in no way affecting the signatures on other sections. For backward compatibility, the file-based signature can also be used. Note: Currently, CoSign’s signature APIs support only file-based signature operations on a given Word file. Excel Specific Signing Features In Excel, only content-based signatures are supported. File-based signatures are not supported. You can select both the scope (workbook, active sheet, or selected area), and the content within the scope that will be signed. Signing Microsoft Office Documents 5 55 The different scopes include: Active sheet – All the relevant content in the active sheet will be signed. Any change in the relevant content within the active sheet will invalidate the signature, while any change in other sheets will have no effect on the signature. This is the default value. Workbook – All the relevant content in all the workbook’s sheets will be signed. Any change in the relevant content within any sheet of the workbook will invalidate the signature. Selection – Only the relevant content in the cells of the selected area will be signed. Any change in the relevant content of any of the selected cells will invalidate the signature, while any change in other cells will have no effect on the signature. You must select the cells before signing the signature field, and you can only sign a single continuous selection, not multiple selections. Note: To view which selected area a specific signature applies to, right-click the signature field and select Show from the right-click menu. The signed cells are highlighted. The different values for the signature content include: Cell Values – The values of the cells will be signed. Cell Formula – The cell formula will be signed. Note: If the cell formula depends on other unsigned cells, then even if the values of those cells change and cause the selected cells value to change, as long as the formula remains the same, this change does not invalidate the signature. Cell Properties – The following cell properties will be signed: font name, font style (indicating whether the text is bold or italic), font size, hide row, and hide column. Configuring Signature Defaults The Default Signature Settings dialog box enables setting defaults for the appearance and other parameters of the graphical signatures. Note: You can configure defaults using the CoSign Configuration Utility. Refer to Setting Microsoft Office Configuration. You can set general defaults for all signatures in a document, or configure a specific signature field. To configure signature defaults for all signatures in a document: From the Digital Signatures toolbar, click . Note: The new signature defaults only affect future signature fields, not existing ones. To configure a specific signature field: Note: You can configure a specific signature field only if the field is empty. CoSign User Guide 56 5 Right-click a signature and select Settings from the right-click menu. The Default Signature Settings dialog box includes the following tabs: Settings – Enables setting general signature parameters. Refer to Default Signature Settings – General Parameters. Time Format – Enables setting date and time parameters. Refer to Default Signature Settings – Date and Time Format. Scope of Signature – Enables setting the different signing options for Word documents or Excel documents. Refer to Default Signature Settings – Scope of Signature (Word) and Default Signature Settings – Scope of Signature (Excel). Signature Policy – Enables defining Signature operation policy. At this stage, you can only define who can clear an existing signature. Refer to Default Signature Settings – Signature Policy. Note: The Microsoft Office Compatible Signature field in the Settings tab is enabled only in Word. Default Signature Settings – General Parameters Figure 39 Default Signature Settings – Settings Tab In the Settings tab you can set the following signature default settings: Signature Dependent – Specify whether the digital signature is dependent or independent. For more information on setting up dependent signatures, refer to Imposing Dependency. Signing Microsoft Office Documents 5 57 Microsoft Office compatible signature – Relevant only to Word documents. If this option is set, the ARX Word add-in generates an XP compatible digital signature that can be validated in Word XP or Word 2003 without installing a plug-in. This option has differing functionality depending on the type of digital signature. If the digital signature is content-based then the ARX Word add-in generates an additional XP compatible signature. If it is a file-based digital signature, the generated digital signature is an XP compatible signature. Refer to Validating Signatures in Word Documents Without Using the ARX Legacy Word Add-in Plug-in. When using Office 2007/2010/2013, keep in mind that there is a difference between signatures that are applied to .doc documents and signatures that are applied to .docx documents. This section is relevant only for .doc documents. In this case, the whole document is locked and therefore after performing such a signature, you cannot perform any modification to the document, including clearing the digital signatures. Show – Specify which elements will appear as part of the graphical signature of the digital signature: Date and time – Whether to display the date and time of the signature. Reason – Whether to ask the user to enter a reason for the signature and then display the reason as part of the signature. Signed by – Whether to display the signer’s name as listed in the signer’s certificate. Title – Whether to ask the user to enter his/her title and then display it as part of the signature. Logo – Whether to display a logo image. Graphical image – Whether to display a graphical signature. If the user selects Initials, a set of initial is displayed. Field Style – Specify the signature field style. Transparent – Whether the visible signature is transparent. When a signature is transparent, the document’s text underneath the signature text is not fully overwritten by the visible signature elements. Keep in mind that in order for this parameter to take effect, you should specify the In Front Of Text layout for the signature field (refer to Figure 45 in Using Design Mode). In addition, this setting will apply only to signatures generated after you set this setting. Captions – Specify whether to display the title of the element, for the elements selected in the Show section. Restore Defaults – Click to restore all the default values. This field is available only when clicking to configure defaults for all signatures in the document. CoSign User Guide 5 58 Default Signature Settings – Date and Time Format Figure 40 Default Signature Settings – Time Format Tab In the Time Format tab you can set the following signature default settings: Format – Use the drop-down lists to specify the desired Date Format and Time Format. The date and time format notation are explained in the dialog box. Display GMT Offset – Specify whether to display the time zone of the signature operation in relation to GMT. Note: The signature time is taken from CoSign, while the time zone is taken from the local machine. Signing Microsoft Office Documents 5 Default Signature Settings – Scope of Signature (Word) Figure 41 Default Signature Settings – Scope of Signature Tab (Word) In the Scope of Signature tab that appears in Word, you can set the following signature default settings: Scope – Specify the content to be signed: Entire File – The Word file itself is signed. You can specify whether the created signature will be compatible with SharePoint 2007/2010/2013 by selecting the SharePoint Compatible checkbox. Document Content – All the text and visible content of the document is signed. Containing Section – The content of the current section is signed. Select this option if you intend to use section-based signing. Section Number – The content of the specified section is signed. Select this option if you intend to use section-based signing. This option is used in cases where the document has a special page that contains digital signatures for sections that appear in other locations in the document. In addition to text, signature applies to – Enables specifying that additional information be signed in the case of a content-based signature. Location & Size of Tables and Objects – The location and size of tables and objects within the scope of signature are also included in the digital signature. This may cause a signature validation failure if content changes. ActiveX Properties – Information related to ActiveX objects embedded into the Word document. If this option is not selected, all ActiveX information (such as ActiveX identification) 59 CoSign User Guide 5 60 will not be included in the digital signature. If this option is selected, limited information about the ActiveX object will be included in the digital signature. Font Strikethrough –Information as to whether a strikethrough font is used will be included as part of the digital signature scope. This means that any attempt to mark the strikethrough text as regular text after information was signed will invalidate the digital signature. Field codes – Field codes are text fields that are updated automatically, such as Date and Header/Footer information. If this option is not selected, the signing process includes the dynamically changing values of the field codes. This may cause a signature validation failure if the values change. If this option is selected, the signing process includes the field codes, but not their dynamically changing values. It is therefore recommended to leave this option selected. Form Fields & Content Controls – The signing process includes form fields and content controls. This may cause a signature validation failure if content changes. Default Signature Settings – Scope of Signature (Excel) Figure 42 Default Signature Settings – Scope of Signature Tab (Excel) In the Scope of Signature tab that appears in Excel, you can set the following signature default settings: Scope – Specify the cells to be signed: Active sheet – All the relevant content in the active sheet will be signed. Workbook – All the cells in the workbook will be signed. Signing Microsoft Office Documents 5 Selection – Only the cells of a specific selected area will be signed. There are two ways for specifying the selected area to be signed: Specify the top left and the bottom right cells of the desired area, separated by a colon, in the selection field. Refer to Figure 43 for an example. In this case the signer merely right-clicks and signs the signature field. Figure 43 Default Signature Settings – Scope of Signature Tab (Excel) – Selection Field Values Example If no selection is specified in the selection field, the signer selects the cells to be signed and then right-clicks and signs the signature field. Signature content – Specify the cells-related content to be signed: Cell value – The cell values will be signed. Cell formula – The cell formula will be signed. Cell properties – The following cell properties will be signed: font name, font style (indication whether the text is bold or italic), font size, hide row, and hide column. Cell Font Strikethrough – Information as to whether a strikethrough font is used will be included as part of the digital signature scope. This means that any attempt to mark the strikethrough text as regular text after information was signed will invalidate the digital signature. Note: You must set either Cell Values or Cell Formula or both. 61 CoSign User Guide 62 5 Default Signature Settings – Signature Policy Figure 44 Default Signature Settings – Signature Policy Tab In the Signature Policy tab you can set the following signature default settings: Clear Policy – Specify the policy for clearing an existing signature field: Anyone – Anyone can clear the signature field. No One – No one can clear the signature field. Signer only – Only the signer can clear the signature field. Imposing Dependency You can use the Dependent Signatures option to impose a chronological hierarchy of signatures. For example, when you wish to ensure that a document will be signed first by the document’s author, then by the author’s superior, and then by the regional manager. To impose dependency in the digital signature process: 1. From the Digital Signatures toolbar, click . The Default Signature Settings dialog box appears. 2. In the Settings tab, select Dependent signature type (refer to Default Signature Settings – General Parameters). Signing Microsoft Office Documents 5 63 All signature fields you place in this document are fields for dependent signatures, and the order of the signing dictates the hierarchy of the signatures. For example, in a document with four signatures, an attempt to re-sign the first signature will invalidate the second, third, and fourth signatures; an attempt to re-sign the second signature will invalidate the third and fourth signatures; while an attempt to re-sign the last signature will not invalidate any signature. 3. Position the cursor where you wish the first signer to sign, and click to insert a signature field. 4. Continue inserting as many signature fields as desired, taking care to place the second field where you wish the second signer to sign, the third field where you wish the third signer to sign, etc. A document with dependent signatures should typically contain text within the document that details the correct order of signing, and directs the signers to their respective signature fields. Dependency in Excel Dependency in Excel is based on the type of signature, as follows: Signatures based on an active sheet are dependent only on signatures inside the active sheet and not in other sheets. Signatures based on a workspace can be dependent on signatures in other sheets in the same workspace. Dependency cannot be enforced on signatures that are based on a selected area. Using Design Mode Design mode enables you to change the size, location, and layout of the signature field, as well as delete a signature field. To use Design mode: 1. Click in the toolbar to switch to Design mode. 2. Perform any of the following, as desired: Modify the field’s location – Select the signature field and move or resize the field. Modify the field’s object’s format: In Word, you can change the field’s size and layout. Right-click the signature field and select Format Control from the right-click menu. The Format Control dialog box appears. CoSign User Guide 5 Figure 45 Word’s Signature Field Format Control Dialog Box Use the Layout tab to specify the layout settings of the signature field. Use the Size tab to specify the size settings of the signature field. In Excel, you can change the field’s colors and lines, size, and properties. Right-click the signature field and select Format Object from the right-click menu. The Format Object dialog box appears. 64 Signing Microsoft Office Documents 5 65 Figure 46 Excel’s Signature Field Format Object Dialog Box Use the Colors and Lines tab to specify the color and line settings of the signature field. Use the Size tab to specify the size settings of the signature field. Use the Properties tab to specify the positioning and printing options of the signature field. Delete the signature field – Select the field and press Delete on your keyboard. 3. When you finish modifying the signature field, click again to toggle out of Design mode. Viewing the Signatures List In the Digital Signatures dialog box you can view the list of all actual signatures in a document. If the signatures are dependent, you can view the dependent signatures of a given signature. CoSign User Guide 66 5 Figure 47 Digital Signatures Dialog Box To view the list of all signatures: From the Digital Signatures toolbar, click . The Digital Signatures dialog box appears, showing all actual signatures (not signature fields) in the document. To view dependent signatures: Right-click a dependent signature and select Dependencies from the right-click menu. The Digital Signatures dialog box appears, showing all the signatures on which the specified signature depends. Note: In Excel, signatures that apply to a selected area never depend on other signatures. Therefore selecting the Dependencies option for such signature fields will show no signatures in the Digital Signatures dialog box. The icon to the left of the signer’s name indicates the signature’s status, as follows: Icon Task Both the signature and certificate are valid. A minor problem is detected (for example, the root certificate is not installed on this machine and therefore the certificate cannot be validated). A major problem is detected (for example, the document was tampered with after signing). To view additional information about the signatures and certificates, refer to Signature Details. Signing Microsoft Office Documents 5 Signature Details To view additional information about the signatures and certificates: 4. Open the Signature Details dialog box in one of the following ways: Select a signature in the Digital Signatures dialog box and click Details. The Signature Details dialog box appears. Right-click a signature field within the document and select Details from the right-click menu. The Signature Details dialog box appears. Figure 48 Signature Details Dialog Box 5. To view certificate information, click View Certificate. The Certificate dialog box appears. 67 CoSign User Guide 68 5 Figure 49 Certificate Dialog Box The Certificate dialog box includes the following tabs: General – Provides general certificate information, including the intended use of the certificate, to whom the certificate was issued, the certificate issuer, and the certificate’s expiration date. Details – Provides additional details about the certificate. Certification Path – Provides information about the certificates at a higher hierarchical level in the chain that approve the current certificate. Validating Office Signatures by a User Not Using CoSign The following sections describe how a user who is not using CoSign can validate digital signatures that were attached using CoSign. Validating Signatures Using the ARX Legacy Word Add-in Plug-in If you are not using CoSign, you may still validate signatures that were attached using CoSign. This is useful if you receive documents from a company or organization that uses CoSign internally. To validate signatures: 1. Install a root certificate and Office CoSign verifier as described in Installing the Root Certificate and CoSign Verifier. Signing Microsoft Office Documents 5 2. Validate the signature (refer to Validating Signatures). Validating Signatures in Word Documents Without Using the ARX Legacy Word Add-in Plug-in If you do not wish to install CoSign nor the ARX Legacy Word Add-in, you can still view the signature that was attached using CoSign and validate it, without installing ARX Legacy Word Add-in. This is useful if you receive documents from a company or organization that uses CoSign internally. This operation is applicable for Word 2007, Word 2010 and Word 2013, in cases where there is a single digital signature inside the document. Note: Although the signature can be viewed, the right-click menu is not available. It is available only when the ARX Legacy Word Add-in plug-in is installed. Signing Word and Excel XP/2003 Documents without Graphical Signatures Word and Excel XP/2003 support digital signatures, enabling seamless integration with CoSign. Only the ARX CoSign client needs to be installed and no additional plug-ins are required to digitally sign or validate a signature in a document. For information on installing this component, refer to Installing the CoSign Client. Signing a Word or Excel XP/2003 Document without a Graphical Signature To sign a Word or Excel XP/2003 document without a graphical signature: 1. Open the document you wish to sign in its associated application. 2. Open the Tools menu and select Options. The Options dialog box appears. 3. Select the Security tab and click Digital Signatures. The Digital Signature dialog box appears. 69 CoSign User Guide 70 5 Figure 50 Digital Signature Dialog Box 4. Click Add. The Select Certificate dialog box appears, listing all your certificates. 5. Select the desired certificate and click OK. Your signature is appended to the list in the Digital Signature dialog box. 6. Click OK. The document is saved and your signature is attached to the document. Note: You can attach several digital signatures of different users to each Word or Excel XP/2003 document. Chapter 6: Signing InfoPath 2007/2010/2013 Forms CoSign enables generating and validating graphical digital signatures in Microsoft InfoPath 2007/2010/2013 forms using the InfoPath 2007/2010/2013 built-in support for digital signatures. The InfoPath 2007/2010/2013 digital signature mechanism supports multiple and sectional digital signatures. The solution is based on placing digital signature fields inside an InfoPath form template. This task is usually done by the designer. When a user uses an InfoPath 2007/2010/2013 form, the user can sign the form’s contents using CoSign. This chapter describes how to design digital signature fields in InfoPath 2007/2010/2013 form templates and how to sign an Info Path 2007/2010/2013 form. Note: It is assumed that the reader of this chapter has a working knowledge of InfoPath forms. Note: CoSign versions 5.6 and above do not support earlier versions of InfoPath. Note: In this chapter, all screen captures are from InfoPath 2010. Understanding Digital Signatures in InfoPath Signature Standards in InfoPath The main difference regarding signatures between InfoPath 2007 and InfoPath 2010/2013 is that in InfoPath 2007, the digital signature is based on the regular XML digital signature standard, while in InfoPath 2010/2013 the digital signature is based on advanced XML digital signatures (i.e., XAdES). Using Graphical Signatures in InfoPath You can incorporate visible information such as the user’s graphical signature into the digital signature when using InfoPath 2007/2010/2013. However, the available graphical signature is not retrieved from the CoSign appliance or the software token/MiniKey, but can be selected only from the local disk of the signer. If you wish to use a graphical signature stored in CoSign, you can use the CoSign graphical signature utility to copy graphical signatures stored in the CoSign appliance or the software token/MiniKey to the local disk. You can then incorporate the graphical image from the local disk during the InfoPath signing ceremony. 71 CoSign User Guide 6 72 Signature Scope and Number of Signers A signature field is defined in a specific section of an InfoPath form, but it can apply to any of the form’s fields as desired. When the designer creates the signature field, the designer defines to which data fields in the form the new signature field applies. This can vary from a single data field, to any number of specified data fields, or even all data fields in the form. It is also important to note that in InfoPath, a single signature field can include multiple signatures from multiple signers. This versatility enables varied signing scenarios. The following are some typical scenarios of using digital signature in an InfoPath form: Alice fills in the form, and signs the signature field at the bottom of the form. Alice fills in the form, and then Alice, Bob and Carol sign the signature field at the bottom of the form. Alice fills in section A and signs it, after which Bob fills in section B and signs it, after which Carol fills in section C and signs it. Signing InfoPath Forms Using CoSign Signature APIs It is also possible to design and prepare digital signature fields using InfoPath 2007/2010/2013 and then use CoSign Signature APIs to sign these fields. Validating signatures can also be performed using either InfoPath 2007/2010/2013 or CoSign Signature APIs. For more information about CoSign Signature APIs, refer to the CoSign Signature APIs Developer’s Guide. In addition, you can use the ARFileSign utility (described in Chapter 9: The ARFileSign Utility) to sign the InfoPath form similarly to using CoSign Signature APIs. Typical Work Flow for Using Digital Signatures in InfoPath To enable digital signatures in an InfoPath form, the typical work flow is a follows: 1. Designing the form template – A designer uses the InfoPath Designer to build an InfoPath form template. 2. Defining signature fields – To enable integrating digital signatures in an InfoPath form, the designer defines one or more signature fields in the form template. Refer to Defining Signature Fields in an InfoPath Form Template. Each signature field is placed in a section of the form template, and the designer specifies to which data fields the signature applies. 3. Publishing the template – The designer publishes the template in an easily accessible location so that users can open forms, fill in information, and sign. The designer can either publish the form template to a network-based file location or to Microsoft SharePoint deployment. 4. Filling and signing the InfoPath Form – A user uses InfoPath filler to open the form, fill in information, and sign it. For instructions on signing, refer to Signing a Signature Field in an InfoPath Form. Note that it is also possible to sign using CoSign Signature APIs (as described in the CoSign Signature APIs Developer’s Guide, or using the ARFileSign utility (as described in Chapter 9: The ARFileSign Utility). In addition, you can use the CoSign add-on for SharePoint solution described in. the CoSign Connector for SharePoint User Guide. Signing InfoPath 2007/2010/2013 Forms 6 73 The filled and signed form can be sent via email or managed in the document management infrastructure. Depending on the type of form and workflow, additional users may need to sign the form, or to fill in more information and then sign it. In addition, you can: Validate a signature – Refer to Validating a Signature in an InfoPath Form. Alternatively, you can use CoSign Signature APIs to verify the signature. View signature details – Refer to Viewing Signature Details in an InfoPath Form. Remove a signature – Refer to Removing a Signature from an InfoPath Form. Prerequisites for Signing an InfoPath Form CoSign enables you to add graphical signatures to InfoPath forms in Office 2007/2010/2013. To enable graphical and digital signatures, you must install the ARX CoSign Client component. For information on installing CoSign client, refer to Installing the CoSign Client. Note: Because ARX’s solution for InfoPath does not require any plug-in installation, you can install Office 2007/2010/2013 after the CoSign components are already installed. Defining Signature Fields in an InfoPath Form Template After designing a template for an InfoPath form (such as the form in Figure 51), the designer can add signature fields to the template. A signature field is added in a specific section of the form, but it can apply to any of the form’s fields as desired. In other words, when you create the signature field, you define to which data fields in the form the new signature field applies. This can vary from a single data field, to any number of specified data fields, or even all data fields in the form. CoSign User Guide 6 74 Figure 51 Sample InfoPath Form To add a digital signature field to a section in an InfoPath form template: 5. Right-click a section and select Section Properties. 6. Select the Digital Signatures tab. Signing InfoPath 2007/2010/2013 Forms 6 Figure 52 Digital Signatures Tab 7. Check the Allow users to digitally sign this section check box. Figure 53 Digital Signatures Tab – Allow users to digitally sign this section 8. In the drop-down list, select Add data that can be signed. The Set of Signable Data window appears. 75 CoSign User Guide 6 76 Figure 54 Set of Signable Data Window 9. In Type a name…, enter a name for the signature field. 10. In Fields and groups to be signed, click to select the data fields to which this signature field applies. Data fields are arranged hierarchically, so keep in mind that selecting a node selects all its sub-nodes. 11. In Signature options, select one of the following: Allow only one signature – Only a single signature is allowed in this signature field. All the signatures are independent (co-sign) – The signature field supports multiple signatures, which are independent of each other. In other words, the order in which the signers have signed has no significance. The practical implication of this is that a signer can re-sign by deleting his/her previous signature, and signing again. Each signature signs the preceding signature (counter-sign) – The signature field supports multiple signatures, but a signer cannot go back and re-sign if someone else has meanwhile signed. The practical implication of this is that a signature cannot be deleted if another signature has subsequently been added to the signature field. 12. In the Signature confirmation message box, you can define the message that will appear when the signer activates the signature ceremony. 13. Click OK. A digital signature field is attached to the section. The next step is to publish the template so that users can fill in forms and sign them. You can either publish the form template to a network-based file location or to Microsoft SharePoint deployment. Signing InfoPath 2007/2010/2013 Forms 6 77 Disabling Versioning in InfoPath Form Templates InfoPath manages versioning information embedded inside a form template. This means that if a local InfoPath template is used for generating an InfoPath form, and then the InfoPath form is published into MS SharePoint, then when a user opens the signed document, the user is informed of a versioning error although the template was not changed. To solve this problem, perform the following in the form template: In InfoPath 2007, select Tools > Form Option > Versioning > On version upgrade and select Do nothing. In InfoPath 2010/2013, select File > Info > Form Options > Versioning > Update existing form and select Do nothing. Signing a Signature Field in an InfoPath Form Note: You can incorporate a graphical signature into your digital signature, provided the graphical signature is on the local disk. Therefore, if you wish to incorporate a graphical signature you stored in the CoSign appliance or the software token/MiniKey, first transfer it to the local disk. To do so, use the Download Images option in the Graphical Signature Management Application (Figure 14). In forms that require signatures, the user typically signs a section after entering information into the data fields of the section. To sign a signature field: 1. Locate the relevant signature field indication. This is the Click here to sign this section link, usually located in the section you are filling in or at the bottom of the form (Figure 55). CoSign User Guide 6 78 Figure 55 Signature Field Indication If you are signing a signature field that allows multiple signatures, it may already contain several signatures. In that case, the signature field looks similar to the one shown in Figure 56. Signing InfoPath 2007/2010/2013 Forms 6 Figure 56 Signature Field Indication with Multiple Signatures 2. Press Click here to sign this section. A Sign window appears. Figure 57 Sign Window – Before Entering Signature 79 CoSign User Guide 6 80 3. To sign, you can either enter your name or select a graphical image (not both). Therefore, in the box adjacent to the X perform one of the following: Enter your name. Click select image…to select your graphical signature from the local hard disk. 4. Optionally, enter the reason for signing in the Purpose for signing this document field. Note: If you have more than one certificate, you can click Change to select the desired certificate. The filled-in signature form will look similar to the following example: Figure 58 Sign Window – After Entering Signature 5. Click Sign. The data fields to which this signature apply are signed by CoSign. They are now locked, as indicated by the seal appearing in the fields. Figure 59 Signed and Locked Data Field The relevant signature section in the form looks similar to the following: Signing InfoPath 2007/2010/2013 Forms 6 81 Figure 60 Signed Section Keep in mind that if the signature field allows multiple signatures, additional digital signatures may be appended to the field. The document can be sent via email or managed in the document management infrastructure. Note: You can also digitally sign an InfoPath form using invisible signatures. For more information, contact ARX. Validating a Signature in an InfoPath Form Digital signatures in an InfoPath form can be validated. To validate a signature: 1. Double-click the signature in the form. The Signature Details window appears. If the signature is valid, a window similar to the following is displayed: CoSign User Guide 6 82 Figure 61 Signature Details – Valid Signature The upper part of the window displays the status of the digital signature (such as the type of advanced signature). Signature type is relevant only if you sign using InfoPath 2010/2013 or using CoSign tools such as CoSign Signature APIs or the CoSign add-on for SharePoint. If the content of a data field to which the signature applies was changed after signing, a window similar to the following is displayed: Figure 62 Signature Details – Unverified Signature Viewing Signature Details in an InfoPath Form You can view signature details of digital signatures in an InfoPath form. Signing InfoPath 2007/2010/2013 Forms 6 83 To view information about a signature in an InfoPath form: 1. In the Info section of the File tab, click Digital Signatures. Figure 63 InfoPath Digital Signature Button The Digital Signatures window appears. Figure 64 Digital Signatures Window 2. View the information displayed in the signers list. The list displays pertinent signature details. 3. Optionally, view a signer’s certificate: select a signature, and click View Certificate. A window appears (similar to Figure 49), displaying certificate information for this signature. 4. Optionally, view additional signature information: select a signature, and click View signature. The Signature Details window appears (Figure 61), displaying various signature details. In addition, from the Digital Signatures window you can also: Add a signature. To do so: a. Click Add. A list of all defined signature fields is displayed. b. Select a desired signature field. The Sign window appears (Figure 57). c. Perform the instructions following Figure 57. Delete a selected signature. For more information, refer to Removing a Signature from an InfoPath Form. CoSign User Guide 6 Removing a Signature from an InfoPath Form You can delete a signature from an InfoPath form. To delete a signature from an InfoPath form: 1. In the Info section of the File tab, click Digital Signatures (Figure 63). The Digital Signatures window appears (Figure 64). 2. Select the signature you wish to delete, and click Remove. Note: You can only delete the most recent signature in a signature field that was defined as a multiple counter-sign signature field. All previous signatures in the counter-sign signature field cannot be deleted. 3. Confirm the operation. 84 85 Chapter 7: Signing Adobe Acrobat Documents The CoSign client enables you to digitally sign Adobe Acrobat documents using both Adobe Acrobat and Adobe Reader, as well as add your graphical signature to the PDF file. This enables you to: Easily sign an Acrobat document – The Acrobat document may contain multiple signatures, and each signature can be located in a different part of the document. It is also possible to generate several signatures for the same end-user. If a document is modified, the end-user is notified that the document was modified and is able to view the specific version of the document that was signed. Certify an Acrobat document – Certification is more stringent than the regular signature operation. When a document is certified, it can be defined that no modification can be applied to the document (not even the addition of a new version to the document), or it can be defined that only certain fields in the document can be updated. Certification is available in Acrobat X/XI. Validate the signature of an Acrobat document – Validation assures you that the document version that was signed was not modified after it was signed and that a trusted CA approves the user who performed the signature operation. The solution for Adobe X/XI also does not require a client installation on the validator’s side. As part of the CoSign Web Services solution, the CoSign appliance provides a new Web Service mechanism called Adobe Roaming ID. This mechanism enables Adobe Acrobat X/XI or Adobe Reader X/XI to directly interface the CoSign appliance for digital signature operations, without requiring the installation of a CoSign client in the end user’s PC. Note: Adobe Acrobat includes sophisticated mechanisms for handling digital signatures. These mechanisms enable you to maintain different versions of the Acrobat document, so that each digital signature actually signs a different version of the document. Be aware that even if the document is modified, older digital signatures will be validated against an older version of the document. Note: CoSign is currently compatible with versions X.x/XI.x of Adobe Acrobat, and versions X.x/XI.x of Adobe Reader. Refer to the Adobe documentation for complete information on Adobe’s digital signature capabilities. This chapter describes signing and validating an Acrobat Document using Adobe Acrobat X/XI, as well as signing and validating signatures using Adobe Reader X/XI. Signing an Acrobat Document using Adobe Acrobat X/XI Note: CoSign supports Adobe X and Adobe XI, but the dialog boxes shown in this chapter are Adobe X dialog boxes. They may differ slightly from the other versions’ corresponding dialog boxes. 85 CoSign User Guide 7 Using Adobe Acrobat X/XI, you can generate and validate digital signatures. The following sections describe how to use the Acrobat 6 Windows Certificate Security and Acrobat X/XI Adobe Default Security signature handlers to set up, sign, and validate digital signatures, as well as certify Acrobat documents. They also describe how to sign and validate signatures using Adobe Reader X/XI. For each signature request, CoSign is activated for the purpose of signature operation only. Setting up Adobe Acrobat X/XI to Use Digital Signatures Note: This setup procedure only needs to be performed once per workstation. To setup Acrobat to use digital signatures: 1. Make sure a graphical signature is stored in the local CoSign workstation. 2. Make sure the Adobe Acrobat application is closed. 3. Refer to Managing Graphical Signatures for instructions on how to import the CoSign based graphical signatures into the local Adobe installation in the end user’s PC. 4. In Acrobat, select Edit > Preferences. The Acrobat Preferences dialog box appears. 86 86 Signing Adobe Acrobat Documents 7 87 Figure 65 Acrobat X Preferences Dialog Box 5. Select the Security option. The ARX Signature -<signature name> appearance appears selected in the Appearance box. 6. Click Advanced Preferences. The Digital Signatures Advanced Preferences dialog box appears with the Windows Integration tab selected. CoSign User Guide 7 Figure 66 Adobe Reader Advanced Preferences Dialog Box 7. Select all the options in the Windows Integration tab. 8. Click OK to return to the Preferences dialog box. Using the Edit button, you can edit the appearance of the digital signature (refer to Editing the Signature’s Appearance). Note: Setting the Verify signatures when document is opened option automatically activates a validation procedure for all of the document’s digital signatures when the document is opened. The default is that digital signatures are not validated automatically when a document is opened. Editing the Signature’s Appearance You can configure the visual look of the digital signature by specifying the information to be presented in the digital signature location in the Adobe document. To edit the appearance of the signature: 1. In the Preferences dialog box (Figure 65), select the relevant ARX Digital Signature appearance. 2. Click Edit. The Configure Signature Appearance dialog box appears. 88 88 Signing Adobe Acrobat Documents 7 Figure 67 Adobe X Configure Signature Appearance Dialog Box 3. In the Configure Graphic section, specify one of the following: No graphic – No graphic will be displayed. Imported graphic – The user’s graphic signature will be displayed with the signature. Avoid using the PDF file button for specifying which file to load, since the Update Acrobat option in the CoSign control panel loads the user’s graphic signature. Name – Only the name of the signer will be displayed. 4. In the Configure Text section, specify which text elements to include in the signature. If you specify the Logo option, a Logo will be displayed as part of the visible signature. When the Update Acrobat option is activated on a Logo image, the default Logo of the Adobe Reader/Acrobat is updated. 5. Click OK to return to the Preferences dialog box. Signing an Adobe Acrobat Document – Acrobat X/XI To digitally sign an Acrobat document using Acrobat X/XI: 1. In Acrobat, open the document you wish to sign. 2. Select Tools >Sign & Certify. 89 CoSign User Guide 7 90 3. Click Place Signature. Figure 68 Acrobat X Sign & Certify Side Bar 4. A message appears, instructing you to specify the location of the signature. Click and drag the cursor to create a rectangle on the screen where you want the signature to be located. The Sign Document dialog box appears. Figure 69 Acrobat X Sign Document Dialog Box 90 Signing Adobe Acrobat Documents 7 5. Select a certificate in the Sign As drop-down list, and the desired appearance in the Appearance drop-down list, and click Sign. The digital signature is created. The signature may be visually presented as follows: Figure 70 Acrobat X Digital Signature Example To configure this process to enable you to provide a reason for the signature during the signature operation: 1. In the Configure Signature Appearance dialog box (Figure 67), make sure that Reason is selected in the Configure Text section. 2. In Acrobat, select Edit > Preferences. In the Security category, click Advanced Preferences, and then select the Creation tab. Set the value of Show Reasons When Signing to On. In this case, the Sign Document dialog box appears as follows: Figure 71 Acrobat X Sign Document Dialog Box – with Reason The digital signature appears as follows: 91 CoSign User Guide 7 92 Figure 72 Acrobat 8 Digital Signature Example – with Reason Modifying a Signed Acrobat Document Any modification of an Adobe document is considered a new revision of the document. Therefore, it is possible to sign a PDF document, modify the document, and then sign the document again (by the same user or by a different user). This means that for any two digital signatures, document content may have differed at the time of signing. For every digital signature that exists in the document, you can view the content of the document at the time of signing. To do so, use the View Signed Version option (refer to Operations on Signatures in Adobe Acrobat X/XI Documents). You can analyze the differences between the current document and the signed document using the Compare Signed Version to Current Document option (refer to Operations on Signatures in Adobe Acrobat X/XI Documents). Operations on Signatures in Adobe Acrobat X/XI Documents You can view and validate digital signatures using the Signatures panel on the left side of the Acrobat window (Figure 73). The palette displays the existing digital signatures associated with the Acrobat document. Information is listed for each signature, including the name of the signer, signature date, and document revision. Figure 73 Acrobat X Signature Palette 92 Signing Adobe Acrobat Documents 7 93 The following digital-signature operations can be performed by right-clicking either the image of the digital signature or the digital-signature entry in the Signatures panel. Go To Signature Field – Enables you to locate a digital signature in the Acrobat document. Clear Signature – Clears the digital signature but keeps the digital-signature field. This enables you to sign the document again and put the new digital signature in the original field. Only the most recently signed signature field can be cleared. Validate Signature – Performs a validation of the digital signature against the document information. A dialog box appears, displaying the results of the signature validation. Figure 74 Acrobat Signature Validation Status View Signed Version – The View Signed Version option enables you to view the actual version of the document that was signed. Compare Signed Version to Current Document – Displays the differences between the current document and the version of the document that was signed using this digital signature. Show Signature Properties – Displays detailed information about the signature, including signature validity, Signer ID, Signature date, and other details. In addition, the certificate details of the signer can be viewed by clicking Show Certificate. If the Signature field is not Sign, the following options are available: Sign Document – The digital signature will be created in the Signature field. The Sign Document dialog box will be presented as described above. Go To Signature Field – Enables you to locate a digital signature field in the Acrobat document. Access the following options by clicking Options at the top of the Signatures panel: Validate All Signatures – Checks all the signatures in the document and validates them. Clear all signature fields – Removes all digital signatures from the document and leaves only digital signature place holders. Note: By clicking a digital signature image, a validation action is executed. After a successful validation, √ is displayed. CoSign User Guide 7 Certifying an Adobe Acrobat Document – Acrobat X/XI In Adobe X/XI you can perform an operation called Document Certification, which is intended for stricter document/form content protection. The major difference between regular digital signing and certification is that during certification you can specify what type of content can be modified after the certification operation. During certification, the document is signed with your Private Key and Certificate. Note: Only a file that is not signed can be certified, which means that a file that contains digital signatures cannot be certified. To certify a document: 1. In Acrobat, open the document you wish to certify. 2. Select Tools >Sign & Certify (Figure 68). 3. In the Certify section, select With Visible Signature. The Certify Document dialog box appears. 94 94 Signing Adobe Acrobat Documents 7 95 Figure 75 Acrobat X Certify Document Dialog Box 4. For the Sign As, Appearance and Reason fields, follow the instructions in Signing an Adobe Acrobat Document – Acrobat X/XI). 5. In Permitted Actions After Certifying, select one of the following: No changes allowed – No changes are permitted to the PDF document. Form fill-in and digital signatures – You may enter data in forms, and sign existing signature fields in the PDF document. Annotations, form fill-in, and digital signatures – You may add annotations to the document, enter data in forms, and sign existing signature fields in the PDF document. 6. Click Sign. After certification is complete, the upper bar of the Adobe Acrobat application displays information similar to the following. CoSign User Guide 7 96 Figure 76 Acrobat X Certification Indication Example Using the Update Acrobat Option in the Graphical Signatures Utility This option creates a new appearance called ARX Signature - <graphical signature name> into which it imports the user’s graphical digital signature. This enables Adobe Acrobat or Adobe Reader to incorporate CoSign graphical signatures in the Adobe graphical signature when a digital signature operation is activated. The utility is activated by first activating the Graphical Signature Management application, then selecting the name of the graphical signature you wish to use in Acrobat, and then clicking Update Acrobat (refer to Managing Graphical Signatures). This option is enabled only if the Graphical Signature Management application utility is working in user mode, in which the user can create his/her own graphical signature. To edit the various settings of the ARX Digital Signature appearance, refer to Editing the Signature’s Appearance. Note: It is recommended to activate this option when Adobe applications are not running, to prevent filesharing problems. Validating CoSign Signatures Using Adobe Reader X/XI Adobe Reader enables you to view and validate digital signatures in the document. No plug-in is necessary for the proper validation of an Adobe X/XI document. To setup Adobe Reader X/XI to validate signatures, perform the following once: 1. Install the Root CA Certificate of the organization that signed the document. Refer to Installing a Root Certificate. This operation is not required if the signing organization has a World Wide Verifiable certificate. 2. Click Advanced Preferences and then click the Windows Integration tab. 96 Signing Adobe Acrobat Documents 7 Figure 77 Acrobat X Advanced Preferences Dialog Box 3. Select all the options in the dialog box. 4. Click OK to return to the Preferences dialog box. 5. Click OK to exit the Preferences dialog box. Note: The CoSign Verifier sets Adobe parameters to enable proper validation of digital signatures. Note that there is an Adobe-only version of the CoSign Verifier that only sets these Adobe parameters (refer to Installing a CoSign Verifier). Note also that after installing the CoSign verifier, although the Enable searching the Windows Microsoft Store for certificates other than yours option is not set in the Windows Integration tab, nevertheless the Adobe validation will use the Windows store for the purpose of certificate validation. The digital signatures appear inside the Acrobat document next to the validation symbol. If the digital signature contains a graphical signature, the graphical signature is displayed as well. When a document containing digital signatures is opened, a question mark is displayed next to each signature. After you validate the signature, the question mark symbol changes to a validated mark. 97 CoSign User Guide 7 98 The following digital-signature operations can be performed by right-clicking either the image of the digital signature or the digital-signature entry in the Signatures panel. Go to Signature Field – Enables you to locate a digital signature in the Acrobat Document. This option can only be activated from the Signatures panel. Validate Signature – Performs a validation of the digital signature against the document information. View Signed Version – Enables the user to view the exact version of the document that was signed. Show Signature Properties – Displays detailed information about the signature, including validity of the signature, signature date, user ID, signature creation date, certificate expiration, certificate issuer, and certificate details. The following digital-signature operations can be performed by clicking Options at the top of the Signatures panel: Validate all Signatures – Checks all the signatures in the document and validates them. This option can be viewed only from the Options button at the top of the Signatures panel. Note: Adobe Reader can be configured to automatically validate digital signatures on opening a document by setting the Verify signatures when document is opened option. Refer to Setting up Adobe Acrobat X/XI to Use Digital Signatures. Signing an Acrobat Document Using Adobe Reader X/XI You can also perform signature operations using Adobe Reader version X/XI. However, you need to use specially formatted Acrobat files that already contain signature fields. Once you locate a signature field in the document, you can perform the digital-signature action. Once you select the digital signature box, the signing process is similar to the signing process using Adobe Acrobat (refer to Signing an Adobe Acrobat Document – Acrobat X/XI). Note: You cannot perform the Certify operation using Adobe Reader. Signing a PDF document Without Using Adobe Acrobat To sign PDF files without installing Adobe Acrobat, you can use OmniSign (refer to Chapter 8: OmniSign – Signing PDF and non-PDF Files). Signing in Adobe Acrobat/Reader X/XI Using Adobe Roaming ID Note: This operation is not relevant when CoSign is installed in Common Criteria EAL4+ mode. In Adobe Reader X/XI and Adobe Acrobat X/XI, Adobe can be set to use a different digital signature mechanism called roaming ID that is based on Web Services. This mechanism enables you to digitally sign PDF documents without installing any software in the client PC. This means that this option is not in the scope of CoSign Client, and is relevant only when configuring Adobe Acrobat or Adobe Reader to use the CoSign appliance. 98 Signing Adobe Acrobat Documents 7 99 Adobe Reader and Adobe Acrobat can interface the CoSign appliance through a Web Service interface. The roaming ID mechanism requires a user to authenticate to the CoSign appliance based on a user name and password and perform a digital signature operation using the user’s signature key inside the CoSign appliance. You can use roaming ID in any of the following modes: User generates a roaming ID profile – In this mode, the PDF document contains a signature field that does not include a roaming ID profile. You must define a roaming ID profile in advance, and use it during the digital signature operation. Refer to Generating a Roaming ID Profile. Signature field already contains a URL – In this mode, the PDF document contains a signature field which already includes the URL of the CoSign appliance that will enable the end user to invoke the digital signature Web Service in Adobe. In this mode, the end user needs only to perform a digital signature operation. Refer to Signing a Signature Field that Contains a URL. Generating a Roaming ID Profile To define a roaming ID profile: 1. In Adobe Reader, select Edit > Protection > Security Settings. The Security Settings dialog box appears. Figure 78 Security Setting Dialog Box CoSign User Guide 7 2. Select Roaming ID Accounts in the left pane of the Security Settings dialog box. 3. Click Add Account. The Add a Roaming ID dialog box appears. Figure 79 Add a Roaming ID Dialog Box – Entering a URL 4. Enter the following information: URL – Enter a value such as https://cosign:8080/SAPIWS/assp.asmx. Note: By default, the CoSign appliance is distributed with a temporary SSL certificate called cosign. You can generate your own SSL Server Certificate and name it with CoSign’s DNS name; for example, cosign.company.com). If you would like use the CoSign temporary certificate, define an entry named cosign in your local hosts file, and specify the IP address of the CoSign appliance. The local hosts file is located in /etc/hosts in UNIX platforms, and in Windows\System32\drivers\etc\hosts in Windows platforms. Note: If you enroll for an SSL Server certificate, refer to the Managing the CoSign Appliance chapter in the CoSign Administrator Guide for instructions on how to upload the SSL Server certificate to the CoSign appliance. 5. Click Next. In the window that appears, enter a user ID and a password for authenticating to the CoSign appliance. 100 100 Signing Adobe Acrobat Documents 7 101 Figure 80 Add a Roaming ID Dialog Box – Entering a User Name and Password 6. Click Next. The final window appears, displaying the roaming ID settings, including the date when the User’s certificate expires. CoSign User Guide 7 Figure 81 Add a Roaming ID Dialog Box – Displaying Roaming ID Information 7. Click Finish. The selected certificate will be listed in any subsequent digital signature operation. If you choose this certificate, Adobe Reader/Adobe Acrobat will access the CoSign appliance for the digital signature operations. During this attempt, the user will be requested to supply a User ID and a password. The signature field that appears when using a roaming ID is identical to a regular signature field. Note: The Roaming ID mechanism does not automatically support a graphical signature. To use a graphical signature, you must manually insert a graphical signature in Adobe Reader/Adobe Acrobat using the Appearance mechanism. Signing a Signature Field that Contains a URL If the user initiates a digital signature operation and the signature field already contains a URL for accessing the CoSign appliance, the user is requested to enter a User name and a password for accessing the CoSign appliance. This act will generate a roaming ID profile for the user, which the user can use for all subsequent signing operations. To sign a signature field that includes a URL: 1. When you initiate a digital signature operation and the signature field already contains a roaming ID profile, the following window appears. 102 102 Signing Adobe Acrobat Documents 7 103 Figure 82 Sign Document Dialog Box – Displaying Roaming ID Information 2. Select the username from the Sign As drop-down list. 3. Select the appearance of the signature in the Appearance drop-down list. If you select an appearance that contains a graphical signature, this graphical signature will be included in the digital signature. 4. Click Sign. A dialog box appears, requesting a password. 5. Enter the password corresponding to the username you selected. Validating the digital signature is similar to validating a regular digital signature. Refer to Validating CoSign Signatures Using Adobe Reader X/XI for more information. Chapter 8: OmniSign – Signing PDF and non-PDF Files This chapter describes how to use OmniSign to manage all digital signature related operations in a PDF document, and sign any printable data from any application. Overview of OmniSign The major benefits offered by OmniSign include: Easily sign existing PDF documents. Sign non-PDF documents by using the document’s application File > Print command. While CoSign comes with extensive third party application support for digital signatures, there are other applications that do not provide digital signature support such as ERP systems, homegrown systems, and others. With OmniSign, any of these applications that support standard printing functionality can utilize OmniSign to add digital signatures to their documents. Manage all digital signature related operations in a PDF document. Starting from CoSign version 7.5, OmniSign supports Signature Locators and presents them to the user as regular signature fields. For more information about Signature Locators, refer to the CoSign Signature APIs Developer’s Guide. Launching OmniSign There are several ways to launch OmniSign. Launching OmniSign with a PDF file If your file is in PDF format, you can launch OmniSign in any of the following ways: Right-click the file name and select Sign with CoSign. OmniSign is launched for the PDF file. Note: If the Sign with CoSign option does not exist in the right-click menu, you can add it as follows: Launch OmniSign via the CoSign Control Panel, and in the OmniSign application select Tools > Add ’Sign with CoSign’ to PDF files. Select Start > ARX CoSign > OmniSign. OmniSign is launched. Open a file by selecting File > Open in the OmniSign menu bar and browsing to the file. Select OmniSign in the CoSign Control Panel. OmniSign is launched. Open a file by selecting File > Open in the OmniSign menu bar and browsing to the file. 105 CoSign User Guide 8 106 Drag the PDF file onto the OmniSign icon or shortcut. Launching OmniSign with a Remote PDF File Using the WebDAV Protocol You can use OmniSign to open a PDF remotely by providing the URL of the PDF file. To open a remote PDF file: 1. Select OmniSign in the CoSign Control Panel. OmniSign is launched. 2. Select File > Open and enter the URL of the remote PDF file. For example: http://www.organization.com/documents/mypdf.pdf. OmniSign uses the Web-based Distributed Authoring and Versioning (WebDAV) protocol to download the PDF file from a remote web server, perform the digital signature, and upload the file to its designated location. After downloading the file, you can use OmniSign to perform all available operations on the PDF file, such as adding digital signatures, adding digital signature fields, etc. The File > Save operation saves the PDF to its remote location. You can also use the HTTPS protocol for accessing the remote file in a secured manner. In this case, it is mandatory that the HTTPS server site be trusted by the connecting client. In addition, you can configure OmniSign so that it can be launched from the right-click menu of a link to a PDF file (if the link is in an HTML document displayed in Internet Explorer). To enable OmniSign to be launched from the right-click menu of a link to a PDF file: 3. Select OmniSign in the CoSign Control Panel. OmniSign is launched. 4. Select Tools > Show in Internet Explorer Popup Menu. The result is that in any HTML document in Internet Explorer, if you right-click a hyperlink to a PDF file and select Sign with CoSign, OmniSign uses WebDAV to download the PDF file from a remote web server, perform the digital signature, and upload the file to its designated location. Launching OmniSign with a non-PDF file If your file is in non-PDF format, you can easily convert it to PDF using OmniSign, and at the same time launch the OmniSign application. To launch OmniSign with a non-PDF file: 5. Open the file in its application. 6. Select File > Print. The Print dialog box appears. Figure 83 displays the standard Print dialog box that appears in Word. 7. Select ARX CoSign OmniSign Printer as the printer. OmniSign – Signing PDF and non-PDF Files 8 107 Figure 83 Selecting the ARX CoSign OmniSign Printer 8. Change the print properties if desired. 9. Click Print. Clicking Print triggers the PDF conversion process, during which a temporary file is created in the Windows Temp folder with the file name derived from the printing job name. The file content is then converted to PDF format and the OmniSign application is launched for the newly created PDF file. Note: When you drag a non-PDF file onto the OmniSign icon or shortcut, the Print option of the associated application is triggered using the OmniSign printer, and the OmniSign application is opened displaying the generated PDF file. Note: CoSign client includes a context sensitive PDF conversion process, which keeps information such as strings and does not convert them to a global image. Getting Started with OmniSign Figure 84 shows a sample OmniSign window. CoSign User Guide 8 108 Figure 84 OmniSign Window The OmniSign window includes the following elements: Menu bar – Enables you to perform various signature related operations such as creating and signing a new signature field in the PDF document, adding a new electronic signature into the document, and validating all existing digital signatures in the document. Toolbar – The toolbar includes some of the operations that can be performed using the OmniSign menu bar. Figure 85 OmniSign Toolbar The two drop-down lists contain options for creating a signature field and for signing a signature field. The last operation you select from a drop-down list is the default operation. OmniSign – Signing PDF and non-PDF Files 8 109 Navigation bar – The Navigation bar enables you to navigate to a certain page in the current document, and control the zoom level of the currently viewed page in the main OmniSign window. Main window – Displays the currently open PDF document or documents. You can display documents in the OmniSign main window in either of two ways: Static mode – The current PDF document is displayed in the main window, enabling you to perform various signature related operations. Cascading mode – All opened PDF documents are cascaded in the main window. Double-click the title bar of a PDF document to maximize it. To switch from Cascading mode to Static mode, double-click the title bar of a PDF document. To switch from Static mode to Cascading mode, select Restore in the menu of the menu bar, or use the Window > Cascade option in the menu bar. Signatures panel – Enables you to view all signed and non-signed signature fields, and perform various operations on the signature fields. Starting from CoSign client version 7.5, every time you open OmniSign without selecting a PDF file, the following Startup window appears. Figure 86 OmniSign Startup Window CoSign User Guide 8 110 The Startup window offers you the following options: Select an existing PDF document for signing. Upon clicking Open New Document, a file browser enables you to select a PDF document, which will be loaded to OmniSign for digital signature processing. Select a file you recently used in OmniSign. Upon selecting a file, that file is loaded to OmniSign for digital signature processing. Access OmniSign-related tutorials in the ARX web site (http://www.arx.com). Inserting a Digital Signature Field You may wish to insert a digital signature field without signing it, for example if you are designing a document template. To create a digital signature field: 1. Click in the toolbar, or select Signatures > Add Digital Signature Field. 2. In the main window, drag the mouse to the desired location of the new signature field. Left-click once to specify one corner of the field. Continue dragging the mouse until the desired size is displayed, and release the mouse to specify the opposite corner. A new signature field is created (Figure 87). Figure 87 New Signature Field 3. Drag any of the handles in the corners of the field’s rectangle to change the shape of the signature field. You can also drag the entire signature field to a different location by clicking inside the rectangle and dragging it. 4. Optionally, specify signature settings for this signature. To do so, right-click inside the signature field and select Settings, or select Settings from the Options drop down menu appearing just above the signature field. OmniSign – Signing PDF and non-PDF Files 8 111 Figure 88 New Signature Options The Signature Settings window appears (refer to Configuring Default Signature Settings for a Single Signature). Edit the settings as desired. Signing an Empty Digital Signature Field To sign an empty existing digital signature field: 1. Locate the empty digital signature field. 2. Select Sign from the Options drop down menu appearing just above the signature field (Figure 88). 3. The standard Signing Ceremony dialog box appears (Figure 27). Select or enter the relevant information. 4. Click Sign. A digital signature operation is performed. Creating and Signing a Digital Signature Field 5. You can create a digital signature field and sign it in a single operation. Note: If you wish to view or change any OmniSign settings before signing, refer to Configuring Default Signature Settings. To create and sign a digital signature field: 6. Click in the toolbar, or select Signatures > Sign. 7. In the main window, click the mouse to the desired location of the new signature field. Left-click once to specify one corner of the field. Drag the mouse until the desired size is displayed, and release the mouse to specify the opposite corner. The standard Signing Ceremony dialog box appears (Figure 27). 8. Select or enter the relevant information for the digital signature act. For more information about the standard signature ceremony dialog box, refer to the explanations following Figure 27. CoSign User Guide 8 112 9. Click Sign. The created signature field is digitally signed. Note: When the digital signature is being validated using Adobe Acrobat X/XI or Adobe Reader X/XI , a message appears to inform you that the time stamp of the digital signature is taken from the local computer, even though the actual time is taken from the CoSign appliance. To provide a more secure time source, you can add a time stamp to every digital signature using the CoSign Configuration utility (refer to Signature API – Time Stamp). Inserting an Electronic Signature Field You can incorporate an electronic signature into the PDF document. An electronic signature is a graphical image of an end-user’s handwritten signature. This method is very suitable for a Point Of Sale purchase. In a Point Of Sale purchase type of usage, after the purchase form is completed, the customer inserts his/her electronic signature, and the local sales person digitally signs the whole document. To insert an electronic signature field: 1. Click in the toolbar, or select Signatures > Add Electronic Signature Field. 2. In the main window, drag the mouse to the desired location of the new signature field. Left-click once to specify one corner of the field. Continue dragging the mouse until the desired size is displayed, and release the mouse to specify the opposite corner. A new signature field is created (Figure 87). 3. Drag any of the handles in the corners of the field’s rectangle to change the shape of the signature field. You can also drag the entire signature field to a different location by dragging the whole rectangle. 4. Optionally specify signature settings for this signature. To do so, right-click inside the signature field and select Settings, or select Settings from the Options drop down menu appearing just above the signature field (Figure 88). The Signature Settings window appears (refer to Configuring Default Signature Settings for a Single Signature). Edit the settings as desired. Signing an Electronic Signature Field To sign an existing electronic signature field: 1. Locate the empty electronic signature field. 2. Select Sign from the Options drop down menu appearing just above the signature field (Figure 88). The standard signing ceremony box appears (Figure 27). 3. Select or enter the relevant information. Note that because this is an electronic signature field, you will not be able to select a certificate. OmniSign – Signing PDF and non-PDF Files 8 113 4. Click Sign. An electronic signature operation is performed. Because there is no definition of an electronic signature in PDF, the electronic signature will turn into a graphical image that is embedded into the PDF document. Note: It is not possible to clear an electronic signature or remove an electronic signature field. Creating and Signing an Electronic Signature Field You can create an electronic signature field and sign it in a single operation. To create and sign an electronic signature field: 1. Click in the toolbar, or select Signatures > Sign an Electronic Signature. 2. In the main window, drag the mouse to the desired location of the new signature field. Left-click once to specify one corner of the field. Continue dragging the mouse until the desired size is displayed, and release the mouse to specify the opposite corner. The standard Signing Ceremony dialog box appears (Figure 27). 3. Select or enter the relevant information for the electronic signature act. For more information about the standard Signing Ceremony dialog box, refer to the explanations following Figure 27. 4. Click Sign. The created signature field is electronically signed. Performing a Multi-Page Signature Operation You can invoke a series of electronic or digital signature operations. In every step, a new signature field is created and signed on the next page, in the same location and size as the previous signature. This multipage signing operation is mostly suitable for contract-type documents, where many signatures need to be created in the same location on every page. To create a multi-page signature: 1. Go to the first page that needs to be signed. 2. Click the down arrow adjacent to the Sign icon . Several options appear (Figure 89). Figure 89 OmniSign – Signing Options 3. Select Multi-Page Signatures. CoSign User Guide 8 114 4. Click the mouse to indicate the top left corner of the new signature field. An empty signature field is created, and the Multi-Page Signatures dialog box appears (Figure 90). In addition, the multi-page signature toolbar appears at the top of the OmniSign window, to aid you in performing multi-page signature operations. Figure 90 Multi-Page Signatures Dialog Box 5. Optionally drag or resize the empty signature field. 6. Optionally click to specify signature settings for this signature. The Signature Settings window appears (refer to Configuring Default Signature Settings for a Single Signature). Edit the settings as desired. For example, specify whether this signature is an electronic or a digital signature. 7. Either click for a digital signature or Ceremony dialog box appears (Figure 27). for an electronic signature. The standard Signing a. Select or enter the relevant information in the standard Signing Ceremony dialog box. For more information about the standard Signing Ceremony dialog box, refer to the explanations following Figure 27. b. Click Sign in the standard Signing Ceremony dialog box. The created signature field is signed. If the signature field is an electronic signature field, an electronic signature field is created. The next page is displayed. 8. Perform one of the following: OmniSign – Signing PDF and non-PDF Files 8 115 Click Sign to sign this page and display the next page. During this signature operation, no Signing Ceremony dialog box appears (unless you clicked Settings, and changed a setting in the dialog box or clicked OK). Click to not sign this page and display the next page. At any page, you can also click do so, then the next time you click to change the signature settings from this page onwards. If you or , the procedure described in Step 7 is carried out. 9. At every page, perform the actions described in Step 8. 10. Click to end the multi-page signature operation. Saving the Signed File To save the signed PDF document, select File > Save. The current PDF document is saved into the default location. If the original file is a non-PDF file, you are prompted to provide a location. After saving, you can email the file from within OmniSign by selecting File > Attach to email. A new mail message is created with the signed file already attached, with the subject being the signed file name. Validating All Signatures To validate all signatures, click in the toolbar, or select Signatures > Validate all Signatures. The Signature Panel displays the validity status of each signature. In the main window, a valid signature appears with a green check mark, an invalid signature appears with a red cross mark, and an unknown (not yet validated) signature appears with no indication. Viewing Signature Details The Signatures panel lists all the digital signature fields inside the PDF document. CoSign User Guide 8 116 Figure 91 OmniSign Signatures Panel The list first displays all signed fields in the order of their signature time. It then displays all non-signed fields in the order of their creation date, listing the field name of each one. For every signed field the following information is displayed: Signer name and graphic indication of signature validation status. Signature validation status – Valid, Invalid, or Unknown (not yet validated). Signature time. Reason – If entered. For every signature field there is a list of available operations, depending on whether the field is signed or not. The available operations are the same as the operations available in the signature field’s right-click menu (for a full list, refer to Performing Operations on a Single Signature Field). The only additional operation is Go to Signature, which is disabled for invisible signatures. OmniSign – Signing PDF and non-PDF Files 8 117 Performing Operations on a Single Signature Field You can perform various operations on a single signature field. These operations are available in any of the following ways: Clicking the Options drop down menu appearing just above the signature field (Figure 88) Right-clicking a signature field Left-clicking a signature field in the Signatures panel (Figure 91). The available operations include: Sign – Signs or re-signs the signature field. The Signing Ceremony dialog appears (Figure 27). Select or enter the relevant information and click Sign. Certify – Performs a PDF signature operation that is “stronger” than the regular PDF signature operation (as described in Certifying an Adobe Acrobat Document). When a document is certified, you can specify one of the following certification modes: No further changes allowed – No changes are permitted to the PDF document. Form filling & signing allowed – You may enter data in forms, and sign existing signature fields in the PDF document. Annotations, form filling & signing allowed – You may add annotations to the document, enter data in forms, and sign existing signature fields in the PDF document. The Certify operation is disabled if there is a signed field in the document. Validate – Validates the digital signature. The display of the signature in the main screen is refreshed to reflect the validation state of the signature. View Signed ver. – View the document as it existed when this signature field was signed. This option presents a new window displaying the relevant document version. Clear – Clears the digital signature. This results in an empty signature field. Remove – Removes the digital signature as well as the signature field from the document. This operation is disabled if there is a signed field in the document. Settings – Displays the signature settings. Signature Settings can be changed if the field is not signed. This operation is disabled if there is a signed field in the document. Details – Displays the digital signature status and certificate status. Configuring Default Signature Settings You can configure default signature settings that will apply to newly created signatures. To configure the default signature settings for an individual signature field, refer to Configuring Default Signature Settings for a Single Signature. CoSign User Guide 8 To configure default signature settings for all signatures: 1. Click in the toolbar, or select Tools > Settings. The OmniSign Settings dialog box appears. The settings you configure will apply to all newly created digital or electronic signatures. 2. Click the Digital Signature tab to configure the default digital signature settings. Figure 92 OmniSign Default Signature Settings – Digital Signatures 3. View the current settings, or change the settings as desired. For an explanation of the available fields, refer to Configuring the Signature General Parameters, Configuring the Signature Appearance, and Configuring Clear Signature Field Policy. 4. Click the Electronic Signature tab to configure the default electronic signature settings. 118 OmniSign – Signing PDF and non-PDF Files 8 119 Figure 93 OmniSign Default Signature Settings – Electronic Signatures 5. View the current settings, or change the settings as desired. For an explanation of the available fields, refer to Configuring the Signature General Parameters and Configuring the Signature Appearance. 6. Click the General tab to configure the default general signature settings. CoSign User Guide 8 120 Figure 94 OmniSign Default Signature Settings – General In the General tab you can configure: General settings – Refer to Configuring General OmniSign Settings. Saving Options – Refer to Configuring OmniSign Saving Options. Signature Date & Time format – refer to Configuring Date and Time Format Configuring General OmniSign Settings You can configure the following general OmniSign settings (Figure 94): Show tips at startup – This parameter is obsolete. Open new documents in same window – Specify whether every activation of OmniSign (via the OmniSign Printer, the Sign with CoSign right-click option, or the CoSign Control Panel) will be diverted to the same running instance of OmniSign. Verify signatures when documents are opened – Specify whether OmniSign will validate all digital signatures upon opening a PDF file. One-touch signature – Specify whether the user only needs to left-click once in a document displayed in the main window to indicate the center of a new digital or electronic signature field. The OmniSign – Signing PDF and non-PDF Files 8 121 width and height of the signature field are determined by the values you enter in the Width and Height fields. Width and Height – Specify the width and height of a one-touch signature field, in points. The fields right under Width and Height display the width and height in the units selected in Measurement Units. Both sets of width and height fields, as well as the Measurement Unit field, are linked. That is, a change in one of them automatically causes an alteration in the fields influenced by the change. Measurement units – Select the unit of measurement for the fields directly under Width and Height. Configuring OmniSign Saving Options Figure 95 Saving Options You can configure the following save options: Default folder – Specify the folder where the signed PDF file will be stored. The file name is identical to the name of the original file if the original file is a PDF file. Do not change this field, unless you are batch signing a group of files. If you do not change this field, OmniSign will overwrite the source PDF file with the signed PDF file, or prompt you for a location if the source file is a non-PDF file. Delete original – Specify whether to delete the original file after the signature operation. This option is relevant only if the signed file is saved in a different location and thus does not overwrite the original PDF file. Configuring Default Signature Settings for a Single Signature To configure signature default settings for an individual signature: 1. Insert a new digital signature field as described in Inserting a Digital Signature Field. 2. Select Settings from the Options drop down menu appearing just above the signature field (Figure 88). The Signature Settings dialog box appears. CoSign User Guide 8 122 Figure 96 Default Signature Settings The Signature Settings dialog box contains the parameters that influence the signature appearance. It includes parameters for the following: Configuring the Signature General Parameters. Configuring the Signature Appearance. Configuring Clear Signature Field Policy. Configuring Date and Time Format. Viewing the Signature Field Size and Position. OmniSign – Signing PDF and non-PDF Files 8 123 Configuring the Signature General Parameters Figure 97 Signature General Parameters The General section includes the following parameters: Field name – Specify a name for the signature field. This option is relevant only when configuring settings for a specific signature field. Signature Type – Specify if the required signature is a digital signature or electronic signature. This parameter does not appear in the OmniSign settings dialog. Prompt for signature reason – Specify whether to prompt the signer to enter a reason during signing. This is the reason that is part of the signature field and can be seen in the signature pane when the file is opened in Adobe Reader. If you also select Reason in the Appearance section, the reason will also be displayed inside the signature on the document itself. Configuring the Signature Appearance Figure 98 Signature Appearance The Appearance section includes the following parameters: Show signature field – Specify whether the signature field will be visible. When this box is unchecked, the signature appearance and the signature size and position settings are disabled, and the signature rectangle is hidden. This parameter is not relevant for electronic signatures. Display caption (labels) – Indicates whether to use captions such as Date, Reason, Signed by, for the fields that will be displayed in the signature field. Graphical signature – Specify whether to display the graphical signature in the signature field. Initials – Specify whether to display the initials. It is not recommended to select both Graphical signature and Initials. CoSign User Guide 8 124 Logo – Specify whether to display a logo. Date and time – Specify whether to display the signing date and time in the signature field. Signer’s name – Specify whether to display the signer’s name in the signature field. This parameter is not relevant for electronic signatures. Title – Specify whether to prompt the user to enter a title during signing. Reason – Specify whether to display the reason for signing in the signature field on the document itself. Graphical signature location – Specify the location of the visible signature: Left – The graphical signature is on the left and the text is on the right. Top – The graphical signature is on the top and the text is on the bottom. Text Alignment – Specify how the text of the visible signature is aligned (this functionality is not relevant if the old PDF processing method is used): Left – The text is aligned to the left. Center – The text is aligned to the center. Scale graphical signature – Specify whether the graphical signature should be rescaled proportionally to the size of the signature field at the time of signature operation, or kept in its original size. This functionality is not relevant if the old PDF processing method is used. Configuring Clear Signature Field Policy Figure 99 Clear Policy You can specify the policy for clearing the signature field: Anyone – Anyone can clear the signature field. No One – No one can clear the signature field. Signer only – Only the signer can clear the signature field. Configuring Date and Time Format If the date and time are displayed in the signature field (that is, the Date and Time box is checked in the Appearance pane), you can set the date and time format as follows: OmniSign – Signing PDF and non-PDF Files 8 125 Figure 100 Date & Time Format Date – The date format. You can select a format from the drop-down list or create a new one. Refer to Figure 40 for an explanation of the date format notation. Time – The time format. You can select a format from the drop-down list or create a new one. Refer to Figure 40 for an explanation of the time format notation. Display GMT offset – Specify whether to display the time zone of the signature operation in relation to GMT. Note: You can modify the format of the date and time strings so that the displayed date and time contain some additional fixed text. Take care not to change the letters that identify the year (y), month (m), day (d), hour (h), and minutes (m), even if these letters are different in your native language. Viewing the Signature Field Size and Position Figure 101 Signature Size and Position The Properties pane displays the signature field’s size and position as follows: Page – The page number of the page in which to create the signature field. X – The horizontal distance in Adobe pixel units of the signature field’s bottom left corner from the document’s {0, 0} point, usually (but not always) the bottom left corner of the document. Y – The vertical distance in Adobe pixel units of the signature field’s bottom left corner from the document’s {0, 0} point, usually (but not always) the bottom left corner of the document. Width – The width of the signature field in Adobe pixel units. Height – The height of the signature field in Adobe pixel units. Restoring Default Settings OmniSign stores parameter values changed by the user, under the Current User settings in the Windows registry. If you wish to restore default settings, select Tools > Restore defaults. CoSign User Guide 8 126 When you select Restore defaults, OmniSign performs the following: 3. Removes all user-defined values from the Windows registry. If no value is then defined under the user’s Windows registry for a certain parameter, OmniSign looks for this value in the local machine definitions (refer to Setting OmniSign Configuration for more details). If no value is found, it uses a default value. 4. Immediately updates the values in the Default Signature Settings dialog box and the Options dialog box. Batch Signing The OmniSign application can also be used for signing multiple files in unattended mode. To run OmniSign for batch signing: 5. Select Start > Programs > ARX CoSign > CoSign Control Panel. In the CoSign Control Panel select OmniSign settings. The OmniSign window appears. 6. Configure the signature settings you wish to apply to all the files to be signed. 7. Turn on silent mode by selecting Enable Silent Mode in the Advanced tab of the OmniSign Profile, in the CoSign Configuration Utility (refer to Editing a Profile’s Advanced Settings). 8. If you want the signed files to be stored in a different folder than the one they are stored in before signing, specify the folder in the Default folder field (Figure 95). 9. Click OK to close the OmniSign window. 10. Run one or more instances of OmniSign.exe /s <PDF file>, either in parallel or serialized, where <PDF files> specifies a group of files using wildcards, for example c:\tmp\*.pdf. OmniSign Menu Bar The OmniSign menu bar includes the following options: Menu Item Options Description This menu option is available in Static display mode, in which a single document is displayed in the main window. Restore Switches the display mode to Cascading mode. Minimize Minimizes the current document in the main window. Close Closes the current document. About Displays information about OmniSign, and a link to the ARX web site. OmniSign – Signing PDF and non-PDF Files Menu Item Options 8 127 Description File Open Close Opens a PDF file. The new file is opened in addition to the currently opened PDF files. Closes the current PDF file. Save As Saves the current PDF file to the default location. If the original file is a non-PDF file, you are prompted to specify a file location. Saves the current PDF file to a user-selected location. Attach to Email Invokes an email client, with the current PDF file attached. Print Prints the current PDF document. Last Used Local PDF Files Last Used Remote PDF Files Exit Displays the last used local PDF files. Toolbar Toggles viewing the OmniSign toolbar. Status Bar Toggles viewing the OmniSign status bar. Go To Displays the First Page, Next Page, Previous page, Last Page, or specific Page of the current PDF document. You can also navigate to the next signature field or the previous signature field. Zoom To… Sets the zoom. Navigation Type Sets whether to display a Single Page in the view window, or whether to display the whole PDF document in Continuous Scrolling. Sign Creates a digital signature field and signs it in the current PDF document. You can place and resize the digital signature field. Sign an Electronic (uncertified) Signature Creates an electronic signature field and signs it in the current PDF document. You can place and resize the electronic signature field. Multi-Page Signatures Initiates a Multi-Page signature operation. Place Digital Field Inserts a new digital signature field into the current PDF document. You can place and resize the digital signature field. Save Displays the last used Remote PDF files. Closes OmniSign. View Signatures CoSign User Guide 8 Menu Item Options 128 Description Place Electronic Field Inserts an electronic signature field into the current PDF file. Validate All Signatures Performs a digital signature validation of all digital signatures in the current PDF file. Settings Presents the OmniSign Settings dialog. Restore Defaults Restores all the default settings. Add ‘Sign With CoSign’ to PDF files Adds Sign with CoSign to the right-click menu that appears when you right-click a PDF file. Show in Internet Explorer Popup Menu Launches OmniSign with a PDF appearing as a link in Internet Explorer. The link points to a file that is accessible using the WebDAV protocol, based on either the HTTP or HTTPS protocol. Cascade Cascades all opened PDF document windows. Help Displays this chapter in on-line Help format. About Displays information about OmniSign, and a link to the ARX web site. Tools Windows Help 129 Chapter 9: The ARFileSign Utility One of the CoSign client components is CoSign Signature APIs. This component enables programmers to digitally sign any PDF, TIFF, XML, Word/Excel 2007/2010/2013, InfoPath 2007/2010/2013 forms or Word 2003 file. For more information about CoSign Signature APIs, refer to the CoSign Signature APIs Developer’s Guide. You can also use the arfilesign.exe command line utility to sign those file types. This chapter describes the arfilesign.exe utility. Keep in mind that the arfilesign.exe utility is your only option for signing TIFF and XML files when code development is not an option. Overview The arfilesign.exe command-line utility is installed under Program Files\ARX\ARX Signature API. This utility enables you to sign and validate signatures of TIFF/PDF/Office 2007/Office 2010/Office 2013, InfoPath 2007/2010/2013, and Word 2003 files. The arfilesign.exe utility signs a document in automatic batch processing, without requiring you to open MS Word or Adobe Acrobat and sign the documents manually. The utility accepts a file name and a set of options, and performs a signature operation on the file. Signing multiple files is possible by providing a wildcard pattern rather than a single file name. The arfilesign.exe utility can be used for other operations, such as creating a signature field or performing verification. Signing TIFF Files The CoSign client supports digital signatures in TIFF documents. This enables you to: Easily sign a TIFF document. You can embed a single visible signature in the TIFF document, in an existing page of the TIFF document. Validate the signature on a TIFF document. Validation assures you that the document was not modified after it was signed, and that a trusted CA approves the signer. Using ARFileSign for TIFF Files Note the following when using arfilesign.exe for TIFF Files: If a given file’s extension is .tif or .tiff, the TIFF signature will be performed on the given file. You can have multiple non visible signatures in a TIFF file, or you can define the first signature as Visible, and the rest as Non Visible. CoSign User Guide 9 130 You can embed a single visible signature into the TIFF document. The visible signature may appear as follows: Figure 102 Visible Signature Embedded in a TIFF Document Example The digital signature is embedded inside a special TIFF tag whose identity number is 50685. Note: Currently, embedding a logo or initials into the visible signature is not supported. Signing XML Files The CoSign client supports digital signatures in XML files based on the XML digital signature standard as described in http://www.w3.org/TR/xmldsig-core/. This enables you to: Easily sign XML files based on the XML digital signature standard as described in http://www.w3.org/TR/xmldsig-core/.:You can use either an enveloped or an enveloping signatures. Note that CoSign supports only a single non visible signature. Perform an advanced XML signature. An advanced XML signature (named XAdES) can be performed upon the given XML file based on the standard described at: http://uri.etsi.org/01903/v1.2.2/ts_101903v010202p.pdf. The advanced XML signature is more suitable for long term archiving. The XAdES conformity level that is supported is XAdES-BES or XAdES-PES. Validate the signature on a XML file. Validation assures you that the data was not modified after it was signed, and that a trusted CA approves the signer. Note: For documents types that are formatted as XML data (such as Office 2007), the signed document is formatted according to the document’s original type and not as XML data. This enables using the document’s specific signature related functionality. Therefore, use the XML signature mainly in cases where plain XML data needs to be signed. Using ARFileSign for XML Files Note the following when using arfilesign.exe for XML Files: The ARFileSign Utility 9 131 If a given file’s extension is .xml, the XML signature will be performed on the given file. You can use the following - flg values to direct ARfileSign to generate an enveloped or enveloping signature in a standard/advanced formation: 1 – Enveloped XML signature. 2 – Enveloping XML signature. 8 – Standard XML signature. 16 – Advanced XML signature (XAdES-BES). Signing Other Files Using ARFileSign for Adobe Files The signatures performed by the arfilesign.exe utility upon a PDF file are compatible with Adobe X/XI (Acrobat and Reader). You can therefore validate the signatures using Adobe X/XI (Acrobat and Reader). If you wish to sign a PDF file, it is not necessary to have any Adobe product installed on the machine running the arfilesign.exe utility. However, it is recommended to use OmniSign for this purpose. Using ARFileSign for Word 2003 Files If you wish to sign a Word file, you must have Microsoft Word installed in the machine that is running the arfilesign.exe utility. To sign Word files, contact ARX for additional directions. Using ARFileSign for Word/Excel 2007/2010/2013 Files If you wish to sign a Word /Excel 2007/2010/2013 file, it is not necessary to install Office 2007/2010/2013 on the client machine. However, you must have .NET framework version 3 installed on the client machine. Note that only the signing or clearing of existing fields is supported. To create a digital signature field, you must therefore use Office 2007/2010/2013 with either the Microsoft Signature Line provider or the ARX Signature Line Provider. Office 2007/2010/2013 files are marked as OXMLP (Office XML Package). Using ARFileSign for InfoPath 2007/2010/2013 Files If you wish to sign an InfoPath 2007/2010/2013 file, it is not necessary to install Office 2007/2010/2013 on the client machine. However, you must have .NET framework version 2 installed on the client machine. Note that only the signing or clearing of existing fields is supported. To create a digital signature field, you must therefore use InfoPath 2007/2010/2013. CoSign User Guide 9 132 Because InfoPath files are .xml files, you must specify that the file is an InfoPath form, or else the InfoPath file will be signed as a regular XML file. To do so, use the –ft parameter described in the following section to indicate that the file type is inp (InfoPath form). Executing arfilesign.exe The arfilesign.exe utility is executed as follows: arfilesign.exe –fn <file-name> [options] where file-name is the name of the file on which the signature field operation is performed. To sign multiple files, provide a file mask instead of a file name (for example, C:\*.tif). The arfilesign.exe Options [-op <operation number>] – Supply one of the following numbers to indicate the required operation: 1 Create field 2 Sign field (creates a field if needed) 3 Verify field 4 Clear field 5 Remove field 6 List fields 7 Create a field and Sign it in one operation The default operation number is 2. [-ft <file type>] – Indicate one of the following file types: doc, OXMLP (docx or xlsx), pdf, xml, inp (InfoPath form) or tif. The default value is set according to the file extension. [-v <Visible/Invisible>] – Visible or Invisible signatures (default: Visible). In the case of a TIFF file, specify whether the signature is Visible or Non Visible. In a TIFF file only the first digital signature may be Visible. [-p <page number>] – The number of the page in which the signature field will be created (default: 1). If –1 is provided, the signature is placed on the last page. This option is not available for TIFF files. [-x <x coordinate>] – The signature field’s left x coordinate (default: 100). This option is not available for TIFF files. [-y <y coordinate>] – The signature field’s bottom y coordinate (default: 100). This option is not available for TIFF files. [-w <width>] – The width of the signature field (default: 200). This option is not available for TIFF files. The ARFileSign Utility 9 133 [-h <height>] – The height of the signature field (default: 100). This option is not available for TIFF files. [-sff <flags value>] – Reserved. Do not use this flag. [-r <reason text>] – The reason for signing, or the reason label when creating fields. The reason will be embedded in the visible signature only if the reason is in the Appearance mask. [-ti <title text>] – The title of the signer for signing, or the title label when creating fields. The title will be embedded in the visible signature only if the title is in the Appearance mask. [-sfi <field index>] – The signature field index. If -sfi is not provided, the first field that matches the operation is used. [-sfn < field name>] – The signature field name (an alternative to -sfi). If -sfn is not provided, the first field that matches the operation is used. [-ser <certificate serial number>] – The certificate serial number. The utility will use this certificate and its relevant Private Key for the digital signature operation. [-grn <graphical signature name>] – The utility uses the specified graphical signature for the digital signature operation. This option can be used when either Images or Initials are selected as part of the Appearance mask. Signing using Initials is not available for TIFF files. [-lgn <logo name>] – The utility uses the specified logo for the digital signature operation. This option can be used when Logo is selected as part of the Appearance mask. This option is currently not available for signing a TIFF file. [-d <dependency mode>] – Dependent or Independent Signature (default: Independent). For TIFF files, this parameter must be defined as Dependent, which is the default in this case. [-am <appearance mask>] – Defines the fields that will appear in the digital signature box (default: Image, Name, Time). Combine any of the following: Image, Name, Time, Reason, Title, Logo, and Initials, separated by commas, or use the value: None. It is recommended that if Initials is selected, Image (Graphical Signature) should not be selected. [-lm <labels mask>] – Defines whether a label will be presented in the digital signature (default: None). Combine any of the following: Name, Time, Reason, separated by commas, or use the value: None. [-tf <time format>] – Time format of the displayed signature (default: "h:mm tt"). For all possible values refer to the time formats in the screen capture appearing in Default Signature Settings – Date and Time Format. [-df <date format>] – Date format of the displayed signature (default: "MMM d yyyy"). For all possible values refer to the date formats in the screen capture appearing in Default Signature Settings – Date and Time Format. [-to <time offset>] – Whether to show signature time offset: GMT or None (default: None). [-c] – Certificate chain flags. If this parameter is set, the digital signature will contain all certificates until the root certificate, inclusive. [-cfg] – For further information on using this parameter, please refer to the CoSign Signature APIs Developer’s Guide or contact ARX. CoSign User Guide 9 134 [-flg] – For further information on using this parameter, please refer to the CoSign Signature APIs Developer’s Guide or contact ARX. [-uid] – The user ID of the user performing the signature operation. [-pwd] – The password of the user performing the signature operation. [-dom] – The Active Directory domain of the user performing the signature operation. [-pfs] – The Prompt For Sign password in cases where it is required. Note that if the password is identical to the one supplied in [-pwd] then it is not required. [-cf] – Additional custom fields. These fields enable you to attach additional information to a newly generated field. Each custom field contains an ID, type, and value. The available types include, for example, 1 – integer, 2 – string. For a full description, refer to the CoSign Signature APIs Developer’s Guide. Format the input as follows: <ID1>,<Type1>,<value1>,<ID2>,<Type2>,<Value2>,… [-mem] – For PDF or XML files, all operations will be done in memory. To use the parameter, set it as follows: -mem 1 135 Chapter 10: Signing WordPerfect Documents The CoSign client supports digital signatures in WordPerfect documents. This enables you to: Easily sign a WordPerfect document. Note: A WordPerfect document can only contain one signature. Note: Any attempt to sign a previously signed document erases the previous digital signature. A digital signature is also erased if the document is modified. Validate the signature on a WordPerfect document – Validation assures you that the document was not modified after it was signed, and that the signer is approved by a trusted CA. This chapter describes how to generate and validate digital signatures using WordPerfect. Signing a WordPerfect Document To digitally sign a WordPerfect document: 11. In WordPerfect, open the document you wish to sign. 12. Open the File menu and select Signature > Sign Document. The Sign Document dialog box appears (Figure 103). Figure 103 Sign Document Dialog Box 13. Select the desired certificate from the drop-down list. The certificate is marked with a . 14. To view more information about the selected certificate, click View. The Certificate dialog box appears. The Information tab displays the contents of the certificate, including the CA Name of the CoSign appliance that issued the certificate, the certificate’s period of validity, and whether the certificate is currently valid. CoSign User Guide 10 136 Figure 104 Certificate Dialog Box – Information Tab 15. Select the Validation tab. Figure 105 Certificate Dialog Box – Validation Tab 16. Select any of the following certificate validation options: Check the Certificate Authority (Using the Internet) – Checks the CRL of the certification authority. Check parent certificates – Checks the chain of certificates from the end user certificate to the root certificate. Signing WordPerfect Documents 10 137 Check root certificate – Checks the root certificate. Note: For more information on WordPerfect validation options, refer to http://Corel.com. 17. Click OK to save your changes or Cancel to return to the Sign Document dialog box. 18. In the Sign Document dialog box, click OK to digitally sign the WordPerfect document with the selected certificate. Note: When you add a digital signature to a WordPerfect document, the document is not automatically saved. Make sure to save the document after adding your signature, since the save operation will actually create the signature. Note: The current version of CoSign does not support graphical signatures in WordPerfect documents. Modifying a Signed WordPerfect Document Once a document is signed, you cannot modify the document without deleting the signature. If you modify a signed document, you must sign the document again. Validating Signatures in WordPerfect Documents To validate a signature attached to a document: 1. Open the document in WordPerfect. 2. Open the File menu and select Signature > View Signature. The Digital Signature dialog box appears. Figure 106 Digital Signature Dialog Box – Valid Signature This dialog box indicates whether the digital signature and the certificate are valid, or whether there is a problem with the digital signature or the certificate. 3. Click View Certificate to view more information about the certificate. The Certificate dialog box appears (refer to Figure 104 and Figure 105). CoSign User Guide 10 138 Viewing Details about Invalid Signatures If someone tampered with the document after the document was signed, the following message appears upon opening the document: Figure 107 Digital Signature Warning Dialog Box To view details about the invalid signature: Click Details. The Digital Signature dialog box appears, displaying information about the invalid signature. Validating CoSign Signatures without CoSign If you are not using CoSign, you can still validate signatures that were attached using CoSign. This is useful if you receive documents from a company or organization that uses CoSign internally. To validate signatures without using CoSign: 4. Install the root certificate of the organization that signed the document, as described in Installing a Root Certificate. 5. Validate as described in Validating Signatures in WordPerfect Documents. 139 Chapter 11: Signing Outlook Emails This chapter describes how to generate and validate digital signatures using Microsoft Outlook and Microsoft Outlook Express. Signing Outlook Emails Microsoft Outlook includes tools for sending and receiving digitally signed emails. CoSign integrates with Outlook by managing your public and private keys and certificates. This enables you to easily sign emails in Outlook. Before you can send signed email messages, you must configure Outlook to associate your certificate with your email account. Note: The procedures described in this section refer to Microsoft Office XP. Dialog boxes and other user interface elements may appear slightly different in Microsoft Office 2003 or Microsoft Office 2007/2010/2013. Configuring Outlook To configure Outlook to work with CoSign: 1. Open Outlook. 2. Open the Tools menu and select Options. The Options dialog box appears. 3. Select the Security tab. CoSign User Guide 11 140 Figure 108 Options – Security 4. For additional settings options, click Settings. The Change Security Settings dialog box appears. Figure 109 Change Security Settings Signing Outlook Emails 11 141 5. In the Certificates and Algorithms section, click Choose to select a signing certificate. The Select Certificate dialog box appears. 6. Select the certificate you want to use for signing your emails, and click OK. You are returned to the Security tab of the Options dialog box. 7. To automatically sign all outgoing messages, check Add digital signature to outgoing messages on the Security tab of the Options dialog box. 8. Click OK. Installing the Root Certificate You must install the root certificate in order to sign and validate signatures. For information on how to install the root certificate, refer to Installing a Root Certificate. Sending Signed Email Messages To sign all your email messages: 1. In Outlook, open the Tools menu and select Options. The Options dialog box appears (Figure 108). 2. Select the Security tab. 3. Check Add digital signature to outgoing messages on the Security tab of the Options dialog box. To sign a specific email message: 1. On the Outlook toolbar, click Options. The Message Options dialog box appears. 2. Check Add digital signature to outgoing message, and click Close. 3. Click Send to send the message. Receiving Signed Email Messages Using Outlook, you can validate the authenticity of any signed email message you receive. This assures you that the message is indeed from the stated sender and that the message has not been tampered with since it was sent. When you receive a signed email message, Outlook displays one of the following icons in the message window: The digital signature is valid. Click this icon to view the signature’s details. The digital signature is invalid. Click this icon to view the reason(s) this signature is invalid. You may also see the icon to the left of the message in the inbox. This icon indicates that the sender checked the Send clear text signed message option (refer to Figure 108). CoSign User Guide 11 142 Note: To properly validate the certificate of the sender, refer to the explanations and instructions in Installing the Root Certificate and CoSign Verifier. Note: In some versions of Outlook (for example, Outlook XP), Outlook attempts to validate that the signer’s certificate has not been revoked. To do this, Outlook attempts to connect to the Active Directory through the network and download a CRL (via LDAP or HTTP protocol). This network activity may be time consuming or blocked by firewalls. Signing PDF Attachments CoSign installs a special Outlook add-in that enables launching CoSign for a PDF file attachment. This option is relevant for Office 2010 and above. Note: It is important to ensure that Outlook settings do not disable the CoSign add-in. For information, refer to Verifying the CoSign Add-in is Enabled in Outlook. To launch CoSign for a PDF attachment: 1. In Outlook, right-click the PDF file attachment. Figure 110 PDF Attachment Right-Click Options 2. Select Sign With CoSign. OmniSign is activated upon the attached file. As part of the OmniSign functionality, the PDF file can be signed or a signature field can be created inside the document, etc. 3. When the operation is finished, save the file to a new location or in its original location. When saving to the original location, you can forward the email to a specific recipient. The updated document will be attached to the email. Verifying the CoSign Add-in is Enabled in Outlook It is important to ensure that Outlook settings enable the operation of the CoSign add-in. Signing Outlook Emails 11 143 To ensure Outlook enables the CoSign add-in: 1. In Outlook, select File > Options. 2. Select the Trust Center tab. 3. Click Trust Center Settings. 4. Select the Macro Settings tab 5. Make sure that Apply macro security settings to installed add-in is not checked. Note that this option is unchecked by default. Signing Outlook Express Emails Microsoft Outlook Express includes tools for sending and receiving digitally signed emails. CoSign integrates with Outlook Express by managing your public and private keys and certificates. This enables you to easily sign emails in Outlook Express. Before sending signed email messages using Outlook Express, you must configure Outlook Express to associate your certificate with your email account. Configuring Outlook Express To configure Outlook Express: 1. Open Outlook Express. 2. Open the Tools menu and select Accounts. The Internet Accounts dialog box appears. 3. Select the Mail tab. Figure 111 Internet Accounts – Mail 4. Select the email account with which you want to use your certificate, and click Properties. The Account Properties dialog box appears. CoSign User Guide 11 144 5. Select the Security tab. Figure 112 Account Properties – Security 6. In the Signing certificate section of the dialog box, click Select. The Select Default Account Digital ID dialog box appears. 7. Select the certificate you want to use, and click OK. Note: Only certificates with the same email address as the selected account are displayed. Sending Signed Email Messages To sign all your email messages: 1. In Outlook Express, open the Tools menu and select Options. The Options dialog box appears. 2. Select the Security tab. Signing Outlook Emails 11 145 Figure 113 Options – Security 3. Check Digitally sign all outgoing messages, and click OK. To sign a specific email message: 1. On the New Message toolbar, click . 2. Click Send to send the message. Receiving Signed Email Messages You can validate the authenticity of any signed email message you receive. This assures you that the message is indeed from the stated sender and that the message has not been tampered with since it was sent. When you receive a signed email, the email includes a signed email icon . If the signature is invalid for any reason, Outlook Express displays a security warning indicating the problem. Installing the Root Certificate You must install the root certificate in order to sign and validate signatures. For information on how to install the root certificate, refer to Installing a Root Certificate. 146 Chapter 12: CoSign Configuration Utility The CoSign client behavior in general and each CoSign component in particular, have several modes of operation that are suitable for different kinds of usage and customer needs. These different modes of operation can be set by the user, or can be set and then distributed by the organization’s administrator. The CoSign Configuration Utility enables both the user and the administrator to set the configuration of any parameter in any of the CoSign client components both for a single machine and for a group of machines. All administrator related functionality is described in the CoSign Administrator Guide. Overview The CoSign Configuration utility is a GUI application that enables a user or administrator to set any of the CoSign client components’ configurable parameters easily and intuitively. The CoSign Configuration utility can run in either of two modes: Admin mode – Run by an administrator to build a certain setting for distribution. It can be a Windows registry file or a group policy that can be distributed to different clients by the Active Directory group policy mechanism, using login scripts or manually. For information on the configuration utility options available in Admin mode, see the CoSign Administrator Guide. End User mode – Enables a user (or administrator) to view or configure the CoSign client behavior on the machine on which the utility is running. The utility displays a components tree, in which you can select the component whose configuration values you wish to set. Each component includes several independent groups of parameters, which can be independently set. The utility can also be used on a specific machine to view or update the current configuration. This may be useful for debugging purposes or when the client behavior deviates from the expected. Note: The CoSign Configuration utility is not the only method for changing the CoSign client’s behavior. Some of the components have their own GUI for setting their own configuration (such as the ARX Legacy Word Add-in plug-in, OmniSign, and others), but while the components’ GUI changes the setting of the current user, the CoSign Configuration utility changes the configuration of the local machine. You can also use the CoSign Configuration Utility to retrieve the CoSign internal CA certificate and the CoSign CA CRL (Certificate Revocation List). CoSign Configuration Utility 12 147 Using the CoSign Configuration Utility The CoSign Configuration Utility enables you to view and edit all the configurable parameters of the CoSign client components. In End User mode, only the installed components are displayed. For more information, refer to Running the CoSign Configuration Utility in End User Mode. To run the CoSign Configuration Utility: 1. Select Start > Programs > ARX CoSign > CoSign Control Panel. The CoSign Control panel appears. Select Client Configuration. The CoSign configuration utility’s main window appears. Figure 114 CoSign Configuration Utility – Main Window The left pane of the CoSign Configuration Utility displays a components tree. Each node in the highest level of the tree is a configurable client component. Each component has one or more sub-nodes, with each subnode being a group of parameters. These sub-nodes group parameters by category, except for the Miscellaneous sub-node, which includes all the parameters that are not included in any of the other groups. To edit a parameter: 2. Double-click the component to which this parameter belongs, or click The component’s sub-nodes are displayed (refer to Figure 115). to the left of the component. CoSign User Guide 12 148 3. Select the sub-node that contains the parameter. The right pane displays all the configurable parameters for the sub-node (refer to Figure 115 for an example). The right pane of each sub-node (except Miscellaneous) displays all the configurable parameters, with a triplet of radio buttons on top. Since the Miscellaneous group is a collection of various unrelated parameters, it may display several triplets, one for each logical set of parameters. Figure 115 Configurable Parameters of a Sub-node 4. Select one of the radio button options: Not Configured – When this option is selected, the local machine definition of this sub-node’s parameters remains unchanged when the configuration is applied to the local machine. When this option is selected, the parameters are disabled. Use Defaults – When this option is selected, Windows registry entries for all this sub-node’s parameters are removed when the configuration is applied to the local machine, and the CoSign defaults are used. When this option is selected, the parameters are disabled. Set <Sub-node Name> Parameters – When this option is selected, the sub-node’s parameters become editable and display values where applicable (either the default value, or a value taken from the local machine definition). When the configuration is applied to the local machine, all the parameters of this group are written to the Windows registry. New registry keys and values CoSign Configuration Utility 12 149 are created if necessary, and the old values, if defined, are overwritten. Refer to the following sections for explanations of the parameters of the following configurable CoSign components: Setting Client Configuration – CoSign Client. Setting Signature API Configuration. Setting Microsoft Office Configuration. Setting OmniSign Configuration. Note: The name of the section is displayed in bold if any modifications were made to the default values. CoSign Configuration Utility Menus The following sections describe the menu options available from the CoSign Configuration Utility: File, CA, and Help. Note that the File menu differs for Admin mode and End User mode. File Menu – End User Mode The following options are available in End User mode from the File drop-down menu: Export to configuration file – Enables exporting the local machine settings to a configuration file. You can export to a file that is compatible with either a 32bit Windows operating system or a 64bit Windows operating system. Import configuration file – Enables importing settings from a configuration file. Apply (Save to Registry) – Enables changing the machine’s configuration as per the changes performed using the CoSign Configuration Utility, by applying the changes to the Windows registry. Refer to Applying the Changes to the Local Windows Registry. Load (From Registry) – Enables clearing all current values in the application dialog boxes and replacing them with the Windows registry values. Refer to Reloading the Windows Registry Configuration. CA Menu The following options are available from the CA drop-down menu: Install CoSign CA Certificate – Enables installing CoSign’s root certificate into the current user’s PC. Refer to Installing a Root Certificate for information relating to CoSign’s root certificate. Download CoSign CA Certificate – This option is very similar to the Install CoSign CA Certificate option. The difference is that in this case the CoSign root CA certificate is output to a selected file. The downloaded file can be placed in the AIA location according to the AIA field defined in the users’ certificates. Download CoSign CA CRL – Enables downloading the CoSign CRL (Certificate Revocation List) to a file. The downloaded file can be placed in the CDP (CRL Distribution Point) location according to the CDP field defined in the users’ certificates. CoSign User Guide 12 150 Help Menu The following options are available from the Help drop-down menu: About – Displays the version of the CoSign configuration utility as well as a link to the ARX web site. Contents – Displays the content of this chapter in on-line help format. Create report – Enables generating a report listing information on both the CoSign Client installation and the CoSign appliance installation. Click Save to save the report to a file. The file can be sent to ARX support for problem analysis. The report includes three parts: CoSign Client installation files – Includes all the files of the CoSign installation, their dates, sizes and version information. CoSign Client and Server parameters – Includes CoSign Client and Server parameters. The parameters also include information that is displayed in the CoSign console. Environmental information – Displays information about the PC in which the CoSign client is installed, the version of the installed MS Office application, and other parameters that can be valuable to ARX support for problem analysis. Running the CoSign Configuration Utility in End User Mode The CoSign Configuration Utility can also be used for editing and viewing a specific machine’s settings. When the application runs in End User mode, it looks for all the CoSign components that are installed, and for each component reads its settings and displays them in the relevant dialog box. To run the CoSign Configuration Utility in End User mode: Select Start > Programs > ARX CoSign > CoSign Control Panel. The CoSign Control panel appears. Select Client Configuration. The CoSign configuration utility’s main window appears. In End User mode, the information in the right pane reflects the state of the CoSign client parameters in the Windows registry. For each group of parameters, the Use Defaults option is selected if none of this group’s values were set in the Windows registry, and the fields are grayed out. If some of the group’s values were set in the Windows registry, the Set <Sub-node Name> Parameters option is selected. After editing the parameters’ values, the changes must be applied in order to update the Windows registry. These actions are described below. Note: To change settings in End User Mode, the current user must have the appropriate permissions to change Windows registry values under HKEY_LOCAL_MACHINE. Following is the list of actions that can be performed in End User mode: Viewing and Editing CoSign Client Settings. Applying the Changes to the Local Windows Registry. Reloading the Windows Registry Configuration. CoSign Configuration Utility 12 151 Exporting the configuration to a configuration file (refer to Exporting the Configuration to a Configuration File). Importing settings from a configuration file (refer to Importing Settings from a Configuration File). Installing and downloading the CoSign CA certificate (refer to Install CoSign CA Certificate and Download CoSign CA Certificate). This action is relevant in a CoSign Client installation only. Downloading the CoSign CA CRL (Certificate Revocation List) (refer to Download CoSign CA CRL). This action is relevant in a CoSign Client installation only. Viewing and Editing CoSign Client Settings To view and edit the CoSign Client Settings, follow the instructions in Using the CoSign Configuration Utility. Changing CoSign client values using the CoSign Configuration Utility does not automatically change the machine’s configuration. They must be explicitly applied in order to take effect (refer to Applying the Changes to the Local Windows Registry). Applying the Changes to the Local Windows Registry Changes performed using the CoSign Configuration Utility do not automatically change the machine’s configuration. They must be explicitly applied to the Windows registry in order to take effect. Select File > Apply (save to registry) to apply all changes to the local machine settings. If you close the application without specifying Apply (save to registry) you will lose all the changes you have made. Note: If you would like to restore default values after applying changes to the Windows registry, do not use the Not Configured option. Instead, use the Use Defaults option which enforces resetting of the parameters back to the default values. Reloading the Windows Registry Configuration If you are not satisfied with the changes you made to the configuration, and have not yet saved them to the Windows registry, or if the local setting was changed outside the application and you want to reload the current setting from the Windows registry, select File > load (from registry) to clear all current values in the application dialog boxes and replace them with the Windows registry values. Exporting the Configuration to a Configuration File To export the local machine settings to a configuration file, select File > Export to configuration file > Export to 32bit or select File > Export to configuration file > Export to 64bit. Browse to the desired file name and location. Use the generated file in an operating system that matches the specified 32/64 bit output file. CoSign User Guide 12 152 Importing Settings from a Configuration File Select File > Import configuration file to import settings from a configuration file. Browse to the desired file name and location. Setting Client Configuration – CoSign Client The client configuration contains parameters related to connectivity and authentication with CoSign. The CoSign client is the basic CoSign component; therefore all CoSign-enabled applications are affected by the client’s settings. Client configuration is composed of the following groups: Appliances – In this group you can manually define the addresses of the CoSign appliances and their authentication mechanism. Login dialog – In this group you can set all the parameters relating to the login dialog box for the environments in which such a dialog box appears. Timeouts – In this group you can set the various timeouts relating to communication between the CoSign client and the CoSign appliance. Miscellaneous – In this group you can set logging parameters and other miscellaneous parameters. Client - Appliances This group enables you to manually set the IP address or DNS name of the CoSign appliances the machine should work with, usually in Directory Independent environments, and whether to display the logon and signing dialog boxes. CoSign Configuration Utility 12 153 Figure 116 Configuring Client – Appliances Parameters In the Appliances group, you can set the following CoSign client parameters: Client optimization – If this value is checked, the CoSign client uses optimized communication with the CoSign appliance. Change this setting only if instructed to do so by ARX. SSL Proxy definitions – If the CoSign client can connect to the CoSign appliance only through an SSL proxy, provide the SSL proxy parameters to enable communications. Specify the following: Enable automatic ssl proxy detection – If this parameter is checked, the CoSign client will use the local PC definitions of the SSL proxy. In this case other SSL proxy parameters are disabled. SSL Proxy address – The DNS name or IP address of the SSL Proxy. Port – The TCP/IP port number of the SSL proxy. CoSign supports various authentication methods that may be required in order to access the CoSign appliance through an HTTP proxy. CoSign User Guide 12 154 If the HTTP proxy requires a userID and password authentication, the user will be prompted with a userID and password request window. The user should enter a userID and password that are relevant for the HTTP proxy. Note: After changing HTTP proxy configuration, you must perform a hardware restart of the PC. Prompt for logon method – Select one of the following values if you wish to enforce a specific logon method that is different from the one defined in CoSign: Auto (default) – The value is chosen automatically according to system setup. SSPI – Enable login through Single-Sign-On mode (relevant for Active Directory environments). User Pwd Server Side (AD/LDAP) – The user and password are passed to the server for verification and the authentication check is performed by the CoSign appliance. This option is relevant for Active Directory, and LDAP environments. SSPI User Pwd Client Side (AD) – The user is requested to input the user name and password, which will be verified by the CoSign client. This option is relevant only for Microsoft Active Directory environments. Directory Independent Prompt – The user password mechanism used in Directory Independent environments. SAML Server Side – ADFS or SAML authentication will be used in Active Mode to enable the client application to access the remote CoSign Server. The CoSign Client will first access the local ADFS system for local authentication; the provided SAML ticket will then be presented to the remote CoSign appliance. Prompt for sign method – Select one of the following values if you wish to enforce a specific authentication method that is different from the one defined in CoSign: Auto (default) – The value is chosen automatically according to system setup. None – No prompt appears upon digital signature operation. User Pwd Server Side (AD/LDAP) – The user name and password are passed to the server for verification. This option is relevant for Active Directory and LDAP environments. Directory Independent Prompt – The user password mechanism used in Directory Independent environments. Directory type – Specify the directory used for synchronizing the CoSign users: Auto (default) – The directory type is taken from the CoSign server. AD – The CoSign users are defined in Active Directory. Directory Independent – The CoSign users are not automatically synchronized with any directory. LDAP – The CoSign users are defined in an LDAP Directory. Note: The directory type influences the automatic behavior of the prompt for logon method and prompt for sign method. CoSign Configuration Utility 12 155 Preferred Server – If this field is not empty, the CoSign client will first attempt to connect to this CoSign appliance. The Preferred server must be listed either in the SCP CoSign servers list or in the following Appliances List. Appliances list – Enter the list of all available CoSign appliances. If more than one appliance is added, the CoSign client performs load balancing between them. Use the Add and Remove buttons to edit the list. You can specify a CoSign appliance by either its IP address or its DNS name. You can also indicate which appliances are your preferred appliances by selecting the relevant checkboxes. These selections are relevant for a high availability environment – the CoSign client will first try to connect with the preferred appliances. This means that if more than one appliance is listed, the CoSign client will first try to connect with the preferred appliances. In a non-high-availability configuration, preferences are ignored. Figure 117 Indicating Preferred Servers for a High Availability Environment REALM service – The URL definition of the remote CoSign service. This is used by the ADFS system to generate a SAML ticket that is suitable for the CoSign remote system. Identity Provider – The URL definition of the local ADFS server. The format of this URL is usually: https://<DNS of local ADFS Server>/. STS endpoint – Specify which authentication method is used in the local Active Directory environment: Kerberos or Username and Password. Kerberos authentication – In this case, the end user will not be prompted for a user ID and a password, and authentication will be based on a previous domain logon. Username and Password authentication – In this case, the user will be required to present a user ID and a password when accessing the remote CoSign appliance. This user ID and password will be validated against the local Active Directory deployment. You must make sure that the mode you select is also enabled in your ADFS configuration. Client – Login Dialog This group enables you to control the login dialog behavior. CoSign User Guide 12 156 Figure 118 Configuring Client – Login Parameters In the Login group, you can set the following CoSign client parameters: Automatic prompt for sign – If this value is checked, the CoSign client can sometimes use an extended authentication mode. This mode can be used by the CoSign Connector for SharePoint, when using cache-based extended authentication mode. Verify user name in prompt for sign – If this value is checked, the user has to provide both the user name and password if prompt for sign is set. Otherwise, the user name is provided automatically by the Prompt for Sign dialog box. Force upper case user name – Change this value only if instructed to do so by ARX support. Close dialog when inactive for <number> Sec. – Determines the time of inactivity the login dialog box waits before automatically closing itself. Note: If the login dialog box closes itself, the logon operation fails. Permit known applications only – Select this option to specify that CoSign can be used from a set of known applications. This option is enabled by default. For the exact list of known applications, CoSign Configuration Utility 12 157 contact ARX. Note that applications that use CoSign Signature APIs are automatically included in the list. Permit login dialog pop-up except for designated applications – Select this option to enable all applications to display the login dialog box, except for the applications listed in the Designated applications list. Deny login dialog pop-up except for designated applications – Select this option to enable only the applications listed in the Designated applications list to display the login dialog box. Note: The Permit login and Deny login options are relevant only in environments where a login dialog box should appear before working with CoSign. Disable login dialog – Prevent all applications from popping up the login dialog box. If this option is selected and an application tries to pop up the login dialog box, the operation will fail, and no dialog box is displayed. This option should be used for unattended environments. Designated applications – A list of applications referenced by the options Permit login dialog popup except for designated applications and Deny login dialog pop-up except for designated applications. Use the Add and Remove buttons for editing this list. Client – Timeouts This group enables you to set the various timeouts relating to communication between the CoSign client and the CoSign appliance. Note: Do not change the timeouts parameters unless instructed to do so by ARX technical support. Incorrect values might prevent the user from succeeding in connecting to the CoSign appliance. CoSign User Guide 12 158 Figure 119 Configuring Client – Timeouts Parameters Client – Miscellaneous This group enables you to set the logging parameters of the CoSign client and other miscellaneous parameters. These logging parameters affect only the layer of communication between the client and the CoSign appliance, and do not affect any other client components. To set the logging parameters of a specific component, configure the logging parameters in the Miscellaneous sub-node of that component. Note: Changing the logging parameters can extensively degrade the performance of the client. It is therefore recommended not to change the logging parameters unless instructed to do so by ARX technical support. CoSign Configuration Utility 12 159 Figure 120 Configuring Client – Miscellaneous Parameters In the Miscellaneous group, you can set the following CoSign client parameters: Log – The reporting level to the log as well as the path for the CoSign client log file. Language – The language in the CoSign client GUI. Multi-Languages support is currently provided for end users and not for administrators. This option is relevant for Windows 7 and above or Win2008R2 and above. Domain – Do not set this parameter unless instructed to do so by ARX technical support. Setting Signature API Configuration CoSign Signature APIs are programming interfacing components used by CoSign and by software developers to interface with CoSign. CoSign Signature APIs’ configuration enables you to define time stamping parameters, OCSP parameters and graphical signature parameters, as well as logging parameters related to CoSign Signature APIs operations. CoSign User Guide 12 160 Signature API – Time Stamp This group enables you to define time stamp server parameters so that every digital signature will include a time stamp. These parameters are relevant to any CoSign Signature API based application, including OmniSign and the Legacy Office add-in. Figure 121 Configuring Signature API – Time Stamp Parameters In the Time stamp group you can set the following Signature API parameters: Use time stamp in signatures – If this option is selected, a time stamp is used for every generated digital signature. denote Export time stamp settings to word – If this option is selected, then when either the ARX Signature Line Provider is used to sign Office 2010/2013 documents (Word or Excel) or the Microsoft Signature Line Provider is used to sign Office 2010/2013 documents, the digital signature will also include TimeStamping information. Additional information such as the URL of the time-stamping provider will be taken from the Time stamp URL field. This functionality is not relevant if the Office document is signed through CoSign Signature APIs. CoSign Configuration Utility 12 161 Time stamp size – The size of the place holder for the time stamp information. Do not change this value without consulting with ARX. Time stamp URL – The HTTP or HTTPS location of the time stamp server. User name – The user name of a user who is authorized to use the time stamp server. User’s password – The password of the authorized user. Hash Algorithm – The hash algorithm to use as part of the time stamping request. The default hash algorithm is SHA256. Ask during Signing Ceremony – If this option is selected, the use may specify during the signature operation whether to incorporate a secure timestamp. Signature API – Certificate Revocation In the Certificate Revocation group you can set parameters that relate to OCSP (Online Certificate Status Protocol) and to Certificate Revocation List (CRL). They enable checking the user’s certificate status in a signature operation as well as incorporating such information as part of the digital signature operation. Note: Certificate Revocation functionality is currently supported mainly for PDF files. CoSign User Guide 12 162 Figure 122 Configuring Signature API – OCSP Parameters In the OCSP group you can set the following OCSP parameters: Use OCSP in signatures – Specify whether to use an OCSP server during signature operation. OCSP URL – If the user certificate does not contain an OCSP entry, the URL you enter here is used to access the OCSP server. In the CRL revocation group you can set the following CRL related parameters: Embed CRL chain – If this option is selected, CRL information will be included for every generated digital signature. Max CRL size – The maximum size of the place holder for the CRL information. Do not change this value without consulting with ARX. Next CRL update threshold – A value, in seconds, that relates to used local cache storage for CRLs. Do not change this value without consulting with ARX. CRL update threshold – A value, in seconds, that relates to used local cache storage for CRLs. Do not change this value without consulting with ARX. CoSign Configuration Utility 12 163 CRL communication timeout – Timeout (in milliseconds) for CRL fetching operations. If the timeout expires, CRL fetching is considered an error. Enforce CRL validation – If this options is set, then if there is any problem with the CRL or its validity status, the entire signature process fails. Signature API – Graphical Signatures This group enables you to define settings for using graphical signatures through the CoSign Signature API applications. Figure 123 Configuring Signature API – Graphical Signatures Parameters In the Graphical Signatures group you can set the following Signature API parameters: Capturing device ID – Specify the mechanism or device to be used by the ARX graphical signature application to upload a graphical signature to CoSign: Automatic – The currently installed capture device is the device used to enter the graphical signature. In this mode, if no capture device is installed, the graphical signature will be captured from a Tablet-PC or a Mouse. CoSign User Guide 12 Manual (default) – The user can select the capturing mechanism directly from the graphical signature application. Extended – Do not use this option. Topaz SigLite – The Topaz SigLite device is used. Interlink ePad – This option is not relevant. Tablet PC / Mouse – Either a Tablet-PC or a Mouse is used to enter a graphical signature. 164 Default capturing font– If a script font is used to enter the graphical signature, you can specify the default script font and its size. Default signature font – If you did not provide a graphical signature, this value is used as the default font and size of the automatic graphical signature. PDF image type – This option is relevant for the Update Acrobat operation in the Graphical Signatures Utility that imports graphical signatures into Adobe Acrobat X/XI and Adobe Reader X/XI. You can select one of the following options: Bit map (bmp) image – The graphical signature is stored in the document as a bitmap. Line vectors – The vectorial representation of the graphical signature is stored in the document. Use old style PDF signature appearance – All textual elements of the visible signature as well as its graphical elements can be combined into a single image that is incorporated into the PDF document. This ensures that for Unicode languages such as Japanese, the digital signature text will be readable when the PDF document is viewed in Adobe reader. The new style mode is also the preferred mode for PDF/A documents. If you select the Use old style PDF signature appearance option, the old appearance style is used, in which the textual and graphical elements are not combined into a single image. Note that the old style mode requires less system resources. This mode is applicable only if the selected PDF Method is the Legacy method (refer to PDF method). Default PDF font – When the new style PDF signature appearance is used, this default PDF font is used for displaying the textual elements in the created image. Local signatures directory – Specify the root directory that stores the local graphical signatures. This directory should have the following subdirectories (note that the names are case sensitive): WetInk – for graphical signatures. Initials – for initials. Logo – for the logo. Any JPG or BMP file located in these directories can be used as a graphical signature during signature operation by the Signing Ceremony dialog box or by the Graphical Signature Management application. The default directory is My Documents/My Pictures/My CoSign Images. CoSign Configuration Utility 12 165 Note: If you use the default directory setting, then in a Terminal Server installation or multi-user desktop, each signer’s graphical signatures will be located in his/her own My Documents/My Pictures/My CoSign Images directory. If however you specify a directory different from the default setting, then even in a Terminal Server installation or multi-user desktop, all signers’ graphical signatures will be located in the single directory you specified. Local signature size – Specify a threshold for initiating the image size reduction algorithm. If the user tries to load an image with a size bigger than the specified value, its image size will be reduced. Graphical signature and text spacing – Specify the spacing between the graphical image and the text in the visible signature, in pixels. This functionality is relevant only if the new PDF processing method is used (refer to PDF method). Allow downloading of CoSign images – Specify whether to allow users to download their graphical signatures to the local hard disk. If this option is not selected, the Download Images option will not be available in the Graphical Signature Management application (see Figure 14). Allow editing of graphical signatures – Specify whether to allow users to update their graphical signatures. If this option is not selected, users will not be able to create new graphical signature, edit existing graphical images, or delete their graphical signatures. Update Acrobat Signature Appearance – Text – Specify the sub-elements in an Adobe Acrobat appearance that will be configured. You can specify whether Signer Name, Date or Reason will be configured in the newly generated appearance. Include CoSign watermark in signatures – Specify whether to include a CoSign watermark in the visible signature. Signature API – External Validation This group enables you to perform certificate path validation prior to the digital signature operation. This restriction is mainly required from customers that use an extensive PKI system. CoSign User Guide 12 166 Figure 124 Configuring Signature API – Graphical Signatures Parameters In the External Validation group you can set the following External Validation API parameters: Enable DoD compliance mode – If this option is set, extensive certificate validation checks are applied to the signing certificate as well as to every certificate in the certificate chain, prior to digital signature operation. Only if the signing certificate passes all the validation checks can the user use the certificate for signature operations. For more information, contact ARX. Signature API – Reasons This group enables you to build and edit the list of available reasons for signing, as well as to select one of them as the default reason. This window is relevant for all CoSign applications such as the ARX Legacy Word Add-in for Office 2007/2010/2013, the ARX Signature Line provider for Office 2007/2010/2013, and OmniSign. The Reasons list is used by the CoSign signing ceremony. CoSign Configuration Utility 12 167 Figure 125 Configuring Microsoft Office – Reasons Parameters In the Reasons group you can set the following parameters: Reasons – The list of reasons displayed to the user before a signature field is signed. You can enter a new reason in the window and click Add to add it, or select a reason from the list and click Remove to remove it from the list. Default reason – The default reason displayed to the user when signing a signature field. The user can either click OK to sign with this reason, or select another reason and then continue with the signing operation. To specify the default reason, you can either enter a reason in this field, or select one from the list of reasons and click Set as default. Signature API – Miscellaneous This group enables you to set the logging and other miscellaneous parameters of the SAPI lib. Note: Changing the logging parameters can extensively degrade the performance of the client. It is therefore recommended not to change the logging parameters unless instructed to do so by ARX technical support. CoSign User Guide 12 Figure 126 Configuring Signature API – Miscellaneous Parameters In the Log section, you can set the following Signature API parameters: Detail level – The reporting level to the log. File name – The path for the SAPI log file. In the Hash algorithm section, you can set the default hash algorithm for digital signature operations. Select one of the following algorithms: SHA-1. Note that this option cannot be used when CoSign is installed in Common Criteria mode or configured to be used in FIPS mode. If SHA-1 is selected in these modes, all digital signature operations are rejected by the CoSign Appliance. SHA-256. This is the default option. SHA-384 SHA-512 In the Signing Ceremony Instructions section, you can set the following parameter: 168 CoSign Configuration Utility 12 169 Instruction to signer – Specify the text that appears in the Signing Ceremony dialog as instructions to the signer. In the Automatic log off section, you can set the following Signature API parameters: Automatically log off after signing – Select this option to specify that the CoSign client will automatically logoff the user after the digital signature operation. This option should be turned on in a multi-user environment, where you would like an automatic logoff operation after each user performs a digital signature operation. In the PDF method section, you can set the following Signature API parameters: Legacy method – Starting from CoSign client version 7.2, a new PDF processing mechanism is used. Set the value of the legacy method toggle to On if you want to use the previous PDF processing method. Setting Microsoft Office Configuration The Microsoft Office configuration enables you to set the default behavior of the signing operation in Word, Excel, and InfoPath. This includes the signature appearance, the signing method, which data will be signed, and a list of available reasons for signing and logging. Microsoft Office configuration also enables you to configure parameters that may be applicable for the ARX Signature Line Provider for Office 2007/2010/2013 as well as for the ARX Legacy Word Add-in for Word/Excel 2007/2010/2013. The Microsoft Office configuration is composed of the following groups: Appearance – In this group you can configure the default appearance of a signed signature field. Settings – In this group you can set parameters relating to the signing method, algorithms, and the data to sign. Excel Specific – In this group you can configure the content and scope of data that will be signed in Excel. Word Specific – In this group you can configure the content and scope of data that will be signed in Word. Miscellaneous – In this group you can set the Office logging parameters, indicate the scope of CRL checking, and indicate whether to enforce the local machine settings over the local user settings. For more information on using CoSign to sign Word and Excel documents, refer to Chapter 5: Signing Microsoft Office Documents. For more information on using InfoPath, refer to Chapter 6: Signing InfoPath 2007/2010/2013 Forms. Microsoft Office – Appearance This group enables you to set the default appearance of a signed signature field, including the fields to be displayed, the size, and the time format. CoSign User Guide 12 Figure 127 Configuring Microsoft Office – Appearance Parameters In the Appearance group you can set the following Microsoft Office parameters: Display validation mark (V) – Check the On Screen option and/or the In Print option to specify that the document on screen and/or the printed document will include this symbol if the signature is valid. This option is relevant only for the ARX Legacy Word Add-in for Office 2007/2010/2013. Display invalidation mark (X) – Check the On Screen option and/or the In Print option to specify that the document on screen and/or the printed document will include this symbol if the signature is invalid. This option is relevant only for the ARX Legacy Word Add-in for Office 2007/2010/2013. Display unknown status mark (?) – Check the On Screen option and/or the In Print option to specify that the document on screen and/or the printed document will include this symbol if the status of the signature is unknown. This option is relevant only for the ARX Legacy Word Add-in for Office 2007/2010/2013. Display GMT offset – Specify whether the GMT offset will be displayed. This option is relevant for both the ARX Legacy Word Add-in for Office 2007/2010/2013 and for the ARX Signature Line provider. 170 CoSign Configuration Utility 12 171 Time format – Specify the displayed time format. This option is relevant for both the ARX Legacy Word Add-in for Office 2007/2010/2013 and for the ARX Signature Line provider. Date format – Specify the displayed date format. This option is relevant for both the ARX Legacy Word Add-in for Office 2007/2010/2013 and for the ARX Signature Line provider. Note: Display GMT offset, Time format, and Date format are relevant only if the Date and Time field is displayed in the signed signature field. Width (pixels) – The width of the digital signature field in pixels. This option is relevant only for the ARX Legacy Word Add-in for Office 2007/2010/2013. Height (pixels) – The height of the digital signature field in pixels. This option is relevant only for the ARX Legacy Word Add-in for Office 2007/2010/2013. Appearance style – The format of the display of items inside the graphical signature image. This option is relevant only for the ARX Legacy Word Add-in for Office 2007/2010/2013. There are two available options: Fixed font size – All text fields in the image are displayed in the same font size. This size is determined by the size of the image. This is the default option. Variable font size – The font size of the various text fields is not fixed. Transparent signature field style – Determines whether the visible signature is transparent, meaning that the document’s text underneath the signature is not fully overwritten by the visible signature elements. This option is relevant only for the ARX Legacy Word Add-in for Office 2007/2010/2013. Display date and time caption – Determines whether the title field Date and Time is displayed before the actual date and time field. This option is relevant only for the ARX Legacy Word Add-in for Office 2007/2010/2013. Display reason caption – Determines whether the title field Reason is displayed before the actual reason field. This option is relevant only for the ARX Legacy Word Add-in for Office 2007/2010/2013. Display signed by caption – Determines whether the title field Signed By is displayed before the actual signer field. This option is relevant only for the ARX Legacy Word Add-in for Office 2007/2010/2013. Show these fields in this order – Specify which fields are displayed in the signed signature field, and in what order. Use the Add and Remove buttons to move fields to or from the Available fields box. Use the Move Down and Move Up buttons to change the order of the fields. This option is relevant for both the ARX Legacy Word Add-in for Office 2007/2010/2013 and for the ARX Signature Line provider for Office 2007/2010/2013. However, the order of the fields is relevant only for the ARX Legacy Word Add-in for Office 2007/2010/2013. Microsoft Office – Settings This group enables you to set the signing mechanism and algorithm as well as the data to be signed. CoSign User Guide 12 172 Figure 128 Configuring Microsoft Office – Settings Parameters In the Settings group you can set the following Microsoft Office parameters: Create Word compatible signatures – Select this option to generate a digital signature that can be validated in Word 2007/2010/2013 without the ARX Legacy Word Add-in plug-in (refer to Validating Signatures in Word Documents Without Using the ARX Legacy Word Add-in Plug-in). This option is not relevant to ARX Signature Line provider. Dependent signatures – Select this option to specify that all newly created digital signatures be dependent. This option is not relevant to ARX Signature Line provider. Enable Word automatic verification – Select this option to direct MS Word to automatically verify all digital signatures of a document upon opening an existing document. This parameter enables users to differentiate between MS Word and MS Excel. This option is not relevant to ARX Signature Line provider. Enable Excel automatic verification – Select this option to direct MS Excel to automatically verify all digital signatures of a document upon opening an existing document. This parameter enables users to differentiate between MS Word and MS Excel. This option is not relevant to ARX Signature Line provider. CoSign Configuration Utility 12 173 Display Signature setting dialog for Office signature line provider – Use this option to direct the ARX Signature Line Provider for Office 2007/2010/2013 to display to the user the Signature Setting dialog box upon field creation. Enter reason for signature in Office signature line provider – Use this option to specify whether the user is requested to add a reason when signing an Office signature line provider based signature. Enable Software required state in Office signature line provider If this field is set, empty signature fields will show the software required image in machines not installed with the CoSign client. If this field is not set, empty signature fields will show the empty signature field image. Hash method – Do not modify this field. This option is not relevant to the ARX Signature Line provider. Signature can be clear by – Specify the default policy for clearing signatures when using the ARX legacy office add-in. The options include: Anyone – Anyone can clear a signed field. No one – No one can clear a signed field. Signer only – Only the signer can clear a signed field. Microsoft Office – Excel Specific These options are relevant only to the ARX Legacy Word Add-in plug-in for Windows 2007/2010/2013. This group enables you to set the default content and scope of the data to be signed when performing a digital signature in Excel. CoSign User Guide 12 Figure 129 Configuring Microsoft Office – Excel Specific Parameters In the Excel-specific group you can set the following Microsoft Office parameters: Cell value – Check this option to include the value of the cells in the data to be signed. Cell formula – Check this option to include the formula of the cells in the data to be signed. Note: You must set either Cell value or Cell formula or both. Cell properties – Check this option to include the properties of the cells in the data to be signed. Cell Strikethrough font – Check this option to treat a strikethrough font as part of the data to be signed. Display Ribbon – Check this option to display the ARX Signature Line Provider toolbar (ribbon) (Office 2007/2010/2013 style). Display Addin – Check this option to display the ARX Legacy Word Add-in digital signatures toolbar (Office/XP 2003 style). Scope – Indicates the scope of the data to be signed. Select one of the following values: Active Sheet – Only the data in the active sheet will be signed. Workbook – All data in the workbook will be signed. 174 CoSign Configuration Utility 12 175 Selection – Only the data in a specific selection of cells will be signed. Microsoft Office – Word Specific These options are relevant only to the ARX Legacy Word Add-in plug-in for Windows 2007/2010/2013. This group enables you to set the default content and scope of the data to be signed when performing a digital signature in Word. Figure 130 Configuring Microsoft Office – Word Specific Parameters In the Word-specific group you can set the following parameters: In addition to text, signature applies to location & size of tables and objects – Check this option to include in the signature the values of the location and size of tables and objects. This option is relevant only for content-based signatures. Font Strikethrough – Check this option to treat a strikethrough font as part of the data to be signed. Field codes – Check this option to include in the signature all field codes (but not their dynamically changing values). Field codes are text fields that are updated automatically, such as Date or Header/Footer information. Form Fields & Content Controls – Check this option to include in the digital signature information from Form Fields Content control. CoSign User Guide 12 Display Ribbon – Check this option to display the ARX Signature Line Provider toolbar (ribbon) (Office 2007/2010/2013 style). Display Addin – Check this option to display the ARX Legacy Word Add-in digital signatures toolbar (Office/XP 2003 style). Scope – Specifies the scope of the data to be signed. You can select one of the following values: 176 Entire File – The entire content of the Word file will be signed. Entire File SharePoint compatible – The entire content of the Word file will be signed to be compatible with SharePoint 2010/2013. Document Content – All the textual and visible content of the Word document will be signed. Selection – All the textual content of the current selection will be signed. Print validation mode – Specifies the behavior of the ARX Legacy Word Add-in in the event of printing the Word document: Validate signatures before print – The digital signatures in the document will be validated prior to printing. Print without validation – No digital signature will be validated prior to printing. The user can manually perform signature validation prior to giving the print command. Alert the user for unknown signatures – Prior to printing, the user will be alerted if there are signatures with unknown status. Microsoft Office – Miscellaneous This group enables you to set the logging parameters, the CRL checking flag and to enforce centralized management of all the MS Office settings. CoSign Configuration Utility 12 177 Figure 131 Configuring Microsoft Office – Miscellaneous Parameters In the Miscellaneous group you can set the following Microsoft Office parameters: Set log parameters – You can set the following logging parameters: Detail level – The reporting level to the log. File name – The path for the Microsoft Office log file. Note: Changing the logging parameters can extensively degrade the performance of the client. It is therefore recommended not to change the logging parameters unless instructed to do so by ARX technical support. Check CRL – You can set the following CRL (Certificate Revocation List) parameters: Check the CRL – Determines the scope of CRL checking when verifying a digital signature. If this option is selected, the CRL of all certificates in the chain is checked. If this option is not selected, only the CRL of the user’s certificate is checked. Local user settings – You can set the following local user settings: Enable local user settings – Determines whether to enable a user to set his/her own settings through any of the supported Microsoft Office applications’ GUI. If this option is not checked, the configuration settings are always taken from the local machine. Note: If a user sets his/her own settings, an attempt to distribute a centralized managed setting will not succeed, and the user will keep using his/her own configuration. CoSign User Guide 12 Setting OmniSign Configuration OmniSign enables you to print and sign any document of any format. It includes both a special printer that converts the file to PDF, and an application that signs the PDF file. OmniSign configuration enables you to set parameters related to the signing application but not to the printing operation. OmniSign configuration is composed of the following groups: Profiles – In this group you can set the appearance and location of the signature, which application to run after signing, where to save the signed file, and whether to run in silent mode. Miscellaneous – In this group you can set logging parameters. For more information on using OmniSign, refer to Chapter 8: OmniSign – Signing PDF and non-PDF Files. OmniSign – Profiles This group enables you to set the parameters of the standard OmniSign profile (currently this is the only profile supported). The profile parameters affect the default behavior of the OmniSign application. Figure 132 Configuring OmniSign – Profiles Parameters 178 CoSign Configuration Utility 12 179 Click Edit and optionally set the following OmniSign parameters in the corresponding tabs: Digital Signature – Refer to Editing a Profile’s Digital Signature Settings. Electronic Signature – Refer to Editing a Profile’s Electronic Signature Settings. General – Refer to Editing a Profile’s General Settings. Advanced – Refer to Editing a Profile’s Advanced Settings. Editing a Profile’s Digital Signature Settings You can define the appearance of the digital signature. Figure 133 Configuring OmniSign – Digital Signature Parameters For an explanation of the parameters, refer to Configuring the Signature Appearance and Configuring Clear Signature Field Policy. Editing a Profile’s Electronic Signature Settings You can define the appearance of the electronic signature. CoSign User Guide 12 Figure 134 Configuring OmniSign – Electronic Signature Parameters For an explanation of the parameters, refer to Configuring the Signature Appearance. Editing a Profile’s General Settings You can set general OmniSign-related parameters. 180 CoSign Configuration Utility 12 Figure 135 Configuring OmniSign – General Profile Parameters In the General tab you can configure: General settings – Refer to Configuring General OmniSign Settings. Saving Options – Refer to Configuring OmniSign Saving Options. Signature Date & Time format – Refer to Configuring Date and Time Format. Editing a Profile’s Advanced Settings You can set various OmniSign application settings. 181 CoSign User Guide 12 182 Figure 136 Edit OmniSign Profile Dialog Box Profile name – Reserved for future use. Initial zoom – The zoom value to be used when opening the document in the preview pane. Graphics Processing – The graphical signature format. You can select one of the following options: Bit map (bmp) image – The graphical signature is stored in the document as a bitmap. Line vector – The vectorial representation of the graphical signature is stored in the document. Point-of-sale mode – If this option is selected, whenever an electronic signature is requested, the user will have to use his/her capture device to provide the graphical image. Allow electronic signatures – if this options is selected, the user will be able to create an electronic signature field and sign it using OmniSign. Digital Signature If signed electronically, require digital signature before closing – If this option is set, then after a user signs electronically an additional digital signature operation will need to be performed before the document can be saved. CoSign Configuration Utility 12 183 Show validation watermark – If this option is set, then when printing the PDF document from OmniSign the printed document displays the signature validation status as of the time when the document was printed. Indicate document changes performed after signing – If this option is set, OmniSign will indicate in the Signatures panel whether changes were made to the PDF document after the PDF document was signed. Silent mode – Enables running OmniSign in unattended mode to perform batch signing of multiple files. You can set the following parameters: Force silent mode – Specify whether to run OmniSign in silent (unattended) mode. If you select this option, specify the signature location in each of the files to be signed, using the following parameters: Page – Specify in which page to create the signature field. Select either First Page, Last Page or enter the page number. X – The horizontal distance in Adobe pixel units of the signature field’s bottom left corner from the document’s {0, 0} point, usually (but not always) the bottom left corner of the document. Y – The vertical distance in Adobe pixel units of the signature field’s bottom left corner from the document’s {0, 0} point, usually (but not always) the bottom left corner of the document. Width – The width of the signature field in Adobe pixel units. Height – The height of the signature field in Adobe pixel units. OmniSign – Miscellaneous This group enables you to set the logging parameters in OmniSign. Note: Changing the logging parameters can extensively degrade the performance of the client. It is therefore recommended not to change the logging parameters unless instructed to do so by ARX technical support. CoSign User Guide 12 Figure 137 Configuring OmniSign – Miscellaneous Parameters In the Miscellaneous group you can set the following OmniSign parameters: Log – You can set the following logging parameters: Detail level – The reporting level to the log. File name – The path for the OmniSign log file. Set Local user settings – You can set the following parameters: Enable local user settings – Specify whether a user can override default machine settings. 184 185 Chapter 13: Troubleshooting This chapter offers solutions to various problems you may encounter while installing or running CoSign. If you are unable to identify or solve a problem, try the ARX support web site at http://www.arx.com/support/ or contact ARX Support at http://www.arx.com/support/supportrequest. ARX Support information Support web site http://www.arx.com/support/ Support Request Form: http://www.arx.com/support/supportrequest Support email address: [email protected] ARX Contact information ARX web site: http://www.arx.com ARX US Headquarters: 855 Folsom Street, Suite 939 San Francisco, CA 94107 General Problems This section describes various problems and error messages you may encounter while running the CoSign Client, and provides possible solutions to these problems. ARX Add-Ins Present a Failed to Select Certificate Message Problem: When you try to sign a document while using a CoSign add-in, such as the ARX Word/Excel addin or OmniSign, you get the message “Failed to select a certificate”. Solution: Perform the following: Restart the client machine and try again. Verify the following: You receive a response when you ping the CoSign IP address, or try to connect to CoSign using telnet to port 443. CoSign User Guide 13 186 If CoSign is installed in an Active Directory environment: You are logged in to the same domain as CoSign. You should not be logged in to any other domain, and you should not be logged in to the current machine. Your DNS definitions are correctly configured on the PC. These definitions should be the same as the domain’s DNS. Your user account is defined in the directory that was defined as the AD users container during CoSign installation. (Refer to the chapter Managing the CoSign Installation in the CoSign Administrator Guide). If a license group is defined, your user account is part of the license group. If you are using a Directory Independent environment: You set configuration parameters for the client machine. Use the CoSign Configuration Utility to set up the CoSign appliance IP address (refer to Client - Appliances). Cannot See Any Certificates in Store Problem: You cannot see any certificates in your Microsoft personal certificates store. Solution: Follow the same solution as in ARX Add-Ins Present a Failed to Select Certificate Message. Cannot Enable the “Add Digital Signature to Outgoing Messages” Checkbox in Outlook Problem: In Microsoft Outlook, the Add digital signature to outgoing messages checkbox is disabled. Solution: In order to send signed emails, you must first define security settings. Refer to Configuring Outlook. Problems Related to ARX Legacy Word/Excel Add-In This section describes various problems and error messages you may encounter while using the ARX Legacy Word/Excel add-in. Cannot Create a Digital Signature Field Using the ARX Legacy Add-in Problem: You cannot generate a signature field since Word or Excel cannot switch to Design Mode. Solution: Check the following: Check whether the Visual Basic for applications component is installed. If it is not installed, install it from the Office installation CD. Make sure the ARX add-in is not disabled in Office applications: 1. Select About... > Disabled Items in the Help menu of the Office application. 2. If the ARX Signature add-in is listed, remove it from the list. Troubleshooting 13 187 Check whether Enable Automatic Verification is unselected in the Settings tab of the Microsoft Office section of the CoSign Configuration Utility. If it is selected, deselect it. Problems Related to OmniSign This section describes various problems and error messages you may encounter while using OmniSign. Cannot Create a Digital Signature Field Using OmniSign Problem: You press the sign option from the menu bar and nothing happens. Solution: In the PDF, drag the mouse to the desired location of the new signature field. Left-click once to specify one corner of the field. Continue dragging the mouse until the desired size is displayed, and release the mouse to specify the opposite corner. 189 Index —A— Account Activation, 23 Add Digital Signature checkbox, disabled, 186 ADFS authentication logon method, 154 overview, 4 STS endpoint, 155 URL of ADFS server, 155 URL of CoSign service, 155 Adobe Acrobat automatic signature validation, 88 certifying a document, 94 configuring for digital signatures, 86 creating a new appearance, 96 digital signature operations, 93 editing the signature’s appearance, 88 introduction to digital signatures, 86 modifying signed documents, 92 roaming ID, using, 98 Signature setup for Acrobat utility, 96 signing a document, 89 validation image, 92 viewing signatures, 92 Windows Certificate Security signature handler, 86 Adobe Reader digital signature operations, 98 roaming ID, using, 98 signing documents, 98 validating signatures, 96 viewing signatures, 96 Applications Adobe Acrobat, 85 Adobe Reader, 85 Microsoft Office, 39 Office 2007, 39 Office 2010/2013, 39 Outlook, 139 Outlook Express, 143 TIFF, 129 WordPerfect, 135 XML, 130 Applications that work with CoSign, 6 ARfileSign utility batch signing, 132 executing, 132 location, 129 options, 132 overview, 129 ARX Legacy Word Add-in plug-in configuring signature defaults, 55 CoSign menu, 48 dependent signatures, configuring, 62 design mode, 63 Excel signature scope, 54 Excel signature settings, 60 Excel XP/2003-signature policy settings, 62 general parameters, configuring, 56 overview, 48 signature details, 67 signature field, modifying, 63 signatures list, 65 time and date format, configuring, 58 toolbar configuration, 50 toolbar options, 50 transparency settings, 57 troubleshooting, 186 Word signature types, 54 Word XP/2003-specific signature settings, 59 ARX Office Signatures Line provider configuring advanced signature settings, 42 configuring general signature settings, 41 configuring signature settings, 41 Authentication extended authentication modes, 3 OTP authentication, 3 password and OTP authentication, 4 simple extended authentication, 3 requirements, 1 —B— Batch signing using ARfileSign, 132 190 CoSign User Guide using OmniSign, 126 —C— CD installation files, 11 installing CoSign client, 13 uninstalling CoSign client, 15 Certificate Revocation List (CRL) downloading to a file, 149 setting CRL parameters, 161 settings CRL parameters, 177 Certificates checking status using OSCP, 161 failed to select, 185 manual external CA mode, 5 none in store, 186 root, for validating signatures without CoSign, 17 setting CRL parameters, 161 viewing certificate information, 68 Certifying Adobe Acrobat documents, 94 signatures in OmniSign, 117 Client client components installation screen, 13 configuring using the CoSign Configuration Utility, 152 installation files, 11 installation introduction, 11 installing directly from CD, 11 supported operating systems, 11 troubleshooting, 185 types of installations on CD, 11 Common Criteria mode, 4 authentication method, 4 user activation, 4, 5, 23 Configuring CoSign, using the Configuration Utility, 146 Outlook, 139 Outlook Express, 143 CoSign applications that work with CoSign, 6 components, 7 documentation, 8 environments supported by CoSign, 2 installing client directly from CD, 11 installing graphical signature capture devices, 27 managing graphical signatures, 28 using the Graphical Signature Management application, 27 CoSign Configuration Utility CA menu, 149 downloading the root certificate, 149 editing parameters, 147 End User Mode reloading Windows registry configuration, 151 running, 150 saving to the Windows registry, 151 usage, 150 viewing and editing settings, 151 File menu, End User mode, 149 generating an installation report, 150 Help menu, 150 installing the root certificate, 149 introduction, 146 menus, 149 modes of operation, 146 overview, 146 running, 147 setting client configuration appliances parameters, 152 logging parameters, 158 login dialog parameters, 155 miscellaneous parameters, 158 overview, 152 timeouts parameters, 157 setting Microsoft Office configuration appearance parameters, 169 Excel specific parameters, 173 miscellaneous parameters, 176 overview, 169 signature parameters, 171 Word specific parameters, 175 setting OmniSign configuration advanced profile parameters, 181 digital signature parameters, 179 electronic signature parameters, 179 general profile parameters, 180 logging parameters, 183 miscellaneous parameters, 183 overview, 178 profile parameters, 178 setting signature API configuration certificate revocation parameters, 161 Index CRL parameters, 161 external validation parameters, 165 graphical signatures parameters, 163 logging parameters, 167 miscellaneous parameters, 167 OSCP parameters, 161 overview, 159 reasons list, creating, 166 time stamp parameters, 160 using, 147 CoSign Control Panel accessing, 21 in a Directory Independent environment, 22 menu bar options, 25 overview, 21 refreshing, 25 User actions, 21 CoSign Nation, 17 CoSign password changing in a Directory Independent environment, 22 CoSign Signature APIs configuring using the CoSign Configuration Utility, 159 creating the reasons list, 166 CRL settings, 161 External validation settings, 165 Graphical signatures settings, 163 OSCP settings, 161 setting SAPI lib logging, 167 setting signing ceremony instructions, 167 time stamp settings, 160 CoSign Verifier Adobe version, 15, 16 installation overview, 16 installing from CoSign Nation, 17 Office version, 15, 16 overview, 15 uninstalling, 20 —D— Data authentication systems, 1 Date setting date format for Office XP/2003 files, 58 setting OmniSign date and time, 124 Deleting digital signature in Adobe Acrobat, 93 191 digital signature in OmniSign, 117 digital signatures in Adobe Acrobat, 93 digital signatures in Office XP/2003 files, 52 graphical signature, 30 signature field, 65 Dependent signatures in Office XP/2003 files setting, 62 usefulness, 62 viewing, 66 Digital signatures adding in Adobe Acrobat, 89 adding in Adobe Reader, 98 adding in WordPerfect, 135 certifying in Adobe Acrobat, 94 configuring in Office 2007/2010/2013, 39 configuring in Office XP/2003 files, 47 configuring in Outlook, 139 configuring in Outlook Express, 143 Signatures List, 66 signing in Office XP/2003 files, 69 signing in Outlook email, 141 signing in Outlook Express email, 144 signing PDF attachments in Outlook, 142 validating in Adobe Acrobat, 92 validating in Adobe Reader, 96 validating in Office 2007/2010/2013, 45 validating in Office 2007/2010/2013, without ARX Signature Line Provider, 46 validating in Outlook, 141 validating in Outlook Express, 145 viewing in Adobe Acrobat, 92 viewing in Adobe Reader, 96 viewing in Office 2007/2010/2013, 45 Directory Independent environment activating the account, 23 changing the password, 22 using the Control Panel, 22 Disabled checkbox, troubleshooting, 186 Disabling digital signatures, 186 Document adding digital signatures in Office XP/2003 files, 51 adding signature fields in Office 2007/2010/2013, 40 certifying in Adobe Acrobat, 94 configuring advanced signature settings in Word 2007/2010/2013, 42 192 CoSign User Guide configuring general signature settings in Word 2007/2010/2013, 41 configuring signature defaults in Office XP/2003 files, 55 configuring signature settings in Word 2007/2010/2013, 41 deleting digital signatures in Office XP/2003 files, 52 digital signing in Office XP/2003 files, 69 modifying in Adobe Acrobat, 92 modifying in WordPerfect, 137 modifying Office XP/2003 files with digital signatures, 54 signing empty signature fields in Office 2007/2010/2013, 42 signing in Adobe Acrobat, 89 signing in Adobe Reader, 98 signing in WordPerfect documents, 135 validating digital signatures in Office 2007/2010/2013, 45 validating digital signatures in Office 2007/2010/2013, without ARX Signature Line Provider, 46 validating digital signatures in Office XP/2003 files, 54, 68 validating digital signatures in Office XP/2003 files using ARX Legacy Word Add-in, 68 validating digital signatures in Word XP/2003 files, without ARX Legacy Word Addin, 69 validating signatures in Adobe Reader, 96 validating signatures in WordPerfect, 137 validating signatures in WordPerfect, without CoSign, 138 viewing digital signatures in Office 2007/2010/2013, 45 viewing digital signatures in Office XP/2003 files, 52 viewing signatures in Adobe Acrobat, 92 viewing signatures in Adobe Reader, 96 DoD compliance mode, setting, 165 —E— Email signing in Outlook, 141 signing in Outlook Express, 144 signing PDF attachments in Outlook, 142 validating signatures in Outlook, 141 validating signatures in Outlook Express, 145 Environments supported by CoSign, 2 ePad-ink, installing, 27 Excel XP/2003 document signing clear signature policy settings, 62 configuring using the CoSign Configuration Utility, 173 Excel specific signature settings, 60 signature scope, 54 specifying content, 61 specifying scope, 60 —G— Graphical signature capture device installing, 28 supported types, 27 Graphical Signature Management creating an image file, 31 creating image-based graphical signature, 30 creating text-based graphical signature, 33 deleting graphical signature, 30 editing graphical signature, 29 installing graphical signature capture devices, 27 overview, 27 uploading an image file, 31 using application, 28 Graphical signatures locally stored signatures, 28 managing, 28 —H— High availability, listing appliances and preferences, 155 HTTPS, using when launching OmniSign with WebDAV, 106 —I— InfoPath form configuring signing operation using CoSign Configuration Utility, 169 deleting a signature, 84 disabling versioning in a form template, 77 InfoPath form, signing, 71 defining a signature field, 73 applying signature to multiple data fields, 76 field with multiple signers, 76 193 Index deleting a signature, 84 digital signature standards, 71 signing a signature field, 77, 83 software prerequisites, 73 typical work flow, 72 using graphical signatures, 71 validating a signature, 81 viewing signature details, 82 viewing signer’s certificate, 83 InfoPath form, validating a signature, 81 InfoPath form, viewing signature details, 82 Installation report, generating, 150 Installing graphical signature capture devices, 27 Installing client. See Installing CoSign Client Installing CoSign Client installation components, 11 installation prerequisites, 12 installing from CD, 13 operating systems supported, 11 selecting the language, 13 uninstalling, 15 Integrating with Adobe Acrobat, 85 with Adobe Reader, 85 with Microsoft Office applications, 39 with Office 2007, 39 with Office 2010/2013, 39 with Outlook, 139 with Outlook Express, 143 with TIFF files, 129 with WordPerfect, 135 with XML files, 130 Intended audience, 8 Introduction to CoSign, 2 to digital signatures, 1 —L— Language selection, 13 Locally stored graphical signatures, 28 Login prompt, 2 —M— Microsoft Office documents configuring signing operation using CoSign Configuration Utility, 169 signing, 39 Modifying Office XP/2003 documents with digital signatures, 54 signed Adobe Acrobat document, 92 signed WordPerfect document, 137 Multi-page signature using OmniSign, 113 —O— Office 2007/2010/2013 adding signature fields, 40 integrating with, 39 Signature Line Provider Toolbar, 47 signing empty signature fields, 42 validating digital signatures, 45 validating digital signatures, without ARX Signature Line Provider, 46 viewing digital signatures, 45 Office XP/2003 files adding digital signatures, 51 configuring signature defaults, 55 configuring the signature field, 63 deleting digital signatures, 52 dependent signatures mode, 62 digital signatures, 69 digital signing, 69 modifying documents with digital signatures, 54 setting date and time format, 58 validating digital signatures, 54, 68 validating digital signatures using ARX Legacy Word Add-in, 68 viewing digital signatures, 52 OmniSign batch signing, 126 configuring advanced settings, 120, 181 clear signature field policy, 124 date and time format, 124 default signature settings, 117 file save options, 121 general OmniSign settings, 120 signature appearance, 123 signature general parameters, 123 signature settings of a signature, 121 using the CoSign Configuration Utility, 178 creating and signing a digital signature, 111 194 CoSign User Guide creating and signing a digital signature field, 111 creating and signing an electronic signature field, 113 Electronically signing the PDF document, 112 getting started, 107 inserting a digital signature field, 110 inserting an electronic signature field, 112 launching, 105 launching using WebDAV, 106 launching with a non-PDF file, 106 launching with a PDF file, 105 menu bar, 126 multi-page signature, 113 overview, 105 restoring default settings, 125 saving a file, 115 signature operations, 117 signing an electronic signature field, 112 singing an empy digital signature field, 111 Startup window, 109 troubleshooting, 187 validating all signatures, 115 viewing signature details, 115 viewing signature field size and position, 125 window elements, 108 One-time signature, 44 Operating systems supported for client, 11 Outlook Add Digital Signature checkbox disabled, 186 configuring, 139 disabling digital signatures, 186 enabling the CoSign add-in, 142 installing the root certificate, 141 integrating with, 139 signing emails, 141 signing PDF attachments, 142 validating signed emails, 141 Outlook Express configuring, 143 installing the root certificate, 145 integrating with, 143 signing, 144 validating signatures, 145 Overview of CoSign, 1 —P— PDF attachment, signing in Outlook, 142 PDF signature appearance default font, 164 old and new style, 164 —R— Reasons list, creating, 166 Receiving signed emails Outlook, 141 Outlook Express, 145 Roaming ID adding a roaming ID, 99 overview, 98 signing a signature field containing a URL, 102 Root certificate downloading, using the CoSign Configuration utility, 149 for validating signatures without CoSign, 17 installation overview, 15 installing root certificate of my organization, 16 installing root certificates of other organizations, 17 installing using CoSign Nation, 17 installing using the CoSign Configuration utility, 16, 149 overview, 15 —S— SAML authentication logon method, 154 overview, 4 STS endpoint, 155 URL of ADFS server, 155 URL of CoSign service, 155 Sending signed emails in Outlook, 141 signed emails in Outlook Express, 144 Signature API. See CoSign Signature APIs Signature defaults in Office XP/2003 documents setting, 55 setting date and time format, 58 setting general parameters, 56 Signature Designer Utility, 35 menu options, 36 status bar information, 37 toolbar options, 37 Signature Details 195 Index dialog box, 67 viewing in Office XP/2003 document, 67 Signature field in Office 2007/2010/2013 adding, 40 operations on an empty field, 40 right-click menu of empty field, 40 right-click menu of signed field, 45 setting signature field parameters, 41 signing an empty signature field, 42 viewing unsigned fields, 46 Signature scope in Excel XP/2003 files, 54 Signature settings in Word 2007/2010/2013 documents configuring, 41 configuring advanced settings, 42 configuring general settings, 41 Signature setup for Adobe Acrobat utility activating, 96 overview, 96 Signature types in Word XP/2003 files, 54 Signatures adding in Office XP/2003 files, 51 basic signing process in Office XP/2003 files, 51 configuring advanced settings in Word 2007/2010/2013, 42 configuring defaults in Office XP/2003 files, 55 configuring general settings in Word 2007/2010/2013, 41 configuring settings in Word 2007/2010/2013, 41 deleting in Office XP/2003 files, 52 modifying Office XP/2003 documents, 54 signing in Office 2007/2010/2013, 42 validating in Office XP/2003 files, 54, 68 validating in Office XP/2003 files using ARX Legacy Word Add-in, 68 validating in Word XP/2003 files, without ARX Legacy Word Add-in, 69 viewing in Office XP/2003 files, 52 Signatures List in Office XP/2003 document, 65 Signing any printable file, 105 digital signature in Office XP/2003 files, 69 digital signatures in Office XP/2003 files, 51 in Adobe Acrobat, 89 in Adobe Reader, 98 in Office 2007/2010/2013, 39 in WordPerfect, 135 Outlook email, 141 Outlook Express email, 144 overview, 15 TIFF files, 129 using OmniSign, 105 XML files, 130 Signing Ceremony Dialog Box, 43 Standard Signing Ceremony, 43 Support ARX contact information, 185 ARX support contact information, 185 generating an installation report, 150 —T— Third-party applications Adobe Acrobat, 85 Adobe Reader, 85 Office 2007, 39 Office 2010/2013, 39 Outlook, 139 Outlook Express, 143 TIFF files, 129 WordPerfect, 135 XML files, 130 TIFF files embedding signature, 129 non visible signatures, 129 signing, 129 validating, 129 Time setting OmniSign date and time, 124 setting time format for Office XP/2003 documents, 58 Time stamp settings, 160 Toolbar, Office 2007/2010/2013 Signature Line Provider, 47 Troubleshooting ARX Legacy Word/Excel Add-In, 186 cannot create signature field in OmniSign, 187 cannot see personal certificates, 186 general problems, 185 OmniSign problems, 187 overview, 185 signature creation using ARX legacy, 186 signatures in Outlook, 186 196 CoSign User Guide —U— Uninstalling CoSign client, 15 User Activation, 23 —V— Validating digital signatures in Office 2007/2010/2013, 45 digital signatures in Office 2007/2010/2013, without ARX Signature Line, 46 digital signatures in Office XP/2003 files, 54, 68 digital signatures in Office XP/2003 files using ARX Legacy Word Add-in, 68 digital signatures in Word XP/2003 files, without ARX Legacy Word Add-in, 69 overview, 15 signatures in Adobe Acrobat, 92 signatures in Adobe Reader, 96 signatures in Outlook, 141 signatures in Outlook Express, 145 signatures in TIFF files, 129 signatures in WordPerfect, 137 signatures in WordPerfect, without CoSign, 138 signatures in XML files, 130 Versioning, disabling in an InfoPath form template, 77 Viewing certificates in store, troubleshooting, 186 digital signatures in Office 2007/2010/2013, 45 digital signatures in Office XP/2003 files, 52, 55 signatures in Adobe Acrobat, 92 signatures in Adobe Reader, 96 signatures in Outlook, 141 signatures in Outlook Express, 145 —W— WebDAV, using when launching OmniSign, 106 Windows Certificate Security signature handler, 86 Word 2007/2010/2013 configuring signature advanced settings, 42 configuring signature general settings, 41 configuring signature settings, 41 Word document signing configuring using the CoSign Configuration Utility, 175 Word XP/2003 files signature types, 54 Word XP/2003 files setting Word specific signature settings, 59 signature types, 54 specifying content to be signed, 59 validating digital signatures, without ARX Legacy Word Add-in, 69 WordPerfect modifying signed documents, 137 signing documents, 135 validating signatures, 137 validating signatures, without CoSign, 138 viewing invalid signatures details, 138 —X— XML files signing, 130 specifying signature types, 130 validating, 130