1
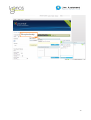
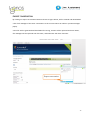
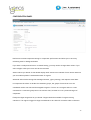
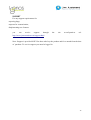
LiveAssistant – Professional Help Desk fo Joomla CMS
User’s manual
Component developed by:
Igonos SA
--
Documen written by:
Igonos SA
26/11/12
Release version:
'1.0
26/11/12
1
REQUIREMENTS...................................................................................................................................3
INTRODUCTION...................................................................................................................................5
INSTALLATION.....................................................................................................................................8
ACTIVATION WITH DOMAIN CODE....................................................................................................9
FILE SHARING EXCHANGE................................................................................................................11
EXPORT CONVERSATION..................................................................................................................13
CONFIGURATION PANEL...................................................................................................................14
Preferences...................................................................................................................................14
Integrations...................................................................................................................................15
Avatars...........................................................................................................................................16
Advanced........................................................................................................................................17
CREAZIONE FILE PERSONALIZZATI LINGUA...................................................................................18
FRONT END........................................................................................................................................18
Wall.................................................................................................................................................18
My contacts (like friends).........................................................................................................19
Front end configuration..............................................................................................................21
SUPPORT............................................................................................................................................22
2
REQUIREMENTS
Live Assistant is a no-hosted solution for live support and customers managing, and must be
installed on your preferred Joomla system.
It’s a completely no-hosted solution that doesn’t require any third party service integration and
let you keep all data on your Joomla server.
For using Live Assistant you need a version fo Joomla of your choice between 1.5, 1.6, 1.7,
2.5, 3.0, installed on a server with MySql database engine.
Component is tested for fully work on Linux server and MySql database, on other
environment unexpected errors can occurre.
Supported desktop browser are:
•
IE 5.5+
•
Firefox 3.0+
•
Chrome 4.0+
•
Safari 3.1+
•
Opera 9.0+
Supported mobile browser are:
•
iOS Safari 5.0+
•
Android browser 3.0+
•
Blackberry 7.0+
•
Opera Mobile 12.1+
•
Chrome/Firefox for Android all versions
Opera Mini browser and old version of iOS and Android browser are not fully supported.
3
INTRODUCTION
Live Assistant is a powerful tool to take advantages of your customers visits on your site.
With Live Assistant you can manage visitors of your site once they arrive on your pages,
contact them as soon as possible, monitor their actions and viewed pages, increment sales of
your products. The component is delivered in native release for Joomla 1.5, 2.5, 3.0.
The 2.5 version is also working for Joomla! 1.6 and 1.7.
For every need simply use the functionality of ticketing and will be given timely responses!
The service lasts one month from the date of purchase.
For the front end you can choose different languages (English, Italian, French, German,
Spanish) explicitly from the component configuration, while the back end is translated from
the selected language pack in Joomla! Within available languages: English, Italian.
Live Assistant functionalities
•Agents management, you can choose what users can have the role of agents and serve incoming
cutomers
•Customers groups management, you can choose what groups of your Joomla system have to be
considered valid incoming customers. By default guest users and low level ‘Registered’ users
are considered target customers
•Offline mode, when no agents are online the component automatically enters in offline mode
showing a form to let customers leave a message that you can track and answer from
administration
•Messages administration listing, you can view, delete and export all exchanged messages between
users
•Offline messages administration listing, you can view, delete and export all exchanged messages
leaved by customers during the offline mode period
•Integrated ticketing system for offline messages, the component is capable of sending responses to
customers that leaved a message during the offline mode simply entering in message admin
area; moreover responses to a question are stored for a history display
4
•Realtime stats tracking, in admin area an agent with right permission can see in realtime what’s
going on site, with detailed graph stats and listing
•Realtime information for agents in frontend chat, an agent can watch in realtime the page the
customers is on, and know the geolocation/language of incoming customers to choose
appropriate language to contact him
•Analytics stats, the component elaborates stats data by period, involving visited page, numbers of
visitors, avarage time/visit data, and generate advanced graph data also exportable in PDF
format
•Suggestions system for agents, admins can prepare a set of suggestions that an agent can use from
frontend chat system to answer customers with standard phrases
•Skype integration, an agent available on skype can decide to be called directly by customers that
will see an icon to start the skype audio/video call (only If customers have skype installed
on their pc)
•files sharing/exchange between users with Drag and Drop HTML5 feature if supported,
•integrated avatar management with re-size/crop
•automatic avatars generation if none provided by users,
•chat conversation exporting feature in text format,
•Emoticons with option to select image directly from the pop-up or write the shortcut (by staying
with the mouse pointer on the images of emoticons a title is displayed corresponding to the
keystroke shortcut),
•Sounds for incoming messages and for new connected customers
5
INSTALLATION
The installation of the component is fully 'easy' plug & play:
•enter the site administrator,
•menu "Extensions" click on "Install/Uninstall" for Joomla! 1.5 or 'Extensions' click on 'Manage
Extensions' for Joomla! 1.6, 1.7, 2.5,3.0 ,
•look for the downloaded package 'liveass15_v1.0.zip' for Joomla! 1.5, ‘liveass25_v1.0.zip' for
Joomla! 1.6, 1.7, 2.5, or ‘liveass30_v1.0.zip' for Joomla! 3.0 on your PC from the button
"Browse" ,
•click the button "Upload File & Install".
•If the installation is completed without errors, the component will display a message of success
installation and will be immediately active and visible as an application bar at the bottom of
the front end pages.
The component will be so active on all your Joomla! Site after inserting activation code, thanks to a
plugin system that does not require additional configurations and makes immediate use of the
component.
However you should be aware that if you put an iframe to the same host site you can view the chat
bar in the outer frame and in the inner frame.
IMPORTANT NOTE: the component must be NO linked to any menu.
6
ACTIVATION WITH DOMAIN CODE
The component will need to be activated before use it, with the domain license code you
obtained during purchasing. When you choose for how many domains you want to buy the
code it will generate a random code that you will receive in the order email, and that you will
access in your ‘Download my products’ area.
Download my
products area
Generated
domain code
(downloadable)
Once obtained the domain activation code, you have to insert it in the component field and
press ‘Activate’ button as shown below, and you will gain component activation.
Moreover the component will show you the status of the domain code you purchased with
details:
•
Domain code
•
Number of activable domains
•
Numer of activated domains
7
Finally the ‘Component activation status’ will show enabled and the chat bar will be visible
in frontend site.
If you uninstall and install again the component on the same domain you will be able to use
again the same code with no increment on its activated domains.
Component status
still not activated
Insert domain
activation code and
press ‘Activate’
8
Component status
activated succesfully
Domain
activation code
details
9
LICENSE EXPIRATION CODE
Once installed for the first time, a initial period of months will be available for using the
component.
However after a fixed period of month the component will be deactivated and you will not
be able to use it until you insert a new license code.
For this you have to purchase a new license expiration code on www.jomextension.com, as
you can see in this screenshot.
Once completed the payment, a new code will be generated and will be available in “Download my
product” area.
You have simply to put the new code in the field provided by component license manager and click
“Activate” button to re-enable the component for next months as listed below:
10
Once you have activated the component will be active again for next X months.
Moreover a reminder will be visible on all your Joomla admin area at the top right corner, to let you
know exactly and in every moment the date of license expire:
11
Live Assistant reminder for
license code expiration
12
CONTROL PANEL
Live Assistant control panel is the starting point for all your activities.
On the left side you will find the tasks icons, on the right side you will see information about
component license status, component activation, component version and manifacturer.
13
SETTING AGENTS
If you install component setting no agents, it will show always a form representing the offline
mode. The offline form is showed when no agents are currently available on your site, so that the
customers can leave a message that you can reply later.
The first step is decide which people inside your organizations will be responsible for
customers assistance, and assign them the role of agents.
When they are logged into your Joomla system they will be capable to contact the customers
that the component assigns automatically to each of them. The number of agents is completely up to
you, and can also be aonly one single person, if your site have a low visits rates.
To set users available on your Joomla system as agents, you can simply click on the icon
“Manage Agents” on the control panel.
14
Click to manage
agents list
Once clicked you will see the list of users on your system, optionally filtered by group or
name. You can set a person as an agent simply clicking the star icon that is light on if a person is set
as a valid agent.
Search by name
Click to set an
agent
Filters by group
The agent users can belong to any Joomla group, so may have login access to frontend or also
to backend area. If this is the case, the agent can also monitor the realtime stats through the graph
panels. Otherwise an agent can only serves customers in frontend area, and leave the stats panel to
an administrator.
15
When an agent login to frontend site, he will see the chat bar indicating the number of
customers that has been assigned to him:
No customers
assigned
The component encapsulate a complex algorithm of load balancing between customers and
available agents. If you have more than 1 agents connected, the new incoming visitors will be
distributed among the agents depending on the number of user load.
This ensure that the component automatically assigns incoming customers to the most free agent,
that is the agents serving fewer customers.
16
Guest user
assigned to this
agent
Realtime info
On the other side, when a customer has been assigned to an agent, he will see only that agent inside
chat bar users list, and will be able to use it to ask for support.
Users click
popup to open
offline form
No agents
available
17
Message to inform customers
that an agent has been assigned
for asking support
Chat users list showing
agent assigned to ask
for support
A popup will inform the customer that an agent has been assigned and now is available for asking
support.
The agent can access realtime info for customers which is handling; the agent can open a popup that
show the page the customer is on, and he can see the geolocation language to best suite the
language in which contact the customer.
18
USERS MESSAGES
Every message exchanged between agents and customers is tracked in a database to be consulted in every
moment from an administrator in the Joomla backend.
This allow you to see all the conversations history, and moreover delete or export messages you are
interested on in CSV format.
There are filters available, to choose the period for which you want to display messages and users that
sent messages.
Export messages
Filters
Click to see message
details
19
OFFLINE MESSAGES
When a customer arrives to your site and no agents are currently connected, Live Assistant is entering
offline mode, meaning that the customers will display a form that can be used to leave a message.
Agents with admin access or sites administrator will be able to handle this type of requests as soon as
possible, using the integrated ticketing system to reply users.
As shown in the image below, customers in offline mode can fill the form with name, email, and a short
message. All fields all required, so that it let you having all needed information to contact the potential
customer.
When the user click on the submit button a short message is shown, so that he knows that will be
contacted as soon as possible, and the form is cleared and prepared for another message.
20
In the Live Assistant control panel you can click on the Offline Messages icon, to see the whole list of
messages leaved by customers during the offline period.
As shown in the image below the message sent is shown in the list, with a check on the field “Worked
request”.
This means that the customers request has not been yet managed, and the request is still open and
require response to be given.
Filters by period and
customer name
Click to enter edit mode
Icon that show a request
not yet worked
21
Clicking on the edit button you can enter the details and ticketing mode, in this way you can answer
customer request by email once specified a email subject and an email body that can also contains html
formatting.
When you are ready you simply click the “Reply message” button and an email with your data will be sent
to the requesting customer.
The status of request will be setted automatically to “Worked” with a green icon, and you will be abl to
see the whole responses history for rapid consulting.
Send reply email
message
Compose you
response
22
Request flagged as
worked automatically
History of sent
messages
23
REALTIME STATS
Clicking on the “Realtime stats”, you will have access to a control panel with details and graphs of what is
happening now on your site.
Watching at this panel you can follow the whole situation that’s going on your site, you can know for
example the total users, how many customers are present and are assigned to agents, how many agents
are currently available for serving customers.
Realtime stats details
and graph data
Below the graph data you can see a detailed view of the single users that are logged on your site and the
current page they are on. Moreover if you click on the current page button it will show a lightbox that
allows you to see the actual page the user are viewing.
Click to open lightbox with
current visited page for this user
As the final realtime stats view, you can see also the number of users currently viewing a page, with the
activable lightbox button on the “Current page” column.
24
Click to open lightbox with
current page view
25
ANALYTICS STATS
Clicking on the “Analytics stats”, you will have access to a control panel with graphs and details about
trend of visits on our site by period. For default you will see always the current month period, but with
calendar filters you can quickly extend or reduce the period within with you want extract graph data.
Inside the first panel you can see stats details for visitors, pages, and calculated average data both in
textual and graphic format.
Following this you will see graphical view for geolocation data, operating system and browser.
Clear stats cache
Export PDF report of
analytics stats
In the following panels you will see a sort of two charts that represent the initial page more viewed
(landing page with highest value of first visit) , and the last page visited before a user leave off your site.
This can be very useful for SEO optimization on you site pages, because let you understand if a page is
penalizing the permanence of a user that leave your site too early, or if a page has been indexed very
well by serach engine being the first page that a user see when arrives on your site.
26
Pages that users arrive on
your site
Pages that user leave off
from your site
Inside the last 2 panels you can see two lists that are showing pages visited by users and the total list of
users that visited your site.
Click to open
details list
Click to open
details list
Moreover clicking on the numeric buttons you will open a popup that shows the detailed list of users that
viewed a page, or the detailed list of pages visited by a user.
27
On the toolbar you will find a button to generate an exportable format of the whole stats panel in PDF
format. All you need is simply click on the icon.
Analitycs stats are stored permanently on Joomla database, and will last forever unless you explicitely
decide to clear cached data. If you would like maintain old data to review stats for past months you will
never use this function, but if you prefer sometimes clear the system and start from a cleaned
environment like as soon after installing component, you can use this functionality and clear all stored
data.
28
SUGGESTIONS
Live Assistant let you set up a number of predefined phrases aka suggestions that an agent can use during
chat conversation with customers in frontend side, to avoid repeadtly write same recurring concept.
Moreover the frontend baloon that display a default message for customers that arrive on your site, can
be customized to suite a particular suggestion of your choice.
To access the suggestions list you simply click on the control panel icon, and it will show up a list of
suggestions that you can add or edit.
Set default
message
You will find the “Welcome message” column that allows you to make the message display in the frontend
baloon. Clicking on the edit mode you will be able to insert text for suggestion.
Default suggestion
message
29
SKYPE INTEGRATION
Live Assistant offers the integration with Skype software, to allow agents to be called
directly via skype by customers for an audio/video call. This feature requires that the agents have
Skype installed on the pc they are using, and are logged correctly and available.
In the same way also the caller customers need Skype installed on their pc to call agents, otherwise
Live Assistant automatically detect that Skype is missing and it will show a link to download and
install it.
Set Skype ID
The agent have to set his Skype ID in options tab in frontend tab and click the checkbox to enable
himself to receive Skype calls.
Once enabled every customers that will have that agent assigned will see the Skype iconset to start a
Skype Call or a Skype Instant Messaging.
30
Skype iconset to
start call
Once the customer click on the icon he will start the call on his Skype software.
31
32
FILE SHARING EXCHANGE
To exchange files between users just click on the button to open the file upload
popup, as shown on the screen below.
Will be shown 2 upload mode if the browser supports it, or only the classic file upload
visible at the top.
1. Classic mode (single file): After selecting the file, click on upload button(green button)
and it will starts the upload process and at the end will be shown a message on the outcome
the operation. If the files will not be accepted because of extensions to be excluded or size
excessive based on the configuration of the component, the user will be notified with a message.
2. Advanced Drag and Drop mode (multiple files) with the advanced mode Drag and Drop
you can upload multiple files by simply dragging them from your desktop or
file system directly into the browser special area. Once dragged and dropped files
they will appear in the list on the right as in a queue. At this point it's possible to decide whether to
delete the current list of dragged files or initiate the upload process via the 2 blue buttons at the
corners. Once started the upload will be shown small progress bars for each files sent with
its report on the outcome.
Once submitted one or more files for every sent files will appear a particular message type in you
chatbox staying for the sent file, with filename and an animated icon indicating the file
was sent but not yet received / downloaded by the receiver user, and you hear a sent file beep.
By the time the file was downloaded from the receiver in real time will be removed in the animated
wait icons for every file sent and received and you will hear another sound notification for file sent
and received that finish the process.
The receiving user will display a file type message that will also show the link to start the
download, along with the same sound alerts.
33
File upload tooltip
34
EXPORT CONVERSATION
By clicking on export conversation button as shown in figure below, will be created and downloaded
a list of all messages of the users conversation in the current session as visible in private messages
popup.
A text file will be generated and dowloaded for storing, avatars will be replaced with user names,
file messages will be replaced with file name, and emoticons with their shortcuts.
Export conversation
35
CONFIGURATION PANEL
Preferences contains important setting for component performance and allow you to set every
refreshing time for background tasks.
If you have a underpowered server or shared hosting, you may need to change those values. If you
insert a higher value your server will be less stressed.
Avatars tab let you decide if chat should display small avatars icons instead of user names. Moreover
you can enable upload of customized avatars for agents.
Advanced tab includes settings like messages lifetime, jQuery settings, and response email data.
It’s important the select to decide the customers groups, the groups of users that are to be
considered valid to use chat and be assigned to agents. If a user isn’t an agent and isn’t a user
contained in a customers groups won’t see and use chat, because he’s not a potential target of
component.
Finally the skype integration let you decide if skype should be available for agents serving
customers. If an agent is logged on skype could decide to be called for an audio/video conference.
36
37
SUPPORT
For any support requirements for:
•reporting
•requests
bugs,
for customization,
•Implementing
you
new features.
can
receive
support
through
the
site
www.2punti.eu
url:
http://www.jomextension.com/support.html
Note: Support is provided ONLY for those who buy the product and for a month from the date
of purchase. To receive support you must be logged in.
38