1
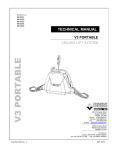
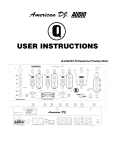
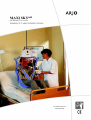
MAXI SKY440
OPERATING AND
PRODUCT CARE INSTRUCTIONS
001.16000.33.EN rev 5
September 2008
Table of Contents
Introduction . . . . . . . . . . . . . . . . . . . . . . . . . . . . . . . . . . . . . 6
Foreword . . . . . . . . . . . . . . . . . . . . . . . . . . . . . . . . . . . . . . . . . . . . . . 6
Please read this manual thoroughly . . . . . . . . . . . . . . . . . . . . . . . . . . 6
Service and support . . . . . . . . . . . . . . . . . . . . . . . . . . . . . . . . . . . . . . 6
Supplier information . . . . . . . . . . . . . . . . . . . . . . . . . . . . . . . . . . . . . . 6
How to use this manual . . . . . . . . . . . . . . . . . . . . . . . . . . . . . . . . . . . 7
Symbols used in this manual . . . . . . . . . . . . . . . . . . . . . . . . . . . . . . .
Key to symbols . . . . . . . . . . . . . . . . . . . . . . . . . . . . . . . . . . . . . . . . . .
Intended use . . . . . . . . . . . . . . . . . . . . . . . . . . . . . . . . . . . . . . . . . . . .
Operational life . . . . . . . . . . . . . . . . . . . . . . . . . . . . . . . . . . . . . . . . . .
Equipment identification . . . . . . . . . . . . . . . . . . . . . . . . . . . . . . . . . .
Verifying the package contents . . . . . . . . . . . . . . . . . . . . . . . . . . . . .
7
7
8
8
8
8
Safety Instructions . . . . . . . . . . . . . . . . . . . . . . . . . . . . . . . . 9
General . . . . . . . . . . . . . . . . . . . . . . . . . . . . . . . . . . . . . . . . . . . . . . . . 9
Important safety advices . . . . . . . . . . . . . . . . . . . . . . . . . . . . . . . . . .
Shock prevention . . . . . . . . . . . . . . . . . . . . . . . . . . . . . . . . . . . . . . .
Fire and explosion prevention . . . . . . . . . . . . . . . . . . . . . . . . . . . . .
Human and environment safety practices . . . . . . . . . . . . . . . . . . . . .
Battery and battery charger safety practices . . . . . . . . . . . . . . . . . . .
Equipment warning labels . . . . . . . . . . . . . . . . . . . . . . . . . . . . . . . .
10
10
11
11
11
11
Labels on the Lift . . . . . . . . . . . . . . . . . . . . . . . . . . . . . . . . 12
Serial number label . . . . . . . . . . . . . . . . . . . . . . . . . . . . . . . . . . . . . . 13
Approval label . . . . . . . . . . . . . . . . . . . . . . . . . . . . . . . . . . . . . . . . . 13
Labels on the Battery & Battery Charger . . . . . . . . . . . . . 14
Battery label . . . . . . . . . . . . . . . . . . . . . . . . . . . . . . . . . . . . . . . . . . . 15
Battery charger label . . . . . . . . . . . . . . . . . . . . . . . . . . . . . . . . . . . . . 15
3
Table of Contents
Part Designation . . . . . . . . . . . . . . . . . . . . . . . . . . . . . . . . . 16
Lift cassette and charger station . . . . . . . . . . . . . . . . . . . . . . . . . . . . . 16
How to use the Maxi Sky440 . . . . . . . . . . . . . . . . . . . . . . . . 18
Emergency shut-off . . . . . . . . . . . . . . . . . . . . . . . . . . . . . . . . . . . . . . 18
Emergency lowering . . . . . . . . . . . . . . . . . . . . . . . . . . . . . . . . . . . . . 18
Battery information . . . . . . . . . . . . . . . . . . . . . . . . . . . . . . . . . . . . . . 18
Charging the batteries . . . . . . . . . . . . . . . . . . . . . . . . . . . . . . . . . . . . 20
Pass Through Hook . . . . . . . . . . . . . . . . . . . . . . . . . . . . . . . . . . . . . . 21
Raising and lowering the resident . . . . . . . . . . . . . . . . . . . . . . . . . . . 24
Folding sling supports . . . . . . . . . . . . . . . . . . . . . . . . . . . . . . . . . . . . 24
Transferring the resident . . . . . . . . . . . . . . . . . . . . . . . . . . . . . . . . . . 26
Procedures for attaching loop slings to the
Maxi Sky 440 folding sling supports . . . . . . . . . . . . . . . . . . . . . . . . . 27
To lift a resident from a bed . . . . . . . . . . . . . . . . . . . . . . . . . . . . . . . . 30
To lift a resident from a chair . . . . . . . . . . . . . . . . . . . . . . . . . . . . . . 30
To lift a resident from the floor . . . . . . . . . . . . . . . . . . . . . . . . . . . . . 32
Before transporting a resident . . . . . . . . . . . . . . . . . . . . . . . . . . . . . . 32
Care and Maintenance . . . . . . . . . . . . . . . . . . . . . . . . . . . . 33
Preventive Maintenance Schedule . . . . . . . . . . . . . . . . . . . . . . . . . . 33
Daily Checklist . . . . . . . . . . . . . . . . . . . . . . . . . . . . . . . . . . . . . . . . . 35
Inspection and cleaning . . . . . . . . . . . . . . . . . . . . . . . . . . . . . . . . . . . 35
Strap Inspection . . . . . . . . . . . . . . . . . . . . . . . . . . . . . . . . . . . . . . . . . 36
Handling and Storage . . . . . . . . . . . . . . . . . . . . . . . . . . . . . . . . . . . . . 36
Battery Replacement . . . . . . . . . . . . . . . . . . . . . . . . . . . . . . . . . . . . . 37
Verification of Charger Power Source . . . . . . . . . . . . . . . . . . . . . . . . 37
Sling Inspection and Care. . . . . . . . . . . . . . . . . . . . . . . . . . . . . . . . . 37
Inspection . . . . . . . . . . . . . . . . . . . . . . . . . . . . . . . . . . . . . . . . . . . . . . 37
4
Table of Contents
Annual Inspection. . . . . . . . . . . . . . . . . . . . . . . . . . . . . . . . . . . . . . . 38
Maintenance Requirements . . . . . . . . . . . . . . . . . . . . . . . . . . . . . . . 38
Troubleshooting . . . . . . . . . . . . . . . . . . . . . . . . . . . . . . . . . 39
Technical Specifications . . . . . . . . . . . . . . . . . . . . . . . . . . 40
Product information . . . . . . . . . . . . . . . . . . . . . . . . . . . . . . . . . . . . . 40
Accessories . . . . . . . . . . . . . . . . . . . . . . . . . . . . . . . . . . . . 42
5
Introduction
Thank you for purchasing ARJO
equipment.
Foreword
Your Maxi Sky440 is part of a
series of quality products
designed especially for acute
care hospitals, elderly care
facilities and other health care
use.
Please read this manual thoroughly
We are dedicated to serving your
needs and providing the best
products available along with
training that will bring your staff
maximum benefit from every
ARJO product.
Please contact your local ARJO
representative if you have any
questions about the operation or
maintenance of your ARJO
equipment.
Please read this manual in its entirety before using your
Maxi Sky440. Information in the manual is crucial to the
proper operation and maintenance of the equipment, and
will help protect your product and ensure that the equipment
performs to your satisfaction. Lifting and transferring a
person always present a potential risk. Some of the
information in this manual is important for your safety and
must be read and understood to help prevent possible injury.
ARJO strongly advise and warn that only ARJO designed
parts, which are designed for the purpose, should be used on
equipment and other appliances supplied by ARJO, to avoid
injuries attributable to the use of inadequate parts.
Unauthorized modifications on any ARJO equipment may
affect its safety. ARJO will not be held responsible for any
accidents, incidents or lack of performance that occur as a
result of any unauthorized modification to its products.
Tested according to standards by:
TÜV, Product Service and
Service and support
A service routine has to be done on your Maxi Sky440 by
ARJO authorized service personnel to ensure the safety and
operating procedures of your product.
See chapter Care and Maintenance.
If you require further information, please contact your local
ARJO representative which can offer comprehensive
support and service program to maximize the long-term
safety, reliability and value of the product. Contact your
local ARJO representative for replacement parts. Your
service representative stocks the parts you will need.
6
Introduction
How to use this manual
CAUTION
This symbol offers helpful information
concerning certain operating procedures.
Failure to follow these instructions may
cause damage to all or parts of the system.
WARNING:
Do not attempt to use this equipment
without understanding this manual.
Additional copies of this manual can be purchased
from your local ARJO representative. Include the
User Manual product number and equipment
identification number, see front page.
To ensure safe operation, read the entire manual
carefully, especially the section on “Safety
Instructions and Warnings”, before installing,
operating, or servicing this equipment.
If anything is not completely understood, please
contact your local ARJO representative for more
details. Failure to comply with warnings in this
manual may result in injury.
Key to symbols
The following symbol is used on the Maxi Sky440
ceiling lift cassette:
Keep this manual with the lift and refer to it as
required. Make sure that all operators are regularly
trained in the use of the equipment according to this
manual.
The symbol indicates the “Service”
indicator light.
The following symbols are used on the charger:
Symbols used in this manual
The symbol indicates the power-on
indicator light.
Throughout this manual the following symbols are
used. Pay particular attention to the information
provided under these headings. These special
annotations are easily recognized as follows:
The symbol indicates the charging
indicator light.
WARNING:
This symbol is intended to alert the user to
hazards or unsafe practices, which could
result in serious injuries.
Failure to understand and obey this warning
may result in injury to you or to others.
NOTE!
This symbol is intended to alert the user of
the presence of important operating and
maintenance instructions, which could
prevent product damage or possible
personal injury.
This is important information for the correct
use of this system or equipment.
7
Introduction
Intended use
The Maxi Sky440 is intended for lifting residents at
acute care hospitals, elderly care facilities and other
health care facilities under the supervision of
appropriate trained caregiver staff in accordance with
the instructions outlined in this Operating and
Product Care Instructions. All other uses must be
avoided.
Transfers per day
Years (10 000 transfers)
4
7
6
4.5
8
3.5
Figure 1
The equipment must only be used for the purposes
stated above, and must be installed by ARJO
authorized personnel and in accordance with local
codes.
The expected operational life for fabric slings and
fabric stretchers is approximately 2 years from date
of purchase. This life expectancy only applies if the
slings and stretchers have been cleaned, maintained
and inspected in accordance with the “ARJO Sling
Information” documents, the “Operating and Product
Care Instructions” and the “Preventive Maintenance
Schedule”.
Operational life
WARNING:
The expected life for other consumable products,
such as batteries, fuses, lamps, slings, straps and
cords is dependent upon the care and usage of the
equipment concerned. Consumables must be
maintained in accordance with published “Operating
and Product Care Instructions” and the “Preventive
Maintenance Schedule”.
The manufacturer cannot ensure full safety
for a ceiling lift or an accessory of which the
lifespan is exceeded.
The equipment is conceived and tested for a useful
life of 10 000 transfers, 3 to 7 years, whatever comes
first, subject to preventative maintenance as specified
in the Operating and Product Care Instructions, the
Assembly and Installation Instructions and the Spare
Part Instructions. Time equivalence between number
of transfers / number of years is made clear in the
table in figure 1. The red indicator on the ceiling lift
will blink for a while when it is halfway to its useful
life, and again to indicate the end of the useful life
period.
Equipment identification
The unit's identification number (specification,
model, serial number) appears on a silver nameplate
attached at the end of the lift.
Verifying the package contents
Always ensure that the ceiling lift shall be installed
by an ARJO authorized contractor or installer.
The operating life of this equipment corresponds
directly to the safe operating time period before a
complete overhaul is required. Age of the cassette,
frequency of use (number of beds / transfers per day),
resident weight and maintenance frequency are
factors that have an impact on the Maxi Sky440
lifespan. A transfer is defined as the displacement of
a resident from one point to another. A transfer cycle
includes a lifting and a descent action.
Upon receipt of the equipment, verify it against the
packing list to ensure it is complete and inspect the
equipment for possible damage due to shipping. If
there is any damage, notify the carrier immediately to
file a claim. Provide complete information
concerning damage claims or shipping errors to your
local ARJO representative. Include all equipment
identification numbers and group part numbers (if
any) as described above along with a full description
of damaged parts.
8
Safety Instructions
The equipment must be used in
accordance with these Safety
Instructions.
Anyone using the equipment
must also have read and
understood the instructions in
this manual.
General
Keep these Safety Instructions with the ceiling lift at all
times.
Read Operation and Product Care Instructions in this
manual before installing, operating, or servicing this
equipment.
If there is anything you are not
sure about, contact your local
ARJO representative.
WARNING:
440
Maxi Sky
is for transferring residents only. Do
not use the lift for any other purpose.
WARNING:
Sky440
Maxi
is intended to be used for residents
within the specified weight limit indicated for the
lift. Do not attempt to lift more than the weight limit
indicated.
WARNING:
Always place the sling around the resident
according to the instructions enclosed. Failure to
do so may result in injury to you or to others.
CAUTION
DO NOT drop the ceiling lift cassette or batteries,
since that may cause internal damage that is not
easily seen. If the ceiling lift is suspected to be
damaged, contact your local ARJO representative
for servicing.
9
Safety Instructions
Important safety advices
NOTE!
ARJO ceiling lifts are specifically designed
for ARJO KwikTrak ceiling rail systems,
slings and accessories. If slings of any other
manufacturer for some reason are used,
always make sure these slings are CEmarked and are attended by the manufacturer of the sling to be used on the Maxi
Sky440.
Always ensure that:
•
The ceiling lift is installed by an authorized
contractor or installer.
•
The equipment is used by trained staff.
•
Installation is conformed to accept a 200 kg
(440 lbs) load, this will be done by the ARJO
installation team.
•
The resident is assessed by qualified professional
before attempting to move the resident.
•
You are prepared before attempting to transfer a
resident.
•
Violent impact during transportation is avoided.
•
The sling is intended to be used for this lift and
can take the weight of the resident.
•
The sling is not damaged, torn or frayed.
•
The lifting procedures outlined in this manual are
followed.
CAUTION
Keep all components of the lift clean and dry,
and have electrical and mechanical safety
checkpoints done as instructed in the Care
and Maintenance section of this
manual.
Shock prevention
•
Do not touch or use a lift with bare conductors or
a damaged power cord. Electrically live
equipment can result in serious injuries. If the lift
or charger has any exposed or damaged wires
contact your local ARJO representative immediately.
•
All controls and safety features are used only
according to the rules specified in this manual.
Never attempt to force a control or button on the
lift.
•
The charger is not stored in a shower, bath or
other areas with high humidity.
•
Do not splash or expose electric parts of the
device to water or moisture.
•
The safety straps are in good condition and
properly fastened.
•
•
The daily maintenance is carried out before using
the lift.
Check nameplate for voltage and cycle requirements. These requirements differ by country. Do
not attempt to use the lift in an area that has a
different voltage and cycle requirement.
•
Any precautionary or instruction labels that
cannot be easily read is replaced.
•
•
The humidity when storing the Maxi Sky440,
when not in use, not exceeds 80 % at 20°C
(68°F).
Do not attempt to expose, service or
repair the lift, battery or charger.
If any unit is malfunctioning, contact your
local ARJO representative.
•
Read batteries and charger instructions
thoroughly before using or storing them.
•
The ambient temperature range when storing
Maxi Sky440 should be –10°C to +50°C (+14°F to
+122°F).
10
Safety Instructions
Fire and explosion prevention
Battery and battery charger safety
practices
WARNING:
WARNING:
Do not place or store the battery under direct
sunlight or near a heat source. Do not
expose the batteries or battery charger to
flames. Do not use the charger in presence
of inflammable anaesthetic gases.
Do not expose the battery connector or the
battery charger to water. The charger is
designed for dry areas only and for normal
air humidity conditions.
•
Do not short-circuit the battery terminals.
•
Be careful not to drop the battery.
•
Do not incinerate the battery.
•
Use only the charger supplied with the
equipment.
•
Do not charge batteries in unventilated room
areas.
•
The charger must not be covered or exposed to
dust.
•
Do not short-circuit the battery.
•
Do not crush, puncture, open, dismantle or otherwise mechanically interfere with the batteries.
•
Do not store batteries at a temperature higher than
50°C (122°F).
Human and environment safety
practices
•
•
•
Should the battery casing crack and cause contents to come in contact with skin or clothing,
rinse immediately with water. If contents come in
contact with the eyes, rinse immediately with
plenty of water and seek medical attention.
Inhalation of the contents can cause respiratory
irritation. Sensitivity of nickel can cause allergic
asthma. Provide fresh air and medical attention.
For recycling and disposal of the batteries the
rules according to the WEEE directive (Waste of
Electronic and Electrical Components) and local
rules and regulations must be followed. If not
they may explode, leak and cause personal injury.
When returning batteries, insulate their terminals
with adhesive tape etc., otherwise, the residual
electricity in used batteries may cause fire or
explosion.
Figure 2 below shows the symbols for disposal
and recycling.
Equipment warning labels
Figure 2
11
•
Carefully read the labels on the battery and follow the instructions.
•
Inspect all precautionary labels on the equipment.
Order and replace all labels that cannot be easily
read.
Labels on the Lift
SERIAL NUMBER LABEL EXAMPLE
Figure 3
12
Labels on the Lift
On the ceiling lift cassette data labels you will find
the following information. See figure 3:
•
Serial number label
•
Model name and number: MAXI SKY 440
#LEXXXXX.
•
Approvals: CAN CSA C 22.2 No. 601.1/
UL No. 2601-1/ISO 10535.
•
Charge maximum load: 200 kg (440 lbs).
•
Duty cycle: Max 10%, Max 6min/hour.
•
Rating: 24 VDC, 10 A Max.
•
Serial number.
•
Manufacturing date.
Environmental danger. Not for disposal.
To be recycled in accordance with the European
Directive 2002/96/EG (WEEE).
Approval label
•
Type BF.
Applied part: protection against electric shock in
accordance with EN 60601-1, double insulated.
•
Read the operating instructions before use.
•
This symbol is required to be displayed on
regulated products for sale in the European
Market. It indicates that the product complies
with applicable European Directive for Medical
Devices.
•
Canadian Standards Association approval.
•
SWL
Safe Working Load represents the maximum load
the ceiling lifter is rated for to ensure safe
operation.
13
•
CE marking in accordance with the Directive 93/
42/EEC (The Medical Device Directive) and
classified to class 1.
•
The lift has been safety tested according to:
IEC 60601-1
ISO 10535
CAN CSA C 22.2 No. 601.1.
•
The lift has been EMC-tested and fullfils
all requirements according to IEC 60601-1-2.
ARJO is not aware of any reciprocal electromagnetic interference between Maxi Sky440 and
other electrical products.
Labels on the Battery & Battery Charger
Battery label
Battery charger label
Figure 4
14
Labels on the Battery & Battery Charger
•
On the ceiling lift cassette battery label and the
battery charger label you will find the following
information. See figure 4:
Recyclable.
Battery label
•
Type: Sealed Rechargeable Valve Regulated
Lead Acid Battery.
•
Constant Voltage Charge.
•
Cycle use: 14.1 - 14.4 V.
•
Standby use: 13.5 - 13.8 V.
•
Initial current: Less than 2.00 A.
•
Rating: 12 V, 2,3 Ah.
Battery charger label
•
This symbol is required to be displayed on
regulated products for sale in the European
Market. It indicates that the product complies
with applicable European Directives related to
health, safety and environment and consumer
protection.
•
•
CAUTION
Do not short battery terminals.
Avoid charging in a sealed container.
Keep away from sparks and flames.
Keep away from children.
Canadian Standards Association approval.
•
•
Insulation class II
•
Approval of plastic materials according to:
UL No. 2601-1.
•
CAUTION
Read the operating instructions before use
This symbol is required to be displayed on
regulated products for sale in the European
Market. It indicates that the product complies
with applicable European Directives related to
health, safety and environment and consumer
protection.
•
Environmental danger. Not for disposal.
To be recycled in accordance with the European
Directive 2002/96/EG (WEEE).
15
•
Input: 100-240 Vac, 50/60 Hz, 27 VA
•
Output: 27-29 Vdc, 1.0 A max.
Part Designation
Lift cassette and charger station
A Emergency key
B Pass Through Hook
C Carabiner
D Hand control pocket
E Hand control
F DC inlet, charger
G Charger
H Front Panel with UP/DOWN button
I Power cord, 1.5 m
16
Part designation
Figure 5
17
How to use the Maxi Sky440
To lower safely a resident, follow these steps:
WARNING:
Always read the Safety Instructions before
using the Maxi Sky440.
1
Press on the Emergency shut-off red button under
the lift. See figure 1.
2
Move the lift with the resident over the bed or the
wheelchair.
3
Remove the plastic cap covering the Emergency
lowering entry. See figure 2.
4
Insert the special key into the opening then turn it
clockwise to lower the resident. See figure 3. The
key rotation turns the motor directly so for each
key turn, the resident will lower slightly. Once the
resident is lowered safely on a bed or into a
wheelchair, remove the key from the lift and call
a certified technician to service your Maxi Sky440.
NOTE!
Always carry out the daily checklist before
each lift use.
Operating the Maxi Sky440 is simple and requires
little instructions. By using the lift, an operator is
able to raise, transefer and lower the resident safely.
Battery information
CAUTION
The batteries included in the Maxi Sky440 are
12 VDC, 2.3 Ah and rechargeable. They provide
10 to 30 transfers per battery charge.
The Maxi Sky440 should not be used in
conjunction with any resident slings other
than the Ergofit slings that are especially
designed for the system. The manufacturer
disclaims any responsibility for improper
use employing any other sling.
NOTE!
The number of transfers may vary
depending on the resident weight and the
batteries condition.
NOTE!
NOTE!
Instructions provided here are described
from the operator´s point of view, i.e. when
positioned in front of the lift and ready to
transport the resident.
To prolong the batteries life, plug the
charger to the lift whenever the lift is not in
use. Do not worry, the batteries will not
overcharge.
Emergency shut-off
The manufacturer uses sealed lead-acid batteries.
Contrary to nickel-cadmium, the batteries do not
have any memory effect. Therefore, batteries should
not be completely drained before recharge.
The operator can shut off the electrical power at any
time by pressing the red mushroom shaped
emergency button under the lift. The button is reset
by a half-turn clockwise in the direction of the
arrows. First time users should practice the shut-off
manoeuvre before operating the lift with a resident.
See figure 1.
Emergency lowering
The Maxi Sky440 is equipped with a special safety
feature that allows the lift to be lowered even if the
electrical system does not operate.
Located on the right side of the lift (near the
folding sling support), the emergency lowering
device is activated by the insertion of the special
key included with this manual.
18
How to use the Maxi Sky440
Figure 1
Figure 2
Figure 3
19
How to use the Maxi Sky440
NOTE!
CAUTION
If the green indicator light does not go on
when you plug the charger into an electrical
outlet, see the "Troubleshooting" section
included in this manual.
Do not drain batteries excessively. This will
dramatically reduce the batteries life span.
If the low battery buzzer sounds, be sure to
recharge the batteries as soon as possible.
WARNING:
Charging the batteries
Do not operate the charger with a damaged
cord or if the units housing has been
damaged.
Do not forcibly bend the power cord or place
a heavy object on it. This will damage the
cord and may cause a fire or an electrical
shock.
Plug the charger into a wall socket compatible with
universal voltage input from 90 Vac to 240 Vac.
See figure 4.
Check to make sure the green light on the charger
is illuminated. This indicates that the charger is on.
Plug the charger DC connector to Maxi Sky440 DC
inlet.
The charger indicator light turns yellow while the
battery is charging. When batteries are fully charged,
the charging indicator light will turn off. The unit is
ready to use.
Do not attempt to use a battery not authorized by
the manufacturer. The Maxi Sky440 and its charging
system use specially designed batteries by the
manufacturer. Using unauthorized batteries may
seriously damage the lift or the charger.
If the battery is low, it will take approximately
2 hours for a full charge.
The lift should not remain stored for long period of
time without charging the batteries.
NOTE!
Connect the charger to the lift when the lift is
not in use. At minimum, charge the batteries
until the light is yellow before using the lift
again. This will extend the life of the
batteries.
When you need the lift again, pull out the charger
plug from it.
The power cord can remain plugged into the wall
indefinitely, convenient for overnight charging.
The charger can either be installed on the wall or
be free. If you install it on the wall, the back of the
charger is designed to be clipped on screws head.
The lift can be charged for an extended period of
time without damaging either the charger or the
batteries.
Figure 4
20
How to use the Maxi Sky440
Pass Through Hook
The Pass Through Hook feature is an ergonomic
handle serving to transport the lift and a practical
way to transfer a resident from one rail to the other
without removing the lift or the resident. To do so,
follow every steps of this procedure:
1
Bring the Maxi Sky440 at the end of the rail.
L=2x the distance between the trolleys
Figure 5
WARNING:
•
The track must be installed by ARJO
authorized personnel and in accordance
with local codes.
•
All tracks are closed with end stoppers
or are connected to other closed track
component.
•
Before use, make sure all end stoppers
are in place and tightened.
2
Bring the trolley at the end of the rail where the
lift will be transferred.
3
Measure the distance (L) between the two
trolleys. See figure 5.
4
To adjust correctly the strap length, use two times
the distance measured between the trolleys. See
figure 6.
Figure 6
View from the top
Figure 7
NOTE!
Before attempting any transfer, make sure
that the rails are:
•
Face to face. See figure 7.
•
Non parallel with a 45º angle. See A and B
figure 8.
A
B
Figure 8
21
How to use the Maxi Sky440
WARNING:
Do not attempt to use the Pass Through
Hook in any X-Y rails.
Here are some examples of rail path where a transfer
with the Pass Through Hook MUST NOT BE
DONE. See figure 9.
Any suspended rail with lateral brackets are
forbidden. If any of the diagrams above represents
your current installation, DO NOT USE the Pass
Through Hook feature. Failure to comply to these
warnings could result in serious injury or damage
to the product.
22
5
Hook the adjustable strap on the second trolley.
See figure 10.
6
Press the DOWN button on your hand control
until the lift is halfway between the rail and the
ground.
7
Unfold the Pass Through Handle and hook safely
the adjustable strap on it. See figure 11.
8
Press the DOWN button on your hand control.
This will pull slowly the unit and the resident
under your second point of transfer. Do not stop
until the lift has completely transferred under
the trolley on the other rail. Be sure that your
adjustable strap is completely tightened before
finalizing the transfer. See figure 12.
How to use the Maxi Sky440
Parallel
45º angle
Perpendicular
Figure 9
Figure 10
Figure 11
Figure 12
23
How to use the Maxi Sky440
1
Unhook the lift from the first trolley and hook it
to the second trolley. When the transfer is
complete, press the UP button on the hand control
until the resident is in a comfortable height.
See figure 13.
2
Unhook the adjustable strap and fold back the
Pass Through Hook, then you can move the resident through the second unit. See figure 14.
Raising and lowering the resident
The hand control can be used to operate the lift while
at the same time the caregiver moves to a position
where he/she can be with the resident continuously.
See figure 15.
To raise the resident:
Touch the "UP" button on the hand control. Keep
your finger on the button until the resident is at the
desired height, release finger pressure and the unit
stops.
Auxiliary "UP" and "DOWN" buttons are located in
front of the lift. These controls serve two functions:
•
they are secondary controls in the event the
hand control stops functioning or,
•
if two attendants are involved in the transfer,
one can use the auxiliary controls while the other
moves into a position where they are with the
resident continuously.
To lower the resident:
Touch the "DOWN" button on the hand control.
Keep your finger on the button until the resident is
at the desired height, release finger pressure and
the unit stops.
Folding sling supports
The Maxi Sky440 lift is set up with folding sling
supports that optimize the resident comfort when
unfold and optimize its storage space when fold.
See figure 16.
The folding sling supports are resistant and safe.
Now it is easy and safe to fix the sling straps to the
supports. You just put your strap on the security flap
and pull it to insert it on the closed hook. The safety
flaps will prevent the strap to come out and endanger
your resident. See figure 17.
24
How to use the Maxi Sky440
Figure 13
Figure 14
Figure 15
Figure 16
25
How to use the Maxi Sky440
Transferring the resident
NOTE!
Install the resident into the sling according to the
"Use of Slings" included in this manual. Unwind the
strap. Press the DOWN button on the hand control
while holding a tension on the strap with the other
hand. Note: there must be tension on the strap for the
lift to function.
Only slings with loops may be used with the
Maxi Sky 440. (Slings with clips do not fit
this system).
Lift the unit until the resident's buttock clears the
arms supports of the wheelchair, the top of the bath
or the bed before moving the resident. Guide the legs
past any obstacles.
Attach the carabiner to the trolley and then move the
lift over the resident. Lower the lift below the chin
and unfold supports before attaching the sling straps
(this will avoid facial contact caused by movement of
the lift). Note: for a resident in a prone position,
lower the lift near the chest, unfold supports then
install the straps. For sling attachments, refer to the
"Use of Slings" section in this manual.
When the resident is located above the desired point
of transfer and ready to be lowered, press the DOWN
button.
NOTE!
Sewn handles are provided on the back of
sling to allow better positioning for the caregiver when transferring safely the resident
on a wheelchair. Be sure to lock the casters
of the wheelchair.
NOTE!
The back of the sling has sewn handles to
allow better positioning for the caregiver and
enhancing resident safety.
To install a sling, unfold the support on each side of
the lift then insert the strap loop on the support and
pull gently the strap. The clip support will lower then
slide the strap. The strap will be trapped inside the
support and the clip will automatically block the
entrance. See figure 17. Do not attempt to transfer
a resident if the flap is not blocking the support
entrance.
Once the resident is properly seated, loosen the straps
and remove the sling from the lift
CAUTION
Hold the lift with one hand at all times when
near a resident.
Slide the lift away from the resident. Unhook the lift
from the trolley and use the hand control to shorten
the strap. You can now remove the sling from around
the resident.
WARNING:
BEFORE LIFTING THE RESIDENT:
1 Make sure that all straps are attached to
the supports.
CAUTION
When you transfer a resident, be sure to be
assisted with another caregiver.
2 Make sure the resident is comfortable.
3 Make sure the sling is not caught on any
obstruction (wheelchair brake or arm of
chair).
If any of the above occurs - lower the resident immediately and correct the problem.
If none of the warnings above occurs, lift the
resident slightly by pressing the UP button on the
hand control.
26
Use of Slings
Procedures for attaching loop slings
to the Maxi Sky 440 folding sling
supports
WARNING:
The Maxi Sky 440 (see figure 16) has folding
slings support hooks for use only with
slings equipped with loops.
UNSAFE
When attaching a loop sling to the Maxi Sky
sling supports, always ensure the sling
attachment loops are positioned correctly
into the retaining hooks as shown in the
inset in figure 17.
SAFE STRAP INSTALLATION
WARNING:
Figure 17
Do not use slings equipped with clips on the
Maxi Sky 440 portable lift, these require
spreader bars that are fitted with attachment
lugs.
The Maxi Sky 440 has 2 hooks. Always use these 2
hooks to attach both the shoulder and leg strap sling
loops.
The specific sling loops chosen determine the
position of the resident.
A
A
Different combinations of loops can be used to allow
the resident to be lifted and transported in positions
ranging from semi-reclined to seated.
Once the loop sling has been fitted around the
resident there are three methods of applying the loop
sling, with each of the 3 methods described it is
necessary to first connect each shoulder loop (points
A), of the sling to the (same side) hook on the Maxi
Sky 440 folding sling supports.
See figure 18.
C
B
B
27
Figure 18
Use of Slings
Method 1: With the sling correctly positioned around
the resident, slide the left hand leg section of the sling under
the resident’s left thigh and the right hand leg section under
the resident’s right thigh, attach each leg loop (points B)
of the sling to the “opposite side” outer hook of the Maxi
Sky 440. See figure 19.
Method 2: With the sling correctly positioned around
the resident, pass each leg section of the sling under both
thighs of the resident, then attach each leg loop (points B) to
the outer hook (opposite side) on the Maxi Sky folding sling
supports. See figure 20.
Method 3: With the sling correctly positioned around
the resident, slide the left hand leg section of the sling under
the resident’s left thigh and the right hand leg section under
the resident’s right thigh, then attach each leg loop (points
B) to the same side hook on the maxi Sky 440 folding sling
supports. See figure 21.
This particular method holds the residents legs in abduction,
and is useful for toiletting.
28
Use of Slings
METHOD 1
METHOD 2
Figure 19
Figure 20
METHOD 3
Figure 21
29
Use of Slings
To lift a resident from a bed
Avoid lifting the resident higher than the eyes of
the attendant to lessen the impression of height to
confused residents.
If the resident cannot attain a sitting position, then
roll the resident toward you, fold the sling in half
length-wise and place it along the resident's back.
Position the sling so that when rolled back, the
resident will lie in the middle of the sling.
WARNING:
Align the bottom of the sling with the resident's
coccyx. See figure 22.
Important: Always hold the Maxi Sky 440
until at least a couple of loops are attached
to the Maxi Sky 440, to prevent it from
striking the resident. See figure 23.
When the resident is lying in the correct position on
the sling, carefully flex the resident’s legs and bring
the sling “leg pieces” under the thighs, ready to
attach the complete sling to the Maxi Sky 440.
Before removing the loops from the hooks,
hold on to the Maxi Sky 440 with your hand so the
Maxi Sky 440 will not strike the resident.
If the resident can sit easily, the sling can be
positioned the same way as if the resident was seated
in a chair: i.e. by easing the resident forward, (if
necessary) slide the sling down the resident’s
back until seam C (see figure 18) reaches the
base of the spine. Take attachment points B and
pass the leg sections of the sling underneath the
residents thighs, as appropriate to the method of
lifting (see previous Methods) ensure the sling
sections are not twisted underneath the resident.
Sling attachment to folding sling supports:
Chose the colour of the position that is best suited for
the patient. For a larger patient, choose blue for both
the leg and shoulder straps. A smaller patient may be
better suited for the black loops on both the shoulder
and leg straps.
The loop colour coding on BHM slings is used for
patient positioning not patient size - sling app guide
has a good positioning graphic.
Attachment of the sling to the Maxi Sky 440 can be
done using any of the methods described previously,
depending on suitability.
To lift a resident from a chair
Lower the Maxi Sky 440 until you can easily attach
the loops of the sling, use your hand to stabilise it,
taking care not to allow the bar to touch the resident.
NOTE!
The design of the Maxi Sky 440 and sling
allows one person to perform the lift.
WARNING:
This patient lift should never be used by a
patient on their own.
Once the sling has been positioned and attached
securely to the Maxi Sky 440 as described in any of
the methods 1 to 3, lifting can be carried out using
the hand control.
30
Use of Slings
Figure 22
Figure 23
31
Use of Slings
To lift a resident from the floor
(Some attendants prefer to use a larger sling for this
operation)
Raise and support the resident into a sitting or half
sitting position. See figure 24. Slide the sling down
the resident’s back as described previously, bring the
leg sections of the sling into position and under the
residents thighs. Lower the Maxi Sky 440 (taking
care not to contact the resident) until the Maxi Sky
440 is low enough to attach the sling shoulder loops.
Flex up the residents knees to connect the leg pieces
of the sling
WARNING:
Check that the sling attachment loops are
securely positioned within the folding sling
supports hooks. See figure 17. Before lifting
the resident and that the loops remain that
way as the resident is gradually lifted.
Figure 24
When the resident has been returned to the bed he/
she maybe reclined before the sling is detached from
the Maxi Sky 440 folding sling supports.
Before transporting a resident
Turn the resident to face the direction of travel, and
keep at a normal chair height - this gives confidence
and dignity.
WARNING:
Ensure any obstructions are removed from
the intended route of travel.
32
Care and Maintenance
Preventive Maintenance Schedule
The equipment is subjected to wear and tear, and the following maintenance instructions must be performed when
specified to ensure that the equipment remains within its original manufacturing specification. Care and
Maintenance shall be carried out in accordance with the Preventive Maintenance Schedule below.
Customer obligations shall be carried out by qualified personnel following the instructions in this manual.
WARNING:
Safety related maintenance must be carried out by qualified personnel, fully trained in servicing
by ARJO, using correct tools and knowledge of procedures. Failure to meet these requirements
could result in personal injuries and/or unsafe equipment.
Action/check
Initially
Before
every use
Every 2
months
Every 4
months
Every year
Customer obligations
Lift device
Inspect for missing hardware or
broken panel
X
X
X
X
Inspect strap for wear
X
Inspect if Pass Through Hook
has any damage (seems loose or
notice cracks)
X
Recharging batteries
Inspect the folding sling supports on the strap of the lift for
damage or cracks
X
Inspect wheels in rail for damage, rust or cracks. Replace if
damaged
X
Clean the rail and the clip on
charging station contacts
X
Overall inspection by authorized personnel
X
Sling and hardware
Check all sling attachments for
sign of wear
X
Inspect sling material for wear
or deterioration
X
Inspect sling straps for wear
X
Inspect for any defects or loose
threads in the “stiched areas”
X
Cleaning sling as indicated on
the tag
When necessary
Verify emergency stop cord
X
Verify emergency lowering
device
X
WARNING:
Before each use, make sure all end stoppers are in place and tightened.
33
Every 2
years
Care and Maintenance
NOTE!
If the product does not work as intended, immediately contact your local ARJO representative
for support.
WARNING:
Authorized service should be carried out by a certified technician.
Action/check
Initially
Before
every use
Every 2
months
Every 4
months
Every year
Every 2
years
Authorized Service
Replace strap
X
Inspect the welding aspect on
the frame to detect cracks
X
Inspect transmission
X
Inspect connecting joints for
proper attachment
X
Verify that the emergency brake
on the drum is turning freely
X
Verify emergency devices for
good functioning
X
Load test with SWL (maximum
working capacity)
X
34
Care and Maintenance
Daily Checklist
The following procedures must be followed before
each use:
WARNING:
Always carry out the daily checklist before
each lift use. Alternations made to the Maxi
Sky440 by someone else than a certified
technician may cause serious injury and
voids the warranty.
WARNING:
The Maxi Sky440 and accessories must be
inspected annually by a certified technician
in addition to the daily and other periodic
visual checks done by the user specified in
this section.
Preventive maintenance specified in this
manual can prevent accidents and reduce
repair costs.
•
Charge the batteries. Park the lift on the charger
whenever the lift is not in use.
•
Inspect the lift for any damage. If the lift casing
does not look properly aligned, or there are any
cracks or other damage on the lift, or any parts are
missing – do not use it. Contact your local representative to have the lift serviced. If any parts are
missing on the lift - DO NOT USE IT.
•
Inspect the strap for any visible signs of wear,
frays, loose threads or other damage. If there is
any evidence of damage – do not use it. Contact
your local representative to have the lift serviced.
•
Inspect the sling for tears, frayed straps or loose
stitching. If the sling has any of the above damage
– do not use it. Contact your local representative
to have the sling replaced or repaired. Inspect
the adjustable extension strap (if you have this
option) for frayed or loose stitches.
•
Inspect the folding sling supports for any signs of
cracking or damage. Inspect the hook at the top of
the strap to ensure that it is properly attached.
•
Before each use, make sure all end stoppers are in
place and tightened.
Inspection and cleaning
Clean the Maxi Sky440 with a soft dry cloth, or a soft
cloth slightly moistened with a mild detergent
solution. Do not use any type of solvent that may
damage the finish.
WARNING:
Do not immerse lift in water.
To ensure a better rolling surface for the trolley
wheels, clean the inside of the track every 4 months.
To do so, insert a damp cloth in the opening and slide
it from one end of the track to the other.
WARNING:
Always reinstall the rail end stopper (if it has
been removed) after servicing.
35
Care and Maintenance
Strap Inspection
NOTE!
If the strap is damaged or shows signs of wear, the
accceptable load on the strap before rupture can drop
rapidly and present a danger for the patient or
caregiver.
The manufacturer recommends changing
the strap at least every two years. By
countinuing to use the lift without changing
the strap, the safety of the caregiver or
patient is greatly compromised.
ARJO recommends thoroughly inspection of the
straps every 2 months as follows:
Handling and Storage
1
Completely unwind the strap.
2
Look for any signs of wear. See figure 25.
Avoid violent impact during transportation.
The lift should not remain stored for long periods of
time without recharging the batteries.
NOTE!
ARJO recommends charging of batteries at
least every two weeks even if the lift is not
used. This will prevent premature ageing of
batteries.
Loose threads in stitched area.
Noticeable discoloration by having
a lighter color strap than the double
thickness stitched area.
Side wear.
Middle wear.
Figure 25
WARNING:
If there is any sign of wear as indicated here
or other visual defects, the strap should be
changed immediately. By continuing to use
the lift without changing the strap, the safety
of the caregiver or patient is greatly compromised.
36
Care and Maintenance
Sling Inspection and
Care
Battery Replacement
ARJO uses sealed lead-acid batteries. Contrary to
nickel-cadmium. ARJO batteries do not have any
memory effect. Therefore, batteries should not be
completely discharged before recharging.
For maximum patient safety and hygiene, read the
following instructions:
Replace the battery when there is a noticeable
reduction in the number of transfers that can be
performed between charges. If you notice the Maxi
Sky440 lift “beeping” and a red light flashing, see the
instructions in “Troubleshooting” to ensure it is a
problem with the battery.
Inspection
WARNING:
The slings should be checked before and
after using it for each patient and if necessary washed according to instructions on
the sling. This is especially important when
using the same equipment for another
patient, to minimise the risk of cross infection. Also refer to sling instruction sheet
MAX.01510.INT.
To replace a battery, contact your local dealer or
representative.
CAUTION
Do not attempt to use a battery not authorized by ARJO.
ARJO batteries are specially designed for
ARJO charging systems. Attempting to use
an unathorized battery may seriously damage the lift and/or the charger.
NOTE!
With regard to laundering, slings should not
be classified as linen, but as an accessory to
a patient transfer lifter and therefore classified as a medical device. Slings should be
cleaned and disinfected only in strict accordance with the manufacturers instructions.
Verification of Charger Power Source
If the light does not illuminate when there are
batteries in, do the following steps:
1
Make sure that the power cord is correctly
plugged into the charger in the wall and charging
indicator green light is on.
2
Make sure the charger connector is properly
connected to unit.
3
Check the power of the outlet.
4
If the yellow or green light of the charger do not
light up, contact your local dealer or representative for assistance.
Before washing the slings that have head support
pockets always remove the plastic reinforcement
inserts. Always refit the inserts before re-using the
sling.
Mechanical pressure should be avoided during the
washing and drying procedure e.g. rolling or
pressing, as these can damage parts vital to the safe
and comfortable operation of the sling.
The stretcher cross straps and suspension straps
should be checked and if necessary washed. Washing
and drying temperatures must not exceed 80°C
(176°F). Wash using normal detergents, do not iron.
also refer to Sling Instruction sheet MAX.01510.INT.
It is essential that the sling attachment cords, the
slings, their straps and attachment clips are carefully
inspected before each and every use. If the slings,
cords or straps are frayed, or the clips damaged, the
sling or attachment cord should be withdrawn from
use immediately and replaced.
37
Care and Maintenance
Annual Inspection
The Maxi Sky440 and its accessories must be
inspected annually by a certified technician.
WARNING:
The Maxi Sky440 and accessories must be
serviced every 12 months as a minimum
requirement.
Do not attempt to do the inspection unless
you are certified to do so.
As a part of the annual inspection an annual load test
with the safe working load must be performed on the
Maxi Sky440 as required for CE Mark Maintenance.
Maintenance Requirements
The Maxi Sky440 is equipped with an electronic
monitor. This red light will flash when maintenance
inspection is necessary to ensure the durability of the
unit and the security of the patient and user.
Once this red light begins to flash, please contact
your local representative in order to perform the
necessary maintenance inspection.
38
Troubleshooting
WARNING:
Do not attempt to open the Maxi Sky440 lift. Only a certified technician is authorized to open the
Maxi Sky440 lift.
Alternations made to the Maxi Sky440 lift by someone other than a certified technician may
cause serious injury.
Problems
To check
The red light “Service” is on and
flashing
•
Contact your supplier or your local representative to do maintenance
The unit starts and stops
repetitively
•
If the load is over a safe working load, the unit will not work due to
an overload protection on the motor
•
Batteries are low and need to be charged
The lift emits a “beep” during
utilization. The unit may stop
lifting but can still lower it
•
Batteries are low. Recharge them
Charger indicator on the lift
(yellow) does not light up when the
charger is connected to the lift
•
Check that the charger is plugged into a standard outlet, and that the
outlet have power. Green light indicator confirms the functionality of
the charger
The lift does not work when you
press the buttons on the hand
control
•
If the emergency stop is activated, gently release the emergency
button
•
Check if the buttons on the lift are working. If not, check the charge
on the lift. If they are working, the problem may come from the hand
control
•
Check if the hand control is plugged in properly into the lift. The hand
control may be slightly pulled out from its socket and yet appear as
though it is plugged in. Check the connection
•
If, after testing all of the above, the lift will not operate, contact your
local dealer or your representative
39
Technical Specifications
Product information
Maxi Sky440 LIFT
Weight, complete
6.35 kg (14 lbs)
Lifting capacity
200 kg (440 lbs)
Strap length
2200 mm (88 in)
Lifting speed
4.3 cm/s (1.7 in/s)
Noise level
60.5 dB
Duty cycle
6 min/hr.
BATTERY AND CHARGER UNIT
Batteries
Qty: 2, rechargeable, 12 VDC, 2.3 Ah
Battery capacity
Provides up to 30 transfers with a load
of 80 kg (180 lbs)
Battery Charger input
90-240 VAC, 50/60 Hz
Battery Charger output
27-29 VDC, 27 VA, 50/60 Hz
Battery Charger safety protection
Class 2, double insulated
HAND CONTROL
Degree of protection
IP 44
TRANSPORT AND STORAGE
Ambient temperature range
-10° to +50°C (+14 F to +122 F)
Relative humidity range
10% to 80% incl. condensation
Atmospheric pressure range
500 hPa to 1060 hPa
RECYCLING
Battery
Sealed lead acid, recycleable
Package
Wood and cardboard, recycleable
The Lift
Separated and recycled according to
the European Directive 2002/96/EG
(WEEE).
40
Technical Specifications
Figure 26
41
Accessories
BATTERIES
KWIKTRAK RAIL STOPPER
Product No. E6585
Product No. 700.11005
CHARGER
Product No. 700.13510.33
ARM EXTENSION
Product No.
24 in/61 cm - 700.08310
36 in/91 cm - 700.08320
CHARGER POWER CORD
Product No.
402.00001 - USA (UL)
402.00002 - Japan
402.00003 - CE (Europe)
402.00004 - Australia
402.00005 - UK
ADJUSTABLE STRAP EXTENSION
Product No. A3710
HOOK
Product No.000.08000
RACK DEMO KWIKTRAK
Product No. 700.09010
KWIKTRAK TROLLEY
Product No. 700.10650
HAND CONTROL
Product No. 700.13600.33
2 buttons
SWIVEL ADAPTOR
Product No. 700.10950
TRAVEL HAND BAG
Product No. 002.08150
EMERGENCY TOOL
Product No. 005.16500
Figure 27
42