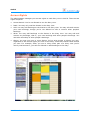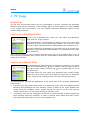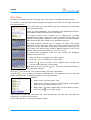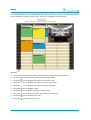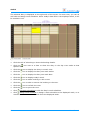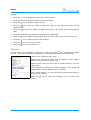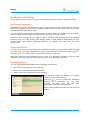
1
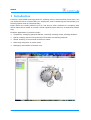
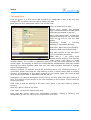
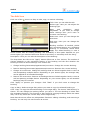
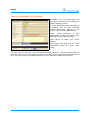
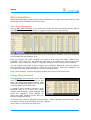
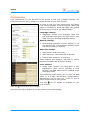
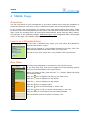
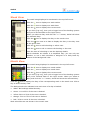
AxiCal
User Manual
August 2011
AxiCal
Table of Contents
1
Introduction
4
2
General Concepts
User
Administrator
Diary
View
Work Schedule
User Environment
Display Modes
Access Rights
5
5
5
5
5
6
6
6
7
3
PC Usage
Overview
Log in as a Standard User
Log in as a Guest User
Day View
Week View
Month View
Search
Bookings and Notes
Bookings Explained
Notes Explained
Booking Details
The Add Icon
The Edit Icon
Taking Ownership of a Booking
Work Schedules
Edit Work Schedules
Assign Work Schedule
Multiple Work Schedules
Preferences
8
8
8
8
9
11
13
14
15
15
15
15
16
17
18
19
19
19
20
21
4
Mobile Usage
Overview
Log in as a Standard User
Day View
Week View
Month View
Bookings and Notes
Booking Details
22
22
22
22
23
23
24
24
2
User Manual
AxiCal
The Add Icon
The Edit Icon
24
25
Revision History
Date
Authors
2011-08-16 Peter S'heeren
Ilse Joostens
User Manual
Description
Initial release.
3
AxiCal
1 Introduction
AxiCal is a web-based booking system for meeting rooms, resources and much more. You
can deploy AxiCal as a shared diary for employees, hence combining the functionality of a
booking system and an individual diary.
Paper diaries are usually difficult to fill in, and they're often confined to a reception area
which makes them harder to consult. AxiCal replaces paper diaries in a smart and flexible
way.
Example applications of AxiCal include:
▪
Companies: managing personal diaries, reserving meeting rooms, booking facilities.
▪
Sports: keeping track of the planning of activities and training facilities.
▪
Hotels: Booking of rooms and conference rooms.
▪
Reserving computers in public areas.
▪
Managing reservations of shared cars.
4
User Manual
AxiCal
2 General Concepts
User
The standard user is the most common type of user. You log in with a user name and
password. Once you're logged in, you can start working with diaries and diary views
you're entitled to access.
The guest user is a special type of user. This user is not required to log in. It suffices to
click an icon in order to access AxiCal as the guest user. Usually, the guest user is
configured to browse certain diaries without the ability to make changes. The
administrator determines the policy on the guest user. The administrator is able to
activate and deactivate the guest user.
Administrator
The administrator is the person who manages AxiCal. The administrator is a user who
logs in with a user name and a password, but who has full access to AxiCal.
The administrator creates users, chooses the passwords, adds diaries and diary views,
configures the access rights, adds photographs of employees, rooms and resources,
determines the general settings, maintains the system, ...
There's always one administrator though multiple administrators may exist.
Diary
We use diaries for requesting room, making appointments, reserving materials, etc. To
accomplish this, you add a booking to one or more diaries in a diary view, for example, a
meeting. You can edit bookings, move bookings, delete bookings, etc.
You can also add notes in a diary. A note is anything that's not a booking, like a reminder
to go home a little earlier, Pete's birthday, or a general remark about today's weather.
View
A diary view groups different diaries into one visual overview. Hence an administrator can
create views of employees, meeting rooms, computers, and the like. In day view, a user
can see a diary view in an instant.
AxiCal provides a number of logical view types: co-workers, facilities, and resources. The
choosen view type is reflected in the meaning of the bookings you create: appointments
or reservations. Throughout AxiCal, the view type is expressed mainly in the display of
diary photos and the reporting of messages.
A diary can be shown in multiple diary views. Yet it's always the same diary we're talking
about; a change made in diary X part of diary view A is visible in the same diary X part of
diary view B. We say the diaries X are linked.
User Manual
5
AxiCal
Work Schedule
You can define work schedules and assign them to your diaries. Work schedules are very
useful to keep track of your working hours, to book appointments during consultation
hours, etc.
User Environment
AxiCal is a web application. You use your browser to interface with AxiCal. Since web
browsers are available for virtually all modern computer systems, you can use AxiCal on
every modern PC, Mac, workstation, laptop and related hardware. In this environment
you can take full advantage of AxiCal. We speak of the PC user environment.
The rise of smartphones has given the mobile Internet an important place in modern
society. That's why AxiCal also offers a mobile user environment. As such AxiCal enables
you to consult your diaries while you're on the move. The mobile user environment
provides a carefully selected subset of the overall functionality of AxiCal, so you can
enjoy the comfort of using your smartphone when you work with AxiCal.
AxiCal's mobile user environment takes into account the specific attributes of smartphone
and similar devices, like the touch screen, the lack of a mouse arrow, the specific screen
resolution, the screen's size and direction.
AxiCal works in all current web browsers. You can continue to use your personal web
browser when you start off with AxiCal, both in the PC and mobile user environments.
Display Modes
For each user environment, AxiCal offers three important visual views: day view, week
view, and month view. Each view comes with its own specific attributes.
▪
▪
6
PC user environment:
▪
The day view displays a whole diary view. In the day view, you can see the diaries
of your colleagues at a glance, check the occupancy of meeting rooms, query
today's visitors, etc.
▪
The week view displays one week of a diary. You can edit and assign work
schedules in the week view.
▪
The month view summarises one month of a diary.
Mobile user environment:
▪
The day view displays one day of a diary. In this display mode you can for
example see your daily appointments.
▪
The week view summarises one week of a diary.
▪
The month view uses colors for showing the amount of time booked every day in a
one month period.
User Manual
AxiCal
Access Rights
The administrator manages your access rights to each diary view in AxiCal. These access
rights comprise:
▪
Access denied: You're not allowed to see the diary view.
▪
Read: You may only read the diaries in the diary view.
▪
Add: You may add bookings to the diaries in the diary view. You may edit and remove
your own bookings, though you're not allowed to edit or remove other people's
bookings.
▪
Write: You may add bookings to the diaries in the diary view. You may edit and
remove any bookings, that is, your own bookings and other people's bookings. You
can take ownership of other people's bookings.
▪
Owner: You may own one or more diaries. You've write access to diaries you own,
regardless of the access rights you have to the diary views that contain these diaries
you own. For example, when you own a diary that's part of a diary view you've
merely read access to, you still are allowed to add bookings to the diary.
User Manual
7
AxiCal
3 PC Usage
Overview
The PC user environment offers the full functionality of AxiCal. Therefore all important
features of AxiCal are discussed in this chapter. Many of these feature are also available
in the mobile user environment. The next chapter discusses attributes specific to the
mobile usage of AxiCal.
Log in as a Standard User
To log in as a standard user, enter your user name and password,
then click the "Login" button.
The administrator is responsible for setting up the user name and
password of every user in the booking system. You've to log in with
the user name and password the administrator has created for you.
You can't change your password. If you belief you've to change your
password, then contact the administrator. He's authorized to change
your password.
After you've logged in, you're always directed to the day view of today's diary view. If
you've access to multiple diary views, then the administrator determines which of these
views you'll see first.
Log in as a Guest User
The administrator has the ability to activate a guest user. The guest
user is activated when the
icon is visible in the top-right corner of
the login screen. When you click the
icon, AxiCal logs you on as
the guest user.
The input fields for user name and password may remain empty
when you log in as the guest user. When the guest user is activated,
every visitor of the booking system can log in as the guest user.
The administrator chooses the application of the guest user. A few of many applications
may include:
▪
A tennis club may grant read access to a particular diary view that displays tennis
bookings and schedules over the Internet. Hence a visitor of the club's website can
simply query for available courts, without having the club to run the risk that the
visitors would edit or remove any booking in the diary view.
▪
A company may give its employees full access to certain diaries so these people can
book meeting rooms for example. In order to access other diaries and diary views,
the employees would have to log in as a standard user.
8
User Manual
AxiCal
Day View
The day view shows one day of a diary view. The screen is divided into two sections.
The section to the left side contains the general options, the choice of the diary view, and
the date selection.
If you click [Log out], then AxiCal logs you out and you're presented
with the login screen.
When you click [Settings], your directed to the preferences screen.
See chapter Preferences for more information.
The option "Select view" enables you to change the currently
displayed diary view. When you select a different diary view, the
screen is immediately updated on the right side. The administrator
determines which diary views you're granted access to.
The date selection allows you to change the diary view being
displayed on the right side. When you click a certain day, then the
diary view on the right side immediately changes to the day you've
just chosen. On the left side, today is always marked in red. In the
picture shown to the left today is July, 23th of 2011.
By clicking the navigation icons you can change the displayed
months on the left side:
▪
Click the
icon to display one month earlier.
▪
Click the
icon to display one month later.
▪
Click the
icon to revert to the original view, showing the
current month and day in the middle.
Note that when you click the
the right also changes.
Click the
icon, the diary view that's shown to
icon to search. See chapter Search for more information.
Click the
icon to export a diary as a vCalendar file. The options screen, as depicted
below, will be shown in a popup window of your web browser.
Options:
▪
Select view: Choose a diary view.
▪
Select item: Choose a diary. The description of this option
depends on the choosen diary view.
▪
Begin date, end date: Begin date and end date to export.
Klik Click the
icon to pick a date.
Click "Export" to save the vCalendar file. Your web browser will take over this task and
accompany you with saving the file.
Click "Close window" to close the popup window.
User Manual
9
AxiCal
The selected diary view is displayed to the right side of the screen. The following picture
is an example of a diary view of type "facilities" consisting of four diaries:
Options:
▪
Hoover the mouse arrow above a diary name to show the diary's photo.
▪
Click the title of a booking to show the booking details.
▪
Click the
icon to display the diary in the week view.
▪
Click the
icon to display the diary view one day earlier.
▪
Click the
icon to display the diary view one day later.
▪
Click the
icon to display today.
▪
Click the
icon to add a booking or edit a note.
▪
Click the
icon to edit or remove the booking or the note.
▪
Click the
icon to refresh the view.
▪
Click the
icon to print the view.
10
User Manual
AxiCal
Week View
The week view shows one week of a diary. If work schedules are activated for the diary,
then they're shown and the user can edit, assign and remove them.
The section to the left side contains the general options, the choice of the diary view and
specific dairy, and the date selection.
If you click [Log out], then AxiCal logs you out and you're presented
with the log in screen.
When you click [Settings], your directed to the preferences screen.
See chapter Preferences for more information.
The option "Select view" enables you to change the currently
displayed diary view. When you select a different diary view, the
screen is immediately updated on the right side. The administrator
determines which diary views you're granted access to. The
administrator decides which diary of a view comes first.
The option "Select co-worker", "Select facility" or "Select item"
allows you to pick a diary from the selected diary view. The chosen
diary is shown to the right. Note that the title of the option depends
on the type of the selected diary view.
The date selection allows you to change the diary view being
displayed on the right side. When you click a certain day, then the
diary view on the right side immediately changes to the day you've
just chosen. On the left side, today is always marked in red. In the
picture shown to the left today is July, 23th of 2011.
Click the
icon to export a diary as a vCalendar file. See
chapter Day View for more information.
Click the
information.
icon to search. See chapter Search for more
By clicking the navigation icons you can change the displayed months on the left side:
▪
Click the
icon to display one month earlier.
▪
Click the
icon to display one month later.
▪
Click the
icon to revert to the original view, showing the current month and day in
the middle.
Note that when you click the
User Manual
icon, the diary that's shown to the right also changes.
11
AxiCal
The selected diary is displayed to the right side of the screen. In week view, you can as
well edit and assign work schedules. When today's date falls in the displayed week, it will
be marked in red.
Options:
▪
Click the title of a booking to show the booking details.
▪
Click the
icon next to a date to show the diary in the day view mode at that
specific date.
▪
Click the
icon to display the diary in month view.
▪
Click the
icon to display the diary one week earlier.
▪
Click the
icon to display the diary one week later.
▪
Click the
icon to display today's week.
▪
Click the
icon to add a booking or edit a note.
▪
Click the
icon to edit or remove the booking or the note.
▪
Click the
icon to refresh the view.
▪
Click the
icon to print the view.
▪
Click
▪
Click
Assign work schedule to assign a work schedule to the displayed week, or to
remove the current work schedule from the displayed week.
12
Edit work schedules to edit the diary's work schedules.
User Manual
AxiCal
Month View
The month view shows one month of a diary.
The section to the left side contains the general options, the choice of the diary view and
specific dairy, and the date selection. This panel offers identical options as in the week
view. See chapter Week View for more information.
The selected diary view is displayed to the right side of the screen. Due to the size of the
month view, the bookings are summarised.
Hoover the mouse arrow above bookings to see the title of these bookings. Notes aren't
displayed. If today's day occurs in the month view, it is marked in red. Work schedules
are shown concisely: you can only see whether a work schedule is assigned to each day
based on the background color.
User Manual
13
AxiCal
Options:
▪
Click the
icon to display the diary one month earlier.
▪
Click the
icon to display the diary one month later.
▪
Click the
icon to display today's month.
▪
Click the
icon next to a date to show the diary in the day view mode at that
specific date.
▪
Click the
date.
▪
Click the booking's time period to show the booking details.
▪
Click the
icon to add a booking. Note that you can't edit notes in the month view.
▪
Click the
icon to edit or remove the booking.
▪
Click the
icon to refresh the view.
▪
Click the
icon to print the view.
icon next to a date to display the diary in the week view at that specific
Search
You can search for bookings in each view mode. Click the
icon to show the search
window. The search window will be shown in a popup window of your web browser.
Select view: Choose a diary view.
Select item: Choose a diary. The description of this option
depends on the choosen diary view.
Search value: Here you can enter a search string of up to 30
characters.
Click "Search" to execute the search operation. The results will
appear below. AxiCal displays up to 5 results.
Click "Close window" to close the serach window and return to
the previous screen.
Click the
mode.
14
icon to show the booking in the current view
User Manual
AxiCal
Bookings and Notes
Every diary has 30-minute time slots. You add bookings and notes in these time slots.
Bookings Explained
A booking is an entry that occupies one or more consecutive time slots within a day in a
diary. For example, you can book a meeting with Hubert in room 5 from 10 A.M. to 1 P.M.
This booking will span 6 time slots.
You can create a booking in multiple diaries at once. When you create such a booking,
AxiCal creates a link between the bookings in the diaries you've chosen.
Bookings can't overlap. If you want to add a booking that overlaps with an existing
booking, then you may choose how AxiCal reacts to this situation depending on your
access rights. See option "Booking conflicts" in chapter The Add Icon for more
information.
Notes Explained
A note is a short line of text that has a maximum length of 20 characters and occupies
one time slot. You may manipulate a note in each time slot that comes with a
icon.
Click the
icon to create, edit or remove the note in a time slot.
Note that a booking as precedence over a note. If a booking overlaps a time slot that
contains a note, you don't see the note and you can't manipulate the note.
Booking Details
You can request booking details in the following view modes:
▪
Day view: Click the title of the booking.
▪
Week view: Click the title of the booking.
▪
Month view: Click the period of the booking.
The booking details are shown in a popup
window of your web browser.
Click the
icon to export the displayed
booking as a vCalendar file. Your web
browser will take over this task and
accompany you with saving the file.
Click "Close window" to return to the previous
screen.
User Manual
15
AxiCal
The Add Icon
Click the
icon in a time slot to add a booking or manipulate a note. If the icon isn't
present then you don't have the right to modify the diary.
Note that you can't manipulate notes in the month view.
Title: 30 characters at most.
Select type: Choose the booking
type. The administrator decides which
booking types appear in this list.
Date: The booking date. In case of a
periodical booking it's the start date.
Click the
icon to use the date
picker.
Periodicity:
Create
a
one-time
booking or a periodical booking.
Start time: Start time of the booking.
End time: End time of the booking.
End date: Choose an end date when
you've selected a periodicity.
Make also a ... for: Select extra
diaries for this booking. Click with the
CTRL button held down to select
multiple diaries. The number of additional diaries you can pick from depends on your
access rights. The booking is added to multiple diaries simultaneously while the created
bookings are linked together. Note that you can't add periodical bookings to multiple
diaries simultaneously.
Booking conflicts: If checked, AxiCal will overwrite/remove any conflicting booking. If
unchecked, AxiCal won't add the new booking in case it would conflict with an existing
booking. The availability of this option depends on your access rights (you need at least
write access to the diary or ownership over the diary).
Description: An optional description of the booking. You may enter more than one line of
text. The amount of text shown in the view depends on the number of time slots the
booking occupies.
Click "Add" to add the booking to the diary. Click "Back" if you don't want to create a
booking.
Note text: Enter a text for the note.
Click "Save" to store the entered note text.
Note that the screen offers two independent functions: adding a booking, and
manipulating a note. You can only use one function at a time.
16
User Manual
AxiCal
The Edit Icon
Click one of the
icons in a diary to edit, copy, or remove a booking.
Title: Here you can edit the title.
Select type: Here you can adjust the
booking type.
Date
and
periodicity
aren't
adjustable. If you need to change
these settings then you'll have to
create a new booking.
Start time: Here you can change the
start time.
End time: Here you can change the
end time.
Booking conflicts: If checked, AxiCal
will overwrite/remove any conflicting
booking. If unchecked, AxiCal won't
apply the edited booking in case it
would conflict with an existing booking. The availability of this option depends on your
access rights (you need at least write access to the diary or ownership over the diary).
Description: Here you can edit the description of the booking.
The drop-down box left to the "Apply" button offers two or four choices. The number of
choises depends on the periodicity setting of the booking and the fact whether the
booking is linked to other bookings. The choices are:
▪
Change booking/reservation/appointment/occurence: Change the current booking.
▪
Remove booking/reservation/appointment/occurence: Remove the current booking.
▪
Change all occurences: Change all bookings that are linked together both in time as
well as spanning multiple diaries. Depending on your access rights, the changes may
not be applied to all intended bookings.
▪
Remove all occurences: Remove all bookings that are linked together both in time as
well as spanning multiple diaries. Depending on your access rights, not all intended
bookings may be removed.
Click "Apply" to process your changes. Click "Back" if you don't want to change the
booking.
Copy to diary: Select a target diary where you want to copy the selected booking to.
Click "Copy" to copy the selected booking to the target diary. The screen "Add booking" is
shown. You can change the booking before you save it. The new booking is linked with
the originating booking. This function is also useful for copying bookings within the same
dairy. To do so, select the current diary as the target diary.
Note that the screen offers two independent functions: editing a booking, and removing a
booking. You can only use one function at a time.
User Manual
17
AxiCal
Taking Ownership of a Booking
Depending on your access right, you
may take ownership of a booking you
haven't added yourself.
If you're allowed to take ownership of
a booking, then an extra checkbox
named "Ownership" appears in the
screen "edit/remove appointment".
Check "Take ownership of this
appointment" to become owner of the
booking and all linked bookings.
Click "Apply" to make your choice
happen.
See chapter The Edit Icon for more
information about the other input
fields.
You may use this function in the following example scenario: a person responsible for
meeting rooms is given the ability to approve meeting room reservations and make them
final. You can inquire your administrator for more information about this scenario.
18
User Manual
AxiCal
Work Schedules
When the administrator has activated work schedules for a diary, then you're able to edit
and assign work schedules in the week view.
Edit Work Schedules
Click
Edit work schedules in the week view to edit the work schedules that are part of
the diary. The edit screen is shown in a popup window of your web browser.
The booking system lets you keep track of up to five work schedules. The work schedules
are denoted with the letters A to E.
First you choose the work schedule you want to edit using the option "Select work
schedule". Then you fill in the times for each day of the week. You can set up to five
periodes a day. Finally click "Save" to store the settings of the selected work schedule.
You can repeat these steps to edit multiple work schedules. Note that, when you select a
work schedule, the times change to reflect the new selection. Hence it's important you
first select the work schedule before you start changing times.
Click "Close window" to close the popup window and return to the week view.
Assign Work Schedule
Click
Assign work schedule in the week
view to assign a work schedule to the
diary. The assignment applies to the week
that's being displayed above. It's the same
week as shown in the week view.
To assign a work schedule, choose a work
schedule from A to E using the option
"Select work schedule". Once selected, the
times are displayed. Click "assign" to
assign the work schedule to the diary for
the week displayed above.
To remove the currently assigned work schedule, choose "Remove work schedule" using
the option "Select work schedule" and click "Assign".
Click "Back" to return to the week view.
User Manual
19
AxiCal
Multiple Work Schedules
An important feature of assigning a work schedule to a diary is that the times of the work
schedule are duplicated for the selected week. If you edit the work schedule some time
later, doing so won't influence the times of the previously assigned work schedule in the
diary.
The five work schedules that you can edit, you should look upon as templates which you
may choose from to assign to your diary. Once you've assigned a template, you can
change it without influencing the diary. As a result, it's possible to work with more than
five different work schedules in a diary.
20
User Manual
AxiCal
Preferences
Click [Preferences] in the left side of the screen to edit your personal settings. The
preferences screen will be shown in a popup window of your web browser.
In order to edit your own preferences, the option
"Use custom settings" must be checked. When this
option is unchecked, AxiCal will apply the general
preferences as set up by the administrator.
Language settings:
▪
Language: Choose your language. Note that
the language settings of the login screen may
differ from your personal language setting.
General settings:
▪
Show popup messages: Choose whether or not
you want to see a confirmation following some
actions like adding a booking.
Date/time format:
▪
Date format: Select a format.
▪
Week starts on: Select Monday or Sunday.
▪
Time format: Select 12 or 24 hours.
These settings are primarily intended to choose
between European and American formats.
Color settings:
▪
Select color scheme: This description is selfexplanatory. After you've selected a color
scheme, the RGB values will be updated in the
remaining fields.
The remaining fields expect you to enter an RGB
value in a 6-digit hexadecimal representation.
Alternatively you can click the
icon to open a
popup window with a color picker.
Click the
icon to display an example of your
color choices.
Click the
icon to save your settings.
Just close the popup window if you don't want to save the changes.
User Manual
21
AxiCal
4 Mobile Usage
Overview
You can use AxiCal on your smartphone or any other mobile device with the capability to
access the Internet. This form of use is called the mobile user environment of AxiCal.
In the mobile user environment you always work with diaries rather than diary views
because of the limited dimensions of the screen. Nevertheless AxiCal offers access to the
diary views by showing them as three-letter abbrevations along with the diary names.
For example, in the following images, MRS/Acancagua room designates diary "Acancagua
room" in the diary view named "Meeting rooms".
Log in as a Standard User
To log in as a standard user, enter your user name and password,
and click the button "Login".
After you've logged in, you're always directed to the day view. The
administrator determines which diary you'll see first.
You can't log in as a guest user in the mobile user environment.
Day View
The day being displayed is mentioned in the top-left corner.
If you click [Log out], then you're logged out of the booking system
and you're directed back to the login screen.
When you select a diary and click the ">>" button, AxiCal will show
the selected diary.
Click the
icon to display the diary in the week view.
Click the
icon to display one day earlier.
Click the
icon to display one day earlier.
Click the
icon to display today.
Click the
icon to add a booking or edit a note.
Click the
icon to edit or remove the booking or the note.
Click the title of a booking to see the booking details.
Work schedule times are visible in the day view.
22
User Manual
AxiCal
Week View
The week being displayed is mentioned in the top-left corner.
Click the
icon to display one week earlier.
Click the
icon to display one week later.
Click the
icon to display the current week.
If you click [Log out], then you're logged out of the booking system
and you're directed back to the login screen.
When you select a diary and click the ">>" button, AxiCal will show
the selected diary.
Click the
icon to display the diary in the month view.
Click the
icon next to a date to display the diary in the day view
at the given date.
Click the
icon to add a booking or edit a note.
Click the
icon to edit or remove the booking or the note.
Click the time of a booking to see the booking details.
Work schedules are shown in a simplified way: you can only see
whether or not a work schedule is assigned on a daily basis by
means of the background color.
Month View
The month being displayed is mentioned in the top-left corner.
Click the
icon to display one month earlier.
Click the
icon to display one month later.
Click the
icon to display the current month.
If you click [Log out], then you're logged out of the booking system
and you're directed back to the login screen. When you select a
diary and click the ">>" button, AxiCal will show the selected diary.
Click the
icon to display the diary of the corresponding week in the week view. Click a
day to show the day view.
The background color indicates how much time of a day is booked:
▪
White: No bookings added this day.
▪
Green: 1% to 25% of the time is booked.
▪
Yellow: 26% to 50% of the time is booked.
▪
Orange: 51% to 75% of the time is booked.
▪
Red: 76% to 100% of the time is booked.
Work schedules are not shown in the month view.
User Manual
23
AxiCal
Bookings and Notes
Booking Details
In the mobile user environment you can query booking details from
the following view modes:
▪
Day view: Click the title of a booking.
▪
Week view: Click the time of a booking.
Click the
icon to export the displayed booking as a vCalendar
file. Your web browser will take over this task and accompany you
with saving the file.
Click the
icon to return to the previous screen.
The Add Icon
Click one of the
icons to add a booking or manipulate a note. If the icon isn't present
then you don't have the right to modify the diary.
Note that you can't manipulate notes in the week view.
Title: 30 characters at most.
Select type: Choose the booking type. The administrator decides
which booking types appear in this list.
Start time: Start time of the booking.
End time: End time of the booking.
Remove existing bookings on conflict: If checked, AxiCal will
overwrite/remove any conflicting booking. If unchecked, AxiCal
won't add the new booking in case it would conflict with an existing
booking. The availability of this option depends on your access
rights (you need at least write access to the diary or ownership over
the diary).
Description: An optional description of the booking. You may enter
more than one line of text.
Click "Add" to add the booking to the diary.
Note text: Enter a text for the note.
Click "Save" to store the entered note text.
Click one of the
icons to discard any changes or return to the previous screen.
Note that the screen offers two independent functions: adding a booking, and
manipulating a note. You can only use one function at a time.
24
User Manual
AxiCal
The Edit Icon
Click one of the
icons in a diary to edit, copy or remove a booking.
Title: Here you can edit the title.
Select type: Here you can adjust the booking type.
Start time: Here you can change the start time.
End time: Here you can change the end time.
Remove existing bookings on conflict: If checked, AxiCal will
overwrite/remove any conflicting booking. If unchecked, AxiCal
won't apply the edited booking in case it would conflict with an
existing booking. The availability of this option depends on your
access rights (you need at least write access to the diary or
ownership over the diary).
Description: Here you can edit the description of the booking.
The drop-down box above the "Apply" button offers two choices:
▪
Change booking/reservation/appointment/occurence: Change the current booking.
▪
Remove booking/reservation/appointment/occurence: Remove the current booking.
Click "Apply" to save your changes.
Nota that you can't edit or remove linked bookings in the mobile user environment.
User Manual
25