1
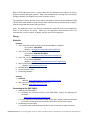
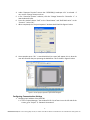
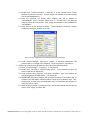
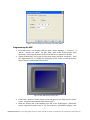
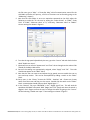
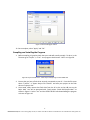
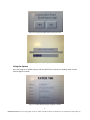
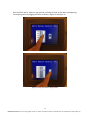
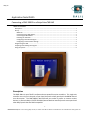
May-13 Application Note #5525 Connecting a DMC-30012 to a Beijer ExterT60 HMI Table of Contents Description ................................................................................................................................................. 1 Set-up......................................................................................................................................................... 2 Materials ............................................................................................................................................... 2 Connecting to the DMC-30012 ............................................................................................................. 2 Connecting the BLM Motor .................................................................................................................. 3 Powering the ExterT60 .......................................................................................................................... 3 Configuring Information Designer ........................................................................................................ 3 Configuring Communication Settings ................................................................................................... 4 Programming the HMI ............................................................................................................................... 6 Compiling and Installing the Program ....................................................................................................... 8 Using the System ....................................................................................................................................... 9 Description The DMC-300xx is one of Galil’s smallest and most powerful motion controllers. This single-axis controller not only fits in the palm of your hand, but packs a hefty punch with the 800W internal sine drive option. The DMC-30000’s dual Ethernet port makes it perfect to connect various devices; in particular Beijer’s EXTER T60 HMI (Human Machine Interface) touch screen panel and other Beijer panels that are DMC compatible. -1Galil Motion Control, Inc. 270 Technology Way Rocklin, CA 95765 USA 800-377-6329 Ph: 916-626-0101 Fax: 916-626-0102 www.galilmc.com Beijer’s EXTER T60 touch screen is a great choice for any application that requires an easy to program interface with great graphics. Beijer also provides drivers, through their Information Designer software, that supports up to 3-axis of motion control. This application note will provide a basic step-by-step guide on how to set-up both Beijer EXTER T60 and Galil’s DMC-30012 to create a simple touch interface that will allow the user to input a particular jog speed and to start and stop motion. Note: This application note is not meant to subsidize the manual for each of the components listed in the materials list below. Please use the appropriate documentation from the manufacturer in order to power, configure, and use each of the components. Set-up Materials Hardware 1. Galil’s single-axis motion controller with internal 800W sine amplifier Part number: DMC-30012 Website: www.galilmc.com/products/dmc-300xx.php 2. Galil’s Nema 23 Brushless Motor with 1000-line encoder Part number: BLM-N23-50-1000-B Website: www.galilmc.com/products/servo-motor.php 3. Galil’s 24V, 12A Power supply Part number: PSR-12-24 Website: www.galilmc.com/products/psr-power-supplies.php 4. Beijer EXTER T60 HMI Touch Panel Website: www.beijerelectronics.com 5. NETGEAR Dual Speed Hub DS104 6. 2x Cat5 Ethernet Cables 7. PC Running Windows Software 1. GalilTools Website: http://www.galilmc.com/products/galilsuite.php 2. Beijer Information Designer Demo Version 1.52 Website: www.beijerelectronics.com Connecting to the DMC-30012 1. Powering the DMC-300012 1.1. Following the instructions found in the DMC-30012 manual for powering the controller: www.galilmc.com/support/manuals.php 1.2. In this application we powered the DMC-30012 with a 24VDC, GND and connected the chassis to Earth ground as provided by the PSR-12-24 Galil power supply. 2. Establishing Communication 2.1. Download and install GalilSuite onto the PC that will be used to make connection: -2Galil Motion Control, Inc. 270 Technology Way Rocklin, CA 95765 USA 800-377-6329 Ph: 916-626-0101 Fax: 916-626-0102 www.galilmc.com http://www.galilmc.com/support/software-downloads.php 2.2. Connect an Ethernet cable from the host PC to the DMC-300012 and power up the system. 2.3. Open up GalilSuite and click the icon to open up the connections window. Find your DMC-30012 controller and assign the following IP address: 192.168.98.101. Connecting the BLM Motor 1. If the BLM-N25-50-1000-B motor was ordered at the same time as the DMC-30012, the encoder and hall lines are already properly wired to connect to the 15-pin D-sub Encoder connector and the motor phases are in the correct configuration. 2. The motor now needs to be sinusoidally commutated. For additional assistance in sinusoidal commutation and connecting to the motor phases see the Tech Talk “Wiring a brushless motor for Galil’s Sine amplifier” found here: www.galilmc.com/techtalk/drives/wiring-a-brushelss-motor-for-galils-sineamplifier/ Also take a look at Application Note 1501: “Brushless Sine Drives” found at: www.galilmc.com/support/application-notes.php 3. Once satisfied with the your start-up and commutation sequence, un-plug the Ethernet Cat5 cable from the PC side and place it into the NETGEAR Dual Speed Hub DS104 leaving the other end connected to the DMC-30012. Powering the ExterT60 1. Use the EXTER T60 user manual, found on the webpage link provided above to find the appropriate way in which to power the HMI device. 2. This model of the EXTER T60 required +24VDC, GND, and Earth ground to power the device, thus Galil’s PSR-12-24 power supply was perfect for powering both the HMI device and the DMC-30012 single-axis motion controller. 3. Plug in one of the Cat5 Ethernet cables to the RJ-45 connector on the back of the EXTER T60 and the other end to the NETGEAR Dual Speed Hub DS104. Configuring Information Designer 1. Download the latest version of Information Designer from Beijer. During the writing of this application note, Information Designer Version 1.52 was the latest software version available. This software was also used on a Windows XP SP3 PC. It is important to note that some changes may occur as newer versions are released and results may vary for different operating systems. 2. Install Information Designer by following the instructions provided by the distributor. 3. Open Information Designer. In the menu bar, select “File” → “New.” A new window will appear titled “Project Properties.” 1 Note, in order to maintain proper communication with the Host PC, the host must also be within the subnet mask of 192.168.98.10. If the host PC is not within the same subnet mask, communication will be lost immediately. -3Galil Motion Control, Inc. 270 Technology Way Rocklin, CA 95765 USA 800-377-6329 Ph: 916-626-0101 Fax: 916-626-0102 www.galilmc.com 4. Under “Operator Terminal” ensure that “EXTERT60(c) Landscape 1.5x” is selected. If not, use the “Change” button to do so. 5. In the “Controller Systems” selection, click the “Change” button for “Controller 1.” A new window will open. 6. From this window choose “Galil” as the “Brand Name” and “Galil DMC series” as the “Protocol.” Select “OK.” 7. When completed, the “Project Properties” window should look like Figure 1 below: Figure 1: Project Properties Window 8. Once complete press “Ok.” A new blank block (or screen) will appear--this is what the user will see when they are operating the HMI device. This is shown in Figure 2 below: Figure 2: A new project opened in Information Designer Configuring Communication Settings 1. Changing the IP address of the ExterT60 1.1. In the “Project Manager,” the window full of a list of items in on the left side of the screen, go to “Project” → “Network Connections” -4Galil Motion Control, Inc. 270 Technology Way Rocklin, CA 95765 USA 800-377-6329 Ph: 916-626-0101 Fax: 916-626-0102 www.galilmc.com 1.2. Double click "TCP/IP connection 1, 192.168.1.1" A new window titled “TCP/IP Network Connection” will open. This will change the network connection settings of the ExterT60 HMI device. 1.3. Since the controller has already been assigned with the IP address of “192.168.98.10” and it’s default subnet mask is “255.255.255.0” the ExterT60 needs to match this subnet mask. Thus, change the IP address from the default to “192.168.98.1.” 1.4. Leave the rest of the settings to default. “TCP/IP Network Connection” window should look like Figure 3 below. Press “OK.” Figure 3: Proper configuration for ExterT60 communication settings 1.5. Under “Project Manager,” again go to “Project” → “Network Connections” and perform steps 1.3-1.4 again, but instead for "TCP/IP connection 2, 192.168.1.1." 2. Configuring communication between the ExterT60 to the Galil DMC-30012 2.1. Go to “Project Manager” → “Project 1” → “Peripherals” 2.2. Double click “Controller 1: Galil/Galil DMC series.” A new window will open up called “Properties for Galil driver.” 2.3. Under protocol select “Ethernet” and under “IP address:” type in the address we already assigned to the DMC-30012: “192.168.98.10.” 2.4. IMPORTANT: Information Designer will automatically choose “Port number: 502” as a default. The DMC-30012 standard product cannot act as a Modbus slave. Thus, choosing this port will cause communication issues. Instead make sure to choose a UDP port, such as “1024.” 2.5. When all the properties are chosen correctly, your window should look like Figure 4 below. Press “Apply” and then “OK.” -5Galil Motion Control, Inc. 270 Technology Way Rocklin, CA 95765 USA 800-377-6329 Ph: 916-626-0101 Fax: 916-626-0102 www.galilmc.com Figure 4: Correct settings for connecting to the DMC-30012 Programming the HMI 1. If the Main block is not already visible go under “Project Manager” → “Project 1” → “Blocks.” Double click “Main” The grey, blank, main screen should present itself. Remember, everything that shows on this screen will be as it appears on the HMI. 2. (Optional) With that in mind, right click the blank screen and select “Properties.” Go to the “Appearance Tab” to change the background of the screen to ones preference. Figure 5 shows a modified Main block below: Figure 5: Main HMI block with extra flare 3. In the Library, under the “Slide” object, click and drag one of the slides onto the “Main” screen. A menu will automatically open titled “Scale *.” 4. Under the “General Tab” of this window, type “JG0” in the “Analog signal.” (More Galilspecific supported functions such as “JG” can be found in Information Designer; From -6Galil Motion Control, Inc. 270 Technology Way Rocklin, CA 95765 USA 800-377-6329 Ph: 916-626-0101 Fax: 916-626-0102 www.galilmc.com the file menu, go to “Help” → “Controller Help” a brief communication manual for the Galil DMC controller will open up, a full list of functions can be found by going to the “Addressing” chapter.) 5. Now that the scale object is set to an equivalent command on the Galil; adjust the following to make the for the user by setting the “Scale division” to “2000,” “Scale Ticks” to “1000,” “Minimum value” to “0,” and lastly, “Maximum Value” to “10000.” Correct settings are shown in Figure 6. Figure 6: Correct settings for the Slide Object 6. To make the Jog speed adjustable by the user, go to the “Access” tab and check the box titled “Enable user input.” 7. (Optional) You can use the “Appearance” and “Font” tab to change how the scale will be viewed on the Beijer HMI screen. 8. Once all the settings are appropriately assigned, select “Apply” and “Ok.” The scale should now appear on the “Main” block. 9. Now that the user can now set and adjust the jog speed, we must enable the user to start and stop motion. This can be accomplished by adding a switch to the “Main” block. 10. Once, more, in the “Library” choose the “EXTER -- Switches” tab. Choose any 2-state switch from the menu and drag it to the screen. Double click the switch on the “Main” block--a new window should open up titled “Digital Signal *.” 11. In the “General” Tab, type “MOTION0” in the “Digital signal” box. This will send the equivalent Galil DMC commands “BGX” (Begin) and “STX” (Stop) each time the switch is toggled. Don’t forget to allow the user to change this switch by going to the “Access” tab and selecting “Enable user input.” These settings are shown in Figure 7. -7Galil Motion Control, Inc. 270 Technology Way Rocklin, CA 95765 USA 800-377-6329 Ph: 916-626-0101 Fax: 916-626-0102 www.galilmc.com Figure 7: Correct settings for switch 12. Once complete, select “Apply” and “Ok.” Compiling and Installing the Program 1. Before compiling it’s good to check that your code will actually compile. To do so, in the file menu go to “Project” → “Test” Your program should return “valid” as in Figure 8. Figure 8: Project should return "valid" before transferring it to the EXTER T60 2. Ensure that you have a flash drive currently connected to your PC. From the file menu select “Transfer” → “Export Project File Transfer” and save your project on the flash drive as “Project 1.dat” 3. Once saved, safely remove the flash drive from the PC to the to the USB port on the Bejier HMI. You will be prompted with “Load project: \Hard Disk\Project1.dat?” as shown in Figure 9. Select “Yes” and the EXTER T60 will start downloading the program as shown in Figure 10. -8Galil Motion Control, Inc. 270 Technology Way Rocklin, CA 95765 USA 800-377-6329 Ph: 916-626-0101 Fax: 916-626-0102 www.galilmc.com Figure 9: Prompt from EXTER T60 to load Project1.dat Figure 10: Program loading sucessfully onto the EXTER T60 Using the System Once the program is loaded properly and the EXTER T60 is booted, the loading screen should look like Figure 11 below. Figure 11: EXTER T60 booting after program is loaded -9Galil Motion Control, Inc. 270 Technology Way Rocklin, CA 95765 USA 800-377-6329 Ph: 916-626-0101 Fax: 916-626-0102 www.galilmc.com One should be able to adjust the jog speed by touching the slide up and down and beginning and stopping motion by toggling the switch as shown in Figure 12 and Figure 13. Figure 12: Using the slide to adjust the speed in counts/second Figure 13: Using the switch to begin motion - 10 Galil Motion Control, Inc. 270 Technology Way Rocklin, CA 95765 USA 800-377-6329 Ph: 916-626-0101 Fax: 916-626-0102 www.galilmc.com