1
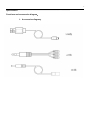
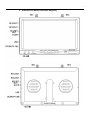
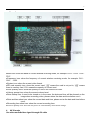
1 Wireless Receiver DVR RC732-DVR User manual DVR operation instruction.................................................................................. Functions and accessories diagram ……………………………………………… 1 Function setting menu........................................................................................... Loop Record........................................................................................... Date Stamp........................................................................................... Memory Info........................................................................................... Format............................................................................................... Language........................................................................................... Date/Time....................................................................................... Default........................................................................................... Beep........................................................................................... TV Standard.................................................................................. Auto Power Off........................................................................................ Battery Type........................................................................................ Remoter Type........................................................................................ LCD Brightness........................................................................................ LCD Full Screen........................................................................................ Version........................................................................................ 2 Volume Adjustment................................................................................................... 3 Wireless receiving mode........................................................................................... 4 AV IN mode................................................................................................. 5 Video recording.................................................................................................... 6 Video playback................................................................................................... Playback................................................................................................... Playback setting menu................................................................................... Delete........................................................................................... Lock................................................................................... Unlock........................................................................................... Thumbnail.......................................................................................... 7 indicator light........................................................................... 8 product parameter........................................................................... Other special functions.............................................................................................. 1 Connect to computer.............................................................................................. 2 Connect to TV.......................................................................................... 3 Switch channel mode synchronously in the sky………………………………………………. 4 Connect to AAT antenna …………………………………………………. 2 Specification.................................................................................... ................... Functions and accessories diagram: 1. Accessories diagram: 3 2. interface and button functions diagram: 4 RC732-DVR operation instruction 1 Functions setting menu ■ Long press “MENU” button to enter main menu. ■ Press “Group(+)” or “Channel(-)” button to choose different menu, then press “OK(●)” to enter setting. Loop Record ●When you open this setting, and click OK(●) button to begin recording. when the memory card is full, it will delete the earliest video file, then continue recording, until clicking “OK(●)” to stop recording or turn off monitor or turn off automatically in low voltage. ●It supports 2GB ~ 32GB SD card. Date Stamp ●When turning on “Date Stamp” function, it could show the date, time on the video while recording. ●Note: You have to revise the date and time when you sue “Date Stam” function. Memory Info ●”Memory Info” function is used for checking memory card space information. Format ●Perform formatting operation will delete all files in the memory card, please backup useful documents to other storage before formatting. ●Formatting operation just could format the memory card you are using now. Language ●Please choose the language you want. ●Language: English, simple Chinese, traditional Chinese, German, French. Date/Time ●Press “Group(+) or Channel(-)” to set number, “OK(●)” means confirming setting. ●We suggest to set time before using every time, make sure the time and date are right in the recording files. Default ●This function could make the system restore to factory settings. Beep ●When you turn on this function, it will have prompt tone when you operate menu. TV Standard ●Set the size of recording video ●Optional: PAL(720×576)、NTSC(720×480) Auto Power Off 5 ●It could be set the time (5min, 3min, 1 min) of turning off when there is no signal. Battery Type ●Low voltage protection function, please choose the battery (2S, 3S, 4S, 5S, 6S) you use, if ignore this choice, it means low voltage protection function is closed. Remoter Type LCD Brightness ●There are 5 grade for the LCD brightness in this mode, you could choose different brightness according to the site . LCD Full Screen ●When this mode turn on, it could show the video in full screen. It will show 4:3 when closed. Version ●You could see the system version in this menu. 2 volume adjustment ●The volume is set to minimum after turn on. the system set minimum volume. ●Long press “Group(+)” to increase volume, long press “Channel(-)” to decrease volume, the volume will be showed on the right of screen. 3 wireless receiving mode ■ Disconnect AV IN to camera, the monitor is working in wireless receiving mode, after connect AV IN to camera, it will switch to AV IN mode automatically. ■ How to use wireless receiving function to receive audio and video ●Make the antenna point to the top of monitor, the signal will be more stable. ●Press “Group(+) and Channel(-)” to adjust band and frequency, and be consistent with the band of transmitter. ( please refer to transmitter user manual). ●If other interferential signal lead to bad image, please switch to other band to avoid interference. ●Band selection and resulting frequencies: FR FR CH CH CH1 CH2 CH3 CH4 CH5 CH6 CH7 CH8 FR: A FR : B FR: E FR : F 5865M 5845M 5825M 5805M 5785M 5765M 5745M 5725M 5733M 5752M 5771M 5790M 5809M 5828M 5847M 5866M 5705M 5685M 5665M 5645M 5885M 5905M 5925M 5945M 5740M 5760M 5780M 5800M 5820M 5840M 5860M 5880M 6 ■ Menu diagram on screen: ●Band icon: show the band of current wireless receiving mode, for example: FR:A、FR:B、FR:E、 FR:F. ●Frequency icon: show the frequency of current wireless receiving mode, for example: CH1 、 CH2、...CH8. ●System icon: show the current video format. ●SD card capacity icon: show the current card, “ M ” means the card is not put in, “ SD ” means there is memory card, 10% means the capacity of current card. ●Files quantity icons: show the quantity of files in the current SD card. ●Volume prompt icon: show the current volume level. ●Date Stamp icon: it need to be turned on in the menu, the date and time will be showed on the image when recording video, please revise the date and time before use it. ●Date and time show icon: show the current date and time, please revise the date and time before use it. ●Recording time show icon: show the current recording time. ●Electric quantity icon: show the left power of current battery and current voltage. 4 AV IN mode Use other audio&video signal through AV cable 7 ●use AV cable connect to monitor AV IN interface, the yellow RCA on the other side connect to video signal source, white or red RCA plug connect to audio signal source. Menu diagram on screen ●AV IN: it means it is in AV input mode now. ●Other icons on screen refer to the icons on wireless receiving mode. 5 record video ■ Record operation ●when preview the video, press OK(●) button could start to record video, it will show the record time beside red recording icons. For example, “00:10:02”, means that it has recorded 10 mins and 2 seconds, press OK(●) again could exit recording. ■ Recording related functions: ●It could show the time when making videos, if you want this function, please switch to functions setting menu. ●It will save the file automatically if the monitor turn off because of low voltage. 6 Video playback ■ Playback ●Press “playback” button, it will enter video playback mode. ●Button functions in “playback” mode MENU button: set menu, stop play Group(+): it is a choice in playback menu, long press will increase volume in preview status, short press could set rapid multiple in playback mode. Channel(-): it is a choice in playback menu, long press will decrease volume in preview status, short press could set fast reverse multiple in playback mode. OK(Search): play/ pause Press “playback” again to exit playback mode. ●It will show the playback time and total time on screen in this mode. For example: 00:05:08 / 00:10:02 ■ Playback setting menu ●After entering playback mode, press “Group(+)/Channel(-)” to switch playback menu setting; press “OK(●)” to confirm setting. 8 Delete ●Press “MENU”, it will popup menu, choose delete, you could choose all files and single file after entering setting. ●If the file is set up to protect, then can’t delete the protected file. Lock ●Setting video file to protect status, it could prevent delete files accidentally. ●You could choose all file or single file to protect. ●Note: formatting operation will delete all the files in the current memory card, it won’t be restricted by this setting. Unlock ●It could unlock the protected video, then you could delete unwanted files. ●Unlock protect could be used for all files and single file. Thumbnail ●Before playback file, you could see the menu in thumbnail, it is convenient to choose the file you want to playback. It could show 9 files at most every time, press “MENU” to exit thumbnail. ●In playback mode. Long press “OK(●) ” button could enter thumbnail mode directly. 7 Indicator light ■ Status indicator ●When work normally, the green indicator will be always light. ●When recording, red indicator will be always light. 8 Product introduction 1) GROPU/+: In default mode, press one time means choose band group, A, B, E, F bands will be chosen recurrently; after pressing “MENU”, this button will be number + . 2)CHANNEL/-: In default mode, press one time means choosing channel from 1 to 8. After pressing “MENU”, this button will be number - . 3)MEUN: LCD screen adjust parameter, parameter could be adjusted by +/-, press “MEUN” to choose different adjustable items. 4) SEARCH: Press this button to begin signal searching, it will find strong signal and keep on this band, if can’t find signal, it will stop on the band before searching, in searching process, all buttons can’t be operated. 5) SOURCE DIVERSITY:In this mode, it will show the stronger signal between RF 1 to RF 2 to reach the best wireless receiving result. RF 1 and RF 2 will blink alternately; 9 RF 1:RF 1 receive signal separately; RF 2:RF2 receive signal separately; AV IN:input AV signal from outside; 6)POWER: Press for 0.5s to turn on, press 0.3s to turn off. 2:JACK: 1)RF A AV OUT:RF 1 receive AV signal output, it should be in “RF 1” mode; 2)RF B AV OUT:RF 2 receive AV signal output, it should be in ”RF 2” mode; 3)DIVERSITY AV OUT:DIVERSITY receive AV signal output, it should be in “DIVERSITY” mode; 4)DC/+12V:DC IN,+12Vpower supply, working current is 650 mA @12V, the battery built-in max current is 850 mA @12V, if the monitor work when charging, please pay attention to choose rated current is more than 2A/1Vcharging equipment; 3:Battery Built in 7.4V 2800mAH large capacity LI-POLYMER battery, when the battery is charging, the red indicator on the bottom of left side will be light, if charged full, the green indicator will be light. Note: if the monitor don’t work for a long time, please charge it every 3-6 months to keep battery electric quantity. Size: 180mm x 120mm x 50mm Power source: DC 7~28V Working temperature: -10℃~ + 65 ℃ Other functions: 1 Connect to PC This monitor support standard USB2.0, and also could use standard USB data cable connect to PC, support hot plug. 2 Connect to TV(AV OUT) Please according to the local television system, set “NTSC” or “PAL” in “Setup ” menu. Plug the AV cable to this monitor, the yellow RCA (video) plug to TV video input socket, white or red RCA (audio) plug to TV audio socket. Basic specifications system LCD Video size:PAL(720×576)、NTSC(720×480) Image:MP4, single voice Memory card: Support SD card, max 32GB Wireless receiving: 32channels, -90dBm Rx sensitivity 7″800*480 high definition screen 10 Input output interface RF1/OUT: audio/video output RF2/OUT: audio/video output and RF1/RF2/OUT: audio/video output AV/IN: audio/video input USB: USB2.0 DC IN: 7-28V