1
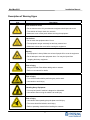
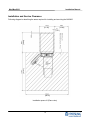
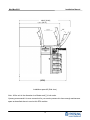
MoniMax5600
Installation Manual
Copyrightⓒ Nautilus Hyosung Inc. 2009 All right reserved
MoniMax5600
Installation Manual
Table of Contents
Warning Signs
Common precautions for safety ····················································································· 3
Description of Warning signs ························································································· 4
Packing Dimensions
On-Site Packing Dimensions ···························································································· 5
Installation Information
Installation Condition and Space ···················································································· 6
Tools required for installation ························································································· 6
System Installation
Unpacking the System ···································································································· 7
Physical Installation ········································································································ 9
Clearance Information
Terminal Dimensions ····································································································· 12
Installation and Service Clearances ············································································· 14
Precautions
······················································································································ 16
2
MoniMax5600
Installation Manual
Warning Signs
Common precautions for safety
Noncompliance with safety precautions mentioned in this manual can
result in bodily injury and/or product damage. This warning symbol is
used along with appropriate warning messages.
And it is also used to denote that the written text is related to safety.
Be sure to read and understand the following safety precautions before handling the product.
1. Follow the procedures shown in this manual.
2. Please comply with the safety precautions in this manual and on the product.
If you do not follow these precautions, bodily injury could result.
3. Do not attempt to operate the product in ways other than mentioned in this manual.
4. If a problem persists even after following the procedures laid out in this manual, please contact
our customer service department.
5. This equipment shall not be set up to make automatic calls to the telecom ‘111’ emergency service.
6. This equipment is not intended to be connected to a line in parallel with other terminal equipment.
7. This equipment should not be used under any circumstances which may constitute a nuisance to
other telecom customers.
3
MoniMax5600
Installation Manual
Description of Warning Signs
Sign
Description
Risk Of Electric Shock
• Do not remove cover. Only a maintenance engineer should open the cover.
• To avoid risk of electric shock, do not touch.
• Make sure to turn off the power before servicing the equipment.
Hot Surface
• Do not touch the equipment when it is on.
• The equipment can get extremely hot and may cause a burn.
• Make sure to close the cover before running the equipment.
Moving
• The equipment is heavy. Make sure at least 2 people lift or move the equipment
• Do not attempt to move the equipment alone. You may be injured from
dropping the heavy equipment
Risk of Injury
• Always lock Push-Plate before adding cash to cassette.
• Refer to user manual for details.
Risk of Injury
• Turn off the machine before performing any service work.
• Use caution to avoid injury
Handling Heavy Equipment
• You may be injured if machine is dropped or mishandled.
• Use caution when moving the machine to avoid injury
Risk of Injury
• Use caution when operating the push-plate to avoid injury.
• The covers should be locked to avoid injury.
• Refer to operating manual before installing the cassette.
4
MoniMax5600
Installation Manual
Packing Dimensions
On-Site Packaging Dimensions
The design of packing used on below picture is structured for shipping of MX5600 by load or air/sea
freight. The dimension of the out box is ‘H1890mm / W600mm / D1150mm’.
5
MoniMax5600
Installation Manual
Installation Information
Installation condition and space
Following conditions should be met before installing equipment.
● Temperature should be between 41~104°F (operating), 14~140°F (storage).
● Relative humidity should be between 25~85% (operating) / 10~90% (storage)
● Avoid locations where intense direct light is reflected off the LCD screen.
● Avoid locations where strong static electricity can occur.
● The floor must allow easy wheelchair access from the front or the side.
● Space required for servicing the machine should be considered before installation.
Tools required for installation
In order to move the machine and place it in a proper location, you need to get help of professionals
trained in moving heavy equipment.
Following tools are needed to install the machine.
Wire cutter
Lifter
Screw driver (Flat, Phillips)
Wrench (Spanner)
Leveling tool
Silicone
Silicone gun
6
MoniMax5600
Installation Manual
System Installation
Unpacking the System
Unpack the machine on top of the palette.
● Cut the straps that are fastened around the box with a knife. (refer to Fig.1)
(Be careful when cutting the straps.)
● Use an appropriate tool to remove the nails from the palette. (refer to Fig.2)
● Remove the lid, then box from the top. Do not discard the packaging materials until you have verified
any shipping damage claim. Contact your distributor immediately if you see any shipping damage.
Store the box in a safe place to re-use or discard of appropriately.
● Verify the contents carefully with the packing list to be sure all items listed are included. Notify your
distributor of any shortages.
●If only the palette needs to be removed, lift the whole machine from the bottom and set it aside.
Fig.1
Fig.2
7
MoniMax5600
Installation Manual
Equipment
Locking Bracket
Fig.3
8
MoniMax5600
Installation Manual
Physical Installation
To install MX5600 ATM, perform the following steps.
● Place the “Anchor bolts locate sheet” at the place where the machine is to be installed. (Refer to
Fig.4, 5)
● Place the system on a flat surface. Be careful when opening the top or bottom of the machine
because it can be off balance
● Place the Anchor nuts into the ground according to the anchor bolts locate sheet.
(4 places)
● Place MX5600 ATM on top of the sheet.
● Open the Security cover with the key provided.
● Using the supplied combination, open the Security Door. The combination should be changed as
soon as possible.
● After the anchor nuts are in place according to the anchor holes on the bottom of MX5600 ATM,
tighten the anchor bolts tightly. (Refer to Fig.5)
Fig.4 Placing MX5600 ATM on top of the sheet
9
MoniMax5600
Installation Manual
Fig.5 Anchor diagram of MoniMax5600 ATM
10
MoniMax5600
Installation Manual
<< Anchor Setting>>
1. Select an appropriate installation area and stick this label on the floor as the picture. Place keep
minimum distance from the wall or object.
(Notice) When you install the ATM machine between the wall and the object, the front of the ATM
machine must stick out approximately 50mm (2 inch) from the wall so that front door can be
opened without any problems.
2. Make 4 anchor holes.
3. Place the ATM machine over the fixed label so that anchor holes line up according to the picture.
Adjusting the System Height
System heights can be adjusted by adjustor bolt
● Lower the height as much as possible while making it as level as possible.
● Keep the vault within 145.8mm (5.7 inch) from the floor since this ATM machine can fall if
133
145.8
you turn the adjuster too much.
● Adjust the position of the machine so that the door can be opened and closed easily.
● Use leveling tools to check if the machine is level.
11
MoniMax5600
Installation Manual
Clearance Information
Terminal Dimensions
The following diagrams are description system dimensions for MX5600 based on UL-291 Level-1.
12
MoniMax5600
Installation Manual
The following diagrams are description system dimensions for MX5600 based on UL Business-Hour.
13
MoniMax5600
Installation Manual
Installation and Service Clearance
Following diagram is describing the areas required for installing and servicing the MX5600.
[21.38]
[18.84]
[51.57]
[26.97]
[1.57]
[59.06]
Installation space #1 (Plane view)
14
MoniMax5600
Installation Manual
1494.5 [58.84]
[50.75]
30°
[58.43]
Installation space #2 (Side view)
Note : All the unit in the dimension is millimeter and [ ] is inch scale.
Hyosung recommends it is more convenient for your service personnel to have enough maintenance
space as described above to service this ATM machine
15
MoniMax5600
Installation Manual
PRECAUTIONS
MX5600 has system battery back up units as optional itself to grantee customers transaction
safety when losing power status. This function will proceeding automatic safe shut down either.
But we are recommending to use UPS system for power sourcing to ATM.
This is basic requirements before turn on the system.
● Check the OUTPUT voltage of power source before inserting ATM power cable into it.
● Dispatch all the unit holder tapes and a desiccant pack form ATM
● This machine should be connected to a dedicated power circuit.
This circuit must consist of LINE, NEUTRAL and GROUND leads connected directly to the power
circuit breaker panel. This circuit cannot be shared with any other equipment.
● Make sure that the outlet of power at installation site should be grounded by using of meter.
It is ok that the voltage measurement between mutual and ground lead in outlet is less than 5.0V
● You can find out that there are 2 types of cables outside the safe door.
- Main Power Supply Cable
- Communication cable.
● Connect power cables and communication cable properly.
16