1
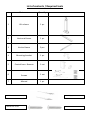
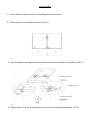
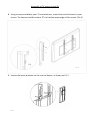
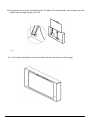
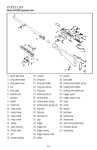
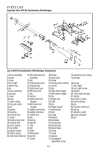
K-SERIES TV LIFT
ECO-VERSION
User Manual
List of contents / Required tools
Part name
Quantity
1
Lift column
1 pc.
2
Horizontal beam
1 pc.
3
Vertical beam
2 pcs.
4
Mounting bracket
1 pc.
5
Control box + Remote
1 set
6
7
Screws
Manual
1 set
1 pc.
Screwdriver
Allen key „4”
Woodscrew 4x16
Woodscrew 5x16
Lift assembly
1. Level cabinet to be sure that it is standing stably on the floor.
2. Place column in the middle of cabinet. (Pic.1).
Pic.1
3. Use provided mounting bracket and attach column to the side of the cabinet. (Pic.2)
Woodscrew max 5x15
Mounting bracket
Woodscrew max 4x15
Pic.2
4. Attach base of the lift to the bottom of your furniture with woodscrews. (Pic.2)
5. Using attached screws mount horizontal beam to the column. (Pic.3)
Pic.3
6. Connect control box to the lift as on Pic.4.
Pic.4
7. Using 4 pcs. of woodscrews hang control box as on Pic.5 There’s no need to mount
control box to the side. Leave about 0,5 mm to have possibility to hang control box
easily.
Pic.5
Assembly of TV screen to the lift
8. Using screws provided by your TV manufacturer, mount the vertical beams to your
screen. The beams should be about 1¾ inch below upper edge of the screen. (Pic.6)
Pic.6
9. Loosen the lower brackets on the vertical beams, as shown on Pic.7.
Pic.7
10. Hang the screens with vertical beams mounted on the horizontal beam on your lift
(Pic.8). For easier assembly you can move up lift (see in control box manual).
Pic.8
11. Move the lower brackets on the vertical beam up and tighten the screws. (Pic.9)
Pic.9
12. Remember to connect all cables to the TV when lift is draw aside. You will be sure that
cables have enough length. (Pic.10)
Pic.10
13. For the final assembly mount the top lid of your furniture on the hinges.
CONTROL BOX MANUAL
K- ECO LIFT
control
box
VIEWING
POSITION
UP
UP
DOWN
SETUP
RC SET
POWER
Programming the VP (Viewing Position)
ATTENTION! You have to set the VP if you want all of the lifts functions to work properly.
To set the VP follow this procedure:
•
Press&Hold the SETUP button for about 3 seconds, until the red SETUP light is lit. You are now in the
programming mode.
•
Press&Hold the UP Or DOWN button to set the preffered position. You can change the movement speed in
the setup mode, by pressing the SETUP button once. There are 2 movement speeds.
ATTENTION! Two movement speeds are available in SETUP mode: slow and fast.
•
The second short press on SETUP button caused faster movement of lift.
When you have set your preffered position, press&hold the SETUP button for about 3 seconds, until you will hear
two short „beeps” and the red SETUP light is down. The viewing position is now set.
Remote Control assignment
To assign the remote control, Press the RC SET button and then press any button and hold one of the remotes
buttons for about 1 second. If the remote is assigned, you will hear a short „beep”.
ATTENTION! The remote assignment mode is active for about 30 seconds after pressing&holding the RC SET
button. If the signal from the remote is not received during this time, the control box will quit the remote
assignment mode.
Safety system
The contorl box monitors the energy consumption of your screen. After exceeding allowed current of motor (allowed
load of lift) control box cuts the power out and lift stops. After the obstacle iss removed lift is ready for working.
Display messages
The numeric display shows the information about the lift operation. If the display shows:
•
„0” Blinking – electric motor overload (current exceeded)
•
„1” Blinking – inactive function
•
„2” Blinking - power cut out when hiding the active screen
•
„3” Blinking – wiring loom not connected to the control box
•
„4” Blinking – lower limit switch activated
•
„5” Blinking – upper limit switch activated
Pressing any button will delete the display message.