1
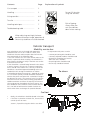
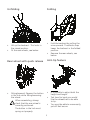
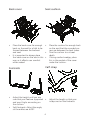
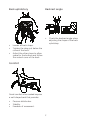
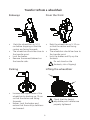
User manual
Rigid frame wheelchairs, English
74591C 13-08-15
ContentsPage
Explanation of symbols
Car transport ..................................
2
Handling ..........................................
3
Sitting comfort .................................
4-5
Transfer ............................................
6
Handling technique ..........................
7
Troubleshooting table ......................
8
Do not lift the chair
using the armrests.
Risk of tipping:
Always have the anti-tip stabilisers
down when moving.
When adjusting seat hight, balanceposition or backrest angle, operation of
the anti-tip stabilisers must be checked.
Vehicle transport
Mobility service bus
Etac’s wheelchairs are crash-tested and approved in
accordance with ISO-7176-19 and ISO 10542, with
attachment features and three-point belts from Unwin.
Etac recommends in the following order:
1) The user transfers to a seat in the vehicle and uses the
vehicle’s 3-point belt while travelling. The wheelchair is
then placed in the boot or safely in the back seat so that
it cannot overturn or roll.
2) The wheelchair is secured facing forwards in the vehicle
as per this manual, the user uses a separate 3-point belt
that is secured in the vehicle. This is the way in which the
wheelchair is tested and approved according to the ISOstandard for crash testing of wheelchairs in vehicles.
3) According to directive 2001/85/EC, appendix VII, point
3.8.3. there are specially marked wheelchair locations in
vehicles that permit transport with a wheelchair facing in
the direction of travel. If this means of travel is used, the
user/carer must be aware while travelling, prepared for
sudden movements and have the capacity to maintain a
safe sitting position throughout the entire journey. The
user’s disabilities must not be of such an extent that he/
she is not able to hold onto the handles fitted in the
vehicle when there are changes of speed or direction.
In conjunction with points 2 and 3:
- a 25668 positioning belt should be used
- a correctly adjusted headrest should be used
- the backrest should be level with or
above the user’s shoulders
- the parking brake should be used
- the anti-tips should be lowered
Car/taxi
•
Ideally, the wheelchair should be placed in the boot.
•
If the chair is placed in the back seat, ensure that it
cannot tip over or move.
Secure it, if possible using the vehicle's seat belts.
2
Tie-down
Unfolding
•
•
Lift up the backrest. This locks in
the raised position.
Fit the rear wheels, see below.
Folding
•
•
Fold the backrest by pulling the
wire upwards. The elastic strap
keeps the backrest in the folded
position.
Remove the rear wheels, see
below.
Rear wheel with quick release
Anti-tip feature
•
•
Fitting/removal: Depress the button
in the hub while fitting/removing
the wheel.
When assembling, always
check that the rear wheel is
correctly positioned.
The button in the hub must
spring out properly.
•
•
3
It is possible to adjust both the height and length.
Test how far back you would
like the wheelchair to be able
to tip.
You must be able to move easily,
yet still feel secure.
Back cover
•
•
Place the back cover far enough •
back on the seat for a fold to be
formed between the backrest
and seat.
•
It is important to always place
the back cover on the seat in this •
way, as it affects user comfort
when seated.
Footrests
•
•
Seat cushion
Adjust the height until you are
sure that your feet are supported
and your thighs are resting on
the cushion.
Split footrests: Adjust the angle,
so the ankles are at 90°.
Place the cushion far enough back
on the seat that the rounded corners are between the back tubes.
Trim the cushion to suit seat
depth.
If using comfort wedge, place
this in the pocket of the cover
under the cushion.
Calf strap
•
4
Adjust the length so that your
insteps rest on the footrests.
Back upholstery
Backrest angle
•
•
•
•
Loosen all back straps.
Tighten the strap just below the
curve of the back.
Adjust the other straps to allow
space for the bottom and follow
the natural curve of the back.
Comfort
Good comfort when seated requires a well-shaped seat that provides:
•
•
•
Pressure distribution.
Stability.
Freedom of movement.
5
Check the backrest angle when
adjusting the shape of the back
upholstery.
Transfer to/from a wheelchair
Sideways
•
•
•
•
From the front
Back the wheelchair up 5-10
•
cm before stopping so that the
castors are facing forwards.
The wheelchair should be close to •
the transfer point.
Lock the brakes.
•
Remove the armrest/siderest on
the transfer side.
Parking
•
•
Back the wheelchair up 5-10 cm
so that the castors are facing
forwards.
The wheelchair should be close to
the transfer point.
Lock the brakes and flip up the
footrests.
Do not stand on the
footrests, risk of tipping!
Lifting the wheelchair
Increase the support area of the
wheelchair by backing up 10 cm
so that the castors are facing
forwards.
Helper: Lock the brakes and
ensure that the anti-tip stabilisers
are lowered.
Check that the heightadjustable push handles are
properly tightened.
6
Travelling uphill
•
Travelling downhill
Lean your body forwards to correct
the centre of gravity.
•
•
•
•
Lean your body back to correct the centre of gravity.
Control your speed using the handrims, not the brakes!
Always travel up/down as directly as possible.
If you are unsure, ask for help.
Stairs
Kerbs
•
•
•
•
•
•
•
•
Always ask for help. We always
recommend using two carers for
this transfer.
Flip up the anti-tip stabilisers.
Ascending: With the wheelchair •
facing backwards.
Descending: With the wheelchair
facing forwards.
Never use an escalator, even with
a helper present.
7
Flip up the anti-tip stabilisers.
If you are unsure, ask for help.
Up: Balance the chair so that the
castors leave the ground. Lean
your body forwards and take a
strong grip on the handrims.
Down: Move forwards slowly so
that all four wheels touch the
ground at the same time.
Maintenance
Rear wheels: Clean quick release axles as required.
Tyre pressure: Check the tyre pressure, see tyre section (once/month).
Castors: Clean castor wheel axles as required.
Chassis: Clean the chassis with non-abrasive detergent, pH value 5-9 or with 70 % disinfectant solution. Rinse and dry.
Upholstery: Wash, see labels on each item.
In the event of problems, contact your dealer or Technical Aids Centre.
(!) If necessary, lubricate moving parts/joints with cycle oil or similar.
Troubleshooting table
•
•
•
•
•
•
Pump up the tyres
Adjust the angle of the front fork attachments
Check that the front fork attachments are fitted at the same height
The rear wheel mountings are incorrectly fitted
The user’s weight is not evenly distributed in the wheelchair
More strength being used on one side than the other when propelling
the chair
•
•
•
•
•
Pump up the tyres
The rear wheel mountings are incorrectly fitted
Clean any hair and dirt from the castor axles
Check the angle of the front fork attachments
Too much weight over the castors; adjust the chair’s balance position
The wheelchair is awkward •
•
to turn
•
•
Pump up the tyres
Check that the front forks are not tightened too much
Clean any hair and dirt from the castor axles
Too much weight over the castors; adjust the chair’s balance position
The wheelchair is pulling
diagonally
The wheelchair is “heavy”
to manoeuvre
The brakes are poor
•
•
Pump up the tyres
Adjust the distance between tyre and brake
The rear wheels are “loose” •
Adjust the hub axle length
The rear wheels are difficult •
•
to get on/off
Lubricate and clean the quick release with cycle oil or similar
Adjust the hub axle length
The castors “wobble”
•
•
•
The front forks have not been tightened sufficiently
Adjust the angle of the front fork attachments
Too much weight over the castors; adjust the chair’s balance position
The wheelchair feels
“unsteady”
•
•
Pump up the tyres
Check that screws and controls are properly tightened
Etac
Box 203, 334 24 Anderstorp
Tel +46 371 58 73 00
Fax +46 371 58 73 90
www.etac.com
Etac Supply Center AB
Långgatan 12
SE-334 24 Anderstorp
8
Sweden