1
Preface
Thank you for purchasing the ComColorExpress IS900C.
This product is a print controller that allows a RISO high-speed color printer to be used as a network-compatible
PostScript3 printer. This unit allows various functions such as data output and printer monitoring to be used from
Windows and Macintosh computers.
Organization of Instruction Manuals
There are three instruction manuals for this product.
• “Setup Guide”
This manual describes how to connect the IS900C and the installation procedures for the software that comes with
this product.
• “Printer Driver Guide”
This manual describes specific functions of and the setup procedure for the printer driver.
• “Utility Guide” (This Manual)
This manual describes Console functions for checking the status of and managing this product through a network,
and the software that comes with this product.
Read each of the manuals before using this product or when there is something you do not understand while using it.
Content of Instruction Manuals
Notes
1) Unauthorised reproduction of all or part of this manual is strictly prohibited.
2) Since there may be improvements to the product, the content of this manual may change in the future without
notice.
3) RISO takes no responsibility for effects resulting from this manual or the operation of this product.
Copyrights
Adobe, AdobePS, PostScript, PostScript3 and the PostScript logo are trademarks or registered trademarks of Adobe
Systems Incorporated.
AppleTalk, Macintosh and Mac OS are registered trademarks of Apple, Inc. in the United States and other countries.
Microsoft, Windows, and Windows Vista are trademarks or registered trademarks of Microsoft Corporation in the
United States and other countries.
SOFHA is a registered trademark of SOFHA GmbH, Germany.
Other product names and company names mentioned in this manual are trademarks or registered trademarks of
various companies.
Copyright © IS900C Manuals: 2009 RISO KAGAKU CORPORATION
Copyright © IS900C Software: 2006-2009 SOFHA GmbH
1
Contents
Icons Used in This Manual .................................................................................................. 5
Terminology used in this manual ..........................................................................................5
Basic Operations
6
Opening the Screen............................................................................................................. 6
Overview of the RISO Console Screen ................................................................................7
Logging in to the Print Controller ......................................................................................... 9
How to Log In .......................................................................................................................9
Functions for Guest Users / General Users........................................................................10
Creating a job .................................................................................................................... 11
Creating Archived Jobs ..................................................................................................... 14
Printing Jobs...................................................................................................................... 15
Other Operations
18
Queues .............................................................................................................................. 18
Checking Queue Settings ...................................................................................................19
Queue management...........................................................................................................19
Jobs (Job manager)........................................................................................................... 20
Checking Job Status...........................................................................................................20
Copying a Job to Another Queue .......................................................................................21
Moving a Job to Another Queue .........................................................................................21
Deleting a Job.....................................................................................................................22
Cancelling a Processing / Waiting Job ...............................................................................22
Rearranging Job Display Order ..........................................................................................23
Displaying Thumbnails of a Job (Job Preview)...................................................................23
Viewing / Editing Job Details ..............................................................................................24
Archived Jobs .................................................................................................................... 37
Editing Archived Jobs .........................................................................................................37
Merging Multiple Archived Jobs..........................................................................................41
Merging Pages from Multiple Archived Jobs ......................................................................42
Saving Archived Jobs to the Computer ..............................................................................43
Importing an Archived Job from the Computer ...................................................................45
Checking Printer Status..................................................................................................... 46
General...............................................................................................................................46
Paper trays .........................................................................................................................46
Output trays ........................................................................................................................47
Installable options...............................................................................................................47
Consumables......................................................................................................................48
Selecting Languages ......................................................................................................... 49
2
Contents
Administrator Settings
50
Administrator ..................................................................................................................... 50
How to Log In .....................................................................................................................50
Available functions for administrator...................................................................................50
Detailed Settings of the Print Controller ............................................................................ 51
General...............................................................................................................................52
Communication settings .....................................................................................................53
User management ..............................................................................................................55
Job settings ........................................................................................................................57
RIPs in network ..................................................................................................................59
Time settings ......................................................................................................................61
Monitor settings ..................................................................................................................62
Backup................................................................................................................................63
Customization Settings...................................................................................................... 66
Custom forms .....................................................................................................................67
Custom paper sizes............................................................................................................68
PCL tray mapping...............................................................................................................69
Color calibration................................................................................................................. 70
Profile management .......................................................................................................... 71
Uploading profiles [Upload profile...]...................................................................................72
Font management ............................................................................................................. 73
Reports .............................................................................................................................. 74
Log settings ........................................................................................................................75
Checking the System Events Log.......................................................................................77
Checking Accounting Information .......................................................................................78
Managing Custom Queue.................................................................................................. 80
Creating New Queues [New queue] ...................................................................................80
Deleting Custom Queues [Delete queue] ...........................................................................81
Changing Detailed Settings of Queues [Queue details...] ..................................................82
Stopping Queue Processing [Stop] ....................................................................................85
Resuming Queue Processing [Start] ..................................................................................85
Rebooting the Print Controller ........................................................................................... 86
Shutting Down the Print Controller .................................................................................... 86
3
Contents
Using the Included Utility Software
88
Utility Software................................................................................................................... 88
Using the RISO Management Tool.................................................................................... 89
Starting the RISO Management Tool .................................................................................89
Basic screen .......................................................................................................................89
Searching for Print Controllers on the Network ..................................................................90
Displaying Print Controller Settings ....................................................................................90
Adding Print Controllers to the List .....................................................................................91
Deleting Print Controllers from the List ...............................................................................91
Starting Up Print Controllers ...............................................................................................92
Displaying Latest Status .....................................................................................................92
Starting Up the RISO Console............................................................................................93
Using SMAP (Windows only)............................................................................................. 94
Starting SMAP ....................................................................................................................94
Direct Printing by SMAP .....................................................................................................95
Dragging and Dropping Files on the SMAP Icon on the Desktop.......................................97
Appendix
98
Feature Restrictions .......................................................................................................... 98
Troubleshooting................................................................................................................. 99
Index................................................................................................................................ 100
4
Icons Used in This Manual
Functions, operations and cautions are described as follows in this manual.
Important!
Note
describes items where care is necessary or where there are prohibitions.
describes items where there is particularly helpful information and ones where there is
something that should be known.
indicates the title and page of an item that should be referred to and thoroughly understood.
When the reference is to another manual, the name of the manual will also be noted.
WARNING
Caution
are safety cautions. “Safety Precautions” are described in a separate manual, “Setup Guide”. Be
sure to read them before using this product.
Terminology used in this manual
Job
The original data sent from the computer is not directly sent to the printer but temporarily stored in the print controller. The data in this status is called a “job”.
Queue
The jobs stored in the print controller are lined up in a “window” for executing print processing. Various settings on
how to process the sent jobs can be registered in this “window” in advance. This “window” is called a “queue”.
Log in
To create your own jobs, a login ID and password are required. The act of inputting such information in order to
access network and device is called “login”.
Icons Used in This Manual 5
Basic Operations
Accessing the ComColorExpress IS900C from your web browser enables you, among other things, to utilize the job
manager for output data, and to monitor the printer. This software is called “RISO Console”.
The software makes available a variety of convenient functions, including the [Create new queue] function that
reduces the time taken to set printing conditions, and the [Hold queue] function that enables quick printing by simply
calling up data uploaded in advance.
The basic functions and the operation method of the RISO Console are explained here.
• For details on functions available to guest users and general users, see “Other Operations” )p.18.
• For details on functions for the administrator, see “Administrator Settings” )p.50.
• For user authority (guest user / general user / administrator), see “Logging in to the Print Controller” )p.9.
Opening the Screen
1
Launch your Web browser.
2
Input the IP address in the address
bar of the URL.
See your computer operating manual or Help.
3
Press the [ENTER] key.
The screen of the RISO console is displayed.
In the address bar, enter http://the IP address of
the printer controller.
The administrator sets the IP address. Enter the
IP address (i.e. 192.168.8.70) confirmed by the
administrator.
Note:
• We recommend creating a desktop shortcut as
an easy way of displaying the RISO Console
screen.
• When accessing to the print controller by https
(encrypted communication), enter
https://(the IP address of the printer) in the
address bar.
It is also possible to access the print controller
automatically by https (encrypted communication). )p.53
• The RISO Console screen can be also displayed from [WWW] on the RISO Management
Tool. )p.93
6 Opening the Screen
Basic Operations
Overview of the RISO Console Screen
The screen layout of the RISO Console is explained below.
1) Menu
Displays submenu by moving the mouse pointer over
each menu button.
2) Login information input area
Logs in by entering the login ID and the password.
3) Message display area
Displays confirmation messages and error messages
related to the operation on the Console screen.
4) Job / Queue selection button
Clicking the Queue or Job button switches to the job list
of the selected queue or job type.
Note:
• Clicking the [My jobs] button after logging in displays
only your own jobs.
5) Status display area
Displays the current status of the printer and the print
controller.
Click to monitor the status of the printer (the RISO Console screen for the print controller is displayed).
6) Job list
The jobs in the print controller are listed according to the
processing status.
• Jobs in the queue
Displays a list of jobs in the selected queue or jobs of
the selected job type.
• Waiting jobs
Displays a list of jobs waiting in the print controller.
• Active jobs
Displays the jobs undergoing print processing while
being processed by the print controller.
• Finished jobs
Displays a list of finished, cancelled, and failed jobs.
Note:
• Clicking
on the upper-right corner of each list
box minimizes the list box. Clicking
when the
list box has been minimised returns the list box to
the normal size. Clicking
on the upper-right corner of the [Jobs of] list box closes the list box.
7) Job / Queue information display
When the queue has been selected, the function icons
and the general information of the selected queue are
displayed.
When a job has been selected in the job list, the function
icons and the general information of the selected job are
displayed.
Note:
• For details on icons displayed in the job list and job/queue information display, see “Icons” )p.8.
Opening the Screen 7
Basic Operations
Icons
The following icons are used in the job list and job/queue information display.
: Used to delete a job )p.22
: Used to print a job )p.15
: Used to cancel a job (becomes a job being processed) )p.22
: Used to edit a job or queue )p.24, )p.82
: Used to view and confirm queue settings )p.19
: Used to copy a job )p.21
: Used to move a job )p.21
: Used to upload a job )p.11
: Used to delete a custom queue )p.81
: Used to stop a queue (for normal queues only) )p.85
: Used to resume a queue* (for normal queues only) )p.85
* Displayed after you click
8 Opening the Screen
to stop a queue.
Basic Operations
Logging in to the Print Controller
There are the following three ways to log in to the print controller and three kinds of access authority.
• Without logging in (Guest user): The print controller is used without logging in. Only certain functions can be used.
• General user: Login using an “ID” and “Password” registered by the administrator. The general user has more
authority over his/her own jobs than the administrator. However administrator settings are not available.
• Administrator: Login using an administrator “ID” and “Password”. The administrator can configure the administrator
settings, such as print controller settings. )p.50
How to Log In
Enter the “Login (ID)” and “Password” in
the input area, and click the [Log in] button.
The “Login (ID)” and “Password” must be registered in
the RISO Console by the administrator in advance.
)p.55
For details, confirm with your network administrator.
To log out, click the [Log out] button.
Logging in to the Print Controller 9
Basic Operations
Functions for Guest Users / General Users
When using the RISO Console without logging in (guest user) or logging in as a general user, the following functions
are available on the RISO Console.
•
•
•
•
•
Viewing detailed settings of the print controller )p.51
Viewing how job processing is distributed over the network by the print controller (load balancing settings) )p.59
Checking printer status )p.46
Checking the settings of the queue )p.19
Uploading jobs )p.11
Note:
• When [Enforce login] has been set by the administrator using “User management” ()p.55), all the functions
except for logging in are not available.
When [Others can see jobs] has been set by the administrator using “User management” ()p.55), the following
functions are available for both guest users and general users.
•
•
•
•
•
•
•
•
•
•
Printing a job )p.15
Viewing the list of jobs )p.20
Viewing detailed settings of jobs )p.24
Copying jobs )p.21
Changing job settings, moving jobs* )p.21, )p.24
Cancelling a waiting job* )p.22
Importing archived jobs )p.45
Feeding back archived job )p.43
Merging archived jobs )p.42
Creating an archived job from a held job* )p.14
* Only jobs without an owner’s name
Note:
• When [Others can see jobs] is not set and you are logged in as a general user, these functions are available for
your own jobs.
When you are logged in as a general user, the following functions are available for your own jobs.
•
•
•
•
•
Editing job settings )p.24
Deleting the job )p.22
Moving the job )p.21
Cancelling job processing )p.22
Creating an archived job from a held job )p.14
10 Logging in to the Print Controller
Basic Operations
Creating a job
Normally jobs are created (sent to the controller) using the print driver, however, they can also be added directly to
a queue using the Console, as explained here.
Files with the following extensions can be used to create a job directly using the Console.
File extensions: pdf, ps, tiff (tif), pcl, zip
1
Click the queue button for adding
the job from the Job/Queue selection buttons (on the left side of the
screen).
Note:
The button of the selected queue is displayed.
2
With no job selected, click
of the
job / queue information display (on
the right side of the screen).
3
Select the file to add.
• When the target queue button is not displayed
in the screen, click the [More queues...] button,
and select a queue from the list of queues.
The [More queues...] button is displayed if the
administrator has created new queues.
After clicking the [Browse] button, select the file
on the file selection dialog box, and then click the
[Open] button.
Creating a job 11
Basic Operations
4
Click the [Upload job] button.
The job is added to the queue.
Note:
• The job can also be added to the queue by
moving the mouse pointer over the [Queue]
menu button and then clicking [Upload job...]
in the displayed submenu.
12 Creating a job
Basic Operations
Hotfolder
This function enables you to directly access queues in the print controller on the network. Queues are displayed as
folders. Therefore, the file is printed at the processing conditions set in the desired queue by simply dragging and
dropping it into that queue. The file can be printed or stored in the Hold queue without opening the application.
Note:
• The file formats that can be printed are as follows.
PostScript file, PDF file, TIFF file
Files that have no owner set for them cannot be printed when the printer mode is set to [Required] for the printer's
administrator setting (login setting).
• The SMB protocol and FTP protocol are supported for accessing the hotfolder.
1) Open Windows Explorer.
2) Enter \\(the IP address of the IS900C)\hotfolder (i.e. \\192.168.8.70\hotfolder) or ftp://(the IP address of the
IS900C)/queue (i.e. ftp://192.168.8.70/queue) in the address bar.
The hotfolder is displayed.
(For SMB)
(For FTP)
Note:
• We recommend creating a desktop shortcut as an easy way of displaying the hotfolder.
3) Drag and drop the file to print or hold on the desired queue.
The processing set in the queue is performed.
Creating a job 13
Basic Operations
Creating Archived Jobs
In order to create archived jobs, the following methods are available.
• When printing original data from the computer, set the [Destination] to [Archive] or [Print & archive] in the
[Workflow] screen of the printer driver.
For details, refer to the separate manual, “Printer Driver Guide”.
• For jobs sent to the print controller, set the [Destination] to [Archive] or [Print & archive] in the [Workflow]
screen of the job details screen. )p.34
• By merging the existing archived jobs, create a different archive job. )p.42
Note:
• The Secure print function cannot be set with data to be output to an archive. Data output to an archive can be freely
accessed from the RISO Console. It is recommended not to output confidential documents to archives.
14 Creating Archived Jobs
Basic Operations
Printing Jobs
You can print jobs that have been held, archived, etc.
1
Click the button to which the job to
be printed is registered from the Job
/ Queue selection buttons (on the left
side of the screen).
• To print a job registered in the Hold queue, click
the [Hold jobs] button.
• To print an archived job, click the [Archive
jobs] button.
• To reprint a failed job, this operation is not necessary.
2
Select the job to print from the job
list.
• To print a job registered in the Hold queue,
select the job from the job list in the Hold queue.
• To print an archived job, select the job from the
list of Archived jobs.
• To reprint a failed job, select the job from the list
of Finished jobs.
The information of the job is displayed in the
Queue / Job information display (on the right side
of the screen).
Note:
• The following operations are available here.
–
–
–
–
–
–
–
–
–
Viewing / Editing job details
Printing a job
Reprinting a job
Copying a job (to another queue)
Moving a job (to another queue)
Deleting a job
Cancelling a waiting/processing job
Rearranging job display order
Displaying thumbnails of a job (job preview)
Printing Jobs 15
Basic Operations
3
Change the job settings if necessary.
For details, see “Viewing / Editing Job Details”
)p.24.
Note:
• When an archived job is selected, click [Overview...] in the job preview to edit, delete pages,
etc. For details, see “Editing Archived Jobs”
)p.37.
4
Click
of the Job / Queue information display (on the right side of the
screen).
Printing will start.
Note:
• Jobs can also be printed by moving the mouse
pointer over the [Job] menu button and then
clicking [Print] from the displayed submenu.
• Jobs can also be printed by clicking the print
icon in the job list.
16 Printing Jobs
Basic Operations
Printing Jobs 17
Other Operations
Queues
There are two types of queues - Normal and Hold. Two types of queues - “Normal” and “Hold” - are prepared for the
print controller in advance. An arbitrary queue can be added by the administrator (Custom Queue).
Normal queue:
This queue is for actually printing or storing jobs as archive jobs. The jobs sent to this queue from the computer
are processed in chronological order.
Hold queue:
This queue is for storing jobs. The jobs sent to this queue from the computer are stored in the print controller. To
process jobs stored in the Hold queue, give commands such as printing a job, using the RISO Console.
Storing original data that are frequently used or shared documents in the Hold queue enables to print them without
opening the application and giving the command to print for every job from the RISO Console screen.
Note:
• “Normal” and “Hold” queues are pre-registered at the factory. These queues cannot be deleted. Moreover, the following settings can be changed.
– Normal: Queue code, priority, direct port, prechecking setting
– Hold: Queue code, prechecking setting
• The administrator can register various settings for processing jobs sent from the computer in the print controller as
a Custom Queue. )p.80
By registering frequently used print settings as a Custom Queue, jobs can be printed using the saved settings by
sending the data to the Custom Queue.
18 Queues
Other Operations
Checking Queue Settings
The processing conditions set for each queue can be checked as follows.
1
Select a queue to check by clicking
the Job / Queue selection button (on
the left side of the screen).
2
With no job selected, click
of the
job / queue information display (on
the right side of the screen).
A details screen of the queue is displayed.
Clicking the setting group icons at the top of the
screen switches the details screen.
Note:
• When the target queue button is not displayed
in the screen, click the [More queues...] button,
and select a queue from the list of queues.
The button of the selected queue is displayed.
Note:
• A details screen of the queue can be also displayed by moving the mouse pointer over the
[Queue] menu button and then clicking [Queue
details...] in the displayed submenu.
• For displayed items, see “Changing Detailed
Settings of Queues” )p.82.
3
After checking the setup, click the
[Close] button.
Queue management
The administrator can operate queues as follows. )p.80
•
•
•
•
Create new queues )p.80
Delete queues )p.81
Edit settings for the queue )p.82
Stop / Resume queue processing )p.85
Queues 19
Other Operations
Jobs (Job manager)
The original data sent from the computer to the print controller is stored in the queue of the print controller as a job.
Various operations can be performed using the RISO Console such as job copying, moving, deletion, queue setup
viewing and editing (The operations that are available depend on whether you are the job owner or not).
Job ownership
The user who sends a job to the print controller is the owner of that job. The owner of the job can operate the created
job (copy, move, delete, edit settings, etc.) in various ways.
Operation by other users than the job owner may be restricted by the administrator.
Note:
• In the Hold queue of the print controller, three sample jobs are stored at the factory -PCL Font Sample Page, PS
Font Sample Page, and Settings Page.
These sample pages cannot be deleted.
Checking Job Status
1
Click the queue button in which the
job is stored from the Job / Queue
selection button (on the left side of
the screen).
2
Click the job you want to check in
the job list.
A list of jobs stored in the queue is displayed.
The information of the job is displayed in the
Queue / Job information display (on the right side
of the screen).
The following operations are available here.
• Viewing / Editing job details
• Printing a job
• Reprinting a job
• Copying a job (to another queue)
• Moving a job (to another queue)
• Deleting a job
• Cancelling a waiting/processing job
• Rearranging job display order
• Displaying thumbnails of a job (job preview)
Note:
• Functions that cannot be operated according to
job authority or administrator settings are
greyed out and cannot be selected.
For details on user authority for each function,
see “Functions for Guest Users / General
Users” )p.10.
20 Jobs (Job manager)
Other Operations
Copying a Job to Another Queue
1
Select the job to copy from the job
list.
3
For details, see “Checking Job Status” )p.20.
2
Select the destination queue to
copy.
When the queue button is clicked, the job is added
to the destination queue.
Click
of the Job / Queue information display (on the right side of the
screen).
Moving a Job to Another Queue
1
Select the job to move from the job
list.
3
Select the destination queue to
move.
4
Click the [Yes] button in the confirmation dialog box.
For details, see “Checking Job Status” )p.20.
2
Click
of the Job / Queue information display (on the right side of the
screen).
After clicking the [Yes] button in the confirmation
box, the job is deleted from the original queue and
added to the destination queue.
Note:
• To cancel job moving, click the [No] button in
the confirmation dialog box.
Jobs (Job manager) 21
Other Operations
Deleting a Job
1
Select the job to delete from the job
list.
Note:
• The job can be also deleted by clicking the deletion icon in the job list.
For details, see “Checking Job Status” )p.20.
2
Click
of the Job / Queue information display (on the right side of the
screen).
3
Click the [Yes] button in the confirmation dialog box.
Note:
• To cancel job deletion, click the [No] button in
the confirmation dialog box.
Cancelling a Processing / Waiting Job
1
2
Click the job you want to cancel from
the [Active jobs] or [Waiting jobs]
list.
Click
of the Job / Queue information display (on the right side of the
screen).
Note:
• The job can be also cancelled by clicking the
cancel icon in the [Active jobs] or [Waiting
jobs] list.
22 Jobs (Job manager)
3
Click the [Yes] button in the confirmation dialog box.
Note:
• To cancel job cancellation, click the [No] button
in the confirmation dialog box.
The information of the cancelled jobs is displayed
in the [Finished jobs] list.
Note:
• Cancelled jobs can be reprinted or deleted. You
can select the job from the [Finished jobs] list,
and print or delete it in the same way as normal
jobs.
Other Operations
Rearranging Job Display Order
The job list is normally displayed with the first job to process at the bottom. (The order of actual processing of jobs
does not change.)
When you click the same item header repeatedly, the order alternative switches between ascending order and
descending order.
When you return the display of the job list to the actual processing order, arrange [ID] in descending order (chronological order with the newest job first).
Displaying Thumbnails of a Job (Job Preview)
1
Select the job from the job list in the
queue.
2
Click the job preview image.
A piece of the job thumbnail is displayed in the Job
/ Queue information display (on the right side of
the screen).
Thumbnails are displayed of all pages.
3
After checking the setup, click the
[Close] button.
Jobs (Job manager) 23
Other Operations
Viewing / Editing Job Details
1
Select the job to view / edit from the
job list.
Note:
• When there is no authority on editing and oper-
For details, see “Checking Job Status” )p.20.
2
Click
of the Job / Queue information display (on the right side of the
screen).
The detailed settings screen for the job is displayed.
ating the job,
icon, you can view detailed settings of the job.
(Settings cannot be changed.)
3
Change the job processing settings
if necessary.
When you click the icon at the top of the screen,
the screen will switch.
[Ok]: Click to save setting changes and end editing.
[Apply]: Click to save setting changes and continue editing.
[Cancel]: Click to cancel setting changes and end
editing.
Detailed settings screen for the job (Editing
screen)
For an overview of settings on each screen, see the next page onward.
24 Jobs (Job manager)
is displayed. By clicking this
Other Operations
[Basic] Screen
Configures settings for normal printing such as page size, orientation and paper type.
Settings
1) Page size
Displays the size of the original.
2) Orientation
Selects the orientation of printing the original.
3) Input tray
Selects the tray holding the paper for printing.
4) Paper type
Selects the paper type.
5) Color output mode
Selects color or single-color (black, cyan, or magenta)
printing.
6) Staple mode*
Staples printed paper.
7) Punch mode*
Punches holes in printed paper.
8) Quick print settings
Click a button for frequently used setting for originals to
be printed. Clicking the button closes the screen, and
starts processing according to the selected layout.
* Staple mode and Punch mode are available when a Multifunction Finisher is connected.
Note:
• For details of settings, refer to the separate manual, “Printer Driver Guide”.
Jobs (Job manager) 25
Other Operations
[General] Screen
The outline information and basic settings are displayed for the job.
Information displayed / Settings
1) Name*
Displays the name of the job.
2) Type
Displays the type of job.
The types of jobs that can be used are as follows:
PostScript(PS), PCL, PDF, TIFF, ASCII,
PPML (as option)
3) Status
Displays the processing state of the job.
4) PC name
Displays information on the job source (the name or IP
address of the computer).
5) Owner*
Displays the owner name of the job.
6) Source
Displays information on the port through which the job
has been received.
7) Pages
Displays the number of pages in the job.
8) Print pages*
Specifies the pages to print.
9) Copy count*
Specifies the number of copies to print.
10) Pages to print
Displays the total number of pages of the job (the
number of pages of the original x the number of copies).
11) Prechecking*
Displays the data precheck (data quality check before
output) setting.
Clicking the [Restart prechecking...] button performs
the data precheck processing. )p.83
* If you have the authority, it is possible to change or process the file.
26 Jobs (Job manager)
Other Operations
[Layout] Screen
Configures the imposition method and enlargement / reduction rate for printing.
Settings
1) Duplex
Selects whether or not to perform duplex printing.
2) Page size
Displays the size of the original.
3) Orientation*
Selects the orientation of printing the original.
4) Output size
Selects the paper size for printing.
5) Scale to fit
Places a checkmark in order to print the original data
with its size automatically enlarged / reduced to fit the
output paper size.
6) Zoom
Specifies the enlargement / reduction rate for printing.
7) Imposition
Selects the type of imposition.
8) Imposition direction
Specifies for the arrangement sequence of output
pages.
9) Multi-up
If [Multi-up (Plural)] is selected at [Imposition], set the
arrangement of pages and the number of pages per
sheet for imposition.
10) Binding margin
Sets the binding margin width.
11) Auto-reducing
When a checkmark is placed, any image that is not
included in the image area because of the margin width
will be automatically reduced so that the image is
included in the image area of the paper.
12) Rotate 180 degrees
The orientation of originals printed on paper can be
rotated by 180° and printed.
* If you set [Orientation] in the [Basic] screen, settings are applied here.
Note:
• For details of settings, refer to the separate manual, “Printer Driver Guide”.
Jobs (Job manager) 27
Other Operations
[Trays] Screen
Selects the tray used when printing.
Settings
1) Input tray*1
Selects the tray holding the paper for printing.
2) Tray selection per page
You can select a different tray for each page.
3) Paper type*1
Selects the paper type.
4) Mixed output size
If the size of the original varies from page to page, you
can print each page on the appropriate sized paper.
5) Output tray*2
Specifies the destination tray.
6) Continuous output*3
If the output tray becomes full while printing, another output tray is used automatically.
7) Collate
Selects whether multiple pages are printed as sets of
pages, or printed in groups of individual pages.
8) Reverse order
Prints originals in reverse order.
9) Slip sheet*4
Inserts a sheet of paper from a tray different to the tray
holding the paper being printed as a slip sheet.
10) Slip sheet tray*4
Selects the tray containing paper to be used for job separation sheets.
*1 [Input tray] and [Paper type] are determined by the settings in the [Basic] screen.
*2 This function is available when Multifunction Finisher, Auto-control Stacking Tray, or Wide Stacking Tray is connected.
*3 This function is available when Multifunction Finisher or Auto-control Stacking Tray is connected.
*4 Not available when the printer has no multi-tray paper feeder.
Note:
• For details of settings, refer to the separate manual, “Printer Driver Guide”.
28 Jobs (Job manager)
Other Operations
[Finishing] screen
Configures paper output settings such as collating.
Settings
1) Finishing side*1
Specifies the finishing side for stapling or hole-punching.
2) Staple mode*1*2
Staples printed paper.
3) Punch mode*1*2
Punches holes in printed paper.
4) Imposition*3
Selects the type of imposition.
5) Booklet fold mode*4
Outputs booklets with two folds.
6) Separate books
Splits a booklet into multiple books when making a booklet.
7) Booklet cover
Prints and outputs cover pages and other pages separately. This function is useful for printing the covers onto
paper that is different with the paper of the body of the
original.
8) Fold mode*4
Outputs paper with 2 folds.
9) Offset output pages*5
Outputs paper at an offset position for each printing set.
10) Header page
Prints a sheet with a job name / owner name, etc. to discern who printed.
11) Front cover, Back cover
Selects the tray containing paper to be used for covers.
From the selected tray, the front cover is output before
the first page of the original, and the back cover is output
after the last page of the original.
*1 This function is available when a Multifunction Finisher is connected.
*2 [Staple mode] and [Punch mode] are determined by the settings in the [Basic] screen.
*3 [Imposition] is determined by the settings in the [Layout] screen.
*4 This function is available when the Booklet maker function of the Multifunction Finisher is enabled.
*5 This function is available when a Multifunction Finisher or a Face Down Offset Tray is connected.
Note:
• For details of settings, refer to the separate manual, “Printer Driver Guide”.
Jobs (Job manager) 29
Other Operations
[Image] screen
Adjusts settings such as the resolution, color output mode, density and contrast of images.
Settings
1) Color output mode*
Selects color or single-color (black, cyan, or magenta)
printing.
2) Resolution
Sets the image quality (resolution).
3) Screening
Selects the method of half-tone processing.
4) Screen width
6) Print density
Adjusts the print density.
7) Brightness
Adjusts the density of images.
8) Contrast
Adjusts the contrast of images.
9) Cyan, Magenta, Yellow, Black
Adjusts the gamma level for each color.
Sets the screen width (line per inch).
5) Line smoothing
Selects the degree of line smoothing.
* If you set the [Color output mode] in the [Basic] screen, setting is applied here.
Note:
• For details of settings, refer to the separate manual, “Printer Driver Guide”.
30 Jobs (Job manager)
Other Operations
[Forms] Screen
Selects a form (archived job) registered in the print controller and prints output data overlaid on a form.
Settings
1) Print pattern
Sets whether or not to print a form (archived job) onto the
same face as output data.
2) Form data print face
Selects whether to print a form (archived job) onto the
front side or the back side when [Overlay alternating
(Long edge)] / [Overlaying alternating (Short edge)]
or [Overlay alternating + each page (Long edge)] /
[Overlaying alternating + each page (Short edge)] is
selected.
3) Front/Back separately
Specifies and prints different forms (archived jobs) for
each side when duplex printing.
4) Form 1 (all pages or front)
Selects the form (archived job) printed on the front side
or both sides of the output data.
5) Form 2 (back)
Selects the form (archived job) printed on the back side
the output data.
6) Prepend job*
Selects the form (archived job) added before the output
data.
7) Append*
Selects the form (archived job) added after the output
data.
* The optional “IS900C Advanced Package” or “IS900C Professional Package” is required for using this function.
Note:
• For details of settings, refer to the separate manual, “Printer Driver Guide”.
• Forms are registered from archived jobs stored in the print controller by the administrator. “Custom forms” )p.67
Jobs (Job manager) 31
Other Operations
[Annotation] screen
Allows you to add header or footer text to output data that is printed.
Settings
1) Annotation
Inserts a page number or common text at the top- or bottom- left, centre, or right of the page.
2) Start number
When inserting page numbers, specify the page number
that will appear on the first page that has a page number.
3) Print start page
When inserting page numbers, specify the page number
of the first page that will be numbered.
4) Insert page number
You can select where the page number will appear.
5) Insert total pages
You can select where the total number of pages will
appear.
6) Transparency
Makes the print area transparent.
7) Print first page only
You can select to have the entered number of pages or
text appear on the first page only.
Note:
• For details of settings, refer to the separate manual, “Printer Driver Guide”.
32 Jobs (Job manager)
Other Operations
[Image shift] Screen
Adjusts the vertical and horizontal margins of the originals images.
Settings
1) Horizontal shift
Adjusts the print position horizontally between
-254 mm (-10") and 254 mm (10").
2) Vertical shift
Adjusts the print position vertically between -254 mm
(-10") and 254 mm (10").
3) Shift front/back separately
When duplex printing, both front and back sides can be
adjusted independently.
4) Horizontal shift back side
Adjusts the print position on the back side horizontally
between -254 mm (-10") and 254 mm (10").
5) Vertical shift back side
Adjusts the print position on the back side vertically
between -254 mm (-10") and 254 mm (10").
6) Print position
Selects a standard position allocated to the original
image on the paper.
Note:
• For details of settings, refer to the separate manual, “Printer Driver Guide”.
Jobs (Job manager) 33
Other Operations
[Workflow] Screen
Configures settings for the output destination of the original, and output operation and notification method.
Settings
1) Destination
Selects whether data sent from the computer is printed
onto sheets, or is stored as an archived job in the print
controller.
2) Secure print
A security code is assigned to the job.
When [Hide job name] is checked, the job name will not
be displayed in the job list.
3) Wait after proof
Prints one page or one set only, and enables you to
check the printed sheet(s) of paper.
4) Job splitting
Splits one job into multiple jobs.
5) Job delegation
When several print controllers of the same model are
connected on the network, jobs are delegated to each
print controller for processing.
6) Send E-mail
Sends a job status email message to a specified email
address.
7) Comment
Displays comments entered in the [Comment] area of
the printer driver’s [Workflow] screen.
Comments can also be entered here.
Note:
• For details of settings, refer to the separate manual, “Printer Driver Guide”.
34 Jobs (Job manager)
Other Operations
[Color] Screen
Some image data colors may not be reproducible.
In this case, 4 types of rendering intent and color profiles are used, and mapping (image compression) and color conversion is performed to reproduce colors as close to the original as possible or natural color tones.
Settings
1) RGB: Map RGB to CIE
An RGB input profile can be selected when a checkmark
is placed.
2) CMYK: Map CMYK to CIE/ DeviceLink (on the
fly)/ No profile
4) Max drops
Sets the maximum amount of ink drops.
5) Rendering intent
Selects one of four different types of color conversion to
reproduce colors.
A CMYK input profile or DeviceLink profile can be
selected.
3) Output profile
[Auto] or output profiles added arbitrarily can be
selected.
Note:
• When [Output profile] is set to [Auto], [Rendering intent] cannot be selected.
• For details of settings, refer to the separate manual, “Printer Driver Guide”.
Jobs (Job manager) 35
Other Operations
[Logging] Screen
Displays records of print controller processing for the selected job.
Information displayed
1) Logging
Displays the time when each processing was executed,
processing conditions, and detailed information.
2) PostScript output
Displays information such as error codes that occurred
during PostScript conversion.
36 Jobs (Job manager)
Other Operations
Archived Jobs
The print controller makes it possible to create and store the ripped data (archived jobs). The following operations can
be performed with that data.
• Printing
Stored archived jobs can be repeatedly printed from the RISO Console. Printing jobs from the archive shortens the
time required for ripping.
• Feedback
Downloads as image data
Downloads archive data to a computer
• Merge
• Use as forms
Editing Archived Jobs
1
Click the [Archive jobs] button from
the Job/Queue selection button (on
the left side of the screen), and
select the job to edit from the list of
archived jobs.
Thumbnails are displayed of all pages.
For details, see steps 1 and 2 in “Printing Jobs”
)p.15.
2
Click [Overview...] in the Job preview.
Note:
• The preview screen can be also displayed by
moving the mouse pointer over the [Job] menu
button and then clicking [Overview...] in the
displayed submenu.
• Double-clicking the page opens an enlarged
image of the page in a different screen.
Archived Jobs 37
Other Operations
3
Edit the archive data in the preview
screen.
Moving Pages
The following operations are available.
Select the page on the preview screen of
the archived job, and drag and drop the
page in the location you want to move it
to.
•
•
•
•
Moving pages* )p.38
Copying pages* )p.39
Inserting blank pages* )p.39
Deleting pages* )p.40
Note:
• In order to use the function of editing the
archived data (*), the optional “IS900C
Advanced Package” or “IS900C Professional
Package” is required.
• Pages can be copied from multiple archived
data and merged. For details, see “Merging
Pages from Multiple Archived Jobs” )p.42.
4
Save the edited archived data.
1) Click the [Save changes] button on the pre2)
view screen.
Enter the new job name, and click the [OK]
button.
After the job is processed, it is added to the
list of archived jobs.
Note:
• To not save the edited archived data, click
the [Close] button on the preview screen,
and click the [Yes] button in the confirmation dialog box.
38 Archived Jobs
The selected page is moved to the location in front of
the selected page.
Other Operations
Copying Pages
[Duplicate]
Adding Blank Pages
[Insert blank page]
1
Select the page to copy on the preview screen of the archived job.
1
2
Select the location (next page)
where to insert the blank page on the
preview screen of the archived job.
Click [Duplicate].
2
Click [Insert blank page].
The copied page is added after the original page.
The blank page is added in front of the selected
page.
Archived Jobs 39
Other Operations
Deleting Pages
[Delete]
1
Select the page to delete on the preview screen of the archived job.
2
Click [Delete].
The selected page is deleted.
40 Archived Jobs
Other Operations
Merging Multiple Archived Jobs
Multiple archives stored in the print controller can be selected and merged.
Note:
• The optional “IS900C Advanced Package” or “IS900C Professional Package” is required for using this function.
1
Selects the jobs to merge from the
list of archived jobs.
Click the arbitrary jobs and select while holding
down the [Ctrl] key of the computer. (With Macintosh computers, holding down the [Alt] key.) You
can also select them by specifying the range of
jobs while holding down the [Shift] key.
Important!:
• Archived jobs are merged in the order of selection.
Note:
• To cancel the selection, click the jobs you want
to cancel while holding down the [Ctrl] key.
(With Macintosh computers, holding down the
[Alt] key.)
2
Move the mouse pointer over the
[Job] menu button and then click
[Merge] in the displayed submenu.
3
Enter the new job name, and click
the [Ok] button.
After the job is processed, it is added to the list of
archived jobs.
Archived Jobs 41
Other Operations
Merging Pages from Multiple Archived Jobs
Note:
• The optional “IS900C Advanced Package” or “IS900C Professional Package” is required for using this function.
1
Select the job to edit from the list of
archived jobs, and display the preview screen.
The selected page is added to the merging location (before the specified page).
For details, see “Editing Archived Jobs” )p.37.
2
In the same way, display the preview
screen of the archived jobs to
merge.
3
Select the page to copy, then drag
and drop the page at the merging
location.
4
Save the merged archived data.
1) Click the [Save changes] button on the pre2)
view screen.
Enter the new job name, and click the [OK]
button.
After the job is processed, it is added to the
list of archived jobs.
Note:
• To not save the merged archived data,
click the [Close] button on the preview
screen, and click the [Yes] button in the
confirmation dialog box.
42 Archived Jobs
Other Operations
Saving Archived Jobs to the Computer
Archived jobs can be saved on the computer in two ways: downloading and exporting.
If downloaded, the file is saved as an image file (such as JPEG) or as a PDF file.
If exported, the file is saved in a format (.shae) that the print controller uses to read data.
When downloading
1
Click the [Archive jobs] button from
the Job/Queue selection button (on
the left side of the screen), and
select the job you want to download
from the list of archived jobs.
3
Specify the data format and other
settings for the download.
For details, see steps 1 and 2 in “Printing Jobs”
)p.15.
2
Click [Feedback...] in the Job preview.
The feedback setting screen is displayed.
• [From page] [To page]: Specify the page to
download from the archived data.
• [Pack to zip file]: When placing a checkmark, a
zip-compressed job (The extension is .zip) is
saved. This cannot be set for “TIFF” format.
• [Resolution]
[Screen]: Downloads the image with the resolution for screen display (75dpi).
[Full]: Downloads the image with the resolution
for printing. This image can be used for checking before actual printing.
• [File format]: Select the file format to download
(TIFF, PDF, PNG, or JPEG).
• [Compression]: Select the compression level
(Lowest, Low, Medium, High, or Highest). This
cannot be set for “TIFF” format.
Note:
• Image data can be also downloaded to the
computer by moving the mouse pointer over the
[Job] menu button and then clicking [Feedback...] in the displayed submenu.
• When printing data downloaded in the [Full]
setting, be sure to print to a ComColor series
printer.
Archived Jobs 43
Other Operations
4
5
6
Click the [Download...] button.
Click the [Save] button.
Specify the destination folder and
file name, and click the [Save] button.
The data is saved in the specified folder.
When exporting
1
Display the feedback setting screen.
2
Click [Export job].
For details, see steps 1 and 2 in “When downloading” )p.43.
3
Click the [Save] button.
4
Specify the destination folder and
file name, and click the [Save] button.
The data is saved in the specified folder.
Note:
Note:
• The archived data can be also downloaded by
moving the mouse pointer over the [Job] menu
button and then clicking [Export job] in the displayed submenu.
44 Archived Jobs
• The extension of the archived data is “.shae”.
• The archived data exported to the computer
can be imported to the print controller. For
details, see “Importing an Archived Job from the
Computer” )p.45.
Other Operations
Importing an Archived Job from the Computer
Archived jobs saved in the computer (the extension is .shae) can be imported to the print controller.
Note:
• Archived jobs (extension is .shae) are saved by exporting archived jobs or using the backup function of archived
jobs. ()p.44, )p.64)
1
Click the [Archive jobs] button from
the Job/Queue selection button (on
the left side of the screen).
The Import archive job screen is displayed.
3
Click the [Browse] button, and select
the archived job.
After specifying the archived job on the file selection screen, click the [Open] button.
4
2
Click the [Import job] button.
The archived job is imported and added to the list
of archived jobs.
Click
of the Job / Queue information display (on the right side of the
screen).
Archived Jobs 45
Other Operations
Checking Printer Status
The status screen of the printer can be displayed by moving the mouse pointer over the [Printer] menu button and
then clicking [Printer details...] in the displayed submenu.
After the checking is completed, click the [Close] button.
Note:
• You can also click the RISO Console screen status area to confirm printer status (the RISO Console screen for the
printer is displayed). For details on the RISO Console screen for the printer, refer to the ComColor series printer's
instruction manual.
General
Clicking [General] displays the information on the printer and printer status.
Paper trays
Clicking [Paper trays] displays the paper set in the paper tray, paper quantity, and availability for auto tray selection.
46 Checking Printer Status
Other Operations
Output trays
Clicking [Output trays] displays the status of the output tray.
Installable options
Clicking [Installable options] displays the information on the finisher connected to the printer.
Checking Printer Status 47
Other Operations
Consumables
Clicking [Consumables] displays the remaining amount of ink in the printer.
48 Checking Printer Status
Other Operations
Selecting Languages
Selects the language for messages displayed on the RISO Console screen.
Move the mouse pointer over [Language] menu button, and select the language you want to use from the list.
Note:
• The languages displayed on the RISO Console are
memorised in the cookie of the web browser. Therefore, the language displayed when the RISO Console
was last used will be enabled the next time the console is started up.
Selecting Languages 49
Administrator Settings
This section describes the administrator settings of the RISO Console (the available functions for administrator).
Administrator
The administrator is a user that has the authority to change the settings of the print controller, add queues, and register general users, etc. by logging in as an administrator.
Note:
• For user authority (guest user / general user / administrator), see “Logging in to the Print Controller” )p.9.
How to Log In
For login procedures for the print controller, see “Logging in to the Print Controller (General user / Administrator)”
)p.9.
Important!:
• In the default settings, the login ID for the administrator is set to “Admin” without a password. Be sure to set a password after the logging in as the administrator. )p.55
Available functions for administrator
After logging in as the administrator, in addition to the available functions for general users, the following operations
are enabled.
• Changing the detailed setting of the print controller )p.51
Configuring the network settings, user management, job management, date/time, etc.
• Setting how job processing is distributed over the network by the print controller )p.59
• Operation of queues (Create, Edit, Delete, Stop / Resume) )p.80
• Viewing and saving the accounting (history) data )p.78
• Viewing and saving system event information )p.77
• Changing the settings of*1, copying, moving and viewing*2 jobs owned by other users. )p.21, )p.22, )p.24
• Rebooting / Shutting down the print controller )p.86
*1 The job's security code setting cannot be changed.
*2 Jobs for which a security code has been set cannot be viewed.
50 Administrator
Administrator Settings
Detailed Settings of the Print Controller
This section describes how to make network settings, time settings, change the login password to the administrator
setting, etc for the print controller.
The detailed setting screen for the print controller can be displayed by moving the mouse pointer over the [RIP] menu
button and then clicking [RIP details...] in the displayed submenu.
Clicking the icons at the top of the screen switches to the corresponding setting screen.
[Ok]: Click to save setting changes and end editing.
[Apply]: Click to save setting changes and continue editing.
[Cancel]: Click to cancel setting changes and end editing.
Detailed Settings of the Print Controller 51
Administrator Settings
General
Displays the status and detailed information of the print controller.
Displayed information
1) RIP status
Displays the current status of the print controller.
2) Pages to print
Displays the total number of pages of jobs in the Normal
queue (the number of pages of each job x the number of
copies).
Note:
• Jobs in the Hold queue and jobs in stopped processing status are not included.
4) Comment
The comment concerning the print controller can be
entered.
5) Detailed information
Displays an outline and network settings of the print controller.
6) Status report
The detailed information of the print controller can be
downloaded in text format (file extension .txt).
3) Job count
Displays the number of jobs in the Normal queue.
Note:
• Jobs in the Hold queue and jobs in stopped processing status are not included.
Actions
• Inputting comments
When you click the input area, a comment can be entered. Up to 511 characters can be entered. Comments should
be written in one line.
• Downloading status report
When you click the [Download] button and specify the destination folder and file name, the detailed information
of the print controller is saved in text format (file extension .txt).
52 Detailed Settings of the Print Controller
Administrator Settings
Communication settings
The current network settings of the print controller are displayed under [Current settings].
To change a setting, enter the new setting under [After restart]. The changed settings are applied after the print controller is restarted.
Detailed Settings of the Print Controller 53
Administrator Settings
Settings
1) RIP name
Enter the name of the print controller. Enter up to 15
characters, using alphanumeric characters and
hyphens. The entered name is displayed as the printer
name on the network.
Note:
• Enter an alphabetic character as the first digit in the
name.
• Enter an alphabetic character or numeric character as
the last digit in the name.
2) Domain
Enter the domain name of the network to which the
printer is connected.
3) Use DHCP
Place a checkmark to use the DHCP Server to acquire IP
addresses.
4) IP address
Enter the IP address being assigned to the print controller.
Important!:
• Enter an IP address that is different from the address
set for 14) [Engine IP Configuration].
5) IP gateway
Enter the gateway address of the network to which the
print controller is connected.
6) Subnet mask
Enter the subnet mask of the network to which the controller is connected.
7) EtherTalk zone
When using the printer via AppleTalk, enter the AppleTalk zone name of the network to which the print controller is connected.
“*” indicates that the print controller is enabled for all
zones.
8) NetBIOS workgroup
When the communications are conducted using NetBIOS, enter the NetBIOS workgroup name.
54 Detailed Settings of the Print Controller
9) Name server
If you are using a DNS server to connect to the network,
enter the IP address of the DNS server.
10) Mail server
To use e-mail notification, enter the IP address of the
mail server.
11) Sender address
To use e-mail notification, enter the e-mail address of the
source.
12) Ethernet address
Displays the Ethernet address of the print controller.
13) Enforce https
Place a checkmark to connect the print controller by
https (encrypted communication) when using the RISO
Console. When a checkmark is placed, the screen automatically jumps to https:// (IP address of the controller)
even if you connect to the print controller by http:// (IP
address of the controller).
When displaying the screen, a dialog box concerning
security warning (authentication verification) is displayed. Click the [Yes] button to continue.
14) Engine IP Configuration
Select one of three types of IP addresses used to connect to the printer. Set this setting to suit the settings of
the network.
IP address A: 10.255.255.253
IP address B: 172.16.255.253
IP address C: 192.168.255.253
Administrator Settings
User management
You can configure the settings for managing the users of the print controller.
Settings
1) Edit existing user
4) Enforce login
Registered user names are displayed in the list box.
You can delete users, and change the language and
passwords.
Sets whether the login is enforced or not when using the
RISO Console.
Important!:
2) Create new user
Register the user by entering the user name and the
password.
3) Others can see jobs
• If the printer mode is set to [Required] for the printer’s
administrator setting (login setting), check this item.
5) Default language
Sets the language to be used when an unregistered user
uses the notification function.
Enables/Disables access to jobs of different owner.
6) Auto logout time
Sets the time for automatic logout when a logged in user
performs no operations for an extended period of time.
Registering New Users
1) Enter the new user name in the [User name] input area.
2)
3)
4)
As the user name, enter the name used when logging into the network. (Refer to the names displayed as owner
names in the job list)
Enter the password in the [Password] input area.
Enter a password in 0 to 31 characters using alphanumeric characters and symbols (!"#$%&'()*+,-./
:;<=>?@[^_`{|}~).
Re-enter the password in the [Retype password] input area.
Click the [Create] button.
The user is registered, and the user name is added to the list of registered user names on the left side of the
screen.
Note:
• For optimum print controller performance, we recommend no more than 300 users be registered.
Detailed Settings of the Print Controller 55
Administrator Settings
Deleting Registered Users
1) Select the user name to delete from the list of the names of registered users.
2) Click the [Delete user] button.
The user is deleted.
Changing Passwords
1) Select the user name to which the password will be changed from the list of the names of registered users.
2) Enter the new password in the [New password] input area.
3)
4)
Enter a password in 0 to 31 characters using alphanumeric characters and symbols (!"#$%&'()*+,-./
:;<=>?@[^_`{|}~).
Re-enter the new password in [Retype new password] the input area.
Click the [Change password] button.
The password is changed.
Note:
• When the entry for [New password] does not correspond to that for [Retype new password], an error message is displayed. Enter the same password again.
Changing the Language of Notifications
1) Select the user name from the list of the names of registered users.
2) Select a language from the [Notification language] combo box.
3) Click the [Change language] button.
Set the language to be used for notification functions such as e-mail notifications to selected users.
Changing General User Settings
• When a checkmark is placed in the [Others can see jobs], access to jobs of different owners is enabled.
• When a checkmark is placed in the [Enforce login], entry by login ID and password is enforced in using the RISO
Console.
When [Enforce login] is set, only the login information input area and some operations can be used. (The operations that cannot be used are greyed out.)
• From the [Default language] combo box, select the language to be used when a notification function is used by
an unregistered user.
• If [Auto logout time] is set, a logged in user will be logged out if the user performs no operations for the set amount
of time.
If set to [0], the auto logout function is deactivated.
56 Detailed Settings of the Print Controller
Administrator Settings
Job settings
This screen is for making settings concerning job processing by the print controller.
Settings
1) ASCII printing
Enables/Disables printing of ASCII text jobs.
2) Default page size
Sets the page size applied to the jobs for which a page
size has not been set.
3) Generate Job Info Events
Sets whether or not to generate the detailed events in
the Details column in [Logging] of [Job details].
4) Job auto delete
Sets the deletion method and timing for finished jobs in
the [Finished job] list.
ASCII File Print Settings [ASCII printing]
When placing a checkmark in the [ASCII printing], ASCII text jobs can be printed. When a job of unknown file format
has been received, the job is printed in ASCII text.
Note:
• When [ASCII printing] is enabled, all jobs except for PostScript, PCL, PDF, PPML (optional) and TIFF files are
printed in ASCII text.
Setting Default Page Size [Default page size]
From the [Default page size] combo box, select the page size applied to jobs for which a page size has not been set.
Note:
• Jobs for which a page size has not been set are, for example, sample pages stored in the print controller and print
jobs created by printer drivers except the printer driver of this print controller.
Generate the detailed job information events [Generate Job Info Events]
When placing a checkmark, the detailed job information events can be generated in the Details column in [Logging]
of [Job details].
Note:
• When placing a checkmark, the processing speed will slowdown.
Detailed Settings of the Print Controller 57
Administrator Settings
Setting the deletion method of finished jobs [Job auto delete]
Set whether to delete the finished jobs stored in the [Finished job] list automatically or manually.
1) Select [Automatically] or [Manual] in [How] of [Job auto delete].
2)
3)
When [Automatically] is selected, proceed to step 2. When [Manual] is selected, other settings are not
required.
Select the unit of deletion timing in [When].
[By hours]: When the set time elapses, jobs are automatically deleted.
[By days]: When the set number of days elapses, jobs are automatically deleted.
[By amount]: When the number of stored jobs exceeds the set number, jobs are automatically deleted in chronological order with the oldest job deleted first.
Enter the reference number in the [Value] input area.
The timing of automatic deletion is decided in conjunction with the unit selected in step 2.
58 Detailed Settings of the Print Controller
Administrator Settings
RIPs in network
When several print controllers of the same model are connected to the network, each job can be delegated to a different print controller for processing.
Specify the print controllers that can be used for job delegation.
Note:
• Only the IS900C can be specified as the print controller for load balancing. Load balancing with other models and
non-RISO print controllers is not possible.
• The system for load balancing can consist of one master controller and one to four client controllers. The load balancing settings are made by the master controller. No settings are required on the client controller side.
Actions
1) Refresh RIP list from network
Searches for IS900C connected to the network.
2) Direct input and addition of Name / IP address
Adds the name and IP address of the print controller to
the list by direct input.
3) Deletion from the controller list
Deletes the print controllers from the list.
4) Load balancing
Sets whether or not the print controller in the list is used
for distributed processing (for load balancing).
Searching for Print Controllers on the network [Refresh RIP list from network]
When clicking the [Refresh RIP list from network] button, the IS900C connected to the network is searched and the
list with the latest information is updated.
Direct input and addition of Name / IP address [Name] [IP address] [Add]
Adds the name and IP address of the print controller to the list by direct input.
[Name]: Enter the RIP name. If DNS is not configured, enter the IP address.
[IP address]: Enter the IP address of the print controller.
[Add]: The name and IP address are added to the list.
Detailed Settings of the Print Controller 59
Administrator Settings
Job delegation setting [Load balancing]
When placing a checkmark in the checkbox on the right side of Name / IP address of the print controller, the print controller can be used for load balancing (load distribution processing).
Deleting from the controller list [Delete]
When clicking the [Delete] button on the right side of Name / IP address of the print controller, the print controller is
deleted from the list.
Click [Ok] or [Apply] to confirm the settings.
60 Detailed Settings of the Print Controller
Administrator Settings
Time settings
Synchronises the print controllers' time settings with the computer's time settings.
Displayed information
1) PC time
Displays time settings of the computer.
2) RIP time
Displays time settings of the print controller.
Actions
• [Synchronize]
When clicking the button, the print controller's time settings will be synchronised with the computer's time settings.
Note:
• Time zone settings are also synchronized with the settings of the computer.
Detailed Settings of the Print Controller 61
Administrator Settings
Monitor settings
This screen is for screen saver-related settings.
Settings
1) Enable monitor
Sets whether or not you use the monitor. When you do
not use the monitor, remove the checkmark.
2) Auto logout time
Sets the time for automatic logout when a logged in user
performs no operations for an extended period of time.
4) Screensaver
Select the screensaver to use.
5) Screensaver timeout
Sets the time (in minutes) before the screensaver starts
when the monitor is unused for an extended period of
time.
3) Enable screensaver
Sets whether or not to use the screensaver.
Enabling the monitor [Enable monitor]
When the monitor is connected, place a checkmark in the [Enable monitor] checkbox. When the monitor is not connected, remove the checkmark.
Setting the automatic logout time [Auto logout time]
Sets the time for automatic logout when a logged in user performs no operations for an extended period.
The time can be entered in a range from 1 to 99 minutes (the initial value is 2 minutes).
Setting up the Screensaver
Sets whether or not to use the screensaver when the monitor is unused for an extended period of time.
• Enable screensaver
Place a checkmark in the [Enable screensaver] when using the screensaver.
• Screensaver
The screensaver can be selected from the list of usable screensavers.
• Screensaver timeout
Sets the time at which the screensaver starts.
The time can be entered in a range from 1 to 9,999 minutes (the initial value is 5 minutes).
62 Detailed Settings of the Print Controller
Administrator Settings
Backup
This screen is for exporting various settings of the print controller to the computer and importing settings from the
computer.
Settings
1) Backup queues
Settings of the queues can be exported to or imported
from the computer.
2) Backup users
User information set in [User management] can be
exported to or imported from the computer.
3) Backup archive jobs
All archived jobs saved in the print controller can be
exported to or imported from the computer.
4) Backup hold jobs
All held jobs saved in the print controller can be exported
to or imported from the computer.
Note:
• When importing data, data for which [Clear before import] is marked with a checkmark will be deleted then
imported.
Exporting queue settings to the computer [Export queues]
Click the [Export queues] button, and enter the destination folder and file name, and then execute the save.
All the queue settings currently registered in the print controller are saved. The file is saved in text format (file extension .txt).
Importing queue settings from the computer [Import queues]
Click the [Browse] button, and specify the queue setting file to import (file extension .txt). Click the [Import queues]
button, and execute the import to the print controller.
Note:
• The imported queue is added to the existing queues in the print controller.
• When there is the same queue name as the imported queue in the print controller, the existing queue will be overwritten with the information of the imported queue.
Detailed Settings of the Print Controller 63
Administrator Settings
Exporting user information to the computer [Export users]
For backup purposes:
Click the [Export users] button, set the file format to XML, enter the destination folder and file name, and then execute the save.
All user information (except for the administrator) currently registered in the print controller is saved.
The file is saved in text format (file extension .txt).
For batch registration purposes:
Click the [Export users] button, set the file format to CSV, enter the destination folder and file name, and then execute the save.
All user information (except for the administrator) currently registered in the print controller is saved.
The file is saved in CSV format (file extension .csv).
Note:
• For XML, passwords are encrypted and saved.
Importing user information from the computer [Import users]
For backup purposes:
Click the [Browse] button, and specify the user information file to import (file extension .txt).
Finally, click the [Import users] button and execute the import.
For batch registration purposes:
Click the [Browse] button, and specify the user information file to import (file extension .csv).
Finally, click the [Import users] button and execute the import.
Note:
• If the printer mode is set to [Required] for the printer’s administrator setting (login setting), the following procedure
is recommended for importing registered user information.
1) Using the printer's administrator setting (user setting), use [Export as CSV] to export the data.
2) Use the print controller [Import users] function to import the saved CSV file.
The data entered in the [PC login name] column of the CSV file is registered in the print controller as user information.
• When the settings of the same user exists in the print controller, the existing settings will be overwritten with the
settings imported.
Exporting multiple archived jobs to the computer [Export archive jobs]
Click the [Export archive jobs] button, enter the destination folder and file name, and then execute the save.
All archived jobs currently saved in the print controller are saved in one file.
The file is saved with a .shae extension.
Note:
• Archived jobs can be also individually saved.
“When exporting” )p.44
• Files can be saved up to 2 GB in size.
Importing multiple archived jobs from the computer [Import archive jobs]
Click the [Browse] button, and specify the archived jobs file to import (file extension .shae). Click the [Import archive
jobs] button to import to the print controller.
Note:
• The imported archived jobs are added to the list of archived jobs.
64 Detailed Settings of the Print Controller
Administrator Settings
Exporting Held Jobs to the Computer [Export hold jobs]
Click the [Export hold jobs] button, and enter the destination folder and file name, and then execute the save.
All held jobs currently saved in the print controller are saved in one file.
The file is saved with a .shhe extension.
Note:
• Files can be saved up to 2 GB in size.
Importing held jobs from the computer [Import hold jobs]
Click the [Browse] button, and specify the held jobs file to import (file extension .shhe). Click the [Import hold jobs]
button, and execute the import to the print controller.
Note:
• The imported held jobs are added to the list of held jobs.
Detailed Settings of the Print Controller 65
Administrator Settings
Customization Settings
Frequently used form data, user defined paper size, and PCL tray setting can be registered in the print controller in
advance.
The customization setting screen can be displayed by moving the mouse pointer over the [RIP] menu button and
then clicking [Custom preferences...] in the displayed submenu.
Clicking the icons at the top of the screen switches to the corresponding setting screen.
[Ok]: Click to save setting changes and end editing.
[Apply]: Click to save setting changes and continue editing.
[Cancel]: Click to cancel setting changes and end editing.
66 Customization Settings
Administrator Settings
Custom forms
Register the frequently used form data.
The custom forms registered here are displayed by the combo boxes - [Form 1 (all pages or front)],
[Form 2 (back)], [Prepend job], and [Append] - on the [Forms] screen of the [Job details] menu or printer driver.
“[Forms] Screen” )p.31
Settings
• Custom form 1 to 10
Archived jobs saved in the print controller are allocated to custom forms.
Setting up custom forms
In the combo box of the custom form you want to set, select the name of the archived job to allocate.
Note:
• Data to be used as a custom form must first be archived. )p.14
Customization Settings 67
Administrator Settings
Custom paper sizes
Registers irregular paper sizes.
The paper sizes registered here are displayed in the [Output size] combo box in the [Layout] screen of the [Job
details] menu or printer driver.
“[Layout] Screen” )p.27
Settings
• Custom 1 - 10
Registers the [Width in mm] or [Width in inch] and [Height in mm] or [Height in inch] to the paper names.
Setting custom paper sizes (user defined sizes)
Enter a numeric value (mm or inch) in the [Width in mm] or [Width in inch] box and the [Height in mm] or [Height
in inch] box on the right side of the paper name.
Note:
• Set the custom paper sizes within the range of paper sizes that can be used by the printer. For details, see the
“Printer's User's manual”.
• Available paper sizes vary depending on the model of the optional finisher connected. For details, see the “Printer's
User's manual”.
68 Customization Settings
Administrator Settings
PCL tray mapping
Set the allocation of trays to be used when processing PCL jobs.
Actions
Assign the tray number specified in the PCL job to a tray of the printer.
Setting tray allocation for PCL jobs
Enter the tray numbers in the PCL job as the printer trays: [Standard tray], [Tray 1], [Tray 2], and [Tray 3].
Note:
• When entering multiple tray numbers in the [Tray numbers in PCL job] box, separate the numbers by commas (,).
Customization Settings 69
Administrator Settings
Color calibration
Color calibration information can be exported to or imported from the computer.
The [Color calibration] screen can be displayed by moving the mouse pointer over the [RIP] menu and then clicking
[Color calibration] in the displayed submenu.
Note:
• The optional “IS900C Advanced Package” or “IS900C Professional Package” is required for using this function.
Exporting the color calibration information to the computer
[Export calibration]
Click the [Export calibration] button, enter the destination folder and file name, and then execute the save.
The file is saved in text format (file extension .txt).
Importing color calibration information from the computer
[Import calibration]
Click the [Browse] button, and specify the color calibration information file to import (file extension .txt). Click the
[Import calibration] button to import to the print controller.
Note:
• The existing color calibration information will be overwritten with the imported information.
When finished checking, click
70 Color calibration
to close the screen.
Administrator Settings
Profile management
Profiles used in color management settings can be added / deleted.
For color management settings, see “[Color] Screen” )p.35.
The [Profile management] screen can be displayed by moving the mouse pointer over the [RIP] menu and then
clicking [Profile management] in the displayed submenu.
Note:
• The optional “IS900C Advanced Package” or “IS900C Professional Package” is required for using this function.
Deleting profiles [Delete]
Select the name of the profile to delete from the profile list, and click the [Delete] button.
Note:
• The preinstalled profiles cannot be deleted.
Profile management 71
Administrator Settings
Uploading profiles [Upload profile...]
1
Click the [Upload profile...] button.
The following screen is displayed.
2
3
Click the [Browse] button.
4
Click the [Upload ICC profile] button.
Specify the profile to import. (The
extension is .icc.)
The following screen is displayed.
72 Profile management
5
Select the use of the profile using
the radio buttons.
6
Click the [Import ICC profile] button.
7
When the operation is completed,
click
to close the screen.
The profile is imported to the print controller, and
the profile name is added to the profile list.
Administrator Settings
Font management
The list of fonts installed in the print controller is displayed.
Also additional fonts can be installed or deleted.
The [Font management] screen can be displayed by moving the mouse pointer over the [RIP] menu and then clicking [Font management] in the displayed submenu.
Downloading fonts [Download]
Click the [Browse] button, and select fonts to download.
Click the [Download] button, and execute the download to the print controller.
Note:
• The names of downloaded fonts are added to the list of installed fonts. After the installing is completed, click the
[Close] button to close the screen.
• To download multiple fonts, select multiple fonts image file compressed as zip format, and click the [Download]
button.
Deleting a font [Delete]
Select the font you want to delete from the list of installed fonts, and click the [Delete] button.
Note:
• Newly installed font names are displayed in black. Fonts displayed in grey are the fonts installed at the factory.
These fonts cannot be deleted.
Font management 73
Administrator Settings
Reports
Information such as the print controller processing (event) information and information on the job processing are displayed. Also events settings can be set.
The report screen can be displayed by moving the mouse pointer over the [RIP] menu and then clicking [Reports]
in the displayed submenu.
Clicking the icons at the top of the screen switches to the corresponding setting screen.
[Ok]: Click to save setting changes and end editing.
[Apply]: Click to save setting changes and continue editing.
[Cancel]: Click to cancel setting changes and end editing.
74 Reports
Administrator Settings
Log settings
This screen is for making settings for events that occur with the print controller.
Settings
1) Notification to E-mail address
Enter the e-mail address to notify event information of
the print controller.
2) No duplicates within ... minutes
Sets not to notify the same event if it occurs within the set
amount of time.
4) System event auto delete
Sets the deletion method and timing for event information stored in the print controller.
5) Accounting log auto delete
Sets the deletion method and timing for accounting information stored in the print controller.
3) Event information notification method (The
method can be set according to the type of
event.)
•
•
•
•
•
•
•
Info
Consumables warning
Warning
Consumables error
Error
Fatal error
Job info
Setting the Destination of E-mail Notification [Notification to E-mail address]
In the [Notification to E-mail address] input area, enter the e-mail address to notify event information to.
When e-mail is not used for notification, entry into the input area is not required.
Reports 75
Administrator Settings
Preventing duplicated notification of the same event [No duplicates within...minutes]
Enter the number (minute) in the [No duplicates within...minutes] input area. The same event that occurs within the
set amount time is set to be not notified.
If the same event occurs repeatedly in a short period of time, such as the case that the cover of the printer is frequently opened and closed to clear paper jams, this setting prevents repeated recording of events of the same content and e-mail notification.
• The time can be entered in a range from 0 to 1,440 minutes (the default value is 10 minutes).
Setting the Notification Method of Event Information
Set the notification method according to the type of event. Select the notification method in the combo box of each item.
• Type of event
[Info]: Information concerning the boot of the print controller, and the start and end of processing
[Consumables warning]: When there is little paper or ink remaining
[Warning]: When there is little space on the hard disk
[Consumables error]: When there is no paper or ink left
[Error]: When there is no space left on the hard disk
[Fatal error]: When a serious system failure has occurred
[Job info]: Information concerning the processing of job
• Notification method
[Off]: Does not record the event.
[Log]: Records the event.
[Log and mail]: Records the event and sends e-mail notification to the set destination e-mail address.
[Mail]: Sends e-mail notification to the set destination e-mail address.
Setting the Deletion Method of Event Log [System event auto delete]
Set whether event information stored in the print controller is deleted automatically or manually.
When [Automatically] is selected, set the deletion timing.
1) Select [Automatically] or [Manual] in [How] of [System event auto delete].
2)
3)
When [Automatically] is selected, proceed to step 2. When [Manual] is selected, other settings are not required.
Select the unit of deletion timing in [When].
[By hours]: When the set time elapses for event information, the event information is automatically deleted.
[By days]: When the set number of days elapses for event information, the event information is automatically
deleted.
[By amount]: When the number of stored event information exceeds the set number, jobs are automatically
deleted in chronological order with the oldest job deleted first.
Enter the reference number in the [Value] input area.
The timing of automatic deletion is decided in conjunction with the unit selected in step 2.
Setting the deletion method of accounting information [Accounting log auto delete]
Set whether accounting information stored in the print controller is deleted automatically or manually.
When [Automatically] is selected, set the deletion timing.
1) Select [Automatically] or [Manual] in [How] of [Accounting log auto delete].
When [Automatically] is selected, proceed to step 2. When [Manual] is selected, other settings are not required.
2) Select the unit of deletion timing in [When].
3)
[By hours]: When the set time elapses for accounting information, the accounting information is automatically
deleted.
[By days]: When the set number of days elapses for accounting information, the accounting information is automatically deleted.
[By amount]: When the number of stored accounting information exceeds the set number, accounting information is automatically deleted in chronological order with the oldest information deleted first.
Enter the reference number in the [Value] input area.
The timing of automatic deletion is decided in conjunction with the unit selected in step 2.
76 Reports
Administrator Settings
Checking the System Events Log
A history of events (various kinds of processing) that occurred in the print controller can be checked.
A list of events up until this time is displayed.
• Displayed items: Time, Type, Event class, Details
• To save the event log, click the [Download] button, and specify the destination folder and file name to save. The
data is saved in CSV file format.
• When you click an event in the list, the [Remove all older entries] button is displayed.
• When you want to delete all old entries at once, click the [Remove all older entries] button to delete the event.
After the checking is completed, click the [Close] button to close the screen.
Reports 77
Administrator Settings
Checking Accounting Information
A history of job processing performed by the print controller can be checked.
A list of job processing up until this time is displayed.
• Displayed items: Job, Owner name, Modification time, Processing time, Print time, Total page count, Output count,
Final status
• When you click an entry in the list, the [Remove selected entry] button, the [Remove all older entries] button,
and the [Show details] button are displayed.
[Remove selected entry]: When clicked, the selected entry is removed.
[Remove all older entries]: When clicked, all information prior to the selected entry is removed.
78 Reports
Administrator Settings
[Show details]: When clicked, the screen switches to the details screen of the selected job. Click the [Back to
overview] button to return to the list screen.
• To save the account information, click the [Download] button, and specify the destination folder and file name to
save. The data is saved in CSV file format.
After the checking is completed, click the [Close] button to close the screen.
Reports 79
Administrator Settings
Managing Custom Queue
The administrator can register various settings in the print controller in advance to process jobs sent from the computer as a custom queue. With the registration of frequently used print settings as a custom queue, you can print jobs
with the same processing conditions without changing the settings many times, by simply specifying the registered
output queue.
Note:
• The processing items that can be set for queues are based on the setting items of the printer driver. )p.82
• For instructions on how to specify the output queue, refer to the separate manual, “Printer Driver Guide”.
Creating New Queues [New queue]
1
Move the mouse pointer over the
[Queue] menu button and then click
[New queue] in the displayed submenu.
4
Click the [Create] button.
5
Set the processing conditions of the
queue.
The button of the queue name input in step 2 is
added to the Job / Queue selection buttons (on
the left side of the screen).
The Create new queue screen is displayed.
2
Enter the name of the new queue in
the [Queue name] input area.
Enter a name up to 12 characters long using
alphanumeric characters and symbols (-.^_).
3
Select [Queue type].
[Print]: The job sent to this queue is printed by the
printer.
[Hold]: The job sent to this queue is stored in the
print controller and will not be printed until a print
command is given.
80 Managing Custom Queue
For processing conditions and setting method,
see “Changing Detailed Settings of Queues”.
)p.82
Administrator Settings
Deleting Custom Queues [Delete queue]
1
Click the queue button to delete from
the Job / Queue selection buttons
(on the left side of the screen).
2
Move the mouse pointer over the
[Queue] menu button and then click
[Delete queue] in the displayed submenu.
Note:
• After selecting the queue button, the queue can
be also deleted by clicking
of the Job /
Queue information display (on the right side of
the screen) in the state that the job is unselected.
3
Click the [Yes] button in the confirmation dialog box.
The selected custom queue is deleted.
Note:
• [Normal] and [Hold] queues cannot be
deleted.
Managing Custom Queue 81
Administrator Settings
Changing Detailed Settings of Queues [Queue details...]
This section describes processing settings of newly created queues and how to change the settings of existing
queues.
Note:
• The following settings of [Normal] and [Hold] queues can be changed.
– Normal: Queue code, priority, direct port, prechecking setting
– Hold: Queue code, prechecking setting
1
After selecting a queue button, click
of the Job / Queue information display
(on the right side of the screen) in the state that the job is unselected.
A details screen of the queue is displayed.
Clicking the setting group icons at the top of the screen switches the details screen.
Note:
• A details screen of the queue can be also displayed by moving the mouse pointer over the [Queue] menu
button and then clicking [Queue details...] in the displayed submenu.
Queue details screen (Edit screen)
2
Changing queue processing settings.
When you click the icon at the top of the screen, the screen will switch.
[Queue priority]: When placing a checkmark, the settings of queue are prioritized over the settings for the
printer driver.
[Ok]: Click to save setting changes and end editing.
[Apply]: Click to save setting changes and continue editing.
[Cancel]: Click to cancel setting changes and end editing.
The processing items that can be set for queues are the same as the setting items for jobs except [General] and
[PCL settings].
For the settings of the [General] screen and the [PCL settings] screen, see the next page onward.
For other screens, see “Viewing / Editing Job Details” )p.24.
82 Managing Custom Queue
Administrator Settings
[General] Screen
The outline information and basic settings of queues are displayed.
Information displayed / Settings
1) Name
Displays the name of the queue.
2) Type
Displays the type of queue (Print or Hold).
3) Status*
Displays the current status of the queue (whether or not
it has been stopped).
4) Visible in network
When placing a checkmark, the queue is displayed in the
network.
To hide the queue display on the network, remove the
checkmark.
5) Queue code (1-8 digits)
Set the password of queue if necessary.
When the password is set, the job sent to the queue from
the computer can be added to the queue only when the
correct password has been input in [Workflow] of the
printer driver. When the password is incorrect, an error is
generated and the job is ended.
For the print settings from the computer, refer to the separate manual, “Printer Driver Guide”.
6) Priority*
Sets the priority (low, middle, high) of the queue.
7) Direct port*
Sets the port number (9100-9999) of the RAW port.
8) Number of jobs
9) Number of pages
Displays the total number of pages of the jobs in the
queue (the number of pages of each job x the number of
copies).
10) Pages (from/to)
Specify the range of pages to be processed “From page”
- “To page”.
Note:
• To specify all pages, enter “1-0”.
11) Copy count
Specifies the number of copies.
12) Queue priority
When placing a checkmark, the settings of queue are prioritized over the settings for the printer driver.
13) Prechecking
Sets the pre-flight (the data check before output and the
creation of thumbnails).
[Precheck pages]: Specify the pages to check.
Select [All] or enter the last page in [Up to page].
[Create thumbnails]: Set the thumbnails to create.
Select [All (prechecked)] or enter the last page in [Up
to page]
[Thumbnail quality]: Select the image quality of thumbnails from the following five levels.
Very low (fast) / Low / Default (medium) / High / Very high
(slow)
Displays the number of jobs in the queue.
* : Displayed only when the type of queue is “Print”.
Managing Custom Queue 83
Administrator Settings
[PCL settings] screen
This screen displays settings concerning PCL job processing.
Settings
1) PCL symbol set
Select the symbol set (the encoding of character).
2) PCL default font
Select the PCL font.
3) PCL pitch
Set the pitch of font (the number of characters in 1 inch).
4) PCL lines per page
Set the lines per page.
5) PCL point size
Set the font size for proportional fonts.
6) PCL line termination
Select the conversion process of linefeed code.
[No change]: Select to print a text file from a Windows
computer.
[Add LF after CR]: Select to print a text file from a Macintosh computer.
[Add CR before LF + FF]: Select to print a text file from
a UNIX computer.
[Add LF, add CR]: Select to add both “LF” and “CR”.
84 Managing Custom Queue
7) PCL line wrapping
Select whether to use automatic wrapping according to
the width of the page or not.
8) PCL default paper size
Select the paper size to be applied when the information
about paper size is not contained in a PCL job.
9) PCL custom paper size
When [Custom] is selected in [PCL default paper
size], set the width and the height of paper (mm).
10) Queue priority
When placing a checkmark, the settings of queue are prioritized over the settings for the printer driver.
Administrator Settings
Stopping Queue Processing [Stop]
Queue processing can be stopped.
Move the mouse pointer over the [Queue] menu button and then click [Stop] in the displayed submenu.
Note:
• After selecting the queue button, processing can be also stopped by clicking
display (on the right side of the screen) in the state that the job is unselected.
of the Job / Queue information
Resuming Queue Processing [Start]
Processing of a queue that has been stopped can be resumed.
Move the mouse pointer over the [Queue] menu button and then click [Start] in the displayed submenu.
Note:
• After selecting the queue button, processing can be also resumed by clicking
display (on the right side of the screen) in the state that the job is unselected.
of the Job / Queue information
Managing Custom Queue 85
Administrator Settings
Rebooting the Print Controller
You can reboot the print controller from the RISO Console.
1
Move the mouse pointer over the
[RIP] menu button and then click
[RIP reboot] in the displayed submenu.
2
Click the [Yes] button in the confirmation dialog box.
The print controller will reboot.
Shutting Down the Print Controller
You can shut down the print controller and turn the power off from the RISO Console.
1
Move the mouse pointer over the
[RIP] of menu button and then click
[RIP shutdown] in the displayed submenu.
2
Click the [Yes] button in the confirmation dialog box.
The print controller will shut down.
86 Rebooting the Print Controller
Administrator Settings
Shutting Down the Print Controller 87
Using the Included Utility
Software
When you execute the setup from the CD-ROM that comes with this product, the following utility software is installed.
Utility Software
RISO Printer Driver (Installer)
Installer for the IS900C printer driver
RISO Management Tool
Utility for setting the IP address of the IS900C on the network and starting the print controller by remote control
SMAP (Windows only)
Direct print utility that allows printing by the dragging and dropping files
This chapter describes the functions and how to operate the RISO Management Tool and SMAP.
Note:
• For software installation, refer to the separate manual, “Setup Guide”.
• For information on the RISO Printer Driver, refer to the separate manual, “Printer Driver Guide”.
88 Utility Software
Using the Included Utility Software
Using the RISO Management Tool
The RISO Management Tool allows the user to easily search the print controller on the network, set IP addresses,
and start the print controller from the computer. The RISO Console can also be easily started from the RISO Management Tool.
Note:
• When the IS900C is newly connected to a network, the network settings of the print controller can be made from
the RISO Management Tool. For details, refer to the separate manual, “Setup Guide”.
Starting the RISO Management Tool
For Windows:
From the [Start] menu of the Windows computer, select [All Programs] (Windows Server 2003 / Windows XP / Windows Vista) or [Programs] (Windows 2000) -> [RISO] -> [RISO IS900C] -> [RISO Management Tool].
For Macintosh:
Select [Applications] folder -> [RISO Client Software] -> [RISO Management Tool].
Basic screen
1) Menu
When clicking, the corresponding function is executed.
For details, see the next page onward.
2) Language selection
From the language selection box on the right side of the
screen, select the language for messages displayed on
the RISO Management Tool.
5) Minimize to tray
When clicking, the screen of the RISO Management Tool
is minimized and stored in the task tray.
When clicking the RISO Management Tool icon, the
basic screen is displayed.
The RISO Management Tool icon is displayed in the task
tray.
3) Autostart
When placing a checkmark, the RISO Management Tool
is set to automatically start when the computer starts.
4) Exit
Exit the RISO Management Tool.
When the mouse is moved over the RISO Management
Tool icon, the status of all the print controllers added to
the RISO Management Tool can be viewed as a popup.
Using the RISO Management Tool 89
Using the Included Utility Software
Searching for Print Controllers on the Network
Click [Search] on the basic screen of the
RISO Management Tool.
The IS900C connected to the network are displayed on
the screen.
• If the computer and the print controllers are not connected to the same network segment, the print controllers will not be found. Add them using the
procedure in “Adding Print Controllers to the List”
)p.91.
Displaying Print Controller Settings
1
On the basic screen of the RISO
Management Tool, select the name
of a connected controller from the
list.
90 Using the RISO Management Tool
2
Click [Display].
The communication settings screen of the print
controller is displayed.
Using the Included Utility Software
Adding Print Controllers to the List
When the print controller connected to the network cannot be automatically detected, the print controller can be manually added to the list.
1
On the basic screen of the RISO
Management Tool, click [Add RIP].
The communication settings screen is displayed.
2
Enter the “RIP Name” or “IP
address” of the print controller you
want to add to the list, and click the
[Ok] button.
Note:
• For the “RIP Name” and “IP address”, confirm
with your network administrator.
When the relevant print controller is detected, it is
displayed in the list.
Deleting Print Controllers from the List
1
On the basic screen of the RISO
Management Tool, select the RIP
name you want to delete from the
list.
2
Click [Delete RIP].
The selected RIP name is deleted from the list.
Using the RISO Management Tool 91
Using the Included Utility Software
Starting Up Print Controllers
When the print controller displayed in the list of the RISO Management Tool is sleeping (the power of the connected
printer has been turned off), the print controller can be started up from the computer.
1
On the basic screen of the RISO
Management Tool, select the RIP
name of the sleeping print controller
from the list.
2
Click [Wake-Up].
The printer starts up, and the status is displayed in
the list.
Displaying Latest Status
On the basic screen of the RISO Management Tool, click [Refresh].
The latest status of the print controllers displayed in the
list is displayed.
92 Using the RISO Management Tool
Using the Included Utility Software
Starting Up the RISO Console
From the RISO Management Tool, the status of the printer controller can be checked and the RISO Console that
manages jobs and queues can be started.
On the basic screen of the RISO Management Tool, select the target RIP name
from the list and click [WWW].
The Web browser starts, and the RISO Console screen
for the selected print controller is displayed.
For available functions and operation procedures of the
RISO Console screen, see “Basic Operations” )p.6
and “Administrator Settings” )p.50.
Using the RISO Management Tool 93
Using the Included Utility Software
Using SMAP (Windows only)
SMAP allows the user to quickly print files by simply adding the file to SMAP without opening the application software
used to create the file. The file is printed at the processing settings registered in the queue of the specified print controller.
Note:
• This software cannot be used with Macintosh computers.
Starting SMAP
From the [Start] menu of the Windows computer, select
[All Programs] (Windows Server 2003 / Windows XP /
Windows Vista) or [Programs] (Windows 2000) ->
[RISO] -> [RISO IS900C] -> [SMAP].
The basic screen is displayed.
When quitting SMAP, click the [Quit] button.
94 Using SMAP (Windows only)
Using the Included Utility Software
Direct Printing by SMAP
1
On the basic screen of SMAP, select
the print controller (print driver) to
send the original data.
3
Select the file to print, and click the
[Open] button.
Note:
• The file formats that can be printed are as follows.
PostScript, PCL, ASCII text, PDF file*, TIFF file
*If RAW port is set for a printer, SMAP cannot
be used to print PDF files to that printer.
• To add multiple files, repeat steps 2 and 3.
• To remove the added file, select the file you
want to remove from the file list on the basic
screen of SMAP, and click the [Remove] button.
On the printer list, the printer drivers installed in
your computer are displayed. When installed in
the standard way, the printer driver for the IS900C
is displayed in the form of “RIP name” - “Queue”.
(Example) IS900C-Normal
2
Click the [Add Files] button.
4
Click the [Download] button.
Note:
• Files can also be added by dragging and dropping them on the SMAP screen.
Using SMAP (Windows only) 95
Using the Included Utility Software
The original data is sent to the specified queue of
the print controller, and processing starts.
96 Using SMAP (Windows only)
Using the Included Utility Software
Dragging and Dropping Files on the SMAP Icon on the Desktop
With the creation of a SMAP shortcut icon on the desktop, direct printing can be executed by simply dragging and
dropping files on the shortcut icon.
1
Drag and drop the file to print onto
the SMAP icon.
The list of print controllers (printer drivers) is displayed as a popup.
2
Select the print controller (including
the queue) to send the original data.
The original data is sent to the specified queue of
the print controller, and processing starts.
Using SMAP (Windows only) 97
Appendix
Feature Restrictions
The following restrictions apply to operations performed using a monitor, USB keyboard, or USB mouse that is connected to the IS900C.
Feature Restrictions
Feature
General
Administrator Settings
Restriction
Page
Mouse operation
When right-clicking, the menu
(copy, paste, etc.) is not displayed.
–
(When clicking an icon in the status
area)
Display printer’s console screen
Cannot be displayed
Upload jobs
Cannot be uploaded
)p.11
Import archive jobs
Cannot be imported
)p.45
Download printer general
information (status report)
Cannot download ([Download]
button is not displayed)
)p.46
Download print controller general
information (status report)
Cannot download ([Download]
button is not displayed)
)p.52
Time setting for print controller
Cannot be set ([Synchronise]
button is not displayed)
)p.61
Backup various print controller
settings
Cannot backup ([Backup] is not
displayed in upper-right of screen)
)p.63
Color calibration
Only viewing is available (The
[Browse], [Import calibration],
[Export calibration], and [Cancel]
buttons are not displayed)
)p.70
Only viewing is available ([Upload
profile…] and [Delete] buttons are
not displayed)
)p.71
Only viewing is available (The
[Browse], [Download], and
[Delete] buttons are not displayed)
)p.73
Save system events log information Cannot save ([Download] button is
not displayed)
)p.77
Profile management
Font management
Save accounting log
98 Feature Restrictions
)p.7
Cannot save ([Download] button is
not displayed)
)p.78
Appendix
Troubleshooting
This section describes displayed information and solutions for trouble that occurs while operating the print controller
and the RISO Console.
Trouble
Cause and solution
The RISO Console does not start.
The “RIP Name” or “IP address” has not been correctly entered into the URL
input area.
The print results are different from
the settings in the printer driver.
In the queue of the print controller through which original data has been sent,
the “Queue priority” is set to “on”.
When you want to prioritize the settings of the printer driver, either change the
processing settings of the queue (administrator setting) or select a different
queue before executing the print operation. “[General] Screen” )p.83
The job you have sent cannot be
cancelled, deleted, or edited in the
job manager.
The job manager has been used without logging in or was logged into with an
ID that is different from the owner of the job.
Log in with the correct ID.
Troubleshooting 99
Index
A
L
Accounting Information ......................................... 78
Administrator ......................................................9, 50
Archived Jobs ........................................................ 37
Log in ................................................................. 9, 50
Log settings ............................................................75
Login ID ..................................................................55
B
M
Backup ................................................................... 63
Merging Multiple Archived Jobs ............................41
Merging Pages from Multiple Archived Jobs .......42
Monitor ....................................................................98
Mouse .....................................................................98
Moving a Job to Another Queue ...........................21
C
Canceling a Job ..................................................... 22
Changing Detailed Settings of Queues ................ 82
Changing Passwords ............................................ 56
Color calibration ..................................................... 70
Communication settings ........................................ 53
Console Screen ....................................................... 6
Copying a Job ........................................................ 21
Create new queue ................................................. 80
Creating Archived Jobs ......................................... 14
Custom forms ........................................................ 67
Custom paper sizes ............................................... 68
Custom Queue ...................................................... 80
D
Deleting a Job ........................................................ 22
Deleting Custom Queues ...................................... 81
Detailed Settings of the Print Controller ............... 51
E
Editing a Job .......................................................... 24
Editing Archived Jobs ............................................ 37
Event log ................................................................ 77
Export archive jobs ................................................ 44
F
Fold mode .............................................................. 29
Font management ................................................. 73
G
General user ............................................................ 9
Guest user ............................................................... 9
H
Hold queue ............................................................. 18
Hotfolder ................................................................. 13
J
Job delegation ....................................................... 59
Job Display Order .................................................. 23
Job manager .......................................................... 20
Job ownership ........................................................ 20
Job Preview ........................................................... 23
Job settings ............................................................ 57
N
Normal queue .........................................................18
O
Others can see jobs ...............................................56
P
Password ................................................................55
PCL tray mapping ..................................................69
Printer Status ..........................................................46
Printing Archived Jobs ...........................................15
Profile management ..............................................71
Q
Queue .....................................................................18
R
Rebooting ...............................................................86
Registering New Users ..........................................55
Reports ...................................................................74
Resuming Queue Processing ...............................85
RIP Data .................................................................37
RISO Management Tool ........................................89
S
Saving Archived Jobs ............................................43
Selecting Languages .............................................49
Shutting Down the Print Controller .......................86
SMAP ......................................................................94
Stopping Queue Processing .................................85
System Events Log ................................................77
T
Time settings ..........................................................61
U
User defined sizes .................................................68
User management .................................................55
K
Keyboard ................................................................ 98
100
101-06054-008


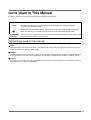


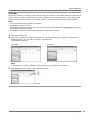
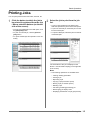


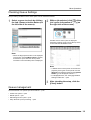
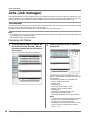
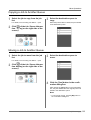

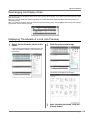

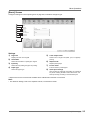
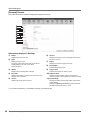
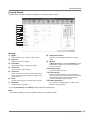

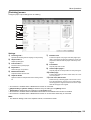

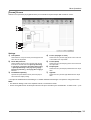

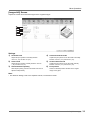
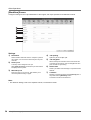
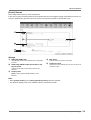

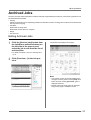
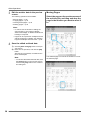
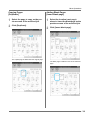
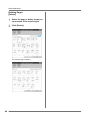
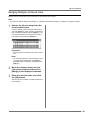
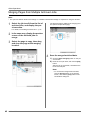
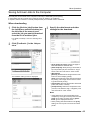
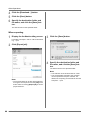
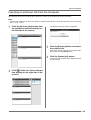
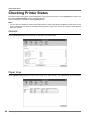
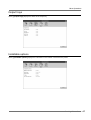
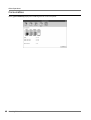
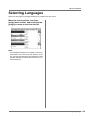
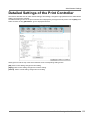


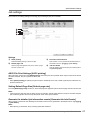
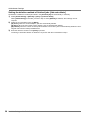
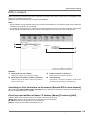


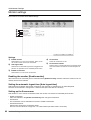
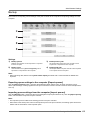


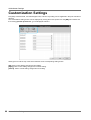

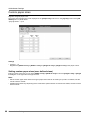

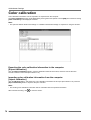
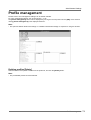
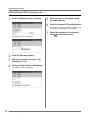
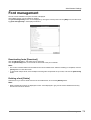


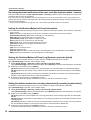
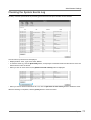
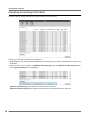
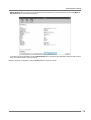
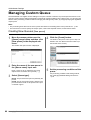
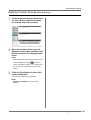

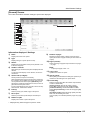
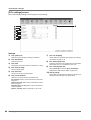


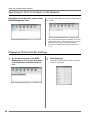
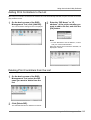
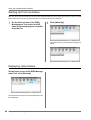
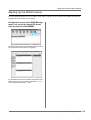
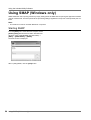
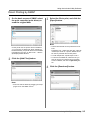

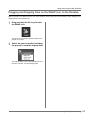
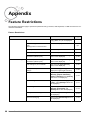
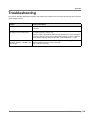


![1 Click the [OK] button.](http://vs1.manualzilla.com/store/data/005894494_1-d1f52ee6fd3b2146a5f252d3f1858c3b-150x150.png)